

Redemption Cemetery:
Grave Testimony
Platform: Mac, Windows

![]() When you're in the wrong place at the wrong time and wind up witnessing a crime the criminals would rather unsurprisingly be un-witnessed, you find yourself abducted and buried alive. Fortunately for you, these thugs chose the wrong cemetery to bury their secrets in. In this latest installment in ERS Game Studio's hidden-object adventure series, Redemption Cemetery: Grave Testimony, fate decides to intervene in your gruesome end. But is this a power you really want to be indebted to? And does fate really want its champion to be someone who doesn't have the sense to climb out of an unlatched car trunk, or grab the gun sticking in your face out of the waistband of your merrily oblivious would-be murderer's pants? Seriously, what's wrong with you? You don't need magic birds, you need a Darwin Award!
When you're in the wrong place at the wrong time and wind up witnessing a crime the criminals would rather unsurprisingly be un-witnessed, you find yourself abducted and buried alive. Fortunately for you, these thugs chose the wrong cemetery to bury their secrets in. In this latest installment in ERS Game Studio's hidden-object adventure series, Redemption Cemetery: Grave Testimony, fate decides to intervene in your gruesome end. But is this a power you really want to be indebted to? And does fate really want its champion to be someone who doesn't have the sense to climb out of an unlatched car trunk, or grab the gun sticking in your face out of the waistband of your merrily oblivious would-be murderer's pants? Seriously, what's wrong with you? You don't need magic birds, you need a Darwin Award!
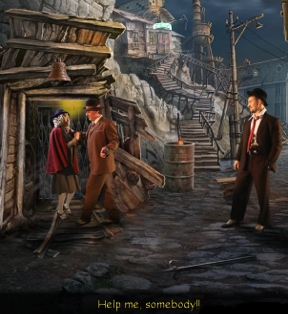 Turns out just because the gangsters who wanted to done you in got done in instead doesn't mean you're in the clear. The island they've taken you to is kinda sorta cursed, and to escape you'll need to pay a toll to one very unusual ferryman... three soul stones from three restless souls. As it happens, he isn't completely heartless, and lends you his pet crow, who can be paid with mystical runes to perform tasks for you that your meaty, earthbound self would otherwise be unable to complete. Search the island for clues, solve puzzles, and try not to meet the same fate as your kidnappers. Items in your inventory with a small green plus beside them can be dragged together to be combined into something new, so stay resourceful. With the help of some guilty ghosts, you'll be able to travel back in time to various locations, hopefully saving yourself as well as another innocent who wasn't quite so lucky. And hey, who doesn't love time travel? It's so... wibbly-wobbly! Just be careful, since not everyone wants you to escape the great beyond.
Analysis: As a series, Redemption Cemetery has come a long way. ERS always makes stunning games, but the first installment, Curse of the Raven, fell prey to ridiculous amounts of backtracking and repetition on top of a story that took a back seat to everything else. Grave Testimony does a great job of not only liberally spicing up the gameplay with twists and turns in its wonderfully ghoulish gangster plot, but also trying valiantly to keep the gameplay itself interesting and varied... and mostly succeeding. The tone is definitely campy throughout, and the whole "magical crow" concept never really feels like more than a gimmick, but it's hard not to get drawn into it. It's creative, it looks great, and it feels like it's having a lot of fun with itself.
 Some of the puzzles feel like busywork and are sort of eyebrow-raisingly odd, but should at least be applauded for attempting to avoid the cookie-cutter familiar types in hidden-object adventures. And speaking of hidden-object scenes, the approach of making them mini-puzzle areas in themselves is a clever one that, combined with how sparingly they're used, helps to keep them from feeling tedious and brainless the way others might. You'll still have to do a fair amount of back-tracking, however, and the game's habit of making an item vanish from your inventory after a single use only to turn around and force you to find almost exactly the same item all over again for another use can get obnoxious. Oh well. At least I'm smart enough not to hire henchmen who wouldn't drink a mysteriously appearing sleeping-pill laden cup of coffee just because it was there. Who's laughing now, game?!
Redemption Cemetery: Grave Testimony is a great choice for a little late evening lounge gaming, best enjoyed kicked back and with a bucket of popcorn. It's a decent length at over four hours for your average playthrough, and the wide variety of puzzles combined with the comparatively scarce hidden-object scenes will make this one much more appealing to straight-up adventure fans. Ghoulish, goofy, and full of otherworldly murders, it's definitely worth checking out the demo for this one. And maybe the next time someone tosses you in their car's trunk with the intent of driving you somewhere to bury you alive but doesn't latch it... hop out, huh? What's a little road rash compared to sleeping with the worms? Kids today, I swear.
A Collector's Edition is also available. It contains a bonus chapter, art gallery, strategy guide, and more. Remember that Big Fish Game Club Members pay only $13.99 for Collector's Editions (or 2 club credits), and collector's editions count 3 card punches of 6 total needed for a free game.
![]() Windows:
Windows:
Download the demo
Get the full version
Also available: Collector's Edition
![]() Mac OS X:
Mac OS X:
Download the demo
Get the full version
Also available: Collector's Edition


Walkthrough Guide
(Please allow page to fully load for spoiler tags to be functional.)
Redemption Cemetery - Grave Testimony Walkthrough
Chapter 1: Skull Hill
Outskirts
Inspect the dead body by the water and grab the Optical Sight from the gun.
Go left to the Docks.
Use the Optical Sight to zoom in on the gangster in the boat.
Examine the stump by the dock and pick up the Skull Piece.
Walk back and go right to the Lake of Death.
Inspect the lantern and use the Skull Piece to open in. Pick up the Candle and the Empty Locket Half.
Return to the Docks.
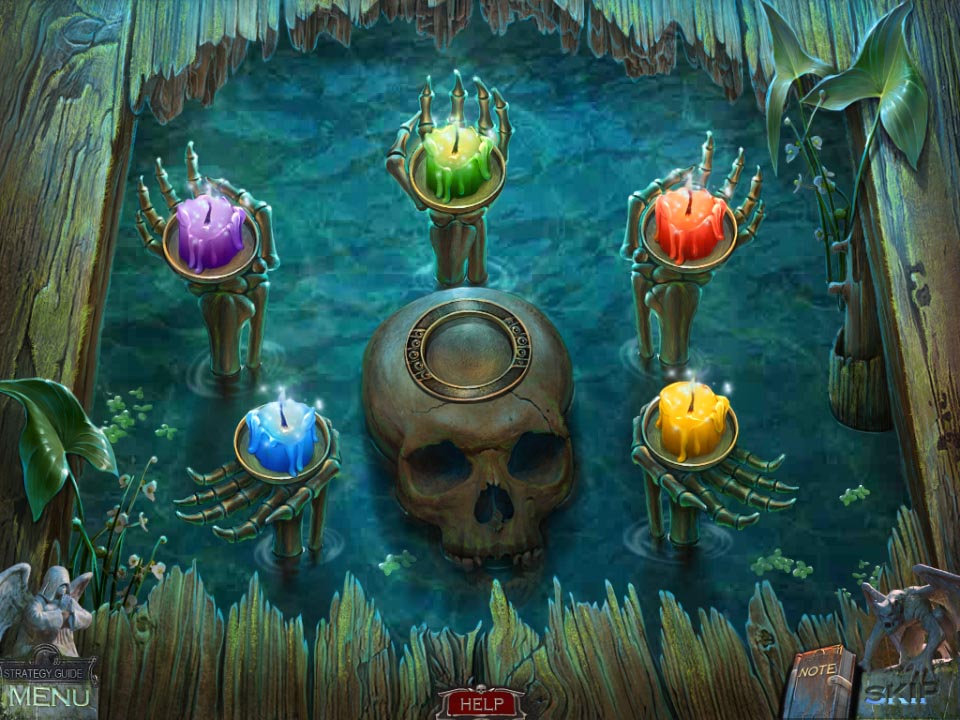
Look at the hole in the dock and use the Candle to start the puzzle.
Rearrange the candles so that the color of each candle corresponds to the color of the candleholder.
Screenshot
Speak to the ghost in the boat.
Take the Crow Rune and use the Crow to retrieve the hat on the gravestone.
Examine the hat and take the Photo from inside.
Combine the Empty Locket Half with the Photo to create the Locket Half.
Walk back, look at the dead body, and inspect the locket in his hand. Use the Locket Half to complete the locket.
Speak to the ghost and go through the portal that appears.
Examine the sign on the ground and pick up the Handkerchief.
Inspect the car and open the back door. Take the Batteries from the seat and the Elastic Band from the coat.
Look under the seat and under the floormat to start the puzzle.
Pick up the Trunk Key.
Open the front door of the car and examine the rear view mirror.
Clean the mirror with the Handkerchief and note the number that appears.
Move back and inspect the trunk of the car.
Use the Trunk Key to open the trunk and pick up the Horses Statuette and the Fuel Canister.
Walk forward through the gate.
The Town
Pick up the Hook from the ground.
Examine the briefcase on the ground and enter the number seen from the rear view mirror to open it.
347
Click on the open briefcase to start the hidden object scene.
Pick up the Medallion on the gift box.
Put the Medallion in the envelope in the briefcase.
Spin the pieces to create a picture of a beetle.
Take the Powder Compact.
Look at the lock at the top of the briefcase and use the Powder Compact on the numbers to see which were pressed.
Press 2 and 3 and pick up the Key.
Use the Key to unlock the ring box in the briefcase and take the Signet Ring.
Use the Signet Ring to open the book and take the Photo Pieces.
Assemble the Photo Pieces in the pouch on the right and take the Belt.
Screenshot
You will receive a Belt.
Walk back, use the Hook to lift the sign on the ground, and pick up the Glass Shard.
Combine the Glass Shard with the Belt to create a Glass Knife.
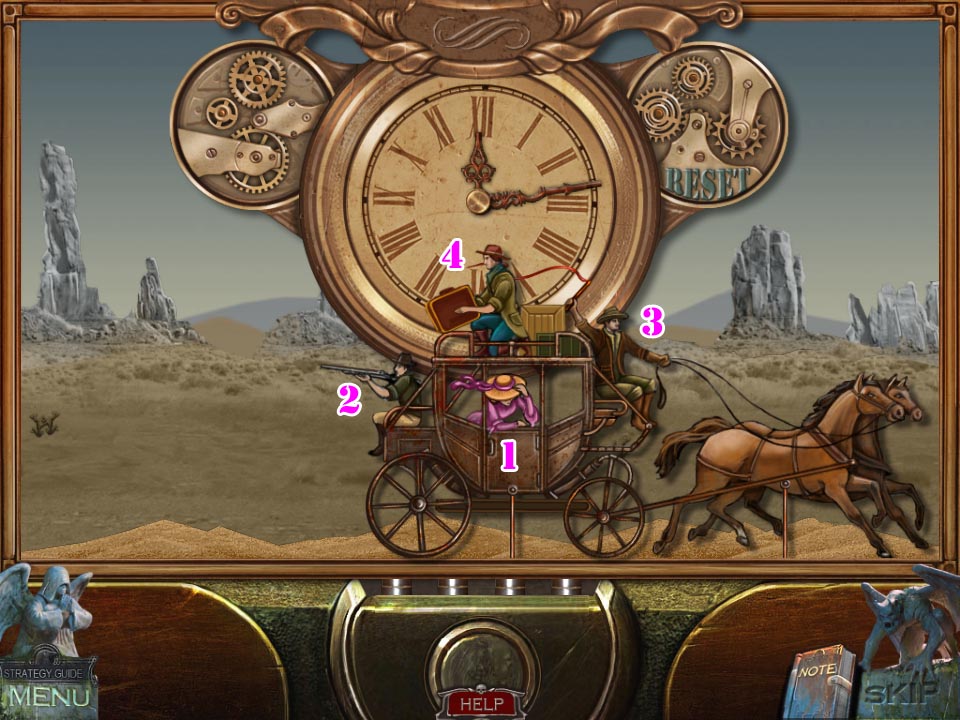
Inspect the front seat of the car, click on the dashboard, and use the Glass Knife to cut it open to start the puzzle.
Click on the lady in the carriage, and she will throw her hat.
Click on the man on the back of the carriage, and he will shoot.
Click on the man on the front of the carriage, and he snap his whip.
Click on the man on the top of the carriage, and he will throw the suitcase.
Screenshot
Pick up the Forked Stick.
Combine the Forked Stick with the Elastic Band to create a Slingshot.
Walk forward through the gate.
Use the Slingshot to hit the bell over the door on the left to distract the gangster.
Examine the table by the gangster and pick up the Cup and the Garrote.
Walk forward.
Inspect the board on the left and take the Pliers.
Examine the bucket below the board, clear away the leaves, and pick up the Crow Rune at the bottom.
Use the Crow to knock the Grapple down from the streetlight and pick it up.
Inspect the ladder to the right of the gate and use the Garrote to fix the broken rung.
Examine the water tower above the ladder and pick up the Lever.
Walk back and inspect the mechanism on the pole on the right.
Use the Lever on the mechanism to start the puzzle.
Move the levers to the positions marked on the diagram next to the levers.
Examine the box that is lowered, use the Pliers to open it, and pick up the Rope and Flashlight without Batteries.
Combine the Flashlight without Batteries with the Batteries to create the Flashlight with Batteries.
Walk forward and look at the barrel below the water tower.
Use the Flashlight with Batteries to see to the bottom and use the Hook to pick up the Valve.
Go back up to the water tower, put the Valve on the spout, and turn it.
Go through the gate.
Chapter 2: The Bar and the Workshop
The Bulldozer
Inspect the barbed wire on the left, use the Pliers to snip the wires, and pick up the Glass Cutter.
Examine the grate below the bulldozer and pick up the Winch.
Combine the Grapple and the Rope to create a Grappling Hook.
Use the Grappling Hook to pull the ladder down from the balcony on the right.
Inspect the door at the top of the ladder and use the Glass Cutter to cut through the window and open the door.
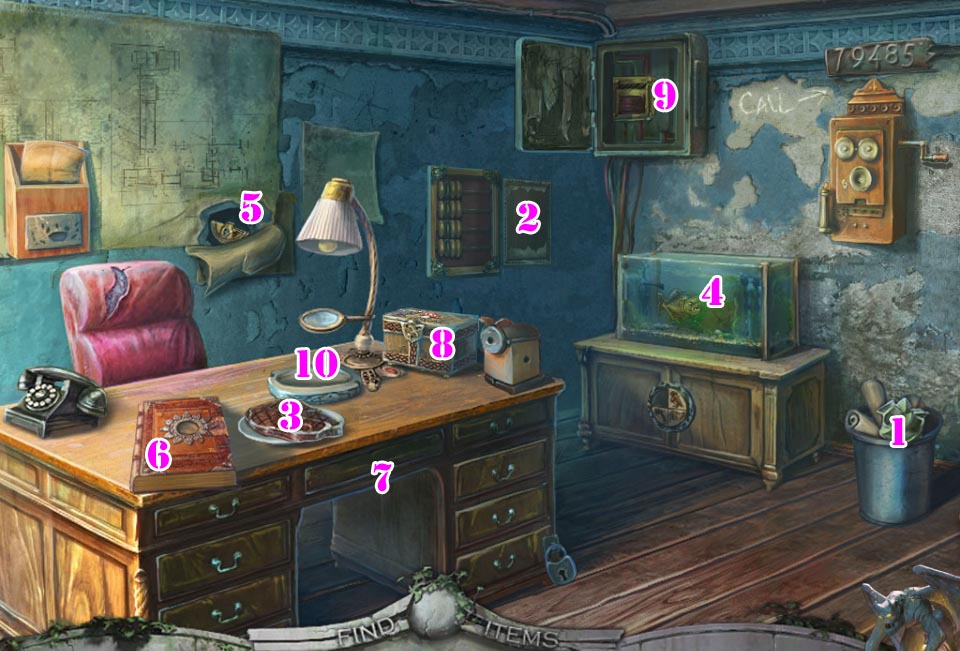
Once inside the office, click on the desk to start the hidden object scene.
Pick up the Code Message from the trashcan on the right.
Look at the abacus on the wall, place the Code Message next to it, align the pieces to match the picture, and take the Resin Lump.
Pick up the Steak on the desk.
Click on the fishtank, feed the Steak to the pirhana, and pick up the Right Medallion Half.
Open the corner of the map on the wall and take the Left Medallion Half.
Look at the book on the desk, use the two Medallion Halves to open it, and take the Ruler.
Use the Ruler to open the stuck drawer of the desk and pick up the Gnome.
Look at the box on the desk, put the Gnome into place, and take the Fuse inside.
Open the fusebox on the wall and install the Fuse.
Use the lamp on the desk to melt the Resin Lump and take the Knight.
Look at the book again, put the Knight in the scene, and place the items on the bookmark in the correct places in the scene.
Give the eye to the dragon.
Put the crown on the princess.
Give the shield to the knight.
Put the rose on the rosebush.
Take the Angel.
Screenshot
You will receive an Angel.
Hang the Winch from the hook on the ceiling and lower the rope.
Attach the winch to the large safe on the floor and turn the crank to lift the safe up.
Examine the safe and pick up the Insulating Tape from the handle.
Open the right door of the cabinet on the right, click on the open door, and pick up the Matches.
Walk back, look at the bulldozer, and open the panel to start the puzzle.
Arrange the gems into the slots of the same color.
Inside the bulldozer, use the Insulating Tape to attach the wires in the ignition and pull the lever.
Enter the bar through door behind where the bulldozer was.
Inspect the jukebox and pick up the Angel.
Pick up the Fire Extinguisher on the floor.
Examine the first aid box on the wall, cut the rope with the Glass Knife, and pick up the Stethoscope.
Walk back and use the Fire Extinguisher to put out the fire on the bulldozer.
Inspect the scoop of the bulldozer and pick up the Jack.
Go back inside the bar and look at the hatch below the fridge.
The Coffee and the Sleeping Pills
Place the Jack under the fridge and crank it to lift the fridge so the hatch can be accessed.
Open the hatch, cut the rope around the sack with the Glass Knife, and pick up the Coffee Beans.
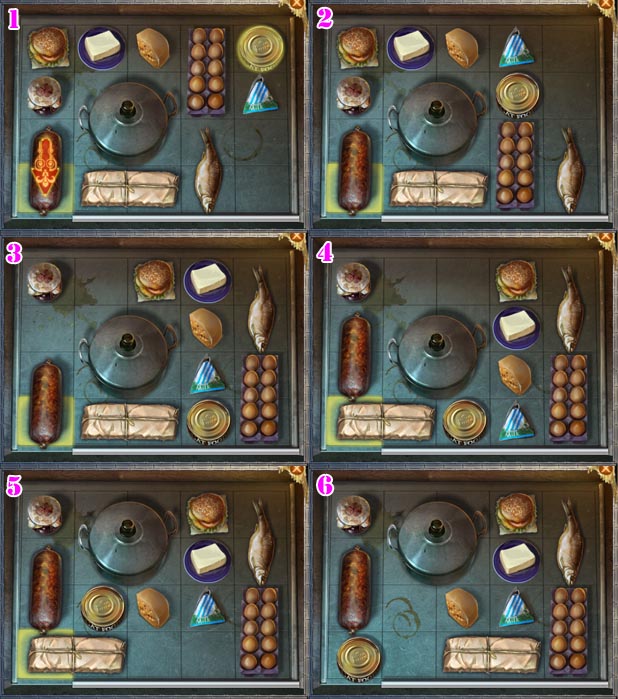
Examine the fallen fridge to start the puzzle.
Arrange the items so the cat food can is in the bottom-left corner.
Consult the screenshot for the solution.
Screenshot
You will receive a Cat Food Can.
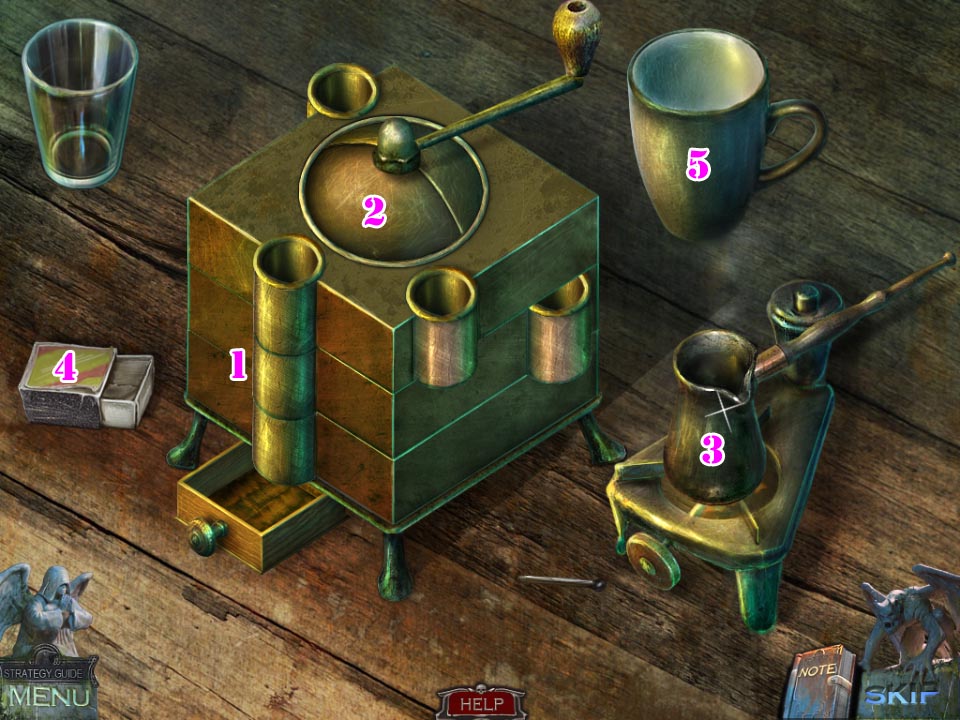
Inspect the coffee maker on the counter. Use the Coffee Beans, Matches, and Cup to start the puzzle.
Spin the grinder pieces so that the tubes line up above the catch.
Put the coffee beans in the top of the grinder and turn the handle.
Put the ground coffee and the water in the beaker.
Light the burner with the match.
Pour the coffee in the cup.
Screenshot
You will receive a Cup of Coffee.
Walk back and go back up the ladder to the office.
Examine the safe and use the Stethoscope to start the puzzle.
Spin the lock next to the stethoscope until it makes a noise.
Move the stethoscope and repeat for the other two locks.
The combination will be 2 2 9.
Once the safe is open, pick up the Sleeping Pills.
Walk back three times.
Combine the Cup of Coffee with the Sleeping Pills to create the Coffee with Sleeping Pills.
Place the Coffee with Sleeping Pills on the saucer next to the gangster.
Inspect the sleeping gangster and pick up the Lighter in his pocket.
Examine the fire and pick up the Funnel.
Go up the stairs behind the fire to the workshop.
Pick up the Forge Bellows on the ground.
Inspect the generator, open the gas can, place the Funnel in it, and fill it with the Fuel Canister.
Pick up the Coin in the funnel and press the button to start the generator.
Examine the power box above the generator and pick up the Demon.
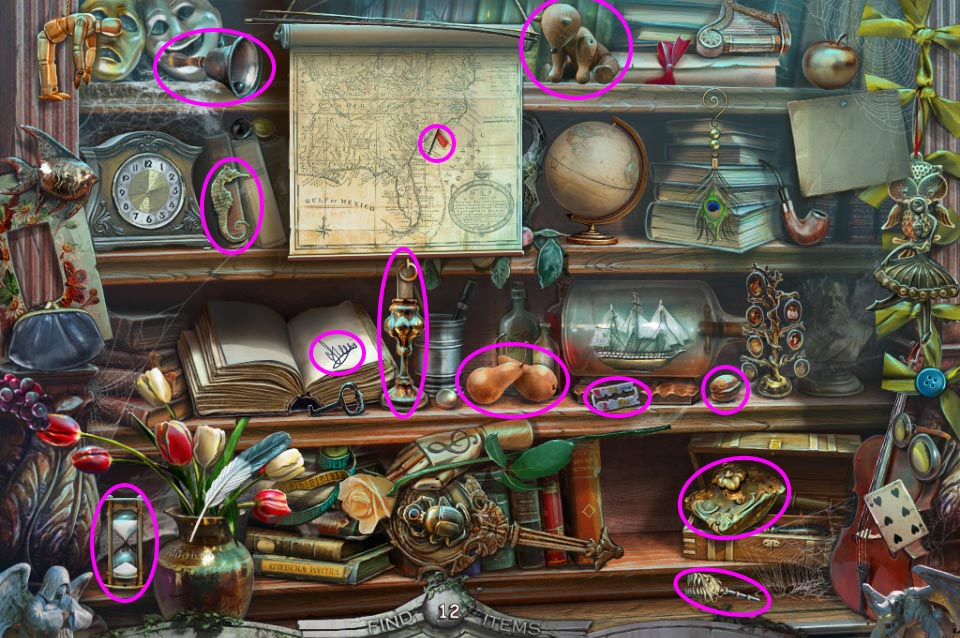
Walk back and click on the suitcase to start the hidden object scene.
Pick up the Knitting Needles.
Use the Knitting Needles on the yarn to make some Gloves.
Use the Gloves to pick up the Rose.
Look at the box on the left, open it with the Rose, and pick up the Screwdriver.
Use the Screwdriver to remove a screw from the suitcase lid and take the Spring.
Open the pocketwatch on the right, put the Spring inside, and take the Hairpin that pops out.
Use the Hairpin to open the pouch on the left of the suitcase and pick up the Scissors.
Use the Scissors to cut the ribbon on the gift box and take the Tin Soldiers inside.
Screenshot
You will receive Tin Soldiers.
Inspect the fire, place the Tin Soldiers in the mold, use the Forge Bellows to heat up the fire, and pick up the Angel.
Walk forward twice.
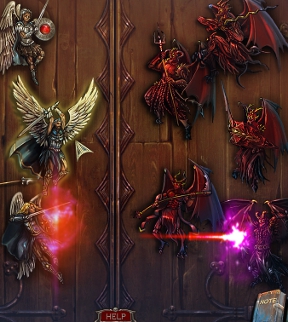
Look at the church door and use two Angels and the Demon to start the puzzle.
Click on an angel to light it up.
Demons will attack, darkening the angels.
Continue until all the angels are lit.
This puzzle is random.
Enter the church.
Chapter 3: The Church
Cat Food
Examine the pew with the hat on it and pick up the Paints.
Inspect the grate below the confessional and pick up the Design Piece.
Look at the bookcase and pick up the Crow Rune.
Walk back and go up the ladder into the office.
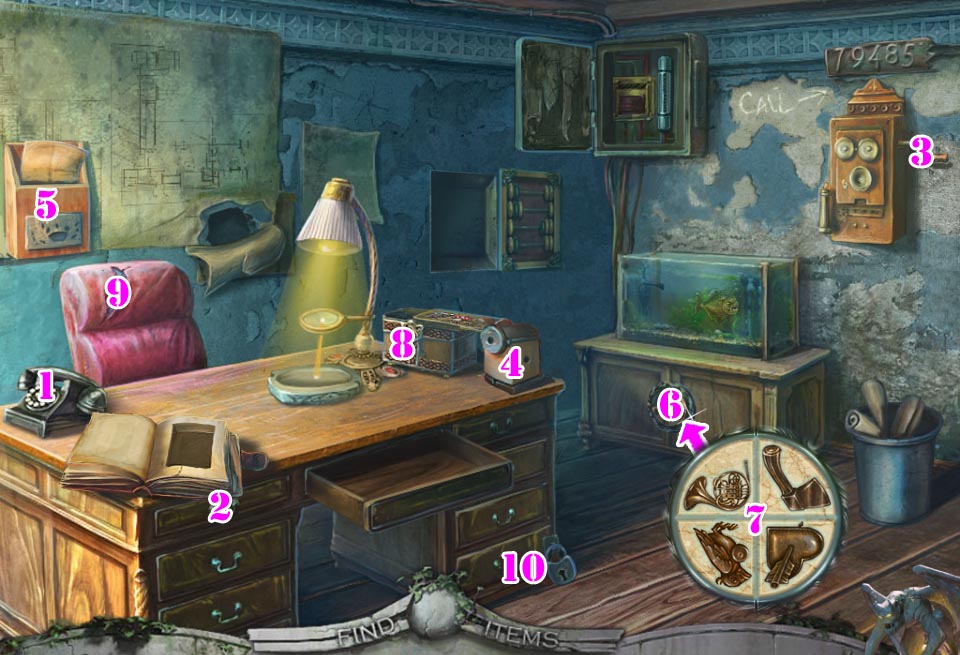
Click on the desk to start the hidden object scene.
Use the phone on the desk to call the number on the wall (79485) and pick up the Piece of Lock that drops out.
Open the left drawer on the desk and take out the Pencil.
Take the Crank from the phone on the wall.
Attach the Crank to the pencil sharpener on the desk and sharpen the Pencil.
Look at the paper on the far left side of the wall and use the Sharpened Pencil to make out the imprint.
Look at the lock on the cabinet with the fish tank on it and put the Piece of Lock in the open spot.
Move the pieces to the correct places and take the Razor Handle from inside the cabinet.
Look in the box on the desk and use the Razor Handle on the blade to complete the Razor.
Use the Razor to cut open the chair and take the Broken Spring.
Use the Broken Spring to pick the lock on the bottom drawer of the desk and pick up the Paintbrush.
Screenshot
You will receive a Paintbrush.
Examine the cabinet on the right and place the Angel in place to start the puzzle.
Give the instruments to the appropriate angels.
From left to right the instrument will be: lute, flute, violin, clarinet, harp.
Press the keys with the same notes as the ones that the angels play.
You will receive a Monk.
Walk back three times and then up the stairs to the workshop.
Use the Crow to obtain the Can Opener from the pipe on the ceiling.
Walk back and then forward three times into the bar.
Combine the Cat Food Can and the Can Opener to create the Opened Cat Food Can.
Look under the couch, use the Opened Cat Food Can on the bowl to lure the cat out, and pick up the Chisel.
Inspect the jukebox, put the Coin in the slot, and pick up the Design Piece.
The Monks
Walk back and enter the church.
Examine the altar at the far end and use the Chisel to scrape off some Wax.
Walk back three times and then up the stairs to the workshop.
Inspect the candle-making device on the table on the right. Place the Wax in the device, turn the handle to turn on the gas, light it with the Lighter, and pick up the Candle.
Walk back and then forward three times into the church.
Pull aside the curtain on the right and zoom in. Place the Candle in the holder, light it with the Lighter, and pick up the Cable.
Walk back three times and then up the stairs to the workshop.
Examine the power box above the generator and connect the Cable.
Flip the lever on the wall to the left to turn on the saw and pick up the Saw Blade.
Inspect the circular saw and click on the wood to obtain the Wooden Statuette.
Combine the two Design Pieces to create a Design.
Look at the work table on the right and place the Paints, Paintbrush, Wooden Statuette, and Design on it to start the puzzle.
Use the chisel on the four pieces of wood to form the limbs.
Use the sandpaper on the four limbs.
Put the limbs on the body.
Use the four screws on the joints and tighten them with the screwdriver.
Dip the large paintbrush into the varnish and coat the doll.
Put the clothes on the doll.
Dip the small paintbrush into the brown paint and apply it to the clothes.
Dip the small paintbrush into the copper paint and apply it to the face.
You will receive a Monk.
Walk back and then forward three times into the church.
Examine the confessional on the left, place the two Monks on either side of the pedestal, and pick up the Key.
Walk back three times, inspect the elevator door, and open it with the Key.
Enter the elevator.
Chapter 4: The Mine
Turning on the Lights
Look at the controls on the left and push any button.
Put the Saw Blade in place where the broken gear was.
Go back to the controls and push the button labeled B3.
Step out of the elevator when the doors open and use the Flashlight with Batteries in the darkness.
Inspect the helmet on the right, move the helmet, and pick up the Central Panel Element.
Pick up the Crow Rune in the lower left.
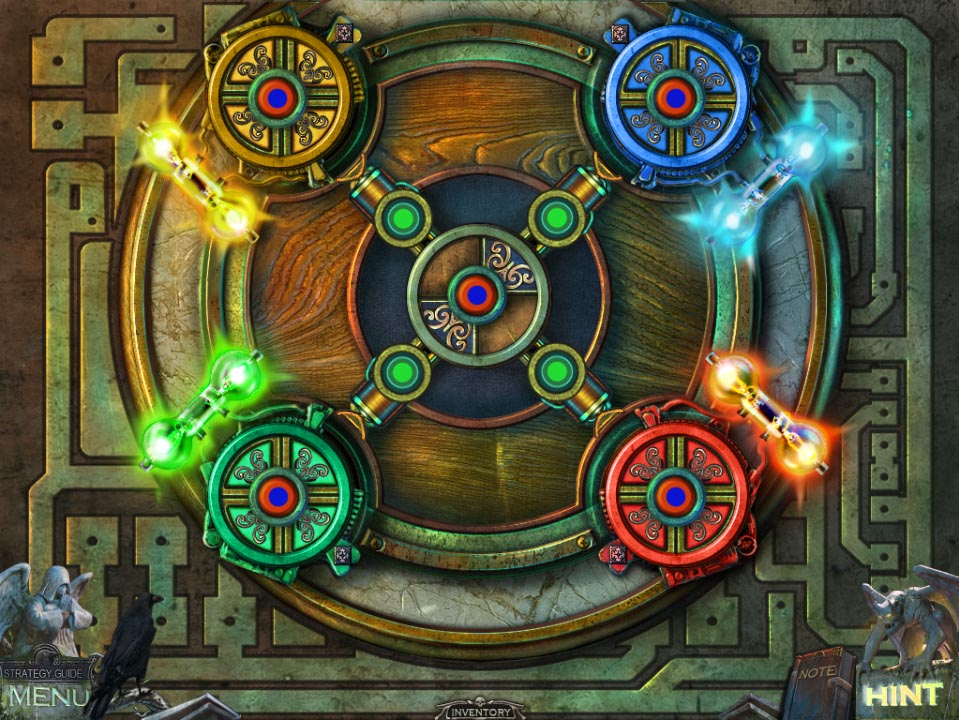
Look at the power box in the upper left, cut the rope with the Glass Knife, examine the panel, and put the Central Panel Element in place to begin the puzzle.
Move the pieces to the circles corresponding to their color using the center circle.
Screenshot
With the lights on, proceed forward down the tunnel.
Use the Crow to flip the lever on the right, inspect the cart that appears, and pick up the Cell Key.
Look at the mechanism to the left of the cart and pick up the B1 Elevator Button.
Walk back twice to the elevator.
Inspect the controls, put the B1 Elevator Button in place, and push it.
Examine the lock, use the Cell Key to open it, and click in the cell to start the hidden object scene.
Use the rubber gloves to flip the switch on the right wall.
Put the kettle on the burner to boil it.
Screenshot
You will receive Insect Spray.
Assembling the Amulet
Return to B3 and walk forward twice.
Examine the overturned cart nearby and take the Amulet Piece.
Use the Insect Spray to clear away the spiders and pick up the Stick.
Go back to the elevator, take it to level 1, and go up the stairs to the workshop.
Inspect the circular saw and use it to cut the Stick into Stick Pieces.
Return to B3 and walk forward twice.
Examine the mechanism on the far wall, use the Stick Pieces for pivot pins, and pull the lever.
Go through the door that opens on the left to the burial site.
Look at the miner, then pick up the Pickax that he throws.
Inspect the wall on the left and pick up the B2 Elevator Button.
Go back to the elevator, put the B2 Elevator Button in the controls, and push it.
Click in the cell to start the hidden object scene.
Use the boot to put a shoeprint in the mud.
Open the locker to find the Flipper and the Piece of Medallion.
Screenshot
You will receive a second Amulet Piece.
Take the elevator to B2.
Use the Pickax to chip away the stone and pick up the third Amulet Piece.
Take the elevator back to B3, return to the burial site, examine the altar, and place the Amulet Pieces in it to start the puzzle.
Spin the discs so that each colored line reaches the middle.
Screenshot
When the puzzle is solved, the miner will be exorcised, and you will be taken back outside the portal.
Chapter 5: A One Horse Town
Speak to the ghost, then pick up the Soul Stone it leaves behind.
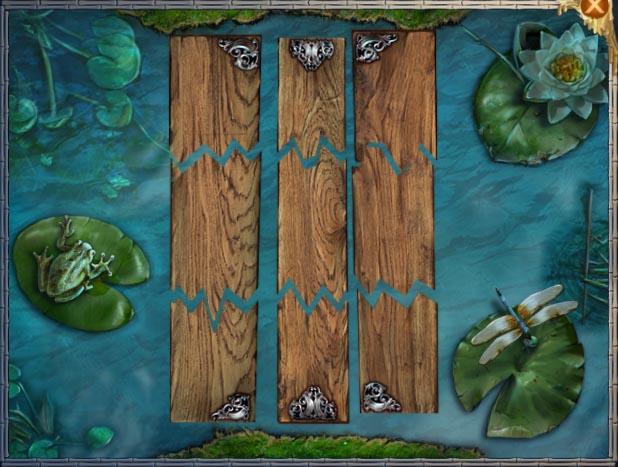
Examine the water to begin the puzzle.
Match each board up with the breakpoints to fix the bridge.
Screenshot
Click on the water to speak to the ghost, then enter the portal that opens.
Click on the box in the upper right to make it fall, then pick up the Hand Drill.
Walk forward and inspect the barrel.
Use the Hand Drill to make a hole in the barrel.
Pick up the Pitchfork and move the barrel.
Inspect the stained glass window above the door and take the Scissors.
Look at the tree to the left, use the Scissors to cut the rope, and take the Fishing Rod.
Examine the door on the right and pick up the Saw.
Walk back, use the Pitchfork on the pile of hay, and take the Iron Hammer and the Crow Rune.
Use the Saw to cut the pitchfork handle and pick up the Hammer Handle.
Walk forward, use the Crow to get the apple down from the tree, and take the Apple.
Walk back, give the Apple to the horse, and take the Fishing Tackle from the bag around the horses neck.
Walk forward and combine the Iron Hammer and the Hammer Handle to create a Hammer.
Inspect the stained glass window, use the Hammer to break it, and look inside.
Combine the Fishing Rod with the Fishing Tackle to create a Rod.
Use the Rod to pick up the Key on the desk, then use the Key to unlock the door.
Examine the grandfather clock at the top of the stairs and take the Globe Key.
Look at the door at the top of the stairs, use the Saw to cut the bolt, and go inside to the library.
Chapter 6: The Judge's House
The Workshop Key
Inspect the bottom of the ladder and pick up the Coal Tongs.
Look at the top of the ladder and take the Shawl.
Examine the bookcase ahead, move the four identical books, and the bookcase will open. Click on the open area to start the hidden object scene.
Use the compass to draw a circle on the sheet of paper.
Click on the clock to spin the hands to midnight.
Click on the globe to spin it and reveal South America.
Screenshot
You will receive a Signet Ring.
Walk back, inspect the fireplace, and use the Coal Tongs to retrieve a Coal.
Return to the library, examine the globe, and use the Globe Key to open it.
Use the Coal to melt the ice and take the Bucket of Water.
Walk back, look at the fireplace, use the Bucket of Water to put out the fire, and pick up the second Signet Ring.
Walk back twice, look at the man and woman, inspect the brushwood, and use the Coal Tongs to get the third Signet Ring.
Return to the house, examine the door on the ground floor, and use the three Signet Rings to start the puzzle.
Move the Dog to the green spot.
Move the Dragon to the red spot.
Move the Falcon to the blue spot.
Once in the backyard, examine the base of the tree and pick up the Amulet.
Look at the gate and take the Guide Half from the ground.
Inspect the top of the windmill and use the Shawl to fix it.
Pick up the Gem Eye that falls out of the fountain when it turns on.
Walk back, look at the statue next to the clock, put the Gem Eye and Amulet in place, and take the Ax.
Go back to the backyard, examine the gate, use the Ax to cut down the tree, and pick up the Workshop Key.
The Swamp Guide
Walk back twice, use the Workshop Key to open the clock workshop, and go inside.
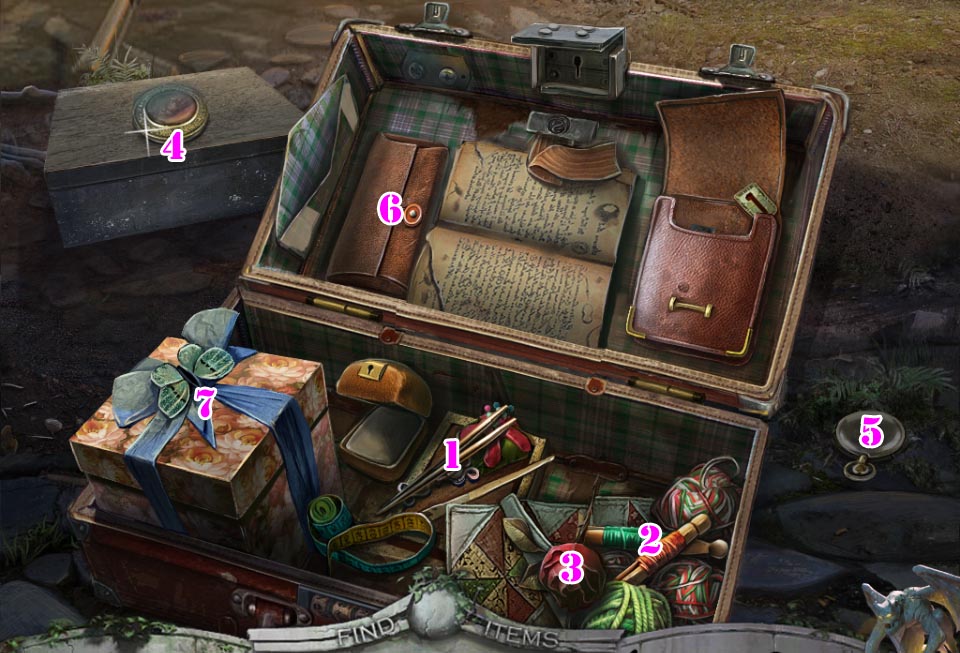
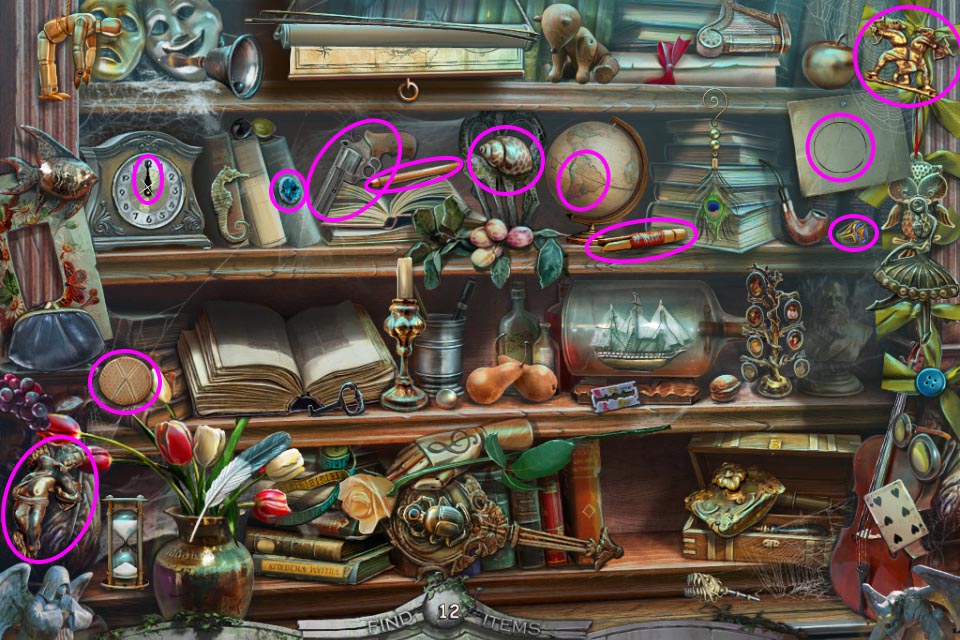
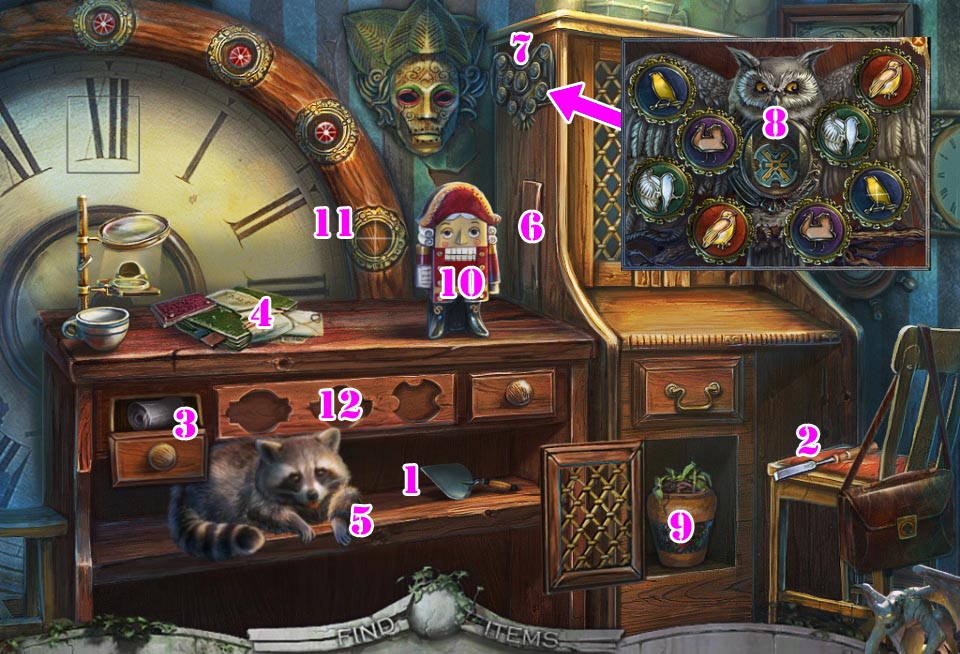
Click on the desk to start the hidden object scene.
Remove the trap from the raccoon's paw and take the Trowel next to it.
Move the hat on the chair and pick up the Chisel.
Open the left drawer on the desk and take the Bandage.
Look at the book on the desk and read the clue: 1, 3, 12, 2.
Use the Bandage on the raccoon and pick up the Oiler and the first Drawer Symbol.
Use the Chisel to remove the loose board on the wardrobe, and take the Owl Coin.
Look at the owl device on the wardrobe and put the coin in it to start the minigame.
Flip over all the pairs of matching coins to get the second Drawer Symbol.
Use the Oiler on the hinges of the lower door of the wardrobe, open it, and use the Trowel on the potted plant to get to the Golden Nut.
Crack the Golden Nut in the nutcracker and take the Clock Button.
Put the Clock Button in place on the large clock and press the clock buttons in the order indicated by the clue earlier.
Take the third Drawer Symbol and use the three symbols on the drawer in the desk.
Pick up the Incomplete Telescope.
Screenshot
You will receive an Incomplete Telescope.
Look at the mirror on the right and take the Crow Rune.
Return to the backyard and use the Crow on the rope ladder.
Go up to the treehouse and pick up the Lever.
Return to the clock workshop, look at the faceless clock on the back wall, and put the Lever into place to start the puzzle.
Slide the top lever to the right.
Slide the bottom lever to the left.
Slide the bottom lever to the right.
You will receive a Gem Eye.
Go back to the hallway of the house, inspect the statue, put the Gem Eye in its eye socket, and go through the door that opens.
Pick up the Guide Half from the floor.
Examine the casket and pick up the Eye Piece.
Return to the backyard and go up to the treehouse.
Combine the Eye Piece and the Incomplete Telescope to create a Telescope.
Combine the two Guide Halves to create the Unmarked Guide.
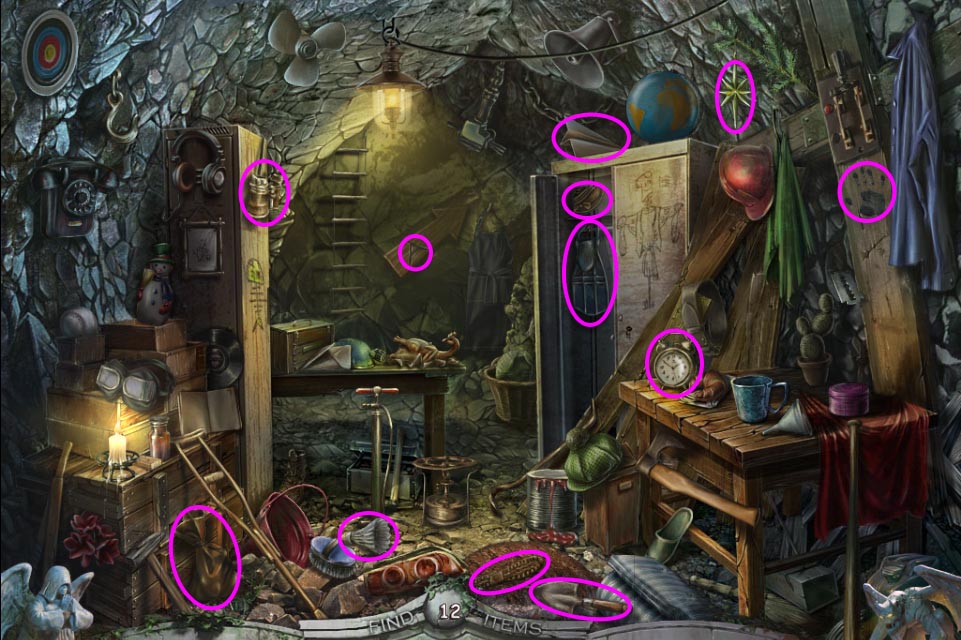
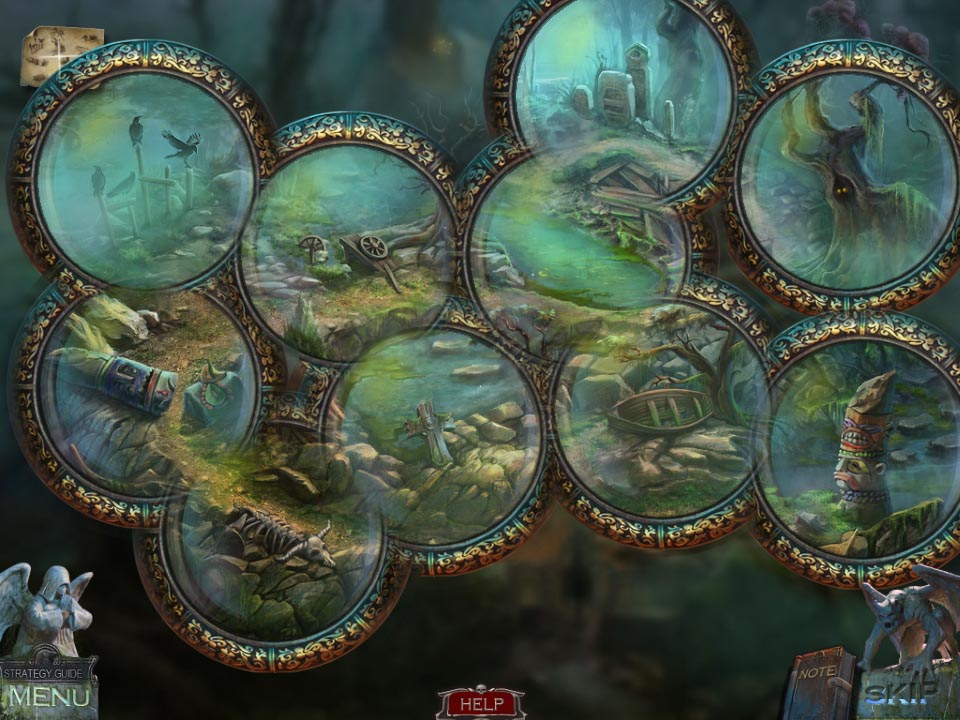
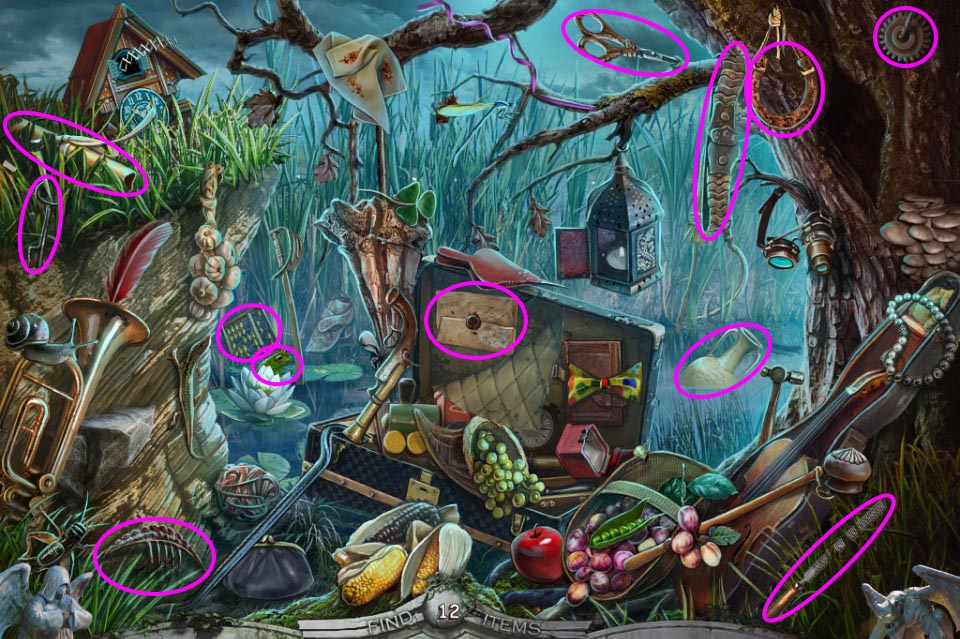
Place the Telescope on the tripod, look through it, and use the Unmarked Guide on the scene to start the hidden object scene.
Use the guide in the upper right to see what you need to find.
Click on the locations shown to find the objects.
Screenshot
You will receive a Swamp Guide.
Walk back, look at the gate, and use the Swamp Guide to proceed into the swamp.
Chapter 7: The Swamp
The Tower Key
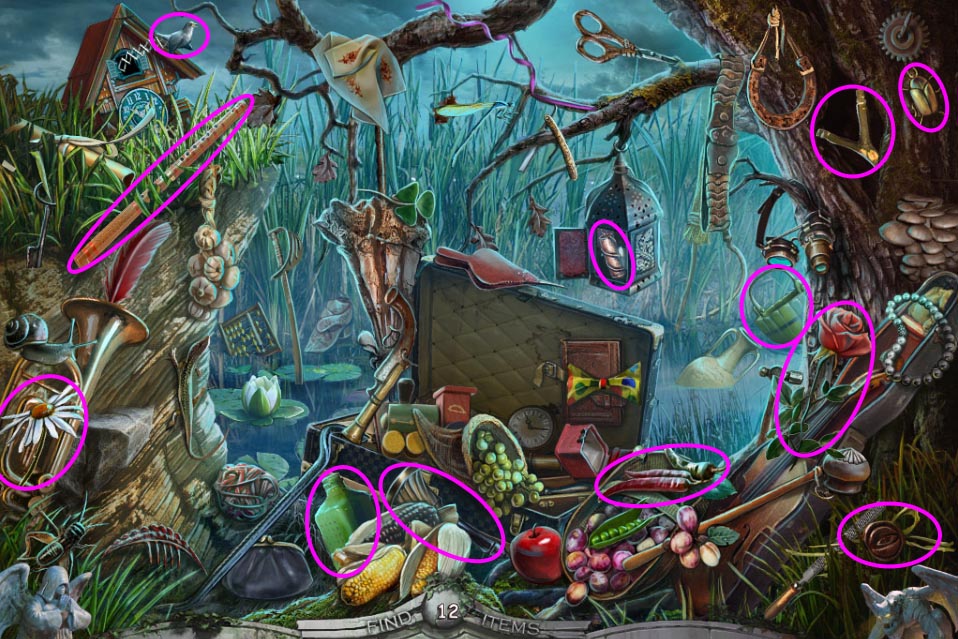
Click on the pile of junk below the tree to begin the hidden object scene.
Give the acorn to the squirrel in the tree to reveal the slingshot.
Click on the clock on the left, and the bird will pop out.
Screenshot
You will receive a Clock Weight.
Pick up the Fork on the ground.
Examine the tower window and pick up the Crow Rune.
Walk back, use the Crow on the purse in the tree, open the purse, and take the note inside.
Walk back three times, enter the clock workshop, and click on the desk to start the hidden object scene.
Click on the cup on the desk and pick up the Shield.
Open the upper doors of the wardrobe, put the Shield in the box, and take the Toy Gun.
Look at the book on the desk and take the Paperclip.
Examine the bag in the wardrobe, use the Paperclip to open the zipper, and take the Clock Hands.
Give the Toy Gun to the nutcracker and pick up the Gear.
Look at the mechanism on the large clock and put the Gear in it to start the minigame.
Click on the two red gears and pick up the first Mask Eye.
Put the Clock Hands on the clock on the far right and take the second Mask Eye.
Place the two Mask Eyes in the mask and take the Spade Clip.
Put the Spade Clip on the pouch hanging on the chair to start the minigame.
Align the handles with the matching breakpoints and take the Pliers.
Screenshot
You will receive Pliers.
Inspect the trunk and use the code from the note to open it.
Look inside the trunk and take the Suction Cup and the Urn.
Examine the mirror on the right, use the Pliers to bend the four clasps, and take the Square Mirror.
Return to the swamp, look in the purse, and use the Suction Cup to remove the Mirror.
Walk back twice, enter the library, and click on the open bookcase to start the hidden object scene.
Turn the page of the open book to reveal the signature.
Pull down the map to get the flag.
Screenshot
You will receive the Dragon Lever.
Look at the mirror frame above the ladder and place the Square Mirror in it.
Move the ladder to the left, inspect the mirror frame above it, and put the Mirror in place.
Examine the table to start the puzzle.
Put the Blue gem into the light on the left.
Put the Red gem into the light on the right and angle it down. The Purple gem will be lit.
Put the Blue gem into the light on the left and angle it down.
Put the Yellow gem into the light on the right. The Green gem will be lit.
Put the Red gem into the light on the left and angle it down.
Put the Yellow gem into the light on the right and angle it down.
Angle both of the mirrors away from each other. The Orange gem will be lit.
You will receieve the Tower Key.
Accessing the Secret Lab
Go back to the swamp and click on the junk below the tree to start the hidden object scene.
Click on the lily to reveal the frog.
Use the razor hanging from the tree to open the briefcase lid and reveal the envelope.
Screenshot
You will receive a File.
Inspect the tower door, use the Tower Key to open it, and enter.
Pick up the Stick leaning against the wall.
Look at the pistol on the ground and take the Bullet.
Examine the cage and pick up the second Dragon Lever.
Go back to the treehouse in the backyard.
Combine the Stick and the Fork to create Tongs.
Use the Tongs to retrieve the Flask.
Walk back twice and inspect the panel on the wall by the fireplace.
Put the two Dragon Levers in place and move the levers until they turn blue.
Click on the trap door on the floor to start the puzzle.
Move the candles to circles matching their color.
Walk down the stairs to the secret laboratory.
Chapter 8: The Secret Lab
The Second Soul Stone
Open the bookcase on the left and take the Clock Weight.
Walk back and go through the upper-left door with the coffin in it.
Inspect the clock, put the two Clock Weights into place, and take the Set of Picklocks.
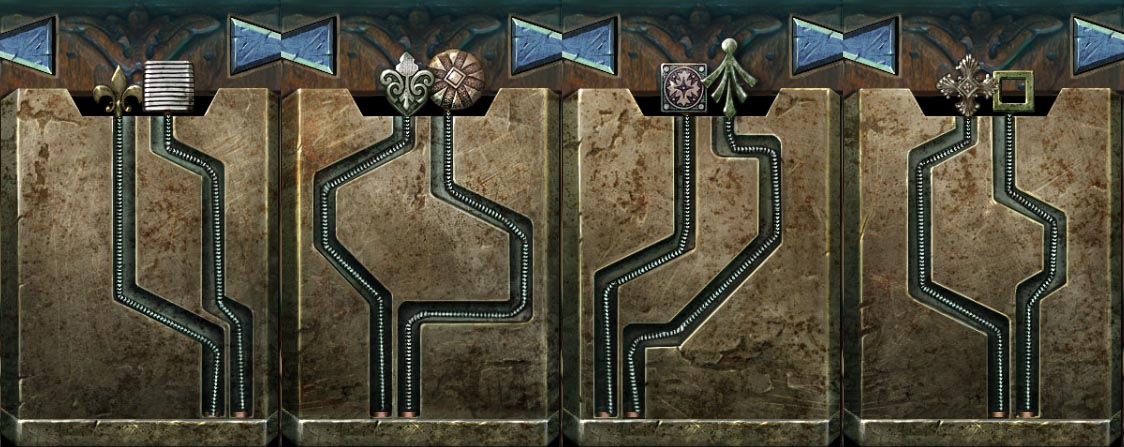
Return to the tower, examine the lock on the cage, and use the Set of Picklocks to start the puzzle.
Place the picklocks in the slots as shown.
Screenshot
Return to the room with the coffin.
Look at the lock on the window, cut it with the File, and take the Skull Knob.
Go back down to the secret lab.
Inspect the book on the left, use the Skull Knob to open it, and take the Central Circle.
Return to the room with the coffin.
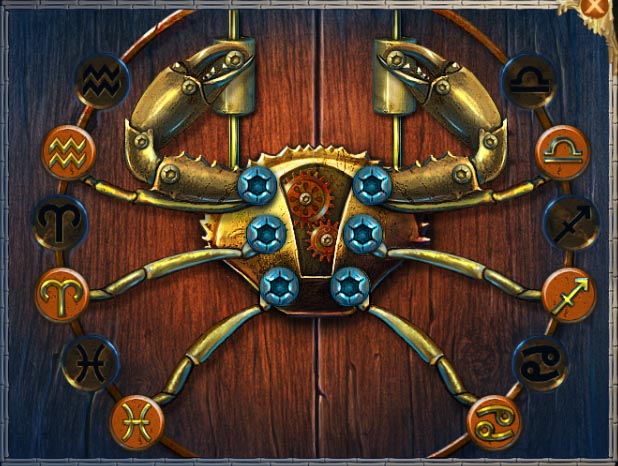
Examine the coffin and use the Central Circle to start the puzzle.
Spin the cicles so that the runes connected by lines are matching.
Screenshot
Inspect the coffin and use the Urn to collect the Vampire Ashes.
Go back down to the secret lab.
Look at the table and use the Vampire Ashes, Bullet, and Flask to start the puzzle.
Place the bullets in the cup on the left and click on the bellows until the temperature reaches 80 degrees.
Pour the ashes in the center cup.
Crush the garlic and pour it into the cup on the right.
Pour the bottles on the tray in the cup in the order shown.
Look through the magnifying glass on the left, eliminate the bacteria by clicking on matching pairs, and pour what remains into the cup.
Turn the valve to fill the flask.
You will receive a Potion.
Go back to the tower, give the Potion to the girl in the cage, and you will be transported back outside the portal.
Click on the ghost and take the Soul Stone.
Getting to the Ghost Ship
Walk back, go to the right, speak to the ghost, and go through the portal.
Examine the grate, speak to the pirate, and pick up the Coin.
Click on the vortex in the water to reveal the ghost ship.
Look at the far edge of the boat and take the second Coin.
Inspect the hatch on the left and pick up the Wedge.
Use the Wedge to hold the rolling barrel in place, go through the door on the right, and speak to the man in bed.
Pick up the Rope from the floor and the Dirk hanging on the left.
Examine the window, use the two Coins on the latches, and look through the window to start the puzzle.
Move the barrels to the corresponding buoys shown in the screenshot to untangle the rope.
Screenshot
You will receive the Medicine.
Give the Medicine to the man on the bed and take the Chest Key.
Look at the chest on the right, use the Chest Key to open it, and pick up the Oil Can and Crow Rune.
Walk back, inspect the hatch on the left, and use the Oil Can to open it.
Take the Harpoon leaning against the barrel and the Oar on the steps.
Combine the Harpoon with the Rope to create a Harpoon with Rope.
Examine the canvas-covered object and use the Dirk to cut the canvas, revealing a crossbow.
Put the Harpoon with Rope in the crossbow and fire it.
Place the Oar in the boat to row across to the ghost ship.
Chapter 9: The Ship
The Crab Door
Inspect the head on the right and take the Horn.
Use the Crow on the rope and climb up.
Look at the carving above the door and pick up the Angerfish Light to the right.
Examine the statue on the left, use the Dirk to scrape it clean, and put the Horn in place.
Return to the boat, give the Angerfish Light to the head on the left, and take the second Horn.
Go back up the rope, give the Horn to the statue on the right, and enter the door that opens.
Speak to the ghost, then inspect the aquarium on the floor and pick up the Behemoth Eye.
Look at the shield on the far wall and take the Crow Rune.
Use the Crow on the swordfish on the ceiling and pick up the Fish Nose that drops.
Walk back and examine the carving above the door.
Put the Behemoth Eye in the socket, use the Fish Nose to keep its mouth open, and take the Crab Claw.
Walk forward, look at the door on the far wall, and use the Crab Claw to start the puzzle.
Swap the symbols so that each one is by a matching symbol.
Screenshot
Pumping the Water Out
Go through the door, inspect the hanging bucket, and pick up the Scraper.
Look at the cannon, open it, and take the Ramrod.
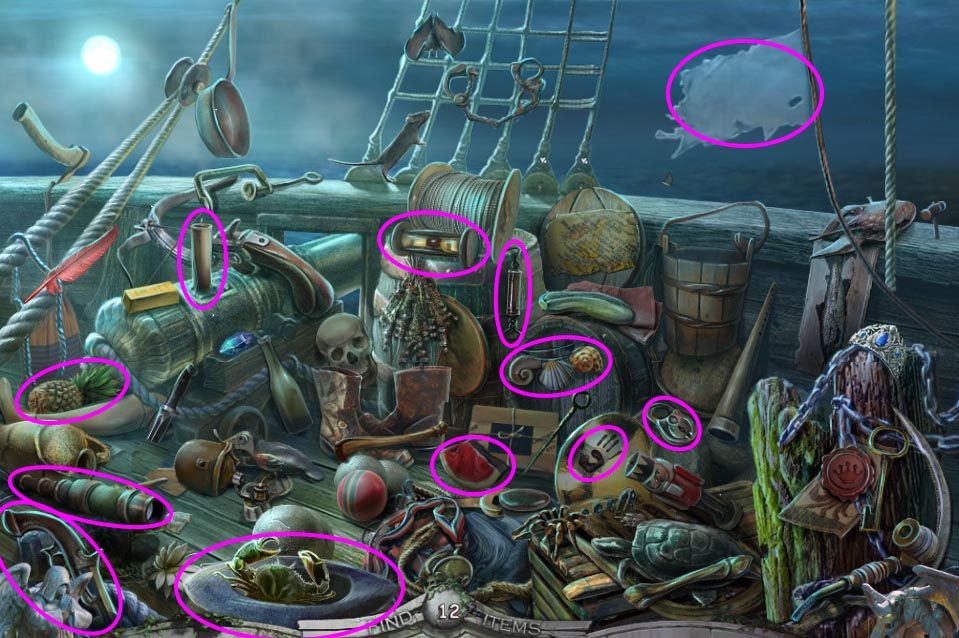
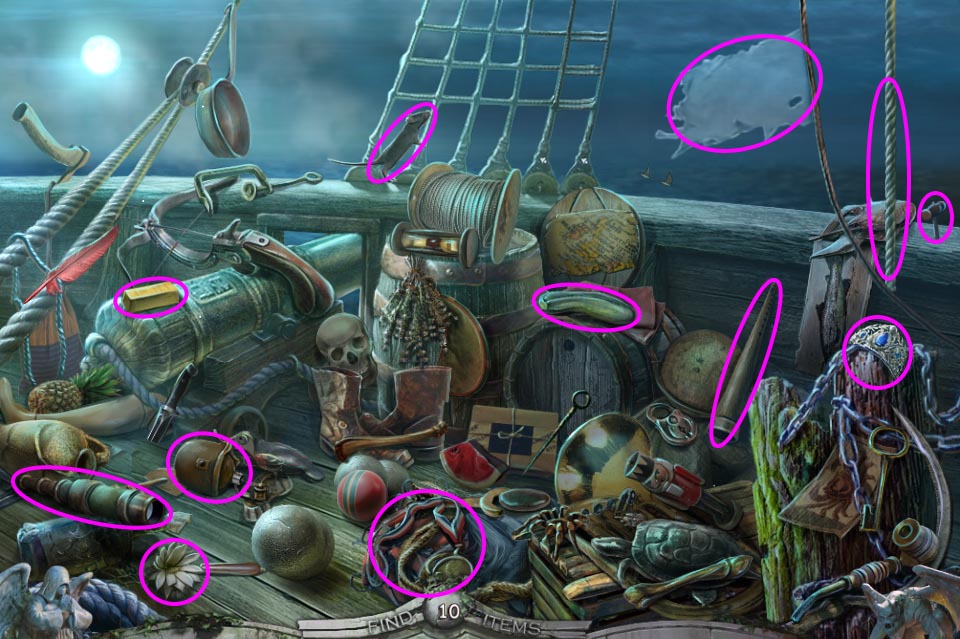
Go up the stairs across the deck and click on the junk on the right to start the hidden object scene.
Use the hat to trap the crab.
Attach two more shells to the necklace with a shell on it.
Screenshot
You will receive a Gem.
Look over the left side of the boat and use the Scraper to pick up the Starfish.
Inspect the barrel on the left, pick up the Map, use the Dirk to open the barrel, and take the Ring inside.
Walk back twice, look at the bookcase on the left, use the Starfish to open it, and pick up the Pirate Hook and the Gem.
Walk forward twice, examine the idol, put the two Gems in its crown, and go down the hatch to the ship hold.
Combine the Ramrod and the Pirate Hook to create a Ramrod with Hook.
Use the Ramrod with Hook to bring the bucket closer and take the Hatch Key.
Look at the barrel on the left, pick up the Cannonball, and cut the net with the Dirk to obtain the Fishnet.
Walk back twice, put the Cannonball in the hanging bucket to raise the curtain, and click on the right side of the screen to start the hidden object scene.
Move the rope and take the Ramrod.
Open the drawer and take the Scoop.
Pick up the Stone in the bottom left.
Move the net and take the Cannonballs.
Move the coat and pick up the Torch.
Put the Scoop in the barrel on the right to get the Powder.
Pour the Powder in the cannon, pack it down with the Ramrod, and load it with the Cannonballs.
Look at the lamp, break the glass with the Stone, and use it to light the Torch.
Light the cannon with the Torch and aim it at the + on the mast.
Look at the chest that falls and take the Seahorse.
Screenshot
You will receive a Seahorse.
Examine the hatch, use the Hatch Key to open it, and take the Board.
Walk forward twice to the ship hold, place the Board on the right side of the screen, look at the area, and pick up the Net.
Combine the Fishnet with the Net to create a Net.
Inspect the aquarium on the floor, use the Ring to cut the glass, and use the Net to catch an Electric Ray.
Look at the shield on the far wall, use the Seahorse to complete the shield, and take the second Map piece.
Walk forward, examine the pump, and put the Electric Ray in the bowl.
When the water is pumped out, go down the hatch to the cargo hold
Chapter 10: The Finale
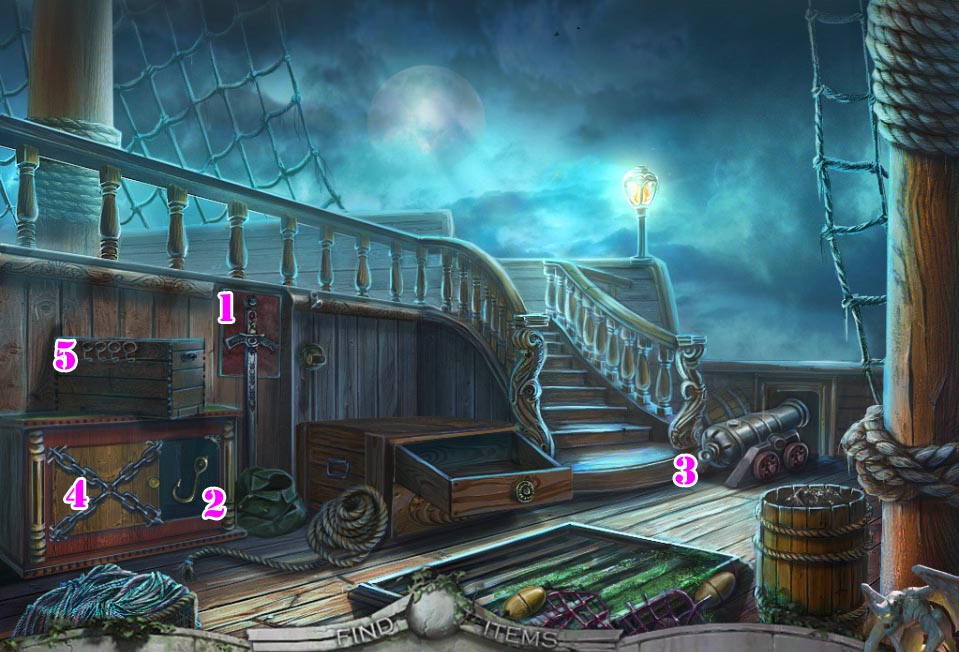
The Three Bracelets
Pick up the Boot on the handrail.
Look at the barrel held by the mechanical octupus and take the third Map piece.
Inspect the door on the right and pick up the Corkscrew.
Walk back, forward, the down into the ship hold.
Look at the window on the right and prop it open with the Boot to drain the water.
Take the Statue Hand by the cannons.
Walk back, look at the idol, and put the Statue Hand into place.
Use the Ramrod with Hook to retrieve the Bracelet.
Click on the junk in the lower right to start the hidden object scene.
Move the two bones and the skull to the flag.
Click on the rope to tie a knot.
Screenshot
You will receive a Diadem.
Go down into the ship hold and examine the picture on the far end to start the puzzle.
Arrange the tiles to form a picture of a mermaid.
Screenshot
Give the Diadem to the mermaid, and she will give you the fourth Map piece.
Walk back twice and down to the cargo hold.
Look at the door on the left, place the Bracelet on the octopus' tentacle, and go through the door.
Use the Ramrod with Hook to take the second Bracelet.
Inspect the statue on the left and pick up the Trident Tines.
Walk back, look at the barrel, and put the Bracelet on the tentacle.
Pick up the Corked Acid and the Crow Rune from the floor.
Combine the Corkscrew with the Corked Acid to create the Acid.
Go through the door on the left, use the Acid on the bars, look at the birdcage, and take the third Bracelet.
Walk back, look at the door on the right, put the Bracelet on the tentacle, and go through the door.
The Last Soul Stone
Examine the trident, use the Trident Tines to reassemble it, and pick up the Parrot Head.
Use the Crow to knock down the Helmet hanging in the upper-right and pick it up.
Walk back, through the door on the left, put the Helmet on the head of the statue, note the parrot sketch and take the Mermaid Figurine.
Inspect the birdcage and put the Parrot Head on the body.
Click on the right wing twice and pick up the fifth Map piece.
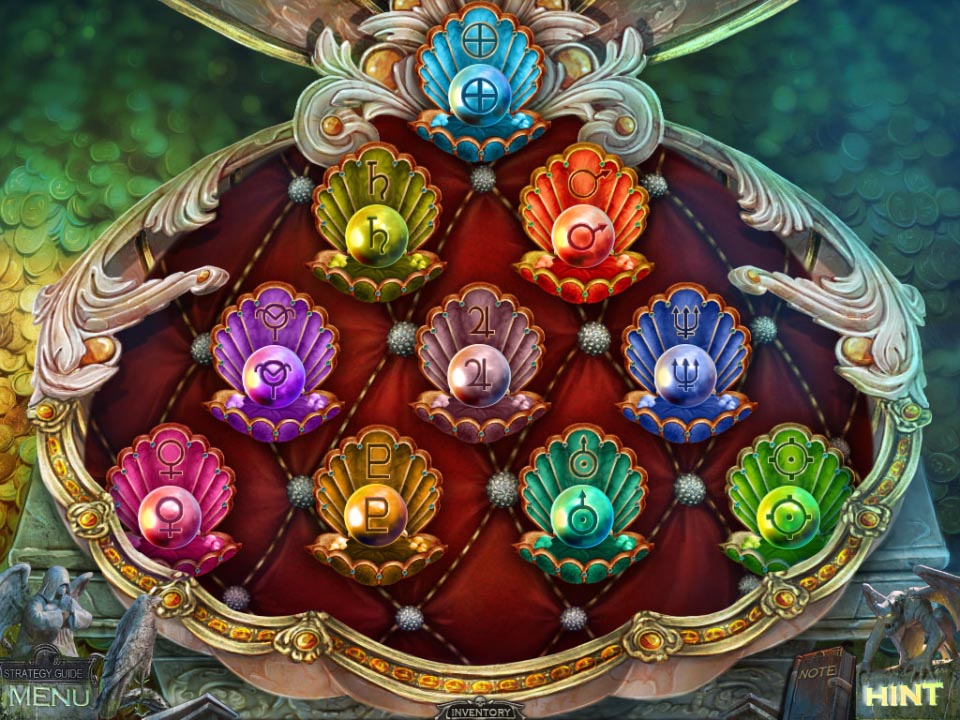
Walk back, through the door on the right, examine the pedestal in the back, and use the Mermaid Figurine to start the puzzle.
Arrange the pearls so the symbols match those on the shells.
Screenshot
You will receive the sixth Map piece.
Walk back twice and click on the broken mast on the right to start the hidden object scene.
Look at the sword, assemble the rose on the handle, and take the Blue Gem.
Pick up the Hook and place it on the rope to get the Hook with Rope.
Attach the Hook with Rope to the cannon and push the cannon to remove the chains.
Look at the chest, click on the symbols until the circles line up facing upward, and take the three gems inside.
Look at the trunk above the chest, put the gems in place, swap gems so that their colors match the wires, and take the Map piece inside.
Screenshot
You will receive the seventh Map piece.
Walk back, inspect the frame on the wall next to the ghost, and use the Map pieces to start the puzzle.
Assemble the map from the fragments.
Screenshot
You will receive Guides.
Walk back three times, go through the door on the right, look at the chest, and put the Guides inside.
Take the Hold Key, walk back, examine the grate on the floor, and use the Hold Key to open it.
After being transported outside the portal, pick up the Soul Stone.
Walk back, go left, speak to the boatman three times, and he will take you to the other bank.
Posted by: cheeko |
August 13, 2012 12:17 AM
|
August 13, 2012 12:17 AM