

Grim Facade: Sinister Obsession
Platform: Mac, Windows

![]() When people show up dead and hanging in a meat freezer, chances are "natural causes" don't factor in unless you have a very liberal definition of the words. It's murder most foul (or at least, the maid thinks so) in Grim Facade: Sinister Obsession, the new hidden-object adventure from ERS Game Studio The maid has worked for the Conti family for years, and when she stumbles across a notebook that appears to detail the murders of three women, she calls you, a local detective, in desperation. It seems like everyone's got motive, and it doesn't look like this idyllic countryside is as safe as it seems to go poking your nose around in. Will you be able to solve the murders without becoming another footnote in the bloodstained notebook yourself?... well... I have faith in you! You might not be any Jessica Fletcher, but you got this.
When people show up dead and hanging in a meat freezer, chances are "natural causes" don't factor in unless you have a very liberal definition of the words. It's murder most foul (or at least, the maid thinks so) in Grim Facade: Sinister Obsession, the new hidden-object adventure from ERS Game Studio The maid has worked for the Conti family for years, and when she stumbles across a notebook that appears to detail the murders of three women, she calls you, a local detective, in desperation. It seems like everyone's got motive, and it doesn't look like this idyllic countryside is as safe as it seems to go poking your nose around in. Will you be able to solve the murders without becoming another footnote in the bloodstained notebook yourself?... well... I have faith in you! You might not be any Jessica Fletcher, but you got this.
 Sinister Obsession has three levels of difficulty depending on how much of a challenge you want, though the basic gameplay remains unchanged. You'll search for clues around the Conti family estate and the surrounding countryside, gathering items to solve puzzles. Make sure you keep an eye out for any gold coins as well, since money talks... or at least, can be used to buy items you'll find useful to your investigation. Click on the screen to interact, and wait for your fan to open fully to use the hint or skip functions, and watch for any fans lying about that can be saved as instant hints when you need them! Some hidden-object scenes will just have you track down a bunch of a particular item, while others may force you to hunt by silhouette and solve puzzles to gain access to other things you need.
Analysis: Okay, look. Nobody's saying murder isn't bad, but come on... there's something about solving one that makes for some solid entertainment. Sinister Obsession is packed with the usual plot twists, cheesy revelations, and, uh, plucky canine companions, and high production values wrap everything up in one pretty package. The character animations are a little... unsettling at times, but the artwork is gorgeous and the environments are packed with movement and detail that keep them from feeling like static images.
 So what's the downside? Repetition, and lots of it. The game has no problem making you repeat hidden-object scenes almost back to back, so they tend to wear out their welcome fast. It's a shame, since the rest of the standard adventure gameplay is actually pretty enjoyable, if peppered by the usual nonsensical scenarios of strange items with stranger uses. There's a nice variety to the gameplay as a whole that helps keep it from feeling too by rote, but there are definitely times when it feels like the game is dragging its feet and padding the gameplay a bit.
At over four hours or so for your average playtime and packed with puzzles and corpses, Grim Facade: Obsessions is a gruesome little murder mystery that's definitely worth checking out. Diehard gumshoes may find it a bit too predictable in places, or irritated that the game occasionally doesn't seem to take itself too seriously. For the rest of us, however, who want a case packed with high camp and drama to solve along with some seriously lovely designs, will want to take a trip to Italy with it and at least try the demo on for size. So go on. You know you want to. Solve ALL the murders!
A Collector's Edition is also available. It contains a bonus chapter, art gallery, strategy guide, and more. Remember that Big Fish Game Club Members pay only $13.99 for Collector's Editions (or 2 club credits), and collector's editions count 3 card punches of 6 total needed for a free game.
![]() Windows:
Windows:
Download the demo
Get the full version
Also available: Collector's Edition
![]() Mac OS X:
Mac OS X:
Download the demo
Get the full version
Also available: Collector's Edition


Walkthrough Guide
(Please allow page to fully load for spoiler tags to be functional.)
Grim Facade: Sinister Obsession Walkthrough
General Information
Main Menu
From the Main Menu, you can Play or Exit the game, choose your Options and Profile, plus connect to more games.
More Information has a link to the Forum and Strategy Guide, and will allow you to view the Credits.
Help will give you a little insight into the various elements of the game.
If you purchased the Collector's Edition, a bonus chapter, Music, Screensaver, Wallpaper, and Concept Art will be unlocked when you've completed the basic adventure.
Options include Music, Sound, and Voice volume, Full or Windowed screen, a Wide Screen adjustment that doesn't seem to work, and use of a Custom Cursor or not.
If you purchased the Collector's Edition, there is a Strategy Guide and Bonus Content, which will become available when you have completed the basic adventure.
Game Modes are Casual, Advanced, or Hard:
In Casual Mode, active zones have sparkles, and the Hint and Skip buttons recharge more quickly.
If you choose Advanced, you won't get that extra help because the Skip and Hint buttons take longer to refill and there are no sparkles.
In Hard, you get no sparkles or black-bar tips, and the Skip and Hint buttons are very slow to refill.
As you begin play, you will get a choice of having Interactive Help .
Scene Navigation
Hints are unlimited once the Hint button in the lower right corner refills.
Throughout the game, you will collect Fans, the count of which is located on the Hint Fan. In the screenshots, fans will be marked in magenta.
If you have more than one Fan count, you can use those hints without having to wait for the Hint button to refill.
In the lower right corner is the Menu where you can change your Options and Play Mode, view Help, continue the game, or quit to the Main Menu.
In the lower center of your screen is your Inventory, and where Hidden Object Scene lists are shown.
If you need to identify an item in your Inventory, mouse over it for its name.
You also have a choice of locking and unlocking your Inventory bar.
There are several types of Hidden Object Scenes.
Random lists of items to find.
Like-kind items which are randomly placed in the scene.
Silhouettes of object that need to be collected in a certain order so they can be combined with other objects or used to obtain other objects.
The items to locate will be marked in the screenshots in hopes will encounter them on one of your visits to the same location.
The item you receive for your Inventory is marked in bright blue.
Mini Games have a Skip option when the button becomes full and instructions about the game at the bottom of the screen.
The Magnifying Glass is in the form of opera glasses. Check them out to get more information or to perform a task.
A Hand wants you to pick something up, or to move or open an object.
You will be collecting Golden Lira in order to purchase items from Giovanni's Store.
There is a Hand with a coin for you to give the coins to Giovanni when he holds out his hand to collect them.
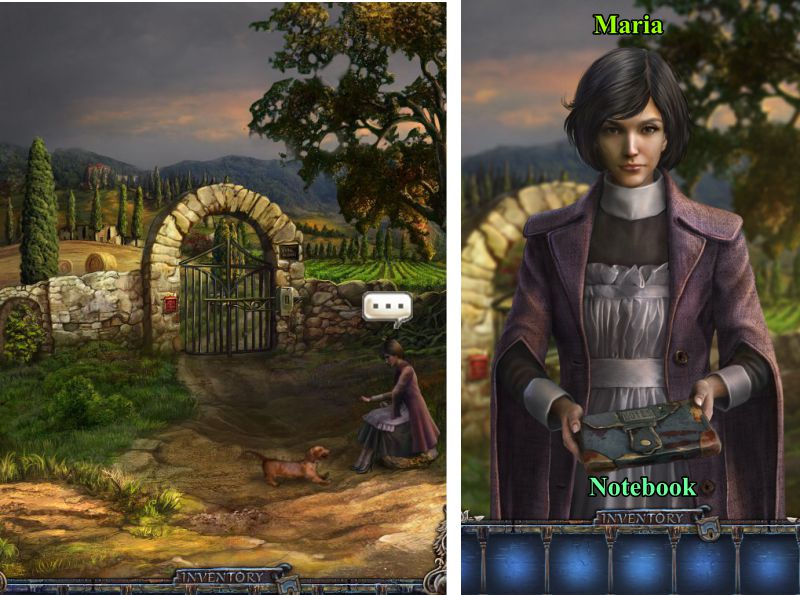
Maria will give you a Notebook in which Notes will be jotted down about your journey, so remember to view it occasionally as a refresher course.
You will definitely get your exercise in this game because there is a lot of running around and no map to let you jump where you need to go.
Arrows will show you where to move on to another location. I will label your destination with those arrows.
Chapter 1: Road to the Villa
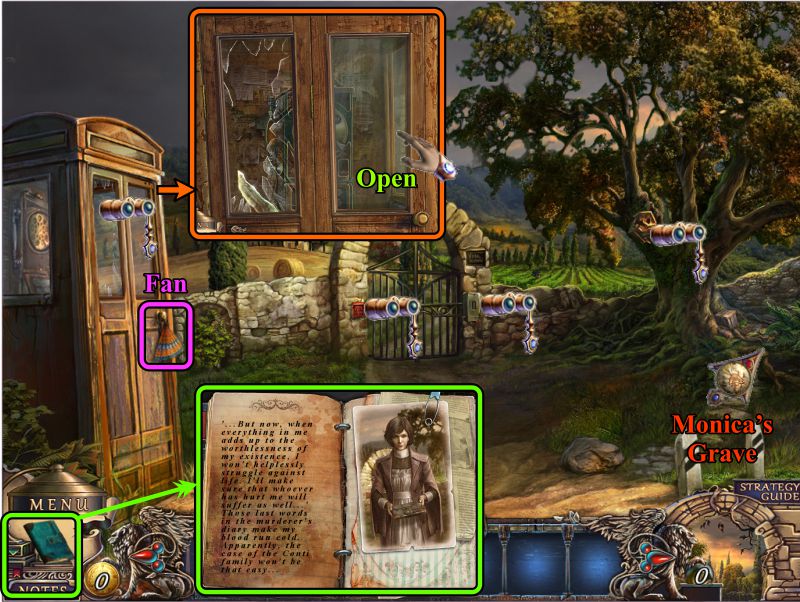
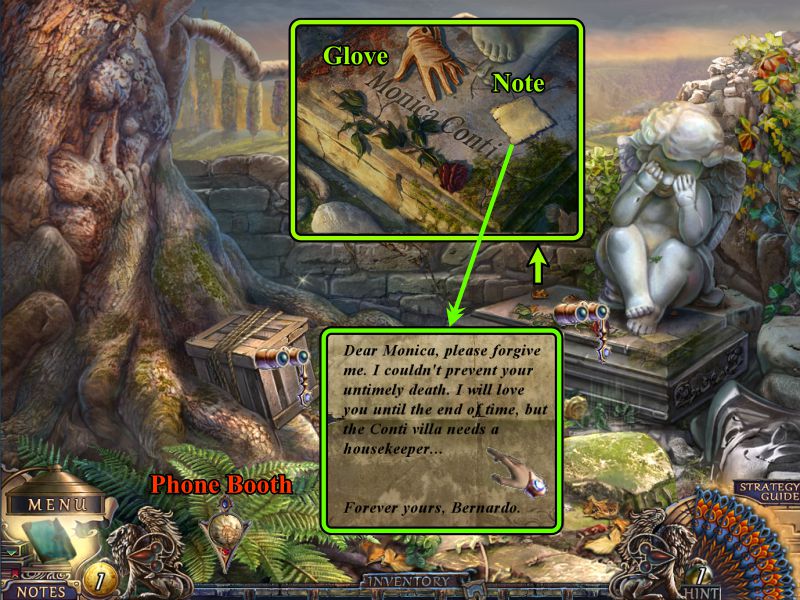
Oak Tree
Talk to Maria, and she will give you a Notebook.
Screenshot
Collect the Fan on the phone booth.
Check out all the opera glasses, zoom in on the phone booth and open the door.
Once you are finished with your tasks here, go right to Monica's Grave.
Screenshot
Phone Booth
Grab the Blue Shell and zoom in on the phone.
Remove the two screws to trigger a Mini Game.
After the Mini Game, close the door.
Screenshot
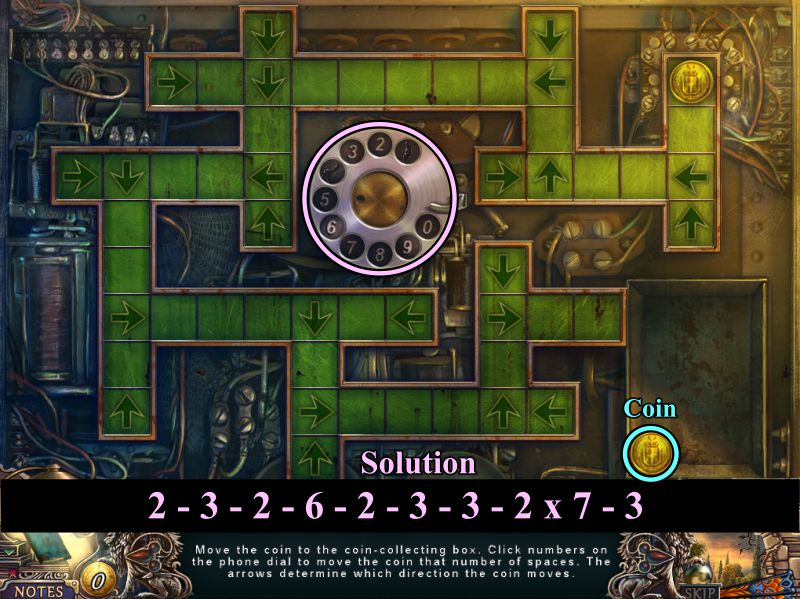
Phone Mini Game
Your goal is to get the Coin down into the box so that you can collect it.
To move the coin, you need to use the numbers on the dial, but some of them are missing.
See the screenshot for the solution.
Screenshot
Monica's Grave
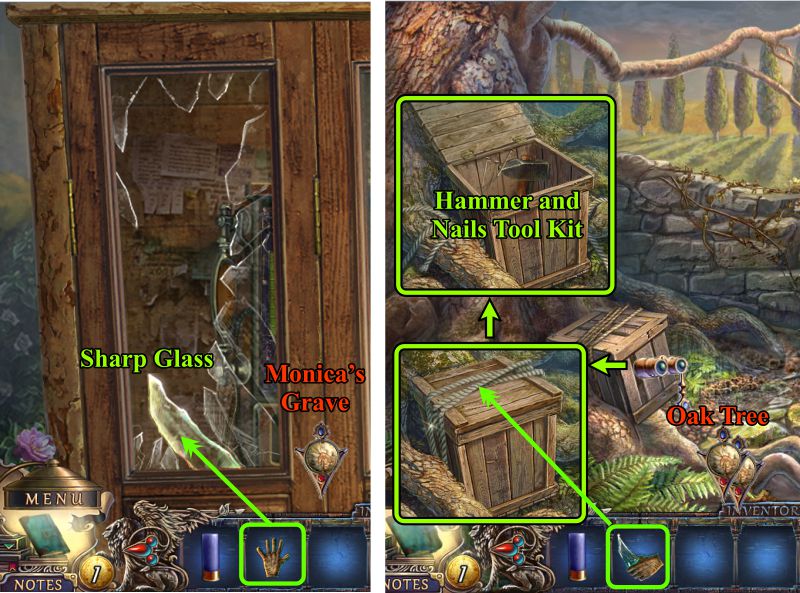
Zoom in on the grave, read the Note and take the Glove.
Return to the Phone Booth.
Screenshot
Phone Booth and Monica's Grave
Use the Glove to take a piece of Sharp Glass from the closed phone booth door.
Return to Monica's Grave and zoom in on the tied-up box.
Use the Sharp Glass to cut the rope, and collect the Hammer and Nails Tool Kit inside.
Return to the Oak Tree.
Screenshot
Oak Tree
Zoom in on the bird house in the tree and repair it with your Tool Kit so the bird will drop the Postal Emblem.
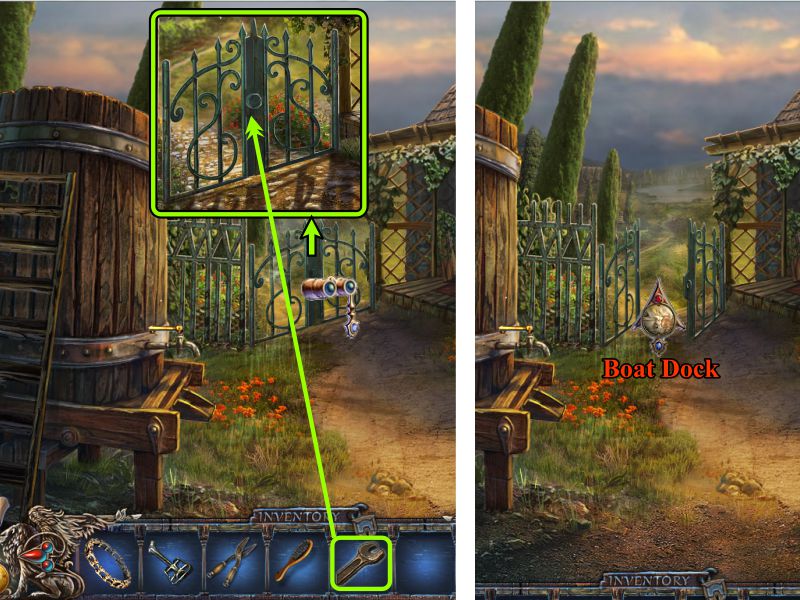
Zoom in on the mailbox, place the Postal Emblem, read the old newspaper, and collect the Gate Handle.
Zoom in on the gate mechanism, place the Gate Handle, and turn it.
Go through the gate when it opens.
Screenshot
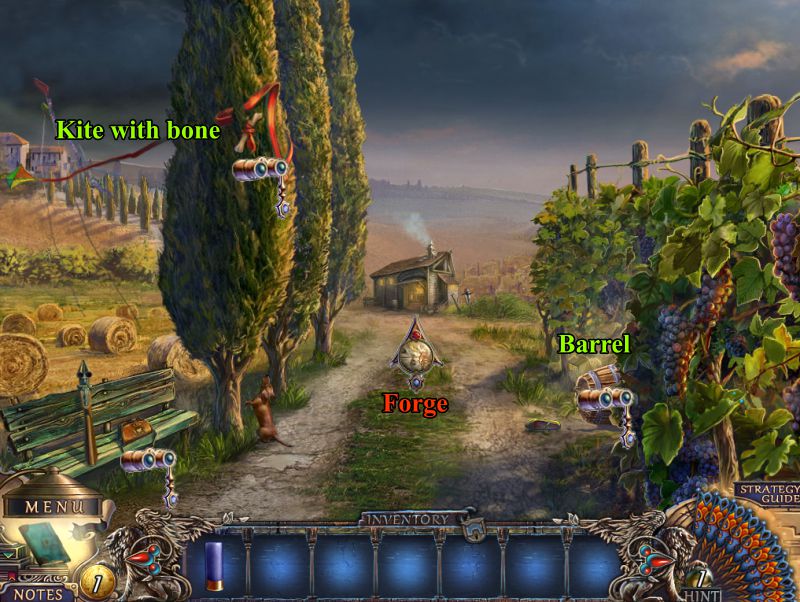
Field
Watch the cut scene and examine the barrel and kite.
Examine the bench, and go forward toward the Forge.
Screenshot
Bench
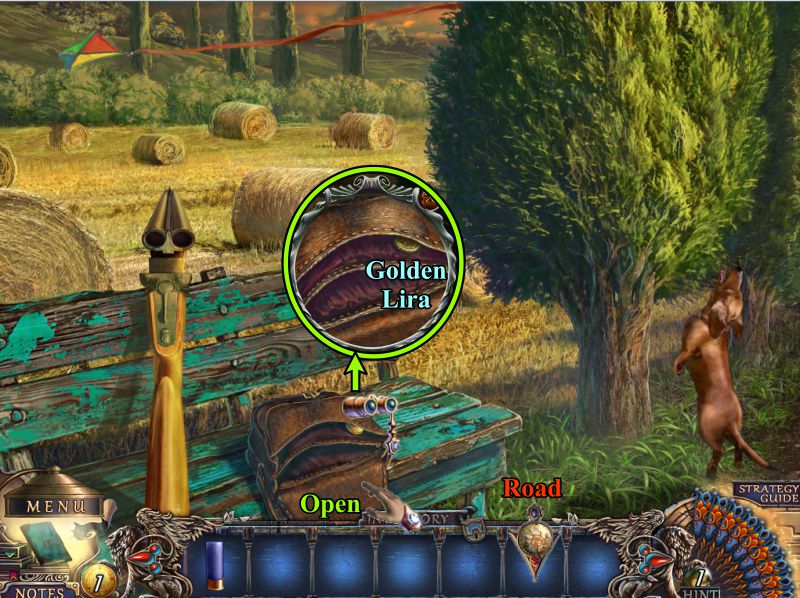
Open the bag and take your first Golden Lira coin.
Continue on up the road.
Screenshot
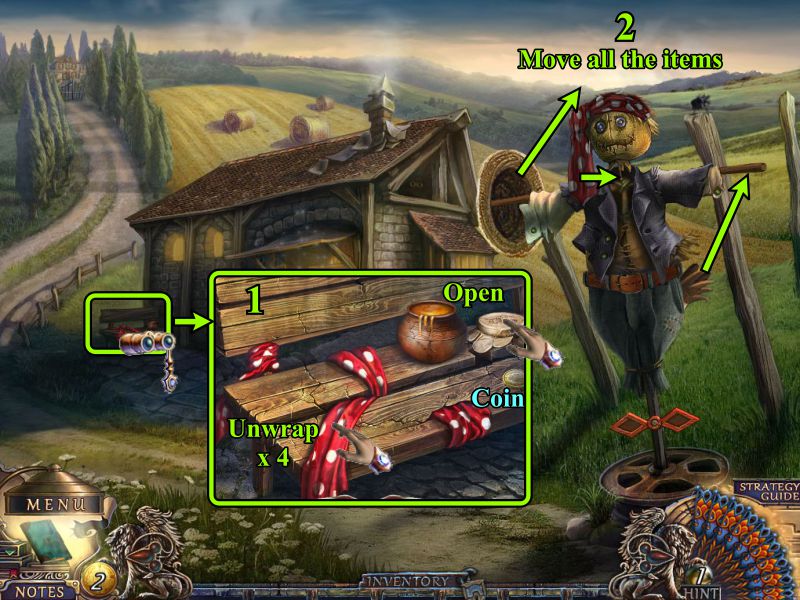
Scarecrow
Zoom in on the bench, pick up the Coin, open the honey jar, and unwrap the scarf 4 times.
Move the items on the scarecrow as shown in the screenshot.
Screenshot
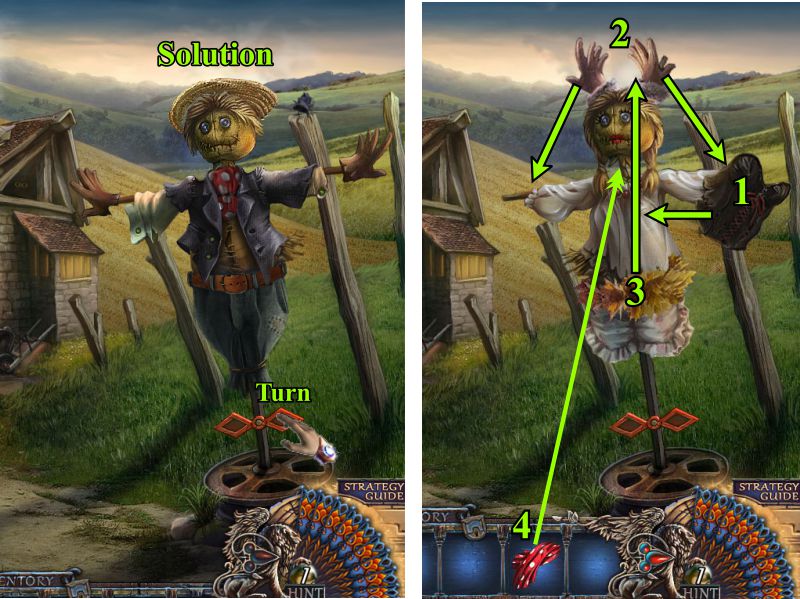
The screenshot shows how the male scarecrow should look, so turn the arrows to find the female.
Fix her up as shown in the screenshot.
Screenshot
Check how adorable she looks until the crow comes along and knocks off her head.
Zoom in on the head and take the Honey Dipper and Coin.
Play the Hidden Object Scene and go back down the road.
Screenshot
Forge Hidden Object Scene
Collect the 2 Fans.
There are 12 Hammers to collect so that you will end up with a Hammer for your Inventory.
The Hammers can be randomly placed, but note the one that has a handle to be placed if it is part of your scene.
To collect a Hammer Shark, zoom in on the book above the Forge and turn the page.
Screenshot
Field
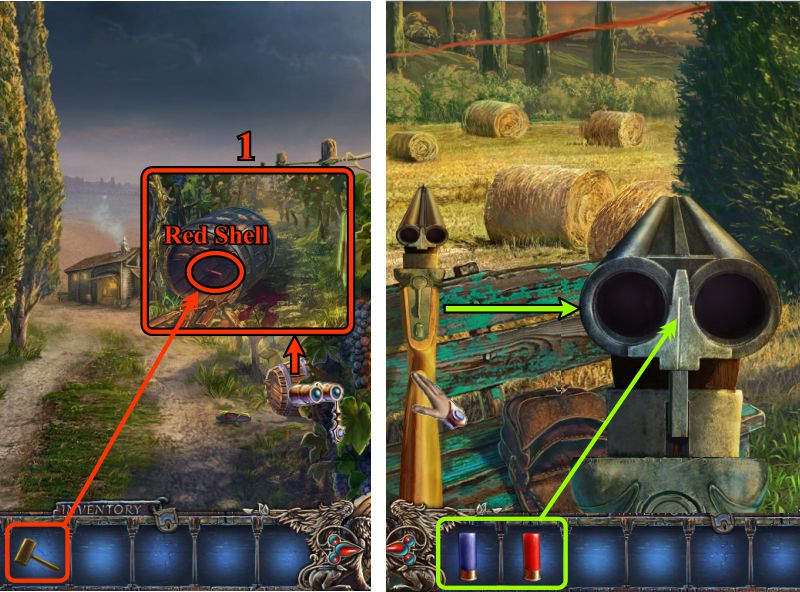
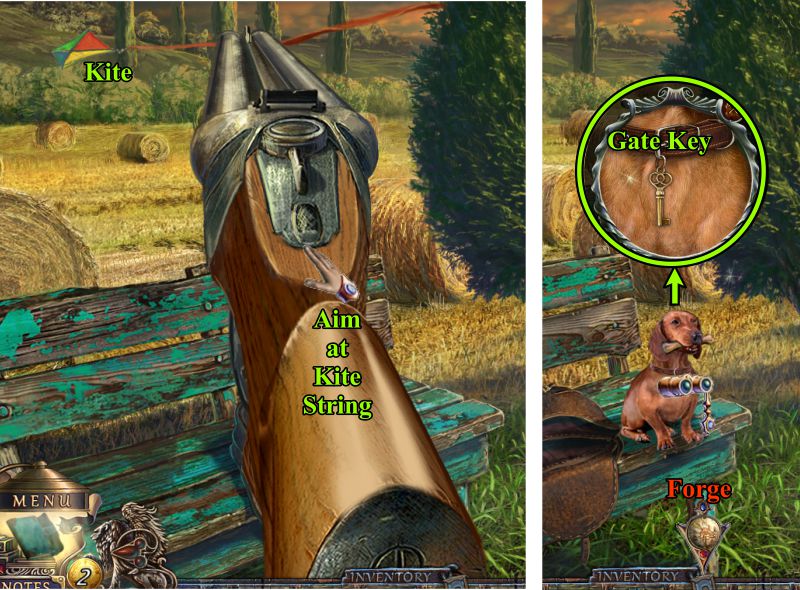
Examine the barrel and use the Hammer to get the Red Shell.
Zoom in on the bench, click on the gun, and place the Blue and Red Shells in the gun barrel.
Screenshot
Aim the gun at the kite string so the dog can get his bone.
Zoom in on the dog once he jumps up on the bench, and take the Gate Key.
Head toward the Forge.
Screenshot
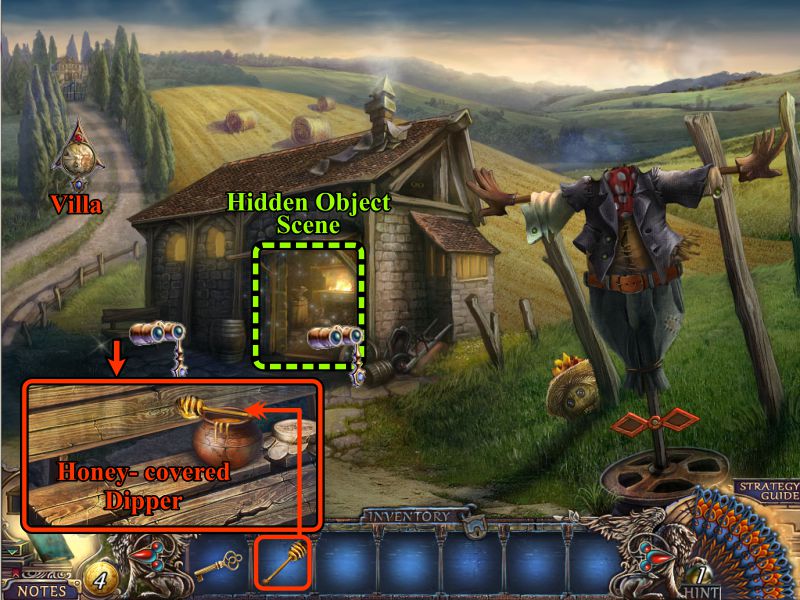
Scarecrow
Zoom in on the bench and place the Honey Dipper so you can collect a Honey-covered Dipper.
Play the Hidden Object Scene at the Forge, and then continue on up the road to the Villa.
Screenshot
Forge Hidden Object Scene
You need to collect 12 Chains in order to have a Chain go into your Inventory.
Open that book again on top of the Forge, turn the page and find the chain of fish.
Zoom in on the anvil, place the rivets, and use the hammer to place them so you can collect that chain.
Screenshot
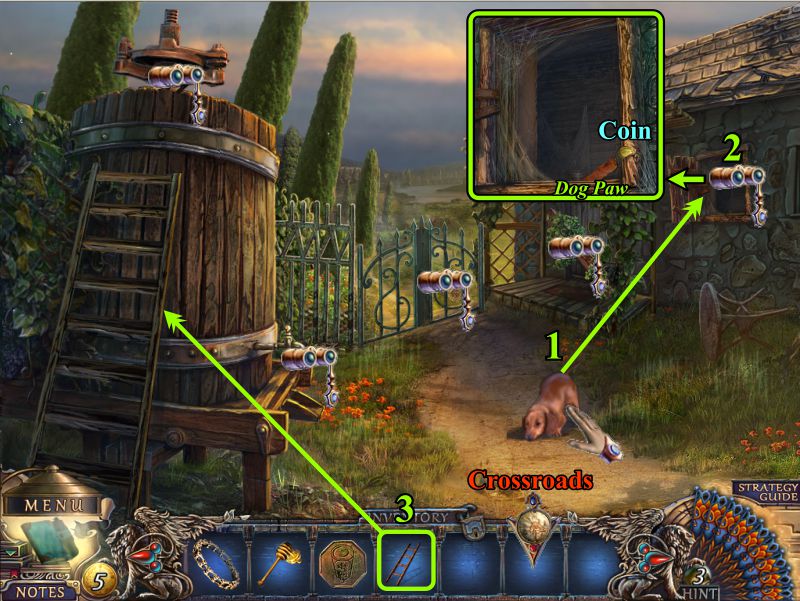
Chapter 2: Crossroads
Gate and Direction Sign
Zoom in on the gate lock, place the Key, and turn it 3 times.
Your choices at the sign are numbered in the screenshot, so start off by heading to the Villa.
Screenshot
Outside Villa
Lots of choices to check out here: first zoom in on the Villa sign and collect the Candy Machine Token.
Also play the Hidden Object Scene, and then go to the Vineyard.
Screenshot
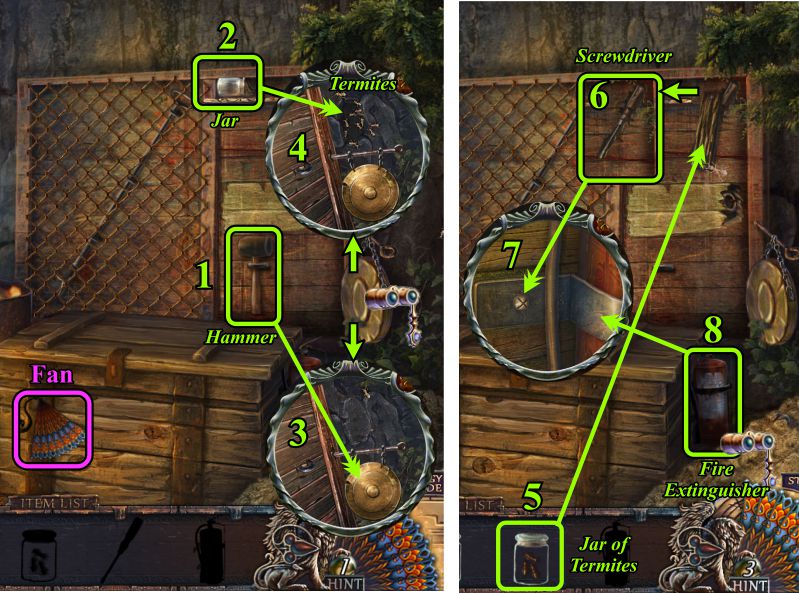
Bin Hidden Object Scene
Collect the Fan on the outside of the bin.
Pick up the Hammer.
Pick up the Jar.
Use the Hammer on the gong to display the Termites.
Use the Jar to collect the Termites.
Place the Jar of Termites as shown in the screenshot to reveal the Screwdriver.
Zoom in and use the Screwdriver to remove the screw bolting down the Fire Extinguisher.
Screenshot
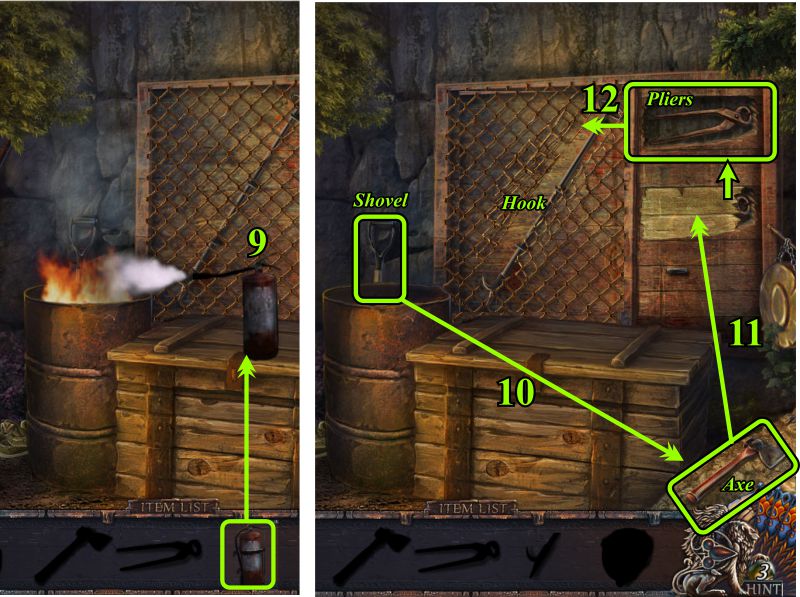
Use the Fire Extinguisher to put out the fire in the barrel.
Take the Shovel and use it to dig in the sand.
Take the Axe and use it to destroy the boards.
Grab the Pliers and use it to reveal the Hook.
Screenshot
Use the Hook to retrieve the Helmet and Ladder Rung.
Zoom in on the snake and zap the Helmet on him so you can get the Ladder Rung.
Zoom in on the ladder and place both Ladder Rungs.
Take the Ladder and don't forget to pick up the Fan next to it.
Screenshot
Vineyard
Touch the dog to see what he is up to, and he jumps into the window.
Zoom into the window, and his paw tells you to take the Coin.
Place the Ladder on the wine barrel and check it out.
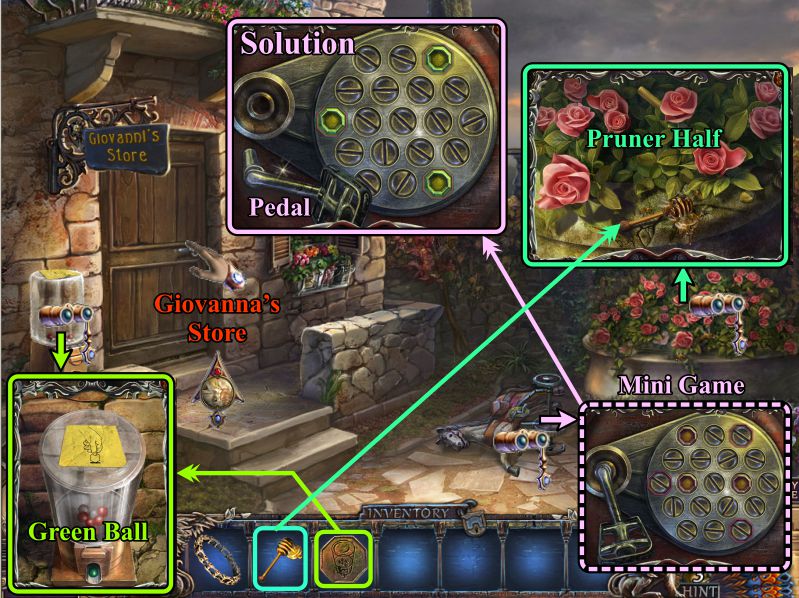
Go to the Crossroads after examining everything and zoom in on the entrance to Giovanni's Store.
Screenshot
Entrance to Giovanni's Store
Zoom in on the candy machine and use your Token to get a Green Ball.
Examine the roses and take the half of the Pruner.
Zoom in on the bike for a Mini Game.
Move all the nuts to place them as shown in the screenshot so you can get the Pedal.
Go check out Giovanni's Store.
Screenshot
Giovanni's Store
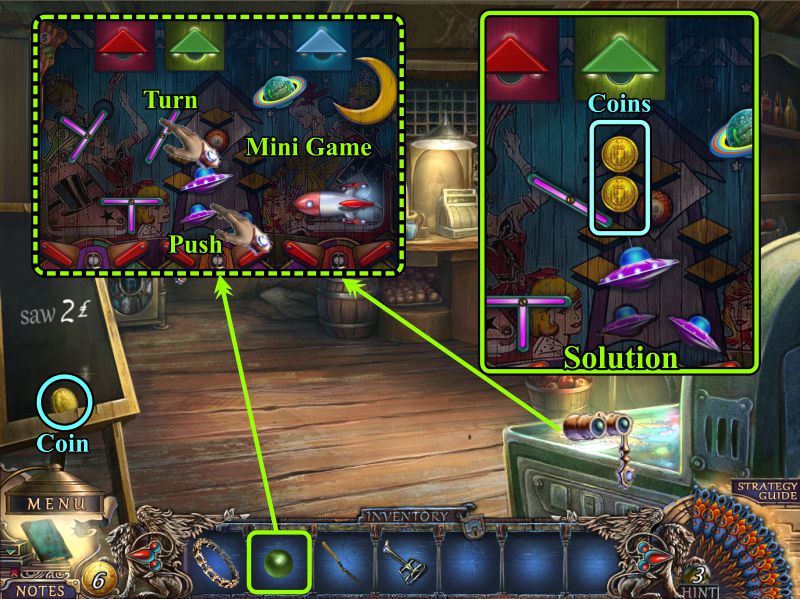
Collect the Coin on the chalk board, and zoom in on the Pinball Machine.
Place the Green Ball to start the Mini Game.
Correct the 2 elements shown in the screenshot and click on the ball, or push to "Push" button to send the ball to the green shade.
See the screenshot for the solution. Collect your two Coins.
Screenshot
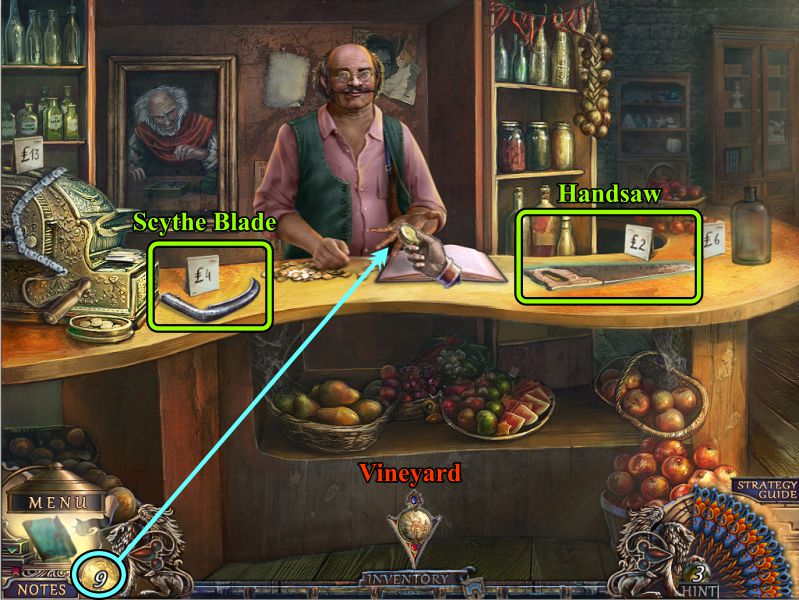
Store Counter
Go to the counter.
Choose the Handsaw and Scythe Blade one at a time and pay Giovanni for each of them from your Coin collection in the lower left corner.
Go to the Vineyard.
Screenshot
Vineyard
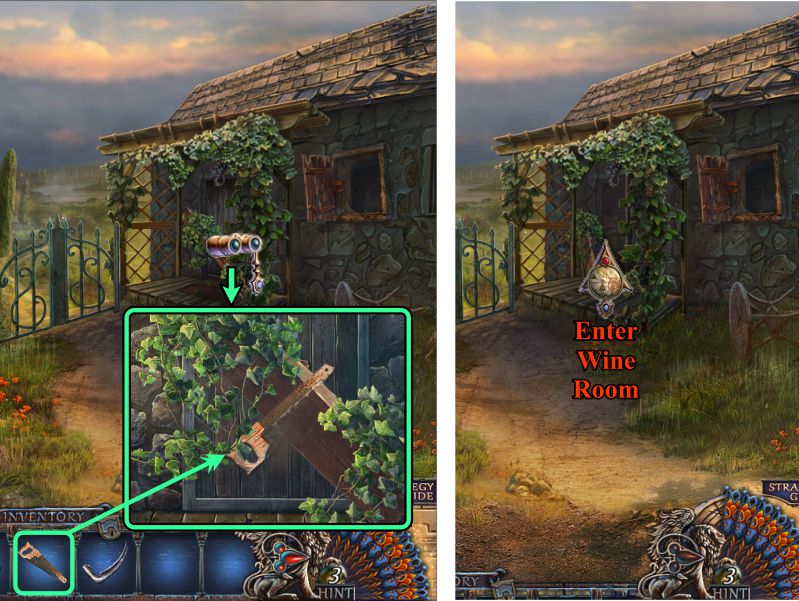
Zoom in on the door to the Wine Room and use the Handsaw to cut the board that is blocking the entrance.
Enter the Wine Room.
Screenshot
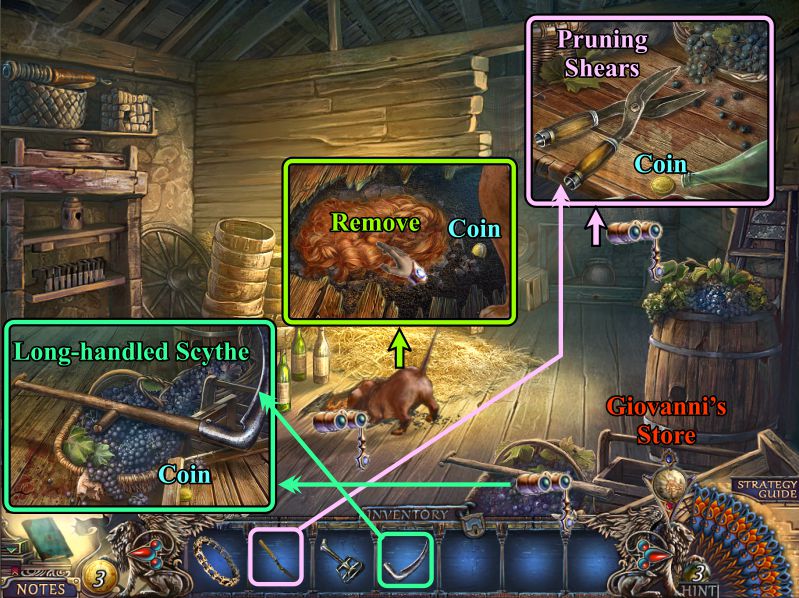
Wine Room
The dog is intent on something in the floor, so investigate, pick up the Coin, and remove the wig to see there is something in the hole you can't reach.
Zoom in on the basket of grapes in front, collect the Coin, and place the Scythe Blade on the handle to get a Long-handled Scythe.
Examine the table at the back, pick up the Coin, and place your half of the Pruning Shears to collect a complete one.
Return to Giovanni's Store.
Screenshot
Store Counter
Go to the counter and select to purchase the Wine Bottle.
Give Giovanni his 6 Lira, and return to the Wine Room.
Screenshot
Wine Room
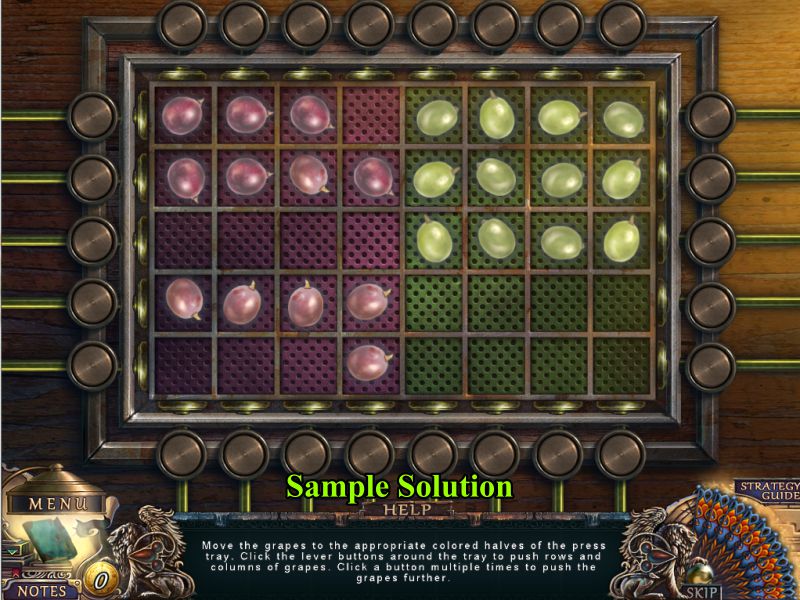
Place your Wine Bottle under the wine press.
Zoom in on the wine press for a Mini Game.
Take the Full Bottle of Wine and pour it in the hole to get the Cat Brush.
Go to the Conti Villa.
Screenshot
Wine-Making Mini Game
Your goal is to move all the red grapes to the left and the green grapes to the right.
Use the buttons surrounding the tray to push the grapes.
There no exact solution, but see the screenshot for a sample.
Screenshot
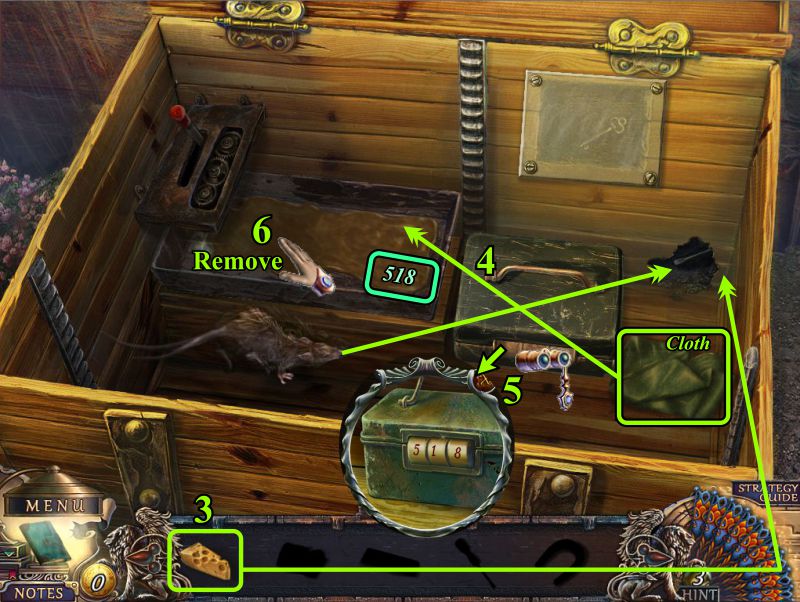
Bin Hidden Object Scene
Zoom in on the chest for a Hidden Object Scene.
Open the bin and collect the Cheese.
Use the oil to lubricate the handle, and the chest will open further.
Screenshot
Put the Cheese in the hole, and the rat will disappear.
Use the Cloth on the tray to uncover the number 518.
Zoom in on the box and enter the combination.
Remove the tray.
Screenshot
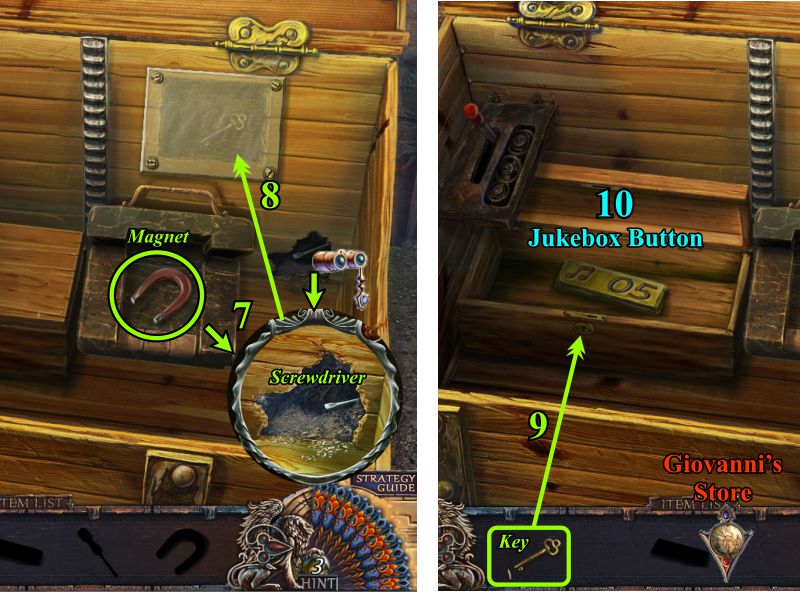
Use the Magnet inside the box to retrieve the Screwdriver from the hole.
Unscrew the plate to get the Key.
Use the Key to open the box.
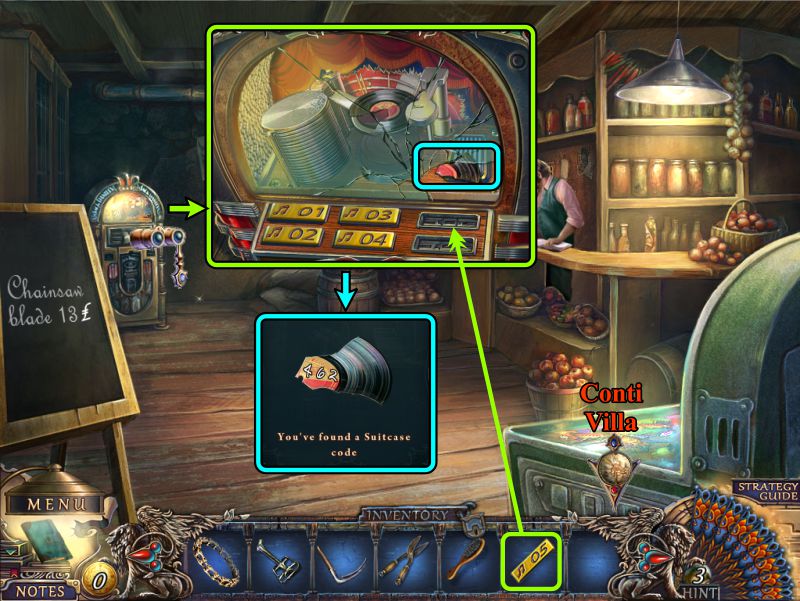
Collect the Jukebox Button.
Go to Giovanni's Store.
Screenshot
Giovanni's Store
Zoom in on the jukebox and place your Jukebox Button.
Something goes wrong because the glass breaks, leaving a broken record behind.
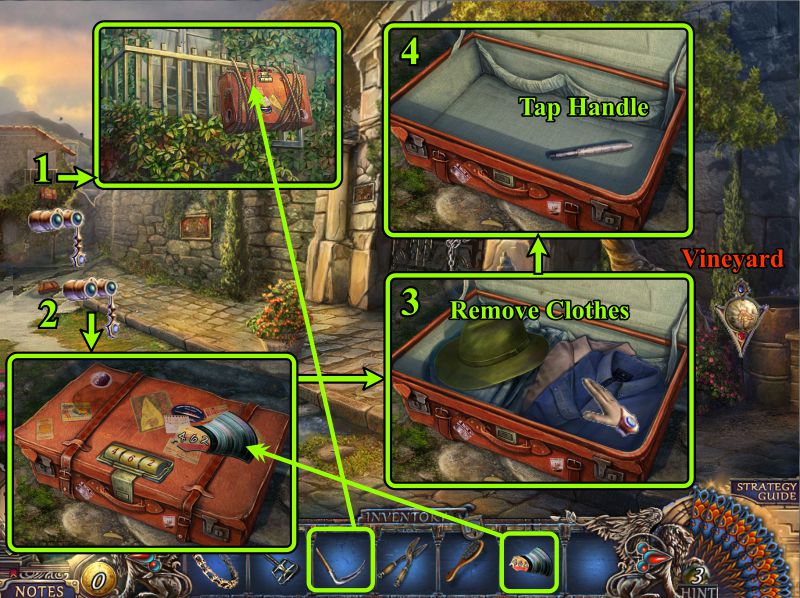
Pick up the record piece with the Suitcase Code, then go to Conti Villa.
Screenshot
Suitcase
Zoom in on the suitcase tied to the balcony and use your Long-handled Scythe to cut the rope.
Zoom in where the suitcase fell, place the Code on it and open the suitcase.
Remove all of the clothes.
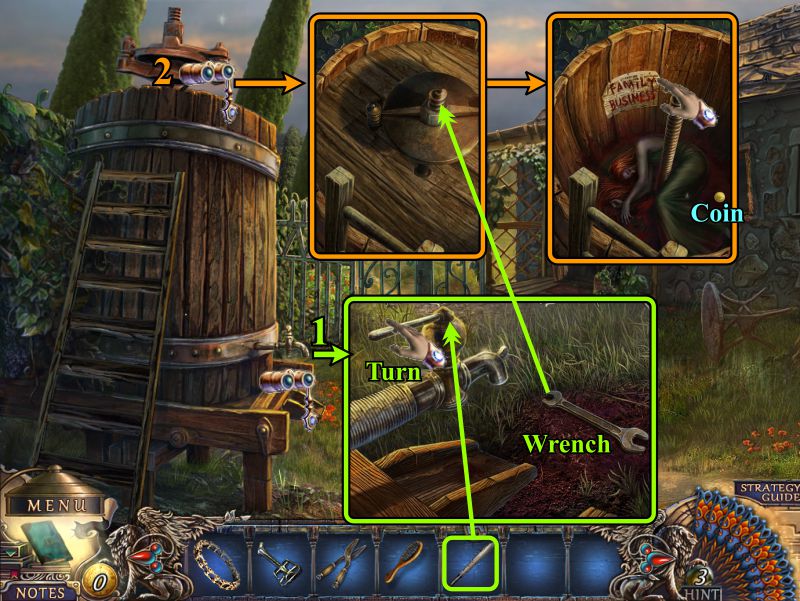
Take the Tap Handle and head to the Vineyard.
Screenshot
Barrel
Zoom in on the tap and place the Tap Handle.
Turn the handle and pick up the uncovered Wrench.
Zoom in on the top of the barrel and use the Wrench to open the lid.
Take the newspaper and Coin.
Screenshot
Gate
Zoom in on the gate and use the Wrench to open it.
Go to the Dock.
Screenshot
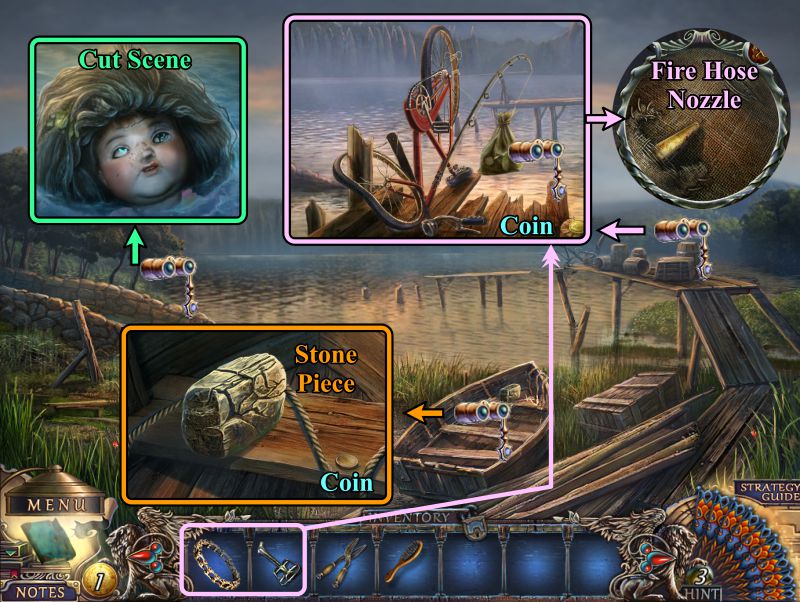
Boat Dock
Zoom in on the water as indicated in the screenshot for a cut scene.
Collect the Stone Piece and Coin from the boat.
Zoom in on the dock, take the coin, and place the Bike Chain and Pedal on the bike.
Turn the pedal, examine the bag pulled out of the water, and take the Fire Hose Nozzle.
Screenshot
Dock and Pinball Mini Game
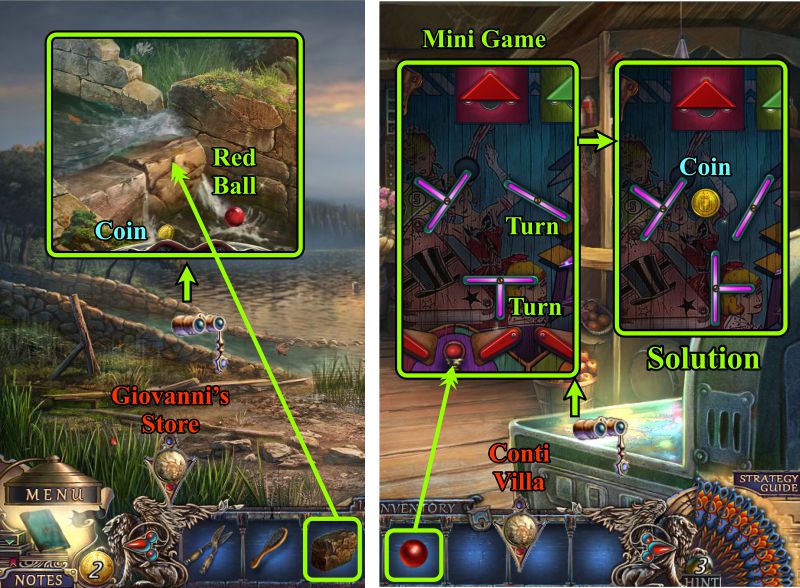
Zoom in on the aqueduct, place the Stone Piece, and collect the Coin and Red Ball.
Go to Giovanni's store and zoom in on the pinball machine.
Place the Red Ball and turn the bumpers, as shown in the screenshot.
Release the ball and collect your Coin.
Go to the Conti Villa.
Screenshot
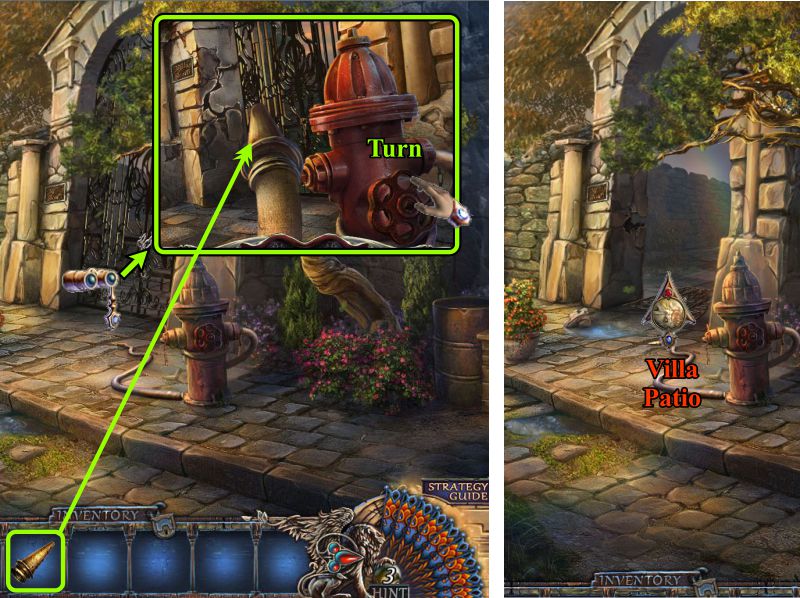
Outside Villa
Zoom in and place the Hose Nozzle.
Turn on the water, then enter once the gate is demolished.
Screenshot
Chapter 3: Villa Conti
Villa Patio
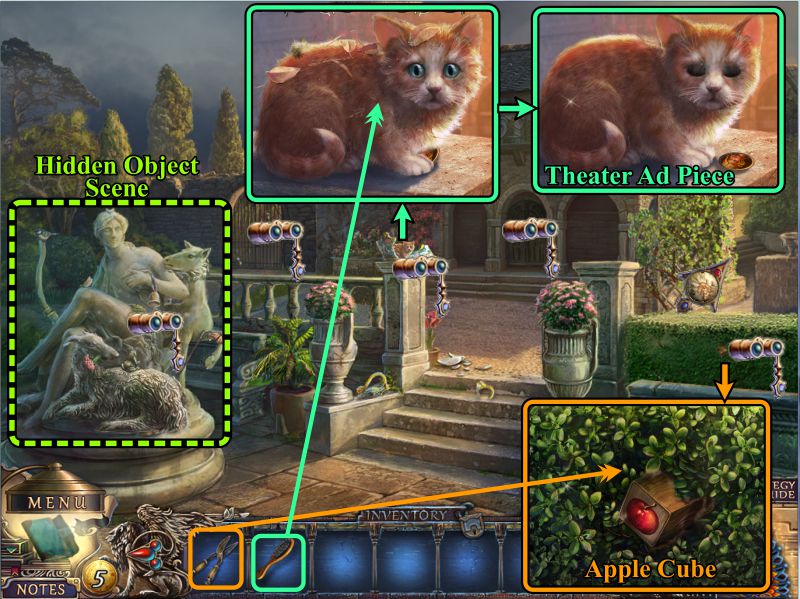
Zoom in on the terrified cat and use the Cat Brush to remove the debris.
Examine the hedge at the right and use the Pruning Shears to uncover an Apple Cube.
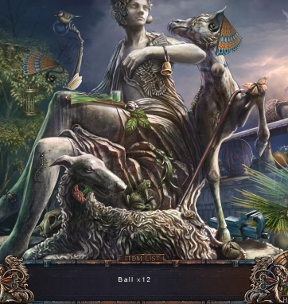
Play the Hidden Object Scene.
Screenshot
Statue Hidden Object Scene
Collect the 2 Fans and 12 Balls.
Use the pump to fill the balloon.
Zoom in on the statue's lap, use the glass and pencil to draw a circle, and the scissors to cut it out.
You will get a Blue Ball for your Inventory.
Screenshot
Side and Outside of Villa
Try to go to the right side of the building, and somebody will detach the vine from the trellis.
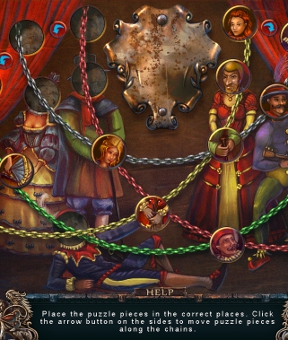
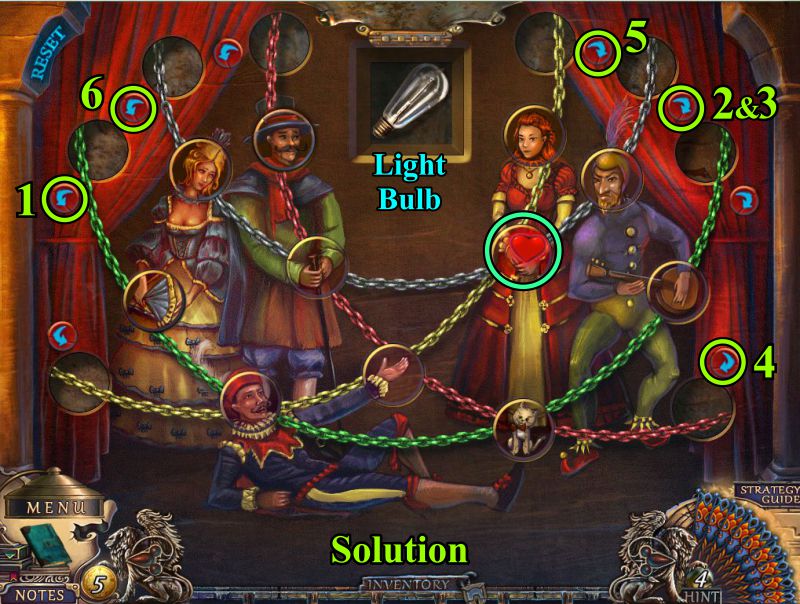
Your way is blocked there, so go Outside the Villa. Zoom in on the poster and place your Theater Ad Piece to trigger a Mini Game.
Screenshot
Poster Mini Game
Your goal is to put the round puzzle pieces where they belong.
Use the arrow at the sides to move the pieces along the chains.
See the screenshot for a numbered solution.
When all the pieces are in place, the heart will blink, so click on it and take the Light Bulb.
Screenshot
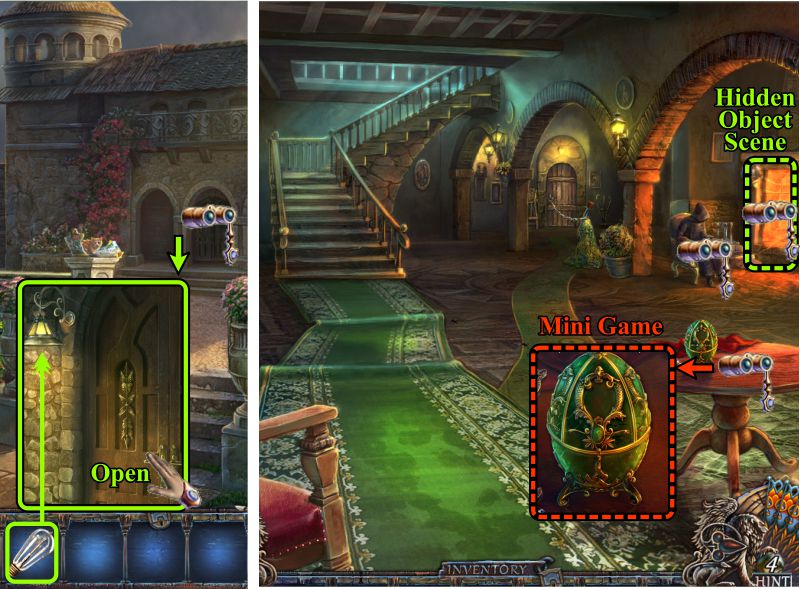
Patio and Fireplace Hall
Return to the Patio and zoom in on the front door.
Place the Light Bulb, open the door and enter the Villa.
Zoom in on the round table for a Mini Game.
Try to see who is sitting in the chair, and the figure will toss something in the fireplace, triggering a Hidden Object Scene.
Screenshot
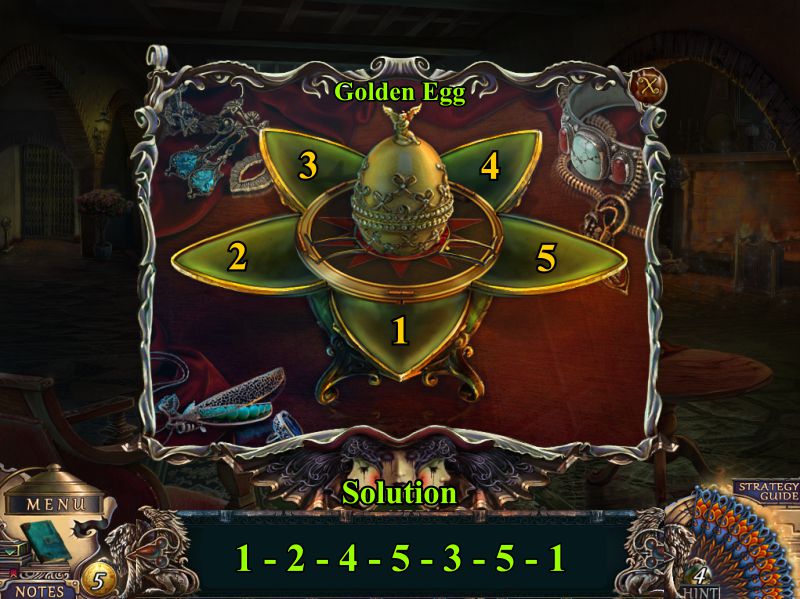
Egg Mini Game
Your goal is to open all the segments of the egg.
See the screenshot for a numbered solution.
Take the Golden Egg inside.
Screenshot
Fireplace Hidden Object Scene
Collect the 2 Fans.
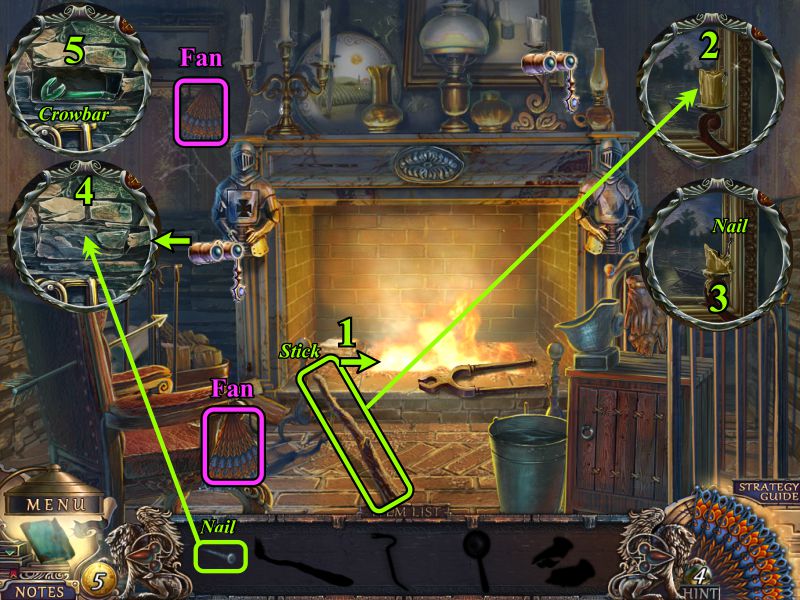
Pick up the Stick and light it in the fireplace.
Zoom in on the candle on the mantel and light it with the Stick.
Take the Nail.
Use the Nail to remove a brick from the wall to the left of the fireplace.
Take the Crowbar.
Screenshot
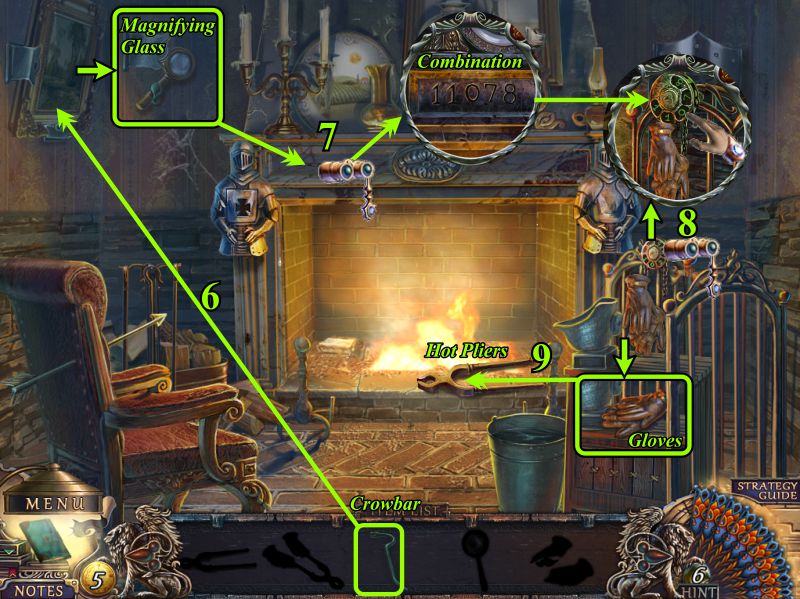
Use the Crowbar to pry the painting loose from the wall.
Take the Magnifying Glass, and zoom in on the fireplace to view the Combination.
Zoom in on the chair to the right and dial 11078 to release the Gloves.
Collect the Gloves and use them to grab the Hot Pliers.
Screenshot
Place the Hot Pliers in the bucket to cool them.
Use the Pliers to cut the Arrow from the chair.
Collect your Broken Arrow.
Screenshot
Fireplace Hall
Try to go through the arch at the left to find there is a grate with a missing handle.
Attempt to go upstairs, and the cloaked figure will push a cabinet to block your way.
Go through the door at the right.
Hall Outside Kitchen
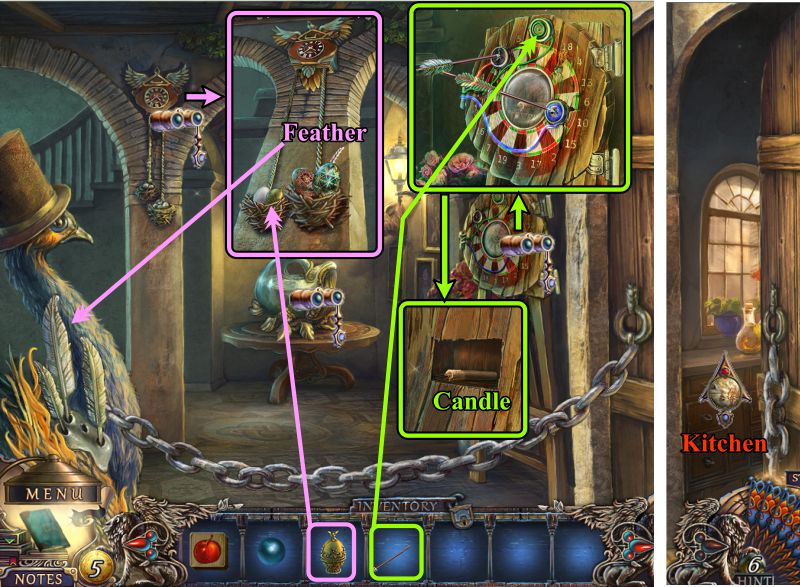
Zoom in on the clock and place your Golden Egg in the nest.
Take the Feather that falls and place it on the bird at the left.
Place your Broken Arrow on the target.
Take the Candle when the center opens.
Enter the now open Kitchen Door.
Screenshot
Kitchen
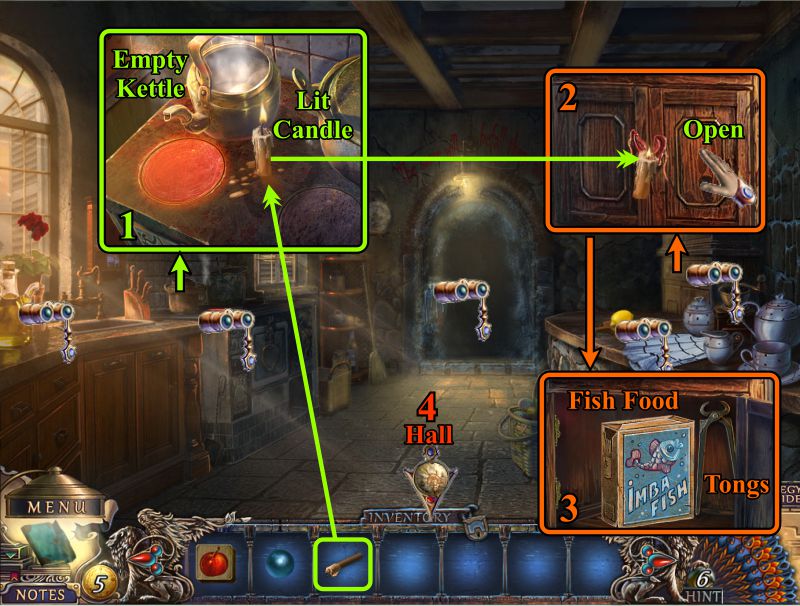
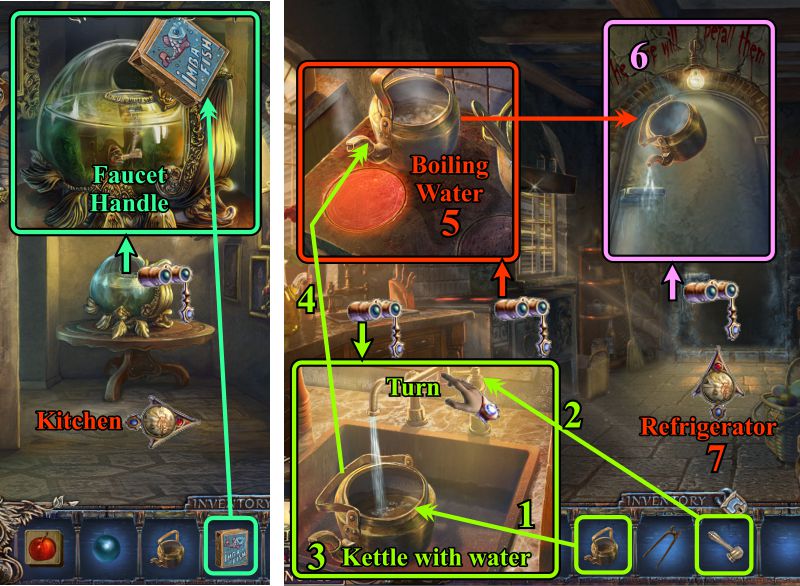
Zoom in on the stove, light your Candle, and collect the Lit Candle and Empty Kettle.
Examine the cabinet on the right wall, use the Lit Candle to remove the seal, and open the door.
Take the Fish Food and Tongs.
Return to the Hall.
Screenshot
Hall and Kitchen
Feed the fish the Fish Food to collect the Faucet Handle.
Return to the Kitchen.
Zoom in on the sink and place the Empty Kettle.
Install the Faucet and turn it on.
Collect the Kettle with Water.
Zoom in on the stove and place the Kettle with Water.
Take the Boiling Water.
Zoom in on the Refrigerator door and pour the Boiling Water on it.
Enter the Refrigerator.
Screenshot
Refrigerator
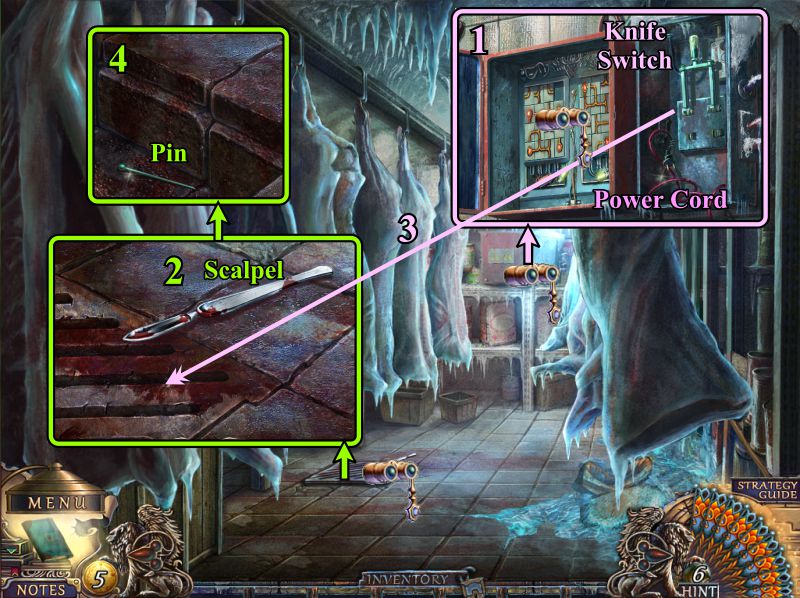
Zoom in on the back wall, open both panel doors, and take the Knife Switch and Power Cord.
Examine the grate in the floor and collect the Scalpel.
Use the Knife Switch to remove the grate.
Take the Pin.
Screenshot
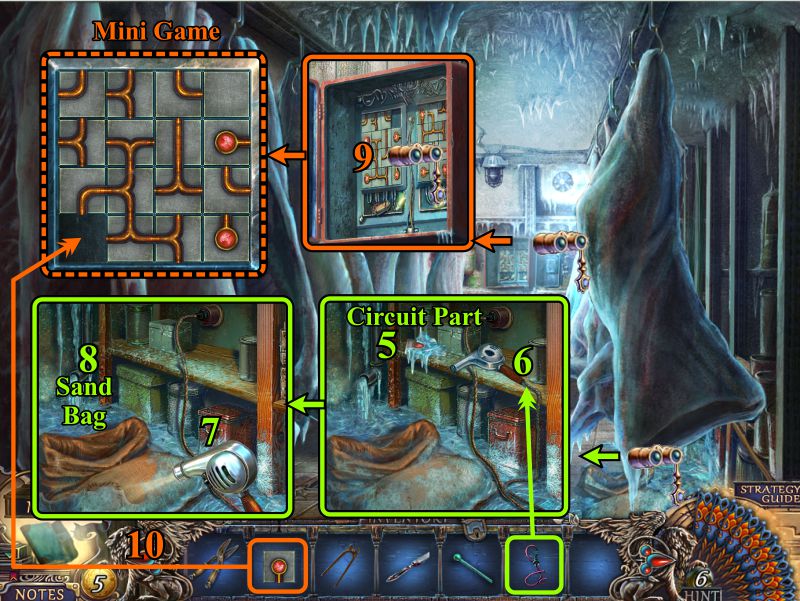
Zoom in on the bag at the right and collect the Circuit Part.
Place the Power Cord on the hair dryer.
Use the hair dryer to defrost the bag.
Collect the Sand Bag.
Zoom in on the circuit board at the back wall.
Place your Circuit Part to trigger a Mini Game.
Screenshot
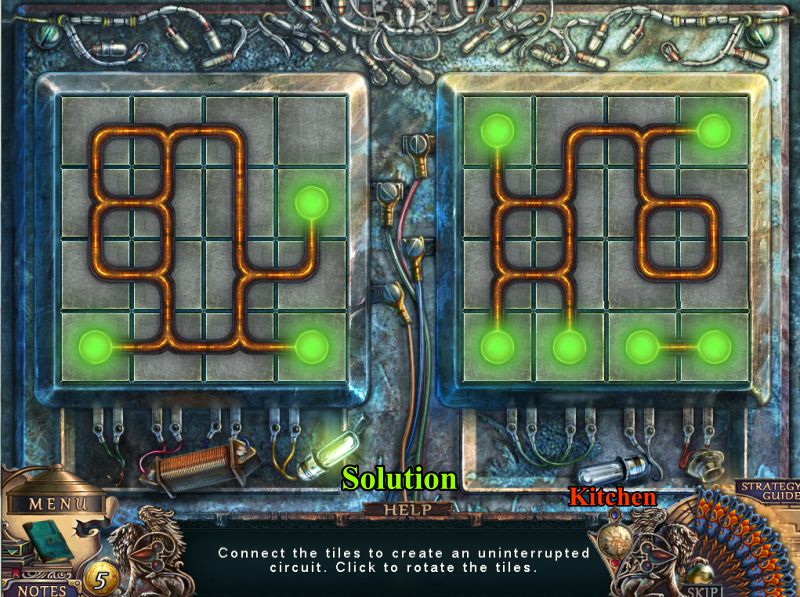
Circuit Board Mini Game
Turn the tiles to create uninterrupted circuits so you can get out of the refrigerator.
See the screenshot for the solution.
Return to the Kitchen.
Screenshot
Kitchen and Fireplace Hall
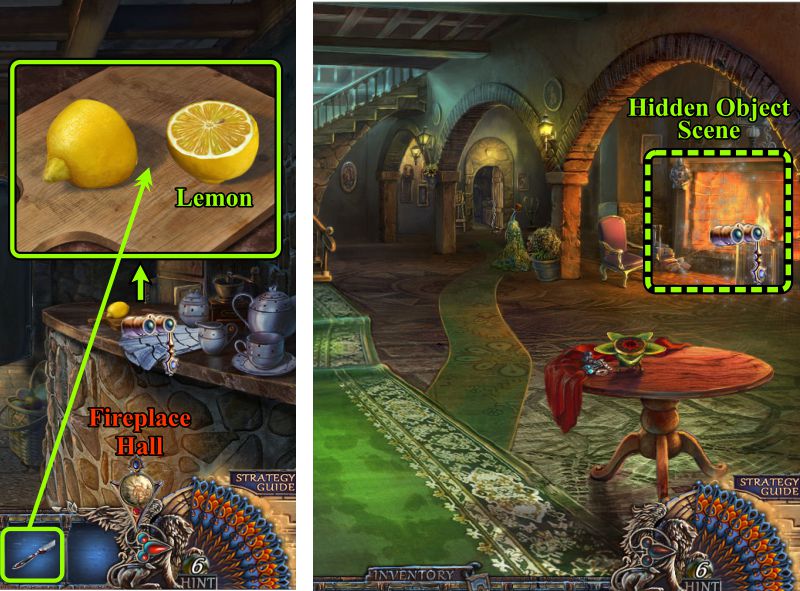
Zoom in on the counter and use the Scalpel to cut the lemon.
Take the Lemon and go to the Fireplace Hall.
Play the Hidden Object Scene.
Screenshot
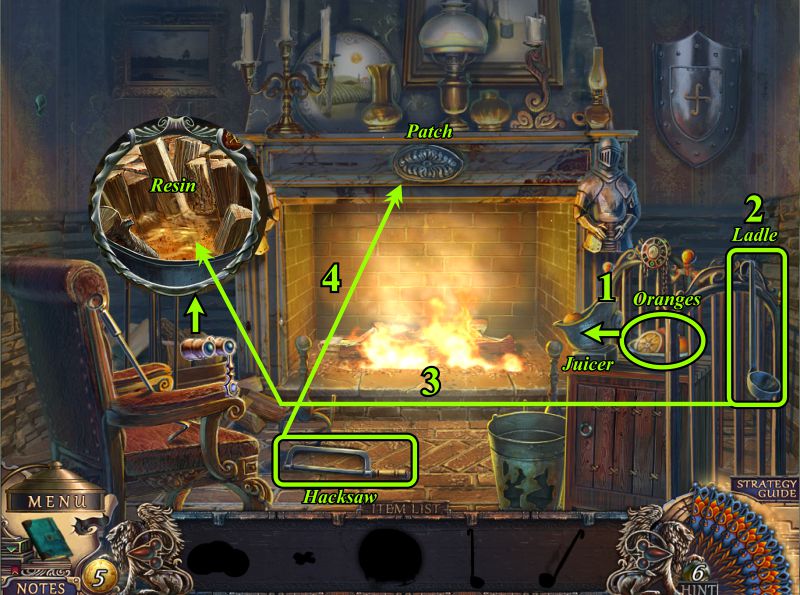
Fireplace Hidden Object Scene
Place the Oranges in the juicer.
Take the Ladle.
Zoom in on the bucket at the left and use the Ladle to take some Resin.
Use the Hacksaw to remove the Patch from the mantel.
Screenshot
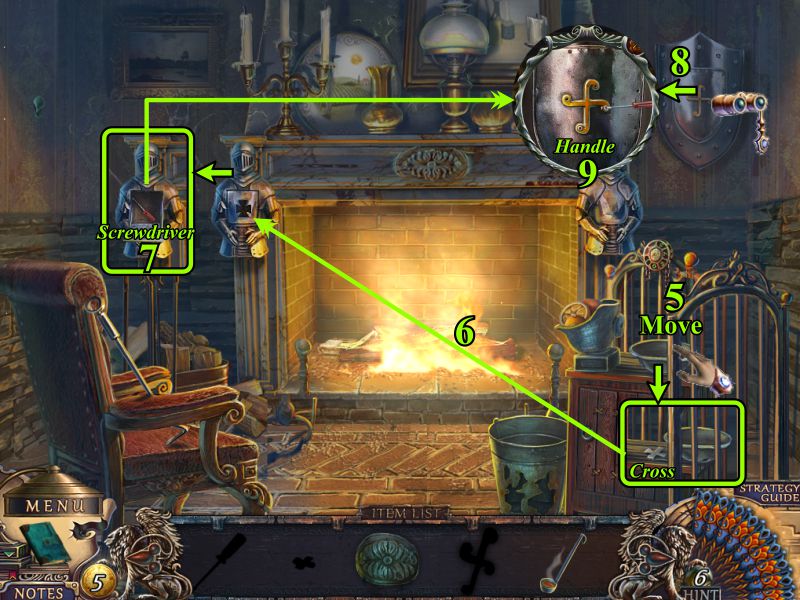
Move the bowl that held the oranges and take the Cross that's underneath.
Place the Cross on the armor at the left.
Take the Screwdriver from inside the armor.
Zoom in on the shield and use the Screwdriver to remove the screws.
Take the Handle.
Screenshot
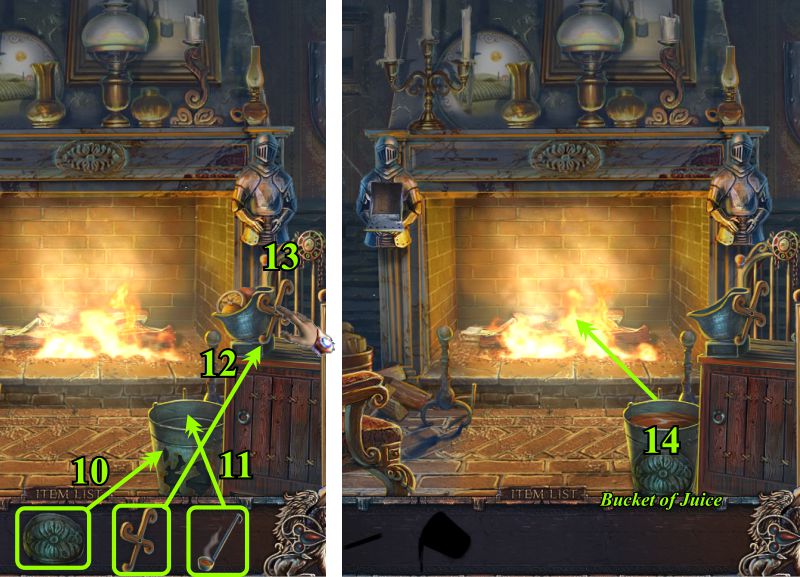
Place the Patch on the bucket.
Use the Resin to seal the Patch.
Place the Handle on the Juicer and turn it.
Pour the Bucket of Juice on the fire.
Screenshot
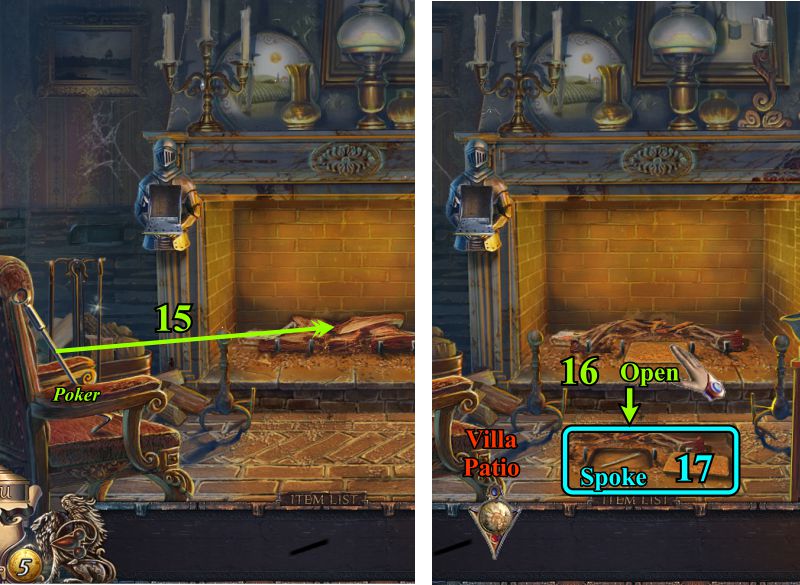
Use the Poker sitting on the chair to move the logs around.
Open the compartment.
Take the Spoke for your Inventory.
Go to the Villa Patio.
Screenshot
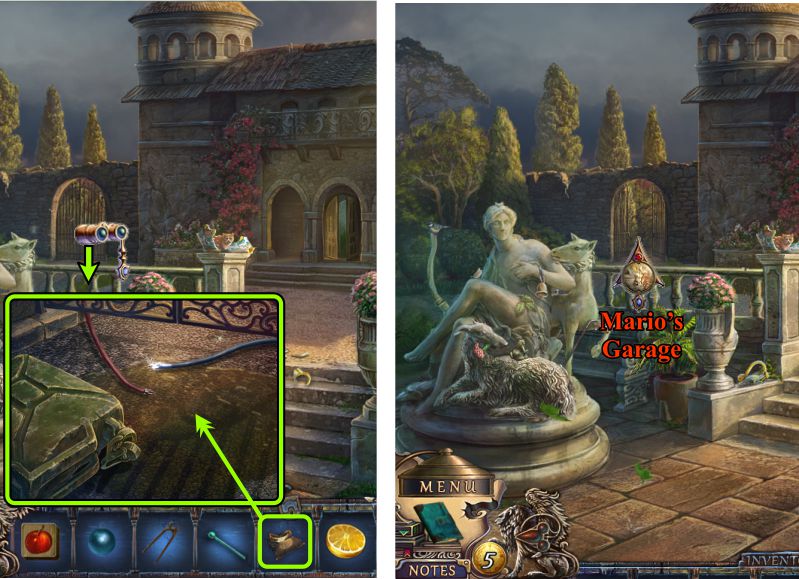
Villa Patio
Zoom in on the gate at the left and use your Bag of Sand to cover the spilled fuel and live wires.
Go through the gate to Mario's Garage.
Screenshot
Chapter 4: Mario
Outside Garage
The poor dog is overcome by the smoke from the trash can, so you need to find a way to get the lid to cover it.
Remove the lid from the basket at the left and place your Apple Cube for a Mini Game.
This is a Mahjong type game where your goal is to match like tiles to remove all the tiles from the board. See a couple samples in the screenshot.
Remove the patch in the basket and take the Spoke.
Zoom in on the wagon and place your two Spokes on the Wheel to collect it.
Screenshot
Place the Wheel on the wagon and push it out of the way.
Take the Trash Can Lid and place it on the smoking trash can.
Take the Glass Cutter.
The dog will come to and run around the corner.
Screenshot
Zoom in on the garage doors and use the Pin to pick the lock.
Enter the garage.
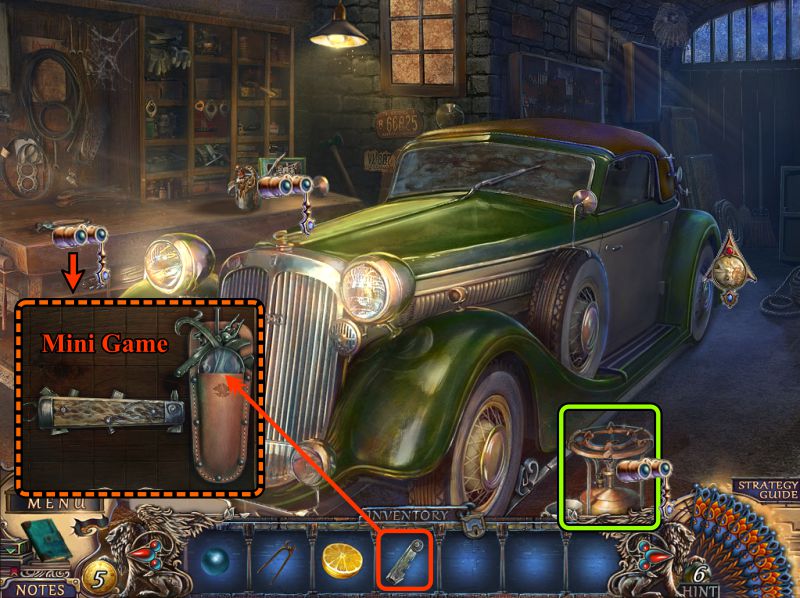
Mario's Garage
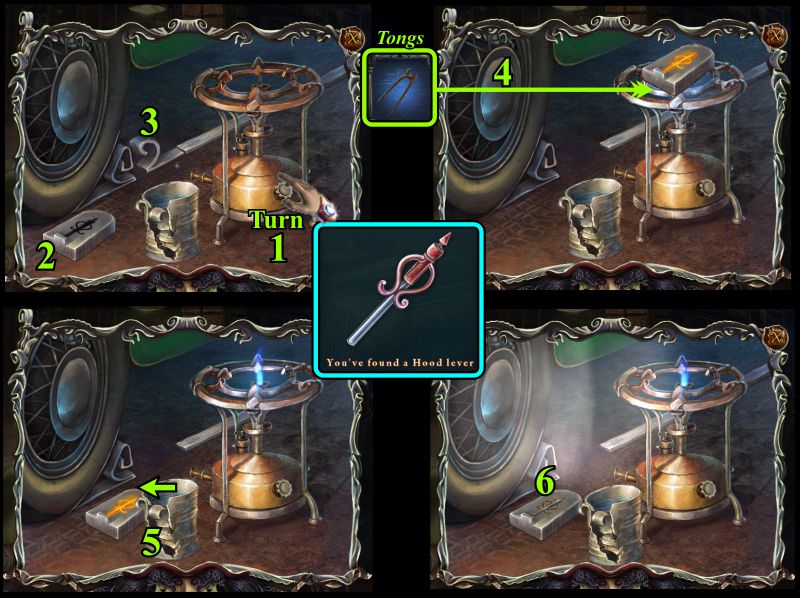
Examine the burner on the floor next to the Bugatti for a task.
Zoom in on the Workbench and place the Glass Cutter to trigger a Mini Game.
Screenshot
Burner
Turn the knob to start the flame.
Place the mold on the burner.
Pick up the cut piece of metal on the floor and place it on the mold.
Use the Tongs from your Inventory to remove the mold from the burner.
Pour the water on the mold to cool it.
Take the finished Hood Lever.
Screenshot
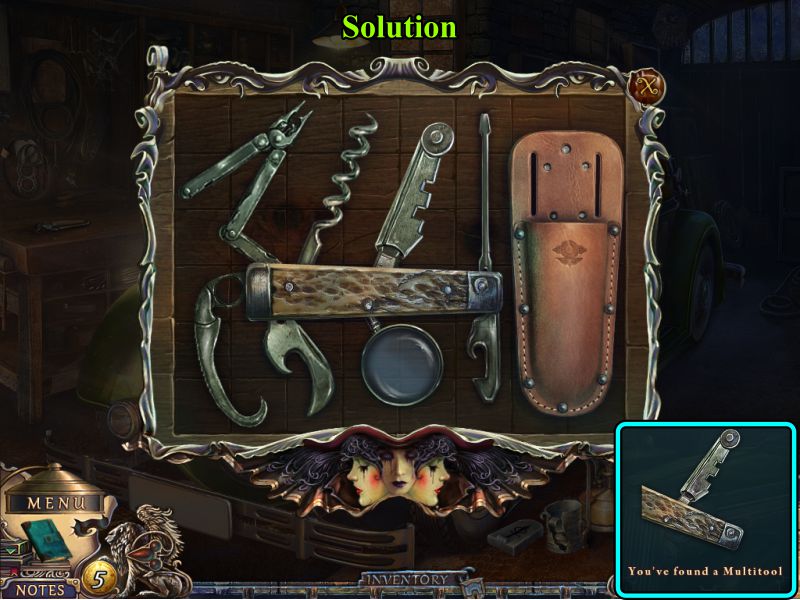
Multitool Mini Game
Place all the tool parts from the holder onto the base.
See the screenshot for the solution.
Collect your Multitool.
Screenshot
Bugatti
Go to the back of the garage and zoom in on the car window.
Use your Multitool to cut a hole in the glass to unlock the door.
Zoom in on the inside of the car.
Push on the windshield wiper.
Screenshot
The cloaked figure left you a message on the windshield.
Place the Hood Lever and pull it to open the hood.
Open the glove compartment and visor.
Take the Cloth and Mario's Photo.
Return to the front of the garage.
Screenshot
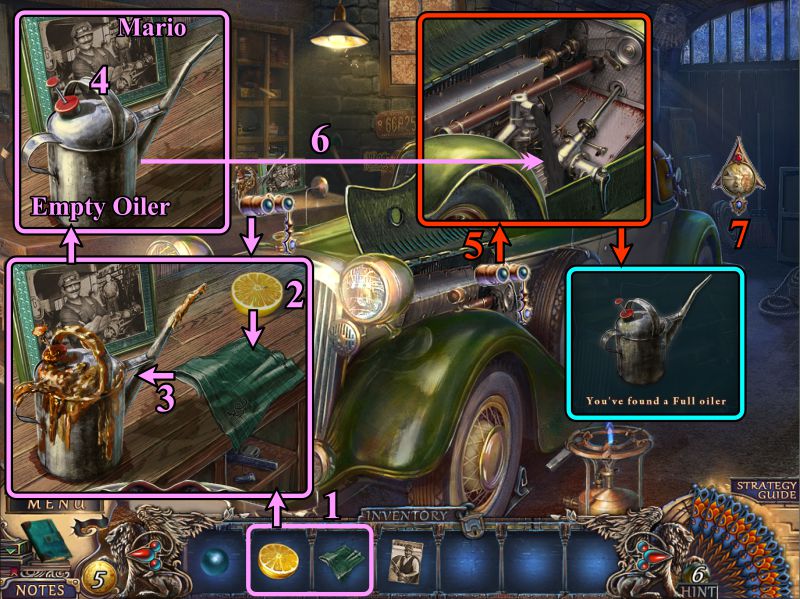
Mario's Garage
Zoom in on the workbench and place the Lemon and Cloth.
Squeeze the Lemon on the Cloth.
Use the Cloth to clean up the oiler.
Collect Mario's picture and the Empty Oiler.
Zoom in on the open car hood.
Place the Empty Oiler to collect the oil.
Go to the back of the garage.
Screenshot
Back of Garage
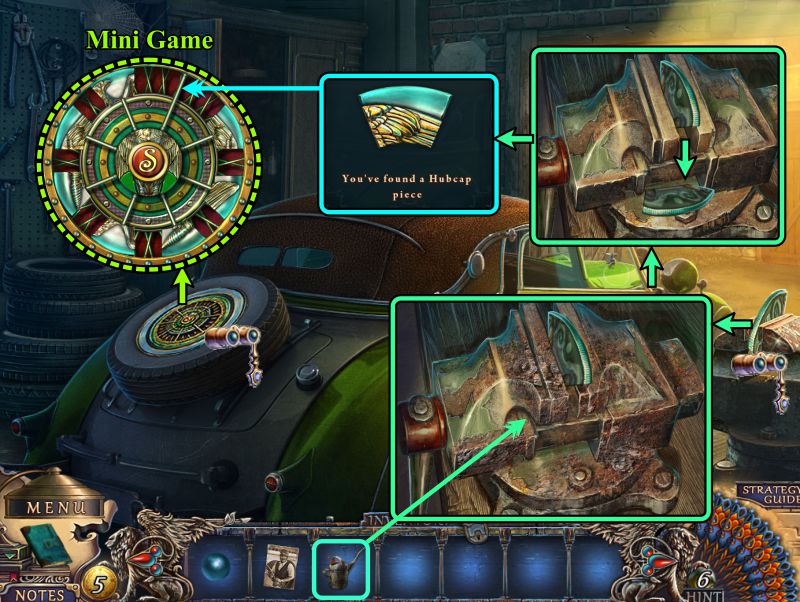
Zoom in on the vice and use the Oiler to remove the rust.
Grab the Hubcap Piece and the vice will open to release it so you can collect it.
Zoom in on the spare tire and place the Hubcap Piece to trigger a Mini Game.
Screenshot
Hubcap Mini Game
Rotate the "S" in the center to rotate the inside of the hubcaps so you can use the spokes to slide the pieces into place.
See the screenshot for the solution.
Screenshot
Bugatti and Fireplace Hall
Take the Grate Handle from the trunk of the Bugatti, and go to Fireplace Hall in the Villa.
Zoom in on the grate at the left, place the Grate Handle and turn it to open the grate.
Go up the stairs to Bernardo's Library.
Screenshot
Chapter 5: Piano Hall
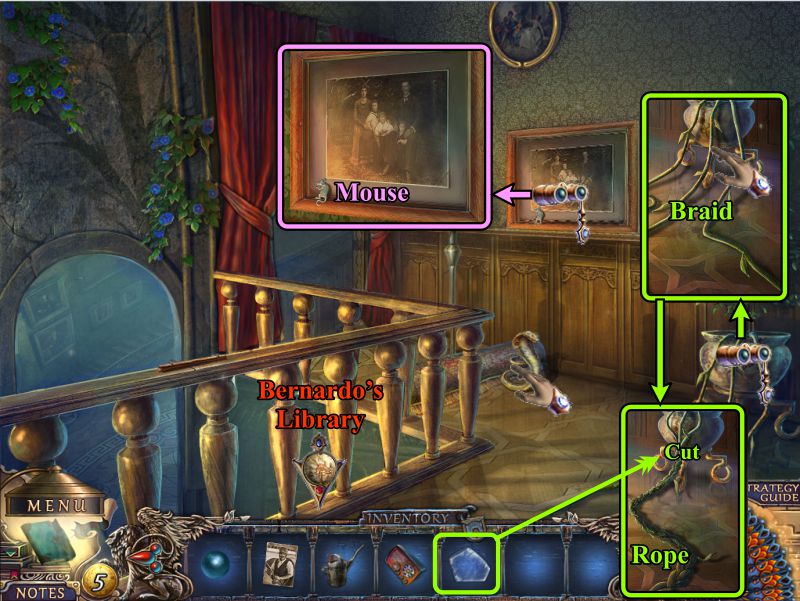
Bernardo's Library
Zoom in on the table and take the Radio.
Examine the screen at the back of the room and remove the piece of Sharp Glass.
Go up the stairs to the Balcony.
Screenshot
Balcony
The cloaked figure left you a present in the form of a snake.
Try to touch it, and it crawls inside the rolled up carpet.
Examine the picture on the wall and take the Mouse.
Braid the roots of the plant in the pot and cut the Rope with the Sharp Glass.
Return downstairs.
Screenshot
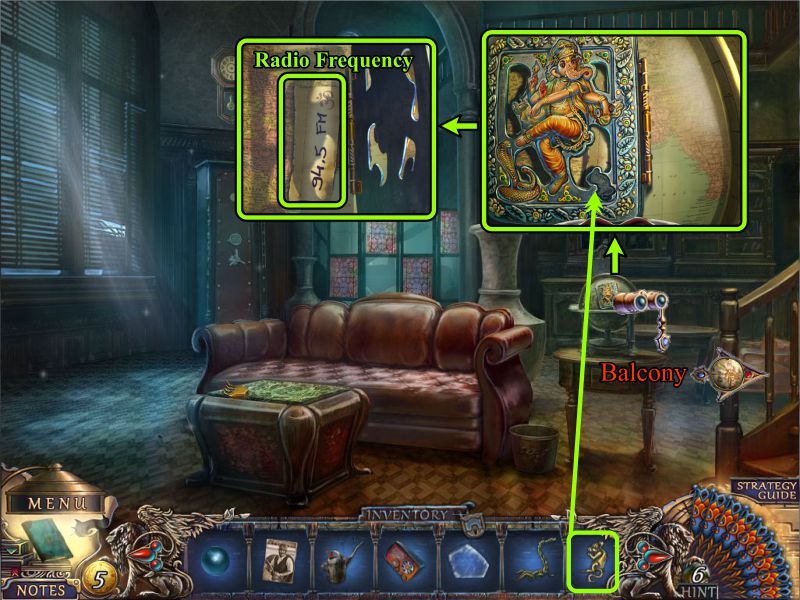
Bernardo's Library
Zoom in on the globe and place the Mouse next to the Ganesh to open the globe.
Take the Radio Frequency and go back upstairs.
Screenshot
Balcony
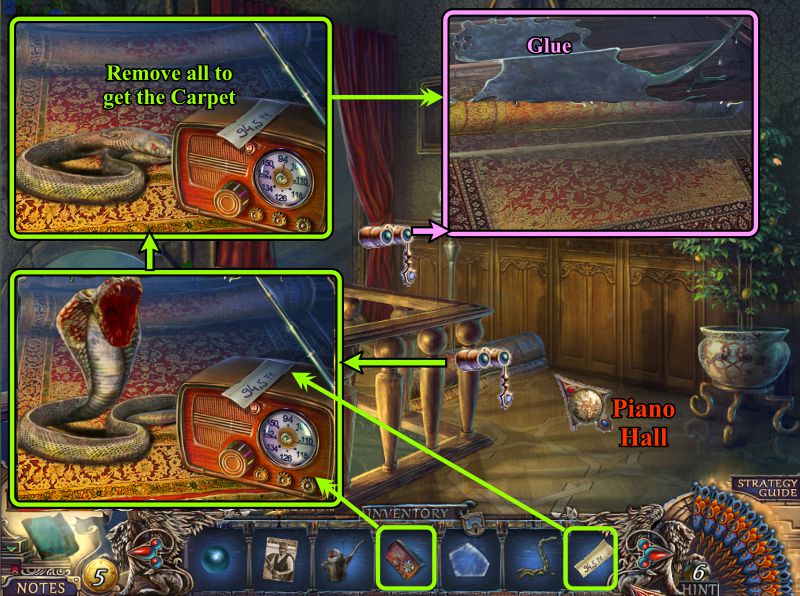
Unroll the carpet, place the Radio on the carpet and the Frequency on top of the Radio.
Dial the Radio to 94.5 FM to charm the snake.
Remove the snake and radio to get the Carpet.
Lay the Carpet over the glue on the floor so you can proceed to the Piano Hall.
Screenshot
Piano Hall
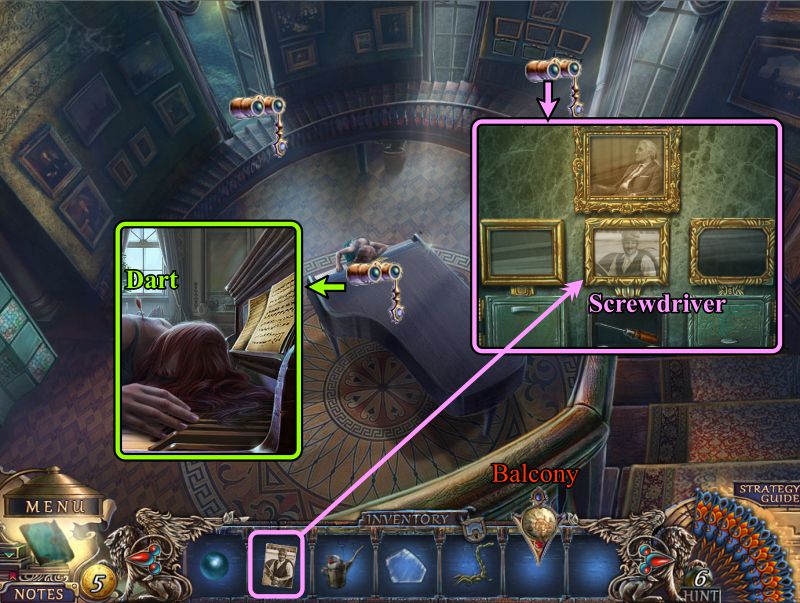
You witness another murder, so zoom in on the dead girl and take the Dart.
Examine the picture wall and place Mario's photo.
Take the Screwdriver from the compartment and return to the Balcony.
Screenshot
Balcony and Library
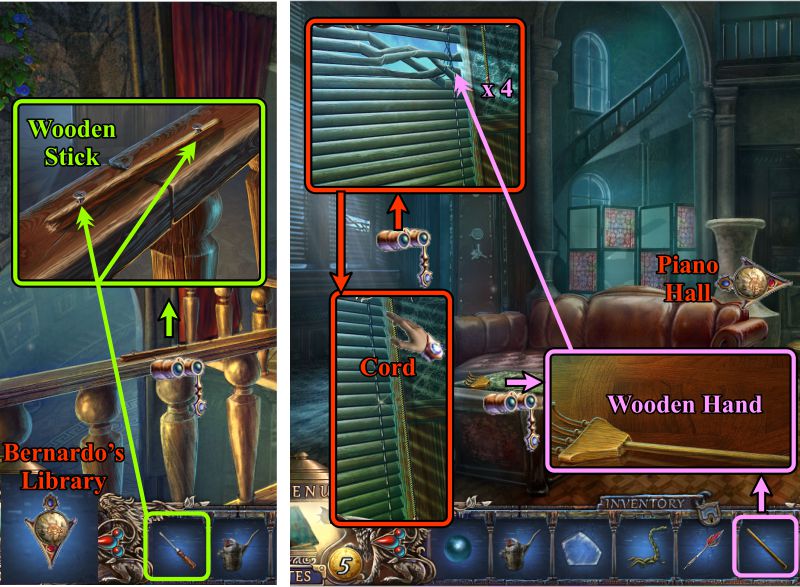
Look at the railing and use the Screwdriver to remove the screw so you can collect the Wooden Stick.
Go downstairs and zoom in on the table.
Place the Wooden Stick on the hand to get a Wooden Hand.
Zoom in on the blinds and use the Wooden Hand 4 times to straighten them.
Take the Cord and go to the Piano Hall.
Screenshot
Piano Hall and Library
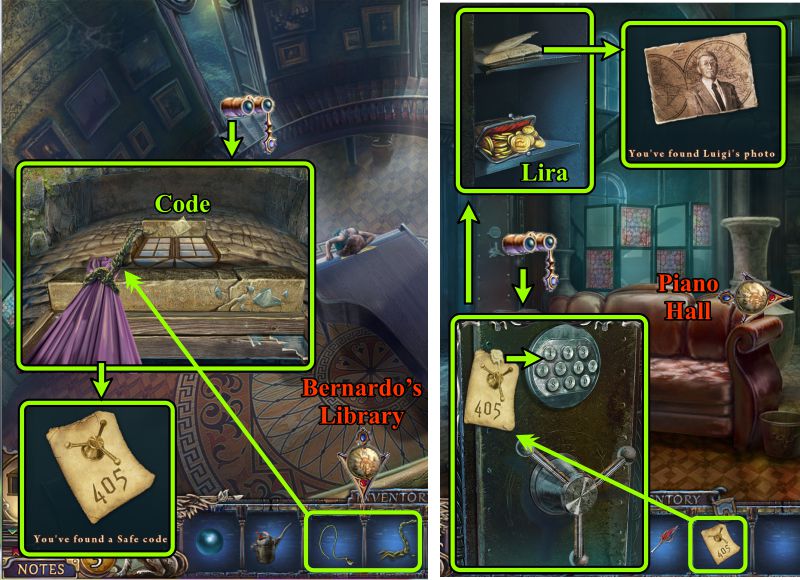
Look out the window where the cloaked figure and dog jumped.
There is a paper on the ledge below, so use your Cord and Rope to get the Safe Code.
Go to Bernardo's Library and zoom in on the Safe.
Punch in 405 to open the safe.
Take Luigi's Photo and the Lira.
Return to the Piano Hall.
Screenshot
Piano Hall and Giovanni's Store
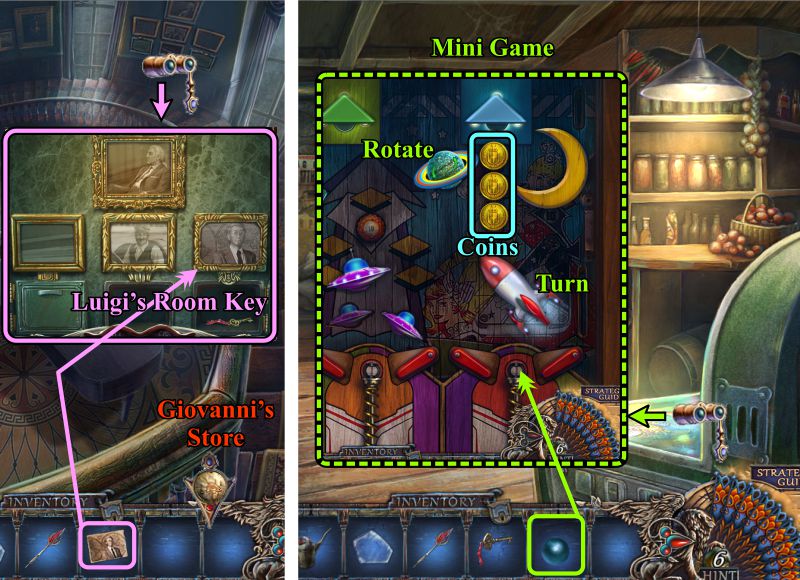
Zoom in and place Luigi's Photo on the picture wall.
Take Luigi's Room Key and go to Giovanni's Store.
Zoom in on the pinball machine and place the Blue Ball to start a game.
Set up the machine as shown in the screenshot and shoot the ball to get 3 Coins.
Screenshot
Counter and Villa Fireplace Hall
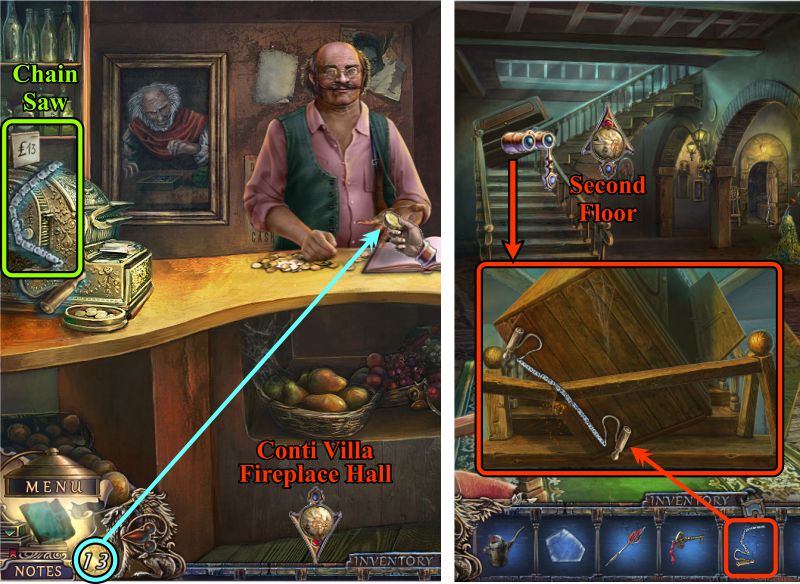
Select the Chain Saw and give Giovanna the 13 Lira.
Return to the Villa and zoom in on the stairs.
Use the Chain Saw to cut the railing and stand back.
The way is now clear to go upstairs to the Second Floor.
Screenshot
Chapter 6: Luigi
Second Floor
Examine the bannister on the right, place your Dart in the ball of yarn, and cut yarn with the Sharp Glass.
Take the Drumstick and zoom in on Luigi's door.
Place the Key and turn it to open the door.
Before entering, play the Hidden Object Scene to see if you get something useful.
Screenshot
Second Floor Hidden Object Scene
Collect the 2 Fans and the 12 Brooches to get a Box Brooch.
To find all the brooches, you will need to open the box on the table, move the curtain, and open each of the drawers.
Screenshot
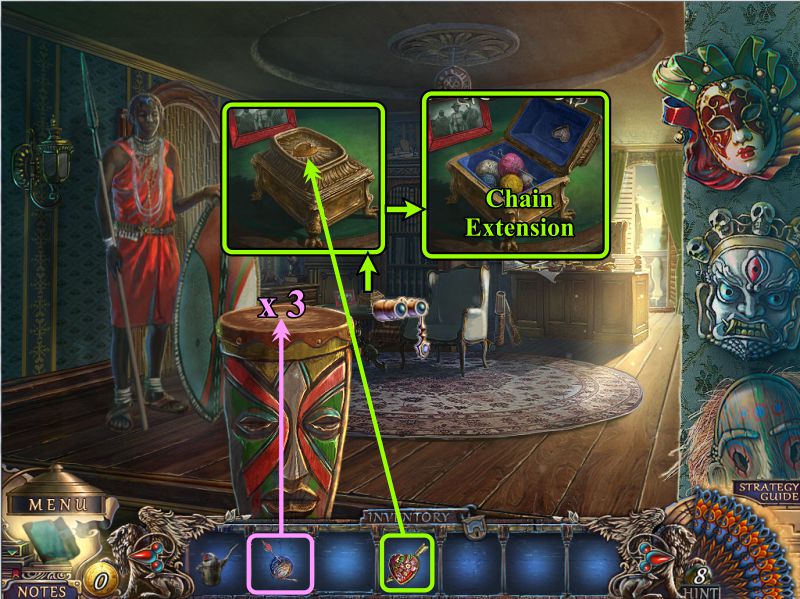
Luigi's Room
Zoom in on the table and place the Box Brooch to open the box.
Take one of the knitting needles, which becomes a Chain Extension.
Use your Drumstick on the drum 3 times.
Screenshot
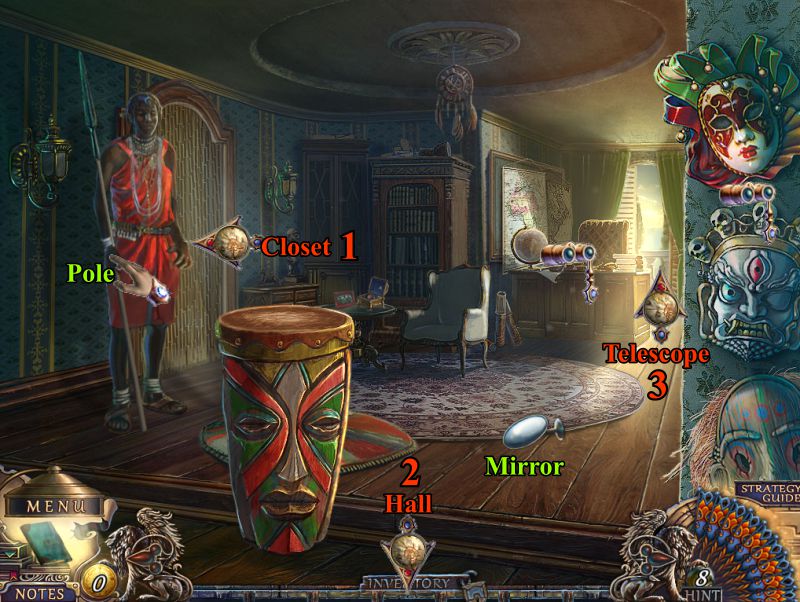
Collect the Mirror from the floor and Pole from the warrior.
Note the various exits: you will be visiting each as numbered in the screenshot. Go left into the Closet.
Screenshot
Closet
Open the cabinet door for a Mini Game and the drawer for a Hidden Object Scene.
Paint Mini Game
You first need to rearrange the paint chairs as shown in the screenshot.
Then tip each of them and press the arrow underneath to fill up the paint containers.
Collect your Paints.
Screenshot
Closet Hidden Object Scene
Take the Fan and open the items shown in the screenshot.
A Brush will go into your Inventory.
Go to the Hall outside Luigi's Room.
Screenshot
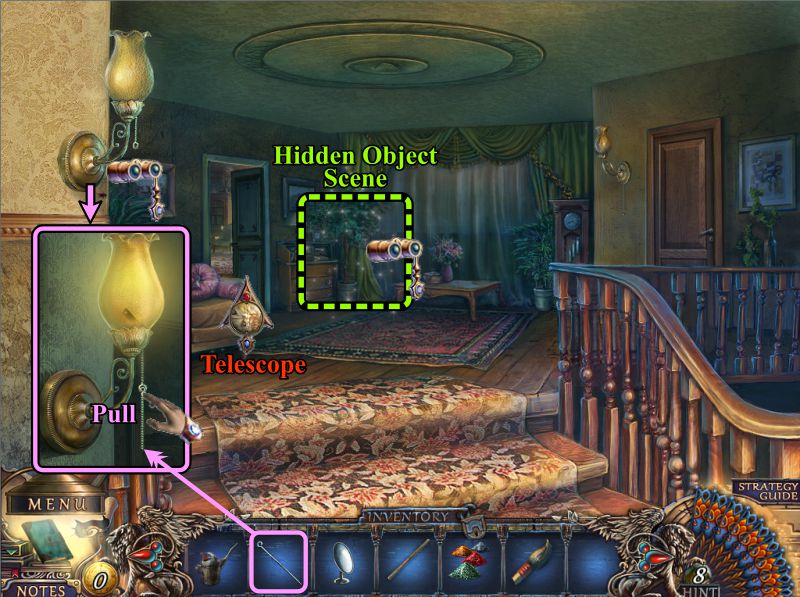
Second Floor Hall
Zoom in on the wall lamp, place your Chain Extension and pull it.
Play the Hidden Object Scene, and then go through Luigi's Room to the Telescope.
Screenshot
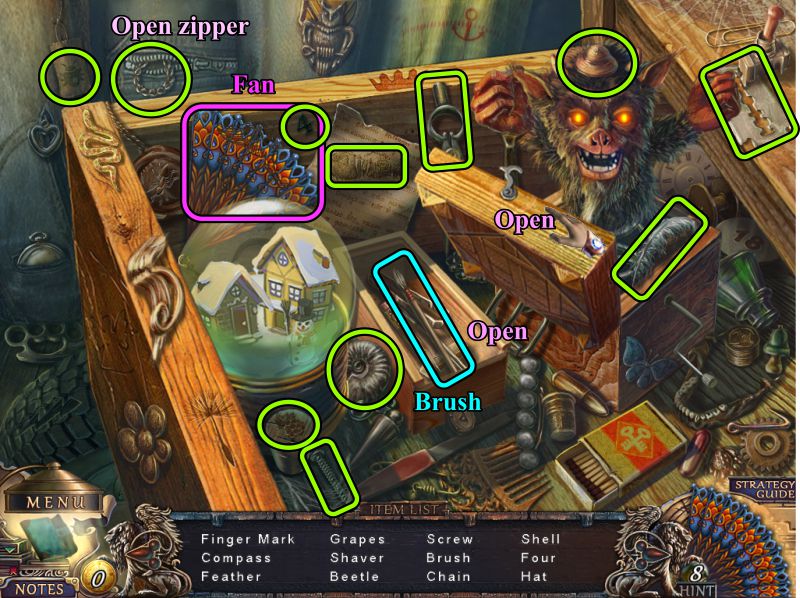
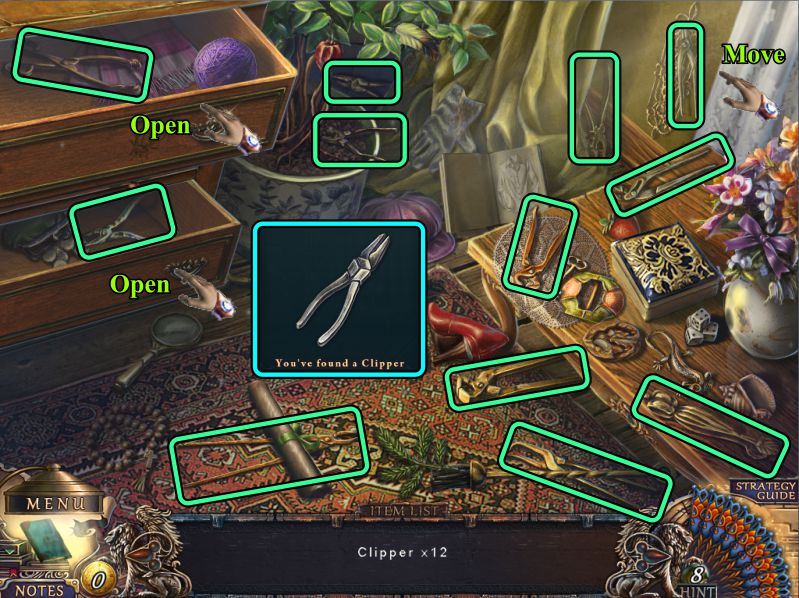
Second Floor Hidden Object Scene
In order to get a Clipper for your Inventory, you need to collect 12 of them.
See the screenshot for which drawers to open. Also, move the curtain.
Screenshot
Telescope
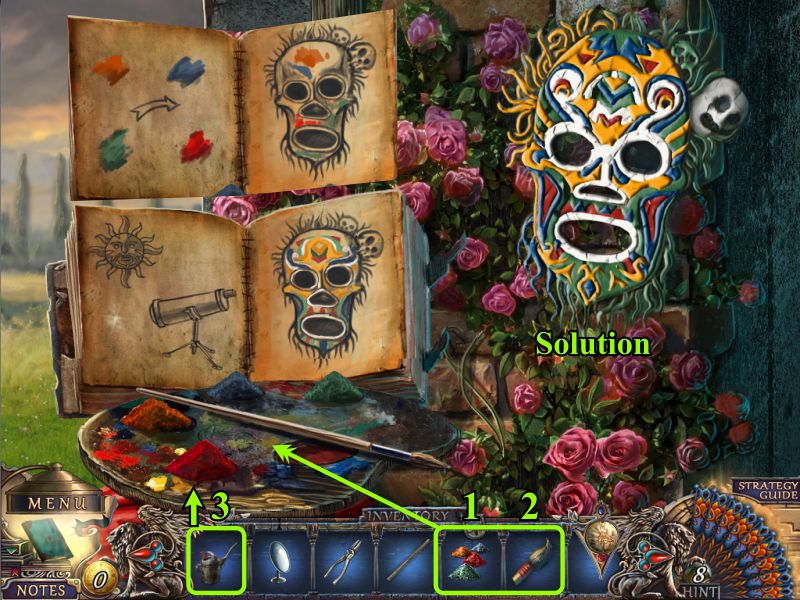
Tilt the Telescope and zoom in on the mask for a Mini Game.
Mask Mini Game
Place the Paints and Brush on the palette and pour the Oiler on the paints.
Flip through the book to find which pages are the biggest help to you in painting the mask.
See the screenshot for the solution.
Screenshot
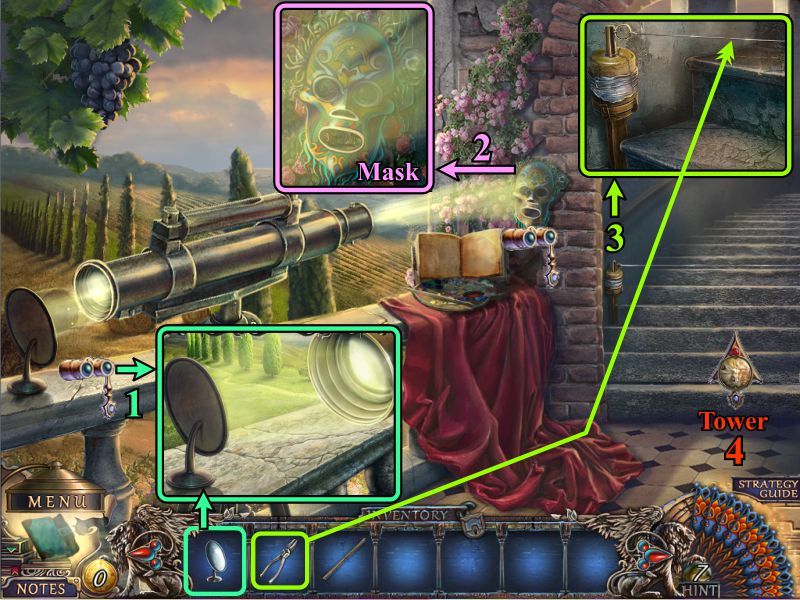
Telescope
Zoom in on the Telescope and place the Mirror.
Zoom in on the lit mask and collect the Mask.
Examine the grenade and trip wire on the stairs, and use your Clippers to snip the wire.
Go upstairs to the Tower.
Screenshot
Tower and Luigi's Room
Another encounter with the cloaked figure, and this time the dog is wounded, so you need to find something to help him.
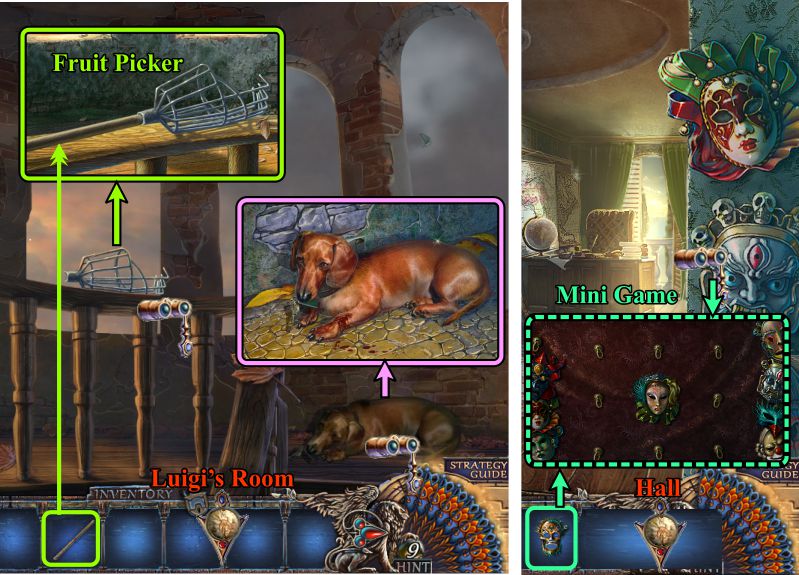
Examine the basket on the railing and place your Pole on it to turn it into a Fruit Picker.
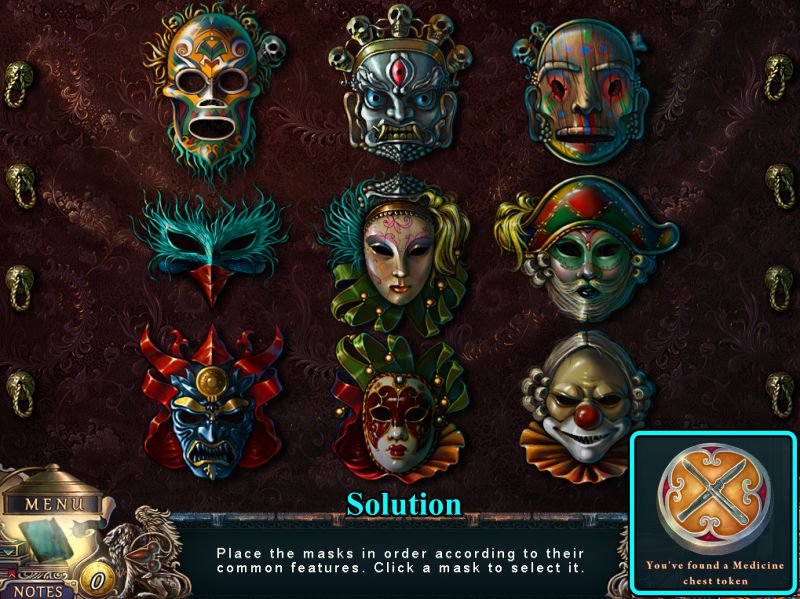
Return to Luigi's Room and zoom in on the masks, then place your Mask for a Mini Game.
Screenshot
Mask Mini Game
Arrange the Masks as shown in the screenshot to get a Medallion Chest Token.
Go out to the Hall.
Screenshot
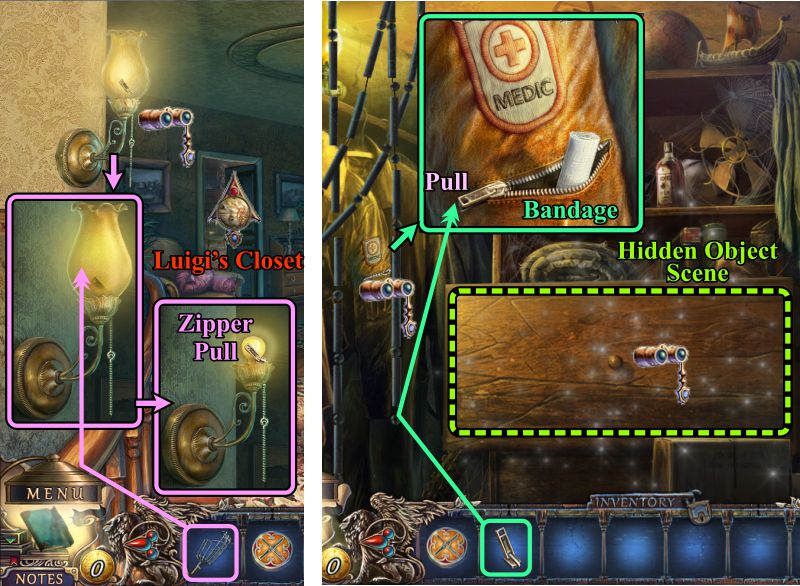
Hall and Luigi's Closet
Zoom in on the wall lamp and use the Fruit Picker to remove the hot glass shade.
Take the Zipper Pull and go to Luigi's Closet.
Zoom in on the Medic uniform, place the Zipper Pull and open the zipper.
Take the Bandage.
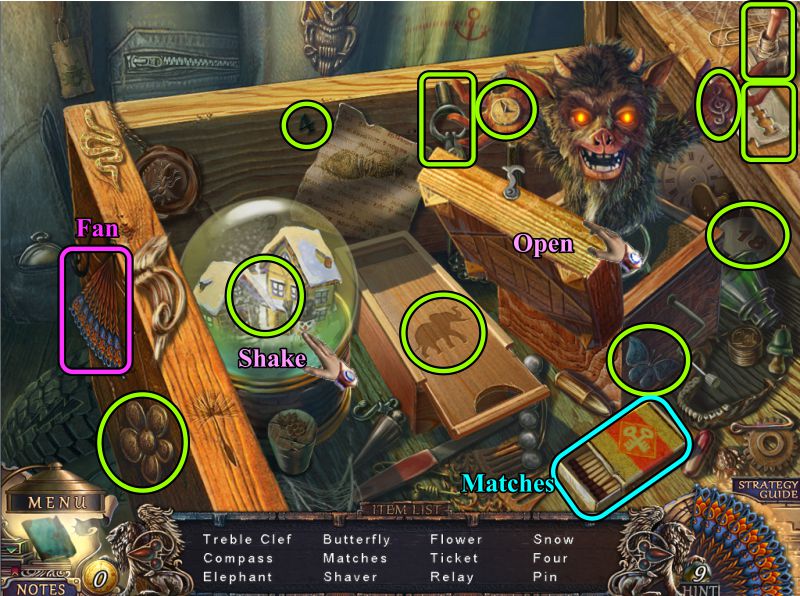
Play the Hidden Object Scene in the drawer.
Screenshot
Closet Hidden Object Scene
Collect the Fan, shake the snow globe to get the Snow, and open the wind-up box to collect what you need there.
Matches will go into your Inventory.
Screenshot
Tower and Hall
Go to the Tower and bandage the dog's leg to stop the bleeding.
He will let go of Francesco's Room Key, so take it and return to the Hall.
Zoom in on Francesco's door, place the Key, turn it, and enter the room.
Screenshot
Chapter 7: Francesco
Francesco's Room
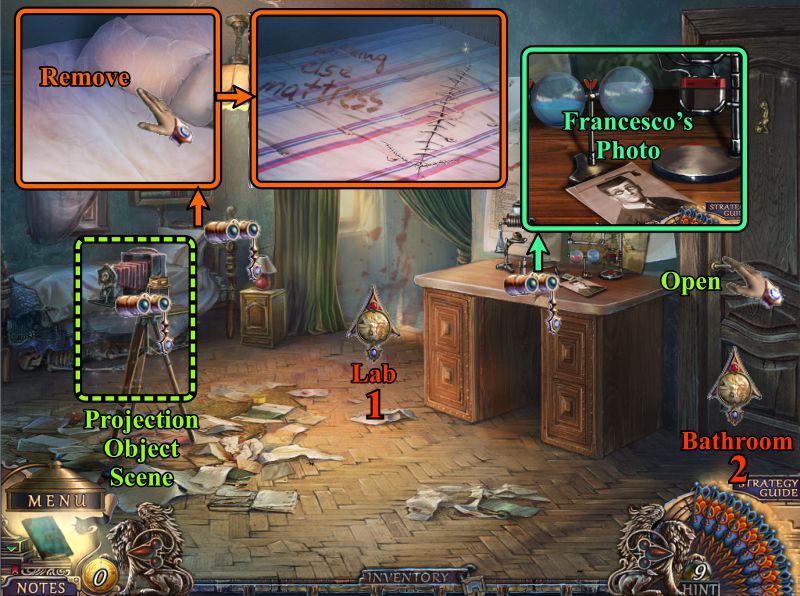
Zoom in on the desk and take Francesco's Photo.
Examine the bed and remove the linens to find a sewn up portion of the mattress.
There are two other rooms you will visit off this room—one is the Lab and the other the Bathroom—, so open the door to the Bathroom to make it accessible.
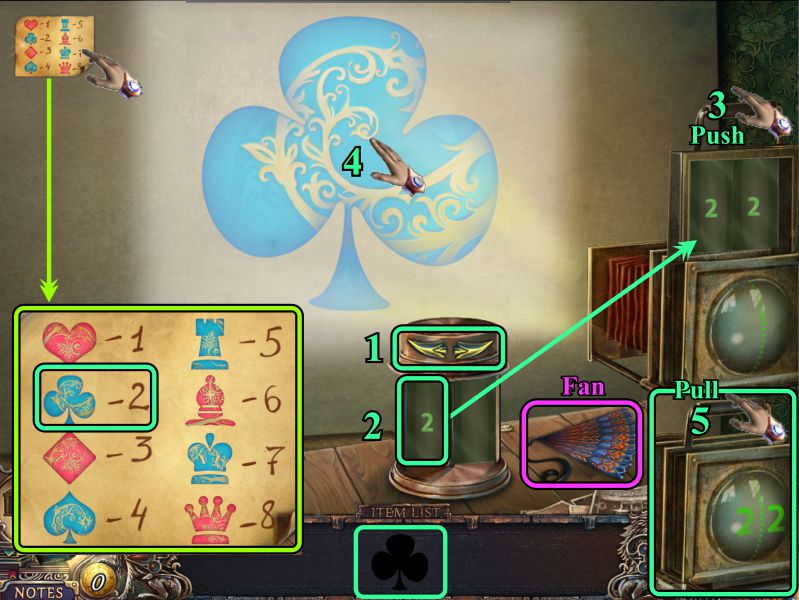
Play what I have called the Projection Object Scene.
Screenshot
Projection Object Scene
Zoom in on the chart on the wall and note the numbers relating to the figures.
Collect the Fan and start the process whereby you need to match the image on the screen to the bottom taskbar image.
Rotate the slide container using the arrows.
In this case, we need to find a set of "2"s and place them in the projector.
Push down the slide.
Collect the projected image.
Pull up the slide.
You will use this same procedure for each of the 8 images.
Screenshot
Your final reward will be a Spade Tile for your Inventory.
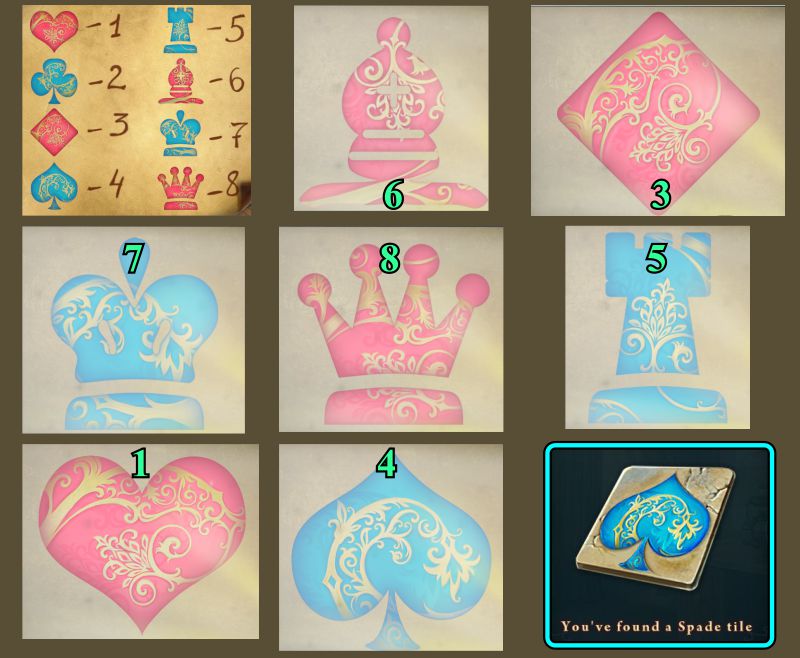
See the screenshot for the order of presentation of the images (from left to right) and the slide number you will need to use for each of the them.
Screenshot
Lab
Enter the Lab and zoom in on the box on the counter.
Place your Medallion Chest Token to open it for a Mini Game.
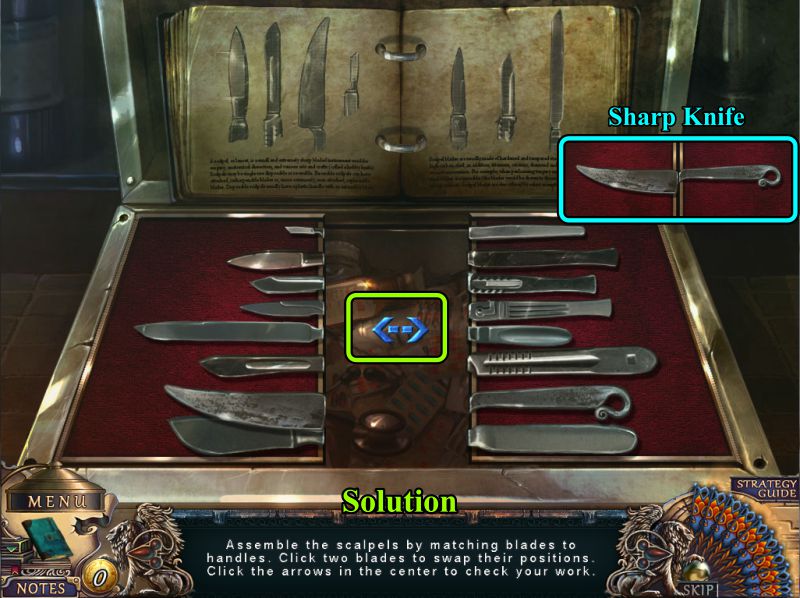
Once you have played the Mini Game, use the Sharp Knife to cut the tape on the stirrup and collect the Control Box.
Go to Francesco's Room.
Screenshot
Knife Mini Game
Your goal is to match up the handles with the blades using the chart.
Use the blue arrows in the middle of the box to check your progress, or see the screenshot for the solution.
You will receive a Sharp Knife for your Inventory.
Screenshot
Francesco's Room and Bathroom
Zoom in on the bed and use the Sharp Knife to cut open the mattress.
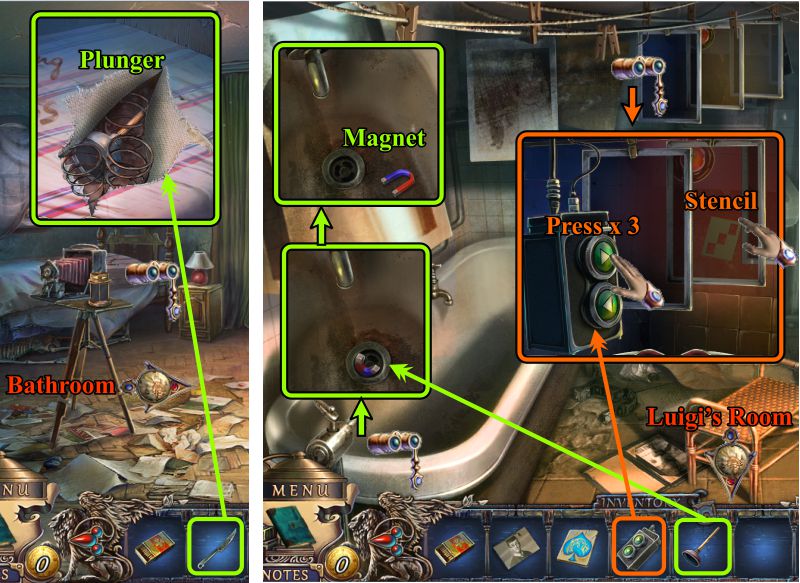
Take the Plunger and enter the Bathroom.
Examine the tub and use the Plunger to get the Magnet.
Zoom in on the frames and install the Control Box.
Press the top button 3 times and take the Stencil.
Go to Luigi's Room.
Screenshot
Luigi's Room and Piano Hall
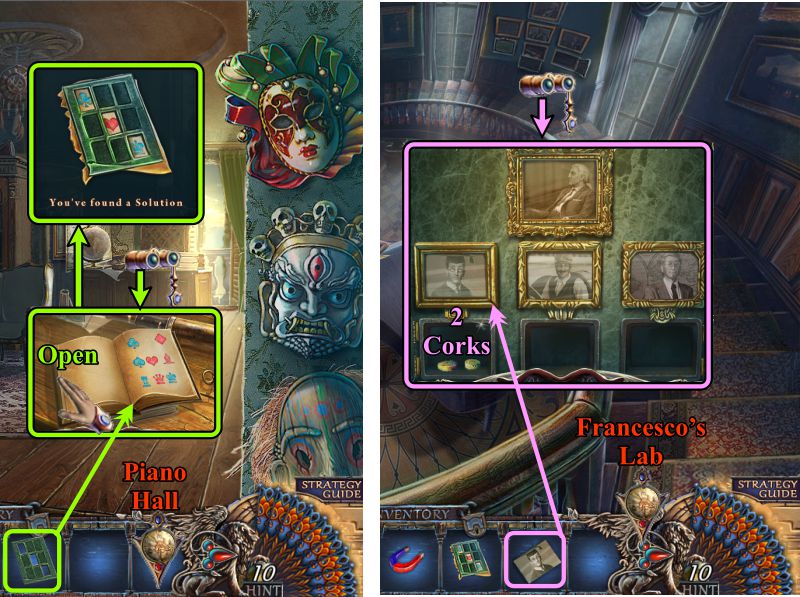
Zoom in on Luigi's desk, open the book, and place the Stencil on the page to obtain a Solution.
Go to the Piano Hall and zoom in on the picture wall.
Place Francesco's Photo, and collect each of the 2 Corks.
Return to Francesco's Lab.
Screenshot
Francesco's Lab
Examine the lab coat and use the Magnet to bring the Battery up to the pocket.
Zoom in on the basins and use the Corks to plug up the left 2 so the Toilet Paper Roller Knob will shoot out into the third basin.
Head to the Bathroom.
Screenshot
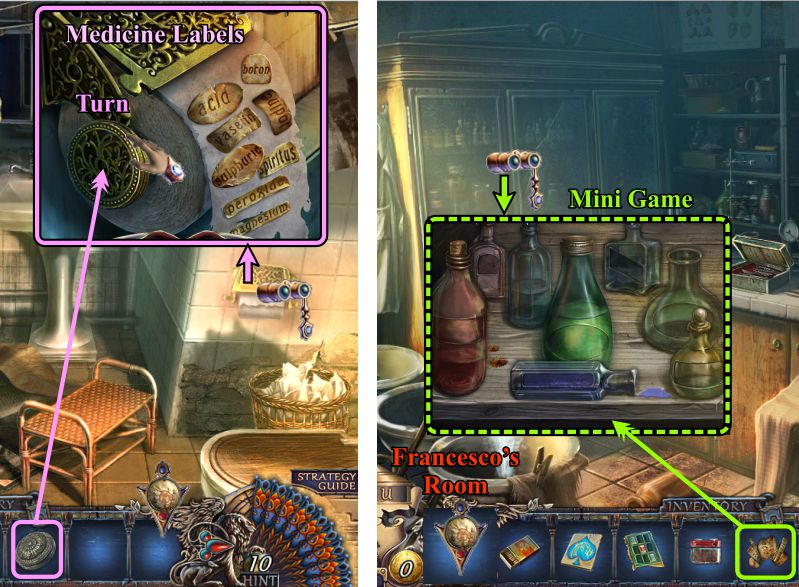
Bathroom and Lab
Place the Toilet Paper Roller Knob on the toilet paper dispenser.
Turn the knob and take the Medicine Labels.
Return to the Lab and zoom in on the cabinet.
Place the Medicine Labels on the shelf for a Mini Game.
Screenshot
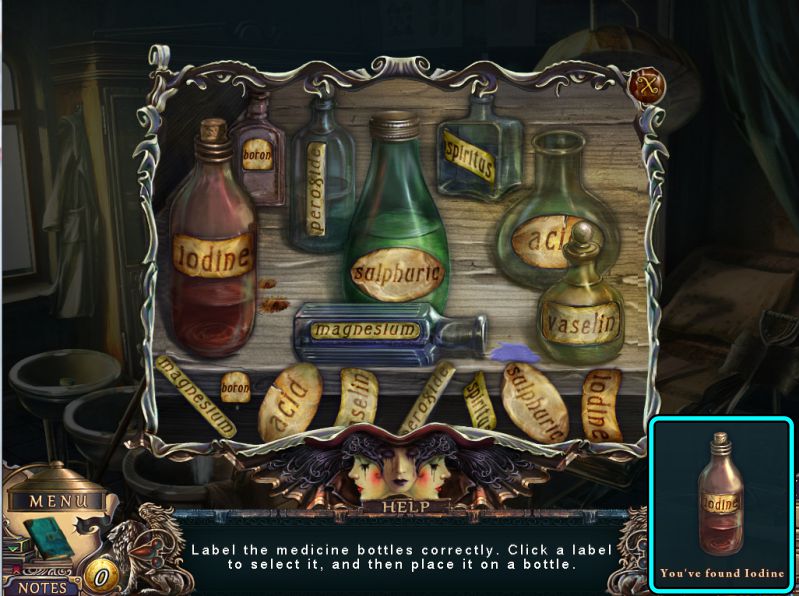
Medicine Label Mini Game
Place the labels as shown in the screenshot and take the bottle of Iodine.
Go to Francesco's Room.
Screenshot
Francesco's Room
Zoom in on the desk for a Mini Game.
Place the Matches and Battery into the scene.
Flip the instructions to see what you need to do, or just check the numbered screenshot instructions below.
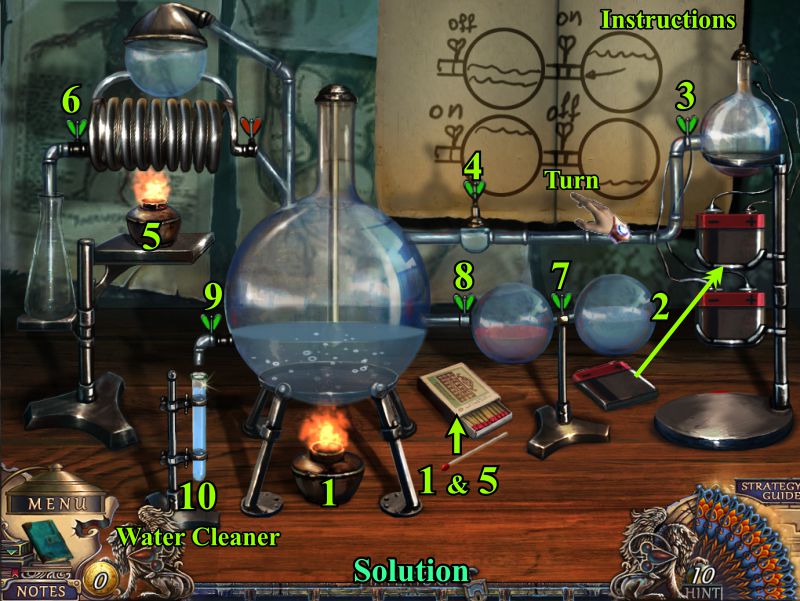
Water Cleaner Mini Game
Strike the Match, and it will light the first burner.
Place the Battery as shown.
Turn on the next two valves as numbered in the screenshot.
Light the second burner and finish opening the valves as numbered.
Take the Water Cleaner.
Go to the Tower through Luigi's Room.
Screenshot
Tower and Francesco's Room
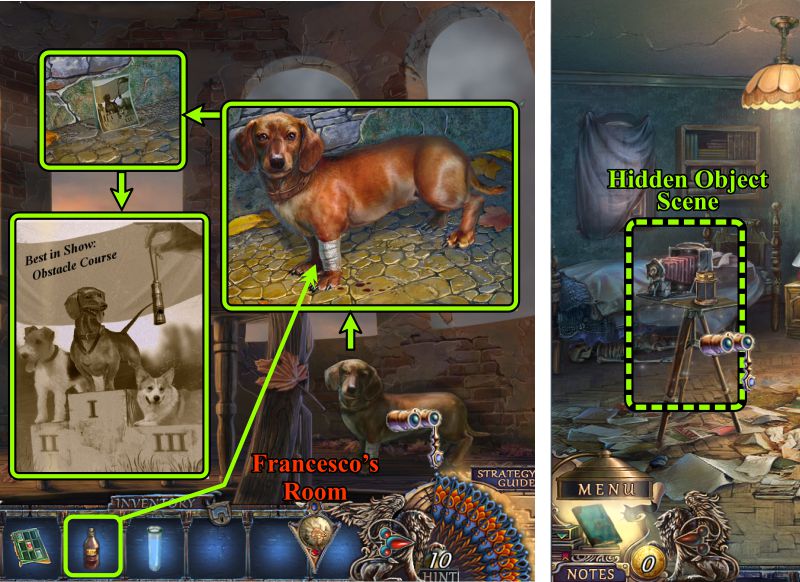
Zoom in and put the Iodine on the dog's bandage, and he will leave you with a picture of him and his accomplishments.
Note that he responds to a whistle.
Go to Francesco's Room and play the Hidden Object Scene.
Screenshot
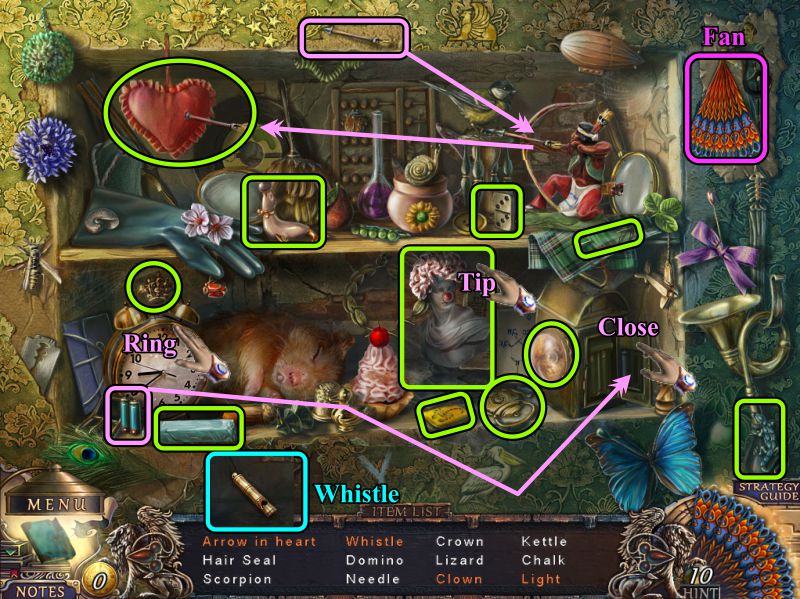
Francesco's Room Hidden Object Scene
Collect the Fan, ring the alarm clock to awaken the hamster so he will leave, and tip the bust into the pastry to get a Clown.
Place the batteries in the lamp and close the compartment to collect a Light.
Give the arrow to the archer to shoot into the heart for an Arrow in Heart.
The Whistle the hamster was hiding will go into your inventory.
Screenshot
Chapter 8: Maria
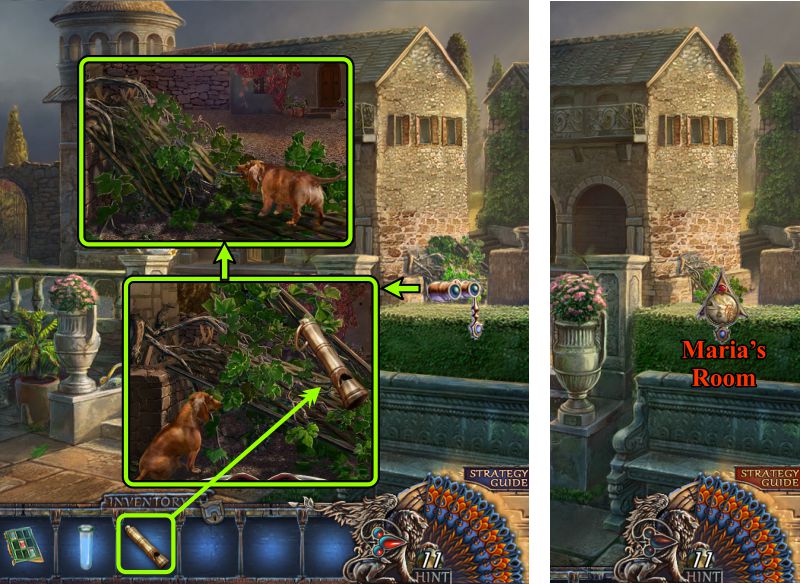
Villa Patio
Go to the Villa Patio to meet up with the dog at the vine mess at the side of the building.
Blow the Whistle, and he will work his magic to clear you a path to Maria's Room.
Screenshot
Outside Maria's Room
Remove the first layer of hanging laundry.
Examine the water jugs and add the Water Cleaner to remove the algae.
Take the Thimble and pick up some Clear Water.
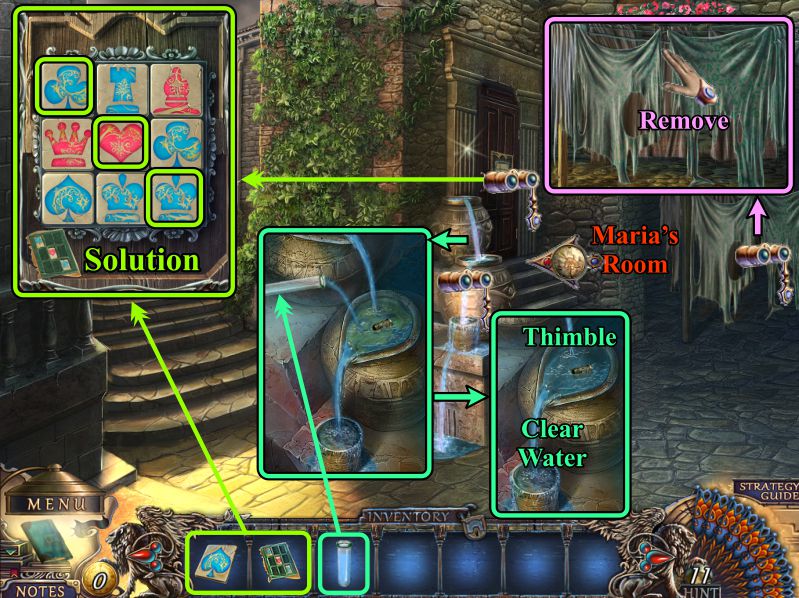
Zoom in on Maria's door and place the Spade Tile and Solution.
Click through the diagonal images to produce the solution shown in the screenshot.
Enter Maria's Room.
Screenshot
Maria's Room
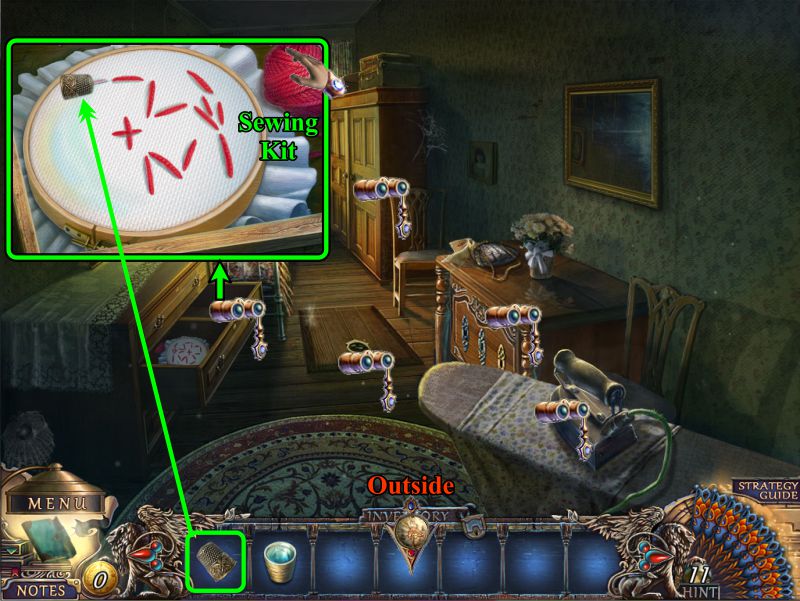
Examine all the magnifying glasses and zoom in on the drawer with the needlework.
Use the Thimble to remove the yarn and create a Sewing Kit.
Return Outside.
Screenshot
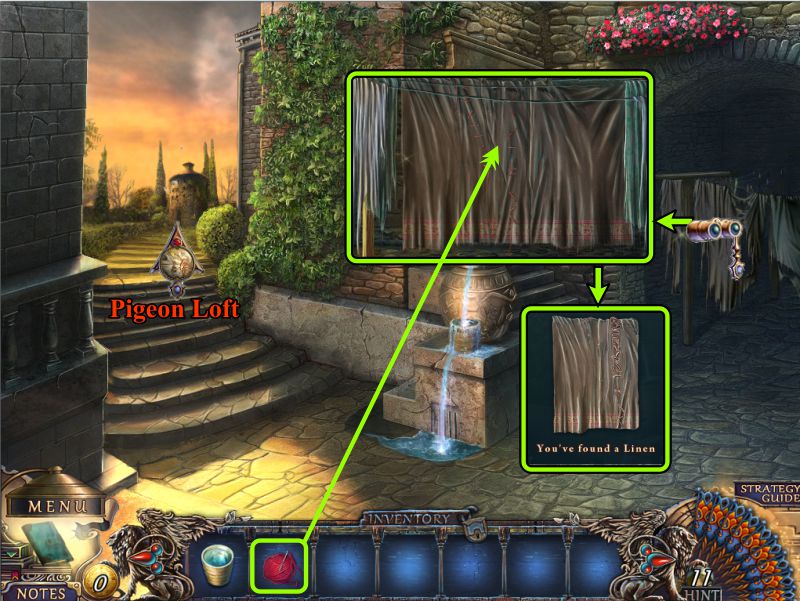
Outside Maria's Room
Zoom in on the laundry and sew up the torn sheets to get Linen for your Inventory.
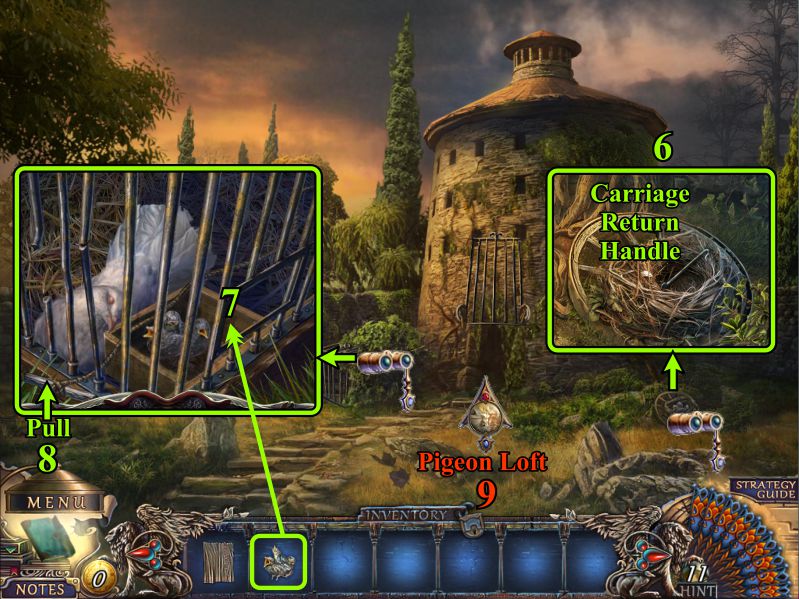
Head off toward the Pigeon Loft.
Screenshot
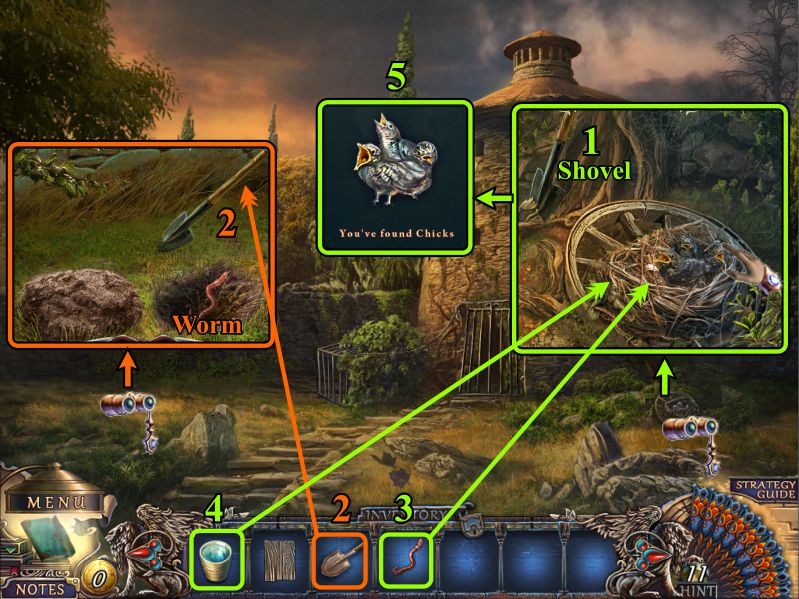
Outside Pigeon Loft
Zoom in on the chicks and take the Shovel.
They need to be fed, so examine the grassy plot and dig up a worm with your Shovel.
Give the chicks the Worm.
Now they are thirsty, so give them some of your Clear Water.
They seem to be happy, so collect them.
Screenshot
After you collect the Chicks, you find a Carriage Return Handle to collect.
Zoom in on Mom in the cage and give her the Chicks.
Pull the rope to open the door to the Pigeon Loft.
Enter the Pigeon Loft.
Screenshot
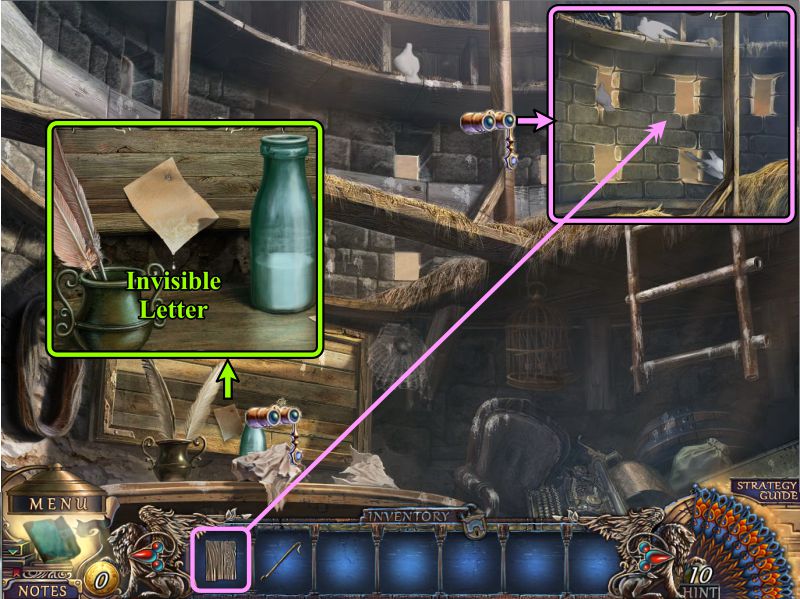
Pigeon Loft
Zoom in on the left wall and take the Invisible Letter.
The pigeons are upset with you looking around, so zoom in on the loft and place your Linen so you can look around.
Screenshot
Without pigeon help, you find a Silver Desk Key in the loft, so take it.
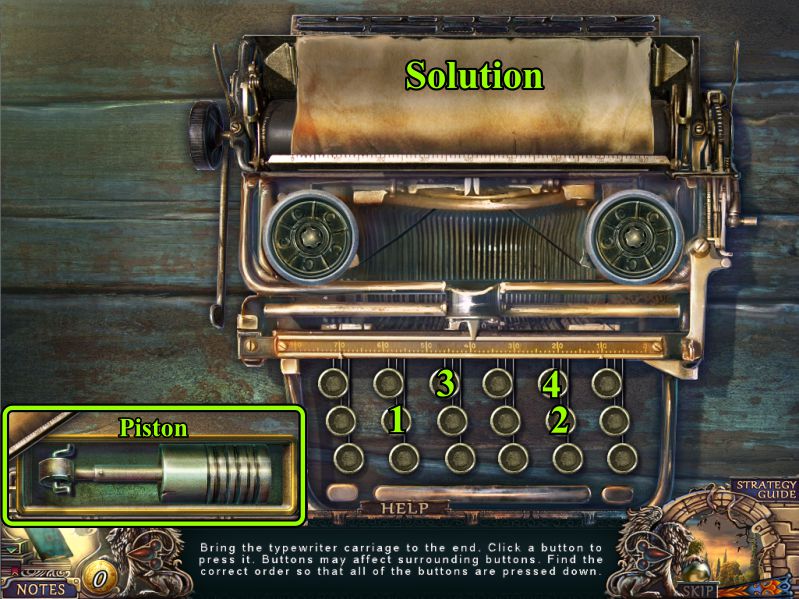
Examine the typewriter and place your Carriage Return Handle for a Mini Game.
Then, return to Maria's Room.
Screenshot
Typewriter Mini Game
Your goal is to get the carriage to move all the way to the left so it falls off the typewriter and you can collect the Piston.
See the screenshot for which keys to press in what order to get the Piston.
Screenshot
Maria's Room
Place the Invisible Letter on the ironing board and move the iron over it to get the Code Solution.
Zoom in on the hatch on the floor, place the Code Solution, and just click to open the hatch.
Go to the Basement.
Screenshot
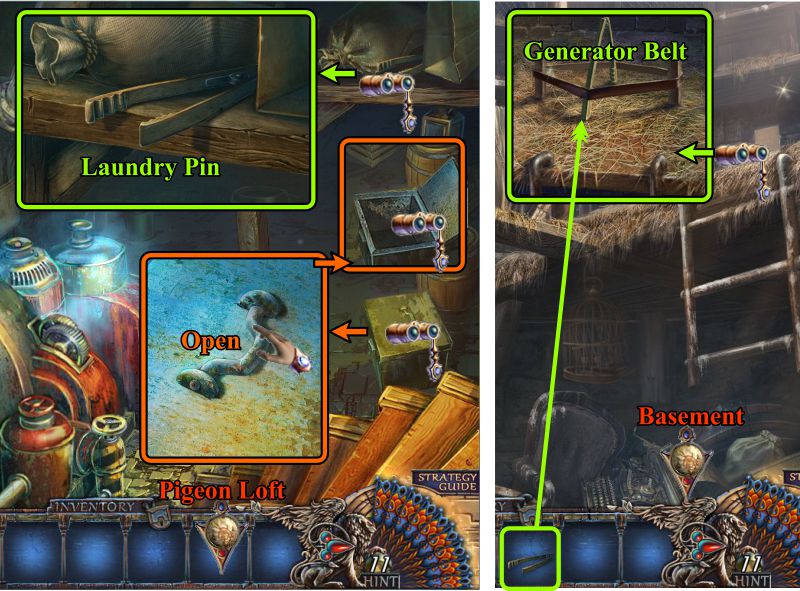
Basement and Pigeon Loft
Open the box and examine it to see you need parts for the jack.
Zoom in on the shelf and take the Laundry Pin.
Go to the Pigeon Loft and zoom in above the ladder.
Use the Laundry Pin to stretch the Generator Belt so you can collect it.
Return to the Basement below Maria's Room.
Screenshot
Basement
Zoom in on the generator and place the Belt and Piston to get it working.
Head to the Wine Cellar.
Screenshot
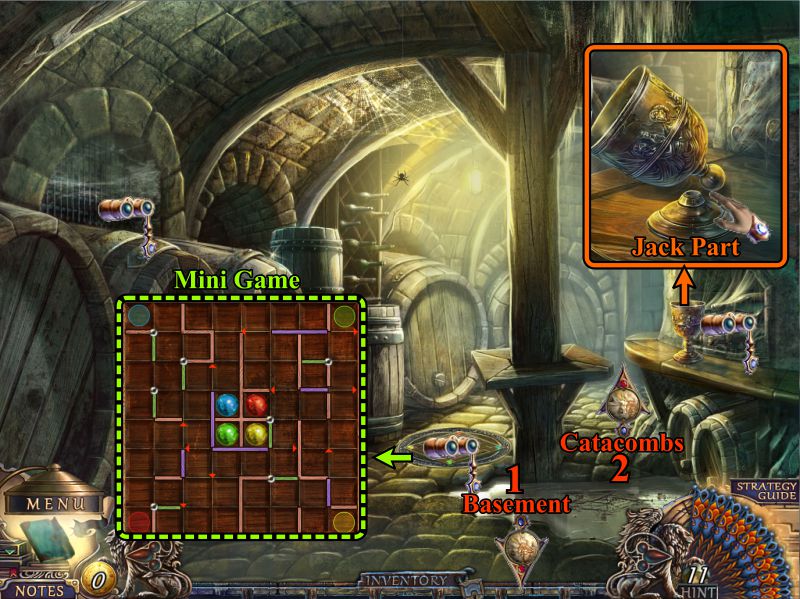
Wine Cellar
Examine the goblet to the right and try to collect it, only to find it falls apart, so just take the base as a Jack Part.
Zoom in on the hatch on the floor for a Mini Game.
There are two exits available here, one will take you back to the Basement and the other will take you forward to the Catacombs.
As marked in the screenshot, you will visit them in that order.
Screenshot
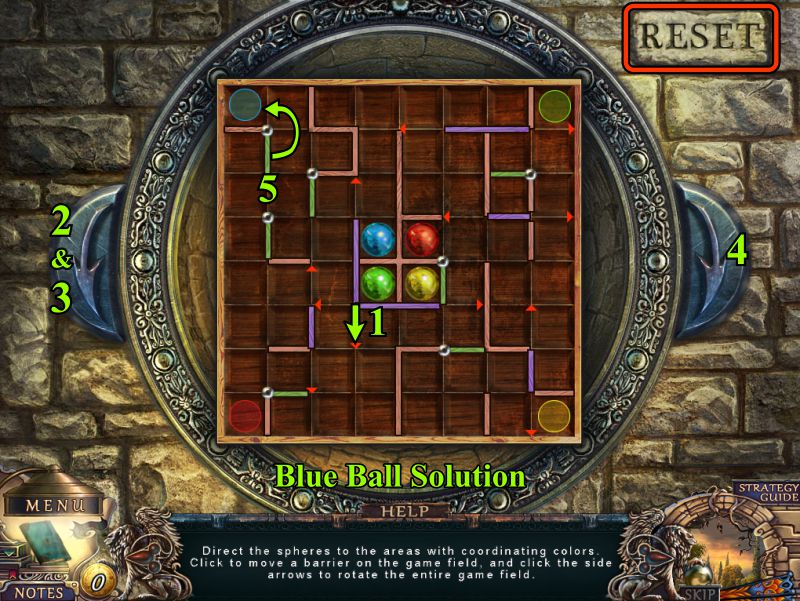
Wine Cellar Mini Game
Your basic goal in this game is to get all the colored balls to their respective corners.
In order to achieve your goal, you will need to move various blockage elements on the board and turn the board by using the arrows to left and right of the board.
If needed, you can Reset the board, but be aware that you will reset to round 1.
Since there are 4 different color balls, we will deal with them one at a time, starting with the Blue Ball.
This is the easiest round, so please see the screenshot for the solution.
Screenshot
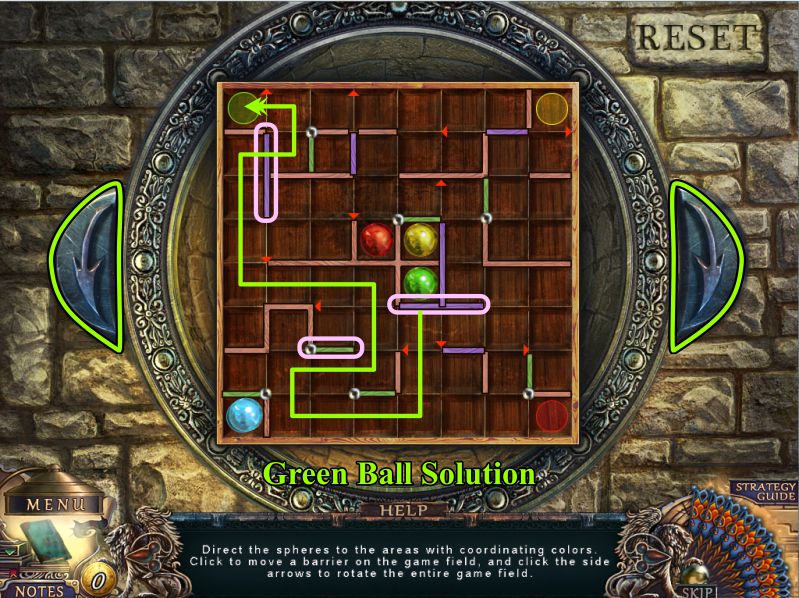
Green Ball
The obstacles marked in pink will need to be moved in order to clear your path to your destination.
Be sure to lock in the Green Ball once you have it in its corner.
Screenshot
Red Ball
Move the obstacles as shown in the screenshot and follow the shown path to your destination.
Note that the Red Ball followed the Green Ball, so we are starting from that destination.
Screenshot
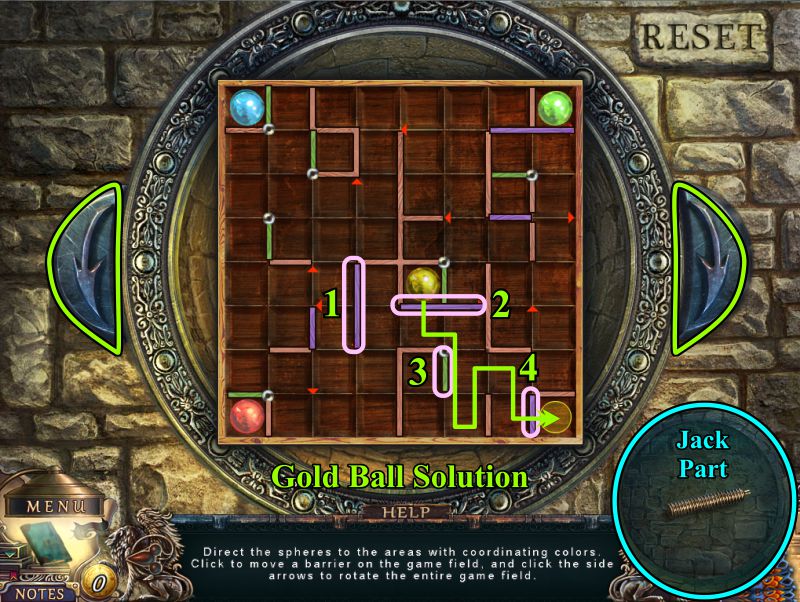
Gold Ball
Move the shown obstacles and follow the path shown in the screenshot.
You will get a Jack Part at the end of the game.
Screenshot
Basement
Return to the Basement, zoom in and assemble the Jack.
Go to the Catacombs past the Wine Cellar.
Screenshot
Catacombs
Use the Jack to open each of the coffins.
See the screenshot for what you get to collect once they are opened.
Go to the Wine Cellar.
Screenshot
Wine Cellar
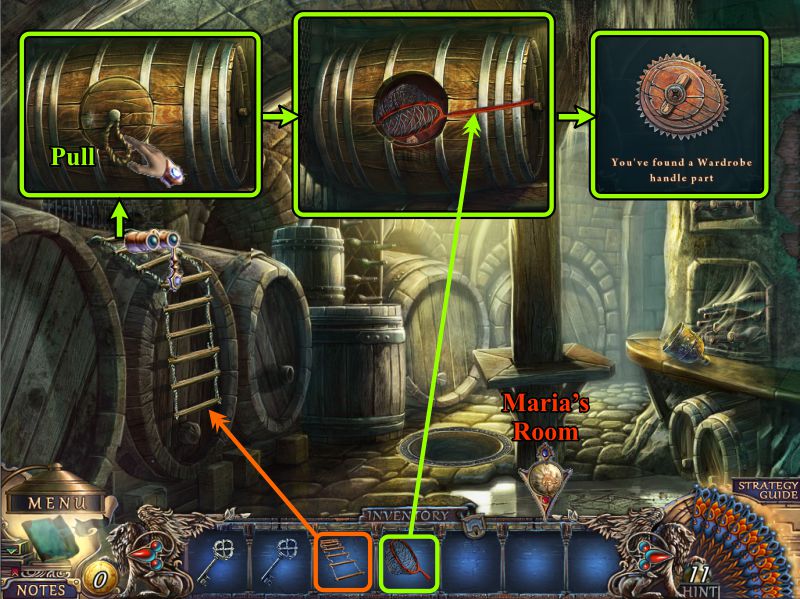
Put the Ladder on the wine cask and climb up.
Pull out the stopper on the keg and use the Net to get the Wardrobe Handle Part.
Go to Maria's Room.
Screenshot
Maria's Room
Zoom in twice on the wardrobe and place the Handle.
Turn it to open the wardrobe and collect the Gold Desk Key.
You now have all 3 Keys, so zoom in on the desk.
Place all 3 Keys to open the desk and view the final cut scene.
Screenshot
Posted by: Jazz |
July 16, 2012 5:32 PM
|
July 16, 2012 5:32 PM