


![]() The Flux Family Secrets series started back in 2009 with Flux Family Secrets: The Ripple Effect, followed by Flux Family Secrets: The Rabbit Hole just over a year later. Now, after a longer than usual wait, the third game in the series has arrived: Flux Family Secrets: The Book of Oracles. Skunk Studios has produced an equally high caliber game with Flux number three, continuing the story precisely where it left off and telling a hidden object-laden tale with a side of lush visuals.
The Flux Family Secrets series started back in 2009 with Flux Family Secrets: The Ripple Effect, followed by Flux Family Secrets: The Rabbit Hole just over a year later. Now, after a longer than usual wait, the third game in the series has arrived: Flux Family Secrets: The Book of Oracles. Skunk Studios has produced an equally high caliber game with Flux number three, continuing the story precisely where it left off and telling a hidden object-laden tale with a side of lush visuals.
 Even though the series has a rich back story, you don't necessarily need to be privy to it in order to play. The opening cinema gives you a brief overview, and for the purposes of enjoying the plot and gameplay, it works out just fine. The protagonist Jesse and her family are in charge of protecting the flow of time. She discovers their less-than-perfect history, though, and tries to escape back to her "normal" life. Instead, she ends up even further in the past and has to fix a time ripple before she can get back. Things get even more complicated from there, introducing the G.E.M. machine, new members of Jesse's family, and more, creating a somewhat confusing but still interesting story to follow. But hey, who said life would be easy when time itself is destabilizing?
Gameplay is structured around hidden object scenes and casual adventure-style exploration. Poking your cursor through each scene, you'll pick up loads of objects that fill in shadowy slots in your inventory. Occasionally you'll find a key item and it stores itself a little differently, allowing you to click and use it on areas later in the game. You're given a few scenes to wander around in, but a few puzzles always prevent you from traveling too far, keeping the game in time with its strict storytelling layout.
 Analysis: Rounding out a well-liked trilogy has to put a lot of pressure on the developers. On the one hand, fans want more of the same formula, but on the other, if you don't innovate, you run the risk of drowning. Flux Family Secrets 3 plays things close to the norm, not really walking far from what you would expect, but still delivering on high points like visuals, puzzle complexity, and sheer volume of hidden object scenes.
Speaking of those item laundry lists, Flux Family Secrets piles on the object finding scenes in thick hillocks, crafting both a main game and most of its sub-scenes out of a similar mold. For a game so steeped in a hidden object motif, you would expect them to be finely polished pieces of point and click glory, yes? Unfortunately, that's not always the case, and you'll find a number of occasions where Flux Family Secrets falls victim to the usual list of hidden object flaws: unfairly obscured items, dubious objects that only vaguely resemble their listed name, and obtuse puzzles. That's not to say the game misses the mark, it just stumbles over the same problems as most games out there, and because the rest of it is of such good quality, the imperfections stand out more than usual.
Flux Family Secrets: The Book of Oracles takes a fine storyline void of traditional spooky themes and crafts a spunky hidden object adventure around it. It's loaded with charm and stocked to the brim with items to find, games to complete, and puzzles to solve. It may not quite live up to the oomph presented by its predecessors, but it's still a heavy-hitting hidden object game you won't want to miss.
![]() Windows:
Windows:
Download the demo
Get the full version
![]() Mac OS X:
Mac OS X:
Download the demo
Get the full version


Walkthrough Guide
(Please allow page to fully load for spoiler tags to be functional.)
Flux Family Secrets: The Book of Oracles walkthrough
General Information and Chapters 1-5
General Information
Main Menu
The following choices are available on the Main Menu: Profile; Play and Exit; Options; Help System; Bonus Content; and a link to purchase the Strategy Guide.
Options include adjustment of Music and Sound Effects; choice of Full versus Windowed screen; Custom Cursor or not; using the Tutorial; and Challenge Level.
Challenge Levels are Casual and Advanced:
Casual is for a relaxing adventure with fast Hint and Skip recharging, lots of sparkles, and the Tutorial is turned on.
Choose Advanced if you are an experienced player who doesn't need sparkles or the Tutorial, and doesn't care how fast Hints and Skips recharge.
The Help System explains the various cursors, and gives a few notations about scene navigation.
The Bonus Content is where you find the Flux Family Factoids that you will collect throughout the game. They will give you interesting background information.
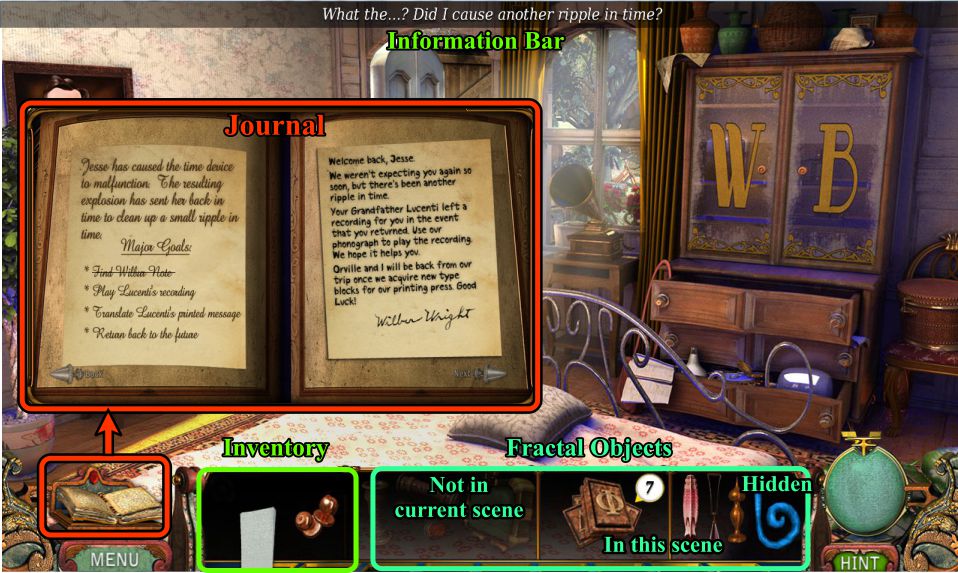
Scene Navigation
Your Journal is located in the lower left corner. Clues, notes, factoids, and cut scenes are recorded for you to read when needed.
Below the Journal is Menu that will pause the game for you to change your Options, go to the Main Menu, view the Help System, or continue the game.
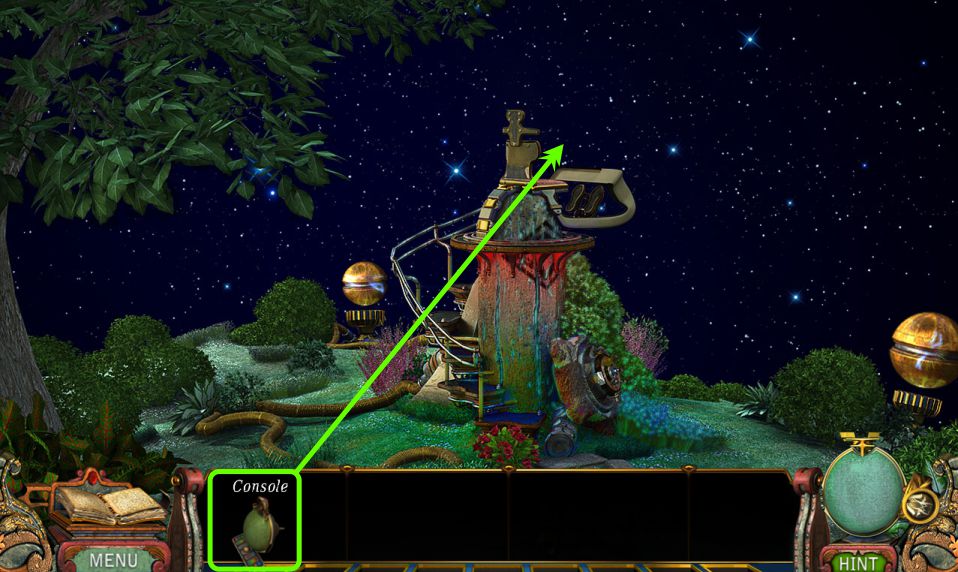
Your Task Bar is a tray at the center bottom of the scene, and your Inventory is located beneath it.
At the far right are your Hints that are unlimited as soon as the button refills.
Your cursor will turn into a green arrow to show you how to exit and navigate to another scene.
The bottom tray with niches contains fragments that will combine to make a complete object that will go into your Inventory.
If the object parts are not available in the current scene it will be blacked out.
A blue part is in the current scene but needs to be uncovered before you can collect it.
All object parts that are available to collect will be shown as they exist in the scene.
In the screenshots, each niche that has parts available for that scene is color-coded with the items in the scene.
Hidden object scenes can be identified by the sparkles on them. The lists are semi-random but will be marked for the list shown because you may need to find the object if you return to the same location.
Inventory items are usually obtained from hidden object scenes and are marked in bright blue.
At the top of the screen is a bar that will provide you information about an action or object.
If you'd like to take a magnified look at the screen in any scene, right click and a magnifier will appear. To go back to normal view, right click again.
Screenshot
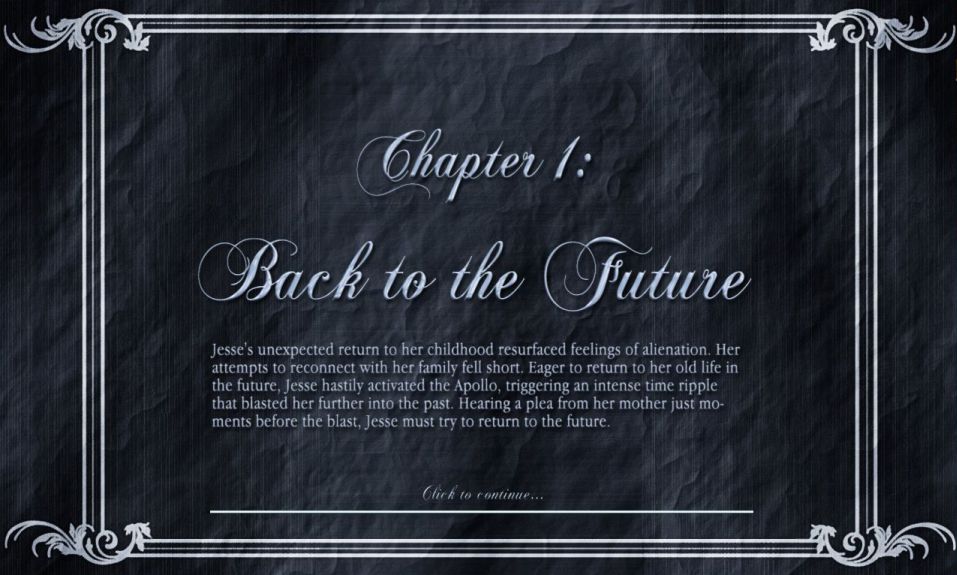
Chapter Screens
As each chapter loads, the screen will give you a little background about that chapter, as shown in the screenshot sample.
Screenshot
Chapter 1: Back to the Future
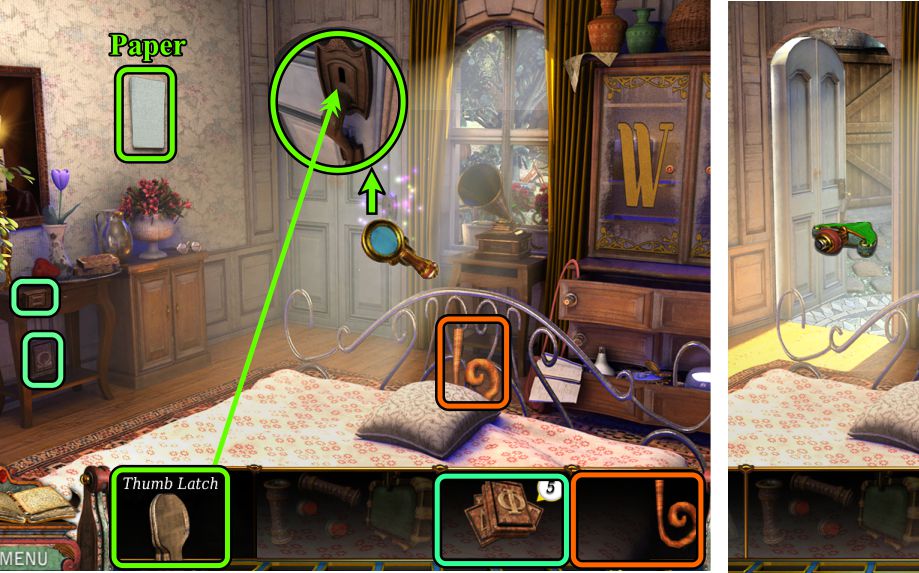
Bedroom
Only parts for the Portal Key, Type Blocks, and Umbrella are available in the scene, so collect them.
Move the pillow on the bed, check out the picture on the wall, and note on the table.
Play the Hidden Object Scene.
Screenshot
Cabinet Drawers Hidden Object Scene
Objects requiring addition tasks:
Move the hat to find the Ball of String.
Open the jar to get the Cream.
Move the paper to find a Button and Tin Can.
Your Inventory item will be the Thumb Latch.
Screenshot
Bedroom
Collect the last part of the Umbrella, the 2 additional Type Bars, and grab the paper on the wall.
Zoom in on the door and place the Thumb Latch from your Inventory.
Go outside.
Screenshot
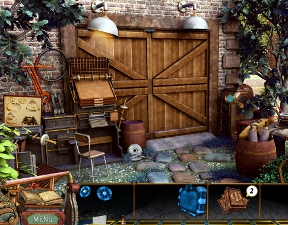
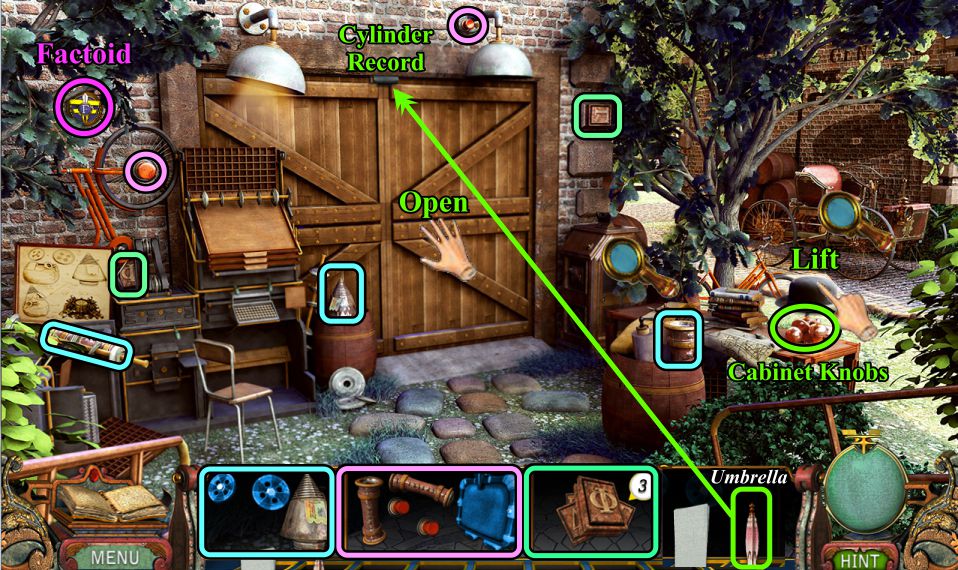
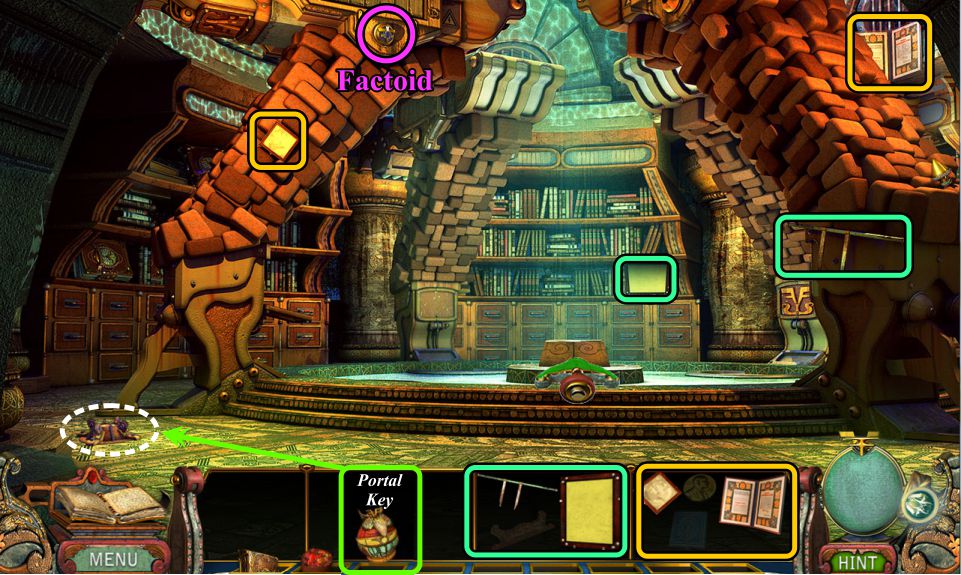
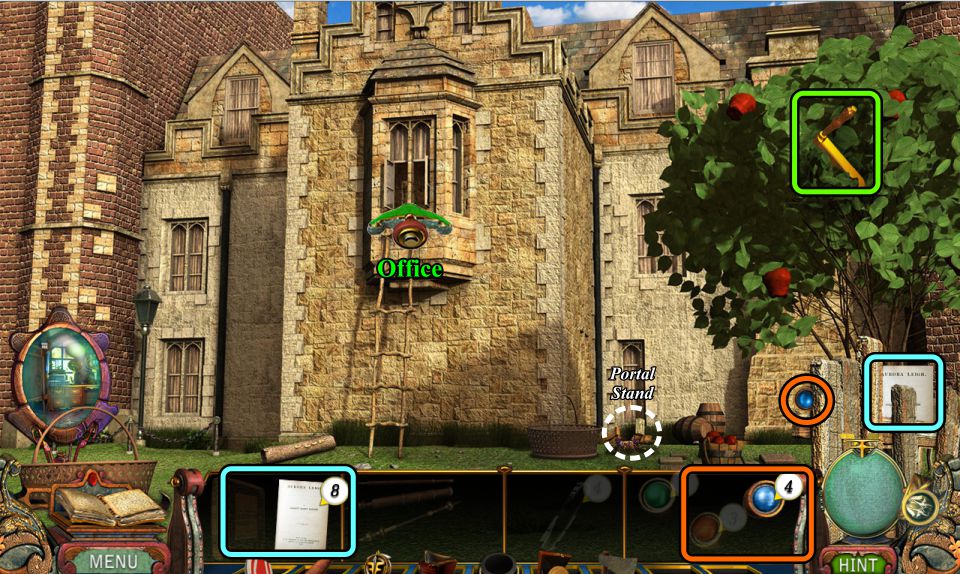
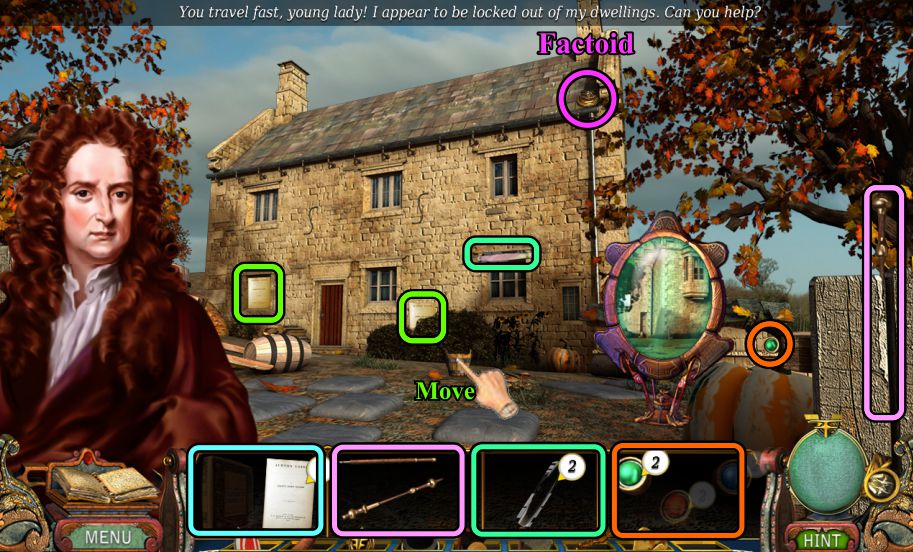
Outside
Collect the Factoid, and check out the carriage that disappears after your investigation.
List the hat to find some Cabinet Knobs, and use the Umbrella to dislodge the Cylinder Record stuck in the door so you can open the door.
Collect all the available parts.
Screenshot
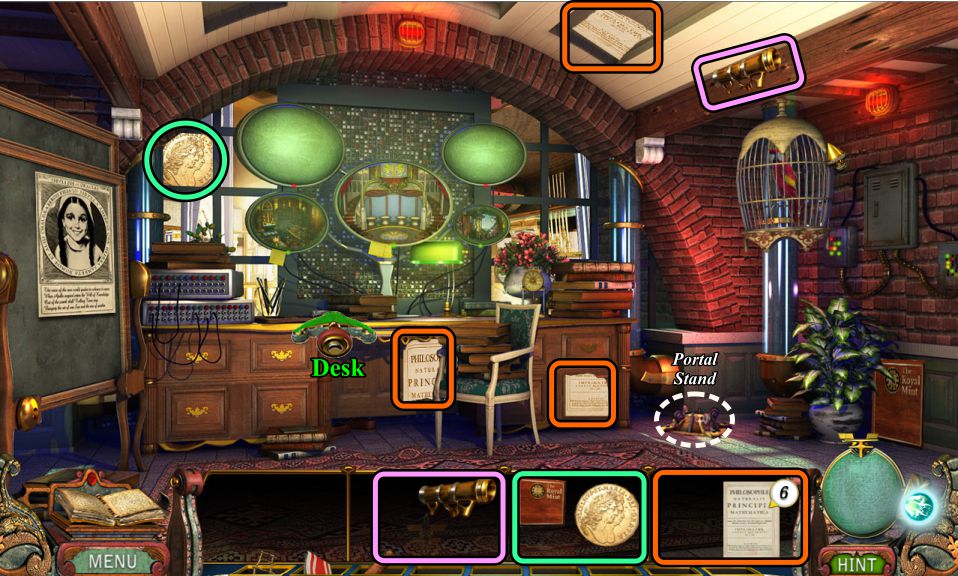
Outside
There's a portal stand inside the door and a printing press appears after another ripple in time.
Examine the drawing about the portal.
Take the object part, then return to the Bedroom.
Screenshot
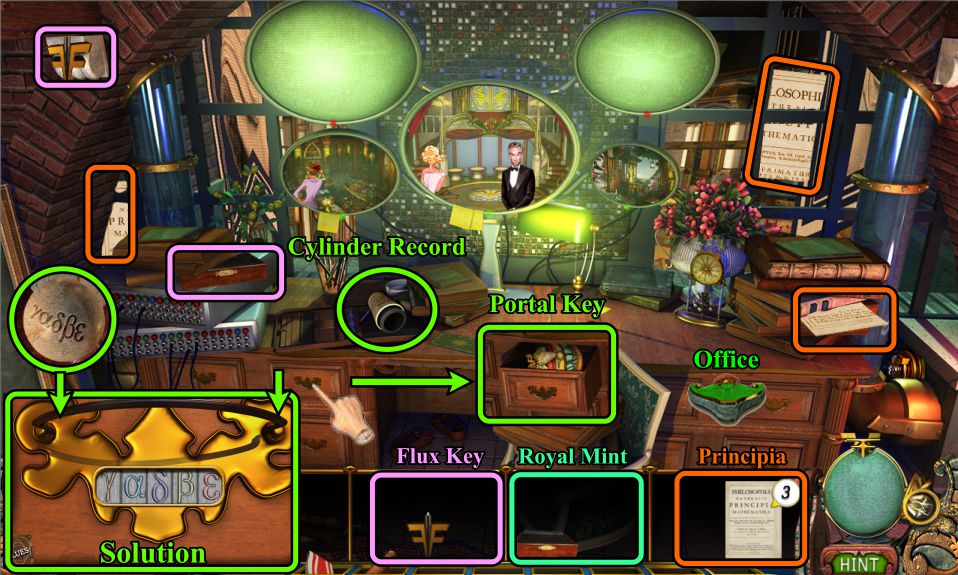
Bedroom
Zoom in phonograph and place the Cylinder Record to hear the recording.
Zoom in on the cabinet doors and place the knobs to trigger a Hidden Object Scene.
Screenshot
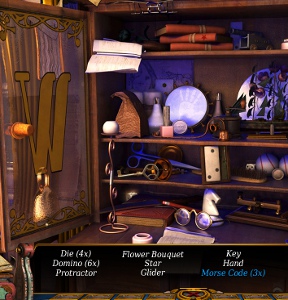
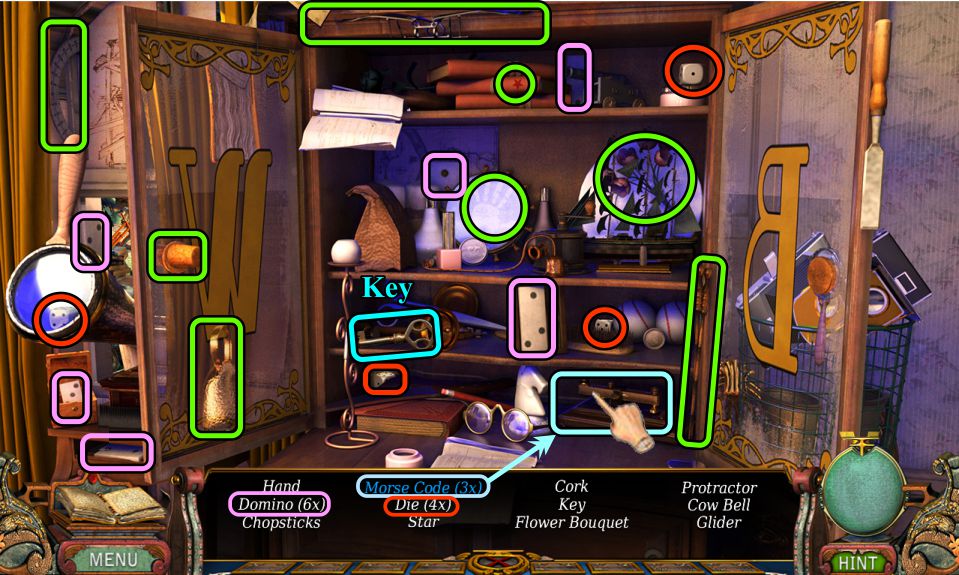
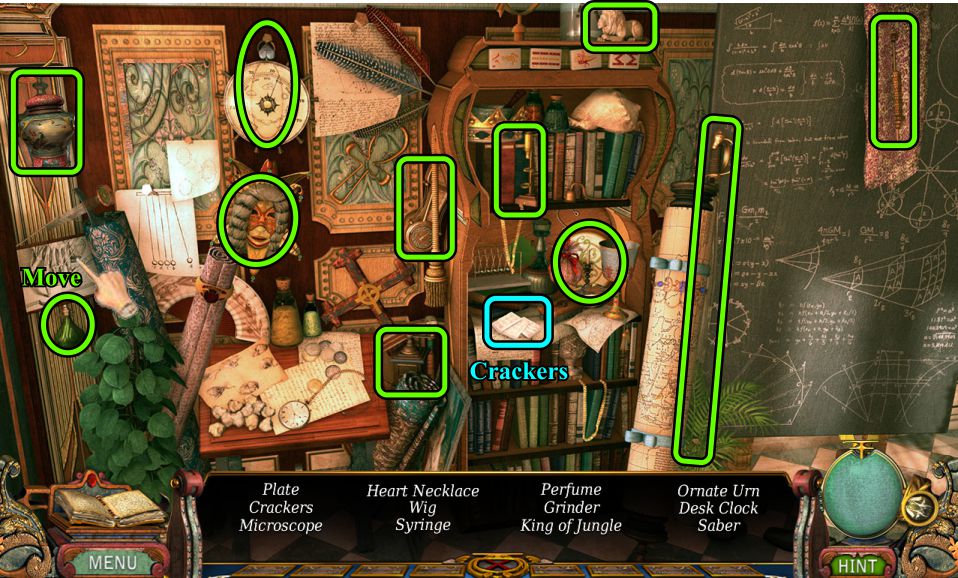
Cabinet Shelves Hidden Object Scene
Collect your list of objects to get the Key.
Tap the Morse code machine 3 times to get Morse Code times 3.
Screenshot
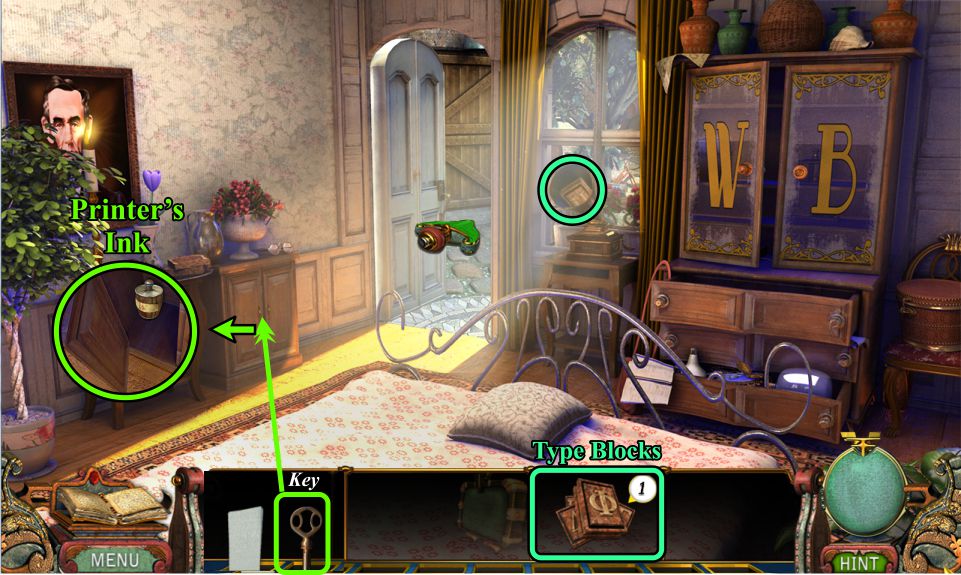
Bedroom
Use the Key to open the small cabinet to get the Printer's Ink.
Collect the last Type Block, and go outside.
Screenshot
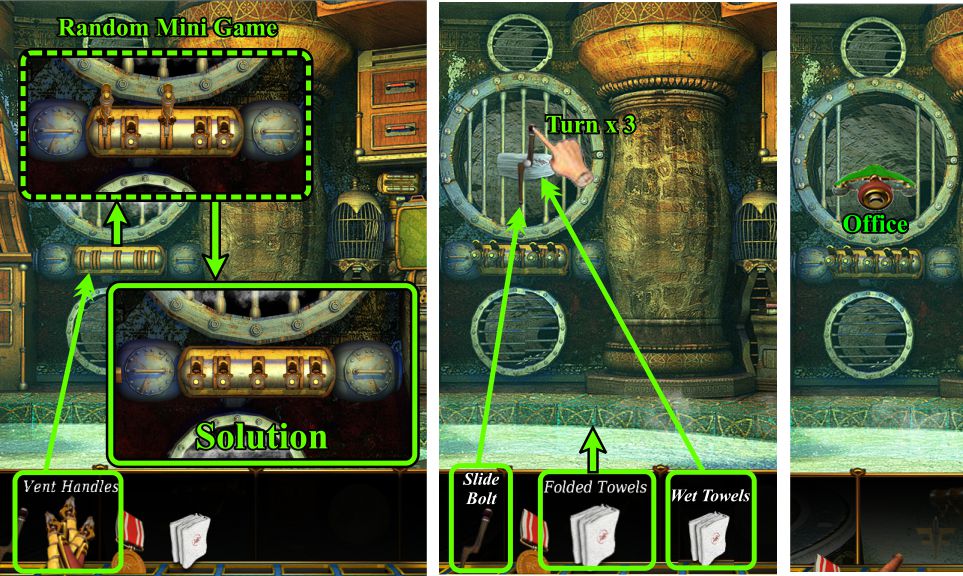
Outside
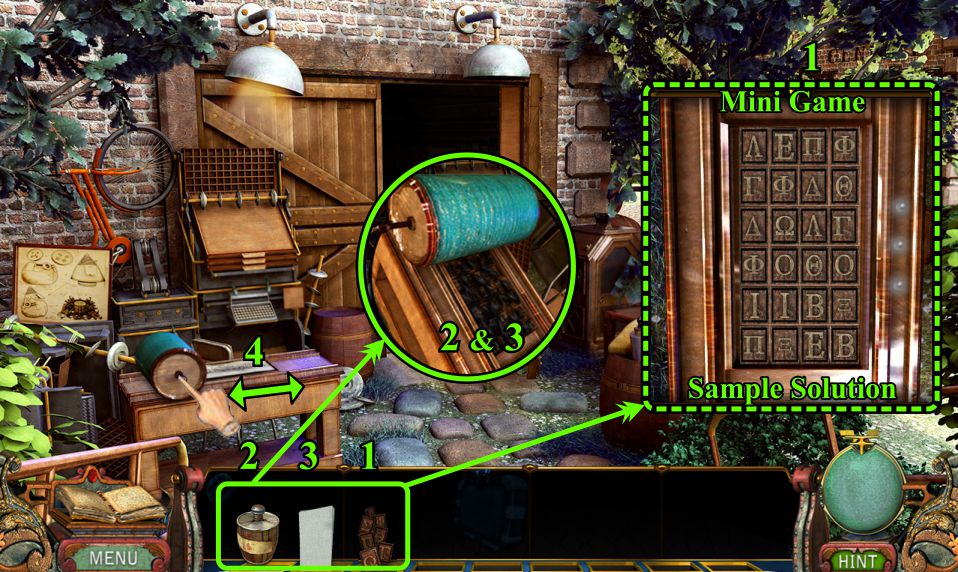
Place the Type Blocks on the printer to trigger a random match 2 Mini Game.
Pour the Printer's Ink on the type.
Lay the Paper on the printer.
Move the roller to the right and then left.
The Greek Note will go into your Inventory.
Screenshot
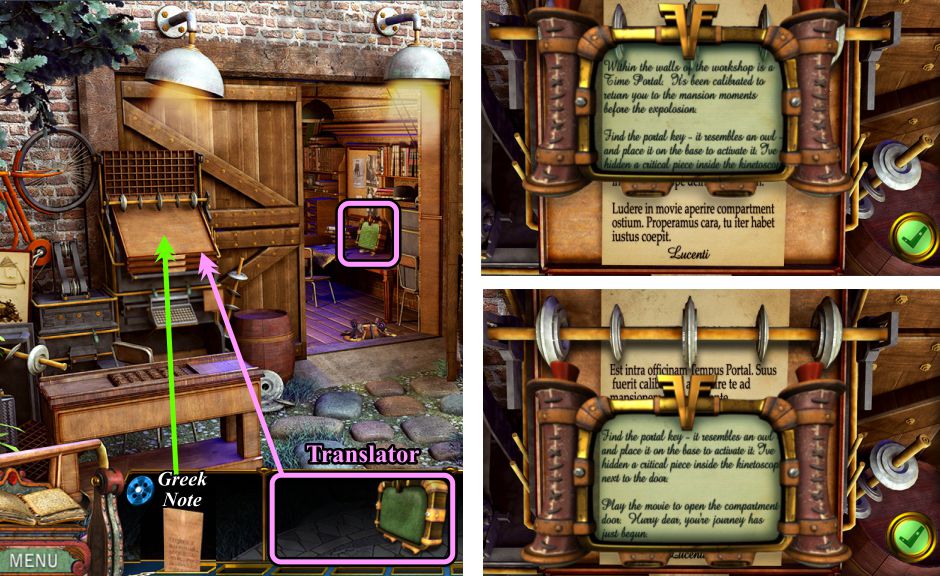
Place the Greek Note on the stand.
Grab the last piece and put the Translator on the stand.
Decode the message with the Translator.
Screenshot
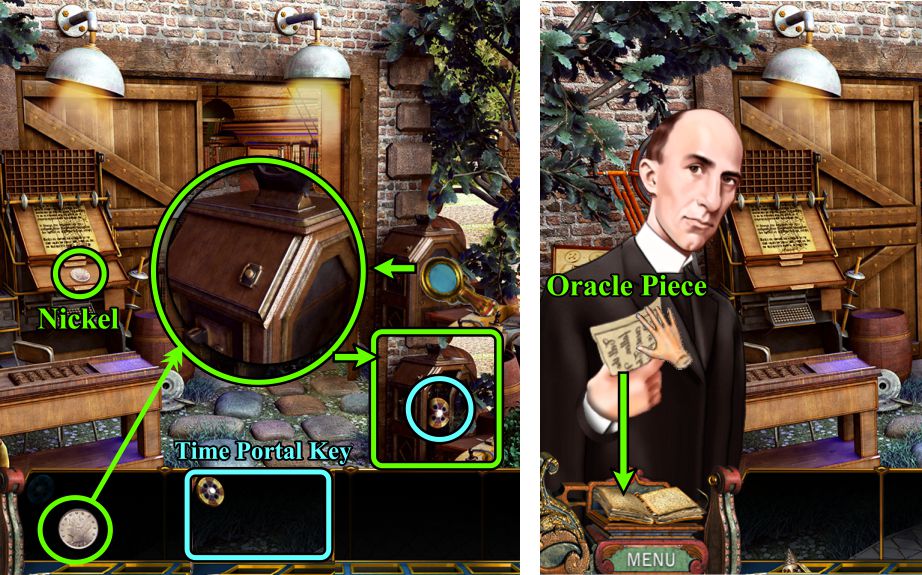
Take the Nickel and place it in the kinetoscope.
Watch the movie and take the last piece of the Time Portal Key.
One of the Wright Brothers appears with a partial note for you, so take it.
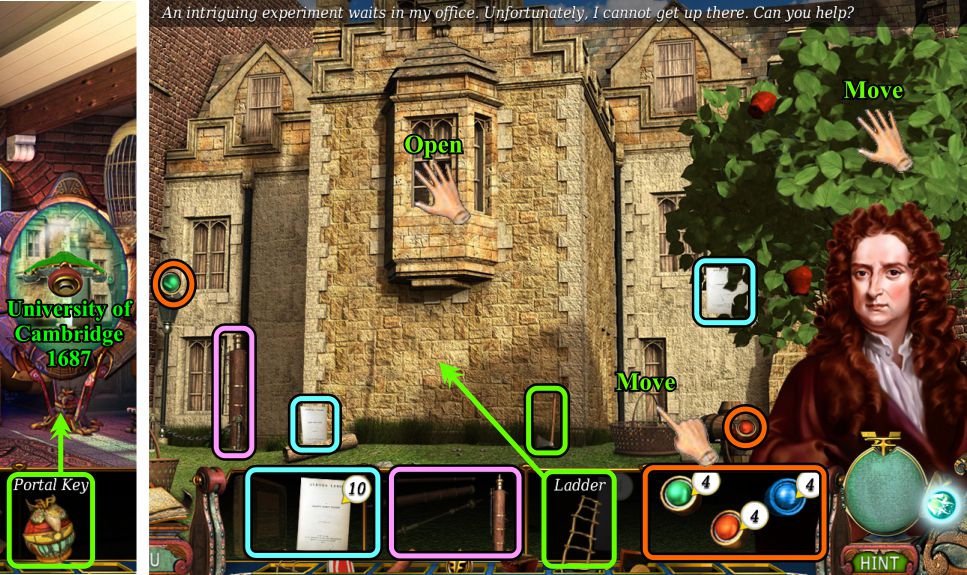
Screenshot
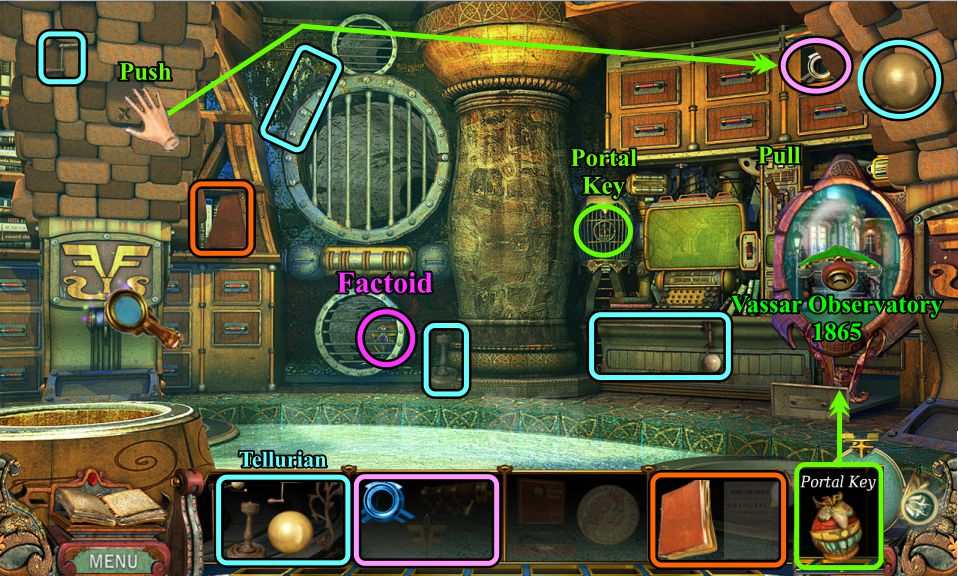
Place the Time Portal Key on the Portal Stand to create the Portal.
Go through the Portal to end the chapter.
Screenshot
Chapter 2: House of Flux
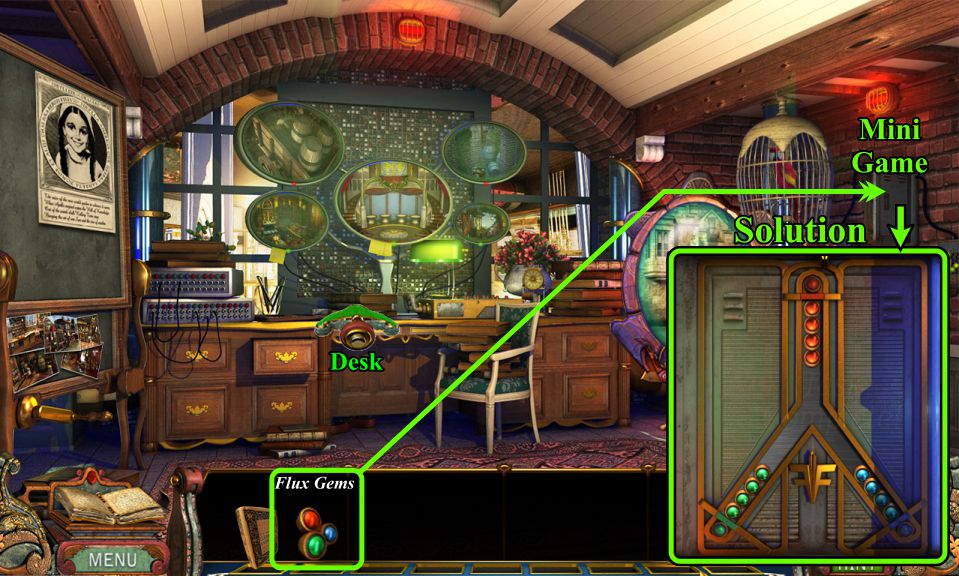
Apollo Room
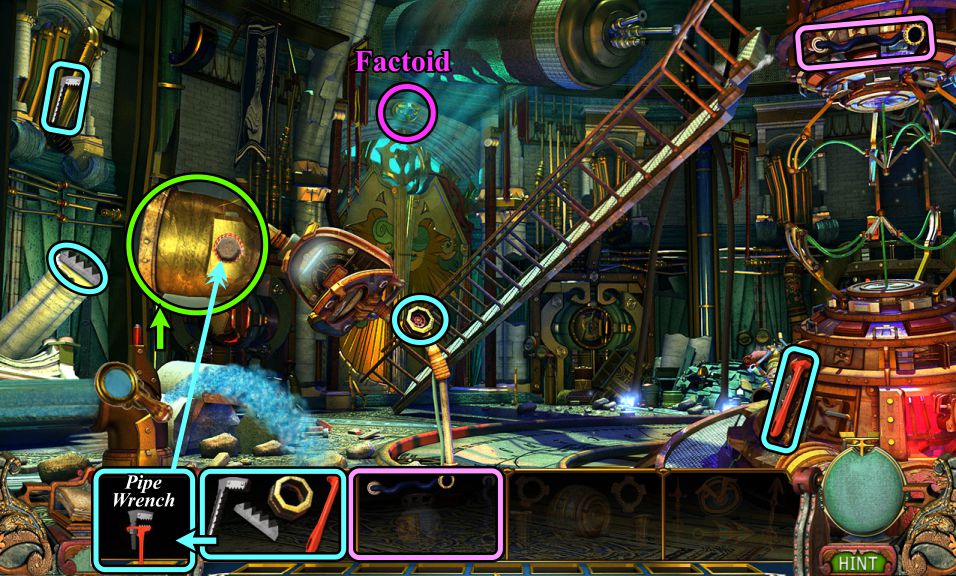
Collect the Factoid and the object parts.
Zoom in on the water pipe and use your completed Pipe Wrench to shut off the water.
Screenshot
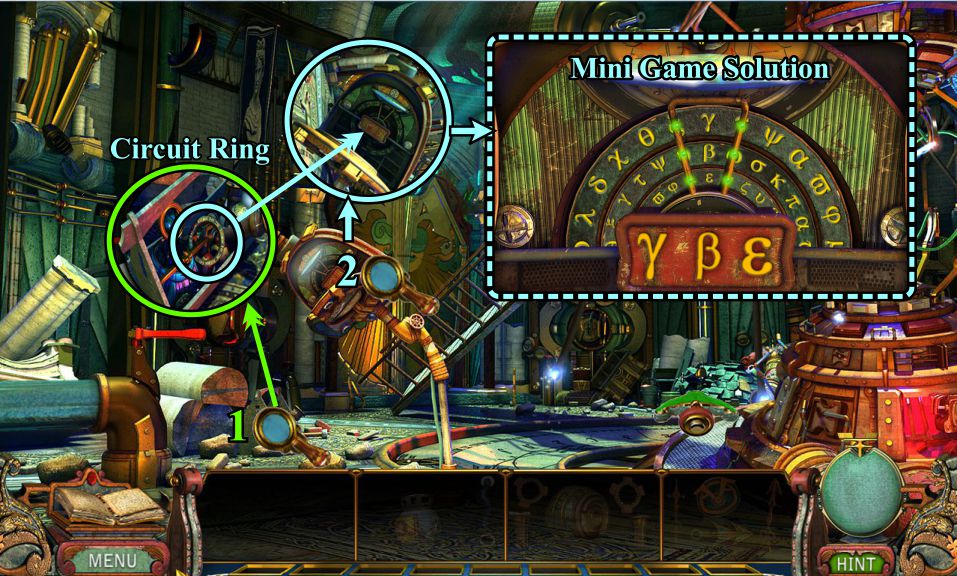
Zoom in on the tool box and take the Circuit Ring.
Place the Circuit Ring in mechanism to trigger a Mini Game.
See the screenshot for the solution.
Go forward to the Apollo Chamber.
Screenshot
Bedroom
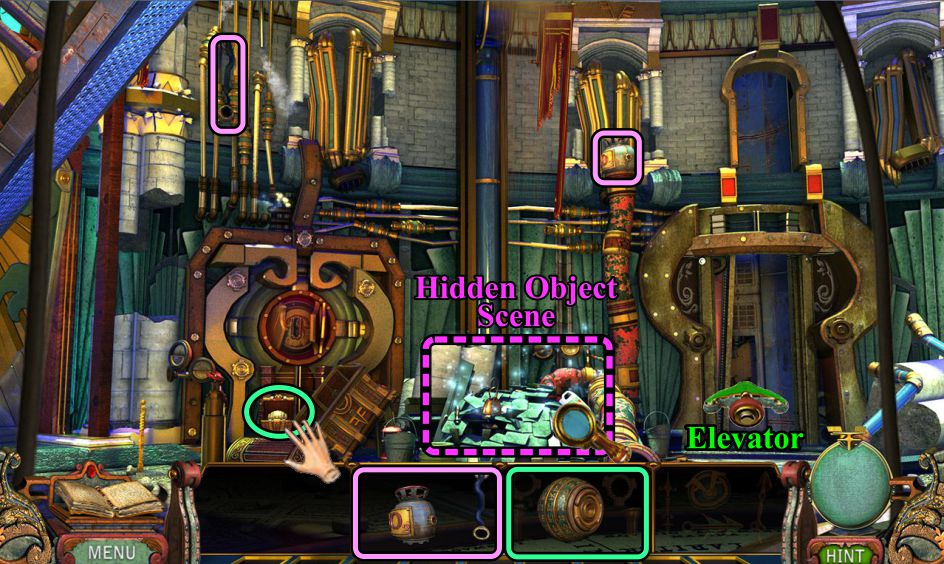
Collect the available object pieces.
Try to collect the Anchor Ball, and a ripple with break the gas line.
Play the Hidden Object Scene, and head to the Elevator.
Screenshot
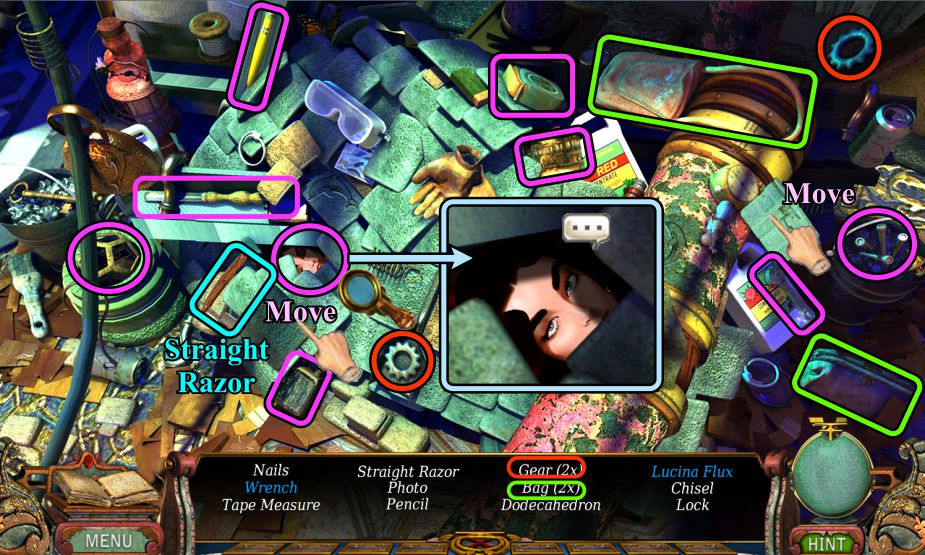
Rubble Hidden Object Scene
A Straight Razor will be your final item for your Inventory.
Move the tile shown to find Lucina and talk to her.
To find the Wrench, move the tile at the far right.
Screenshot
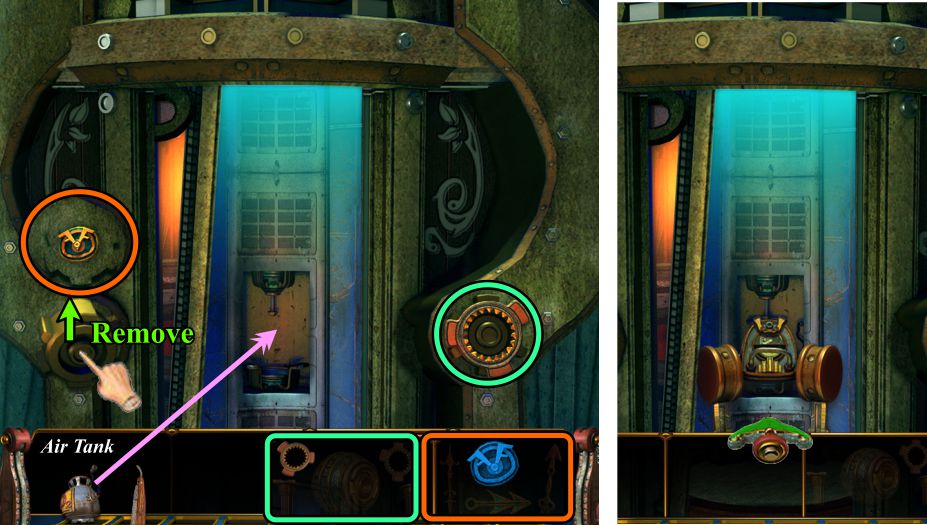
Elevator
Move the cap at the left so you can collect the two part pieces.
Place the Air Tank in the elevator and go use the elevator.
Screenshot
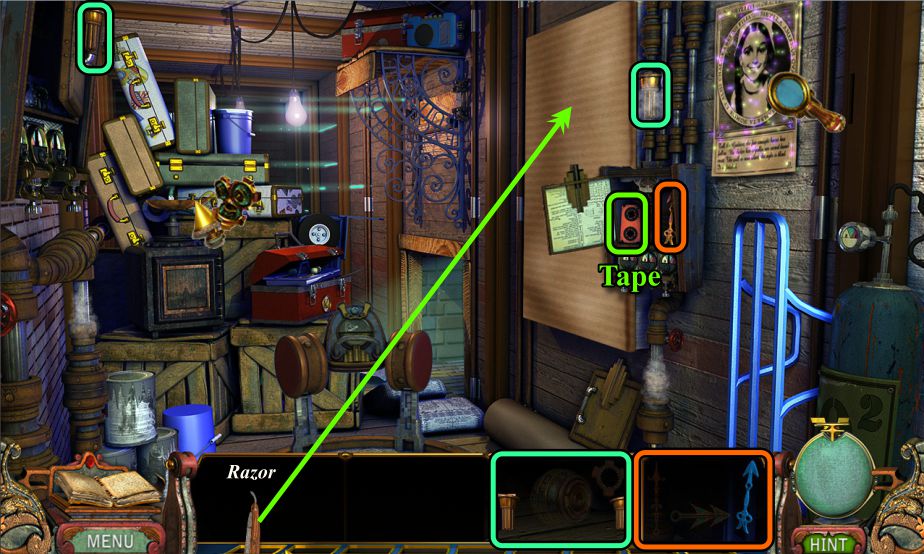
Storage Room
Open the utility box and take the Tape.
Collect the other parts, then zoom in on the paper on the wall.
Use the Razor to remove the paper.
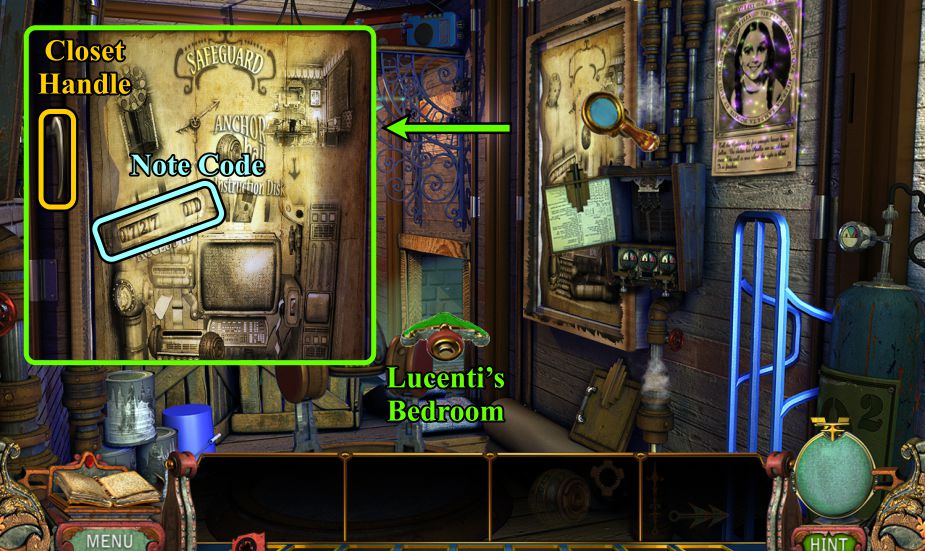
Screenshot
Zoom in on the wall, note the code, and take the Closet Handle.
Go through the opening to Lucenti's Bedroom.
Screenshot
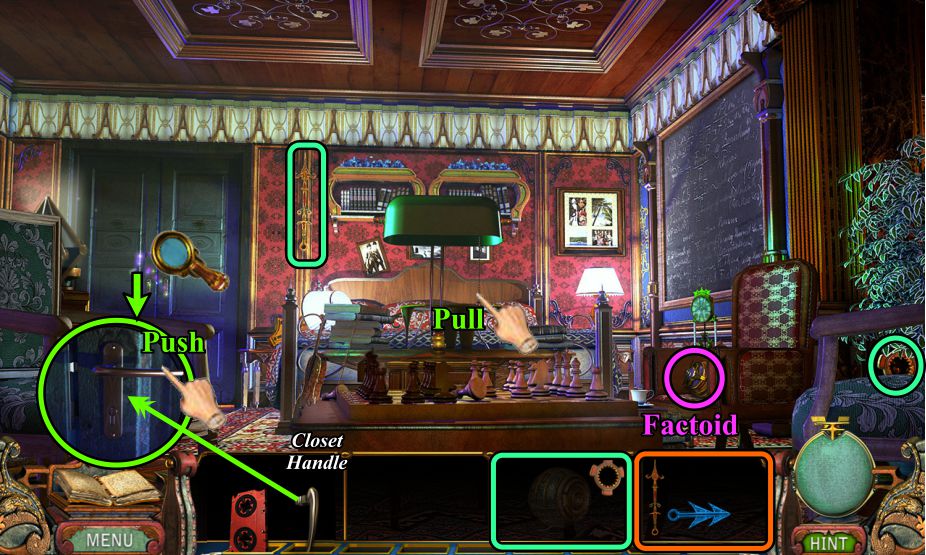
Lucenti's Bedroom
Pull the light switch, collect all available parts and grab the Factoid.
Zoom in on the closet, place the Closet Handle, and push to open.
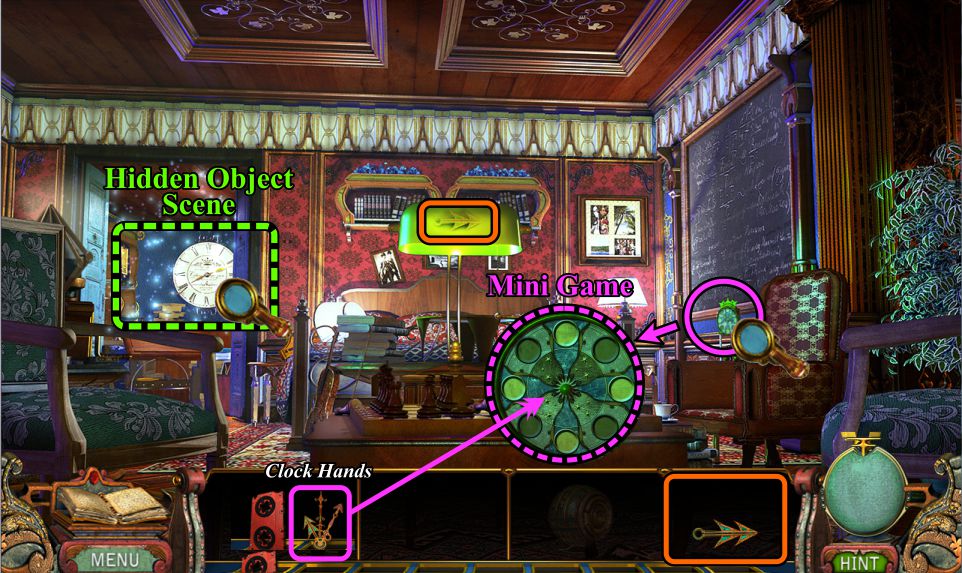
Screenshot
Collect the last Clock Hand, and zoom in on the clock to place the hands for a Mini Game.
Play the Hidden Object Scene in the closet.
Screenshot
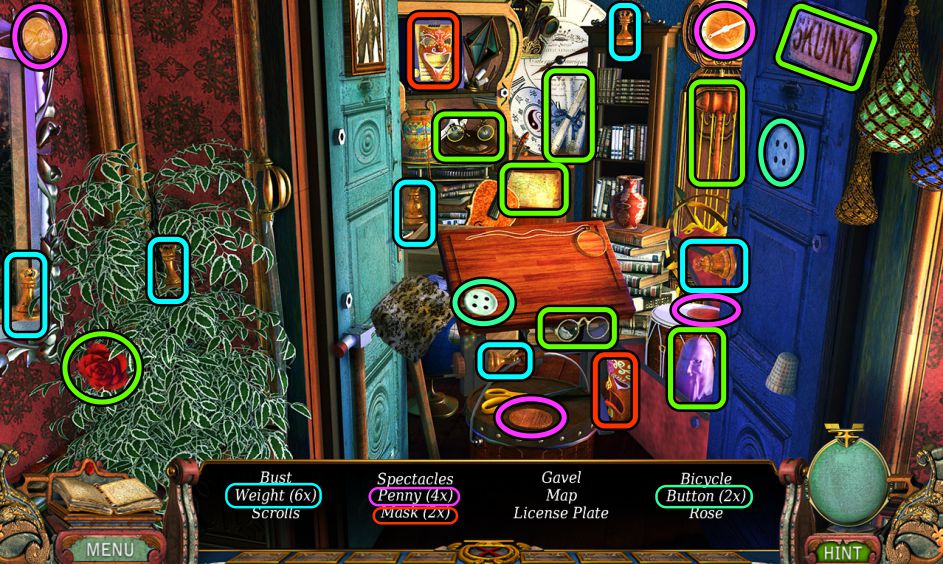
Closet Hidden Object Scene
Move the cloth on the table to find a Button.
Collect everything on your list and you will get the 6 Weights.
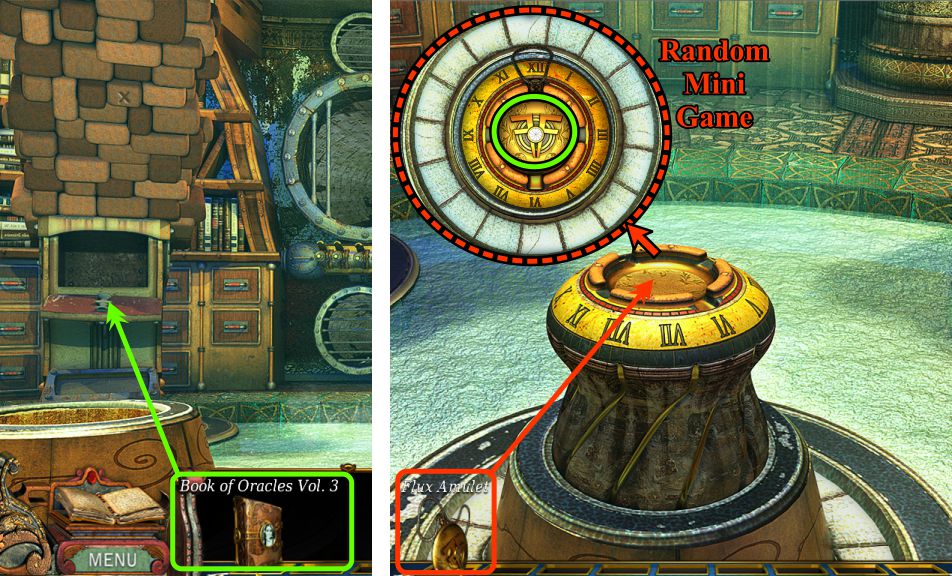
Screenshot
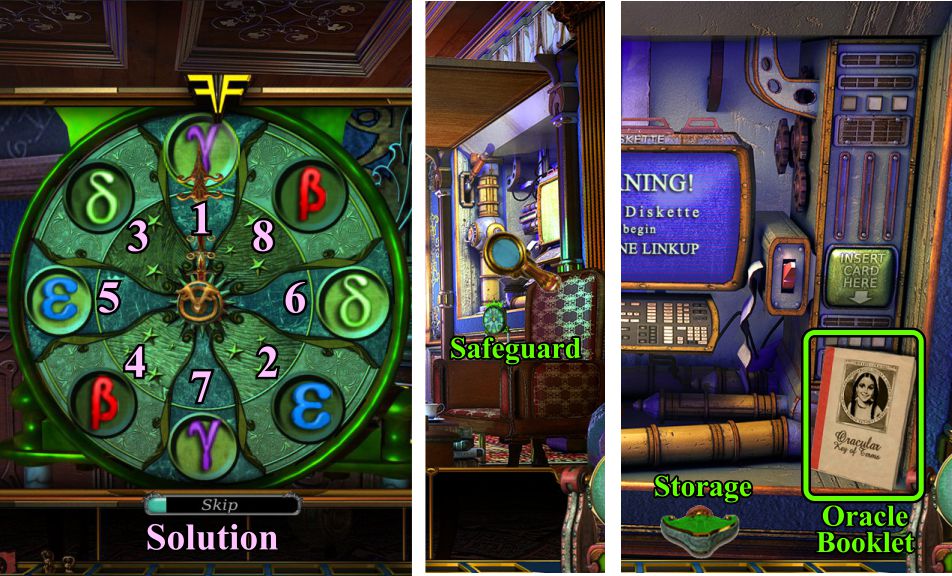
Clock and Safeguard
See the screenshot for the order to press the clock symbols.
Zoom in on the Safeguard and take the Oracle Booklet.
Go to the Storage Room.
Screenshot
Storage Room
Zoom in on the poster and place the Oracle Booklet for a Mini Game.
Place the Weights as shown to trigger another Mini Game. See the screenshot for the solution.
Place the Tape in the recorder, play it, and take the Diskette that appears.
Take the elevator to the Chamber below.
Screenshot
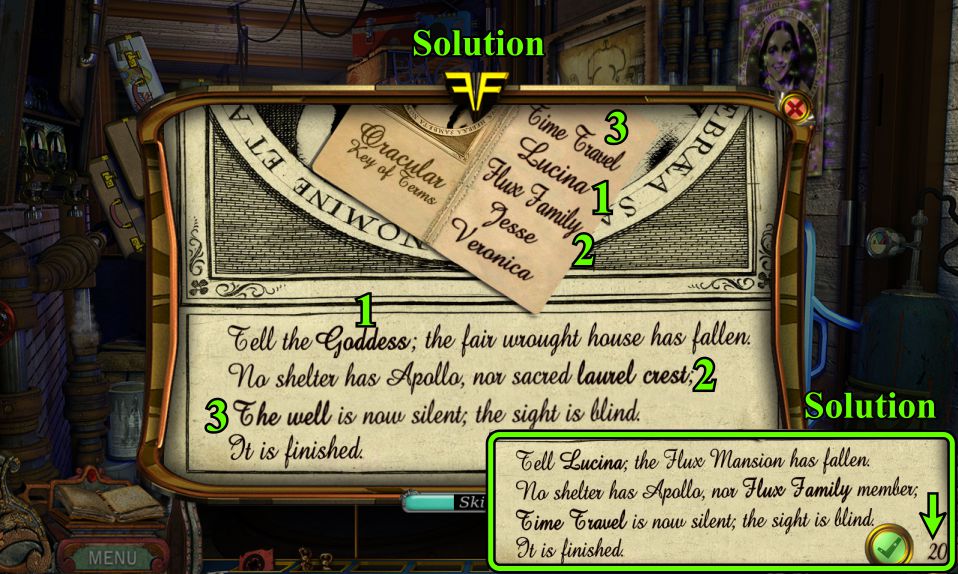
Oracle Poster Mini Game
Replace the words from the booklet on the poster as numbered in the screenshot.
Note the number 20 in the corner of the solution.
Screenshot
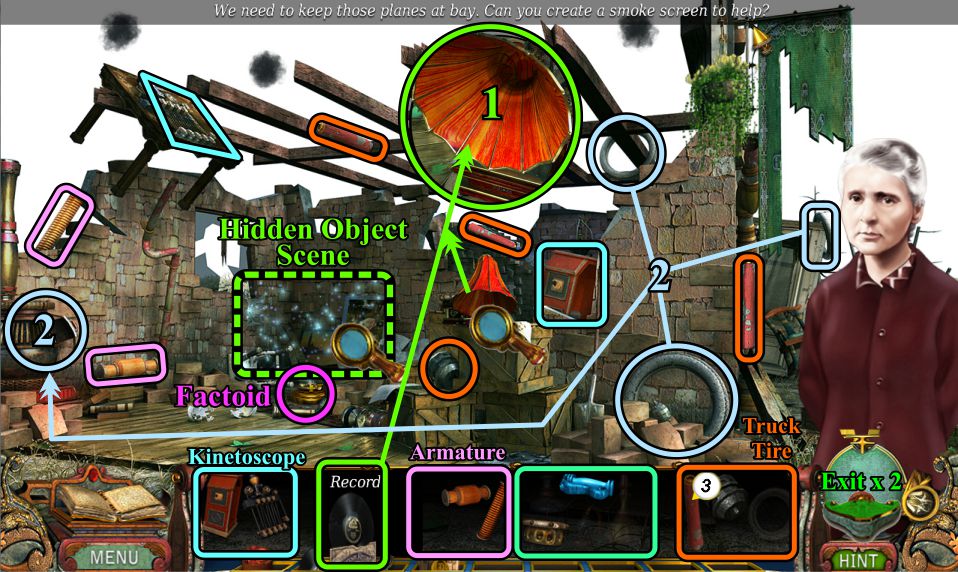
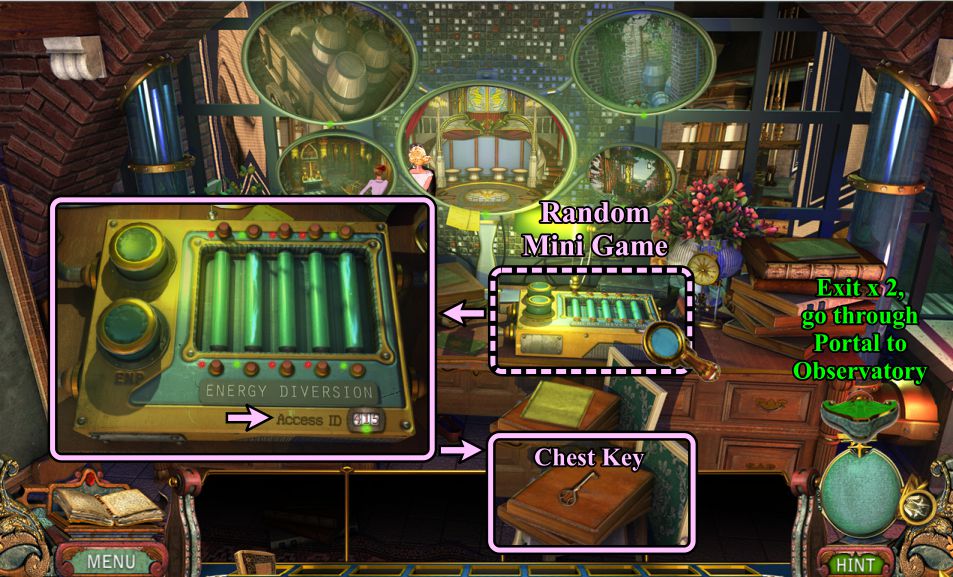
Apollo Chamber
Play the Hidden Object Scene.
Zoom in, place the Gas Valve Handle, and pull down to shut off the gas.
Collect the Anchor Ball.
Take the elevator and go to the Time Safeguard.
Screenshot
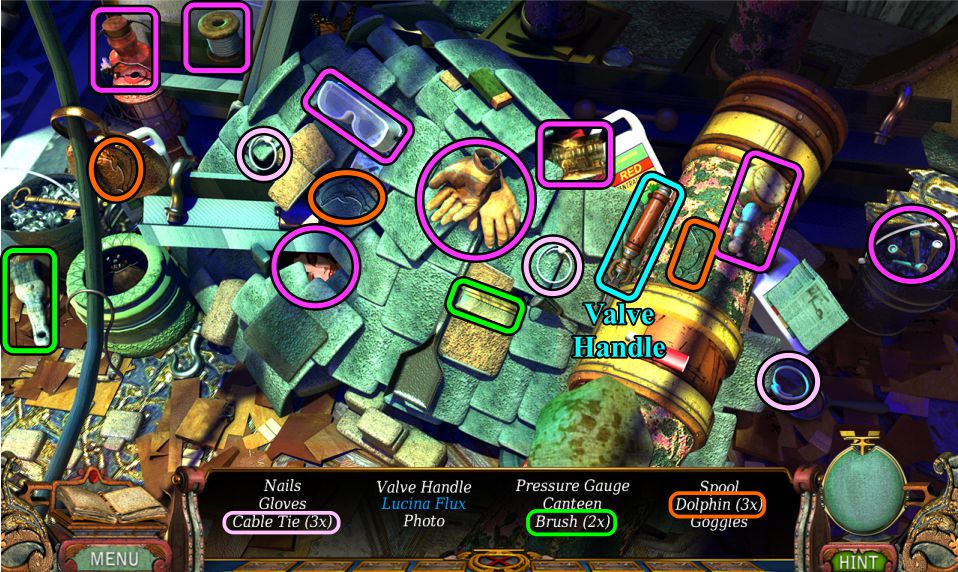
Apollo Chamber Hidden Object Scene
Zoom in to talk to Lucina.
You will get the Valve Handle for your Inventory.
Screenshot
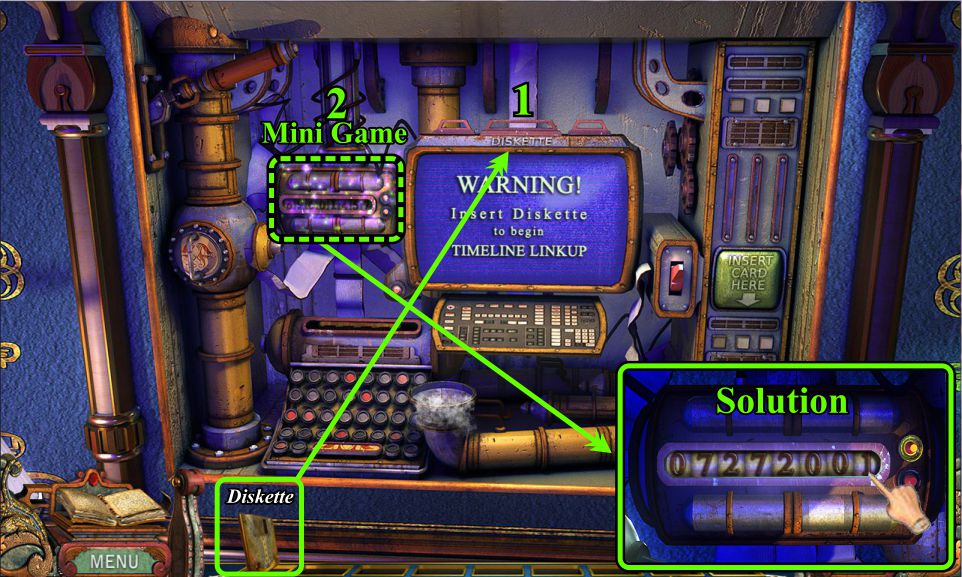
Safeguard Step 1
Place the Diskette.
Enter the code for the Mini Game...solution in screenshot.
Screenshot
Safeguard Step 2 and 3
Take the Punch card and place it.
Flip the switch to turn on the machine.
Screenshot
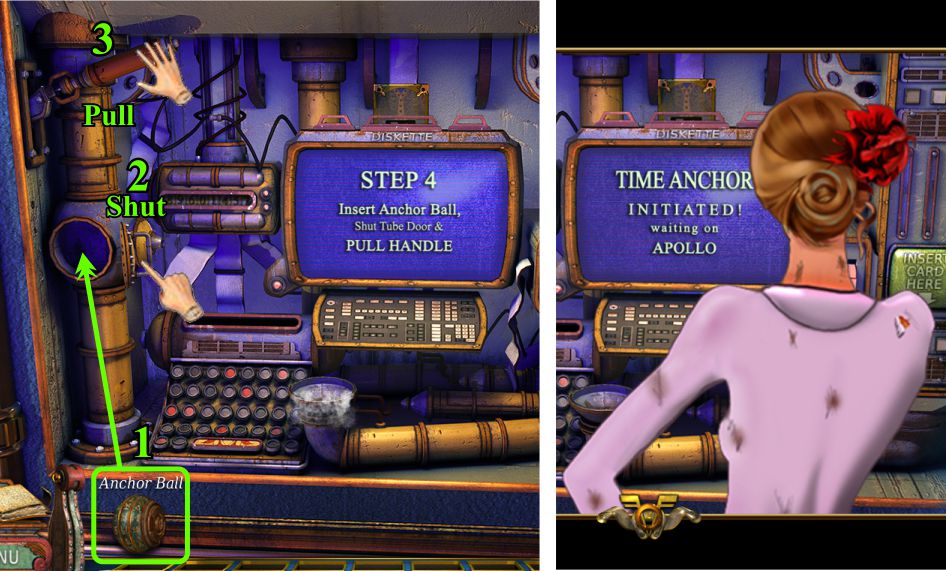
Safeguard Step 4
Place the Anchor Ball.
Shut the door.
Pull the Handle.
The time anchor is initiated so watch the cut scene.
Screenshot
Chapter 3: Lost in Time
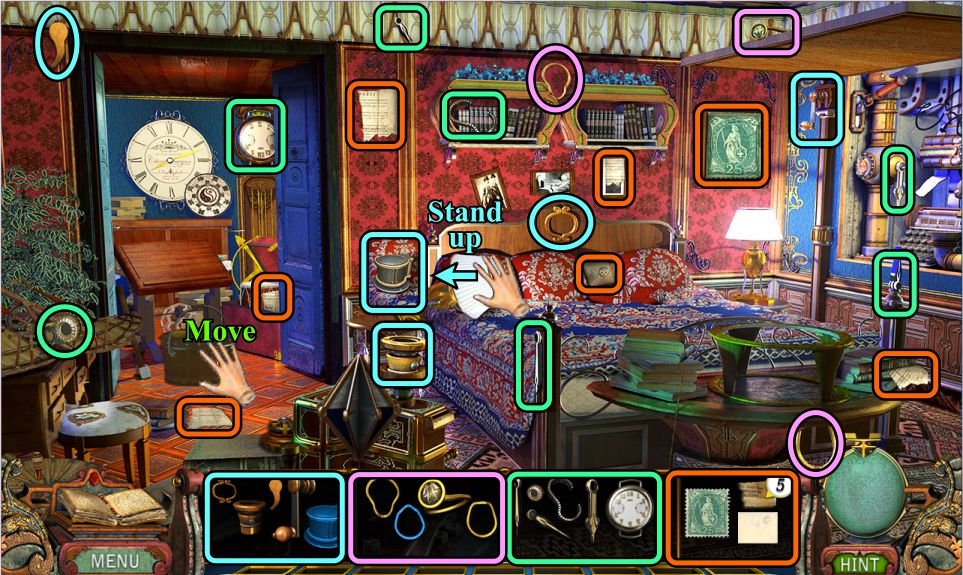
Lucenti's Bedroom
Collect all the available fragments.
Stand up the lamp to find on piece.
Move the box in the closet.
Screenshot
You will end up with a Pencil Sharpener, a 1920s Watch, and a note from Lucenti in your Inventory.
Note the Portal Stand you uncovered in the closet.
Collect the Factoid, and place Lucenti's Note on the stand for a Mini Game.
Assemble it as shown in the screenshot solution, and note the date marked.
Take the last piece of the Portal Key.
Open the drawer at the left.
Screenshot
Play the Mini Game in the drawer.
Your goal is to rotate the rings starting from the inside until you get the solution shown in the screenshot.
Place the Portal Key and enter the Portal that appears.
You are going to visit Amelia Earhart in 1937.
Screenshot
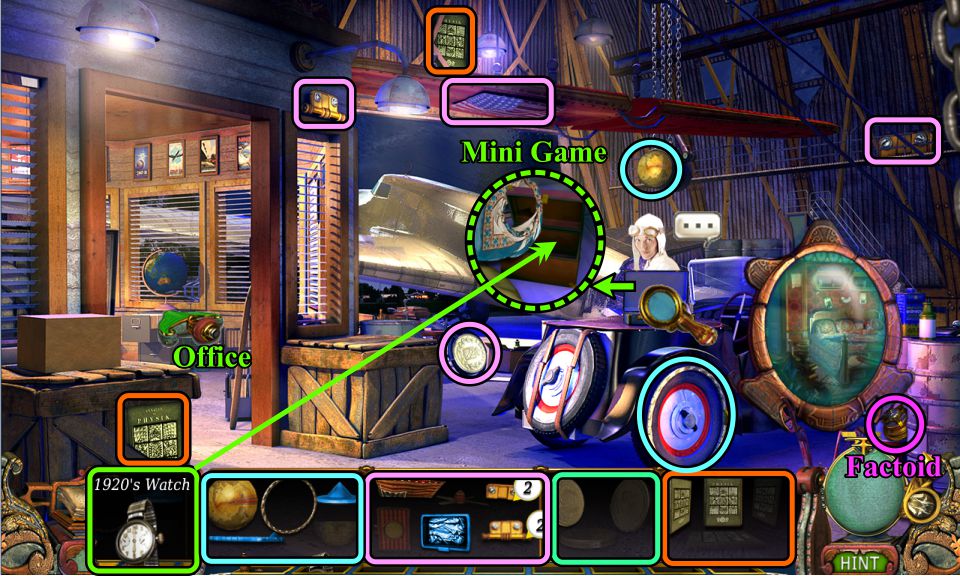
Amelia Earhart's Hangar
Talk to Amelia, zoom in, and place the 1920s Watch to trigger a Mini Game.
She will give you the Scarf.
Collect the Factoid and all available object pieces.
When you're finished in the Hangar, go to the Office.
Screenshot
Watch Mini Game
Place the gears as shown in the screenshot.
Screenshot
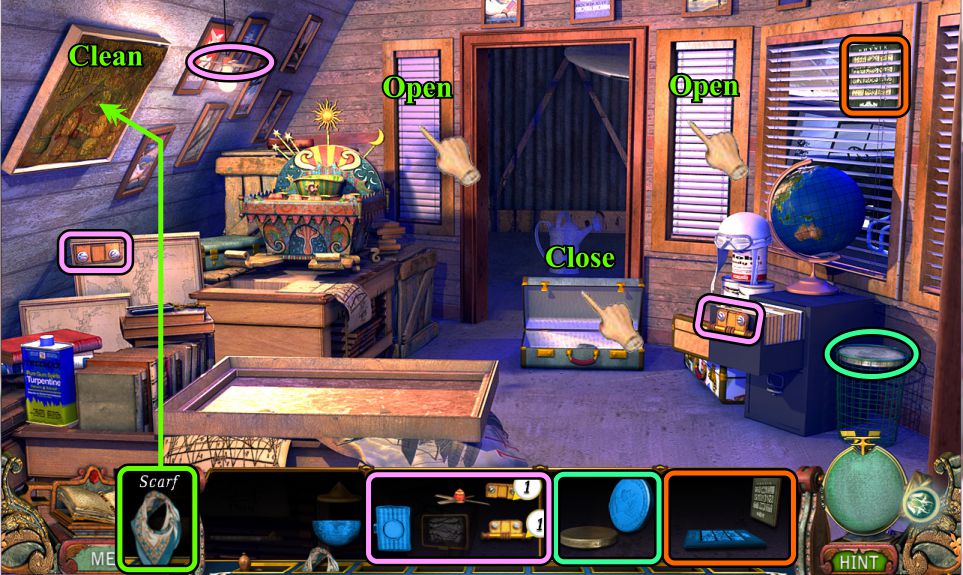
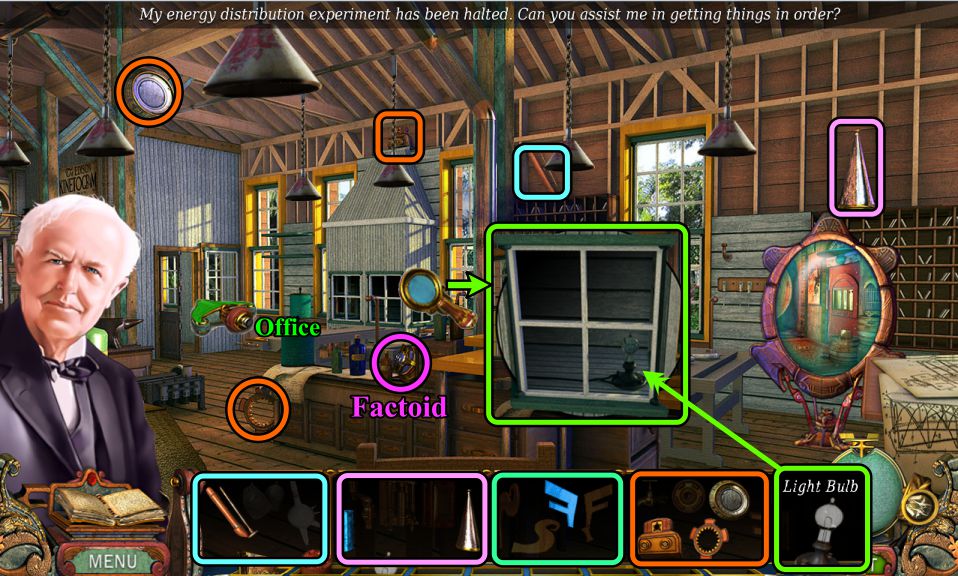
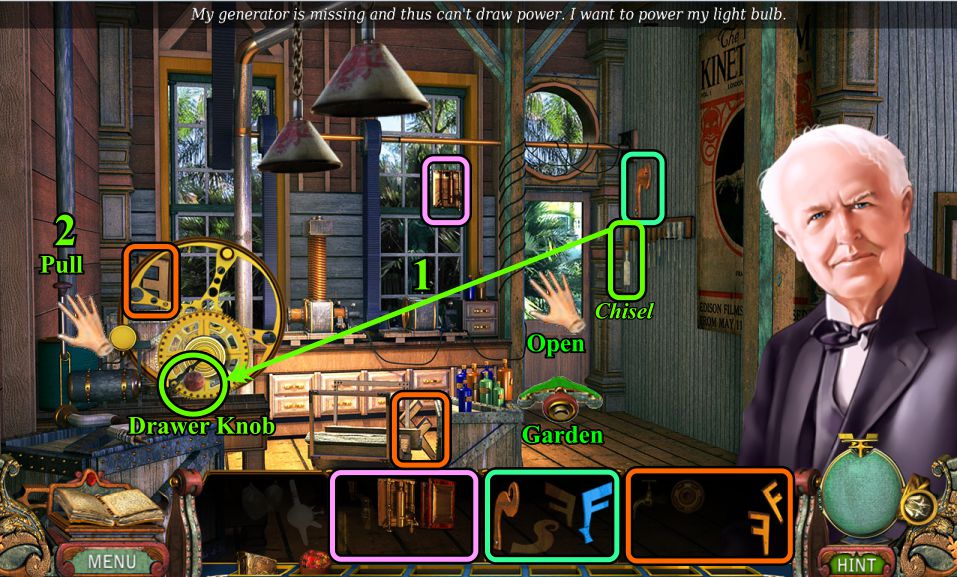
Office
Close the suitcase, and open the blinds shown in the screenshot.
Collect all available parts.
Use the Scarf to clean the poster on the left wall.
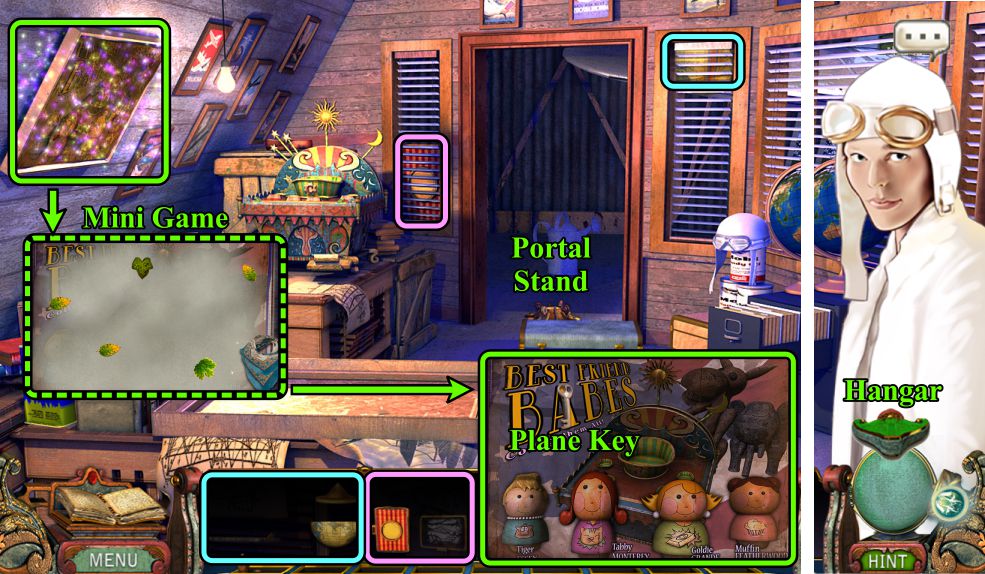
Screenshot
Collect the parts that are now available, and note the Portal Stand.
Play the Mini Game to completely clean the poster with the scarf.
Click, hold, and move the scarf around to get rid of the dust and leaves.
Take the Plane Key.
Screenshot
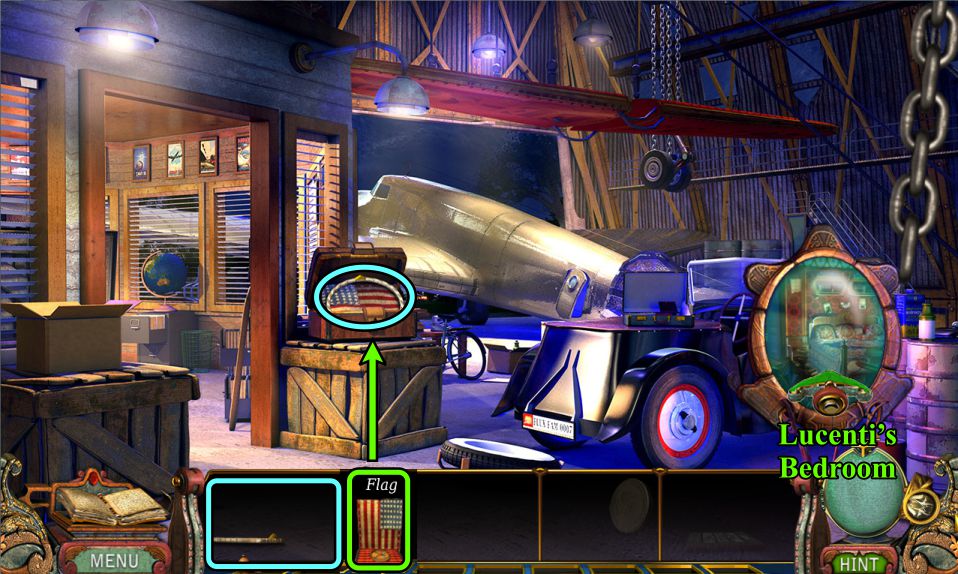
Hangar
Open the plane door with the Plane Key and play the Hidden Object Scene.
Use the Box Cutter to cut the straps on the spare tire.
Collect the available part.
Open the box with the Box Cutter and take the Flag piece.
Screenshot
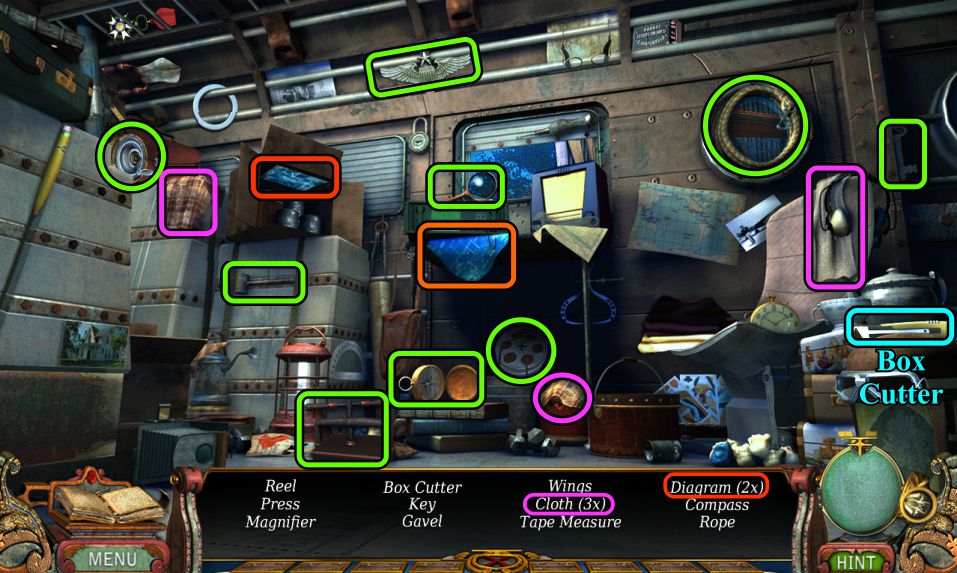
Plane Hidden Object Scene
Collect everything on your list to get the Box Cutter.
Open the box to get one of the Diagram pieces.
Screenshot
Hangar
Place the Flag on the box and take the last Globe part.
Go through the Portal to Lucenti's Bedroom.
Screenshot
Lucenti's Bedroom
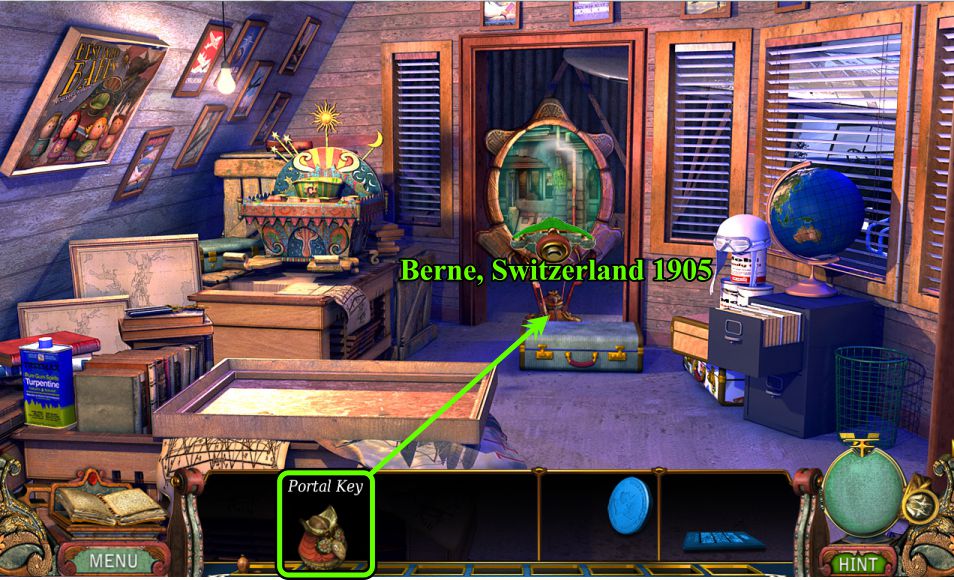
Place the Globe on the table and take the Portal Key.
Enter the portal and go to the Hangar Office.
Screenshot
Hangar Office
Place the Portal Key on the stand and go through the portal to Berne, Switzerland in 1905.
Screenshot
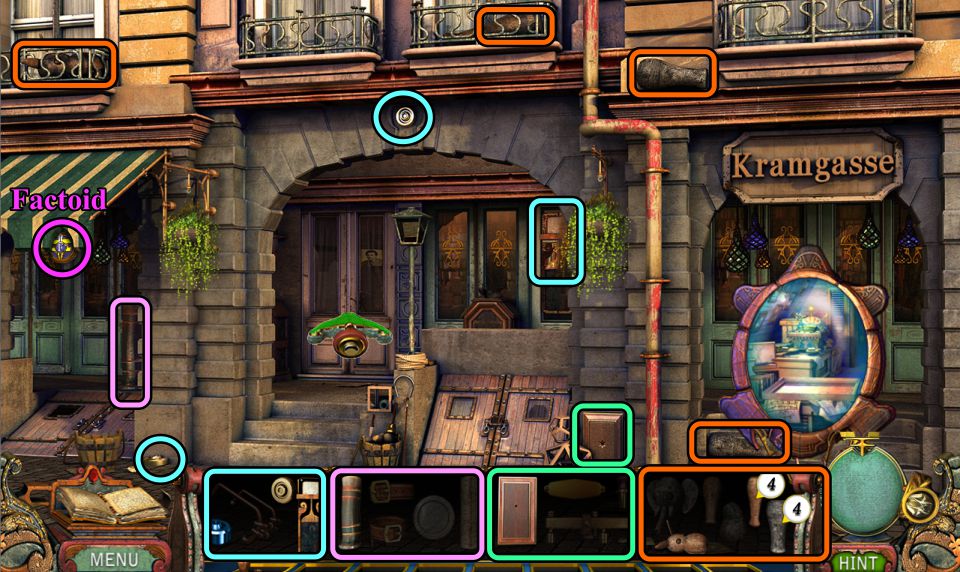
Street in Berne
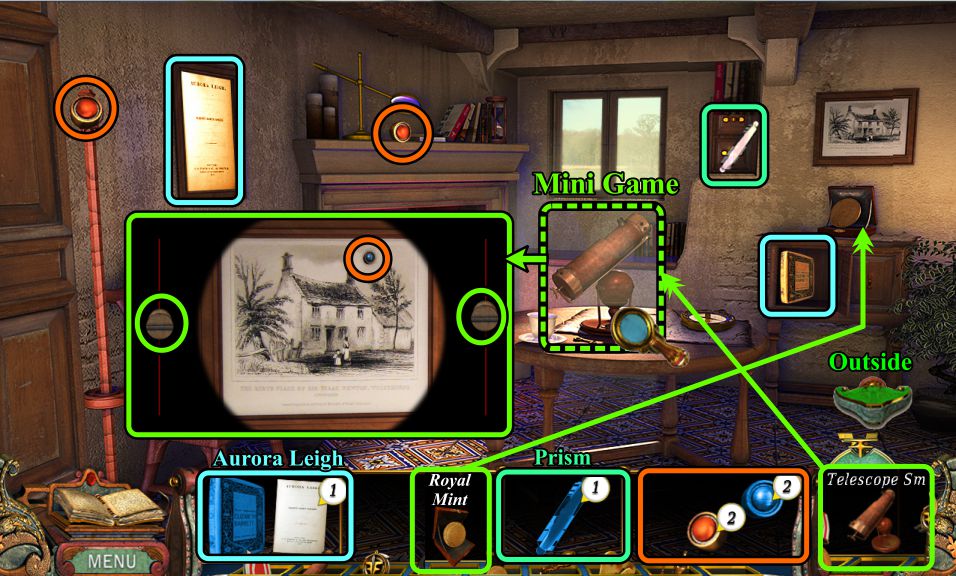
Collect all the parts and the Factoid before entering the shop.
Screenshot
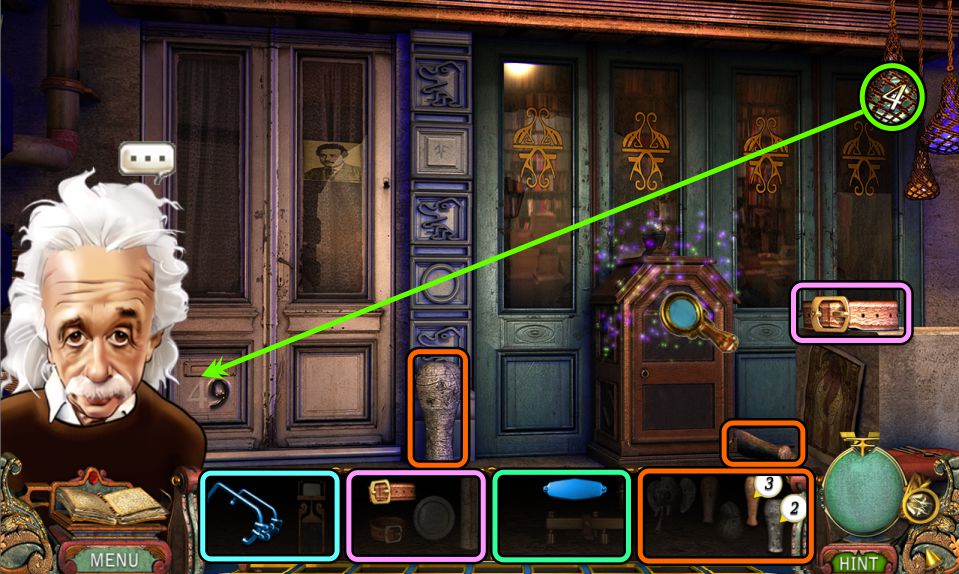
Shop
Einstein shows up needing your help, so collect the available parts and place the 4 as shown in the screenshot.
Screenshot
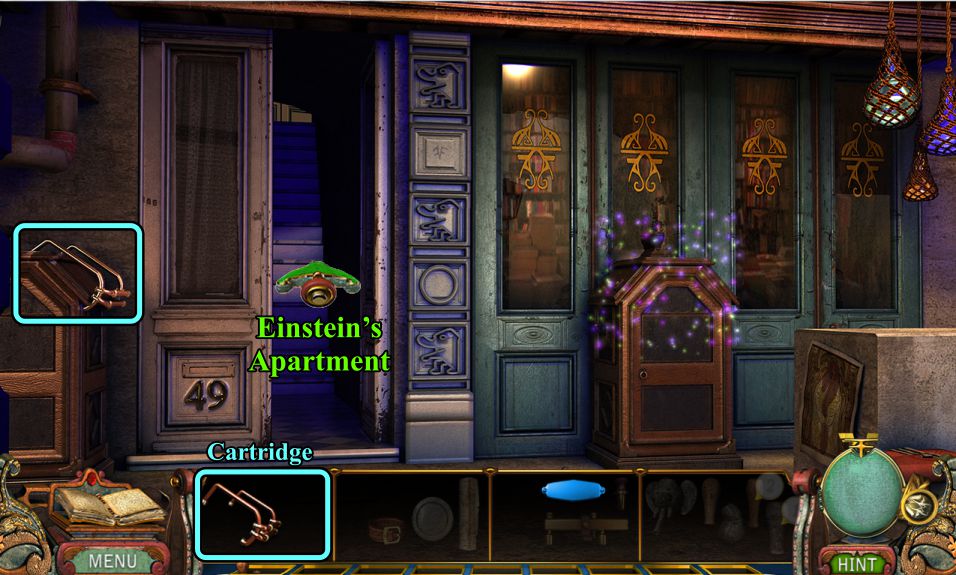
Collect the last part of the Cartridge and go up the stairs to Einstein's apartment.
Screenshot
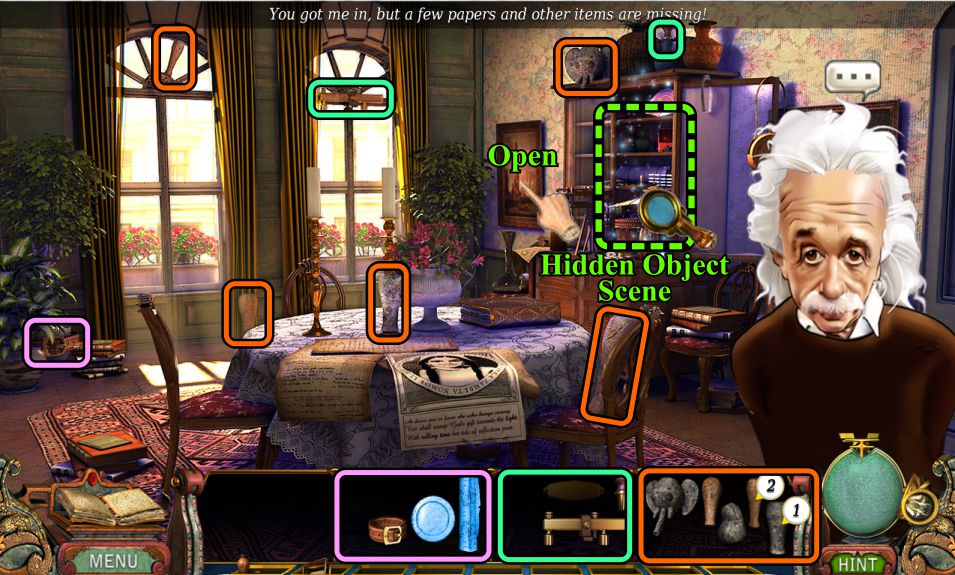
Einstein's Apartment
Einstein still needs your help, so collect all the available parts, and play the Hidden Object Scene.
Screenshot
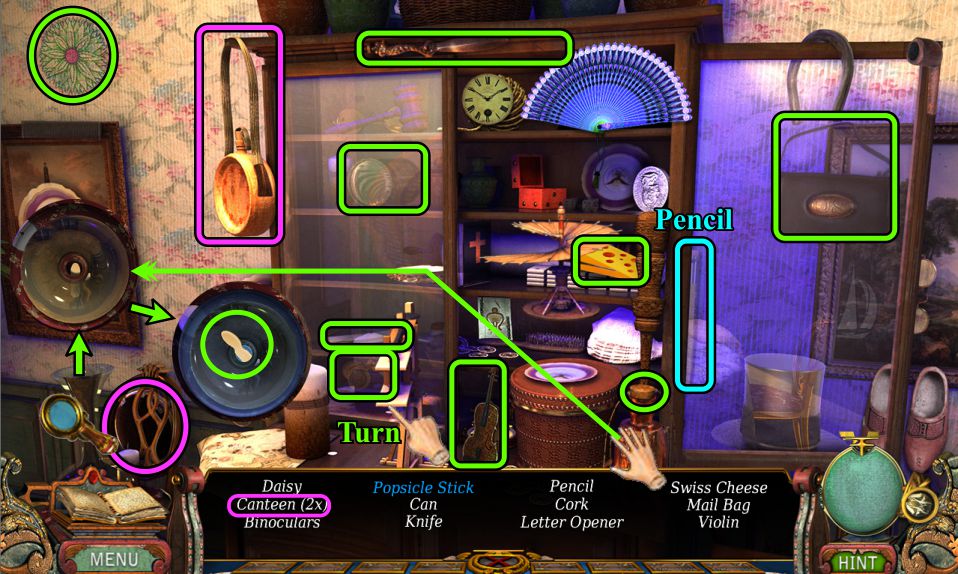
Cabinet Hidden Object Scene
Collect everything on your list.
Turn the object in front to find the Binoculars.
Once you have removed the cork, use the decanter to fill the vase at the left with liquid so the Popsicle Stick will float to the top.
You will get the Pencil for your Inventory.
Screenshot
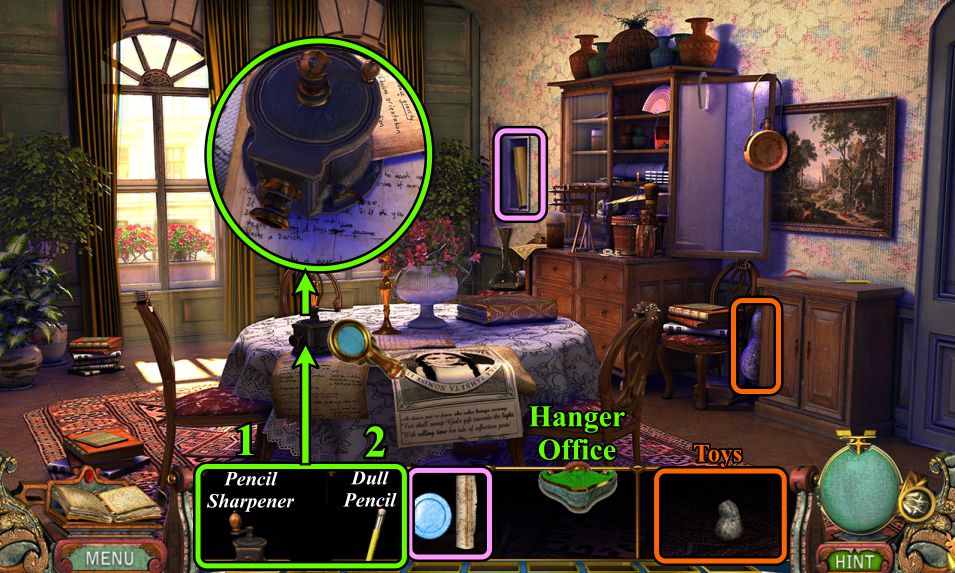
Einstein's Apartment
Collect the uncovered parts and place the Pencil Sharpener on the table.
Zoom in and sharpen your Dull Pencil.
Go down to the street and through the portal to the Hangar Office.
Screenshot
Hangar Office
Place the Toys on the game table to trigger a Mini Game.
Use the trays to move the parts around to assemble the Best Friend Babes as shown in the screenshot.
Some Swiss Coins will go into your Inventory.
Go to the Hanger and through the portal to Lucenti's Bedroom.
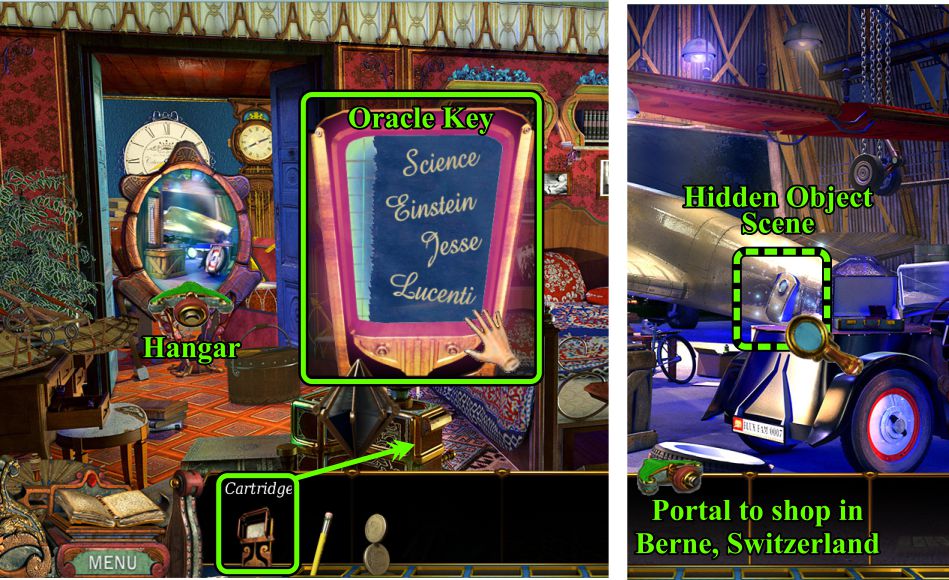
Screenshot
Lucenti's Bedroom and Amelia's Hangar
Place the Cartridge on the projector and take the Oracle Key.
Go through the portal to the Hangar.
Zoom in on the plane for a Hidden Object Scene.
Go to the Office and through the portal to the Shop in Berne.
Screenshot
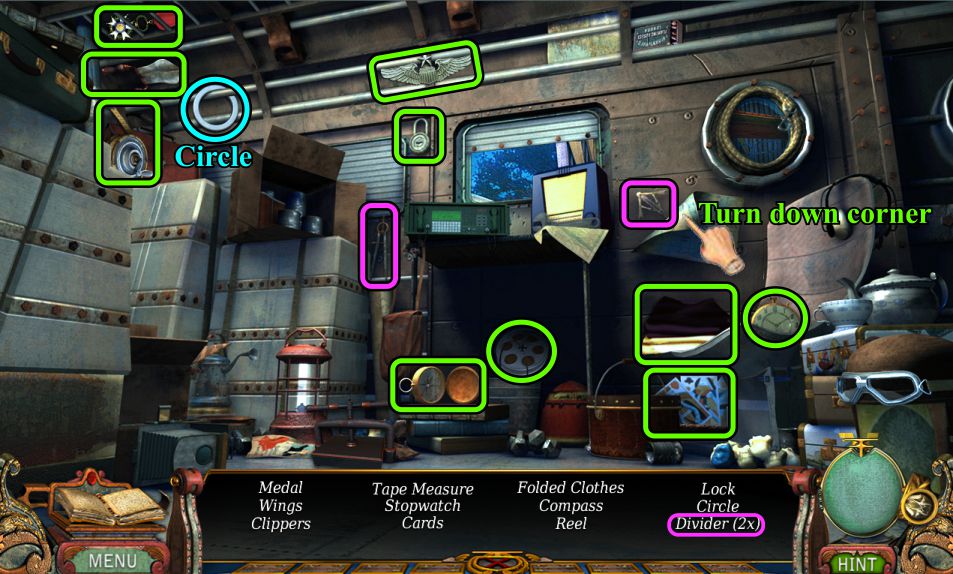
Plane Hidden Object Scene
Turn down the corner of the map to find one of the Dividers.
A decorative Circle will go into your Inventory.
Screenshot
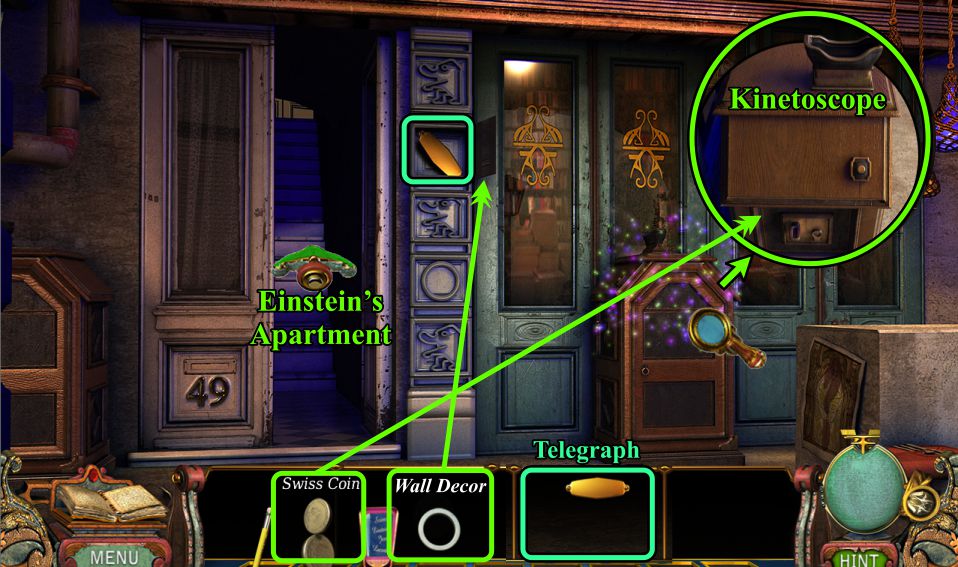
Shop in Berne
Place the Wall Decor to find the final piece of the Telegraph.
Zoom in on the Kinetoscope and place your Swiss Coins to watch a movie.
Go upstairs to Einstein's Apartment.
Screenshot
Einstein's Apartment
Zoom in on the oracle poster and place the Oracle Key for a Mini Game.
Zoom in and place the Telegraph for a Mini Game.
Tap the Telegraph arm when the dots and dashes get to the center crosshairs.
Einstein will give you an Oracle Piece.
Go outside and use the portal and go to the Hangar Office.
Screenshot
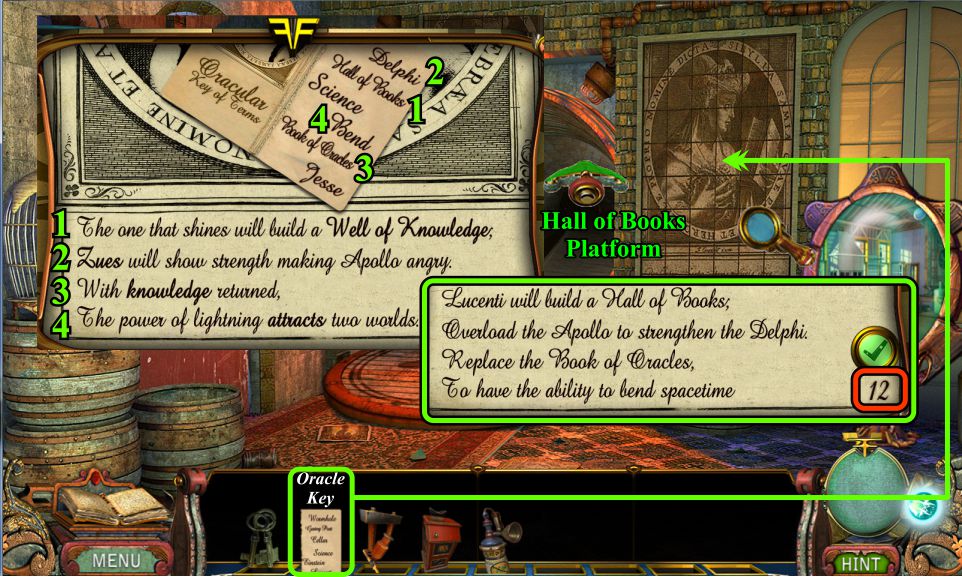
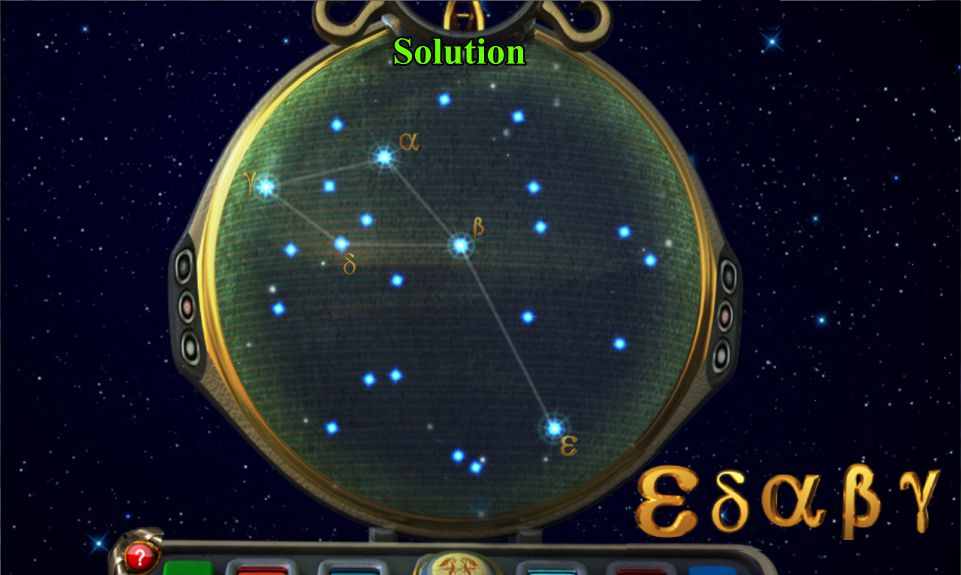
Oracle Poster Mini Game
Replace the words from the Oracle Piece on the poster as numbered in the screenshot.
Note the number Greek letters in the corner of the solution.
Screenshot
Hangar Office
Place the Map and the table and use the Sharp Pencil on it to trigger a Puzzle.
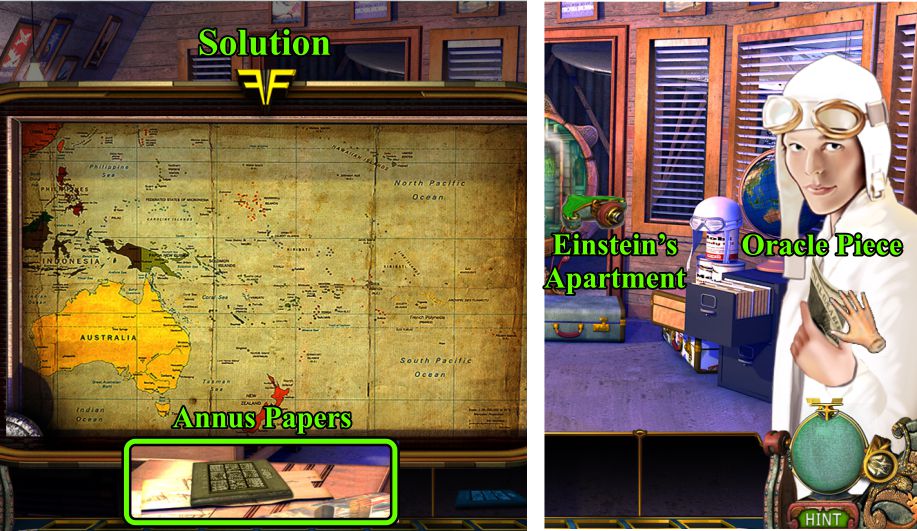
Screenshot
Map Puzzle
Put the Map together so it looks like the solution in the screenshot.
Collect the Annus Papers and take the Oracle Piece from Amelia.
Go through the portal and up to Einstein's Apartment.
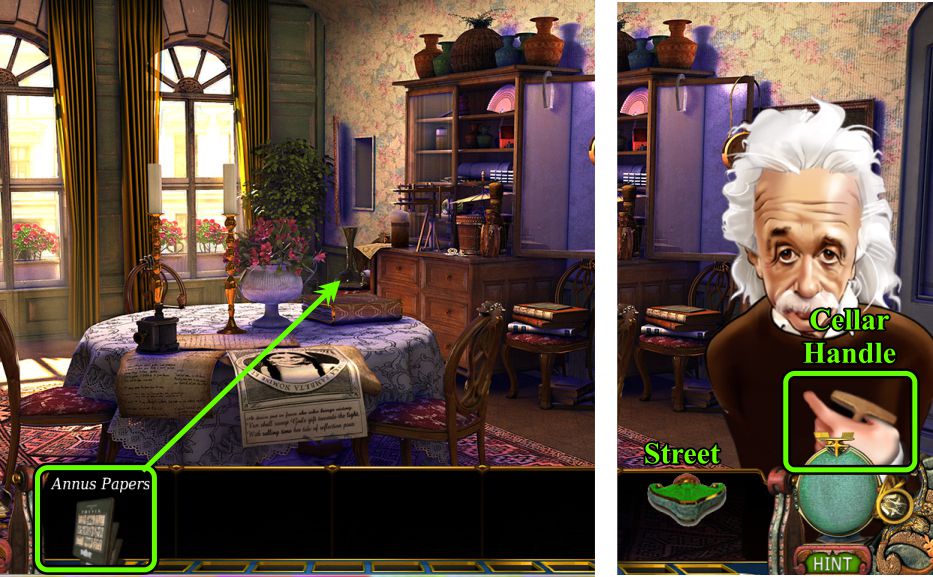
Screenshot
Einstein's Apartment
Place the Annus Papers on the table where they belong.
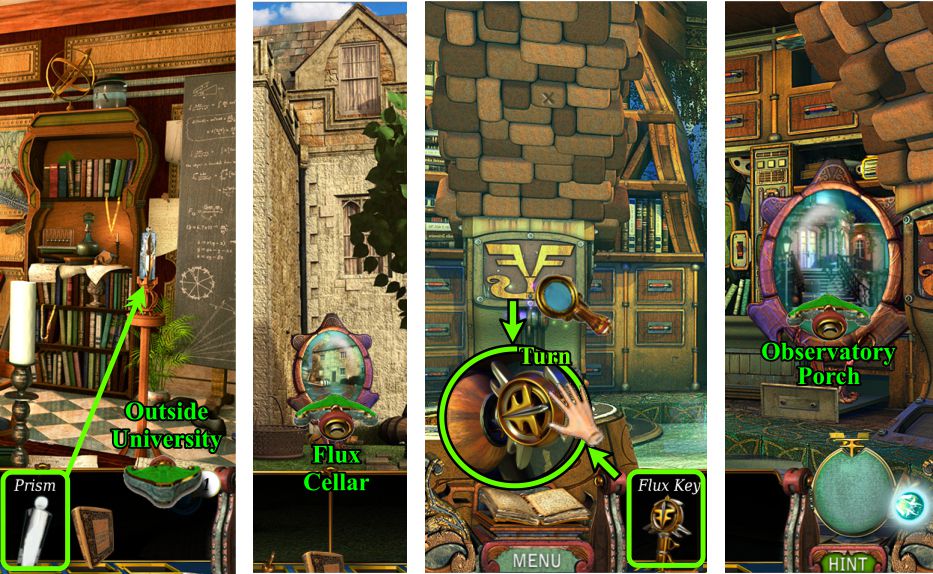
Take the Cellar Handle from Einstein and go outside.
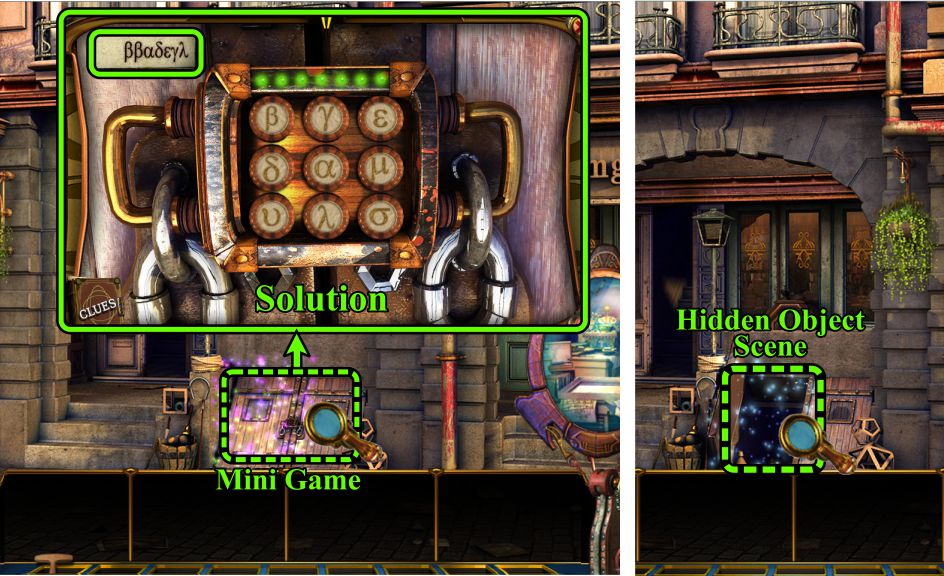
Screenshot
Street
Zoom in on the cellar door and use the Greek letter code to open the lock.
Play the Hidden Object Scene in the cellar.
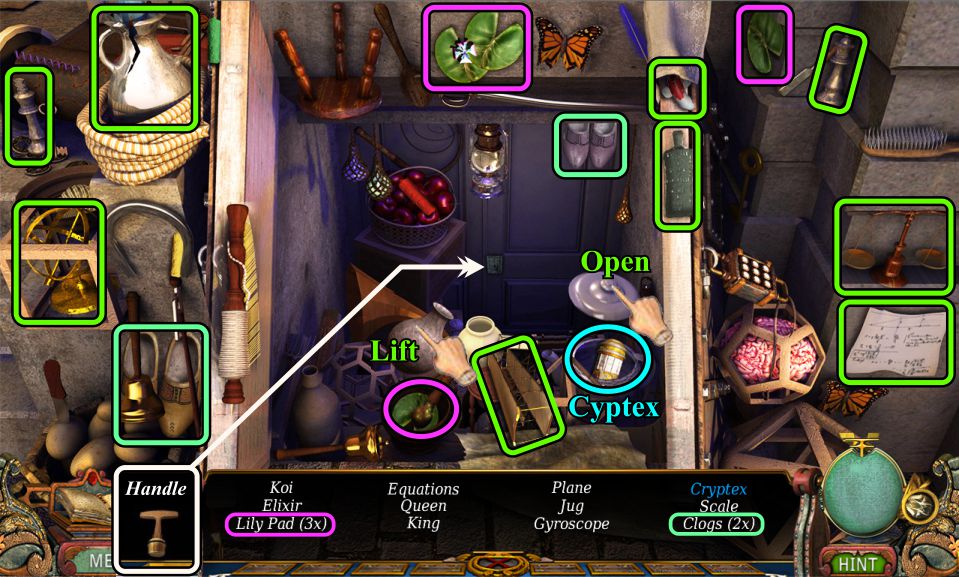
Screenshot
Cellar Hidden Object Scene
Collect everything on your list.
Lift the vase to find a Lily Pad.
Open the jar to find the Cryptex that will go into your Inventory.
Someone is knocking on the other side of the door, so zoom back in and place the Handle on the door.
Watch the cut scene to end the chapter.
Screenshot
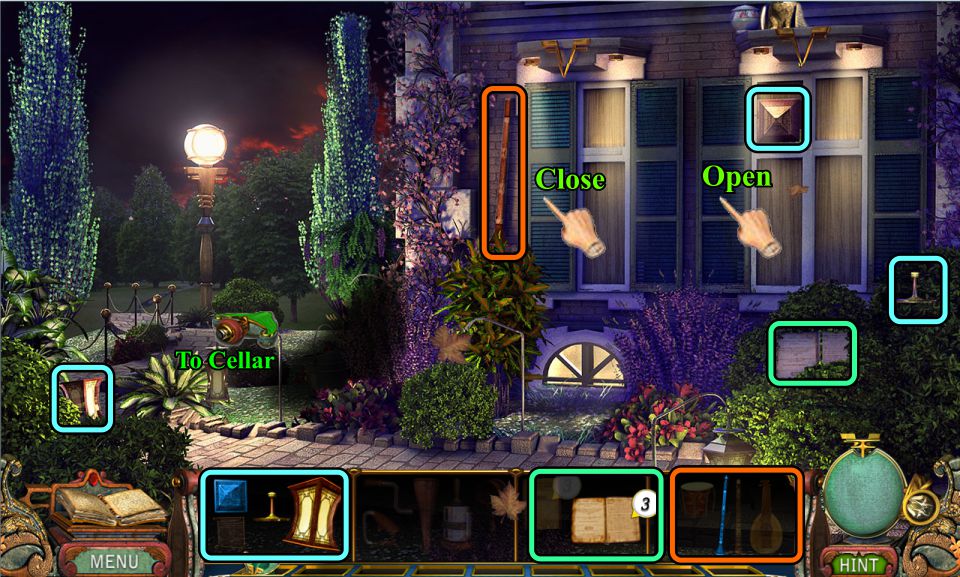
Chapter 4: Full Circle
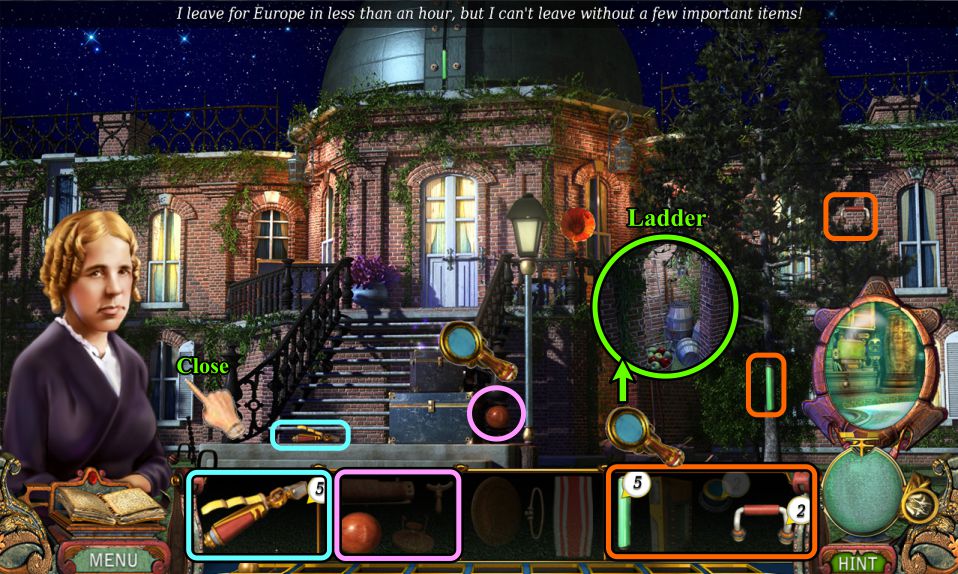
Outside Flux Mansion
Open and close the indicated shutters in the screenshot, and collect all available parts.
Go around the corner of the mansion to the outside of the cellar.
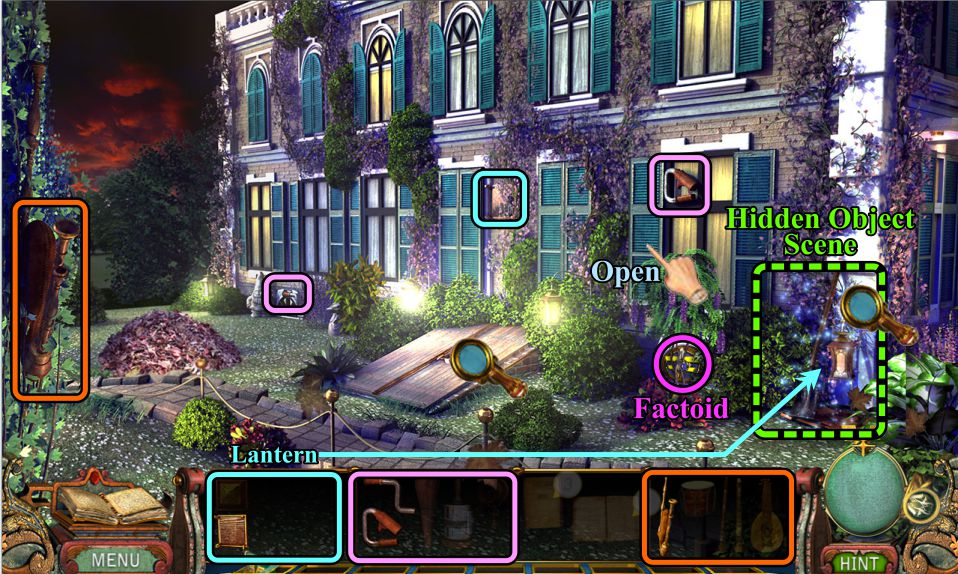
Screenshot
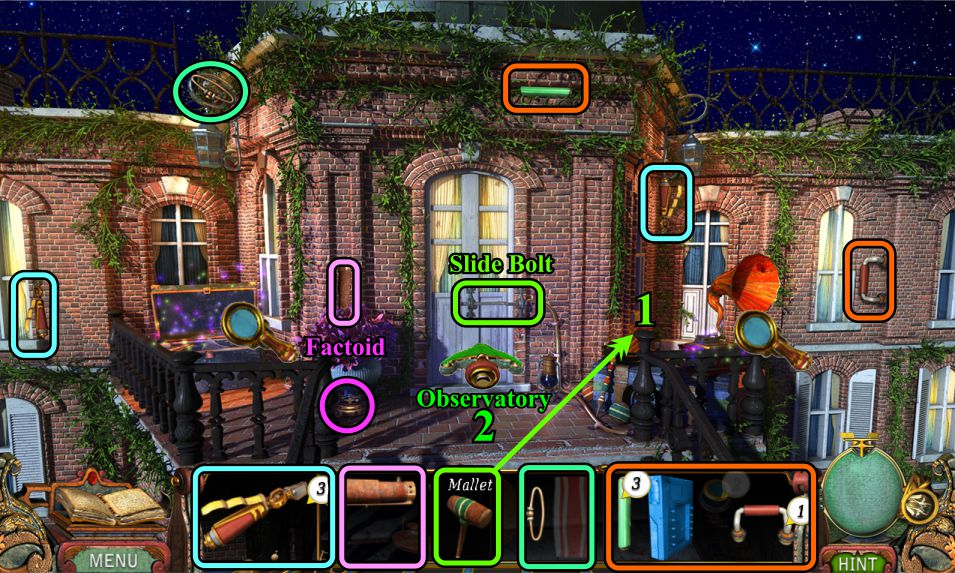
Back of the Mansion
Open the shutter to collect all of the parts.
Examine the cellar doors and pick up the Factoid.
Place the completed Lantern as shown to trigger a Hidden Object Scene.
Screenshot
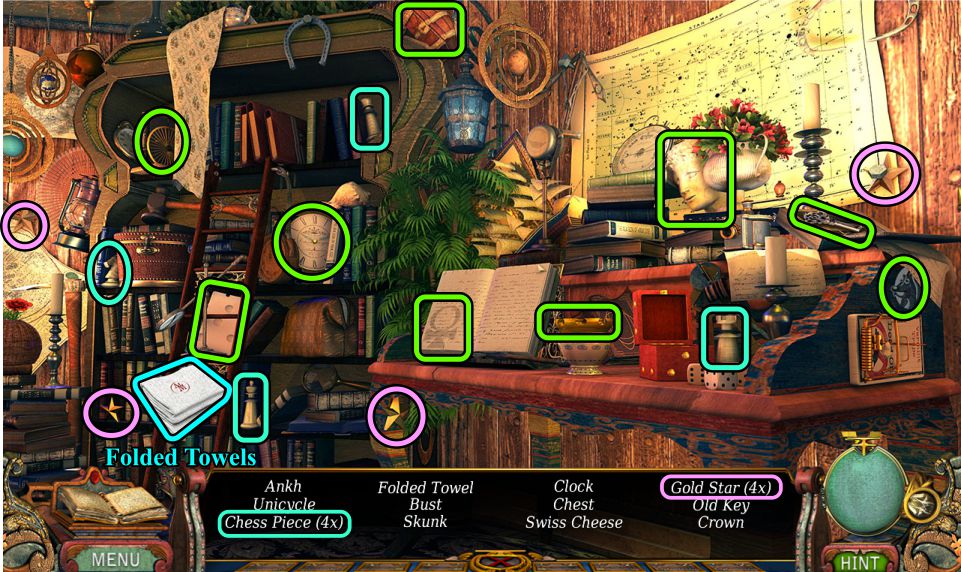
Mansion Hidden Object Scene
Collect everything on your list to get a Slingshot and the Grapes.
Move the shovel to find the Oar.
Use the hammer on the jar on the column to find one of the Apples.
Move the canister to find the Plastic Bottle.
Screenshot
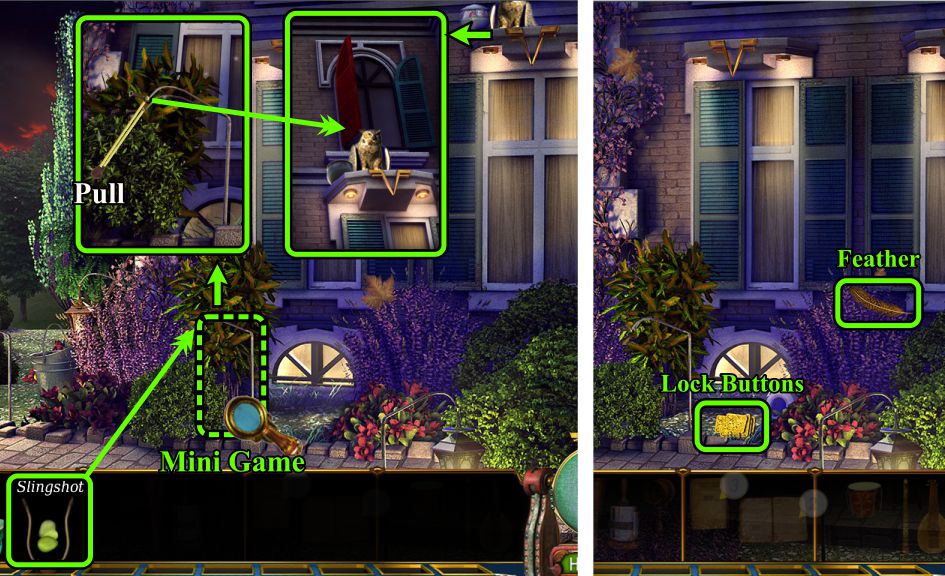
Slingshot Mini Game
Return to the side of the mansion and place the Slingshot on the lantern stand to trigger a Mini Game.
Your goal is to hit the shutter above the owl to scare him away so the jar will fall and you can see what's inside of it.
See the screenshot for the angle to use, and pull on the slingshot.
You may have to try a few times, but your reward will be a Feather and some Lock Buttons.
Return around the corner to the cellar doors.
Screenshot
Cellar Door
Zoom in on the lock and pick it with the Feather.
Place the Lock Buttons for a Puzzle. Swap the pieces to get the shown solution.
Enter the Cellar.
Screenshot
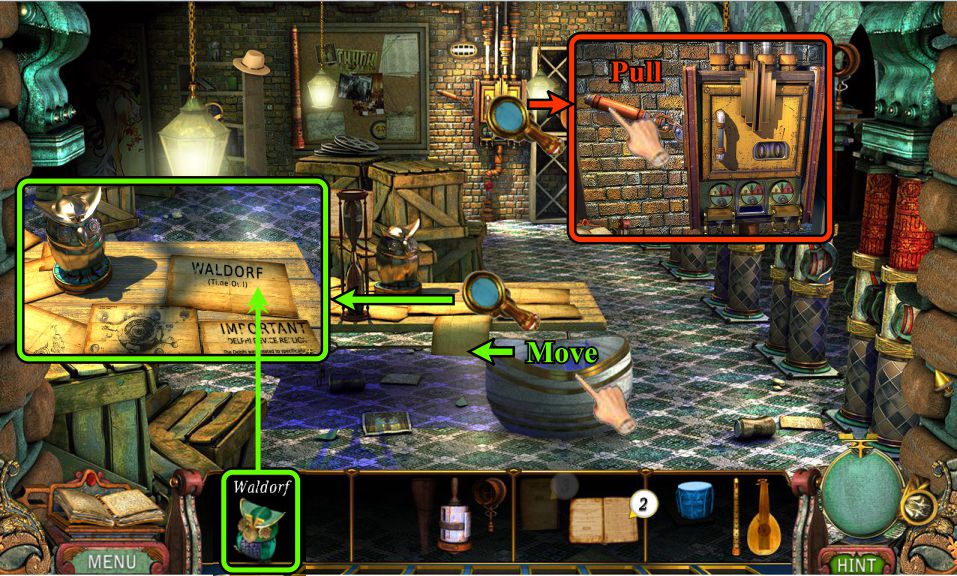
Cellar
Zoom in and place Waldorf where he belongs on the table.
Move the container in front of the table, and zoom in on the electrical panel.
Pull the switch to shed some light in the Wine Cellar.
Screenshot
Collect the Factoid and all available parts.
The Music is now complete and will go into your Inventory.
Go check out the Wine Cellar.
Screenshot
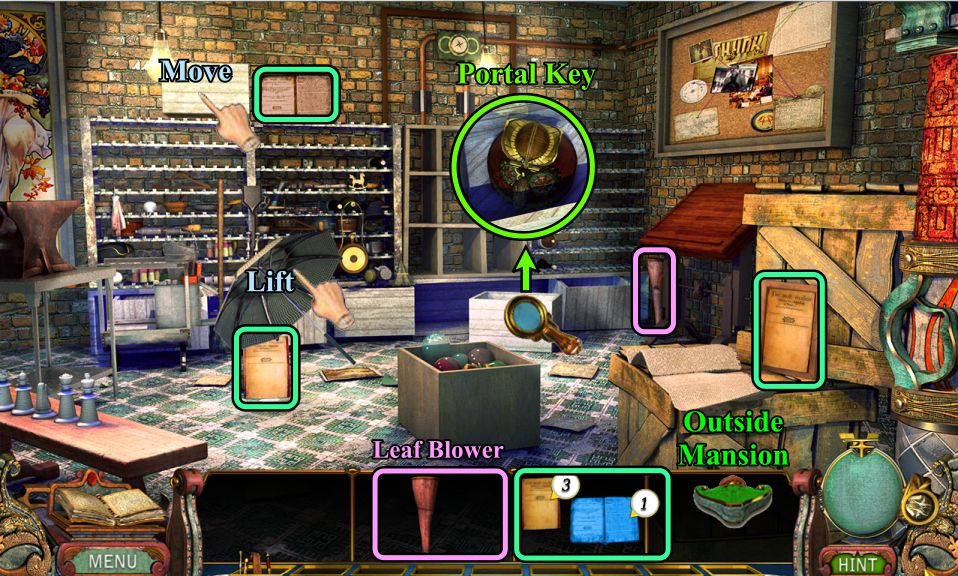
Wine Cellar
Lift the umbrella and move the plaque to find a couple parts.
Look in the box indicated in the screenshot to find a Portal Key.
The Leaf Blower will be complete when you collect the final part; it will go into your Inventory.
The lights go out, so go back outside.
Screenshot
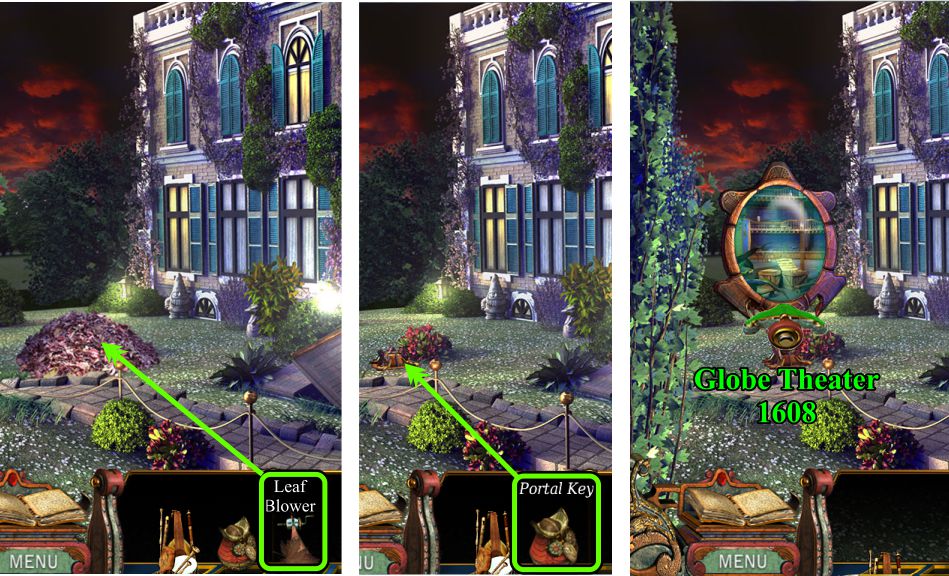
Back of Mansion
Use the Leaf Blower on the pile of leaves to reveal a portal stand.
Place the Portal Key on the stand and go to the Globe Theater in 1608.
Screenshot
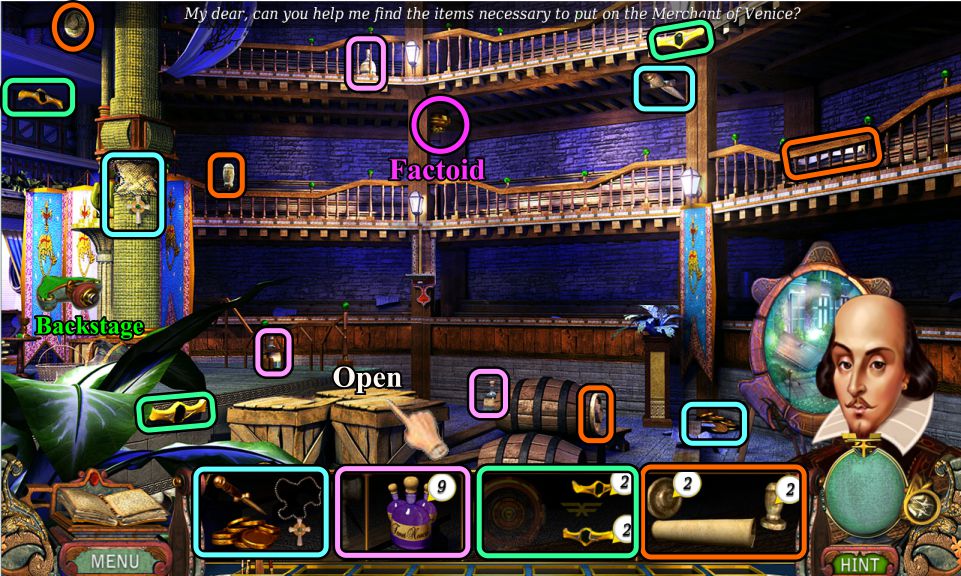
Globe Theater
Shakespeare needs your help, so collect all the available parts and the Factoid.
Open the indicated crate, then go Backstage.
Screenshot
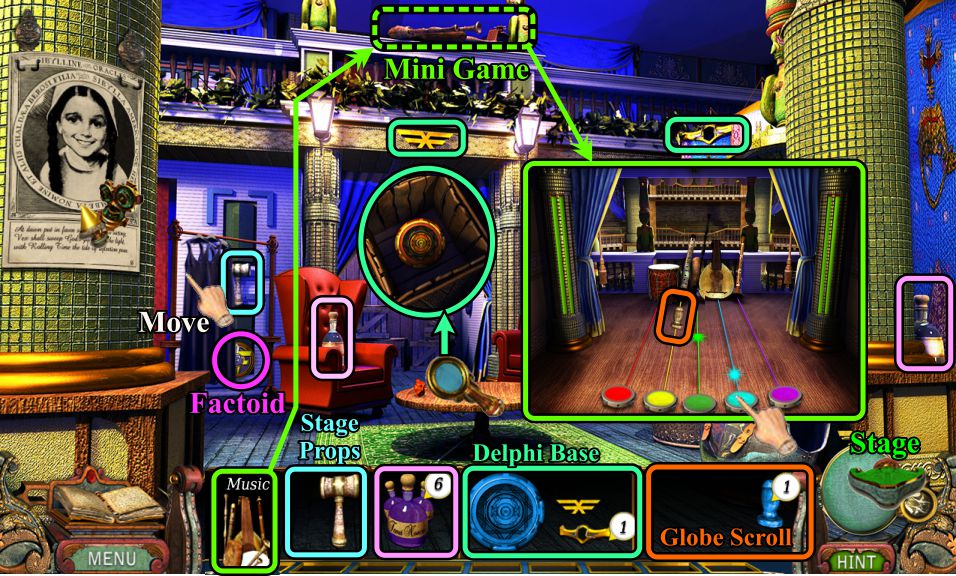
Backstage
Move the dresses on the rack, and place the Music to trigger a Mini Game.
Zoom in on the box in the storage room for one part, then collect the rest of the parts and the Factoid.
You will have completed the Stage Props, Delphi Base, and Globe Scroll, which will all go into your Inventory.
Music Mini Game:
Your goal is to fill up the meters on either side to change them from red to green.
Click on one of the colored tambourines at the bottom when a corresponding color pulse gets to it.
A wrong move will show a red note that will add red to your meters.
Your reward will be the last part of the Globe Scroll.
Return to the Stage.
Screenshot
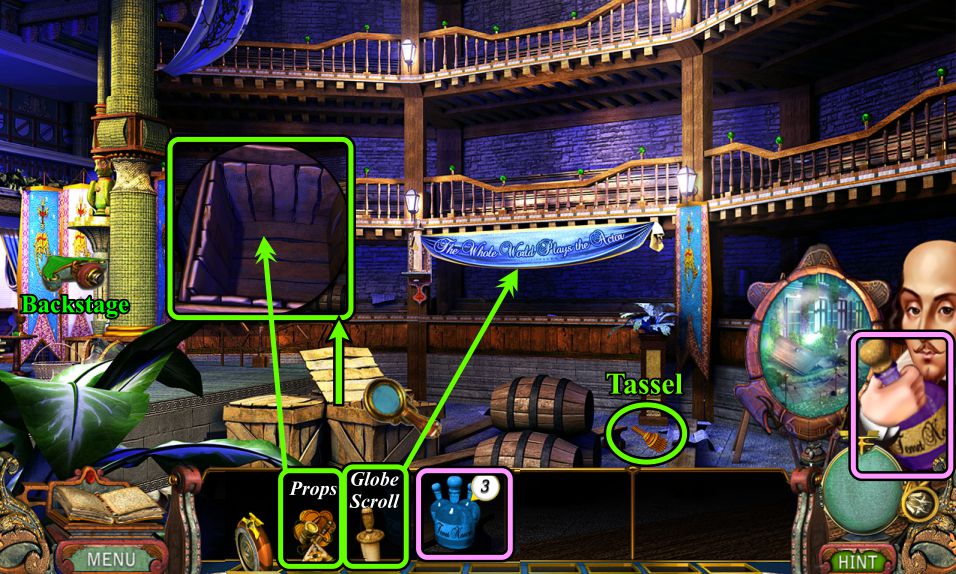
Theater Stage
Zoom in on the box you opened and place the Props.
Put up the Globe Scroll banner, and a Tassel will drop for you to collect.
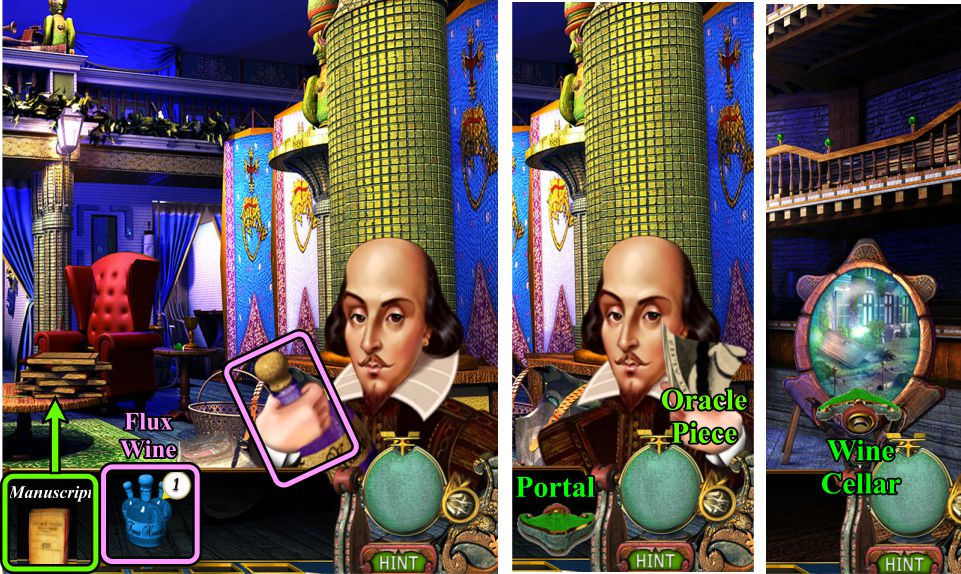
Shakespeare will offer you a bottle of wine.
Return Backstage.
Screenshot
Backstage
Sir Roger Bacon is there, so listen to him and you will get an Oracle Key.
Place the Tassel on the closed curtain to trigger a Mini Game.
Screenshot
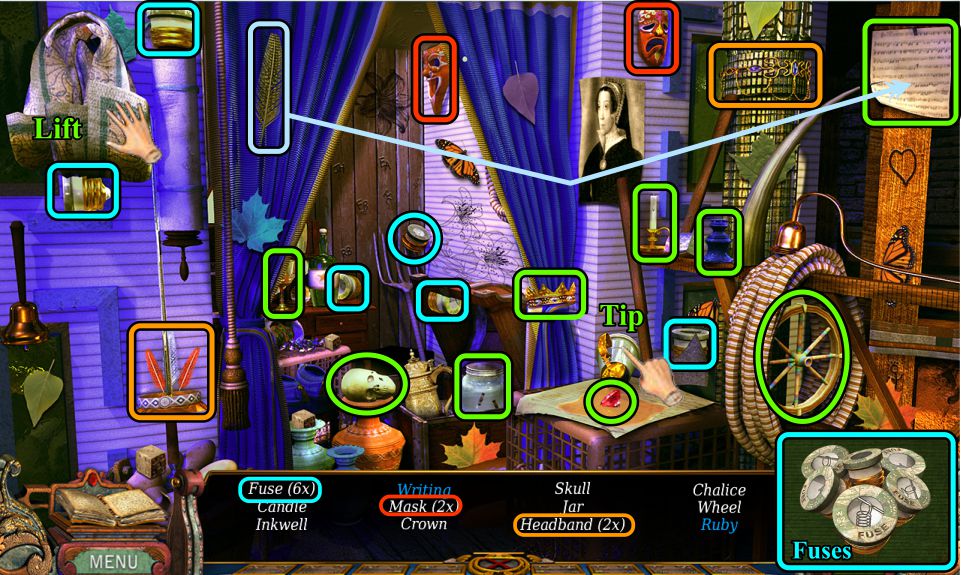
Corner Hidden Object Scene
Lift the towel to find a Fuse, then tip the tankard to get the Ruby inside.
Collect everything on your list for a set of Fuses.
Screenshot
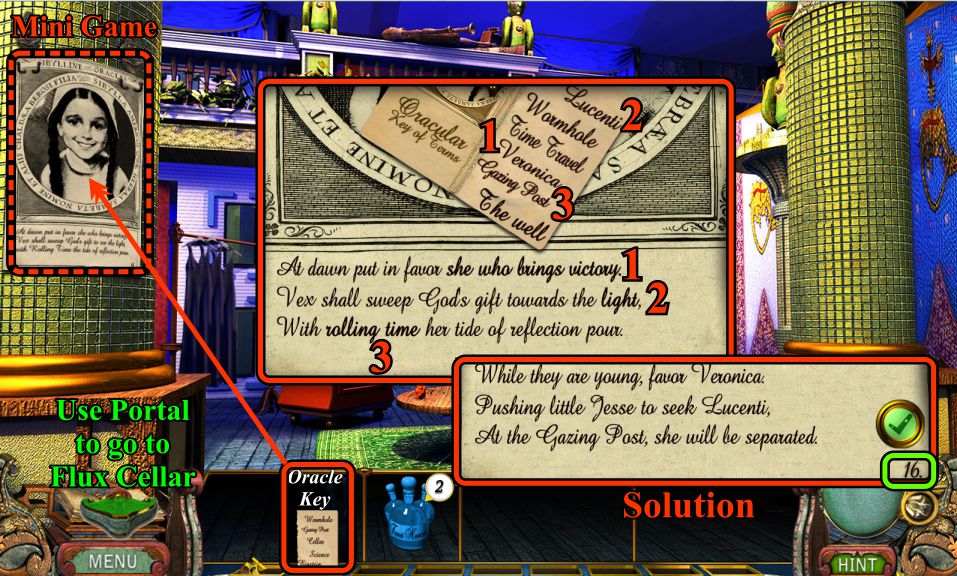
Oracle Mini Game
Place the Oracle Key on the poster to start the game.
See the screenshot for the numbered solution.
Note the number 16 code.
Return to the Stage, use the portal to go to the mansion, and enter the Cellar.
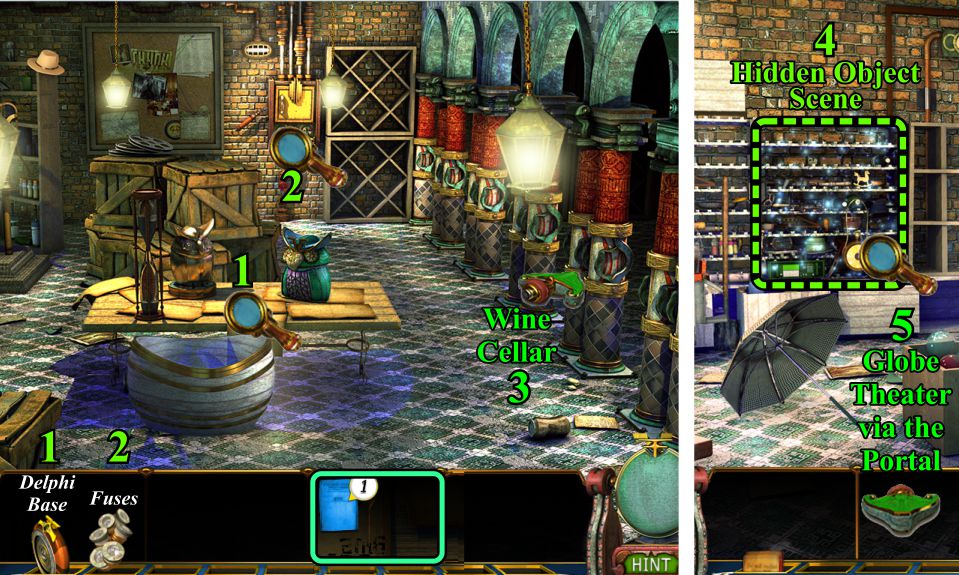
Screenshot
Cellar and Wine Cellar
You have several tasks to perform that are numbered in this screenshot and shown in the screenshots that follow.
When you have finished your tasks here, return to the Globe Theater.
Screenshot
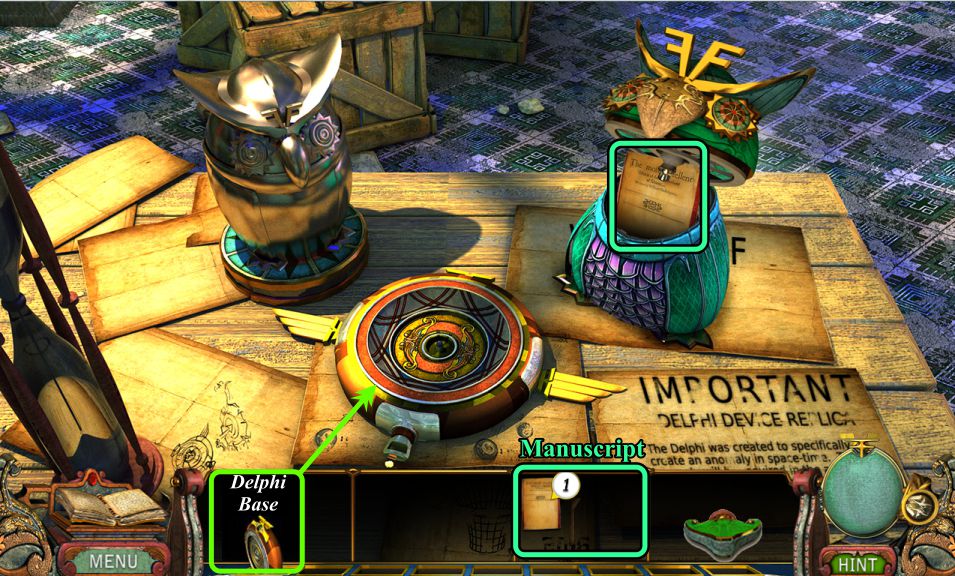
Cellar
Zoom in on the table and place the Delphi Base, and Waldorf will open up with the last part of the Manuscript.
Screenshot
Zoom in on the electrical panel, change the dial to 16, and open the door. Place the Fuses and pull the handle.
Screenshot
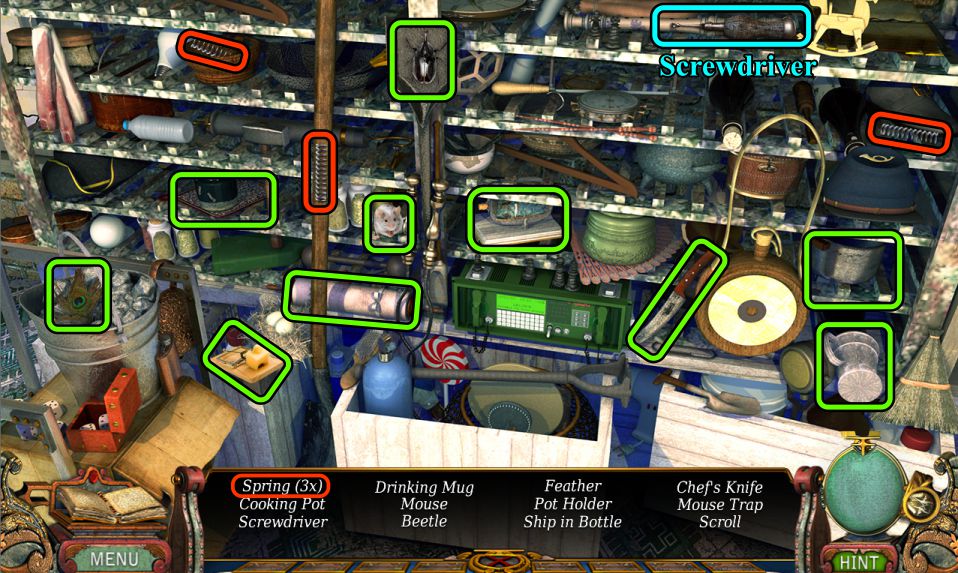
Wine Cellar
Play the Hidden Object Scene to get a Screwdriver.
Screenshot
Return to the Globe Theater via the portal.
Globe Theater
Go Backstage and zoom in on the armor.
Use the Screwdriver to open it and collect the bottle of wine.
Screenshot
Place the Manuscripts on the table, and Shakespeare will reward you with a bottle of wine and an Oracle Piece.
The Flux Wine will go into your Inventory.
Use the portal to return to the mansion and go to the Wine Cellar.
Screenshot
Wine Cellar
Place the Flux Wine in the rack to trigger a tic-tac-toe Mini Game.
Your goal is to win 2 rounds by placing 3 bottles in a row or diagonally.
Zoom in on the bulletin board and open the letter addressed to Jesse.
Screenshot
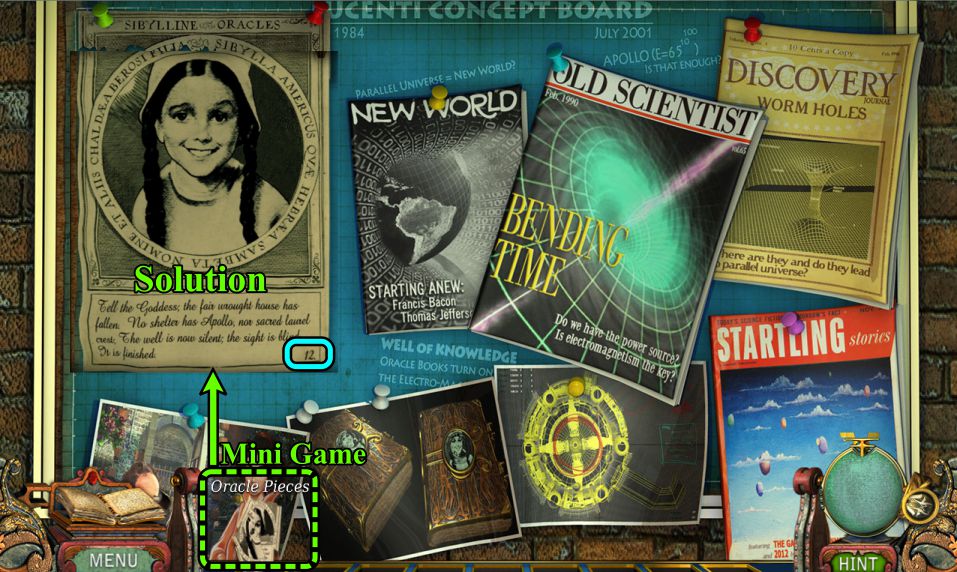
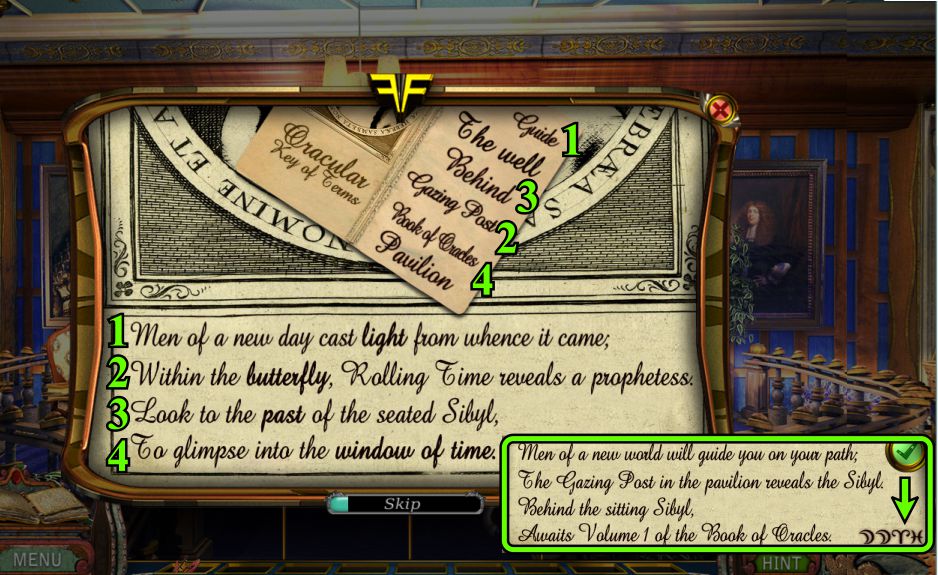
Oracle Puzzle
Place your Oracle Pieces for a puzzle Mini Game.
See the screenshot for the solution and note the code.
Screenshot
Chapter 5: A New World Idea
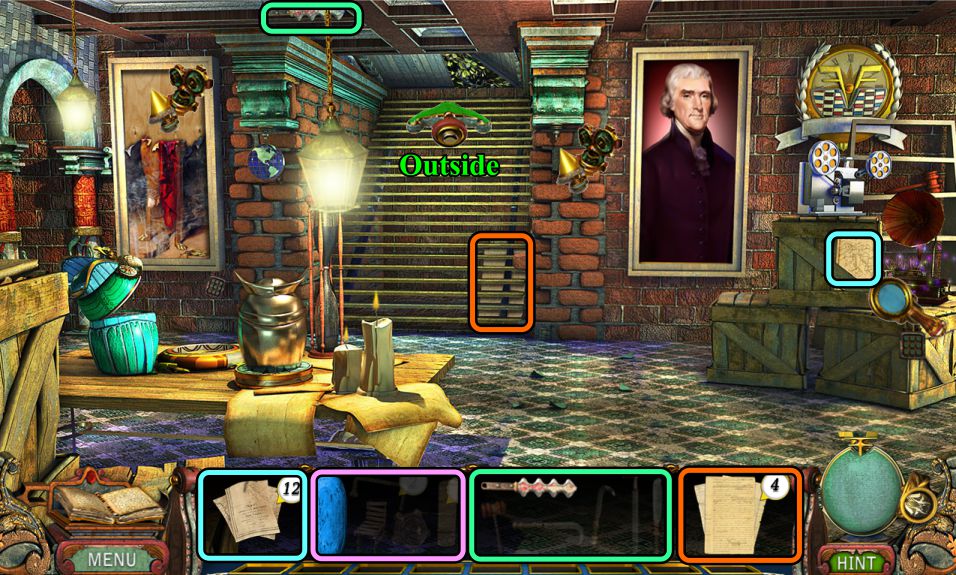
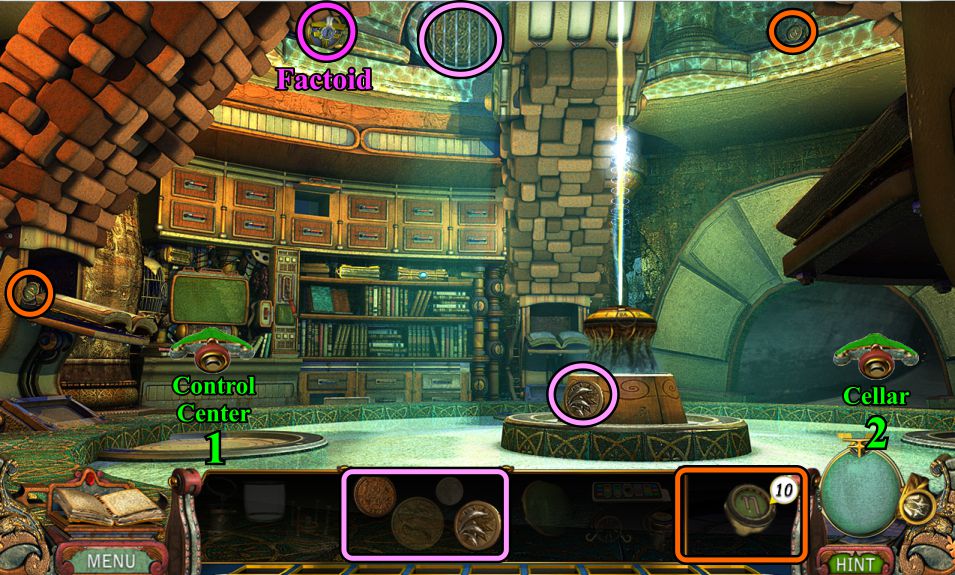
Cellar
We have now turned our attention to the other side of the cellar, so collect what you can and then go up the stairs to outside the mansion.
Screenshot
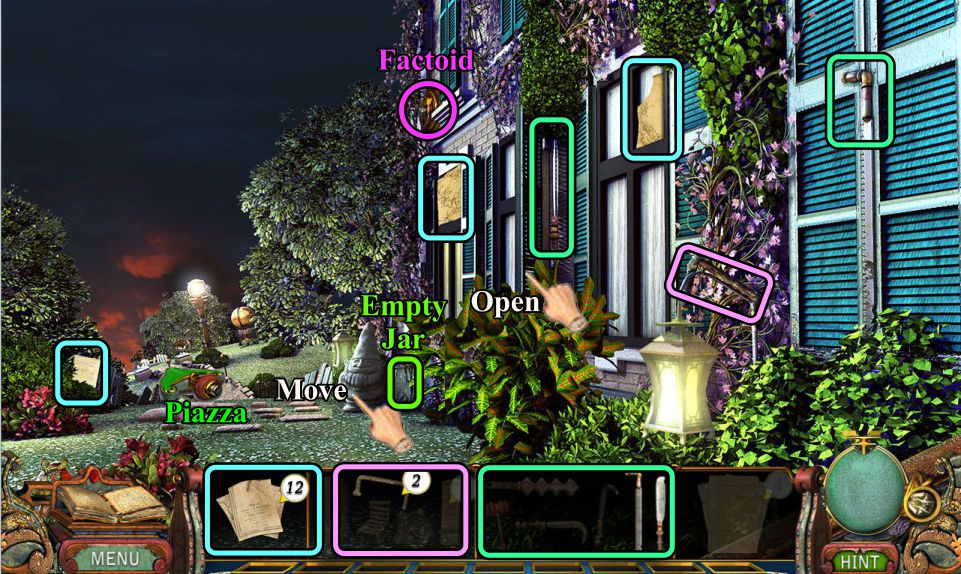
Outside Mansion
Open the indicated shutter to find one part.
Move the gnome to collect the Empty Jar.
Grab the Factoid and head off to the Piazza.
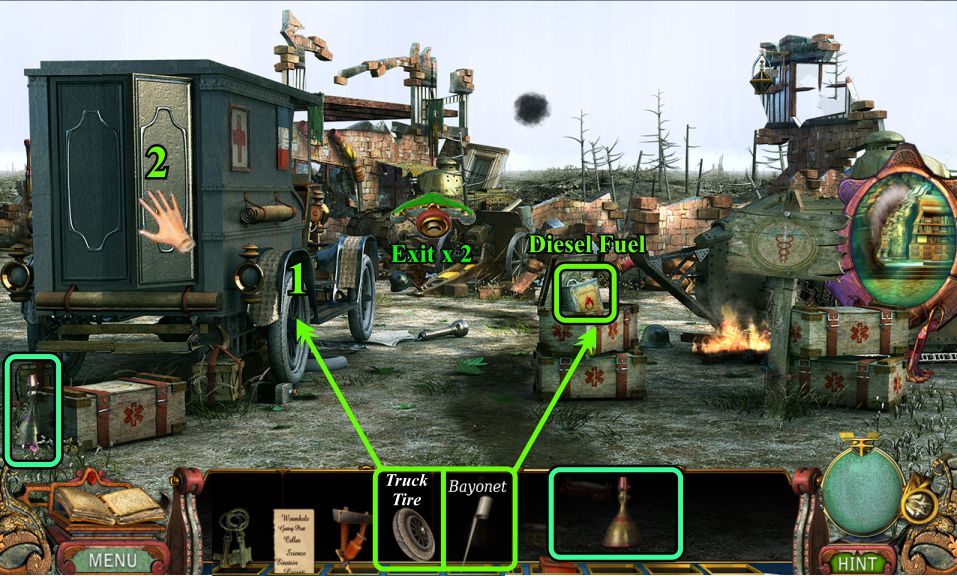
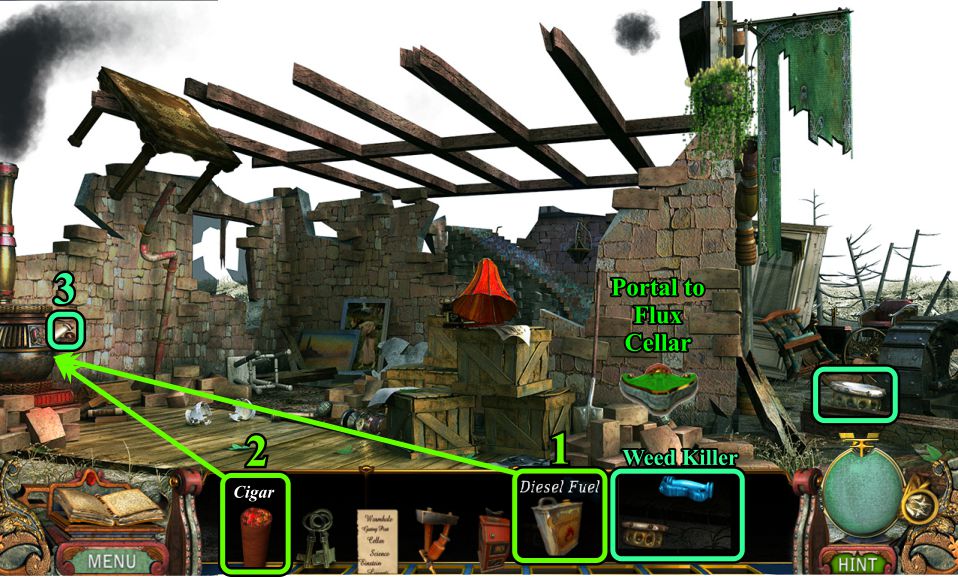
Screenshot
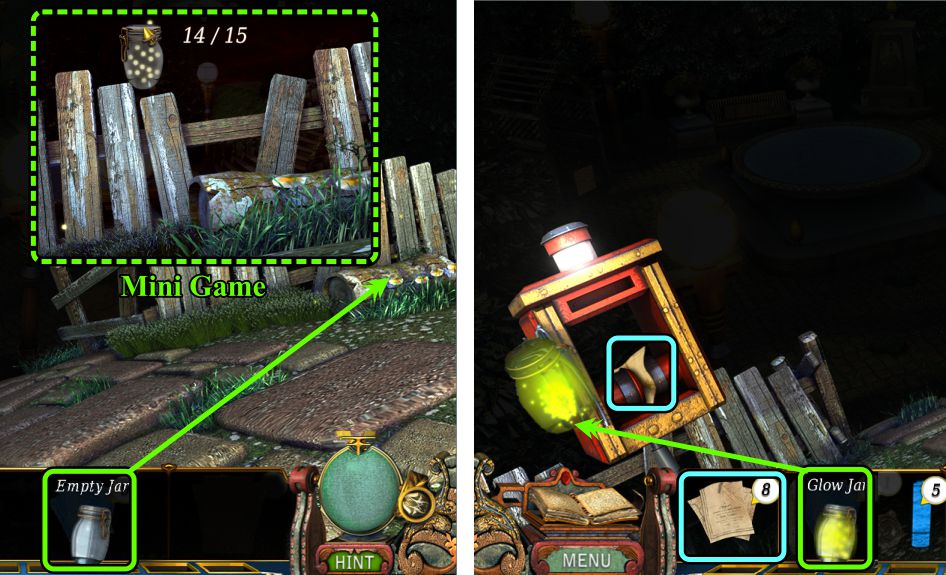
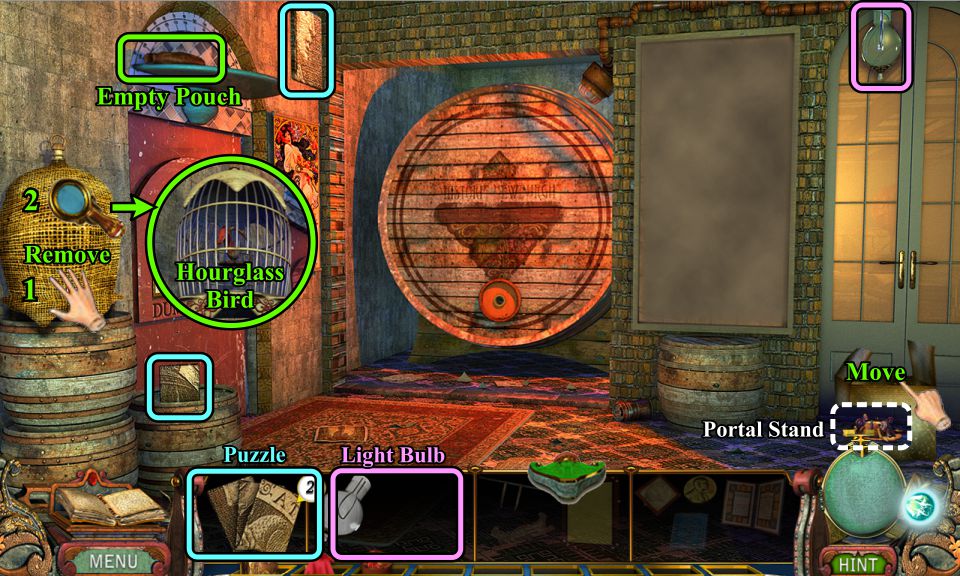
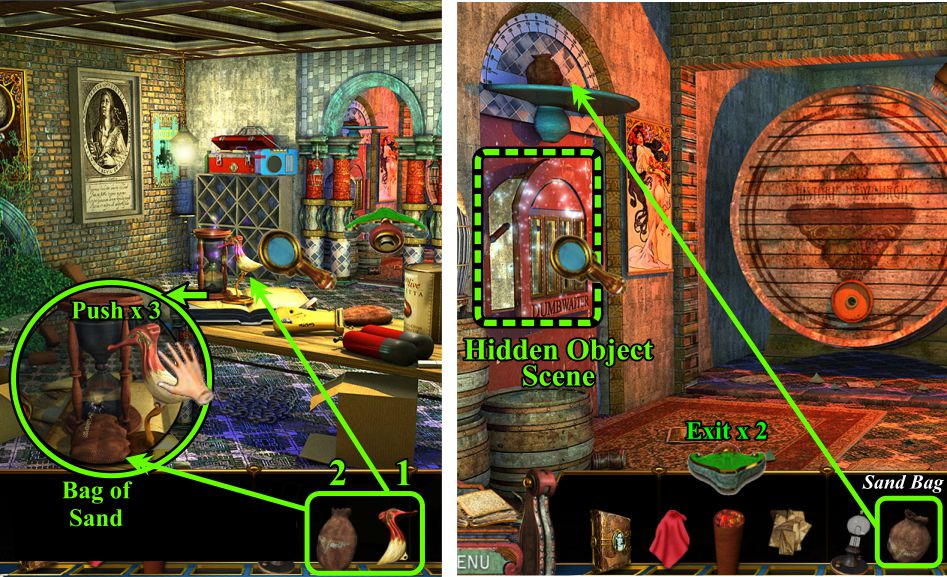
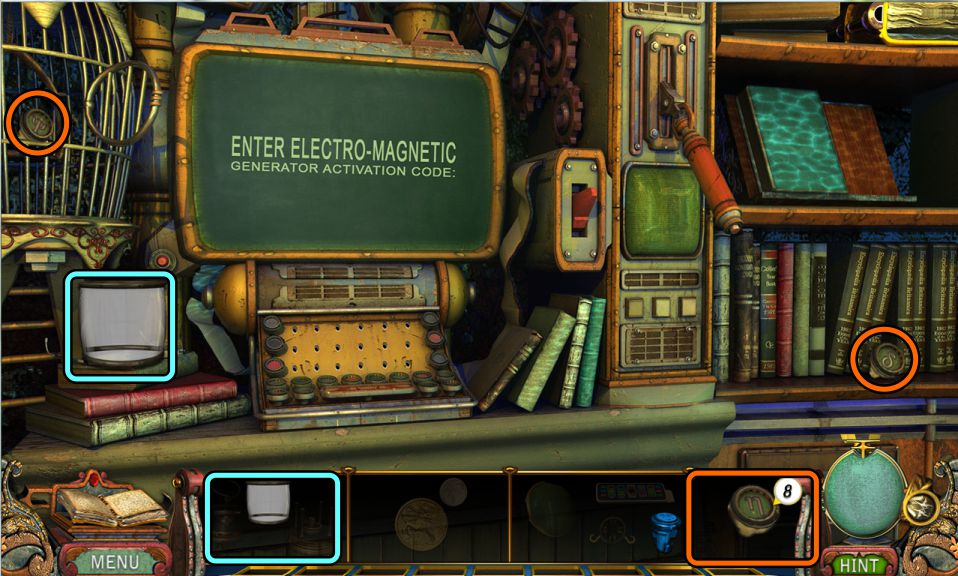
Piazza
It's completely dark, so place your Empty Jar on the log at the right for a Mini Game to catch fireflies.
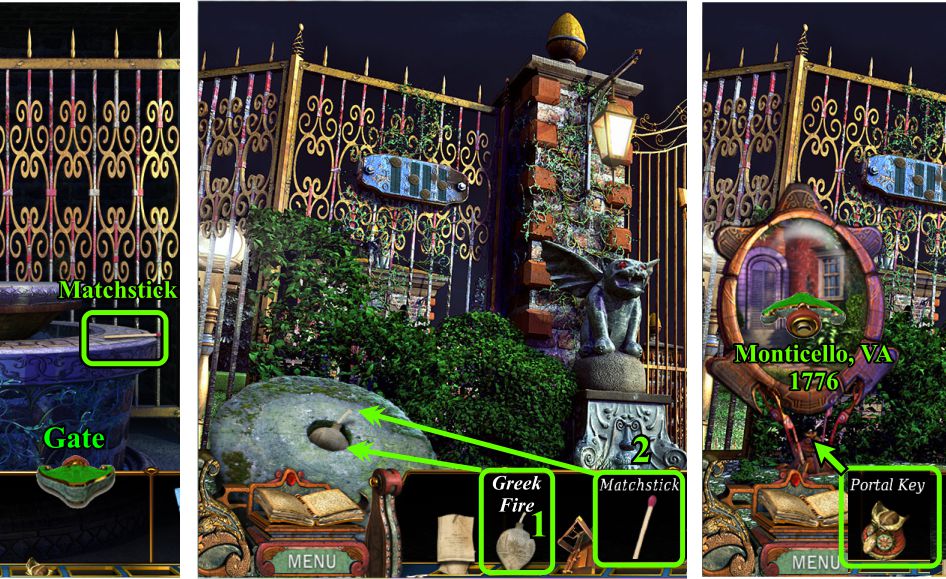
Place your Glow Jar on the stand at the left and remove the piece of Lewis and Clark Map that is stuck in the light switch.
Screenshot
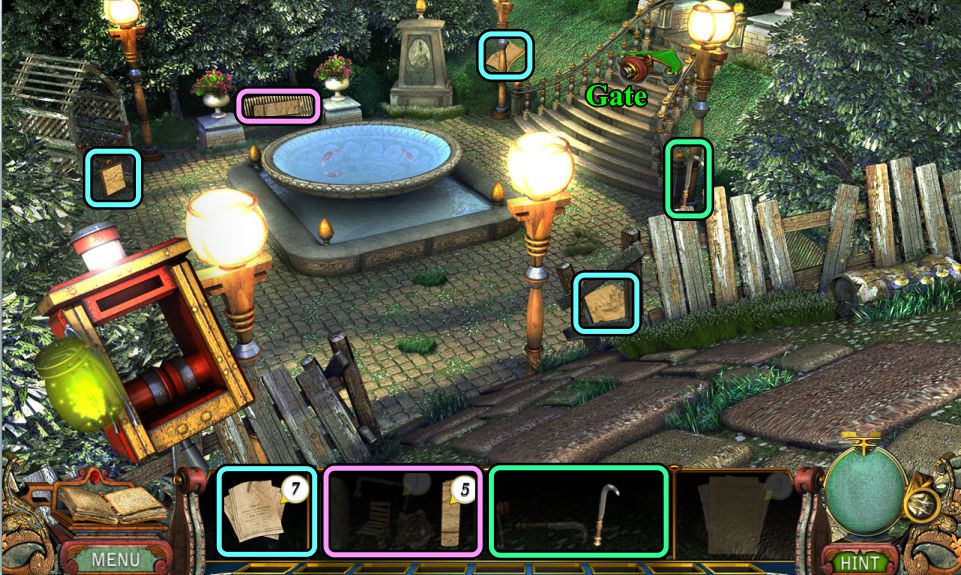
Now that you have light, collect the available fragments, then go up the stairs to the Gate.
Screenshot
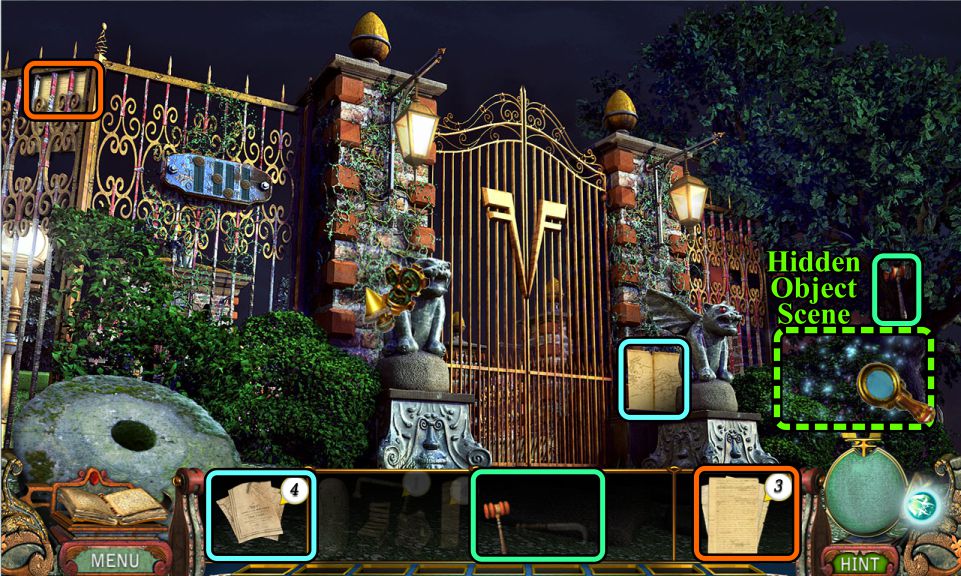
Gate
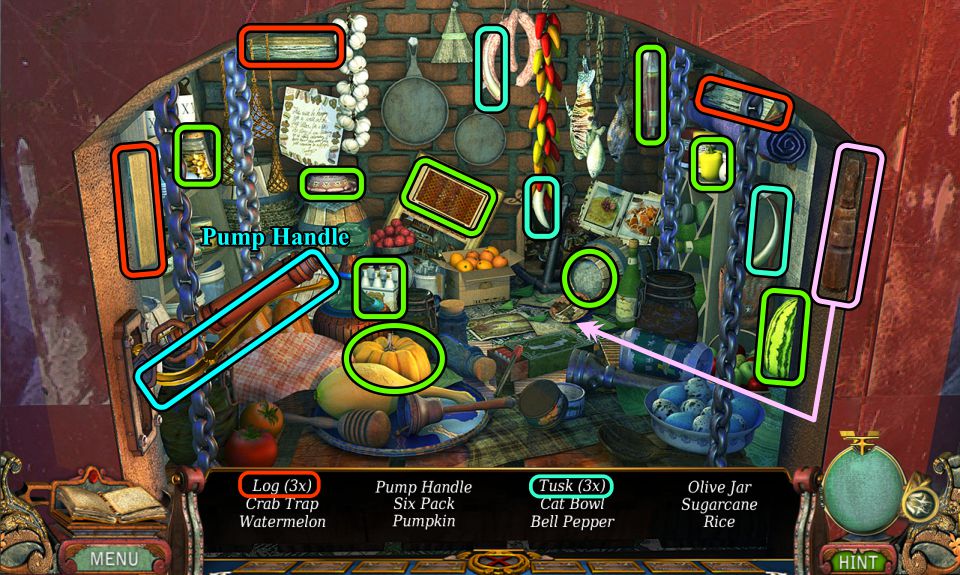
Collect the available parts and play the Hidden Object Scene.
Screenshot
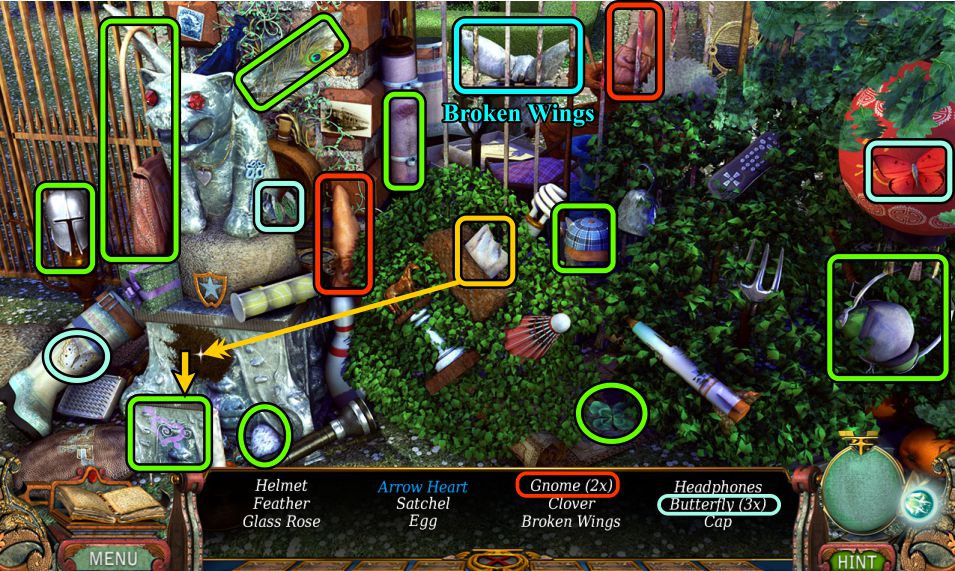
Gate Hidden Object Scene
Use the tissue to wipe the dirt off the gargoyle stand to find the Arrow Heart.
Collect everything on your list to get the Broken Wings.
Screenshot
Gate
Place the Wings on the left gargoyle.
The right lamp will move to reveal Gargoyle Eyes.
Place the eyes in the left gargoyle, and the gate will open. Go through to the Garden.
Screenshot
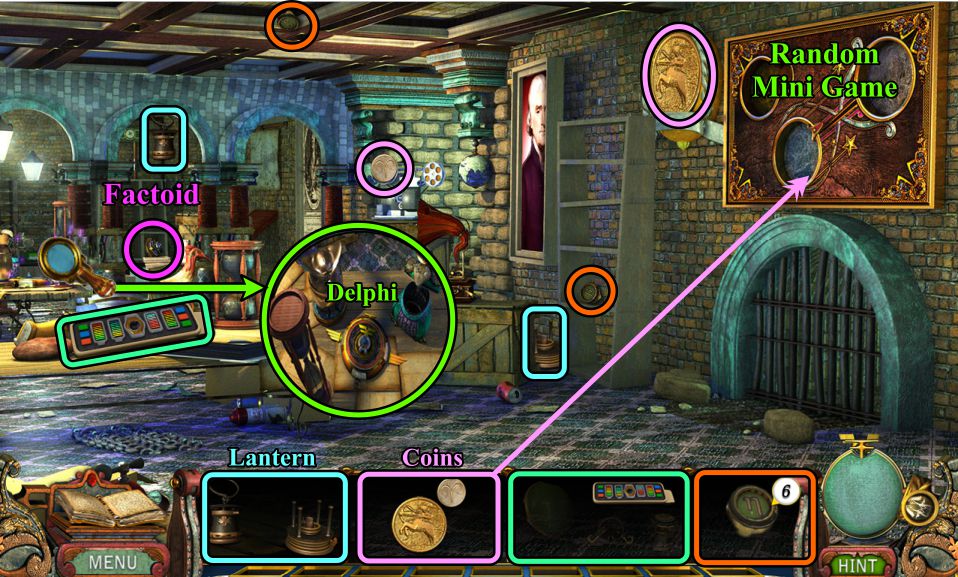
Garden
Collect all the available parts, and the Garden Tools will be completed.
Pick up the Oil Can near the hanging plant and use it to oil the hanger.
Move the plant and get some Fish Food.
Note the Portal Stand that was behind the oil can.
Go up the stairs to the Pavilion.
Screenshot
Pavilion
Collect the last piece of the Lewis and Clark Map, plus the other 2 available fragments, and return to the Piazza.
Screenshot
Piazza
Place the Fish Food in the fountain for a Mini Game.
There are 3 rounds. Your goal is to click the water to start a ripple that will grow until it catch the number of fish indicated for each round.
If you don't collect the required number of fish, you will get another chance.
You only get one click per round, so watch the fish swim and select an area with the most fish.
See the screenshot for a sample of how the ripples can flow.
You will be rewarded with a Portal Key, so go to the Garden and place it on the stand.
Go through the portal to Star Chamber 1615.
Screenshot
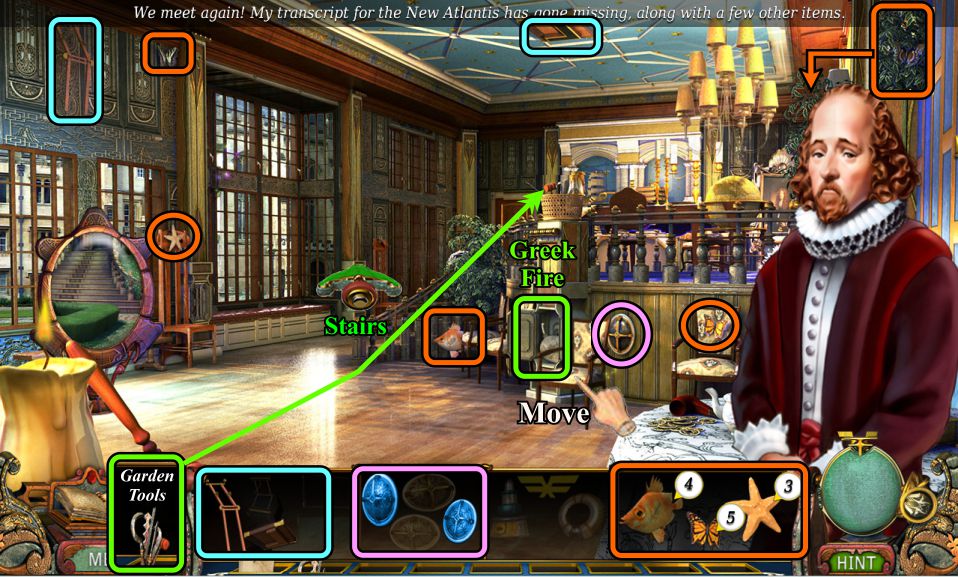
Star Chamber
Sir Roger Bacon is there to greet you and needs your help to find some missing items. Collect everything you can.
Move the chair to find one item, and a butterfly with be visible once Sir Bacon leaves.
Place the Garden Tools in the basket, and the cache below it will open to collect a Greek Fire for your Inventory.
Go forward to the stairs.
Screenshot
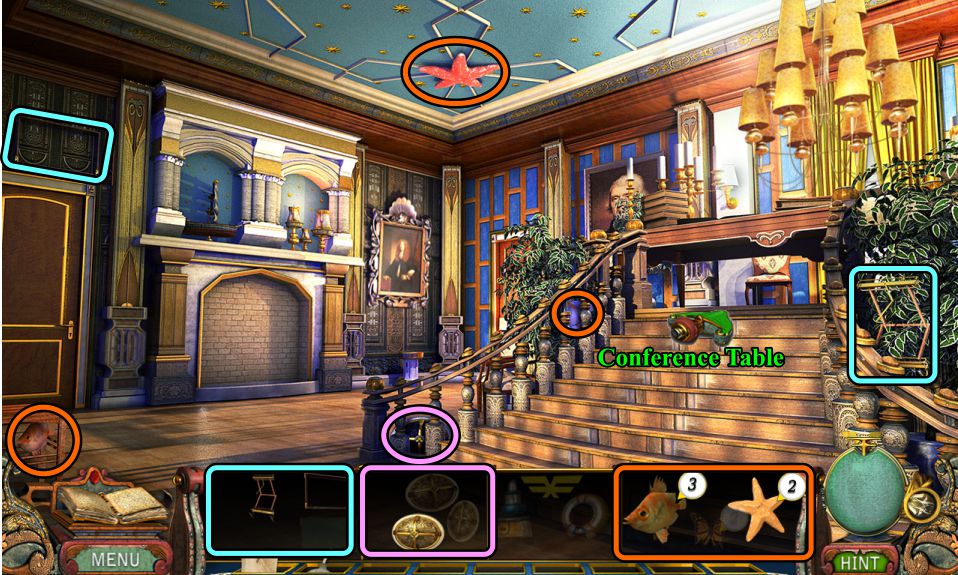
Stairs
Collect the available fragments and go up the stairs to the Conference Table.
Screenshot
Conference Table
Collect the Factoid and Foot Stool.
Move the lamp to find a Tea Cup.
Collect everything else you can and go downstairs.
Screenshot
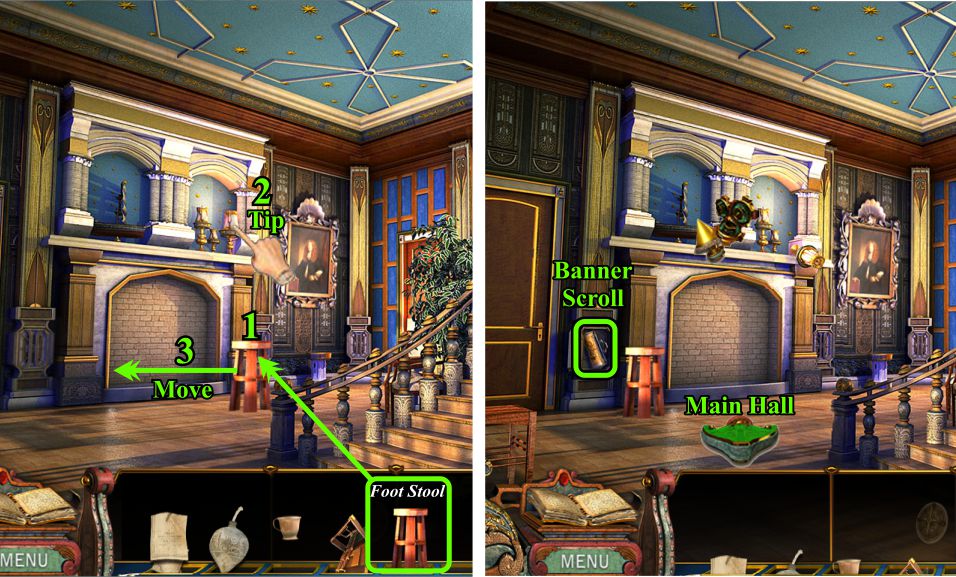
Stairs
Place the Foot Stool to the right of the fireplace.
Stand on it to tip the lamp, and a cache will open to the left of the fireplace.
Move the Foot Stool to the left of the fireplace.
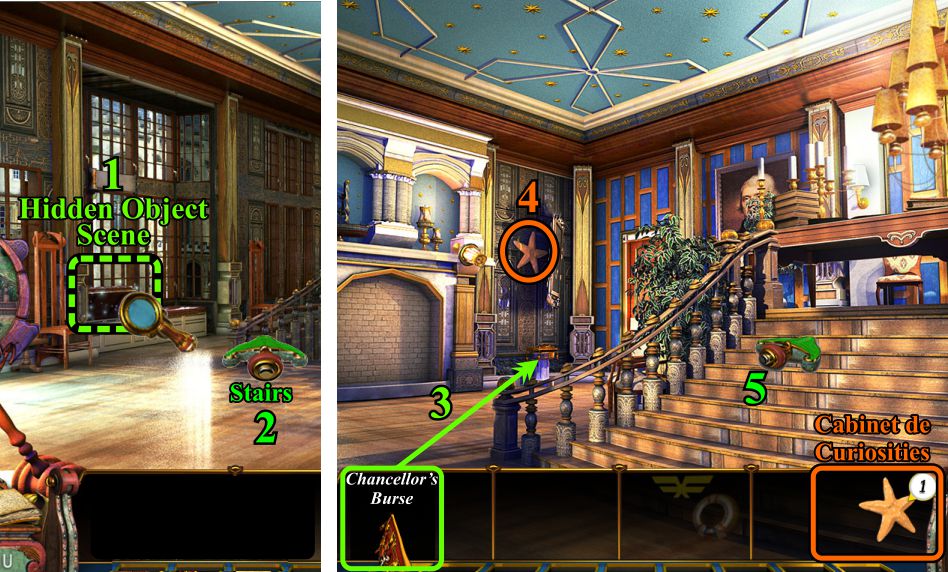
Take the Banner Scroll and return to the Main Hall.
Screenshot
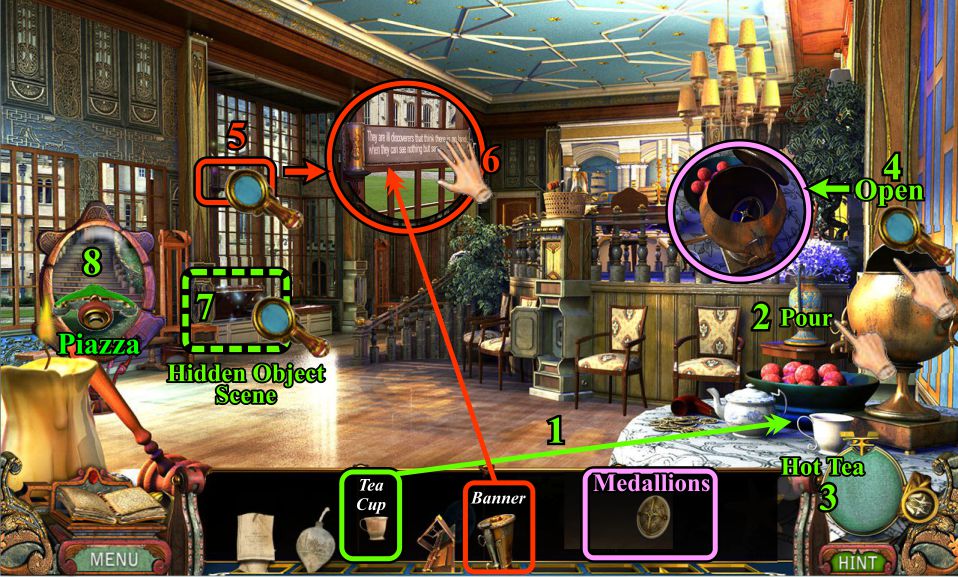
Star Chamber
Place the Tea Cup on the table.
Pour hot water into the cup.
Take your Hot Tea.
Open the urn and collect the last Medallion piece.
Zoom in on the windows and place your Banner where shown.
Press on the Banner to open up with window seat for a Hidden Object Scene.
Go through the portal to the mansion and go to the Piazza.
Screenshot
Window Seat Hidden Object Scene
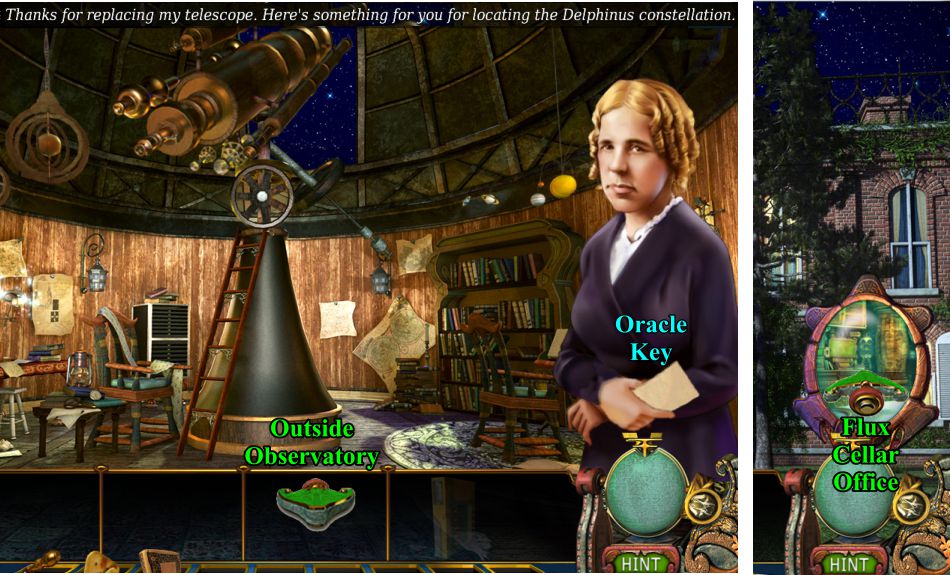
Collect your list to get a Flux Emblem.
Screenshot
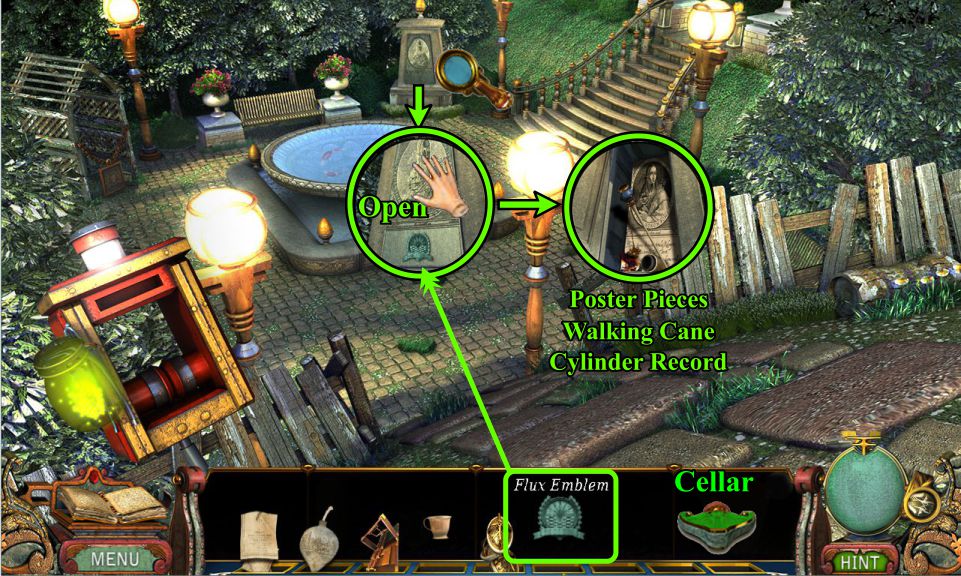
Mansion Piazza
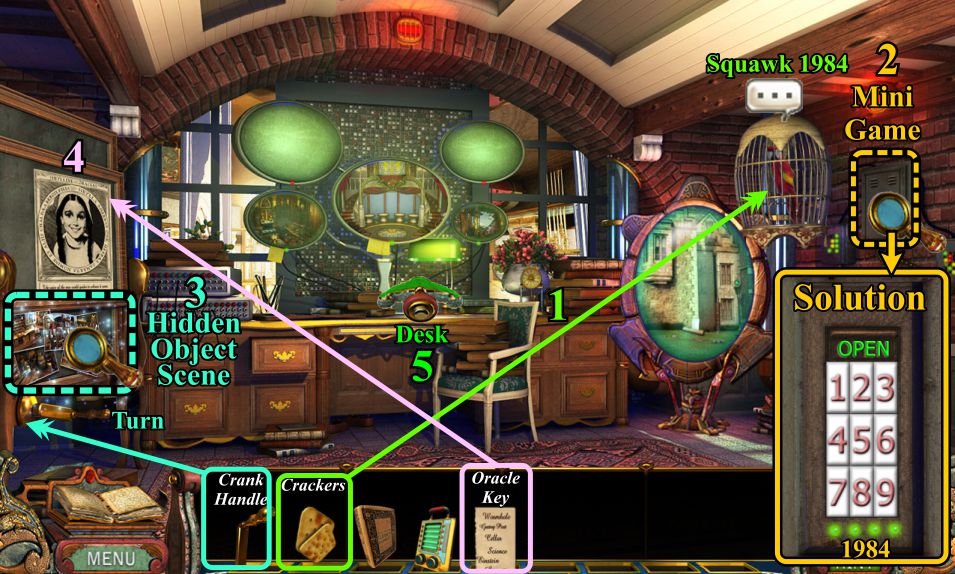
Zoom in on the stone monument to the left of the stairs, and place the Flux Emblem.
Open it and collect the loot inside: Poster Pieces, Walking Cane, and Cylinder Record.
Go to the Cellar.
Screenshot
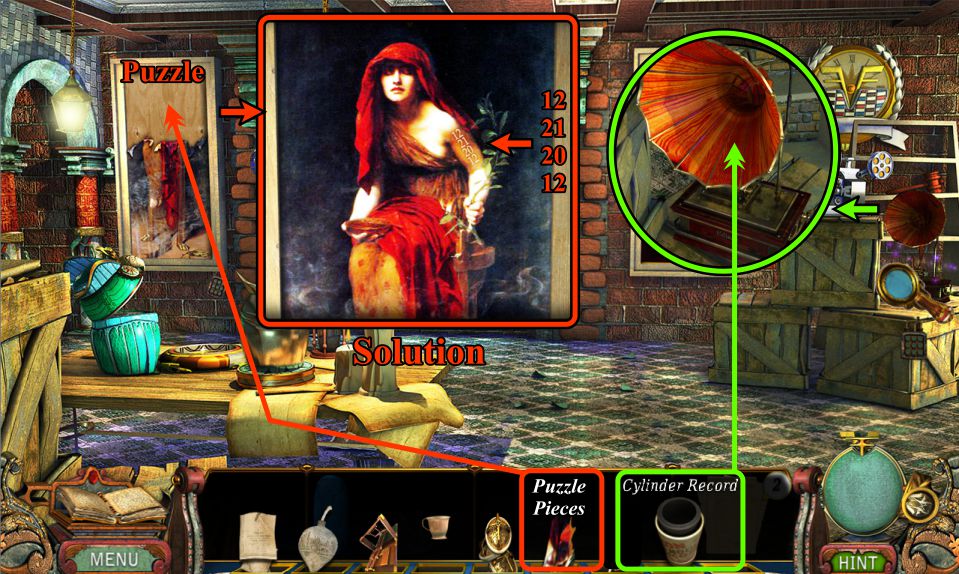
Cellar
You have two tasks to perform: Place the Cylinder Record and listen to the recording, and place the Puzzle Pieces to complete the puzzle.
See the screenshot for the completed picture, and note the code: 12 - 21 - 20 - 12.
Screenshot
Once you have listened to the record, you will be able to collect a piece of the Chancellor's Burse.
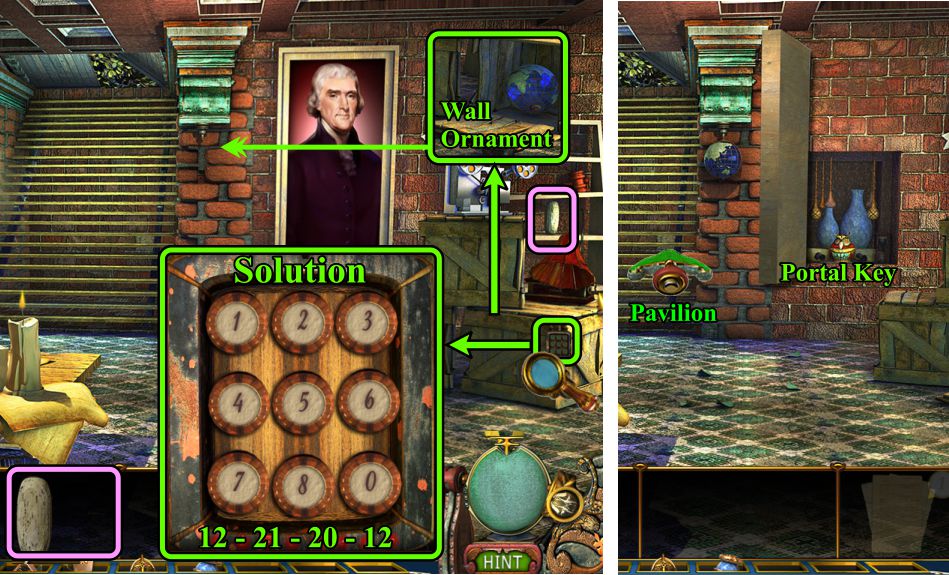
Zoom in on the crate with the lock for a Mini Game.
Enter the code you found on the poster...see the screenshot for a reminder and the solution.
You will find a Wall Ornament inside the crate.
Place it on the brick column to open a cache.
Take the Portal Key and go to the Pavilion.
Screenshot
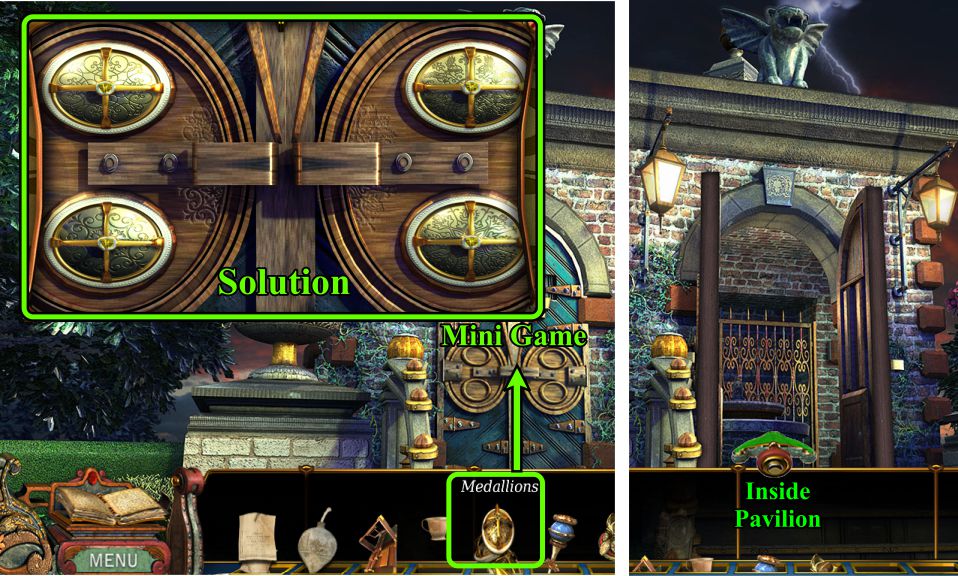
Pavilion Door Mini Game
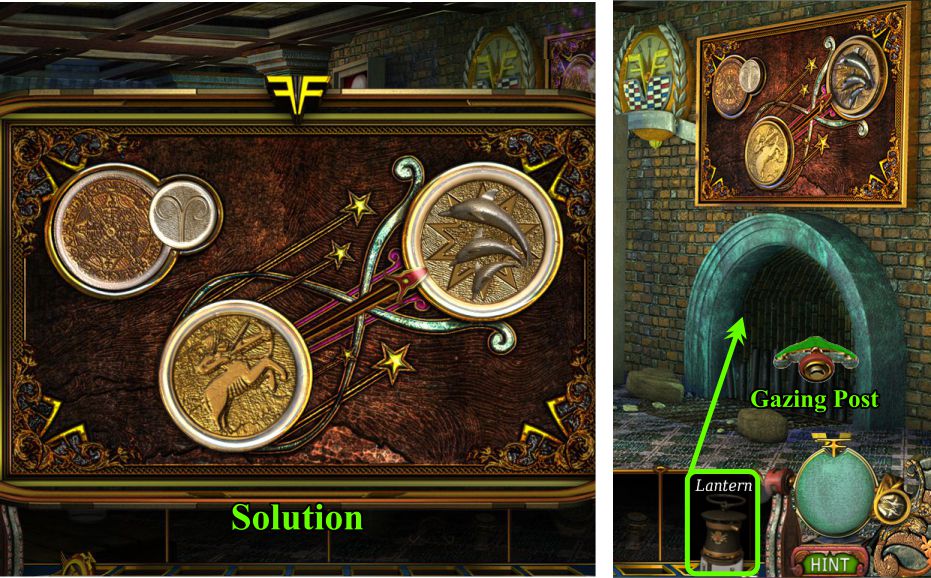
Place your Medallions on the lock for a Mini Game.
Your goal is to match each of the 4 sections of the medallions with the etched design near then on the lock.
To create the solution shown in the screenshot, swap medallion pieces to create the correct designs.
When the doors open, go inside the Pavilion.
Screenshot
Inside Pavilion and Gate
Collect the Matchstick and go to the Gate.
Place the Greek Fire in the hole in the stone.
Light it with the Matchstick to discover a Portal Stand.
Place the Portal Key and go through the portal to Monticello, VA 1776.
Screenshot
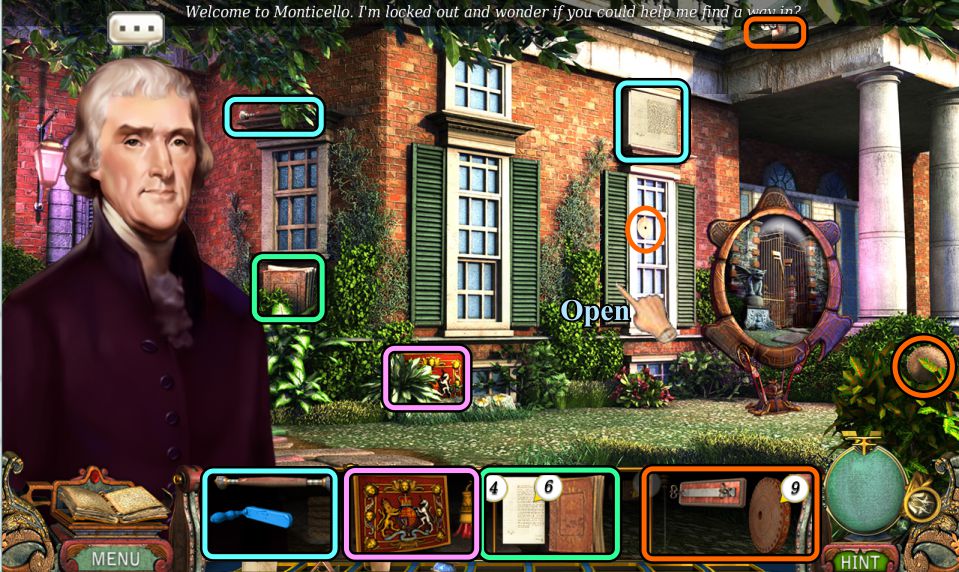
Outside Monticello
Jefferson is there to welcome you and needs your help.
Collect all available parts, opening the shutter to find one.
Screenshot
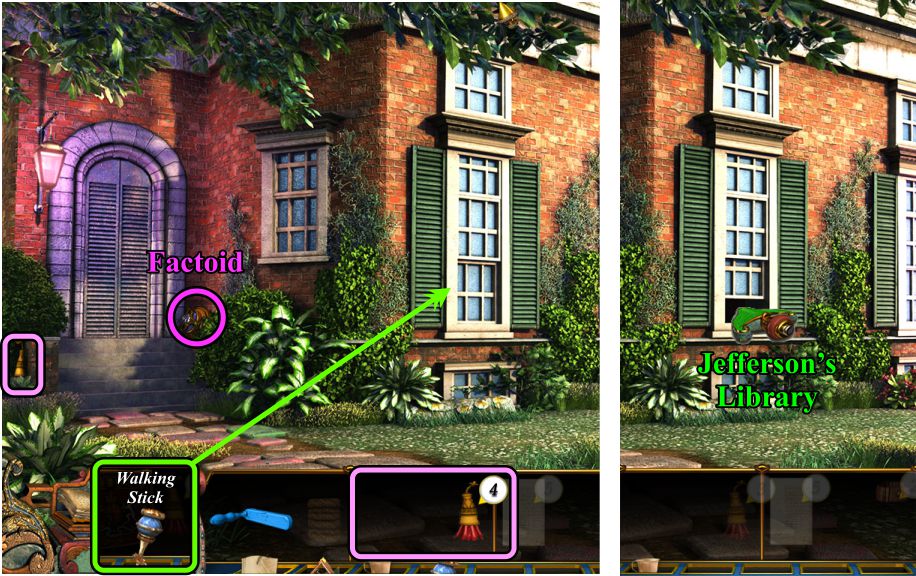
When Jefferson leaves, collect the Factoid and another part.
Use the Walking Stick on the window to open it, then crawl in to find Jefferson's Library.
Screenshot
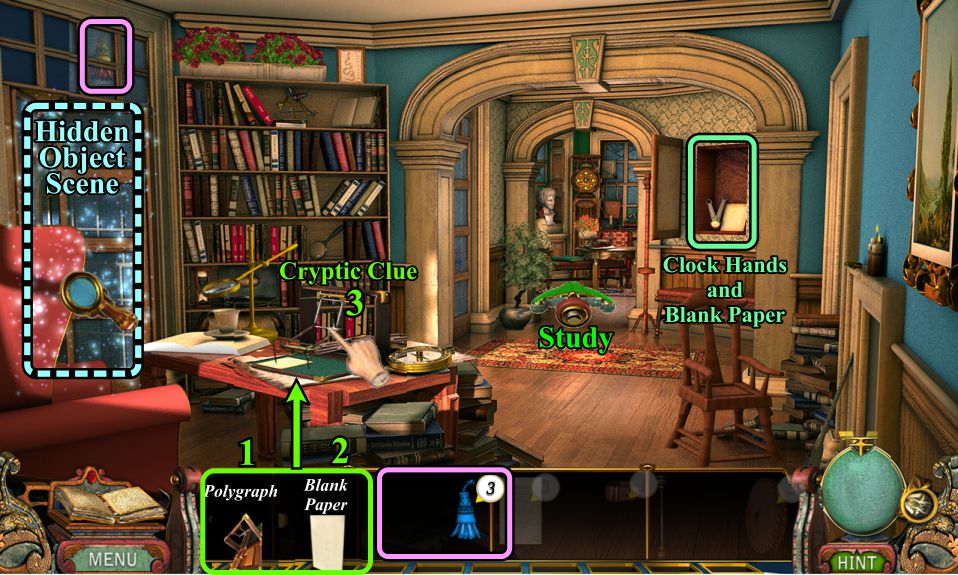
Jefferson's Library
Collect what you can.
Screenshot
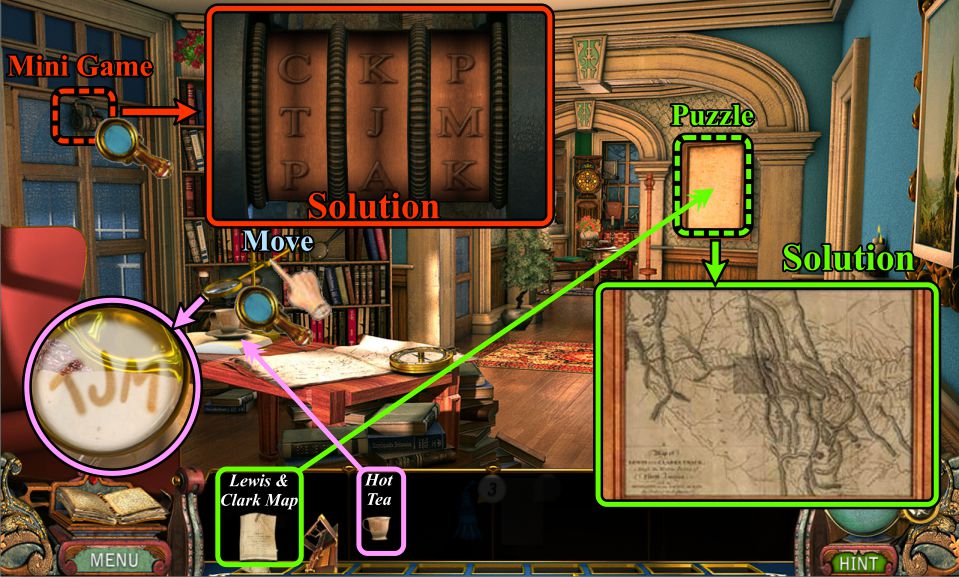
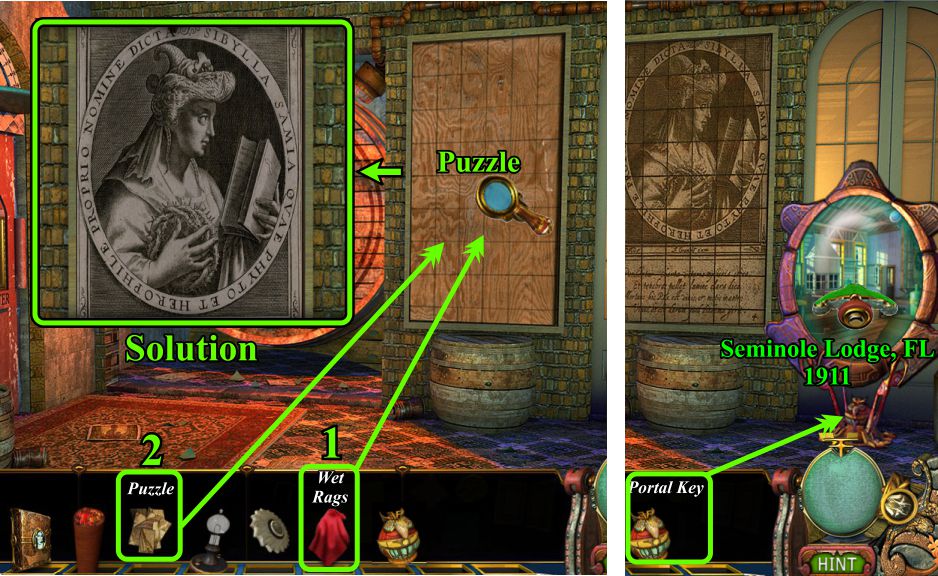
Place the Lewis and Clark Map for a Puzzle: see the screenshot for the solution.
Put the Hot Tea on the saucer and move the magnifying glass over the cup.
Zoom in and note the code from the steam.
Examine the lock on the door and enter the "TJM" code.
Screenshot
Collect the Clock Hands and Blank Paper from the niche behind the Map.
+Place the Polygraph on the table.
Feed the Blank Paper by touching the mechanism.
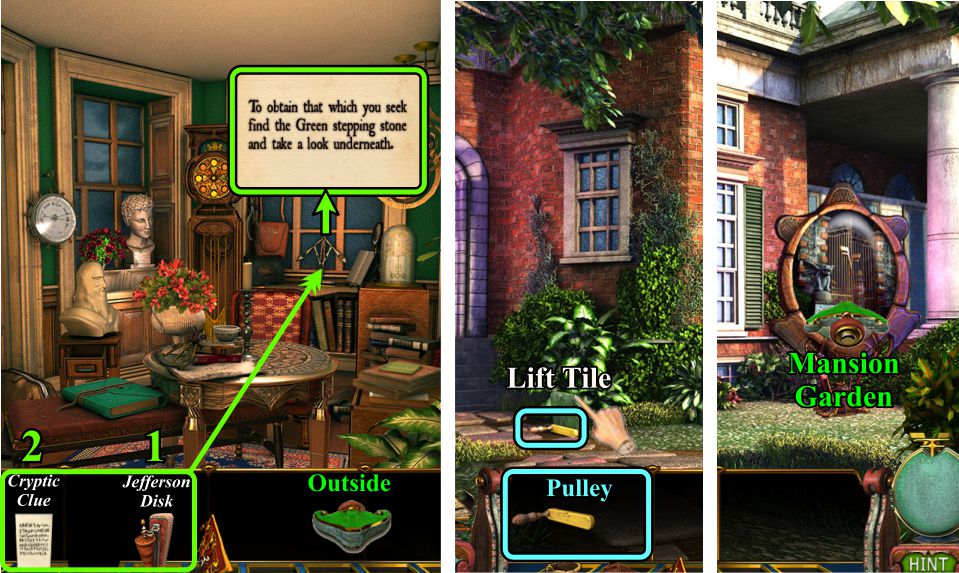
Collect the Cryptic Clue.
Play the Hidden Object Scene, then collect the fragment that appears from the light of the open door and go to the Study.
Screenshot
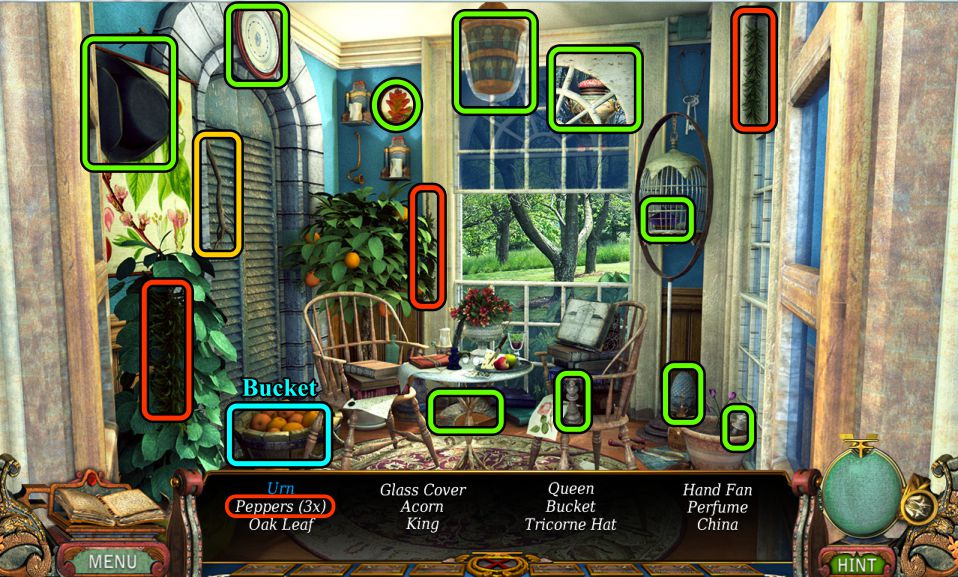
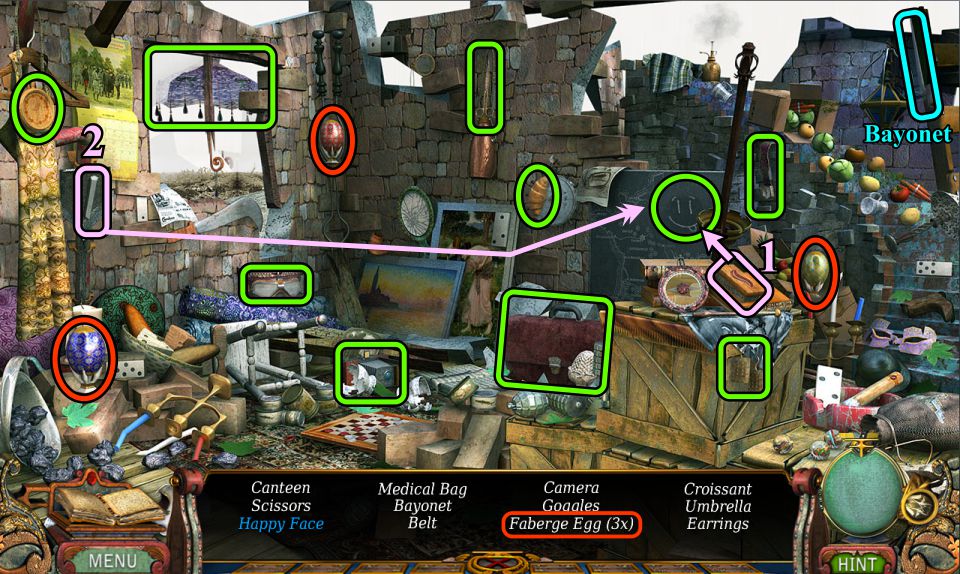
Patio Door Hidden Object Scene
Collect the items on your list to get a Bucket.
Screenshot
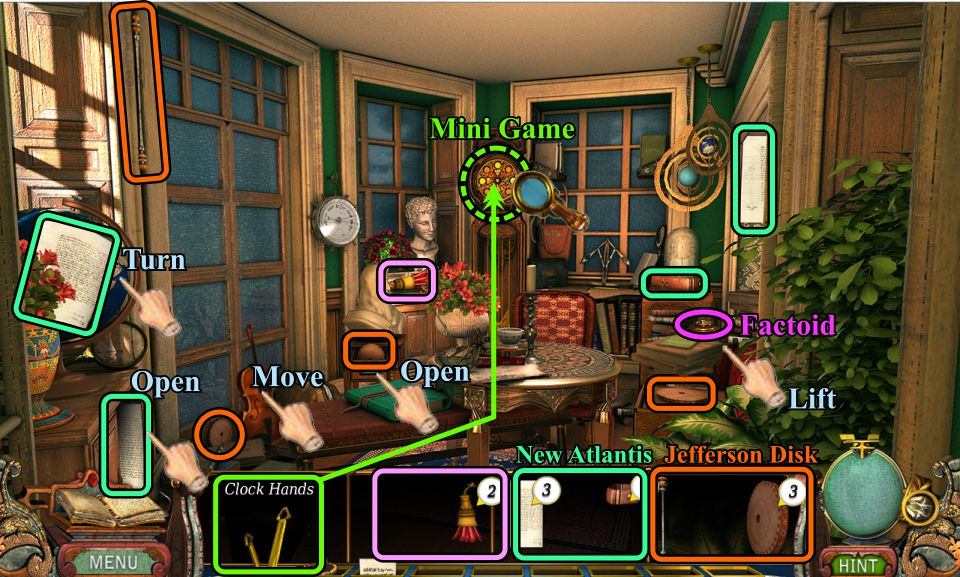
Study
In order to find all the fragments, you will need to perform some other tasks first:
Turn the globe.
Open the cabinet.
Move the violin.
Open the drawer under the bust.
Lift up the books.
Collect all the fragments and the Factoid, and you will complete the New Atlantis and Jefferson Disk.
Place the Clock Hands on the Clock for a Mini Game.
Screenshot
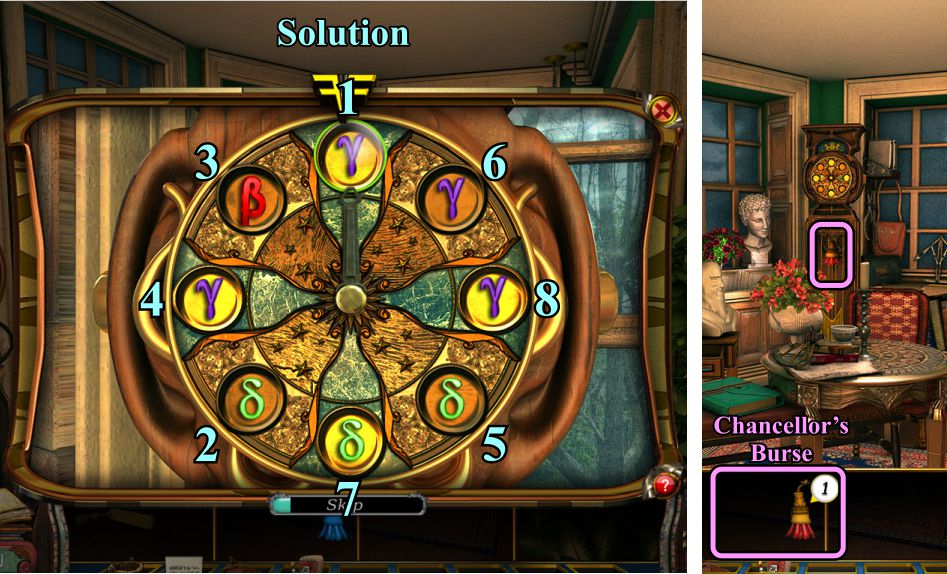
Clock Mini Game
Your goal is to press all of the Greek symbols to open the clock.
See the screenshot for the solution.
Take the last piece of the Chancellor's Burse.
Screenshot
Study and Outside Monticello
Place the Jefferson Disk as shown and insert the Cryptic Clue to get the result shown.
Go outside and lift the green tile to find the last piece of the Pulley.
Enter the portal and go to the Mansion Garden.
Screenshot
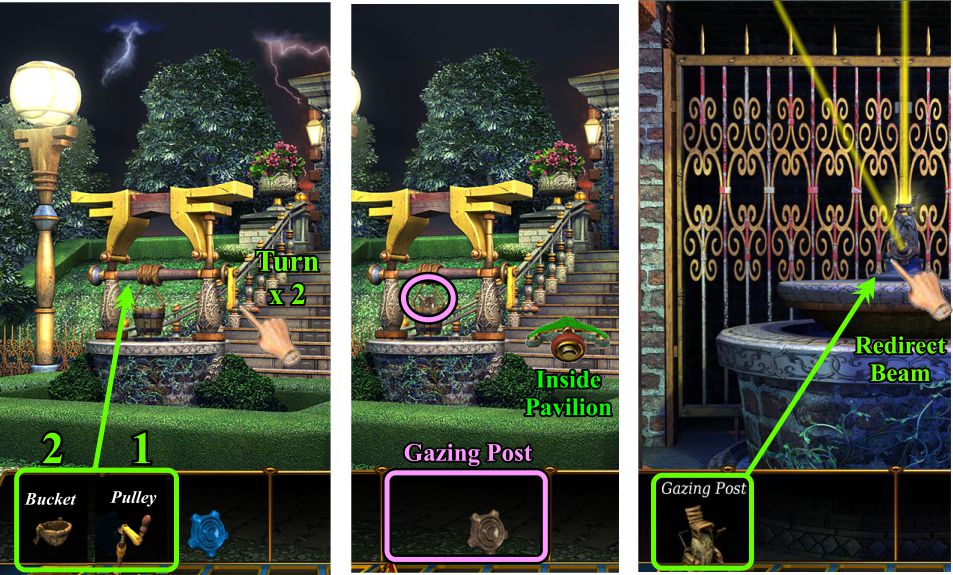
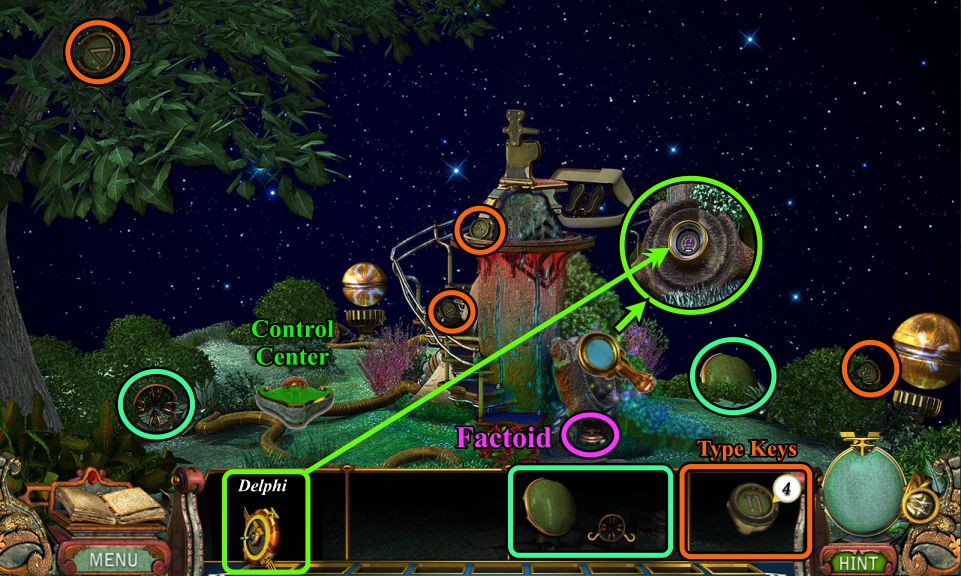
Mansion Garden and Inside Pavilion
Place the Pulley on the well and the bucket on the Pulley.
Turn the Pulley twice, once to send the Bucket down into the well, and again to retrieve it.
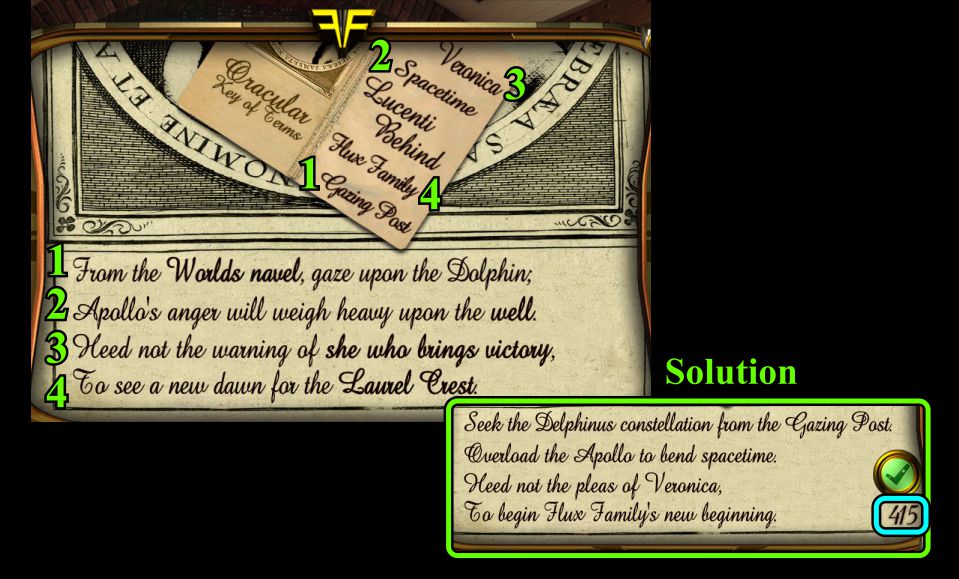
Take the final piece of the Gazing Post and go inside the Pavilion.
Place the Gazing Post and redirect the light beam.
Screenshot
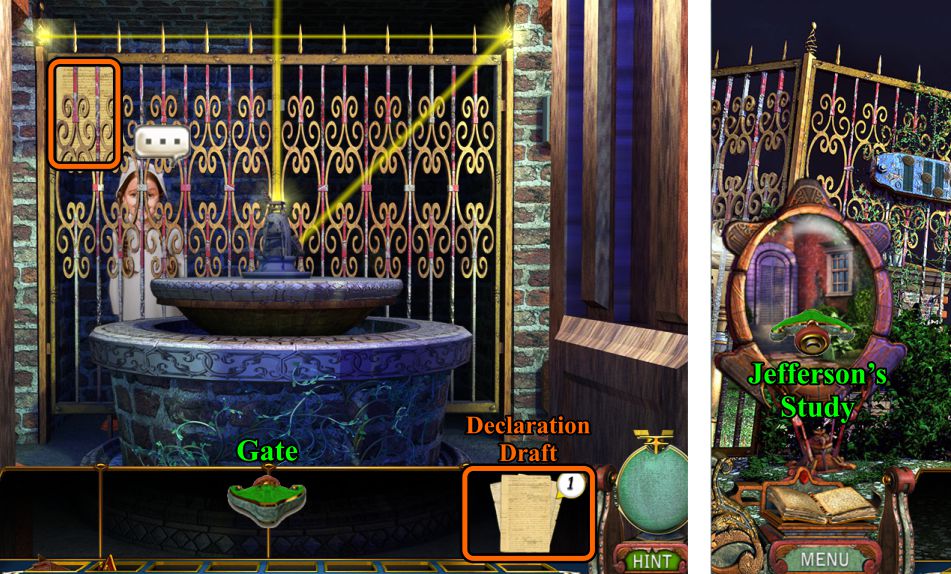
Inside Pavilion and Gate Portal
Talk to Sybil, take the last piece of the Declaration Draft, and go to the Gate.
Enter the portal and go to Jefferson's Study.
Screenshot
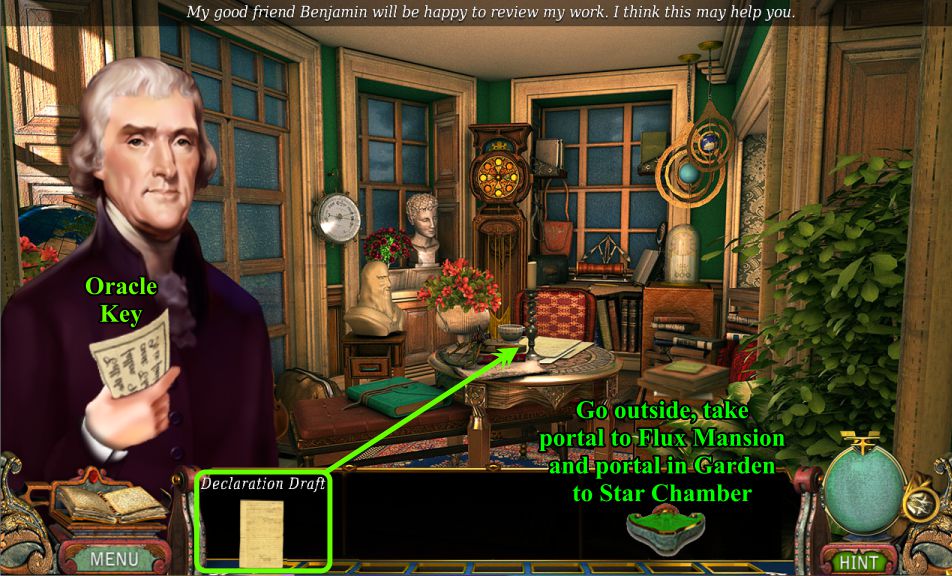
Jefferson's Study
Place the Declaration Draft on the table, and Jefferson will appear to give you an Oracle Key.
Go outside to the portal, go the mansion portal in the Garden, and go to Star Chamber.
Screenshot
Star Chamber
Play the Hidden Object Scene.
Go to the Stairs.
Place the Chancellor's Burse on the stand.
Take the last piece of the Cabinet de Curiosities from the niche.
Go up the stairs to the Conference Table.
Screenshot
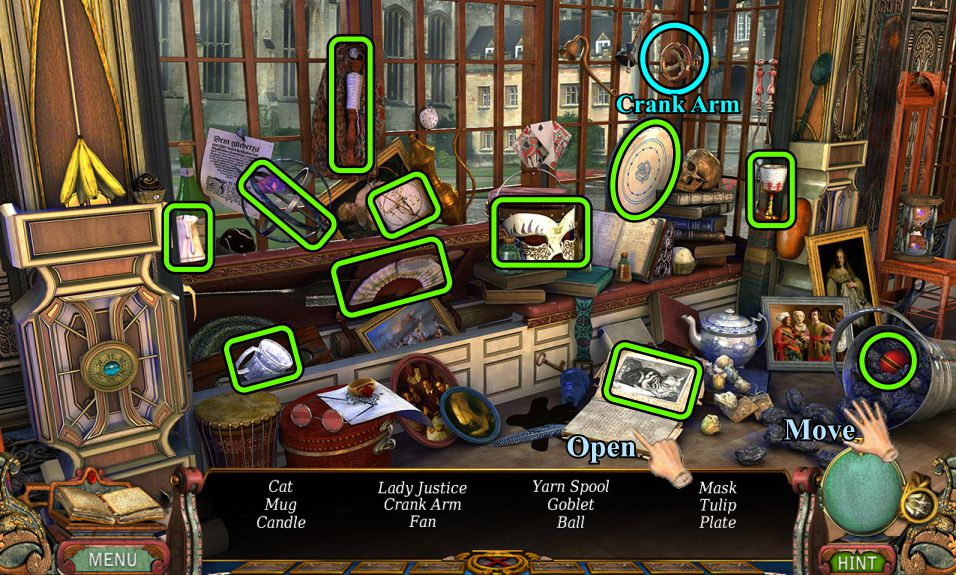
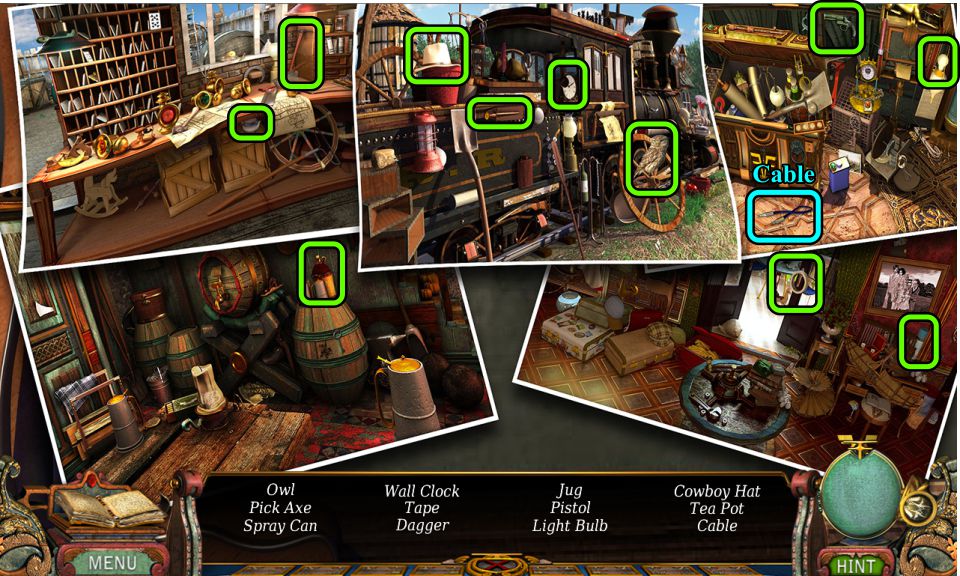
Window Seat Hidden Object Scene
Open the book to find the Cat.
Move some of the coal to find the Ball.
Collect whatever is on your list to get the Crank Arm.
Screenshot
Conference Table
Place the New Atlantis on the table.
Sir Bacon appears with a piece of the Delphi CPU.
Place the Crank Arm on the wall under the left lamp, and the chandelier will move for you to collect another fragment.
Place the Oracle Key on the poster for a Mini Game.
Use the portal to go to the Flux Mansion Gate.
Screenshot
Oracle Mini Game
See the screenshot for the numbered solution.
Note the code.
Screenshot
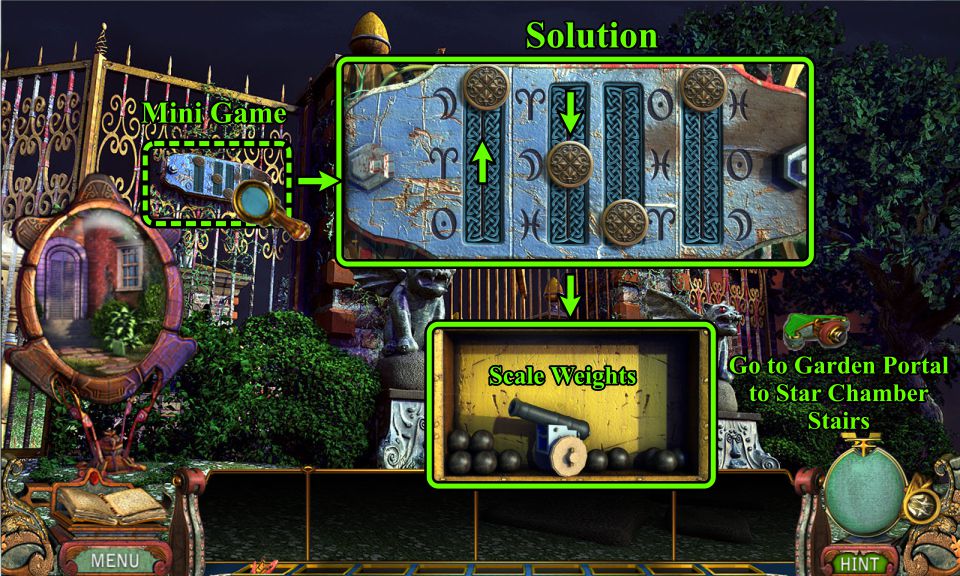
Gate
Zoom in on the plaque for a Mini Game.
Using the code from the Oracle Poster, move the buttons as shown in the screenshot solution.
Take the Scale Weights and go through the Garden portal to the Star Chamber Stairs.
Screenshot
Pirate Ship Mini Game
Zoom in on the pirate ship and place your Scale Weights for a Mini Game.
Your goal is to make the British Crest balanced and even.
Place the cannons and cannon balls as shown in the screenshot solution.
The fireplace will open with a secret door, so enter.
Screenshot
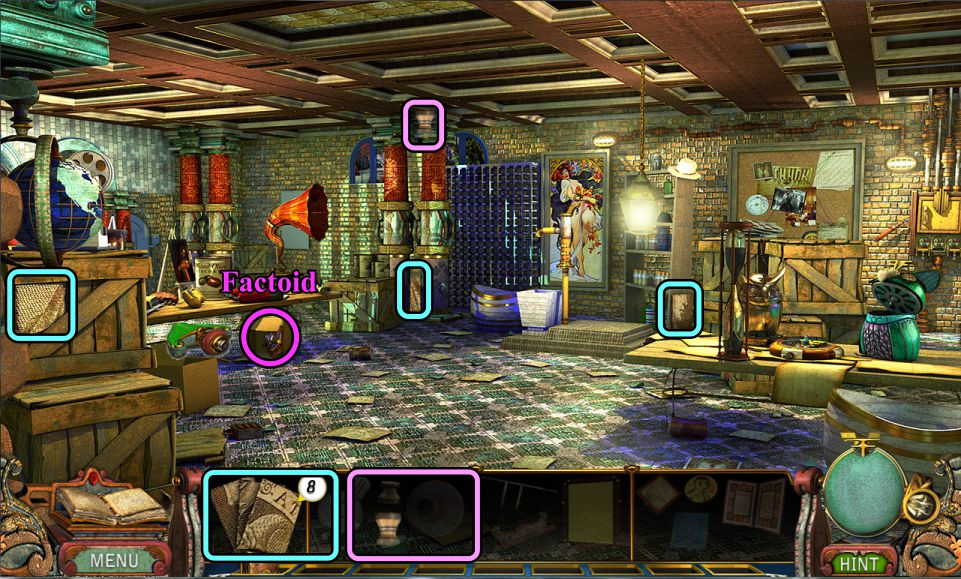
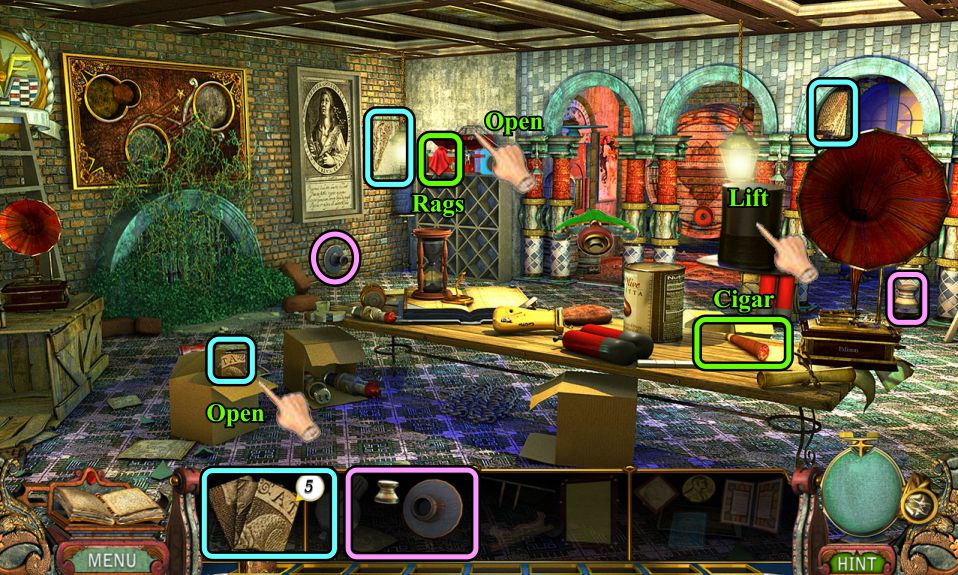
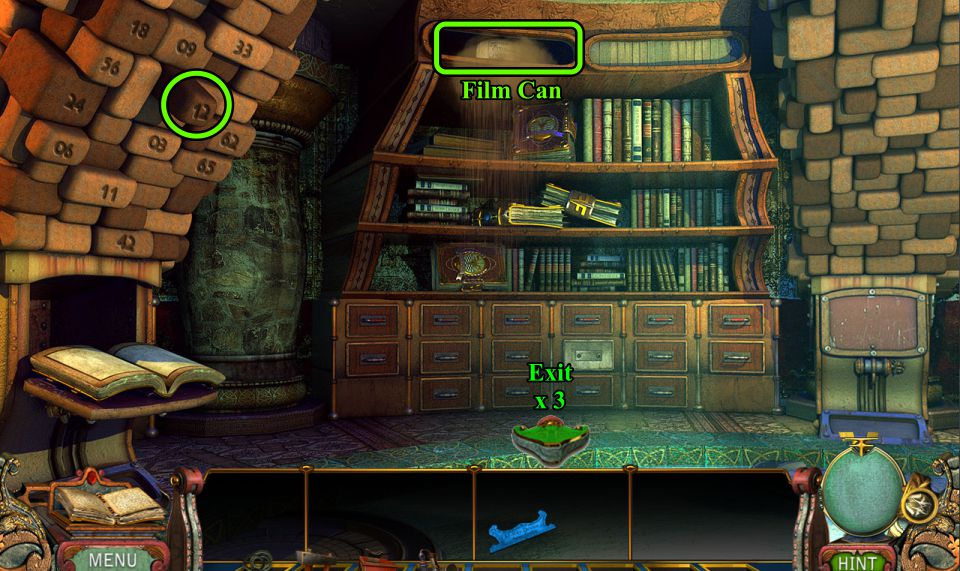
Artifact Room
You find yourself in a room with artifacts from antiquities. Check out all the bookcases.
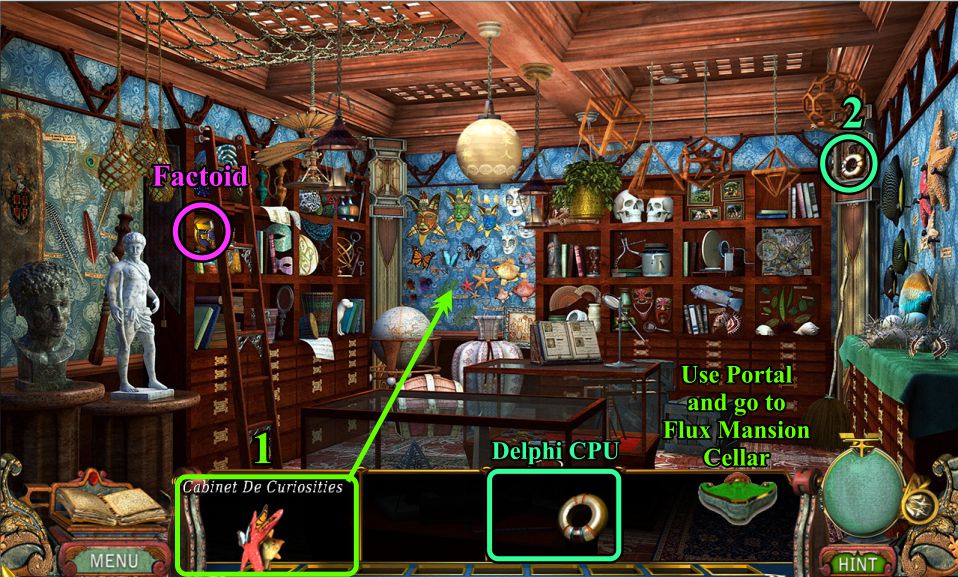
Place the Cabinet de Curiosities on the wall as shown in the screenshot, and a cache will open with the final Delphi CPU piece.
Collect it and the Factoid, and use the portal to go the Flux Mansion and enter the Cellar.
Screenshot
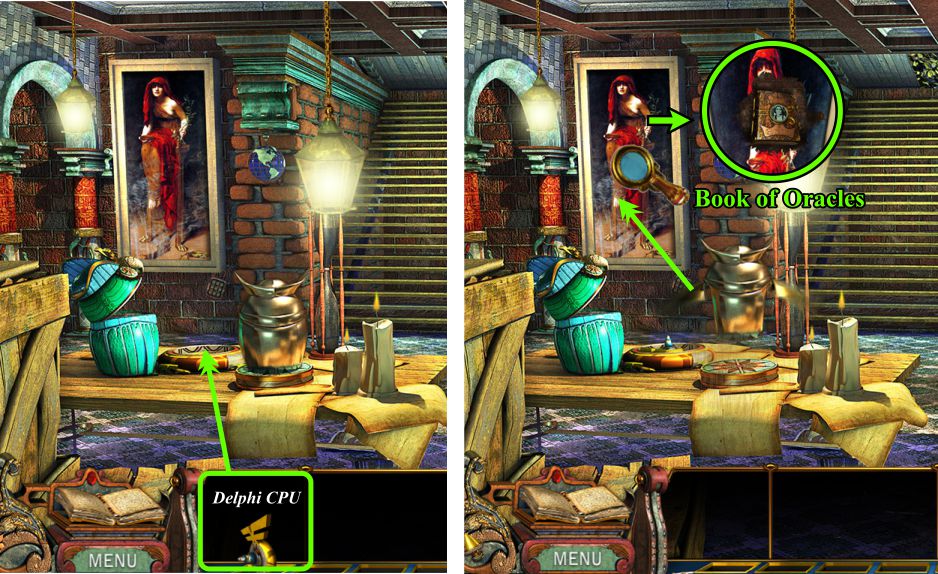
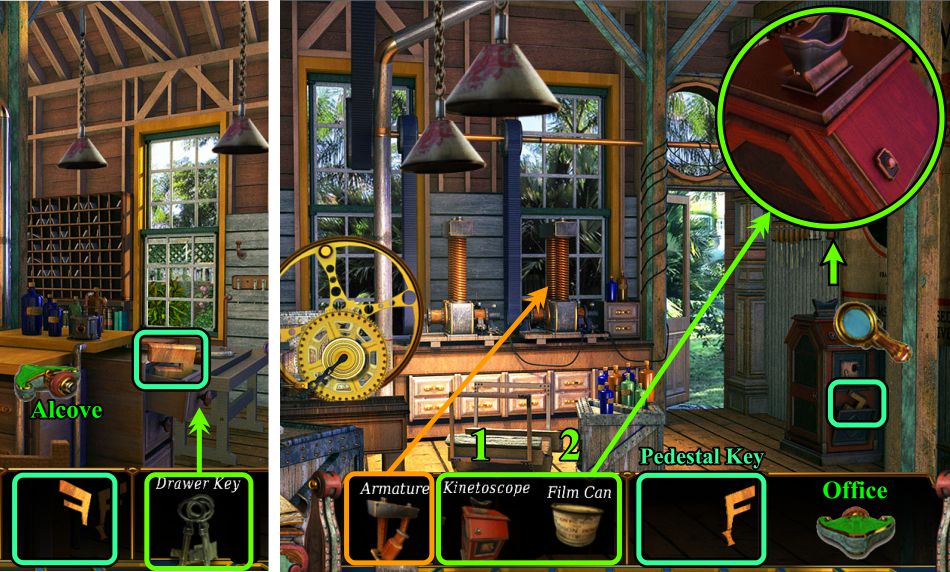
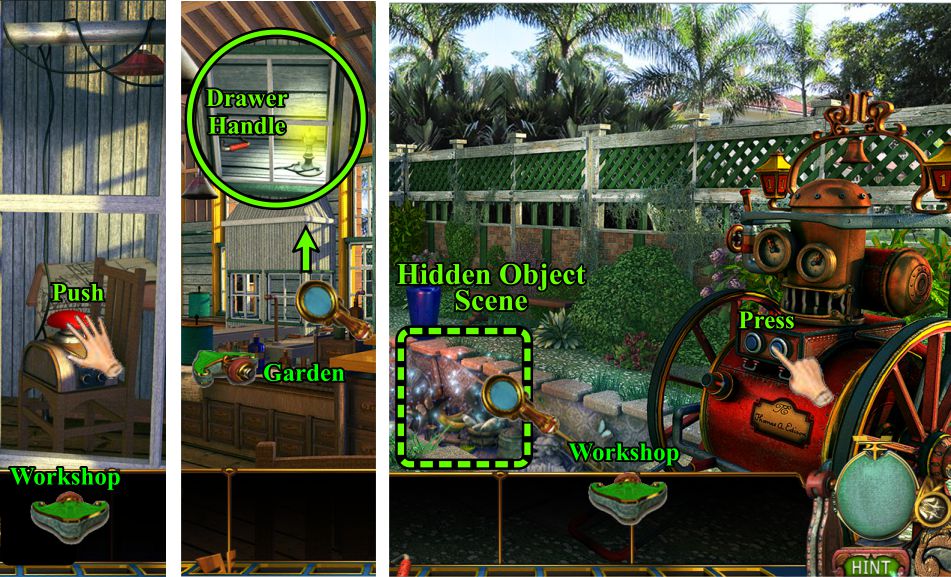
Flux Cellar
Place the Delphi CPU on the base, and the owl will fly off and leave you a present on the poster of the girl in the red dress.
Zoom in on the poster and take Volume 1 of the Book of Oracles.
Screenshot
Posted by: Jazz |
July 13, 2012 7:54 PM
|
July 13, 2012 7:54 PM