

![]()
 As with anything good, there's something about a TomaTea escape game that goes beyond description. But you know one when you see it—logical puzzles that lean heavily on code-breaking, the ever erudite "no clue" messaging and settings that look like an artistically rendered feature spread from House Beautiful—all marks we've come to associate with the designer whose icon is a plump red veggie-like fruit.
So let's look back at Vintage Memory, a relatively vintage TomaTea game. While the light-up cursor, found in newer TomaTea releases, is absent here, both design and distinct (though not always obvious) clues mean you won't miss that extra guidance. Of course, there's a bit of misdirection involved, especially with multiple 4-digit codes to break, and it's not quite as seamless as more recent TomaTea productions. Yet, Vintage Memory is still a fun, mildly challenging escape—with all the classic TomaTea features to make it memorable.


Walkthrough Guide
(Please allow page to fully load for spoiler tags to be functional.)
Vintage Memory Walkthrough
Starting Out, the Top Drawer and the Clock
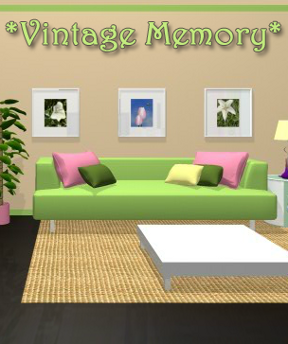
Turn left to face the couch.
Examine the back of each picture for clues:
The left picture has roman numerals and their arabic equivalents.
The middle one depicts a 4-digit number code, "hm," and an 180 degree turn.
The third picture tells you something about a light and a device and what you can find inside a cupboard.
Back up and turn right.
Zoom in on the white-and-black rack to the left of the TV:
Pick up the SUCTION HOOK.
Make a note of the colors and design on the rack:
It looks like roman numerals: 9 1 9 2
Back out.
Turn right. Zoom in on the breakfast table in the corner:
Pick up the CLOTHESPIN.
Notice the way the objects are arranged on the table cloth.
Back up.
Turn left and zoom in on the colored drawers.
Click on the top, yellow "drawer" to solve its code:
Use the clue got from looking at the table...
Press the buttons marked "x"
- - x
x - -
- x x
Then push the bottom button to unlock the drawer.
Open the yellow drawer to get:
RED ROPE.
Back up and then zoom in on the clock:
Use the code found behind the middle picture...
3 5 7 3
Now go back to the bottom, green "drawer":
Use the information from the clock with the hint from the middle picture...
Turn the numbers on the clock's time around and you'll get letters...
ELSE
...enter those letters into the middle drawer then click to open it.
Inside the bottom drawer you'll get:
a KEY
and a SCREWDRIVER.
The Bathroom, Part One
Use the KEY to open the door to the right of the shelves.
Inside the bathroom, zoom in on the shelves to the right of the tub.
Get the FILM roll from the top shelf.
Now back up and look at the black-and-white cupboard.
First, click on the top cupboard door:
Reconstruct the picture.
Click on a tile then click where it should go to switch it.
screenshot: picture solution
From inside the top door, get:
DEVELOPER.
PHOTO PAPER.
Click on the bottom door to see you need another 4-digit number:
This time, use the roman numerals from the black-and-white rack by the TV...
9 1 9 2
From inside the bottom cupboard door, get:
FIXER
and a DVD.
Go back out to the living room.
The TV and a Red Bulb
Back out of the bathroom door to face the TV. Zoom in closer on it:
Click the little green button on the DVD player (device on the right) to open it.
Insert the DVD into the player and click the green button again.
The DVD gives you pictoral directions for what to do next:
You need to get a RED LIGHTBULB, TRAYS and IMAGE PROJECTOR...you have everything else already.
Go back to the doorway.
Click once on the light switch and then back out to see what happened to the lights:
There is a single red bulb up there.
But, it's too hight to reach.
Turn back to the shelves.
Use the SCREWDRIVER on the shelf holding the clock:
The bottom part of the shelf comes out so you have a STOOL of sorts.
Back up and zoom in on the white coffee table.
Put the STOOL on the table and then click on the stool to climb up on it:
You should be looking directly up at the ceiling lights.
Click on the RED LIGHTBULB to take it.
Back down. Zoom in on the middle, pink "drawer":
Use the information from the TV to open it...
3 4 5 2
From inside the middle drawer get:
TRAYS.
Now all you need is an image projector. Zoom in on the end table on the right side of the couch:
Click on the end table's door to see you need a key.
The right picture above the couch tells you where to look for it:
If you turn on the red light, it will help you see it in the cupboard.
Back up. Go through the door into the bathroom.
The Bathroom, Part Two: Setting up the Photo Lab
First, let's set everything up:
Zoom in on the glass wall between the tub and the toilet.
Attach the SUCTION HOOK to the glass wall (there's a faint round mark where it goes).
Then, put the RED ROPE on the hook.
Examine makeshift counter on top of the tub:
Put the TRAYS down here.
Turn on the faucet to fill the middle tray with WATER.
Then use the DEVELOPER and FIXER in the other two trays.
Clip the CLOTHESPIN to the rope above the trays.
Back out and zoom in on the shelves:
Insert the RED LIGHTBULB into the light (on the top shelf).
Click the red button on the wall to turn on the red light.
With that red light on, click on the cupboards:
When you look inside the top door, you'll find:
a KEY. Take it.
Back up three times into the livingroom.
Turn left twice and re-examine the end table in the corner next to the couch:
Use the KEY to open the end table's door.
Take out the IMAGE PROJECTOR.
Back up, turn left, go through the door to the bathroom.
Now you have all the equipment needed, you're ready to develop a picture:
Set the IMAGE PROJECTOR on the surface under the red light.
Put the PHOTO PAPER under the projector.
Then put the FILM roll inside the projector.
Click the white button (on the right side of the projector's platform).
Take the undeveloped PHOTO and back up.
Zoom in on the trays and put the undeveloped PHOTO in them.
The photo will automatically dip in each tray.
Pick up the photo from the last tray.
Hang up the now developed PHOTO on the clothespin to dry.
When the picture shows up on it, take it back.
Go back out to the livingroom.
The Exit Code
Examine the photo you developed in the bathroom.
Notice that it's an opposite image.
Turn around the numbers and enter them into the panel next to the door on the right.
2208
Click "E" when you have the correct code entered. "OPEN" will show on the screen.
Click on the door to exit.
Congratulations on your escape!
Thanks to elle for the walkthrough!
Posted by: Dora Breckinridge |
June 29, 2012 8:41 AM
|
June 29, 2012 8:41 AM