

Royal Detective:
Lord of Statues
Platform: Mac, Windows

![]() Here's the good news: you get to go to a small European village for free. The bad news? Well... there's this tiny issue of horrific and angry statues randomly coming to life and carting off the villagers for who knows what reason. Also, you have the good fortune of being the most prominent detective around! That means you get to go deal with those statues and puzzle out what in the heck is happening. Elephant Games has returned to us with a wonderful new hidden object puzzle adventure game Royal Detective: The Lord of Statues, so put on your bowler hat and get ready to do some mystery solvin'!
Here's the good news: you get to go to a small European village for free. The bad news? Well... there's this tiny issue of horrific and angry statues randomly coming to life and carting off the villagers for who knows what reason. Also, you have the good fortune of being the most prominent detective around! That means you get to go deal with those statues and puzzle out what in the heck is happening. Elephant Games has returned to us with a wonderful new hidden object puzzle adventure game Royal Detective: The Lord of Statues, so put on your bowler hat and get ready to do some mystery solvin'!
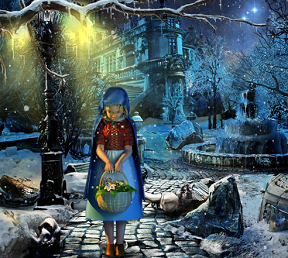 You have been summoned to the snowy town of Martlet. A once upon a time gorgeous town that was filled to the brim with statues, made by a sculptor named Gregory Amadey, that you would swear were alive. Funny story is now they are alive, and they're not so happy. They're after someone and you need to find out whom it is they seek. Lucky you huh? However, it's not only finding out who managed to make these stone giants real. For example, who is Princess? Is she simply the ever-smiling child that Amadey took in? Also, why are some of the statues rocking the fiendish red eyes while others are glimpsing out of emerald peepers? Time is of the essence, Royal Detective, but no pressure or anything.
Unlike Dorothy you don't have any ruby colored heels to click together so you'll have to make due with clicking your mouse to grant your wish. And to also hunt down some clues throughout the town. There are three levels of difficulty ranging from sparkly fun to no sparkles and no helpful hints from your companion Rupert. Add in some achievements and twenty-six miniature figures to be collected and you have yourself quite a hefty case on your hands. To help in your adventure is your cursor, which will change depending on what you hover over, and a slew of statues with specific abilities. The most convenient of your tools are your map. Any place you have visited will have a blip on the map and when pressed you will be instantly transported back to the spot, making going back and forth that much simpler.
 Analysis: Elephant Games always releases heavy hitters, and Royal Detective is a stellar addition to their already abundant repertoire of awesome. Though the idea of an inanimate object coming to life isn't necessarily original, they manage to pack in a few twists and turns to at least spice up the tried and true plot. When you see the Elephant Games title there's always a certain level of expectation and I'm pleased to say they've upped the ante quite a bit.
One of the few drawbacks present in the game is the slow movement speed of the cursor. In this digital age of being a gamer one of the biggest hum bug moments comes when there's something that feels laggy. Oddly enough the lag doesn't seem to occur in any of the hidden object scenes. The hidden object scenes at times feel a bit cluttered, but that is more pleasant challenge than a subtraction from enjoyment. The only other mild inconvenience is length of time between when you finish a puzzle and when it vanishes from the screen. However, none of these things really impedes the greatness of the game as much as allows a cynic to scrutinize a little more.
 I'm happy to say that the positive aspects of the game are like a flood gone wild. They're everywhere and epic. The graphics are stunning to say the least, and it's a great reminder that live action isn't the only way to make a fantastic hidden object game. It's rare to find a casual game that takes the time to invent new and crafty puzzles, but Royal Detective steps up to the plate and hits a home run. I was especially tickled by the puzzle where you have to match the mythological creature to the appropriate country of origin. The story line is enthralling, especially because you're given the information by your handy helper Rupert.
Truly, this game packs quite a wallop. You're guaranteed several hours of enjoyable gameplay that is made all the better because of the gorgeous scenes. Fans of Elephant Games will not be displeased by this testament to their ingenuity and dedication to provide a great experience for their players. If players of the game are lucky, Elephant Games may even have just found themselves a new game to turn into a series. I for one wouldn't mind seeing more of the Royal Detective.
A Collector's Edition is also available. It contains bonus gameplay, an art gallery, strategy guide, and more. Remember that Big Fish Game Club Members pay only $13.99 for Collector's Editions (or 2 club credits), and collector's editions count 3 card punches of 6 total needed for a free game.
![]() Windows:
Windows:
Download the demo
Get the full version
Also available: Collector's Edition
![]() Mac OS X:
Mac OS X:
Download the demo
Get the full version
Also available: Collector's Edition


Walkthrough Guide
(Please allow page to fully load for spoiler tags to be functional.)
Royal Detective: The Lord of Statues Walkthrough
General Information
Main Menu and Scene Navigation
From the Main Menu, you can Play or Quit the game, choose your Options and your Profile.
Options include Music, Environment, Effects, and Voice volume, full screen or not, a widescreen adjustment, custom cursor or not, and a Gamma adjustment for the graphics.
If you find the custom cursor is a little sluggish, turn it off and play with the window's cursor.
There are three Game Modes:
Casual is for players who want relaxed game-play with sparkles and a quick-recharge Hint button.
In Advanced Mode, Hints take longer to recharge, and there are no sparkles.
Hardcore players get no help at all because there are no hints, skips for mini games, and no sparkles.
Other Main Menu items include links to achievements, bonus material and strategy guide if you purchased the Collector's Edition, and credits.
Bonus includes extra game play and video that are unlocked once you finish the basic adventure, wallpapers, concept art, and music.
When you begin, you will need to click on him to meet Rupert, who will be your Hint button and will provide you with other valuable information for your journey.
You will then be asked if you wish interactive help from the Tutorial.
Your cursor will change to a magnifying glass when you should investigate something close up, a hand when you need to move, open or grab something, a gear that will give you information, and an arrow to tell you where you can go to another location.
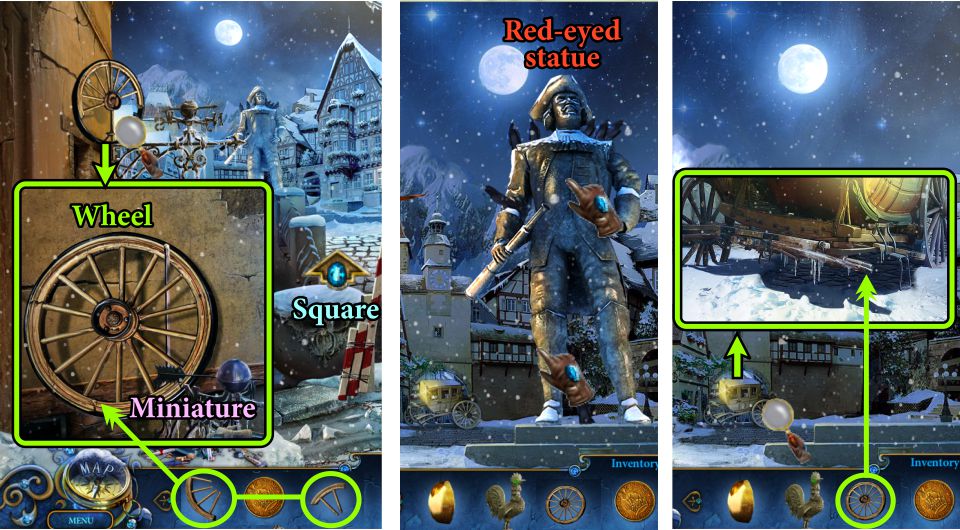
You will learn the red-eyed statues are dangerous and should be avoided, but the friendly green-eyed statues will assist you and even accompany you in your Inventory.
In Hidden Object Scenes, when you choose an object, it will morph to exit the scene and then remove itself from the list. Do not be too quick to choose the next object until the morphing is completed or the game may possibly become unstable. Since there is no time limit, if you are patient, you should not have a problem.
When you come to the end of the game, you will have an important choice to make that will alter the ending, so you may want to save your profile to find out about both endings.
Achievements
There are 10 Achievements to obtain, as numbered in the screenshot:
Puzzle cracker: You will get each level until you have solved 3 mini games without using Skip.
I can find anything: There are 3 levels with the goal of finding everything in 3 Hidden Object Scenes without using any Hints.
Kidnapper: Princess gets kidnapped in the garden by a winged statue.
Meet the creator: After cut scene at the door of Amadey's secret room.
Fast legs: Use the Map to go to another location.
Save everyone: Save everyone in the Attic.
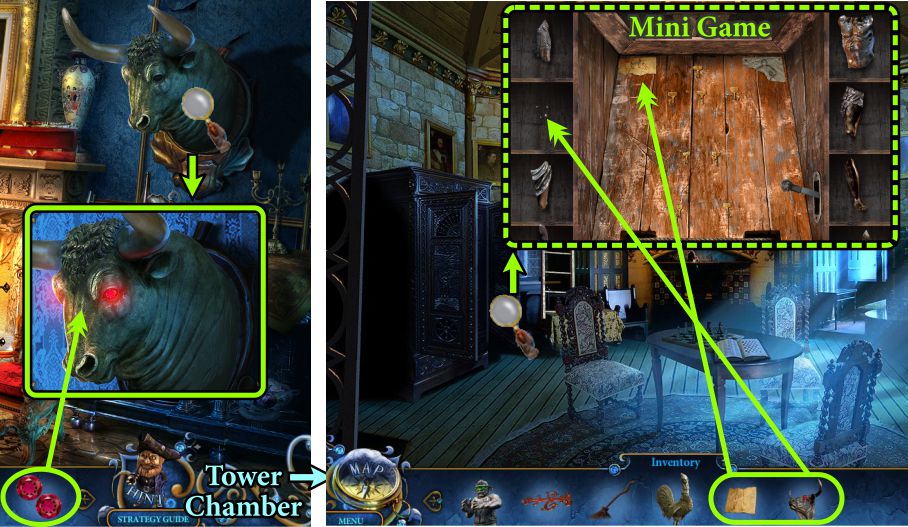
Prince on a white horse: When the Chimera takes Roxanne away in the Tower Chamber.
I need no help: Complete the game with no hints are skips.
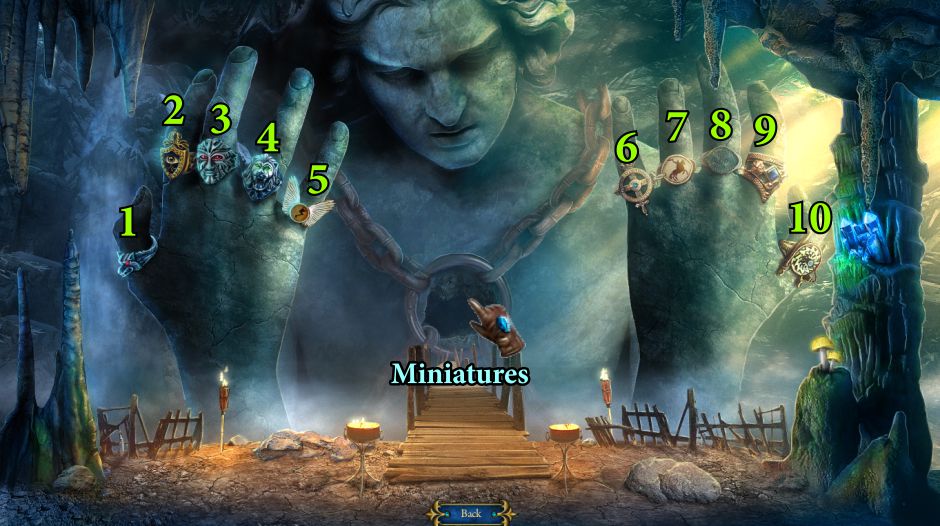
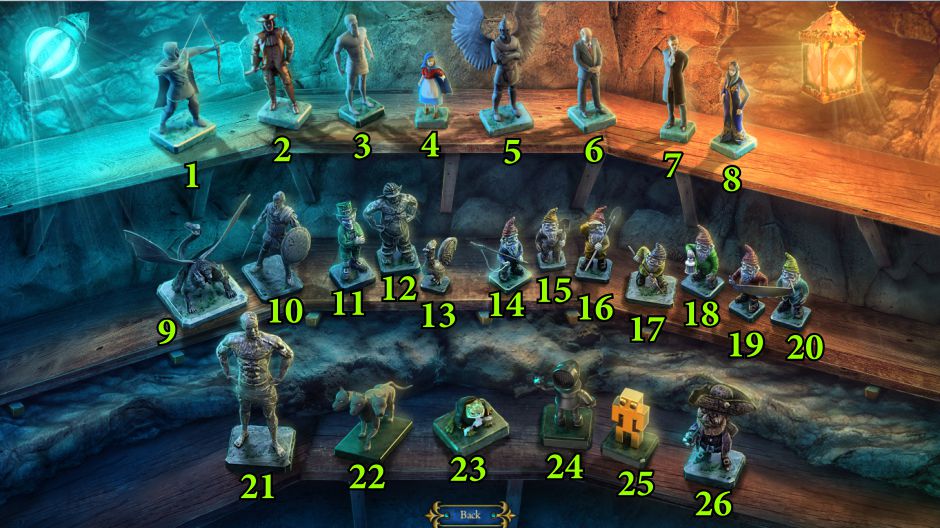
Avid collector: Collect all 26 Miniatures.
Know how to use items: Use the Rooster to get the chest at the Stone Bridge.
Screenshot
Miniatures
There are 26 Miniatures, labeled in pink, to collect throughout the game. See the numbered screenshot to match these names and locations.
Archer: Mansion Balcony
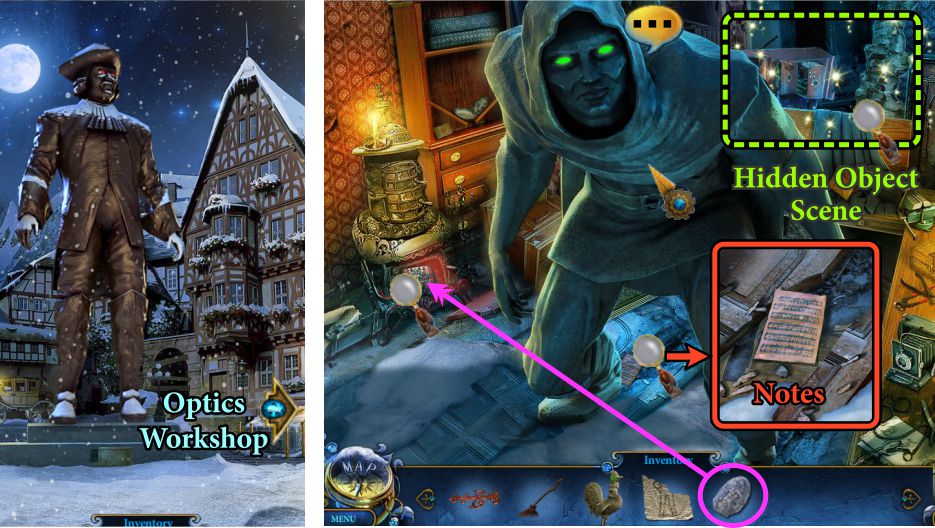
Admiral Holgerd: Optics Workshop
Atlas: Stone Bridge - weather vane
Princess: Amadey's Secret Room - table under his portrait
Angel: Mansion Garden � above "Garden" sign
Mr. Montage: Tower � by barrel
Gregorian Amadey: Tower Entrance � by basket
Roxanne Davis: Mansion Entrance - bannister
Cerberus from "Urban Legends: the Maze": Mansion Garden � basket
Hero Statue: Chapel � bow statue
Leprechaun: Princess' Secret Room - chair
Miner: Optics Workshop � stove
Rooster: Distant window in Square
Gardener Gnome: Tower Chamber � table
Gnome with Shovel: Dining Room � table
Shy Gnome: Dining Room � mantle
Digging Gnome: Backyard House Entrance - next to magic broom
Chief Gnome: Backyard Entrance � window
Gnome with Saw: Gallery of Statues � lower left corner
Lazy Gnome: Stairs to Gallery of Statues
Chronos Titian: Princess' Secret Room � lower left corner
Chimera: Mansion Garden � near bucket
Mr. Toad from "Mystery Trackers" � below painting
Silver robot from "Surface: Mystery of Another World": Mansion steps � near box
Golden robot from "Surface: Mystery of Another World": Tower � under stairs
Rupert: Attic � ground by chasm
Screenshot
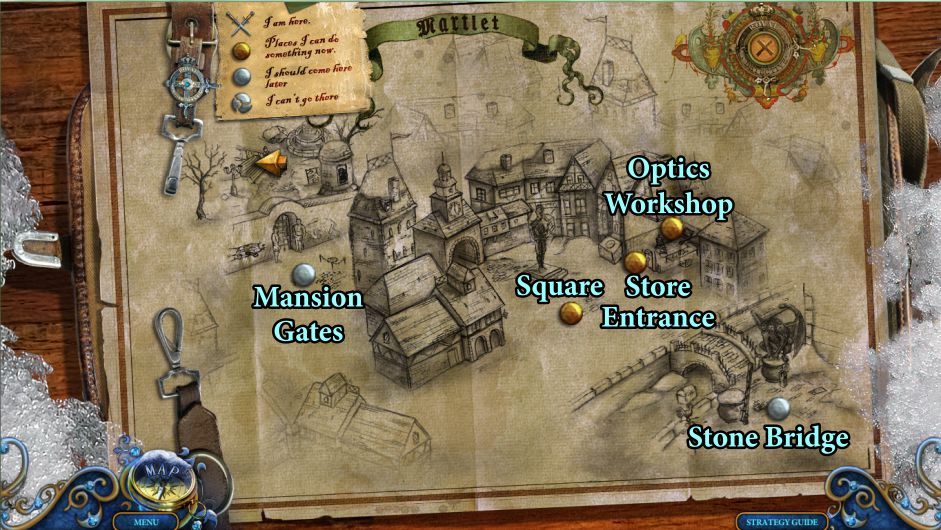
Map
As you progress through the various locations, your Map in the lower left corner will expand to show you where you are, places you need to do something, other places you will need to revisit, and places you cannot go to.
The first map shows the locations until it is time to go through the Mansion Gates.
Screenshot
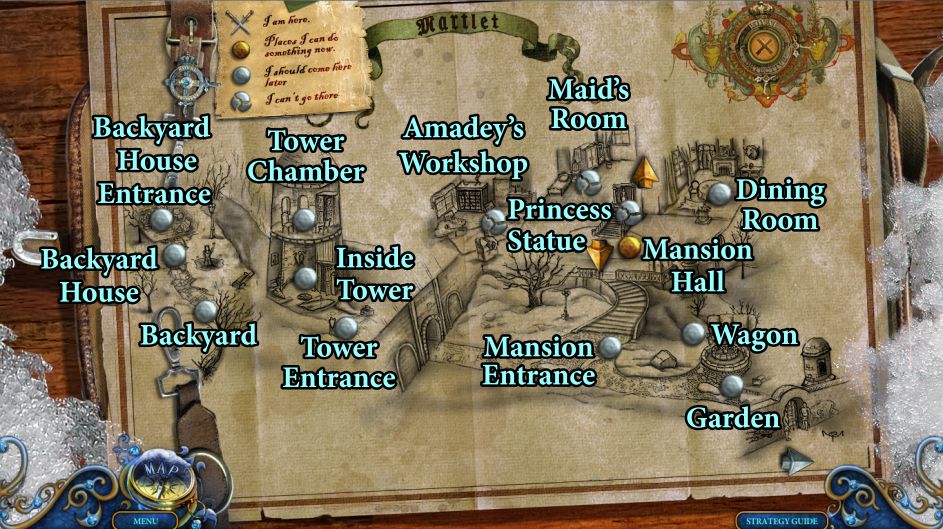
Map 2 shows the Mansion and its grounds.
Screenshot
The last Map shows the basement area under the Mansion and the Attic above the Princess Statue.
Screenshot
Chapter 1: Arrival in Martlet
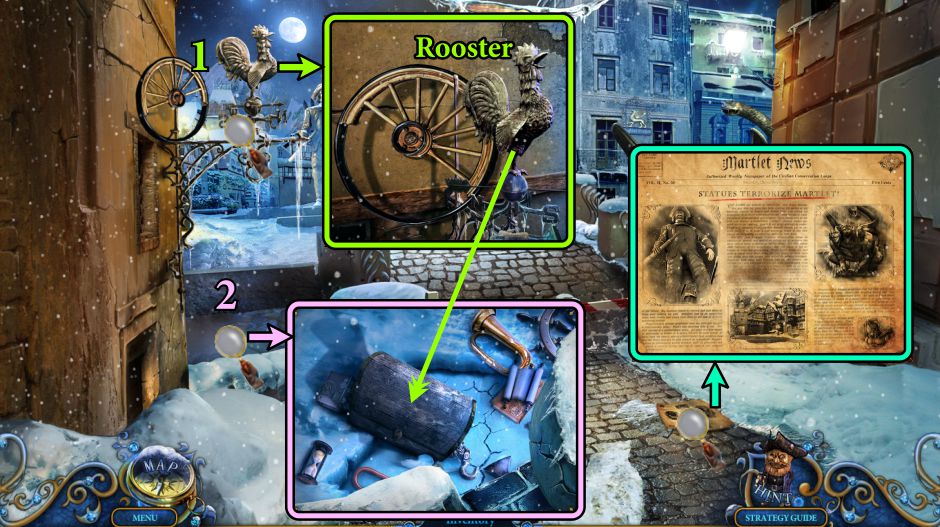
Stone Bridge
Read the newspaper, and zoom in on the weather vane.
Take the Rooster who will become your helper.
Zoom in on the chasm to note you can't get to the chest, so send your Rooster to get it.
Screenshot
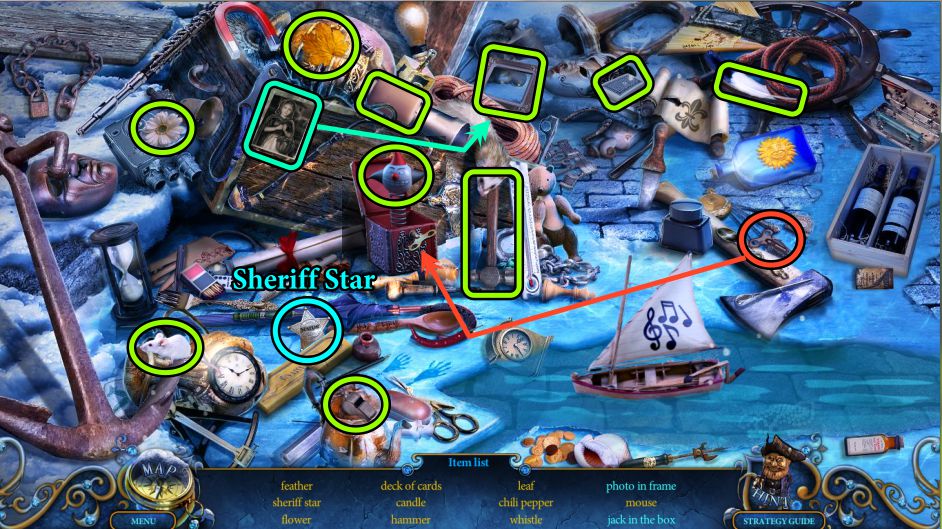
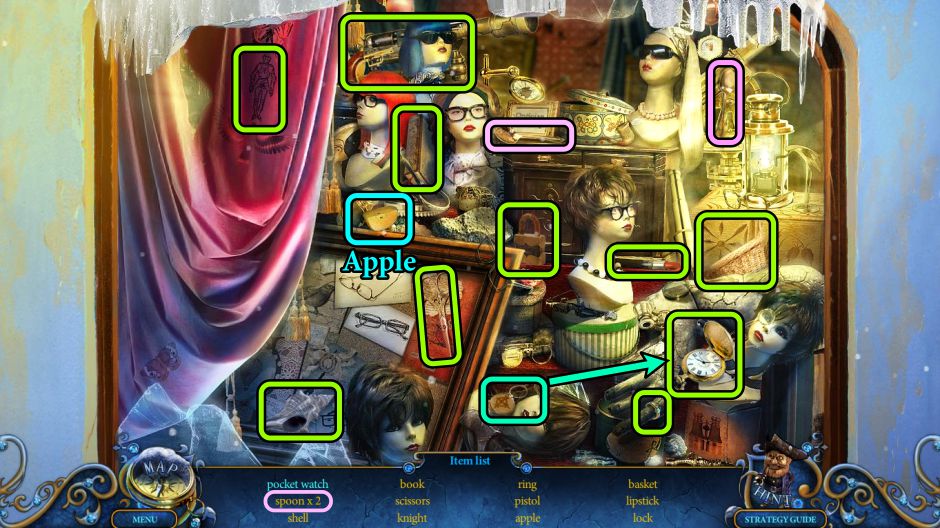
The Rooster drops the chest so you get to rummage through the remains as a Hidden Object Scene.
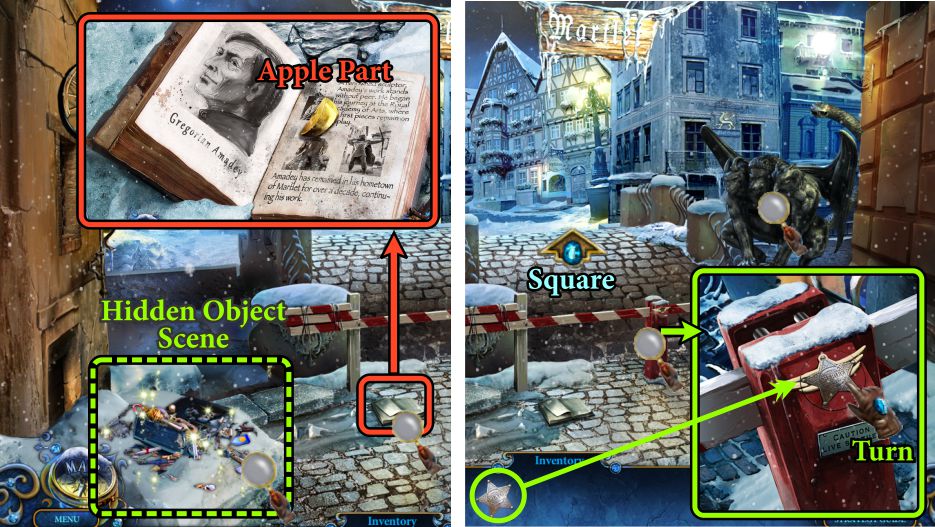
Zoom in on the book and take the Apple Part.
Once you've completed the Hidden Object Scene, zoom in on the gate and place your Sheriff's Star to open the gate and cross to the Square.
Screenshot
Chest Hidden Object Scene
Your final object will be the Sheriff Star.
Use the key to open the box for the jack-in-the-box.
Place the photo in the frame to collect it.
Screenshot
Square
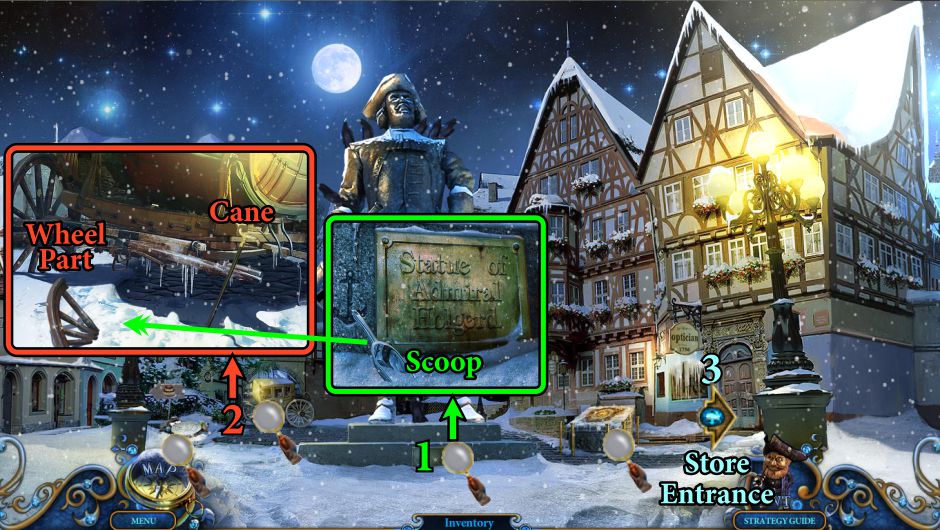
Zoom in on the name of the statue and take the Scoop.
Examine the coach, take the Cane, and use the Scoop to uncover the Wheel Part.
Go to the Store Entrance.
Screenshot
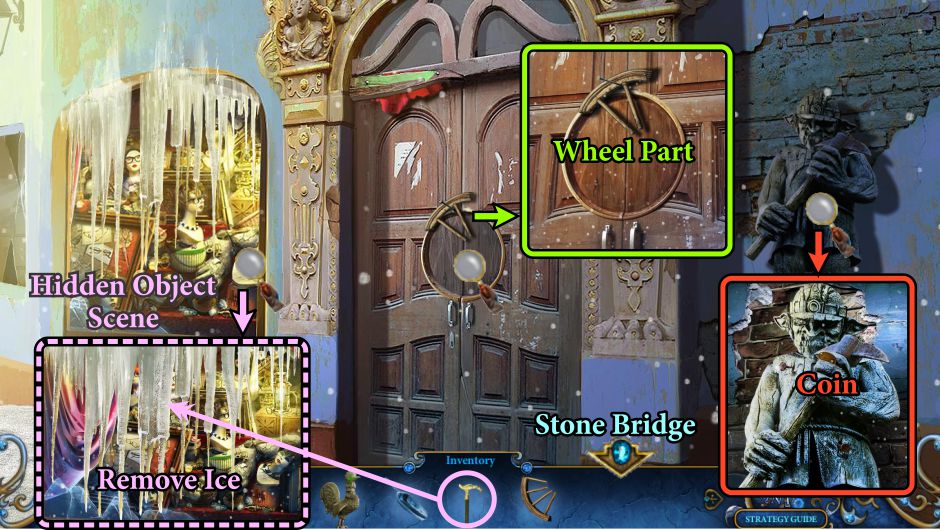
Store Entrance
Zoom in on the Miner and take the Coin.
Examine the door and take the Wheel Part.
Zoom in on the window and use your Cane to remove the ice to trigger a Hidden Object Scene.
Screenshot
Display Hidden Object Scene
Place the fob on the watch to collect the pocket watch.
The Apple part will go into your Inventory.
Go to the Stone Bridge.
Screenshot
Stone Bridge and Square
Zoom in on the wheel, place the Wheel Parts, and collect the Wheel and Miniature.
Return to the Square, touch the statue, and he will leave his pedestal.
Zoom in on the coach and place the Wheel.
Screenshot
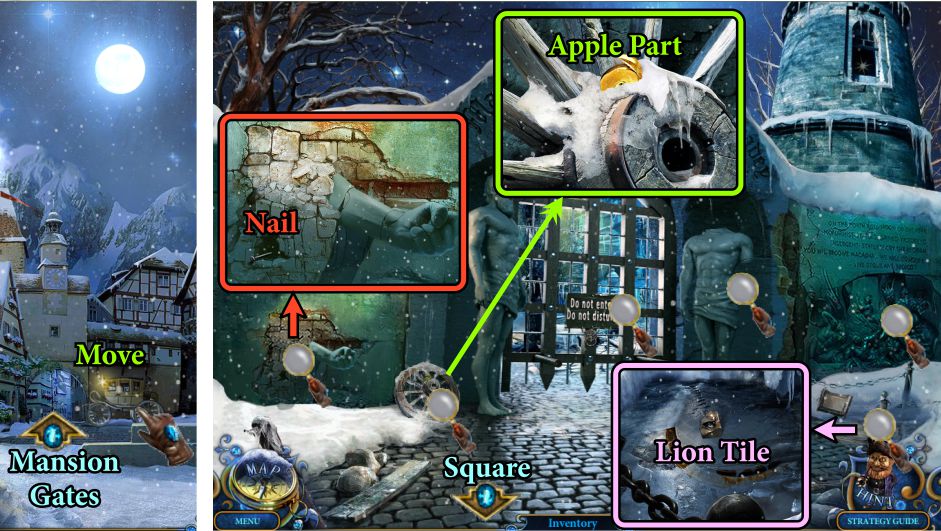
Square and Mansion Gates
Move the coach to unblock the archway, then go to the Mansion Gates.
Note the magnifying glasses, zoom in on the area to the right, and take the Lion Tile.
Examine the Wheel and take the Apple Part.
Zoom in on the wall with the arm and take the Nail.
Return to the Square.
Screenshot
Square
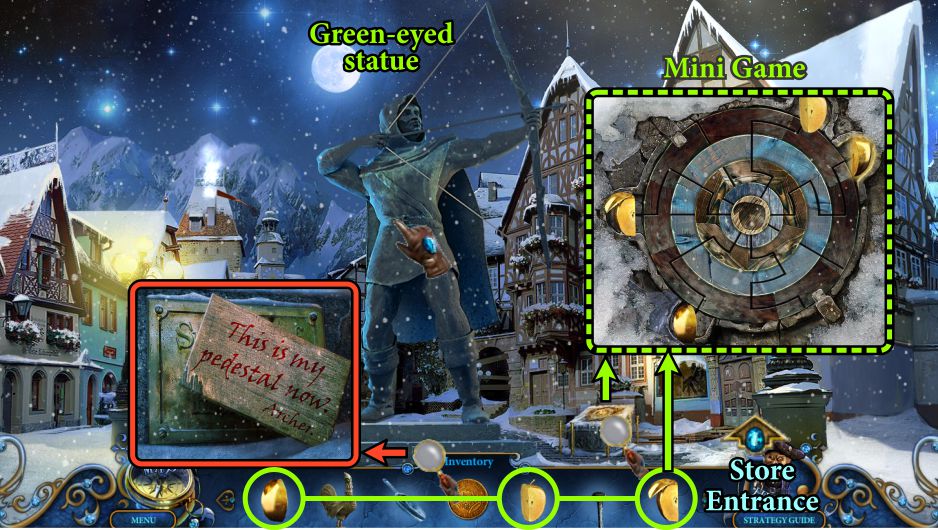
A new statue has taken over the pedestal, so touch him to find out he's green-eyed and friendly.
Zoom in on the placard near the statue and place your Apple Parts to trigger a Mini Game.
Screenshot
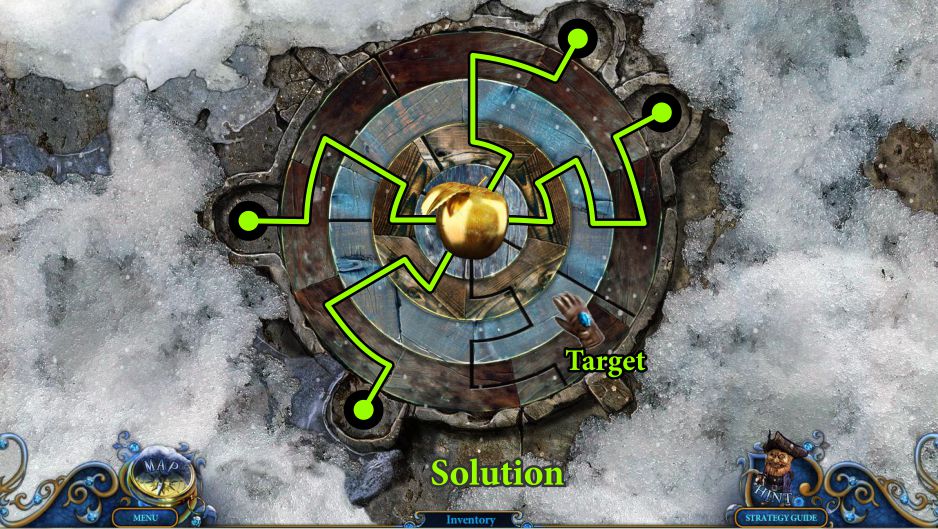
Target Mini Game
Your goal is to rotate the circles so as to create paths for the apples to join together in the center.
See the screenshot for the solution, and take the Target.
Screenshot
Chapter 2: Optics Workshop
Store Entrance and Square
Go to the Store Entrance, zoom in and place the Target on the door.
Back out of the way to the Square while the Archer aims at the Target.
Return to the Store Entrance to see he has broken down the door. Enter the Optics Workshop.
Screenshot
Optics Workshop
Zoom in on the camera at the right and open it.
Remove the photo so you can pick up the Spring.
Examine the box on the desk and use the Nail and Coin to open it.
Take the Jam and open the small box to collect a Vampire Magnet.
Screenshot
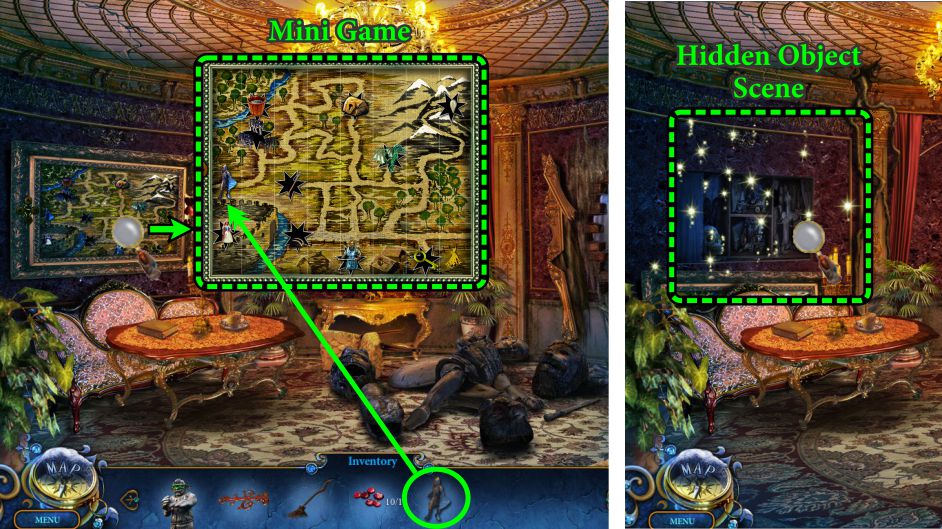
Zoom in on the map on the back wall and place the Vampire Magnet to trigger a Mini Game before returning to the Square.
Screenshot
Map Mini Game
Arrange the magnets so the mythical creatures are in their correct locations. See the screenshot for the solution.
Take the Magnifying Glass when the game is completed.
Screenshot
Square
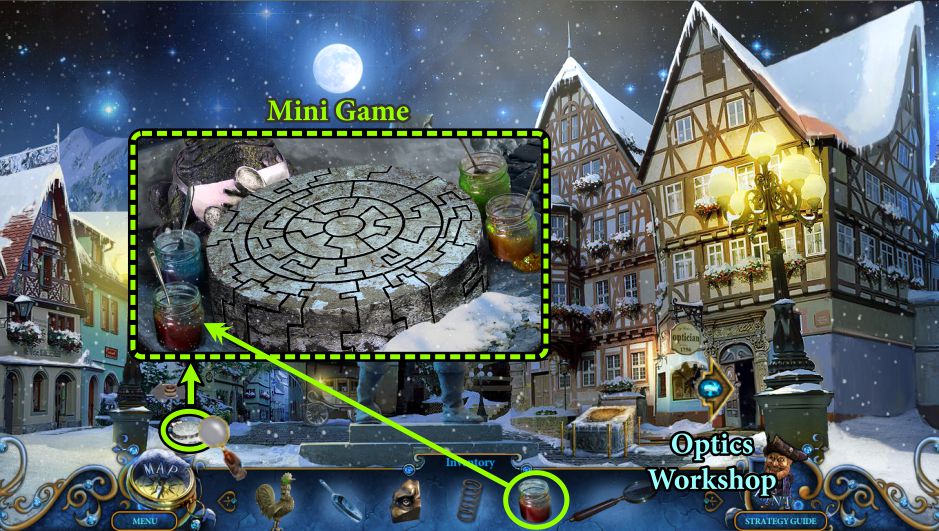
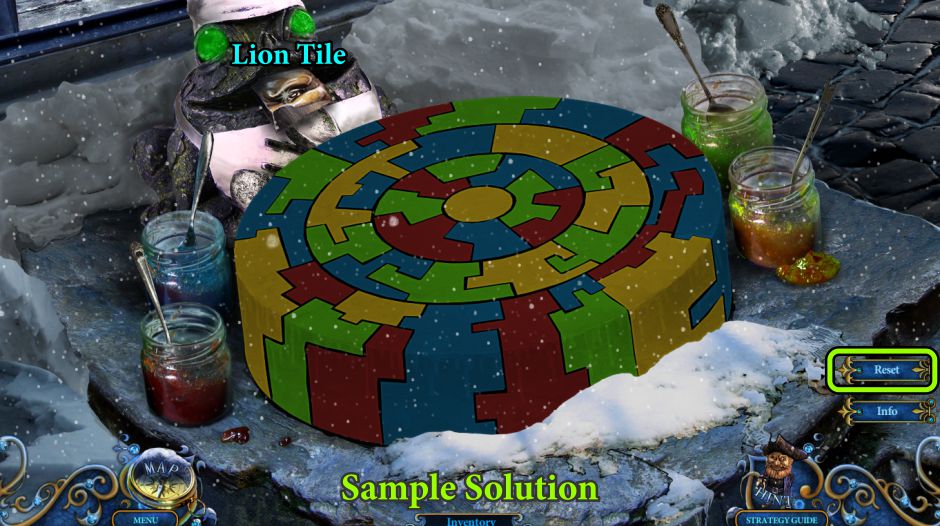
Zoom in on the stone at the left and place your Jam to trigger a Mini Game.
Screenshot
Cake Mini Game
Your goal is to paint the cake with the Jam so that adjacent pieces are not the same color.
Touch the Jam and then the pieces of the cake. See the screenshot for a sample solution.
There is a Reset button if you need to start over, but you can also paint over the Jam colors.
Take the Lion Tile and return to the Optics Workshop.
Screenshot
Optics Workshop
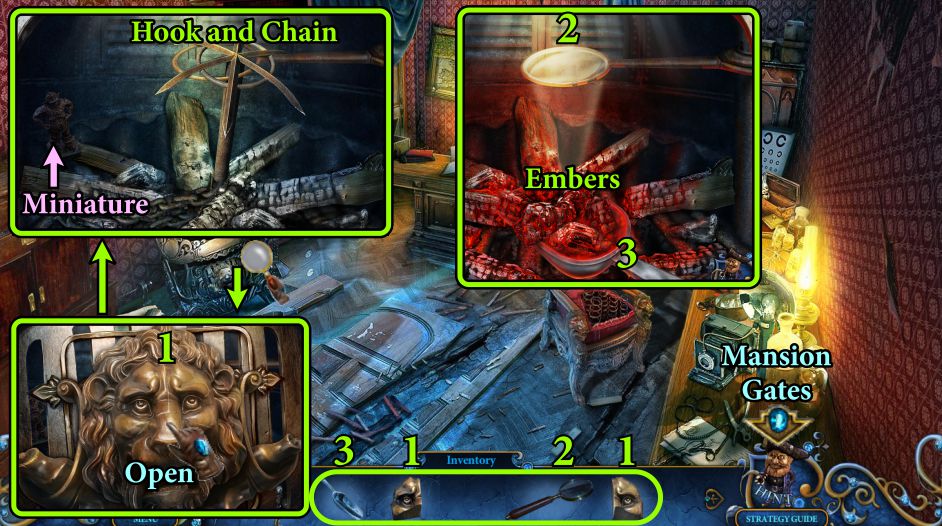
Zoom in on the stove, place your Lion Tiles, and touch the completed lion to open the oven.
Take the Hook and Chain, and the Miniature.
Place the Magnifying Glass in the holder to light the fire.
Use your Scoop to take some Embers.
Go to the Mansion Gates.
Screenshot
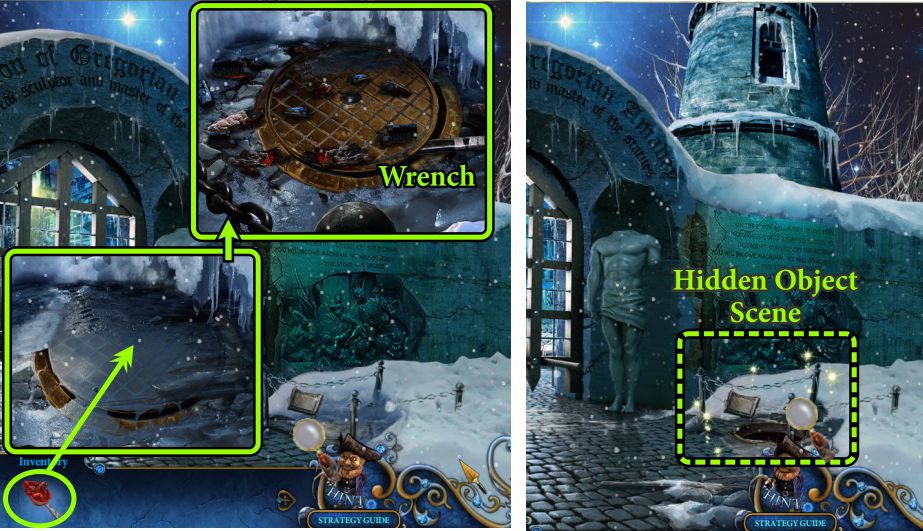
Mansion Gates
Zoom in at the right and use the Embers to melt the snow.
Take the Wrench to trigger a Hidden Object Scene.
Screenshot
Sewer Hidden Object Scene
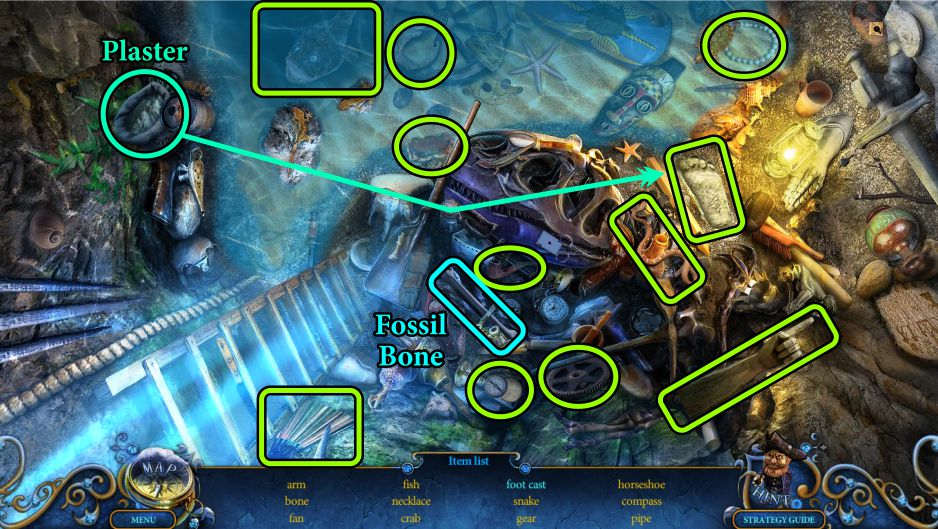
Use the plaster on the foot to get the foot cast.
Your Inventory item is a Fossil Bone.
Screenshot
Mansion Gates
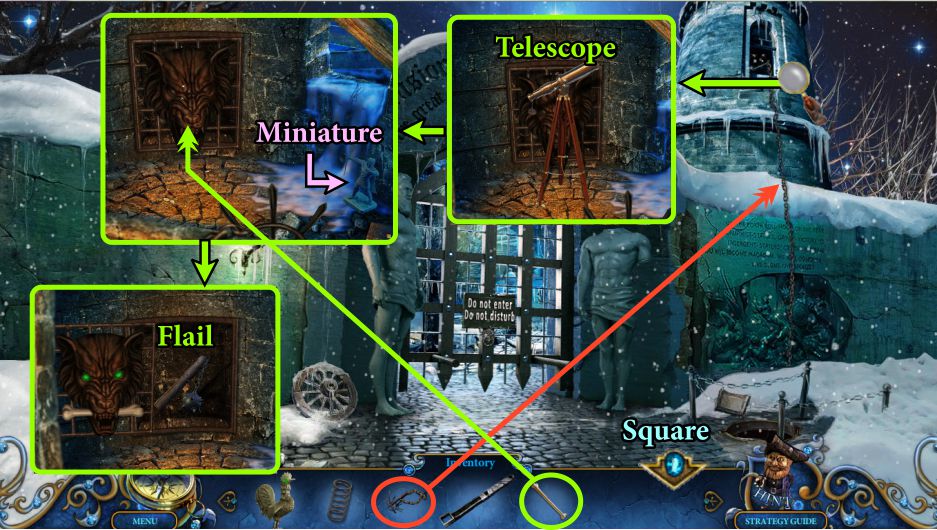
Place your Hook and Chain on the window and zoom in on it.
Take the Telescope and Miniature.
Give the Fossil bone to the wolf, and take the Flail.
Return to the Square.
Screenshot
Square
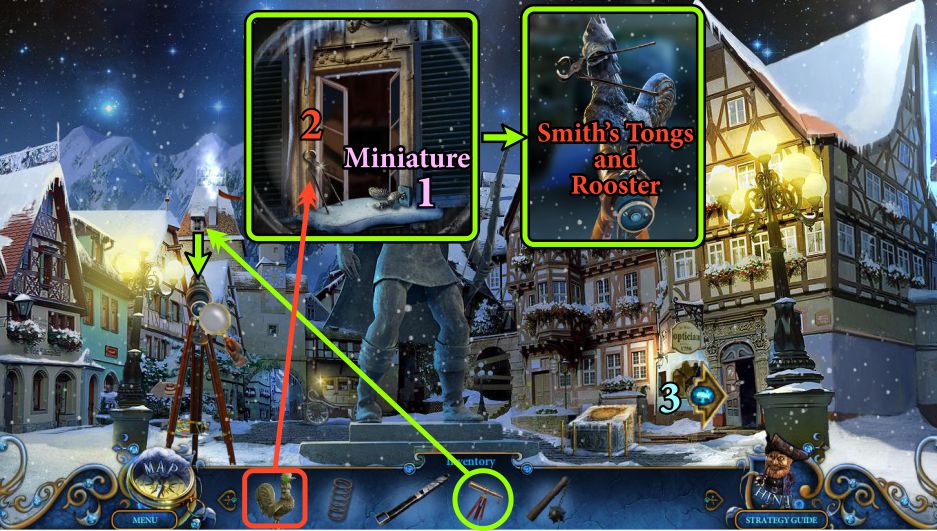
Place the Telescope on the distant window, and the Telescope will plant itself in the proper place.
Zoom in on the lens to view the window, take the Miniature, and place your Rooster on the tongs.
The Rooster will fly back and sit on the Telescope, so take the Smith's Tongs and your Rooster.
Go to the Store Entrance.
Screenshot
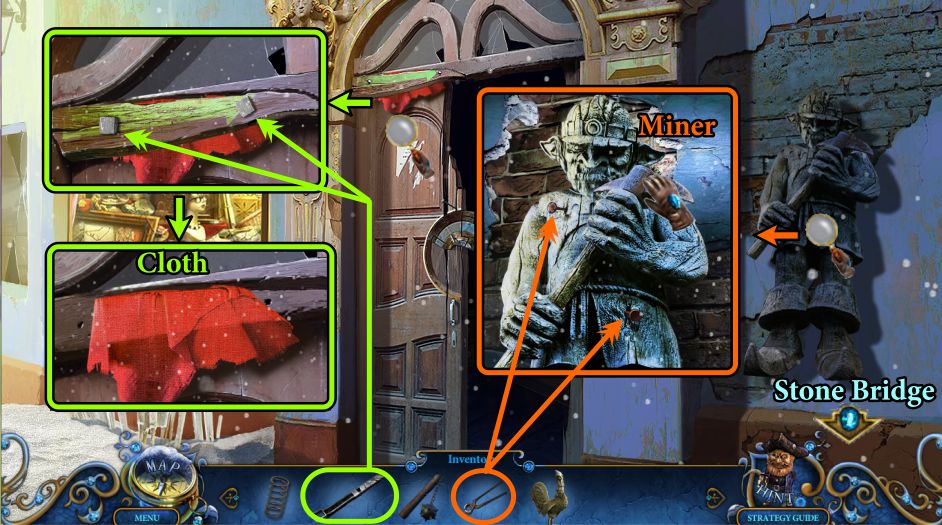
Square
Zoom in on the red cloth and use the Wrench to remove the bolts so you can take the Cloth.
Use the Smith's Tongs to remove the nails holding the Miner and collect him.
Go to the Stone Bridge.
Screenshot
Stone Bridge
Use the Flail on the Chimera to get rid of it.
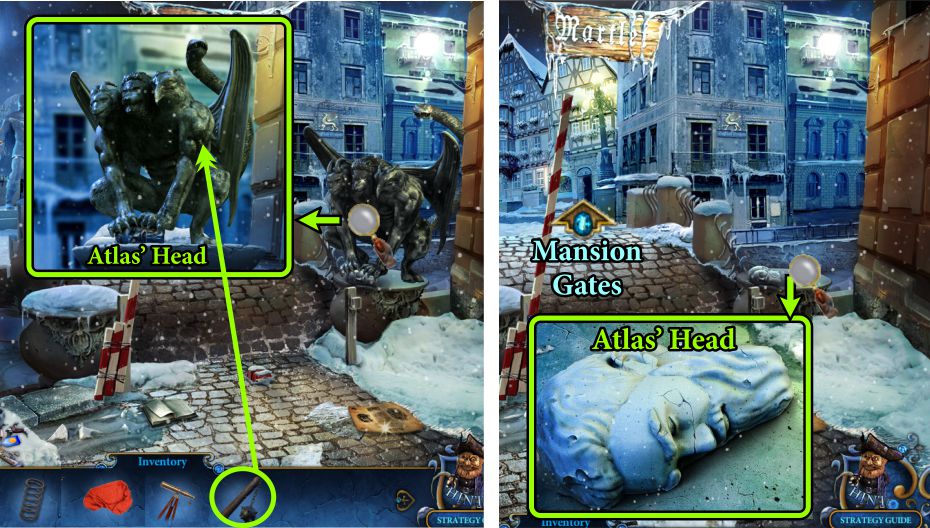
Zoom in to collect Atlas' Head, then go to the Mansion Gates.
Screenshot
Mansion Gates
Zoom in on the wall to the left, place your Miner, and take Atlas' Arm.
Zoom in on Atlas' statue and place his head and arm.
Screenshot
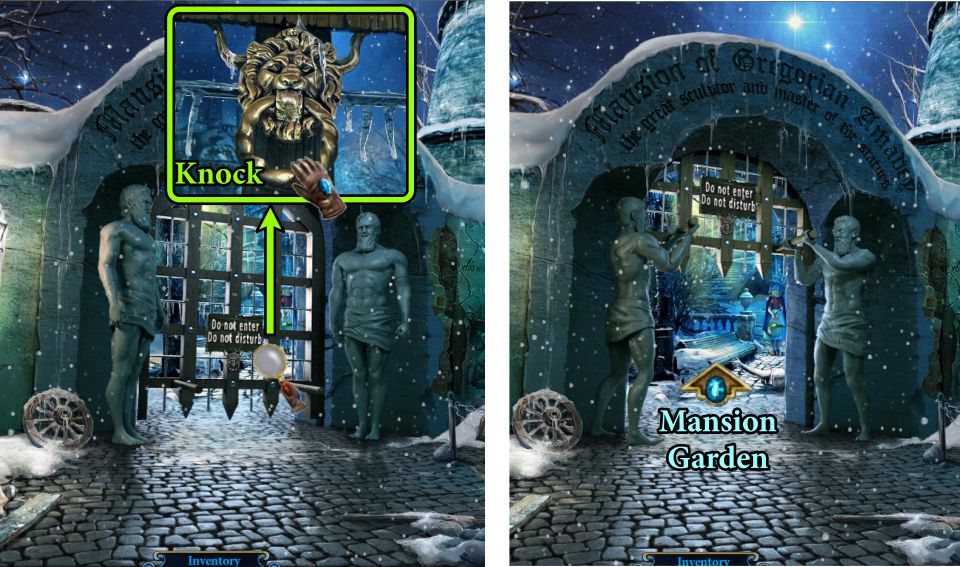
Time to knock on the gate, so zoom in on the knocker and use it. The statues will raise the gate for you to enter the Mansion Garden.
Screenshot
Chapter 3: Mansion
Garden
Touch Princess, and a winged statue arrives to kidnap her.
Collect the Miniature above the sign, and zoom in on the bucket.
Take the Handle and the Miniature, and examine the basket Princess dropped.
Take the Miniature, Flower, and Baking Form.
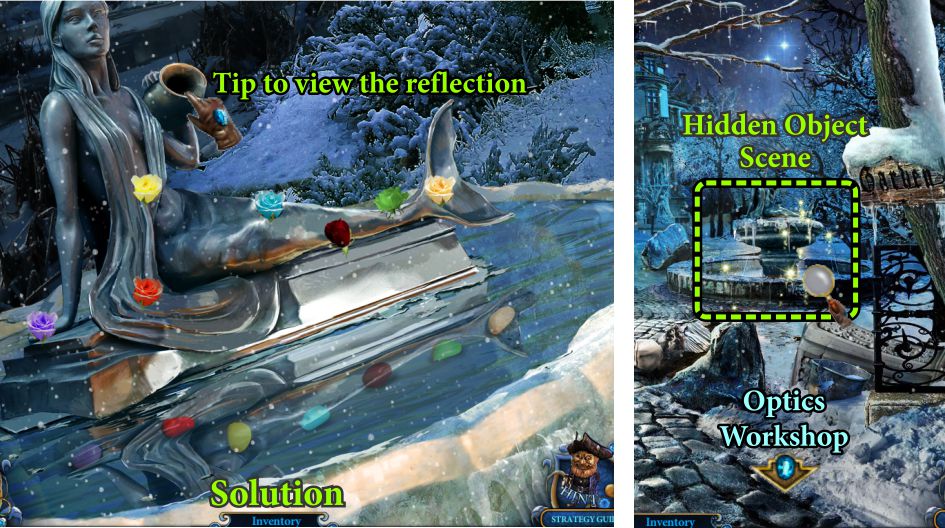
Touch the fountain to remove the snow and ice, and zoom in for a Mini Game.
Screenshot
Fountain Mini Game
Tip the jar to view the reflection in the water to show you where to place the flowers on the statue. See the screenshot for the solution.
Once the game is completed, play the Hidden Object Scene in the fountain before going to the Optics Workshop.
Screenshot
Fountain Hidden Object Scene
Place the coffee beans in the grinder and turn the handle to get ground coffee.
Feed the dragonfly to the frog for a well-fed frog.
Your final item will be a Princess Figure.
Screenshot
Optics Workshop
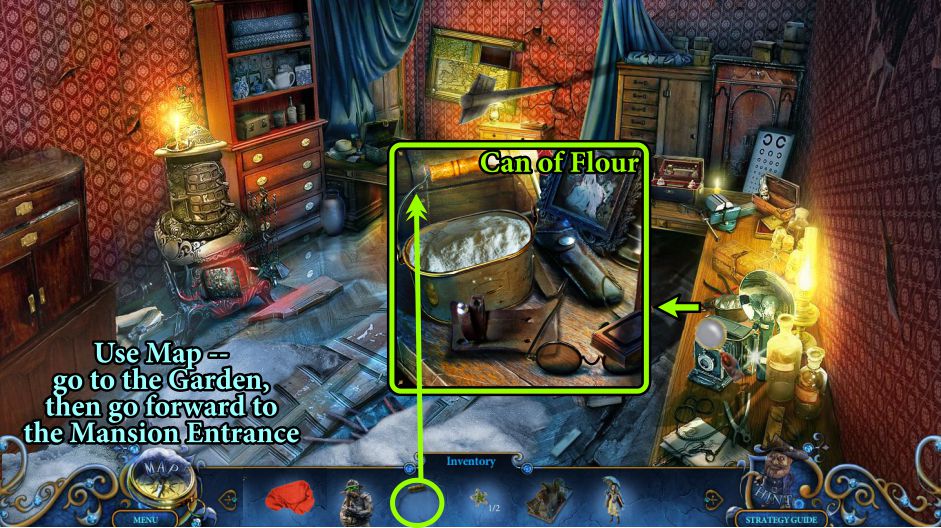
Zoom in on the table at the right, place the handle, and take the Can of Flour.
Use the Map to return to the Garden, and then go to the Mansion Entrance.
Screenshot
Mansion Entrance
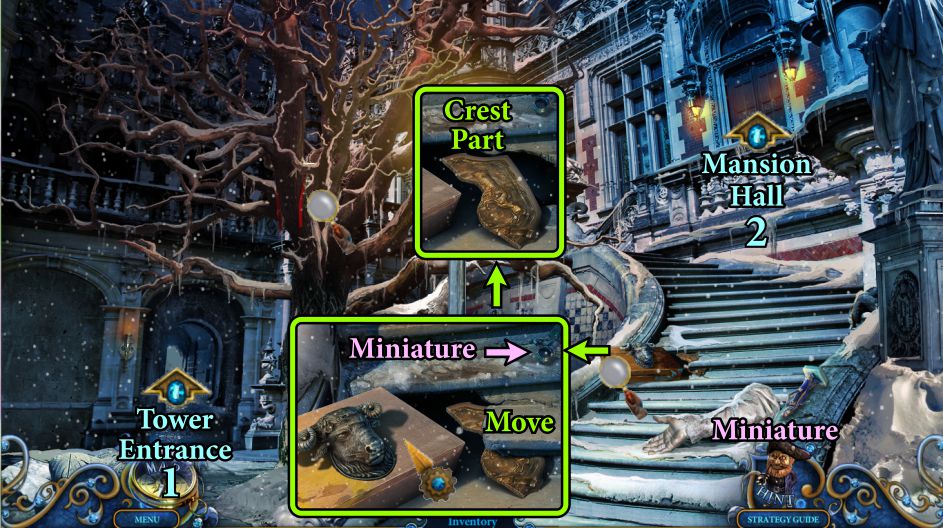
Take the Miniature on the banister, and zoom in on the box on the stairs.
Move the broken step piece to take the Crest Part, and collect the Miniature.
Go to the Tower Entrance, and then enter the Mansion Hall.
Screenshot
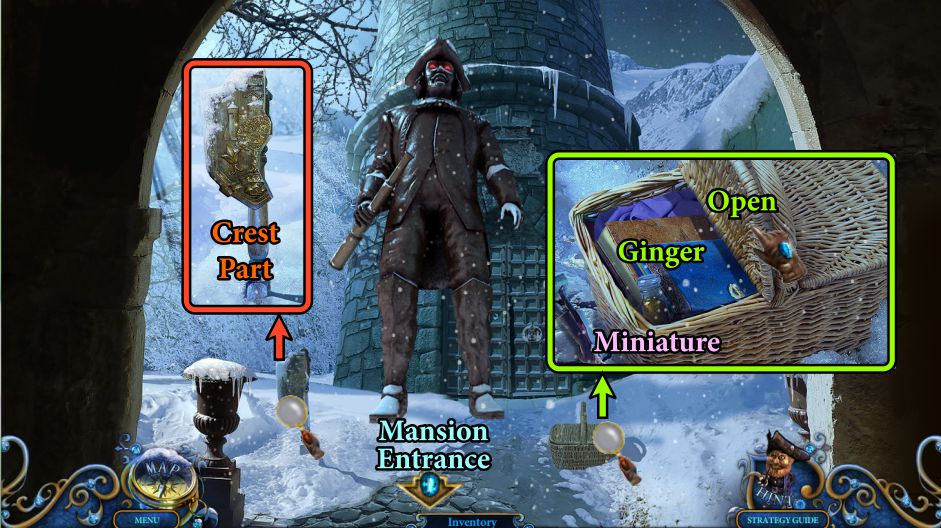
Tower Entrance
Roxanne runs through the door to the Tower, and the statue of Admiral Holgerd isn't far behind to block your path.
Zoom in on the post at the left and take the Crest Part.
Examine the basket, open it to find some Ginger, and take the Miniature.
Return to the Mansion Entrance and enter the Hall.
Screenshot
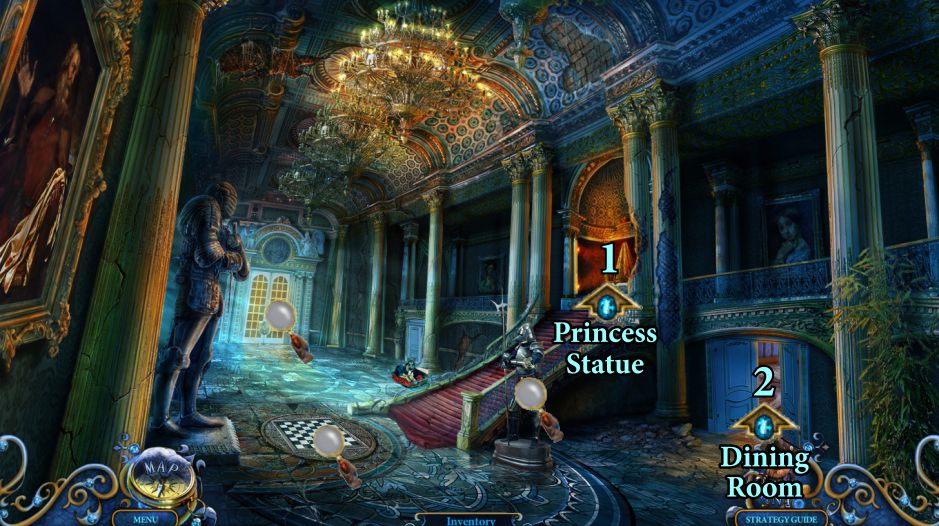
Mansion Hall
Check out all the magnifying glasses, go to the Princess Statue, and then the Dining Room.
Screenshot
Square
Remove the cloth, zoom in, and take the Flower and Princess Figure.
Go to the Dining Room.
Screenshot
Dining Room
Zoom in on the mantle, take the Miniature, and pull on the canvas.
Collect the Princess Figure and zoom in on the chicken on the chair.
Place your Rooster, who scares her off: Collect him and the Egg.
Note that when you press on the design on the floor, the closet door opens but then shuts.
Screenshot
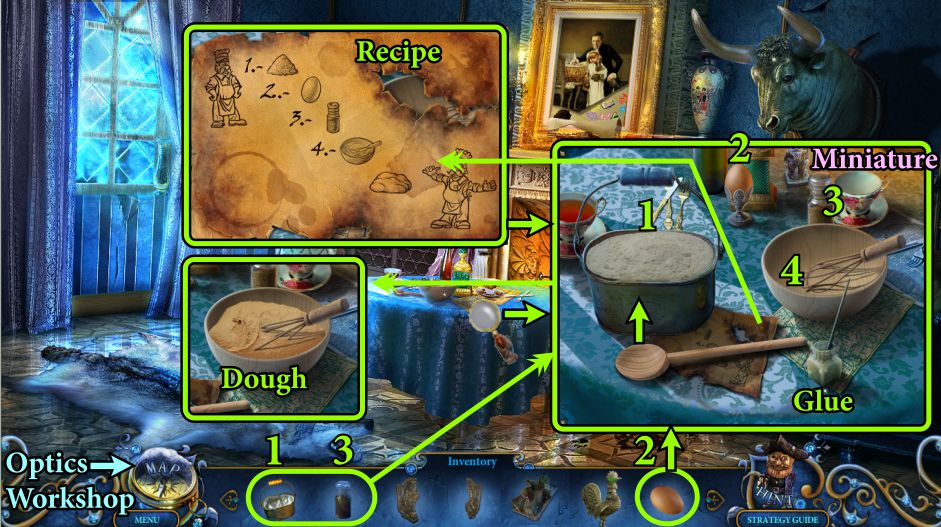
Zoom in on the table, check out the recipe, and collect the Miniature and Glue.
Place your Flour, Egg, and Ginger on the table.
Use the spoon to scoop some flour into the bowl, add the Egg, and then some Ginger.
When it's finished mixing, collect the Dough, then use the Map to go to the Optics Workshop.
Screenshot
Optics Workshop
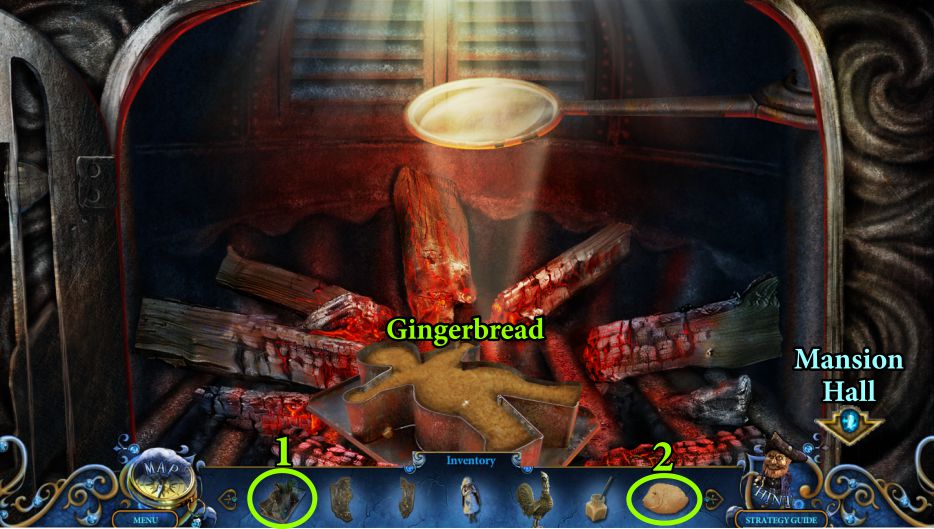
Zoom in on the oven, place your Baking Form, and place the Dough in the form.
Collect the Gingerbread and go to the Mansion Hall via the Map.
Screenshot
Mansion Hall
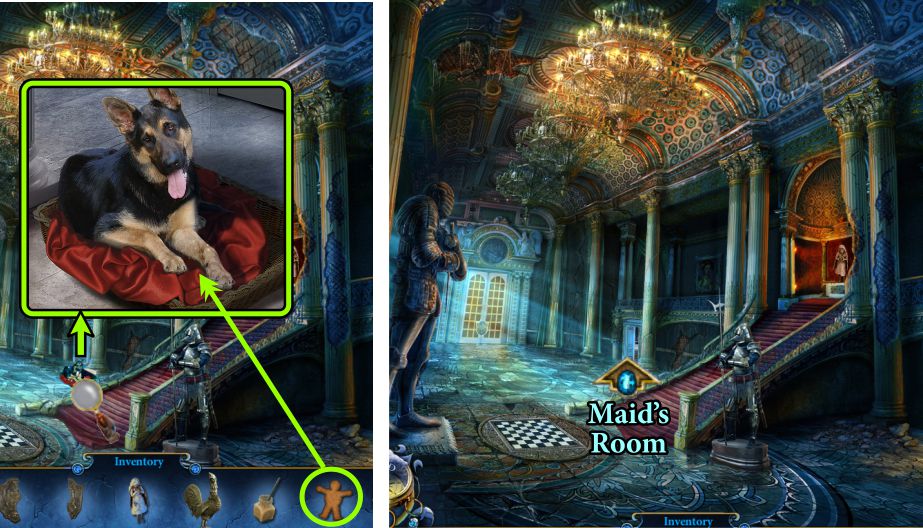
Zoom in on the dog and give him the Gingerbread.
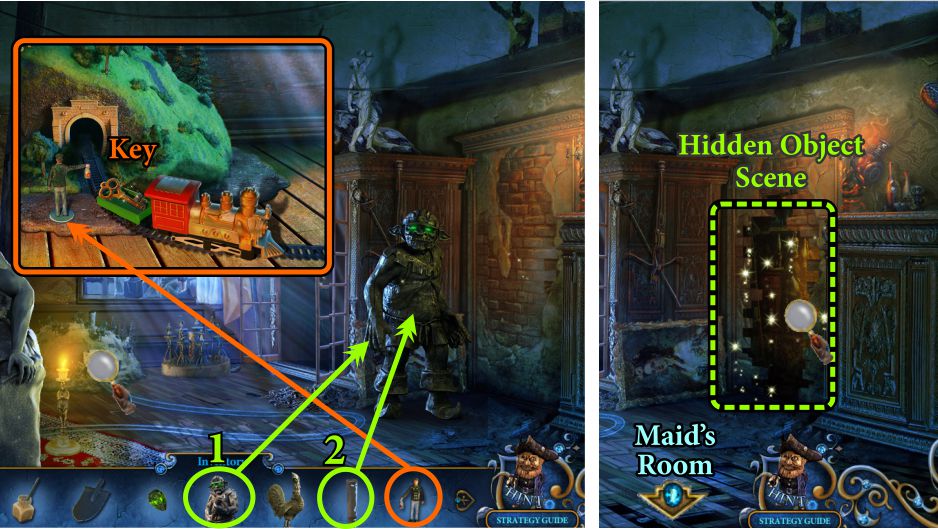
While he's busy eating, enter the Maid's Room.
Screenshot
Maid's Room
Zoom in on the sewing machine and take the Needle and Thread.
Check under the bed: Even though it's too dark to see everything, you can collect the Shovel.
Zoom in on the bird cage, open the door, and take the Horse's Leg.
Examine the bed. Touch the angel and the bubbly bursts, so take the Golden Angel.
Move the pillow to check out the book.
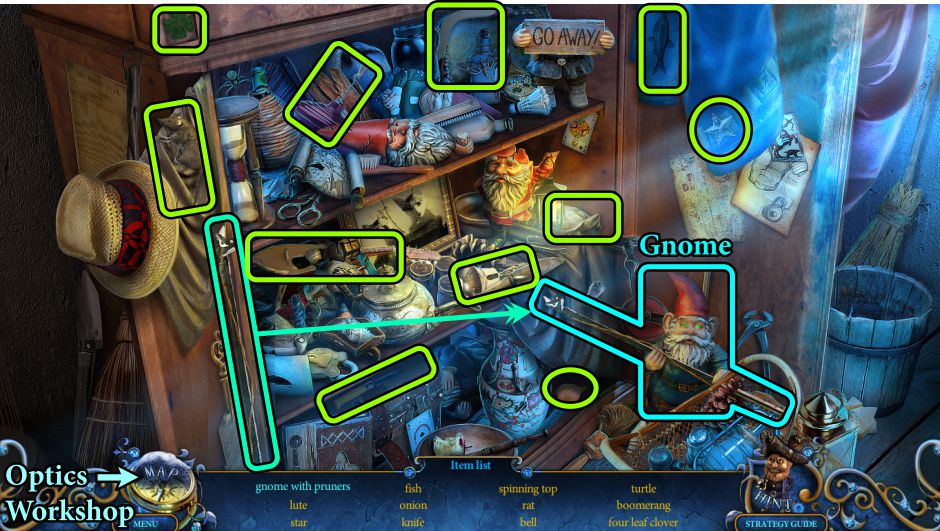
Open the closet door for a Hidden Object Scene.
Screenshot
Closet Hidden Object Scene
Give the pruning shears to the Gnome so you can get the Gnome with Pruners for your Inventory.
Go to the Optics Workshop using the Map.
Screenshot
Optics Workshop and Dining Room
Place the Cloth on the chair and use the Needle and Thread to fix the seat.
Collect the Chair and go to the Dining Room.
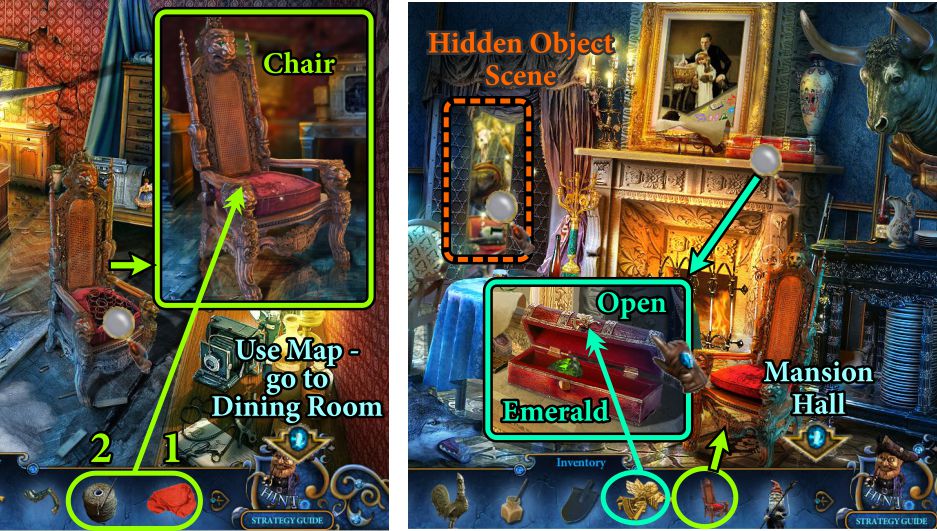
Zoom in on the mantle, place the Angel on the box, open it, and take the Emerald.
Place the Chair on the decorative place on the floor so that it opens the closet for you to play a Hidden Object Scene.
Screenshot
DR Closet Hidden Object Scene
Place the bullet in the gun to get a loaded gun.
Milk the snake venom into the jar to collect the snake poison.
You will get the Horse Head for your Inventory.
Go to the Mansion Hall.
Screenshot
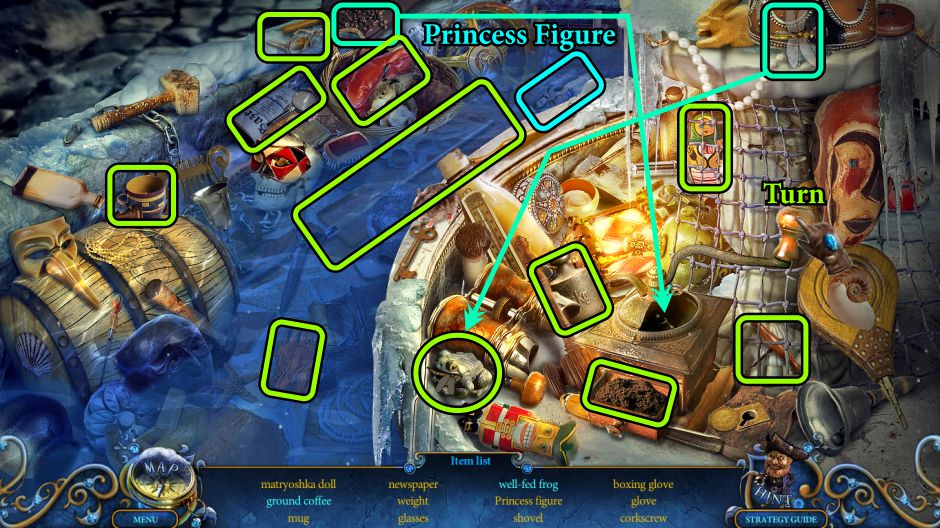
Mansion Hall and Amadey's Workshop
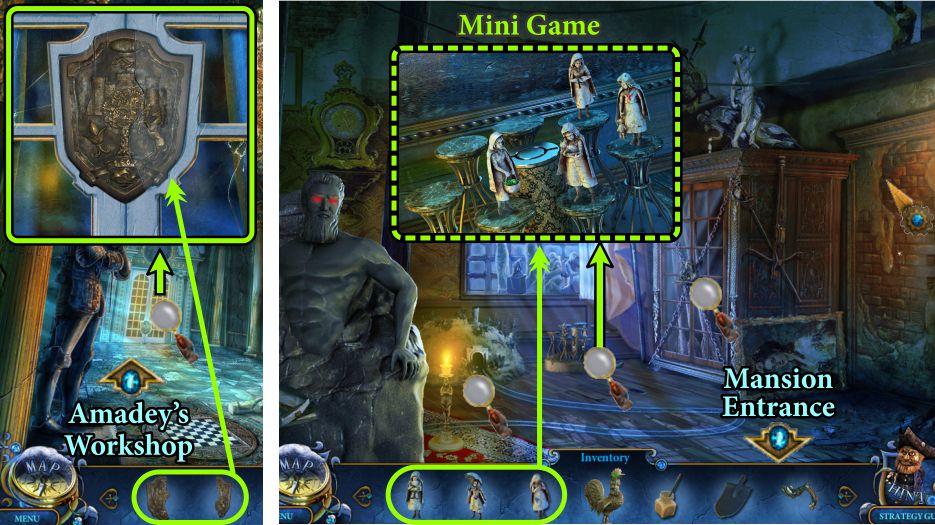
Zoom in on the doors at the end of the Hall and place your 2 Crest Pieces in order to open it.
Enter Amadey's Workshop and zoom in on the place marked in the screenshot for a Mini Game.
Place all your Princess Figures to activate the Mini Game.
Screenshot
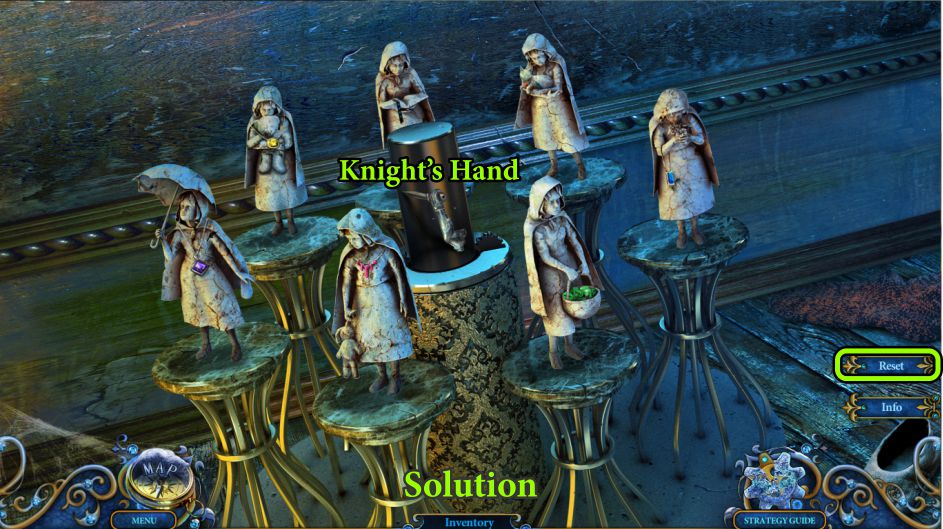
Princess Figure Mini Game
Swap the Princess Figures as shown in the screenshot so you can collect the Knight's Hand.
Go to the Mansion Entrance.
Screenshot
Mansion Entrance
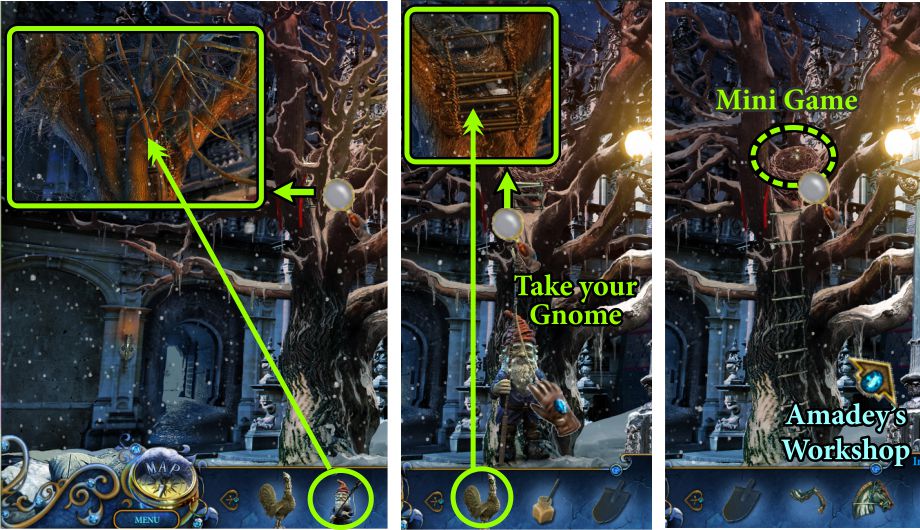
Zoom in on the tree and place your Gnome to get rid of the unwanted branch.
Take your Gnome and zoom in on the ladder you cannot reach.
Place your Rooster to lower the ladder so you can zoom in on the nest for a Mini Game.
Screenshot
Nest Mini Game
See the screenshot for the solution with the puzzle pieces showing.
Take the Feather and go to Amadey's Workshop.
Screenshot
Amadey's Workshop
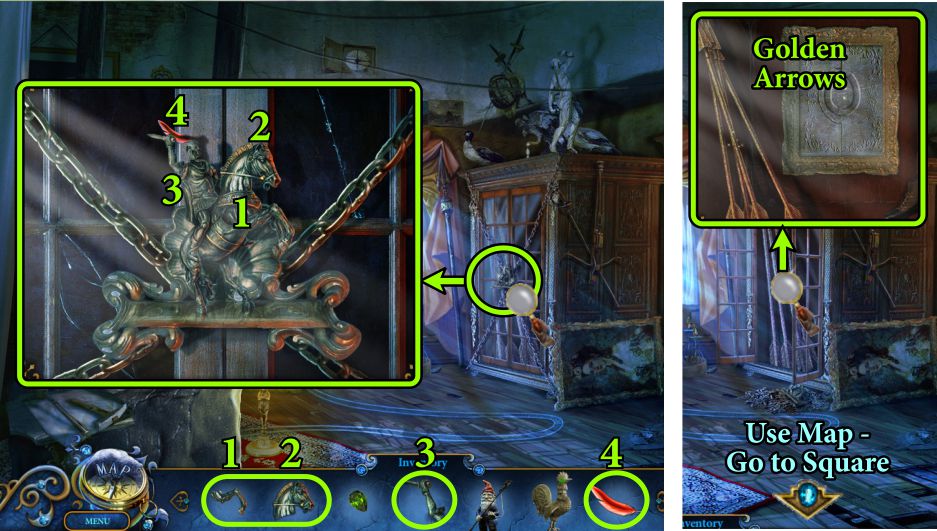
Zoom in on the closet lock and place all the parts to open it, as shown in the screenshot.
Once opened, zoom into the closet and take the Golden Arrows.
Use the Map and go to the Square.
Screenshot
Square and Tower Entrance
Give the Golden Arrows to the Archer, who tells you to go to the Tower and he will help you.
Use the Map to go to the Tower.
The Archer runs off Admiral Holgerd, so grab his Stone Spyglass and zoom in on the door of the Tower.
Take the Signalman and go to Amadey's Workshop.
Screenshot
Amadey's Workshop
Zoom in on the train tunnel and place your Signalman, who will summon the train with a key for you to collect.
You need to break down that wall, so place your Miner there.
He tries to break it down but destroys his axe, so give him the Stone Spyglass to use as a ram to break the wall and find you a Hidden Object Scene in the storage room.
Screenshot
Storage Hidden Object Scene
The hammer will break the bottle so you can collect the ship.
Use the key to open the cabinet so you can find the Bell for your Inventory.
Go to the Maid's Room.
Screenshot
Maid's Room and Mansion Entrance
Zoom in on the birdcage and use the Key on the bird.
Oops, you broke the bird and may need to repair him, but you can collect the Bronze Ring.
Go to the Mansion Entrance and zoom in on the box.
Place the Bronze Ring to open the box so you can take the Bell and Paint.
Go to the Tower Entrance.
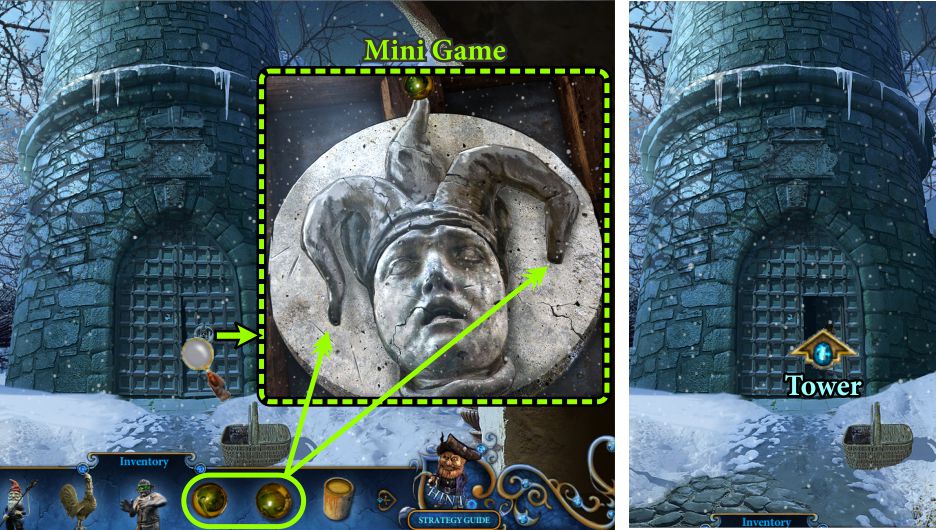
Screenshot
Tower Entrance
Zoom in on the door so you can place your Bells as shown in the screenshot to trigger a Mini Game.
At the end of the Mini Game, the door will open for you to enter the Tower.
Screenshot
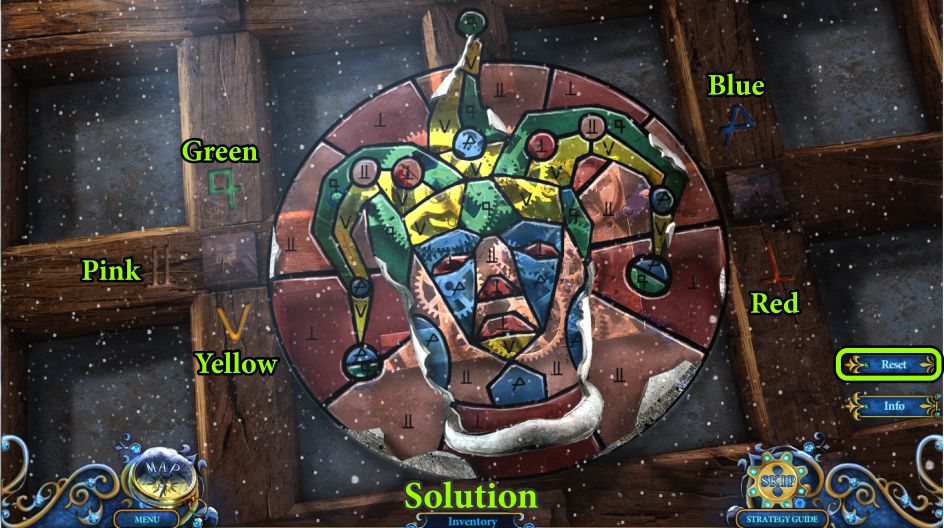
Jester Lock Mini Game
Note the symbols and their colors that are surrounding the lock.
Your goal is to paint the jester with the appropriate colors as shown by the symbols. See the screenshot for the solution.
To change the colors, touch the various pieces until the correct color shows.
Enter the Tower when the door opens.
Screenshot
Chapter 4: The Tower
Tower Inside
Whoa, when you touch anywhere, a spiked ball will swing down to attack you and end up covering an entrance to the basement.
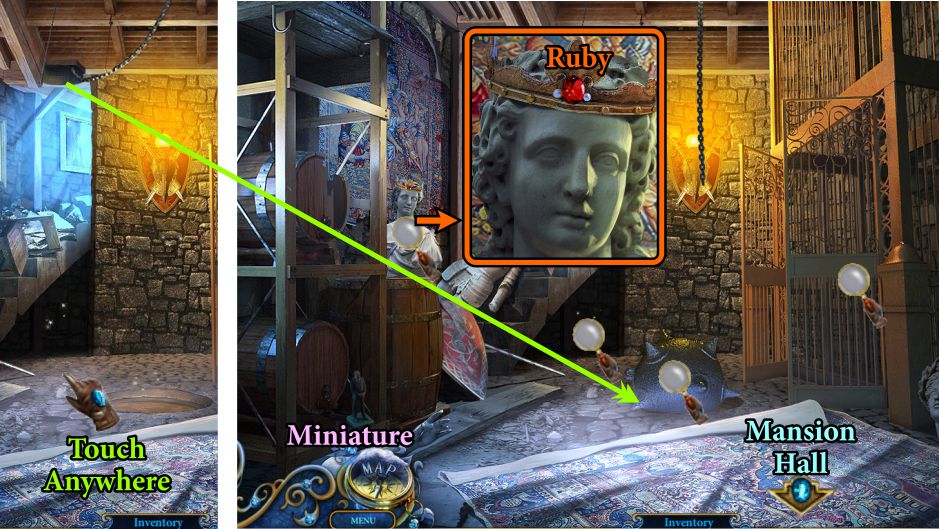
Collect the Miniature by the barrel, and zoom in on the statue to collect the Ruby.
Go to the Mansion Hall.
Screenshot
Mansion Hall
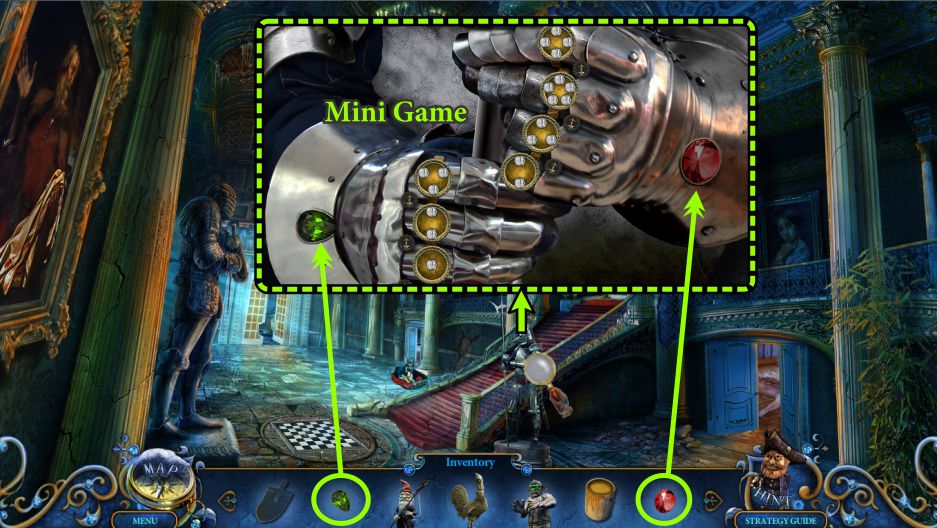
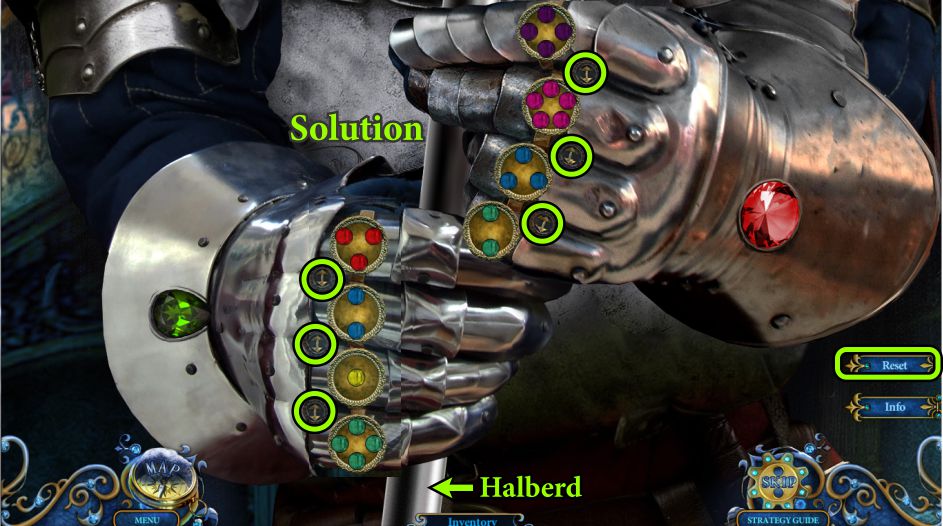
Zoom in on the Knight and place the two gems to trigger a Mini Game.
Screenshot
Knight's Armor Mini Game
Your goal is to make the knights hands look like the solution in the screenshot.
To obtain your goal, you need to rotate the circles and use the arrows to transfer the dots to the proper knuckle of the armor.
If you need to start over, there is a Reset button, and your ultimate goal is to get him to release the Halberd to you.
Screenshot
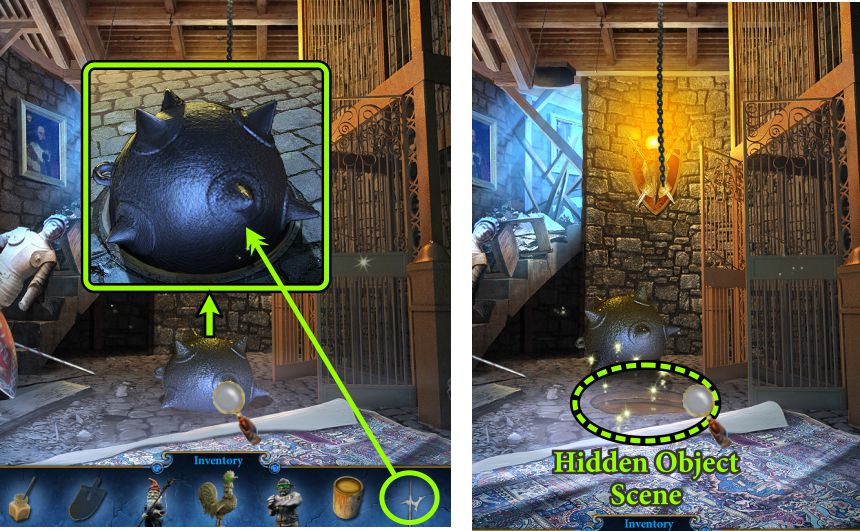
Inside the Tower
Once you have the Halberd, go to the Inside of the Tower and use it to pry the spiked ball out of the whole to trigger a Hidden Object Scene.
Screenshot
Statues Hidden Object Scene
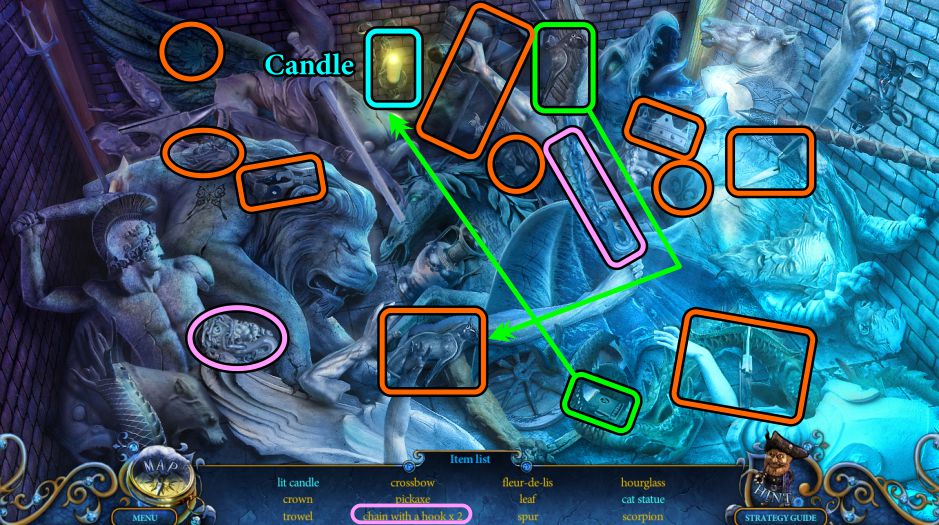
There are a whole bunch of destroyed statue pieces for you to root through, so use the matches to light the Candle that will ultimately go into your Inventory.
Place the Cat part onto the body to collect the cat statue.
Screenshot
Inside Tower
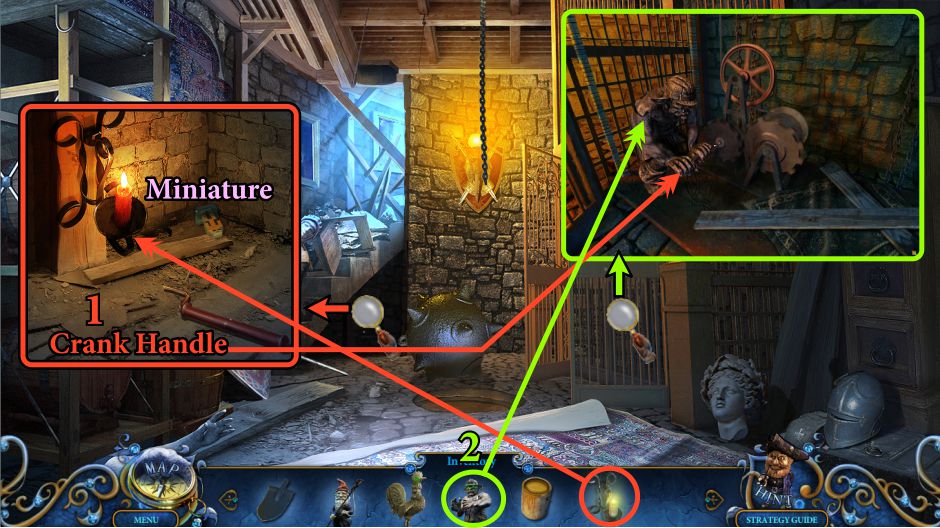
The Candle will now allow you to view what is under the stairs, so place it there.
Collect the Miniature and the Crank Handle.
Zoom in and place the Crank Handle on the lift mechanism, but you need somebody to operate it so you can get to the top of the Tower.
Place the Miner to help crank you up to the top.
Screenshot
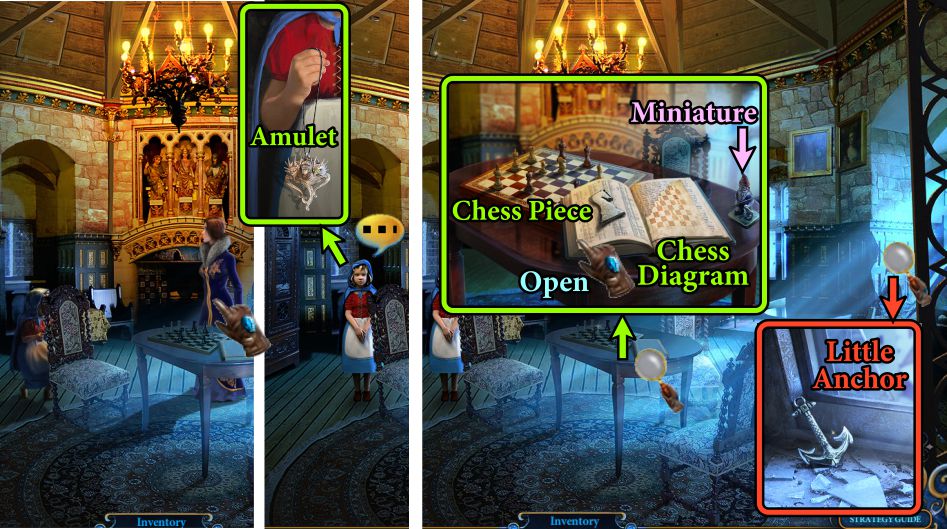
Tower Chamber
Click on Roxanne and watch the cut scene.
Talk to Princess, and she will offer you an Amulet.
Zoom in on the window and take the Little Anchor.
Check out the table, open the book and take the Chess Diagram and Chess Piece, as well as the Miniature.
Screenshot
Examine the trap door in the ceiling and send your Rooster to open it.
Check out the trap door to find out it is too dark and needs cleaning up, so it is probably a later project.
Go to the Square.
Screenshot
Chapter 5: Gallery of Statues
Square and Mansion Hall
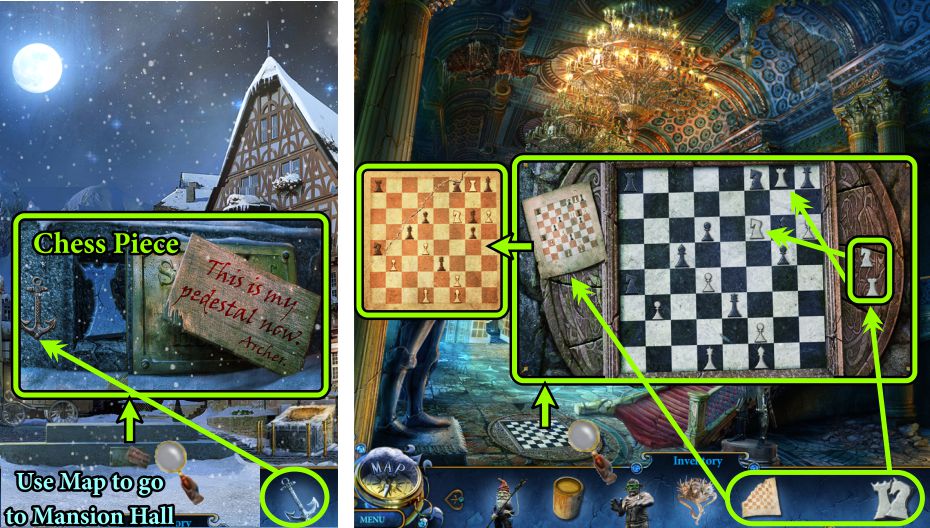
At the Square, zoom in on the statue pedestal, place the Little Anchor and take the Chess Piece.
Go to the Mansion Hall.
Zoom in on the chess square on the floor.
Place your Chess Pieces and your Chess Diagram as shown in the screenshot.
Screenshot
Stairs
You have opened a path to the Stairs that will lead to the Gallery of Statues, so go there.
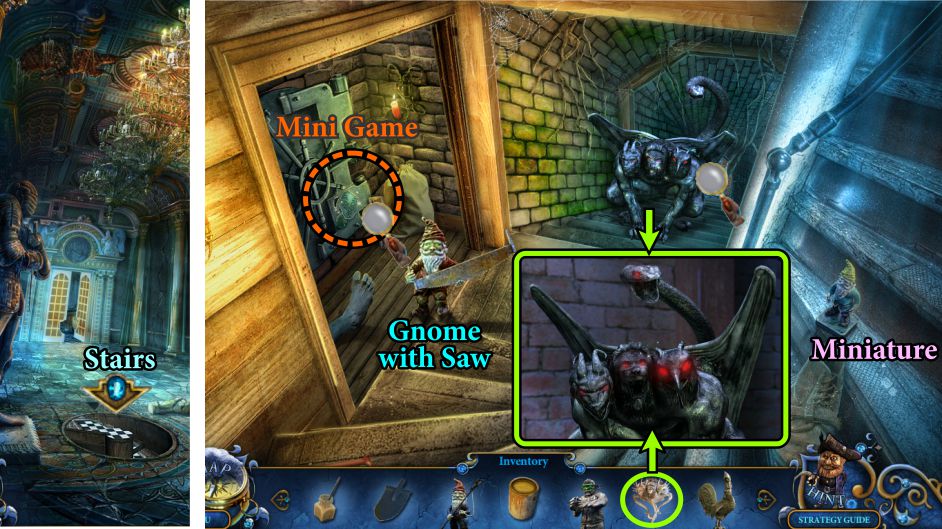
Collect the Miniature and the Gnome with Saw.
Zoom in on the Chimera and use Princess's Amulet to tame it.
Check out the safe for a Mini Game to open it.
Screenshot
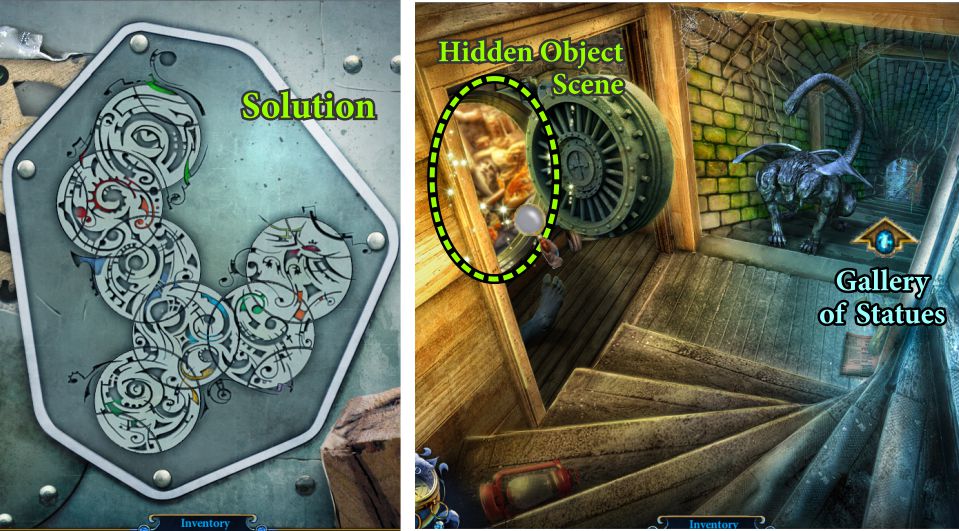
Safe Mini Game and Hidden Object Scene
Your goal is to rotate the circles to produce the solution shown in the screenshot.
Once you have completed the game, you can play the Hidden Object Scene, and then continue on down the stairs to the Gallery of Statues.
Screenshot
Safe Hidden Object Scene
Move the 25 pound weight to the scale to reveal the Gold Bar.
You will need to place the 7 and 5 pound weights on the scale to make it weigh 12 pounds so you can collect 12.
Your final item will be the Gold Bar.
Screenshot
Gallery of Statues
Zoom in on the head above the light fixture and send your Rooster up there to knock him down.
Check him out once he is on the ground and collect the 2 Red Eyes.
Pick up the Miniature and go to the Tower Entrance.
Screenshot
Tower Entrance
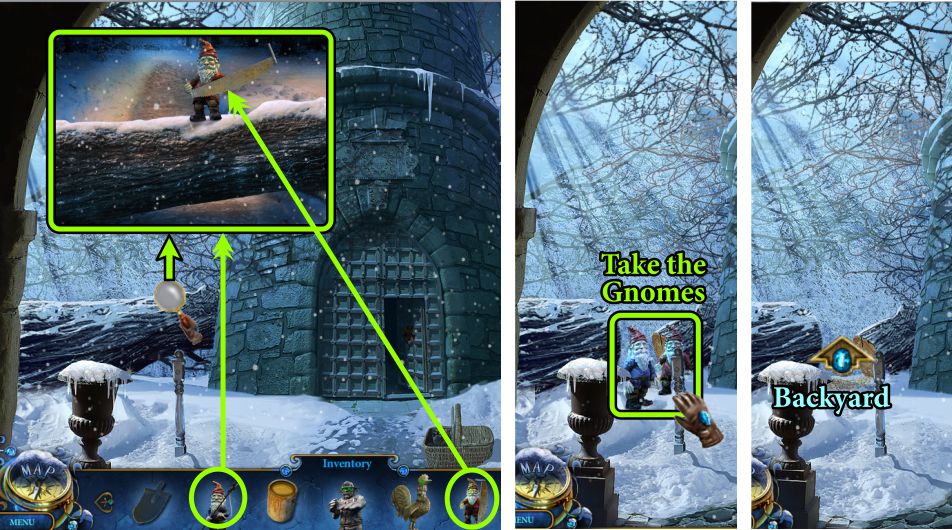
Zoom in on the tree and place your Gnome with the Saw, but he apparently needs help to get rid of the tree, so place your other Gnome to help him.
The guys did a wonderful job, so collect your Gnomes and precede though the opening to the Backyard.
Screenshot
Backyard
There seems to be a gathering of Gnomes, so place your two Gnomes from your Inventory.
One of the Gnomes already there needs your help, so give him the Shovel to add to his stick.
Zoom in on the pond and take the Fish Mold.
Check out the Backyard House.
Screenshot
Backyard House
There is a Horse blocking your way, so zoom into the hoof and take the Horseshoe.
Zoom in on the window area, take the Miniature and Wooden Hand.
Go to Amadey's Workshop.
Screenshot
Amadey's Workshop and Optics Workshop
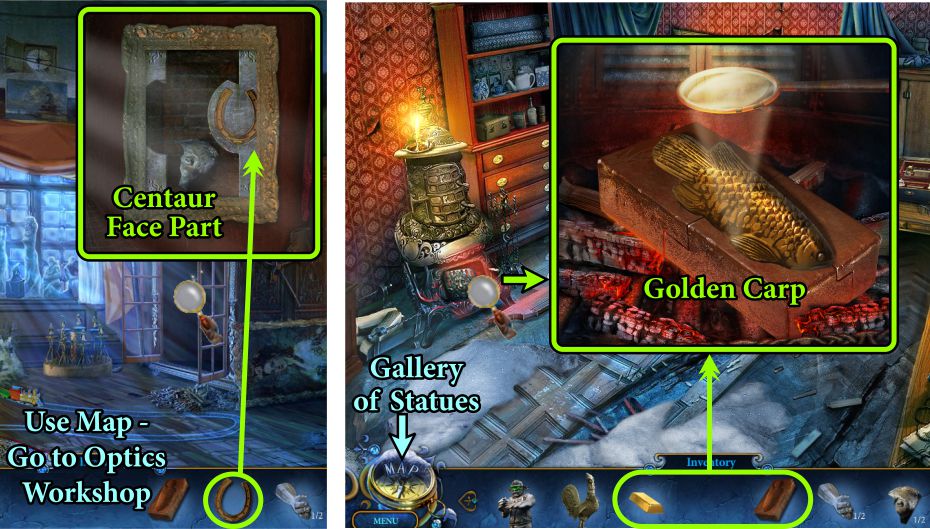
Zoom in on the closet, place the Horseshoe, and take the Centaur Face Part.
Use the Map to go to the Optics Workshop.
Zoom in on the stove and place the Fish Mold and the gold in the mold.
Collect the Golden Carp and go to the Gallery of Statues.
Screenshot
Gallery of Statues and Backyard
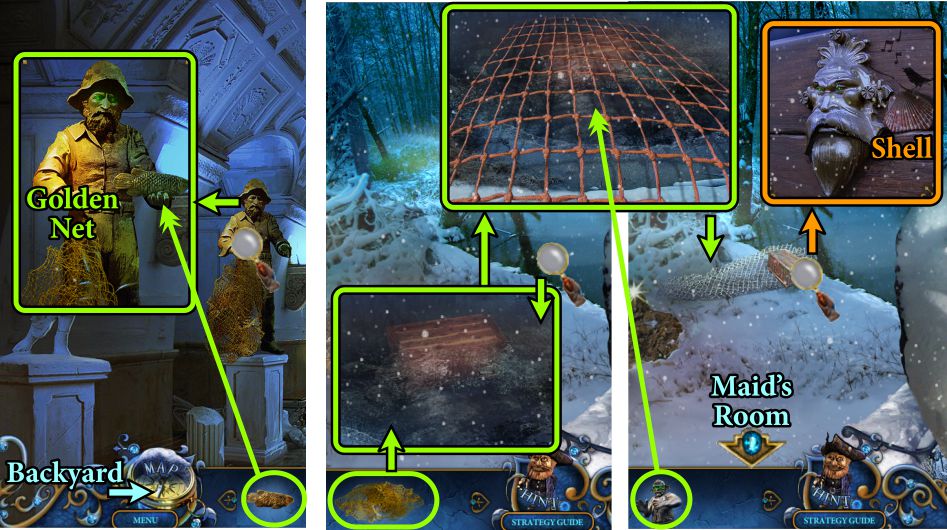
Give the Golden Carp to the Fisherman in exchange for the Golden Net.
Go to the Backyard, zoom in on the pond, and place the net.
You don't have the strength to collect the net so place your Miner to help you.
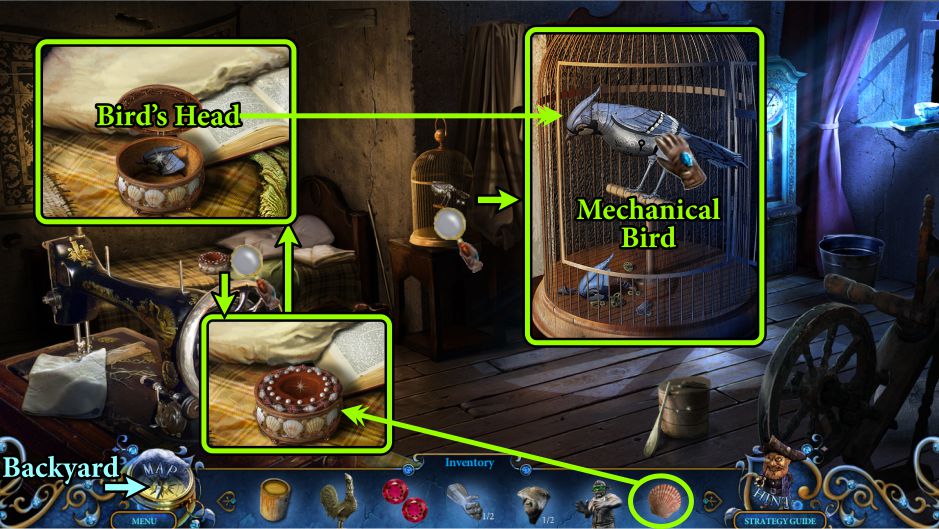
Check out the chest, take the Shell, and go to the Maid's Room.
Screenshot
Maid's Room
Zoom in on the bed. Place the shell to open the box so you can take the spare bird's head.
Zoom in on the cage, place your spare bird's head on the bird and collect the Mechanical Bird.
Now you need to go to the Backyard, so use the Map.
Screenshot
Backyard
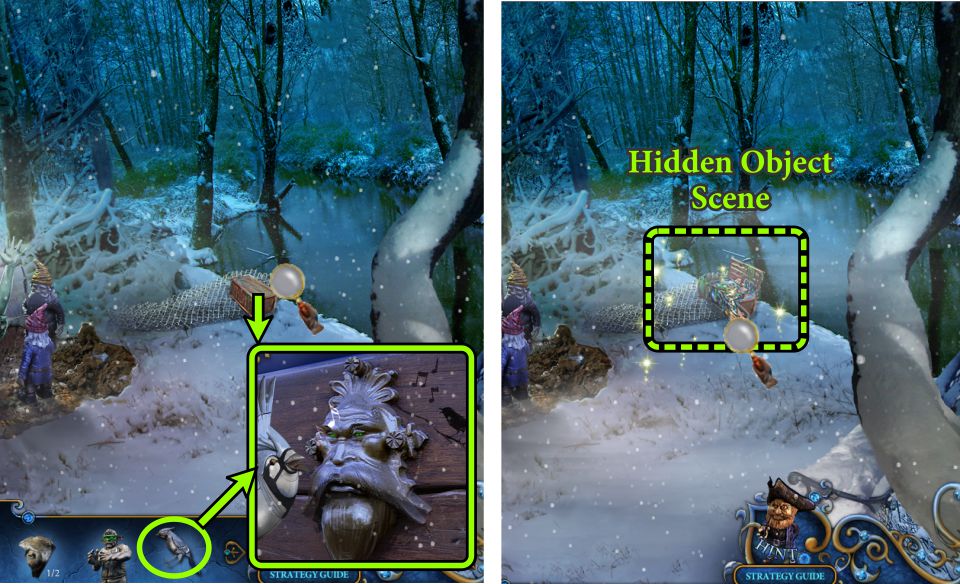
Zoom in on the box and place the Mechanical Bird to sing so the box opens for a Hidden Object Scene.
Screenshot
Chest Hidden Object Scene
Place the axe handle on the axe to collect it.
You also need to put the top half of the knight on the horse to collect the mounted knight.
Your final item will be a Centaur Face Part.
Screenshot
Gallery of Statues
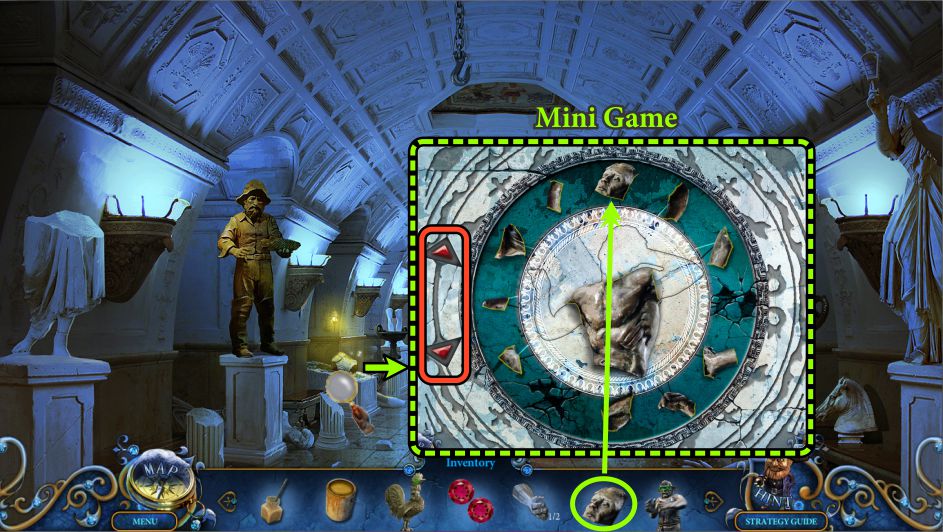
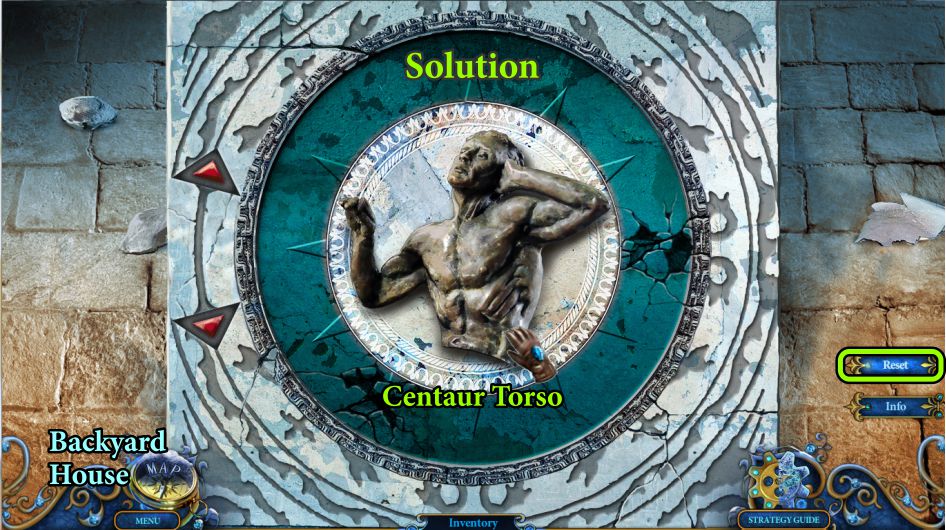
Zoom in on the statue part near the fisherman and place your Centaur Parts to trigger a Mini Game.
Screenshot
Centaur Mini Game
Arrange all the parts as shown in the screenshot, and then collect the Centaur Torso.
Screenshot
Chapter 6: Backyard House
Door
Place the Centaur body on the horse, and collect the Centaur for your Inventory.
Collect the Door Handle and talk to the door
Go to the Maid's Room.
Screenshot
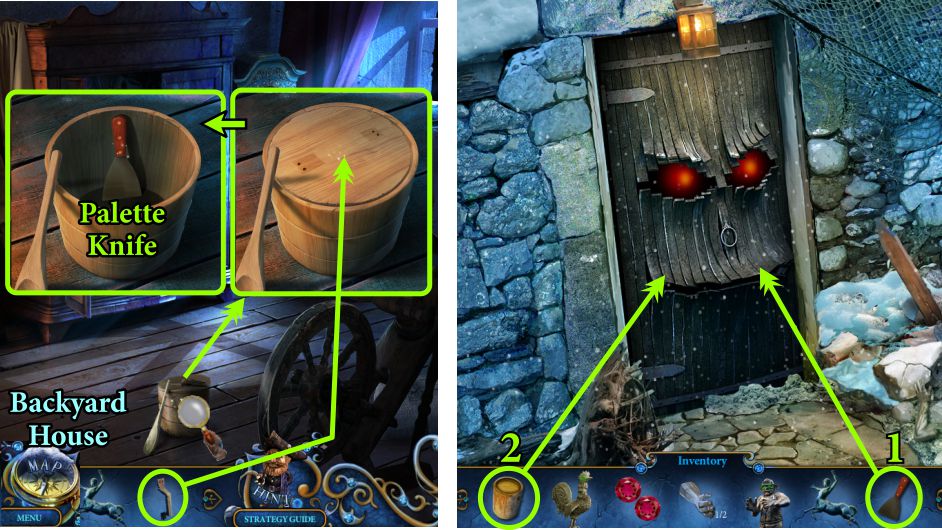
Maid's Room and Backyard House
Zoom in on the container, place the Door Handle, and take the Palette Knife.
Return to the Backyard House.
Use the Palette Knife and Paint on the door.
Screenshot
Backyard House
The door is grateful, so gives you a Hinge and opens for you to enter.
Screenshot
Backyard House Entrance
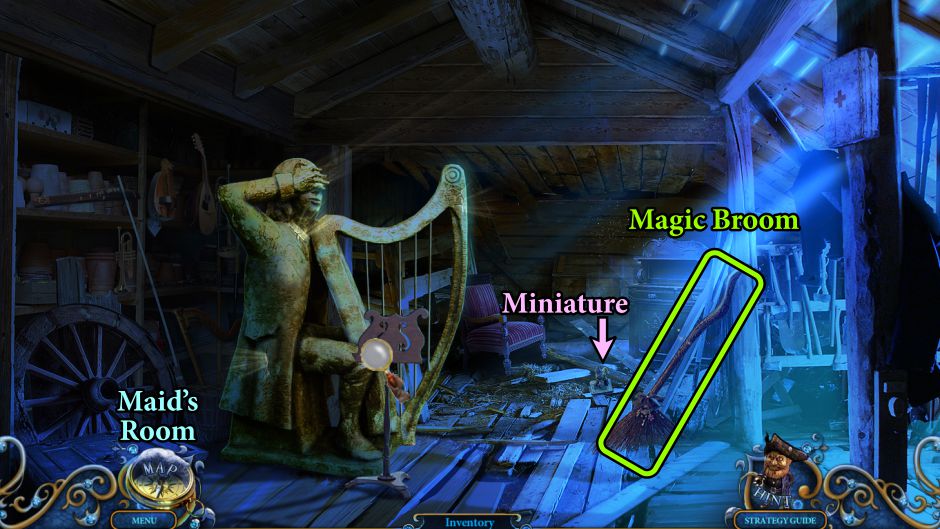
Collect the Miniature and Magic Broom, then go to the Maid's Room.
Screenshot
Maid's Room
Zoom in under the bed and use the Magic Broom to drag out the wood pieces.
Glue them back together and take the Wooden Hand.
Go to the Gallery of Statues.
Screenshot
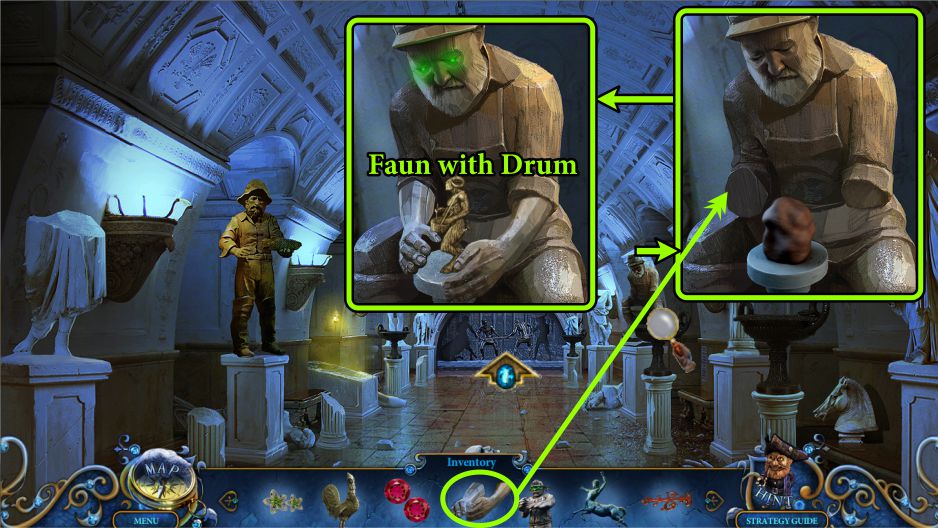
Attic
Zoom in on the sculptor and give him the Wooden Hands.
He will sculpt a Faun with Drum for you.
Head to the door in the back.
Screenshot
Place the Centaur on the door and collect the Faun with Bagpipes.
Go to the Tower Chamber.
Screenshot
Tower Chamber and Belfry
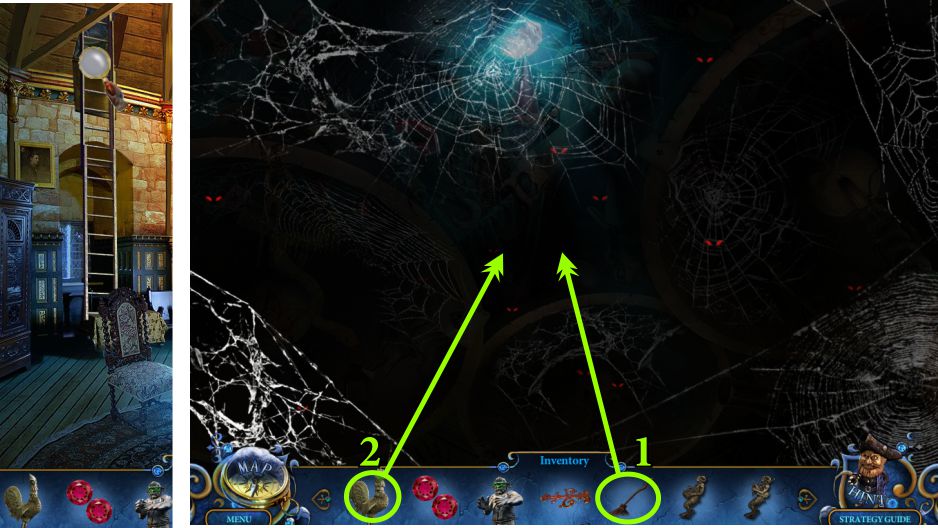
Zoom in on the top of the ladder.
Use the Magic Broom to clear away the cobwebs, and your Rooster to scare off the bats.
Screenshot
Belfry Hidden Object Scene
The bells are now viewable as a Hidden Object Scene.
Give the lantern to the Gnome, and the Chief Gnome will end up in your Inventory.
Go to the Backyard.
Screenshot
Backyard
Place the Chief Gnome with the other gnomes, and they will all start digging out the statue.
Zoom in and place your Flowers in exchange for a Little Harp.
Return to the Tower Chamber.
Screenshot
Tower Chamber
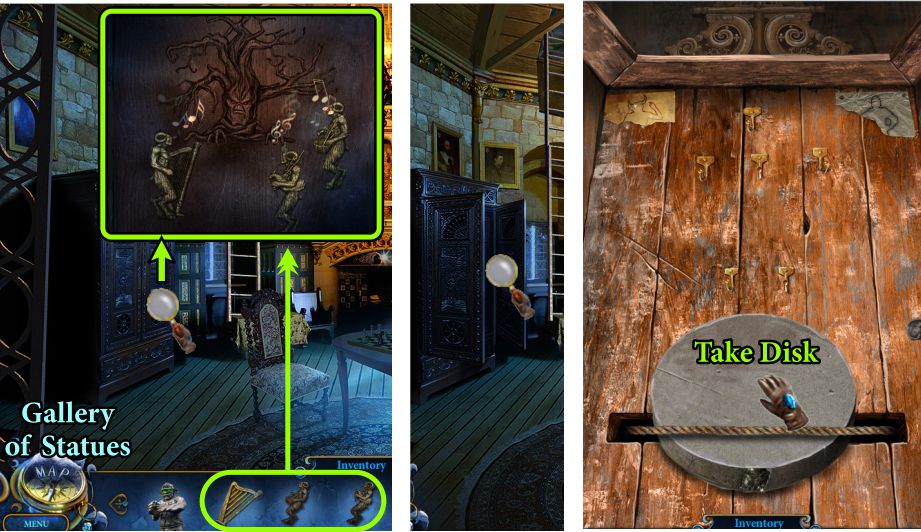
Examine the armoire doors, place both of your Fauns, and the Harp to open the door.
Take the Disk and go to the Gallery of Statues.
Screenshot
Gallery of Statues
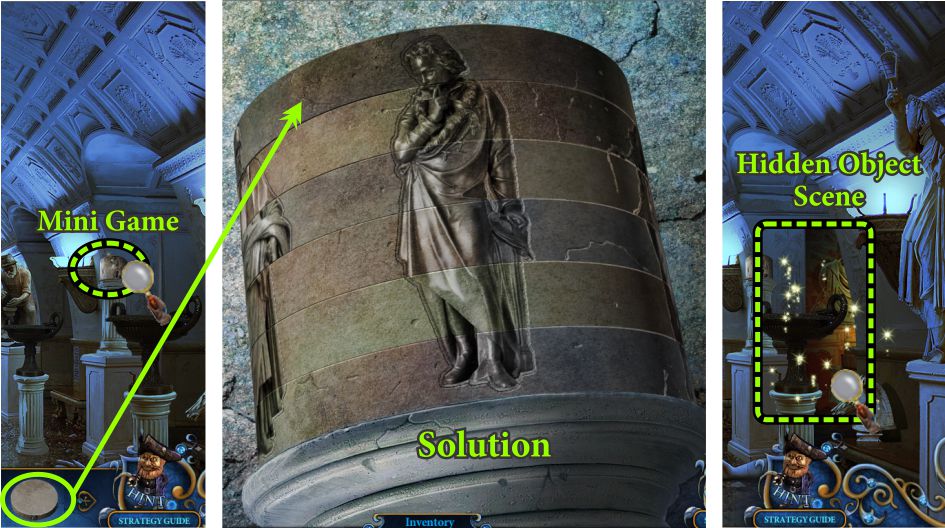
Zoom in on the column and place your column to trigger a Mini Game.
Your goal is to rotate the disks until you produce the image shown in the screenshot and trigger a Hidden Object Scene.
Screenshot
Gallery of Statues Hidden Object Scene
Use the pencil to complete the picture of the sun.
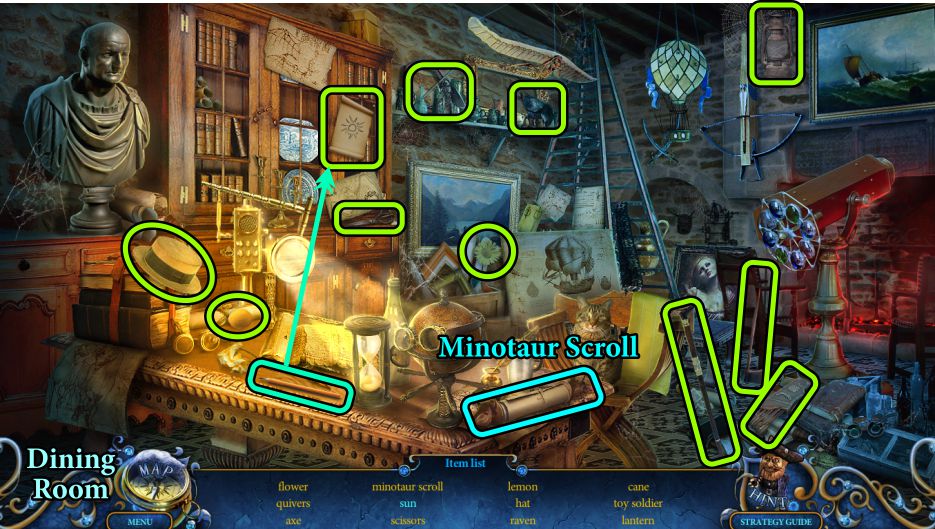
You will get the Minotaur Scroll for your Inventory, so go to the Dining Room.
Screenshot
Dining Room and Tower Chamber
Zoom in on the animal head, place the 2 Red Eyes from your Inventory, and collect the Minotaur Head.
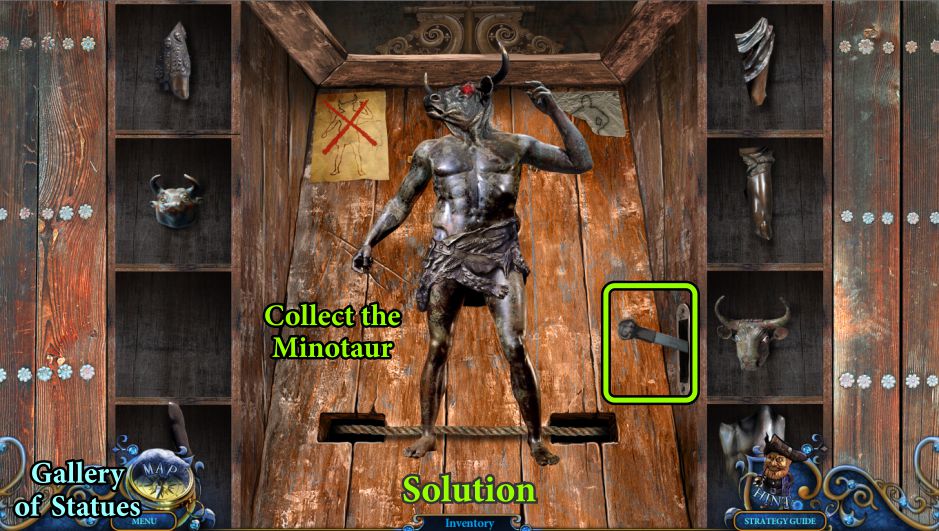
Go to the Tower and zoom in on the armoire.
Place the Minotaur Head and Scroll to trigger a Mini Game.
Screenshot
Minotaur Mini Game
Your goal is to assemble a Minotaur to look like the diagram .
Use the lever at the right to move the parts until you find those that will create the Minotaur in the screenshot.
Collect him and go to the Gallery of Statues.
Screenshot
Chapter 7: Amadey's Secret Room
Gallery of Statues
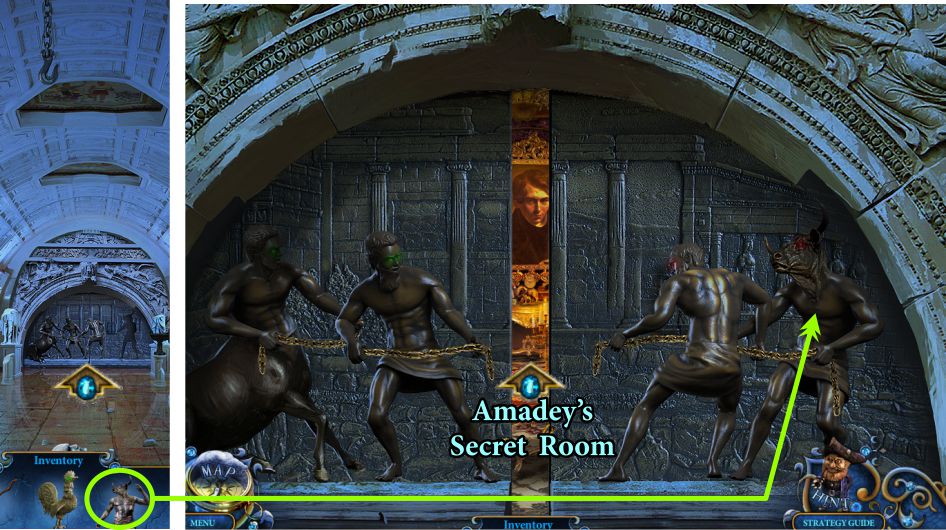
Walk forward to the door and place your Minotaur.
When the door opens, enter Amadey's Secret Room.
Screenshot
Amadey's Secret Room and Gallery of Statues
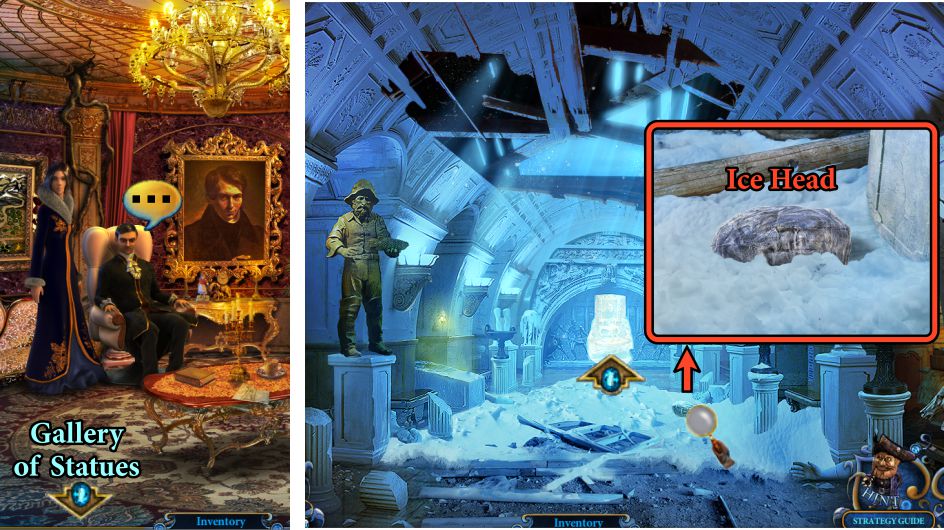
Talk to Amadey, watch the cut scene, and follow him to the Gallery of Statues.
Zoom in and take the Ice Head before returning to Amadey's Secret Room.
Screenshot
Amadey's Secret Room
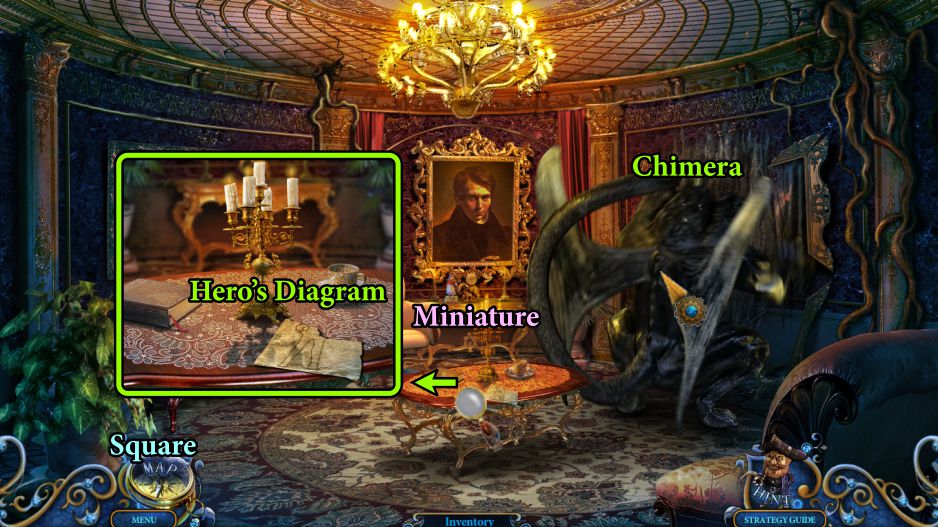
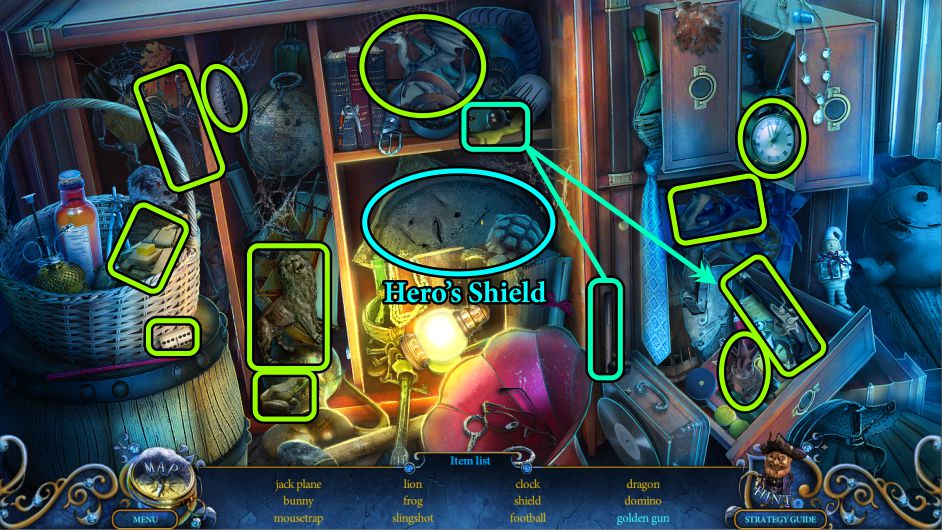
Collect the Miniature, and zoom in on the table to find the Hero's Diagram.
Note the Chimera feverishly clawing at the wall. Go to the Square in search of the Archer.
Screenshot
Square and Optics Workshop
The Admiral has taken over the pedestal again, so go to the Optics Workshop.
The Archer is there because his bow has broken.
Collect the Notes, play the Hidden Object Scene, and zoom in on the oven.
Screenshot
Optics Workshop Hidden Object Scene
To get the golden gun, dip the brush in the gold paint, and paint the gun.
The Hero's Shield will go into your Inventory.
Screenshot
Chapter 7: The Wagon
Optics Workshop and Garden
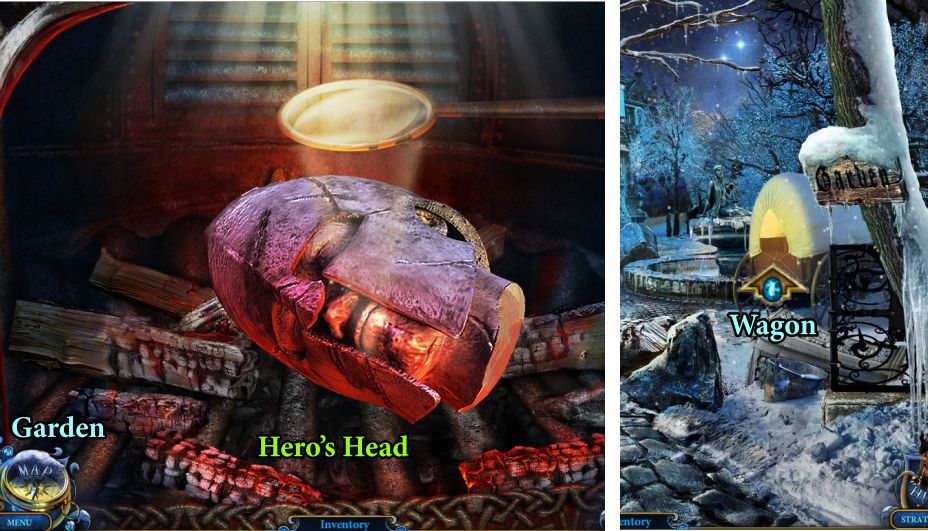
Place the Ice Head in the oven and collect the Hero's Head.
Go to the Garden, and zoom in on the Wagon that has appeared.
Screenshot
Wagon
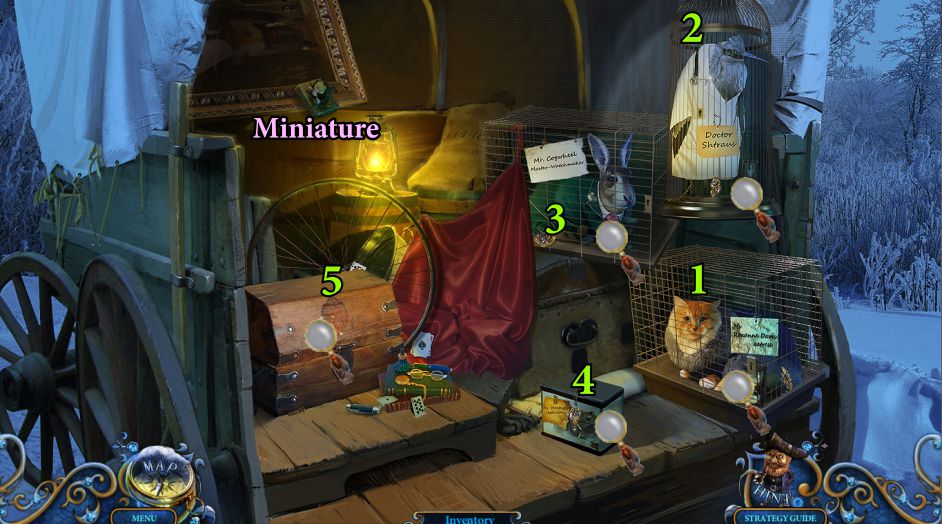
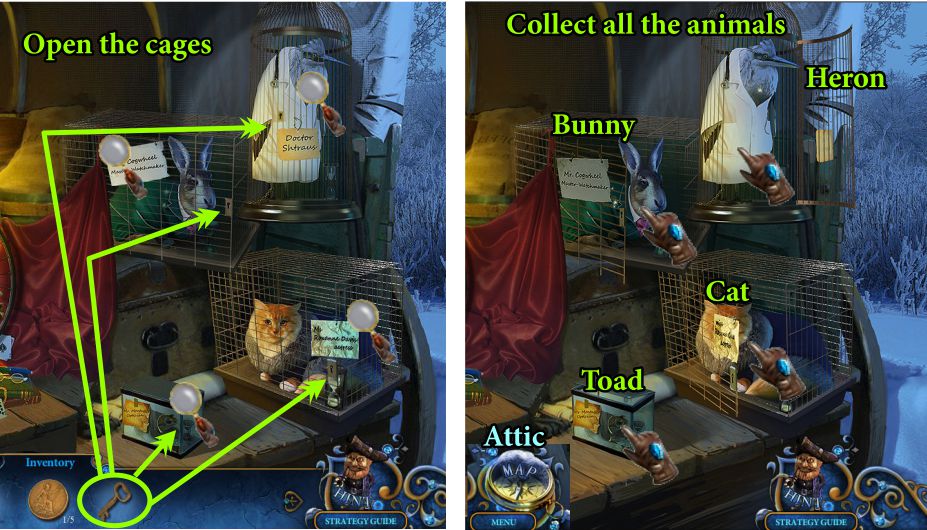
Collect the Miniature and examine the cages and the small chest.
Screenshot
Take the Pendant Part from each cage.
Amadey's actress companion, Roxanne Davis, is now a cat.
The heron is Dr. Shtraus.
Mr. Cogwheel, the watchmaker, has been turned into a bunny.
The optical master, Mr. Montage, is a toad.
Once you have all the parts, assemble the Pendant lock on the chest to trigger a Mini Game.
Screenshot
Chest Mini Game
Your goal is to turn all of the triangles from red to blue as shown in the screenshot.
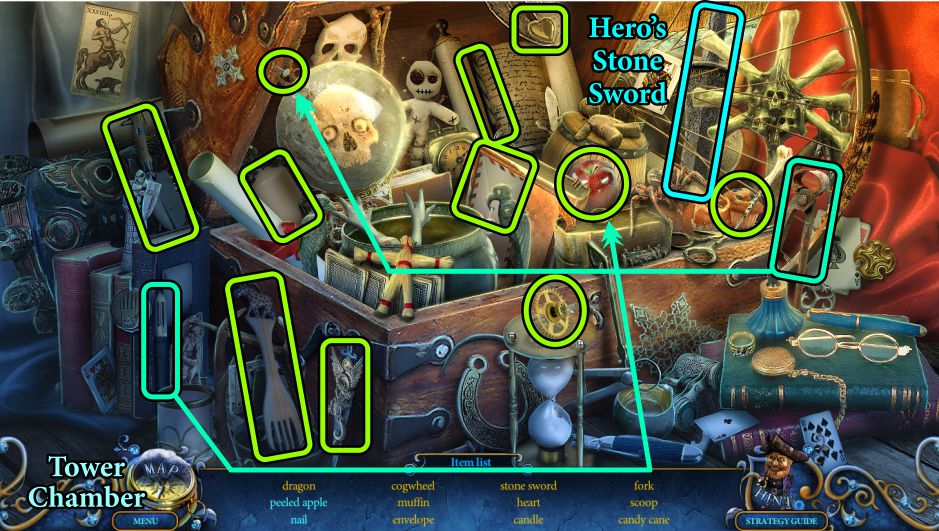
At the end of the game, the chest will open for a Hidden Object Scene.
Screenshot
Chest Hidden Object Scene
Use the peeler to peel the apple, and the nail puller to loosen the nail.
The Hero's Stone Sword will go into your Inventory.
Go to the Tower Chamber.
Screenshot
Tower Chamber
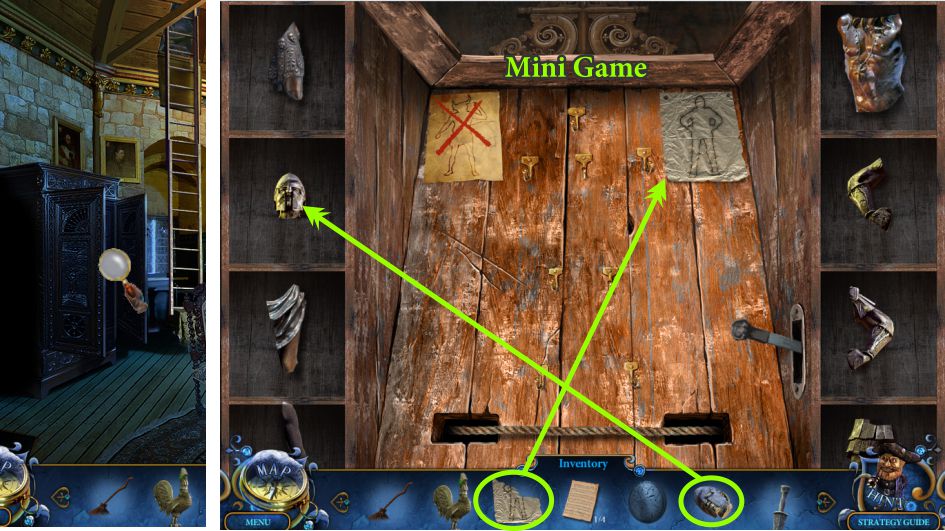
Zoom in on the armoire, place the Hero's Head and Diagram to trigger a Mini Game.
Screenshot
Hero Mini Game
Use the lever to scroll the parts until your Hero looks like the screenshot.
Give him his Shield and Sword, and collect him.
Go to Amadey's Secret Room.
Screenshot
Amadey's Secret Room
Place Hero on the Chimera, and watch the cut scene.
Hero fought a valiant battle but both warriors lost, so zoom in and collect the 8 Red Eyes from the Chimera.
Go through the hole in the wall to the Chapel.
Screenshot
Chapel
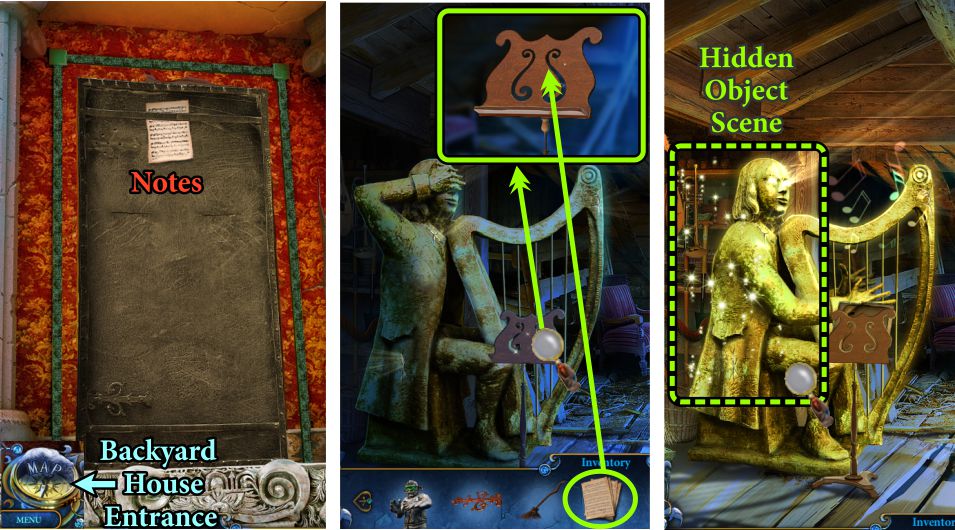
Examine the bow, which needs a string. Collect the Notes and Miniature.
Zoom in on the organ for a Mini Game.
Note the cutout for the angel; your goal is going to be to make her fly through all the cutouts.
Screenshot
Organ Mini Game
In order for the angel to clear all the cutouts, press the 3 buttons on the organ.
Each button provides a different amount of air to make her fly.
To begin the game, press the play button and quickly follow the numbered solution in the screenshot.
If she doesn't make it through a cutout, you can try again.
In the end, you will have another set of Notes to collect before going to Mansion Hall.
Screenshot
Chapter 8: The Finale
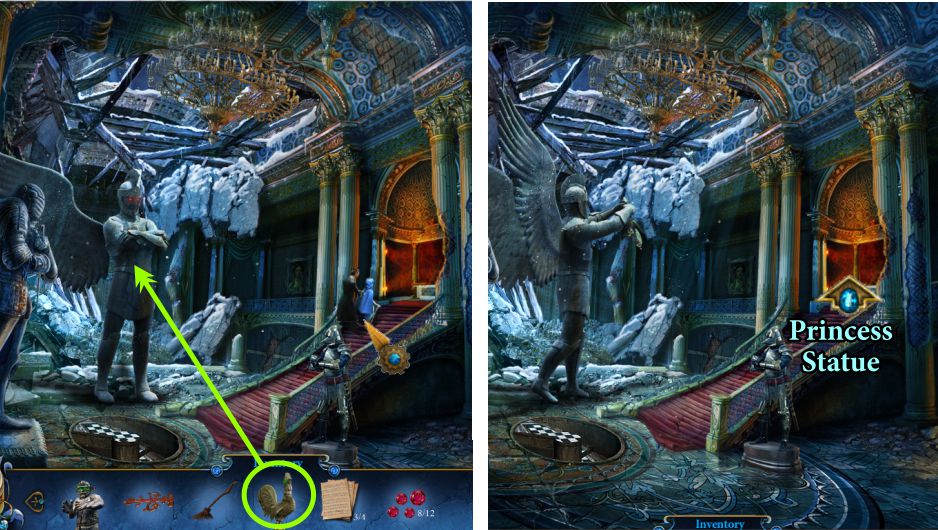
Mansion Hall
Princess is taking Amadey up the steps toward the Princess Statue, but the Angel won't let you follow.
Use your Rooster to put him in a trance so you can investigate.
Screenshot
Princess Statue and Backyard House Entrance
The Princess Statue is gone, but there is a set of notes, so take them and go to the Backyard House Entrance.
Zoom in on the music stand and place your collection of Notes to trigger a Hidden Object Scene.
Screenshot
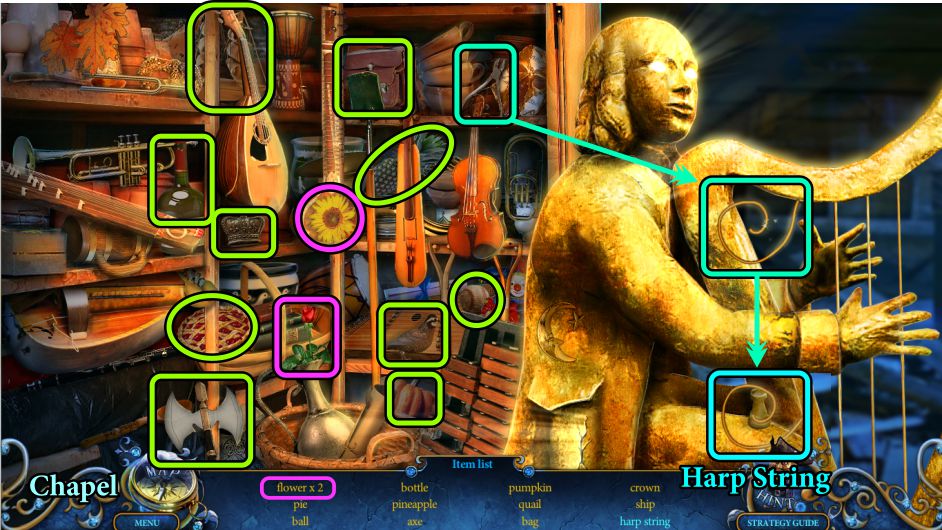
Harpist Hidden Object Scene
Use the wire cutters to snip the curled Harp String so you can take it for your Inventory.
Go to the Chapel.
Screenshot
Chapel and Optics Workshop
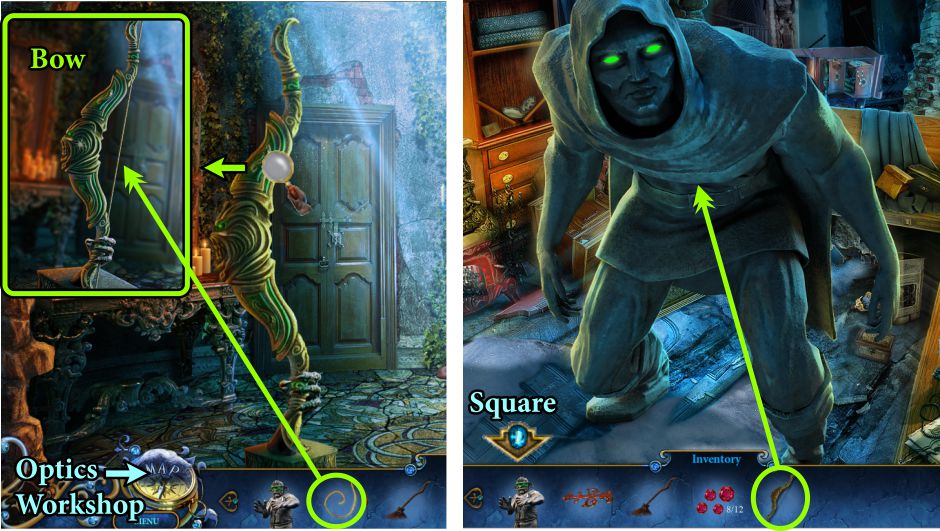
Zoom in on the Bow, place the Harp String, and collect the Bow for the Archer.
Go find him in the Optics Workshop and give him the Box.
Go out to the Square to see that he has regained the pedestal.
Screenshot
Square and Tower Chamber
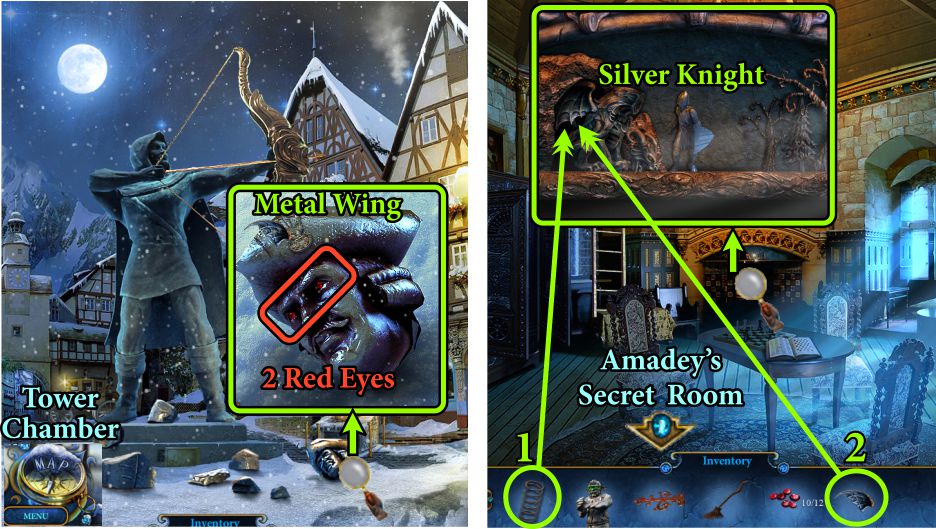
Collect the 2 Red Eyes and Metal Wing from the Admiral's Head, and go to the Tower Chamber.
Zoom in on the mantle and place the Spring and Metal Wing on the dragon.
The dragon slayer appears to take care of the dragon, so collect your Silver Knight, and take him to Amadey's Secret Room.
Screenshot
Amadey's Secret Room
Zoom in on the maze and place your Silver Knight to trigger a Mini Game.
At the end of the game, the maze will give way to a Hidden Object Scene.
Screenshot
Maze Mini Game
Your goal is to move the knight through the maze until he is united with the princess.
In order to complete your journey, you need to make stops along the way using the arrows at the left to guide the way.
If you make a mistake, there is a Reset button to help you start over.
See the screenshot for the numbered solution.
First stop is to get the key (1) so you can open the chest (2).
Take the coins from the chest and give them to the blacksmith (3) in exchange for a sword to kill the dragon (4).
A picture of the dragon will be transferred to the right side of the frame.
Next, you need to collect the lever for the castle gate (5) and use it to lower the drawbridge (6).
Finally, you need to take something for the princess, so go get the bucket of water (7) to water the bud (8).
Armed with a beautiful flower, it's time to go to the princess. In exchange for the flower, she will give you her heart that will be pictured on the right portion of the frame.
Screenshot
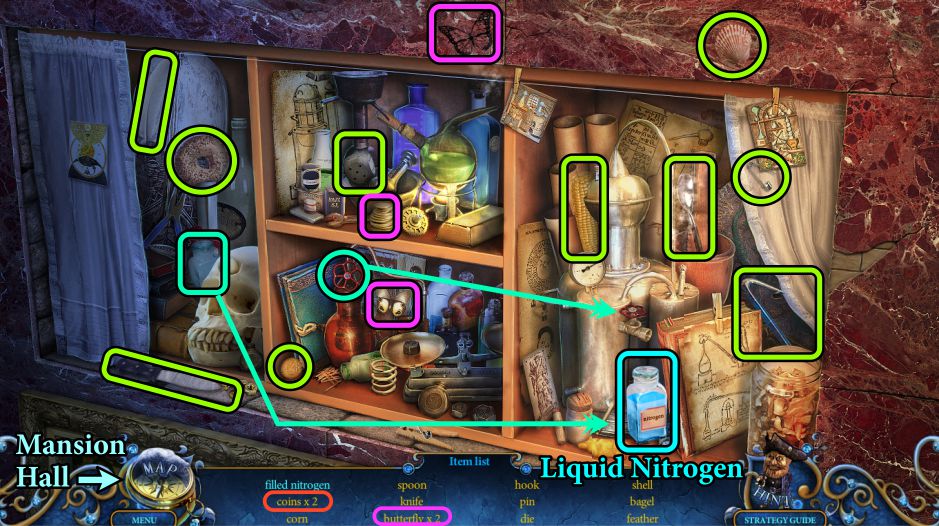
Alchemy Cabinet Hidden Object Scene
To get Liquid Nitrogen for your Inventory, you will need to place the valve on the tank and the bottle to catch the liquid.
Go to the Mansion Hall.
Screenshot
Mansion Hall
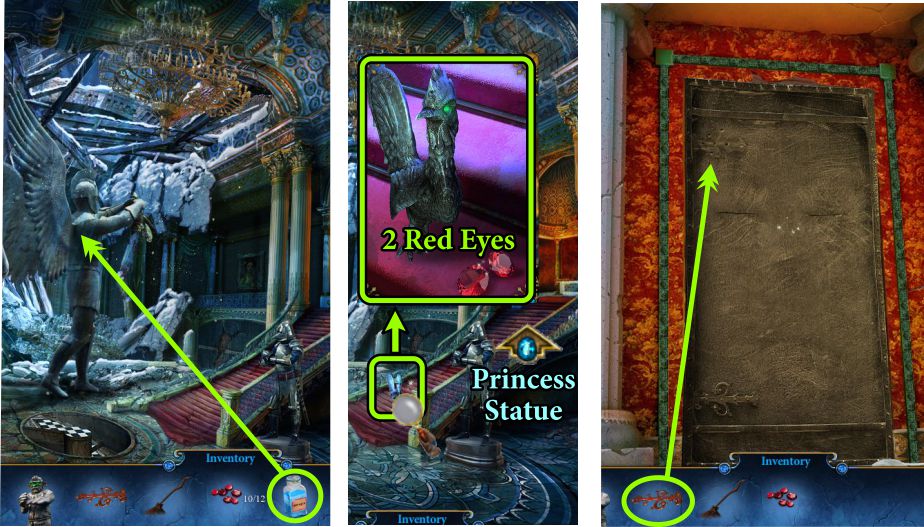
Place the Liquid Nitrogen on the Angel.
Zoom in on the steps where your Rooster is sitting and take the 2 Red Eyes.
Go up the steps to the Princess Statue, and place your Hinge on the door.
Screenshot
Door to Attic
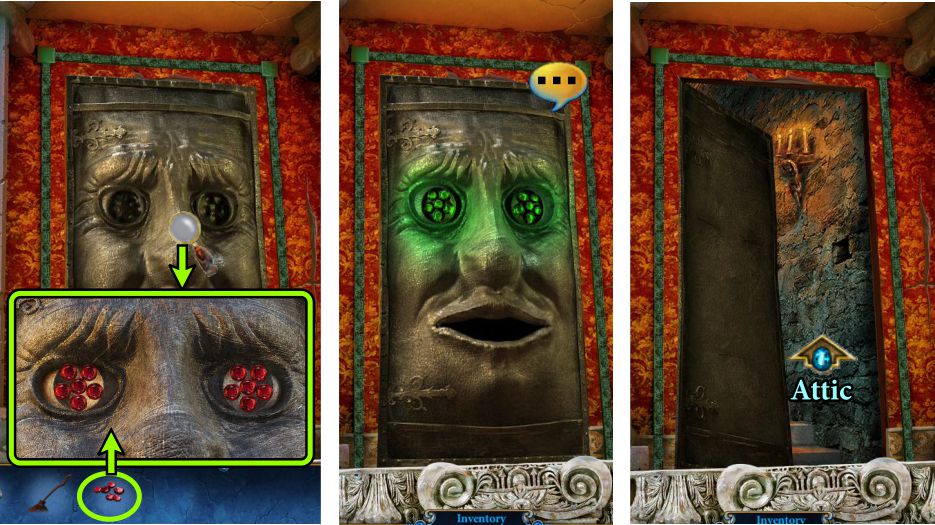
Zoom in on the door's eyes, and place your Red Eyes in the sockets.
The door's eyes turn green, so it is friendly and talks to you.
When he opens, go through to the Attic.
Screenshot
Attic
When Princess disappears, pick up the Miniature and the Magic Powder.
Zoom in on the bookstand, touch the book, and listen to Rupert.
When the book reappears, place the Magic Powder on it, and the turtle will turn into Amadey.
Zoom in on his hand, take the Coin and Cage Key, and go to the Wagon in the Garden.
Screenshot
Wagon
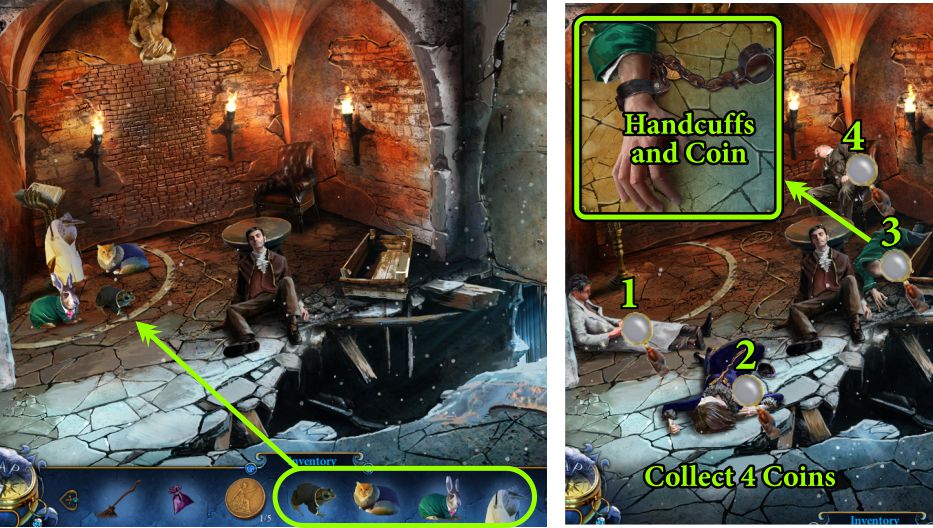
Zoom in and open all the cages, collect the animals, and return to the Attic.
Screenshot
Attic
Place the animals in the magic circle and use the Magic Powder on them.
They are back in human form, so zoom in on each of them and take the 4 coins.
Mr. Cogwheel (3) also has some Handcuffs for you to collect.
Screenshot
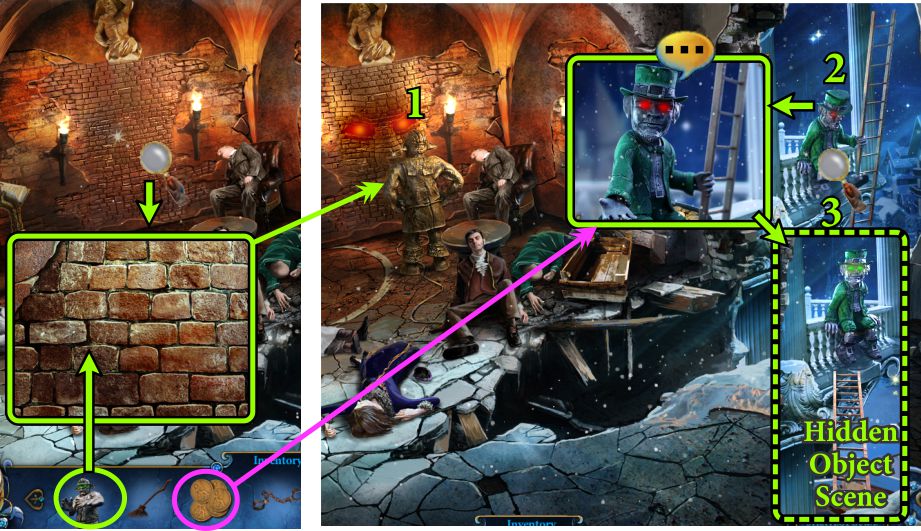
Zoom in on the bricked up portion of the back wall and place your Miner.
He makes a valiant effort to knock it down, but all that happens is that a wall to the balcony falls and reveals a Leprechaun with a ladder.
Zoom in on him to find out he wants your 5 coins, so give them to him.
He will set up the ladder so you can go to the balcony for a Hidden Object Scene.
Screenshot
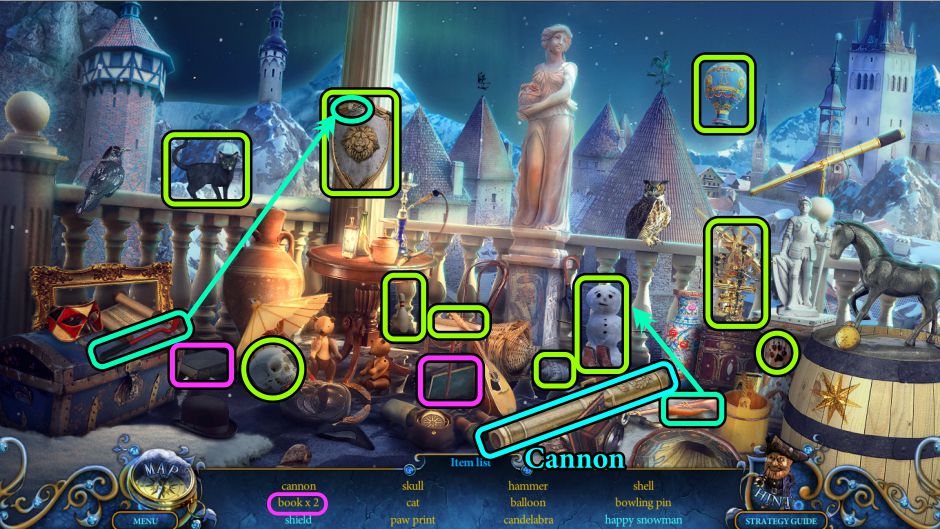
Balcony Hidden Mobile Scene
Use the tool to remove the nail so you can get the shield.
Put the carrot on the snowman to make him happy.
The Cannon will go into your Inventory.
Screenshot
Attic
Give the Cannon to the Miner, and he will knock down the wall so you can enter Princess' Secret Room.
Screenshot
Princess's Secret Room
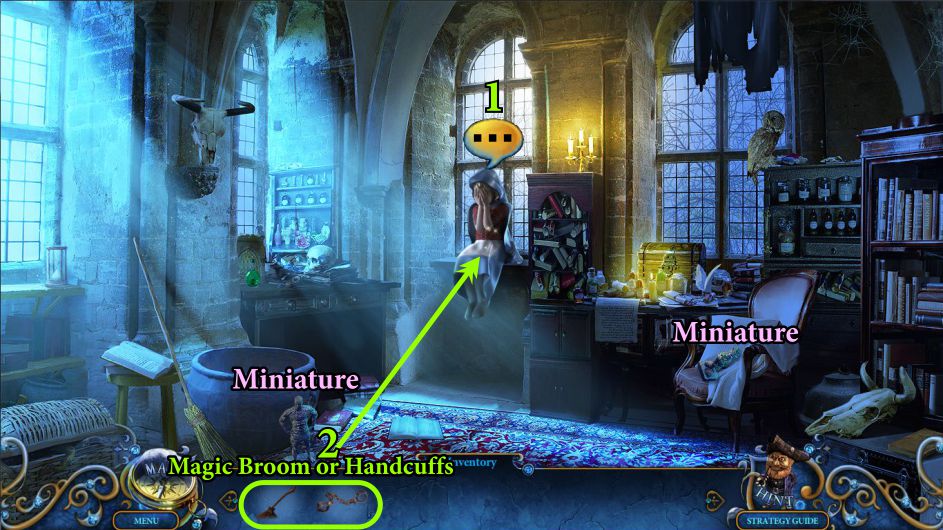
Collect the final 2 Miniatures, and talk to Princess.
The ending of the game is now up to you.
Give Princess either the Magic Broom or the Handcuffs, and watch the final cut scene.
Screenshot
Posted by: Jazz |
June 24, 2012 11:27 AM
|
June 24, 2012 11:27 AM