


![]() Tiny world, tiny problems, right? More like "not right". Er, yeah. Anyway, Mini Quests is a pint-sized adventure/puzzle game by dishmoth available for Android devices and as a Java Applet for browsers. The chunky-pixeled isometric game puts you in control of a little guy out on an adventure, trudging through the fantasy lands as he hunts for treasure and fights/puzzles his way out of various scrapes, like you do!
Tiny world, tiny problems, right? More like "not right". Er, yeah. Anyway, Mini Quests is a pint-sized adventure/puzzle game by dishmoth available for Android devices and as a Java Applet for browsers. The chunky-pixeled isometric game puts you in control of a little guy out on an adventure, trudging through the fantasy lands as he hunts for treasure and fights/puzzles his way out of various scrapes, like you do!
Tap the corners of the screen to move in the mobile version, and swipe to fire your weapon in the direction you're facing. Browser players can use a number of keyboard combinations, including [WASD] to move and the [spacebar] to fire. Move across the overworld map and tap the dungeon level when you encounter one. Once inside, you'll encounter a puzzle per room, each containing a fair selection of buttons to press, enemies to stun or destroy, rotating laser statues of death, floors that drop into lava pits, and so on.
Mini Quests, as the name might imply, is a fairly short game with just a few dungeons to work through and a small world to explore. The puzzles are pretty standard for the genre, but that doesn't mean they aren't just as intriguing or challenging to solve. It's the perfect bit of casual entertainment for when you don't have the time for a solid RPG but still want to go out and be an adventurer!
NOTE: This game was played and reviewed on an HTC Incredible. Game was available in the North American market at the time of publication, but may not be available in other territories. Please see individual app market pages for purchasing info.


Walkthrough Guide
(Please allow page to fully load for spoiler tags to be functional.)
Mini Quests walkthrough
General Info
The tutorial gives you the basic instructions for how to move around, fire, and use switches and targets. The recommended move controls for keyboard users [QSKP] may seem odd, but they are much more intuitive for the game's isometric layout than the typical [WASD] scheme.
In this walkthrough, I use compass directions to indicate where you should move. To clarify: northwest=up-left, southwest=down-left, southeast=down-right, northeast=up-right.
This game was made to be playable in an extremely tiny space, but I recommend one of the larger view areas available.
Your crossbow fires in the direction you are facing. It can sometimes be tricky to aim, especially on uneven ground. You can sometimes use a path ahead of you to help you aim, if the path leads towards your target.
There are a few kinds of monsters and other foes:
Pink monsters can be killed with your crossbow.
Green monsters cannot be killed, but can be frozen with your crossbow.
Turrets are stationary and will fire whenever they face you directly, or you cross their paths. Firing at a turret causes it to fire in whatever direction it's facing, and while your crossbow can't kill a turret, a shot from another turret can.
You have infinite lives, and you will respawn at the entrance of whatever room you die in. Be aware that the number of times you die affects the hero rating for whatever dungeon you are playing.
After the tutorial, you can play any dungeon in any order, and the results of one doesn't affect how the other plays. They are effectively separate games.
Tutorial
NB: Hit the fire key ([spacebar] on PCs) to advance the tutorial screens.
Move up the stairs and to the open door.
Step on the flashing blue floor switch. Climb the stairs and move along the platform to the target along the wall. Fire at the target—you should be facing northwest towards the target, standing on the gray square. Head to the exit.
Shoot at all the pink monsters to unlike the door, then head to the exit.
Training complete! You can now head to either dungeon; whether you play the Lonely Tower or Dragon Temple first doesn't matter.
Dragon Temple
From the training hut, go left, left, up, right.
From the Lonely Tower, go down, right, right, up, up, left, left, up, right.
Press the fire key ([spacebar]) to enter. Press escape to exit.
Entrance
Just head to the southwest door.
Lava Pit
Get as far along the platform as you can without touching lava when it's at high tide.
Once the lava sinks, head down the stairs to the middle of the lower platform and shoot the target on the other side. Then head to the open northwest door. Do this all before the lava rises again.
Fire Wheel 1
Step on the red floor switch, avoiding the spinning arms of fire.
Move counterclockwise to each quarter of the room, each of which has another red floor switch to step on.
The four switches open the southwest door, in the south corner of the room. Exit through it.
Green Room
Go down to the pink switch in the south corner of the room to open the northwest door. This also summons a bunch of pink monsters, which you can either shoot or avoid. Head to the northwest exit.
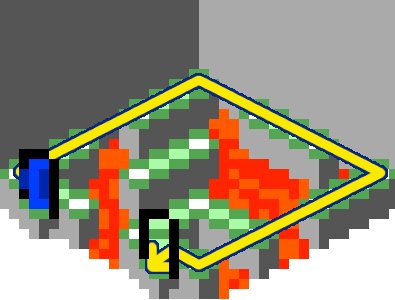
Hidden Lava Maze
Step on the red switch to see where the lava is hiding. The lava seems to disappear when you step of the switch, but you'll step in lava if you step on one of the tiles hiding it.
Avoid the lava tiles. The pattern is basically a bunch of S-curves, three steps at a time, with a long straight stretch along the northwest wall.
Solution
Head up the stairs and to the northeast exit.
Fire Wheel 2
The blue platform will become stairs as you walk across it.
Before going downstairs, stand on the second tile of the platform from the right of the door, face northeast, and fire your crossbow. This hits a target on the other side of the room and deploys another blue staircase.
Go downstairs and move counterclockwise to avoid the fire, until you get to the other staircase. Go upstairs and go through the northeast exit.
Two Green Monsters
You can't kill the monsters; you can only freeze them.
Stand so you are facing one of the purple switches and wait for a monster to stand on it. Keep shooting it until the other monster steps on the other purple switch.
And you thought you'd be safe! Avoid the monsters and shoot the two pink targets.
Go through the now-open northeast door.
Sinking Lava Maze
The safe path is along the walls.
Solution
Wait for a platform to emerge if you need to. The white tiles are safe for at least one round of sinking and emerging platforms.
Exit the door on the other side of the maze.
Monster Gauntlet
Shoot the monsters as they are summoned. You can only shoot them if they are on the same level as you. This is fairly easy on the longer platforms.
It's a little more tricky on the shorter platforms at the end of the path. For these, step down so you will be as far away from the monster as it climbs up the step. As soon as it does this, fire and procede down to the next step.
Exit through the southwest once the way is clear.
Fire Wheel 3
Walk along the blue platform and shoot the red target.
Go downstairs and to the switch in the middle of the room, where the fire wheel was centered.
Exit through the northwest door.
Lava and Targets
Shoot the red target.
Shoot the yellow targets that appear before the lava rises again.
If you stand at the second right angle in the blue platform, you can shoot the red target, then the yellow target very quickly.
You face the leftmost target after you go downstairs and proceed down the platform.
Dragon Pit 1
Walk over to the blue-violet switch. Follow the new orange path as it appears. If you miss it, just wait for it to appear again.
Continue to follow the path, avoiding the dragon's fiery breath.
As the path splits, go northwest, then northeast, then northwest again. The dragon tends to breath where you need to go.
Hit the green switch near the end of the path, then quickly head to the now-open southeast door before the path disappears.
Ring of Fire
Avoid the ring of fire by walking through the gap to where the path turns, then waiting for the gap to move so you can proceed through the southwest door.
When waiting the second time, the gap moves in place sooner than it might appear.
Dragon Pit 2
Walk to the purple switch and follow the orange path as before.
You have to shoot the three targets to open the door to the southeast. The trajectory to each is colinear with one of the three northwest-southeast paths that appear. Don't let the platforms disappear under you, and try not to hit the monsters, as they'll freeze in front of the targets.
When you've hit all three targets, take the southeast path that appears to the open southeast door.
Colored Tiles and Torches
If you step on a colored tile, you will either light or snuff the torch of the corresponding color. Light all four torches, and the northeast door will open.
You therefore need to head to the orange-colored tile in the middle before heading to the door.
Also, you need to step on each color an odd number of times.
One possible path is shown below.
Solution
If you follow this path, the green torch will still be unlit. Just step back one step to the southwest, then continue northeast to the open door.
Dragon Pit 3: Dragon Fight!
Step on the purple switch as before. Follow the path to the red switch.
Fight the dragon by facing it as it emerges and firing. Don't let the wake that appears the second and third time it emerges fool you; wait instead for it to actually begin to emerge before turning to face.
Hit the dragon three times, then head up the path to the treasure room.
Treasure Room
Approach the treasure chest and hit fire to claim your treasure and complete the dungeon.
Lonely Tower
From the training hut, go down, down, left, left, up.
From the Dragon Temple, go left, down, right, right, down, down, left, left, up.
Press the fire key ([spacebar]) to enter. Press escape to exit.
Getting In
Go northwest. The door is locked, and there is no way to open it.
Instead, go southwest, then northwest.
Walk into the stream, then walk under the bridge. Go through the secret entrance that appears in the wall.
Entrance Hall
Shoot the green thing in the middle of the room.
It's a turret, and it will shoot you if it faces you. Move off of the red line to avoid its trajectory.
Shoot the other green things as they appear, making sure that no active turrets are facing you as you walk near them.
Once all three turrets are active, the northeast door upstairs opens. Head to it, making sure the turrets aren't looking at you.
Up the Stairs
Go southeast, then quickly move back northwest so the turret that emerges doesn't shoot you.
Get rid of it by shooting the other turret on the left side of the screen. It won't be destroyed, but it will destroy the turret in your way.
Head upstairs. If you move quickly enough, the original turret won't be fast enough to hit you.
When the screen changes, head southwest up the stairs (it might be hard to tell it's a staircase). Go northwest to continue up the orange stairs to the green floor.
Turrets and Targets 1
You have to move the turrets so you have a clear path to one of the doors. You do this by shooting the target.
Move so you are standing southwest of the turret that is facing northwest. Then take one more step southeast. Take another step, and the turret facing southwest will shoot you.
Face northeast, then shoot the target to rotate the turrets.
Head to the northwest exit. Take the long way southeast, northeast, then northwest, so you move behind the turret nearest the northwest exit.
Solution
Three Statues
Stand on the empty pedestal so you are posed like the three orange statues. The easiest way to do this is to stand northeast of the pedestal, then move southwest.
Head to the southwest exit that appears.
One Spinning Turret, Two Stationary
Move one space southwest of the entrance to the room. When the spinning turret faces the stationary turret on the right, move one space northwest and fire at the spinning turret.
Move one space northwest before the spinning turret faces you.
When the spinning turret faces the remaining stationary turret, move one space southeast and fire at the spinning turret.
You now have several clear paths to the southeast exit. Just make the spinning turret isn't ever facing you.
Sliding Colored Platforms
Step on the blue sliding platform when it approaches from the southeast (i.e., from the bottom corner of the room).
Wait until it moves under the yellow platform near the northeast exit, then step up and leave. Make sure the yellow platform doesn't push you off.
Turrets and Targets 2
As soon as you enter the room, fire at the target.
Head to the northeast exit, moving quickly so the turret facing you won't hit you.
Green Stairwell
Shoot all the pink monsters. You can hit the monsters on the lower "8"-shaped platform, but you'll have to go upstairs to get the other monsters, or wait for them to come to you.
Continue up the stairs and shoot the pink target. Follow the pink path towards the exit, but don't leave just yet.
Turn around and shoot the target again, making sure you are standing in front of the door. Then take the exit.
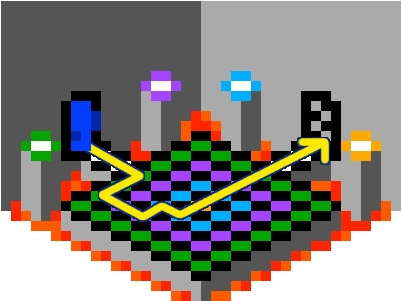
Color Matching Targets
Take the path to the southeast exit. Note the colors, then leave.
Go to the southwest exit. Avoid the green monster and shoot the targets to set them to the proper colors.
First, match them to the colors shown on the pedestals in the other room.
Pink, green, pink.
Then, set them so they match the colors that appear above them.
Black, blue, orange
This slides the purple-and-white platforms into the other room, completing paths to some of the other doors.
Exit the room with the targets, then take the northeast exit.
You are back in the green stairwell. Shoot the target from the doorway, then enter the door.
You've got a new path to the northeast exit, and the purple-and-pink path is out of the way. Head to the northeast exit.
Move the Purple-Yellow Platform
Move so you can shoot the purple target. Make sure the green monster is in front of the turret before you move in front of the turret.
The yellow-purple platform moves so you can get to the northmost exit in the other room.
Head to the exit, again making sure the green monster is in front of the turret at the right time.
Take the northmost exit on the northeast wall. IF YOU CAN'T GET TO THE EXIT, it means you haven't moved all the platforms in this room where they need to be. To see how to do this, read Color Matching Targets above.
Boss Turret Fight!
From the green stairwell room, take the northwest exit to the next room. Take the northwest exit to the room after that.
Continue northwest towards the large center platform.
When the boss turret appears, shoot it, then immediately move off the side of the blue-white platform you are standing on before it blasts the entire side.
A smaller platform will appear on one side of the blue-white platform, depending on where you were standing. You need to shoot it when it is facing the boss turret, so it fires and kills it.
You need to time it so you are not in the sight of the smaller turret, but before the boss turret stops spinning and blasts the side of the platform you are standing on.
Happily, it takes just one shot from the smaller turret to kill the boss turret. Once it's dead, go southeast and step on the brown switch.
Approach the treasure chest and hit fire to claim your treasure and complete the dungeon.
Posted by: Mike |
June 4, 2012 9:49 AM
|
June 4, 2012 9:49 AM