

![]()
 The king has lost his precious Golden Bottle, and you have just the team of mercenaries to retrieve it for him! Start your quest at the inn with Rune Raiders, an easy to pick up but hard to put down turn-based strategy game by Retro64. What begins as a simple quest for a bottle turns into a fight for the kingdom. You have what it takes to defeat the Dark Master, right?
You start with three heroes for hire and just enough money to recruit them all. Once you've selected your team you'll head to the playing field, an area packed with rows of tiles. Use the arrow buttons on the bottom of the screen to move the entire group in that direction. You can also order them to stand in place, or drag and drop each character to change their formation. Step forward and you'll run into a wide variety of enemies, each with unique abilities that will slow you down and, well, try to kill you. Solution: kill them first!
Luckily each of your characters, none of whom would be out of place in a Saturday morning cartoon series, has unique abilities as well. There are heavy armor creatures, who like to be up front to take the damage. There are long distance attackers, who deal death from afar. Each one has a different attack range and damage. Many can be upgraded with special abilities such as knocking an attacker back, or crushing walls that hinder your progress. Upgrades are essential as they also provide longer attack range, better armor, and more attack power. The key is to get the right mix of abilites that will allow you to easily dispatch the enemies in your way.
After each move, if an enemy is in range, your heroes will attack. This is followed by an enemy attack. Click an enemy before moving close to check its attack range. Note also that every time you move forward, your team regains a bit of health, even if you are playing without a healer. Despite this, occasionally a hero will fall in battle. If you think you can live without her or him, carry on. If, however they are essential to you finishing the level, you can use your accumulated cash to ressurect the fallen. Each enemy you kill drops a sack of money. Make sure you click on them all so you have enough gold to fund your next expedition!
Rune Raiders is also available as an iOS download. The iOS version features two additional heroes and five more levels, but otherwise plays the same. Both include survival mode which doesn't involve gold. Just select your team and fight until everyone is dead. The humor in the game will have you smiling all the way through, and each hero has a distinct personality which adds to the overall charm of the game. The soundtrack, while well made, gets repetitive after awhile, as do the sound effects. If they start to bother you, you can turn one or both off in the options menu. It would be nice to have some input into which monsters you attack when multiple ones are in range, but the game usually does a good job of judging what should be hit. With three difficulty levels, Rune Raiders is a well made game, with solid strategy elements, which is sure to please.


Walkthrough Guide
(Please allow page to fully load for spoiler tags to be functional.)
Rune Raiders Walkthrough
Tips and Tricks
Healing potions can be "carried" by dragging them up the screen with you. You can save potions for use later in the level using this trick, which is especially useful on boss levels.
The Tree's healing ability works even if you smash a block rather than killing an enemy. If your team is struggling, put him near some blocks for a free heal.
The bear can throw enemies into other things for bonus damage. If an enemy is thrown into another enemy, both take damage.
Similarly, if the bear throws an enemy into a teammate, both will take damage - avoid doing this!
The Ninja is perfect for taking out minotaurs, which can't attack behind them, and won't move unless a character is stood in front of them. Characters like the Bear and the Tree are able to withstand a minotaur attack without any difficulty, but be careful of attacking minotaurs with the bear - if his throw doesn't kill them, they may end up in line to charge into a teammate.
It's possible for Autumn's attack to knock enemies back, out of reach of the Ninja, because she attacks before Hwan. Keep her on a different side to the Ninja, or stand Hwan directly behind his targets to block knockbacks.
Getting a three star rating on a level requires you to complete it with no team deaths. Use characters with high armor, but keep the ninja at the back of the group, ready to leap forward and deal with minotaurs and small groups of enemies.
Character Guide
Note: listed stats are for max leveled characters.
Gruffle the Dwarf
Gruffle is a good starting character, but quickly becomes less useful due to his low stats and attack range. Early on, he's a good melee character to round out your group, but don't base your team around him.
Type: Melee
Range: 1 tile in any direction
Max Damage: 50 x 1
Max Armor: 50
Recovery: 10
Skills:
Axe Therapy: +25% attack
Emotional Armor: Defense boost
Facing Intimidation: Double attack if more than one enemy is on adjacent tiles.
Money Cures Everything: $25 more money per kill
Coping With Criticism: 20% defense bonus against melee attacks
Sheen the Heroine
Sheen starts off with a strong, but limited attack directly ahead of her, and little armor. At max level it's a different story and she's a solid character throughout the game, with a powerful ranged attack that also triggers a knockback effect. However, Minotaurs remain deadly to her.
Type: Melee (becomes ranged with 'Tri-Blade Crossbow)
Range: 2 tiles front or back
Damage: 60 x 1
Armor: 60
Recovery: 10
Skills:
Heavy Daggers: Knockback on attack
Chain-mail Vest: 20% armor increase
Dagger-Throwing Crossbow: Range increase
Agility Training: Dodge first enemy attack each turn
Tri-Blade Crossbow: Throw 3 daggers at once
Flenta the Elf
Flenta's ranged attacks initially work well for the team, but the damage increase as he levels up isn't enough to justify making him a permanent member of the squad. Although the game sometimes suggests putting him at the front, his armor is weak and it's likely he won't survive on the front line.
Type: Ranged
Range: 4 tiles in any direction
Damage: 20 x 1
Armor: 45
Recovery: 20
Skills:
Ambition: Better arrow cover, but lower range
Designer Armor: 30% armor increase
Full Healthcare Package: 20% more healing each turn
Explosive Arrowheads: 25% of damage from attacks to tiles adjacent to the enemy
Optimised Teamwork Targets: Improved range
Moonflower the Healer
The healer skips her turn if any character moves in that turn. She has very little armor and no form of attack, and in campaign mode this limits her usefulness significantly - you can't bring a character back from the front line to heal up during a battle, and she can't join in the fighting.
Type: Healer
Range: One tile in each direction
Damage: 0 x 3
Armor: 10
Recovery: 10
Skills:
Multitasking Smugly: Heal up to two allies at once
Restorative Smelling Salts: Improve heal range to cover diagonals
Extra Thick Fig-Thistle Juice: Healing remedy takes place twice as fast
Multitasking Kindly: Heal up to three allies at once
Veganism: Defense bonus to the elf, if he's on an adjacent tile
Kapalzor the Wizard
Kapalzor is good in levels where groups of enemies are hidden behind rows of bricks. His upgraded attacks don't do a huge amount of damage, but will hit every enemy in range - the problem is that his attack is quite difficult to line up with enemies as they move around. Using Pun Tree to smash clean thrugh bricks is a better option than trying to shoot around them.
Type: Ranged
Range: A hoop ahead of him.
Damage: 35 to each enemy in range
Armor: 30
Recovery: 10
Skills:
Remembering Tricks: Better attack
Aim-Improving Spectacles: 20% increase to attack
Armored Hearing Aid: 20% defense bonus
Learning New Tricks: Attack all targets in range in one turn
Inspiring anecdotes: Adjacent allies receive an 20% attack bonus. Also applied to his own attacks.
Stallona the Centaur
Stallona does more than three times the total damage of the Elf, and has far higher armor to boot. He's a pretty solid character all round, and good in boss fights.
Type: Ranged
Range: 3 tiles in any direction
Damage: 22 x 3
Armor: 120
Recovery: 25
Skills:
Thick Human Skin: 20% defense bonus
Manly Self Sacrifice: If killed, the rest of the party's health is restored
Five Extra Workouts a Day: Longer range attacks
Manly Diet: 25% more recovery
Ten Extra Workouts a Day: More attacks per turn
Hwan the Ninja
The Ninja is the only character who can move anywhere on the board, aiming for sneak attacks on opponents further up the game area. Fully upgraded, he can attack twice per turn, and although his armor is very low, he can kill many enemies on one hit. He's especially useful for clearing out minotaurs, as they can't attack behind themselves, but most small groups of enemies can be dispatched by him with ease. His low armor means you shouldn't bring him to boss fights, however.
Type: Melee
Range: 1 tile each side and beyond, plus one additional tile directly behind.
Damage: 100 x 2
Armor: 24
Speed: Instant
Recovery: 10
Skills:
Ninja Stealth: Moves don't count towards your turn total.
Spirit of Range: Increase range
Spirit of Booze: 20% defense increase
Spirit of Shots: Two attacks per turn
Avoiding Addiction:Dodge one enemy attack per turn
Svena Sjin the Swordsman (iOS only)
Svena is heavily armored and attacks a whole row of tiles across the screen.
Type: Melee
Range: Whole line of tiles horizontally across the screen.
Damage: 24
Armor: 240
Speed: 2
Skills:
Reinforced Turban: 20% armor bonus
Repeated Attack: Make two slicing passes at th enemy.
Sensible Profiteering: Earn $50 more per kill.
Crafty Approach: No turn counted for moves.
The Blade of Farsand: 20% attack bonus.
Whipman (iOS only)
The Whipman has the strongest armor in the game, making him near essential for boss battles, despite a difficult line of attack.
Type: Melee
Range: Ahead and to the right
Damage: 24
Armor: 360
Speed: 2
Skills:
Leather Jacket: 20% armor bonus
Civilized Whip: Longer whip allows civilized lashing of enemies
Double Whip: Fire 2 shots per turn.
Archeology: Break open rocks in search of artifacts.
Tea Buzz: 20% attack bonus.
Amelia the Waitress
Amerlia shoots forks in all directions, making her a great character to use against groups of enemies. Her attacks continue until they hit something, so if only one enemy from a group is in range, she can still attack the entire group. Using this trick can allow you to pick off enemies from larger groups before getting in range of their attacks.
Type: Ranged
Range: 3 tile radius
Damage: 10.4 x 18
Armor: 180
Speed: 4
Recovery: 10
Skills:
Tip money: $25 bonus money per kill.
Sharing is Fun: Tiles adjacent to target take 20% of damage
Being Extra Helpful: Forks shoot in all directions
Non-Homemade Armor: 20% Armor bonus
Super Extra-Sharp Forks: 30% attack bonus
Pun Tree the Tree
Pun Tree is a solid, high armor character with a healing ability and a strong attack . His range is limited, but the strength of his armor and an attack that hits up to 8 enemies simultaneously allows him to wade into groups of enemies. An upgraded Pun Tree is a great character to put in your party.
Type: Ranged
Range: adjacent tiles
Damage: 40 x 8
Armor: 200
Speed: 8
Recovery: 25
Skills:
Taking Route: Absorb damage in place of adjacent allies.
Rolling Stones: Destroy barrier tiles
Green Energy: 25% more recovery
Wilt to Live: If an adjacent ally is killed, take their place and heal them at the same time
Fruits of Labor: Heal entire party for 33hp after every kill. This includes tile blocks!
Autumn the Forest Fairy
Autumn's ranged attack doesn't do much damage, but can hit all enemies in range, as well as sometimes triggering knockback. High armor means she's useful on most levels, including bosses, despite the low damage output.
Type: Ranged
Range: 3x3 square area one square ahead
Damage: 12
Armor: 130
Speed: 4
Recovery: 20
Skills:
Natural Protection: Improve armor
Come Spring, Bring Life: 20% recovery bonus
Come Winter, Bring Death: 20% attack bonus
Boredom with Nature: Increase range
Improving on Nature: 25% attack bonus
A. Bear the Bear
A Bear is the tank of the game, with a huge amount of armor. His damage per hit is second only to the Ninja's, although even when fully upgraded, he can only attack the tile immediately ahead of himself. If the enemy has empty space to either side, A Bear will grab them and fling them in whichever direction has the most clear tiles - and should they crash into another enemy, both will take damage.
Type: Melee
Range: 1 square directly in front
Damage: 86 + bonus
Armor: 192
Speed: 4
Recovery: 10
Skills:
Stolid Bear: 20% defense increase
Angry Bear: 20% attack increase
Hungry Bear: 25% attack bonus if enemy is below 50% health
Scary Bear: Hold Bumblehawks in place
Fury Bear: 20% attack bonus
Monster Guide
Ogre
Ogres are the most basic enemy you'll encounter. Low damage, range, and armor make them easy pickings.
Attack Range: any adjacent tile
Damage: Low
Armor: Low
First level seen: 1
Ork
Orks are basic ranged enemies. There's little problem taking them out.
Attack Range: 3 tile radius
Damage: Low
Armor: Low
First level seen: 2
Minotaur
Minotaurs are a difficult enemy to deal with even late in the game due to their strength. They will charge forward and inflict heavy damage on any character within 3 tiles directly ahead of them. The Ninja is able to kill these in one hit, so use him to take them out before your party gets in range.
Attack Range: 3 tiles directly ahead
Damage: Very High
Armor: Medium
First Level Seen: 3
Fire Dragon
Big, vicious parrots that can breathe fire. Keep the ninja away while they're on full health, as he isn't able to deal with these in one shot, and their attacks can hit in any direction.
Attack Range: 2 tile radius
Damage: Medium
Armor: High
First Level Seen: 4
Medusa
These bizarre enemies have a powerful attack that hits every tile around them, and so are best dealt with from range. Where that isn't possible, use characters with high armor that can withstand the damage they're capable of dealing.
Attack Range: Every adjacent tile simultaneously
Damage: High
Armor: High
First level seen: 6
Mud Golem
Although not too powerful in their own right, mud golems can fire a concoction of mud over a character to hold them in place for a few turns. The mud stops the character from attacking and prevents you from manually moving them, but doesn't affect the dodge ability or a group move command.
Attack Range: 1 adjacent tile
Damage: None (but holds characters in place)
Armor: High
First Level Seen: 7
Cyclopes
Each Cyclopes has a high attack range and can do a lot of damage to characters with limited armor, making them one of the most dangerous ranged enemies in the game. On the other hand, against the bear or the tree, their attacks barely leave a scratch, and the Cyclopes' own armor is pitifully weak.
Attack Range: Any horizontal, vertical, or diagonal tile
Damage: Medium
Armor: Low
First Level Seen: 8
Bumblehawk
Bumblehawks are most dangerous because of their dodge ability, which allows them to hop out of the way of the first attack each turn. This renders your Ninja helpless against them. The Bear is able to grab Bubmlehawks, making their dodge useless.
Attack Range: Any 2 adjacent tiles in a line
Damage: Medium
Armor: Low (but dodges first attack)
First Level Seen: 9
Hydra
Hydras are deadly enemies capable of attacking groups of characters for high damage. Attack from range or send strongly armored melee characters in for high impact attacks. Although the Ninja can deal with lone Hydras, a single hit from them will kill him, so it's best to keep him out of harm's way where more than one show up.
Attack Range: 3 x 4 box, plus two on each side. Attacks 3 characters at once.
Damage: Very High
Armor: Medium
First Level Seen: 11
Mummies
Don't be fooled by the relatively low stats: mummies are tricky enemies due to their ability to jump into the middle of your team and deal damage to everyone. One mummy by itself isn't much of a threat, but a group of them can wreak havoc.
Attack Range: Jumps one tile to land on a character and deal splash damage to nearby tiles.
Damage: Low
Armor: Low
First Level Seen: 12
Spider
Although slow, spiders are strong, heavily armored, and leave a web on every square they move from. The web can entangle characters, stopping them from moving or attacking, and sometimes prevents collection of gold.
Attack Range: 1 tile directly ahead
Damage: Very high
Armor: High
First level seen: 13
Reaper
Reapers float vertically from the top of the screen and cannot be attacked. They don't stop for anything and they don't take turns to move. Just get out of the way!
Attack Range: Own tile
Damage: Very high
Armor: N/A, can't be attacked
First Level Seen: 14
Rock Monster
Beasts with a hard stone shell.
Attack Range: 3x2 tile line three tiles ahead, plus directly in front.
Damage: Medium (attacks three tiles at once) + knockback
Armor: Medium
First Level Seen: Survival
Boss Guide
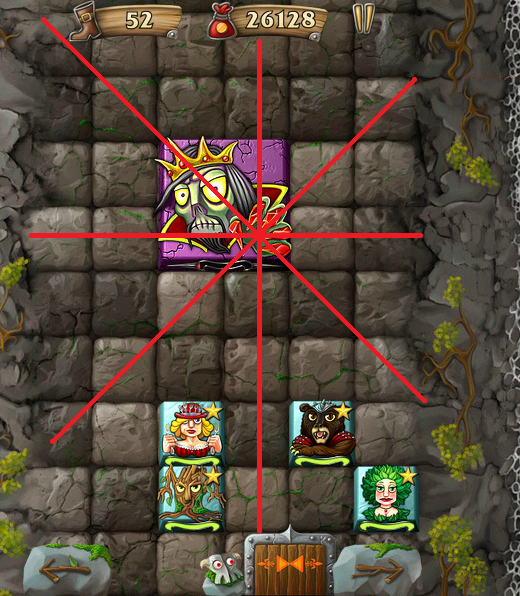
Westward King
Any team member hit by attacks from this boss will target teammates on their next turn, which is usually deadly. There aren't many safe places to stand to avoid getting hit: See this screenshot for one safe formation. Note that where the red lines cross the edges or the corner of a tile, characters on that tile will still take damage.
Recommended party: Ranged characters. Stand them on safe tiles, and they won't take any damage all fight. Melee characters are unable to get close enough to the King to do any damage.
Witch
Her attacks are strong, and she'll take out even well armored characters with only a few attacks. Melee characters like the bear can deal plenty of damage to her, so go all out on the attack.
Recommended Party: Armored characters to soak up the damage. The bear is essential to win the battle quickly, before your party is worn down. You should find at least two health potions on your way to the boss fight; drag those up with you for some extra healing power should you need it.
Dark Lord
Expect to take a lot of damage in this battle. Not only does this boss have powerful attacks of his own, reapers will constantly appear to further drain health from your party. You should collect as many HP potions as possible in the lead up to the boss fight, because it's impossible to get through this one without taking damage.
Recommended Party: Only your best, most armored characters. iOS users have an advantage here as the two exclusive characters both have high armor, great for this battle. If the tree is in the party, stand him apart from the group, or else he'll absorb half their damage, and won't survive more than two rounds.
Posted by: Ben |
May 22, 2012 11:18 AM
|
May 22, 2012 11:18 AM