

![]()
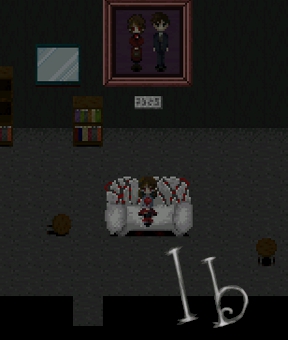 When you think about it, art galleries can be pretty creepy places. They're quiet, they're filled with unusual visions, and after all, one person's art is another person's nightmare. In Ib, a free horror adventure made by Kouri and translated by vgperson, a little girl out on a day trip with her parents suddenly finds herself trapped in the gallery after dark. Which might be spooky enough, if not for the fact that it's a most unusual darkness, and it happened all at once and seemed to take all the other people away with the light. With no choice but to follow a strange message begging her to come come come, Ib ventures deep into the gallery and tumbles into a surreal world where art, humanity, and safety are largely open to interpretation.
Though Ib was made with RPG Maker 2000, you won't find any battles here. Use the [arrow] keys to move around, [Z] to interact with things, and [X] to open your inventory. You can save your game at writing desks, which you should do frequently since it turns out art galleries are unfriendly places when the lights go out. Shortly after the game begins, Ib finds a red rose that represents her health and is always displayed in the upper-left corner of the screen. As Ib takes damage, petals fall away and the rose begins to wilt. Luckily, you can restore your rose (... or anyone else's... ) by placing them in water vases found throughout the game. Just stop and think a little about the decisions you can make and the responses you can give... Ib may need to forge a bond if you want the best ending, and, well, let's just say the gallery reacts poorly to people who break the rules.
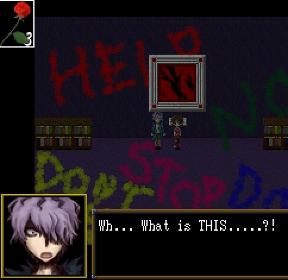 Analysis: Ib is kind of an odd duck. Though the visuals can occasionally make it hard to tell what you're looking at, the game still packs some surprisingly scary moments for its visual style. Jump scares? Sure, but some really effective subtle creep-outs like a ball slowly bouncing down the stairs towards you or increasingly irate messages scrawled on the wall as you go do wonders for the mood. There's also one extremely tense scene with a room full of dolls that... ugh! What makes Ib stand out is this decision to go for the more surreal scares and strangeness rather than relying on gore or ultra violence. There are a lot of unsettling scenes that creep you out far more than a lot of other games manage with a lot more blood and guts, and Ib manages to be more memorable as a result.
There are good endings and bad endings to get depending on your choices throughout the game and Ib's bond with the people she meets, and a playthrough will probably take a few hours if you take your time. Ib isn't a particularly difficult game, apart from a few "chase" sequences, since the developer intended it to be able to be finished by players of any skill level, and most of the puzzles are actually pretty solid. Weird, but solid. Since you're always moving forward, backtracking is kept to a bare minimum over each new area, and figuring out what you need to do is just a matter of remembering to investigate everything... multiple times. Ib has her flaws, but with a fantastically freaky sense of fright and design combined with likable characters an unreal environments, this is one great little free horror adventure that is far and away creepier and more effective at times than its big budget peers. Highly recommended.
![]() Windows:
Windows:
Download the free full version
![]() Mac OS X:
Mac OS X:
Download the free full version
Thanks to Noodle for sending this one in!


Walkthrough Guide
(Please allow page to fully load for spoiler tags to be functional.)
Ib Walkthrough
~updated April 2nd 2013
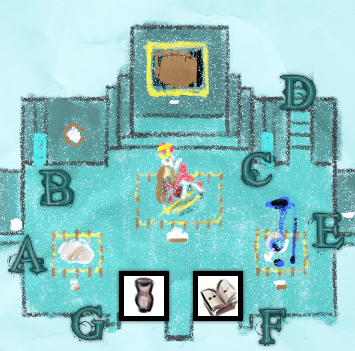
Notes on the walkthrough, and map key:
I've done my best to keep this walkthrough free of plot spoilers, but if you're trying to keep yourself unspoiled about the plot, it's probably best not to read ahead. I've offered hints in addition to outright solutions when possible, too.
There are color puzzles here, but I've done my best to add notes on the colors for players who have difficulty distinguishing them. If I've done it wrong or there's something I've left out, please let me know.
To help make the directions clearer, I've made maps. The maps come in two versions: Full and Limited. Full maps show every relevant room, and every region has one. Limited maps are more used as a signpost for directions, and only the more nonlinear regions have one of these.
Map Key
I've tried to have enough variation in shade that the maps are accessible to players who have difficulty with colors, but if I haven't accomplished that, please let me know and I'll edit them to be more differentiated.
Changes in 1.04:
If you've played Ib 1.02, a few things have been changed:
Some dialogue has been added, and some of the current dialogue is now translated a little bit differently.
Two new endings have been added:
A Painting's Demise and Welcome to the World of Guertena.
Two extra areas have been added, and are now accessible on a second playthrough after Ib escapes.
There's now a bonus gallery at the end of the game, where you can listen to the game's music, see the paintings you've discovered, and talk to characters (who appear based on the endings you've gotten)
Some events are now randomized, which means a few of the old solutions no longer work. Fortunately, this only applies to events that are meant to be random searches.
The storybook event can now be skipped, so players who couldn't proceed past it can now continue the game.
General hints:
If a vase looks full and blue in its sprite, it generally has unlimited uses. Take advantage of that. If it doesn't, it's usually only good once (there are one or two that are still unlimited but don't look full, but that might be an error?), so be careful. Don't heal more than you need to.
Save often. You can do it as much as you want with no penalty, and if you're in a place with limited healing available, you can get more out of your vases if you save often enough to backtrack easily. You have 15 save slots, which is probably more than you'll need, so don't be stingy.
Examine everything and talk to everyone. Paint splotches, bookcases, and signs often have helpful information, and they're usually interesting as well.
Keep a notebook on hand or a word processor open. Some of these puzzles require multiple steps, and it's easier to take notes than to memorize.
Most of the game can be played in windowed mode, but for some areas, fullscreen is much better. If you're missing something or having a hard time with a chase event, switching back to fullscreen might help.
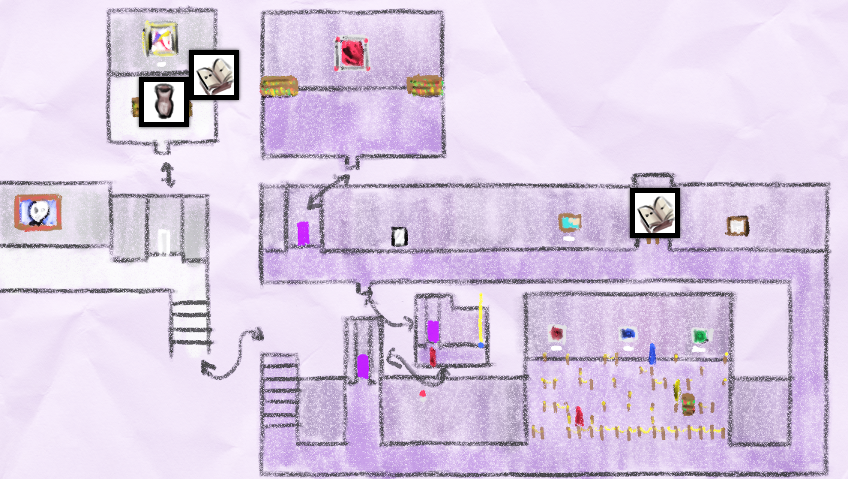
Gallery: Starting out in the museum
Full Map
Examining the long painting on the southmost room of the upper floor starts the story. If you'd like to explore a little first, do so before you investigate that painting.
After you've examined the long painting, leave the room and go down the stairs to the lobby. Ib will notice nobody's there. Some of the artwork gets a little bit strange, and it might be interesting to look around again if you want. The first save point of the game is now available at the front desk. After the lights have dimmed, you can go back to the long painting on the upper floor, and investigate the blue splatter. After, examine the blue writing.
Go back downstairs. Part of the rope around the dark square-shaped fish painting will be missing now, and you can go down.
Blue Space: Dark corridor
Full Map
The west leads to a locked door, but there's a save point next to it so you might want to go over there anyway. Save if you'd like, then go east. Take the rose, then move the table and go through the door. Get the key. When you go outside, the position of the vase and table have changed. You can place your rose in it and you'll restore your health- plus the first time you do it, you'll get two more health points, which are going to be really useful. After, go west to the locked door. Unlock it, and go through.
Green Space: Insects and reaching arms
Full Map
There's an ant wandering around the insect paintings (it's a little black dot, probably only visible at all in fullscreen.) Talk to it if you want. To the east is a door leading north, but part of the floor is missing and you can't go anywhere quite yet.
Head north- but listen to the sign and stay in the middle of the passageway, or the arms that jump out of the walls will hit you. Don't go all the way north either, because there's another arm waiting on the opposite wall. The passageway bends to the east. Take the ant painting and save if you want. The door is locked for now, so carefully head back through the arms.
If you'd like, show the ant its painting. Then, go east and through the door, to the room with part of the floor missing. Lay down the ant painting and you can cross. Keep going, and you'll come across a green key and a statue. Take the key, but be careful- when you do, the statue will start chasing you.
Be quick and go back across the ant painting. After you cross again, the painting will give way, and the statue will be unable to follow. Go back through the hands, and unlock the door. You might want to save.
Yellow Space: Cat-shaped room, hanging dolls, liars, and lips
Full Map
Note the fish shaped hole on the northern wall of the room. You'll need to go to both side rooms, but you can do them in either order.
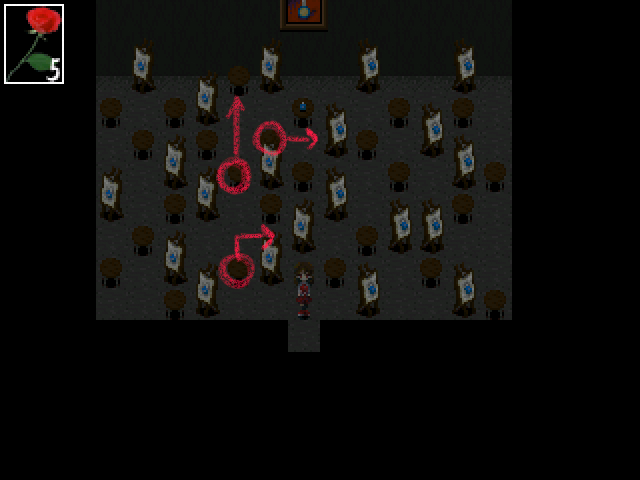
On the west, there's a stick figure on the wall. Examine the paint smear next to him, and he'll play a hide-and-seek game with you. Press a button on any of the curtained panels to guess if he's in there. Some of the buttons will hurt you when you press them... but you can restore your health in the east room, so don't worry too much about losing petals.
The stick figure's location is randomized, but he doesn't show up in every possible position.
Solution:
He's either in the upper left corner, the bottom right corner, or the bottom row, second from the left.
This image shows the stick figure's possible positions.
Press the upper left button first. If you see a picture of Ib falling, the stick figure will be in the bottom row, second from the left. If you see the moon, he'll be in the bottom right corner.
Get the fish head from the painting on the north wall, then leave.
On the east is a room full of mannequins, statues, and giant heads. Examine the objects on the right side of the room. There's a vase, if you need it. Soon, one of the giant heads will start moving towards you. Stay out of its way, and lead it across the crack in the floor. When it breaks, get the fish tail.
When you have both fish parts, you'll automatically combine them. Put them in the fish-shaped hole, and go north when the passageway opens up.
Limited Map
To the east, there's a save point and a not-quite-blank painting. Examine that painting twice. Take note of the number you see, and its color.
Color note:
It's red.
The tongue-waggling painting will drop some spit on the ground. Avoid it. To the west, there's a pair of lips on the wall. You don't want to mess with those yet. So go north, and once again stay in the middle- there's one stray arm waiting to pop out.
Once you're through, to the east are some hanging dolls. Examine the one you can reach, and then examine the one that falls. Note the number and its color.
Color note:
It's green.
There's a door on the far east side (Exit B on the limited map), but you don't currently have the numbers to calculate the password. Go instead through the door on the far west side (Exit A on the limited map), labeled "The Liars' Room".
Examine the portraits, then go through the door to the north. Don't turn up any tiles yet, but examine the statue for a clue. Go back to the Liar's Room. When you think you have the correct directions for the room with the statue, go back north, follow the direction, and examine where you stand.
Color note:
From left to right, these are the colors the portraits are wearing:
Left side: Green, brown, yellow.
Right side: Blue, white, red.
Hint:
Only one of the portraits isn't a liar- that's what "the odd one out" means. Which portrait can be the only one telling the truth?
Solution:
The one in brown (second from the right) is telling the truth.
The blue one contradicts itself. If Blue is telling the truth, then Blue isn't telling the truth, because Blue says Green is the only truth teller. Blue must be a liar. Because of that, the truth teller can't be Green, either. None of the others contradict themselves, but White, Red, and Yellow are all either telling the truth together or lying together, and there's only one truth teller, so they all must be liars. Brown is the only one left.
This image shows Ib standing at the correct place in the statue room.
Take note of the number you find, and its color.
Color note:
It's purple.
You have all the necessary numbers to calculate the correct combination for the northeast door in the main room, so make your way back.
Color note:
In "X x X + X", the first "X" is green, the second "X" is red, and the third "X" is purple.
Use the colored numbers you've found with the equation, substituting a green number for a green "X", and so on.
Hint:
The password is ([green number] x [red number]) + [purple number].
Or, (18 x 9) + 4.
Solution:
166.
Go through the door, take the wooden apple, and go back out. Remember the lips? Head back south down the corridor (stay in the middle, there's going to be another hand coming out of the other side) and go east. Feed the apple to the lips, then go through the open mouth.
Guillotine hall, lady in red, and wounded man:
Full Map
Walk east. Watch the pictures of the guillotine as you walk by- once the guillotine's disappeared from the picture, it's going to come falling down on Ib. Go only as far east as you have to in order to trigger it, then back up out of the way as soon as you see it start to fall. Once it's almost risen, get down the stairs as quickly as you can.
Follow the corridor past the painting and around to the door. There's a save point first, you'll probably want to use it.
In the next room, there's several sculptures, several paintings, and a locked door to the north. At the northeast corner, there's a picture of a lady in red. When you examine it, it'll fall down, leaving a key behind, and the painting will chase you. Watch out, she's pretty quick. Lead her away, then scramble back and get the key, unlock the door to the north (leading her away some more if you need to), and go through. The paintings that chase you can be a bit unnerving, but they're not that tough- they'll always follow you, so you can almost always lead them away.
You'll find yourself in a library, with another locked door to the north. You'll need to examine one of the books on the northwest bookshelf to proceed (some of the other books are interesting too, so save that one for last if you want). Just watch through the story, and you'll get the key.
Some people have experienced issues with the game crashing during the storybook, so you might want to save first. If the storybook does not work for you, on your next attempt, choose not to read the book. Ib will notice a different book-- choose to push it in. This will unlock the door without showing the video.
Either way, when you've unlocked the door, go north. There's a save point and full vase here. Save and heal if you need to. You can go either east or west, but you'll need a key before you can get very far going west. Go east instead. You'll find yourself in a long hallway with a man lying on the ground. Examine him and you'll find a key. Take it- you'll need it to help him out anyway. You can talk to him and try to help him, but that won't do much.
Go back past the save point and go west this time. Unlock the door, and go through. There's a lady in blue and a blue rose. Lead her over to your side of the room, then go around her and cross to the other side. Take the blue rose and do the same thing to get back. Get out of there, and get back to the save point and vase. Put the blue rose in the vase (heal yourself too if you're not at full health, since this vase has unlimited uses.) Go back east to the wounded man, and give him back his rose. He'll introduce himself as Garry. Once you get control back, go west, and watch out for the new spit puddle as you leave. Garry will move the statue in the next room. Go north.
Gray Space: Sorrowful bride, hungry painting, maze, and eyes
Full Map
Limited Map
This room has a sorrowful bride's hands, and pictures of a grieving bride and groom. You'll be able to do something here, but not quite yet. Go north.
You'll come out in a large room. In the southeast area of the room, there's a save point. In the southwest area of the room, there's an unlocked door that leads to a maze (Exit A on the limited map). On the ground by the west wall, there are eyes on the floor, including one red one. Towards the east in the middle, there's an unlocked door that leads to a room full of stools and easels (Exit B). At the northeast corner, there's a blue painting with a fanged smily face that asks to take your rose- you'll want to find something else to feed it instead. At the north wall in the center, there's a painting of a snake with a hole in its eye.
You don't have to complete all these steps in the order listed here, but this is one way to go about it:
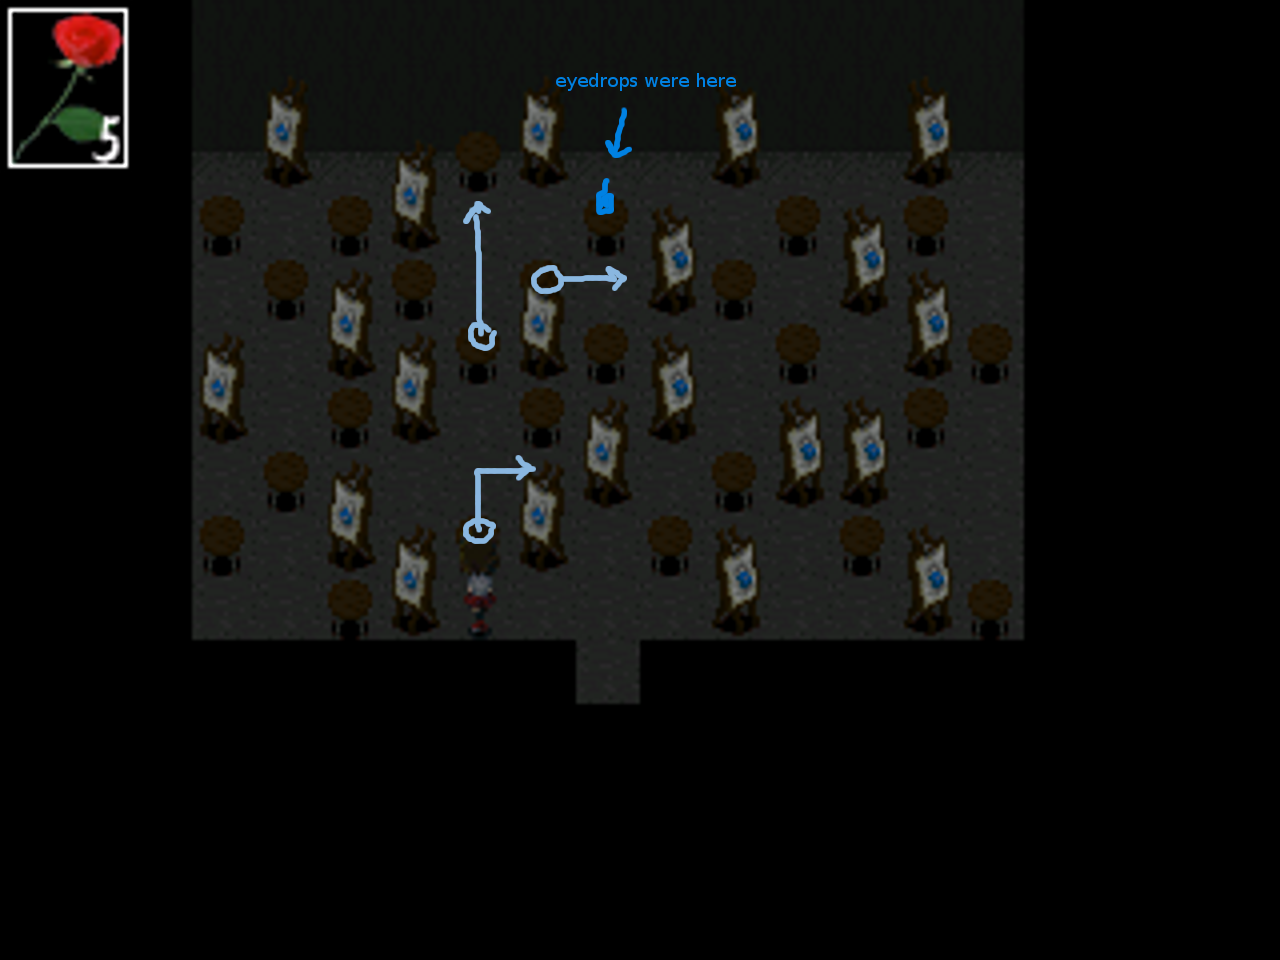
Go into the east door (Exit B) with the stools and easels. In the north side of the room, there are some eyedrops on one of the stools. You can move the stools around to clear a path to the eyedrops.
Hint:
Though it looks complicated, you'll only have to move three different stools (though you'll have to move some of them more than once.
The first stool you'll need to move is the one two steps west and one step north of your starting position.
Solution:
This image shows a possible way to reach the eyedrops.
Go give the eyedrops to the red eye by the west wall. Examine it at its new position, then examine the section of wall it was facing. Go through the passageway, get the red glass ball, then go back to the painting of the snake in the main room and put the ball in its eye. Examine the painting that falls.
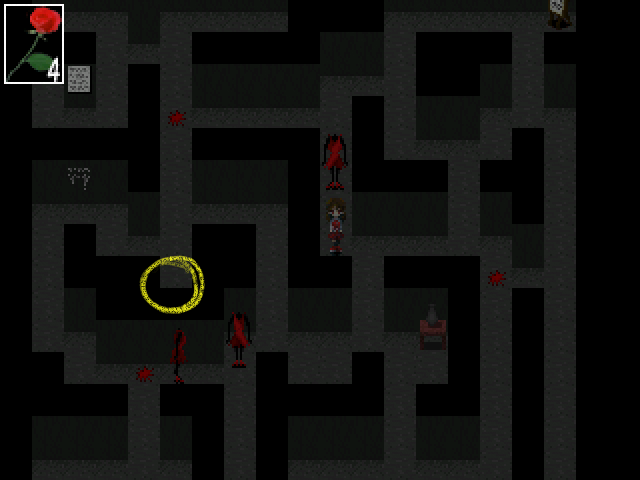
Go through the southwest door to the maze (Exit A). As the sign in the northeast says, you want something south of one of the dots of red paint.
The correct dot is:
...the northwest one. Go into the little space south of it and examine.
This image shows the location of the switch.
Pull the switch. Watch out for the statues. There's a vase of water here too, though you really shouldn't need it. Just concentrate on getting to the switch and getting out.
Back in the main room, you'll see a new door, near the save point. Go through, and follow the directions from the fallen painting. Get the wedding ring, and go back south to the room with the sorrowful bride's hands. Put the wedding ring on the correct finger.
Hint:
Where do people generally wear their wedding rings?
Solution:
Left hand, ring finger.
Get the bouquet, and feed it to the hungry painting. Once it's done, the painting turns into a door. Go through.
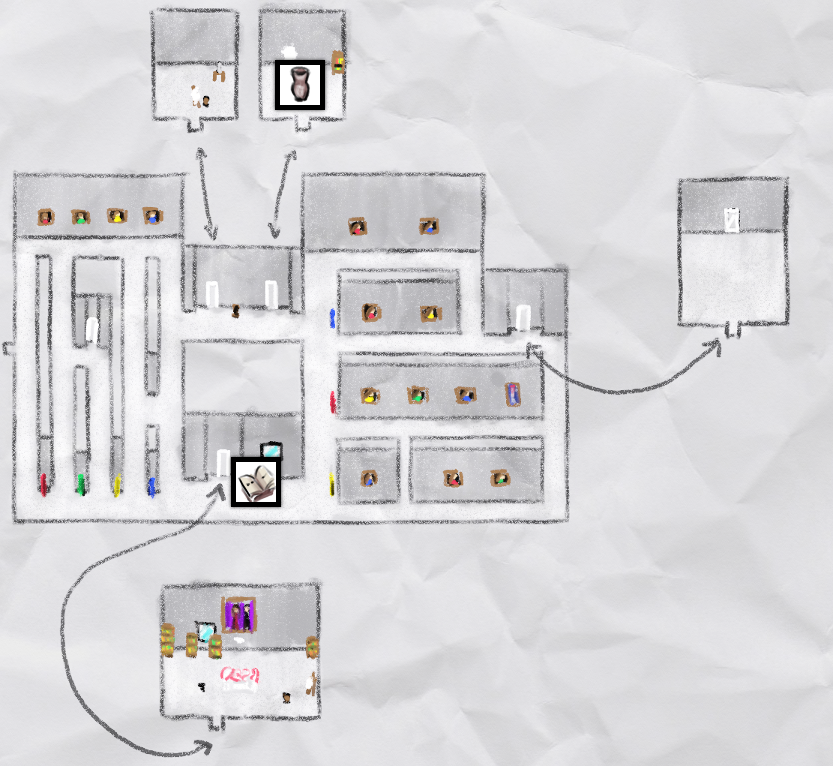
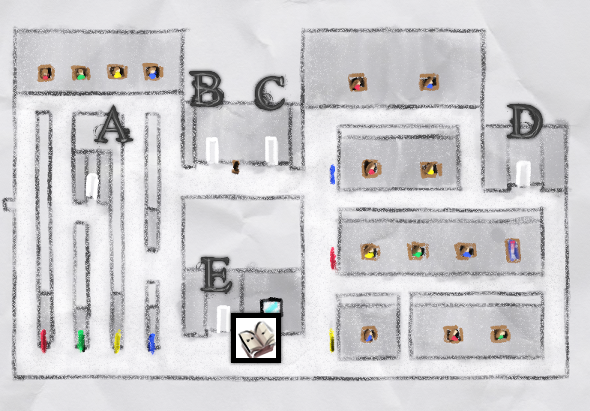
Gray Space, Part 2: Room of living paintings, mannequin heads:
Full Map
Limited Map
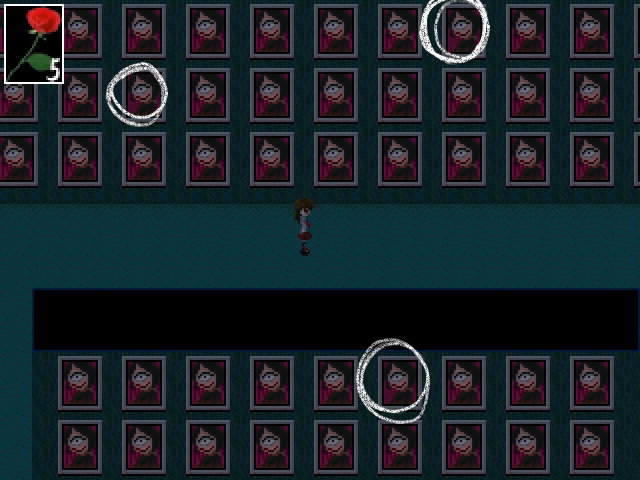
Go through the small passageway in the next room, then through the hall of mannequin heads. You'll come out in a large mazelike room full of paintings of women. They WILL come to life and chase you, but they won't come to life just yet. Take note of all the doors. There's a locked door in the west mazelike area below the paintings (Exit A on the limited map), two doors locked with passcodes at the north of the room in the center (Exits B and C), a locked door near the northeast corner of the room (Exit D), and a locked door at the south of the room in the center, next to a save point (Exit E).
The passcoded door on the left (Exit B) opens with a 4-digit number. The passcoded door on the right (Exit C) opens with the number of paintings of women in the room. Let's go through Exit C first- as you start doing things, the paintings come to life, and it's easier to count them while they're still. This isn't a strictly necessary room, but you might need it later and it's better to have it unlocked first. Something that may not be obvious to people playing in windowed mode: all of the "standard" paintings in this room are of women.
Solution:
There are 14 paintings of women in the room.
There's a vase if you need it, but save it for later unless you're already almost dead. The bookshelf and poster might be interesting to examine, while you're there.
Work on Exit B next. Near the east wall, there's a different painting hanging near the paintings of the women. Examine it until you find a 4-digit number, then, keeping in mind what the subject of the painting is and how that might change how you interpret the password, go back and unlock the right passcoded door.
Hint:
The hanged man is upside down. How does that change the way you should interpret the number he's wearing?
Solution:
5629 upside down is 6295.
Go inside. There's a table with an empty vase that you can push around, and an easel with a chair. Push it around until you find the right spot (the game will let you know when it's where it's supposed to be).
Solution:
Just keep moving it west
Go back out after you've moved the table. There's going to be a few paintings roaming around by this point, so be careful. The door near the northeast corner of the room will now be unlocked. Go in, and examine the mirror until you get a reaction from Garry. Quickly make whatever choice you feel is best, then go back to the main room.
On the south corridor of the east side of the room, the woman in green can now be coaxed to come to life- she'll drop a key when she does. (Depending on if you've passed her before, she might already be moving around.) Lead her away, get the key, then go into the room next to the save point (Exit E). It's a very good idea to save first.
Examine the portrait of Ib's parents, sit on the couch, look around if you want. There's a movable bookshelf near the window- you want to get Garry to move it so that it covers the window. When you're done, try to leave. A moving painting will make a hole in the north wall. Lure the painting away and go through the hole.
The room's going to be swarming with moving paintings and statues at this point. If you're low on health, now is a good time to go back through Exit C and use the vase- you come out right beneath it. Just make sure you don't get trapped between the paintings and statues. Make your way as quickly as you can to the door in the mazelike area on the west side of the room- it's Exit A on the map, and it's going to be the only one in the area you haven't gone through yet.
Whew. Enjoy the cutscene.
Violet Space: Garry's coat, roped room, "___ of the Deep"
Full Map
Wake up, and talk to Garry. Give him back his coat. There's a save point and a vase here, but you might want to save the vase for later. If you want, you can talk to him before you go- sometimes he repeats himself, but he's got more to say than you might think. When you're ready, leave the room.
Go south into a large area. There's a door to the north, but it's locked, and there's nothing to see through the peephole. To the east, there's a roped off area with a bookshelf inside. It's just a trap, and you don't actually need to go through there. The bookshelf's mildly interesting, and you can only see it by going inside, so you can if you want to. The yellow statue comes to life when you go in, and pressing the buttons on the north wall of the area can either bring more statues to life, or open up the exit.
Solution:
Press the center button to open up the exit. Don't press any of the others.
Once you're done with the roped off area, or if you've decided against it altogether, keep going around. If you examine the white puzzle on the wall, you can have a little conversation with Garry about it, but that's also optional. There's a save point, too. Once you're done with that, keep going to the exit to the west. You'll end up in a room with a mirror, and doors to the north and south. The north door is locked with a password, but you don't know the password so you can't get through. Go south instead.
After Garry moves the statue, pull the rope in the corner, then go south. You'll end up around where you were when you entered the large area, but now there's a paint splotch under the lamp. Read it, and Garry will ask you if you remember the name of the dark square painting from the museum.
Hint:
It's a trick question- if you investigated the picture at the start of the game, Ib couldn't understand the word, and nobody around the painting mentioned the title.
But that'll rule at least one of those words out- the one Ib would obviously have known.
Does Guertena usually go for dramatic names for his paintings, or more subtle ones?
Solution:
It's "Abyss."
Go north through the now-unlocked door, and keep going north until you reached the passworded door. What you've decided for the painting's name is what you're using for the password. Once you're in, examine the big painting to proceed- though some of the books around are interesting too, and you might want to check them first. After the cutscene, go back out and go east until you see the red footprint trail, then follow it.
Brown Space and Violet Space: Red eyes, flowers of jealousy, and pulling cords
Full Map
Meet Mary, your newest party member. Go south and use the vase (even if you don't need to, you need to use the vase before you can advance.) After the cutscene, go north, and keep going north until you reach a set of doors and a save point. The right door is locked, so go through the left one.
Examine the painting and the left bookshelf, and a statue will break. Get the key from the broken statue and leave. When you pass through the hall, the party will be separated, with Garry on one side and Ib and Mary on the other. As Ib, unlock the remaining door and go through it. Investigate everything, then try to go back to see Garry. The door's now blocked, so go north, and keep going along that path until you get to a room with a save point, a missing section of floor, and a big blue rose on the ground. Examine the blue rose.
Now you're Garry. Go back in the room. Examine the bookcase on the right. You'll move it, revealing a hole in the wall. Go in the hole. You'll come out in a room with 5 ropes to pull and a big red rose on the ground. Examine the red rose, and be Ib.
Look around. Pulling any cord but the correct one will harm Garry, pulling the correct one will help Ib. Find the cord that would help Ib, then be Garry again and pull it.
Hint:
Which cord looks like it might do anything at all on Ib's end?
Solution:
It's the second from the right, the one which, in Ib's room, is directly above the painting with the eyes.
Be Ib again. Cross the room. Push the triangular object into the gap, then go out the exit to the west. Make your way down the hall, and answer Mary's questions however you want.
You'll come out in a room with a blue rose. For now, use the rose to switch to Garry.
Be Garry. Push the triangular object into the hole in the floor, then leave through the now-open door. Go down the hallway. You can examine the messages next to the creepy dolls, but you only really have to read the last one at the end. Move the creepy doll, examine the door, read the paint on the wall, and go through the now unlocked door. You'll come out in a room somewhat similar to the one where Ib is. There's a red rose on the floor. Use it to switch back to Ib.
Brown and Violet Space, Part 2: Rainbows, gas, and balls of paint
Ib's Side:
Full Map
Limited Map
Garry's Side:
Full Map
Limited Map
As Ib, explore your surroundings. Aside from the blue rose, there's a save point, a blue rose and red gas covering one of the passageways near the entrance (Exit D on the limited map). Don't go down there- every step you take through the red gas costs you one point of health, and with only five points maximum, Ib just won't be able to get through. Note the seaside painting ("Fisherman") in the east near the entrance. Next to it is a locked door (Exit B). To the south is a door (Exit C) that leads to a room with a bunch of mannequin heads and a painting called "Lady Without Her Umbrella." Go inside. Moving the southwest mannequin head will crack the floor, which is necessary, so go ahead and do that. Don't move any of the others, you'll just get hurt. Take the Tree Key from the table. Go back out.
Further west, in the center of the room, there's a vase. On the far end of the room, there's an unlocked door at the north (Exit A). Inside is a gray room, with a painting of a rainbow and a large area of floor missing. You can't do anything here yet. There's a door on the north that's locked with a password (Exit E)-- the name of the painting shown. The painting is on Garry's side, so you can switch to him and look for the painting... or, since you get unlimited tries and there aren't any consequences for giving the wrong answer, you can just guess.
Hint:
What does it look like?
Solution:
It's "Marvelous Night".
Inside is a library. On the rightmost bookshelf, there's a book about some of the paintings here. Note the date when "Juggling" was painted. Examine the gap, and use the Tree Key in the lock. Go out, and switch to Garry.
Look around. There's a locked door nearby (Exit E), that has a "cold feeling" about it. To the north, there are two unlocked doors next to each other (Exits A and B-- B starts out locked, but was unlocked with the Tree Key). Go inside Exit A. You'll see seven pedestals and a palette. Read the message and go outside, then to Exit B. Examine the bookshelves on the west side of the room. The one at the north row, closest to the wall that divides the room, contains the green ball of paint. Take it. You can't get to the east side of the room right now, so don't worry about it.
Go back out to the main room, and you'll see a table with a save point and a full vase. If you don't still have full health, heal yourself- you can use this vase as many times as you want. Next to a locked door in the northeast part of the room (Exit Note the "Fishing Hook" painting. South from there is a painting of a figure juggling balls. Examine it, and tell it the year it was painted- if you've been following this walkthrough, you've read that information in the library as Ib.
Solution:
Enter "6223".
Take the blue ball of paint. Go south through to Exit D.
This room is full of the red gas. Garry has enough health to do what he needs to do in here, but be careful. Just go east until you get the umbrella- don't bother with the ball of paint for now. You can get it later and be much more convenient about it too. Once you have the umbrella, just leave. Heal yourself, and go to the "Fishing Hook" painting. Put the umbrella on the fishing hook. Then go back down to the southwest corner of the room. Take the yellow ball of paint.
Be Ib. Examine the fishing hook painting, then take the umbrella. Go back to the "Lady Without Her Umbrella" painting and give the umbrella to her. It'll start to rain.
Be Garry. Go back to the room of red gas (Exit D). The vase at the end of the room now has a little bit of water in it. Make your way down so you're directly east of the vase, then heal yourself. Keep going east. You'll reach a pull cord. Pull it, and the gas will go away. Take the violet ball of paint and heal yourself on the way out.
Walk in front of the library (Exit B). If you've found four balls of paint (green, blue, yellow, and violet have been available by this point) and turned off the gas, Garry should hear a sound and pause. Go back inside the library. The bookcase should now be moved, giving you access to the pink ball of paint. Investigate the bookshelves and read the last entry in the book about the paintings. Go outside. The creepy doll has moved next to the cold door. Read the message next to it, and search it. Take the red ball of paint. After the doll runs away, go through the cold door- it's now unlocked. You are strongly encouraged to save before you do this.
Take the white ball of paint. You can fail or succeed at this next part and the game goes on, but it'll have an effect on what ending you get. After you try to leave, there's going to be a timed event. If you want to fail, just wait the timer out. If you want to succeed, examine as many creepy dolls as you can as quickly as possible. Once you find the one with the key, get out as quickly as you can.
The key's location is randomized, but it doesn't show up in every possible doll.
Solution:
There are four different configurations for this room, each with a different set of doll positions.
This image shows the possible locations for dolls holding the key.
The color of the X indicates the color the doll is wearing. Not every doll shows up in every version, so if you can locate one or two of them, you can find the correct doll in just one or two guesses.
After Garry's timed event:
If you succeeded:
Exit C is now unlocked. Go upstairs. You'll automatically switch to Ib. Talk to Mary, then go follow her to the previous area. After you talk to her, go back. Mary will follow you, and you can talk to her if you want. Like when you got to talk to Garry, she has quite a few things to say and it might be interesting. Go through Exit A, now colorful, and get the key. The key unlocks Exit B. Go through, and you'll run into Garry. Once he's with you, go back into the main area.
If you failed:
You'll automatically be Ib. Go through Exit A, now colorful, and get the key. The key unlocks Exit B. Go through and downstairs, and you'll find yourself in Garry's area. Go through Garry's Exit E, to the cold room. Talk to Garry until he comes with you, you switch characters, or you get a premature ending, then go back upstairs.
If you're now somebody else, go through Ib's Exit D and down the stairs.
The way out is pretty straightforward.
Sketchbook:
Full Map
Limited Map
Note: The Full Map is censored to avoid a major character spoiler.
The red gas is gone from the upstairs, so go through the exit where the red gas used to be. Get Garry to move the statue, and go down. Keep going down, and then follow the pathway until you come to a crossroads.
Make a loop around the area, and take note of the scenery. In the center area, there's a vase (one use only) and a save point.
Examine the wall of the pink house in the center screen. Go to the center west screen and into the upside-down house (Exit F), and take the bucket from the closet. After the cutscene, leave the house and go to the northeast screen. Examine the lake and fill the bucket. Go to the southeast screen. You'll notice a small flower. Water it, then examine it and take the key. Go to the center south screen, and unlock the gallery with the key (Exit D). Go inside, open Pandora's box, and get the mirror.
Some things about the Sketchbook have changed. Look around each screen, and examine everything you can. Then, go to the northwest area, and examine the patch of light. You can talk to Garry if you'd like to, but when you're done, put down the mirror and melt the icy door.
Enter the formerly icy door (Exit A). You'll see a spiral of symbols and 8 buttons arranged in a square. Press the correct button for each symbol, from start to end of the spiral. Stepping on the wrong buttons will hurt you, so if you don't know what you're doing, it's best to leave, save, and come back again. Though there's a ticking clock noise, this event doesn't seem to be actually timed.
Hint:
Don't worry if you didn't quite catch the arrangement of the symbols when you opened the box. The buttons do not correspond to the original positions of the symbols.
What do they correspond to? Well, the arrangement looks kind of like a square grid. What else is a square grid?
The buttons correspond to the different screens in the town. Almost every screen now has some element of one of the symbols after the box was opened. You might need to figure out one or two by process of elimination, but most can be figured out just by some exploring.
Northwest screen:
You've probably noticed the spiral sun in the sky- it created the sunny spot you used to melt the ice.
North center screen:
There's a heart drawn on the door that wasn't there before you opened the box.
Northeast screen:
Examine the lake- the moon shows up reflected.
West center screen:
Examine the red butterfly. Garry notices it has an eye pattern.
East center screen:
There's a lone apple on the tree.
Southwest screen:
You can walk off the path to the west. When you do, a grinning mouth comes into view.
South center screen:
There's a spiral on the bulletin board.
Southeast screen:
I had to process-of-elimination this one, but it's the star. Could be that it's where you arrived when you first got into the Sketchbook, and there were stars along the path you took to get here.
Solution:
Press the buttons in this order: North center, west center, northeast, northwest, southeast, south center, east center, southwest.
This image shows the correct order in which the buttons should be pressed.
Take the key. Go to the north center screen (Exit B), and unlock the house. Save, and when you're ready, examine the Toy Box.
Last confrontation:
I had technical difficulties mapping this segment of the game, so no map this time. However, it's a very straightforward area.
You'll find yourself in the Toy Box, with no rose and no Garry. Garry's on the east side of the area. Your rose is sort of northwest, if it's there. Note the door at the north. Get Garry and the rose. A pink key will appear sort of down from where the rose was located, but find the save point and save before taking it. This is a very difficult section, so saving is really a good idea.
Depending on what happened to Garry in the cold room, there might be a key but no rose- if so, the key will be somewhere else, sort of south and west of Garry. Still, save before taking the key. If that's what happens, you'll get a cutscene before you get your rose back. Make whatever choice you want- it's not going to change anything.
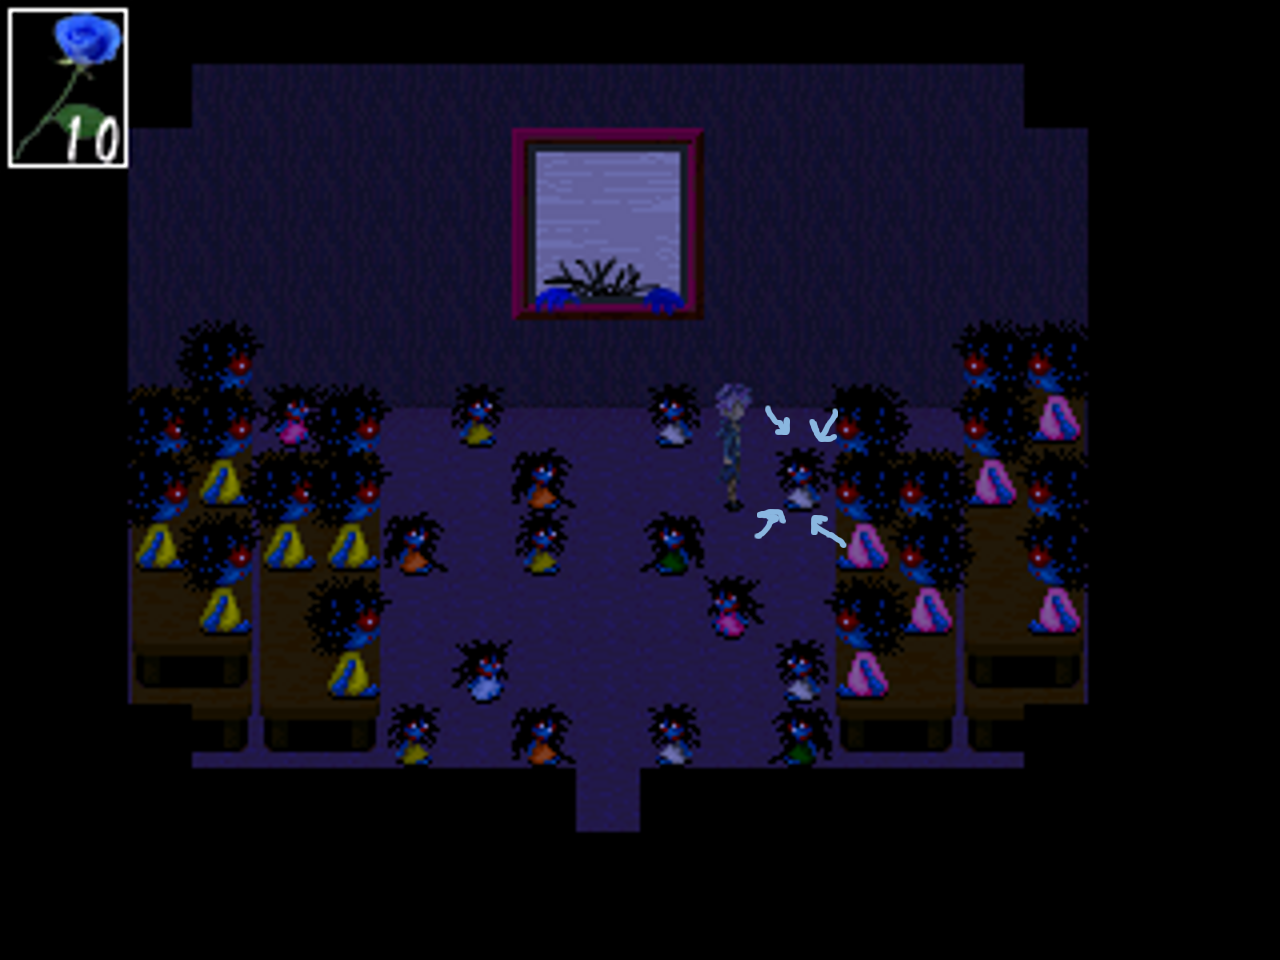
There is no vase, so don't bother looking. Once you take the key or once the cutscene is over, the room will darken, and everything will try to kill you. It helped me to try to lead them away and then head for the door, instead of just charging through the crowd. If you didn't get the cutscene, you'll have to do this with one hit point. It's challenging, but doable. You might want to switch to fullscreen if you usually play windowed, just for this part.
This image shows the basic idea behind how I escaped the Toy Box.
Follow the pathway until you come out in a pink room with an exit to the south, vines to the north, and a save point. If you don't have Garry with you currently, then you can just walk out of here now (but you can confront the antagonist if you want to, and you'll get a different ending.) If Garry's with you, then you'll have to confront the antagonist. If you're going for it, save first. It's not particularly difficult, but it's very easy to die.
Burn the vines to the north. If Garry is with you, just tell him to do it- he has a lighter. If he's not with you, go back to where you last saw him and take the lighter. The game will prompt you to eat your candy first- do it. Save once the vines are taken care of, then go north.
In the middle of the next room, you'll get a cutscene. As soon as it's over, you'll be charged. Prepare to run north immediately. Examine the painting as quickly as you can, then burn it.
After another cutscene, leave the room. If you have Garry with you, he might let you know that he's hurt. You can pick either option, but it changes the ending.
Finishing up:
Leave the building- you'll be back in the Sketchbook. If you haven't already used the center vase and you're running low on health, go ahead and do that now-- though nothing else can harm you for the rest of the game, unless you're planning to play the bonus dungeon. Go to the pink house in the center screen (Exit G). You'll have the pink key. Unlock it, and go inside. Go down the stairs until you arrive at a place that looks very much like the museum where you started.
Full Map
If you've completed the game before (and reached an ending where Ib escaped the museum), the bonus dungeon is now accessible.
Otherwise, explore the dark gallery and examine the paintings- if Garry's with you, you'll be able to see the words that Ib couldn't read, so while it's optional to look around, it's also pretty fascinating. Go to the long painting from the start of the game (upstairs, south center room) and examine it. You'll get a choice about what to do. You might want to save at the lobby first, if you want to see it both ways.
Aaaaaaaaaand... you're out! Or, you know, trapped in the museum forever, if that's the ending you got. If you're in the regular museum again, find Garry or your family, and you're done. Congratulations!
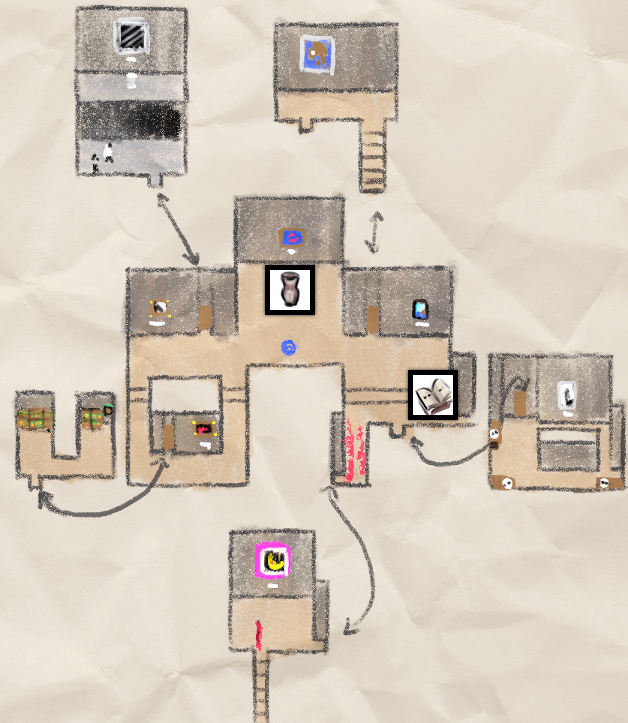
Bonus Dungeon: Orange Space
Full Map
Limited Map
If you've unlocked the bonus dungeon, there's now a staircase heading south just below the front desk at the dark gallery. Go down the stairs until you come out in a room with a vase. If you're still injured from the Toy Box sequence, go ahead and heal. Go south again, then in the next room, go around to the east and through the door north.
Go north again, and you'll come out next to a very large and very sleepy snake that blocks you from going west. Continuing up the stairs, you'll arrive at a hole in the floor that you can't cross. There's also another ant in this area, this time a white one. Talk to it.
The only place left to go is through the door heading east in the middle of the stairs (Exit B on the limited map). Inside, there's a room with a row of paintings with differently- colored frames.
Color note:
From left to right, the frames are these colors:
Red, blue, yellow, violet, green.
The painting on the right, of an anthill, can be detached and taken away with you. Carry it back to the ant in the main room, and examine the gap to place the painting across it. Once the ant is done going inside, you can cross.
There's a door behind the flowers (Exit A), but if you try to cross right now, the flowers will attack until you're dead. Instead, move around the room counterclockwise until you come to a pair of doors (Exits D and C). You can try to go into Exit D, but you won't be able to navigate in the dark right now. Go through Exit C.
Note the "Mistake" painting on the wall, and the snake's tail--you can pull it if you'd like. The snake won't wake up, and it'll make it easier to navigate the main room. To the north of the snake is the ant's home, which doesn't do anything, but it's cute. Go north. Swords will come down at you from the north side of the room. They only come from three different points, so it should be easy enough to stand between them and wait for the right time to run. When you reach the top of the room, step on the black rose to stop the swords.
To east is a painting of a blue sky, and to the west is a butterfly. Free it, then catch it. When you try to leave the room, the Mistake painting will jump out of the frame. Touching it will injure you, but the Mistake doesn't chase you, it just moves randomly. This can make it less dangerous than other paintings, but it's also more unpredictable. Carefully leave the room, and head to the northwest corner of the main map. The butterfly will approach the candle painting and light it. You can now remove the candle painting from the wall and take it with you.
Go back to the dark room (Exit D). It's difficult to navigate in there, but head directly to the center of the back wall and examine the white label. Hold up the candle and pull the switch. There's more to do in this room, though- there are six easels, each with a number and (stated) color. If you examine the white urn, it will break and partially block your path. You can still get everywhere you need to go, but it'll be a little more difficult, so just leave the urn alone.
This image shows the positions of the easels in the room.
Go outside and examine the clock. You'll now be able to input a five-digit number on the panel.
Hint:
You've found six numbers, all connected to a color. All you need to do is figure out which ones to use, and in what order.
Is there anywhere in this area that might show you which colors to use?
What about Exit B?
Solution:
The paintings in Exit B are ordered: red, blue, yellow, violet (and then green, before you moved the anthill painting.) Using the numbers from the easels, that would translate to:
72391
Now it's night, and the flowers are asleep, but the door behind them is locked. The ant is back in the main room. Talk to it again-- it's hungry and wants something to eat. It might take a few tries talking to it for it to tell you what it wants.
Hint:
Where can you find stars?
Maybe one of the paintings changed?
Solution:
The sky painting near the ant's home (through Exit C) is now a night sky. Shake it to get some stardust.
Avoid the Mistake, who can now leave the room he was previously stuck inside, and feed the ant. It'll give you the key, and you can be on your way. Go past the flowers through Exit A, up the stairs, and then down the other set of stairs at the top.
Bonus Dungeon: Abyssal Space
Full Map
Limited Map
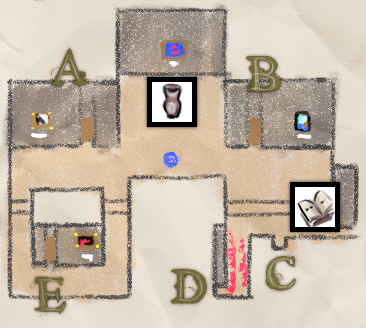
Go down the stairs on the west side of the room, east, and out the other side. You'll come out in a large room with seven exits, and some very strange sculptures. Near the blue one with the glass is a piece of a painting. Collect it. Found painting pieces go to the large empty painting on the north wall. You'll need to find 12 of them.
Note the vase- that's the only one you'll have for the rest of the game, and some of these areas can kill you easily. Fortunately, there's a save point right there. If there's ever a time to save frequently, it's now-- and you might want to get in the habit of reverting to previous saves when you lose a lot of health.
You don't have to go through the rooms in exactly this order-- this is just a way that I found efficient. It's probably a good idea, however, to save Exit D for last.
Go through the door right next to the save point (Exit F). You'll come out in a maze of cacti. If Garry is with you, read the sign. Take Garry up on his offer. He has more health than Ib, and if he survives at less than full health, it's not going to be relevant for the rest of the game. However, if Garry dies here, you still get a game over, and you cannot use this event to kill him for a different ending.
When you get about a third of the way across the room, the colors on the painting will come out and start chasing Garry (or Ib, if you don't have Garry with you or if you chose to go together). Stepping on the black rose at the far right side of the room will destroy the attacking colors, so head for the rose and ignore the first painting piece on the path. Get the painting piece that's directly in your way, and step on the black rose. Then, carefully make your way out, collecting the second painting piece along the way.
Next, go through the exit next to the vase (Exit G). Be careful-- touching the red stick figures will hurt you. Go south, and examine the book. Your goal in this area is to catch 18 black stick figures while avoiding the 2 red ones. The red ones can sort of look like an overlapping black and red stick figure, but they're not. It's impossible to get a situation where a red and black stick figure get stuck moving together. Note that one stick figure is riding a bird. The bird rider needs to be examined to be caught, but for everybody else, you just have to touch them. Some of the stick figures are a little faster than Ib, but they're not very good at running away from her, so don't be intimidated by their speed. Once you've got them all, examine the book again, and choose to put the stick people back inside. Examine the book once it closes, and Garry will ask to take a break. But we're not taking a break quite yet-- search the room to find two painting pieces, and approach the bird. It should start following you, and when you leave for the main room, it should come out beside you.
Go through the door on the east wall (Exit E.) You'll come out in an endless corridor. According to the paint on the wall, "the way will be shown to those pure of heart." If you've rescued the bird, it'll follow you into the corridor, walk in a strange pattern, and then scamper out of sight.
Hint:
You've saved the poor creature from being ridden around by a mob of crazed stick figures. Maybe that qualifies you for having a pure heart.
Note the bird's movements.
Solution:
Stand in the bird's starting position and copy its movements. They are:
Two steps east, one step south, one step east, two steps north, two steps east, one step south, two steps east. It can be a little bit tricky to take just one step at a time, so if you get it wrong, keep trying.
This image shows the correct path to walk.
When you get to the other side, examine the bird painting and a painting piece will appear. Take it, and go back to the main room.
Next, go through the door on the west wall (Exit A). All the paintings in this room are the same, but only one moves. Find the moving painting and point to it. If you're playing in windowed mode, you might want to switch to fullscreen to better see the animation.
Which painting moves is randomized, but not every painting will potentially be a moving one.
Solution:
The moving painting will either be on the south set of paintings, in the top row, fourth from the right; on the north set of paintings, in the middle row, third from the left; or on the north set of paintings, in the top row, fourth from the right.
This image shows which paintings can move.
Point to the moving painting, collect both painting pieces from the room, and go back out to the main area.
Go through the west cyan door (Exit B). If Garry mentioned being tired before, he'll take a rest now. Examine the bookshelves. In the southwest group of bookshelves, the middle shelf gives you a painting piece.
Talk to Garry until he falls asleep, then try to leave the room. The curtain falls off the painting, but Ib can't understand the title. Examine the bookshelves again. In the northwest group of bookshelves, the shelf on the very left will tell you how to enter the Secret Room. Read both how to enter the Secret Room, and the other pages, which tell you how to exit the Secret Room.
Follow the trail of clues until you reach the canvas, then examine it and choose to close your eyes and count to three. A cord will come down from the ceiling. Pull it, and you'll find yourself in the Secret Room.
There's a screen in front of you where several animals and objects pass by. The middle label says "XXX Crows and Five XXX". On the left panel, you can enter a number, and on the right panel, you can enter a word.
Hint:
Start with the crows. Each crow is unique, in size, pose, or position.
When you've figured out how many crows there are, pick the most memorable crow and use it while you count the other objects to measure the start of a new loop.
Solution:
There are three crows.
And five fish.
Enter the correct number and word. Be careful-- wrong answers will hurt you. When you're done, examine the middle label again to get a painting piece. Then, follow the book's directions to leave the secret room.
You should have read the rest of the book.
Really.
But if you didn't, examine the southeast corner and press the switch.
You'll be transported back to the room with Garry, who's now awake. Go back to the main area. The remaining door (Exit C) is locked, so go up the stairs (Exit D). Turn the corner and go west. You'll be in a room with a hole in the floor and the Mistake painting on the wall. Get the painting piece, and examine the hole. It doesn't matter which option you pick, you'll be going down anyway.
The Mistake will fall into the room with you. Unlock the door. You'll be back in the main area, and you now have access to the east door (Exit C). Unfortunately, the Mistake will now start roaming the main area. Save if you want to and heal if you need to, then dodge the Mistake and go back though Exit B. Examine the treasure box from the side, and tell it you want its treasure. It'll direct you to the wall puzzle: "Which heavenly bodies weren't there?"
Hint:
That's right, you need to drop yourself through the hole until you've figured out which objects don't show up during the fall.
The solution is not randomized, so you can save, drop yourself down the hole as many times as you want, and not have to worry about losing health.
It helps to look for one or two objects at a time instead of trying to memorize all of them at once.
Solution:
Out of the choices on the left, the big, smooth, bright reddish orange sphere wasn't there during the fall. Out of the options on the right, the small, shiny, dark green sphere didn't show up, either.
Select the correct heavenly bodies, and examine the treasure box again. Get the painting piece, and go back out into the main area.
You should have all 12 painting pieces by now, and a complete picture on the north wall. If you're still missing any, there was one in the main area, two in the cactus maze (Exit F), two in the stick figure room (Exit G), one in the endless corridor (Exit E), two in the room with the identical paintings (Exit A), one in the library (plus another one in the secret room)(Exit B), one by the hole up the stairs (Exit D), and one in the treasure box (Exit C).
Examine the complete painting, and go up the new set of stairs. In the next room, place your rose in the vase, then move the table with the vase out of the way. If Garry isn't with you, you can sleep on the bed...
But if you haven't saved recently, it might not be a good idea.
Otherwise, if this is your first time through, open up the chest at the north side of the room to get the Black Key, which lets you enter the bonus gallery. Go through the north passageway to end up back in the dark gallery. Finish up the game as usual... but be aware that you can only access the bonus gallery and save your progress if you get an ending where Ib escapes the museum.
Posted by: Alice |
April 2, 2013 3:21 AM
|
April 2, 2013 3:21 AM
Endings Guide:
A note on the endings guide, and how endings work in Ib:
Being an endings guide, this is full of spoilers for everything. I'm assuming here you've played through to an end at least once, and this still will probably spoil you for other paths.
The endings in this game, for the most part, are controlled by counters rather than single decisions-- for example, developing a friendship with Garry isn't a matter of taking his side in some big, dramatic choice, it's determined by whether you got Ib and Garry to have enough little moments together over the course of the story. Several different variables affect the endings, covered in-depth in the "Variables" section. Looking at "How to get it" for an ending will show where the counters need to be, and also any other requirements.
Variables:
Garry Friendship Count:
Whether or not Ib becomes friends with Garry. If you want to raise this counter, talk to him when you take breaks, see as many things together as possible, and try to be helpful when he's afraid.
Specific actions that raise the Garry Friendship Count are:
Examining the poster in the northwest corner of the maze room (Exit A in the first area of Gray Space), choosing to stop Garry in the mirror room (Exit D in the second area of Gray Space), giving Garry his coat back (after Gray Space), talking to Garry 7 times or more on your first break (after Gray Space), reading the book in the roped-off trap area (in Violet Space), examining the white painting (in Violet Space), speaking up when the lights go out (in the northwest room of Violet Space), talking to Garry 6 times or more on your second break (in the sunny spot in the Sketchbook), and speaking up when Garry talks to you in the Toy Box.
Mary Friendship Count:
Whether or not Ib becomes friends with Mary. If you want to raise this counter, show concern for her, talk to her when you can, and always take her side.
Specific actions that raise the Mary Friendship Count are:
Asking Mary if she's okay when you bump into her (in Violet Space, but you only get the choice if your Despair Count is currently at 2), saying something positive about Red Eyes (in the rabbit room, early in the first map of Violet and Brown Space), agreeing with Mary after the Flowers of Jealousy event (early in the first map of Violet and Brown Space), telling Mary you want to leave with her (on Ib's path, late in the first map of Violet and Brown Space-- but this conversation doesn't always happen), and talking to her 7 times or more when she follows you (in Ib's side of the second part of Violet and Brown Space)
Garry Rose Count:
Whether or not Garry loses his rose in the Toy Box. If you want to raise this counter, get Garry to lose his composure, make him a target, and don't be too careful around gallery objects yourself.
Specific actions that raise the Garry Rose Count are:
Choosing not to stop Garry in the mirror room (Exit D in the second area of Gray Space), dropping a mannequin into the cord room by pulling the wrong cord (on Garry's path, late in the first map of Violet and Brown Space), telling Mary you want to leave with Garry (on Ib's path, late in the first map of Violet and Brown Space-- but this conversation doesn't always happen), getting violent towards the doll (on Garry's path, late in the first map of Violet and Brown Space), breaking all the mannequin heads in the rain room (in Ib's side of the second part of Violet and Brown Space), and failing Garry's timed event (in Garry's side of the second part of Violet and Brown Space). Failing Garry's timed event raises the count by two points instead of one.
Despair Count:
Whether or not Garry and Ib fall into despair after Garry's timed event. If you want to raise this counter, get both of them to see something especially disturbing, and push Garry close enough to the breaking point to tip him over.
Not technically a variable within the innards of the game, but it behaves enough like a variable from the outside that it's easiest to treat it as one.
Specific actions that raise the Despair Count are:
Seeing the disturbing painting of Ib while searching for the stick figure (in Yellow Space), seeing the message behind the poster (Exit C in the second area of Gray Space, but only after the mirror room event in Exit D, and only if you chose not to stop Garry), and failing Garry's timed event with your Garry Rose Count over 5, counting the failure itself (in Garry's side of the second part of Violet and Brown Space.)
Endings:
Ib All Alone:
What happens:
Instead of going back into the real world at the end, Ib chooses not to jump through the painting and stays in the world of the gallery. There are several variations- this ending is available whatever path you're on, and different things cause Ib to stay or go. A more detailed version shows up in the bonus dungeon, where Ib goes to sleep and thinks about her family... but only if Garry isn't there with her.
Requirements:
Ib and Garry make it out of the doll room.
Ib doesn't make it out of the museum.
How to get it:
Have a Despair Count of less than 3.
Don't jump through the painting at the end, OR choose to sleep in the black bed at the end of the bonus dungeon, after a playthrough where your Garry Rose Count reached 3 or more.
Forgotten Portrait:
What happens:
Ib gets out of the museum alone, but Garry gets left behind, probably dead. Ib sees a portrait of Garry in the gallery, where "The Hanged Man" used to be displayed, but doesn't remember anything about him or their journey.
Requirements:
Ib and Garry make it out of the doll room.
Garry loses his rose.
Ib defeats Mary.
Ib makes it out of the museum.
How to get it:
Have a Despair Count of less than 3.
Have a Garry Rose Count of 3 or more.
After the Toybox event, confront Mary before you leave the Sketchbook.
Jump through the painting at the end.
Together, Forever:
What happens:
Ib gets out of the museum, and Mary follows her. Back in the real world, everyone believes that Mary is Ib's sister, and has been there all along- even Ib herself. Ib still has the lighter or candy, but Mary quickly takes it away. It ends on a picture of Ib and Mary holding hands.
Requirements:
Ib and Garry make it out of the doll room.
Garry loses his rose.
Ib leaves without defeating Mary.
Ib makes it out of the museum.
How to get it:
Have a Despair Count of less than 3.
Have a Garry Rose Count of 3 or more.
After the Toybox event, leave the Sketchbook without confronting Mary.
Jump through the painting at the end.
Memory's Crannies:
What happens:
Ib and Garry both make it back to the real world, but with their memories gone. They meet again and feel like they know each other, but there's no evidence to support this and it's just too strange. They part, and Ib goes home with her family.
Requirements:
Ib and Garry make it out of the doll room.
Garry keeps his rose.
Ib and Garry aren't friends, OR Garry doesn't have a way to remember Ib.
Ib makes it out of the museum.
How to get it:
Have a Despair Count of less than 3.
Have a Garry Rose Count of less than 3.
Have a Garry Friendship Count of less than 8, OR don't choose to give Garry your handkerchief when prompted.
Jump through the painting at the end.
Promise of Reunion:
What happens:
Ib and Garry both make it back to the real world, but with their memories gone. They meet again and feel like they know each other. It's almost just too strange, but then they discover evidence that they were friends and that their experience in the gallery was real. They remember everything, and decide to meet up again later.
Requirements:
Ib and Garry make it out of the doll room.
Garry keeps his rose.
Garry and Ib are friends.
Garry has a way to remember Ib.
Ib makes it out of the museum.
How to get it:
Have a Despair Count of less than 3.
Have a Garry Rose Count of less than 3.
Have a Garry Friendship Count of 8 or more.
Choose to give Garry your handkerchief when prompted.
Jump through the painting at the end.
A Painting's Demise:
What happens:
Ib and Mary find Garry in the doll room, and no matter what they do, they can't bring him back to reality. This is the last straw for Ib, and she breaks down and joins him. Mary tries to persuade Ib to leave, but despite her efforts, Ib won't even respond. Finally, Mary decides to leave on her own. She escapes to what looks like the regular gallery, but she can't leave, and the museum itself turns on her.
Requirements:
Ib and Garry don't make it out of the doll room.
Ib and Mary aren't friends.
How to get it:
Have a Despair Count of 3.
Have a Mary Friendship Count of less than 4.
Welcome to the World of Guertena:
What happens:
Ib and Mary find Garry in the doll room, and no matter what they do, they can't bring him back to reality. This is the last straw for Ib, and she breaks down and joins him. Mary tries to persuade Ib to leave, but despite her efforts, Ib won't even respond. Finally, Mary decides to leave on her own... but remembering her friendship with Ib, she turns around and decides to stay. She throws a party with the creepy dolls and mannequins, announcing Ib and Garry as her new friends and hoping they can play lots and lots forever and ever. Ib and Garry are still traumatized and unresponsive.
Requirements:
Ib and Garry don't make it out of the doll room.
Ib and Mary are friends.
How to get it:
Have a Despair Count of 3.
Have a Mary Friendship Count of 4.
Posted by: Alice |
April 2, 2013 1:46 PM
|
April 2, 2013 1:46 PM