

The Cross Formula
Platform: Mac, Windows

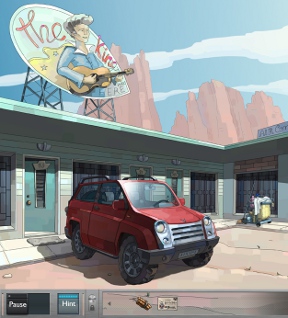
![]() Upon awakening in a run-down motel room, you hear a beeping sound. It seems to be coming from a tablet on the table across the room. A creepy message tells you the police are after you, to wash your face and get out. How did you get to the back end of nowhere, and what did you do to set the police on your trail? That's the set-up for a great new point-and-click adventure title, The Cross Formula from KatGames, developers of the popular Dream Chronicles series.
Upon awakening in a run-down motel room, you hear a beeping sound. It seems to be coming from a tablet on the table across the room. A creepy message tells you the police are after you, to wash your face and get out. How did you get to the back end of nowhere, and what did you do to set the police on your trail? That's the set-up for a great new point-and-click adventure title, The Cross Formula from KatGames, developers of the popular Dream Chronicles series.
 As you retrace your steps from the week before, you begin to get clues as to who you might be and why you are on the run. Some unknown Big Brother controls the tablet that guides you, providing you with information — and warnings — along the way. Certain sights and sounds will trigger blackouts as you travel, and suddenly you are trying to figure out a piece of the formula you're searching for. What the formula might be, and what it has to do with you, are slowly revealed throughout the game.
Everything plays out in a very adventure-oriented kind of way. Items can be examined, taken, or otherwise interacted with by a simple click of the mouse. You can move to new areas by clicking certain parts of the screen, and a hint button at the bottom of the screen nudges you in the right direction if you're stuck. Your inventory also plays an important part in the game, both in terms of the story and with various puzzles you'll encounter as you progress.
 Analysis: Adventure games are just about the keenest thing ever, but sometimes the puzzles are too obtuse for a casual player to solve without consulting a walkthrough. Difficult riddles are one thing, but spending your time trying to figure out what the puzzle designer was thinking so you can follow that twisted line of thought is another thing entirely. The Cross Formula elegantly sidesteps that problem with sensible item usages and story outcomes that never leave you in the dark.
The beautiful pastel hand-drawn art is rich in detail, from the torn wallpaper in the motel room to stains on the ceiling tiles in the lobby. Set in the deserts of New Mexico and Arizona, the artwork draws on the color palette of the region, washing everything in bright white sunlight. Little touches add especial beauty to each scene, like the wind blowing outside the window of the motel lobby, or the sunshine streaming through rooftop windows in an underground bunker.
Sometimes, the map jumps you'll make are a bit disorienting, especially if you're familiar with the part of the world the game takes place in. One moment you're near Albuquerque, New Mexico, then you're in Arizona before suddenly hopping back to a mountainous region in southern NM. Fortunately, very little else pulls you out of the game's world, as even the mini-games fit the storyline. The high number of clickable objects is also a plus, even if it just provides you with a little information and isn't directly related to the tasks at hand.
In the end, no matter how gorgeous a game is or how good the gameplay, if it's over too soon, it's easy to feel cheated. The Cross Formula is a lengthy adventure, requiring two, three, or even four sittings to complete, even for the pickiest and most experienced of adventure nuts! It's a refreshing change of pace from the glut of hidden object adventure games that are flooding the market, from the artwork to the sound design and smartly-built puzzles. A great, unassuming game that will take you by surprise!
![]() Windows:
Windows:
Download the demo
Get the full version
![]() Mac OS X:
Mac OS X:
Download the demo
Get the full version


Walkthrough Guide
(Please allow page to fully load for spoiler tags to be functional.)
The Cross Formula walkthrough
General Info
In the main menu, you can start a new game, select options, change your player profile, read instructions, or quit.
Options include fullscreen or windowed mode, custom or default cursor, game difficulty, and volume options.
Pick a difficulty level when you start a new game, or change it in the options menu.
Casual mode features a hint system and a tooltip system for items, and you can skip puzzles.
Expert mode doesn't have a hint or tooltip system, but you can still skip puzzles.
Challenge mode offers no hints, tooltips, or puzzle skipping.
In the main game, the pause button is in the bottm left corner. Here you can view the options menu or return to the main menu.
Once you pick it up, the Tablet is in the bottom right corner. Here you can view missions, locations, and bits of the formula to solve (see Flashback Puzzles below). You will also get periodic instructions from your tablet for what to do next.
Your cursor changes into a gear when you can interact with a scene, a magnifying glass when you can zoom in on something, a speech bubble when you can speak with someone, and a directional arrow when you can move to a new scene.
Your inventory is at the bottom. Click an inventory item, then click on a scene to use it. Use the scroll arrows on the left and right to see items out of view.
If you have an item someone needs, talk to them instead of using the item with them, unless they ask for it.
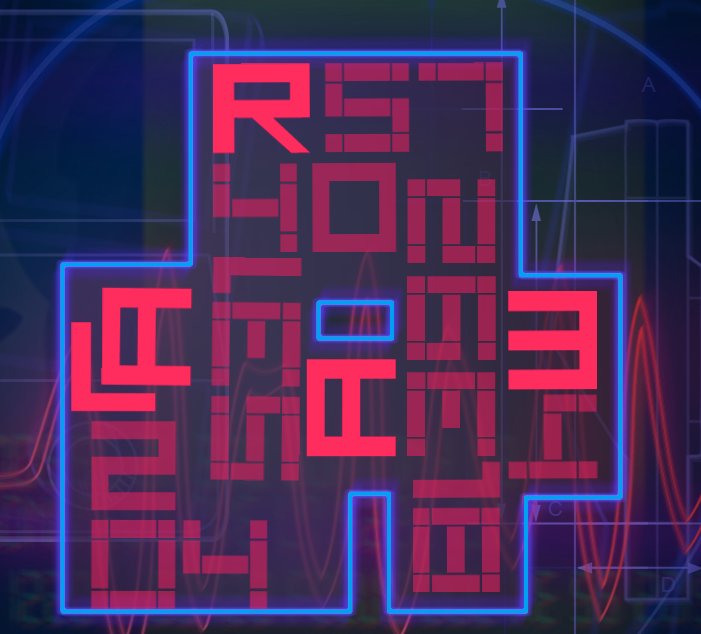
Flashback Puzzles
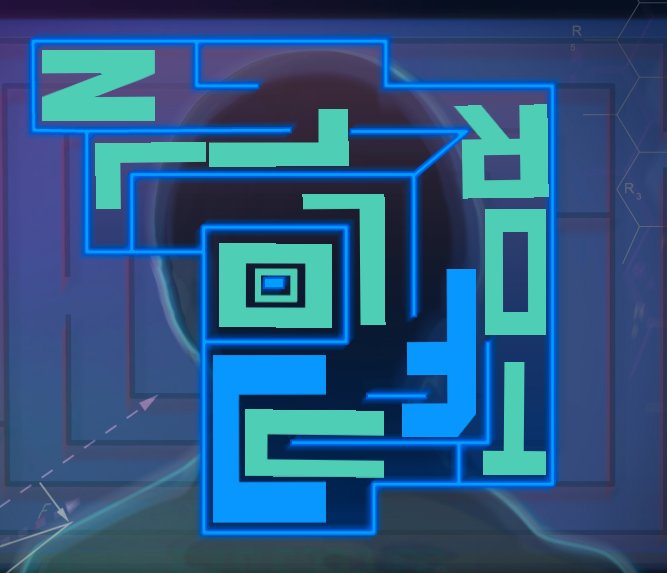
Throughout the game, Mark will experience flashbacks, which manifest as flashback puzzles.
Drag the letters and other shapes so they fit inside the highlighted areas without overlapping. You can also rotate pieces so they fit.
When the cursor is a hand, you can click and drag to move a piece.
When the cursor is a circular set of arrows, you can click and drag to rotate the piece.
When a piece glows and the game chimes, it means you have legally placed the piece. It does not necessarily mean you have placed the piece correctly.
For some puzzles, multiple solutions may be possible.
If you have trouble with the puzzle, just hit "back" so you can revisit it later.
You can check out all your flashback puzzles from your Tablet, via the Formula menu. Click a symbol to resume an incomplete puzzle. Gray symbols are complete, while white symbols are incomplete.
Main Walkthrough:
The King
Escape the Room
Pick up the flashing Tablet on the desk. Read the note.
Open the door on the far left. Click the sink to run it. Note the code on the mirror.
Click the briefcase at the foot of the bed. Enter the code.
7492
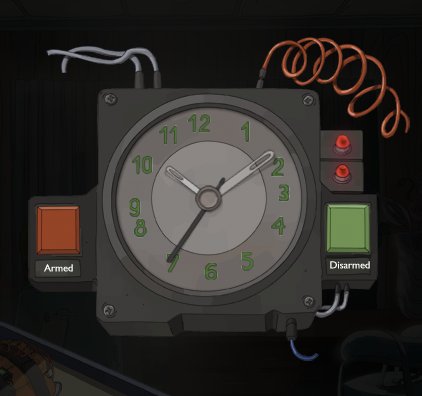
Click again to open it, then click on the bomb.
Click and drag the numbers to arrange them as though they were a clock face. They'll turn green when they're properly positioned.
Solution
Once the bomb is diffused, you'll keep the Dynamite for your inventory.
Click the file folder the bomb was under to get the Ticket, then take the Key to Room 13.
Click away to zoom out from the briefcase. Click the drawer of the nightstand on the far right, then click again to get a Coin (1).
Click the note on the minifridge to read it. It's a receipt for Room 13.
Use the Room Key on the door, then click to exit.
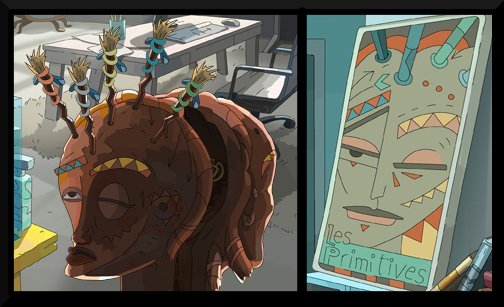
The Office
The car is locked, and the dog won't let you in the office. Instead, zoom in on the cleaning cart (between the car and the office door) and take the Minibar Key hanging from the right.
Go back to the room and use the Minibar Key on the lock on the fridge. Grab the Beef Jerky from inside.
Go back outside, click the dog to get its attention, the give the Beef Jerky to the dog. Enter the office.
Click the newspaper on the counter for a clue to the story.
Click the short door (with the UFO poster) to go behind the counter, then click the security camera for some privacy.
Take the Fuse from the short shelf under the bulletin board.
Click the door to the back to open it, then click the fuse box.
Use the Fuse in the open spot.
The TV triggers a flashback puzzle (see Flashback Puzzles above for how to solve).
Solution
Now that there's power, click the gray lockbox on the short shelf under the bulletin board, then click again to grab the Car Key.
Go outside and use the Car Key on the car. Click the car to enter.
The Car
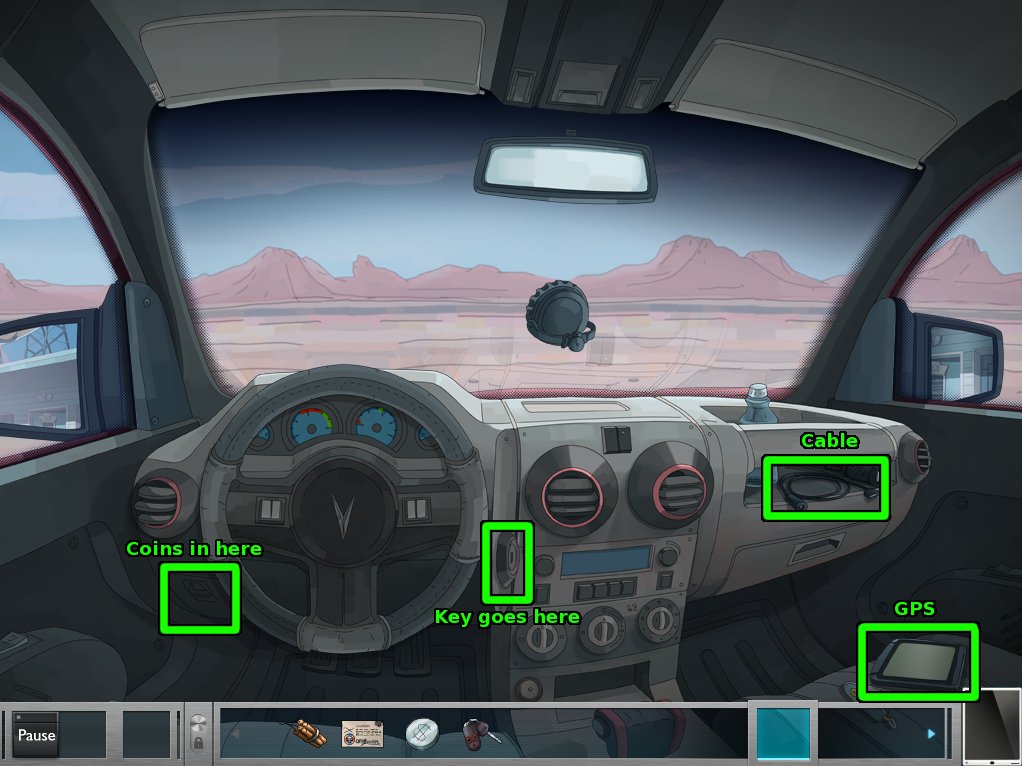
Open the compartment to the lower left of the steering wheel. Click the candy bar to eat it if you want, then take the Coins (2).
Click the water bottle on the right to drink if you want. Take the nearby Cable and the GPS on the passenger seat.
Screenshot
Use the Car Key on the key slot to the right of the steering wheel (You can change radio stations by clicking the buttons on the center console).
Mount the GPS on its spot in the middle of the windshield. Use the Cable on the right side of the GPS, then click the GPS to use it.
Push the button on the right to retrace your steps.
The Gas Station
Pay for Gas
Zoom in on the newspaper boxes to read more about yourself.
Talk to the attendant. Ask about who you are. Have him fill up the car for you.
You are now a debtor, but the door to the diner is now open; enter it.
After talking to Rachel, take the Plug from the far end of the counter (to the left of the cash register), then use it on the outlet near the jukebox.
Click the jukebox to open it, then click again to zoom in.
You need another doll. Click to zoom out, then go outside. Use one of your Coins (from the nightstand in the motel room, or from the compartment in your car) on the "Rock & Roll" vending machine. Take the Doll from the dispenser.
Go back inside, zoom in on the jukebox, and use the Doll on the middle spot to start a minigame.
Hit the "Start Music" button. Click the button for each animated silhouette so the doll below it performs the same dance move. The solution is random.
This puzzle is all about timing. You can try to watch both the silhoutte and doll animations to determine how the animation starts and base your timing that way. You may also have luck by just pushing the button as much as you can.
If the music stops, you have to hit the "Start Music" button again and start the puzzle over. Match all three dancers, and you fix the machine.
For your mechanical wizardry, Rachel pays you Cash ($200).
Go outside and use the Cash on the attendant.
Make Repairs
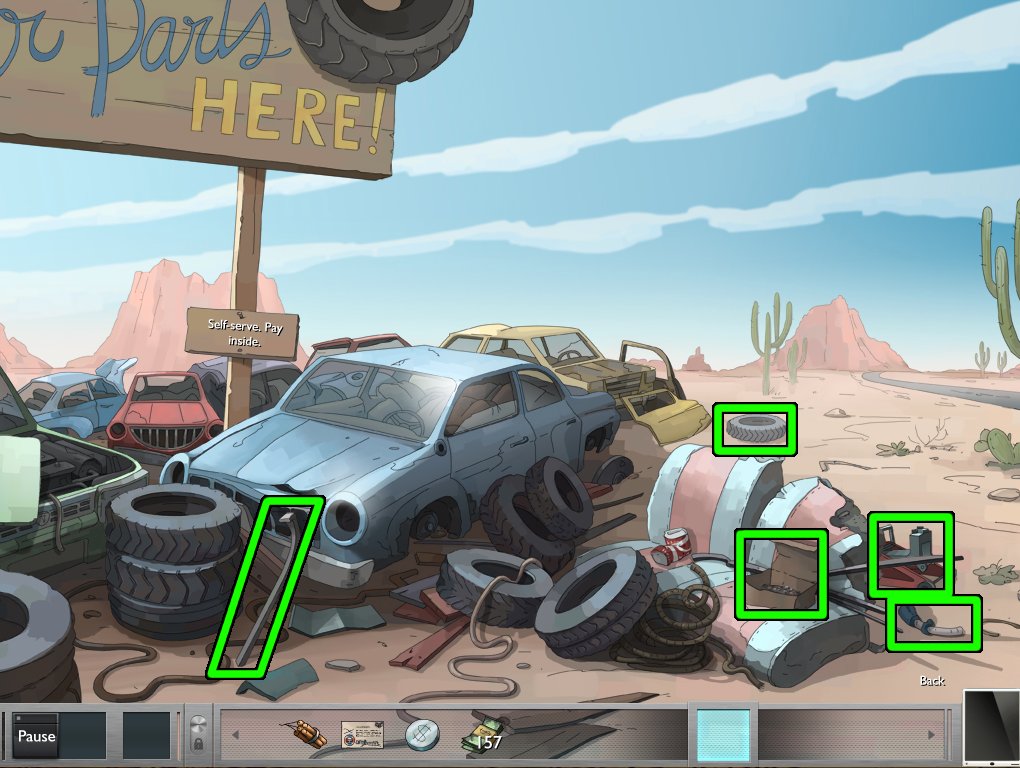
It's not your best day. Click the "Scrapyard" sign to go to the scrapyard, then grab the Crowbar, Fuses, Hose, Tire, and Carjack.
Screenshot
Click the "back" button, then use the Carjack on the driver's side tire car. Use the Tire to change it.
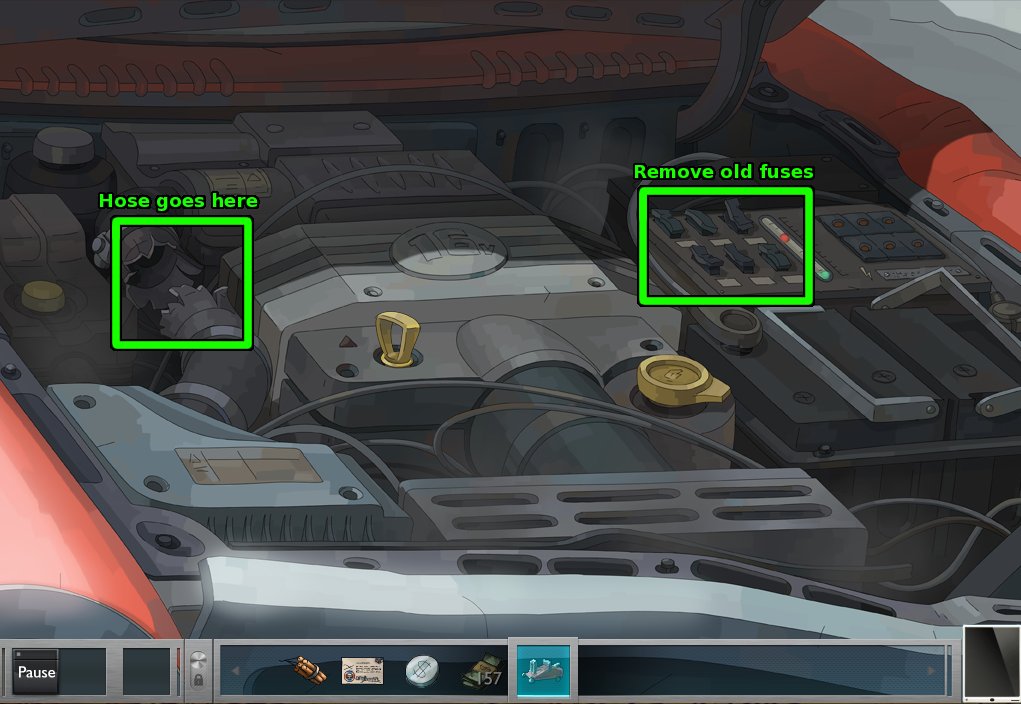
Use the Crowbar on the hood of your car. Click again to take a look.
Note the broken hose in the upper left. Use the Hose on the broken hose to replace it.
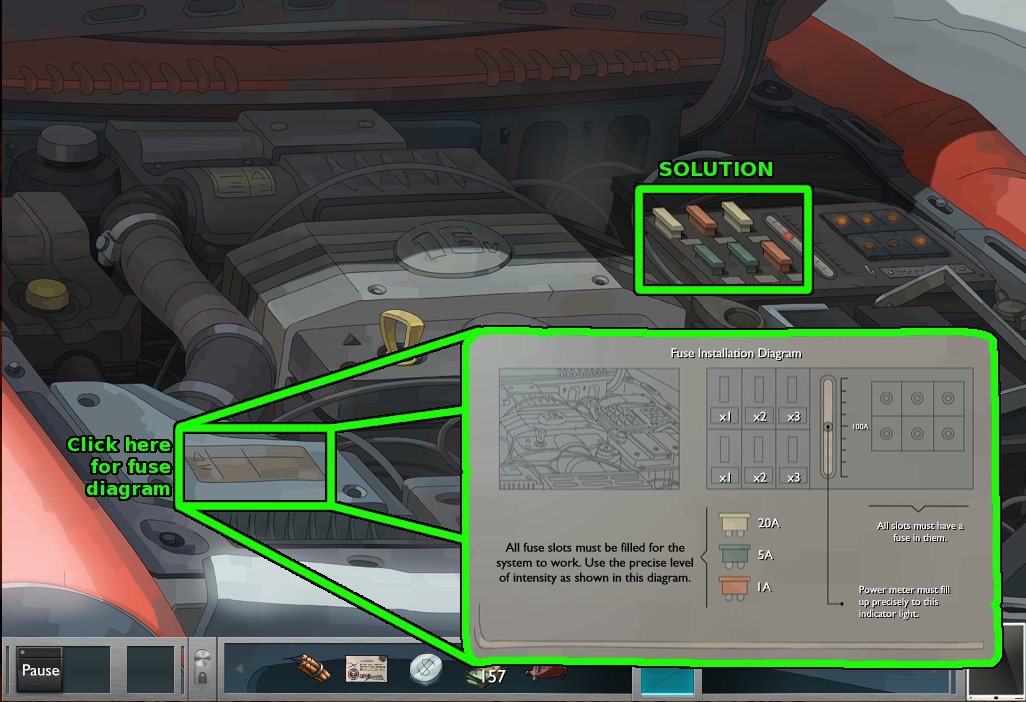
Click the broken fuses on the battery to remove them. Check out the fuse diagram in the lower left for a guide on how to replace them.
Screenshot
You need to fill the gage to 100A.
Use the Fuses from your inventory in the fuse slots. Red fuses are 1A, green 5A, and yellow 20A.
Slots in the first column multiply the amperage x1. The second column is x2, the third x3.
Focus on the red fuses first. The amperage you need and the other fuses are multiples of 5, so you need the red fuses to also equal 5.
First put one red Fuse in one of the x2 slots and the other in one of the x3.
Then fill in the other slots according to the screenshot. This is just one possible solution: The row for each fuse doesn't matter, only the column.
Solution
Give the attendant more Cash. He tells you to talk to the waitress again.
Sweepstakes and Flashbacks
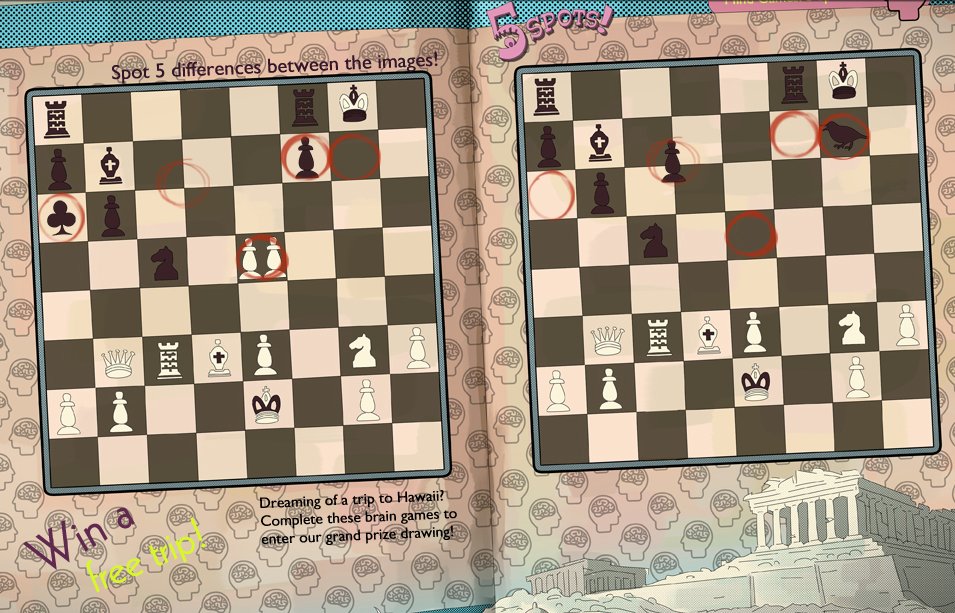
Go inside and talk to Rachel. Ask her about her sweepstakes and offer to help. Help her complete the Spot the Difference game. The solutions are random but pretty easy. Click a spot on either side to mark it. Incorrect clicks won't leave a mark.
An example solution is shown below.
Spot the Difference example 1
Another flashback puzzle (see Flashback Puzzles above for how to solve):
Flashback solution
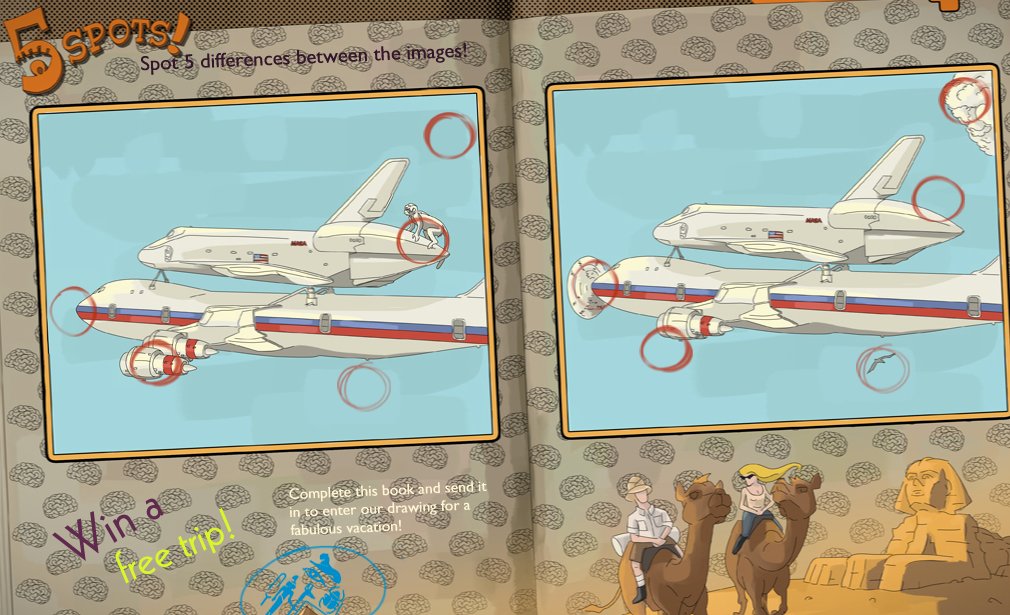
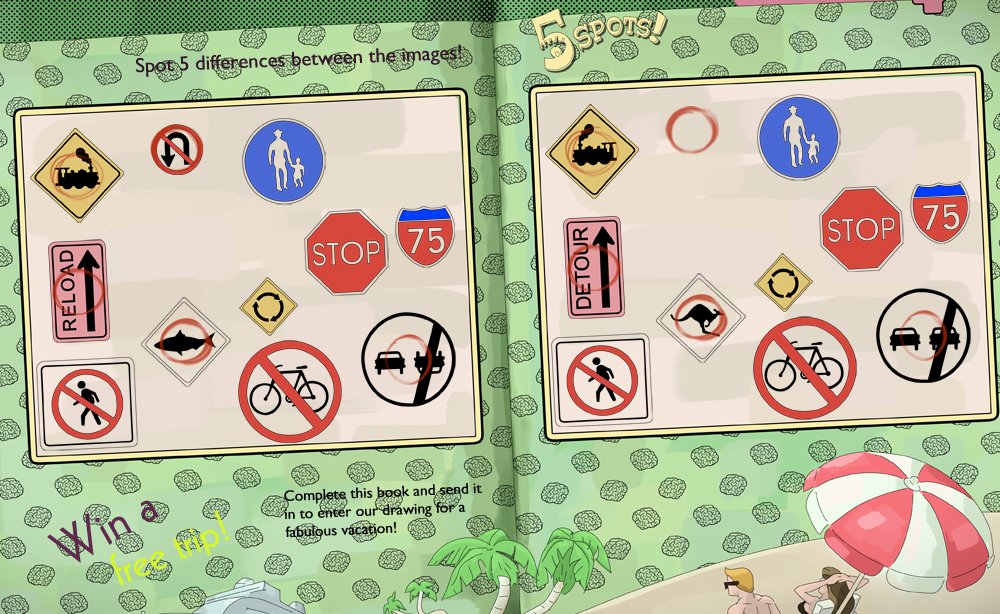
There are two more spot-the-difference puzzles to solve: Example solutions are shown below.
Spot the Difference example 2
Spot the Difference example 3
Finish the conversation with Rachel, go outside, and get in the car to go to Dolin's place.
Dolin
Running Errands
Talk to the man with the cast. It's Dolin: ask if there is anything you can help with.
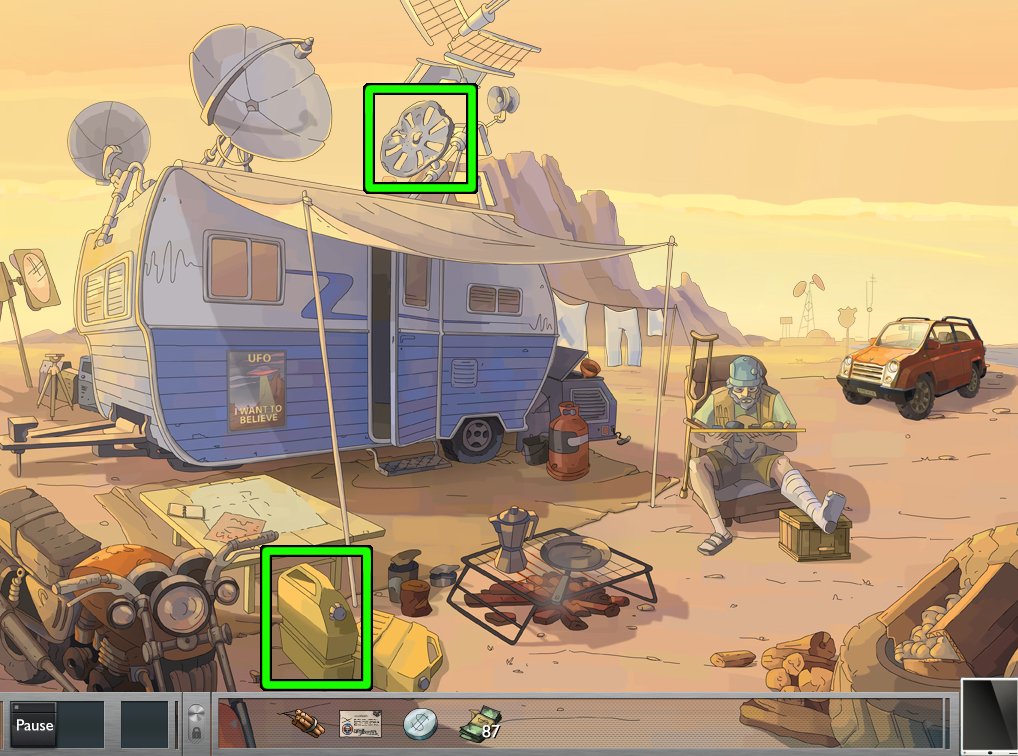
Grab the broken Satellite Dish from the roof of the trailer and one of the yellow Gas Cans near the motorcycle.
Screenshot
Get in the car to go back to the gas station.
Talk to the attendant and ask him for gas. Give him the Gas Can.
Ask him to fix the "Satellite Dish", then give it to him.
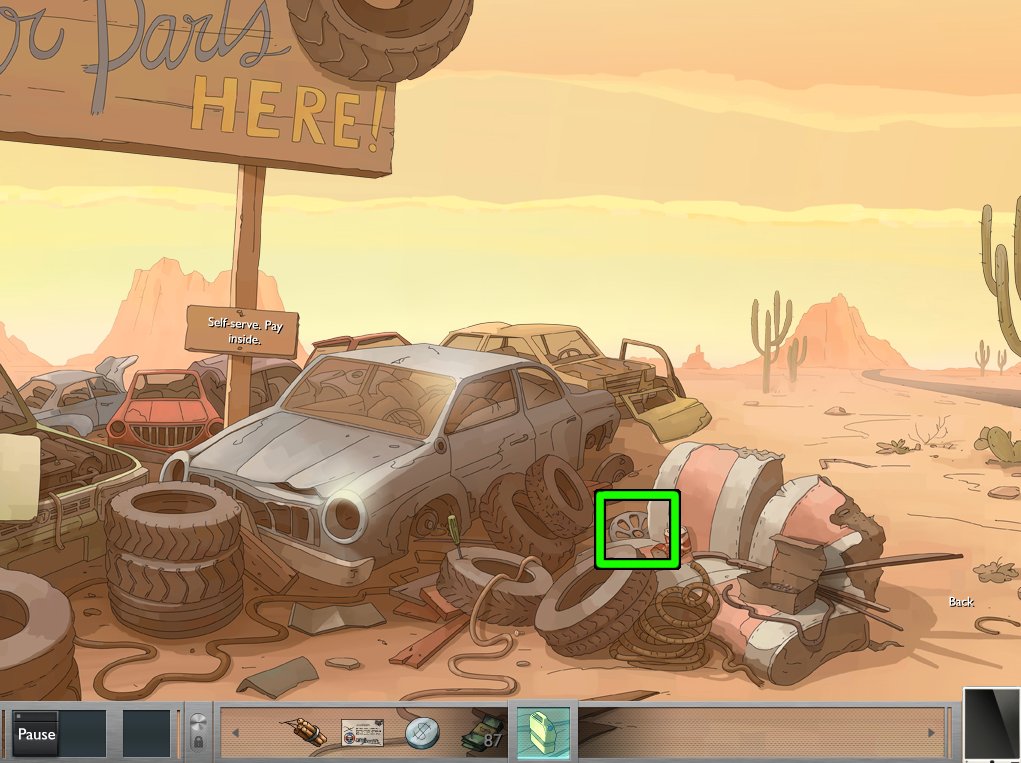
Click to "Scrapyard" sign to go to the scrapyard. Grab the Hubcap, between the car seat and the tire pile.
Screenshot
Go back, give the attendant Cash, then get in the car to head back to Dolin's.
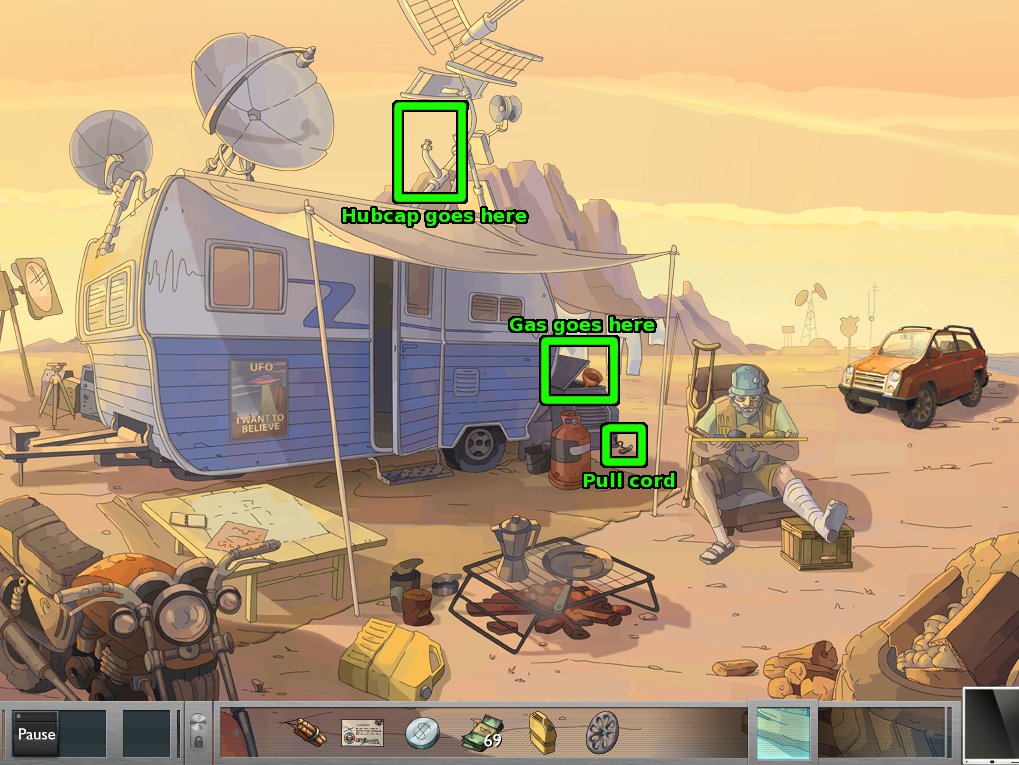
Put the Hubcap back in its place. Use the Gas Can with the generator to the right of the trailer, then pull the cord to start it.
Screenshot
Assembly Required
After talking to Dolin, go inside the trailer and grab the Blueprint from the desk on the far right.
Go outside and use the Blueprint on the table.
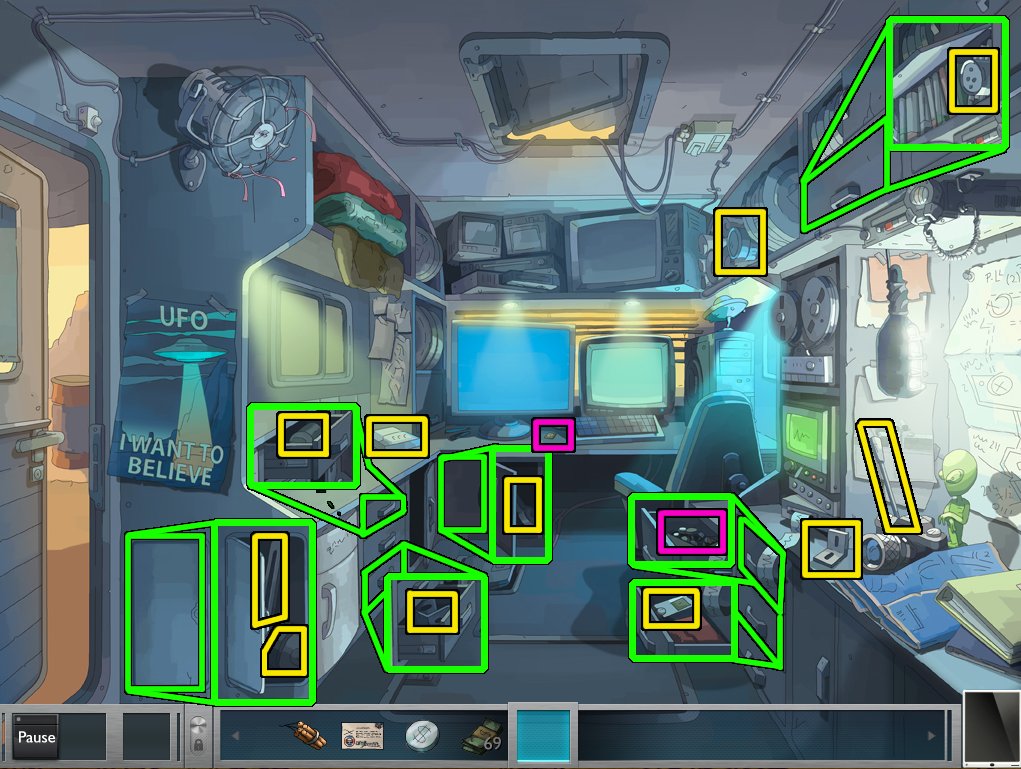
Go inside and find the camera parts. There are 11 Parts to grab, some of which are hidden in drawers. Also, grab the Cable and the Memory Card.
Screenshot
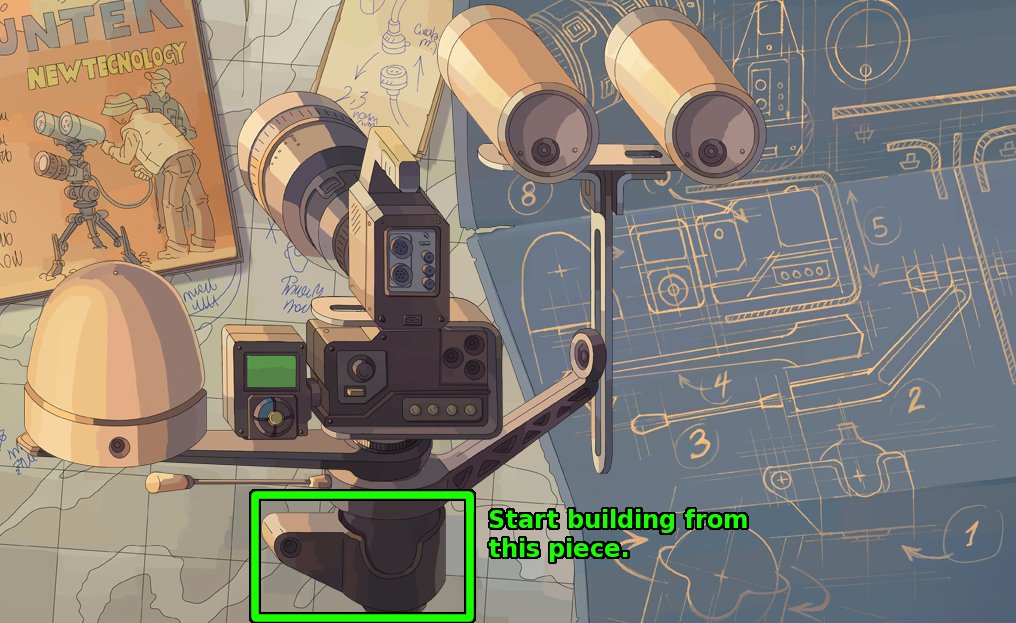
Go outside and zoom in on the table with the Blueprint. Use the Parts on the blueprint to start a minigame.
Click and drag the pieces to assemble the camera according to the blueprint. One part (labelled 1 on the blueprint) is fixed in place already, so you should build up from there. Parts will sparkle and lock in place when they are properly positioned.
Solution
Use the Cable on the assembled Camera to finish it. Click the lower-right corner to go back.
Use the Camera on the tripod behind the trailer, on the left side. Go inside the trailer.
UFO Hunting
Grab the Memory Card next to Dolin's computer if you haven't already.
Read the camera instructions posted on the right side of the trailer (near the green alien statue.
Go outside and use the Memory Card on the camera.
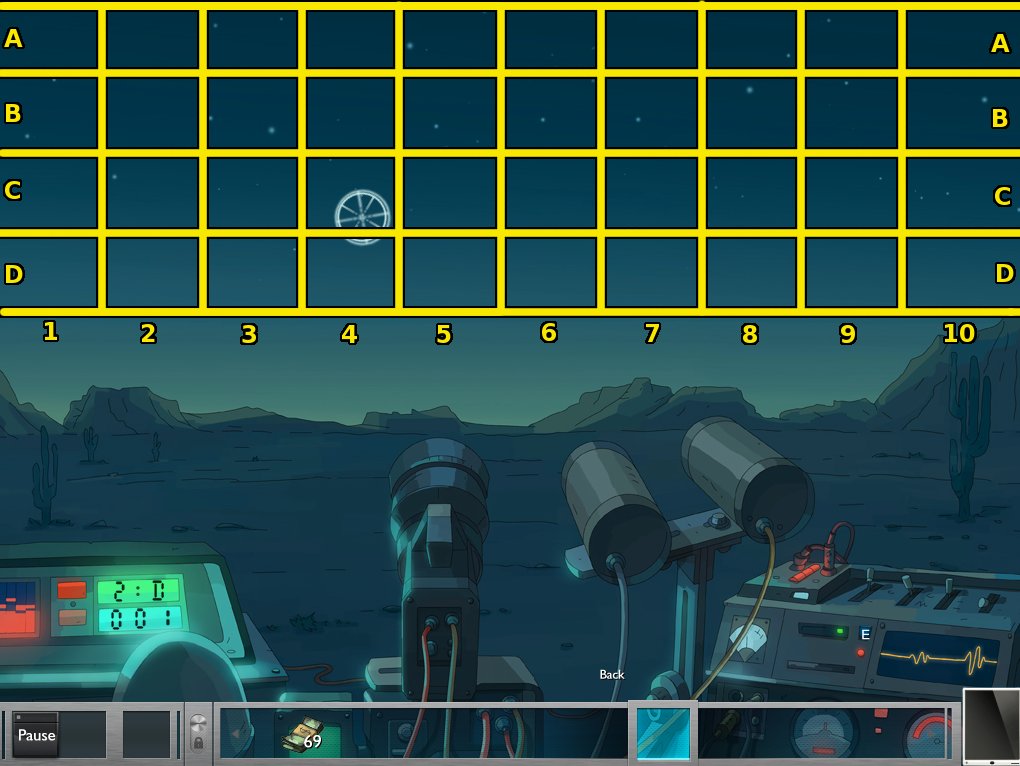
Put the Memor Card in the open slot on the right (with the green light) to start a minigame.
Move the cursor over the skyfield and click wherever a flashing light appears.
Remember the instructions: treat the skyfield as a grid, and use the coordinates shown in the green display to determine where the UFO will appear.
Screenshot
The blue display is a countdown for when the next UFO appears.
Take three successful pictures to conclude the minigame.
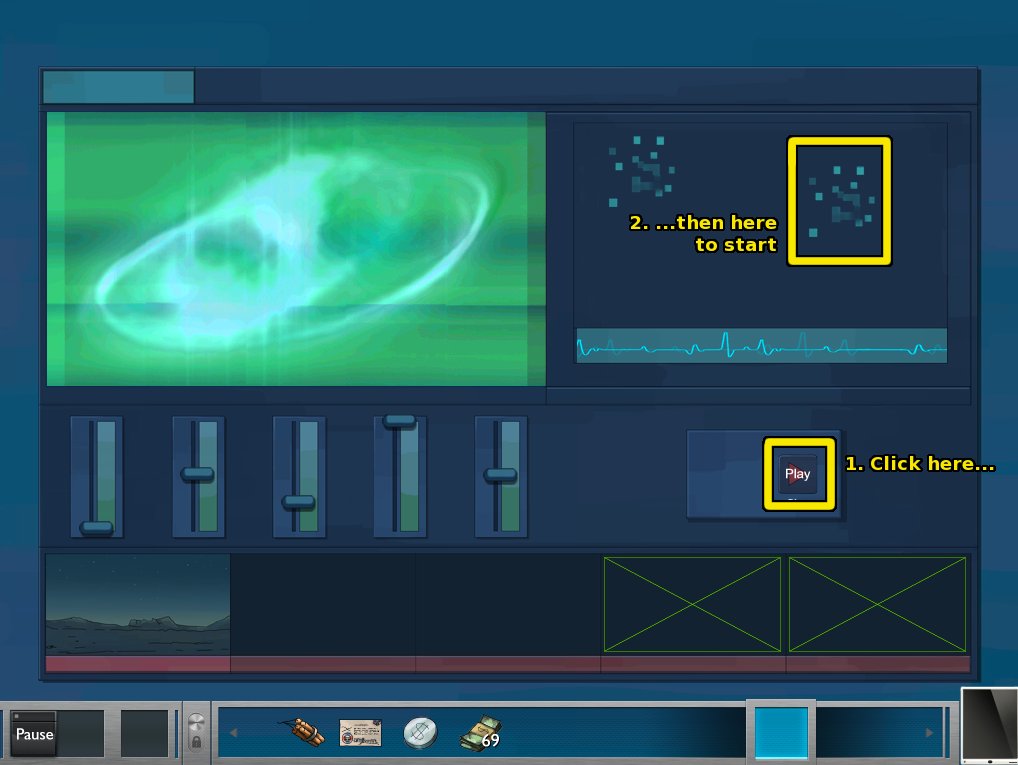
Go back and inside the trailer and give the Memory Card to Dolin. Click the screen to start a minigame.
Click "Play" to begin.
Click the staticky images on the right.
Drag the sliders to adjust the columns on the left so they align into a coherent picture.
Solution 1
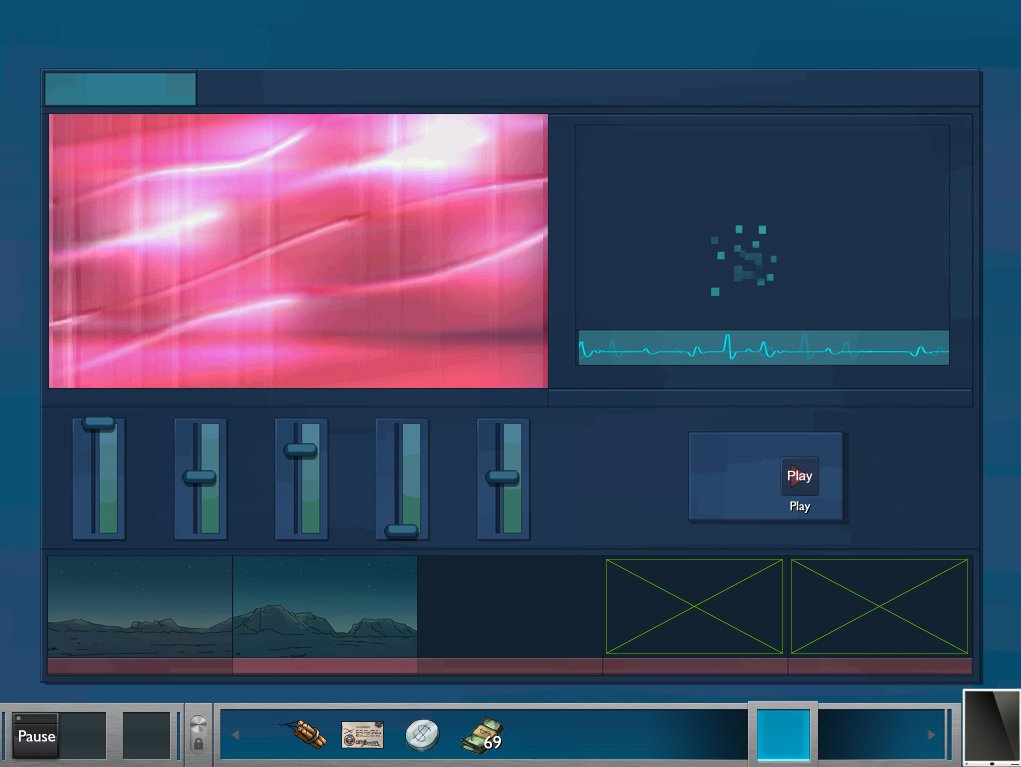
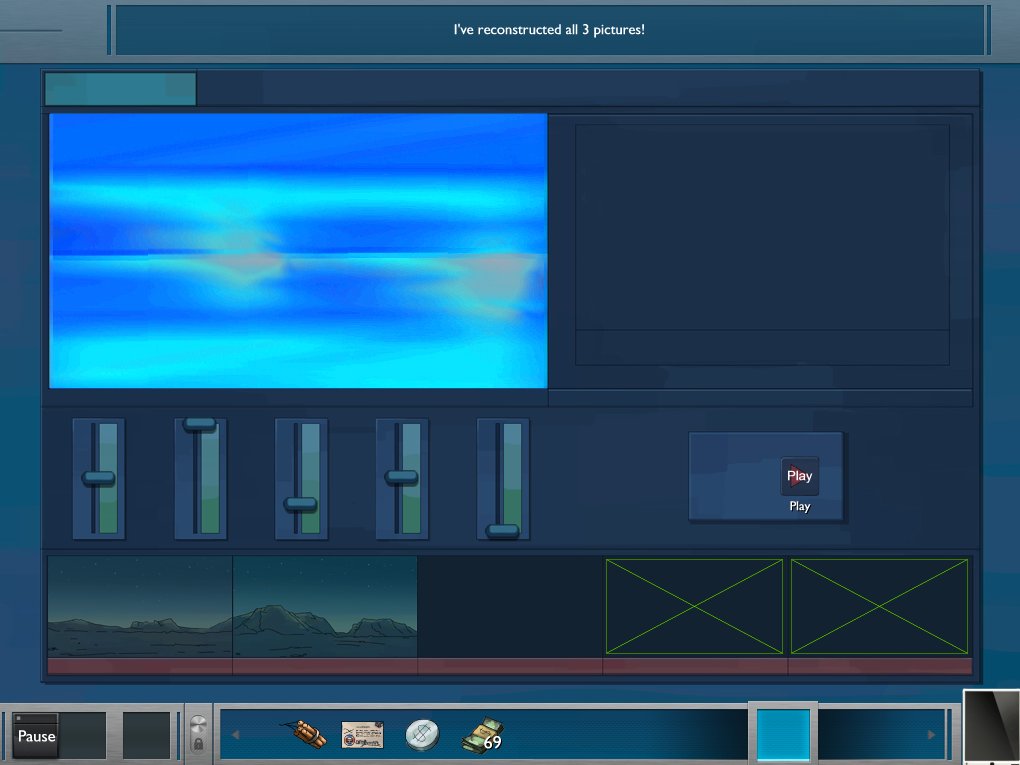
Repeat steps two and three for two more pictures.
Solution 2
Solution 3
Talk to Dolin about the invitation, then exit the trailer.
Before you go, solve another flashback puzzle (see Flashback Puzzles above for how to solve).
Solution
Get in your car to move on.
The Base
Entry and Power
Click anywhere to progress from night to daytime.
Use the Dynamite in the rocks above the flowing water.
Click the trunk of the car to open it, then click again to grab the Lighter.
Use the Lighter with the dynamite. Effective!
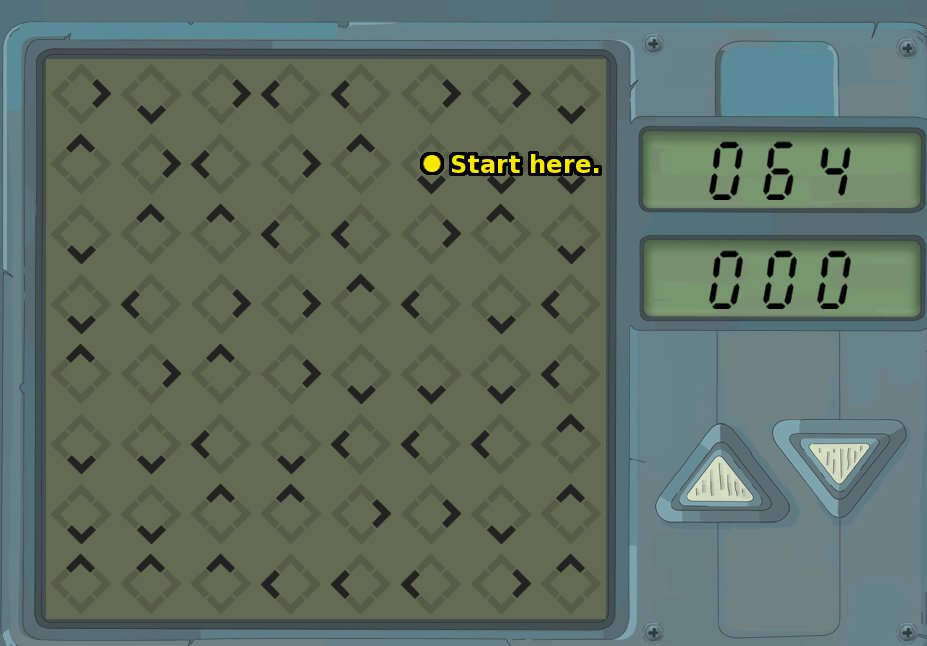
Click the console on the platform that appears to start a minigame.
The goal is to make all the diamond-shaped symbols disappear. Click one of the symbols and it will disappear. The nearest symbol it points to will also disappear; a chain reaction of disappearing symbols will continue until one symbol has nothing left to point to.
The solution is the same each time. You have three clicks to solve before the puzzle resets.
A solution with one click is shown below.
Solution
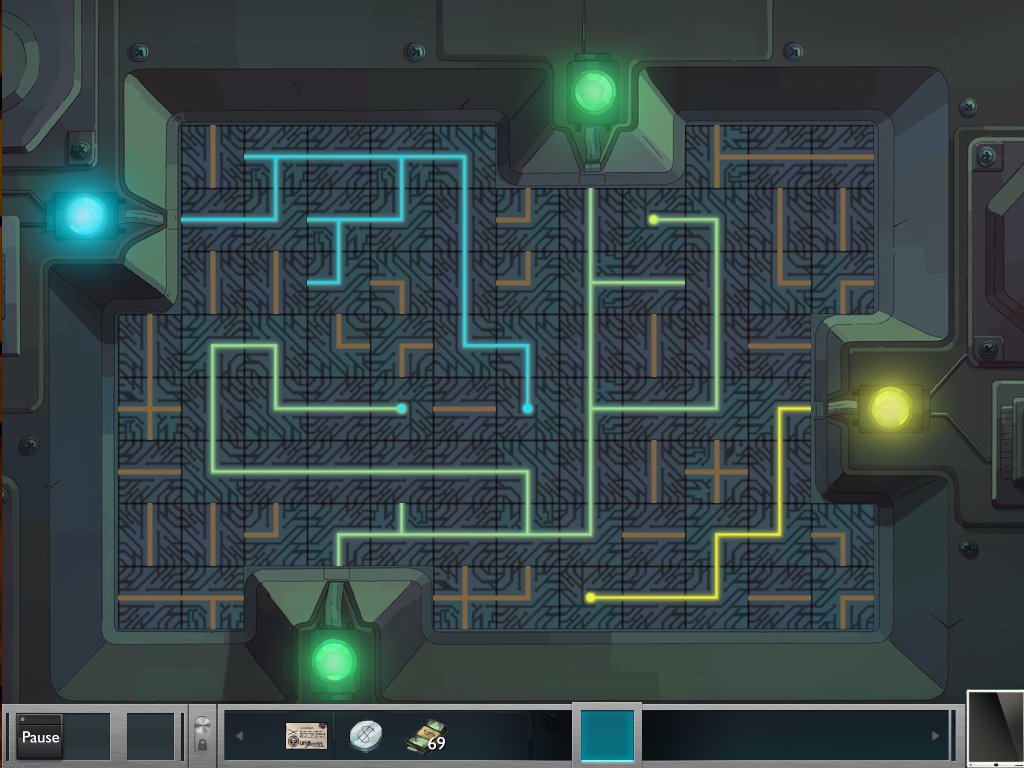
Ride the platform down to the secret bunker. Click the power door with the flashing red light to start a minigame.
Click the tiles to rotate them and complete the circuits from the source tiles to the matching colored lights.
You can mix the yellow and blue signal paths by merging them with a T-junction, resulting in a green signal.
Solution
Watch the monorail leave, then play another flashback puzzle (see Flashback Puzzles above for how to solve). The colors of the letters don't have to match the colored areas.
Solution
Monorail!
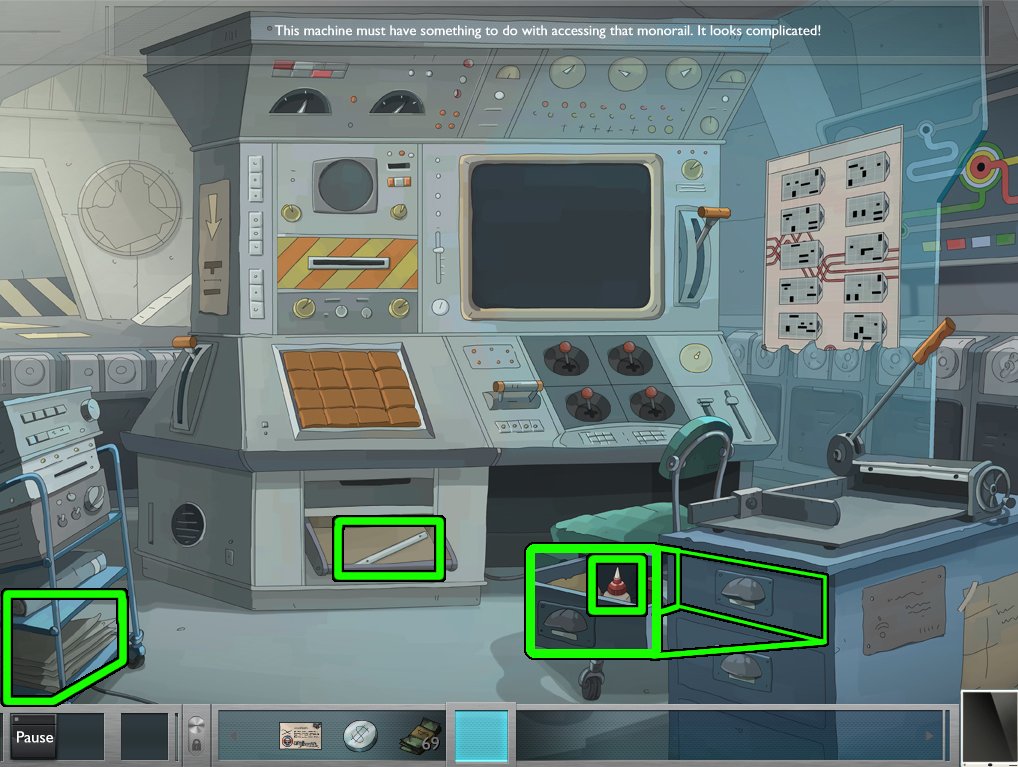
Zoom in on the big stand-alone machine terminal just under the monorail map.
You'll need to collect a few items: the Razor, Paper, and Oilcan (found in the drawer).
Screenshot
Use the Razor, then the Paper, on the paper cutter on the right side of the room. Pull the handle and take the Card.
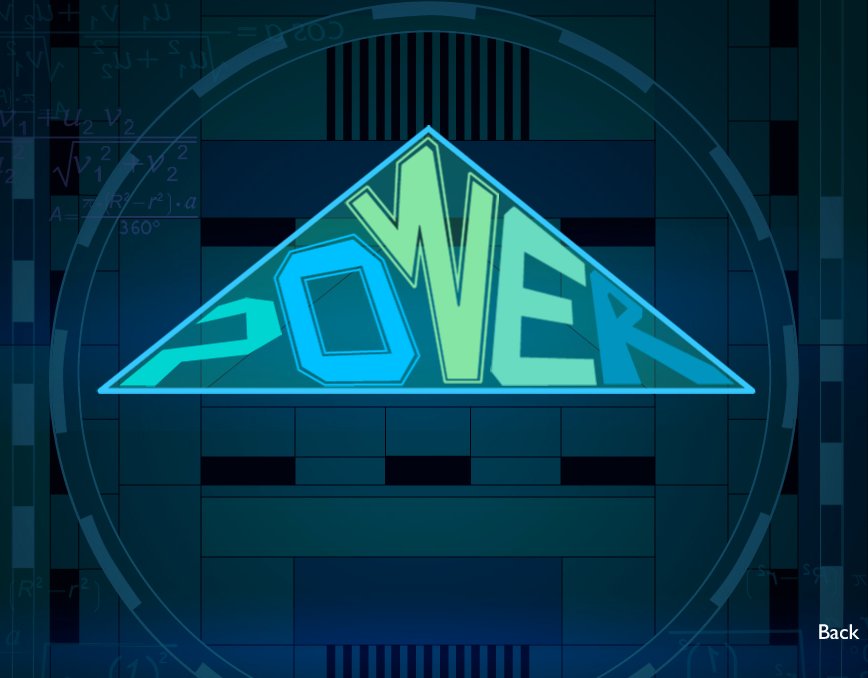
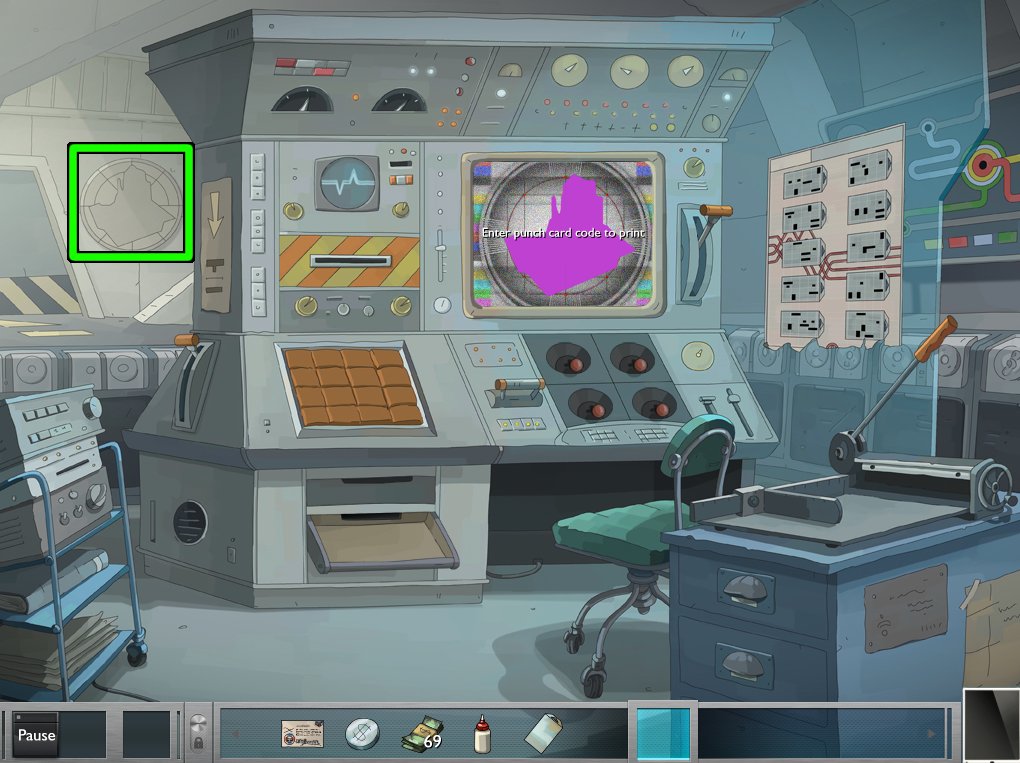
Pull the lever on the right side of the machine to start it.
Enter the code picture by clicking the four levers below the screen to change each quadrant of the image. It should match the big insignia on the wall to the left of the machine.
Screenshot
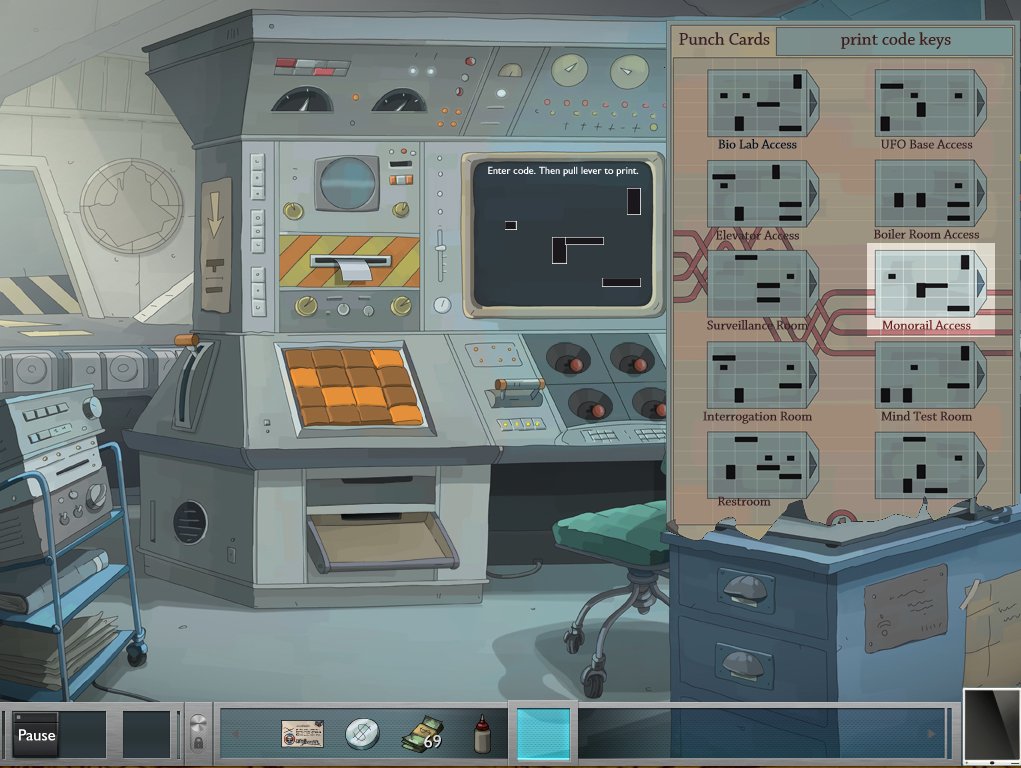
Feed the card into the card reader to the left of the screen. Click the card punch guide to the right of the machine and find the code for the monorail.
Click the orange buttons below the card reader to enter the monorail code. You only have to worry about the locations of the punches, not the shapes.
Screenshot
Use the Oilcan on the switch on the left, then pull it. Take the completed Punchcard from the tray at the bottom of the machine.
Zoom out, then zoom in on the monorail door. Use the Punchcard in the slot. Click the monorail when it arrives to travel.
The Test Room
If you want, use your last Coin on the snack machine and grab the snack.
Pick up the key hidden behind the rightmost container.
Zoom in on the keypad on the right and use the key in the center. Finish the conversation with the woman on the screen. Note the code.
25209
Zoom in on the keypad near the door on the left and enter the code. Enter the door.
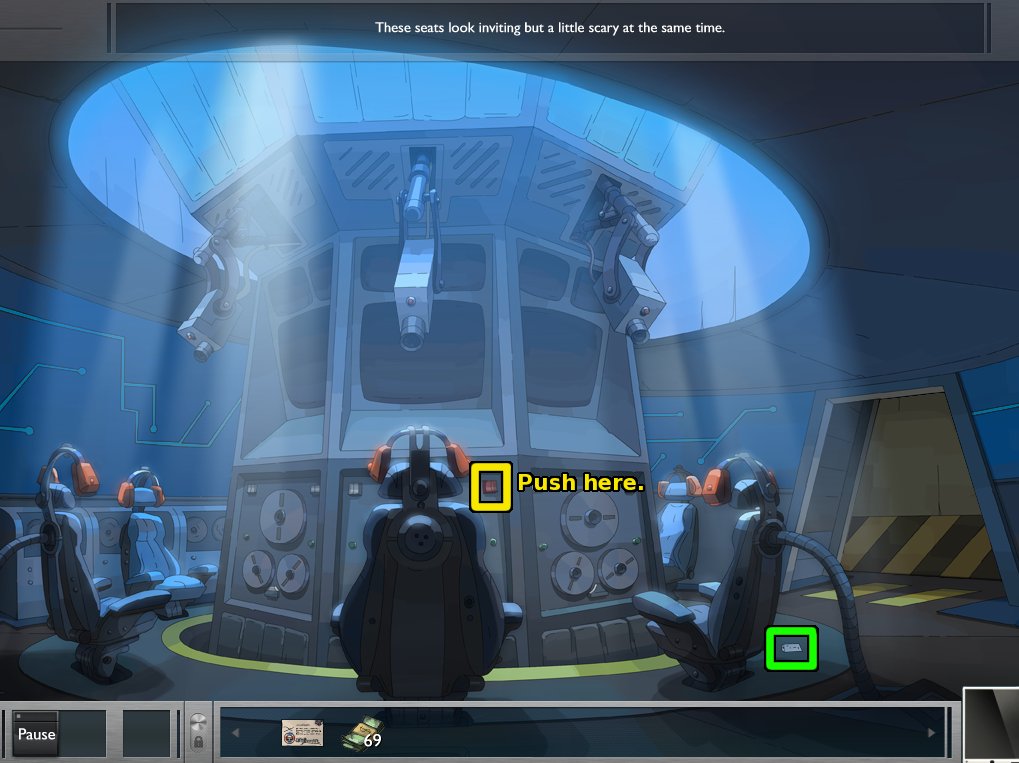
Pick up the Punchcard next to the rightmost chair, then hit the red button on the center listening console.
Screenshot
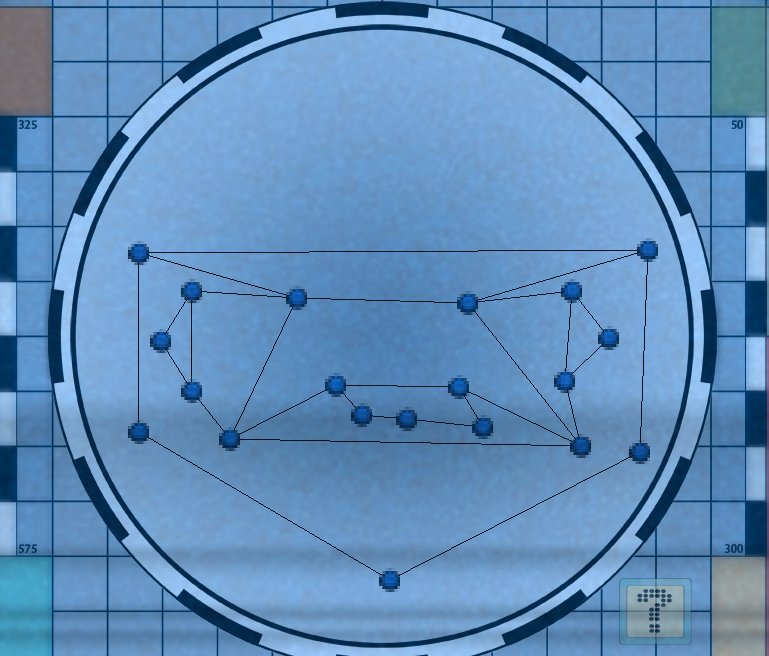
Click on the leftmost monitor for the first test. Drag the nodes so the red lines no longer overlap. They will turn black when no lines are crossing them. Click the red "X" button when you're done.
Solution
Click the middle monitor for the second test. It's a Stroop test: Click the name of the color of the word in the middle. You have 60 seconds to correctly complete the task 6 times: Mess up, and you have to start over. Click the red "X" button when you're done.
Click the rightmost monitor for the third task. Just click the icon you are told to click. The questions are random. You have 60 seconds to correctly complete the task 14 times: Mess up, and you have to start over. Click the red "X" button when you're done.
After finishing the tests, complete another flashback puzzle (see Flashback Puzzles above for how to solve).
Solution
Leave the test room to talk to the woman on the screen.
Zoom in on the card reader near the monorail doors. Use the Punchcard from the test room and ride the monorail.
Elevator Card
You can't ride the elevator without another punchcard, so zoom in on the punchcard machine again. The basic procedure is the same as before.
Grab some paper and use it on the cutting machine, pull the leveer, and grab the Card.
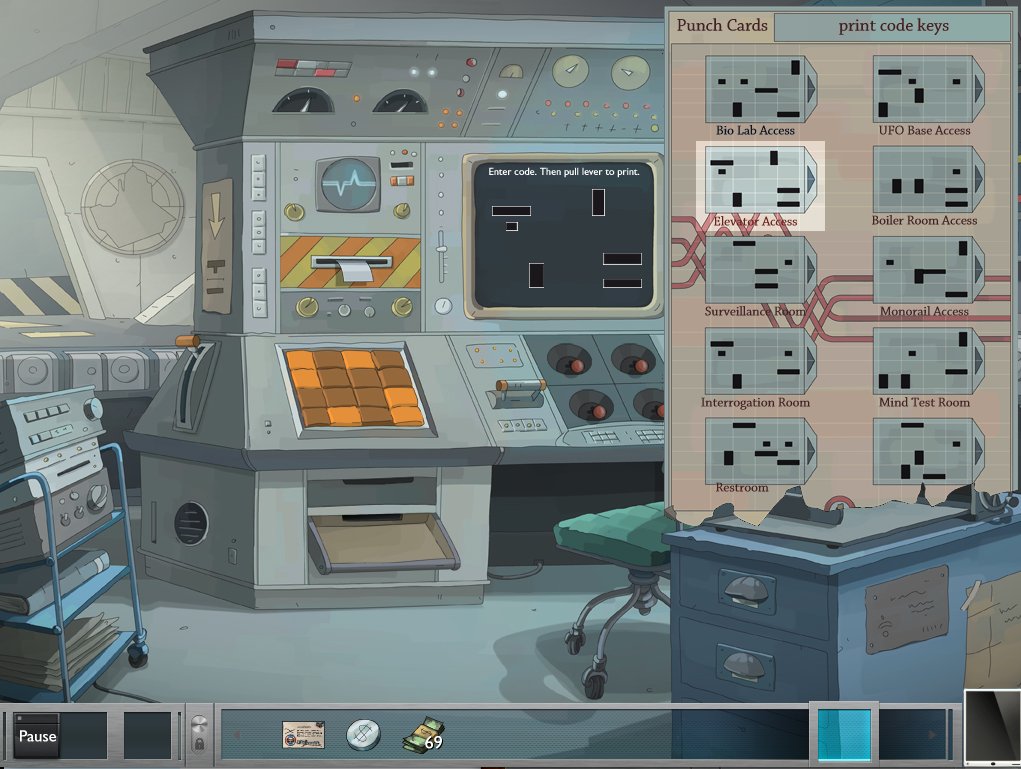
Feed the Card into the card reader. Consult the punchcard codes for the code to the elevator.
Enter the code as before. Don't forget to clear the previous code first.
Screenshot
Pull the lever on the left and grab the Punchcard from the tray.
Zoom out, zoom in on the card reader near the elevator, and use the Punchcard. Get in the elevator. You have to complete the security minigame again, but the solution can be the same as before.
Solution
The Studio
Breaking in
Move the boards on the left side of the screen. Open the door to the trailer and go inside.
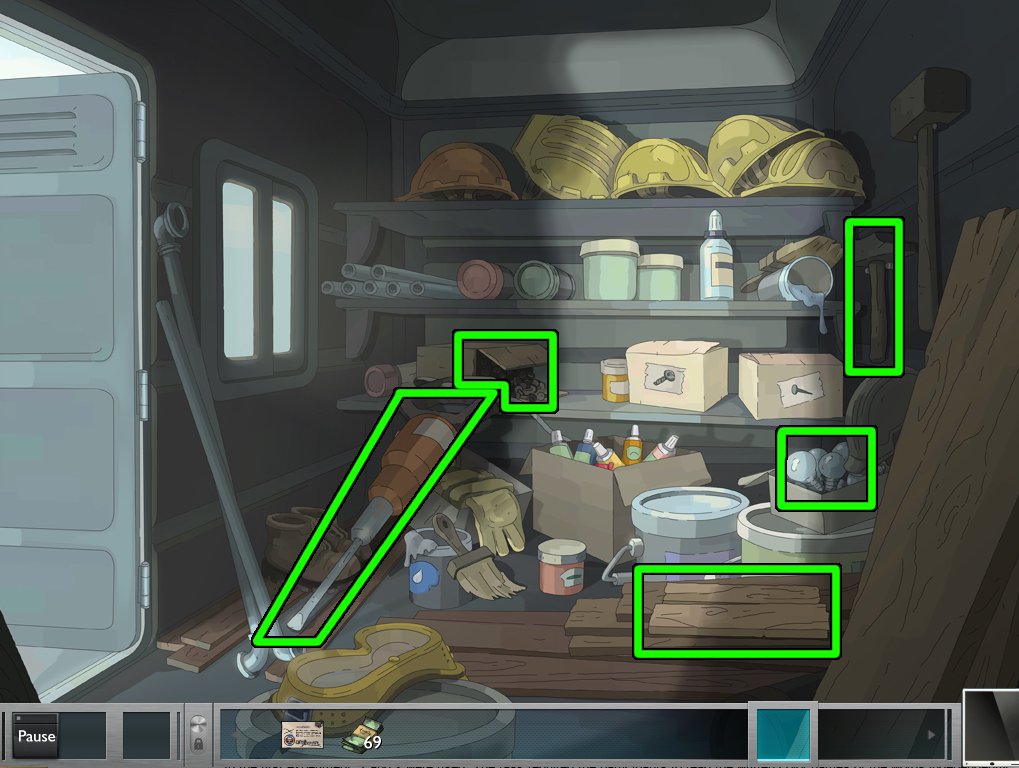
Grab the small Hammer hanging from the right wall. Also, take the two smaller Boards, a Light Bulb, the Jackhammer(!) and some Nails.
Screenshot
Zoom in on the mailboxes and play the flashback puzzle (see Flashback Puzzles above for how to solve).
Solution
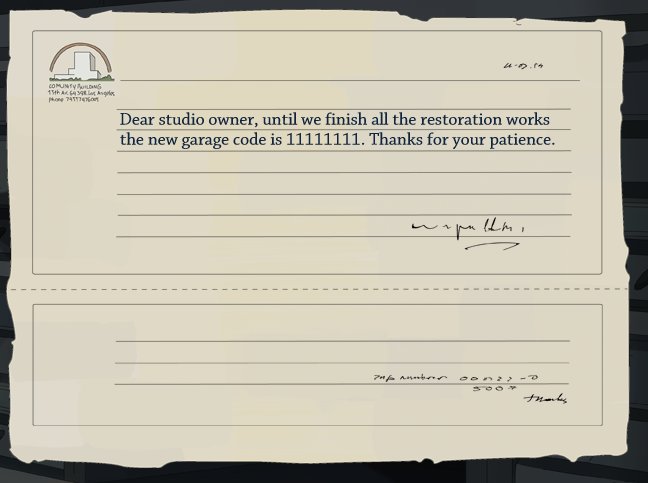
Use the Hammer on your mailbox (the one with Studio Mark Cross written on it) and click to open it. Click the bits of paper for a minigame.
Assemble the torn pieces of paper by dragging them to their proper spot. Matching pieces with the edge of the borders will help. You don't need to rotate the pieces.
Solution (Note that the text doesn't appear until you complete the puzzle)
Click the lower right corner to zoom out, then click the small console near your car. Enter the code from the note.
1111111
Grab the Key from the desk and use it on the chest. Take the other Key from the open chest.
Use this Key on the maintenance door on the left. Click again to take the ladder.
Use the Boards, then the Nails (from the construction trailer outside) with the ladder, then use the Hammer.
Now that you have a ladder, zoom in on the note on the door upstairs. Take the Key Card and enter the door. Use the Key Card on the flashing alarm to turn it off.
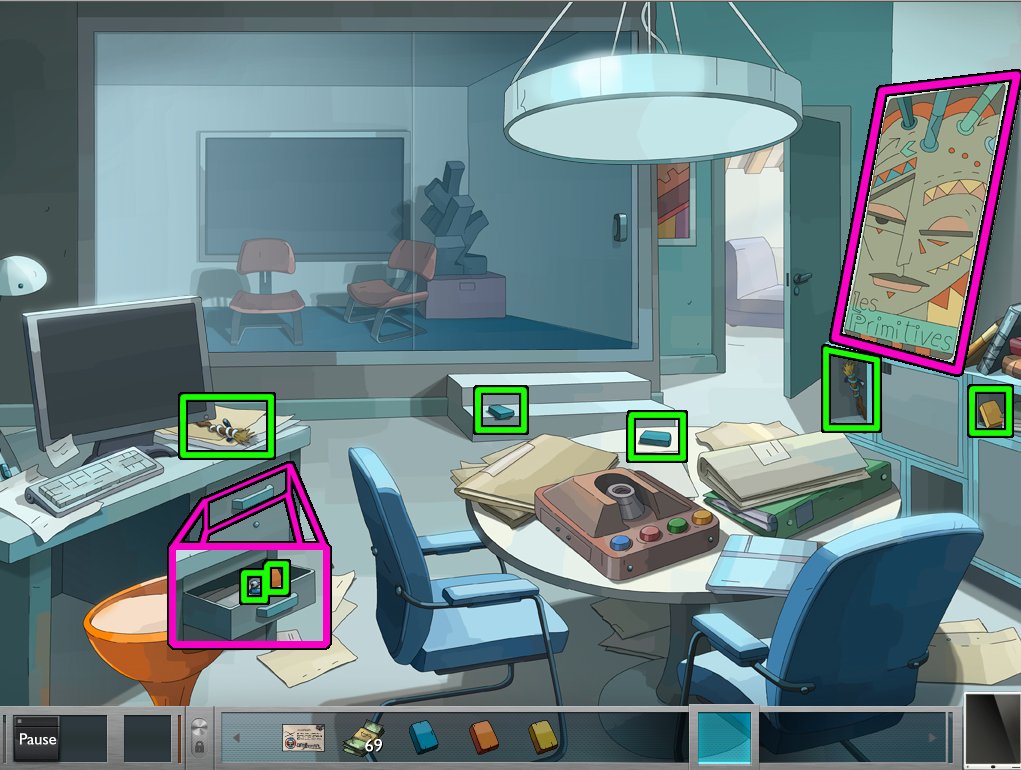
Collecting Items
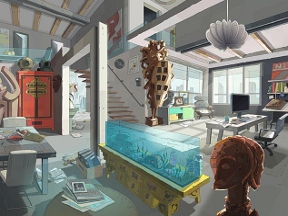
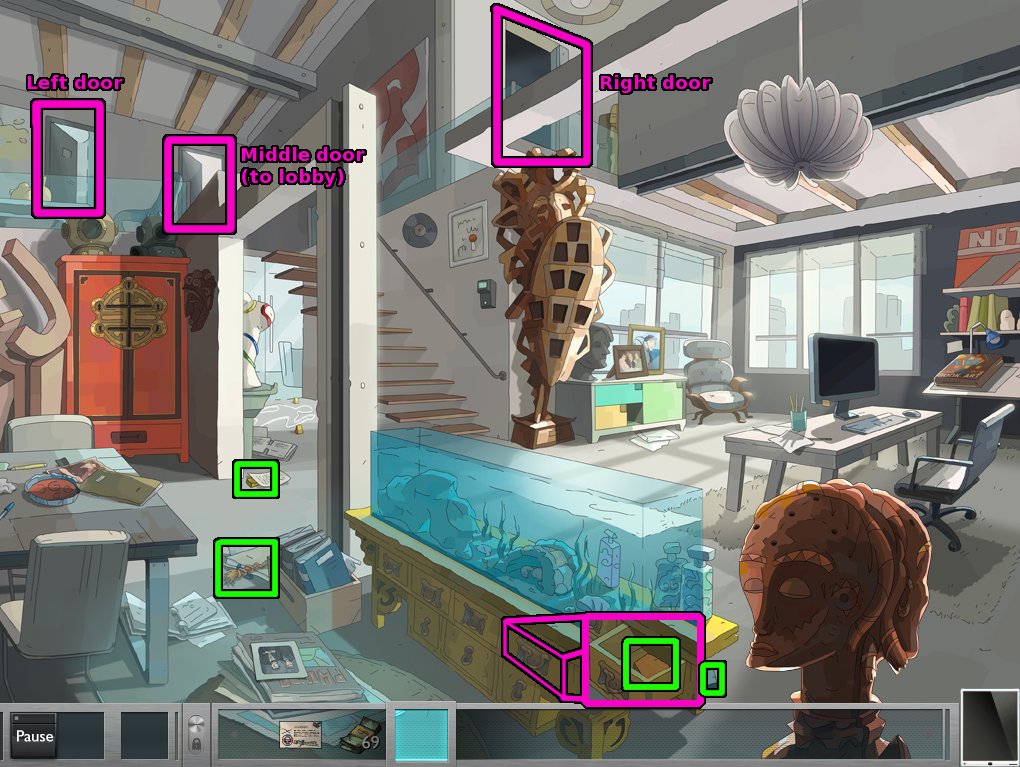
In the main room, pick up the Red Stick, the Yellow Tile (1/3), and the Blue Tile (1/3). Open the nearest drawer beneath the aquarium and take the Orange Tile (1/3). Note the two doors upstairs.
Screenshot
Go through the left door and play a flashback puzzle (see Flashback Puzzles above for how to solve).
Solution
Pick up the Gray and Blue Sticks, the two Blue Tiles (2-3/3) and the Yellow Tile (2/3). Open the desk drawer and pick up the Orange Tile (2/3) and the Key.
Screenshot
Also, note the mask in the poster.
Go back, then enter the right door. Note the message on your tablet.
Take the Green and Yellow Sticks and the Orange Tile (3/3). Open the desk drawer and take the Yellow Tile (3/3).
Screenshot
Find the Five Keys
The first three keys can be found in the main room of the studio.
First Key
Use the Key from the desk in the left room upstairs on the drawer beneath the aquarium.
Take the Fish Food and use it on the aquarium. Take the Chinese Safe Key.
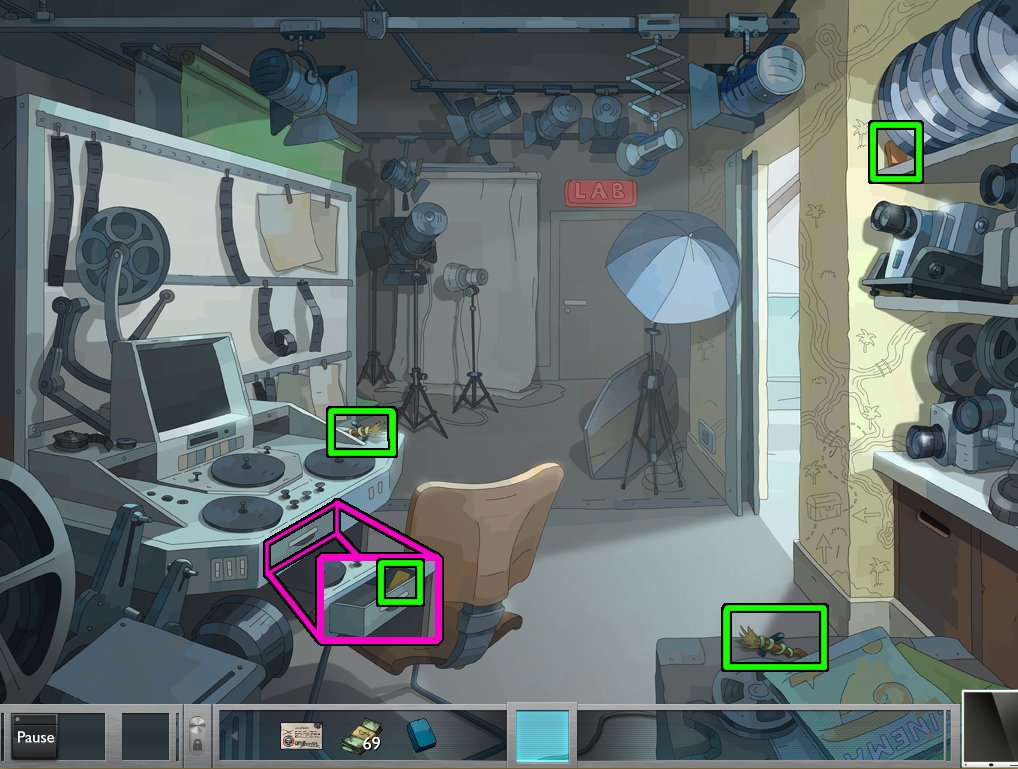
Second Key
Place the colored Sticks in the holes atop the mask. The idea is to make it look like the poster in the left room upstairs. You'll have to experiment a bit; the happy-chime will sound when you place it correctly.
Screenshot
One you've placed all the Sticks correctly, the mask opens. Take the Chinese Safe Key.
Third Key
Zoom in on the art book on the far right. Note the patern of orange, yellow, and blue trapezoids.
Notice the shield of the African warrior statue. Place the Orange, Yellow and Blue tiles so they match the cover of the book.
Screenshot
Once the drawer opens beneath the statue, take the Chinese Safe Key.
Go through the door on the right upstairs to find the fourth key.
Fourth Key
Rememember the clue from the pad about "finding treasure."
Note the treasure chest on the wallpaper.
Use the Jackhammer from the construction trailer outside on the chest (To go back outside, go through the middle door upstairs and ride the elevator).
Take the Chinese Safe Key from the wall.
Go through the door on the left upstairs to find the fifth key.
Fifth Key
Use the Light Bulb from the construction trailer outside on the device on the center table (To go back outside, go through the middle door upstairs and ride the elevator).
Press each button and note how many times the bulb flashes. This tells you the order you need to push them in.
Press the buttons in the order of fewest flashes to most.
Red, yellow, blue, green (i.e., 2nd button, 4th button, 1st button, 3rd button)
When the drawer opens on the side of the device, take the Chinese Safe Key.
The Cross Formula
Now that you have all the keys, go downstairs to the main studio room and look at the Chinese safe (the red cabinet left of the stairs).
Put each Safe Key in the matching-colored keyhole. Next, turn each key however many times it takes so that the colored beads in the grooves slide to the colored-keyhole that matches.
Take the Film Reel from the locker. Go upstairs through the door on the right.
Place the Film Reel in the reel machine, then zoom in on the machine. Press the power button on the right to start a minigame.
The goal is to form a continuous sequence of motion between the six video clips. Match the clip with the flashing border with the one before it.
Use the play and stop buttons to time the sequences. Time it so the animated piece of the current clip continues where and when the piece from the previous clip leaves off.
Timing on this puzzle is tricky. You might be able to get away with brute-forcing a solution, by pressing play and stop repeatedly.
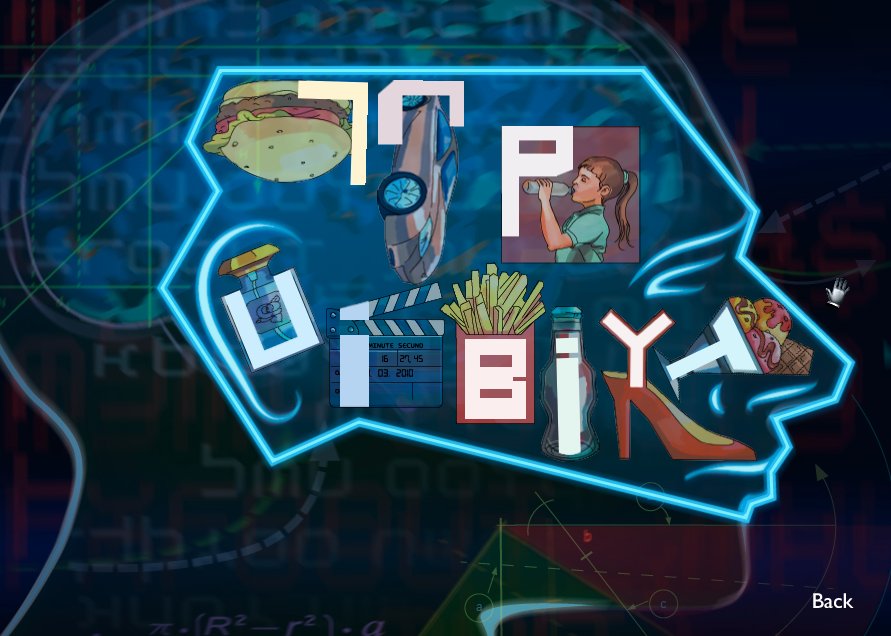
Staring at the symbol on the screen prompts another flashback puzzle (see Flashback Puzzles above for how to solve).
Screenshot
If you haven't finished all the flashback puzzles yet, you need to do so now. Click a symbol to resume an incomplete puzzle. Gray symbols are complete, while white symbols are incomplete.
Watch the final cutscene. The end!
Posted by: Mike |
March 29, 2012 9:59 PM
|
March 29, 2012 9:59 PM