

Film Fatale:
Lights, Camera, Madness!
Platform: Windows
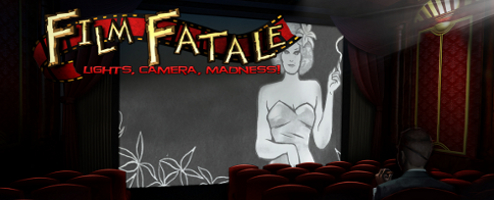
![]() What are you looking for in your adventure hybrid game? Thrills? Laughs? Being immersed so deeply in entertainment that, when the show is over, you hardly know where the time went? Fugazo's wonderfully campy Film Fatale: Lights, Camera, Madness! dishes out all of that and more from the opening scenes through the last words of the credits. It's just a shame you won't have a ticket stub to pack away in your scrap book.
What are you looking for in your adventure hybrid game? Thrills? Laughs? Being immersed so deeply in entertainment that, when the show is over, you hardly know where the time went? Fugazo's wonderfully campy Film Fatale: Lights, Camera, Madness! dishes out all of that and more from the opening scenes through the last words of the credits. It's just a shame you won't have a ticket stub to pack away in your scrap book.
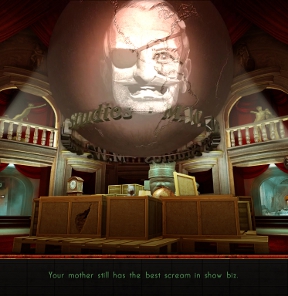 As the lights dim and the film begins to roll, the background story is quickly laid out. Your mum, Rita Ray, beloved royalty of the silver screen, has been kidnapped and is being held captive by M.W. Vernon, the legendary director and owner of a once great movie studio. Just what Vernon wants from Rita is not yet fully explained, but a dread feeling of foreboding, agitated by the madman's echoing "Bwahahaha!" has the hairs on the back of your arms standing on end. This cannot be good. Each corner you turn slowly reveals Vernon's plans and, right when you think it's over, another twist delivers a climatic ending worthy of—well, if not Hitchcock, at least better than any B-movie producer could ever hope for.
Gameplay is fairly evenly divided between adventuring and puzzle-solving using the standard point-and-click method of navigation. A changing cursor will indicate areas to investigate, puzzles, hidden object searches and items to pick-up as well as showing when you can move on to another room. As you explore the lurid scenes of a violence and insanity run amok through eclectic compartments of a fully-equipped movie studio, your progress is barely halted for brief moments of mini-games or hidden object searches to collect useful props and tools.
 If you've ever taken a tour of one, you know movie studios are big and full of rooms. Between the back lots, special effects stages, working sets and main buildings, there is a lot to be seen. Usually places like this will put you in touring trams operated by loquacious, knowledgeable actor-hopefuls in order to spare your bunions. Seeing as the crazy director managed to drive off (or, perhaps, murder) all his staff, the next best thing is an accoutrement found early on that makes leaping to the next destination as easy as a mouse click.
Analysis: What's not to love about a game that actually has "Muwahahahahaha!" as a line of dialogue? Fuzago pulls out every trick in the showman's book— such as pitch perfect voice acting (which can be muted if you prefer), detail-orientated scenery, a story replete with plot-twists and amusing dialogue—to guarantee your complete entertainment. Here is a game to lose yourself completely in the moment. If ever there was a time searching through an assortment of wild objects, grappling to repair broken equipment or solving cryptic codes would be appropriate, it's when you're on a large movie-lot-turned-gauntlet pitting your wits against a deranged "architect of the mind." The mini-games manage to put a unique spin on otherwise familiar puzzles; a few are initially confusing to figure out yet the hint function will explain succinctly. Another great feature is a map that shows, and lets you skip to, the next area of interest. This speeds things along, keeping the action flowing, although it also shortens the overall play time.
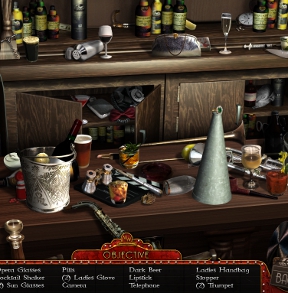 Film Fatale has another convenience you'll appreciate: a selective hint function during search scenes that lets you select exactly which item to reveal. Although hidden object scenes are about as typical as it gets in terms of how they're done, they're made enjoyable through crisp photo-realistic graphics and a cinematographer's talent for composing displays. Expect to see any object imaginable if it will serve as a movie prop; yet scenes are still well-organized, sorted by theme to suit each setting. Non-fans of the genre won't be wooed by these searches but at least they're not unpleasant, especially when driven by the compulsion to see what that fruitcake Vernon will do next.
It's not much longer to play Film Fatale: Lights, Camera, Madness! than it is to watch a feature-length blockbuster. Yet for less than the price of a movie ticket, you'll get an experience that is far more immersing, fulfilling and loaded of fun. You'll be toyed with by a maniacal lunatic, but at least you won't have to put up with popcorn down your shirt or the cell phone lights of rude fellow moviegoers.
![]() Windows:
Windows:
Download the demo
Get the full version
![]() Mac OS X:
Mac OS X:
Not available.
Try Boot Camp or Parallels or CrossOver Games.


Walkthrough Guide
(Please allow page to fully load for spoiler tags to be functional.)
Film Fatale: Lights, Camera, Madness! Walkthrough
General Information
At the start of a new game you have a choice between two difficulties: Regular Mode and Expert mode. You can change the game difficulty at any point in time by returning to the Menu Options
In Regular Mode the Hint and Skip buttons will recharge more quickly and sparkles will indicate active areas.
In the Expert mode the Hint and Skip buttons have a slower recharge timer, and sparkles indicating active areas are disabled.
Use the cursor to interact with the environment.
The cursor will change to a magnifying glass when you can investigate an area or to start a puzzle or hidden object scene.
The cursor changes to a directional arrow when you can move to a different location.
The cursor changes to a hand when you can pick up an item to add it to your Inventory or to interact directly with the environment.
The Inventory is the toolbar located at the bottom of the screen.
Your Inventory bar contains all of the items you will need to progress through the game.
Click an item in your Inventory to select it, then click on an area in the game to attempt to use the item.
Often, once an item is used, it will disappear permanently from your Inventory.
Click the arrows at the left and right sides of the Inventory to toggle through the multiple sections of the list.
To the left of the Inventory bar is the Hint button, shaped like a question mark.
The Hint button can be used to reveal an item during a hidden object scene, offer additional information about a puzzle, or to show you the next step of your adventure if you're stuck.
While solving a puzzle, the Skip button will appear at the upper left corner of the window.
Wait for the lights to fill completely green, then press the Skip button once it is fully charged to immediately complete the puzzle.
Hidden object scenes are areas indicated by sparkles where you must collect various randomized objects listed at the bottom to receive a new inventory item upon completion.
If you are having trouble finding an item, click its name in the list below to highlight its location; this will cost a fully loaded Hint button to activate.
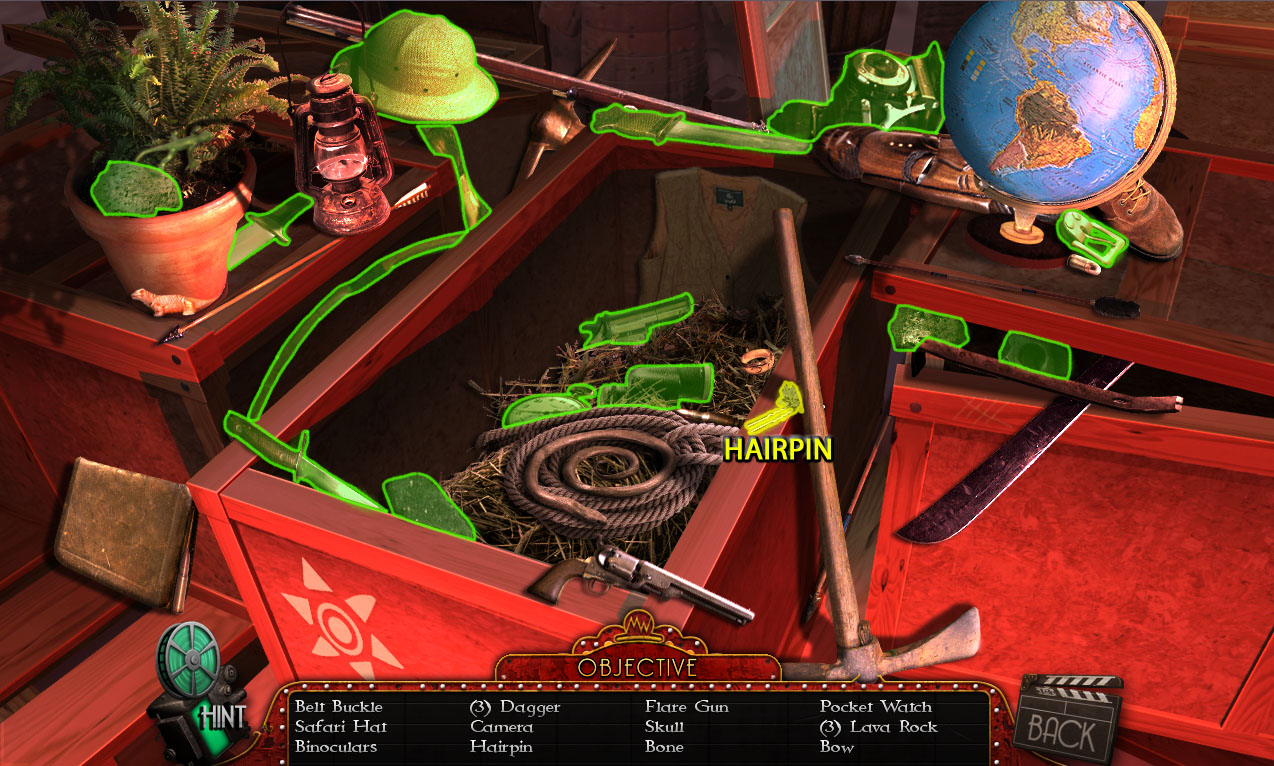
In the screenshots of this guide, the random items are highlighted in green and the inventory item you receive at the end is labeled and highlighted in yellow.
On the right side of the Inventory bar is the Journal.
The Journal contains helpful information and tracks your progress through the game.
Access the Journal to find pictures and text that can help you solve puzzles and follow the story.
Opening the Journal will also reveal the Current Task bar at the bottom of the screen.
The Current Task bar contains general instructions explaining your goal at that stage of the game.
Beside the Journal button is the Map, which includes the entire floor plan to Vernon Island.
An area you have not yet visited will remain blank in the blueprints; once you have reached that destination, it will be labeled properly with the name of the room.
The Star on the map indicates your current location.
A green highlighted area on the map denotes a location where you still have available actions to complete.
An Eye icon indicates an area that contains an unfinished hidden object scene.
After you have collected the Sneakers, you can click a location on the Map to travel there instantly.
To the left of the Hint button is the Menu button.
Click the Menu button to return to the Main Menu where you can edit the Options, view the Credits, change profiles, or Quit the game.
Gameplay Guide
Task: Find a way inside the studio and find Mum
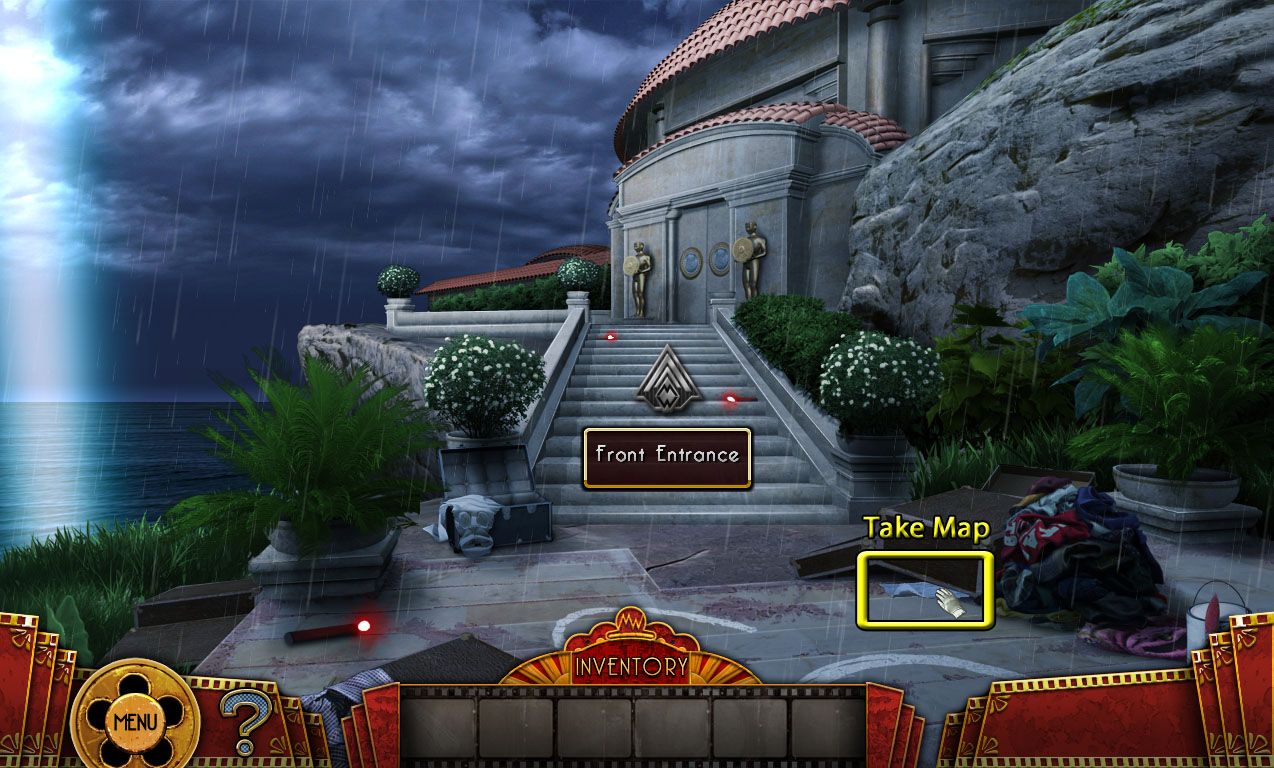
Landing Pad
Screenshot
Pick up the Map under the empty suitcase.
The Map feature is then added to your toolbar in the lower right corner.
Continue left up the stairs to the Front Entrance.
Front Entrance
Screenshot
Take the Journal at the base of the left statue.
The Journal feature will also be added to your toolbar, beside the Map button.
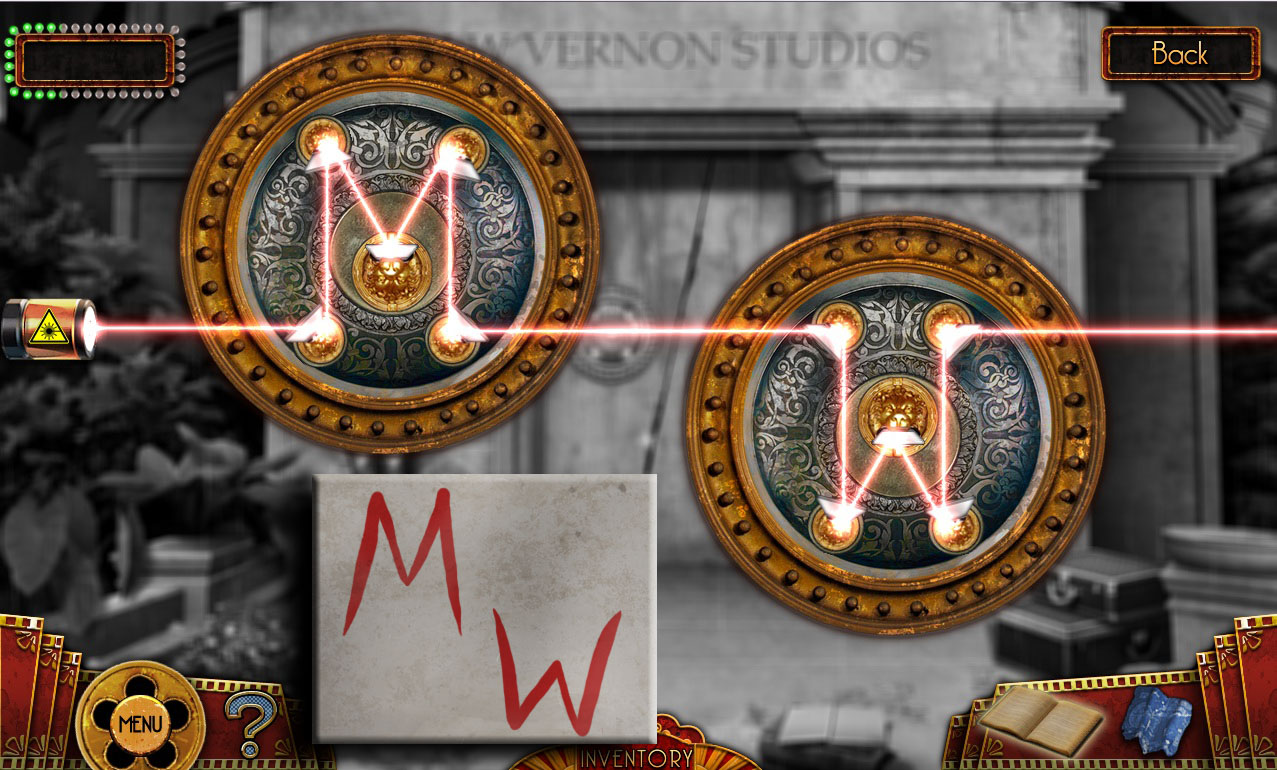
Click the front doors to start the mirror puzzle.
Rotate the mirrors to reflect the beams of light into the shape of the letters M and W.
Click a mirror to rotate it slightly clockwise or counterclockwise.
The direction a mirror is facing will determine the angle of the beam of light it reflects.
Solution.
Go through the open doors to the Grand Foyer.
Task: Turn the lights on...
Grand Foyer
Screenshot
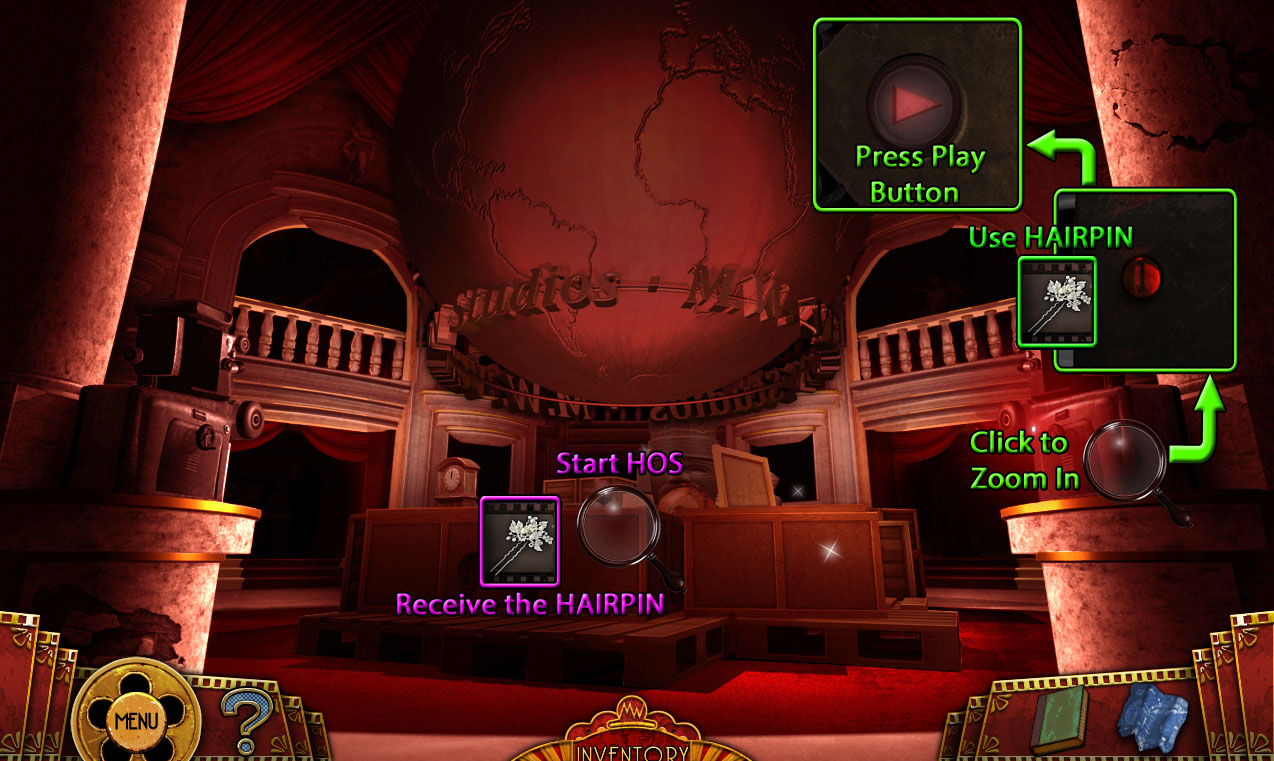
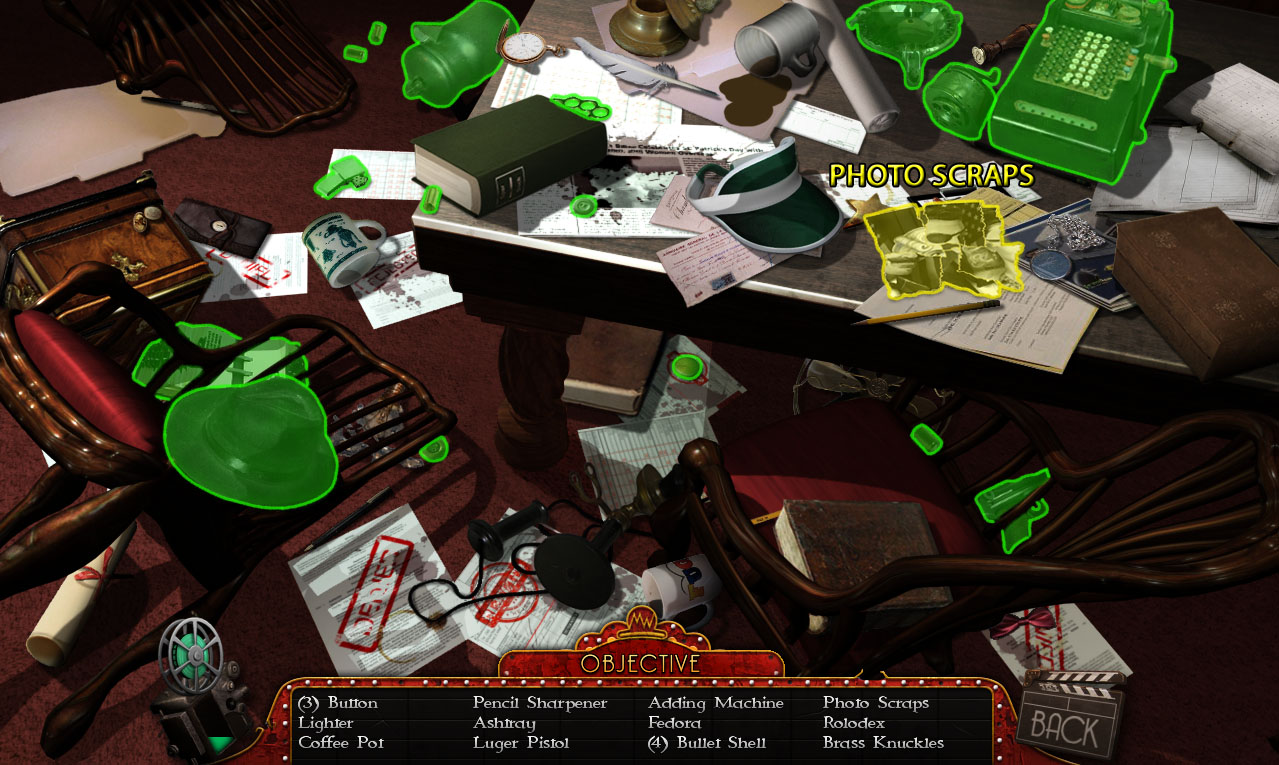
Click the crates to start the hidden object scene.
Screenshot.
Once the hidden object scene is complete, you will receive the HAIRPIN.
Click the projector on the right pedestal to zoom in.
Use the HAIRPIN to open the lock.
Press the play button to start the projector.
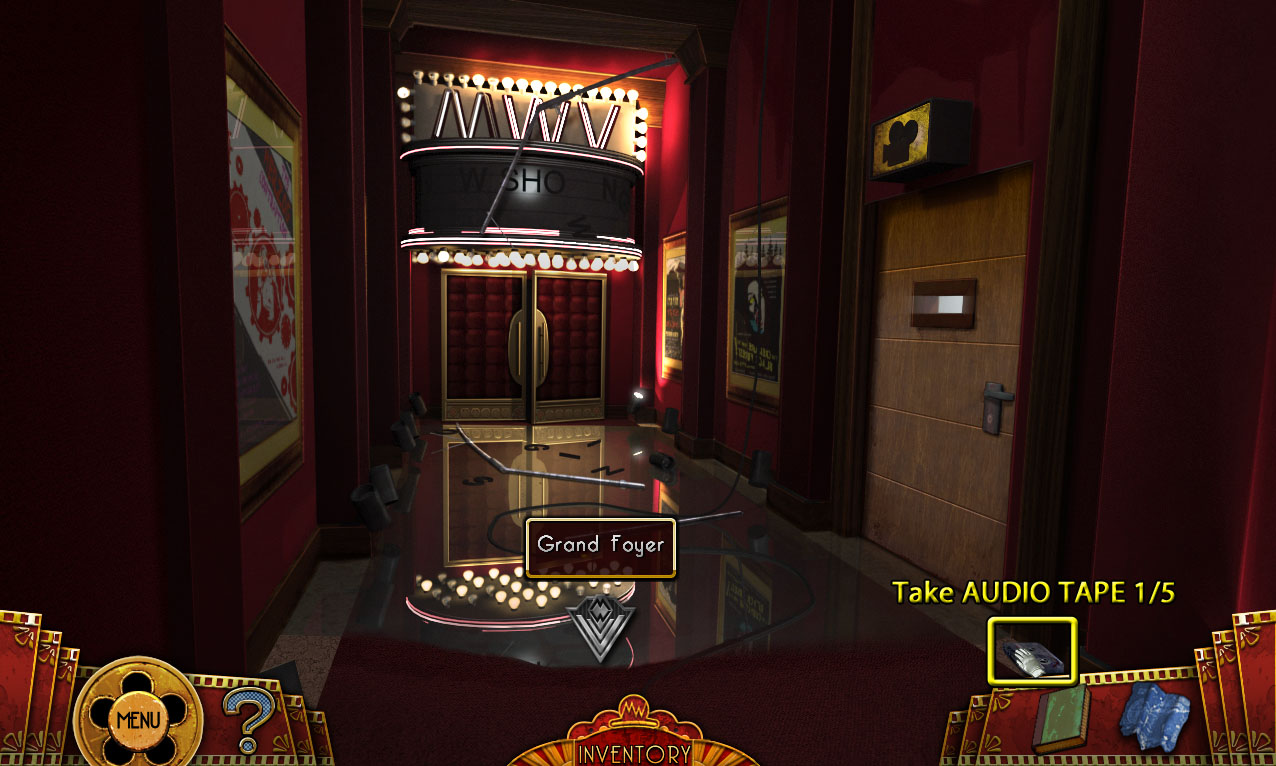
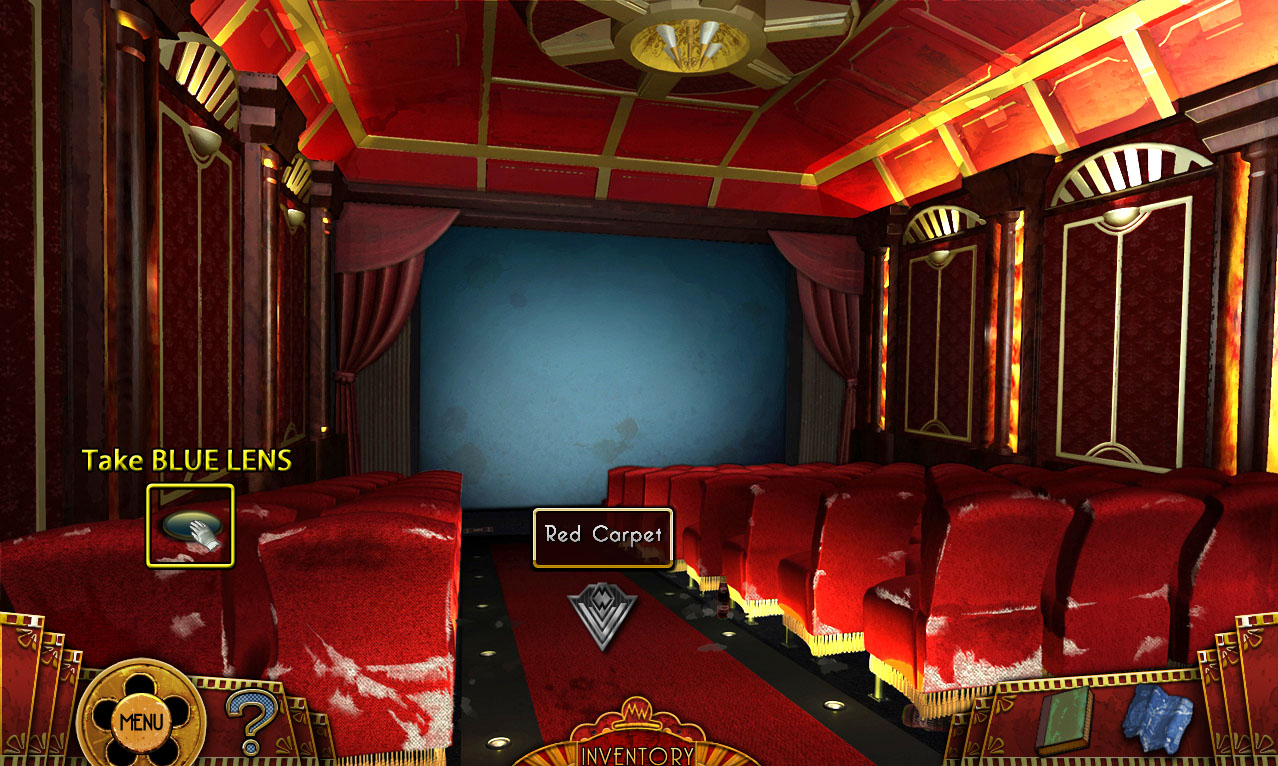
Go left to the Red Carpet.
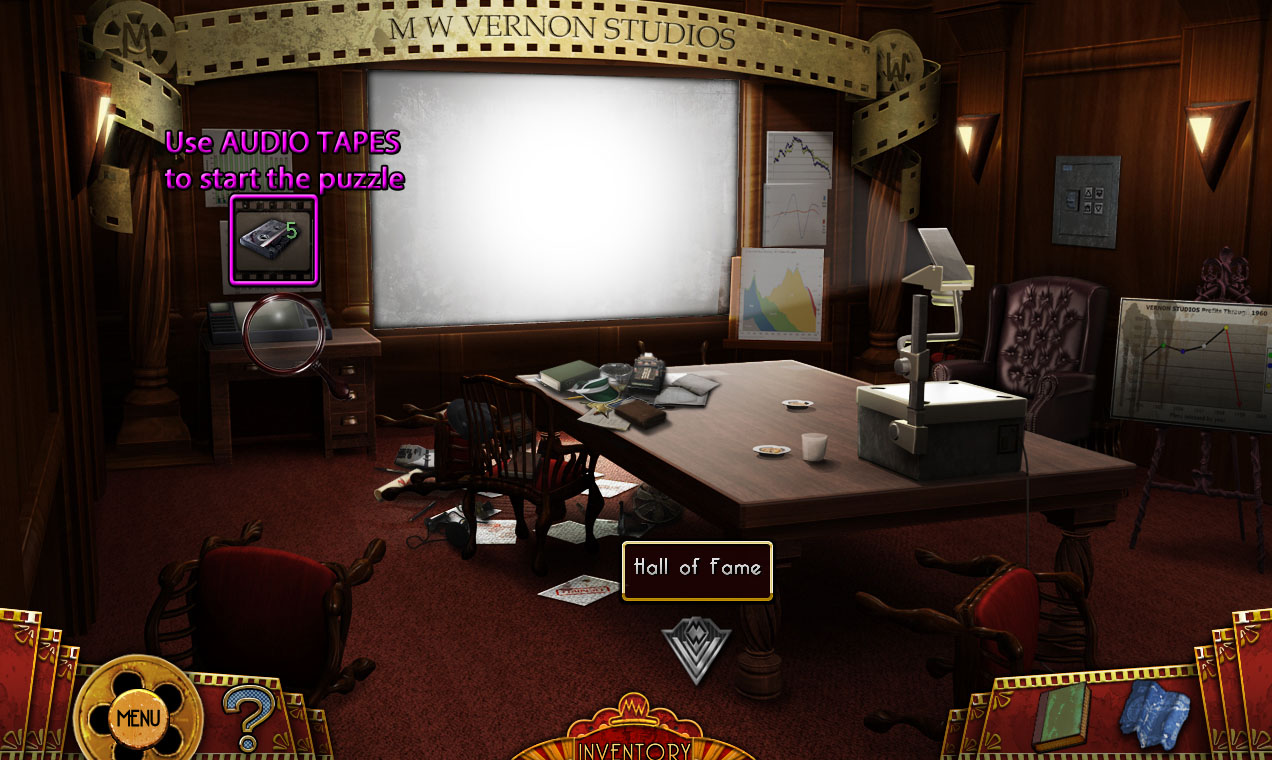
Task: Save Mum from M.W. Vernon
Red Carpet
Screenshot
Pick up the AUDIO TAPE (1/5) on the floor near the bottom of the right door.
Go back to the Grand Foyer, then continue right to the Hall of Fame.
Hall of Fame
Screenshot
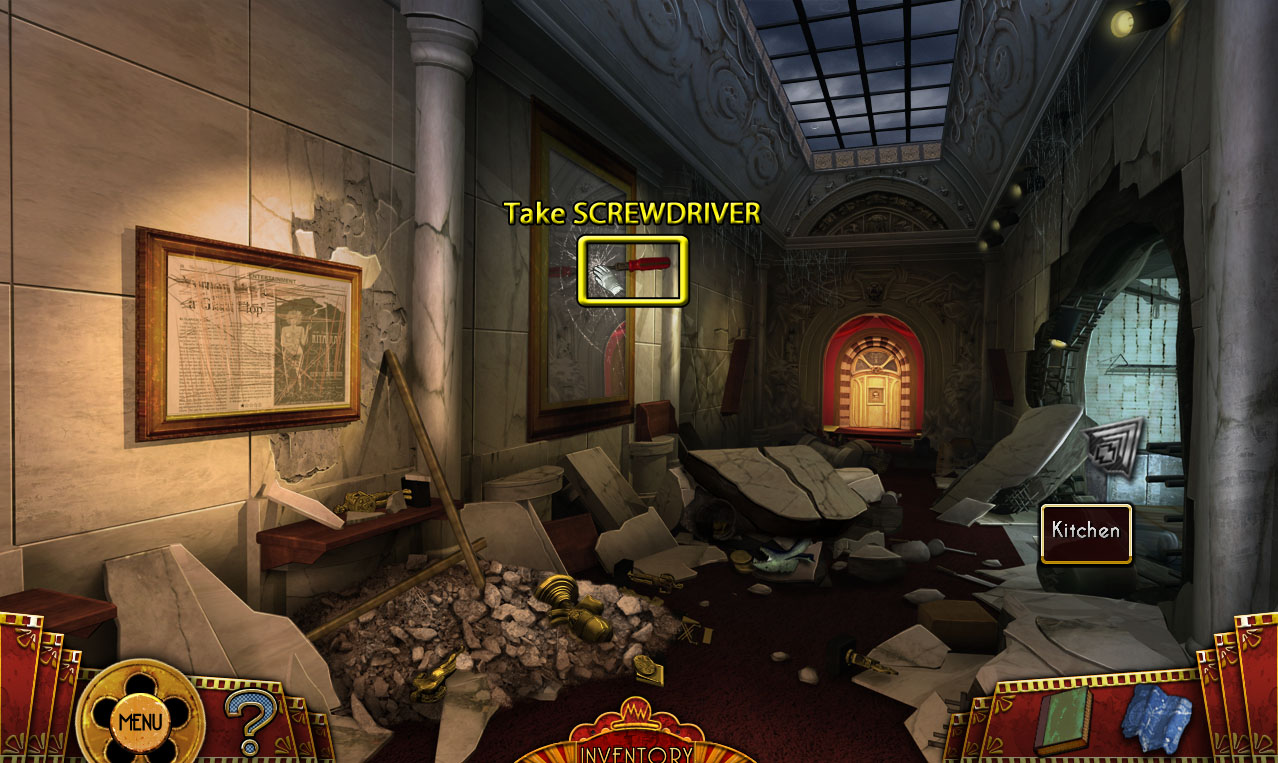
Take the SCREWDRIVER sticking out of the broken mirror.
Continue right to the Kitchen.
Kitchen
Screenshot
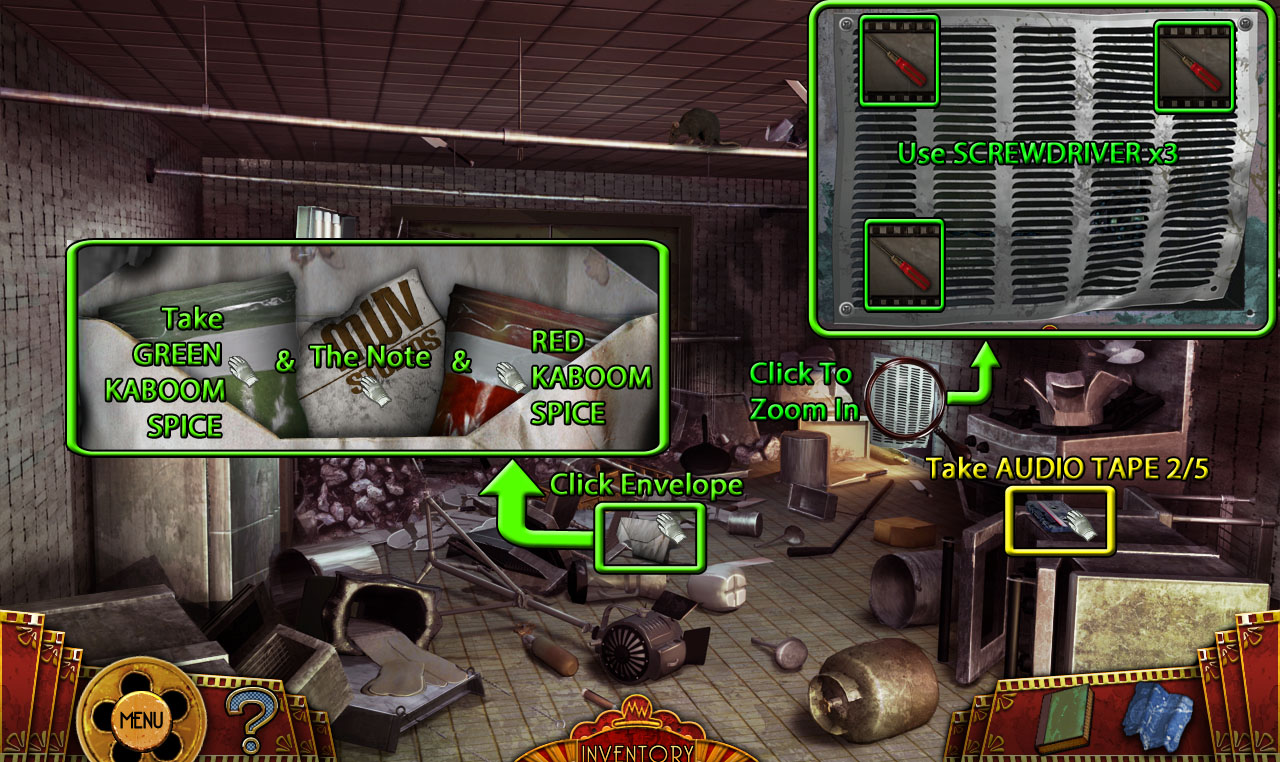
Pick up the AUDIO TAPE (2/5) on top of the overturned oven.
Click the envelope on the floor between the fallen chair and blender to zoom in.
Read the note inside the envelope for the explosive instructions.
Take the GREEN KABOOM SPICE and the RED KABOOM SPICE from the envelope.
Click the vent in the right wall for a closer look.
Use the SCREWDRIVER from the mirror in the Hall of Fame to remove the screws from the corners of the vent.
Once the cover is removed, go inside the Vent.
Vent
Screenshot
Pick up the AUDIO TAPE (3/5) in the corner of the vent by the roll of film.
Turn left to face the exit of the vent.
Click the cover twice to remove it.
Continue forward to the Crews Quarters.
Crew's Quarters
Screenshot
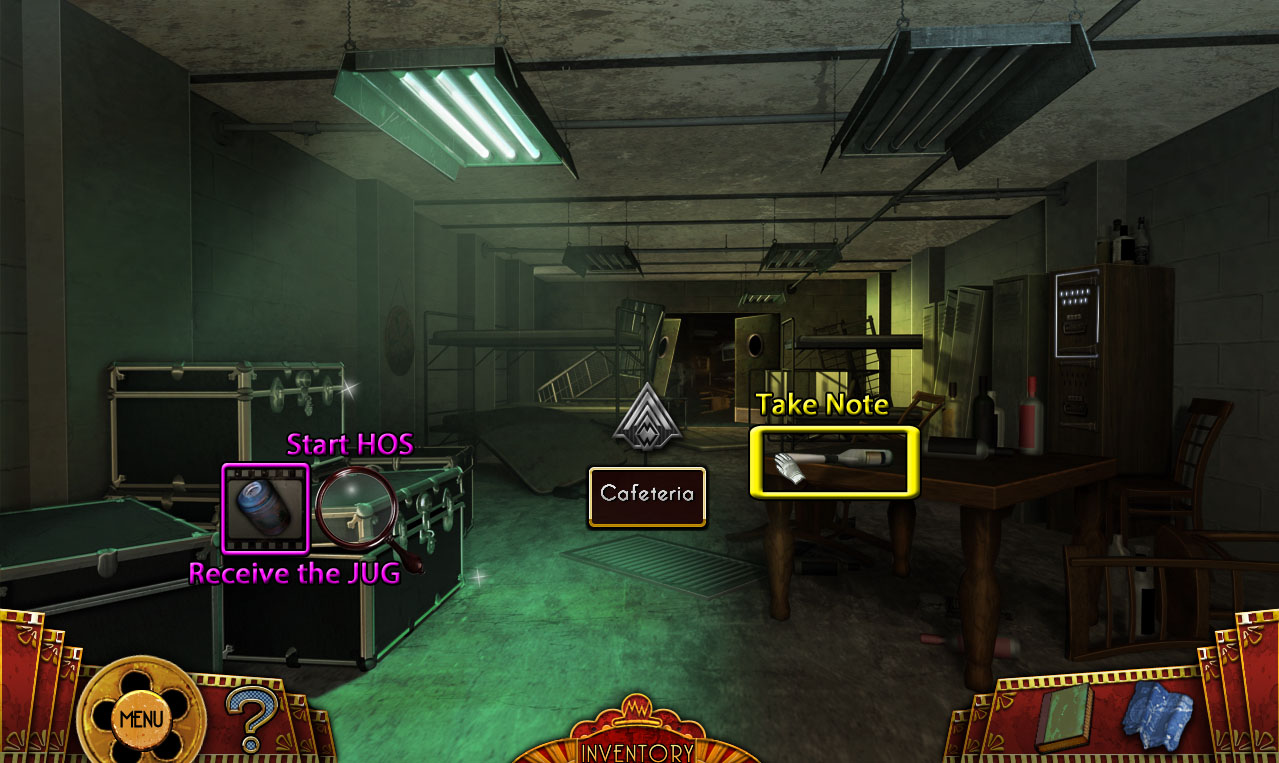
Read the note inside the bottle on the table for the film development instructions.
Click the stack of black boxes to start the hidden object scene.
Screenshot.
Once the hidden object scene is complete, you will receive the JUG.
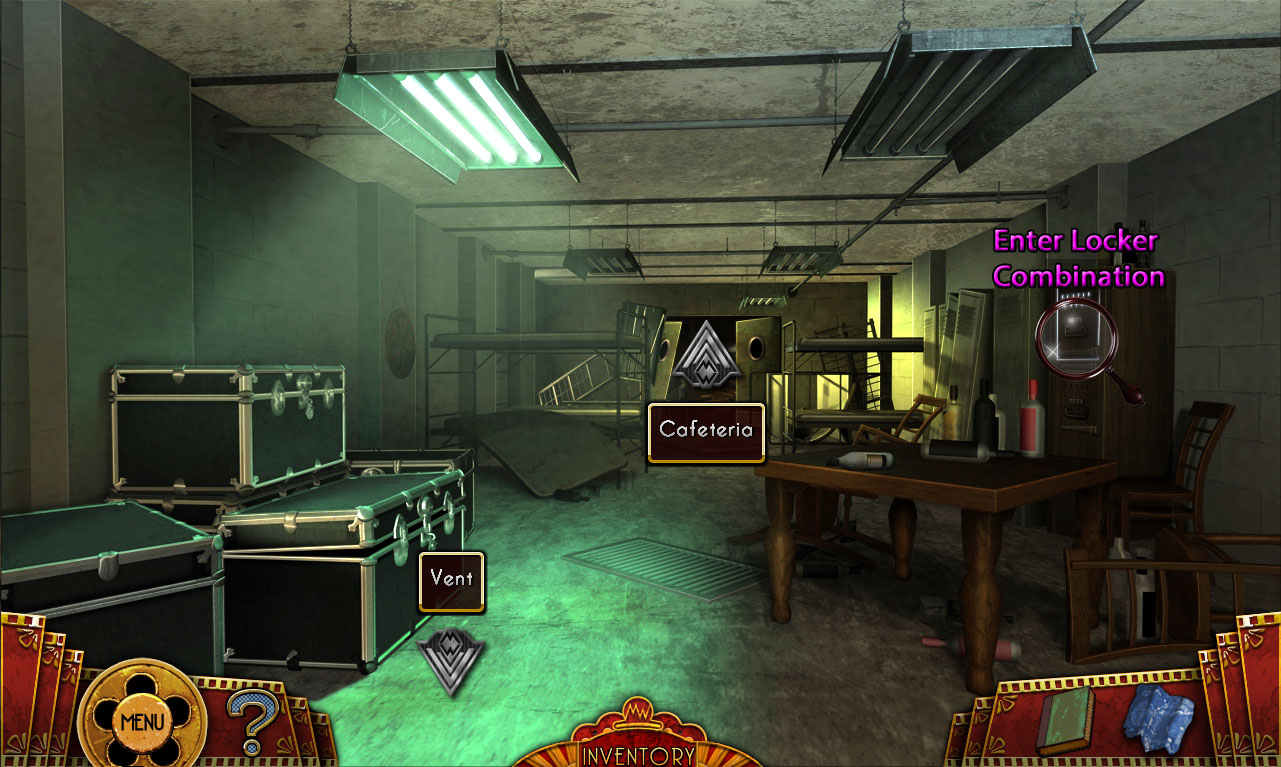
Go forward into the Cafeteria.
Cafeteria
Screenshot
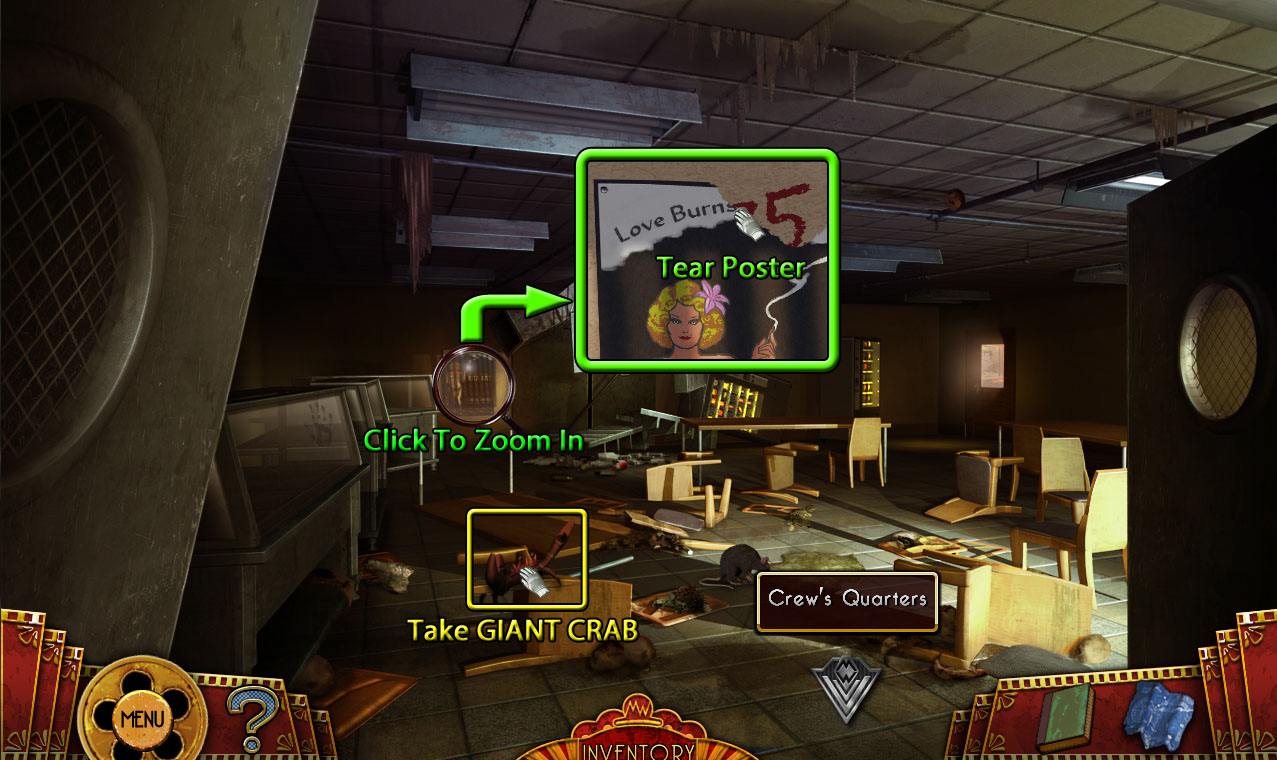
Pick up the GIANT CRAB on top of the overturned chair.
Click the posted on the back wall to zoom in.
Click the poster again to tear off the corner.
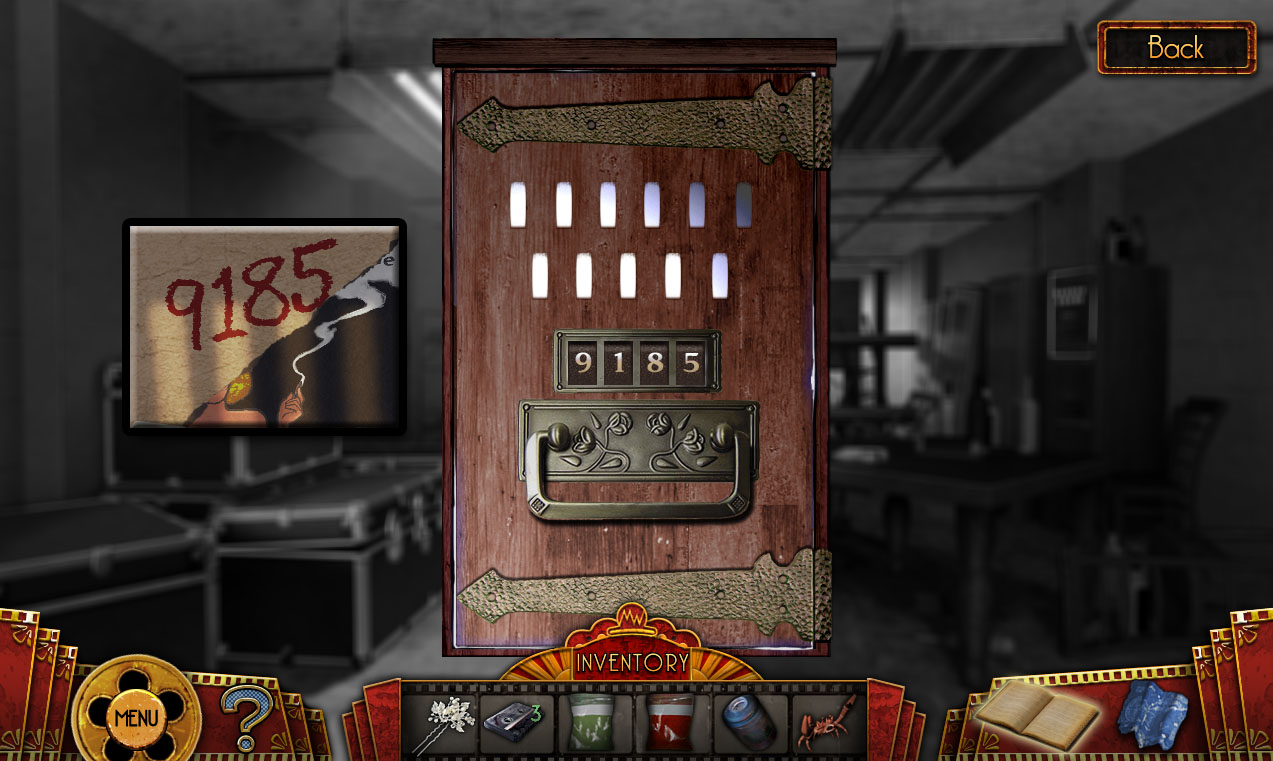
Note the 4 digit number written on the wall: 9185.
Go back to the Crew's Quarters.
Crew's Quarters
Screenshot
Click the locker against the right wall for a closer look.
Click the dials to enter the combination found behind the poster in the Cafeteria.
Screenshot.
Take the WRITER'S ROOM KEY from the open locker.
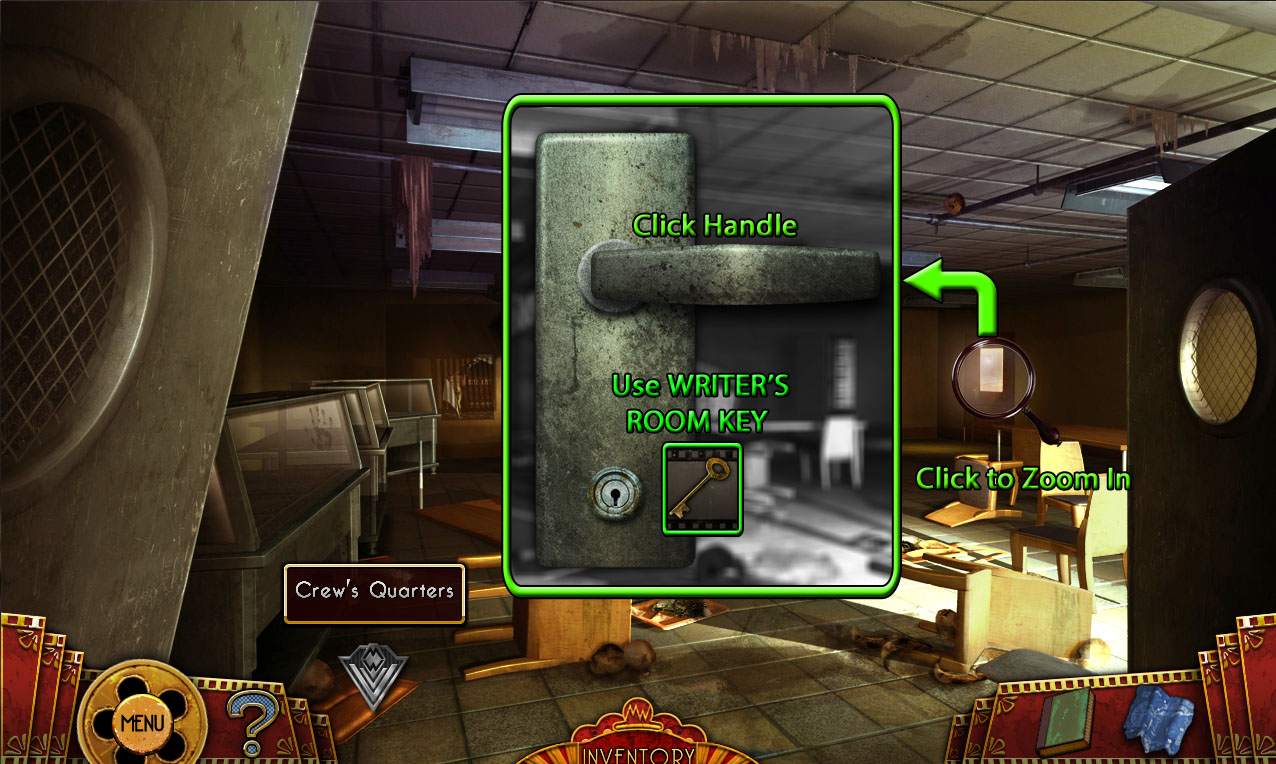
Return to the Cafeteria.
Cafeteria
Screenshot
Click the locked door to zoom in.
Use the WRITER'S ROOM KEY from the locker in the Crew's Quarters on the keyhole.
Turn the key, then click the handle.
Go through the open door to the Writer's Room.
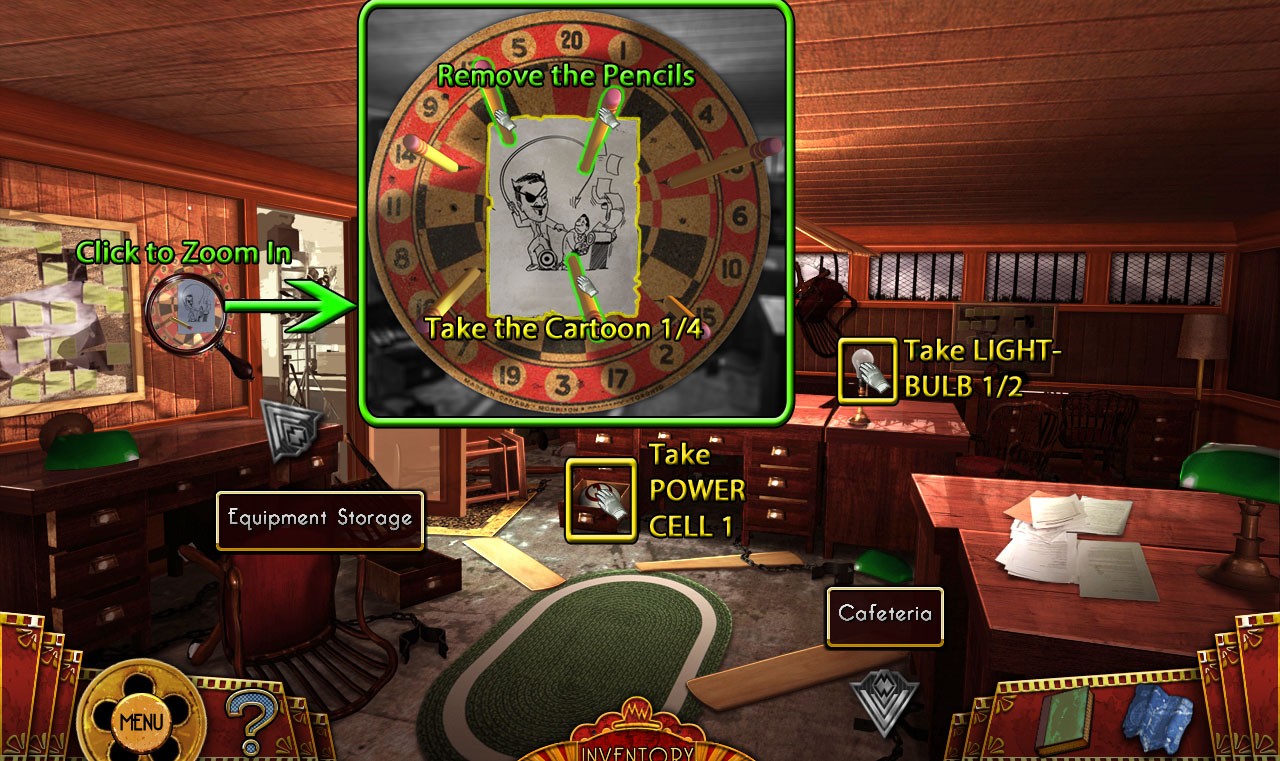
Writer's Room
Screenshot
Pick up the POWER CELL 1 from the open drawer at the bottom of the desk.
Take the LIGHT BULB (1/2) from the uncovered lamp on top of the same desk.
Click the dart board on the wall for a closer look.
Remove the three pencils pinned to the paper on the dart board.
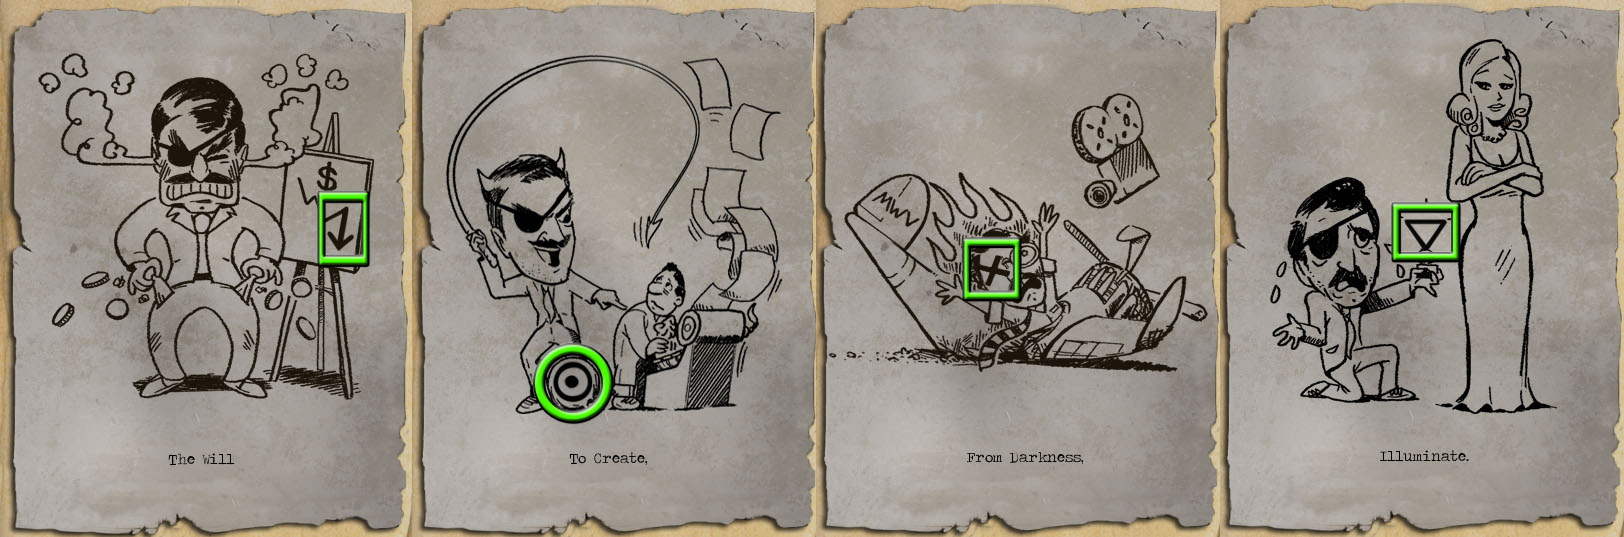
Click the paper to read the message and the back and add the Cartoon (1/4) "To Create" to your Journal.
Click the left door to open it.
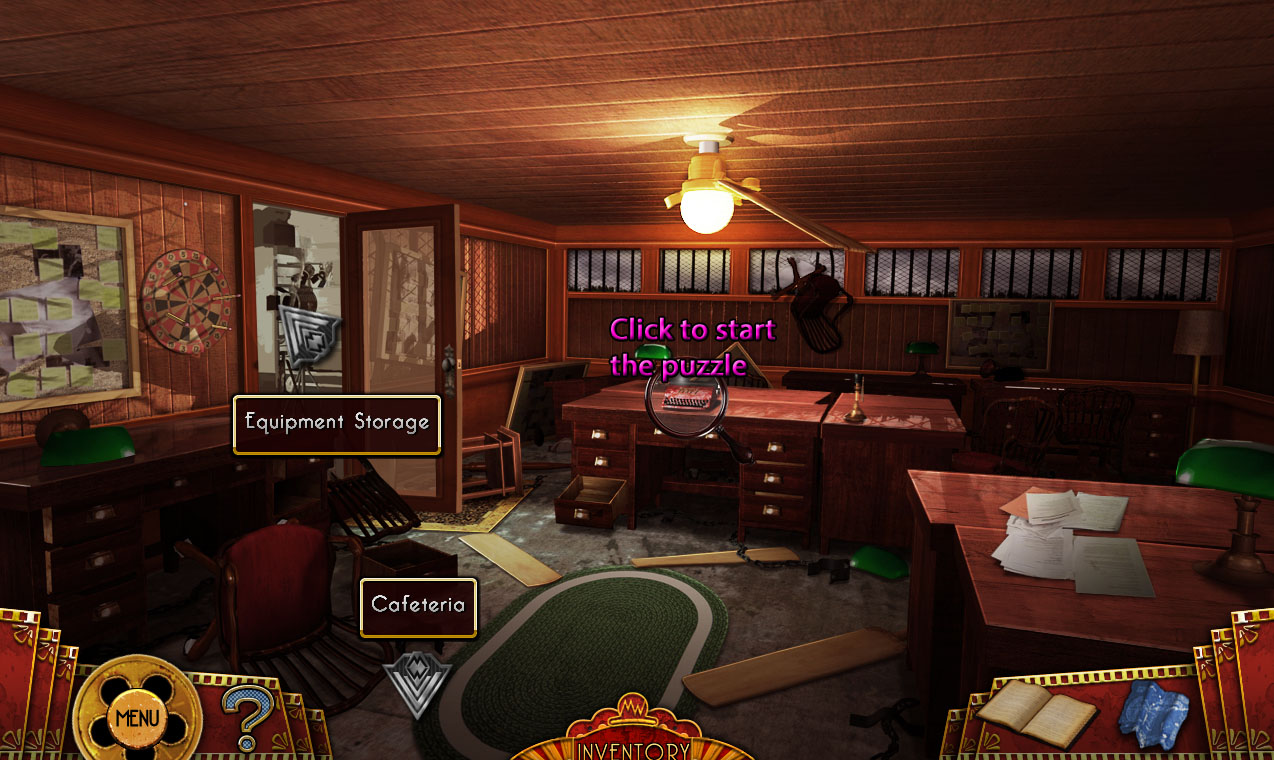
Continue left to the Equipment Storage room.
Equipment Storage
Screenshot
Grab the paper hanging from the ceiling vent to add the robot diagram to your journal.
Take the AUDIO TAPE (4/5) on top of the tripod.
Move forward to Prop Room 1.
Prop Room 1
Screenshot
Click the fallen metal shelves to start the hidden object scene.
Screenshot.
Once the hidden object scene is complete, you will receive the M.W. TILE.
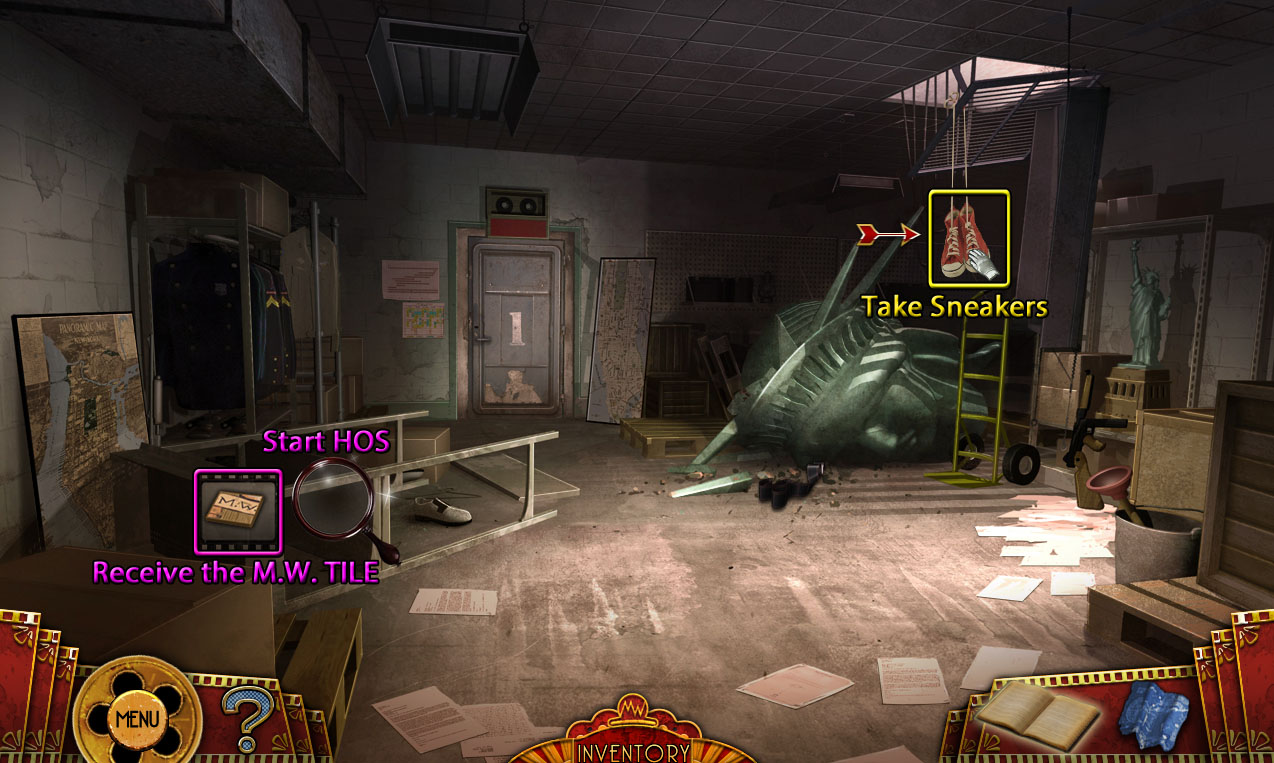
Take the Sneakers hanging from the ceiling vent.
The Sneakers will allow you to instant travel to any already visited location on the Map.
Click the Map in the toolbar for a closer look, then click the Hall of Fame to travel there.
Hall of Fame
Screenshot
Click the fallen ceiling block in the pile of rubble on the floor to zoom in.
Place the RED KABOOM SPICE and GREEN KABOOM SPICE from the envelope in the kitchen to the crack in the block.
After the block is destroyed, pick up the uncovered SEA SERPENT from the floor.
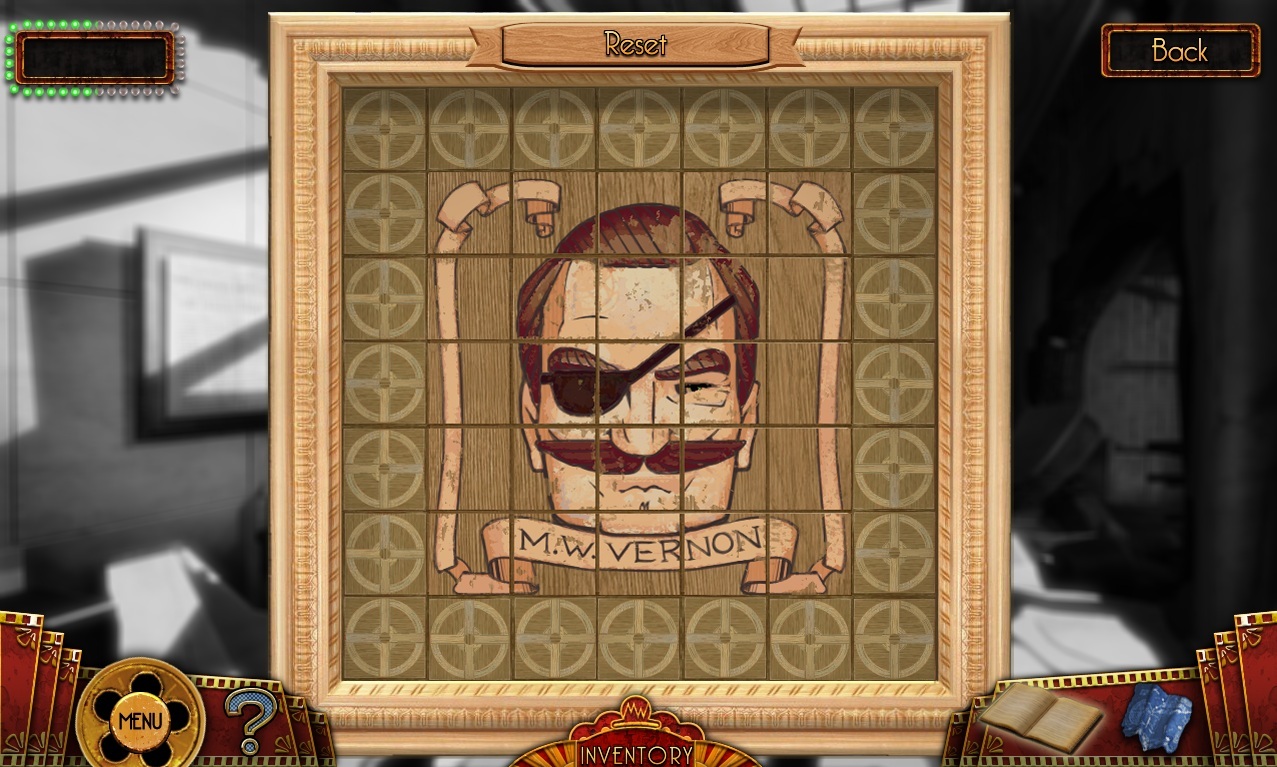
Click the door at the end of the hall for a closer look.
Add the M.W. Tile from the Prop Room hidden object scene to the missing space on the board to start the puzzle.
Rotate the tiles to arrange the portrait of M.W. Vernon.
Click a tile to rotate it and all adjacent tiles around it 90 degrees counterclockwise.
Solution.
Once the puzzle is solved, go through the open door to the Meeting Room.
Meeting Room
Screenshot
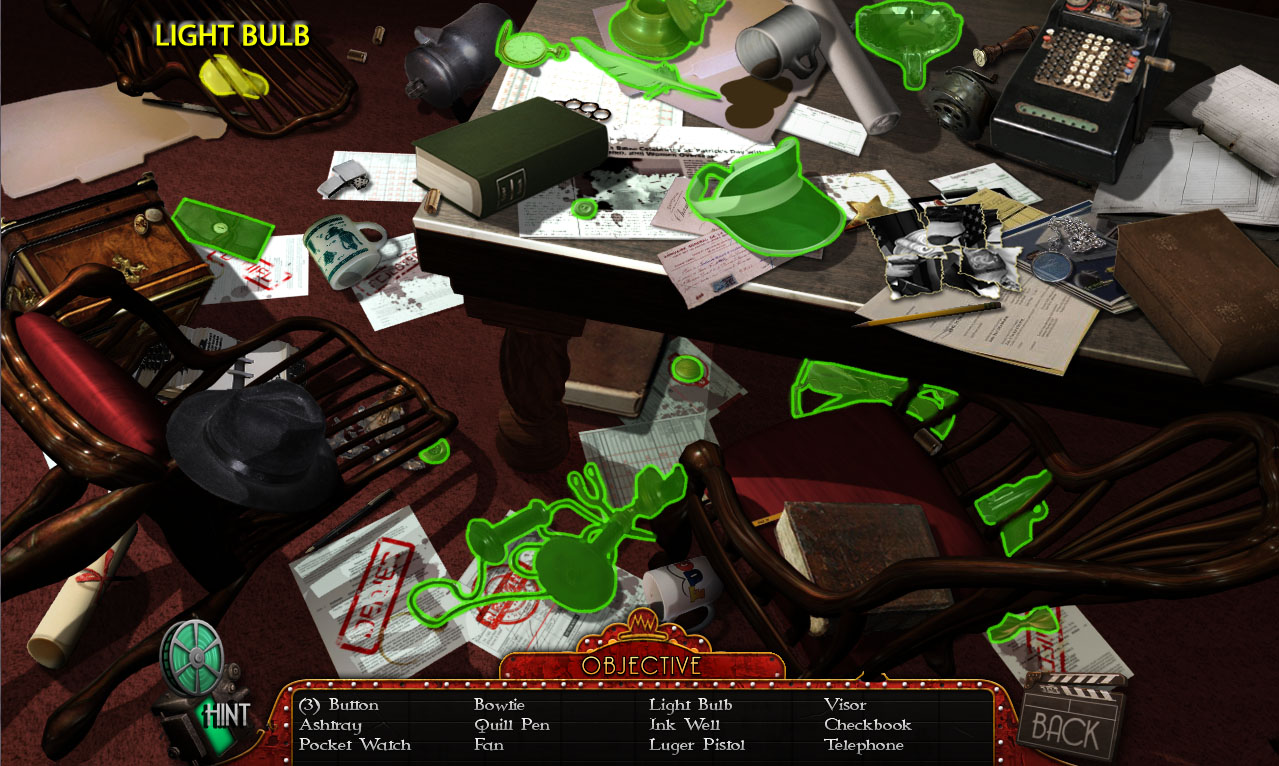
Click the pile of junk at the end of the table to start the hidden object scene.
Screenshot.
Once the hidden object scene is complete, you will receive the LIGHT BULB (2/2).
Return to Prop Room 1.
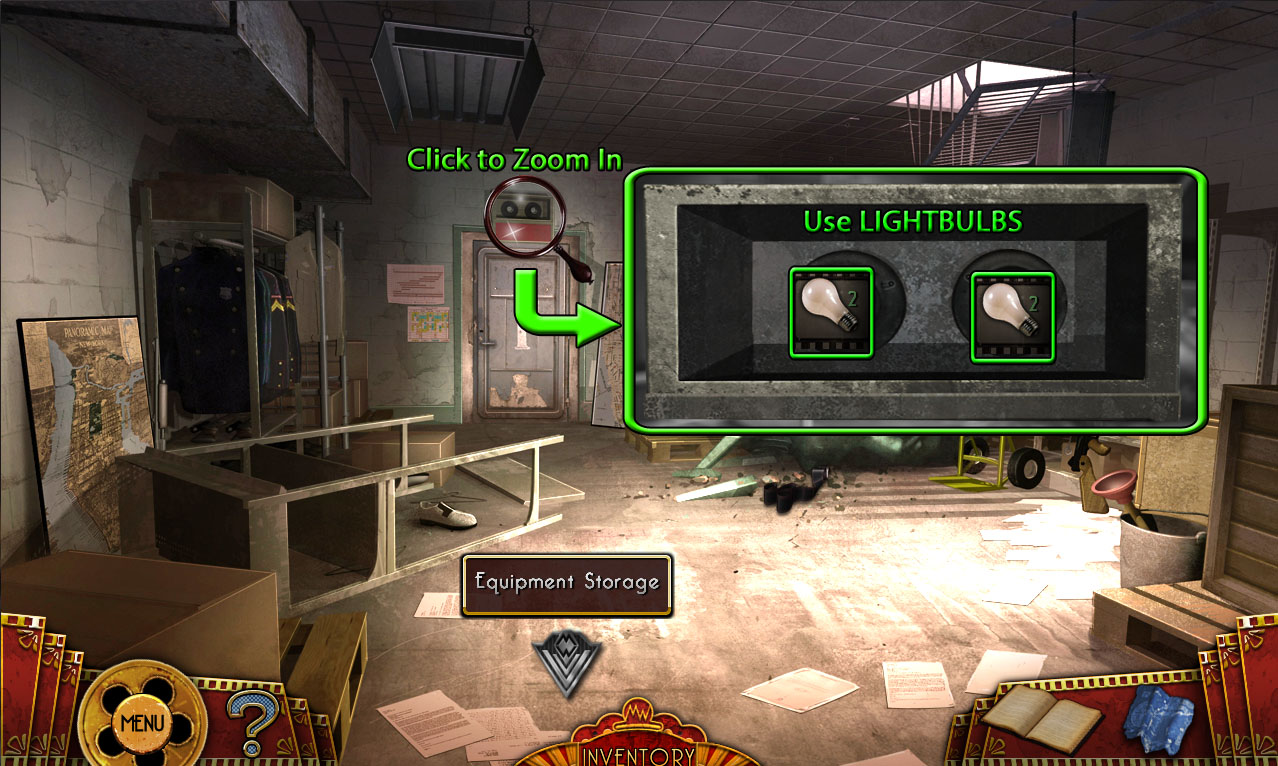
Prop Room 1
Screenshot
Click the top of the metal door to zoom in.
Place the two LIGHT BULBS (One on the desk in the Writer's Room and one from the Meeting Room hidden object scene) into the sockets.
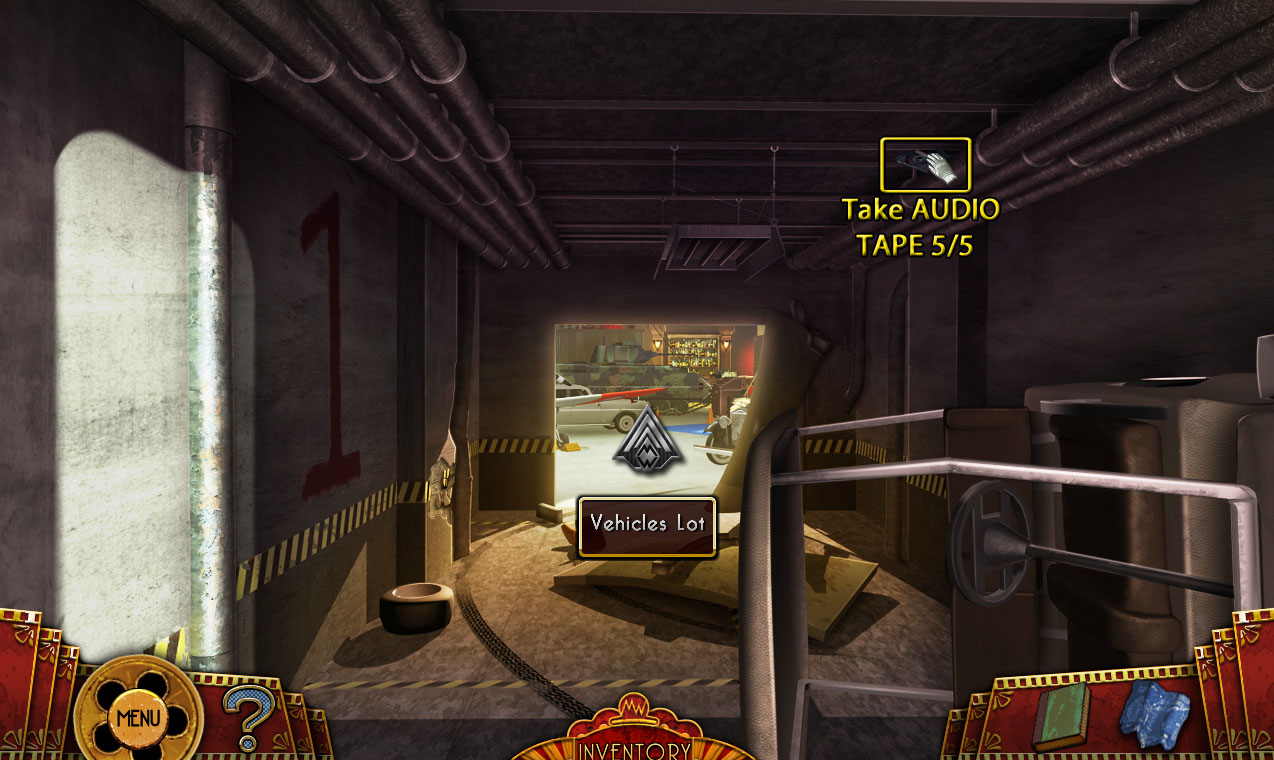
Go through the open door to the Lot 1 Corridor.
Lot 1 Corridor
Screenshot
Take the AUDIO TAPE (5/5) in the middle of the right ceiling pipes.
Continue forward to the Vehicle Lot.
Task: Obtain, then develop, the film strip trapped under the Statue of Liberty.
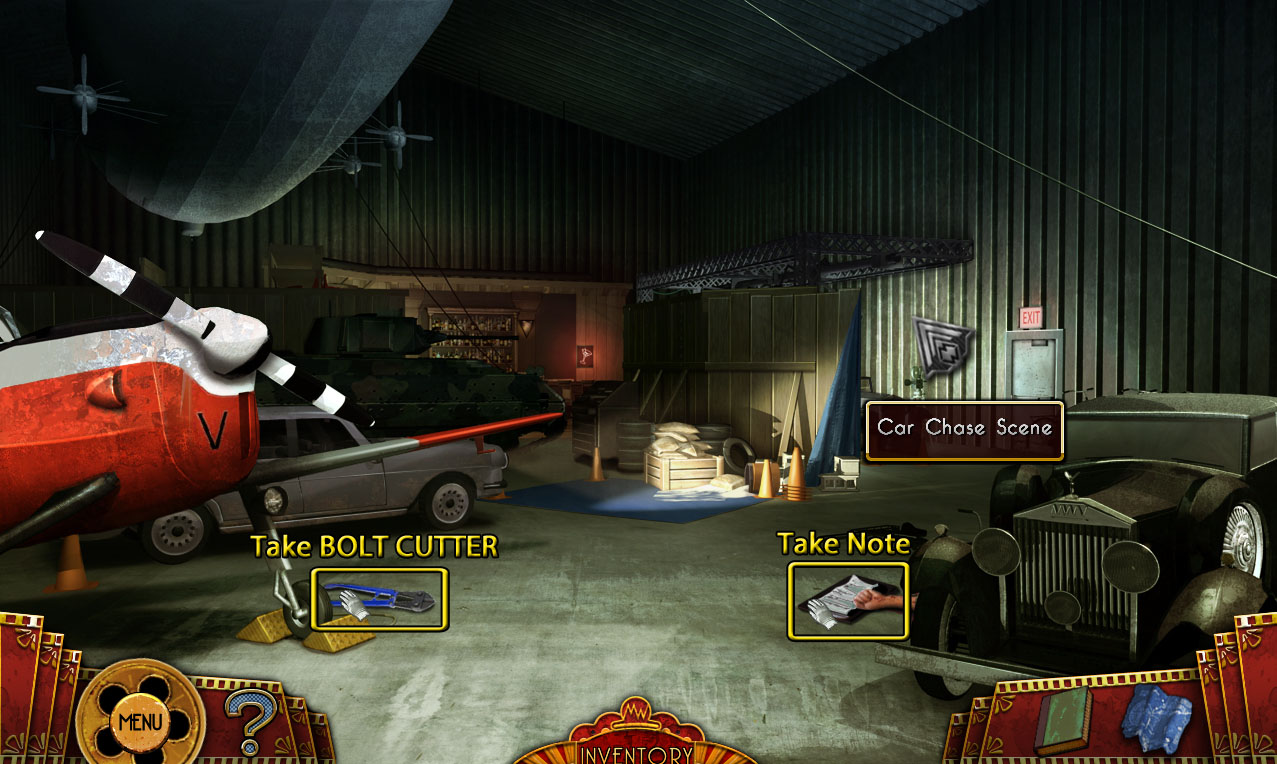
Vehicles Lot
Screenshot
Take the BOLT CUTTER on the floor by the plane's front landing gear wheel.
Pick up the clipboard next to the corpse's hand to add the note to your Journal.
Move forward towards the exit door to travel to the Car Chase Set.
Car Chase Set
Screenshot
Use the JUG from the Crew's Quarters hidden object scene on the stream of water from the rain machine to collect the WATER JUG.
Click the CAR JACK under the car once to remove it and a second time to add it to your inventory.
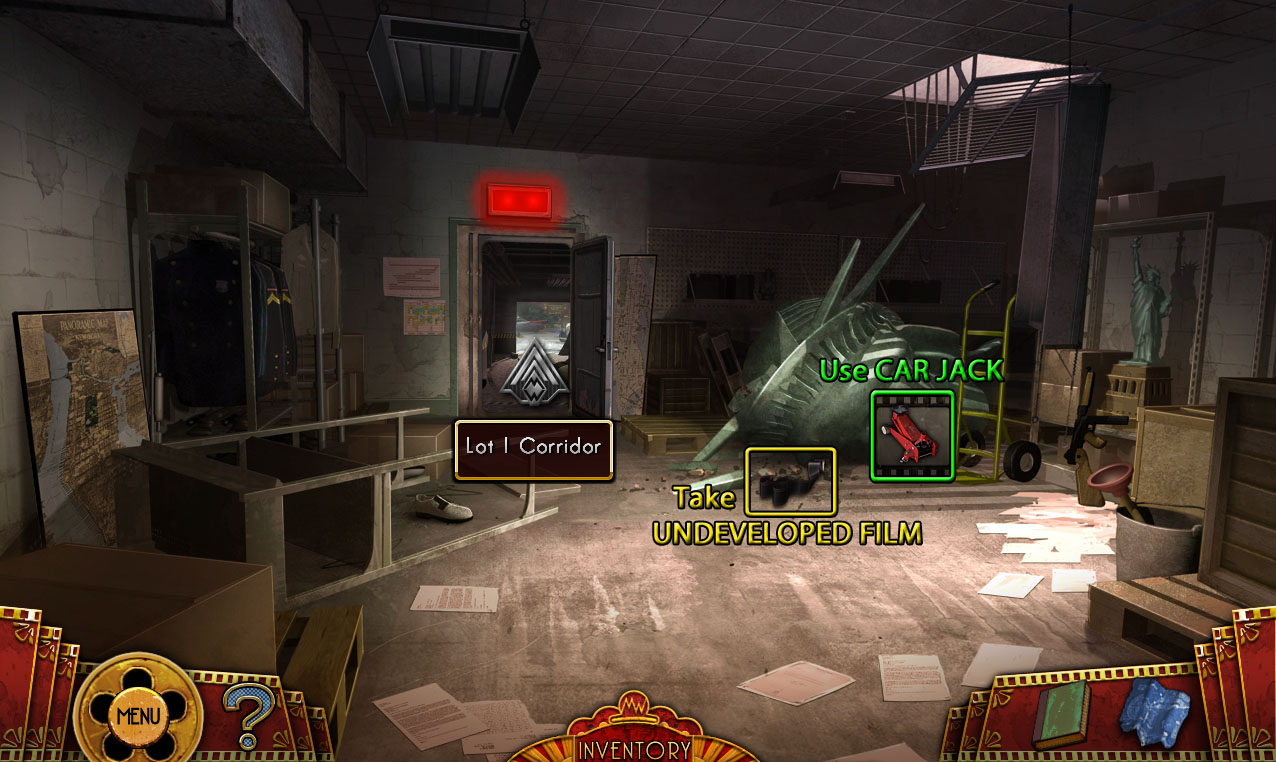
Use the Map to travel to Prop Room 1.
Prop Room 1
Screenshot
Use the CAR JACK on the giant Statue of Liberty head.
Take the uncovered UNDEVELOPED FILM from underneath the statue head.
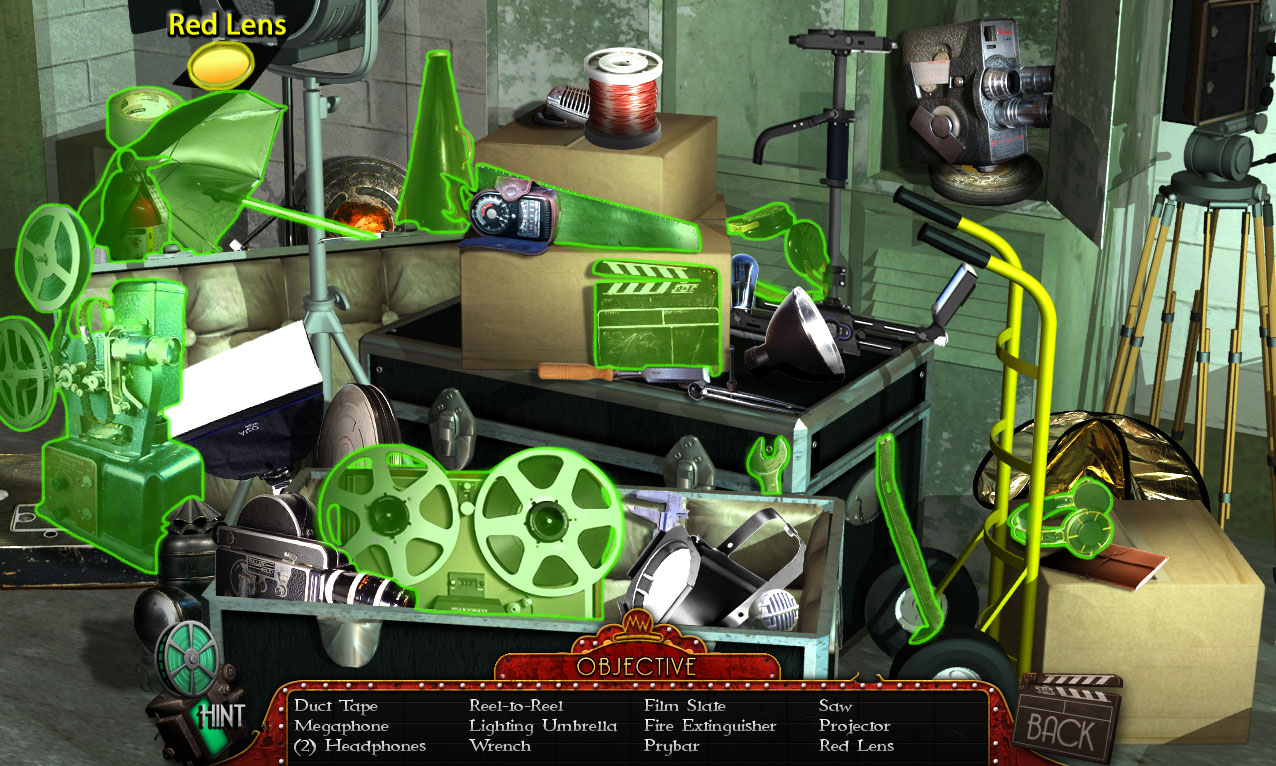
Go back to the Equipment Storage room.
Equipment Storage
Screenshot
Click the large black box on the floor to zoom in.
Use the BOLT CUTTER from the floor of the Vehicle Lot to remove the two padlocks.
Click the open box to start the hidden object scene.
Screenshot.
Once the hidden object scene is complete, you will receive the RED LENS.
Use the Map to travel to the Meeting Room.
Meeting Room
Screenshot
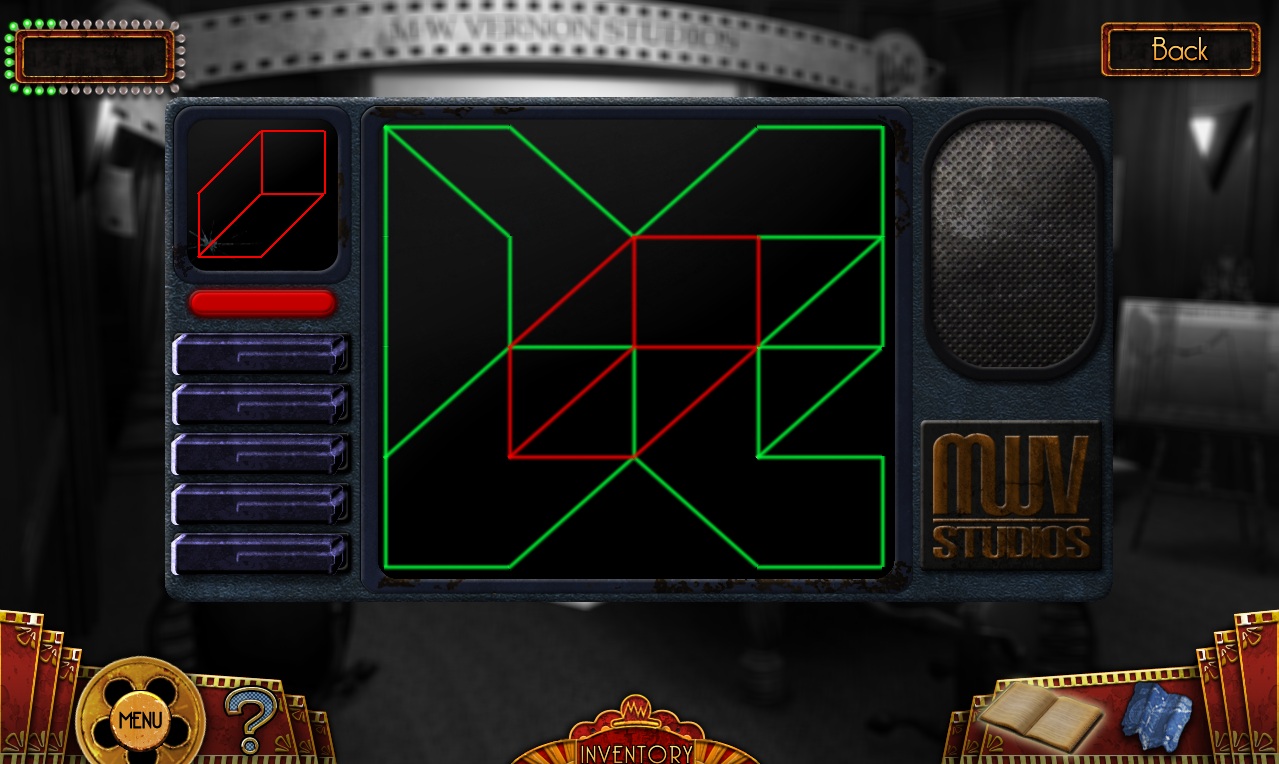
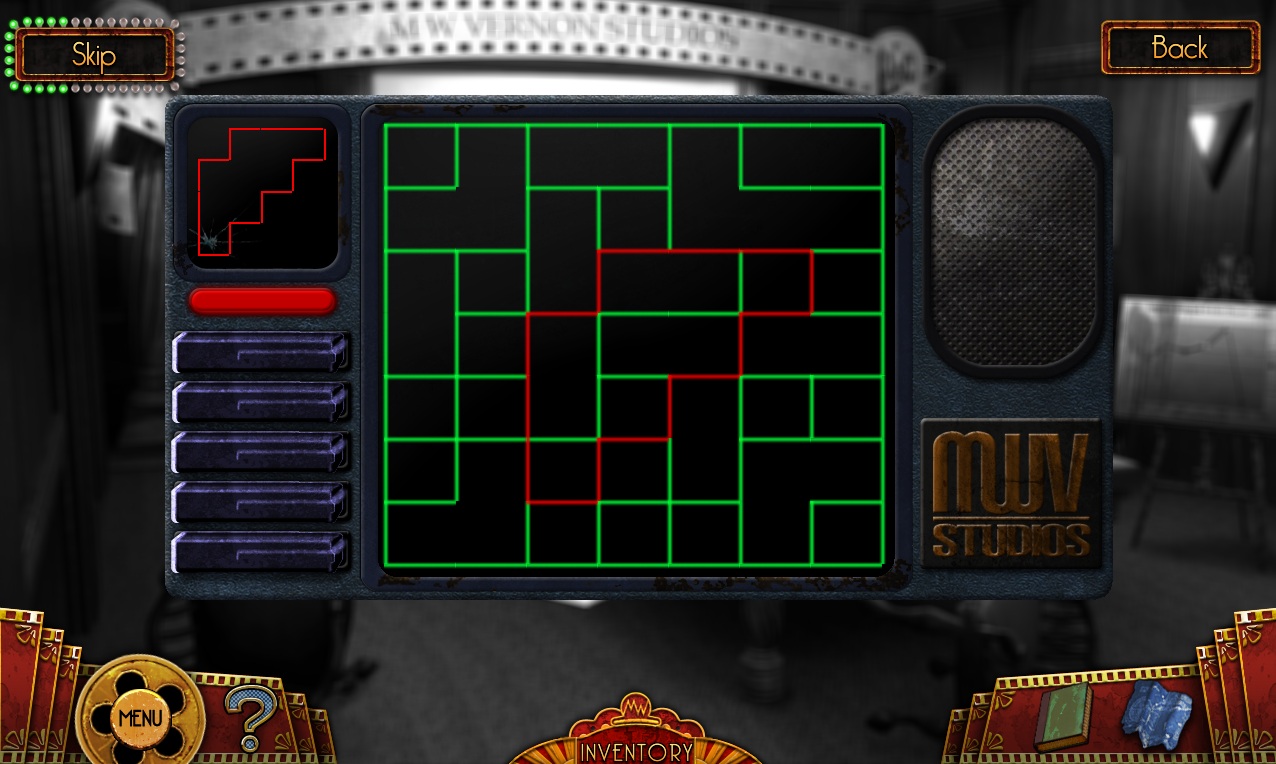
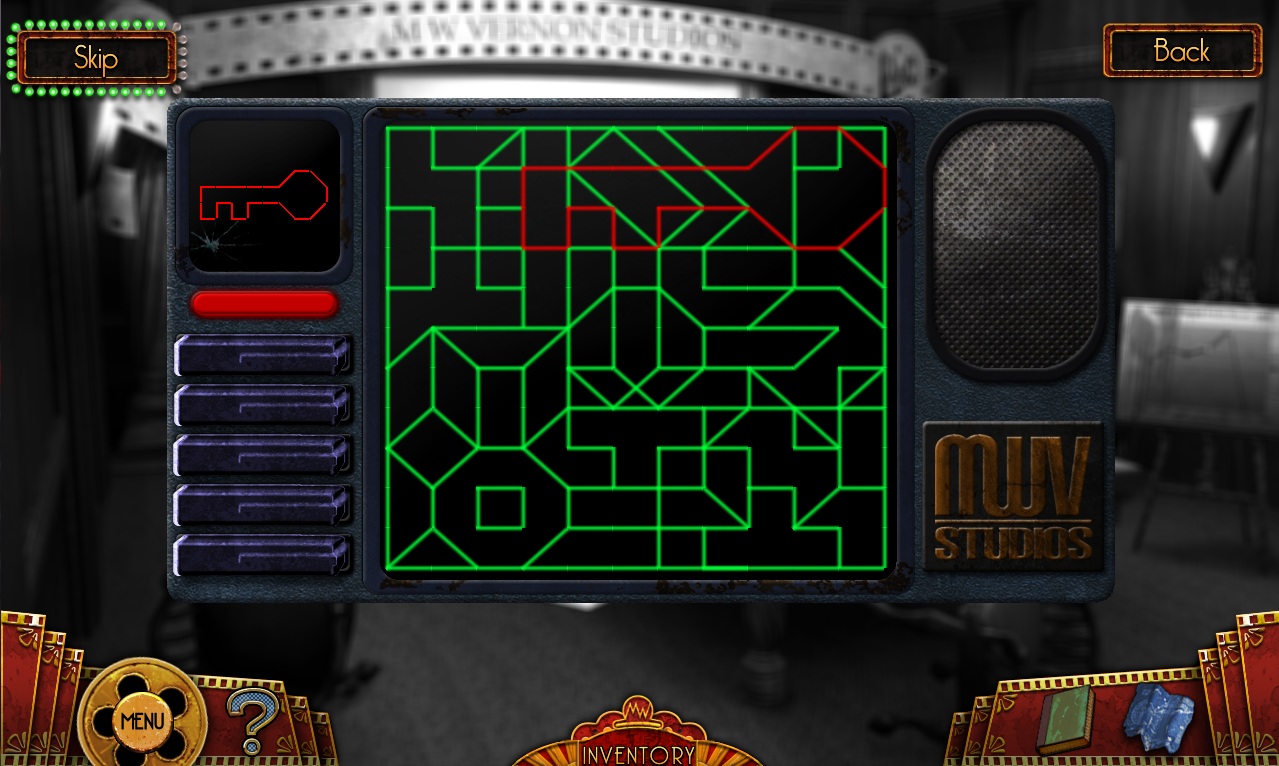
Click the monitor device on top of the desk for a closer look.
Add the 5 AUDIO TAPES to the empty slots at the side of the machine.
Tape 1 is found on the floor in the Red Carpet room.
Tape 2 is on top of the overturned oven in the Kitchen.
Tape 3 is beside the roll of film inside the Vent.
Tape 4 is on the tripod in the Equipment Storage room.
Tape 5 between the pipes on the right side of the ceiling.
When all of the tapes are in the slots, the puzzle will begin.
Duplicate the pattern shown in the smaller image at the upper left corner by highlighting the correct lines.
Click a line to change its color between green and red.
Solution #1.
Solution #2.
Solution #3.
Solution #4.
Solution #5.
Once the puzzle is solved, take the bottle of FILM DEVELOPER from the revealed compartment at the lower right corner of the device.
Return to the Car Chase Set, then continue right to the Nightclub Set.
Nightclub Set
Screenshot
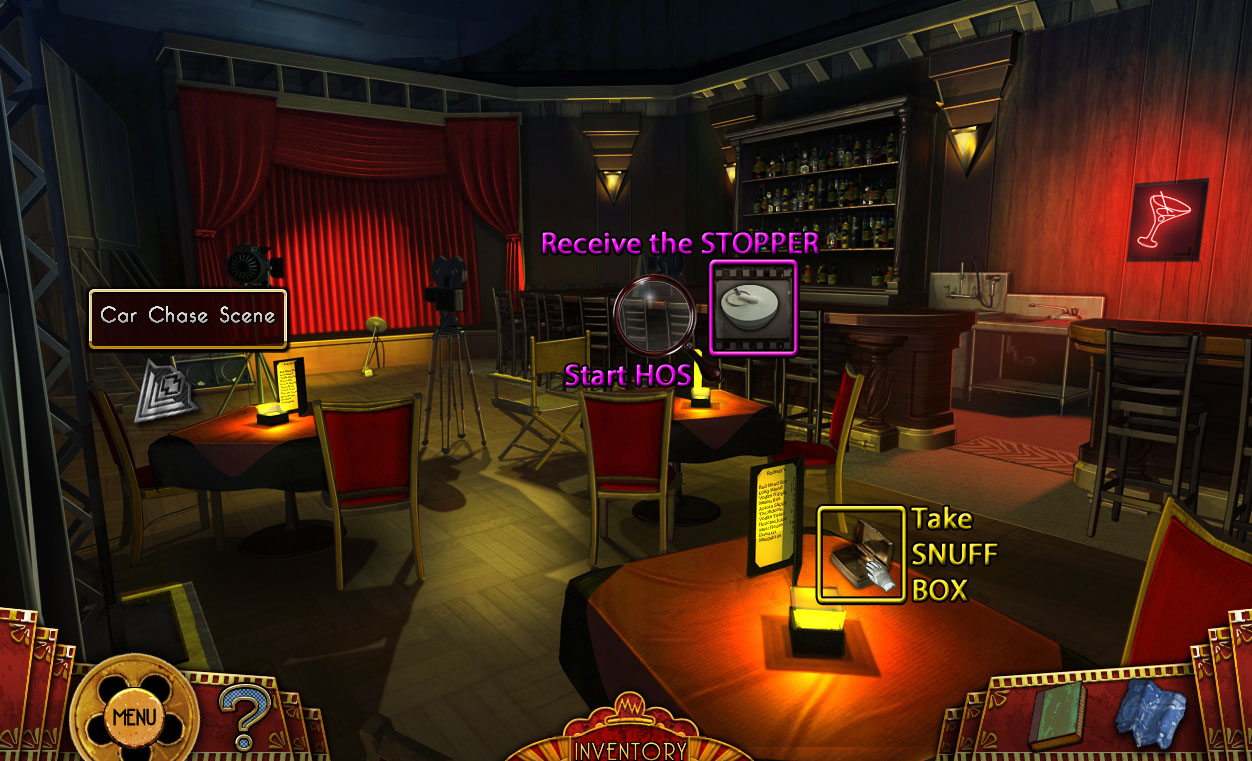
Click the bar to start the hidden object scene.
Screenshot.
Once the hidden object scene is complete, you will receive a STOPPER.
Pick up the SNUFF BOX on top of the closest table.
Go back twice to the Vehicle Lot.
Vehicle Lot
Screenshot
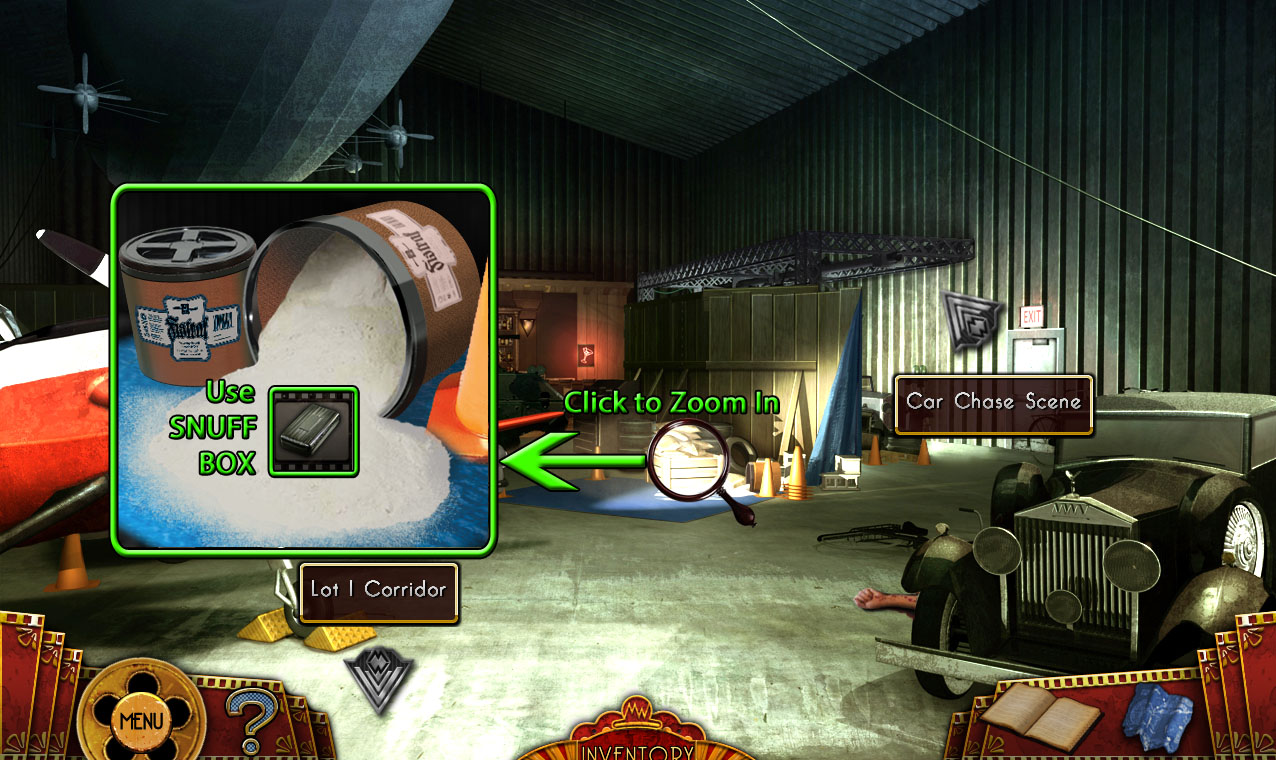
Click the blue floor mat for a closer look.
Use the SNUFF BOX from the table at the Nightclub Set to collect the powder of FILM FIXER.
Return to the Nightclub Set.
Nightclub Set
Screenshot
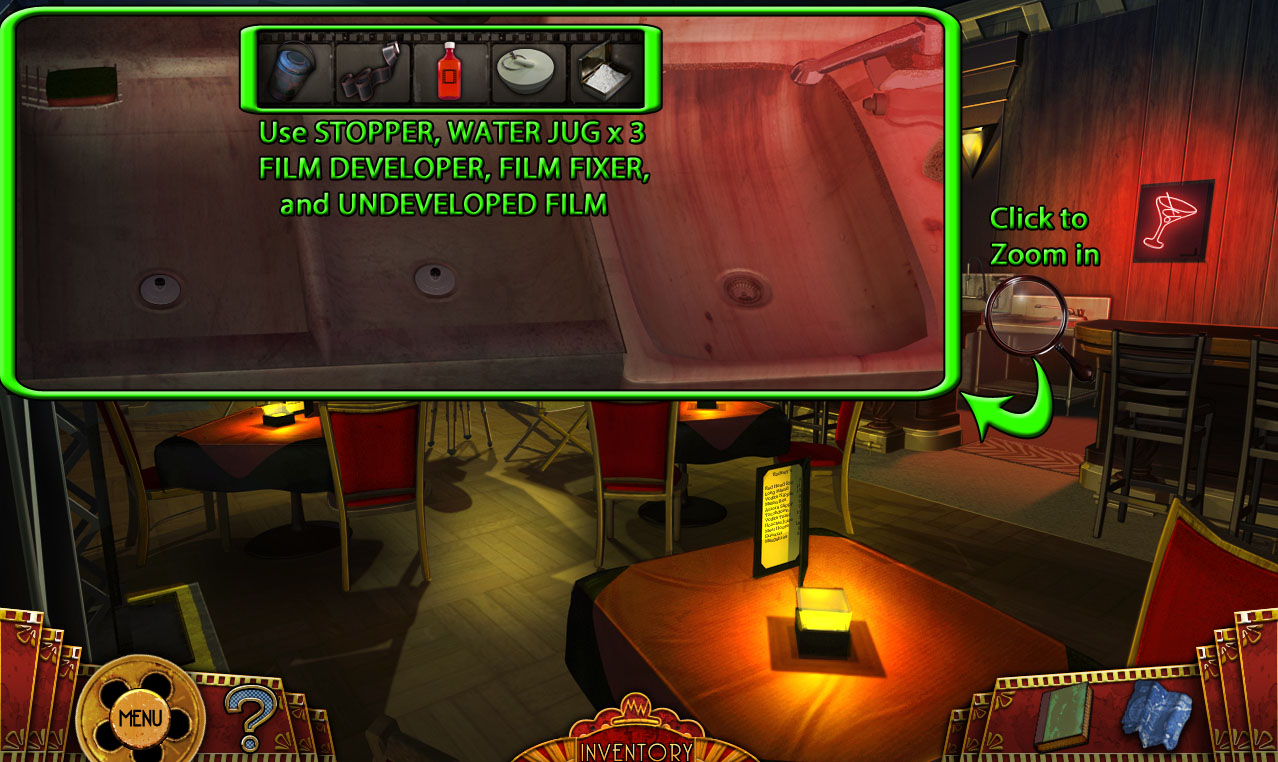
Click the sink behind the bar counter to zoom in.
Add the STOPPER to the empty drain in the right sink.
Pour the WATER JUG from the Car Chase Set into all three sinks.
Add the FILM DEVELOPER from the Meeting Room line puzzle to the right sink.
Add the FILM FIXER from the Vehicle lot to the middle sink.
Put the roll of UNDEVELOPED FILM into the right sink.
When the film floats to the surface, click and drag it into the middle sink.
After the film floats again to the top, click and drag it into the left sink.
Take the finished roll of DEVELOPED FILM.
Use the Map to travel to the Meeting Room.
Task: Find a way to illuminate the developed film strip
Meeting Room
Screenshot
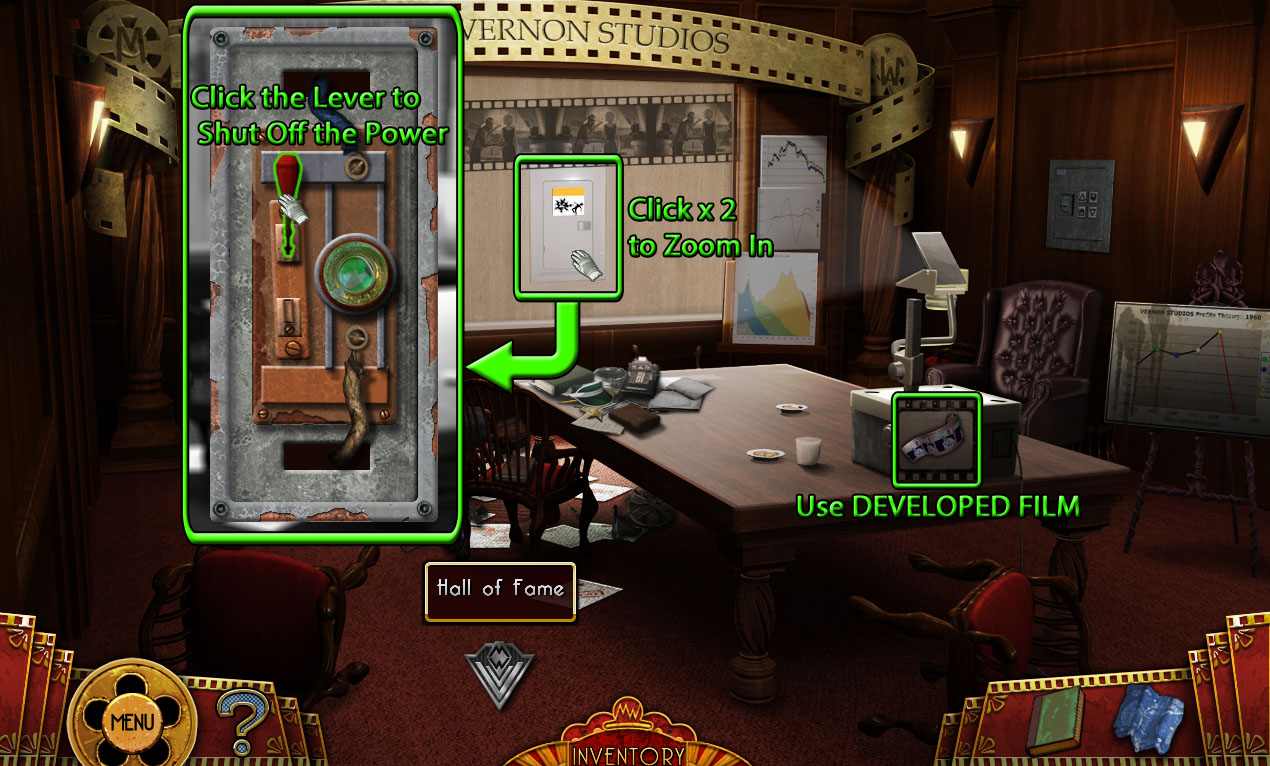
Place the DEVELOPED FILM created at the Nightclub Set into the overhead projector on the table.
Open the door to the electric panel in the middle of the projection screen.
Click the open panel for a closer look.
Click the handle at the side of the panel to shut off the power.
Use the Map to travel to the Red Carpet then continue forward through the double doors to the Theatre Room.
Task: Access the Projector Room
Theatre Room
Screenshot
Take the BLUE LENS on top of the left row of seats.
Use the Map to travel to the Equipment Storage room.
Equipment Storage
Screenshot
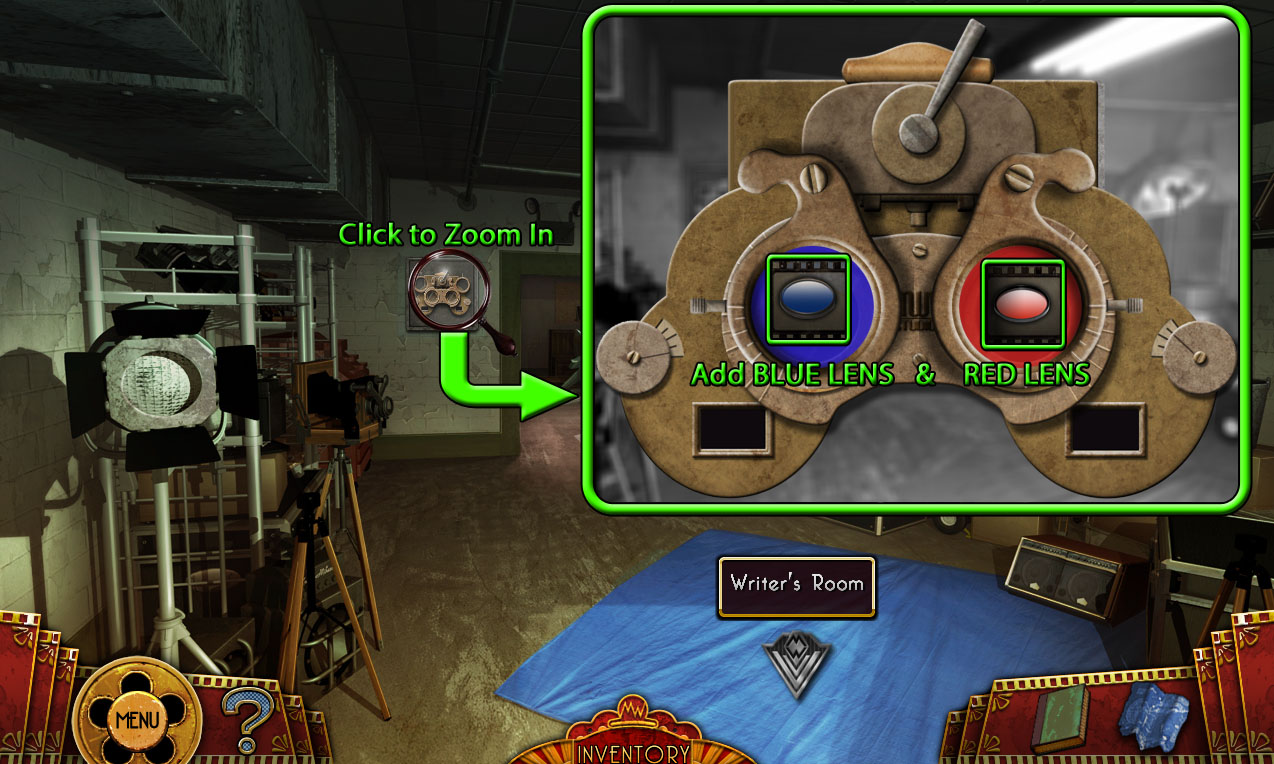
Click the view finder installed in the left wall for a closer look.
Add the RED LENS from the Equipment Storage hidden object scene to the left empty slot.
Add the BLUE LENS from the chair in the Theatre Room to the right empty slot.
Click the lenses to look through the view finder.
Note the pattern of the 5 symbols seen through the lenses.
Return to the Meeting Room.
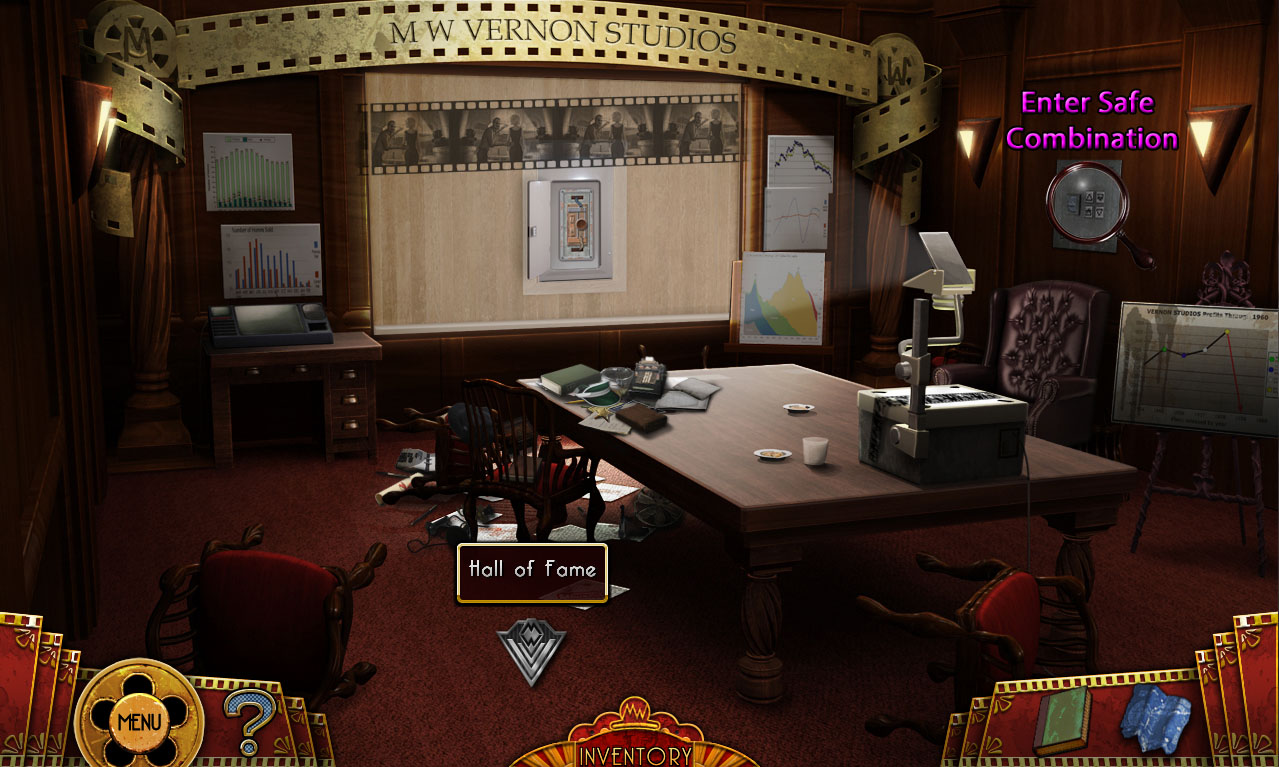
Meeting Room
Screenshot
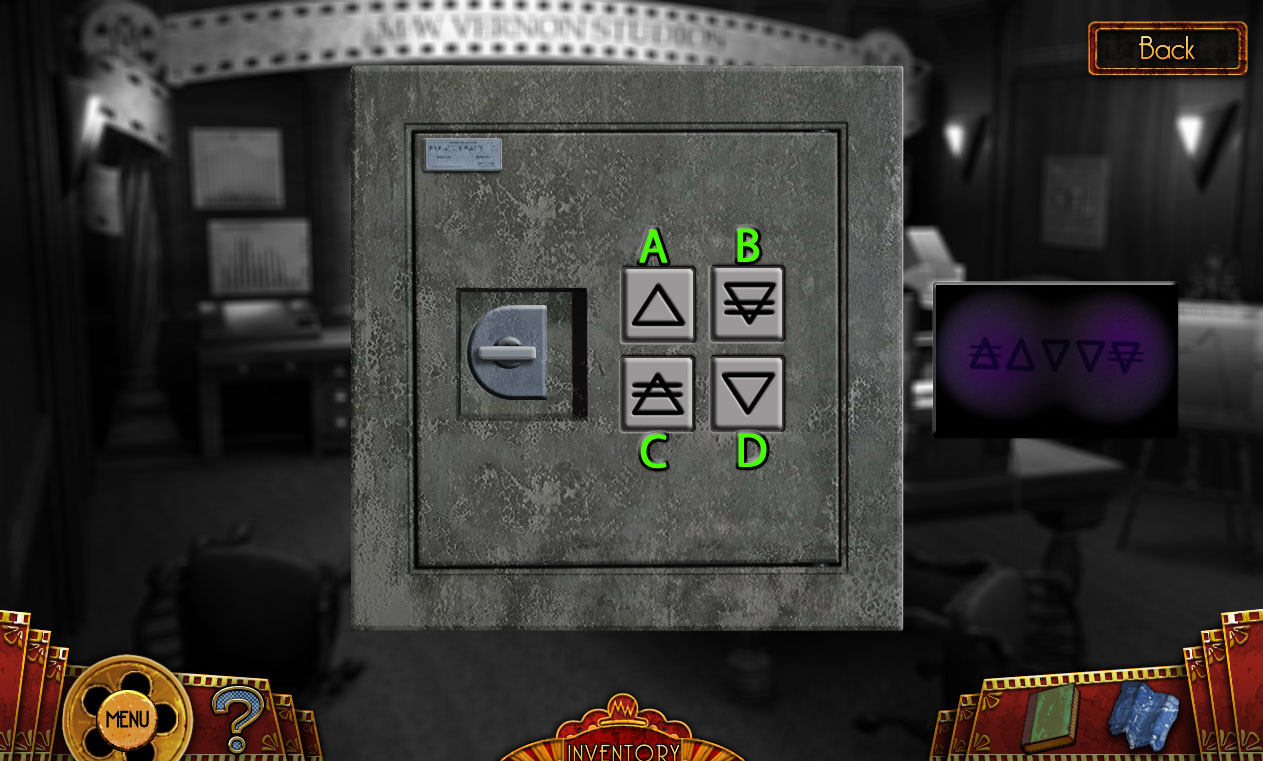
Click the safe in the middle of the right wall to zoom in.
Click the symbols in the correct order seen through the view finder at the Equipment Storage.
Press the buttons in the following order: C-A-D-D-B
Solution.
Take the PROJECTOR ROOM KEY from the open safe.
Go back to the Red Carpet.
Red Carpet
Screenshot
Click the right door to zoom in.
Use the PROJECTOR ROOM KEY from the safe in the Meeting Room on the lock.
Turn the key and click the handle to open the door.
Go through the open door into the Projector Room.
Task: Save Mum from M.W. Vernon (2)
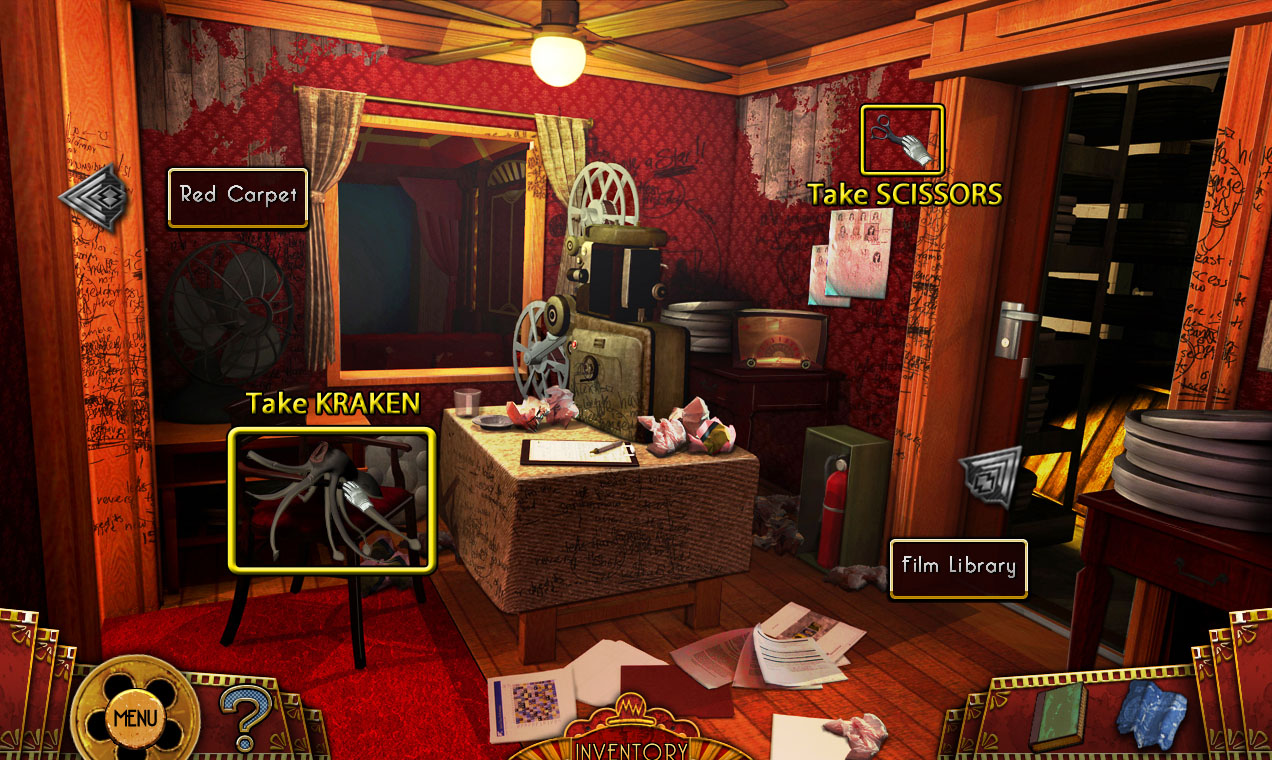
Projector Room
Screenshot
Pick up the miniature KRAKEN on top of the chair.
Take the SCISSORS sticking out of the right wall.
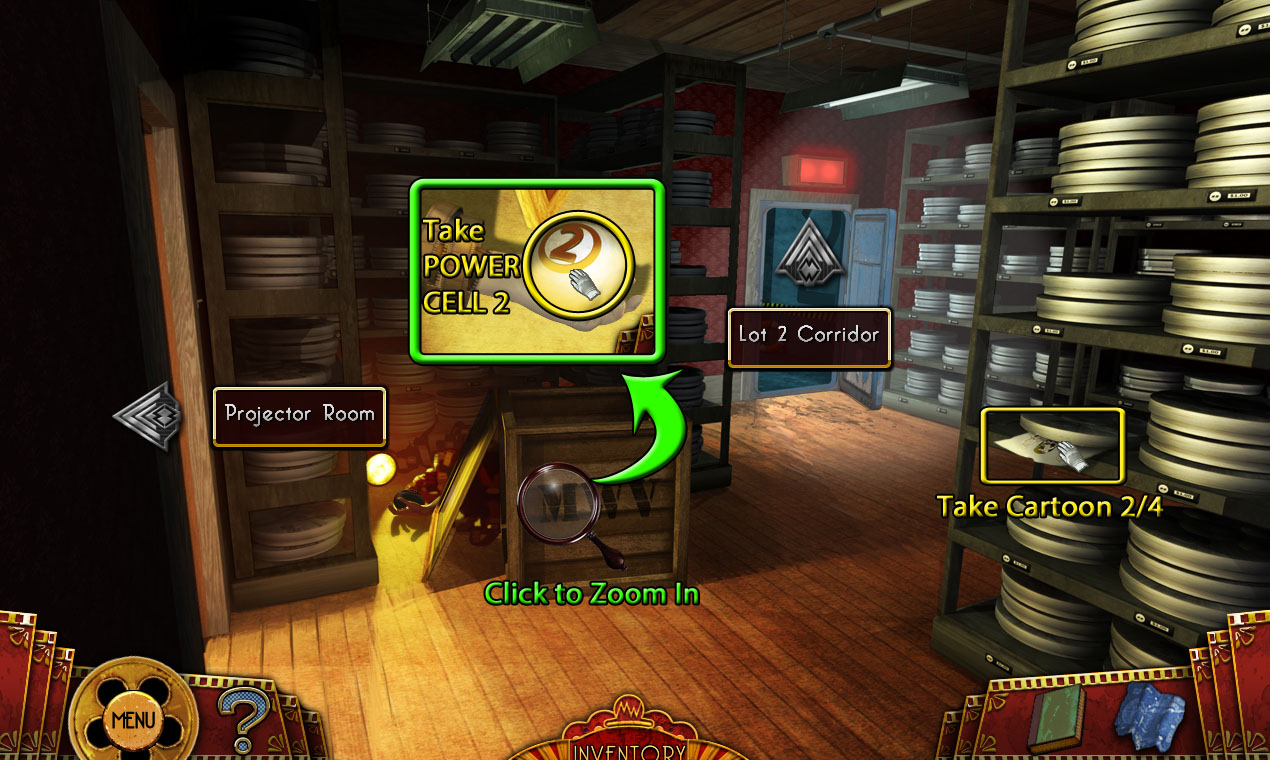
Go through the right doorway to the Film Library.
Film Library
Screenshot
Take the Cartoon (2/4) "The Will" underneath the roll of film on the middle shelf of the right rack.
Click the large open crate to look behind it.
Take the POWER CELL 2 from the corpse's hand.
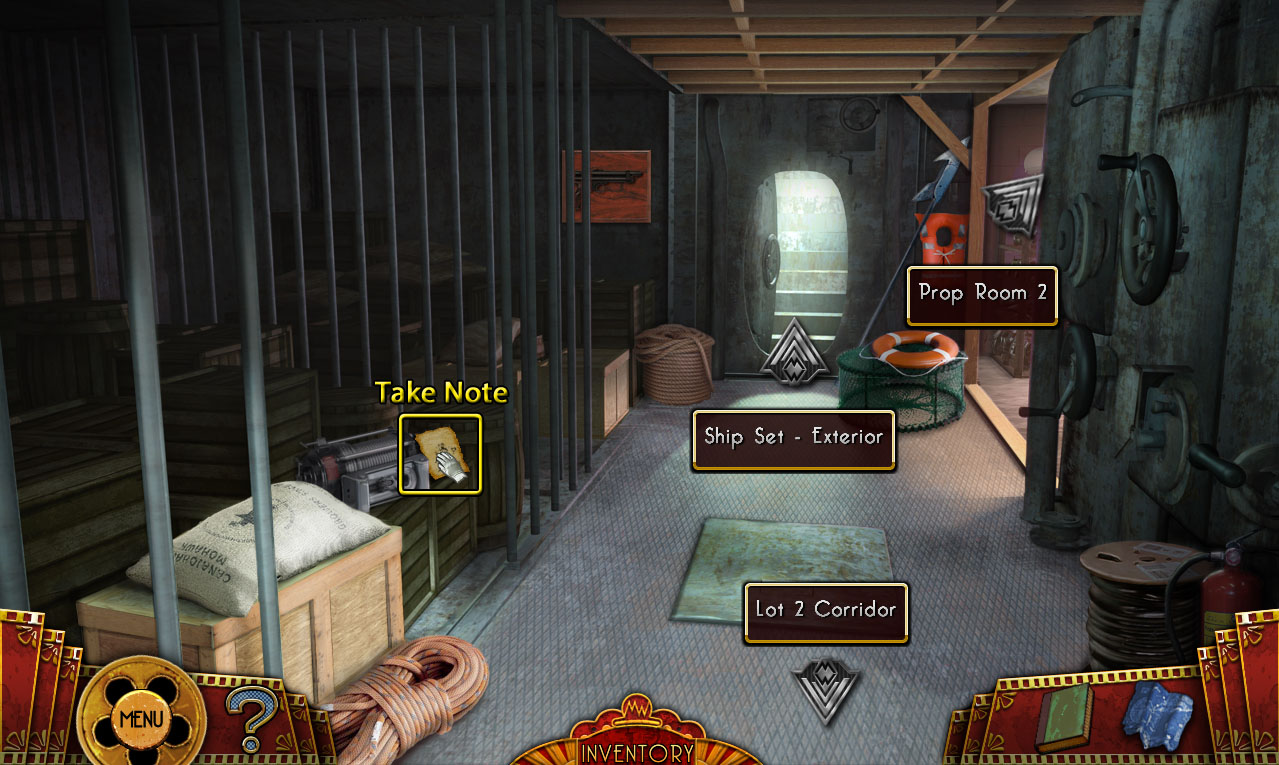
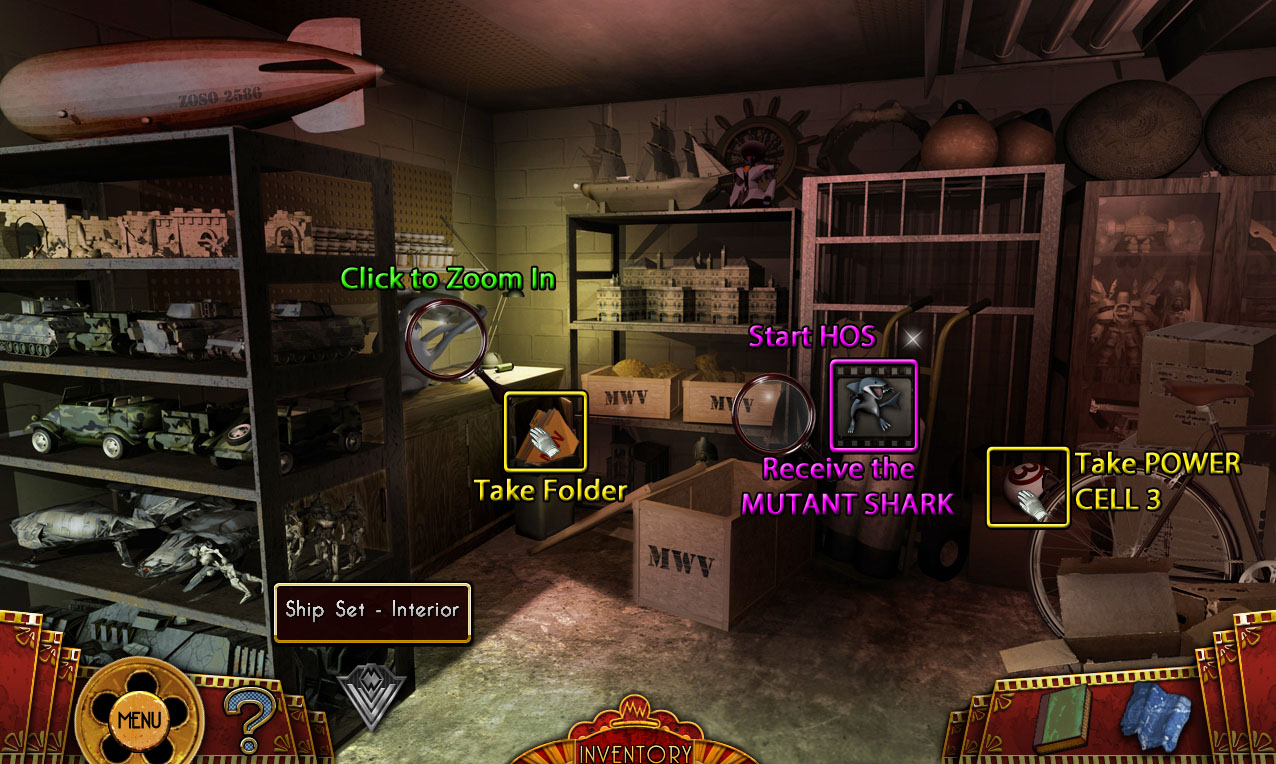
Continue through the metal door to the Lot 2 Corridor, then move forward again to the Ship Set Interior.
Ship Set Interior
Screenshot
Take the piece of paper on top of the crate to add the Sceptre of Biliku Yasa note to your Journal.
Continue forward to the Ship Set Exterior.
Ship Set Exterior
Click the wall behind the crane to start the cut scene.
Continue right to the Model's Room.
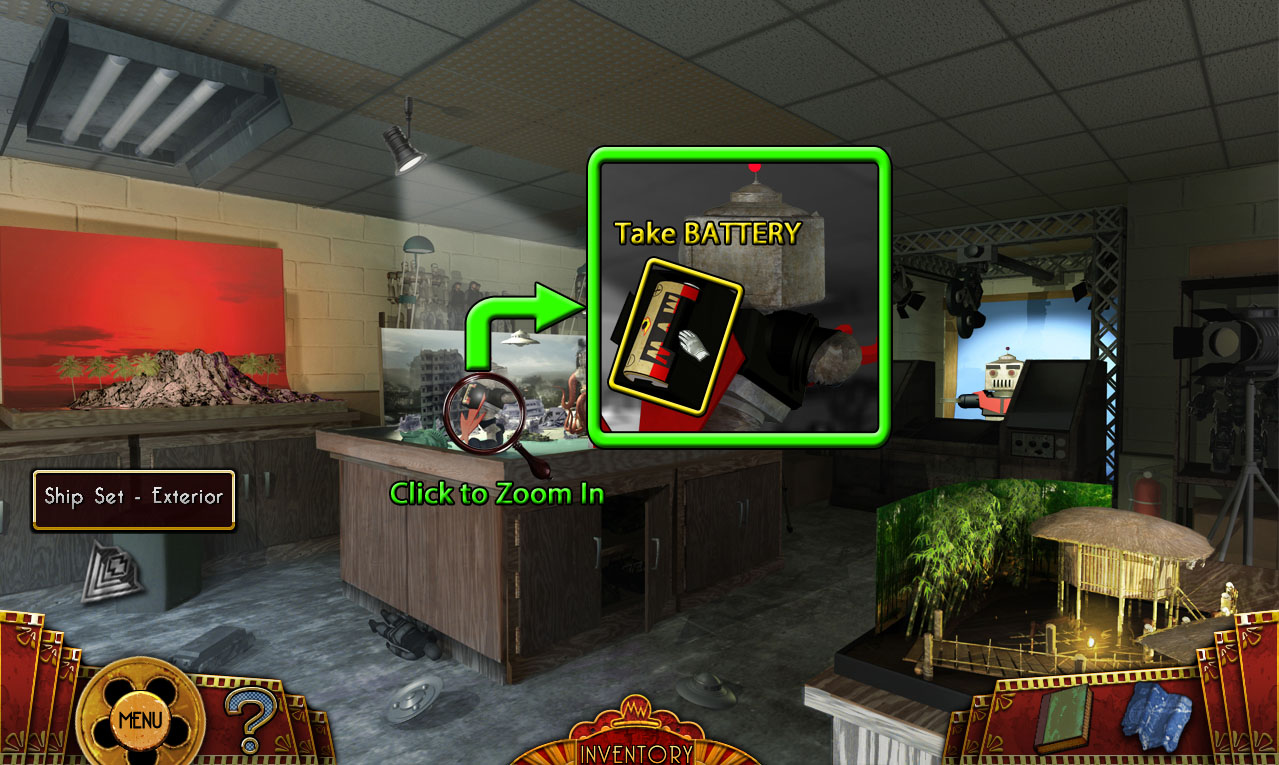
Task: Activate the crane to reach the crocodile pit
Models Room
Screenshot
Click the diorama in the center of the room to zoom in.
Take the BATTERY from the toy robot's back.
Go back to the Ship Set Interior, then continue right to Prop Room 2.
Prop Room 2
Screenshot
Take the folder inside the trash can to add the note with the monster diorama instructions to your Journal.
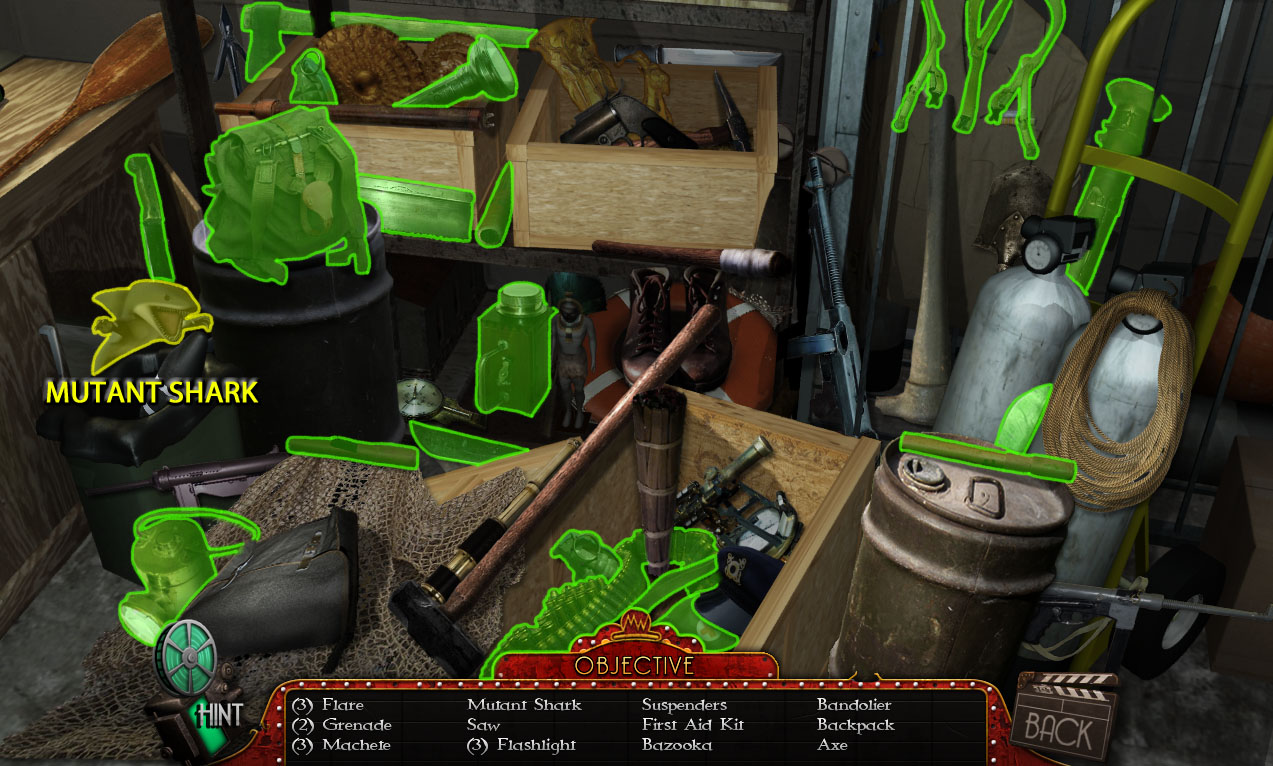
Click the crates on the shelf to start the hidden object scene.
Screenshot.
Once the hidden object scene is complete, you will receive the MUTANT SHARK.
Take POWER CELL 3 on the box behind the bicycle wheel.
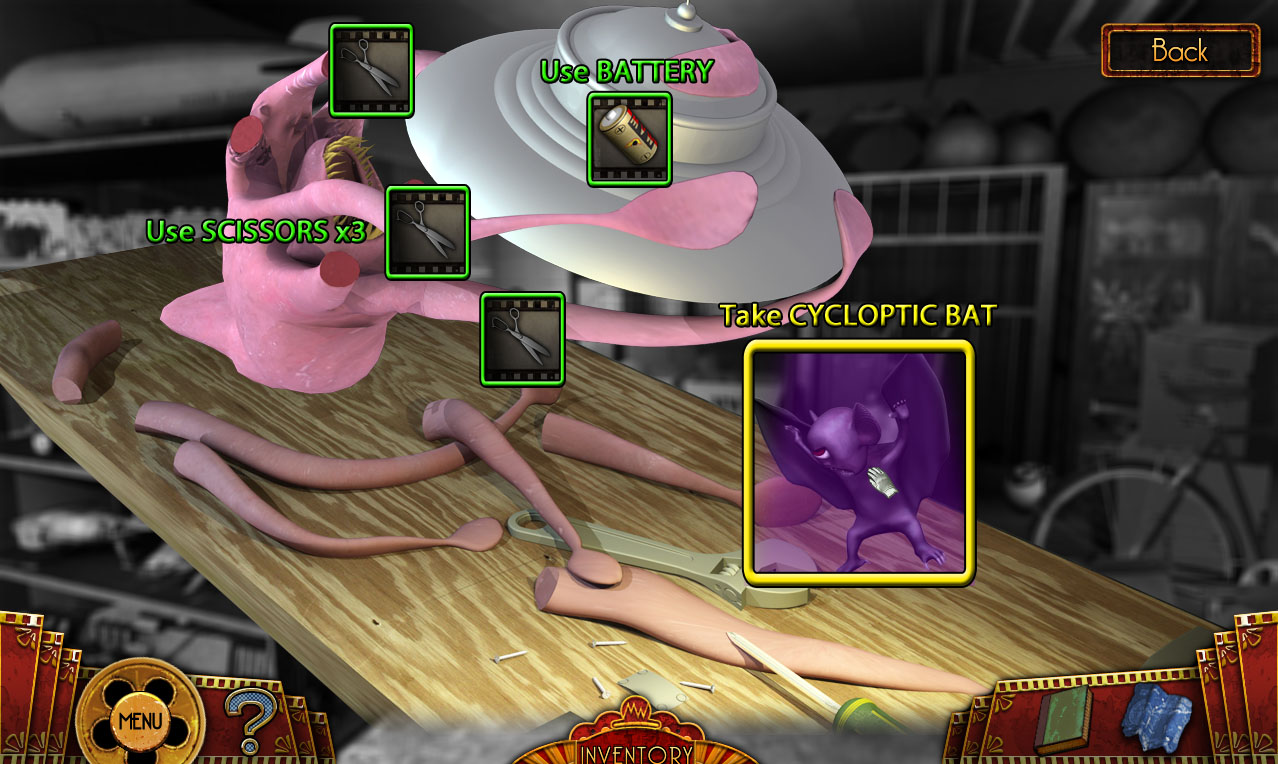
Click the work table in the corner of the room to zoom in.
Screenshot
Use the SCISSORS from the wall in the Projector Room to cut off the alien's three tentacles attached to the UFO.
Place the BATTERY from the robot in the Model's Room diorama into the slot at the center of the UFO.
Take the CYCLOPTIC BAT projected onto the work table.
Return to the Ship Set Exterior.
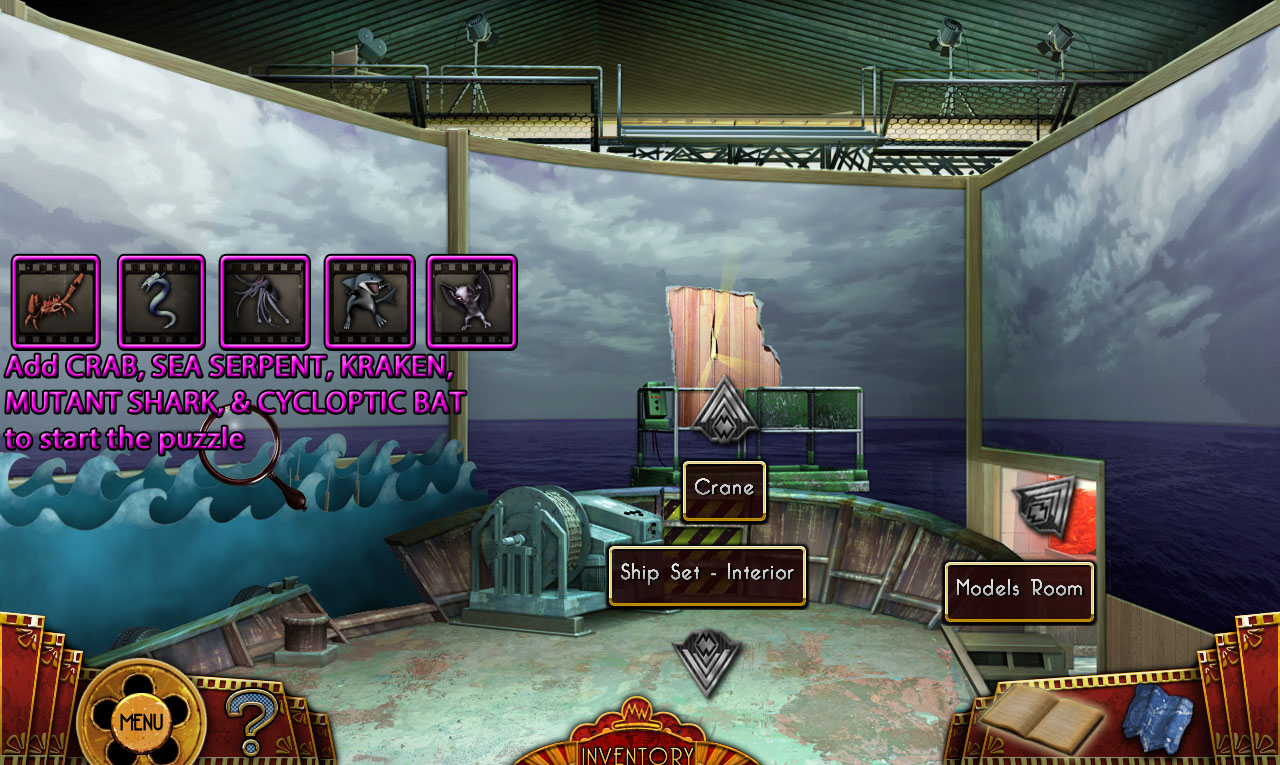
Ship Set Exterior
Screenshot
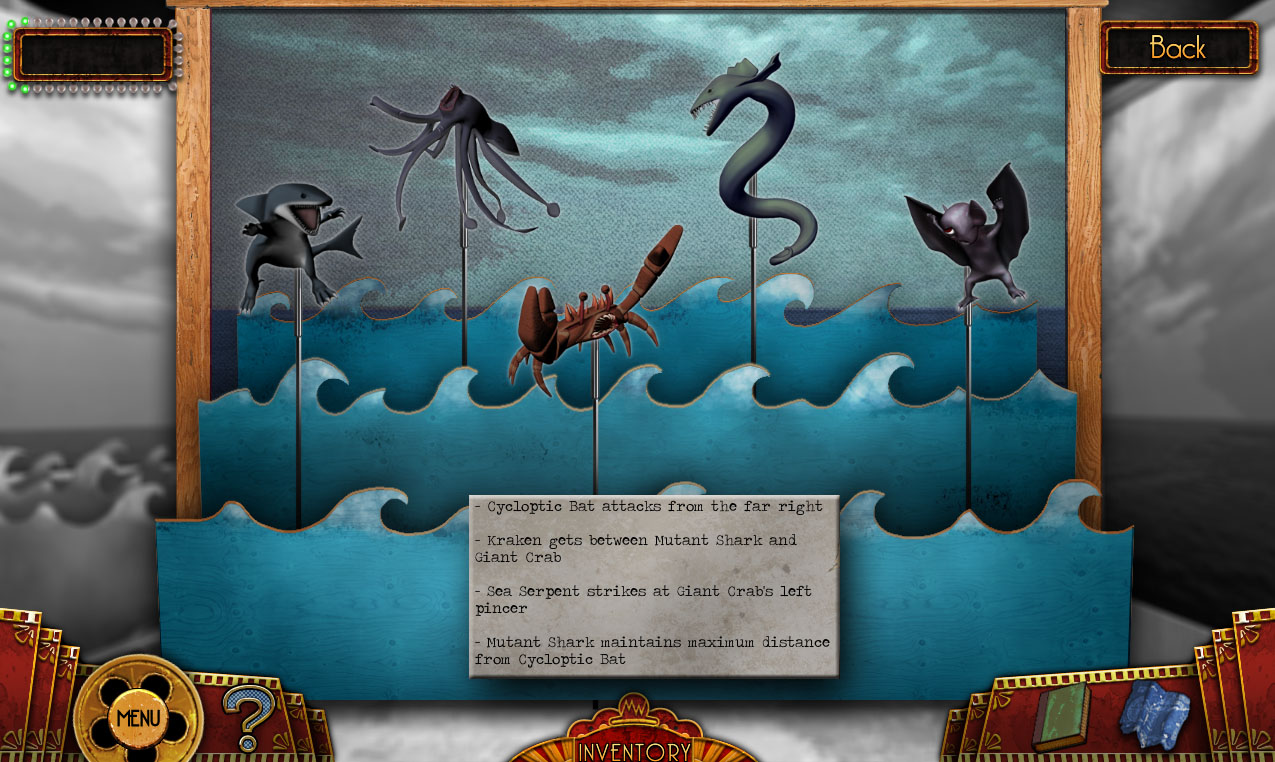
Click the waves on the left side of the set for a closer look.
Add all of the creatures in your inventory to start the puzzle.
The SEA SERPENT is from under the block in the Hall of Fame.
The GIANT CRAB is from the chair on the Kitchen.
The KRAKEN is from the seat in the Projector Room.
The MUTANT SHARK is from the hidden object scene in Prop Room 2.
The CYCLOPTIC BAT is from the UFO diorama in Prop Room 2.
Arrange all of the monsters on the stands in the correct order.
Refer to the note from the folder in Prop Room 2 for their proper positions.
From left to right the order is: Mutant Shark, Kraken, Giant Crab, Sea Serpent, Cycloptic Bat.
Solution.
Once the puzzle is solved, go through the revealed left passageway to the Special Effects Department.
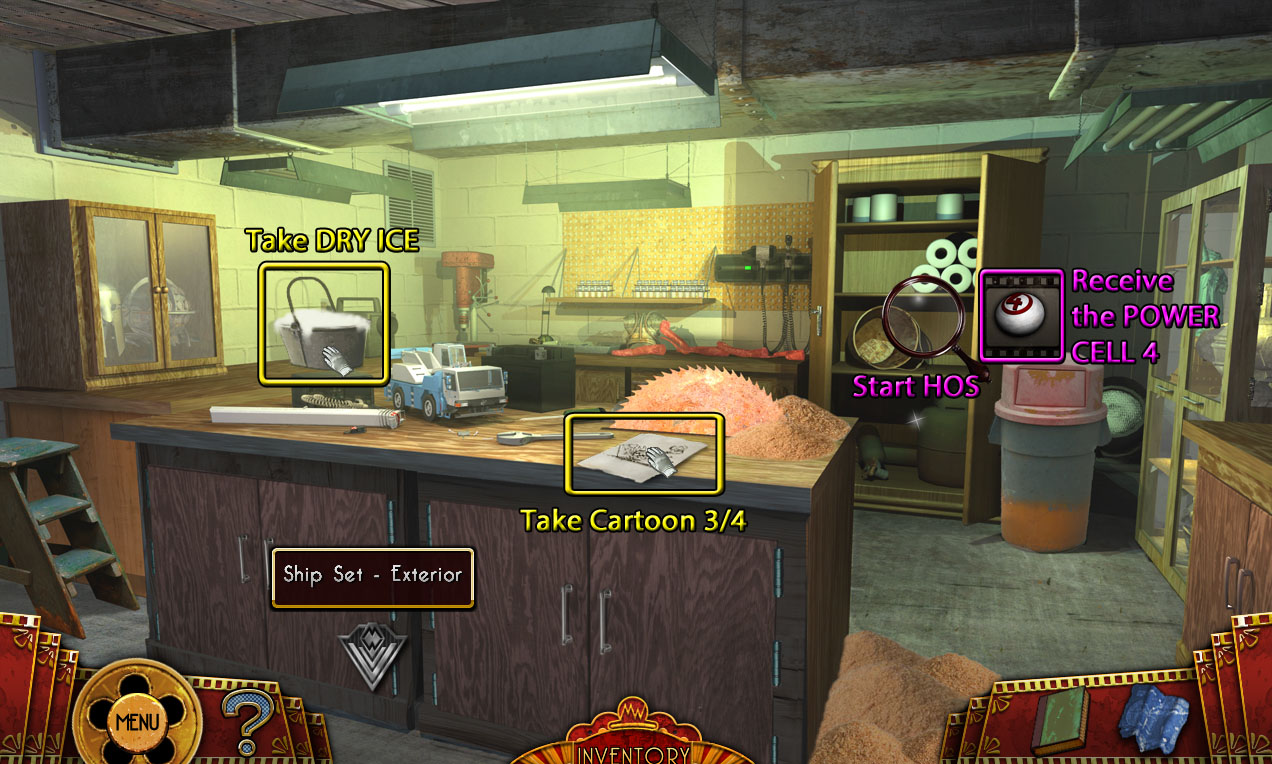
Special Effects Department
Screenshot
Take the Cartoon (3/4) "From Darkness" on top of the counter.
Click the open closet to start the hidden object scene.
Screenshot.
Once the hidden object scene is complete, you will receive the POWER CELL 4.
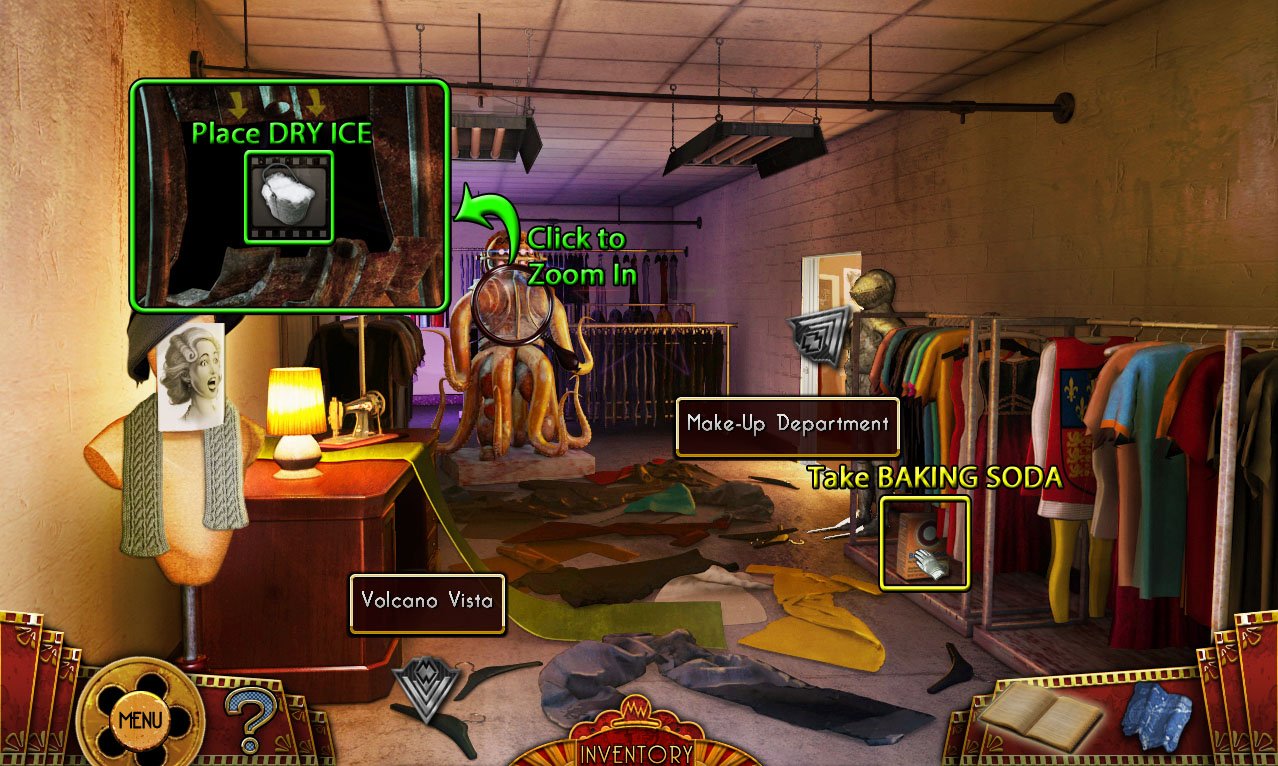
Pick up the bucket of DRY ICE on the left table top.
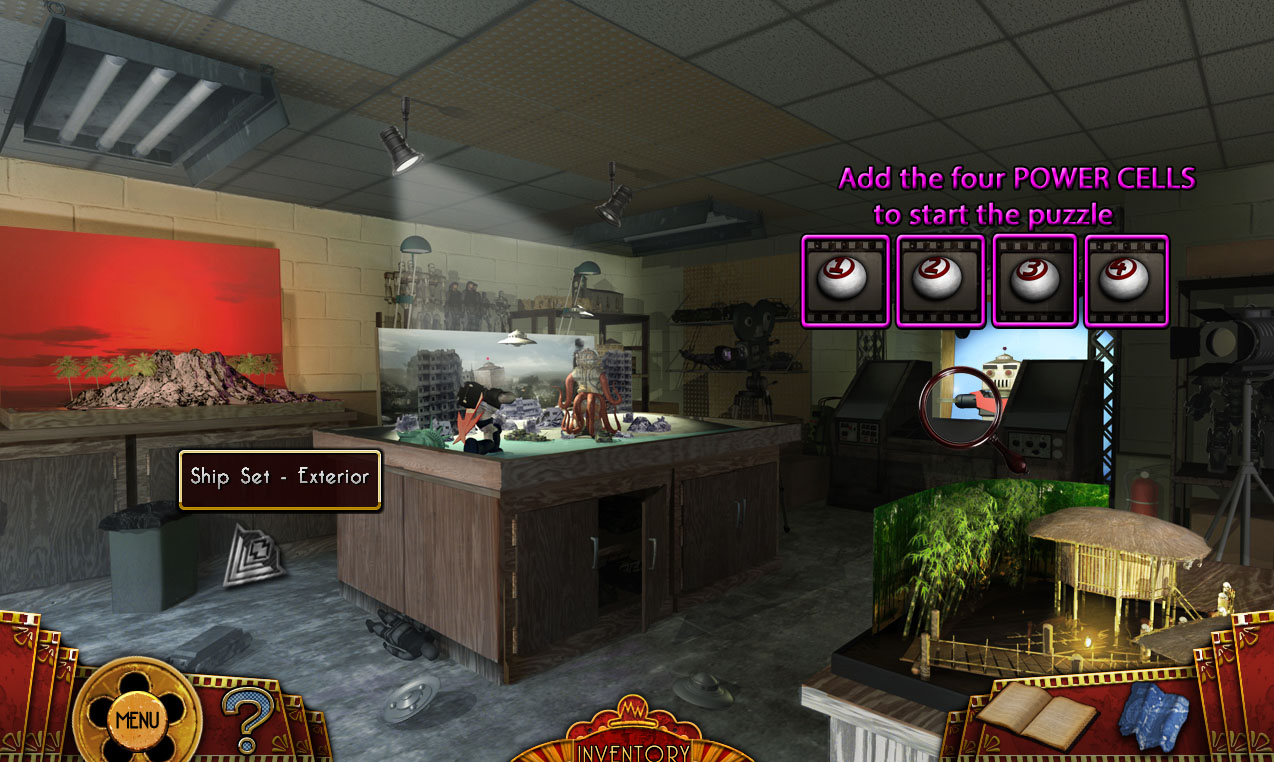
Return to the Models Room.
Models Room
Screenshot
Click the large robot machinery at the right side of the room to zoom in.
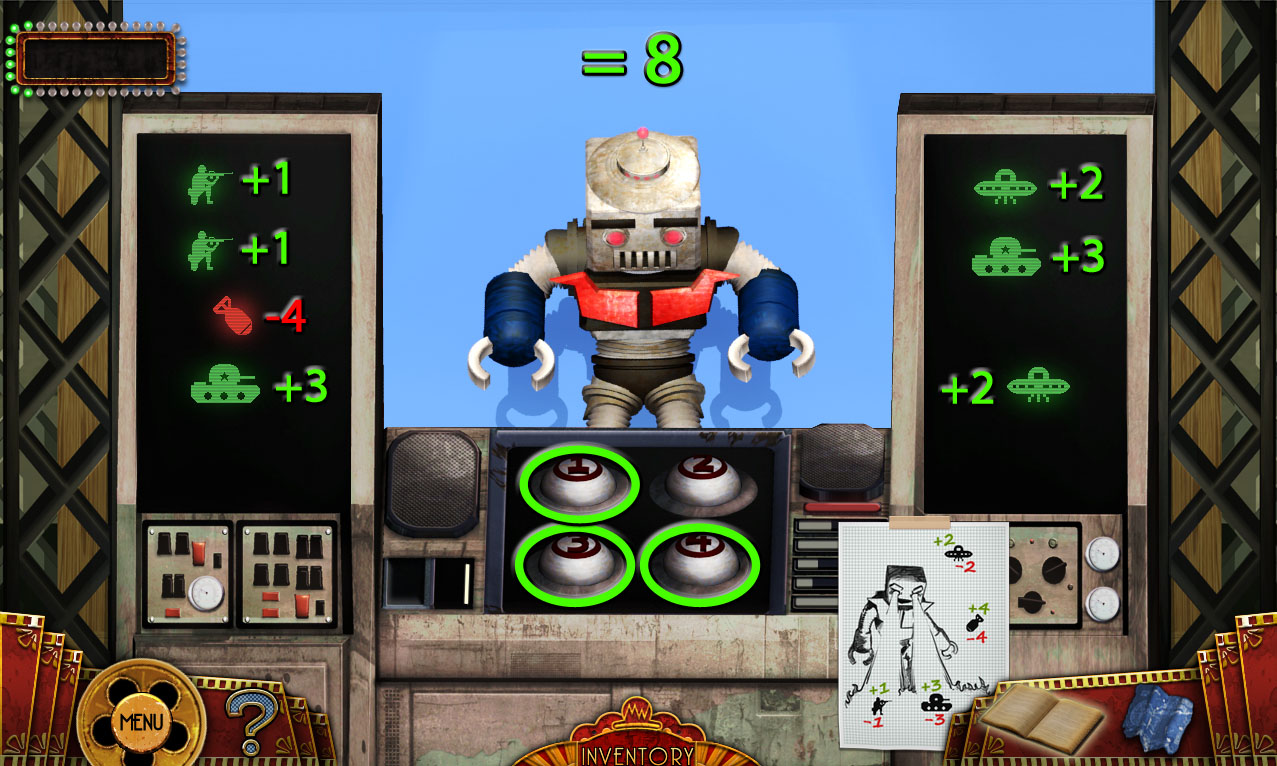
Add the four POWER CELLS from your inventory to the empty slots in the center of the device to start the puzzle.
POWER CELL 1 is from the desk drawer in the Writer's Room.
POWER CELL 2 is from the corpse in the Film Library.
POWER CELL 3 is from the box in Prop Room 2.
POWER CELL 4 is from the hidden object scene in the Special Effects Department.
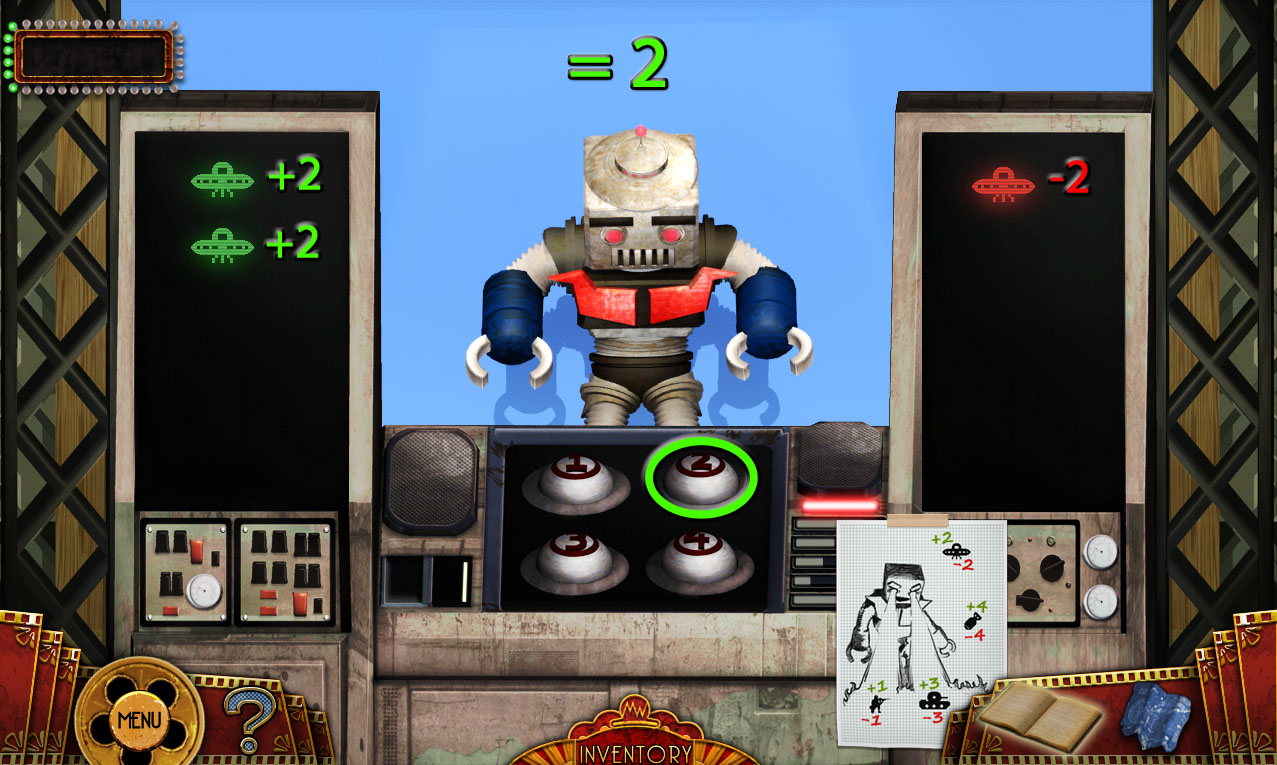
To solve this puzzle, press the power cell buttons that equal the correct sum according to the symbol guide on the sheet of paper taped to the bottom of the device.
A green soldier has a value of +1 and a red soldier has a value of -1.
A green spaceship has a value of +2 and a red spaceship has a value of -2.
A green tank has a value of +3 and a red tank has a value of -3.
A green bomb has a value of +4 and a red bomb has a value of -4.
Calculate the value of all the symbols shown on the left and right monitors, then press the corresponding power cell buttons to enter your solution.
Solution #1.
Solution #2.
Solution #3.
Once the puzzle is solved, you will receive the CRANE KEY from the robot.
Go back to the Ship Set Exterior, then continue forward to the CRANE.
Crane
Screenshot
Use the CRANE KEY from the robot puzzle in the Models Room on the ignition to start the elevator.
Press the button to raise the elevator to the Crocodile Pit, then continue forward to the Voodoo Village Set.
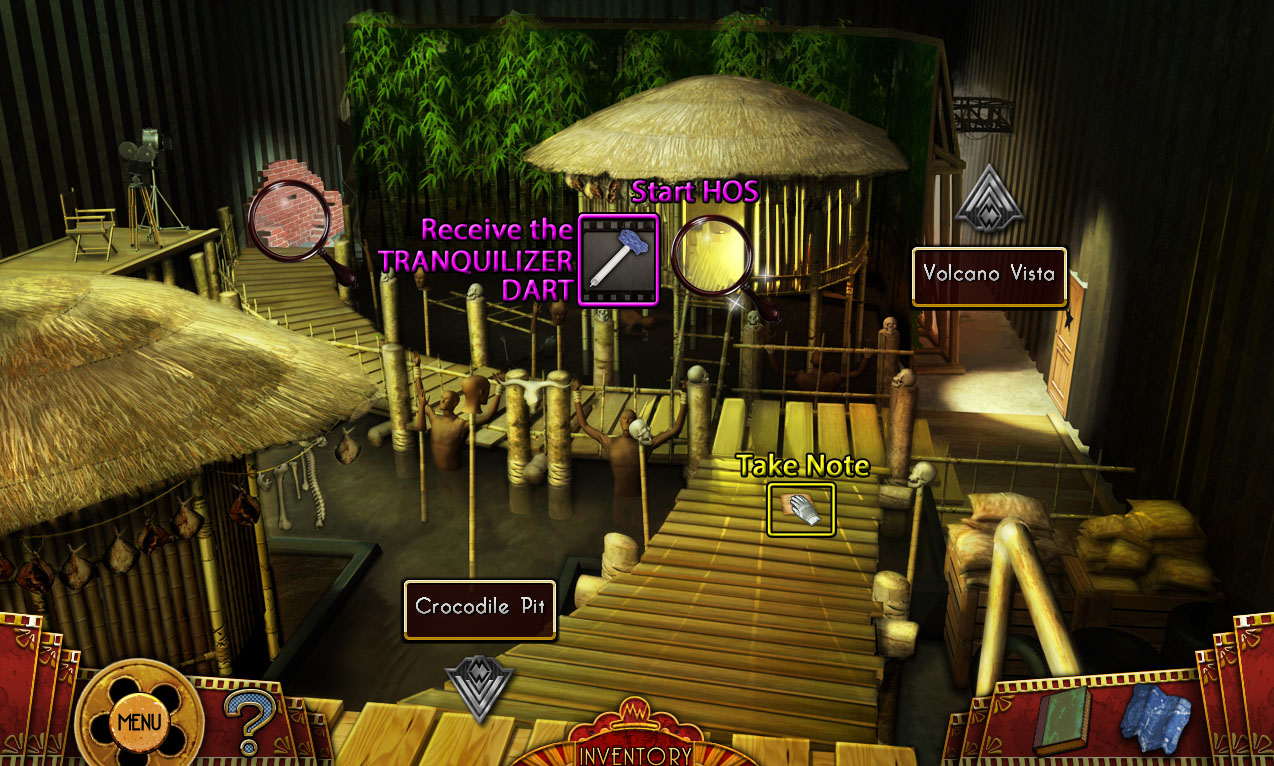
Task: Solve the laser lock to free Mum from her dressing room.
Voodoo Village Set
Screenshot
Click the door to Rita's Dressing Room to start the cut scene.
Pick up the note on the floor of the bridge to add it to your Journal.
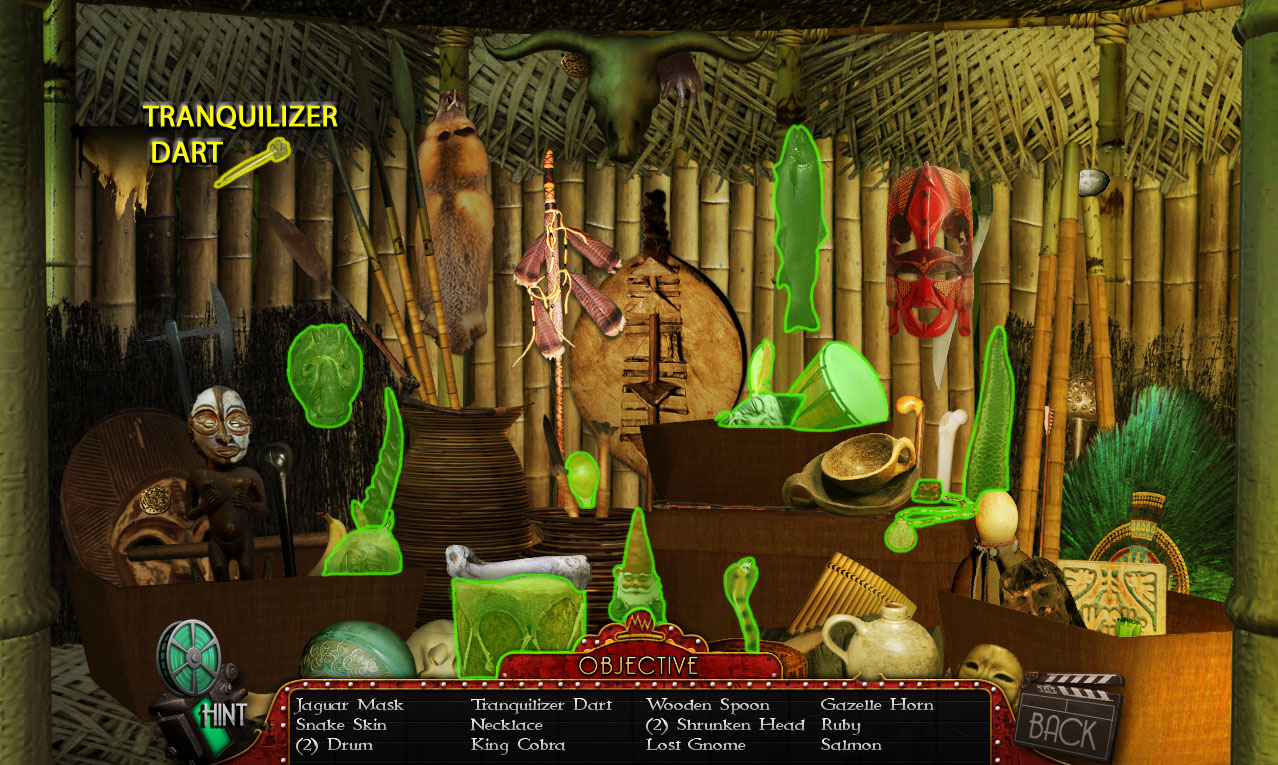
Click the open door to the hut to start the hidden object scene.
Screenshot.
Once the hidden object scene is complete, you will receive the TRANQUILIZER DART.
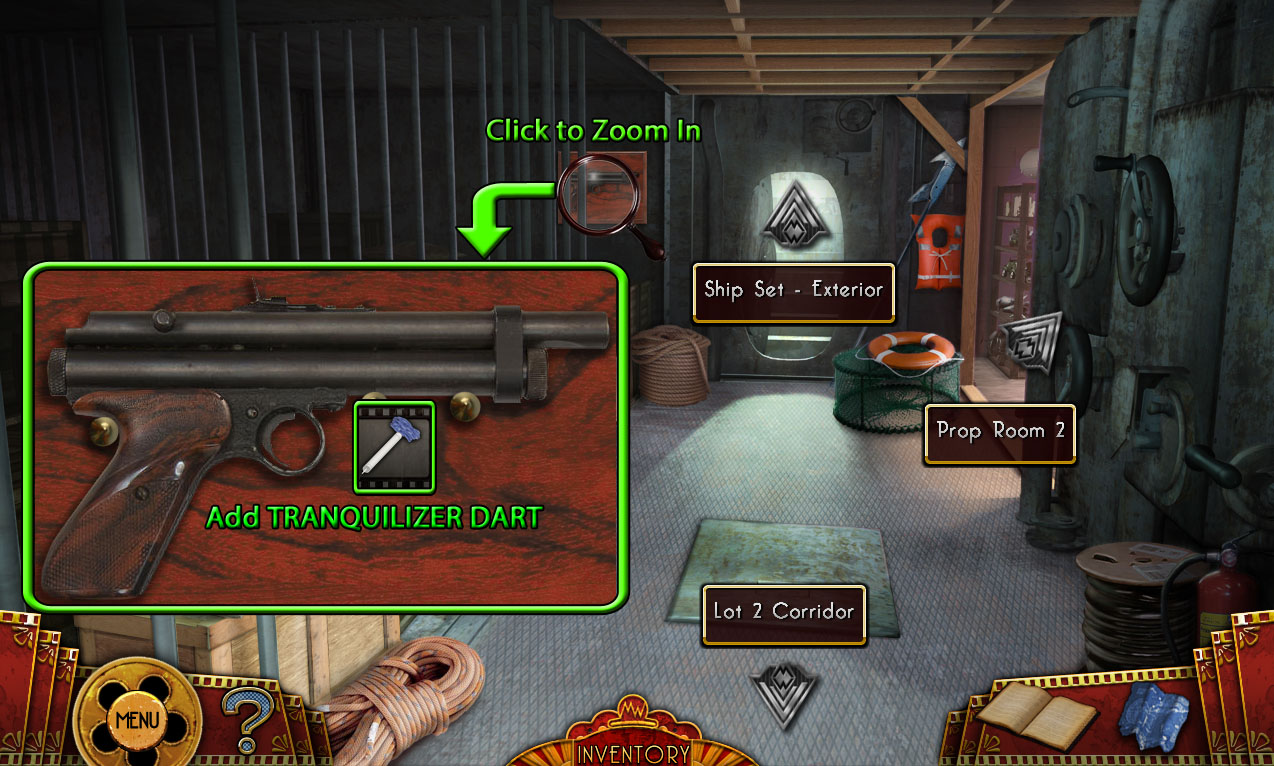
Go back to the Ship Set Interior.
Ship Set Interior
Screenshot
Click the dart gun mounted on the wall to zoom in.
Add the TRANQUILIZER DART from the Voodoo Village Set hidden object scene to the TRANQUILIZER GUN to add it to your inventory.
Use the Map to travel to the Crocodile Pit.
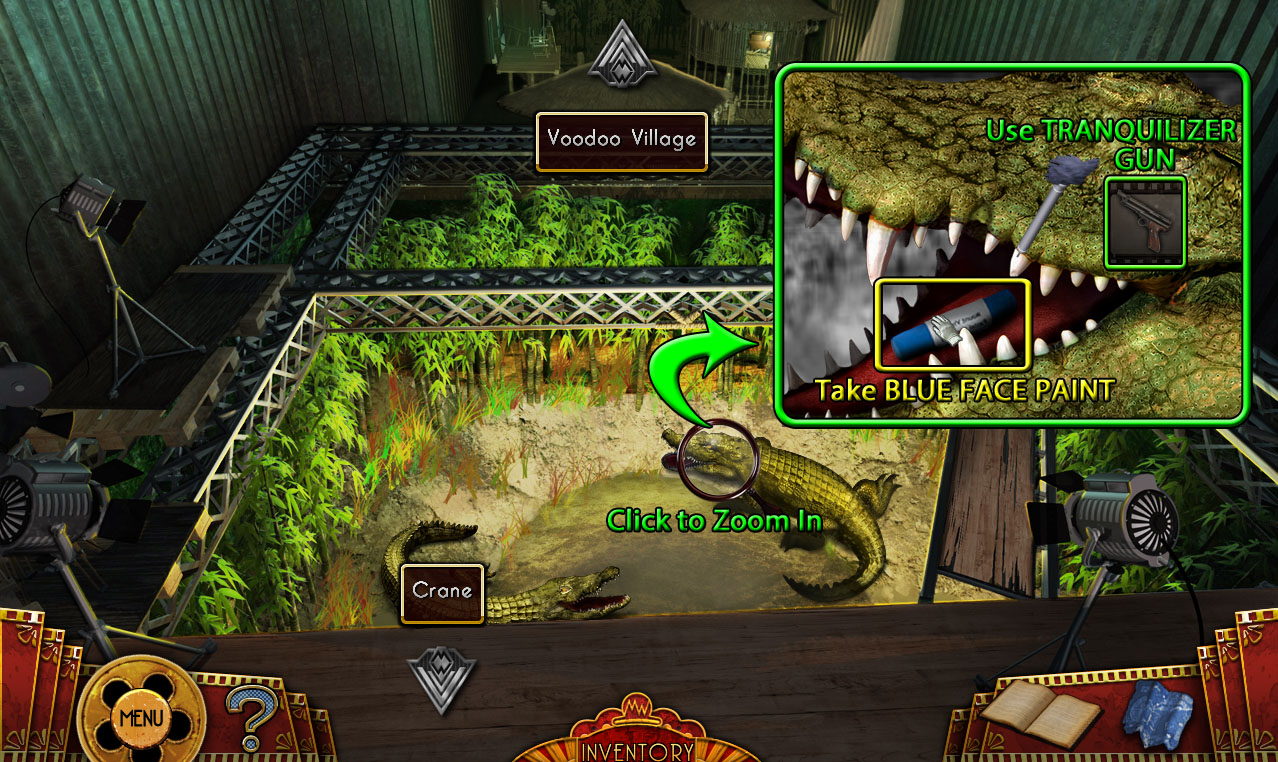
Crocodile Pit
Screenshot
Click the right crocodile for a closer look.
Shoot the crocodile with the TRANQUILIZER GUN.
Take the BLUE FACE PAINT from the crocodile's open mouth.
Go forward to the Voodoo Village Set.
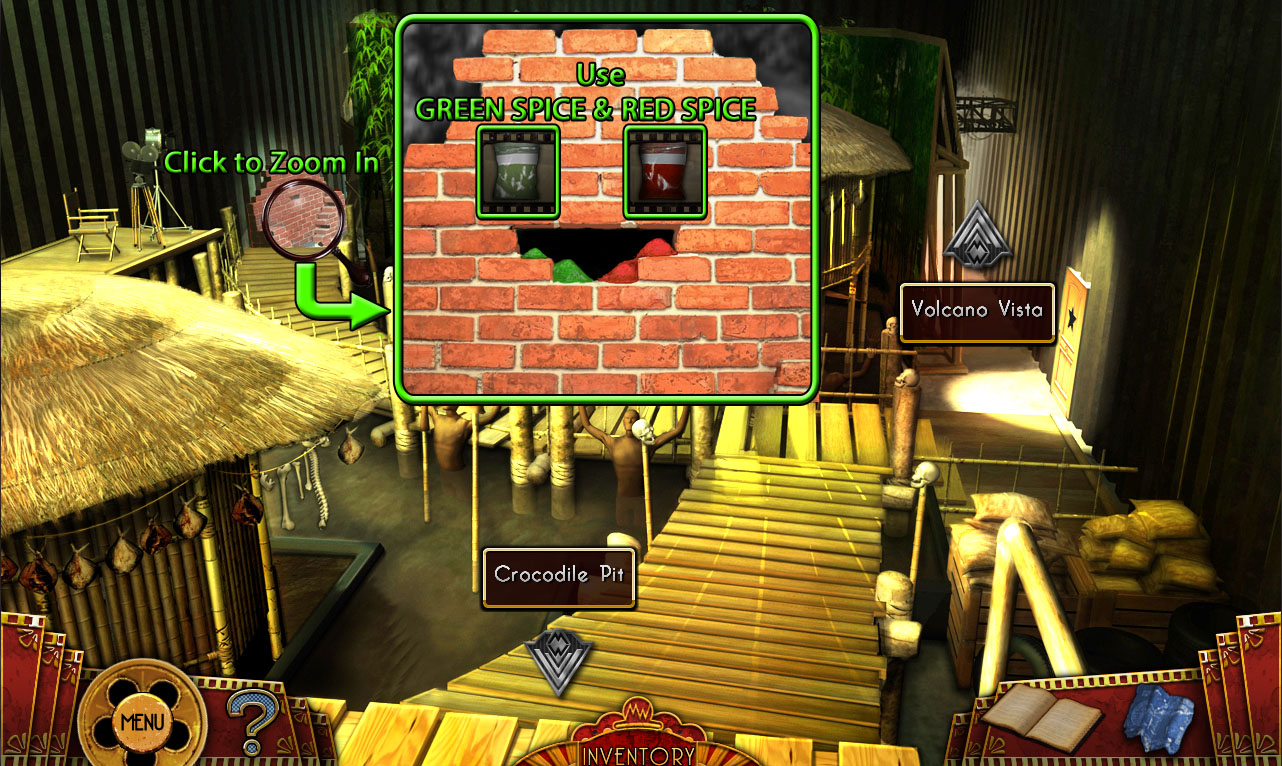
Voodoo Village Set
Screenshot
Click the bricked wall at the end of the left path to zoom in.
Add the RED KABOOM SPICE and GREEN KABOOM SPICE to the hole in the wall.
Continue through the left doorway to the Bricked-Up Room.
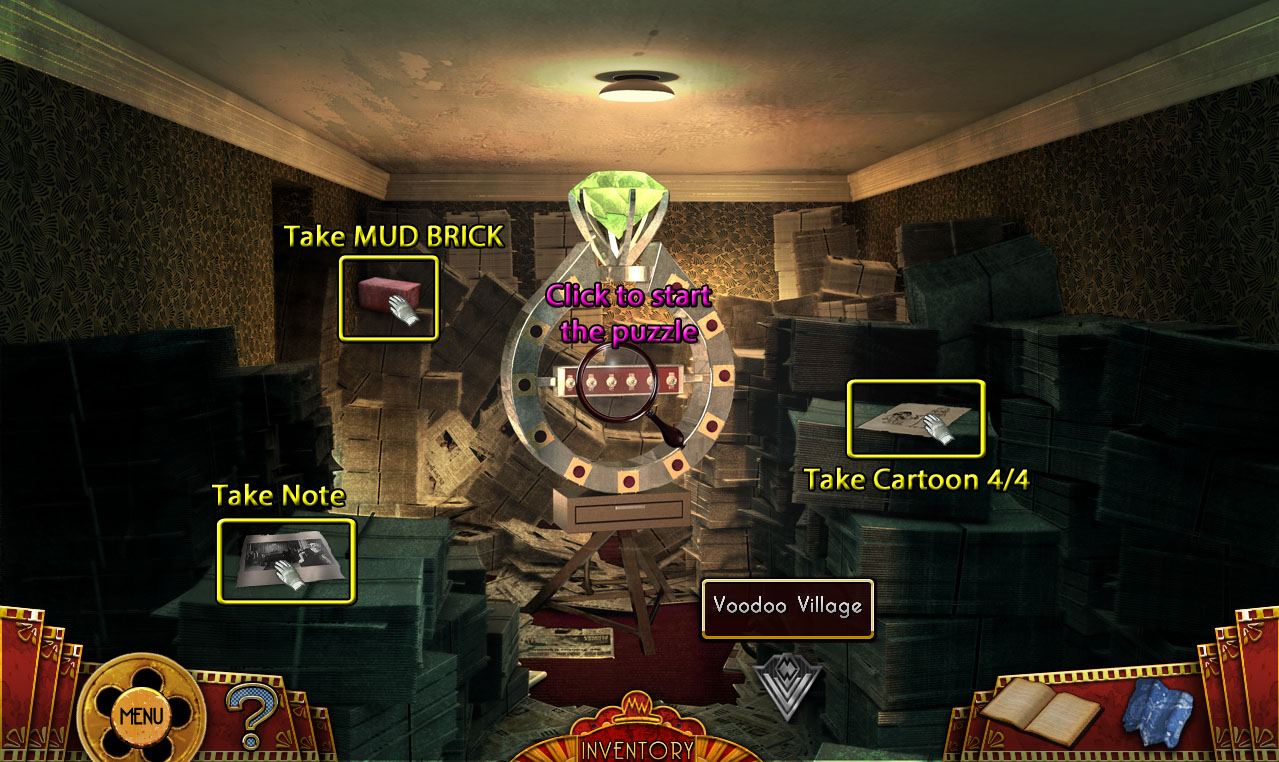
Bricked-Up Room
Screenshot
Read the note on top of the left stack of newspapers for instructions to the ring puzzle.
Pick up the MUD BRICK on the newspaper pile in the back left corner of the room.
Take the Cartoon (4/4) "Illuminate" from the right stack of newspapers to add it to the Journal.
Click the large ring to start the puzzle.
Flip the switches in the correct order to move the light to the gem at the top of the ring.
From left to right, hit the switches in the following pattern: Down, Up, Up, Down, Up, Down.
Solution.
Once the puzzle is solved, you will receive RITA'S RING.
Use the Map to travel to the Writer's Room.
Writer's Room
Screenshot
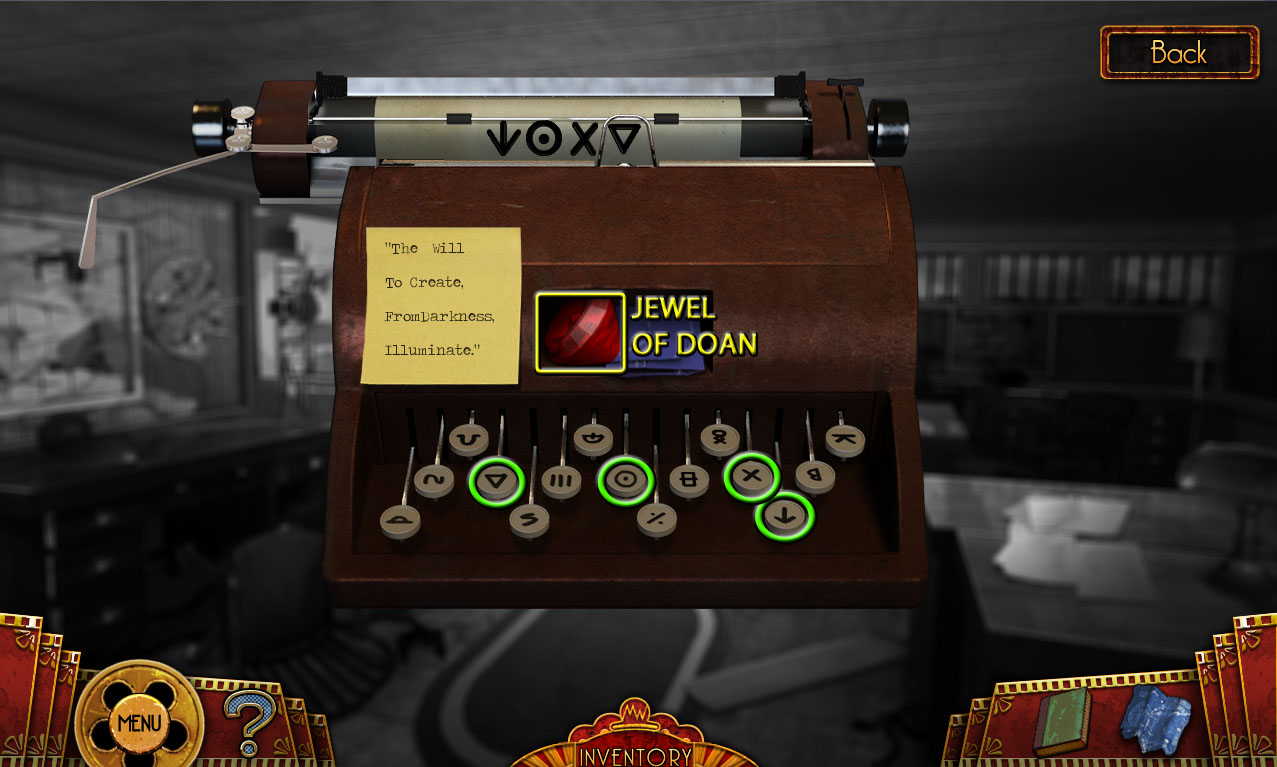
Click the typewriter on the center desk to start the puzzle.
Press the correct keys according to the symbols hidden in the Cartoons and the phrase on the typewriter.
Cartoon 1 "To Create" is from the dart board in the Writer's Room.
Cartoon 2 "The Will" is under the film on the shelf in the Film Library.
Cartoon 3 "From Darkness" is on the counter in the Special Effects Department.
Cartoon 4 "Illuminate" is on the stack of newspapers in the Bricked-Up Room.
Cartoon Symbols.
Solution.
Once the puzzle is solved, take the JEWEL OF DOAN and the blueprints from the revealed compartment in the typewriter.
Use the Map to travel to the Voodoo Village Set, then continue forward to the Volcano Vista Set.
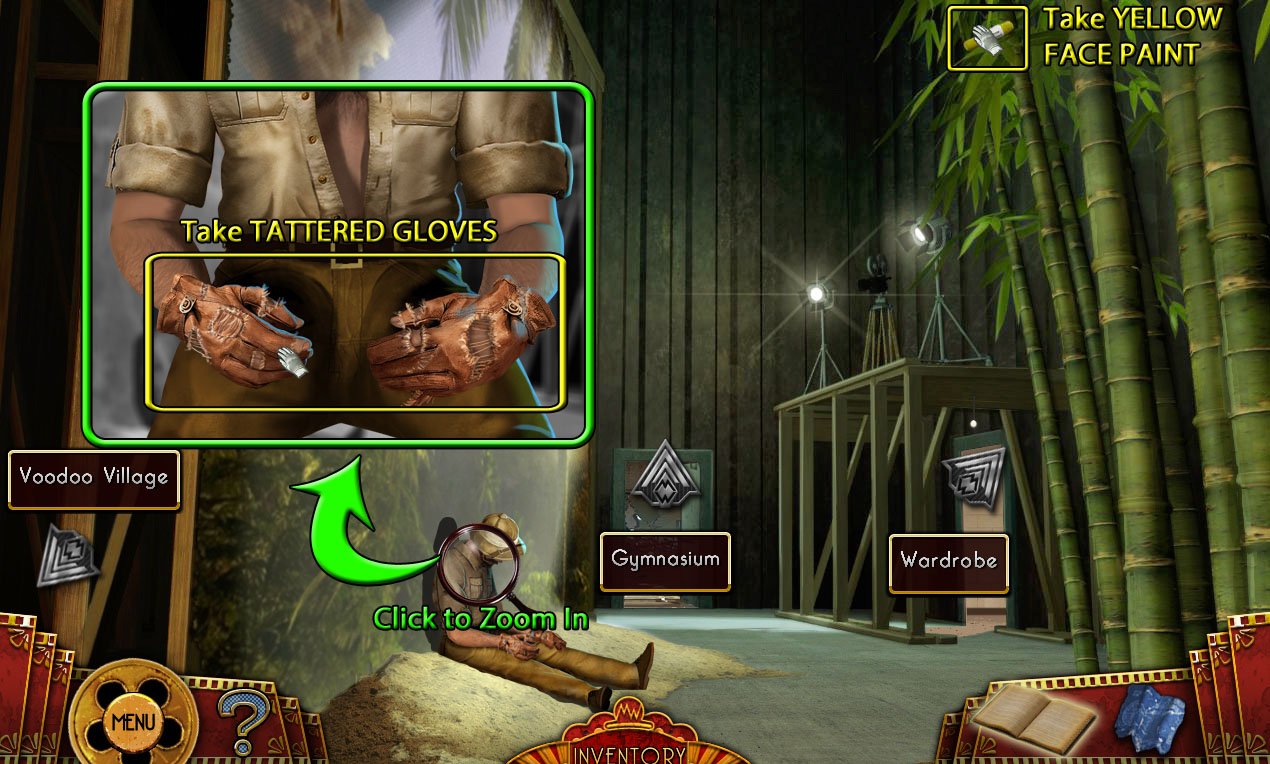
Volcano Vista Set
Screenshot
Click the body lying on the ground to zoom in.
Take the TATTERED GLOVES from the body's hands.
Pick up the YELLOW FACE PAINT on top of the bamboo leaves.
Continue forward into the Gymnasium.
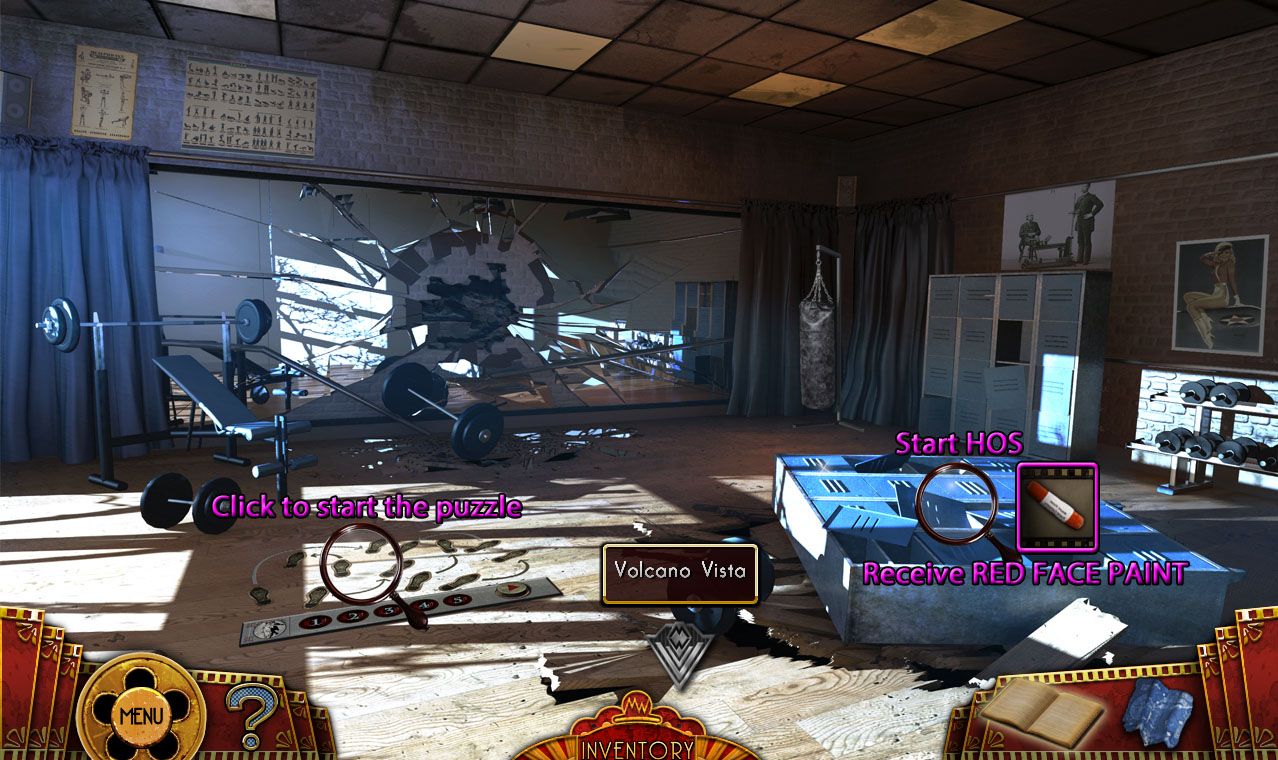
Gymnasium
Screenshot
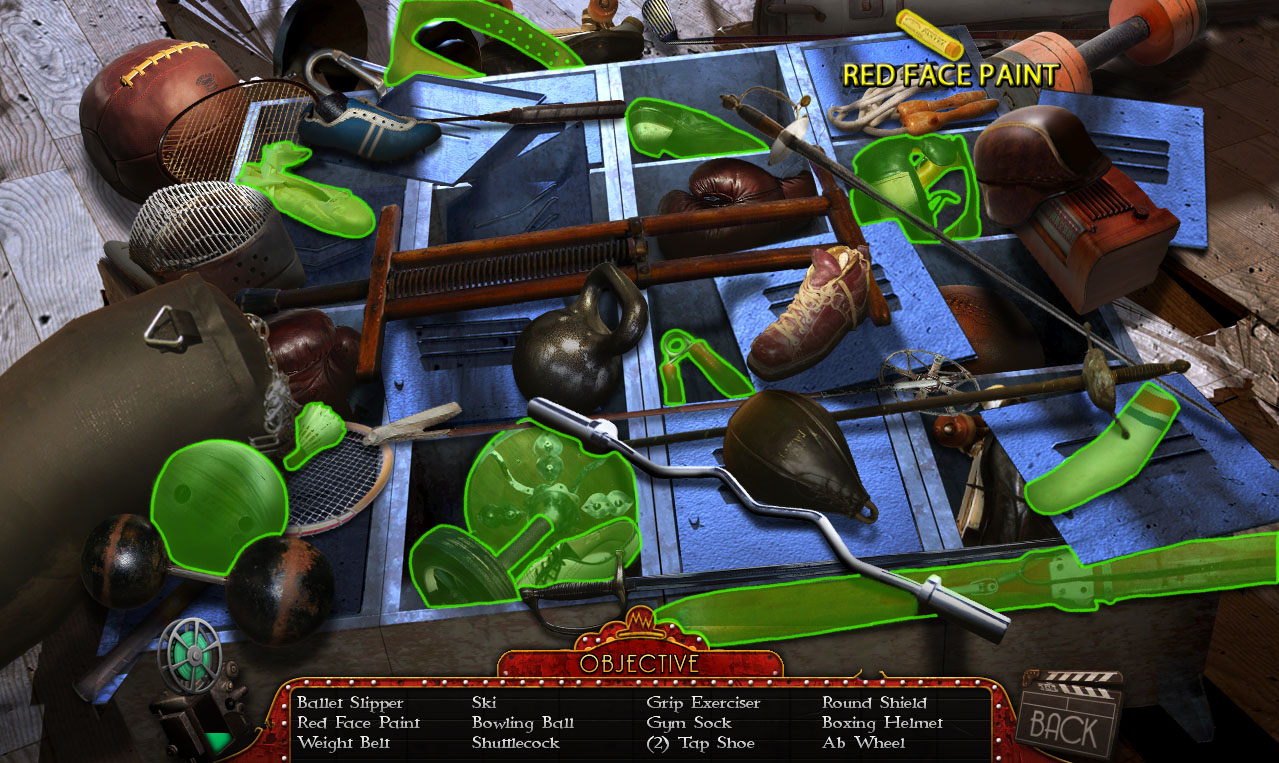
Click the fallen lockers to start the hidden object scene.
Screenshot.
Once the hidden object scene is complete, you will receive the RED FACE PAINT.
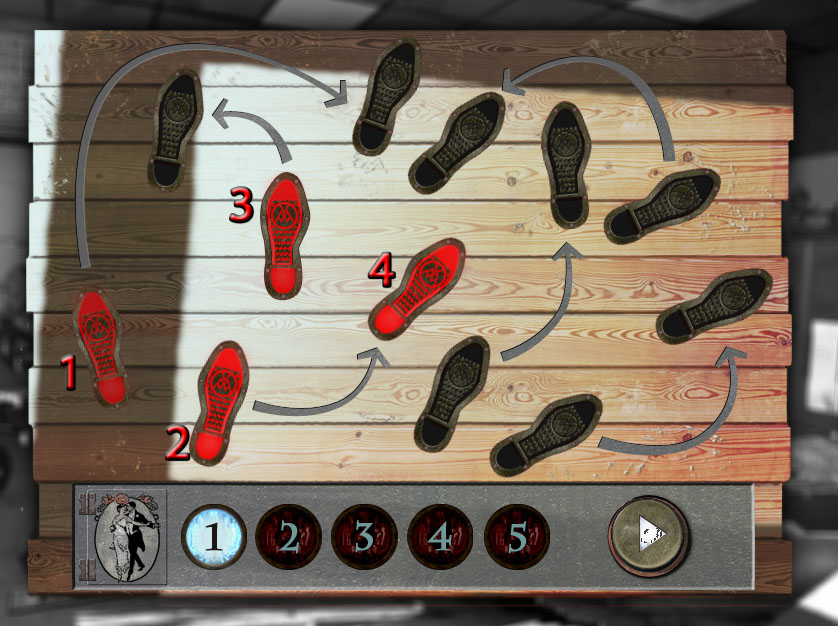
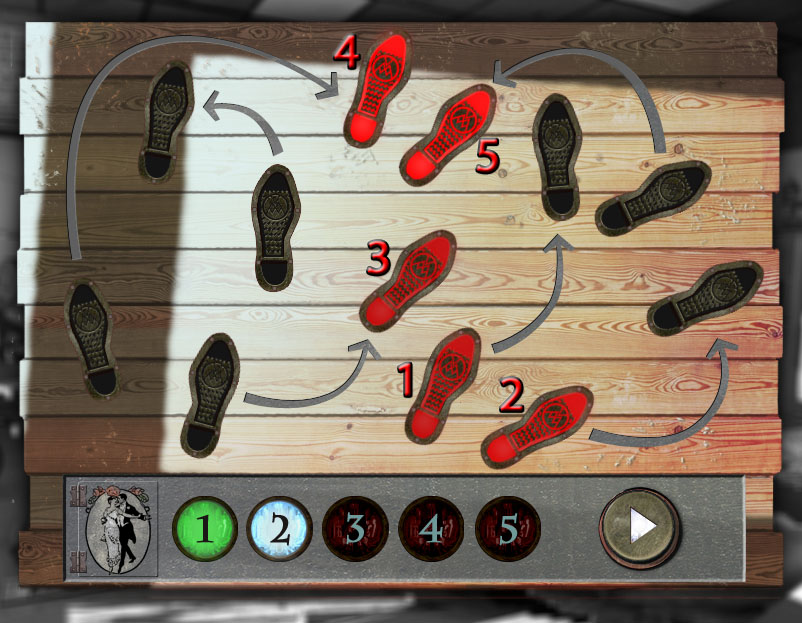
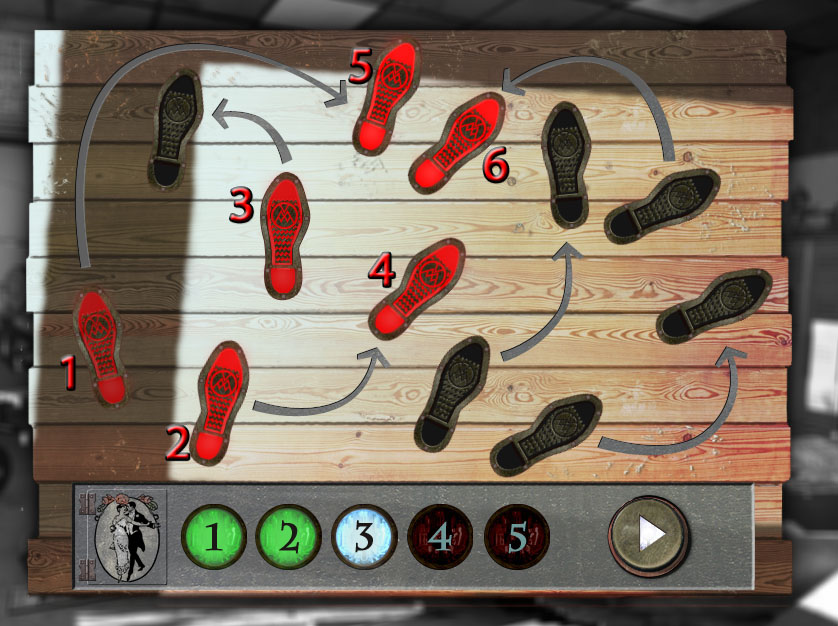
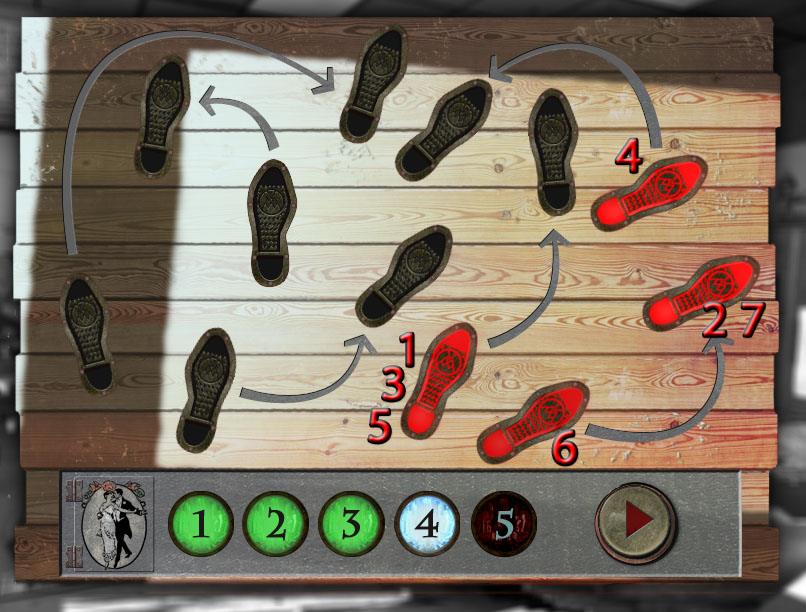
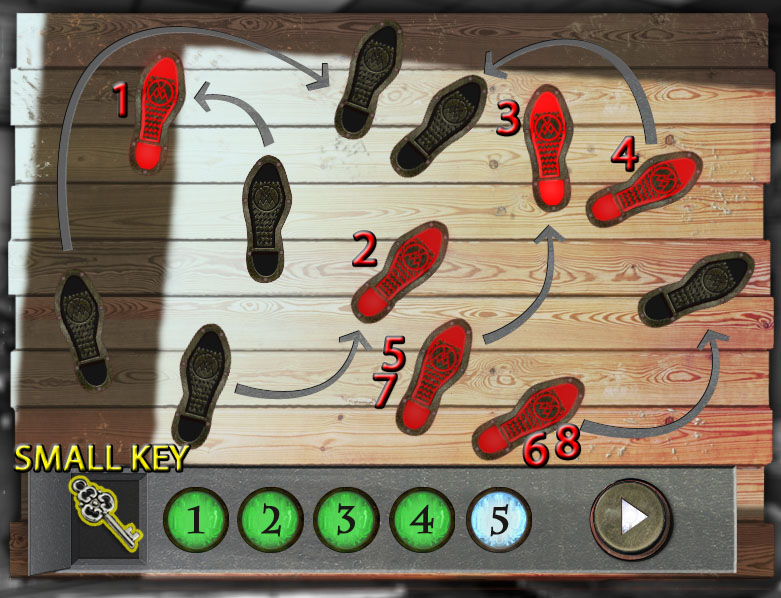
Click the dance pad on the floor to start the puzzle.
Copy the order of the steps highlighted in red by clicking the footprints on the dance pad in the correct order.
Click the play button in the lower right corner to replay the steps sequence.
Solution #1.
Solution #2.
Solution #3.
Solution #4.
Solution #5.
Once the puzzle is solved, take the SMALL KEY from the opened compartment in the lower left corner of the dance pad.
Go back to the Volcano Vista Set, then continue through the right door to the Wardrobe.
Wardrobe
Screenshot
Take the BAKING SODA on the base of the right clothing rack.
Click the monster suit with the laser device for a closer look.
Click the chest panel to lift it.
Put the DRY ICE from the table in the Special Effects Department inside the suit.
Note the colored star pattern made by the laser projection: a copy will be added to your Journal.
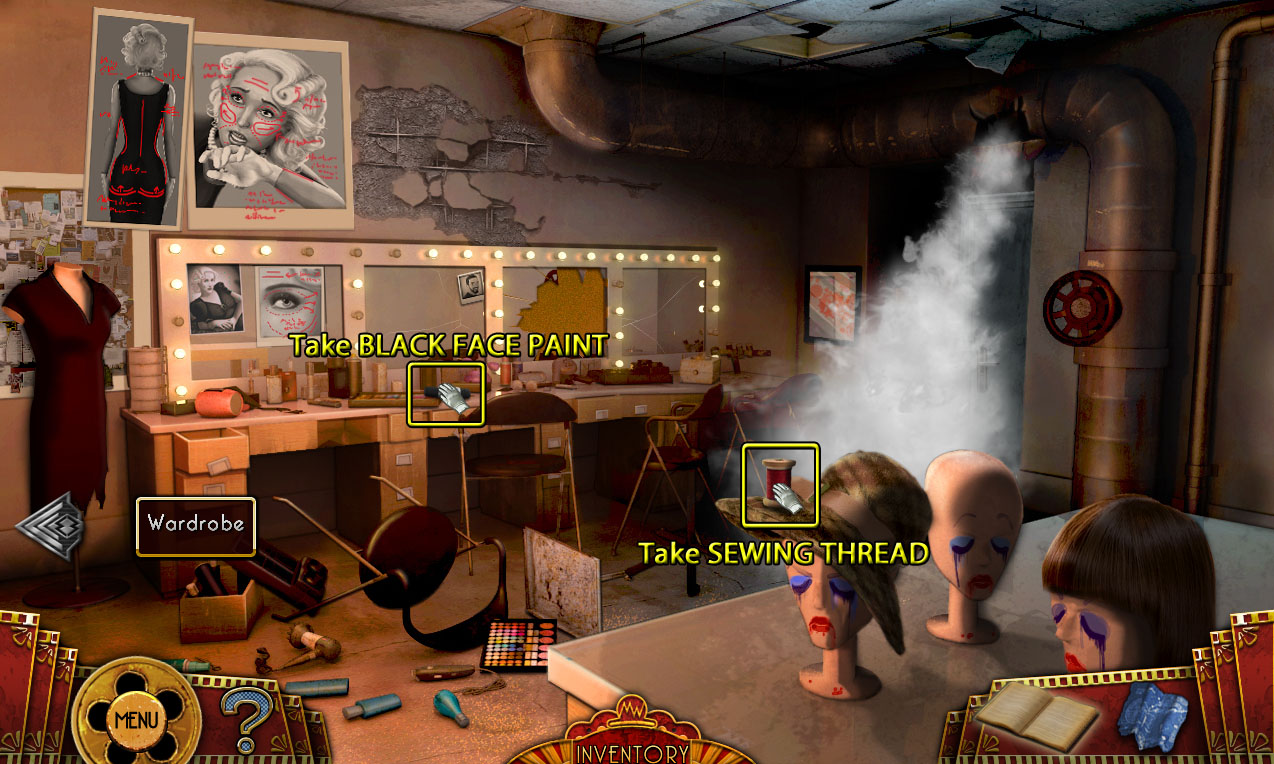
Go through the right doorway to the Make-Up Department.
Make-Up Department
Screenshot
Take the SEWING THREAD on top of the mannequin head's hat.
Pick up the BLACK FACE PAINT on top of the counter in front of the vanity mirrors.
Go back to the Wardrobe.
Wardrobe
Screenshot
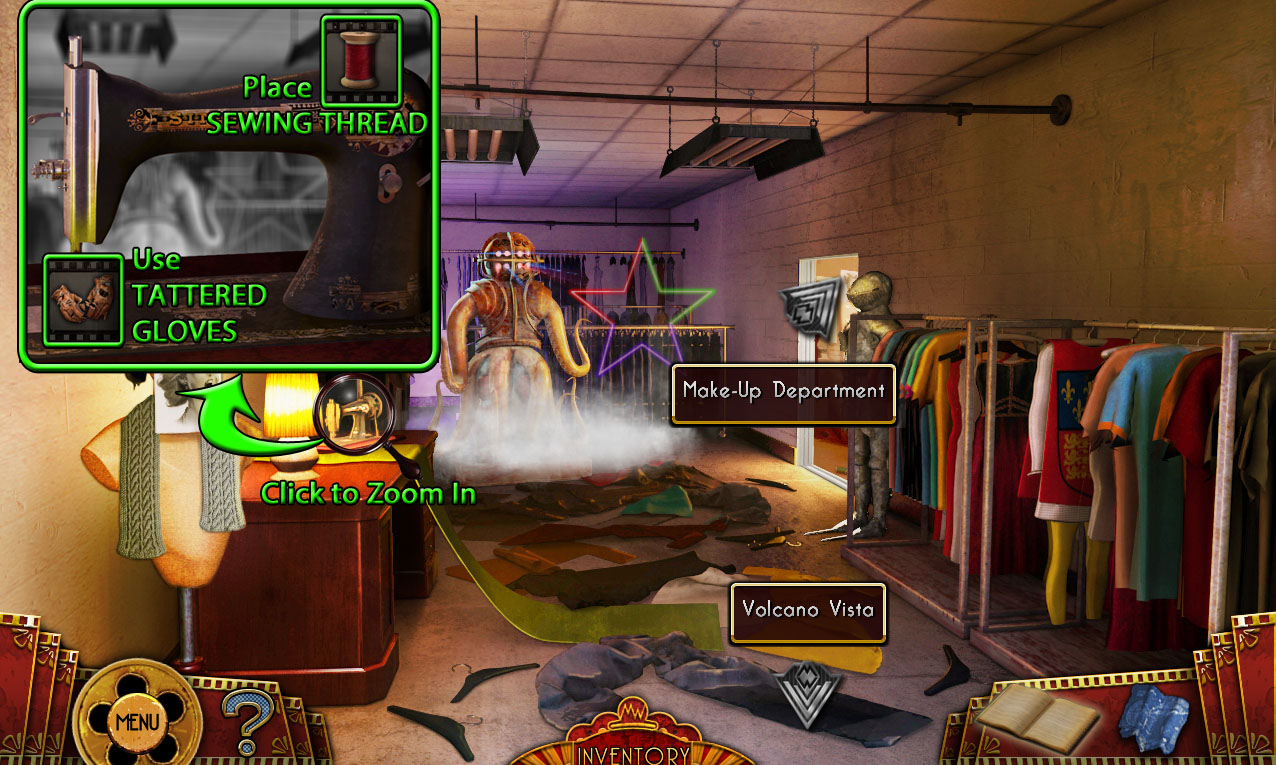
Click the sewing machine on the desk to zoom in.
Add the SEWING THREAD from the mannequin's hat in the Make-Up Department to the machine.
Use the TATTERED GLOVES from the body in the Volcano Vista Set on the machine.
You will receive the MENDED GLOVES.
Return to the Make-Up Department through the right door.
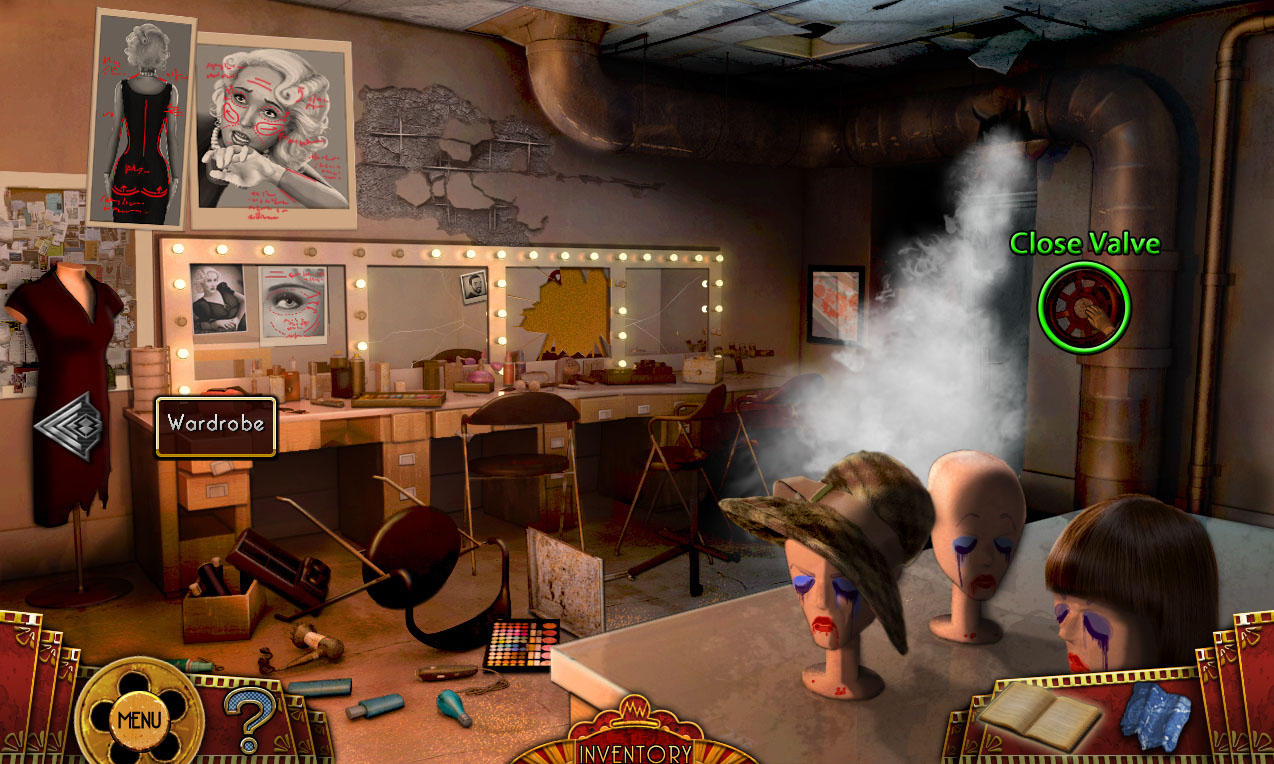
Make-Up Department
Screenshot
Click the steaming pipe valve for a closer look.
Click the valve again to shut off the flow of steam; this will only work if you have the MENDED GLOVES from the sewing machine in your inventory.
Click the revealed metal door to open it, then continue right to Prop Room 3.
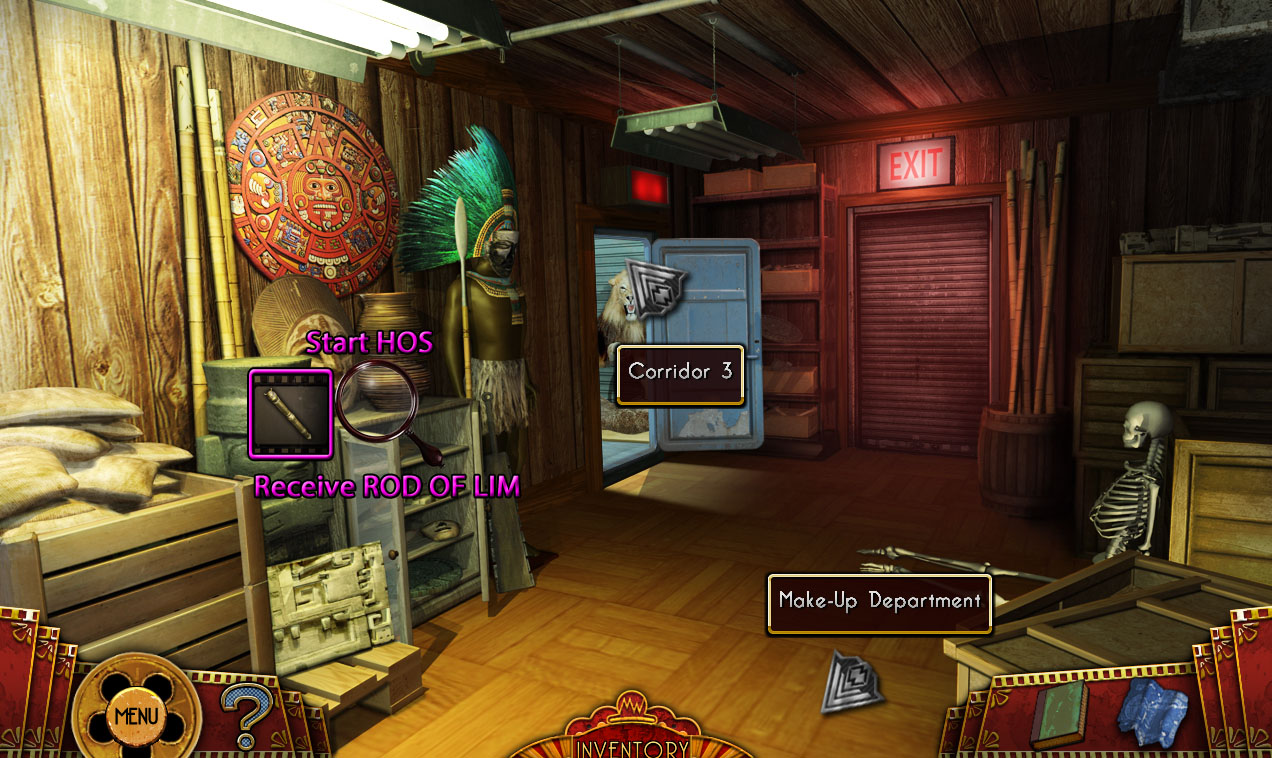
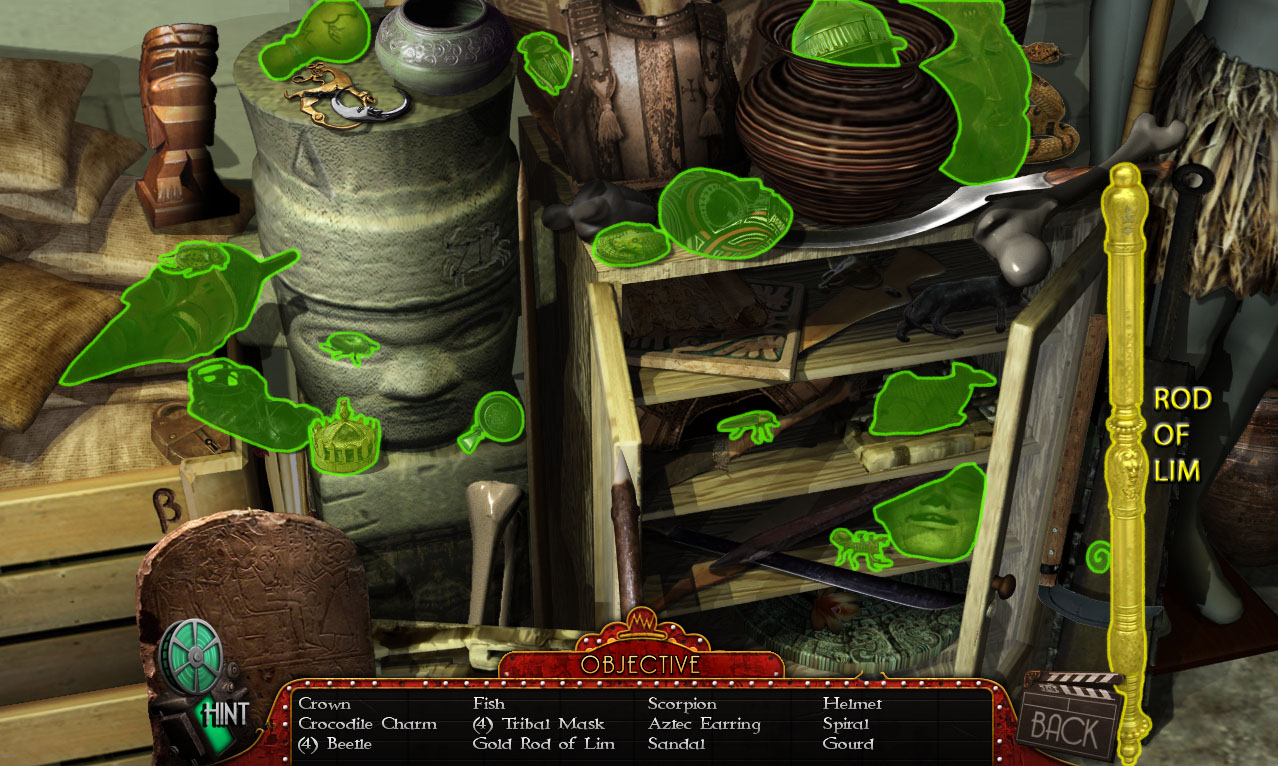
Prop Room 3
Screenshot
Click the cupboard and props to start the hidden object scene.
Screenshot.
Once the hidden object scene is complete, you will receive the ROD OF LIM.
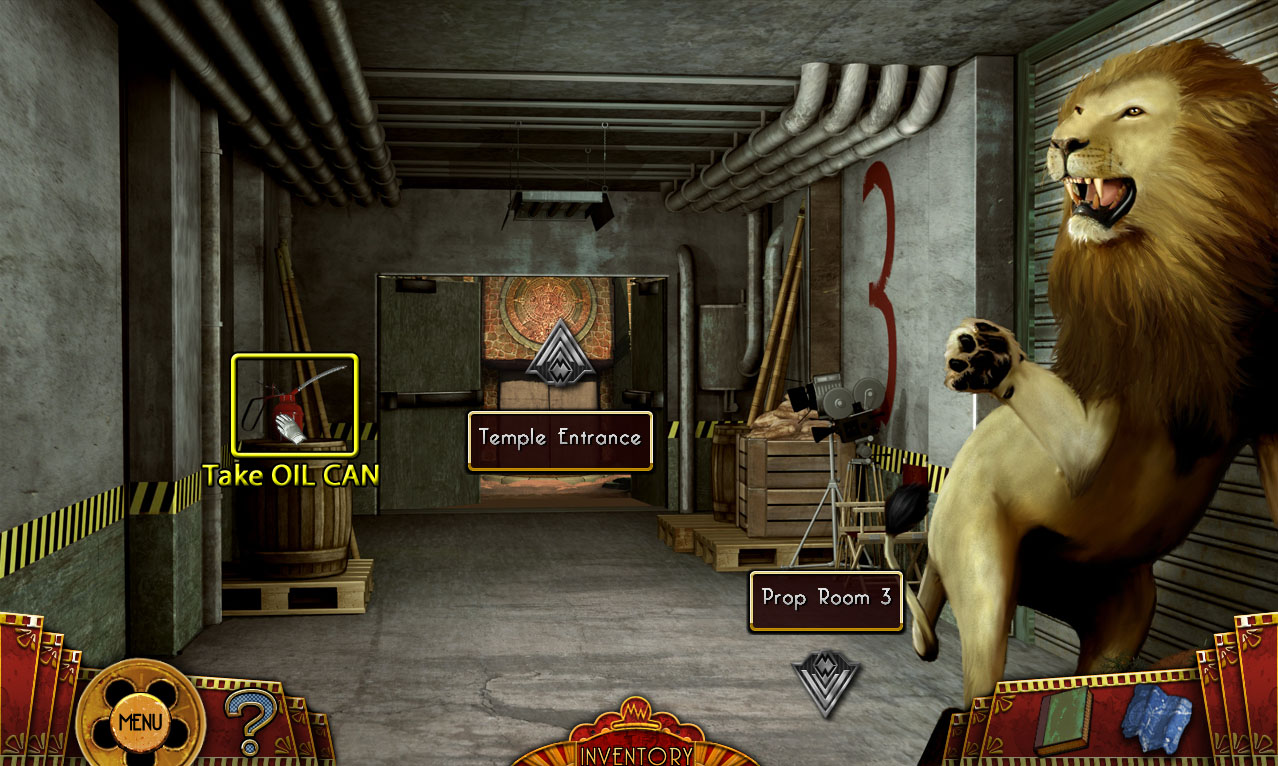
Open the left door and continue left to Corridor 3.
Corridor 3
Screenshot
Take the OIL CAN on top of the barrel.
Continue forward to the Temple Entrance Set.
Temple Entrance Set
Screenshot
Click the snake wrapped around the left rock wall.
Take the revealed GREEN FACE PAINT at the top of the rock.
Click the well to look down into it.
Drop the JEWEL OF DOAN from the type writer puzzle into the well.
Next, put the ROD OF LIM from the Prop Room 3 hidden object scene in the well.
Take the SCEPTRE OF BILIKU YASA that floats to the surface of the water.
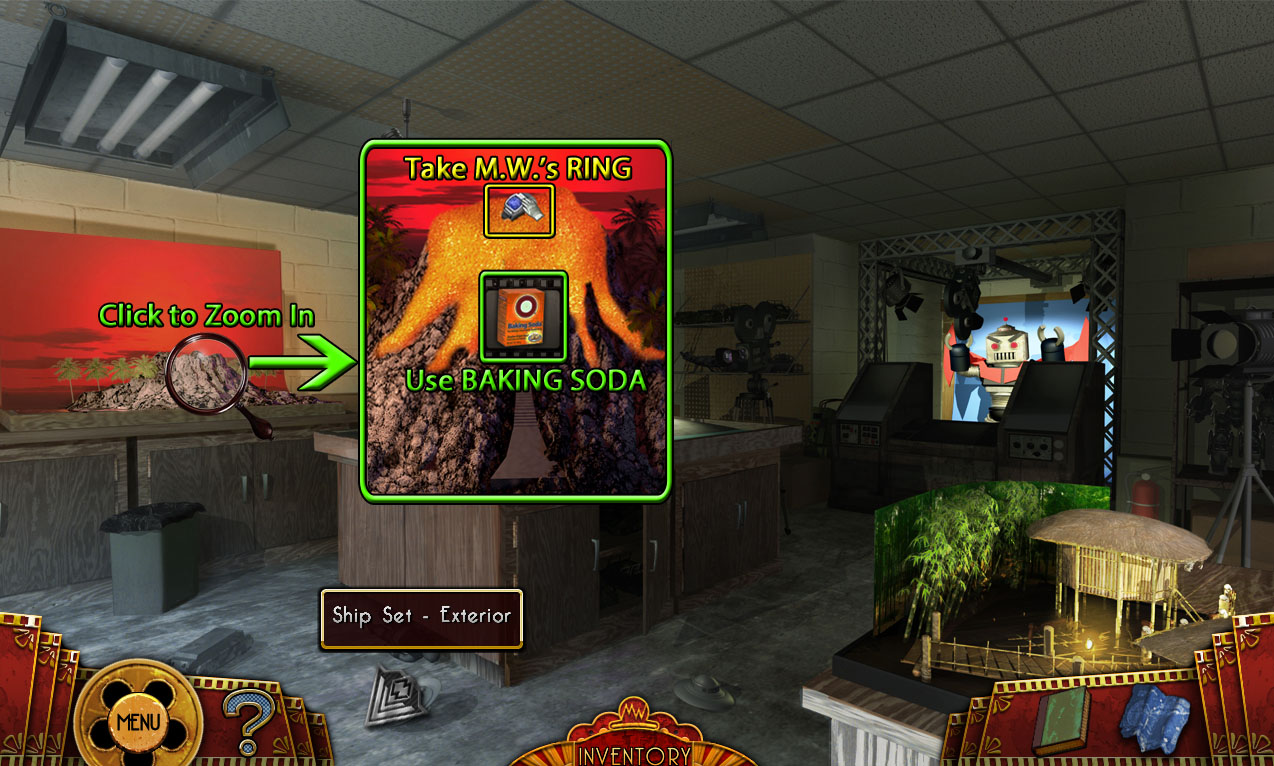
Use the Map to travel to the Models Room.
Models Room
Screenshot
Click the volcano diorama to zoom in.
Pour the BAKING SODA from the clothing rack in the Wardrobe into the volcano.
Take M.W.'S RING from the lava foam in the volcano.
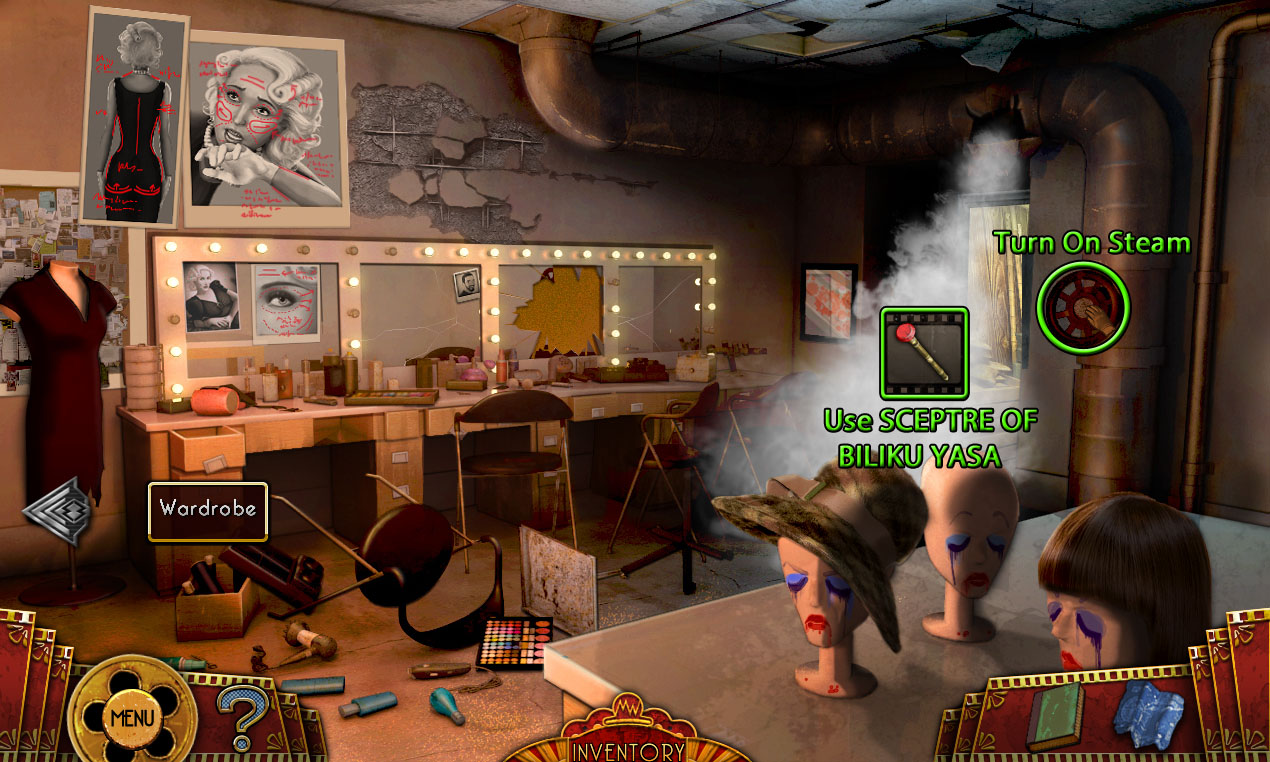
Return to the Make-Up Department.
Make-Up Department
Screenshot
Click the pipe valve for a closer look.
Click the valve to turn the steam back on.
Use the SCEPTRE OF BILIKU YASA from the well in the Temple Entrance Set to make the POWERED SCEPTRE.
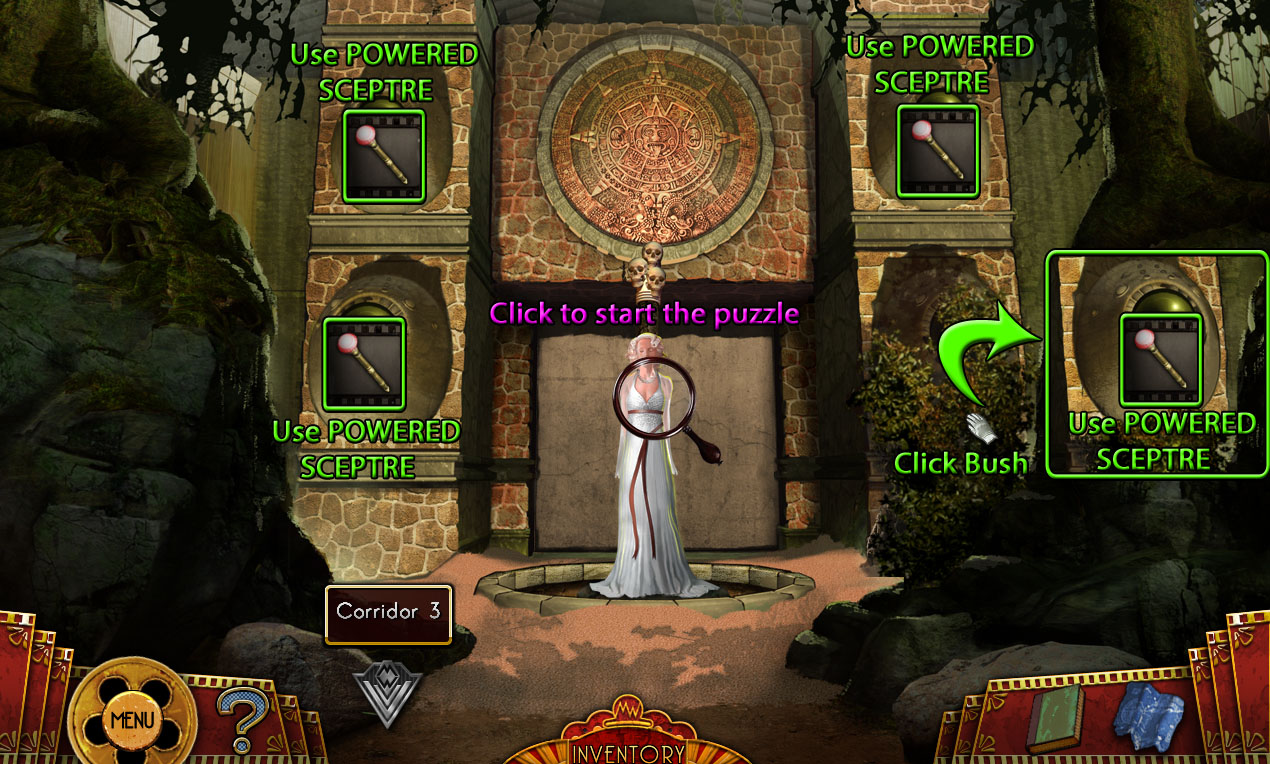
Return to the Temple Entrance Set.
Temple Entrance Set
Screenshot
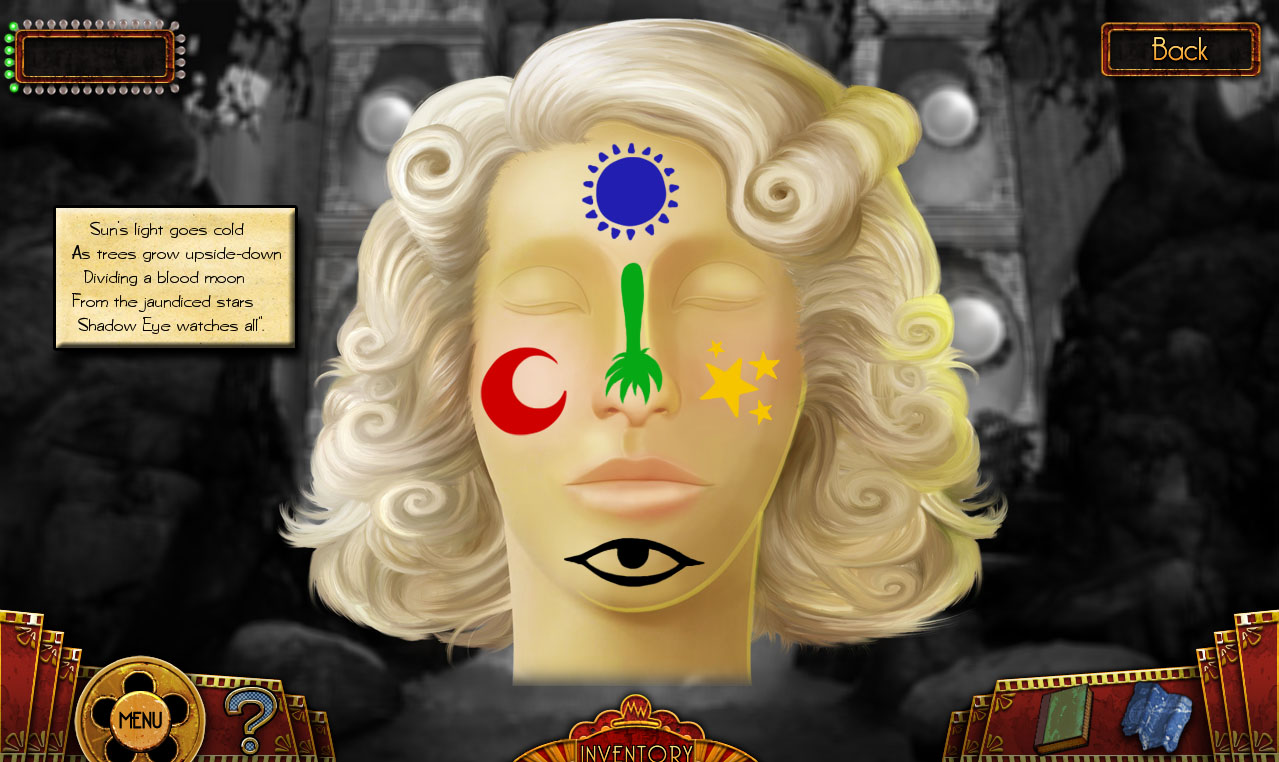
Click the right push to reveal the fourth demon face.
Use the POWERED SCEPTRE charged from the steam in the Make-Up Department on the orbs in the center of each of the demon faces.
Click the mannequin tied to the raised platform for a closer look.
In order to start the puzzle, you must have collected all five of the colored FACE PAINT.
The BLUE FACE PAINT is found in the crocodile's mouth at the Crocodile Pit.
The YELLOW FACE PAINT is on top of the bamboo leaves in the Volcano Vista Set.
The RED FACE PAINT is from the Gymnasium hidden object scene.
The BLACK FACE PAINT is from the counter in the Make-Up Department.
The GREEN FACE PAINT is found on the rock hidden behind the snake at the Temple Entrance Set.
Paint the symbols on the face with the FACE PAINT in the correct color order.
Refer to the Sacrificial Prayer of Colours note from the bridge at the Voodoo Village Set for the solution.
"Sun light goes cold"
"As trees grow upside-down"
"Dividing a blood moon"
"From the jaundiced stars"
Shadow Eye watches all"
Solution.
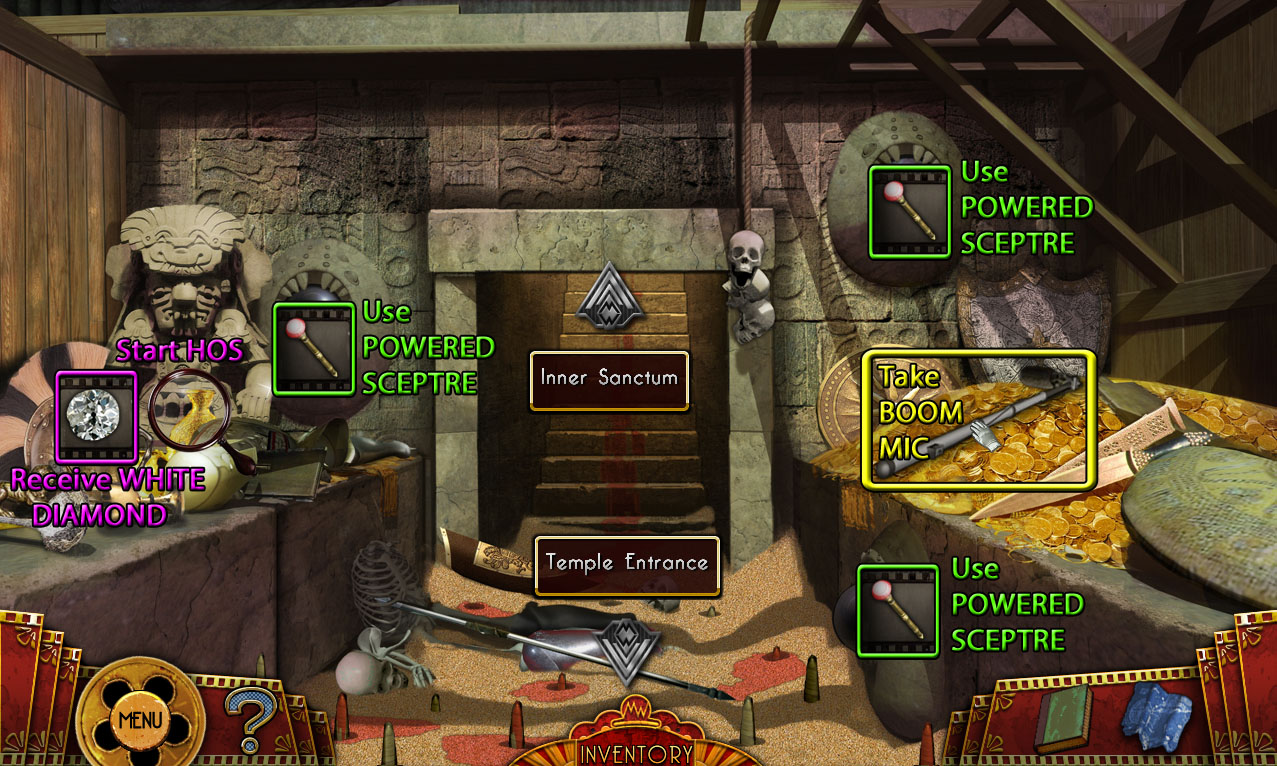
Go forward through the open doors to the Treasure Room Set.
Treasure Room Set
Screenshot
Take the BOOM MIC on top of the right treasure pile.
Click the left pile of treasure to start the hidden object scene.
Screenshot.
Once the hidden object scene is complete, you will receive the WHITE DIAMOND.
Use the POWERED SCEPTRE on the three orbs in the demon faces: one on the wall at each side of the doorway, and one under the right pile of treasure.
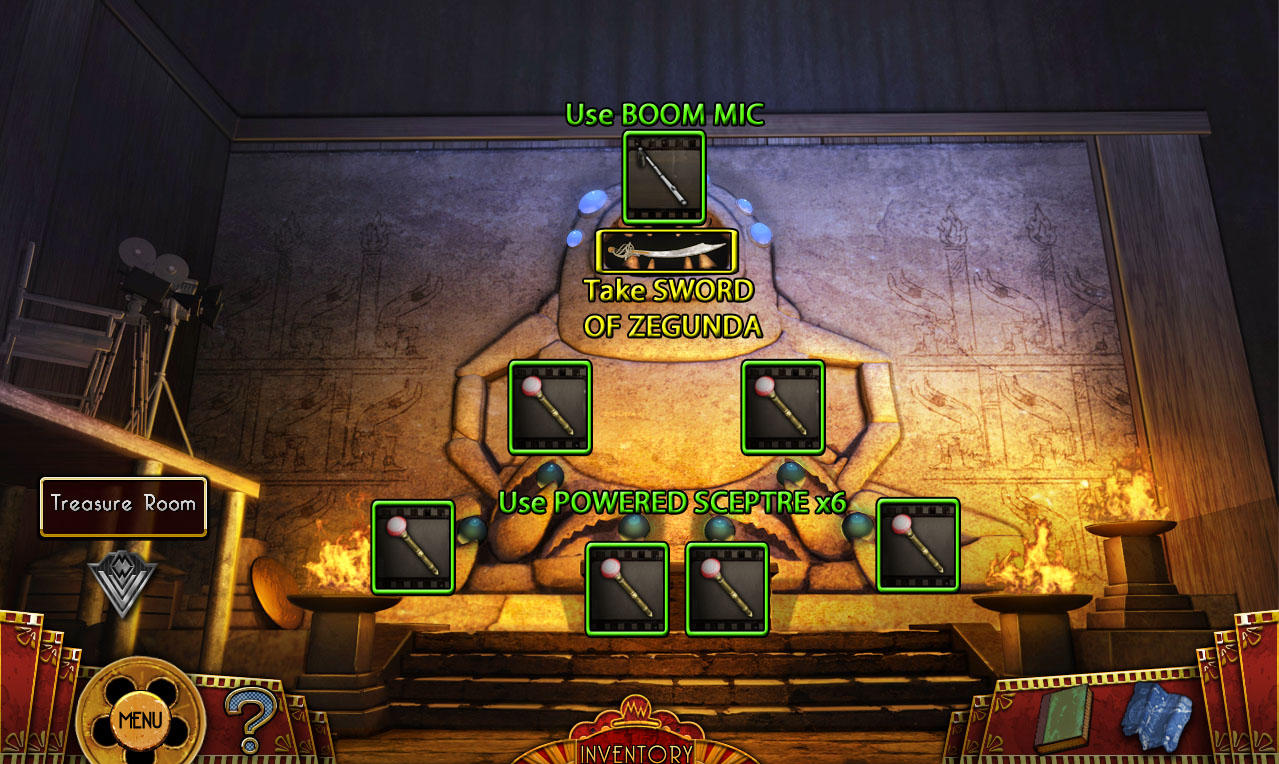
Continue forward to the Inner Sanctum Set.
Inner Sanctum Set
Screenshot
Use the POWERED SCEPTRE on the 6 orbs inside the stone monster's claws.
Use the BOOM MIC from the treasure pile in the Treasure Room Set on the saber inside the monster's mouth to receive the SWORD OF ZEGUNDA.
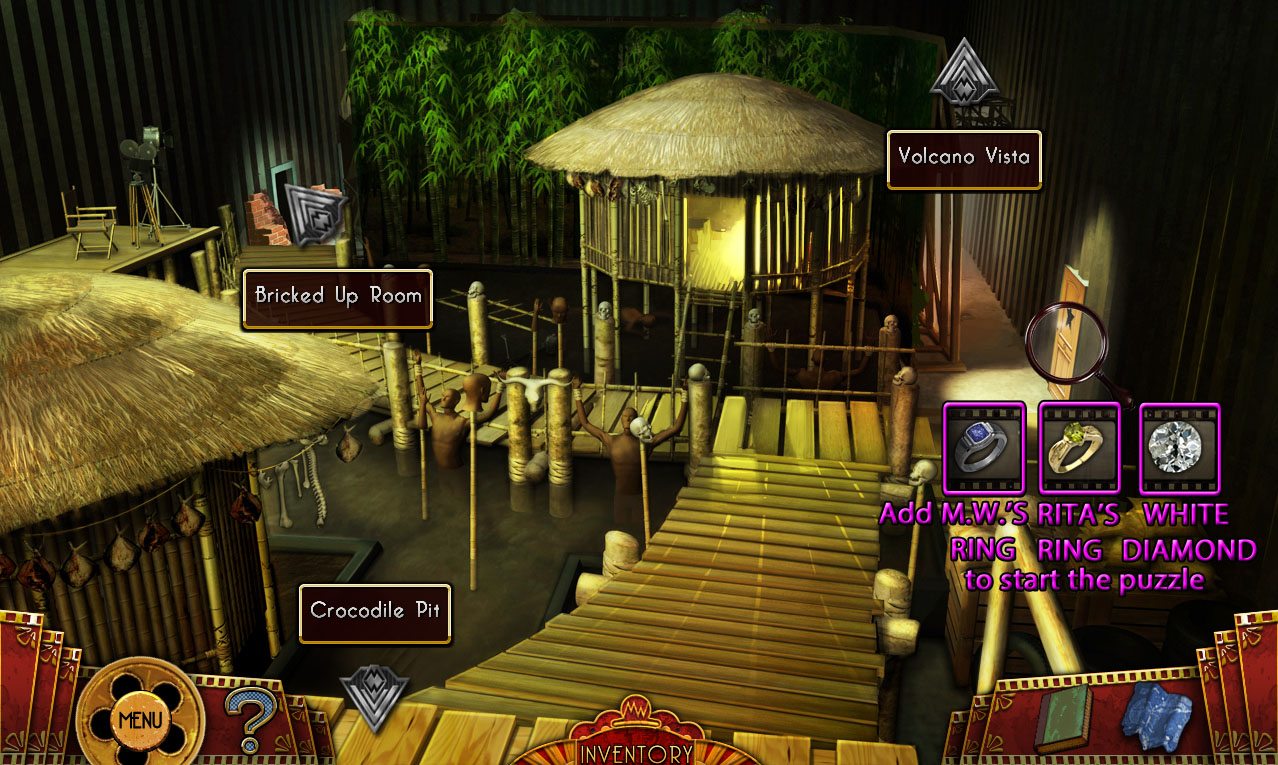
Go back to the Voodoo Village Set.
Voodoo Village Set
Screenshot
Click the right door for a closer look.
Add the WHITE DIAMOND from the Treasure Room Set hidden object scene to the missing slot on the left point of the star.
Place RITA'S RING, from the ring puzzle in the Bricked-Up Room, in the right space for the female piece.
Place M.W.'S RING, from the volcano in the Models Room, in the left space for the male piece to start the puzzle.
Reflect the light beam around the star to match the pattern in the taped photograph of the monster's laser projection at the Wardrobe.
Click the diamonds to rotate them, changing the angle of the reflected beam of light.
The light will change color to blue as it passes through the left ring and to green as it passes through the right ring.
Solution.
Once the puzzle is solved, go through the open right door to Rita's Dressing Room.
Task: Access the set for the film's climax and rescue Mum
Rita's Dressing Room
Screenshot
Click the jewelry box on the left table to zoom in.
Use the SMALL KEY from the dance pad puzzle in the Gymnasium to open the lock.
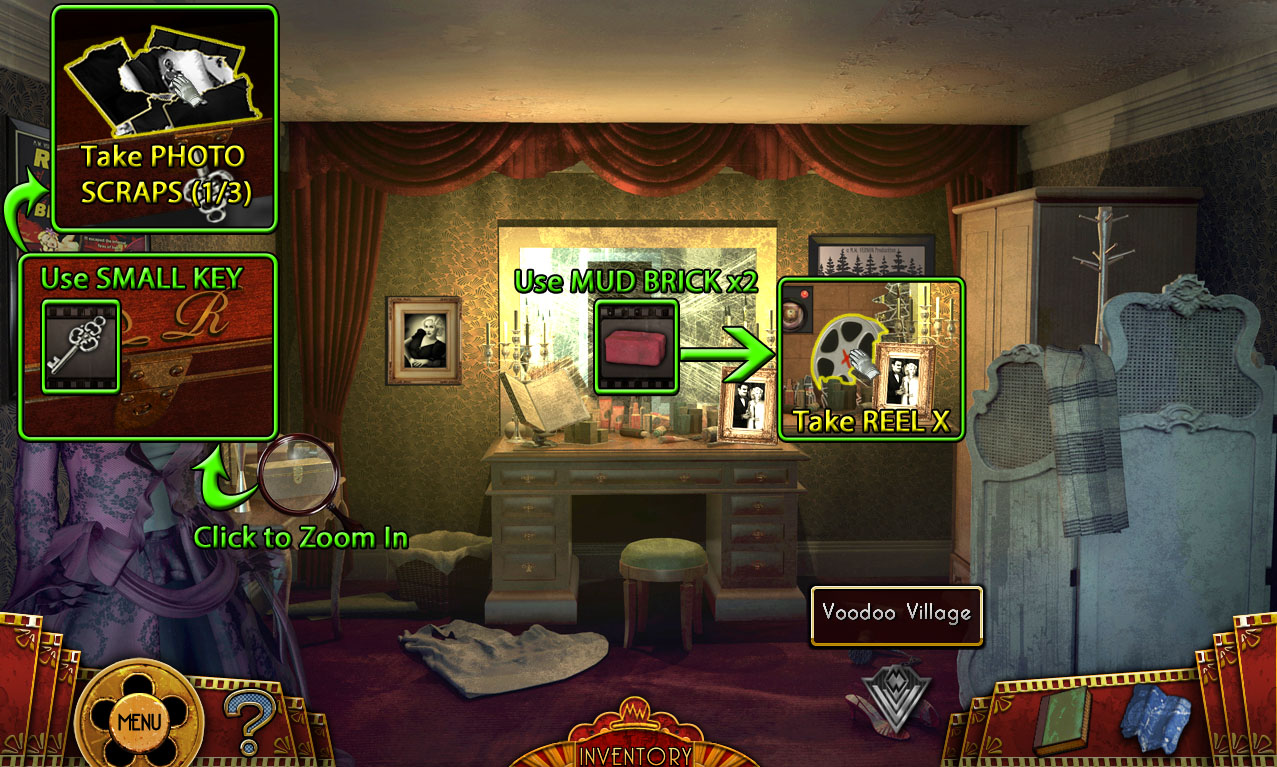
Take the PHOTO SCRAPS (1/3) inside the open box.
Use the MUD BRICK from the pile of newspapers in the Bricked-Up Room to smash twice through the scratched mirror.
Take REEL X from the revealed cache behind the broken mirror.
Use the Map to travel to the Crews Quarters.
Crews Quarters
Screenshot
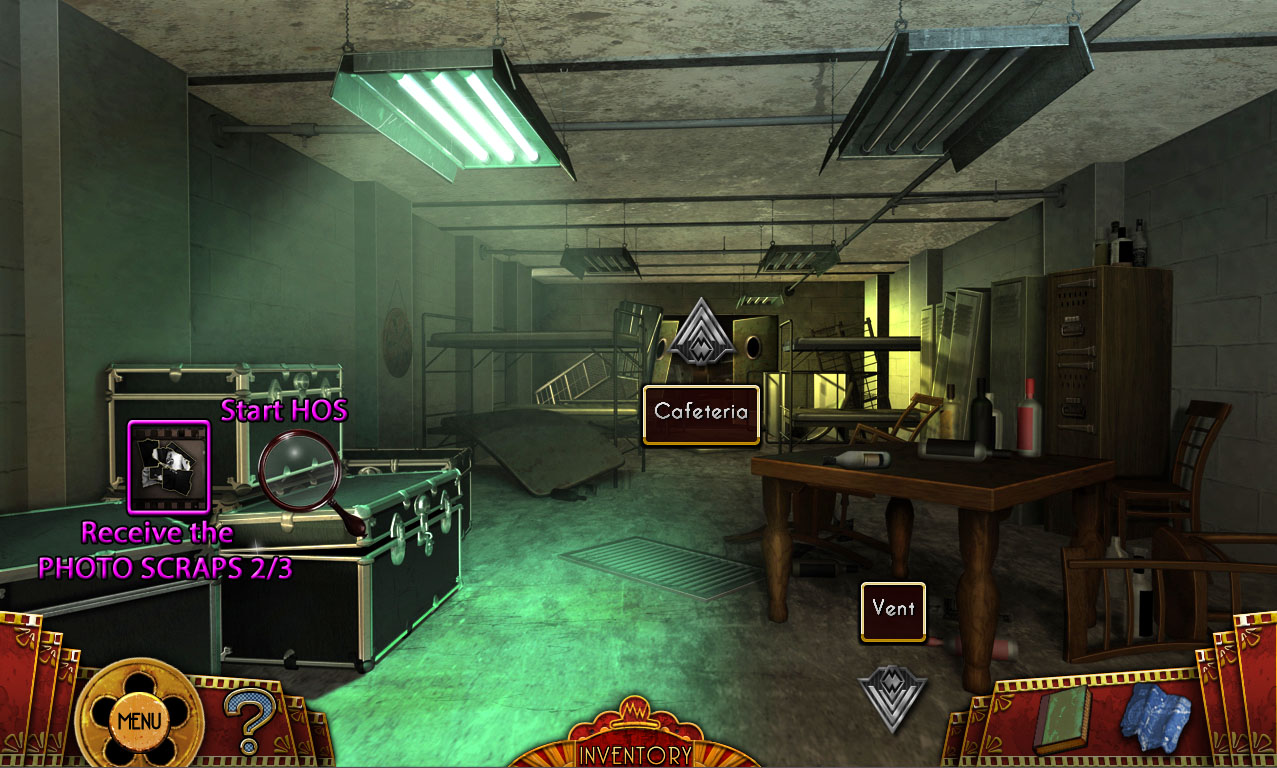
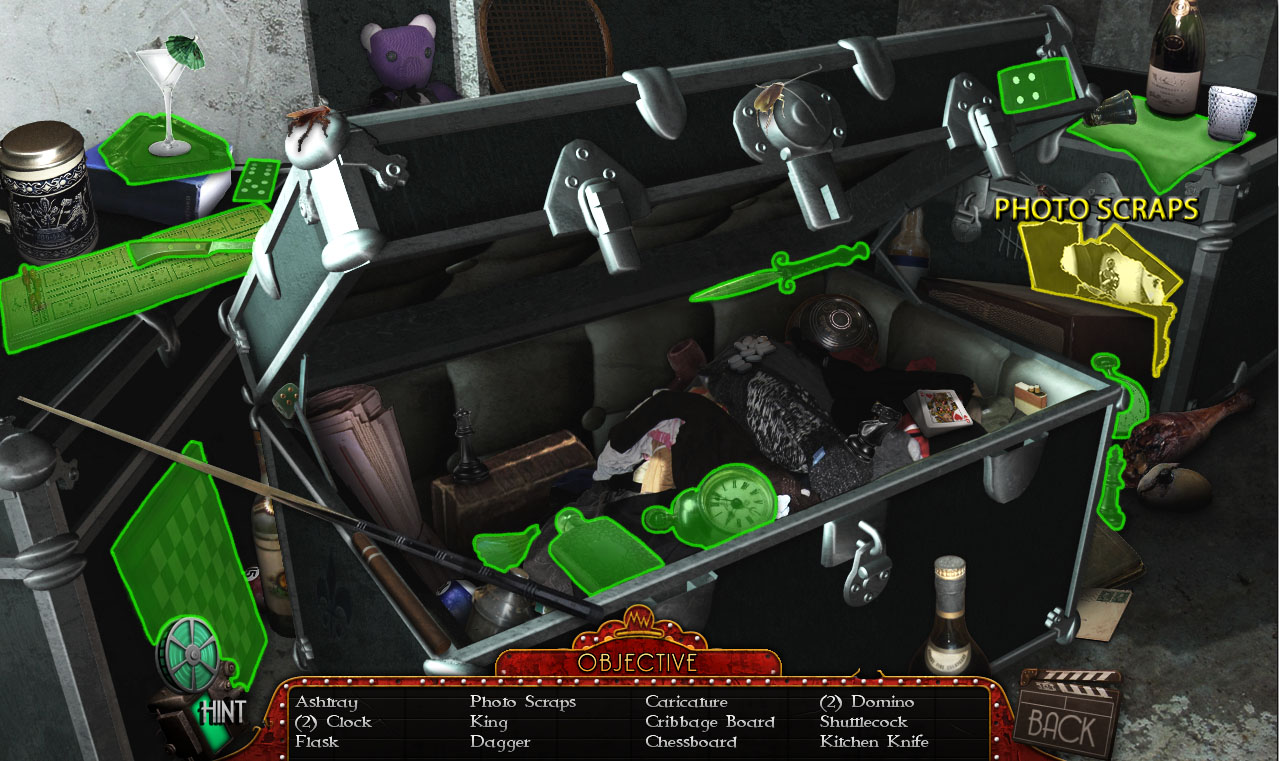
Click the black boxes on the left to repeat the hidden object scene.
Screenshot.
Once the hidden object scene is complete, you will receive the PHOTO SCRAPS (2/3).
Use the Map to travel to the Meeting Room.
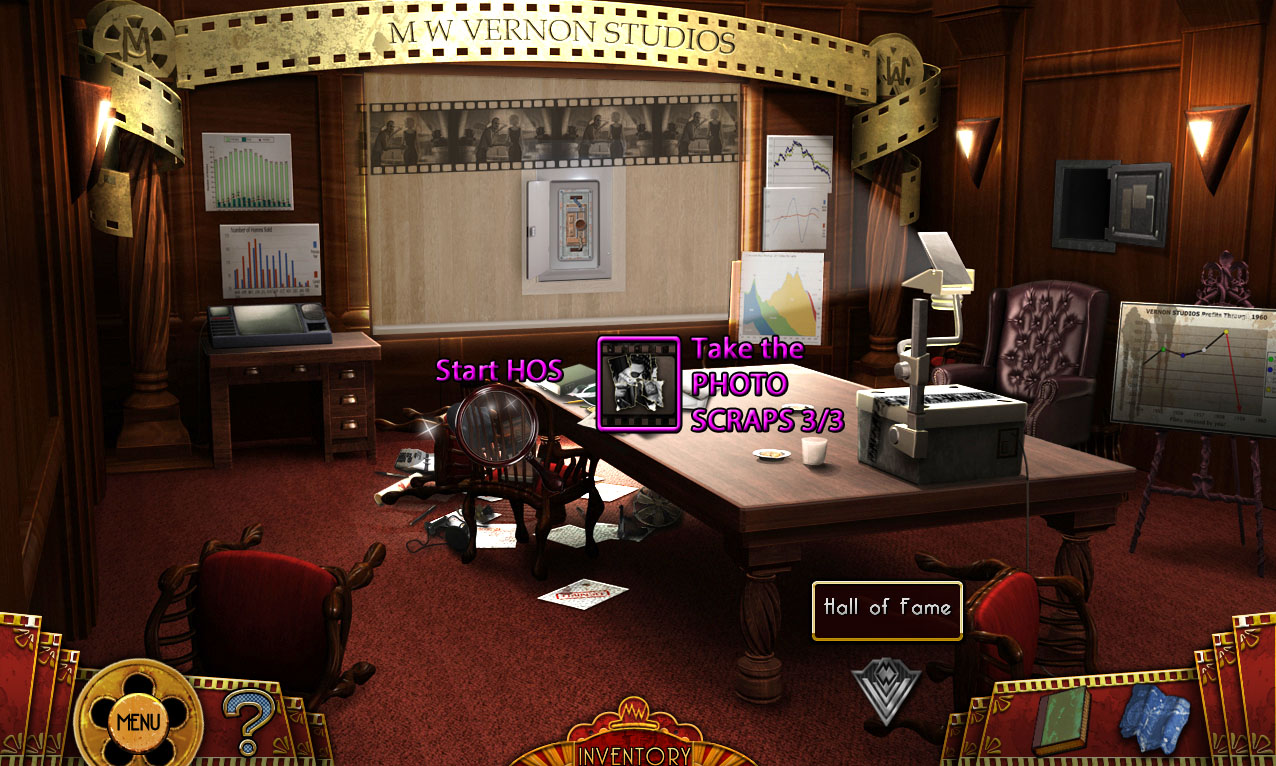
Meeting Room
Screenshot
Click the pile of junk at the end of the table to repeat the hidden object scene.
Screenshot.
Once the hidden object scene is complete, you will receive the PHOTO SCRAPS (3/3).
Use the Map to return to the Projector Room.
Projector Room
Screenshot
Place REEL X from the broken mirror in Rita's Dressing Room into the projector.
Click the window to find the X marked spot on the theater screen.
Go left and then forward into the Theatre.
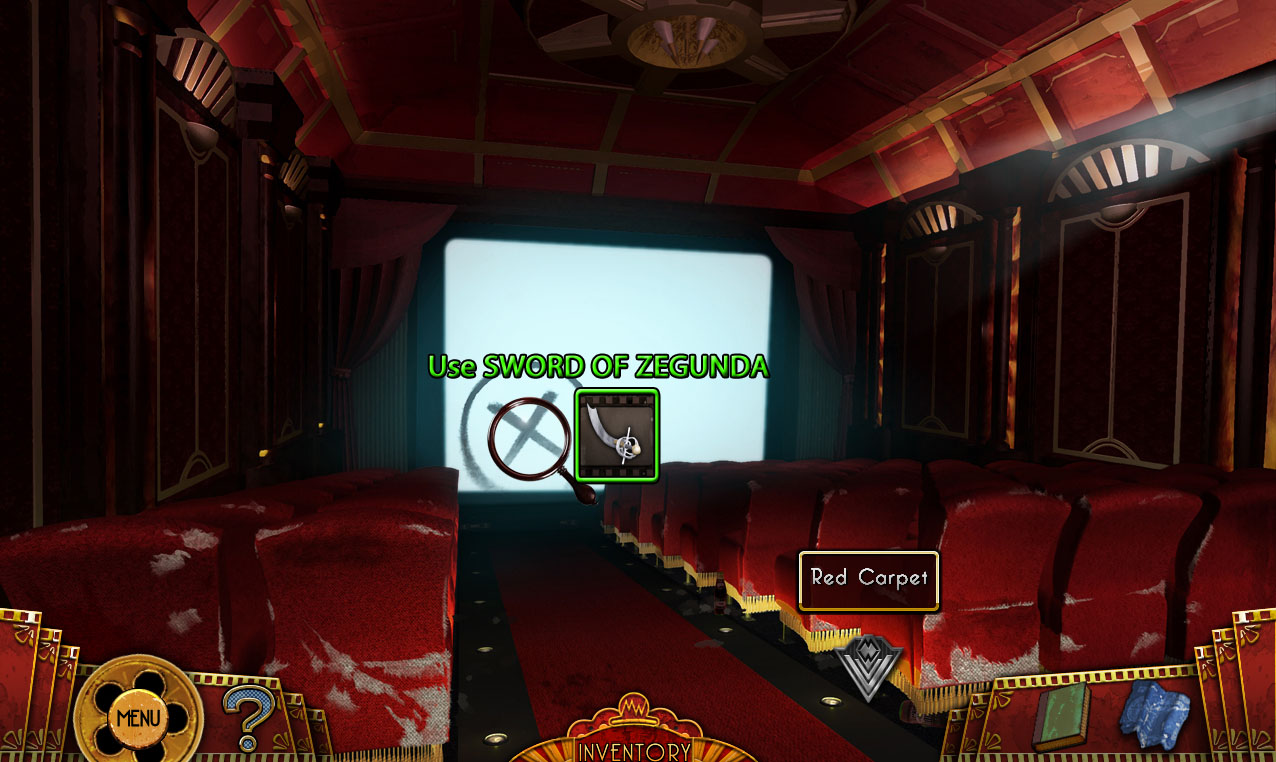
Theatre
Screenshot
Use the SWORD OF ZEGUNDA from the monster's mouth in the Inner Sanctum Set to cut through the X on the movie screen.
Go forward through the cut in the screen to travel to the Secret Wing.
Secret Wing
Screenshot
Take the doctor's note stuck in the cobwebs on the ceiling to add it to the Journal.
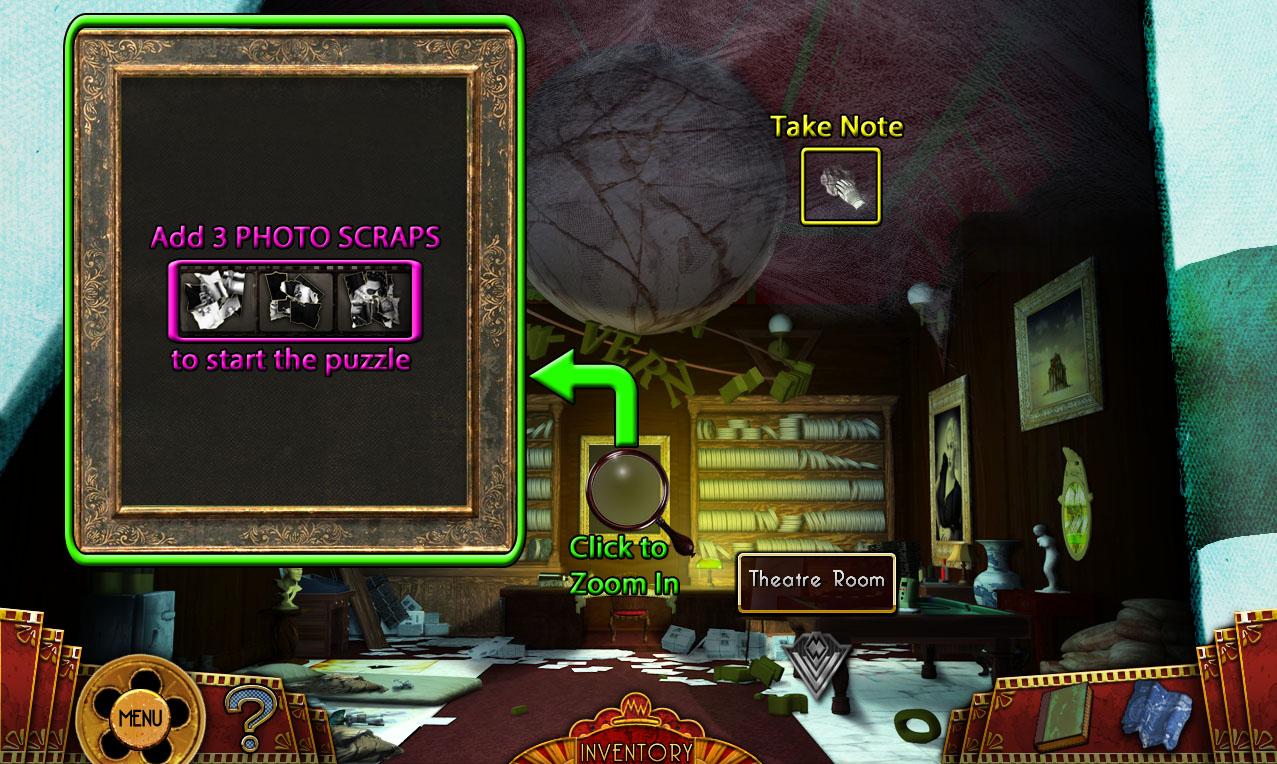
Click the painting frame in the center of the wall for a closer look.
Add the three PHOTO SCRAPS to the frame to start the puzzle.
PHOTO SCRAPS 1/3 is found in the locked box in Rita's Dressing Room.
PHOTO SCRAPS 2/3 is from the Crews Quarters hidden object scene.
Photo SCRAPS 3/3 is from the Meeting Room hidden object scene.
Arrange the fragments to complete the picture inside the frame.
Click and drag a piece to move it around the frame.
When a photo scrap is correctly positioned, it will lock in place.
Solution.
Once the puzzle is solved, continue forward through the revealed doorway to the elevator.
Press the down button to ride down to the Volcano Set.
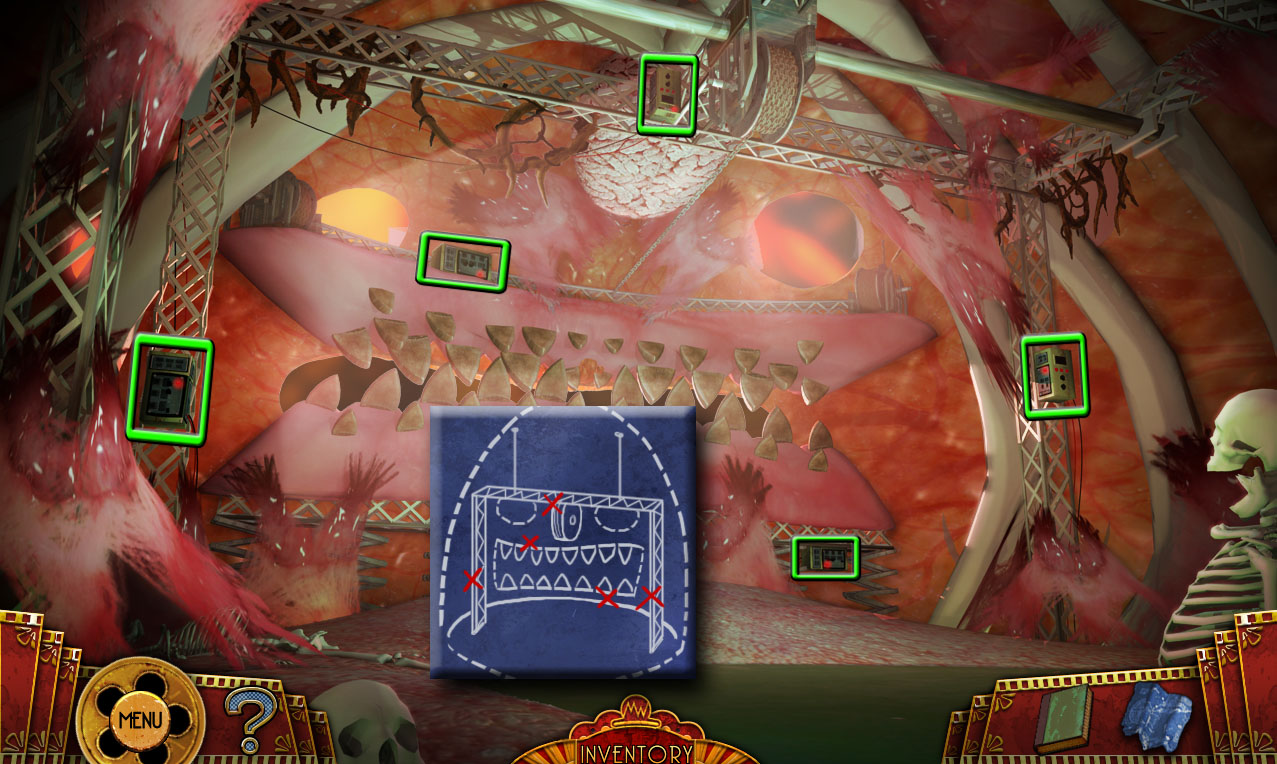
Volcano Set
Move up the path to enter the inside of the monster.
Click the five electric boxes around the monster set; refer to the blueprints from the typewriter puzzle for their locations.
Screenshot.
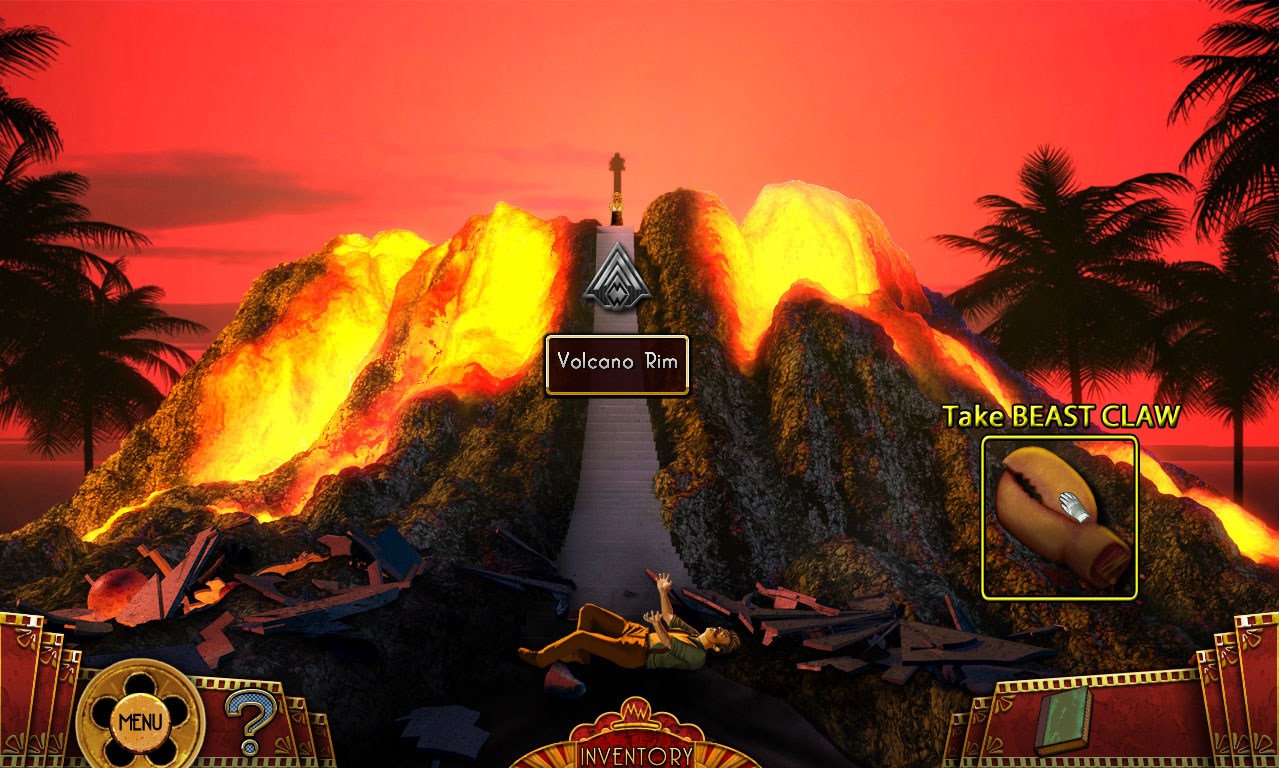
Pick up the BEAST CLAW from the side of the volcano.
Climb up the stairs to the Volcano Rim.
Screenshot
Volcano Rim
Screenshot
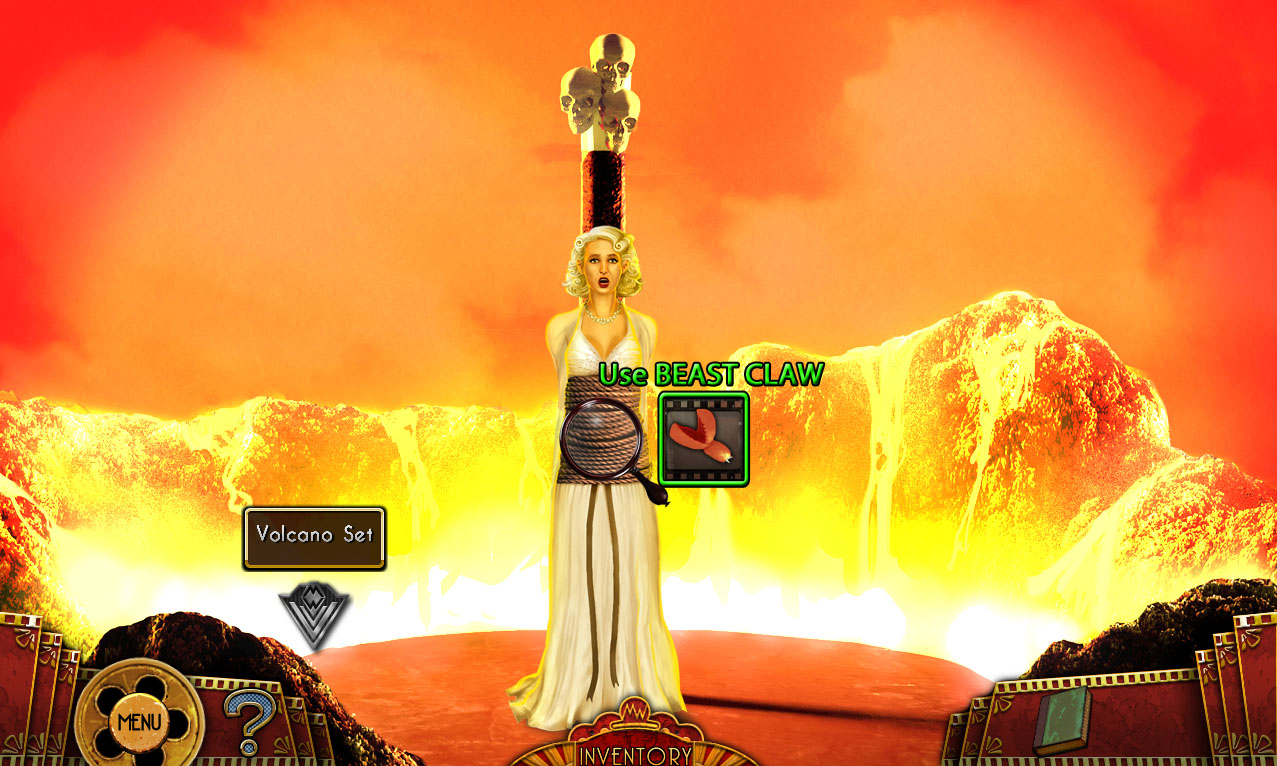
Use the BEAST CLAW to cut through the rope tied around Mum.
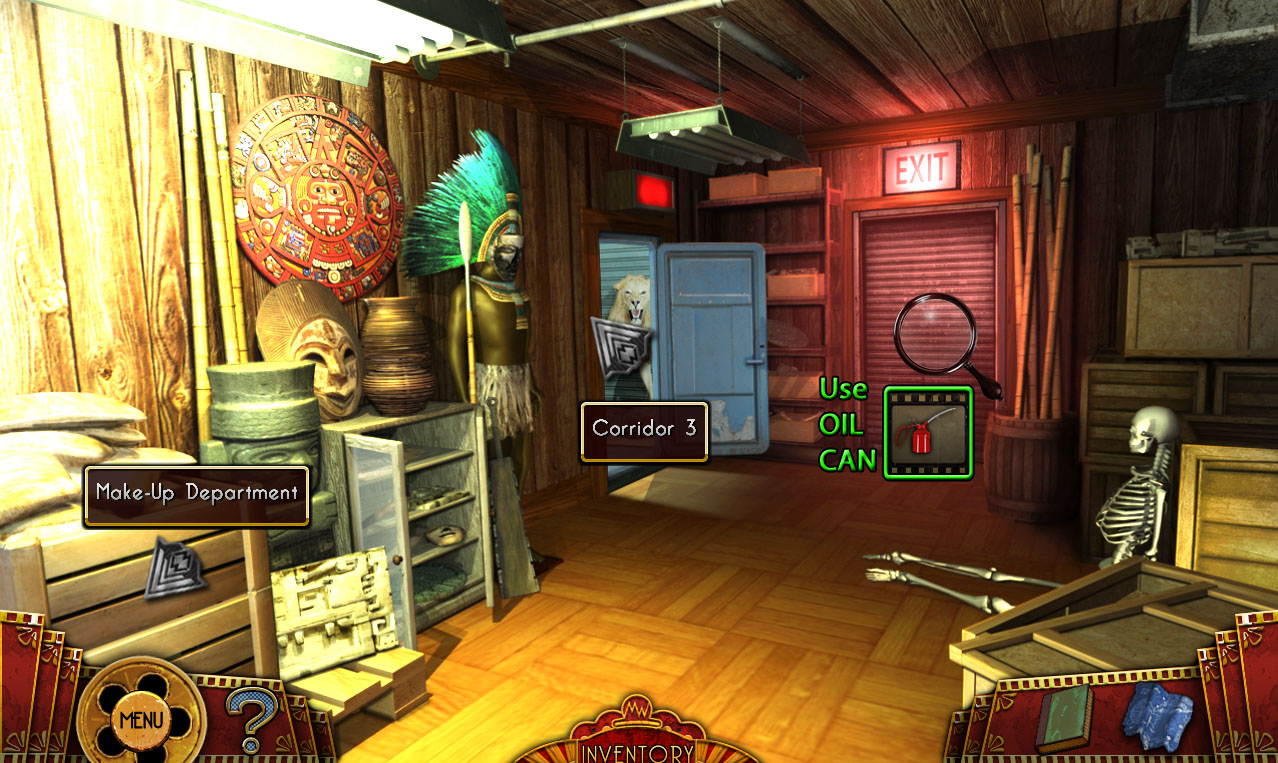
Use the map to travel to Prop Room 3.
Prop Room 3
Screenshot
Use the OIL CAN from the barrel in Corridor 3 on the rusted exit door.
Go forward to the Courtyard.
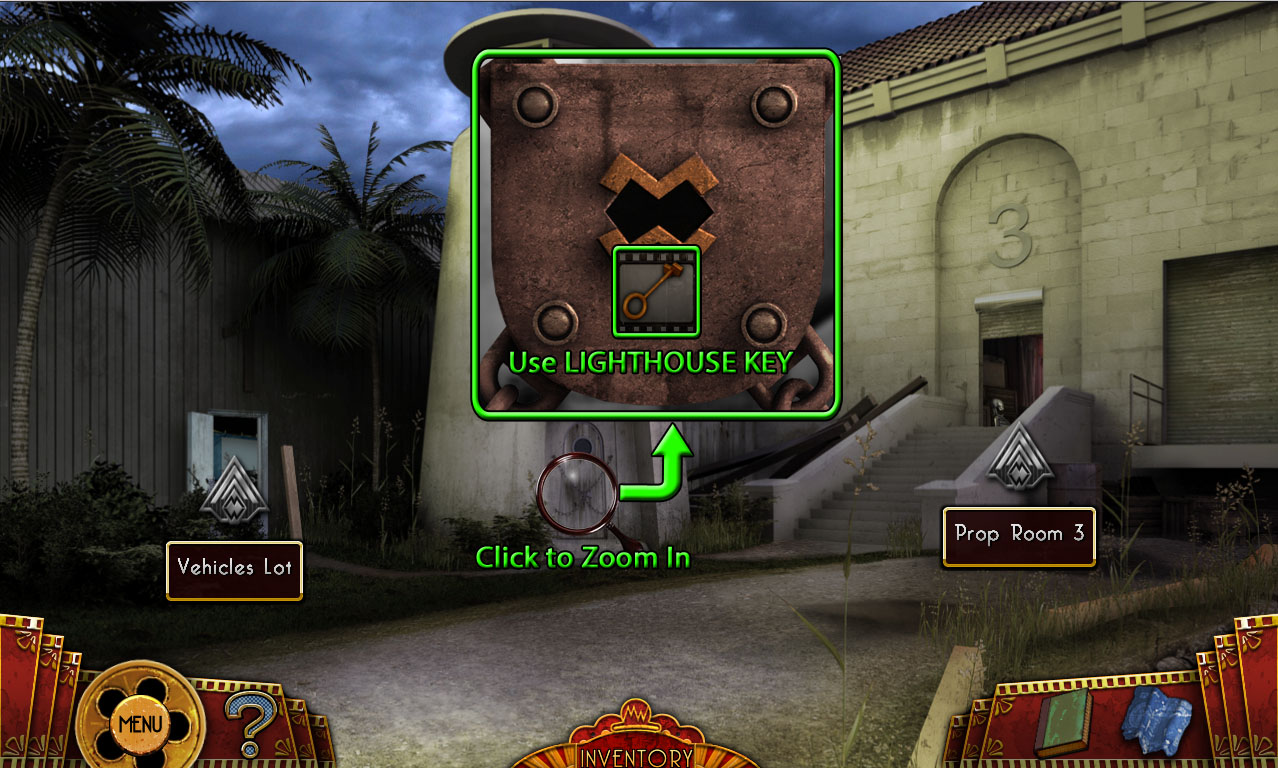
Task: Escape Vernon Island before it falls into the sea!
Courtyard
Screenshot
When you enter the courtyard, you will receive the LIGHTHOUSE KEY.
Click the door to the lighthouse to zoom in.
Use the LIGHTHOUSE KEY to open the lock.
Go through the open door into the Lighthouse Entry, continue down the stairs to the Lighthouse Exit, then move forward into the Airplane.
Airplane
Screenshot
Click the box labeled MW to zoom in.
Use RITA'S HAIRPIN to open the lock.
Press the revealed red button to turn off the auto pilot.
Click the lever under the Cargo sign.
THE END
Posted by: Trinn |
February 25, 2012 8:52 PM
|
February 25, 2012 8:52 PM