

Dark Parables:
Rise of the Snow Queen
Platform: Mac, Windows

![]() The life of a fairy tale detective must be an exhausting one. For one thing, you seem to get called in at a moment's notice all over the world whenever anything strange happens. For another, you must then spend a lot of time fighting your way through fairy tales as they were originally meant to be: dark, scary, and dangerous. However, you are again up to the task in the latest adventure/hidden object hybrid from Blue Tea Games, Dark Parables: Rise of the Snow Queen.
The life of a fairy tale detective must be an exhausting one. For one thing, you seem to get called in at a moment's notice all over the world whenever anything strange happens. For another, you must then spend a lot of time fighting your way through fairy tales as they were originally meant to be: dark, scary, and dangerous. However, you are again up to the task in the latest adventure/hidden object hybrid from Blue Tea Games, Dark Parables: Rise of the Snow Queen.
 Like Dark Parables: The Curse of Briar Rose and Dark Parables: The Exiled Prince before, Dark Parables: Rise of the Snow Queen takes a classic tale, in this case Snow White, and takes it down some dark and disturbing paths. This is not the story of happily ever after, this is what actually happens afterwards, when Snow White has gone as loony as her step-mother before her and locked the mountain kingdom in perpetual winter, along with turning her hapless father into a raging beast. Snow, now known as the Snow Queen, has presided over this place for centuries now, and has decided to bury the nearby Swiss town in a raging snowstorm to cover her kidnapping of all the town's children. As the only fairytale detective in the area it is your job to brave the driving snow, solve your way into the frozen kingdom, and rescue the children with the help of a local guide and a few of the smarter kids. Can you save the world before Snow locks it into eternal ice?
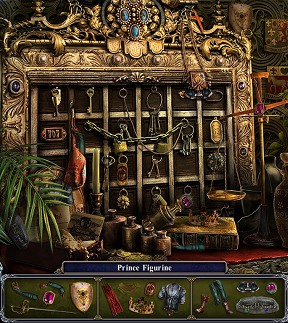
Dark Parables: Rise of the Snow Queen plays like a classic point-and-click adventure with lots of FROG (fragmented object game) elements. Rather than the classic lists of junk to find in a junk pile, you are tasked with finding pieces (lots of pieces) of a particular item scattered throughout a scene in order to reassemble an object that will be useful later in the game. Along with the exploring comes a nice mix of mini-games and puzzles, some familiar, some unique. A changing cursor indicates areas of interest, sparkles highlight games and puzzles (at least in casual mode), a refilling hint timer gives helpful hints (and allows skipping some puzzles), and items go into a bottom-loading inventory. In a break from tradition there is not a classic "detective's notebook" to keep track of clues. Instead, you find fragments of stories along the way which go into a fairytale book. Collect enough fragments and you can get the whole story of what happened with Snow, her father, her hapless Prince husband, and the kingdom. Also along for the ride is a very handy map feature which allows you to see where you are going, where you have been, and places you might need to return.
 Along with finding the fragmented objects and fairytale pieces you are once again tasked to find "cursed" objects within the scenes. These objects, reminiscent of the "morphing" objects from the Mystery Case Files games, are items that shift from one form to another. Some are obvious when you enter a scene, some will only trigger later when a specific task has been completed. The cursed objects are a nice little side quest that don't affect the main story while adding an additional layer of gameplay.
Analysis: Dark Parables: Rise of the Snow Queen contains everything we've come to expect from the Dark Parables series: an intriguing story, stunning graphics, and fabulous gameplay. What makes the Dark Parables series stand out from the crowd is the attention to storytelling involved and the depth of the characters. Dark Parables: Rise of the Snow Queen examines what happens when good people do bad things for what seem like good reasons and the fallout that results, a moral lesson that today's modern fairytales seem to have jettisoned along with any scary or creepy elements in order to "protect the children".
The backgrounds are the usual gorgeous storybook confections, enhanced by some pretty amazing animations, not only in the main characters but also in the backgrounds of the adventure and the hidden object scenes. A swooping music score, amazingly life-like incidental sounds, and some fairly decent voice acting round out the adventure, immersing you completely in the experience. This attention to every aspect of the game is what we've come to expect from Blue Tea, who also created the enchanting world of Enlightenus.
 The puzzles are a nice range of difficulties and include some nice original work including a couple of multi-layered door puzzles that are once again reminiscent of the original Mystery Case Files: Ravenhearst. The other puzzles are fun variations on the familiar: sliders, mazes and the like. Puzzles and mini-games are skippable after a while except in the hard level of the game, where there is no hint feature or sparkles either. What Dark Parables: Rise of the Snow Queen contains is a fine balance of exploration, puzzle solving, and hidden object finding, each aspect in perfect harmony and not dominating the gameplay.
The third so far in the series (with a hint at the end that a fourth is in the works), Dark Parables: Rise of the Snow Queen continues the legacy of excellence the Dark Parables series established. Challenging, engrossing, and lovely, and with three levels of difficulty, you're looking at a fantastic hidden object adventure done right.
A Collector's Edition is also available. It includes wallpapers, extra gameplay, and a built-in strategy guide. Remember that Big Fish Game Club Members pay only $13.99 for Collector's Editions (or 2 club credits), and collector's editions count 3 card punches of 6 total needed for a free game.
![]() Windows:
Windows:
Download the demo
Get the full version
Also available: Collector's Edition
![]() Mac OS X:
Mac OS X:
Download the demo
Get the full version
Also available: Collector's Edition


Walkthrough Guide
(Please allow page to fully load for spoiler tags to be functional.)
Dark Parables: Rise of the Snow Queen Walkthrough
General Information
Menus
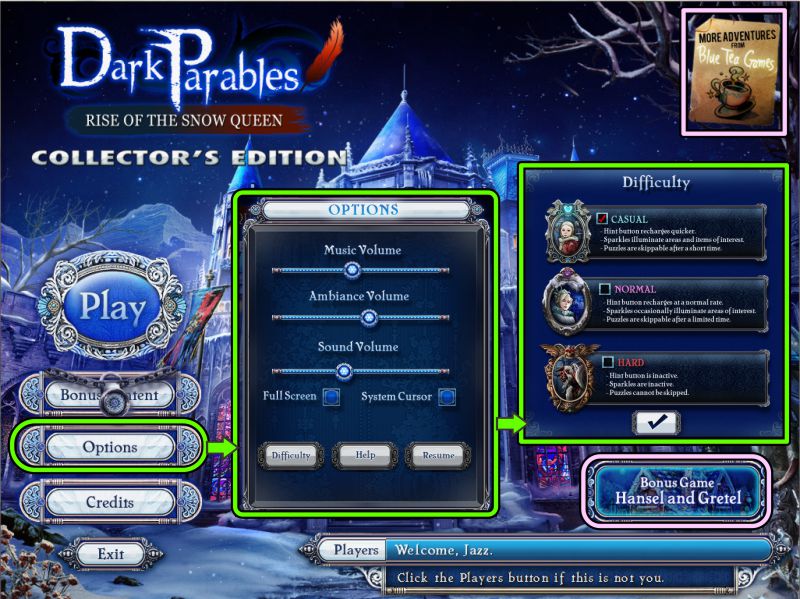
On the Main Menu you can choose your Player name, Play or Exit the game, select your Options which include Music, Ambiance, and Sound volume, Full Screen or not, System Cursor or not, Help, Difficulty, and Resuming the game.
This is the same menu you get when you choose Options from a scene, so you can change all of these options, plus exit to the Main Menu.
If you purchased the Collector's Edition, the Bonus Game of Hansel and Gretel will be available once you have completed the novel. You will not be able to access the locked up Bonus Content until you finish the Hansel and Gretel Bonus Game.
When you Quit the game, your progress is automatically saved, but the game does have one funny quirk, so when you again start the game, you will have to adjust your Ambience Volume to what you want because it reverts to the game's default volume.
You can click on the Blue Tea Games banner in the upper right corner to see some of their other games, and you can check out the credits of the developers on the Main Menu.
Difficulty levels include Casual, Normal, and Hard.
Casual gives you short times for refill of Hint and Skip buttons and shows sparkles for areas of interest.
Normal still lets you Skip Mini Games, and provides Hints and Skips at a more normal rate.
If you want to tackle "Hard", you will get no Hints, Skips, or Sparkles.
Screenshot
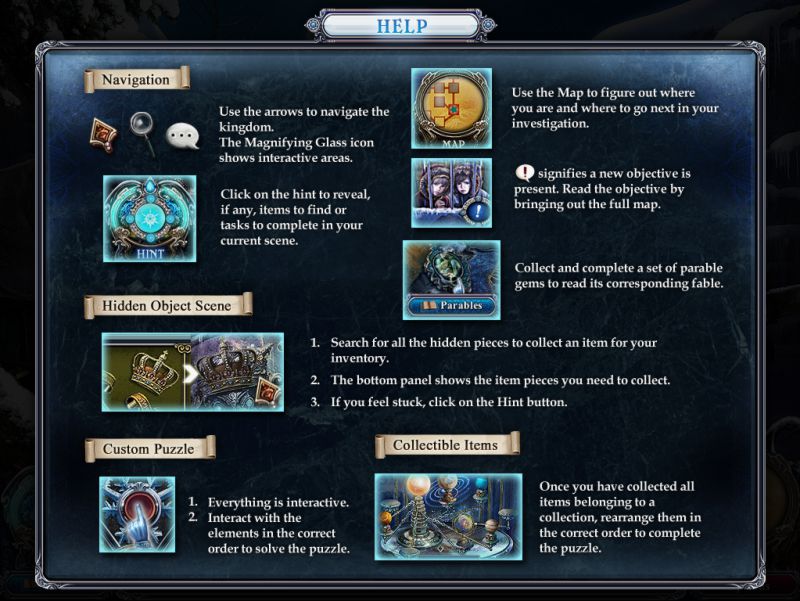
Help
Help provides explanations of the cursors, how the arrows work for navigation, and the necessity to check out the Magnifying Glasses for areas of interest, as well as more information.
It also reminds you to interact with the various elements of the scenes and puzzles.
A hand allows you to, for instance, move, open, select, and press objects.
A talk bubble wants you to hear what the characters have to say.
There are items to collect throughout the game, people to talk to, and a Map to help you find your way.
Collectibles are items, such as globes and jewels that you will collect for future use.
Once you have all of a certain collection, you will need to place them where they belong, and in their proper order in that scene.
Hidden Object Scenes are fragmented objects rather than lists.
Screenshot
Scene Navigation
When you begin, you will be given you choice to use the Tutorial.
The lower left of the screen gives you access to Hints and Parables.
The lower center portion has your Inventory, and will also show you the fragments to be collected for Hidden Object Scenes.
The lower right has access for the Map and your Options.
Don't forget to check all Magnifying Glasses in every scene, and look at the screenshots for additional information.
Screenshot
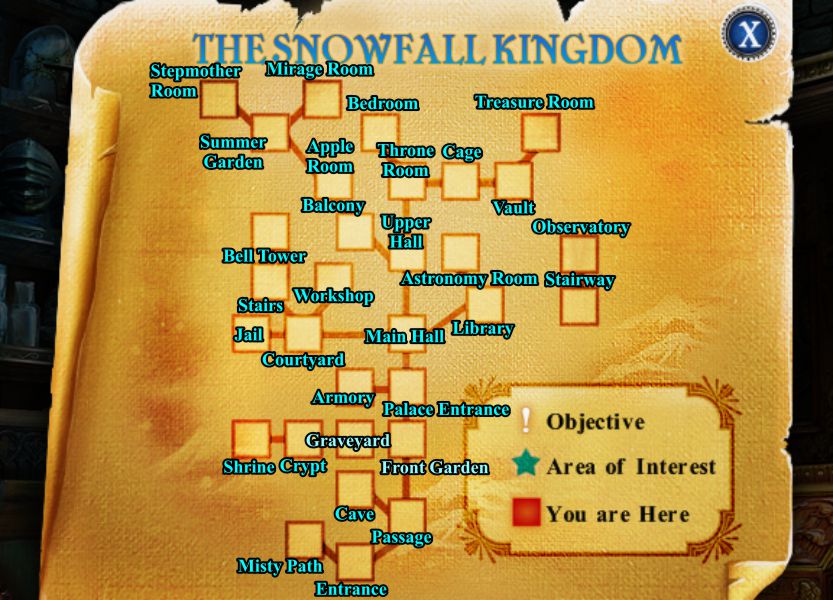
Map
The map of The Snowfall Kingdom helps you navigate to the various locations for your journey.
New locations will become available throughout the game.
Your current location is marked by a red square, areas of interest will have a green star, and a white exclamation point indicates a new objective.
See the screenshot for the names of the locations you will visit.
Screenshot
Location of Parables
You will encounter Parables to collect throughout the game.
Once you have collected all of the Parables for a certain group, you will be able to read the story of that Parable.
The complete stories are shared at the end of this walkthrough.
In case you need to locate one you have missed, the complete list of all their locations is listed below.
The Mountain Beast (3)
Front Garden: base of statue on right.
Palace Entrance: to the left of the Armory door.
Library: king's hand when statue transforms from the beast.
Rise of the Snow Queen (6)
Misty Path: next to rocks on the right.
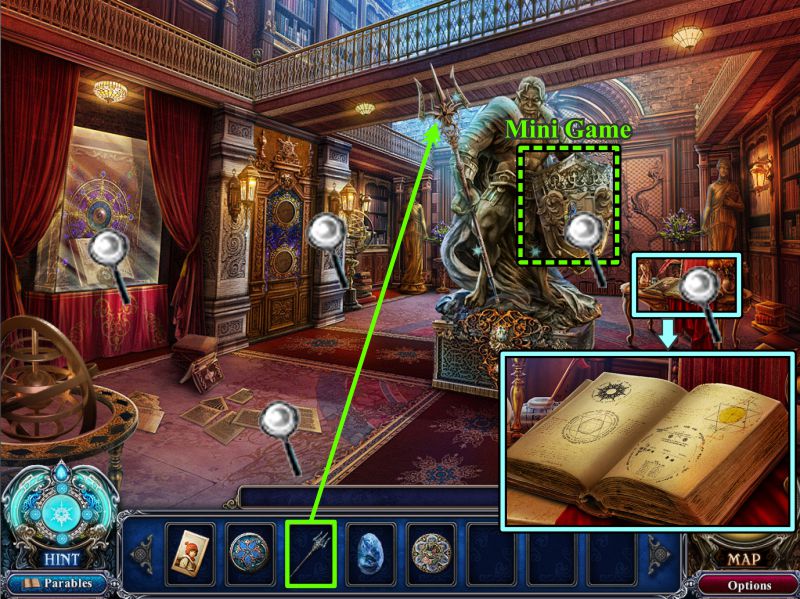
Armory: book on desk.
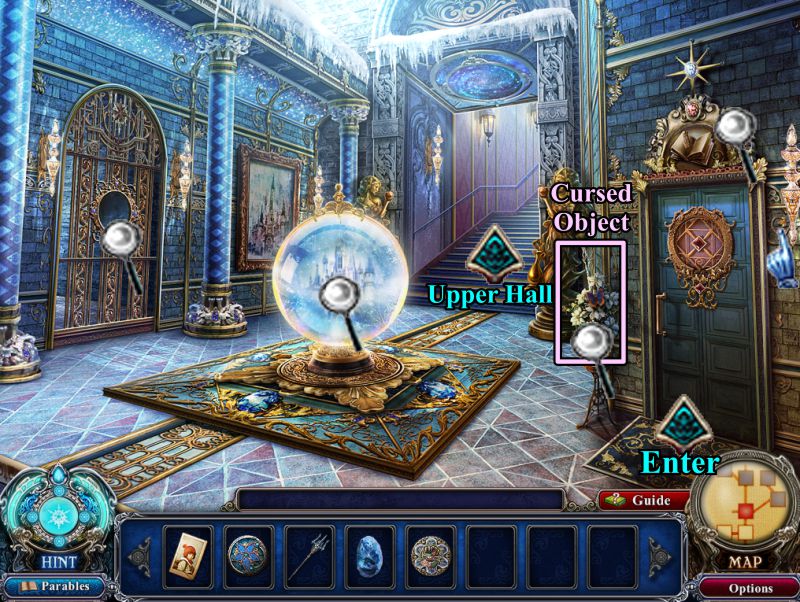
Upper Hall: portrait to the right.
Apple Room: on floor at the left.
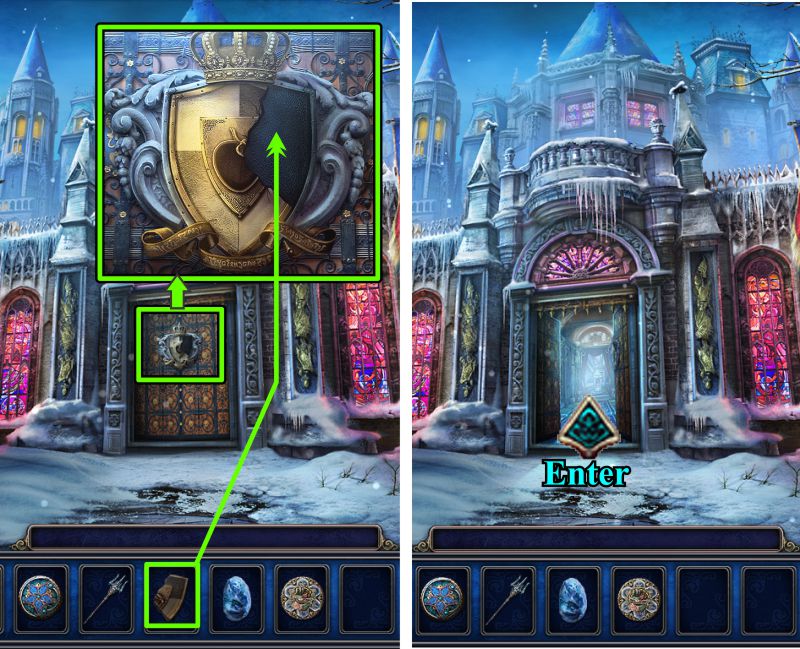
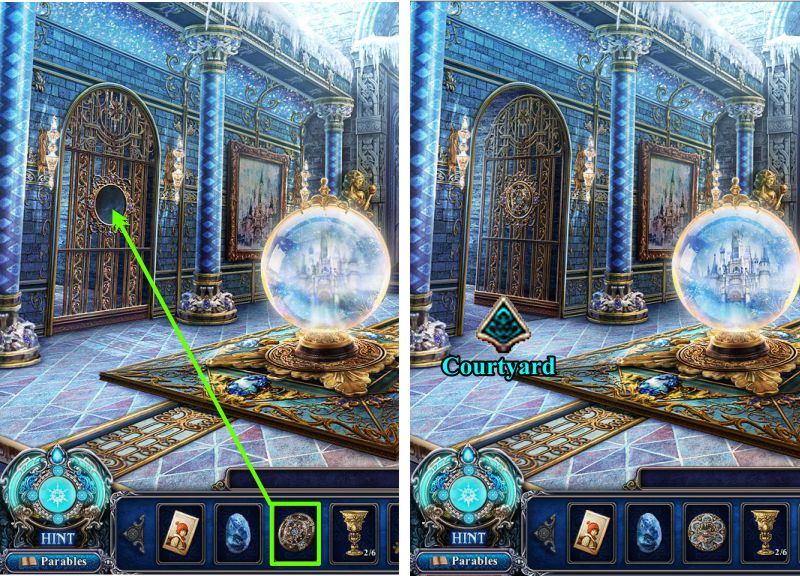
Courtyard: king's shield.
Jail: book on table.
The Golden Child (3)
Apple Room: portrait on left wall.
Cage: right wall under picture.
Shrine: portrait on back wall.
Tale of the Two Mirrors (4)
Cave: mirror drawing engraved on tombstone to the left.
Workshop: broken mirror.
Treasure Room: display case.
Courtyard: next to stairs to Workshop.
The Snow Queen Tale (6)
Jail: scroll on table.
Bell Tower: left side of platform.
Bedroom: table to left next to fireplace.
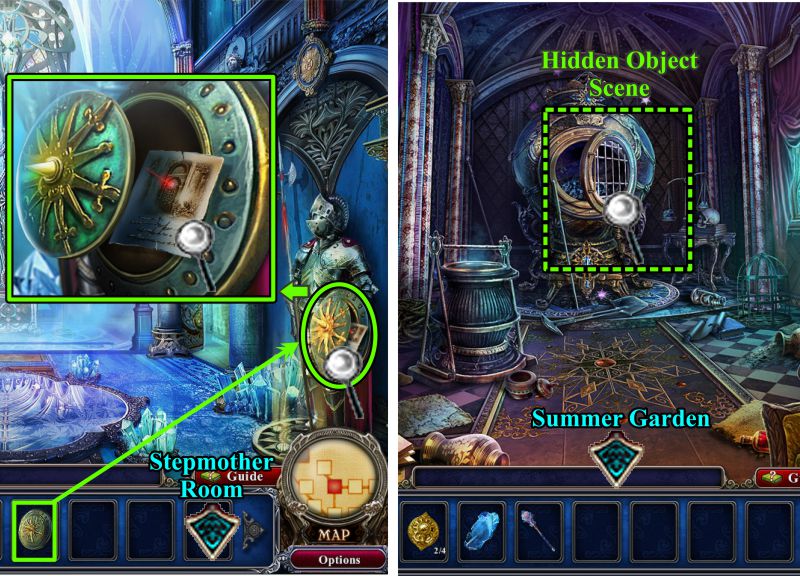
Stepmother Room: on book at the left.
Mirage Room: wall above painting.
Library: on book once display is open.
Location of Cursed Objects
Throughout the game there will be cursed morphing objects that will upgrade your Hint Meter so it refills faster.
The following is a list of the locations of all of the Cursed Objects.
Palace Entrance: knight's sword on the statue.
Armory: skull helmet on top shelf.
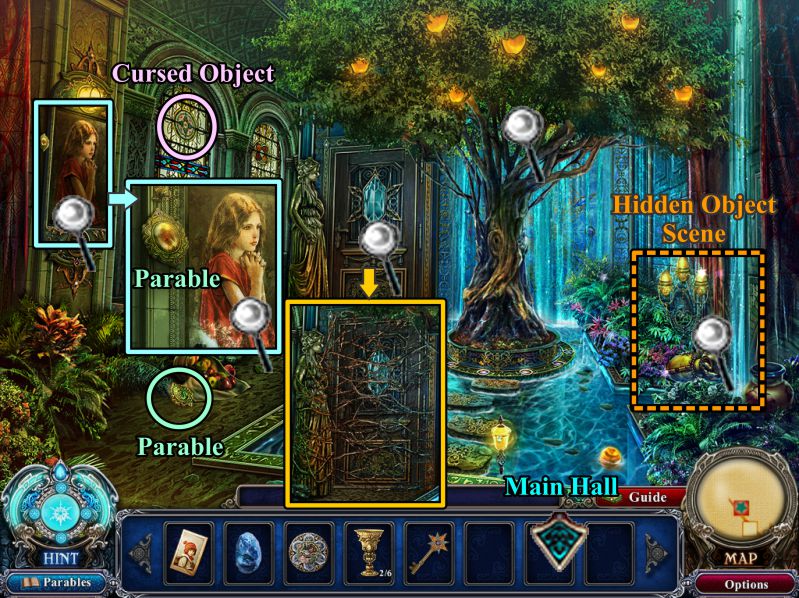
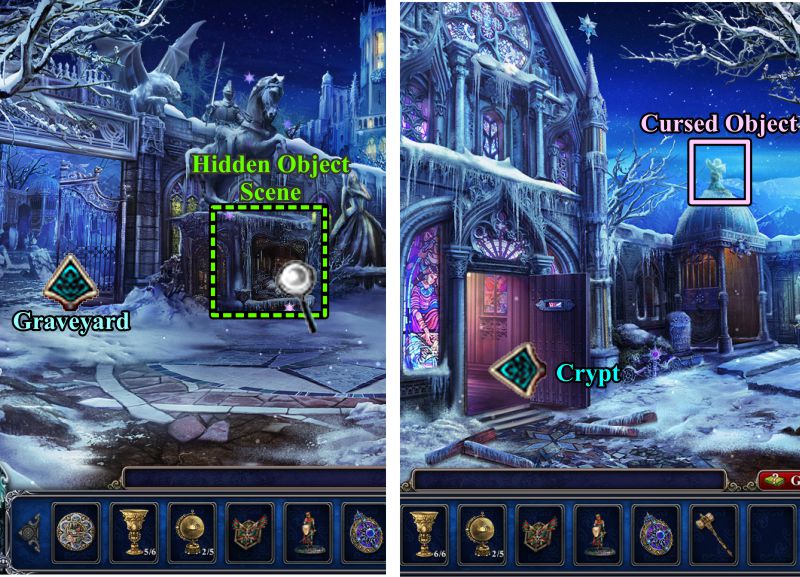
Main Hall of Palace: flowers to left of Library door.
Crypt: stained glass at the left of scene.
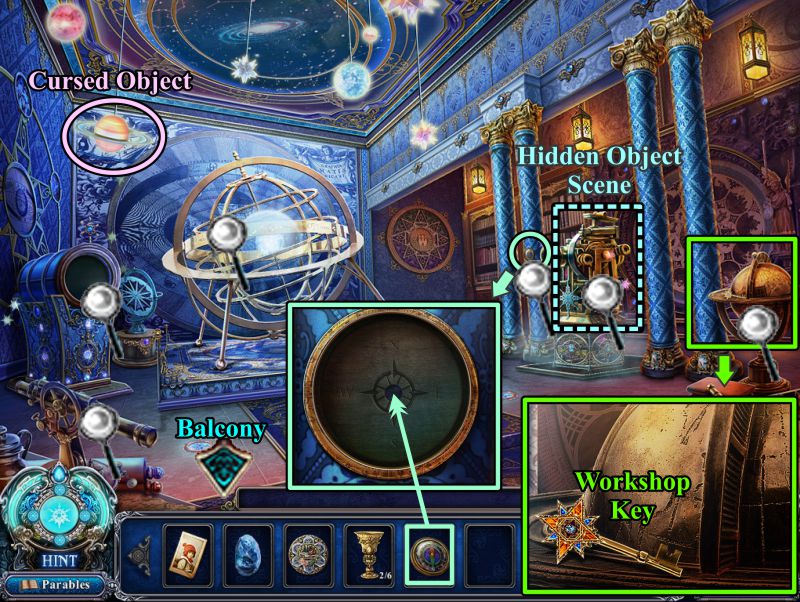
Astronomy Room: hanging Saturn planet.
Apple Room: circle in upper part of left stained glass.
Workshop: helmet on floor.
Jail: diagram on the wall.
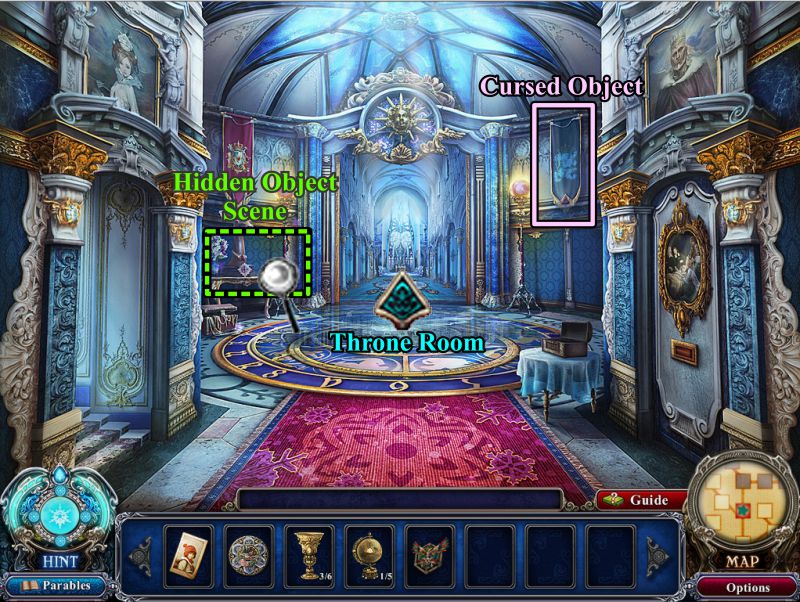
Upper Hall: right hanging banner.
Cage: painting at the left.
Treasure Room: center rosette/shield above door at left.
Passage: chest to left of cave entrance.
Misty Path: shield on the wagon covering.
Graveyard: star/angel on top of the shed.
Shrine: portrait at far right.
Tower Stairs: jewelry box on table to left, after visit to Bell Tower.
Bedroom: clock over wardrobe.
Stepmother's Room: bottles at the right, next to the chair.
Main Hall: gem in front of snow globe.
Mirage Room (frozen world): plaque above lamp to left of mirrors.
Prologue: Bernese Alps, Switzerland
Entrance to the Snowfall Kingdom
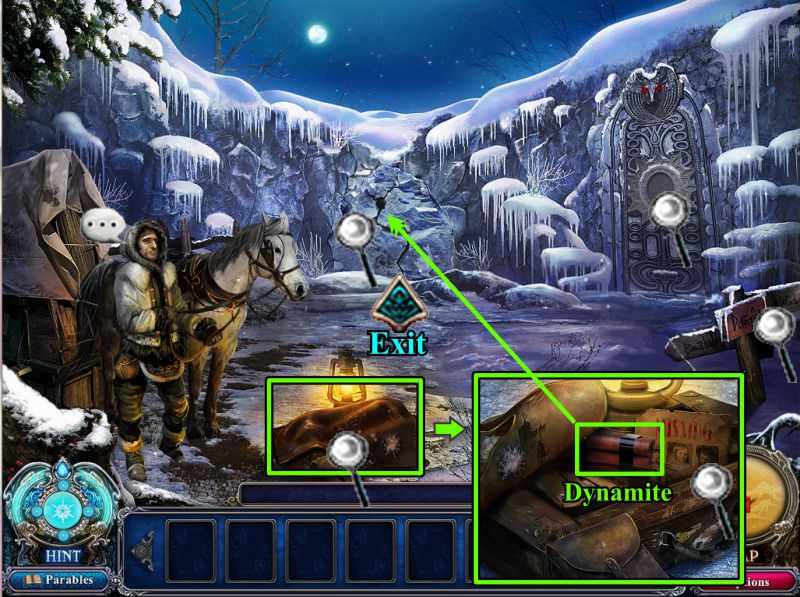
Your guide Noah brings you to the Entrance of The Snow Kingdom but tells you when you speak to him that he does not want to venture farther.
Zoom in on the area by the lantern and pick up the Dynamite.
Place the Dynamite on the rocks at the back of the scene to blast a hole so you can exit to the Misty Path.
Screenshot
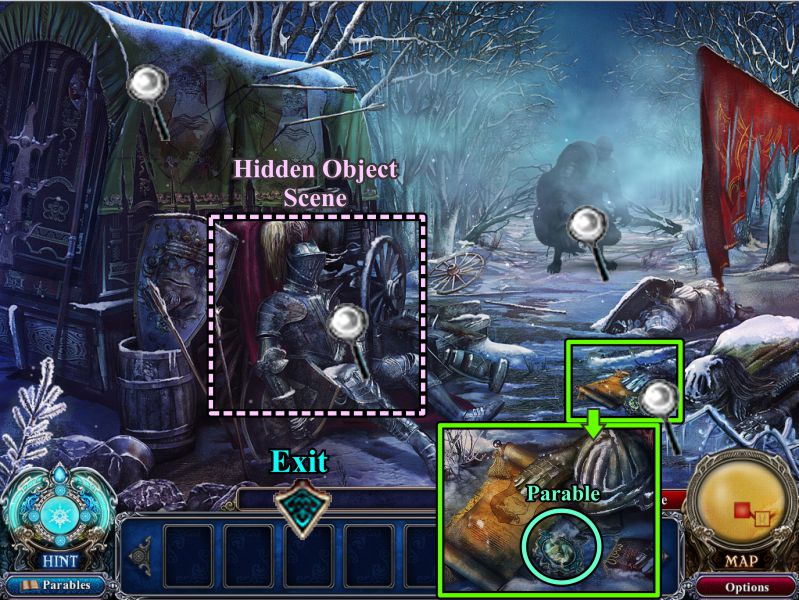
Misty Path
There is a figure in the distance that disappears once you try to see what it is.
Zoom in on the area by the rocks at the right and collect the Parable.
Note the wagon and play the Hidden Object Scene before returning to the Entrance.
Screenshot
Misty Path Hidden Object Scene
Collect all the fragments to get the Mountain Kingdom Emblem for your Inventory.
Screenshot
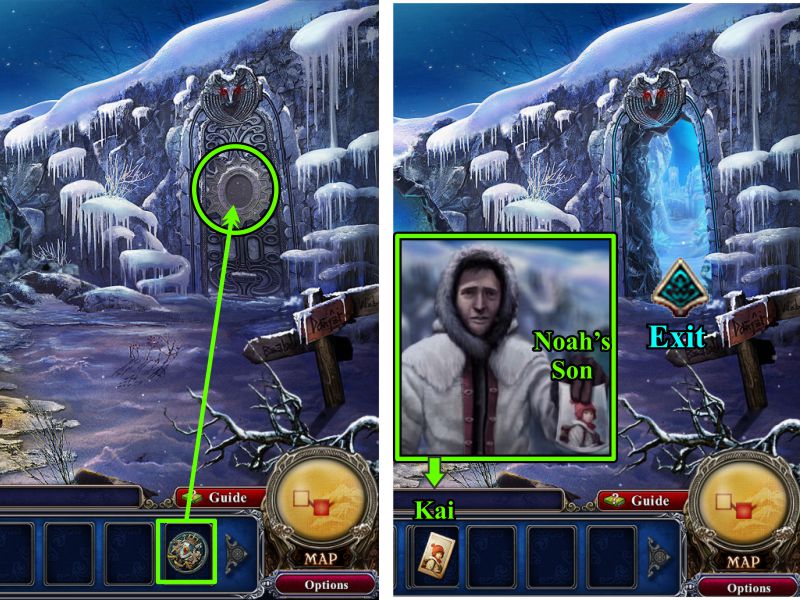
Entrance
Use the Mountain Kingdom Emblem to open the door at the right.
Before you leave, Noah will give you a picture of his son, Kai, and ask that you find him.
Go through the door.
Screenshot
Chapter 1
Passage
Note the ice statues of the King and the Snow Queen.
Zoom in to play the Mini Game, then exit through the Passage.
Screenshot
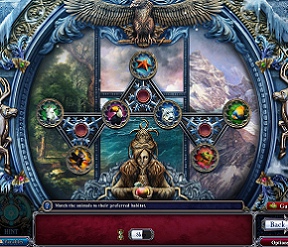
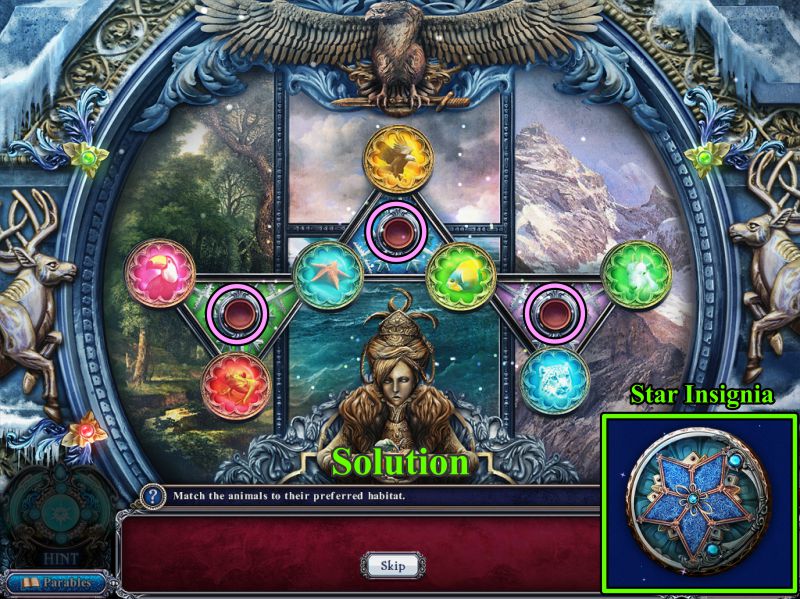
Passage Mini Game
Your goal is to place all the animals in their proper environment.
Rotate the triangles, marked in pink in the screenshot, to get the shown solution.
Your reward will be a Star Insignia.
Screenshot
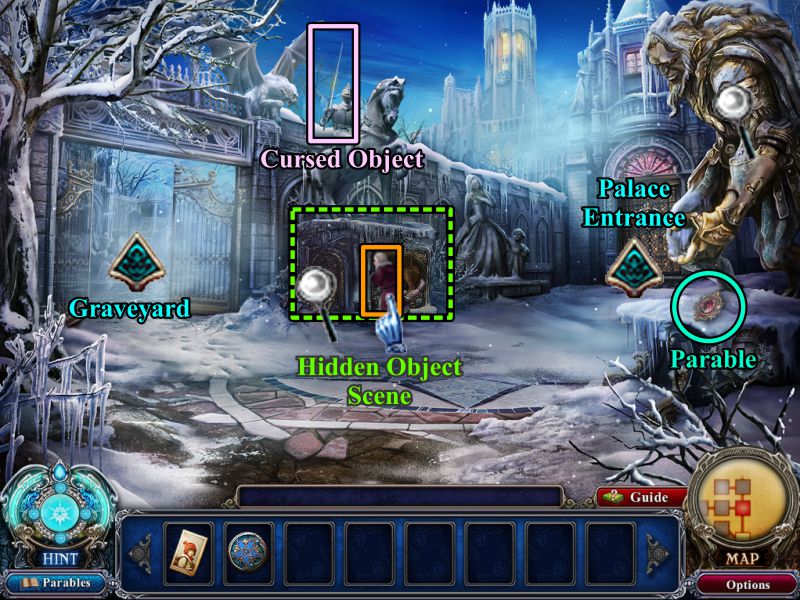
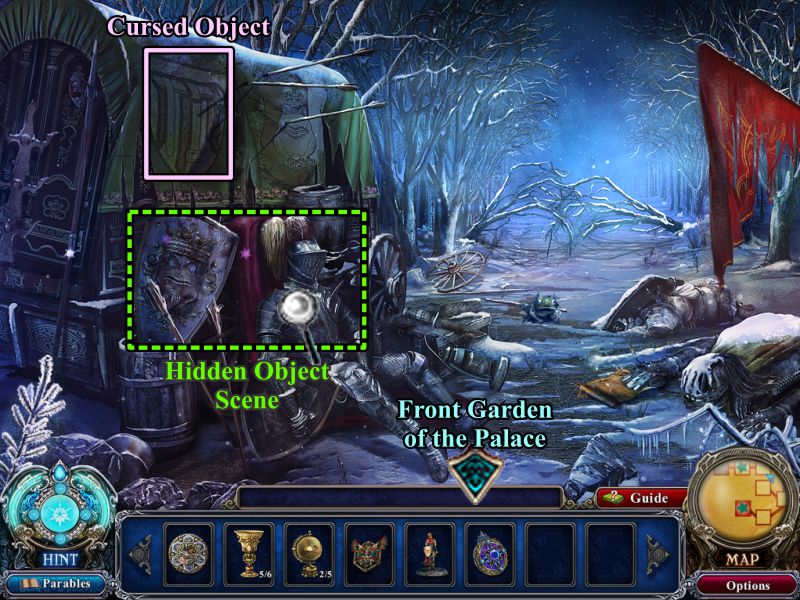
Front Garden
Try to talk to the little girl, and she runs off toward the Graveyard.
Collect the Parable at the base of the statue on the right.
Pick up the knight's sword Cursed Object from the statue at the left, and play the Hidden Object Scene before going toward the Palace Entrance.
Screenshot
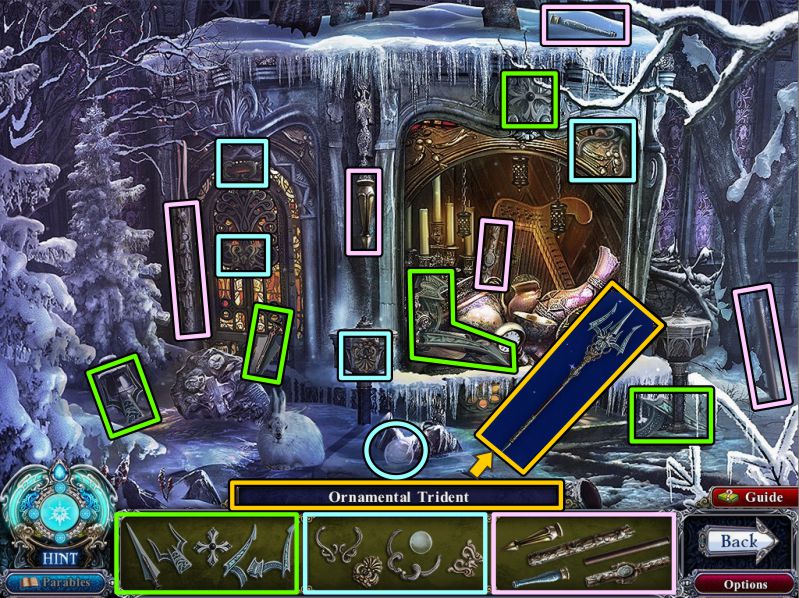
Front Garden Hidden Object Scene
Collect all the fragments of the Ornamental Trident that are marked in the screenshot.
Screenshot
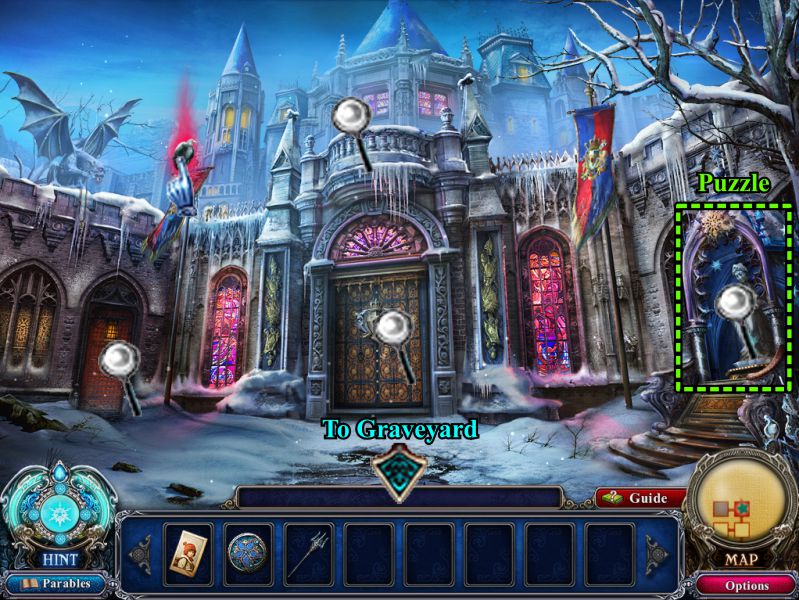
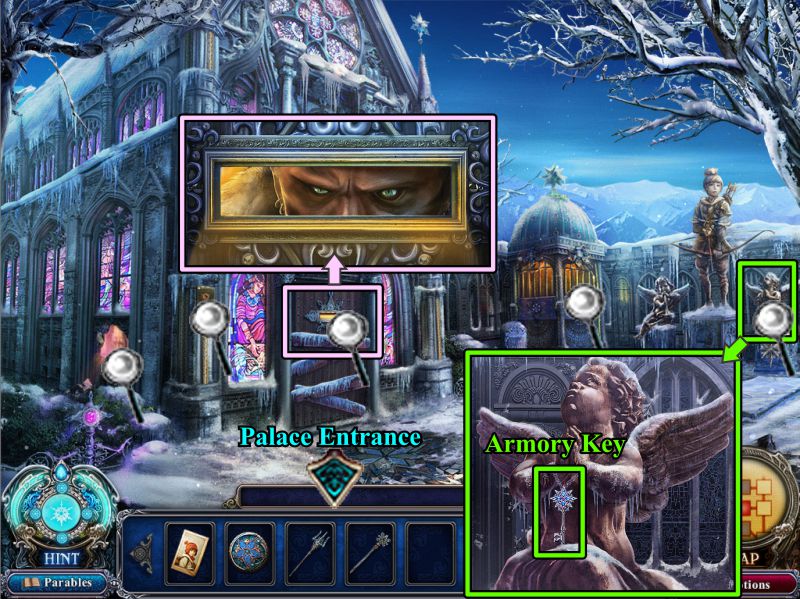
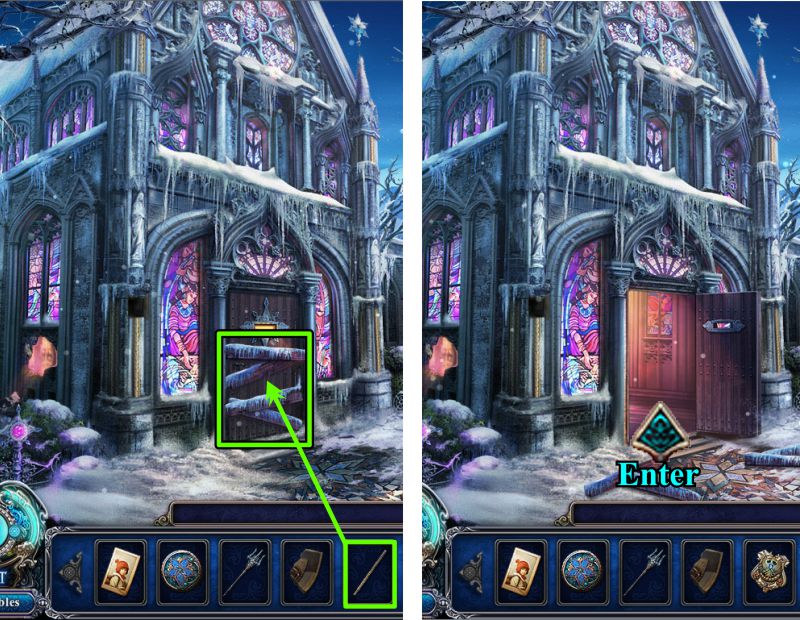
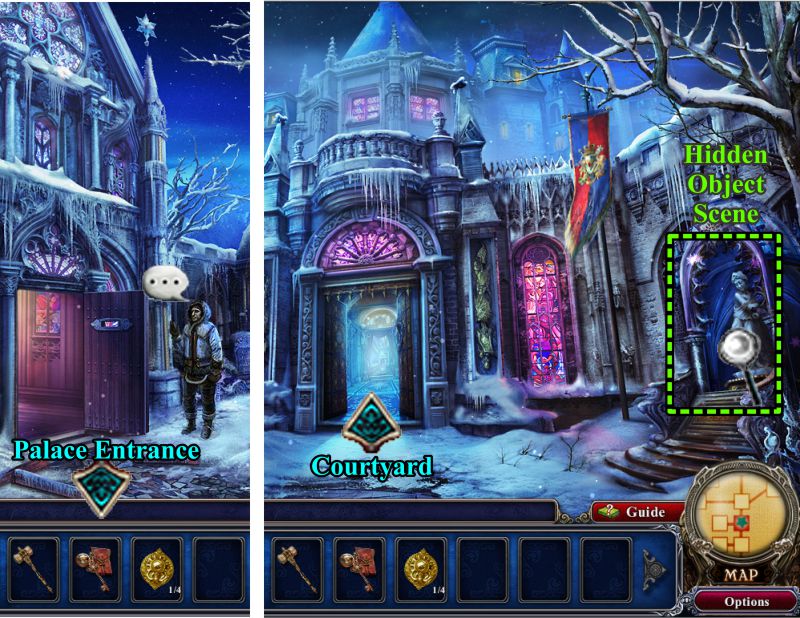
Palace Entrance
Note the two locked doors, then zoom in on the niche at the right for a Puzzle.
When you are finished, go to the Graveyard.
Screenshot
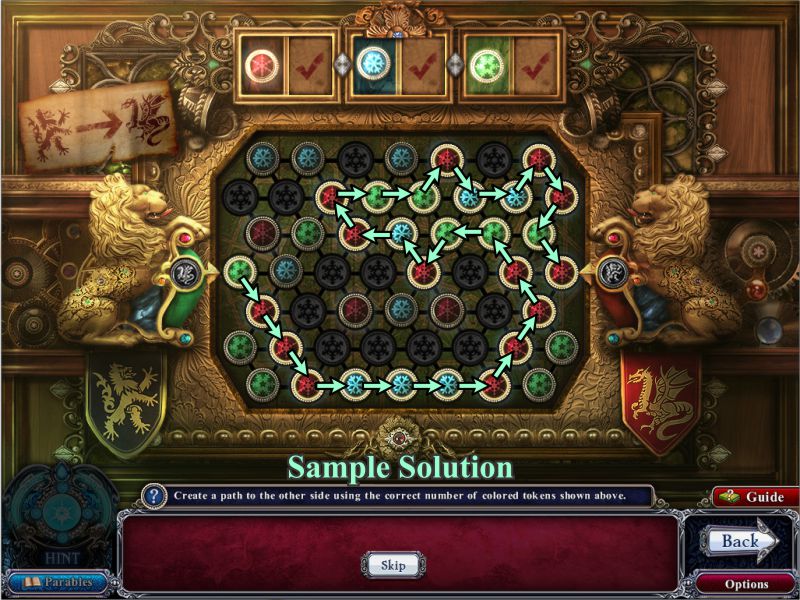
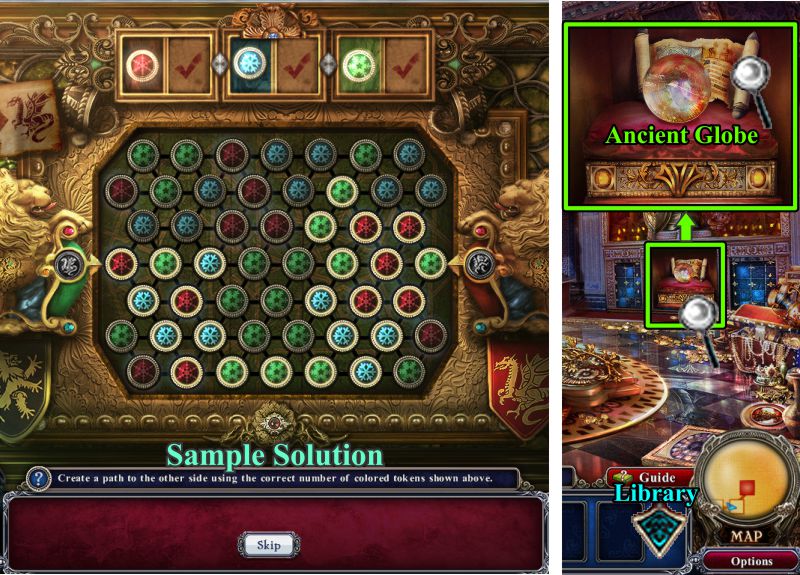
Palace Entrance Puzzle
Your goal is to connect the buttons from the left lion to the right lion using 6 red, 2 blue, and 5 green.
A sample solution is shown in the screenshot.
Your reward is the Snow Queen's Wand for your Inventory.
Screenshot
Graveyard
Check out all the magnifying glasses and pick up the Armory Key from the right angel statue.
Return to the Palace Entrance.
Screenshot
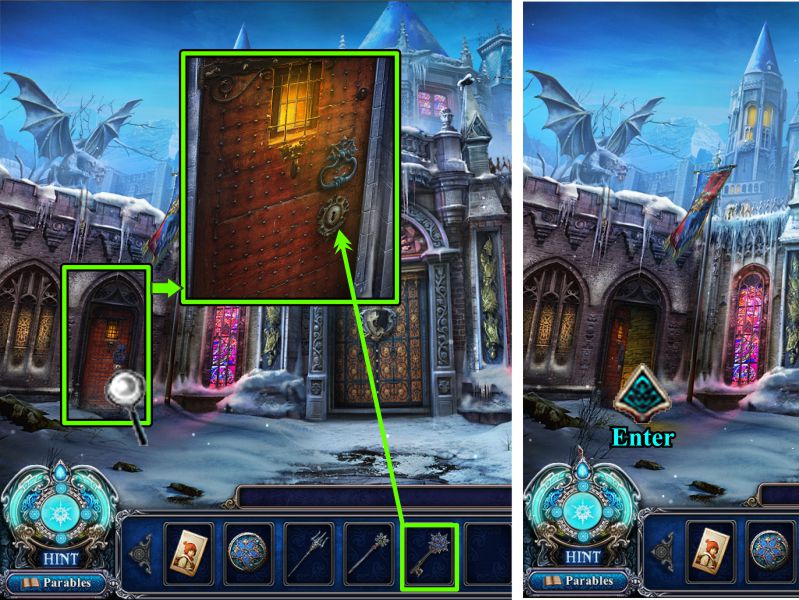
Palace Entrance
Zoom in on the Armory door and use the key you just picked up.
Enter the Armory.
Screenshot
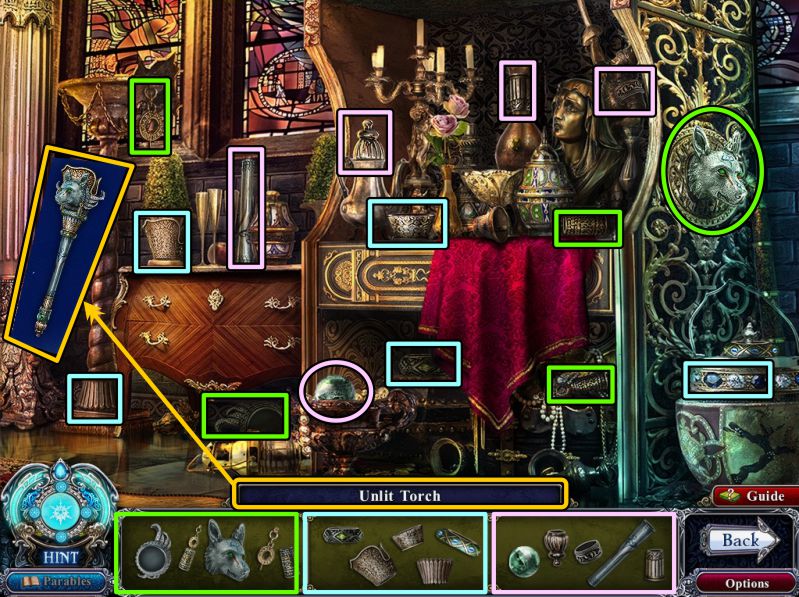
Armory
Zoom in on the table at the right and pick up the Parable from the book.
The left helmet on the top shelf is a Cursed Object that becomes a skull, so collect it.
Play the Hidden Object Scene, then go to the Graveyard.
Screenshot
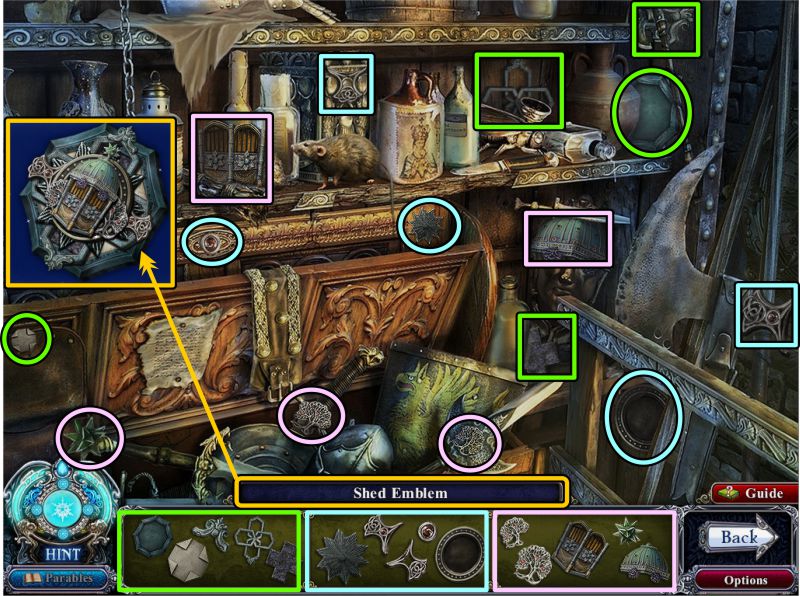
Armory Hidden Object Scene
Collect all the fragments to make a Shed Emblem.
Screenshot
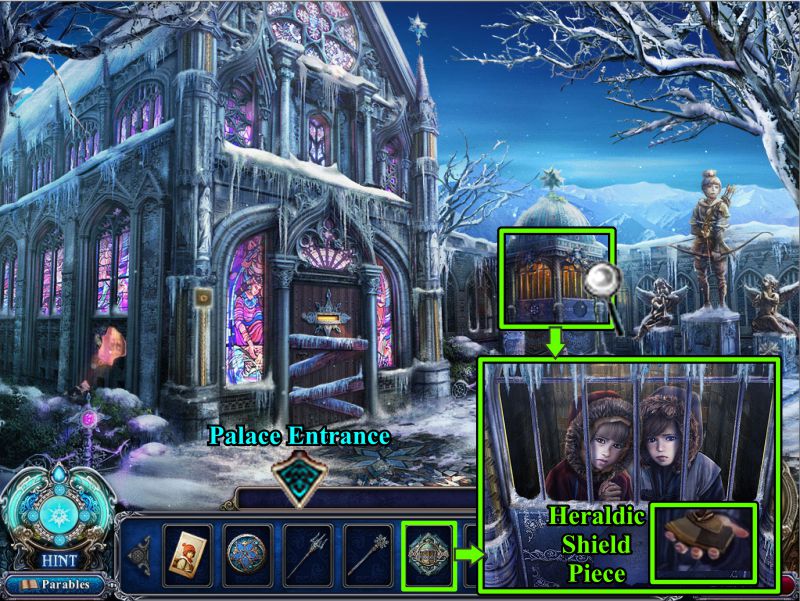
Graveyard
Zoom in on the Shed and place Shed Shield to free the children.
You will receive the Heraldic Shield Piece for your Inventory.
Return to the Palace Entrance.
Screenshot
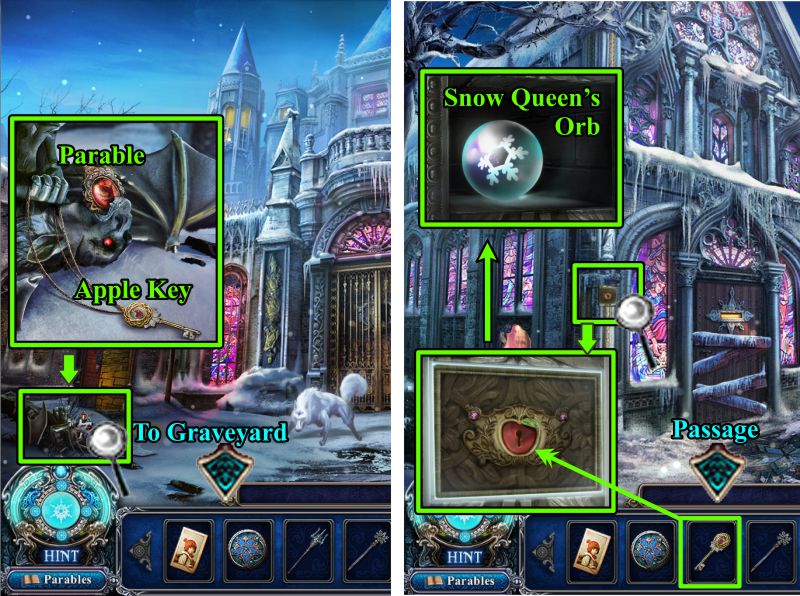
Palace Entrance and Graveyard
Watch the cut scene, zoom in on the area to the left to grab the Parable and Apple Key before returning to the Graveyard.
Zoom in and use the Apple Key to open the niche and collect the Snow Queen's Orb.
Go to the Passage.
Screenshot
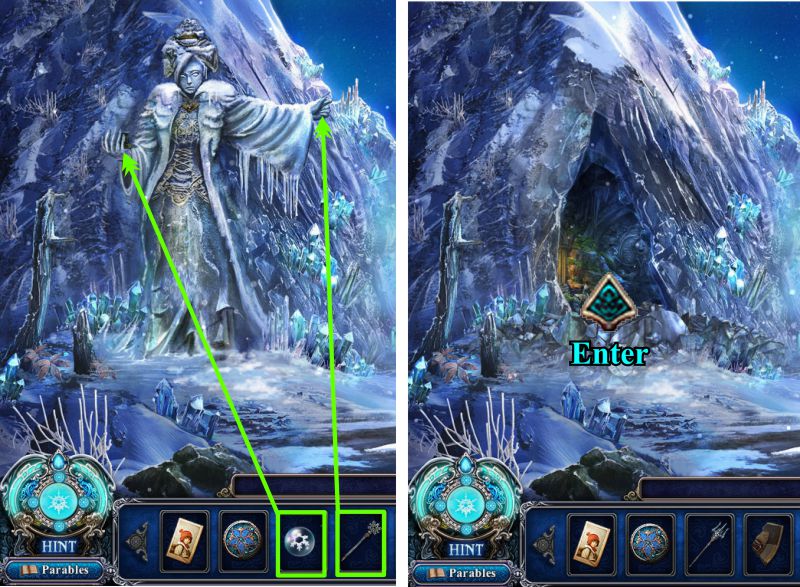
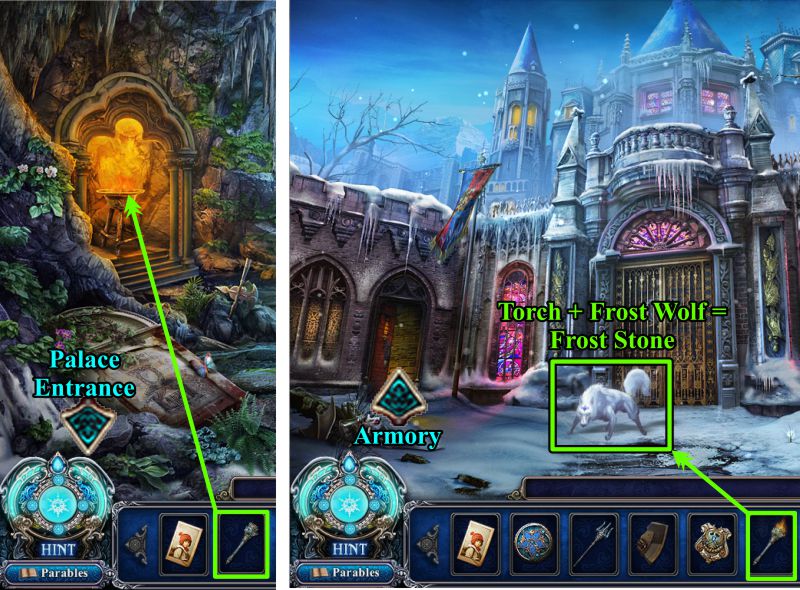
Passage
Give the Snow Queen's Orb and Scepter to the Snow Queen ice statue.
The statue will crumble, exposing the entrance to a Cave. Enter the cave.
Screenshot
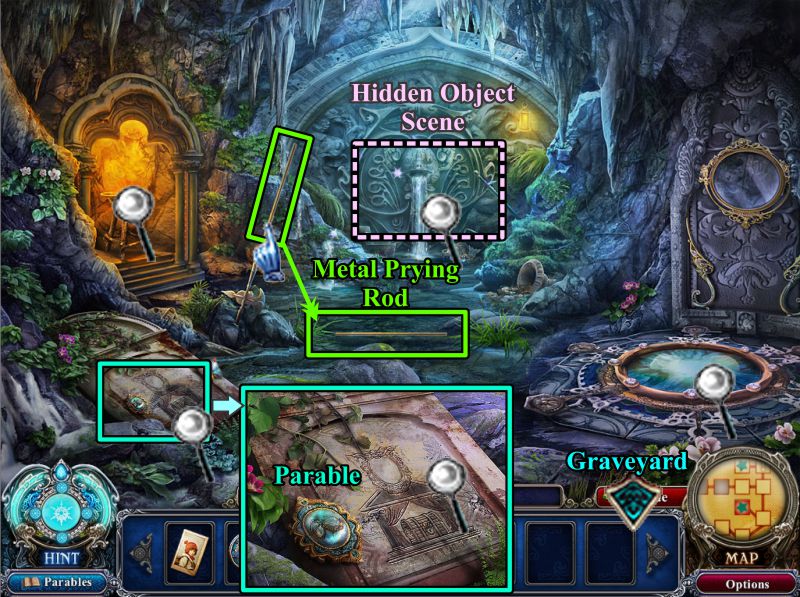
Cave
Zoom in on the tombstone at the left and take the Parable.
Touch the Metal Prying Rod, and it will fall to the ground for you to collect.
Play the Hidden Object Scene and go to the Graveyard.
Screenshot
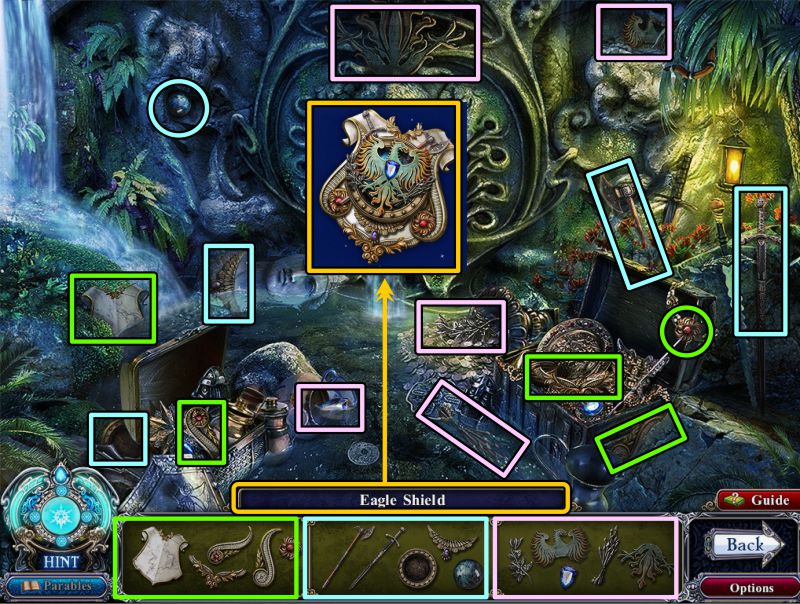
Cave Hidden Object Scene
Collect all the fragments of the Eagle Shield.
Screenshot
Graveyard
Use the Metal Prying Rod to remove the boards from the door.
Watch out for the ghost, then enter the Crypt.
Screenshot
Crypt
Check out all the magnifying glasses, collect the Cursed Object, and play the Hidden Object Scene before returning to the cave.
Screenshot
Crypt
Once you collect all the fragments, you will have an Unlit Torch.
Screenshot
Cave and Palace Entrance
Light the Torch in the fire and go to the Palace Entrance.
Use the Torch on the Frost Wolf to get a Frost Stone.
Go to the Armory.
Screenshot
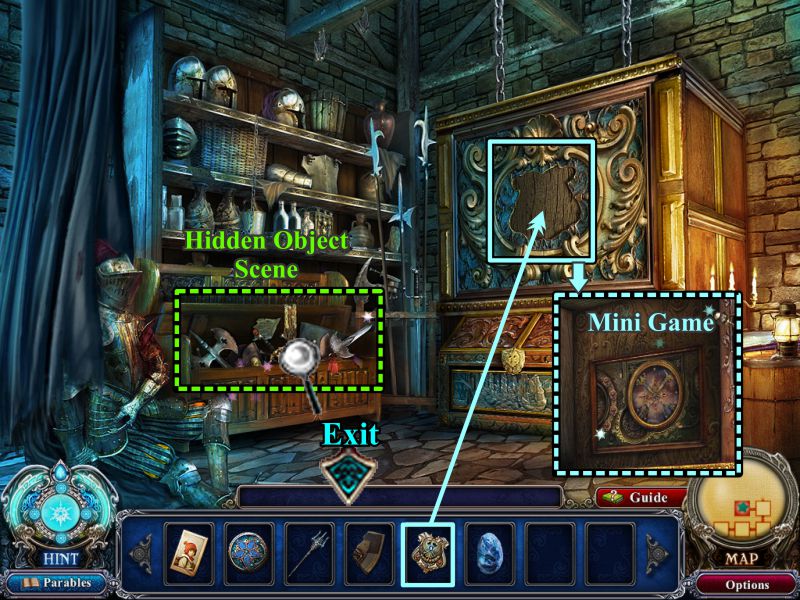
Armory
Play the Hidden Object Scene and then the Mini Game.
Screenshot
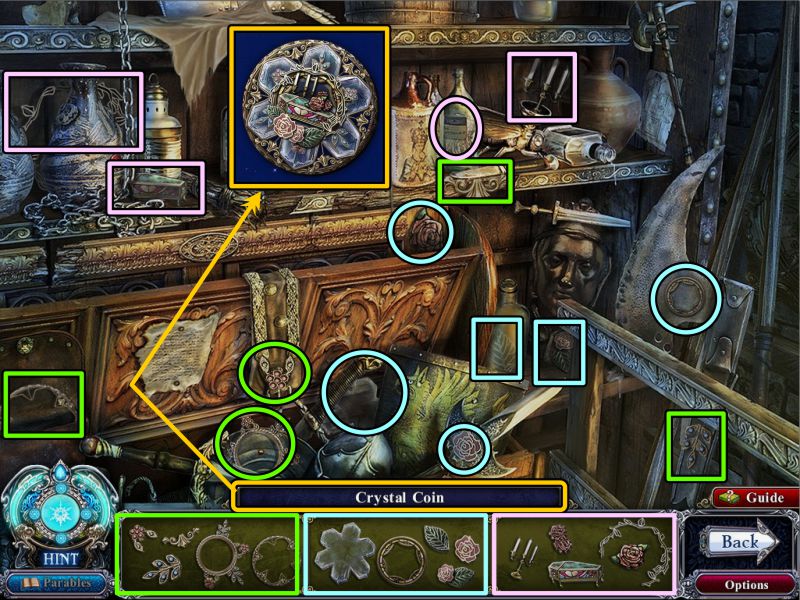
Armory Hidden Object Scene
Collect all the fragments of the Crystal Coin.
Screenshot
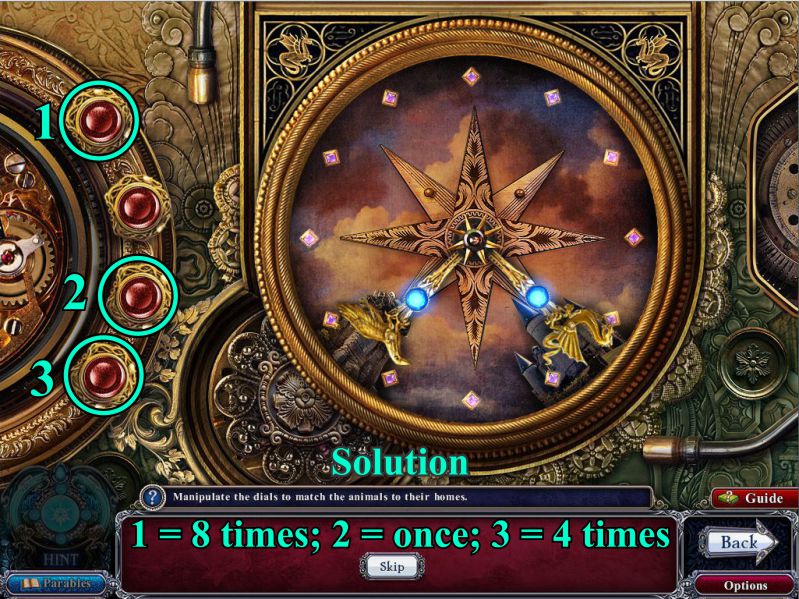
Armory Mini Game Part 1
Your goal is to place the animals as shown in the screenshot using the buttons at the left.
Press the marked buttons the number of times shown in the screenshot.
Screenshot
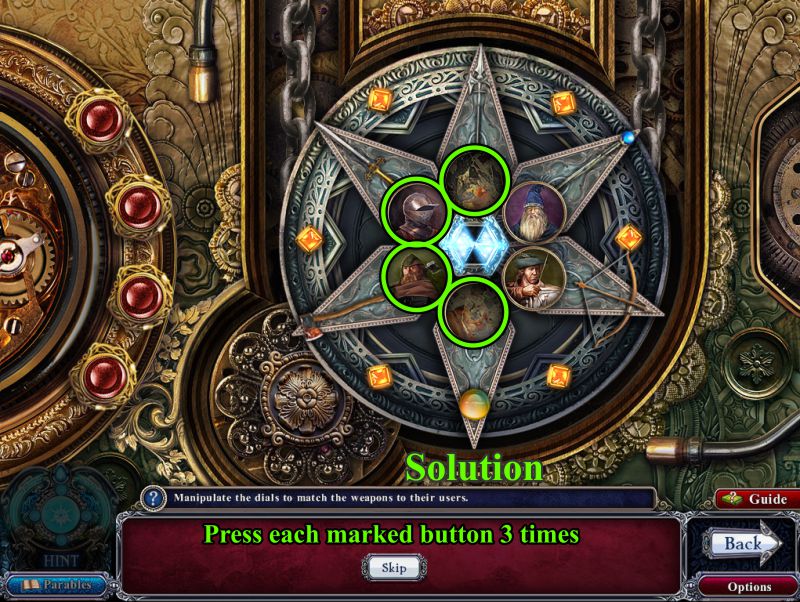
Armory Mini Game Part 2
In order to match the weapons to their users, press each of the buttons marked in the screenshot 3 times.
Screenshot
Palace Entrance
The bars covering the door are now gone, so place your piece of the Heraldic Shield to open the door and enter.
Screenshot
Chapter 2
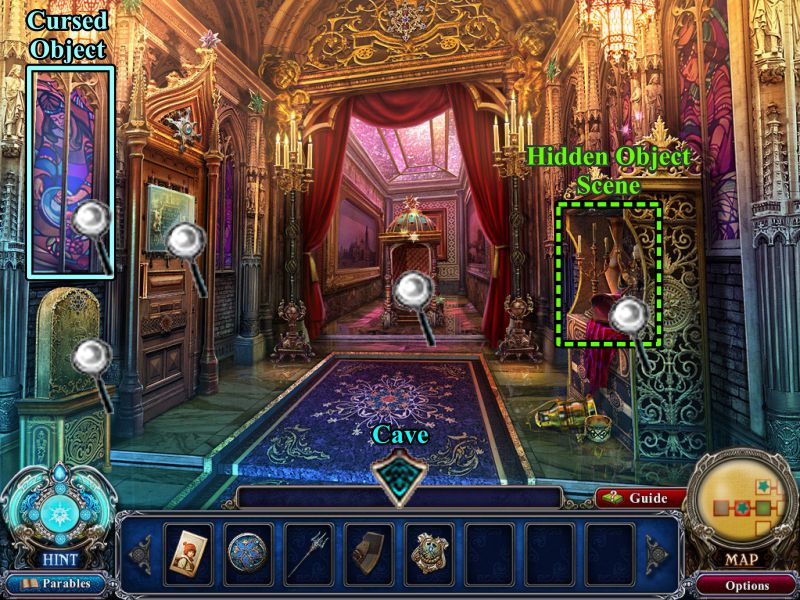
Main Hall
Collect the Cursed Object, then press the lever to open the Library door.
Screenshot
Library
Check out all the magnifying glasses, then zoom in on the book on the table.
Give the Ornamental Trident to the statue and play the Mini Game.
Screenshot
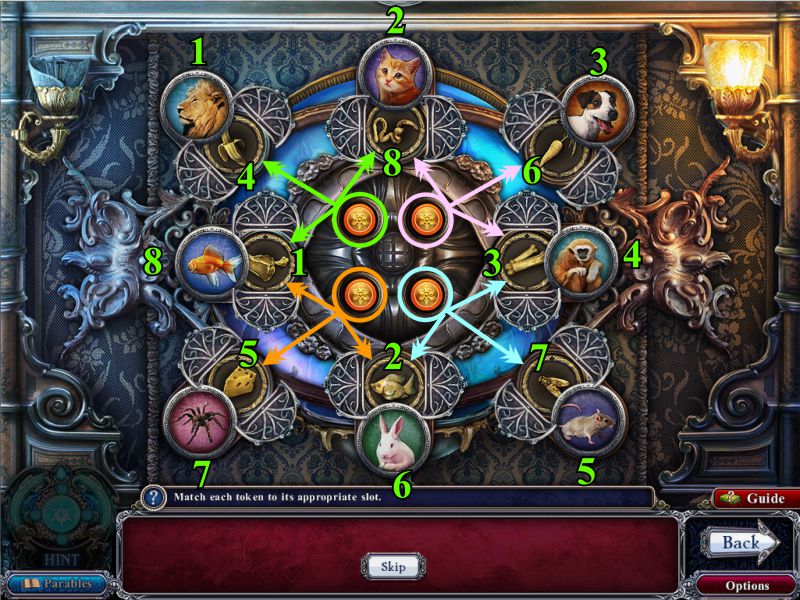
Library Mini Game
Your goal is to match the food to the animals using the 4 buttons in the center.
Each button opens 3 food choices for you to swap until you have the correct location.
See the screenshot for a numbered match and which food choice open for each button.
Screenshot
When you have correctly match the food, the animals will light up, and the center will open for you to press the button.
The beast statue will morph into the King holding a Parable for you to collect.
Screenshot
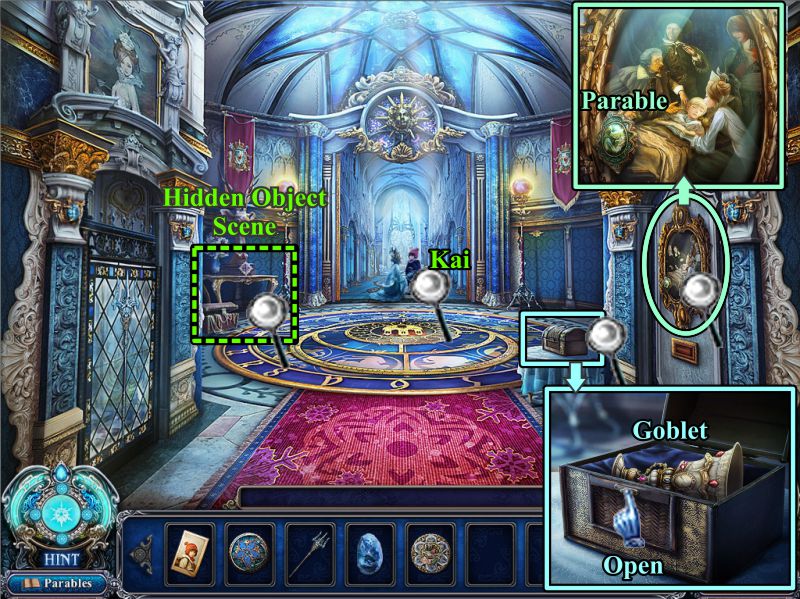
Upper Hall
Try to zoom in on Kai and the Snow Queen, and the entrance will be iced over.
Zoom in on the small chest, open it and take the Goblet.
Zoom in on the painting at the right and take the Parable.
Play the Hidden Object Scene.
Screenshot
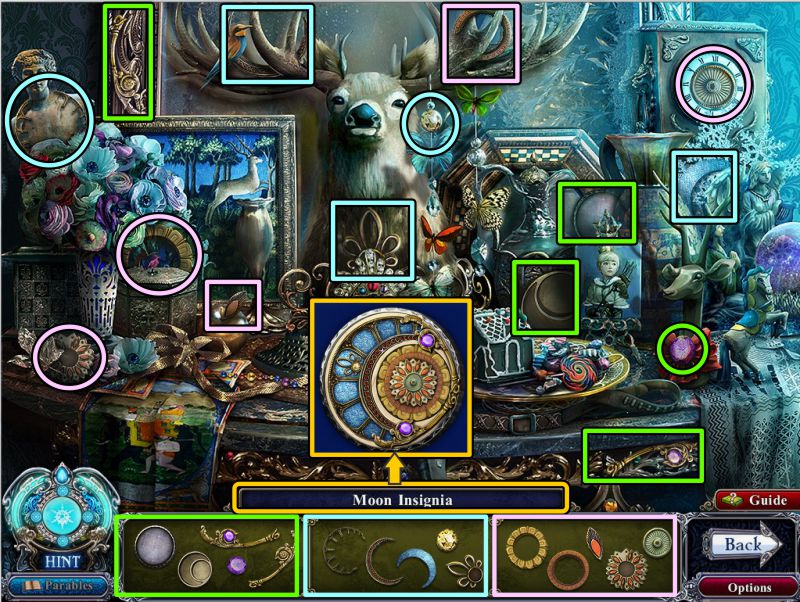
Upper Hall Hidden Object Scene
Collect all the fragments of the Moon Insignia.
Screenshot
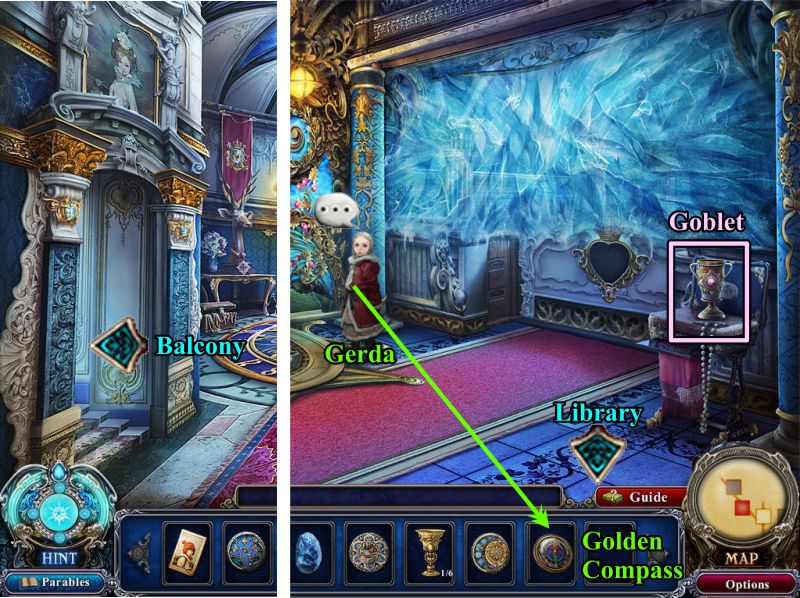
Upper Hall and Balcony
Go through the door at the left to the Balcony.
Collect the Goblet and talk to Gerda, who will give you a Golden Compass.
Return to the Library.
Screenshot
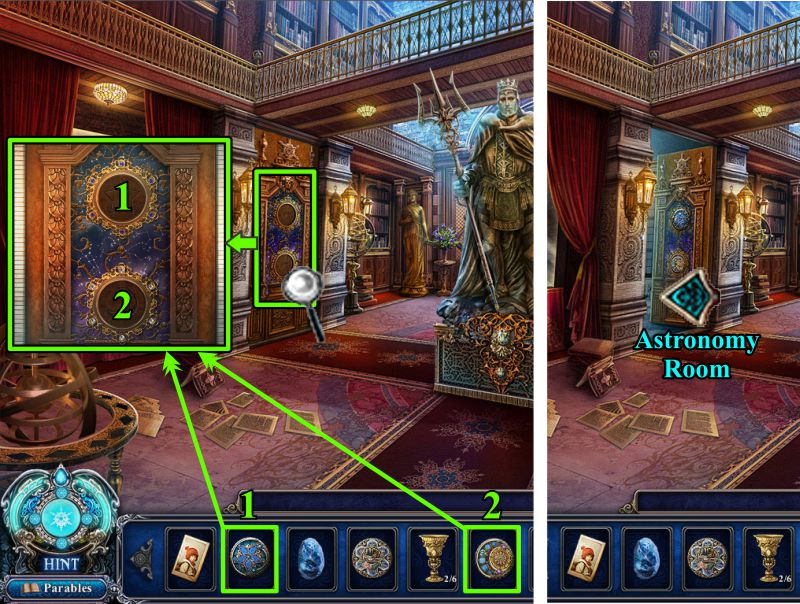
Library
Zoom in on the door at the left and place the Star and Moon Emblems as shown in the screenshot.
Enter the Astronomy Room.
Screenshot
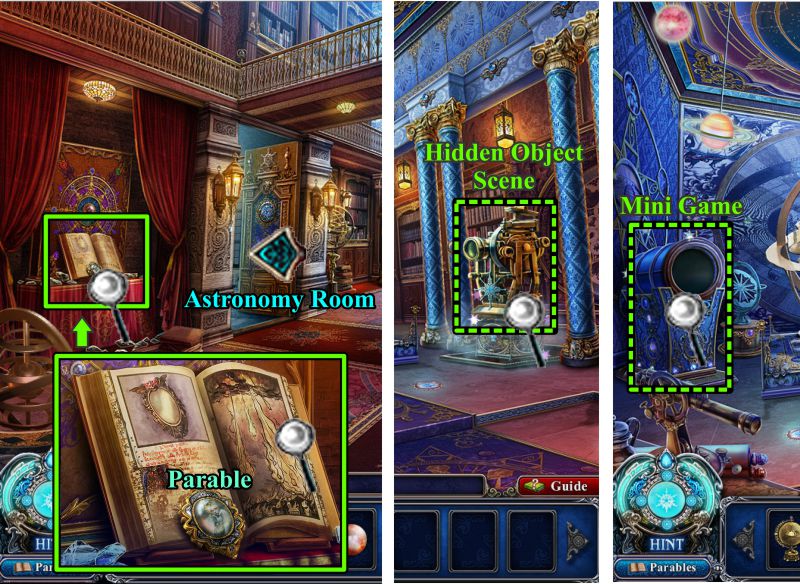
Astronomy Room
Collect the Cursed Object, then zoom in on the globe to find the Workshop Key.
Zoom in on the column shown in the screenshot and place the Golden Compass.
Play the Hidden Object Scene on the machine that rises from the floor.
Screenshot
Astronomy Room Hidden Object Scene
Collect all the fragments of the Gilded Apple and return to the Balcony.
Screenshot
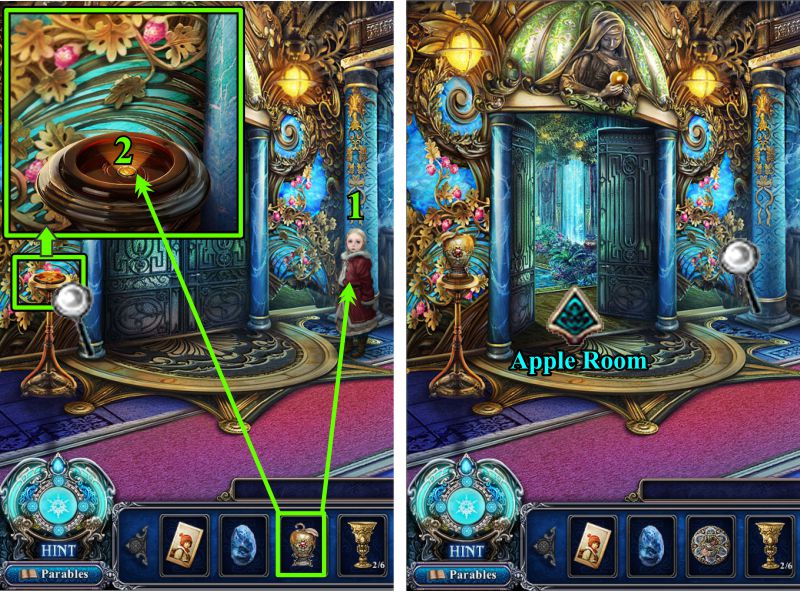
Balcony
Give the Gilded Apple to Gerda, who is sucked away be some unknown force.
You still have the Gilded Apple, so zoom in and place it on the stand to the left of the door.
The door opens, so enter the Apple Room.
Screenshot
Apple Room
Collect the Cursed Object and the Parable.
Zoom in on the portrait and take another Parable.
Touch the door in the back and it becomes covered in thick vines.
Play the Hidden Object Scene and return to the Main Hall.
Screenshot
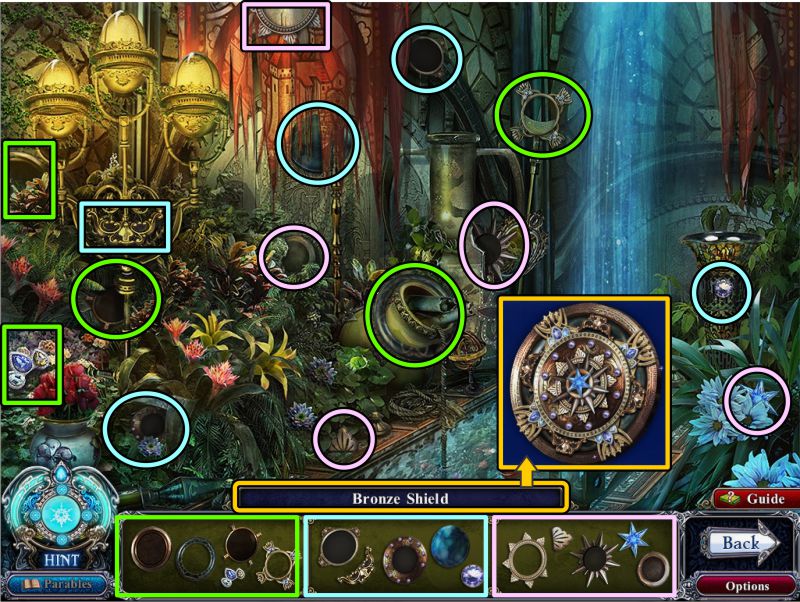
Apple Room Hidden Object Scene
When you have collected everything, you will have a Bronze Shield.
Screenshot
Main Hall
Place the Bronze Shield on the door to the left and enter the Courtyard.
Screenshot
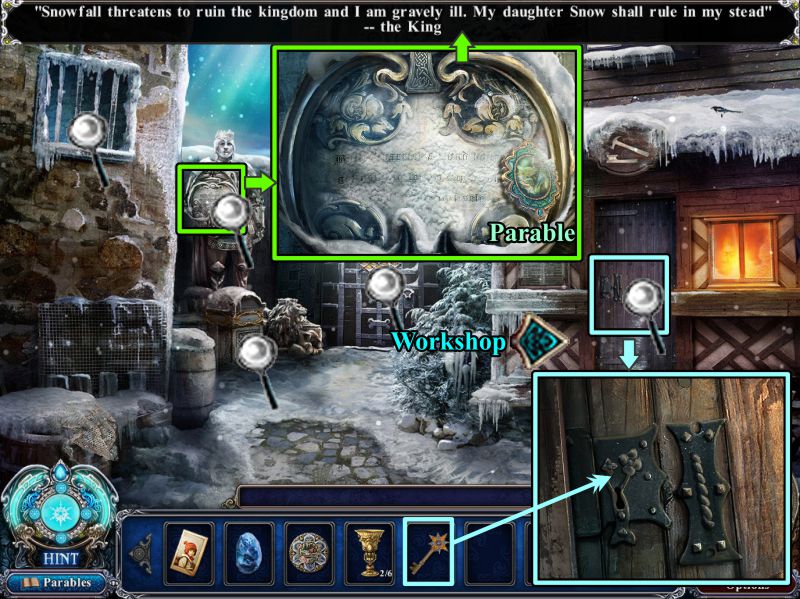
Courtyard
Zoom in on the statue, take the Parable, and read the inscription.
Zoom in on the Workshop and use your key to open the door and go inside.
Screenshot
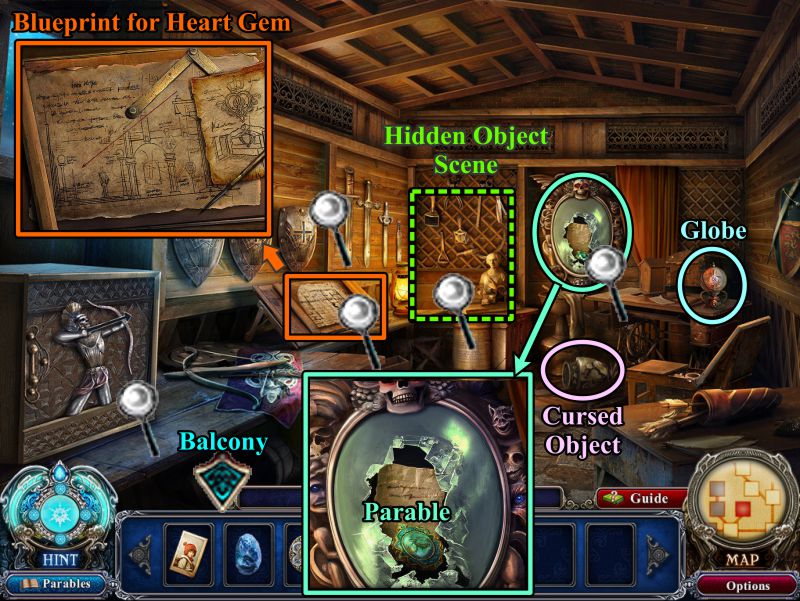
Workshop
Collect the Cursed Object and Globe.
Zoom in on the mirror and take the Parable.
Zoom in on the table and seen the Blueprint for a Heart Gem.
Play the Hidden Object Scene and go to the Balcony.
Screenshot
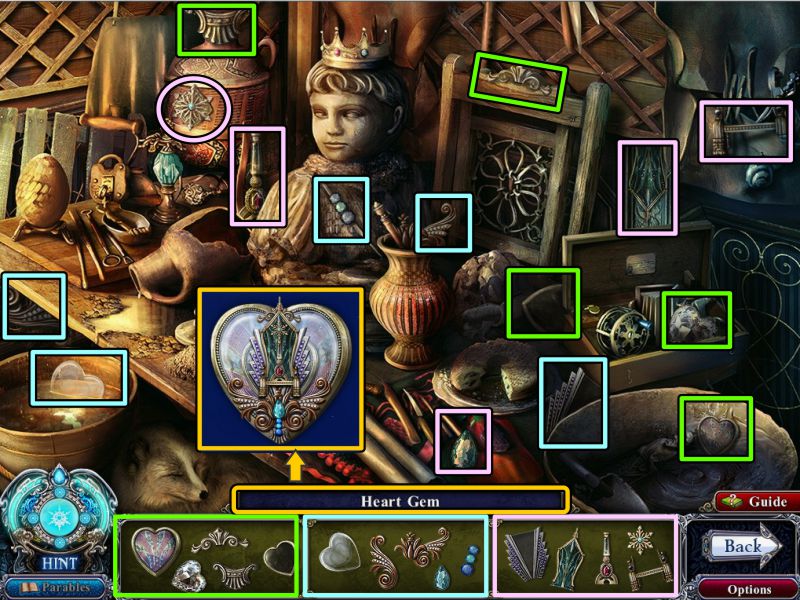
Workshop Hidden Object Scene
You will have constructed the Heart Gem by collecting all the fragments.
Screenshot
Balcony
Zoom in on the Throne Room overlook and place the Heart Gem.
Watch the cut scene.
Screenshot
Chapter 3
Jail
You ended up in the jail, so open the drawer and take the Silver Arrow.
Zoom in on the table and take the Parables from the book and scroll.
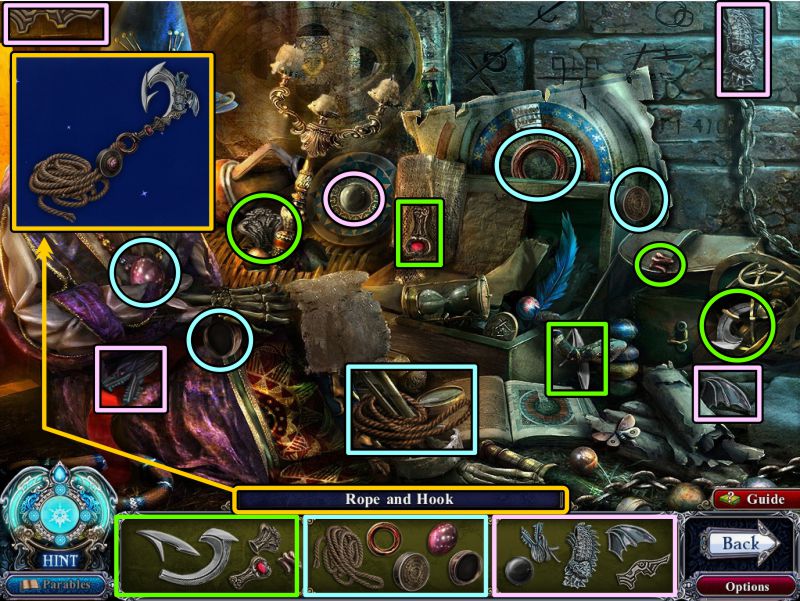
Play the Hidden Object Scene.
Screenshot
Jail Hidden Object Scene
The fragments make up a Rope and Hook.
Screenshot
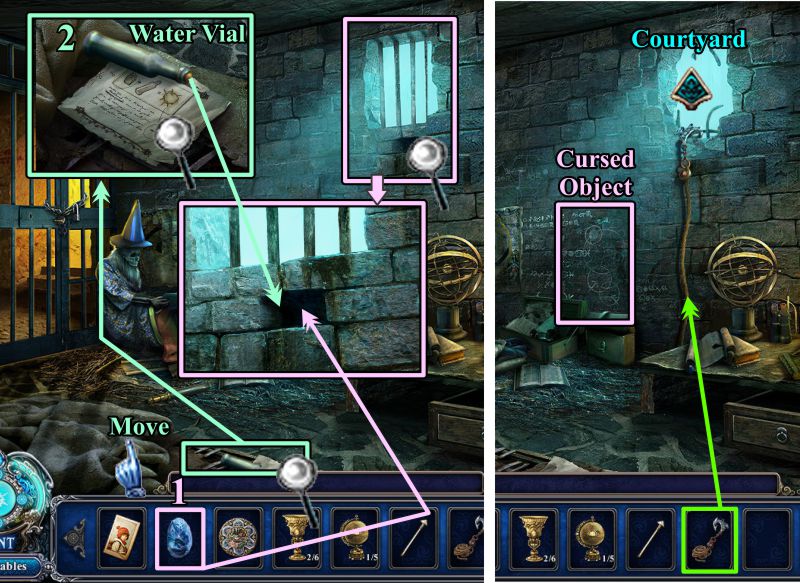
Jail
Move the blanket on the floor and zoom in on object on the floor.
Take the Water Vial and read the instructions.
Zoom in on the wall under the bars, place the Frost Stone, and add the Water Vial.
Place your Rope and Hook on the opening, take the Cursed Object, and exit to the Courtyard.
Screenshot
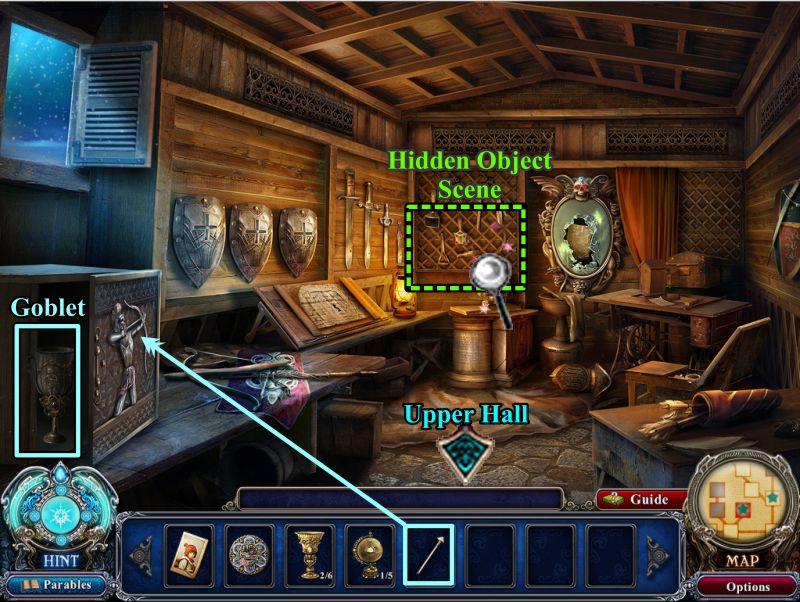
Workshop
Enter the Workshop and place the Silver Arrow on the archer at the left.
Take the Goblet, play the Hidden Object Scene, and go to the Upper Hall.
Screenshot
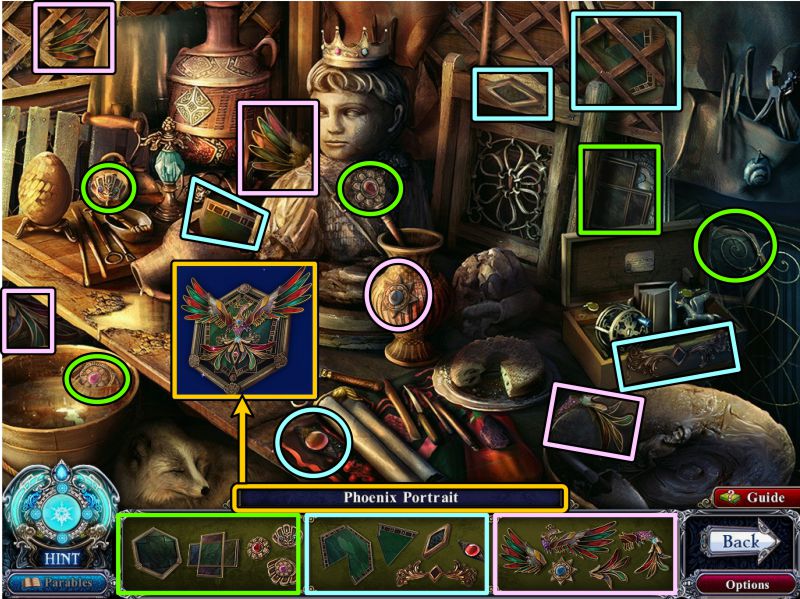
Workshop Hidden Object Scene
Collect the fragments of the Phoenix Portrait.
Screenshot
Upper Hall
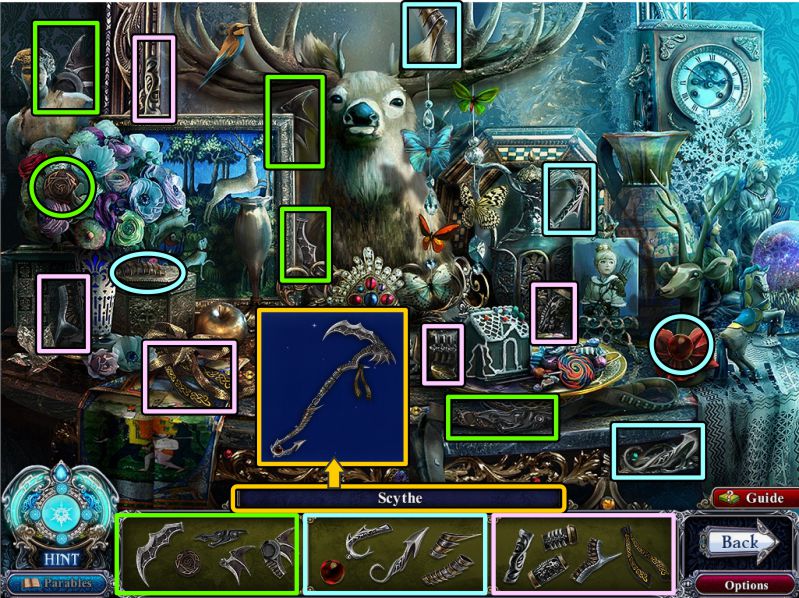
Collect the Cursed Object, play the Hidden Object Scene, and go to the Throne Room.
Screenshot
Upper Hall Hidden Object Scene
Collect the fragments to put together a Scythe.
Screenshot
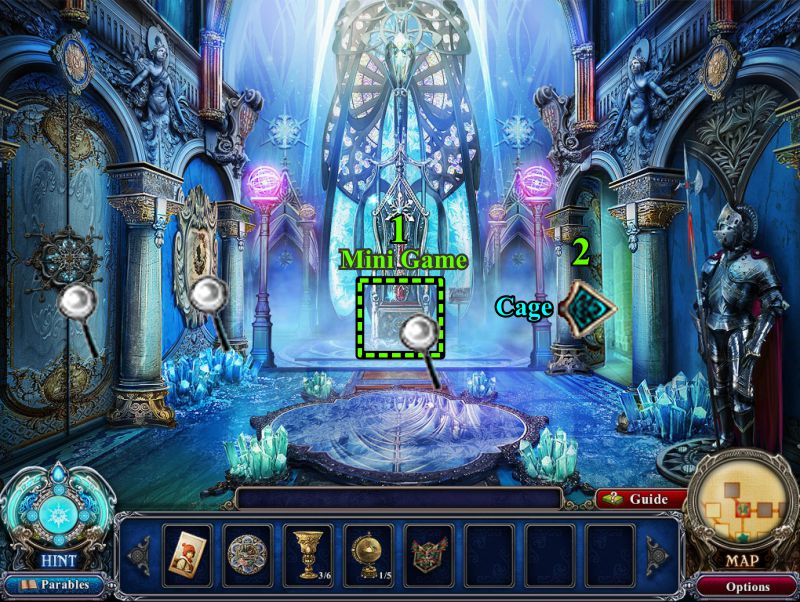
Throne Room
Check out the objects in the room, then play the Mini Game to be able to go to the Cage.
Screenshot
Throne Mini Game
Your goal in this game is to match the objects with the portraits.
As in the last game like this one, the buttons open 3 selections at a time.
See the screenshot for a numbered matchup.
Screenshot
Once the portraits are all lit, push the button in the center to open the door to the Cage.
Screenshot
Cage
Talk to the children to get another Goblet.
Collect the Cursed Object and Parable.
Give the Scythe to the statue and the door to the Vault will open.
Screenshot
Chapter 4
Vault
Talk to Kai, play the Hidden Object Scene, and then the Mini Game.
Screenshot
Vault Hidden Object Scene
You will get a Prince Figurine for your Inventory when all the fragments are collected.
Screenshot
Vault Mini Game
Connect the buttons from the left to right lion using 14 red, 6 blue, and 5 green buttons.
A sample solution is available in the screenshot.
Screenshot
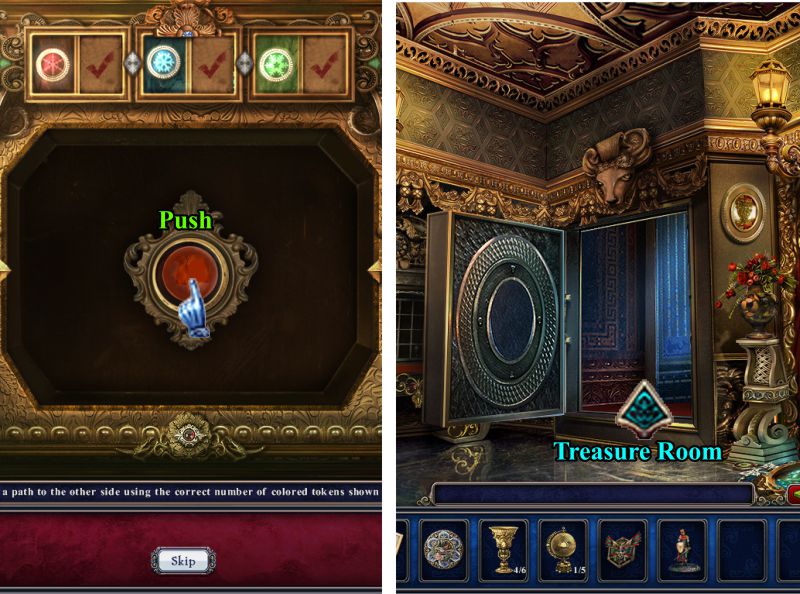
Vault
Push the button to open the door to the Treasure Room, then enter.
Screenshot
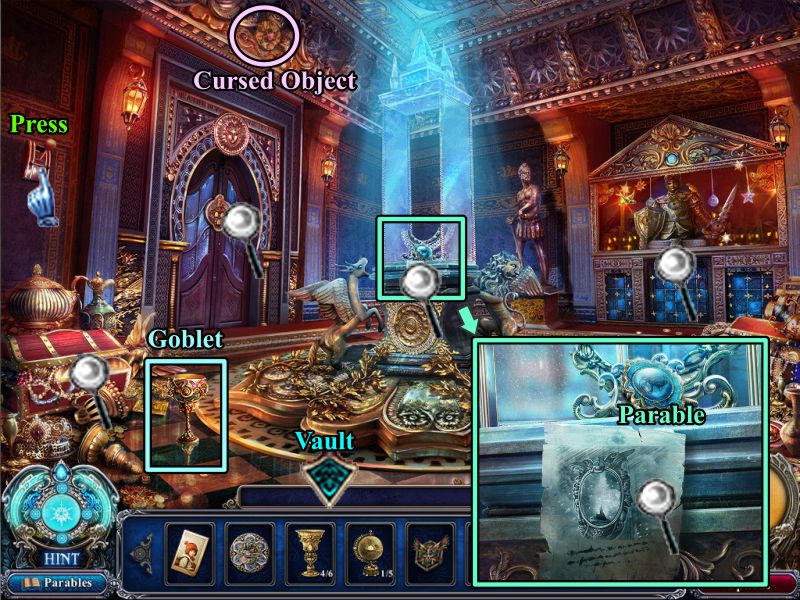
Treasure Room
Collect the Goblet and Cursed Object.
Check out the magnifying glasses, press the lever at the far left, and zoom in on the display to take the Parable.
Return to the Vault.
Screenshot
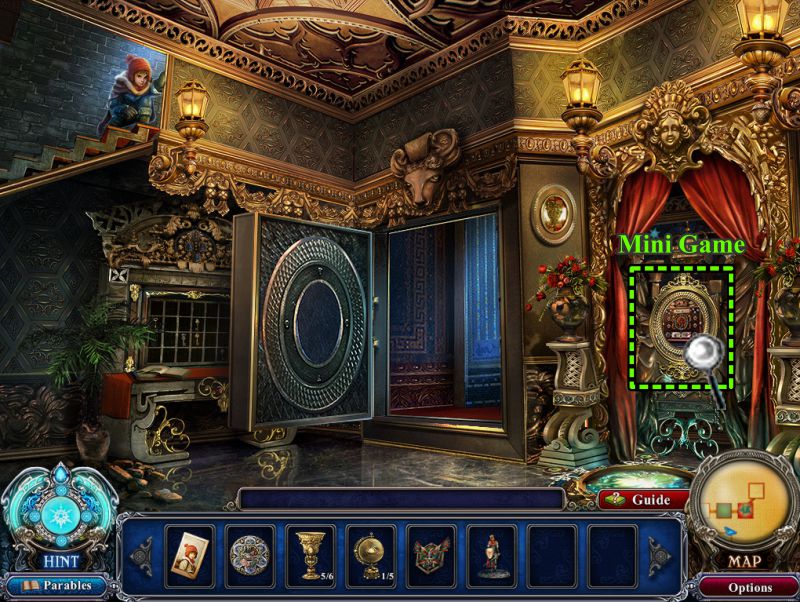
Vault
Zoom in on the curtains to the right for a Mini Game.
Screenshot
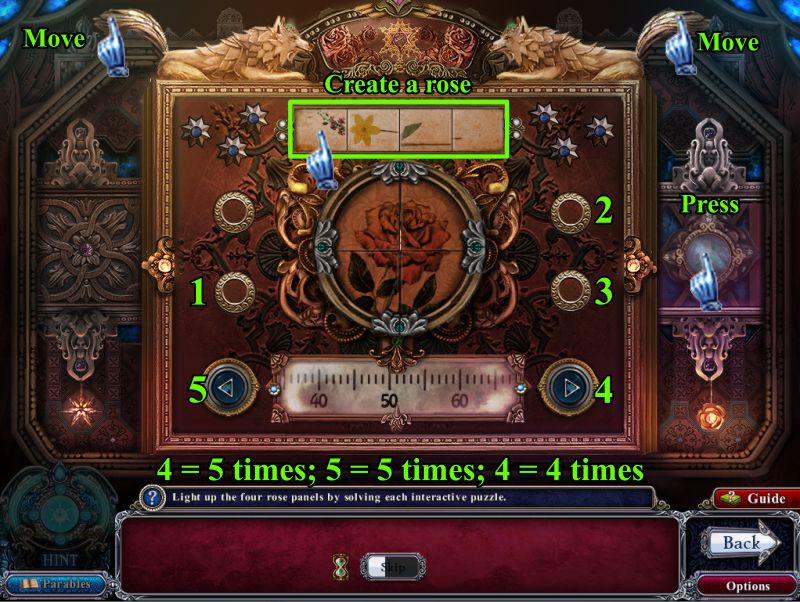
Vault Mini Game
Click on the two wolf tails to move them down.
Click on the 4 tiles at the top to create a rose.
Press the blue button at the far right, and then on the buttons labeled 1, 2, and 3 in the screenshot.
Your goal is to light up the 4 rose panels in the center. To complete the game, press buttons 4 and 5 the number of times indicated in the screenshot.
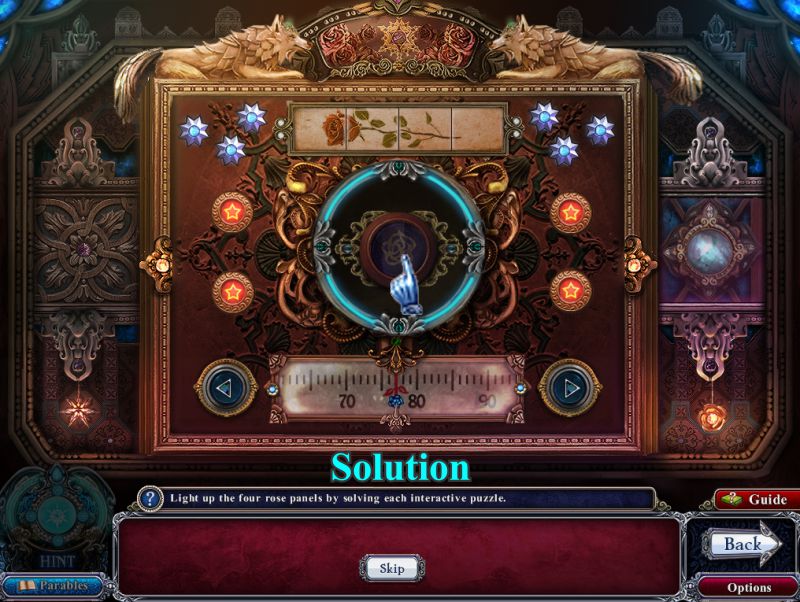
Screenshot
The screenshot shows the solution to the game.
Press the rose button in the center to create a portal.
Screenshot
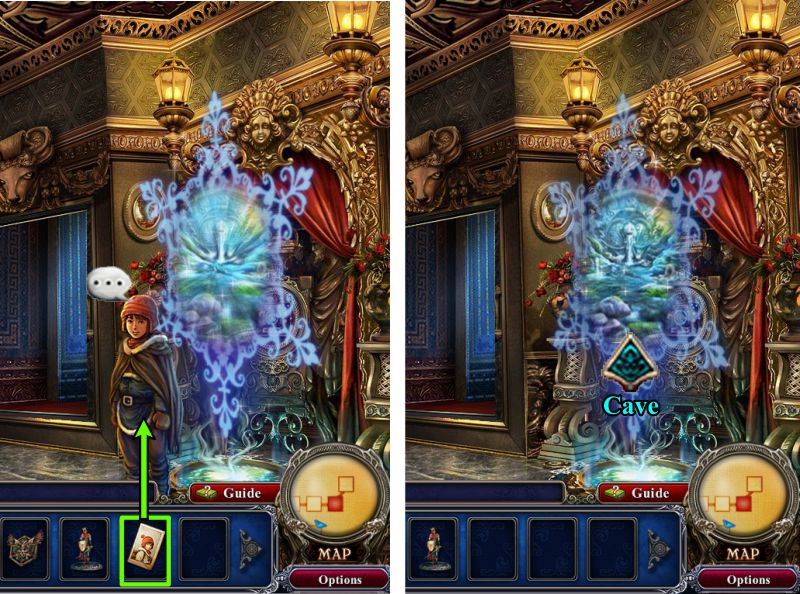
Vault Portal
Kai comes down from the stairs, so talk to him and give him the picture from his father.
Follow him through the portal to the Cave.
Screenshot
Cave
Zoom in on the back wall for a Hidden Object Scene.
Exit to the Passage.
Screenshot
Cave Hidden Object Scene
Collect all the fragments of the Earth Globe.
Screenshot
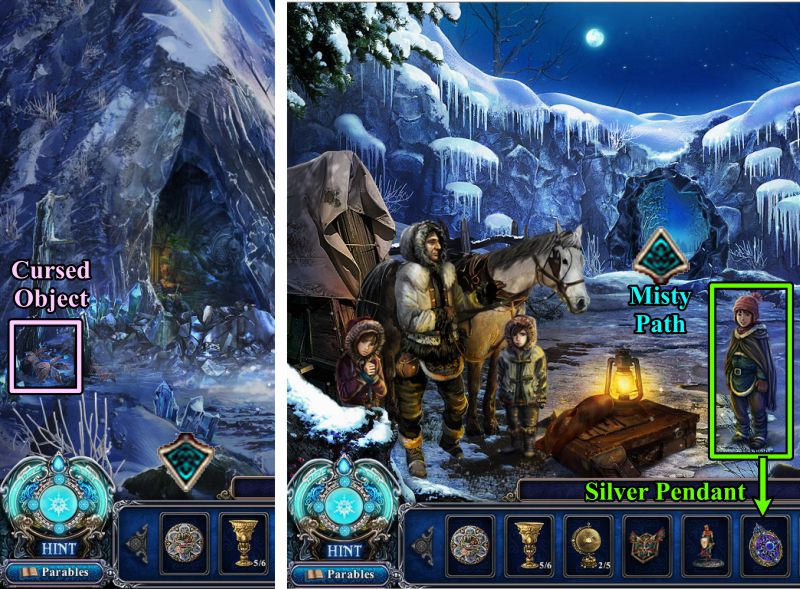
Passage and Entrance
Collect the Cursed Object and go down to the Entrance.
Kai is with his father and the other children. He gives you a Silver Pendant.
Head to the Misty Path.
Screenshot
Chapter 5
Misty Path
Collect the Cursed Object and play the Hidden Object Scene.
Go to the Front Garden of the Palace.
Screenshot
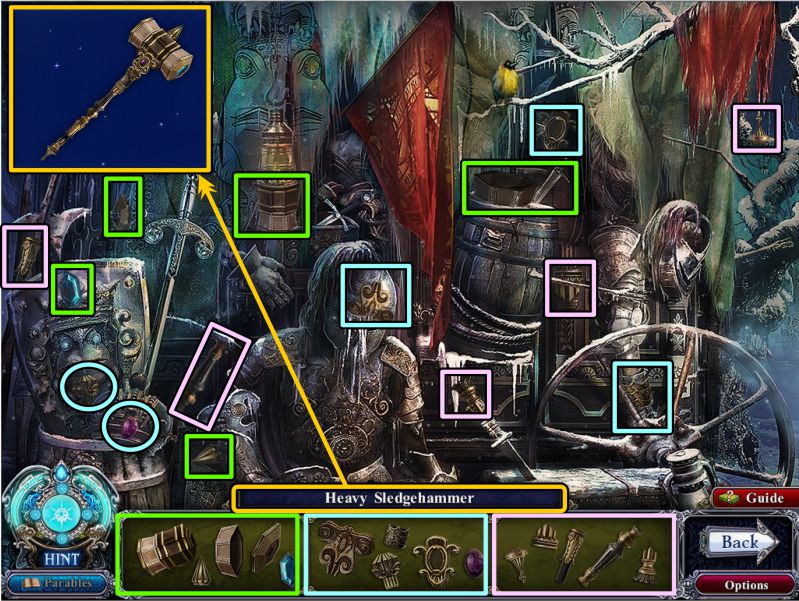
Misty Path Hidden Object Scene
Once you have collected everything, you will have a Heavy Mallet for your Inventory.
Screenshot
Front Garden and Graveyard
Play the Hidden Object Scene and go to the Graveyard.
Collect the Cursed Object on top of the shed and enter the Crypt.
Screenshot
Front Garden Hidden Object Scene
Collect all the fragments to get an Amber Goblet.
Screenshot
Crypt
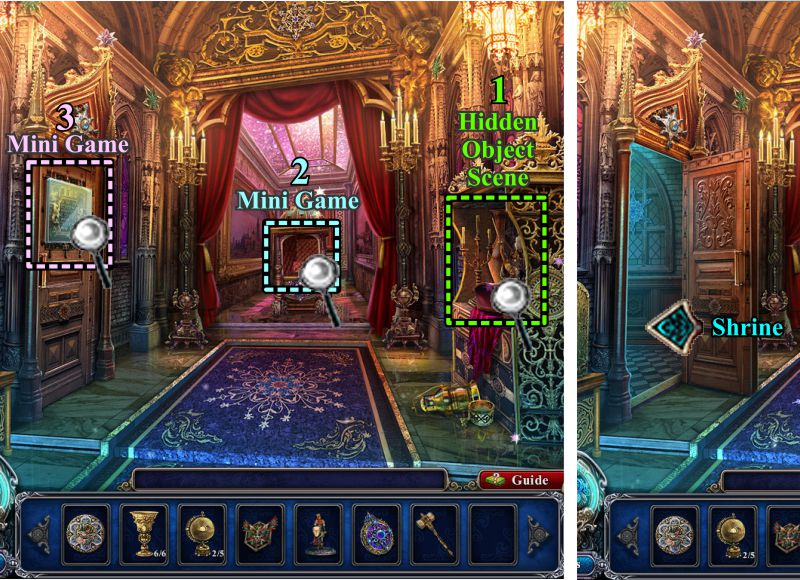
Play the Hidden Object Scene and two Mini Games.
See the screenshot for the order to play them, and then enter the Shrine once the door is open.
Screenshot
Crypt Hidden Object Scene
Collecting all the fragments will get you a Key to the Tower.
Screenshot
Goblet Mini Game
You have collected all 6 Goblets. They now need to be arranged in their proper places in the collection.
Swap the Goblets to look like the collection in the screenshot.
Screenshot
Shrine Door Mini Game
Once again you are asked to press the buttons from the left to right Lion.
This time you must use 3 red, 5 blue, and 10 green buttons as shown in the sample solution in the screenshot.
Screenshot
Shrine
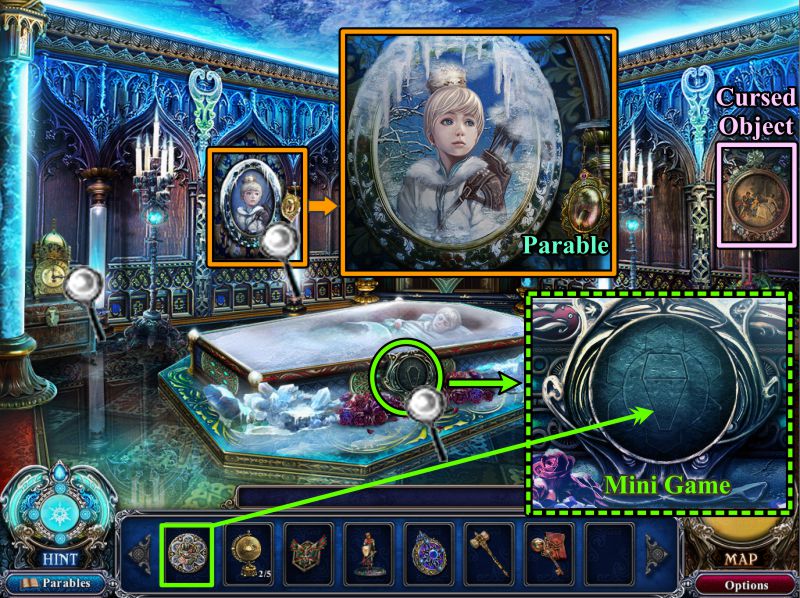
You've found the Snow Queen's son.
Zoom in on his portrait and take the Parable.
Collect the Cursed Object, then zoom in on his resting place to place the Crystal Coin to trigger a Mini Game.
Screenshot
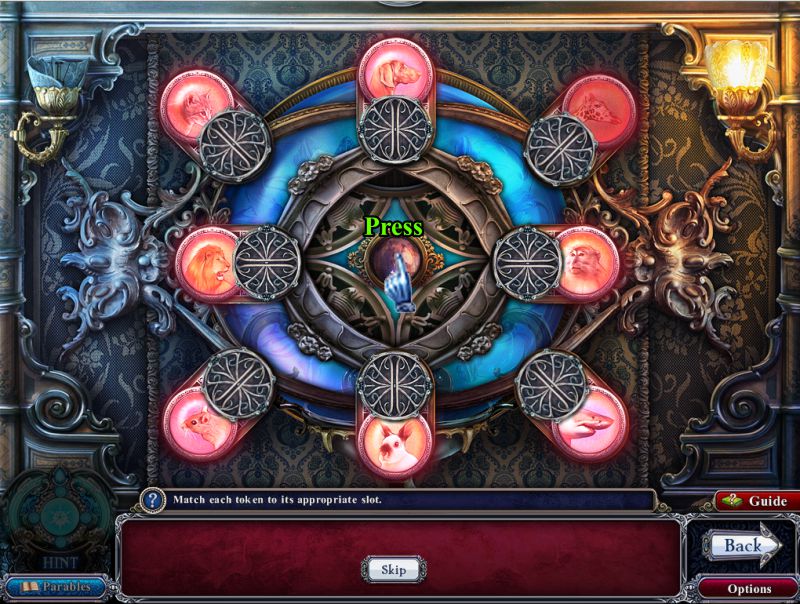
Shrine Mini Game
You've seen this game before, but your goal this time is to match the tails to the animals.
See the screenshot for the numbered matches.
Screenshot
When all the animals light up, press the center button to open the casket.
Screenshot
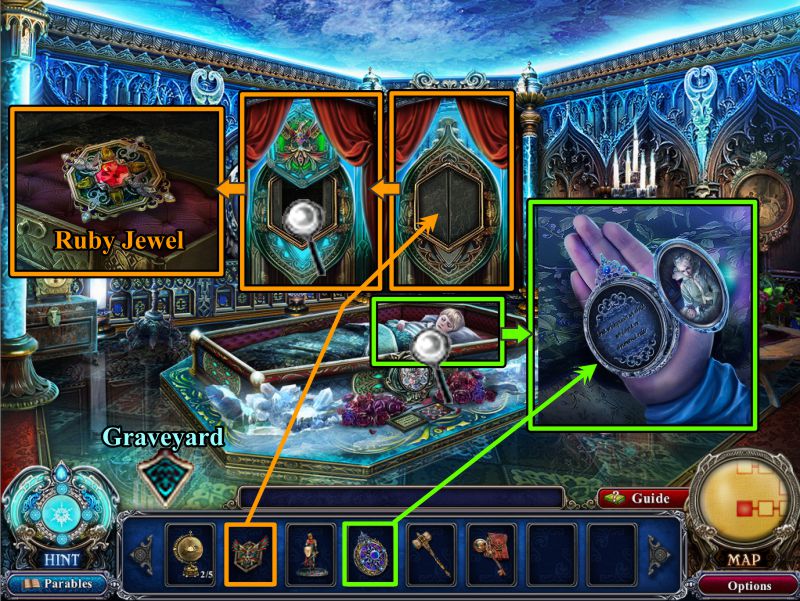
Shrine
Place the Silver Pendant in the boy's hand.
Place the Phoenix Portrait on the back wall and zoom in to collect the Ruby Jewel.
Exit to the Graveyard.
Screenshot
Graveyard and Palace Entrance
Noah is in the Graveyard and wants to talk to you.
When you have talked to him, go to the Palace Entrance, and play the Hidden Object Scene before heading off to the Courtyard.
Screenshot
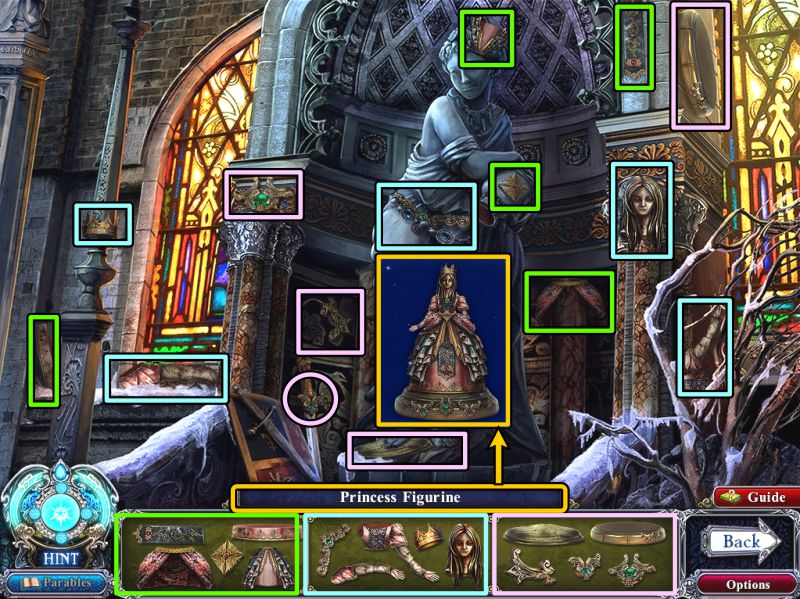
Palace Entrance Hidden Object Scene
Collecting all the fragments will get you the Princess Figurine.
Screenshot
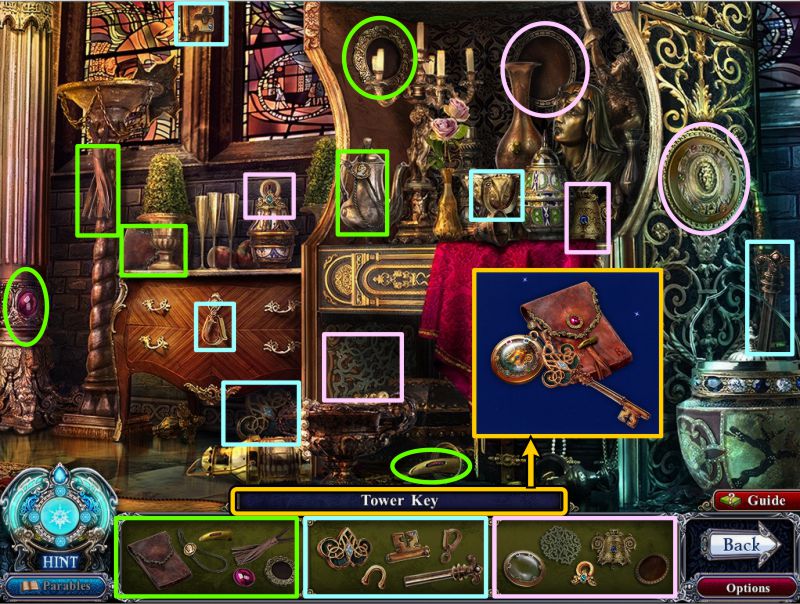
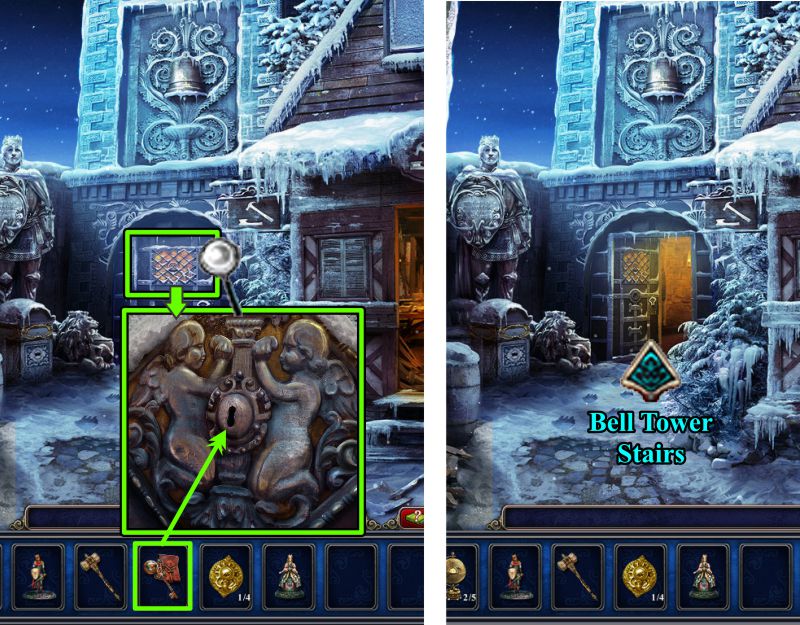
Courtyard
You have the Tower Key in your Inventory, so zoom in on the door and place the key to open the door and go to the Bell Tower Stairs.
Screenshot
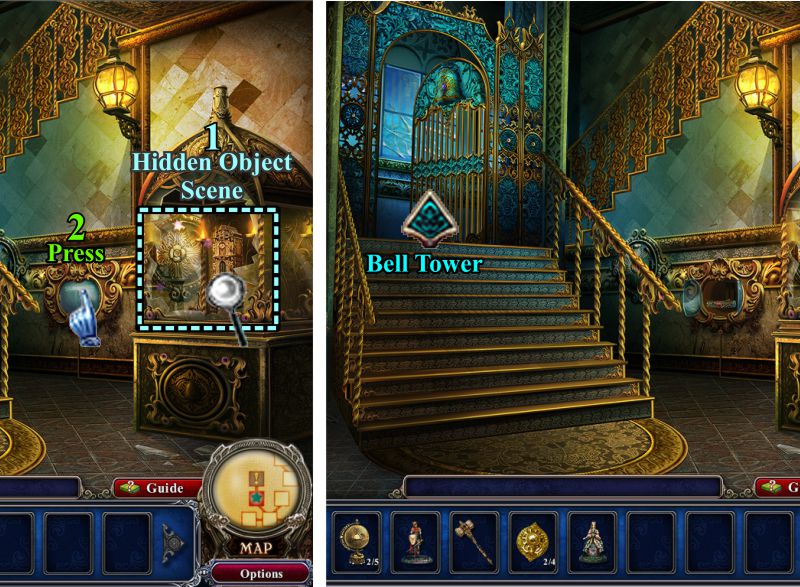
Bell Tower Stairs
Play the Hidden Object Scene, then press the button that becomes available to lower the stairs to the Bell Tower.
Go to the Bell Tower.
Screenshot
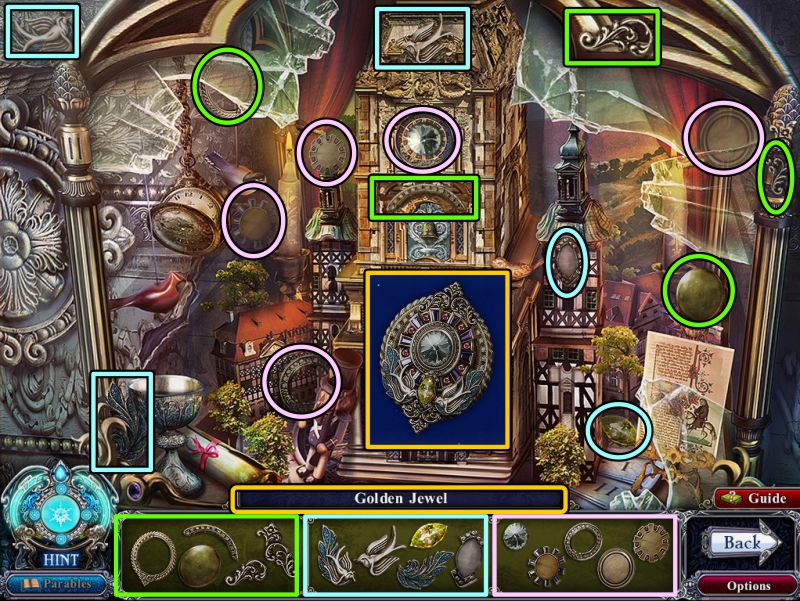
Stairs Hidden Object Scene
When you collect all the fragments, you will have a Golden Jewel.
Screenshot
Chapter 6
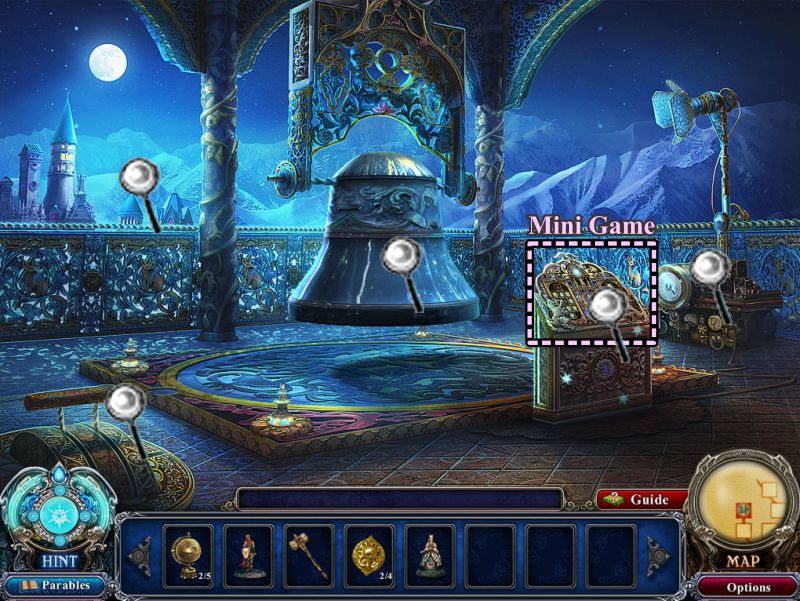
Bell Tower
Check out all the magnifying glasses for information, then play the Mini Game.
Screenshot
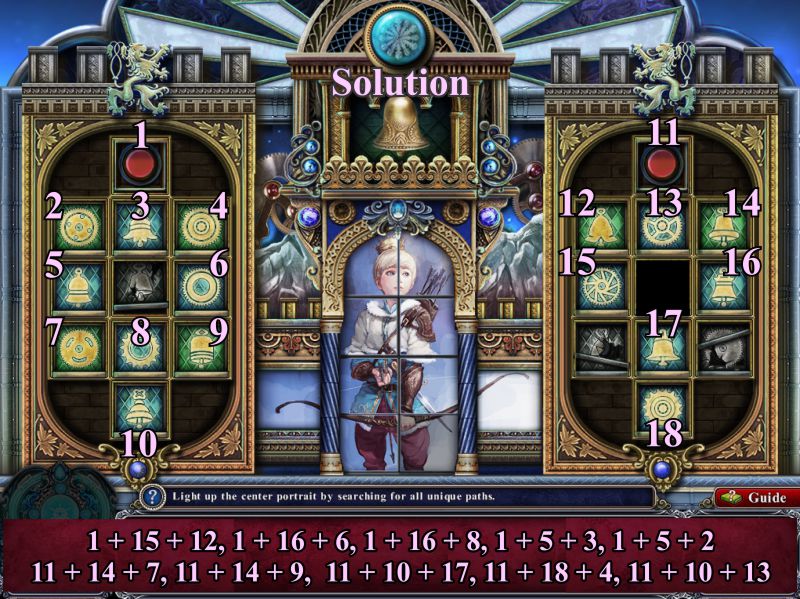
Bell Tower Mini Game
Your goal is to light up the portrait of the Snow Queen's son.
See the screenshot and push the buttons as numbered.
Screenshot
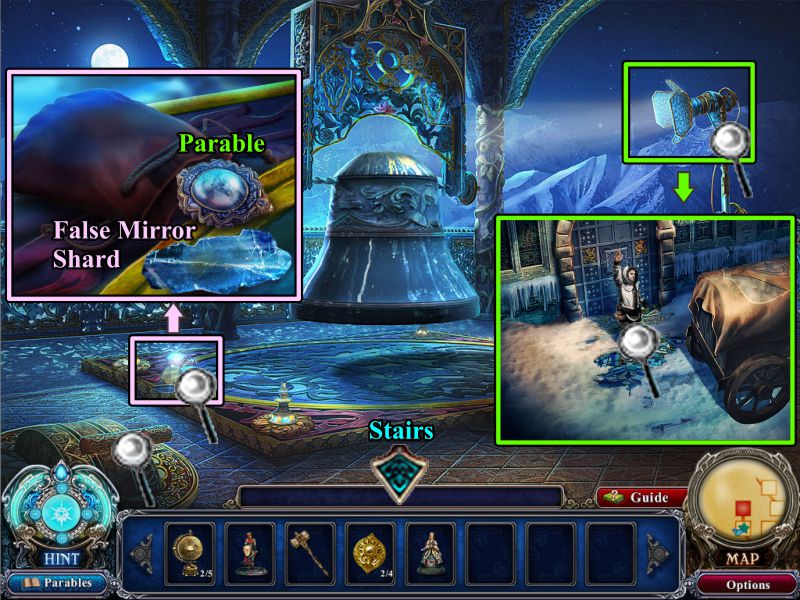
Bell Tower
Zoom in on the left of the bell platform and pick up the False Mirror Shard and Parable.
Zoom in on the lamp at the right and find Noah, who is waiting to find out where to rescue the children.
Return to the Stairs.
Screenshot
Stairs
Collect the Cursed Object, play the Hidden Object Scene, and return to the Courtyard.
Screenshot
Bell Tower Stairs Hidden Object Scene
Collecting all the objects will get you a Royal Key.
Screenshot
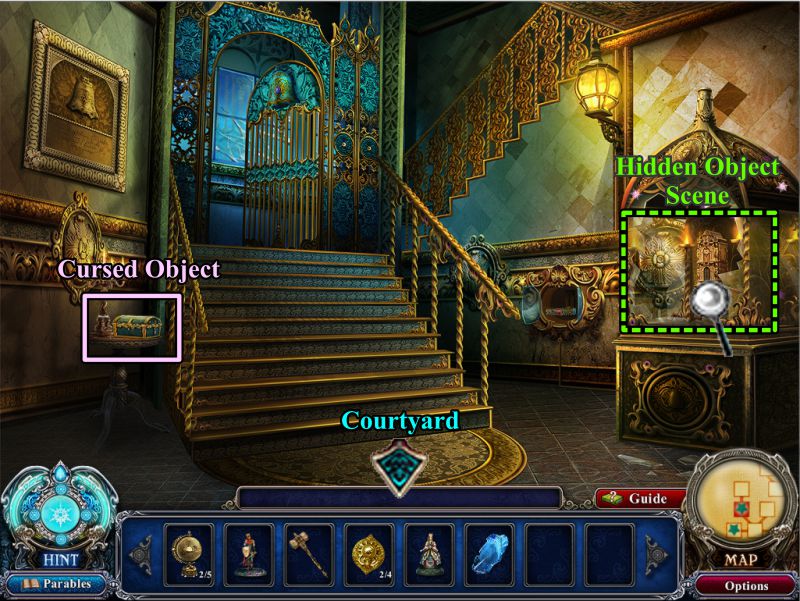
Courtyard
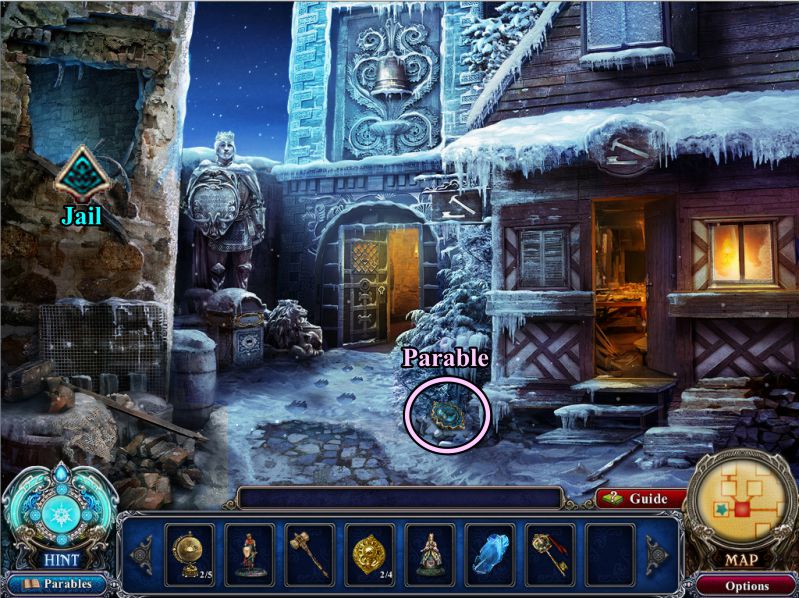
Pick up the Parable and enter the Jail.
Screenshot
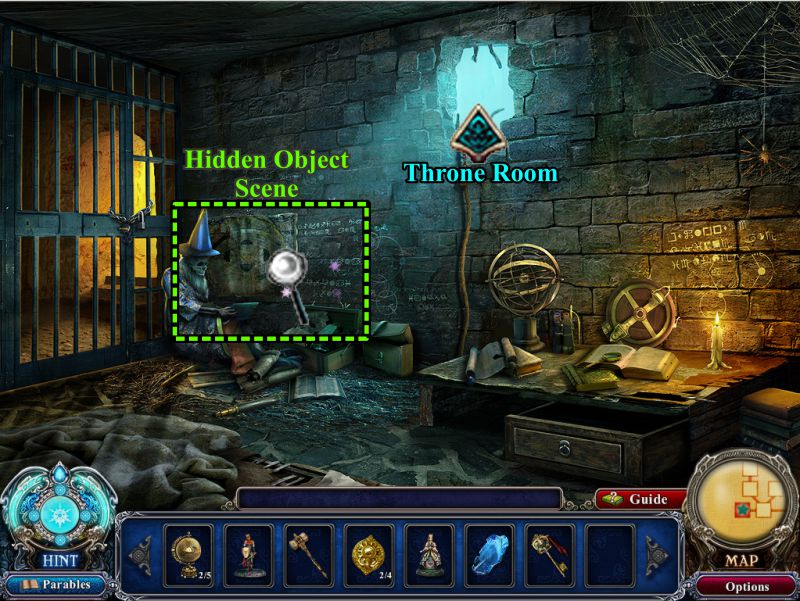
Jail
Play the Hidden Object Scene, then go to the Throne Room.
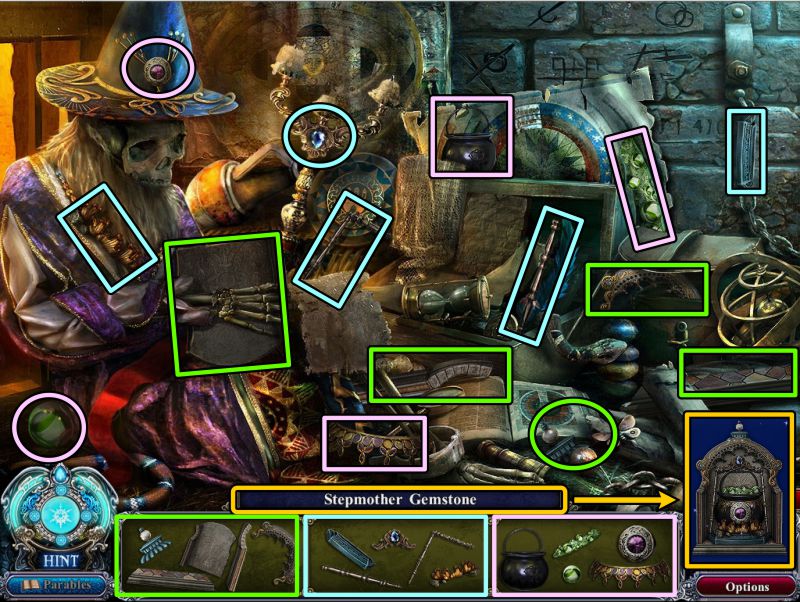
Screenshot
Jail Hidden Object Scene
Collecting everything will get you a Stepmother Gemstone.
Screenshot
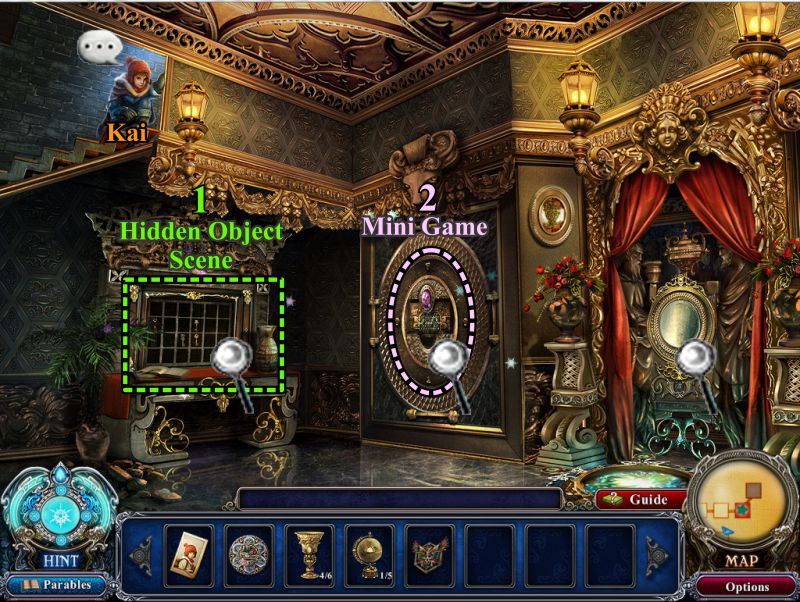
Throne Room
Zoom in on the door to the left and use the Royal Key to enter the Bedroom.
Screenshot
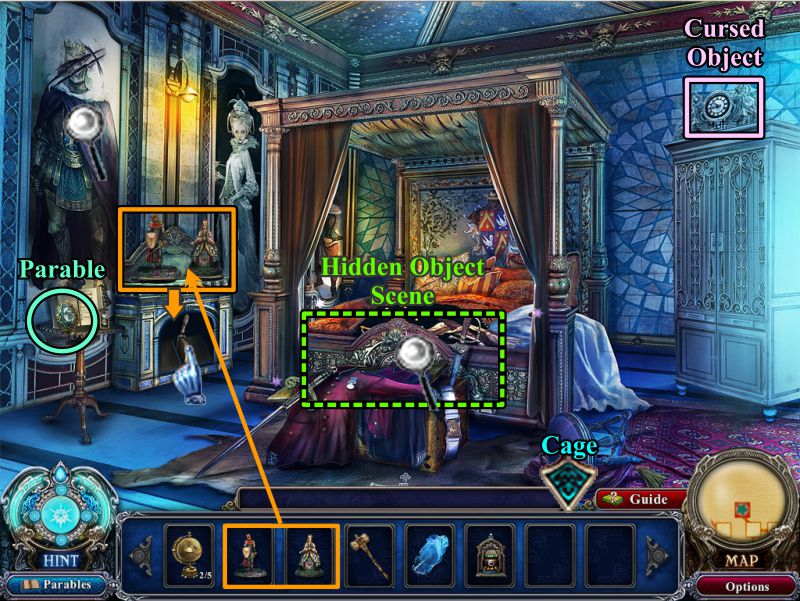
Bedroom
Collect the Parable and Cursed Object.
Play the Hidden Object Scene.
Place the two figurines on the mantle as shown in the screenshot and push the lever that appears in the fireplace.
Go to the Cage.
Screenshot
Bedroom Hidden Object Scene
All of the fragments will get you a Mars Globe.
Screenshot
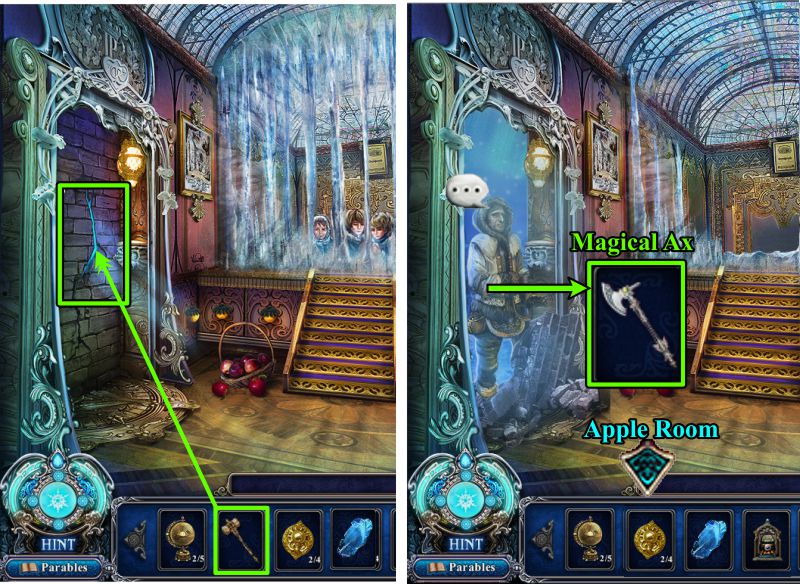
Cage
Use the Heavy Mallet on the wall at the left.
Noah will appear in the doorway and give you the Magical Ax after you talk to him.
Go to the Apple Room.
Screenshot
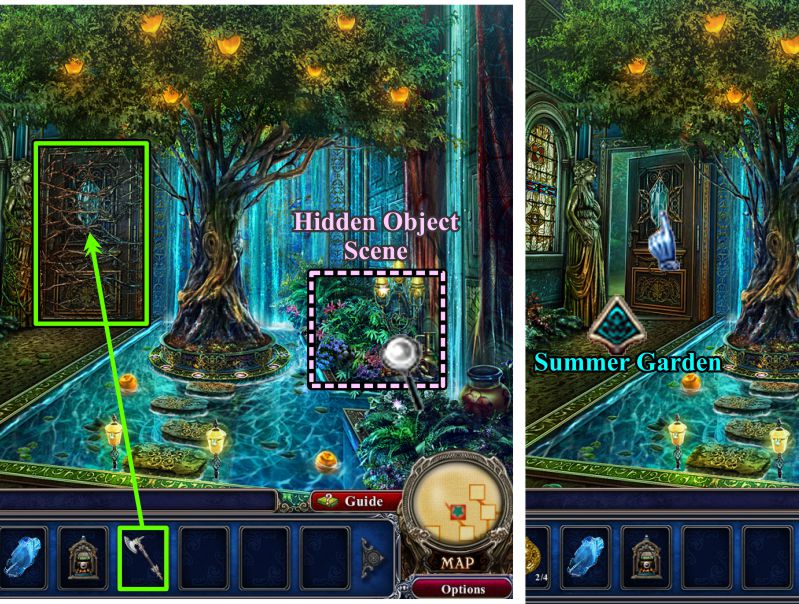
Apple Room
Play the Hidden Object Scene, then use the Magical Ax to clear the vines from the door so you can enter the Summer Garden.
Screenshot
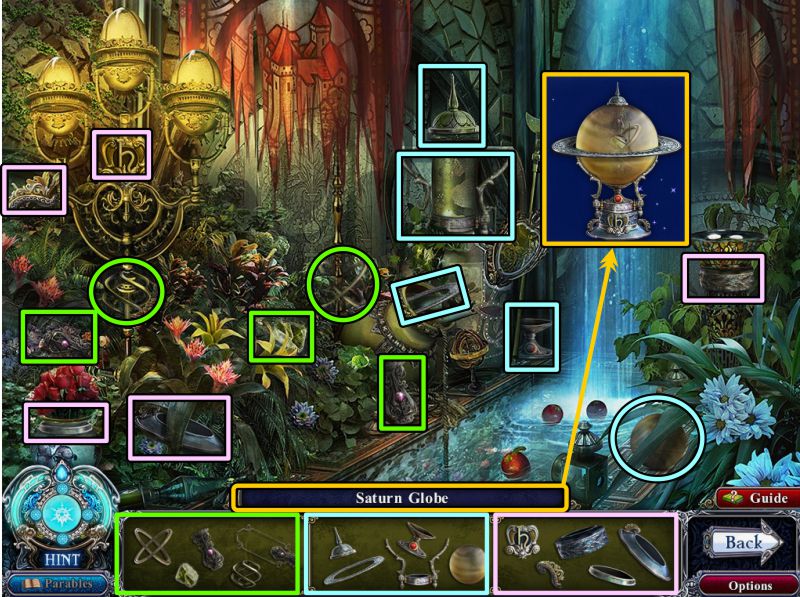
Apple Room Hidden Object Scene
When you collect everything, you will have a Saturn Globe.
Screenshot
Summer Garden
Pick up the Golden Crown and zoom in on the door at the left.
Place the Stepmother Gemstone to open the door.
Note the magnifying glasses and play the Mini Game before entering the Stepmother Room.
Screenshot
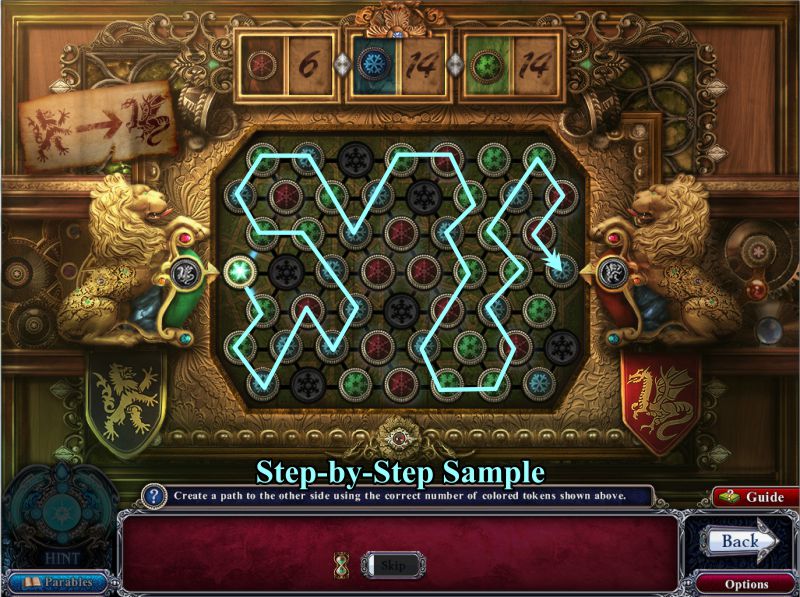
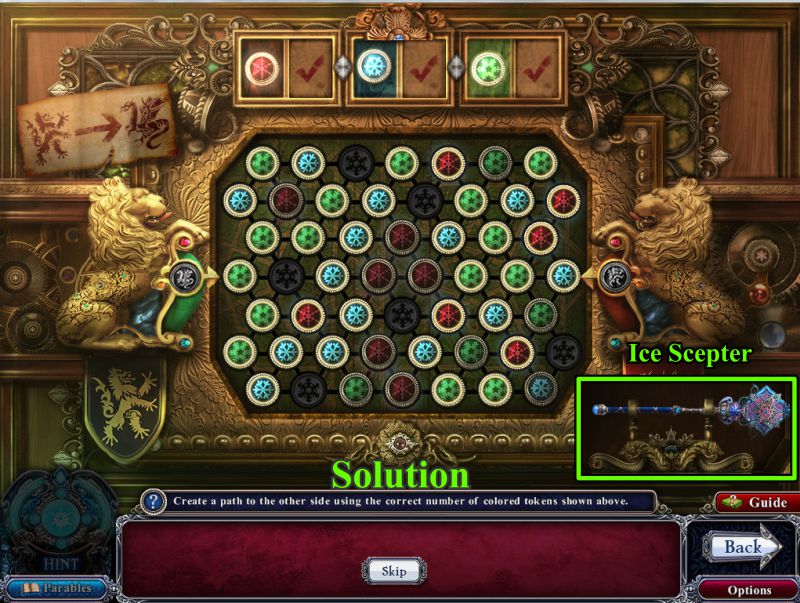
Summer Garden Mini Game
This is another Lion to Lion game. A sample path is shown in the screenshot.
You need to use 6 red buttons, 14 blue, and 14 green to solve the game.
Screenshot
The sample solution is shown in the screenshot, as is your reward, an Ice Scepter.
Screenshot
Stepmother Room
Check out the magnifying glasses and collect the Cursed Object.
Zoom in on the book at the left and take the Parable.
Go to the Main Hall.
Screenshot
Main Hall and Courtyard
Pick up the Cursed Object and go to the Courtyard.
Zoom in on the base of the statue and place the Crown to trigger a Mini Game.
Screenshot
King's Statue Mini Game
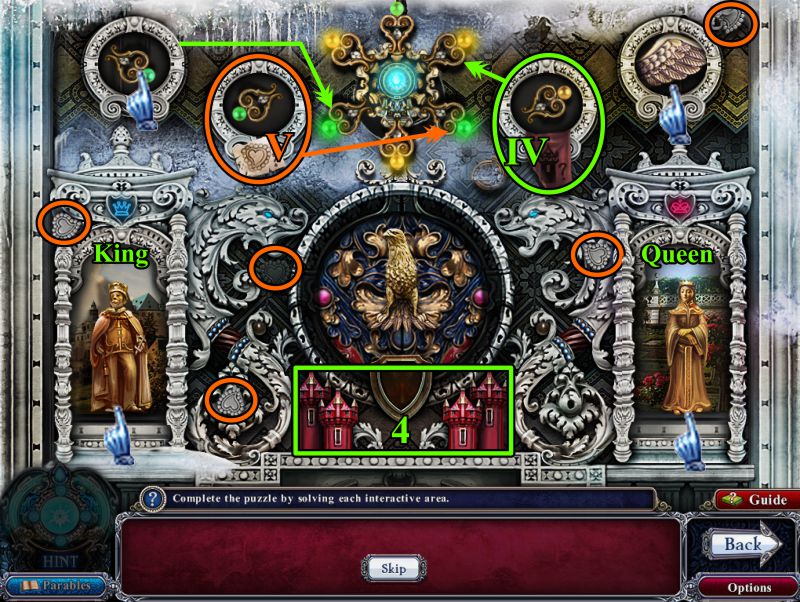
Your goal is to complete each section of the puzzle by interacting with the objects.
Top section:
Press the left and right rings once.
Change the ring marked in red in the screenshot to the roman numeral "V," representing the 5 hearts marked in the scene.
Change the ring marked in green the roman numeral "IV," representing the 4 castles marked in the screenshot.
Place the 3 matching decorations on the emblem in the middle.
Change the picture in the arch at the left bottom to a King and the right picture to a Queen.
Screenshot
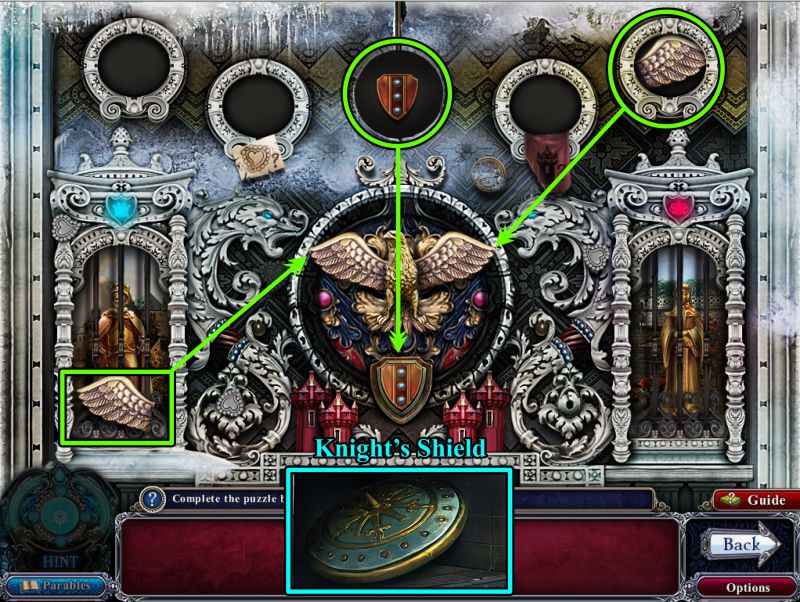
Bars will drop down to cover the King and Queen, and a wing will appear in front of the King. The top decoration will rise to reveal a shield.
Place the shield below the eagle and the wings as shown in the screenshot.
The eagle niche will open for you to take the Knight's Shield.
Go to the Throne Room.
Screenshot
Throne Room and Stepmother Room
Place the shield on the knight, zoom in and note the diagram.
Go to the Stepmother Room and play the Hidden Object Scene before exiting to the Summer Garden.
Screenshot
Stepmother Room
Collect everything to assemble the Mirage Statue.
Screenshot
Summer Garden
Place the Mirage Statue as shown in the screenshot, and the waterfall will part to reveal the entrance to the Mirage Room.
Screenshot
Chapter 7
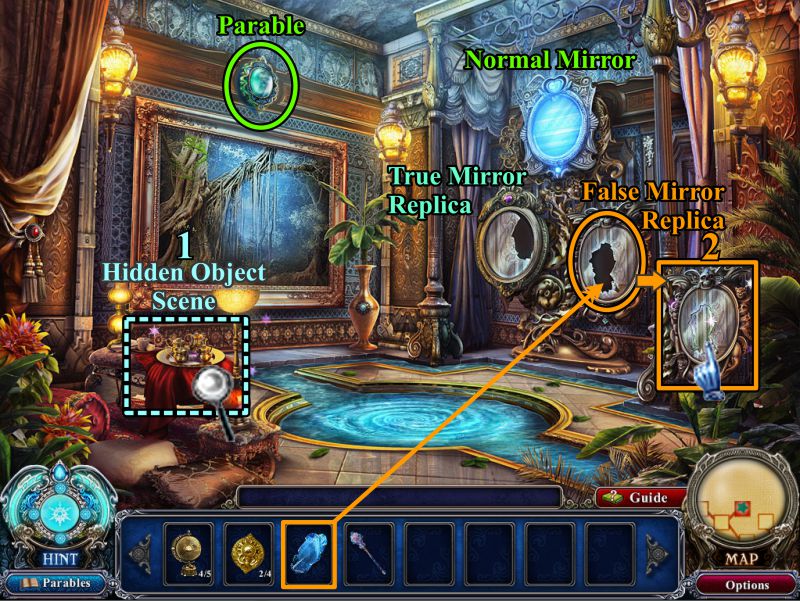
Mirage Room
Collect the Parable and play the Hidden Object Scene.
Note the types of mirrors as marked in the screenshot.
Place the Mirror Shard in the False Mirror Replica.
Click on the now whole mirror to change the room to a false perception.
Screenshot
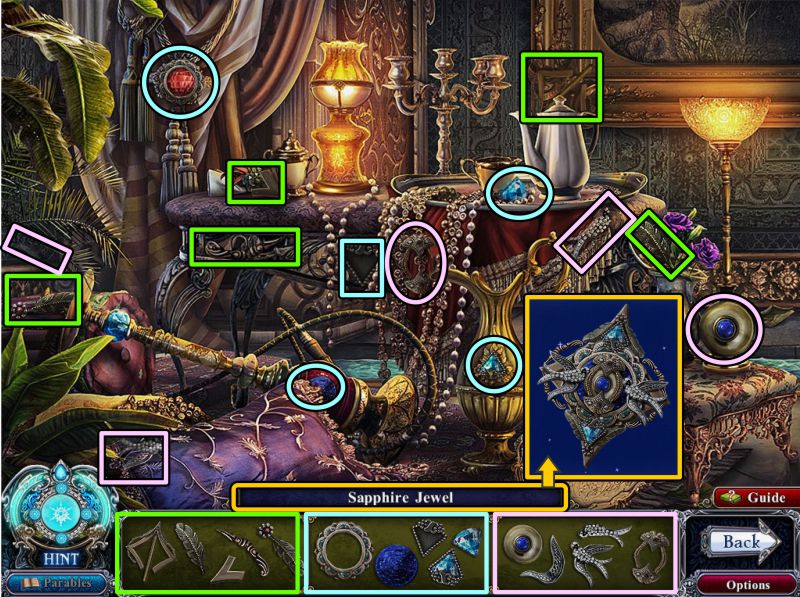
Mirage Room Hidden Object Scene
Put together the Sapphire Jewel by collecting all the fragments.
Screenshot
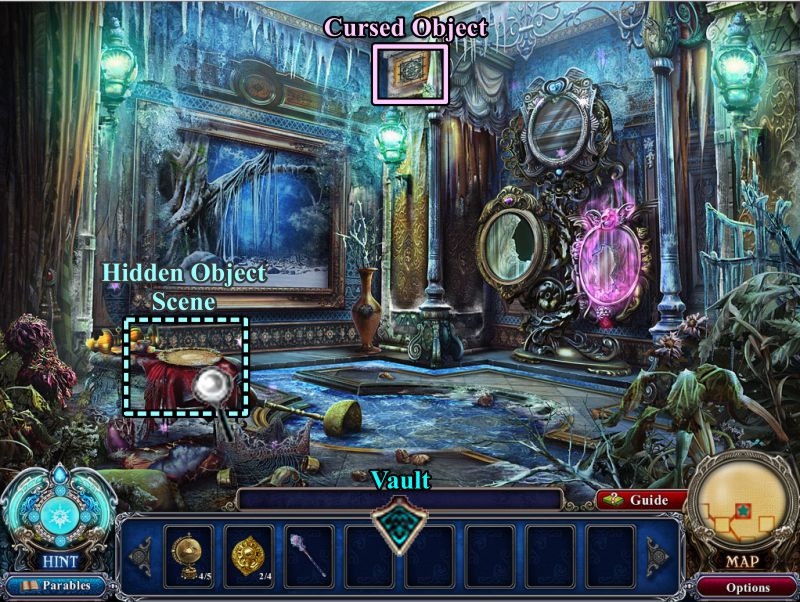
Frozen Mirage Room
Collect the Cursed Object and play the Hidden Object Scene.
No need to turn the room back to reality because you will be returning later, so just exit to the Vault.
Screenshot
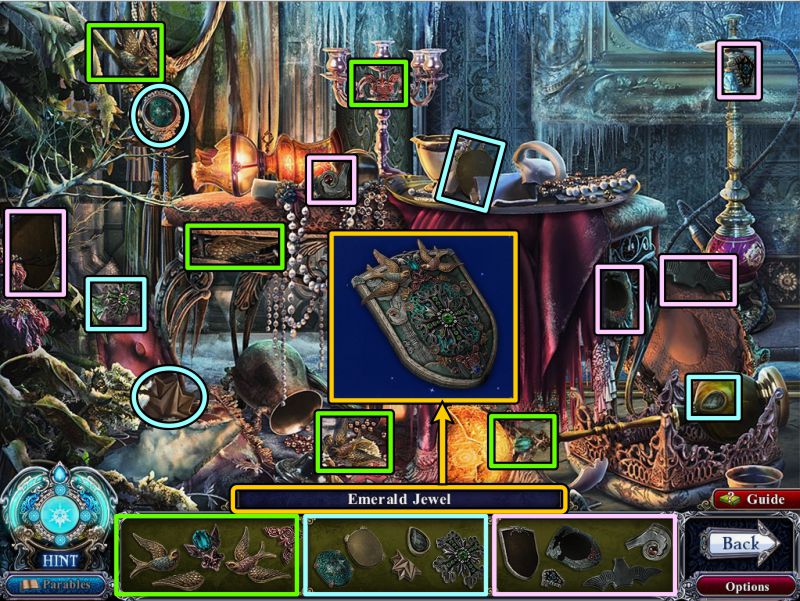
Frozen Mirage Room Hidden
Collect all the fragments of the Emerald Jewel.
Screenshot
Vault and Treasure Room
Play the Hidden Object Scene in the Vault.
Go into the Treasure Room and play the Mini Game.
Screenshot
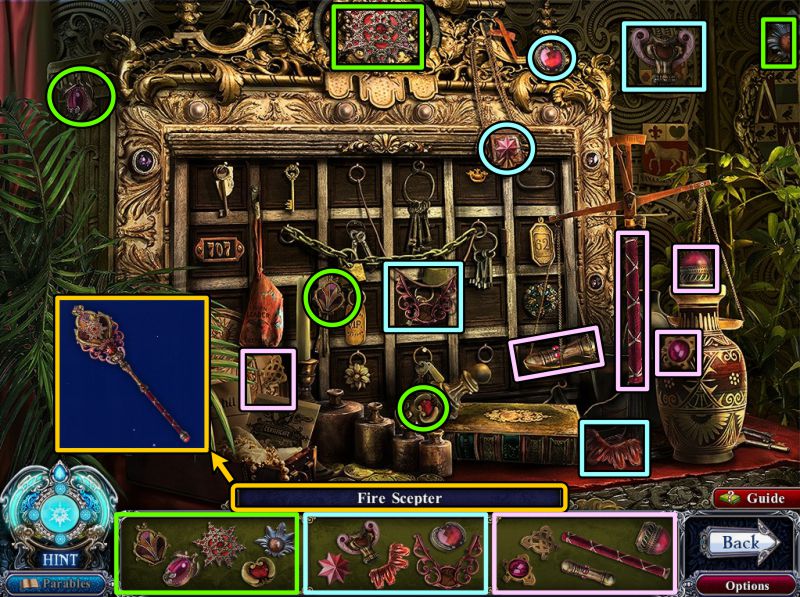
Vault Hidden Object Scene
Collect all the fragments of the Fire Scepter.
Screenshot
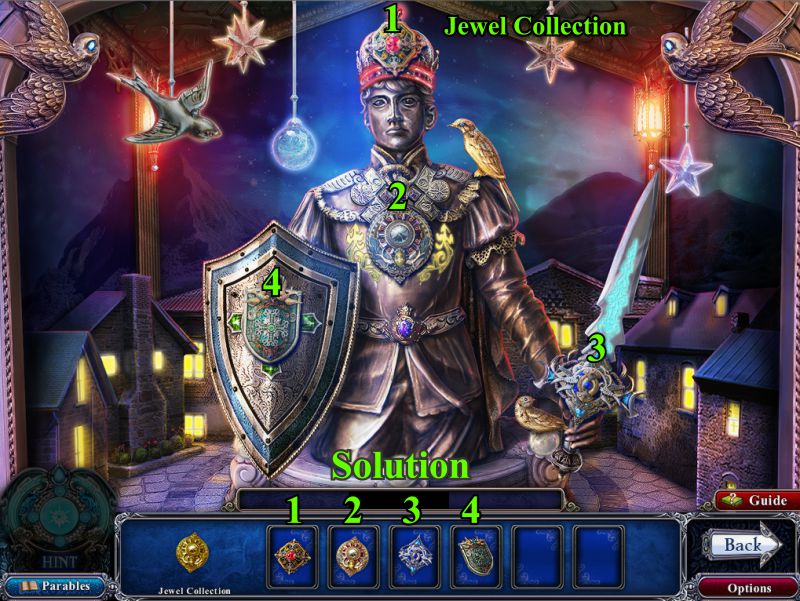
Jewel Collection Mini Game
Swap the Jewels to arrange them as shown in the screenshot.
Screenshot
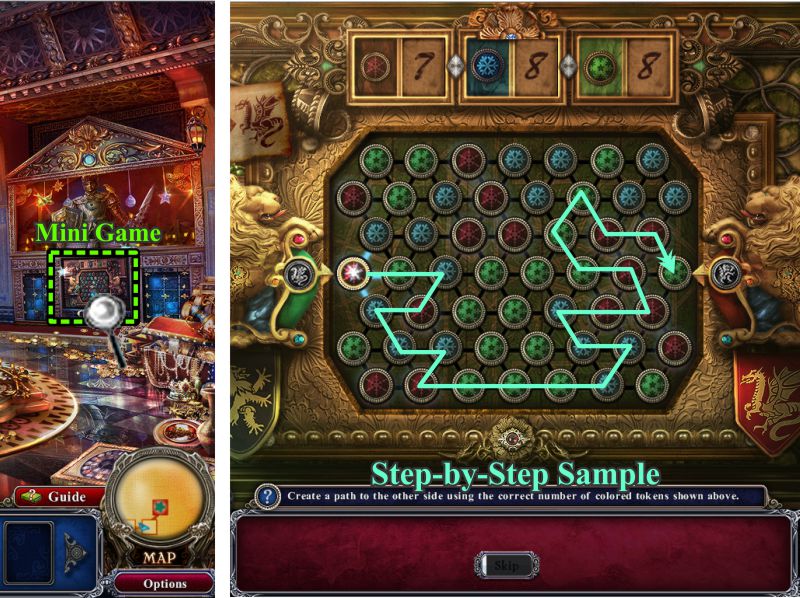
Treasure Room Lion's Path Mini Game
Click under the Jewel Collection for another Mini Game.
The step-by-step sample solution is shown in the screenshot.
This time you are to use 7 red buttons, 8 blue, and 8 green.
Screenshot
The sample solution is available in the screenshot below.
The compartment will open for you to collect an Ancient Globe.
Read the scroll before going to the Library.
Screenshot
Library and Astronomy Room
The glass is gone from the display at the left, so zoom in on the book and take the Parable.
Zoom in on the pages of the book before going to the Astronomy Room.
Play the Hidden Object Scene on the right and the Mini Game at the left of the scene.
Screenshot
Astronomy Room Hidden Object Scene
Collect all the fragments of the Neptune Globe.
Screenshot
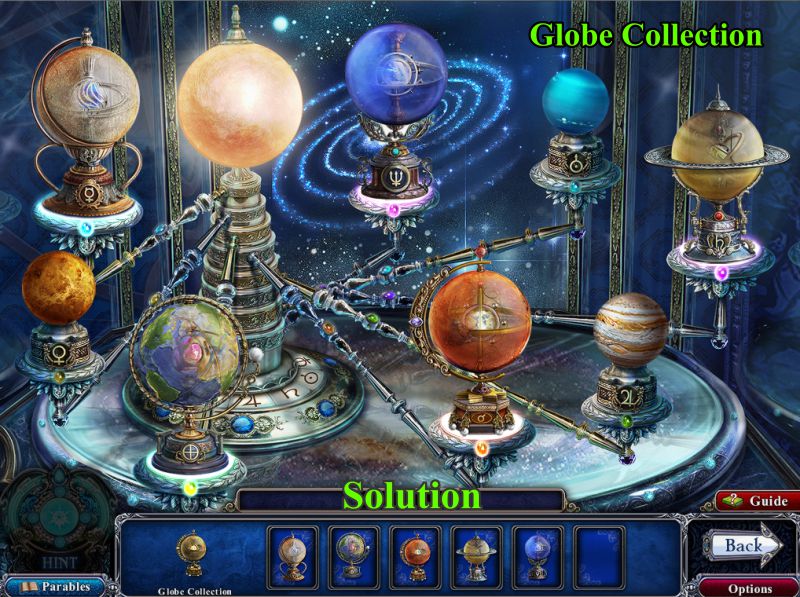
Globe Collection Mini Game
Rearrange the globes to their proper places as shown in the screenshot.
Screenshot
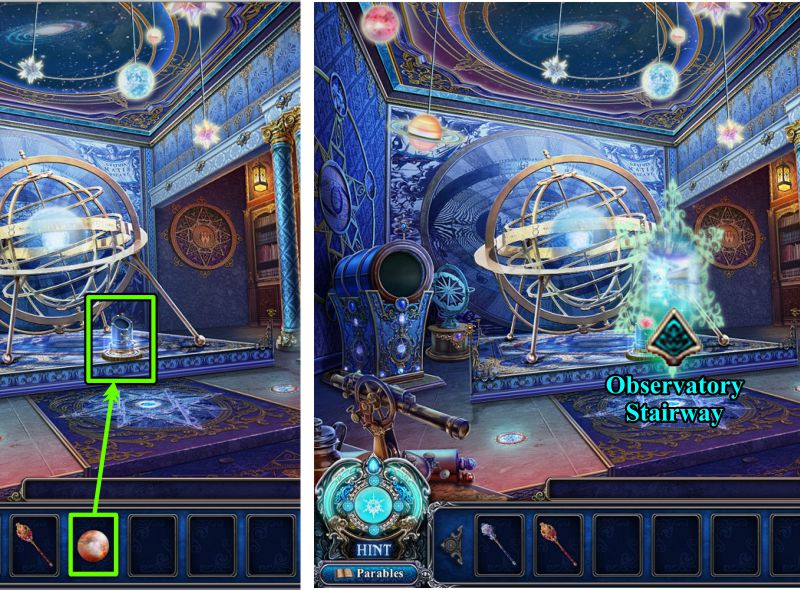
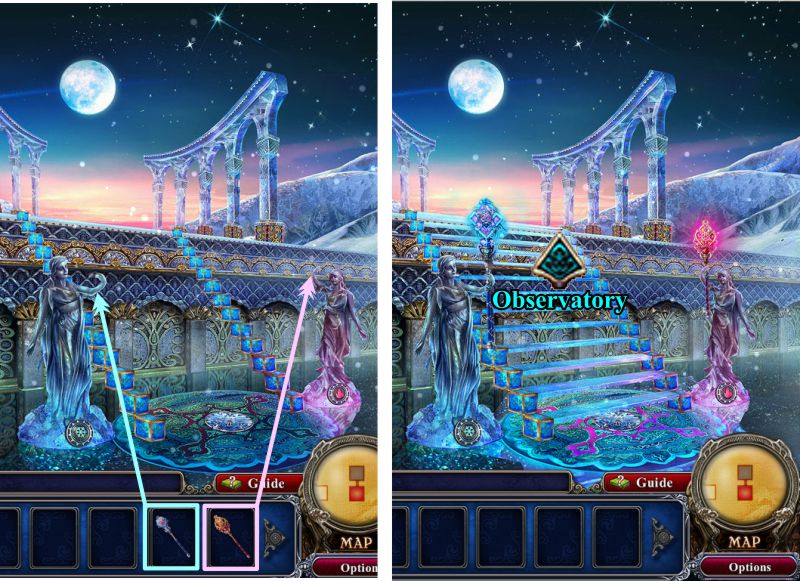
Astronomy Room
Place the Ancient Globe as shown in the screenshot to create a portal to the Observatory Stairway.
Go through the portal to the Stairway.
Screenshot
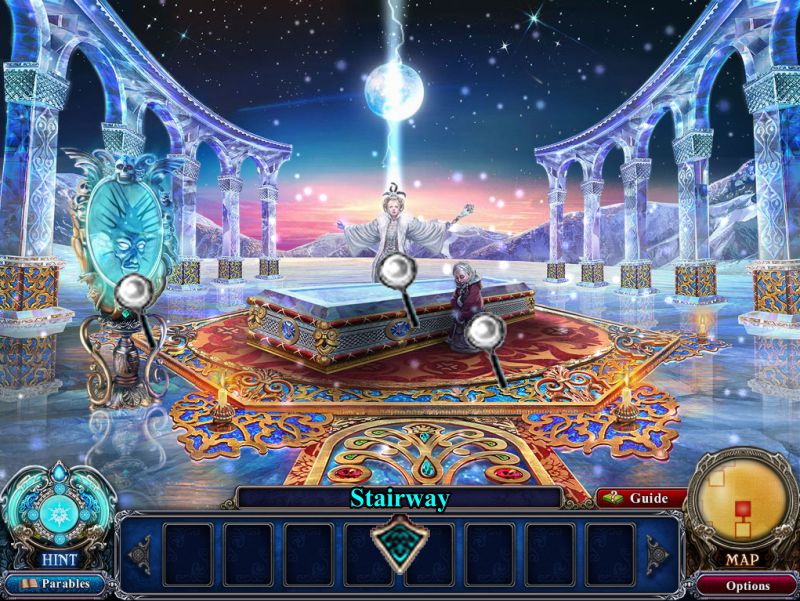
Chapter 8
Observatory Stairway
Place the Ice and Fire Scepters on the statues to create the stairway.
Go to the Observatory.
Screenshot
Observatory
Check out all the magnifying glasses and return to the Stairway.
Screenshot
Stairway and Bedroom
Talk to the King, enter the portal, and go to the Bedroom.
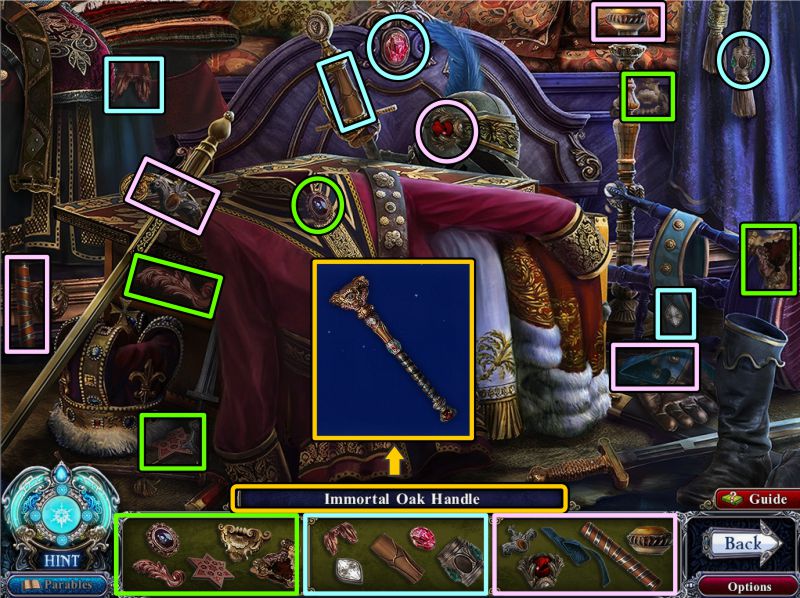
Play the Hidden Object Scene and go to the Stepmother Room.
Screenshot
Bedroom Hidden Object Scene
The fragments will create the Immortal Oak Handle.
Screenshot
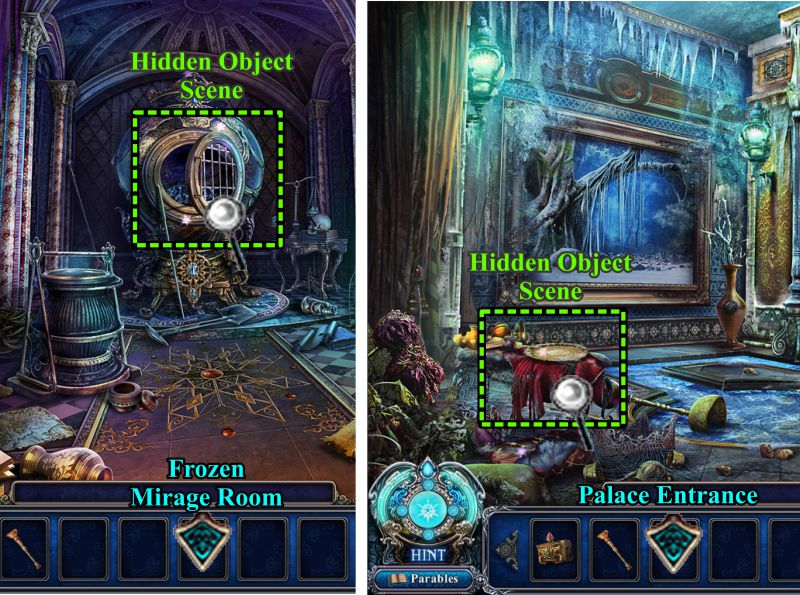
Stepmother Room and Frozen Mirage Room
Play the Hidden Object Scene in each room, then go to the Palace Entrance.
Screenshot
Stepmother Room Hidden Object Scene
Collect the fragments of the Fiery Gemstone.
Screenshot
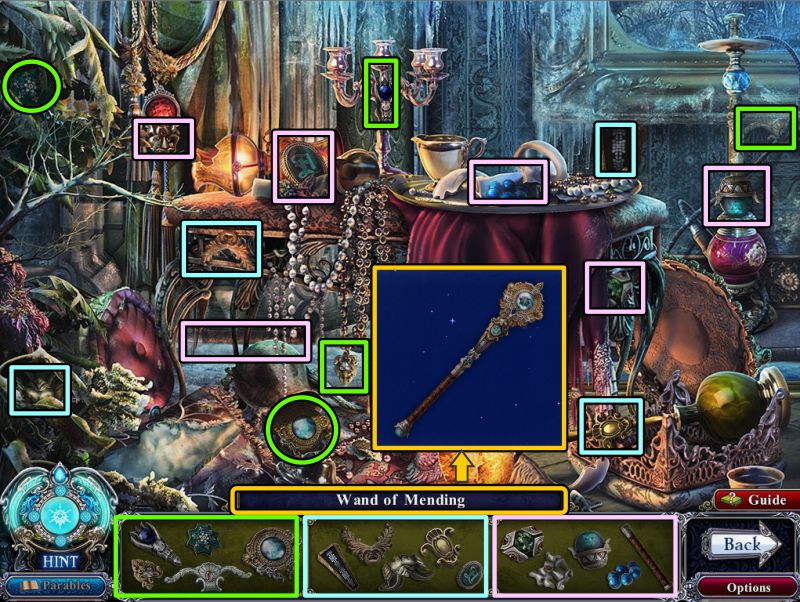
Frozen Mirage Room Hidden Object Scene
Collect all the fragments of the Wand of Mending.
Screenshot
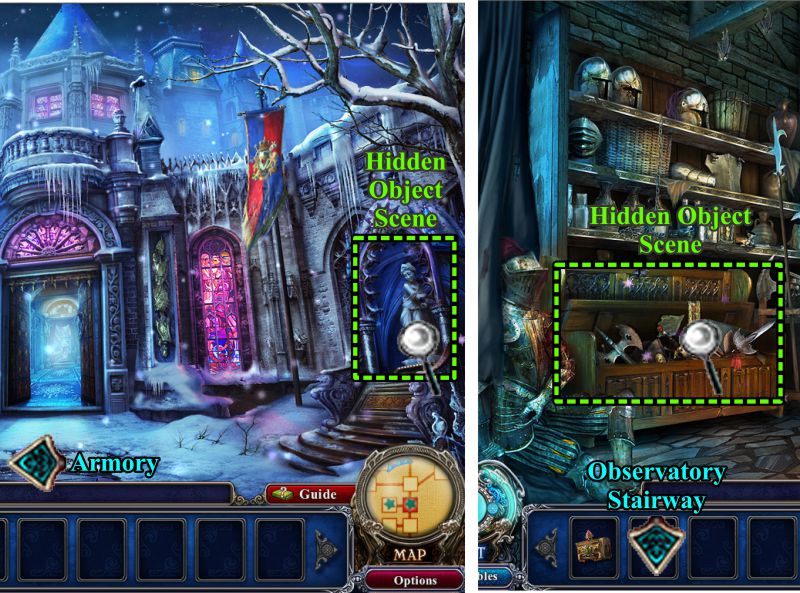
Palace Entrance and Armory
Play the Hidden Object Scenes in both locations, then go to see the King at the Observatory Stairway.
Screenshot
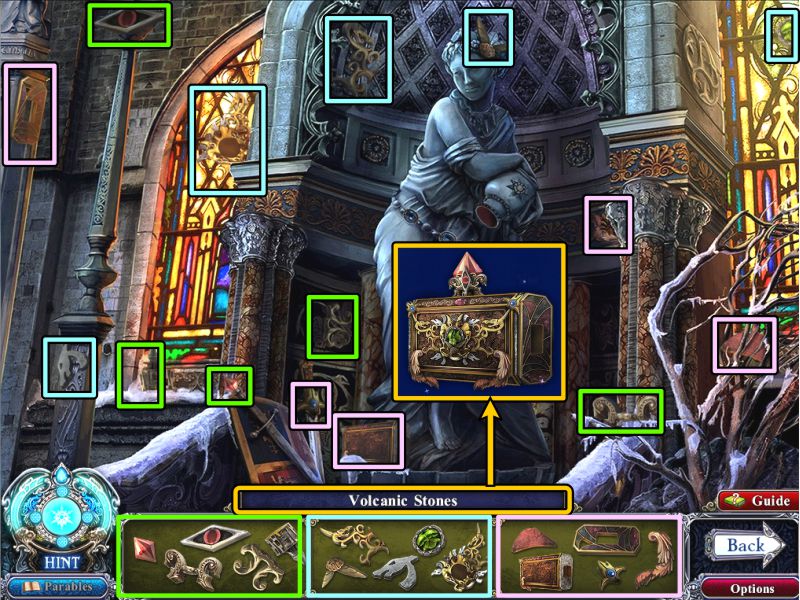
Palace Entrance Hidden Object Scene
Collect all the fragments of the Volcanic Stones.
Screenshot
Armory Hidden Object Scene
A Freezing Sapphire will be added to your Inventory when you collect all the fragments.
Screenshot
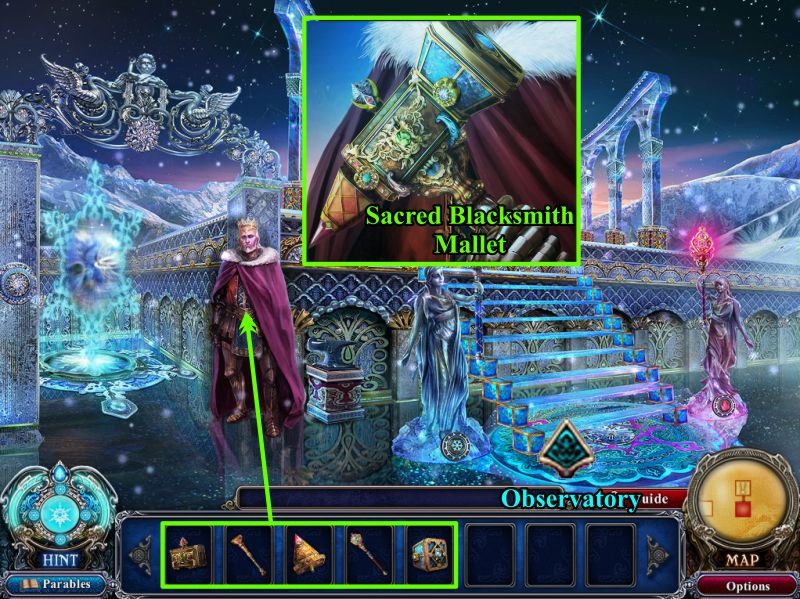
Stairway
Give the 5 items in your Inventory to the King, and he will create the Sacred Blacksmith Mallet.
Take it and go upstairs to the Observatory.
Screenshot
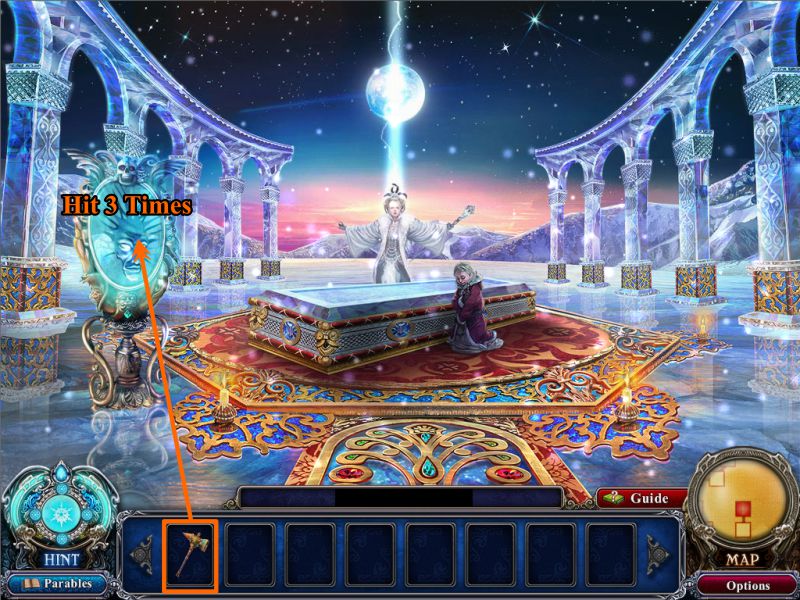
Observatory
Hit the mirror 3 times with the Mallet, and watch the cut scene.
Screenshot
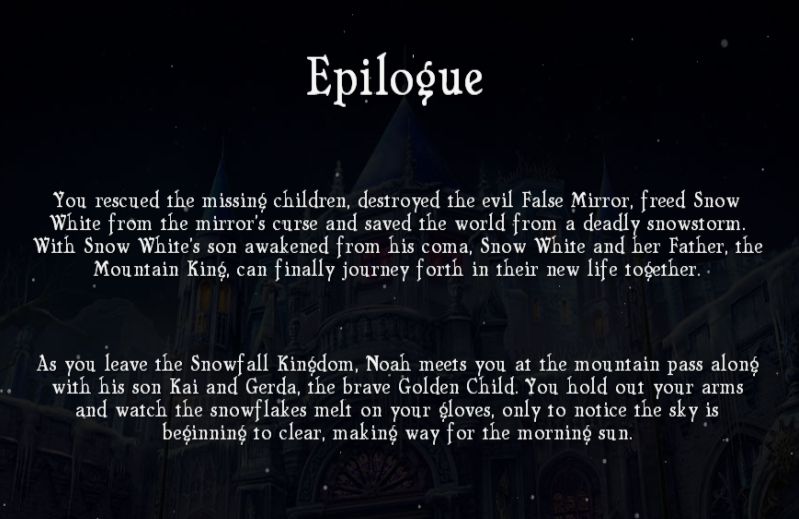
Epilogue
In case you didn't get to read the entire Epilogue, see the screenshot.
Screenshot
Parables
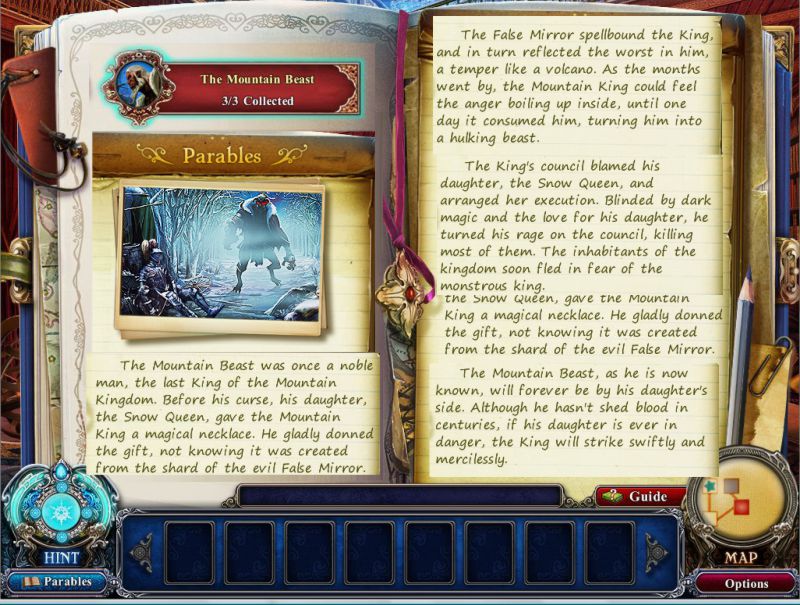
The Mountain Beast
The Mountain Beast Parable explains how the King became the beast.
You can read about it in the screenshot.
Screenshot
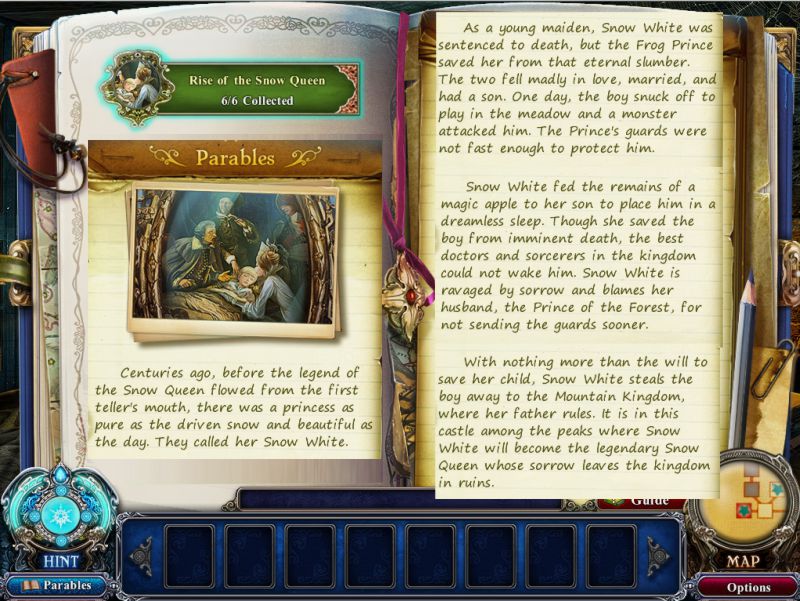
Rise of the Snow Queen
See the screenshot to find out how there come to be a Snow Queen.
Screenshot
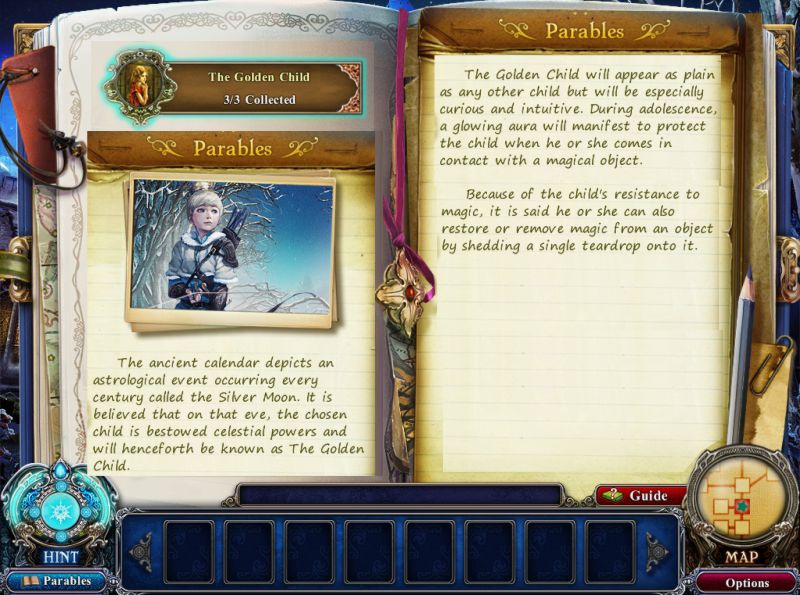
The Golden Child
To find out what a Golden Child is, read the Parable in the screenshot.
Screenshot
Tale of the Two Mirrors
Read the tale about the two magical mirrors.
Screenshot
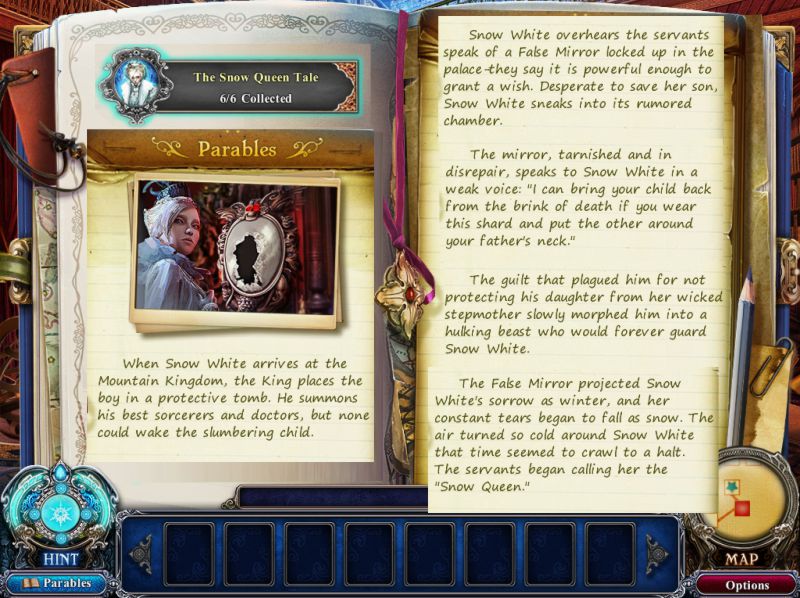
The Snow Queen Tale
This tale explains what happened to Snow White and how she became the Snow Queen.
Screenshot
Read the rest of the Snow Queen Tale.
Screenshot
Congratulations! You have completed Dark Parables: Rise of the Snow Queen. If you purchased the Collector's Edition, you can now play the Hansel and Gretel Bonus Game.
Posted by: Jazz |
December 21, 2011 7:12 PM
|
December 21, 2011 7:12 PM