

Sphera
Platform: Windows
![]() Tess is looking for an escape from her reality, a world where she is overcome by fear and loneliness. She is tormented by her older brother who taunts, "You're stupid and weird!" Her father has gone off to war and her mother works in a factory making weapons. Tess spends most her time alone until the day she picks up a mysterious orb and is transported to Sphera, a new puzzle-heavy hidden object adventure by Sandlot Games.
Tess is looking for an escape from her reality, a world where she is overcome by fear and loneliness. She is tormented by her older brother who taunts, "You're stupid and weird!" Her father has gone off to war and her mother works in a factory making weapons. Tess spends most her time alone until the day she picks up a mysterious orb and is transported to Sphera, a new puzzle-heavy hidden object adventure by Sandlot Games.
 When frightened Tess first arrives in Sphera, she meets Zuchary, a walrus-like king who assures her of his help while explaining: "This world was created by the dreams of ones like you, the dream world of the forgotten children . . . You cannot go home until you confront your strongest fears." Tess has to promise him she'll continue no matter how difficult things seem. At that moment, you'll know you're in for a formidable and wondrous odyssey.
Navigate through the mesmerizing world of Sphera, gathering objects and clues as you go, by the click of your mouse. Zuchary, true to his word, will provide hints in both casual and expert modes of play. In casual mode, you'll be given the additional assistance of cursor icons that indicate graspable items and interactive areas, no penalty for random clicking in hidden object searches, a sixty-second hint recharge and the ability to skip puzzles. On the other hand, if you're looking for increased challenge, expert mode has a slower hint recharge and none of the additional support given to casual.
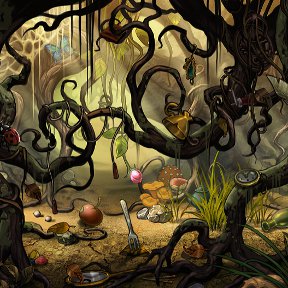
 You'll join Tess as she confronts nightmarish scenes of child-sized skeletons, monsters threatening to devour her, and dungeons of trapped souls along with imaginative daydreams such as a bee with a mechanical unicorn, a room covered in gold leafing, and an Escher-esque hedge maze. Alternating from beautiful childhood fantasies to twisted fears and dystopic visions, every scene in Sphera is a gorgeous piece of art, mostly hand-drawn with intricate details and an atmospheric soundtrack that is perfectly paired to each environment.
Analysis: Sphera contains a generous blend of puzzles and hidden object scenes to keep you actively engaged throughout your adventure. The puzzles do not lean too heavily on any one device and are comprised of: jigsaws, physics, sliders, and matching puzzles plus item-combining and rebuilding tasks. None are overly challenging yet each puzzle is uncommonly interesting and aesthetically pleasing in a style that's reminiscent of the Drawn series (the most recent of which, Drawn: Trail of Shadows, was just released). When you complete a puzzle, you are rewarded with even more intriguing animations, special effects and new scenes which make progressing through Sphera a captivating experience.
 It's necessary to note that, although the protagonist is a child, the story contains disturbing subject matter and complex concepts making Sphera a mature-themed game. Yet, seeing as Tess learns self-esteem and how to conquer fear on her journey, Sphera manages to have a positive, uplifting message. You can't help but feel good when Tess beams, "I actually did it!" Because of this, disappointment might hit when you reach the finale.
Many of the opening scenes foreshadow what's to come but the twist ending is still a disconcerting jolt: it's curt and dark as well as a bit vague and unexplained. By this point in the game, though, you are thoroughly immersed in Tess' world of Sphera and most likely longing for more. That's not necessarily a bad thing, just a sign of how engrossing this game can be. Sphera is of average-length for hidden-object/puzzle adventures and it goes even further in its impact. Sphera's originality, unique artwork and fantastical scenery far outshine any shortcomings it might have. Playing Sphera is well worth the experience, just be sure to have a cheerful something or other standing by for when you're done. No wonder Tess is hugging that cuddly teddy so tightly.
![]() Windows:
Windows:
Download the demo
Get the full version
![]() Mac OS X:
Mac OS X:
Not available.
Try Boot Camp or Parallels or CrossOver Games.


Walkthrough Guide
(Please allow page to fully load for spoiler tags to be functional.)
Sphera Walkthrough
General Information
Casual or Expert?
When you start a new game, you're given the option between two levels of play. Whichever mode you choose, this walkthrough is designed to help you navigate through each scene, solve puzzles, and find objects.
Choose "casual" mode for: more hints, no random click penalty in hidden object searches, a cursor that changes to indicate important areas, and the ability to skip puzzles.
Choose "expert" if you want more challenge: fewer hints, a penalty for random clicking in hidden object scenes, no changing cursor (making it harder to find interactive areas), and no skipping the puzzles.
Navigation
In either mode, an arrow will always indicate where you can move on (or back) to another scene in the game.
Click on the arrow at the bottom of the screen to go back to the previous room.
Click on the doorway or portal (if it's open) to the next room to go forward.
If an area is interactive—such as a puzzle or hidden object scene—clicking on it will open a new window.
In casual mode, your cursor will change into turning gears over an area or item that can be interacted with.
If an item can be picked up, clicking on it will send it to your inventory.
In casual mode, your cursor will change into a grasping hand when you can pick-up an item.
Tips and Hints
If you find yourself stuck, the "Hint" button (Zuchary's icon) will often indicate if you've done all you can in that scene or if there is still more to find.
When a puzzle requires a set of pieces, you must have all pieces before you can begin.
Sometimes you'll need to combine items in your inventory before you can use them.
If you have a lot of items in your inventory, use the arrows on either side of your inventory box to scroll through.
Check for new items or new puzzles after you finish a task. Something you couldn't pick up before may become available after you solve a puzzle or a hidden object scene.
You will often need to return to previous rooms to find new items or solve more puzzles; if you can't find anything to do in the room you're in, try heading back and exploring previous scenes.
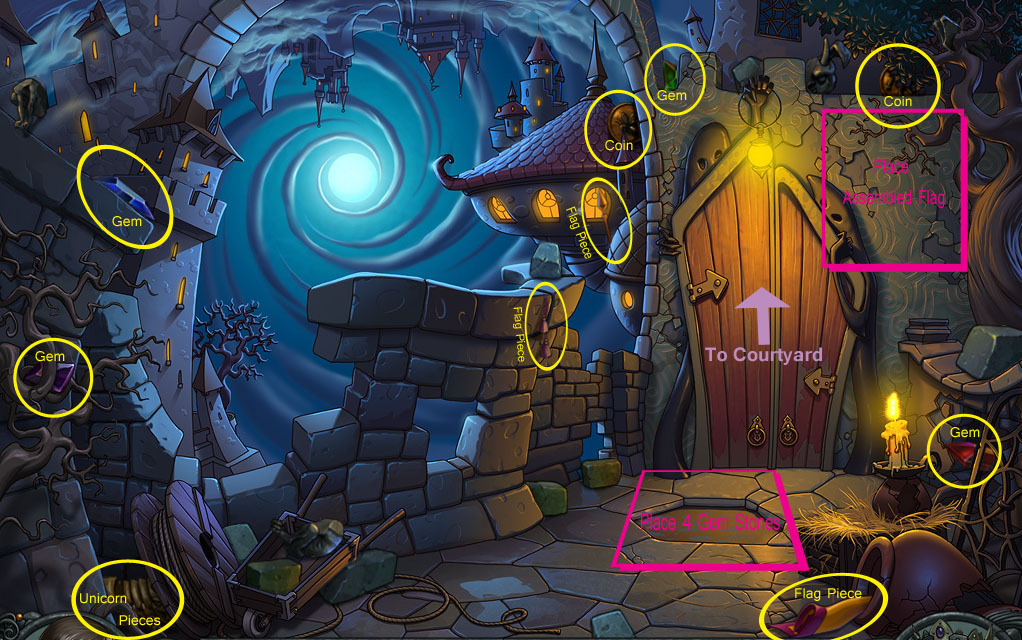
The Castle Exterior: Beginning
Screenshot: castle exterior start of game
Outside the door, you have several items to pick up and a task before you can enter:
4 GEMS.
3 FLAG PIECES.
a UNICORN PIECE.
2 COINS.
Click on the indentation in the pathway before the door; place the 4 GEMSTONES so they fit together in the space provided.
In your inventory, put the flag pieces together until they become an ASSEMBLED FLAG.
Next, lace the ASSEMBLED FLAG on the spot right of the door, just under the leafy tree-limb.
Steps 3 and 4 open the door so you may enter. Go in to the courtyard.
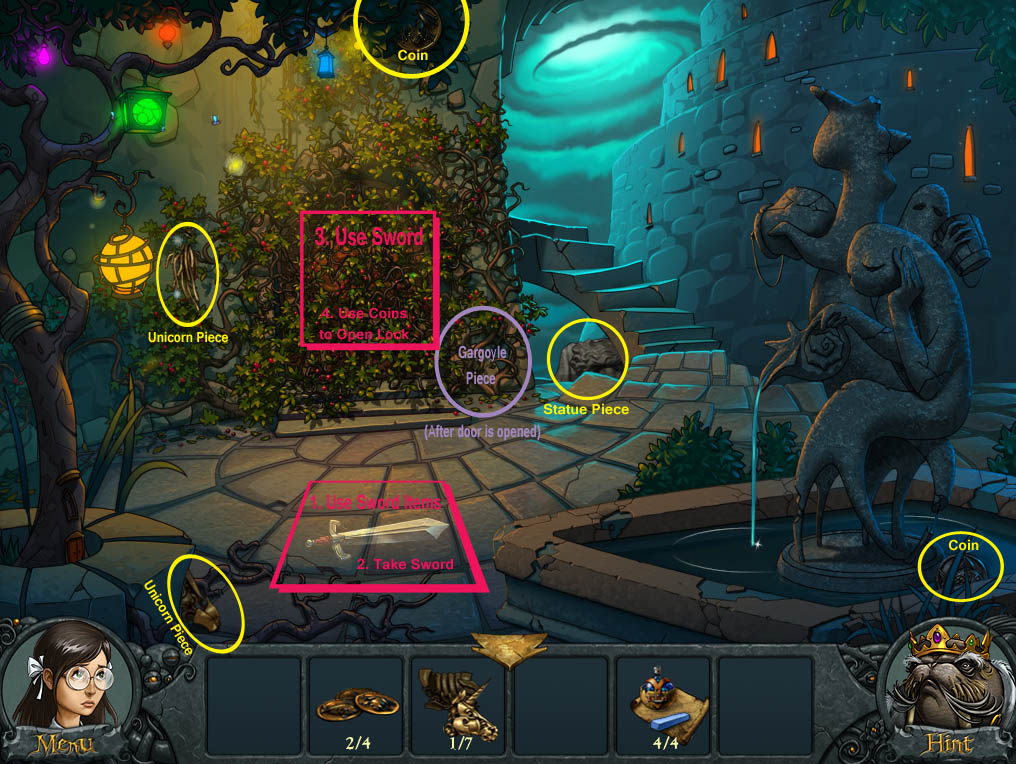
Courtyard: Sword and Unlocking the Door
Screenshot: "Courtyard"
In the courtyard, pick up these items:
2 COINS.
2 UNICORN PIECES.
a STATUE PIECE (under the stairs)
Use the sword items you received at the beginning of the game to make your next tool:
Spread out the PAPER.
Use the CHALK to draw the outline of the sword (keep mouse depressed).
Paint HONEY on it.
Sprinkle GLITTER (click mouse to sprinkle).
Pick up the sword.
Use the SWORD 5-6 times on the vine-covered doorway to reveal the lock-mechanism; then zoom in to solve the puzzle, using the 4 COINS to solve the puzzle. Put in the coins in this order:
First, place the FROG above the fly.
Then, place the FISH above the frog.
Next, the MAN above the fish.
Finally, the BEE over the man.
Solving the lock-mechanism will open the door, but before you can go through it, you'll need to pick up a few more items here and at the castle exterior:
Pick up a GARGOYLE PIECE on the right side of the door.
Go back to the Castle Exterior.
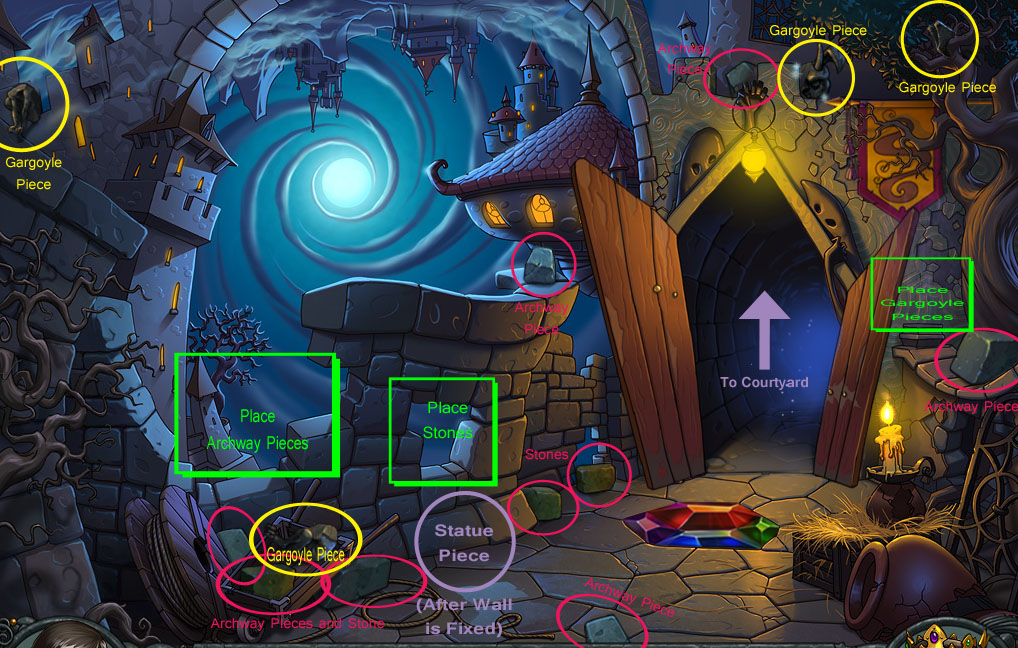
Castle Exterior — Gargoyle and Wall Rebuild
Screenshot: Rebuilding the Wall
Replacing the Gargoyle:
Pick up 4 more GARGOYLE PIECES.
Click just above a little pedestal on the wall to the right of the castle door, to bring the Gargoyle's Pedestal into closer view.
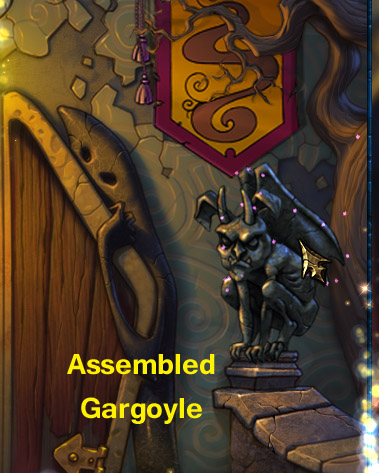
Assemble the pieces in order to produce a completed Gargoyle.
Screenshot: Assembled Gargoyle
When the Gargoyle is completed, you'll need to also repair the wall:
Pick up 3 STONES.
Pick up 6 ARCHWAY PIECES.
Click on the broken wall section to replace the STONES and ARCHWAY PIECES, repairing the wall.
After the wall is repaired, a STATUE PIECE will appear at its base; pick it up then go back into the Courtyard.
Courtyard: Opening the "Bee and Unicorn" Door
Screenshot: Courtyard
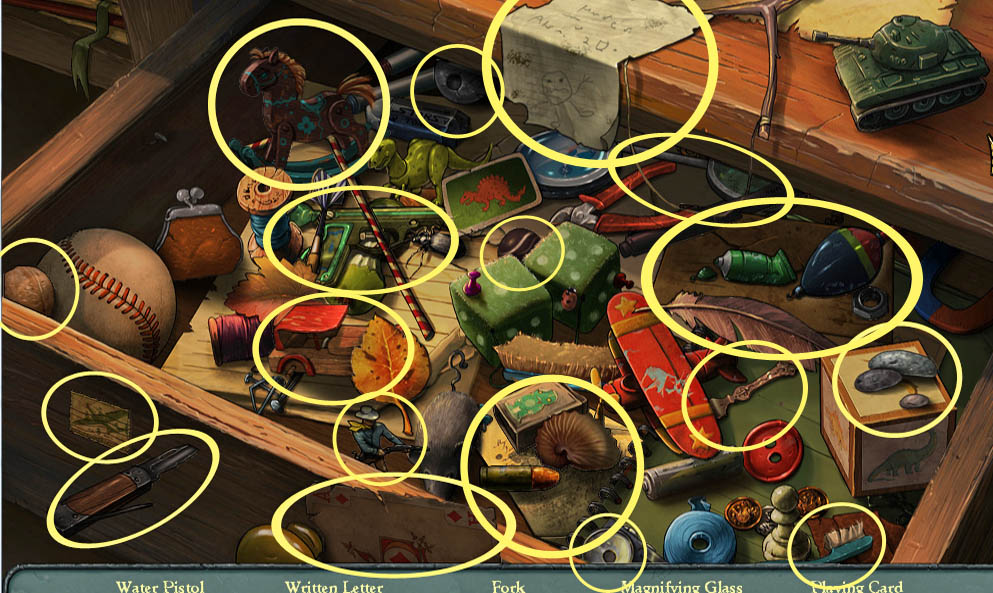
Click on the tree in the upper left-hand corner to begin a Hidden Object Search:
Screenshot: Hidden Objects Circled
Find all the objects to receive a CLOCK BELL and a METAL BAR.
Once you've found all the hidden objects, the door to The Bee and the Unicorn will open. Go on in.
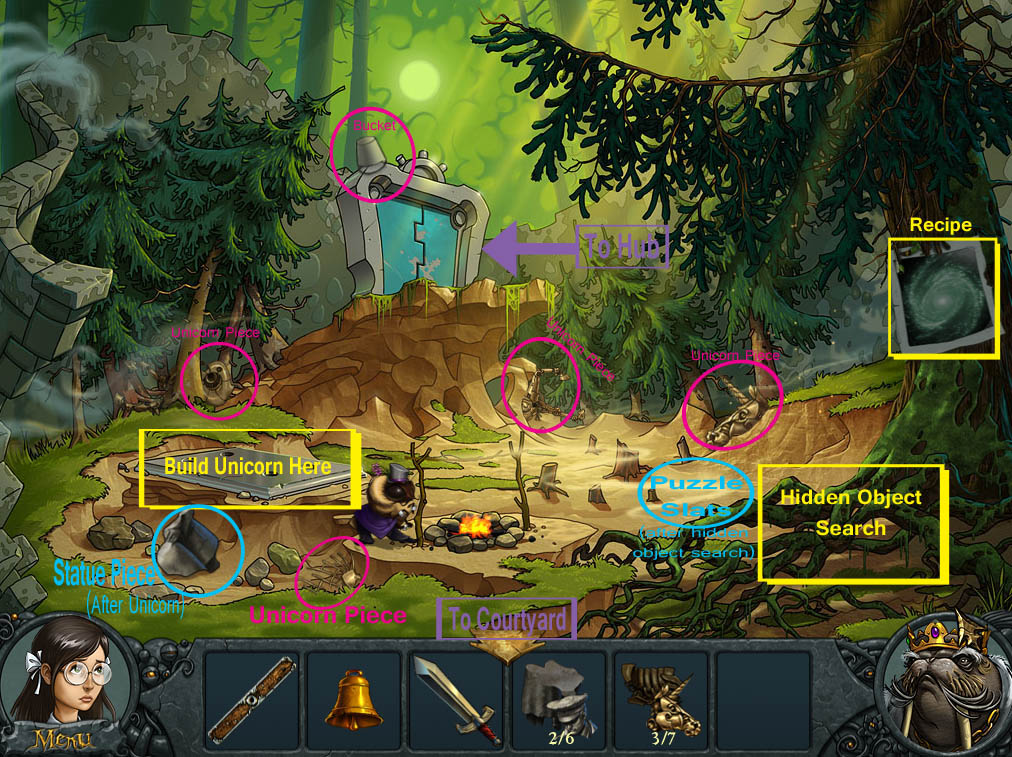
The Bee and the Unicorn
Screenshot: "The Bee and the Unicorn"
Click on the bee to talk to him:
The bee says he lost his unicorn and he needs mushroom soup to remember.
You'll need to gather the ingredients and find the recipe to continue.
Pick up the BUCKET and 4 UNICORN PIECES (you should now have all 7 unicorn pieces).
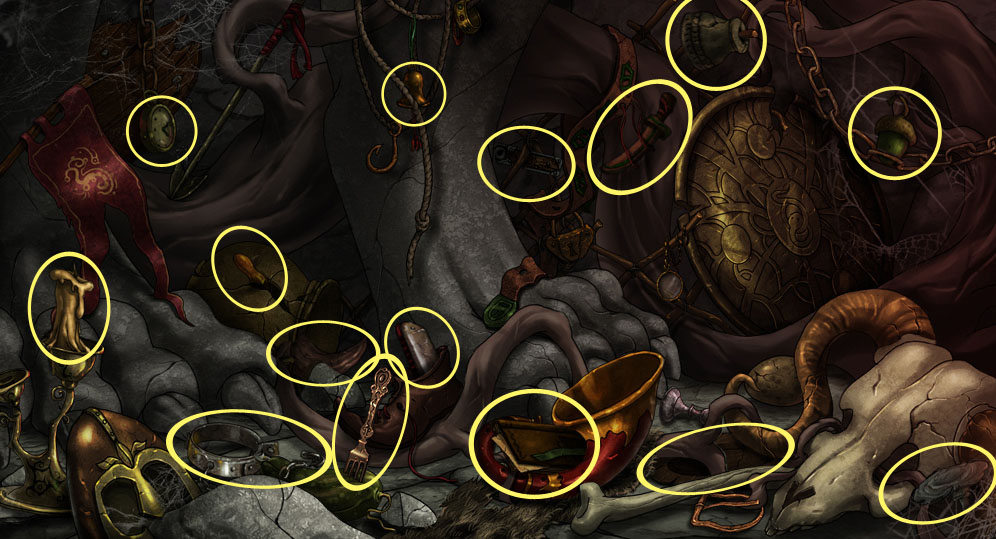
Click on the roots of the big tree (bottom right side of screen) to begin a Hidden Object Search:
Screenshot: Hidden Objects Circled
Find all the hidden objects, and you'll receive ingredients for mushroom soup:
MUSHROOMS, BOWL, PEBBLES, PEPPER, and PINWHEEL
After that, some PUZZLE SLATS will appear by the tree roots; pick them up.
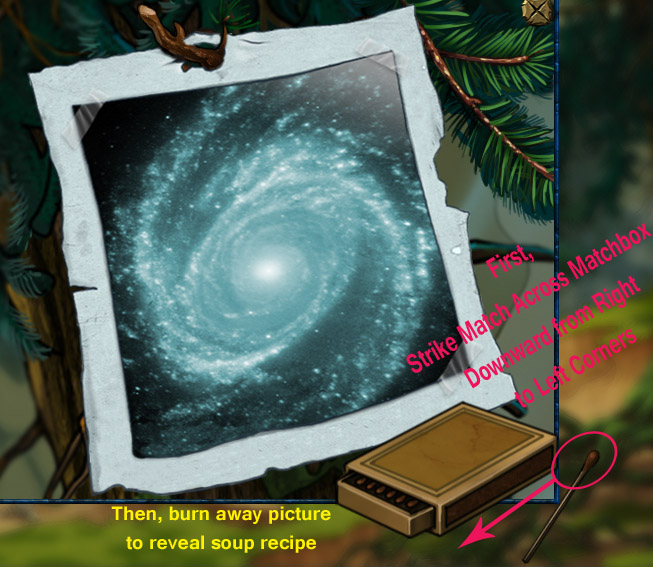
Now you need to make soup for Bee:
Click on the Galaxy Picture posted on the big tree.
Take out MATCHES from your inventory.
Starting at the right corner of the match box, keep your mouse button depressed and move the match downwards to strike it across the edge of the box.
Screenshot: Matches on Galaxy Picture
Lighting the match is a bit tricky on the computer, but do it as if you were really holding a matchbox and match.
Use the lit match to burn away the galaxy picture and reveal the mushroom soup recipe.
Screenshot: Soup Recipe
Go to the Courtyard.
Use the BUCKET to get water from the courtyard fountain, then return to "The Bee and the Unicorn."
Zoom in on the bee's fire pit and place the BOWL over the fire.
Add the ingredients in the order shown in the recipe:
1st - pebbles
2nd - mushrooms
3rd - pepper
4th - water
5th - use the PINWHEEL to fan the flame: keep your mouse button down until the green bar is full.
When the soup is done, take it and give it to the bee. This will make the BEE join you.
Go to the pedestal to assemble the Unicorn:
Place the UNICORN PIECES on the pedestal.
Build the pieces as they're numbered in your inventory. (If you can't see the UNICORN PIECES in your inventory, click on the arrow at the side of your inventory to scroll over.)
When the unicorn is built, add the BEE to its shoulder. The unicorn will come to life.
Another STATUE PIECE appears at the base of the animated Unicorn; pick it up.
The doorway to the Hub is now open; go through.
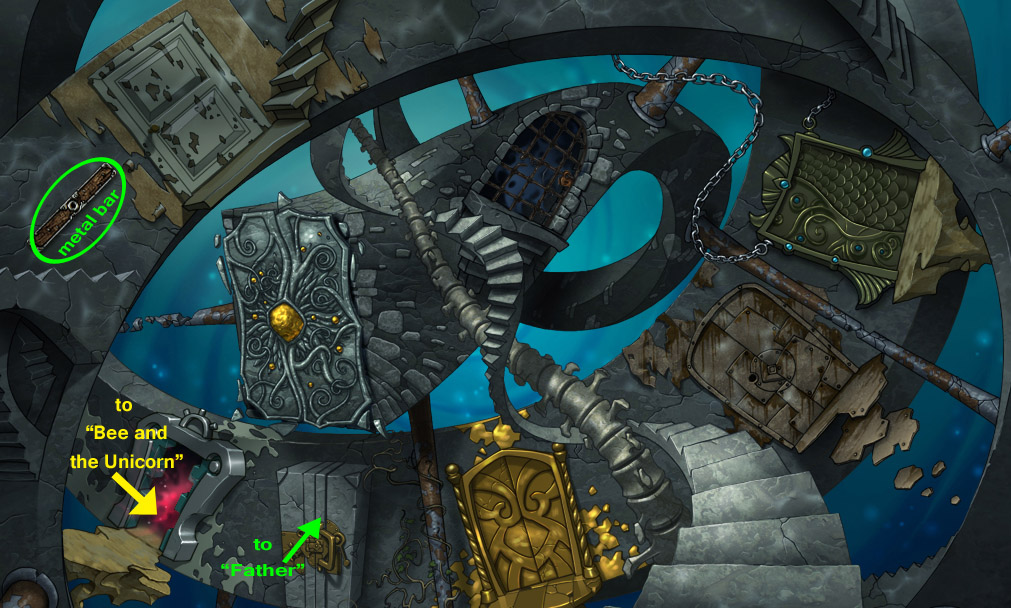
The Hub — Door to "Father"
Screenshot: "Hub" door to "Father"
Take the METAL BAR from upper left corner.
Zoom in on the door next to The Bee and the Unicorn's door to a physics puzzle:
The object of the puzzle is to get the red ball from the top of the screen into the slot at the bottom of the screen.
Place the METAL BARS from your inventory in such a way that the ball will bounce into the slot.
Select the "Rotate" button then use your mouse to turn or slant the bars to the best angles.
Select the "Move" button to change the placement of the bars on the slate.
Hit the yellow button when you're ready to release the ball; you can re-adjust and repeat as necessary.
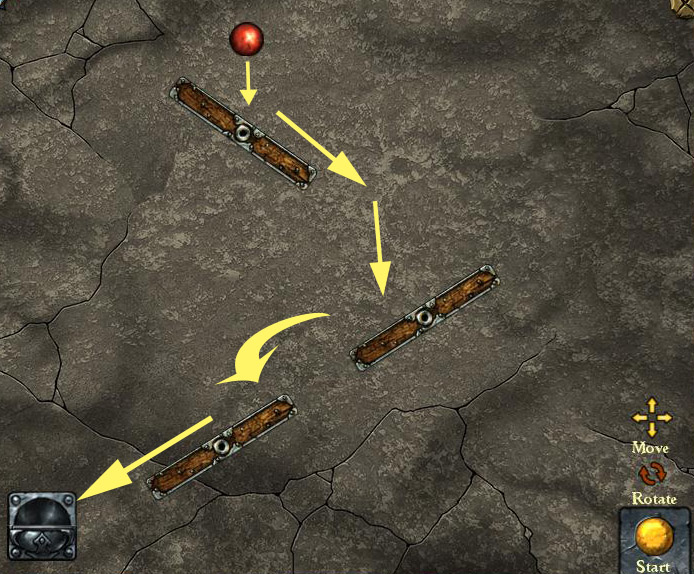
Screenshot: Door Puzzle Solution
Successfully completing the puzzle will open the door to the next room; go on in.
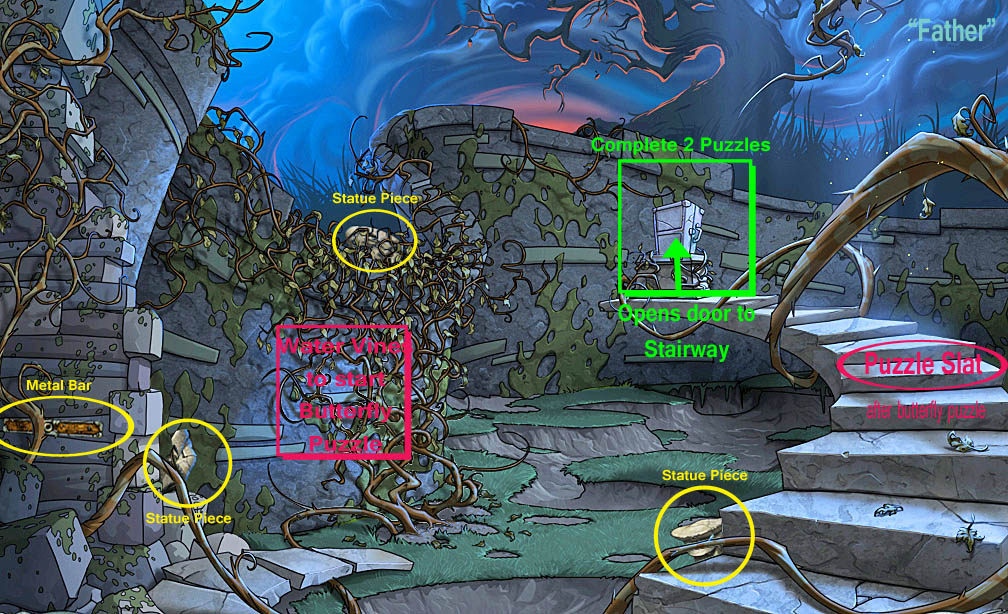
Father
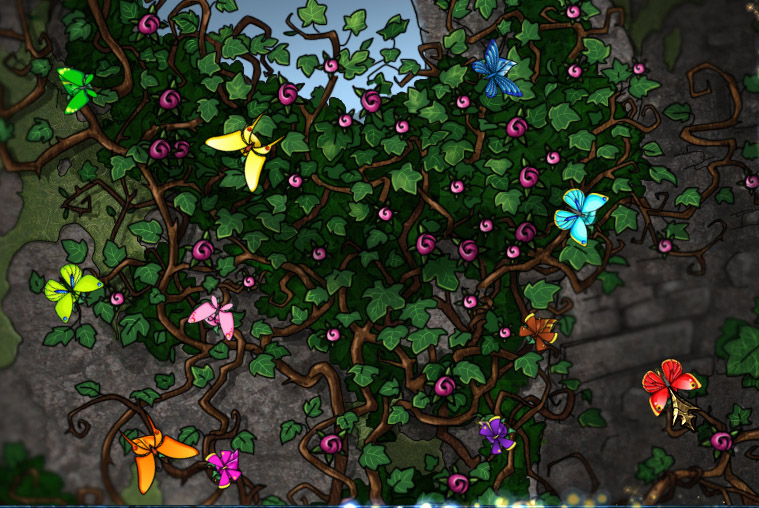
Screenshot: "Father"
Pick up a METAL BAR hidden along the left side of the wall.
Find and pick-up 3 STATUE PIECES.
Click on a spot near base of the vines, then use a BUCKET OF WATER from your inventory to make the vines bloom.
The blooming vines will attract butterflies; click on them again to start another mini-game:
The object is to match each butterfly to its corresponding flower according to color.
First click on a butterfly to capture it then click on its matching flower.
If you correctly pair a butterfly to its flower, the butterfly will stay on it.
Screenshot: Butterflies Solution
After the butterflies are all paired to their flowers, another PUZZLE SLAT appears on the middle step; pick it up.
Click on the suitcase at the top of the stairs to start two more puzzles:
Place the STATUE PIECES in order on the base of the statue (they're numbered in your inventory).
Screenshot: Father Statue
When the statue is complete, the window will close and another puzzle is ready.
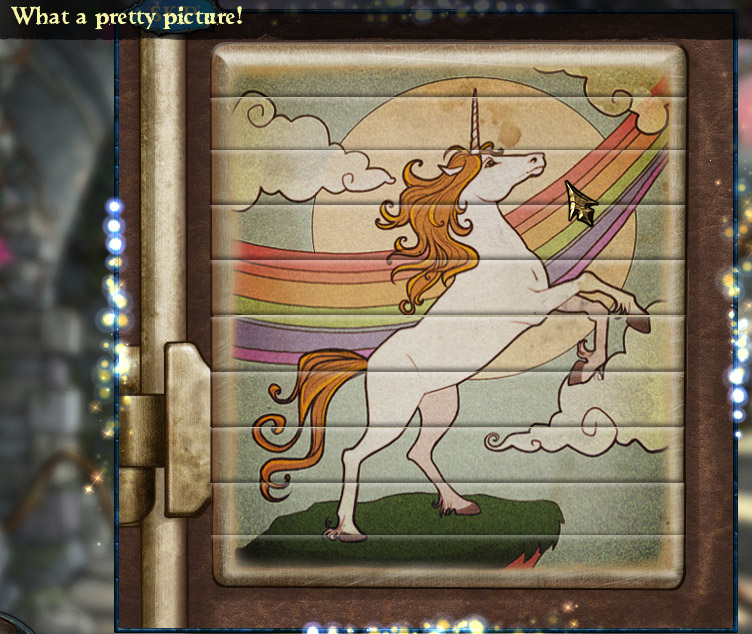
Click on the suitcase again to begin:
Add the 2 missing PUZZLE SLATs from your inventory to begin the puzzle.
Re-arrange the slats to form a picture of a unicorn.
Click on a slat then click on the spot to where you want to move it.
Screenshot: Puzzle Slats Solution
When the picture is complete, a door to the STAIRWAY will open; go in.
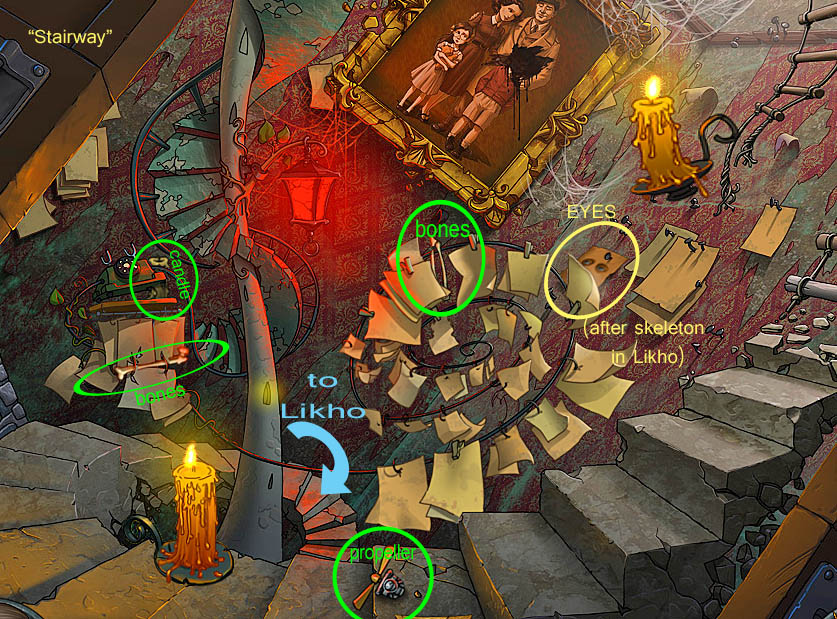
The Stairway
Screenshot: "Stairway"
Pick up a few items before continuing:
CANDLE
2 BONES
a PROPELLER
Head down the stairs to "The Likho".
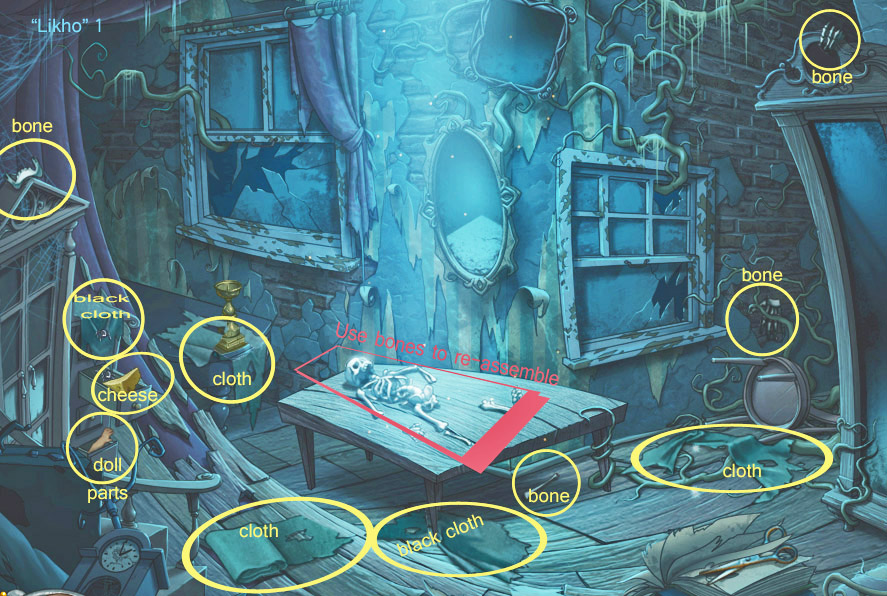
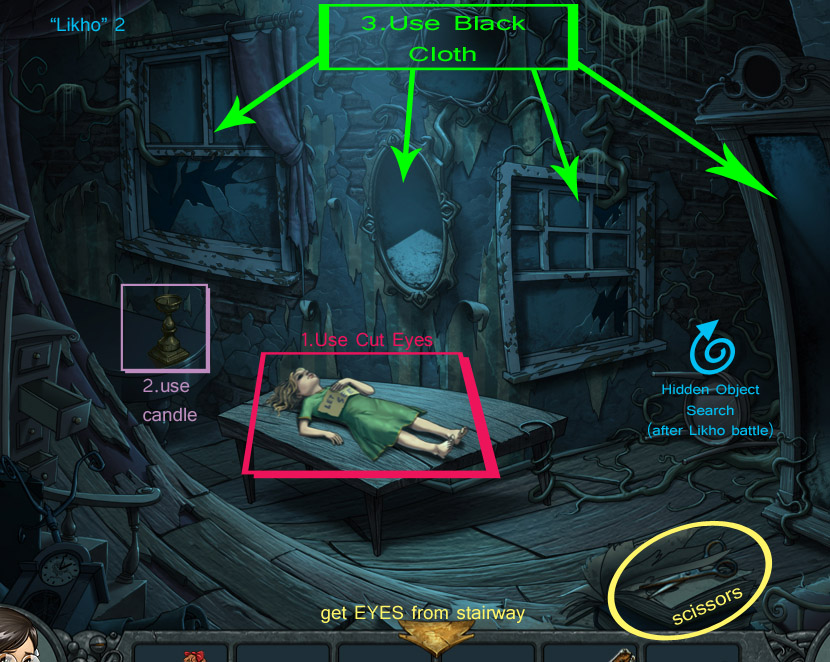
The Likho
Screenshot: "Likho" Part 1
There are many items to pick-up here:
4 BONES
5 pieces of BLACK CLOTH
A DOLL PIECE
CHEESE
When you've collected everything, click on the skeleton on the table to begin another puzzle:
Put the pieces together to form a proper skeleton.
Pick up a bone in your inventory by clicking on it then move it to the spot where you want to place it and click again.
When properly assembled, the skeleton turns into a little girl without eyes: "Let me see."
Grab the SCISSORS that are now available.
Go back into "Stairway" to find a picture of EYES (just under floating candle on the right); then return to "Likho".
Click on the girl again to put her eyes on.
Open the EYES AND SCISSORS in your inventory.
Click on the scissors, then on the eyes to cut them out.
Take the CUT EYES and place them on the girl's empty sockets.
This causes the girl to sit-up and tell you an important clue.
Screenshot: "Lihko" Part 2
Now you need to cover all the windows and mirrors. To do this:
Click on a mirror or window to view it more closely.
Then select strips of BLACK CLOTH from your inventory that best fit the particular mirror or window that you're trying to cover.
Repeat this four times until all mirrors and windows are covered.
Now light is needed in this dark room:
Take the CANDLE out of your inventory and place it in the candle sick (just under the left window).
Find the MATCHES in your inventory; select one.
Strike the match along the matchbox, from top right to bottom corner, keeping your mouse button depressed as you do so.
Once you light the candle, a monster, The Likho, jumps out at you.
Screenshot: fighting the Likho
The monster will hide, then peek out at you from random spots around the room.
Each time the monster appears, quickly slash at it with your sword before it hides again. One of five ill-looking purplish hearts will disappear each time you successfully attack the monster.
Defeat the monster by successfully slashing it five times.
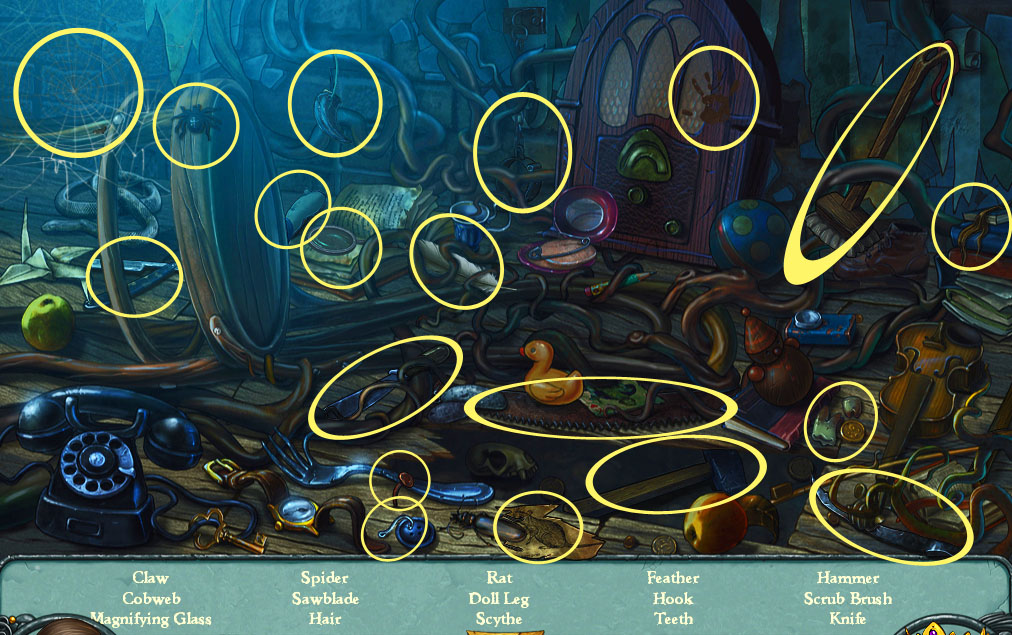
When you finish the battle, a hidden object scene becomes available; click near the floor mirror to begin:
Screenshot: Hidden Objects
Find all the hidden objects in the scene to earn:
a DOLL PART and
a SCRUB BRUSH.
The door to the next room will open up.
Go out to "Gold Room".
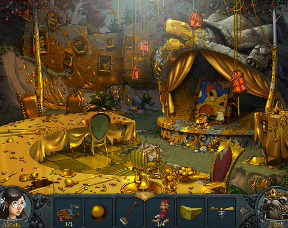
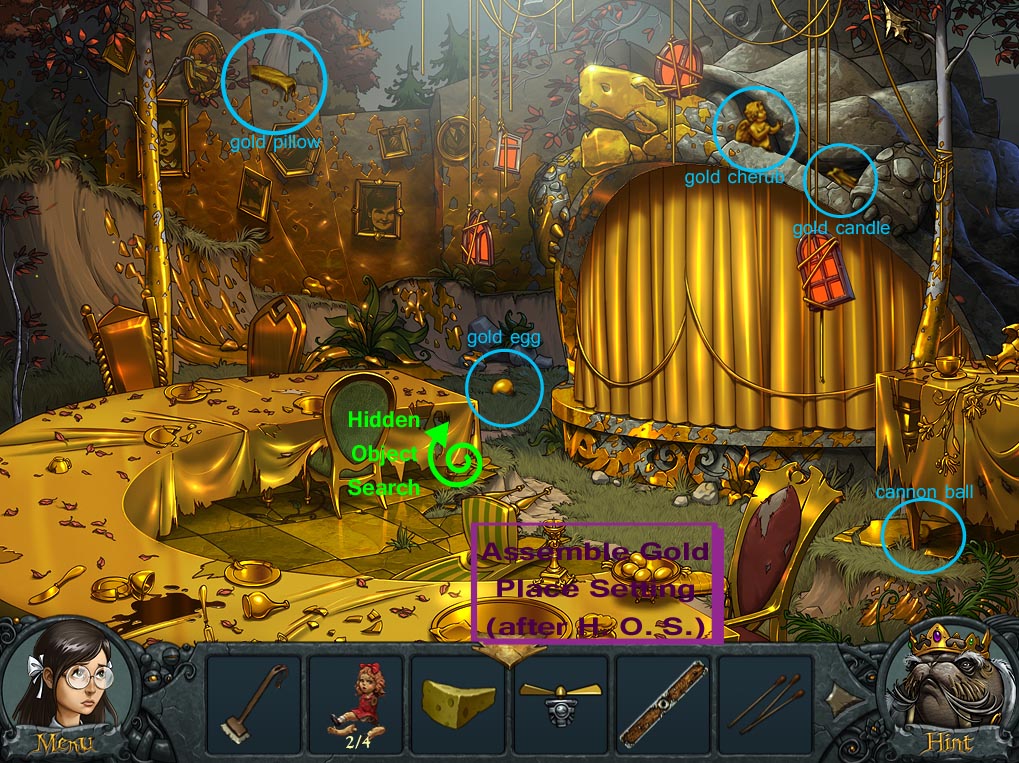
Gold Room
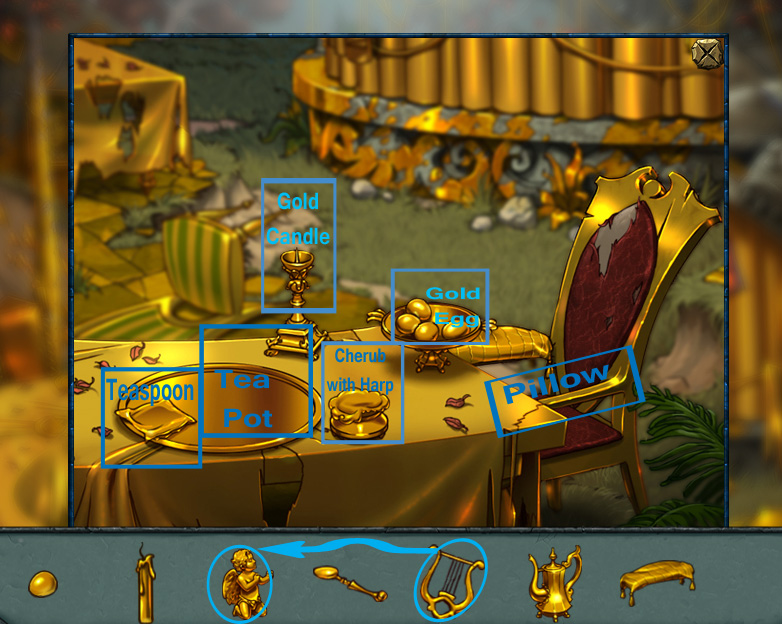
Screenshot: "Gold Room"
Collect several items from around the room:
GOLD CANDLE
GOLD CHERUB
GOLD EGG
GOLD PILLOW
CANNONBALL
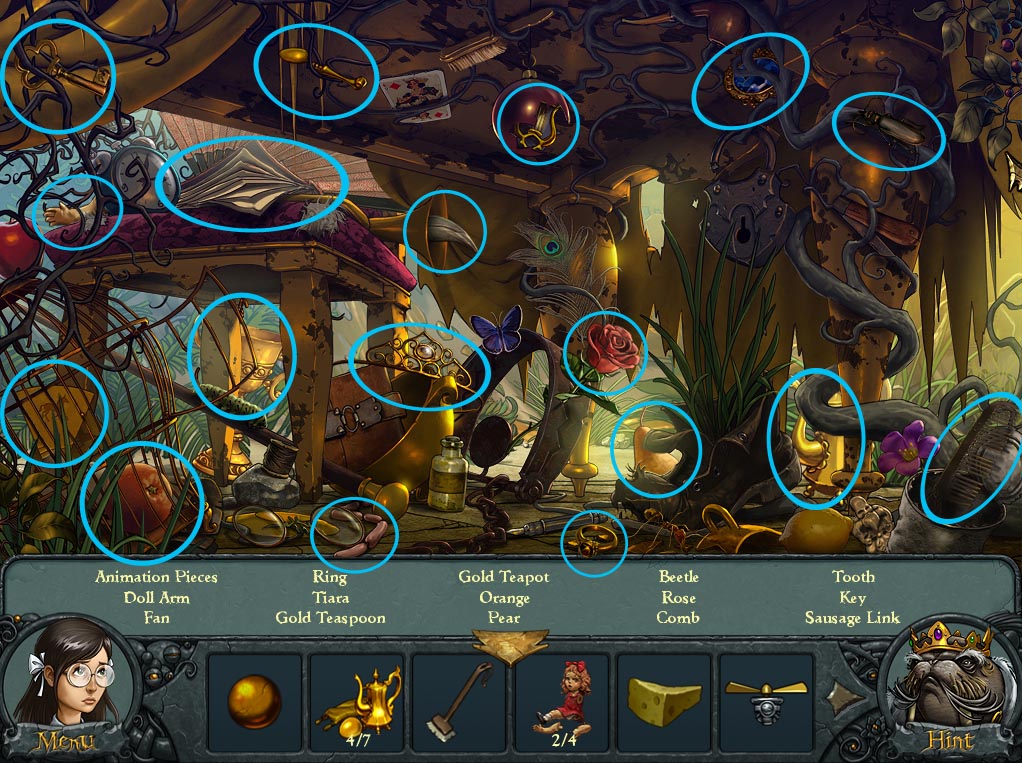
Then click on far corner of the table (near a green chair) to start a new Hidden Object Search:
Screenshot:Hidden Objects
Finding all the hidden objects you'll be rewarded with:
2 ANIMATION PIECES
SAUSAGE LINK
DOLL ARM
a GOLD TEASPOON, GOLD HARP and GOLD TEAPOT
Click on the gold tray on the near end of the table (by the red chair) to start another puzzle:
Open the GOLD PIECES in your inventory.
Give the HARP to the CHERUB.
Then place the CHERUB WITH HARP on its stand on the table.
Put the EGG on the egg plate; the CANDLE on its holder, the PILLOW on the chair's arm, the TEASPOON on the napkin (on the tray) and the TEAPOT on the tray.
Screenshot: Gold Table Settings
When all of the gold pieces are in place on the table, the stage's curtain will open slightly.
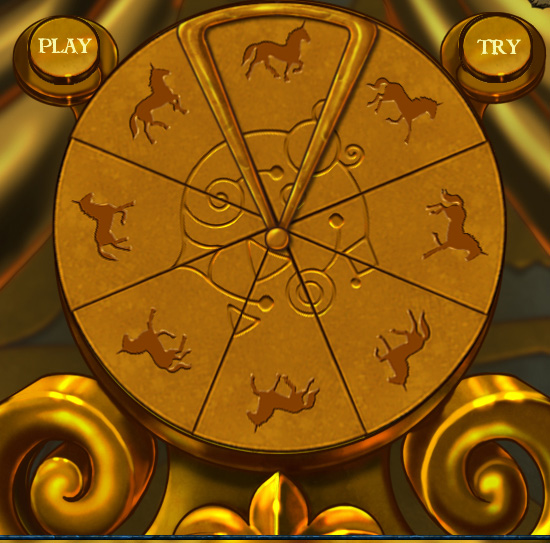
Click on the dial in the curtain opening to start a new puzzle:
Add your ANIMATION PIECES to the puzzle.
Arrange the pieces so that, when the wheel turns, the unicorn will appear to gallop smoothly.
The center design gives a clue as to the order.
Move a piece by clicking on it, then clicking on the spot where you want it to go.
Click the "TRY" button to test the order.
Click "PLAY" when you have the animation pieces properly arranged.
Screenshot: Animation Solution
Correctly solving the Unicorn Animation Puzzle will open the stage all the way.
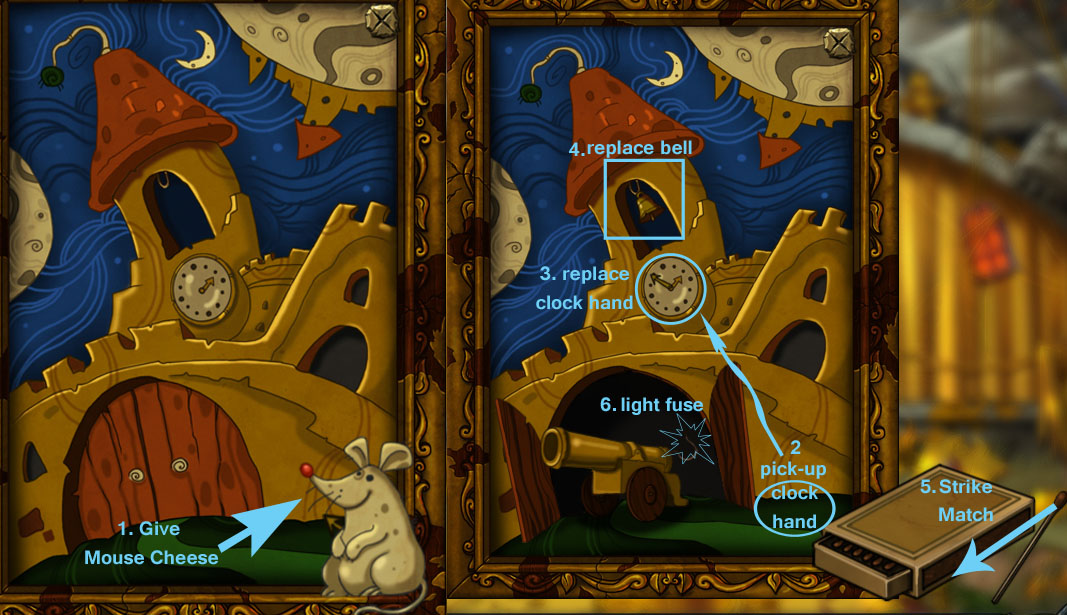
Now click on the painting to start another puzzle:
Screenshot: Castle Painting
First, give the mouse CHEESE to make him go away.
Pick up the CLOCK HAND on the green where the mouse once stood.
Place the CLOCK HAND on the clock.
Find the CLOCK BELL in your inventory; place it in the clock tower.
The cannon will roll out of the castle gates.
Strike a MATCH on the matchbox to light it, then light the cannon fuse.
The cannon will actually fire, leaving behind a real cannon and a BOTTLE OF WATER on the stage.
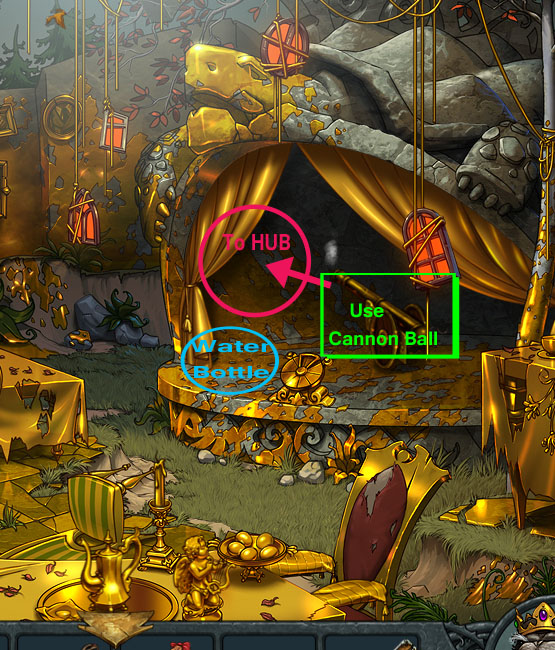
Screenshot: Cannon on Stage
Pick up the BOTTLE of WATER.
Click on the cannon on stage...
Find the CANNON BALL in your inventory and put it in the cannon.
Strike another MATCH.
Light the cannon's fuse.
The cannon will blast a hole in the tent, opening a new pathway to "The Hub."
Exit the room to "The Hub."
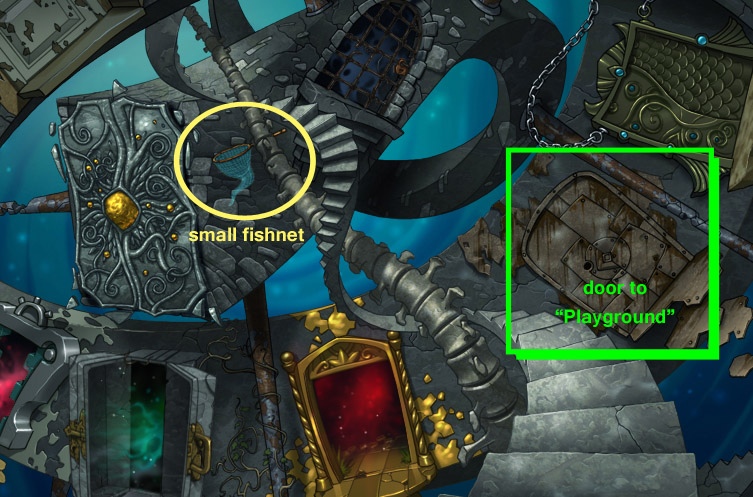
The Hub — door to "Playground"
Screenshot: Hub - door to "Playground"
Pick-up the SMALL FISHNET (about half-way up the spine).
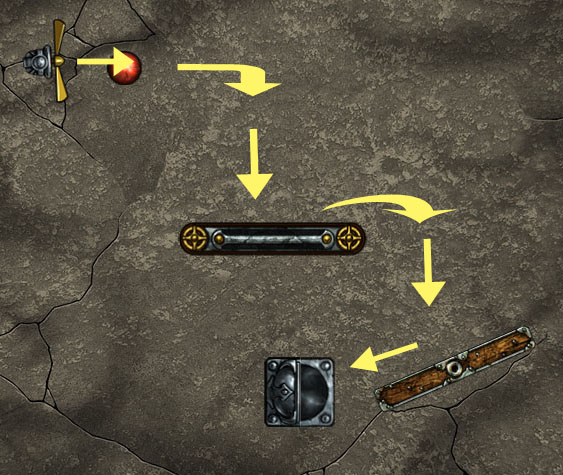
Click on the rusty iron door to begin another physics puzzle:
Find the PROPELLER in your inventory and place it on the game board, just left of the red ball.
Next, place the METAL BAR on the board to the right of the cup.
Use the "Move" and "Rotate" buttons to adjust the propeller to blow the ball toward the right, then adjust the metal bar so it slants up, pushing the ball into the cup.
Press the start button to begin; if the ball doesn't go in the cup, you can make further adjustments until it does.
Screenshot: Puzzle Solution
Successfully solving the puzzle will open the door to "The Playground." Go in.
The Playground
Screenshot: "Playground" Part 1
Pick up the:
PIECE FOR TOY
STRAW
LADDER
Click on the doll that's hanging upside down in the tree...
Drag the LADDER from your inventory to under the tree.
Take the DOLL (now you have all four doll parts).
Open the DOLL PARTS in your inventory and assemble the doll.
Zoom in for a closer view of the bookshelves:
Place the DOLL on the top shelf. This causes a new hidden object area to be added to the scene.
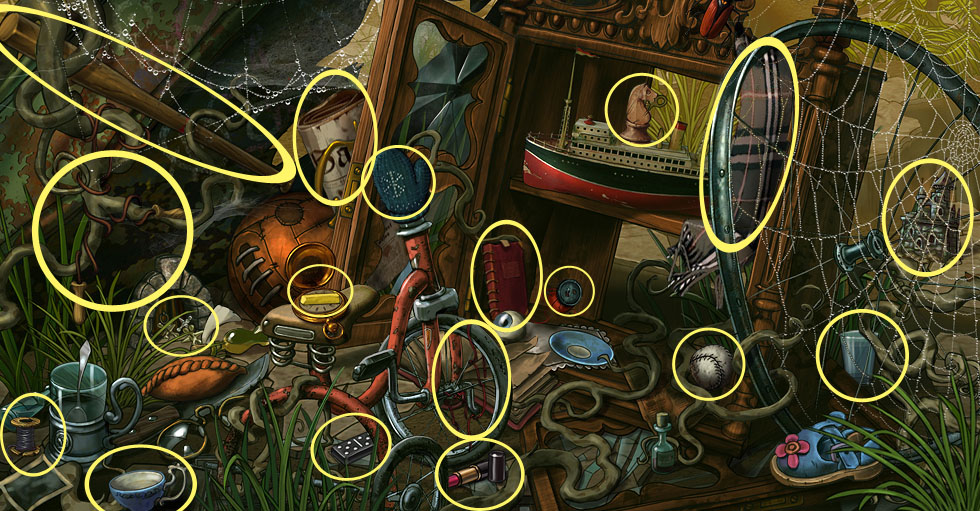
Click the area under the slide to open the Hidden Object Search:
Screenshot: Hidden Objects
When you find all the hidden objects, you'll receive. . .
TOY CASTLE, GLASS OF WATER, and THREAD.
Two new puzzles will also appear in the room:
a fish floating in a inky bowl will appear on the front right corner,
and a table with a drawing pad shows up under the far window.
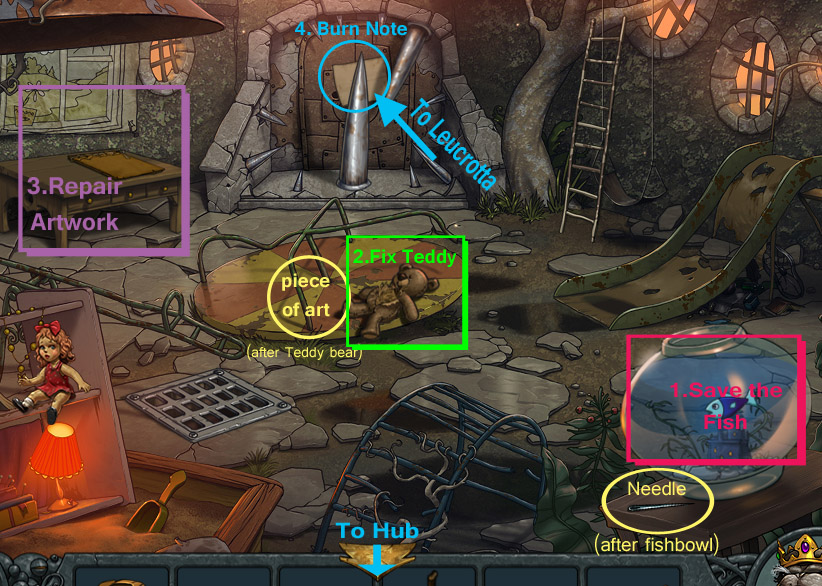
Screenshot: "Playground" Part 2
Take a closer look at the fishbowl:
Use the SMALL FISHNET to rescue the poor fish from the ink-filled bowl.
Open the FISH AND GLASS in your inventory; put the fish into the glass of water.
A bit further in your inventory is a SCRUB BRUSH; use it on the fish bowl two times to thoroughly clean it out.
Next, place the TOY CASTLE into the fishbowl.
Then get your BOTTLE OF WATER and pour that into the bowl.
Finally, put FISH IN GLASS. She'll happily swim around in her fresh home.
After you help the fish, one of the spikes that block the far door will disappear and a NEEDLE will appear next to the fishbowl; pick it up.
Zoom in on Teddy; he needs repairs, too:
Using the STRAW, re-stuff the teddy bear.
Put the NEEDLE with the THREAD in your inventory, then use the NEEDLE AND THREAD to sew up Teddy.
After you sew up the teddy bear, another set of spikes disappear from the door and a PIECE OF ART will appear next to Teddy. Take it.
Screenshot: "Playground" Part 2
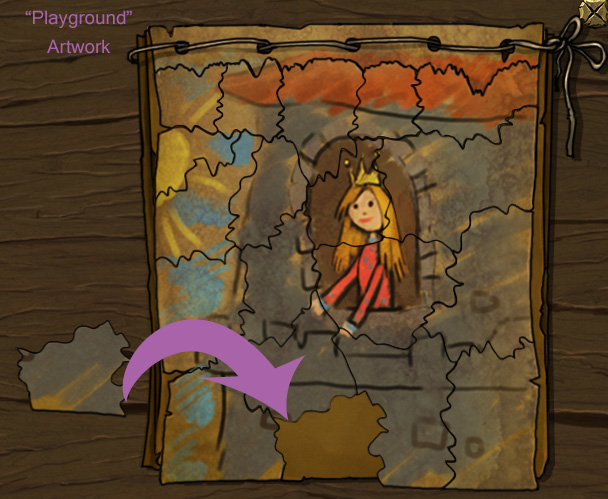
Click on the table under the far window to begin another puzzle:
Your goal is to arrange the torn pieces of the drawing until the picture is whole.
Add the PIECE OF ART from your inventory to the drawing pad.
To move an art piece, click on it, then drag it to the spot where you want it to go, keeping your mouse button depressed. The pieces do not turn.
The edges of the picture do not match the edges of the drawing pad.
The pieces lock into place only when they're connected to the top portion of the drawing (tied onto the top of the pad), so it's easier to work from the top down.
Screenshot: Picture Solution
When the picture is complete, another big spike disappears from the door.
Click on the door to read a warning: "You really want to keep going? Not very smart."
Light a MATCH and burn the note away.
This will open the door to "The Leucrotta" — go in.
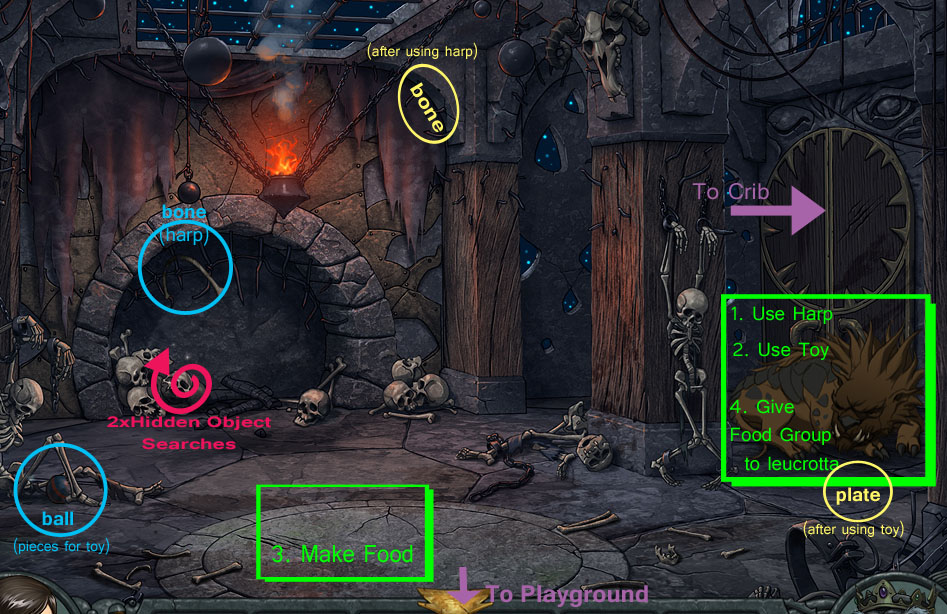
The Leucrotta
Screenshot: "Leucrotta" first time
Pick up two items:
BALL (part of the PIECES FOR TOY)
BONE (part of the HARP)
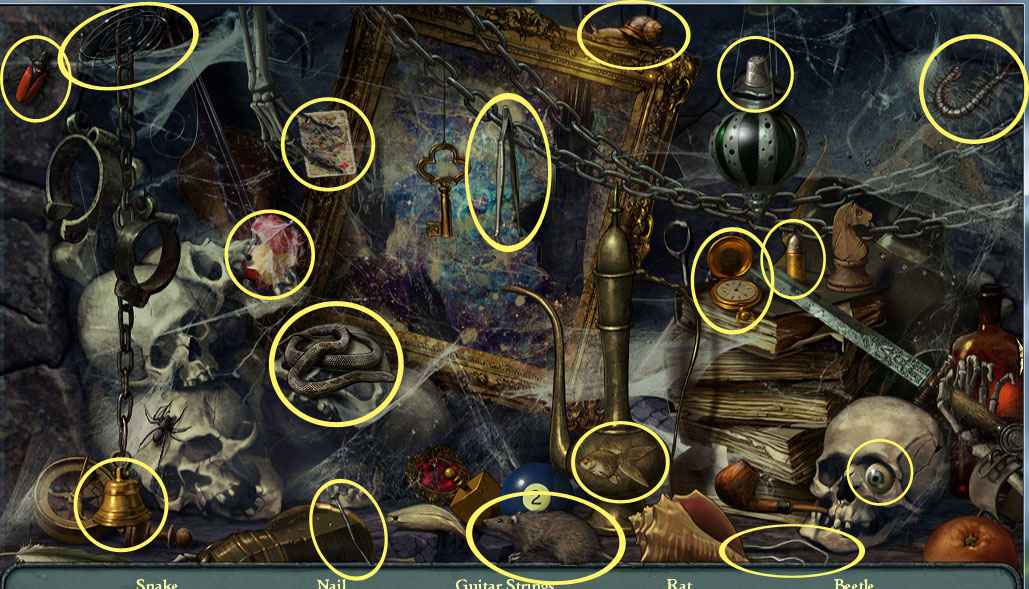
Click on the pile of skulls in the fireplace to begin another Hidden Object Search:
Screenshot: first hidden object search in "Leucrotta"
When you've found all the objects in the search, you'll come away with:
a RUBBER BAND (pieces for toy)
and GUITAR STRINGS (for the HARP).
Now it's time to face the music with the Leucrotta. Click on the beast sleeping by the door on the right:
Open the HARP in your inventory and combine the GUITAR STRING with the BONE.
Use the completed HARP to sooth the leucrotta, to try to lure him from the door.
That doesn't work. Instead, another BONE (pieces of toy) becomes available in a high corner at the back of the room...
Pick-up the new BONE. Now you have all four pieces of a toy for a new game with the Leucrotta:
Open the PIECES FOR TOY in your inventory.
Combine the BONE with the STICK to make an UNFINISHED TOY.
Next, add the RUBBER BAND.
Lastly, put the BALL with the unfinished toy, and you'll have an ASSEMBLED TOY.
Click on the beast again; use the ASSEMBLED TOY to distract him.
The Leucrotta will spit out a PLATE (for making food). Pick it up.
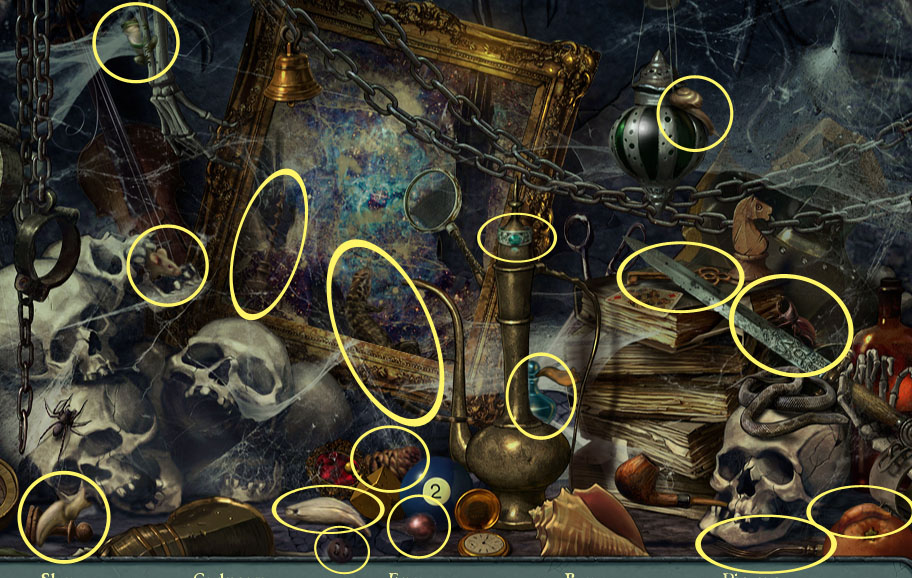
There is now another Hidden Object Search in the fireplace; click on the pile of skulls again:
Screenshot: 2nd hidden object search in "Leucrotta"
After finding all the objects, you'll earn:
SLEEPING POWDER (for making food)
You're ready to try one more tactic to move the Leucrotta from the door:
Click on the round stone area in the middle of the room to get a closer view.
Open MAKING FOOD in your inventory.
Put the PLATE in the center of the floor.
Next, put the SAUSAGE LINK on the plate.
Then, douse the sausage link with the SLEEPING POWDER.
This will give you FOOD GROUP in your inventory.
Zoom in on the "scary doggy" again and give him the FOOD GROUP.
He'll eat it up, then fall asleep in front of the fireplace, leaving the passage to the "Crib" unblocked.
Go through the doorway to "Crib."
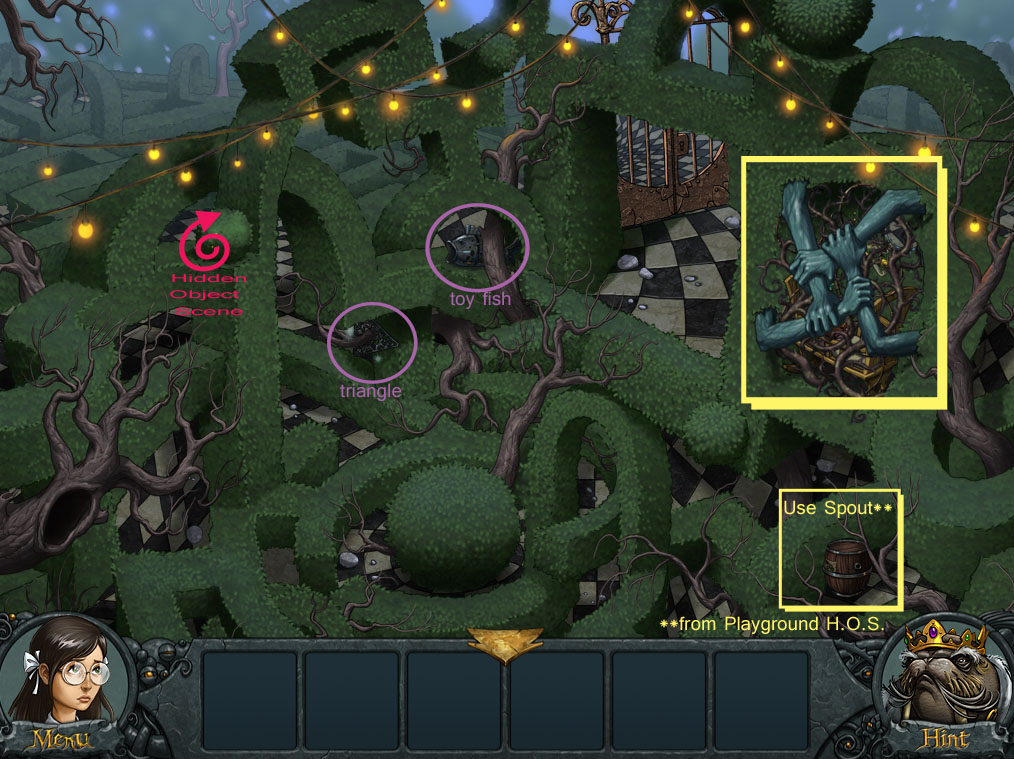
The Crib
Screenshot:"Crib" first time
Pick-up the. . .
TOY FISH
and TRIANGLE.
(both are hidden in between gaps in the hedge, middle of screen.)
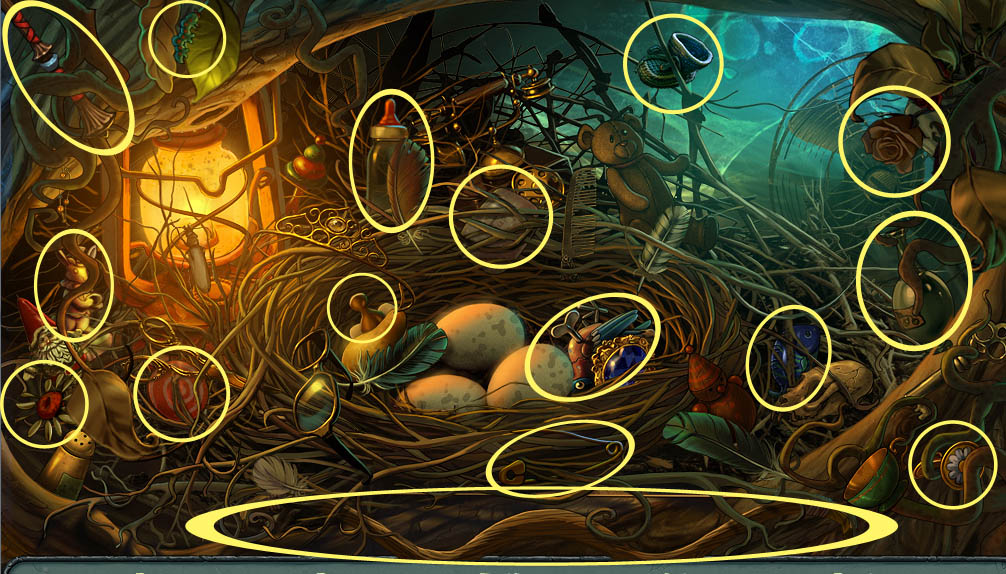
Click on the green ball in the upper left part of the hedge to begin a Hidden Object Search:
Screenshot: hidden object search in "Crib"
When you find all the hidden objects, you're rewarded with:
An EMPTY JAR
and an AXE HANDLE.
Now return to "The Playground" (going through "Leucrotta") and click on the area under the slide for another Hidden Object Search:
Screenshot: hidden object search back at "Playground"
When you've finished this second Hidden Object Search at the Playground, you'll have...
a SPOUT
GLUE
Return to "Crib" (via the Leucrotta) again.
Back at the crib, zoom in on the barrel in the bottom right corner:
Take the SPOUT from your inventory and put it in the barrel.
Then place the EMPTY JAR on the barrel, by the spout, to collect olive oil.
You'll now have a JAR WITH OIL.
Screenshot: "Crib" oil and arms
Click on the grasping arms in the right corner of the hedge:
Use the JAR WITH OIL on the hands.
Take the DULL AXE HEAD.
In your inventory, combine the dull axe head with the axe handle to create a DULL AXE.
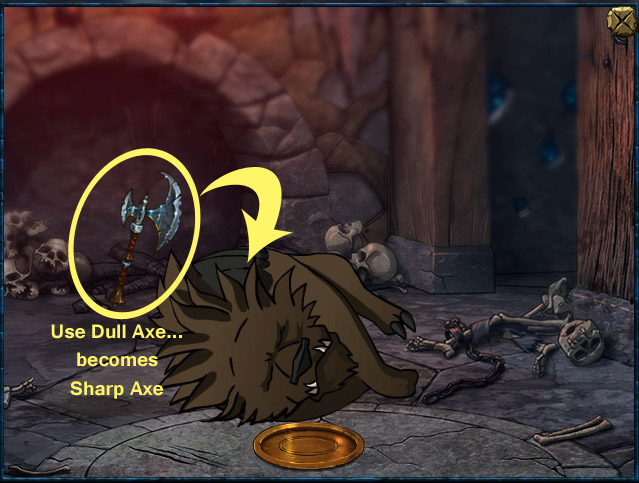
Go back to the Leucrotta's lair. . .
Screenshot: back at Leucrotta
Click on the still-sleeping beast.
Use the DULL AXE on the Leucrotta.
Now you have a SHARP AXE.
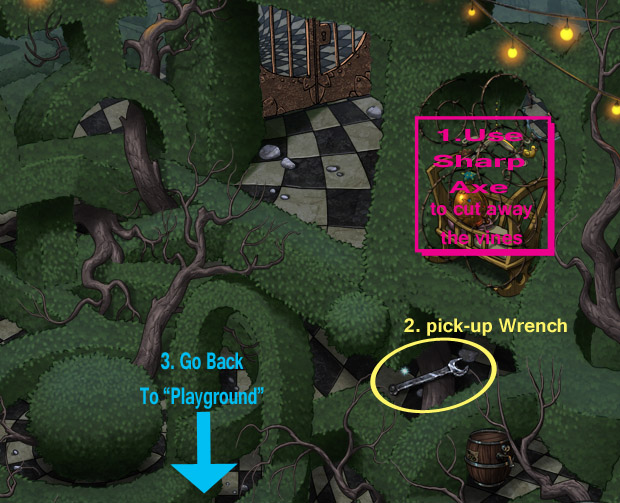
Return to "The Crib" and click on the crib's branch-tangled niche again:
Use your SHARP AXE to hack away at the entanglement blocking the crib area.
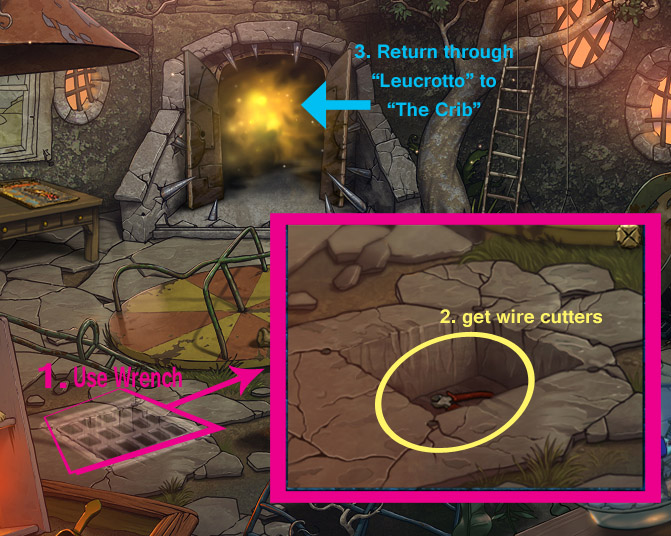
The branches are gone, and a WRENCH appears on the floor below. Take it.
Screenshot: "Crib" branches and wrench
Again, traverse back to "The Playground"
Zoom in on the storm drain just below the merry-go-round.
Using your WRENCH, remove each of the four bolts to open the drain cover.
From inside the hole, take a pair of WIRE CUTTERS.
Screenshot: "Playground" storm drain
Go back to "The Crib."
Use the WIRE CUTTERS to remove the barbed-wire from around the crib.
Screenshot: "Crib" mobile and key
A SMALL BOY appears in the tree branches on the left-side of the screen. Pick him up.
Focus in on the crib's nook again. . .
Place the SMALL BOY on the mobile that hangs over the crib.
The gold egg will open, allowing you to take the KEY.
Use the KEY to open the gate.
Exit to "Water"
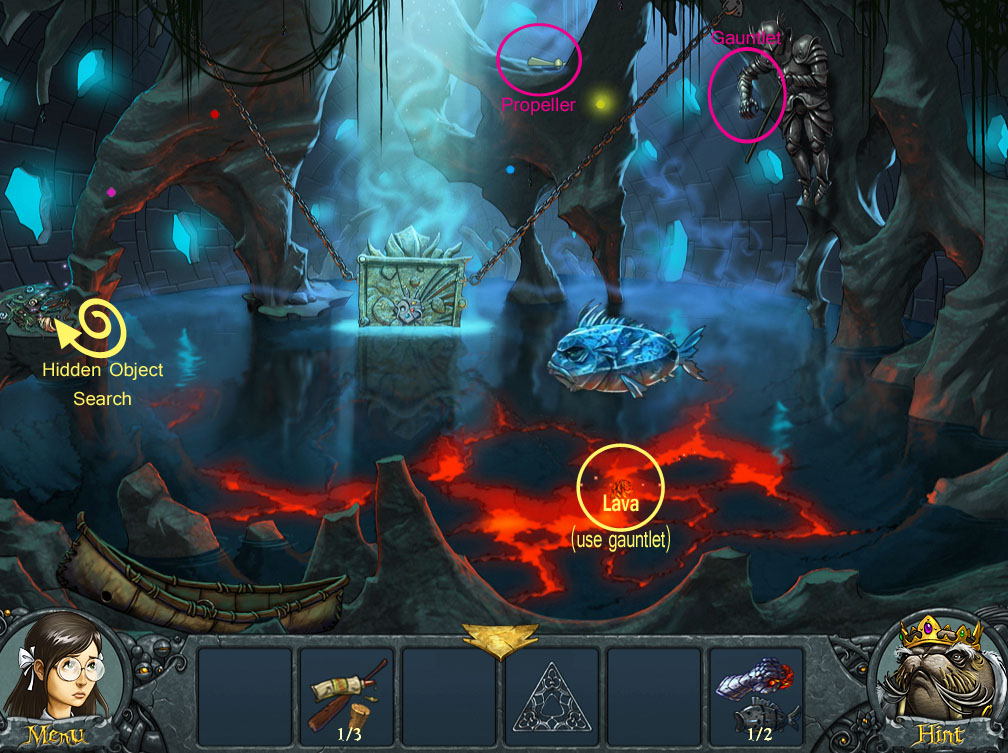
Water
Screenshot: "Water" starting scene
When you arrive at "Water" . . .
Get the PROPELLER off a ledge high in the back.
Take the GAUNTLET from the armored figure pinned to the rock on the right.
Then, use the GAUNTLET to get LAVA from the foreground.
Now you'll have both LAVA AND TOY FISH for the set.
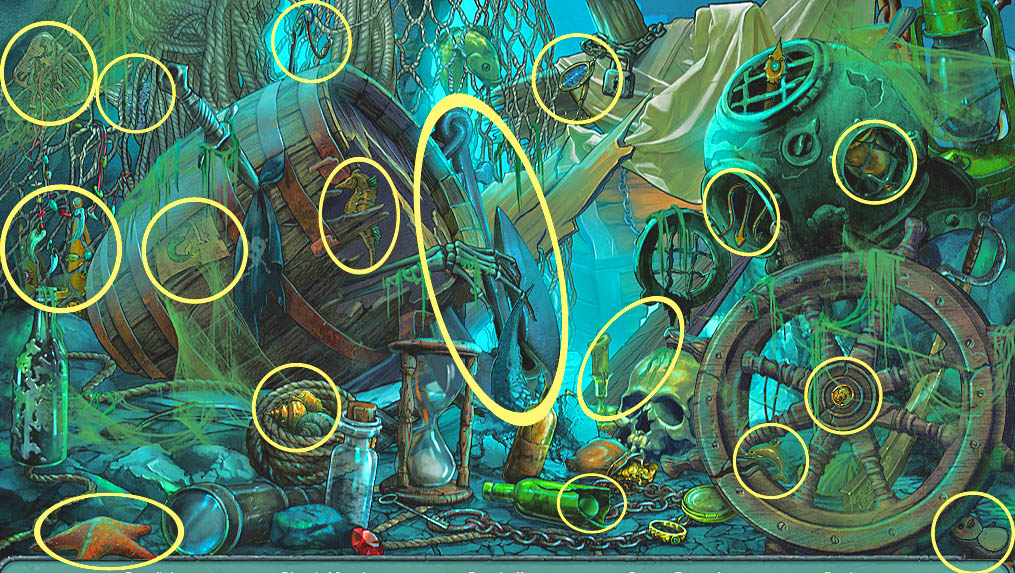
Click on a seaweed strewn shelf just above the water on the left; this begins another Hidden Object Search:
Screenshot: hidden object search in "Water"
When you've found all the objects, you'll come away with:
a GREEN GEM and
a PADDLE (part of BOAT REPAIR).
Click on the Icy Fish in the water, just above the lava area. He looks mean and hungry:
Open the Lava and Toy Fish in your inventory.
Add the GAUNTLET WITH LAVA to the TOY FISH to create: TOY FISH WITH LAVA.
Feed the TOY FISH WITH LAVA to the Icy Fish in the water.
It will melt away, leaving a CORK in its place. Pick-up the CORK.
Now you have all the necessary items for BOAT REPAIR.
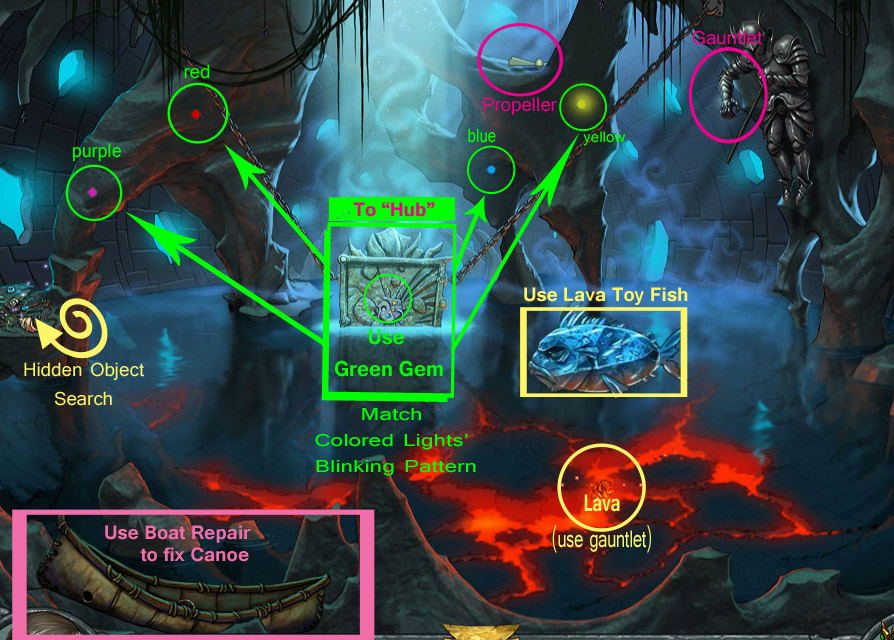
Screenshot: "Water" boat repair and door crest puzzle
Zoom in on the canoe in the bottom left corner of the screen:
Open the BOAT REPAIR items in your inventory.
Insert the CORK into the hole on the bow of the canoe.
Then use GLUE to seal the cork into place.
Add the PADDLE last, and the canoe will move toward the center of the pool.
An elaborate stone door to "The Hub" is half-submerged in the middle of the pool; click on it.
Make note of the color patterns on the door crest.
Add the GREEN GEM to the round indentation of the crest.
Back out for a wider perspective: notice the colored lights blinking in various spots on the background? Pay attention to their pattern:
Purple—Red—Blue—Purple—Yellow—Red.
Zoom back in on the jeweled door crest. Click each colored gem in the same order.
The gems will light up if they're pressed in the right order; the game will reset if not.
When you've entered the correct pattern, the door will unlock.
You can now move on to "The Hub"
The Hub—Door to "Brother"
Pick up the PLANE PROPELLER from the left side of the screen.
Click on the door in the top left corner to begin another door lock physics puzzle:
Screenshot: door to "Brother" puzzle solution
Place the TRIANGLE from your inventory on the metal bar under the ball, so that the ball will fall on the left slant of the triangle.
Now place the PROPELLER next to the bottom bar.
Angle the PROPELLER slightly to the right so that its current will blow the ball up in the direction of the cup.
Each piece needs to be in just the right place and at a certain angle to cause the ball to go up into the cup (note that the cup is upside down).
Solving the physics puzzle will open the door to "Brother." Go in.
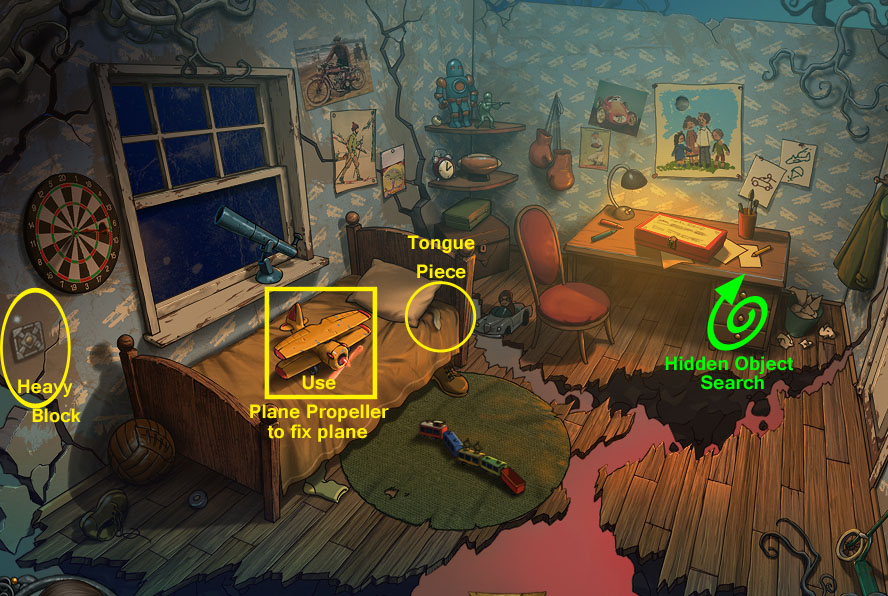
Brother
Screenshot: "Brother"
Pick up the . . .
HEAVY BLOCK from the left side of the screen.
TONGUE PIECE from under the pillow.
Focus in on the Plane on the bed and replace the plane's missing PROPELLER from your inventory.
Now a Hidden Object Search is available in the top desk drawer; click on it to begin:
Screenshot: hidden object search in desk drawer
You'll get a KEY after you've found every object in the H.O.S.
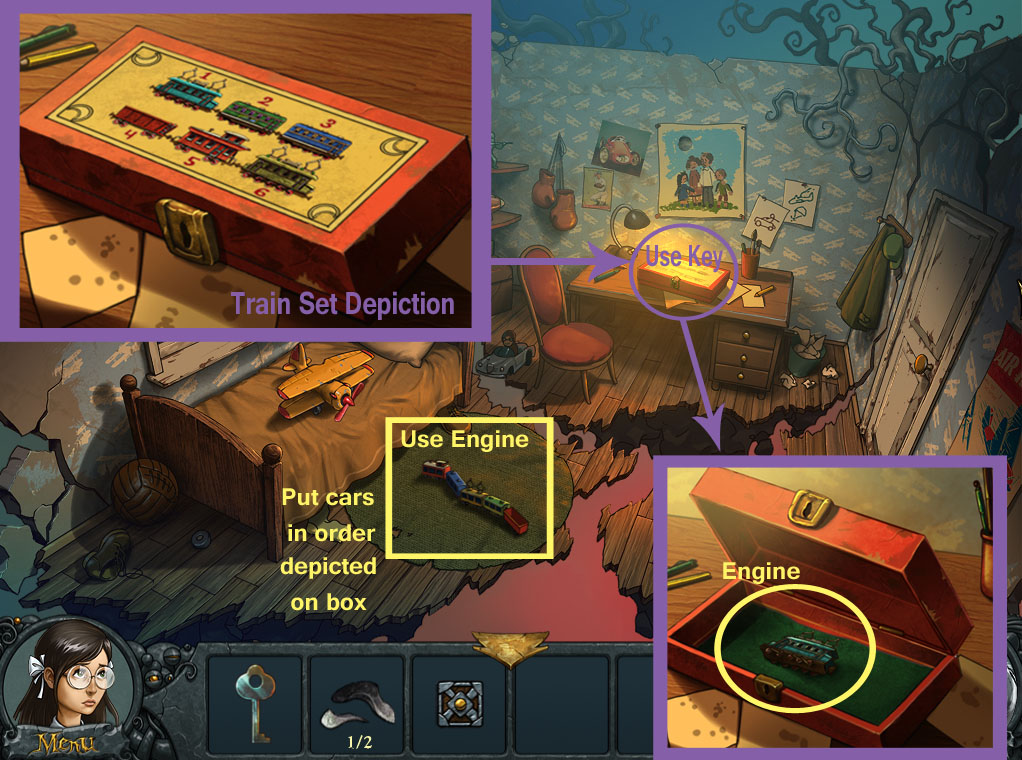
Use the KEY to open the train box on the desk and take the ENGINE; you're ready for another puzzle:
Zoom in on the model train on the rug.
Replace the ENGINE with the set.
Arrange the train cars in the order shown on the box:
light blue; green; dark blue; red; orange; yellow.
Screenshot: trains
When the train cars are in the proper order, the train will move.
Pick up a LENS from the floor by the train.
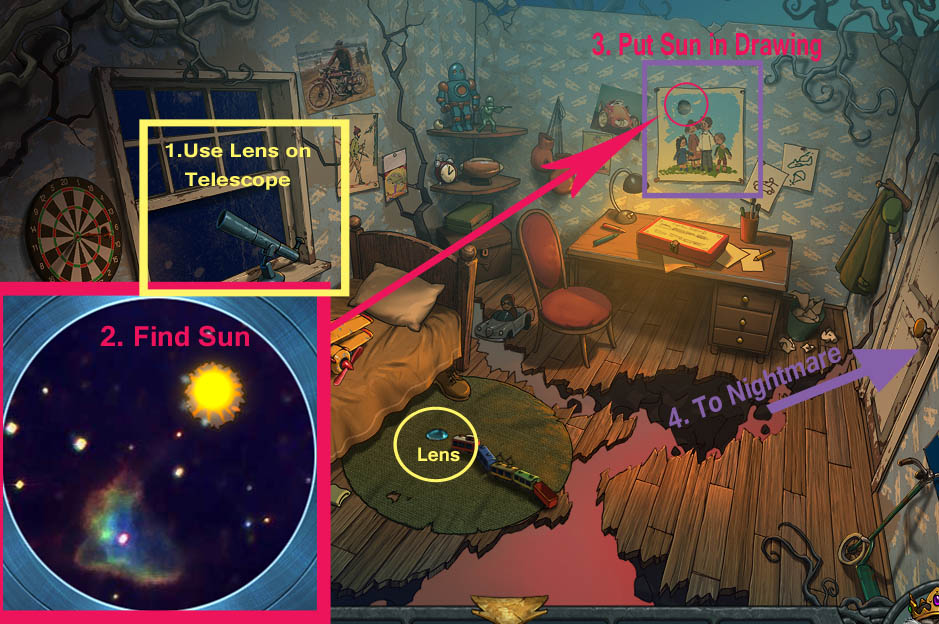
Put the LENS in the Telescope that's perched on the window frame.
Click the telescope again to look through it.
Use the arrows at the top, bottom and sides of the telescope lens to change your view.
Scan across the sky until you spot a SUN (it will be brighter, bigger and more yellow than the other stars).
Take the SUN.
Screenshot: telescope
Now, focus on the picture that hangs over the desk and replace the SUN in the drawing. This will make the family happy, and the door will open to the next room.
Go through the door to "Nightmare".
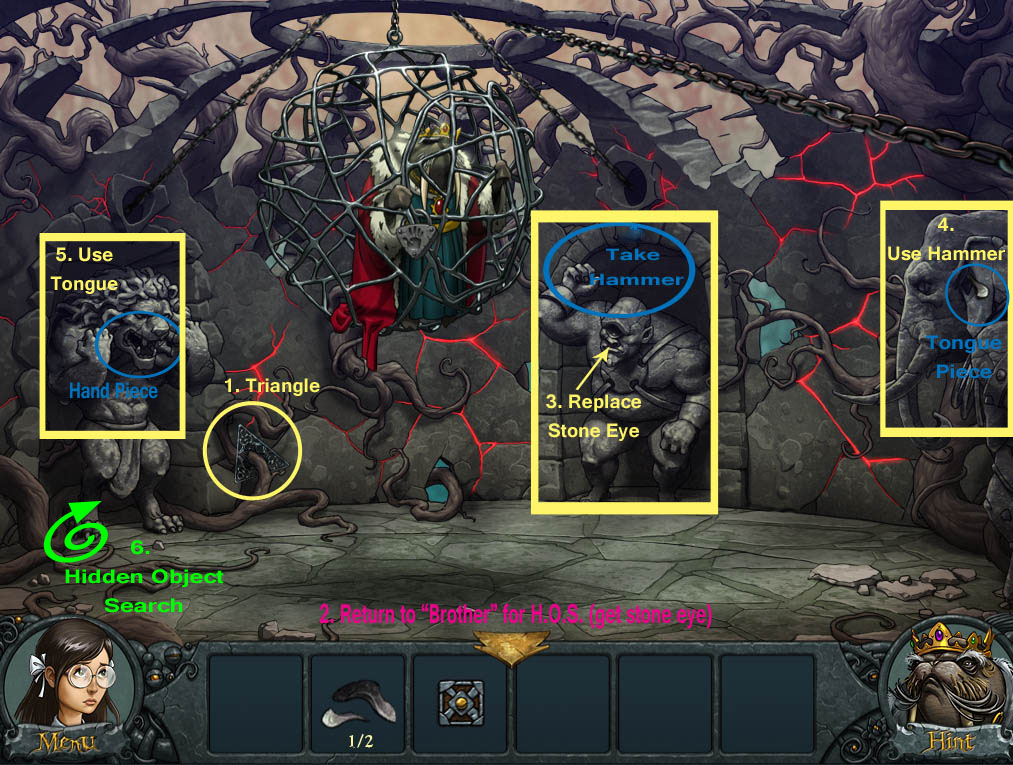
Nightmare
Screenshot: "Nightmare"
When you first arrive in "Nightmare," all you can do here is take the TRIANGLE.
Next, go immediately back to "Brother" to find another new Hidden Object Scene in the desk top right drawer:
Screenshot: second hidden object search in "Brother"
Finding all the objects this time will earn a STONE EYE.
Go back into "Nightmare."
Click on Cyclops (the middle statue).
Replace the cyclops' STONE EYE. This will cause him to lower his arm (and Zuchary's cage).
Take the HAMMER from the cyclops statue.
Screenshot: "Nightmare" statues
Click on the Elephant statute on the right:
Use the HAMMER to loosen something in the elephant's ear.
A TONGUE PIECE will be knocked out and into your inventory.
Click on the Lion statue on the left:
Combine the two TONGUE PIECES in your inventory.
Put the STONE TONGUE in the Lion's mouth.
The HAND PIECE appears inside the lion's mouth; take it.
Now a Hidden Object Scene is ready; click near the base of the lion statue to begin:
Screenshot: hidden object search in "Nightmare"
Find all the items in the hidden object scene for:
another HAND PIECE.
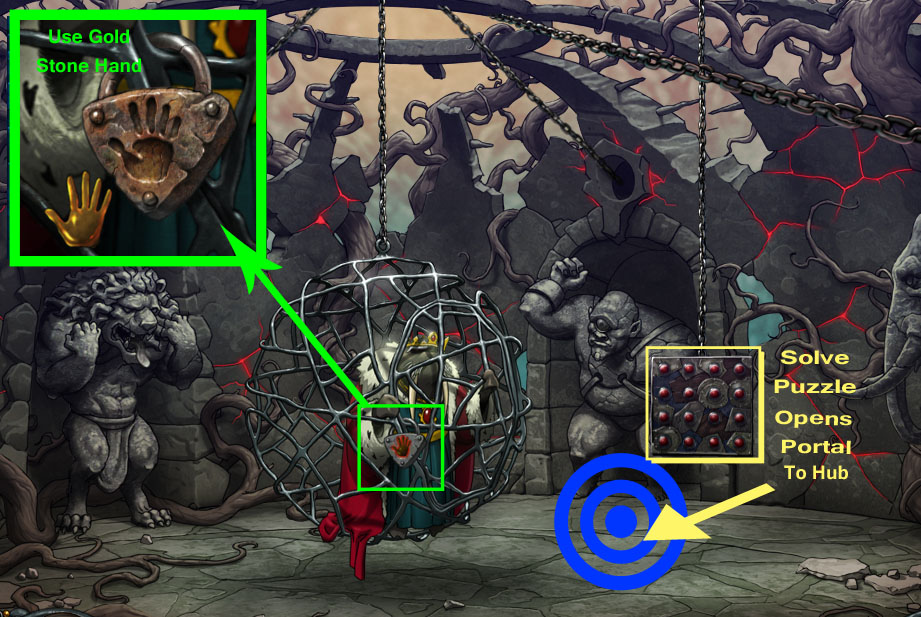
To open Zuchary's cage, follow a series of steps, starting with the gold hand pieces.
Screenshot: "Nightmare" opening Zuchary's cage
In your inventory, add the GOLD THUMB to the BROKEN GOLD HAND.
Focus on the lock on Zuchary's cage.
Put the GOLD HAND in the hand imprint on the lock.
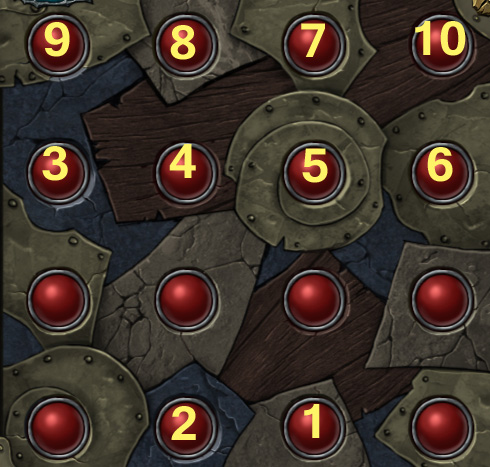
A box of red buttons will be lowered to the right of Zuchary's cage; click it to solve another puzzle:
The object is to get all the red buttons to light up.
Each button will turn on a certain number of surrounding buttons, so clicking them in the correct order is key (See screenshot for solution).
Screenshot: control box solution
When you've solved the control box puzzle, and after a short story scene, a portal will open to the Hub. Go through.
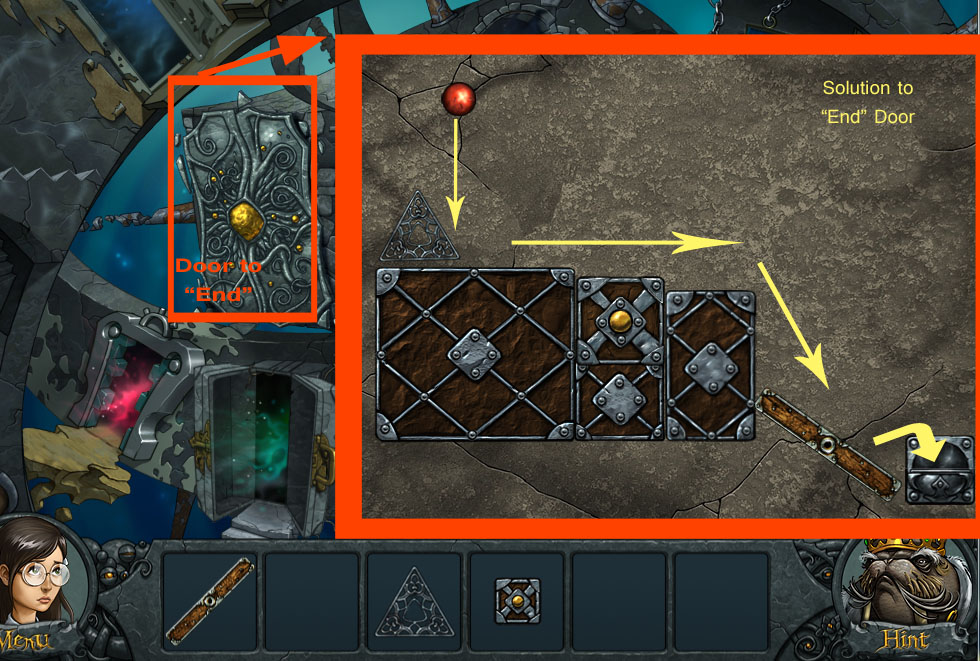
Hub before the End
Screenshot: Hub—Door to the End
Click on the center door to begin the last physics puzzle:
Place the METAL BAR, TRIANGLE, and HEAVY BLOCK on the game board.
Set up a course using each piece to get the red ball into the cup.
Successfully solving the physics puzzle will open the door to "The End"
When you're prepared for the final confrontation, go in.
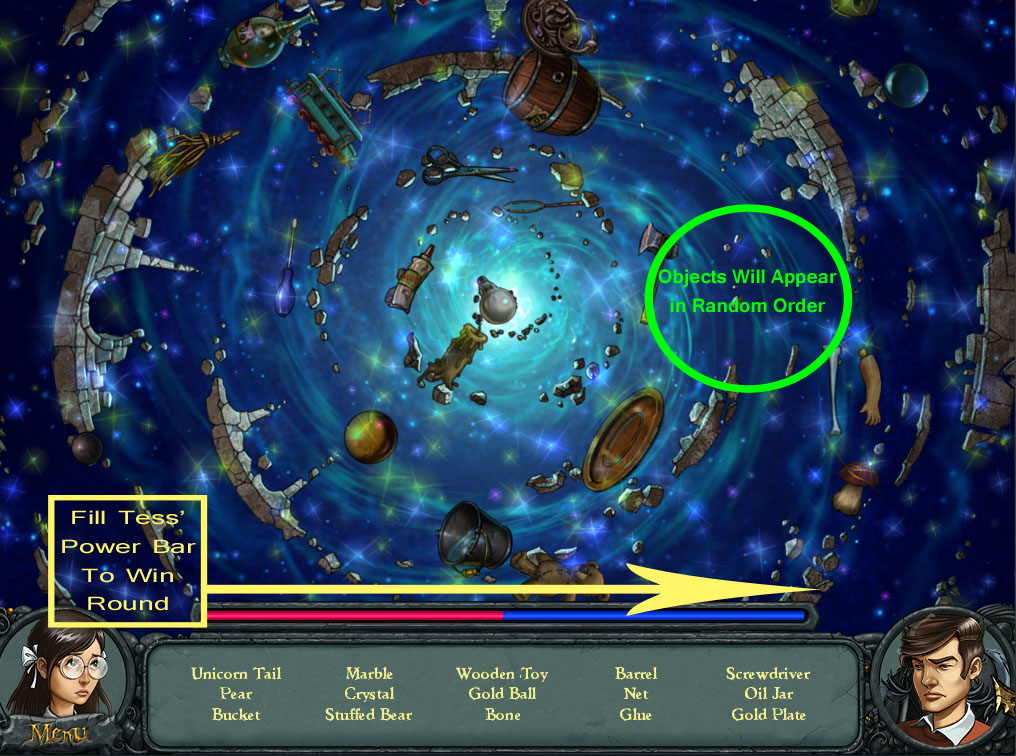
End
Screenshot: "The End"
This moving hidden object search is the final puzzle of the game:
The object is to find the objects on your list as quickly as possible.
As you find and click on listed objects, more objects will be added.
In both "casual" and "expert" modes, there is a penalty for randomly clicking, so be careful to click on only the objects on your list.
If you click incorrectly too quickly or too often, your cursor will be frozen for a short period of time.
Keep going until Tess's red bar is full.
When you've completed three rounds of finding objects, a final story scene ends the game.
Posted by: elle |
October 22, 2011 4:23 PM
|
October 22, 2011 4:23 PM