

Haunted Halls: Fears from Childhood
Platform: Mac, Windows
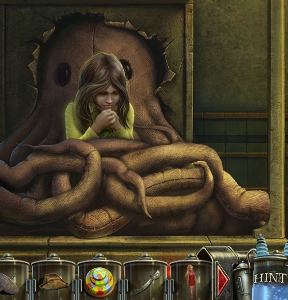
![]() The children! Won't somebody think of the children??... okay, admittedly you already have a lot on your plate, including chasing after your beloved when he's kidnapped by a real life Doctor Octopus and transported away to a nightmare realm that feeds on the fears of children. Haunted Halls: Fears from Childhood from ERS Game Studio is a hidden-object adventure game that picks up right where the original left off, and strives to set new heights in weirdness, surrealism, and tentacle shenanigans.
The children! Won't somebody think of the children??... okay, admittedly you already have a lot on your plate, including chasing after your beloved when he's kidnapped by a real life Doctor Octopus and transported away to a nightmare realm that feeds on the fears of children. Haunted Halls: Fears from Childhood from ERS Game Studio is a hidden-object adventure game that picks up right where the original left off, and strives to set new heights in weirdness, surrealism, and tentacle shenanigans.
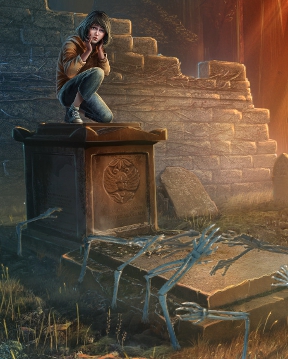
 Yes, as you may have guessed from the title, the kids are not all right in this adventure, and the evil Doctor Tentaclepants has stolen away a batch of them and then locked them up in nightmares that feed off their fears. You'll journey into each child's mind and disperse their nightmares... by solving hidden-object scenes and witnessing an emotional break-up between Barbie and Ken, of course. At the beginning you'll be given two difficulty settings to choose from, but gameplay is the same regardless of which you choose. Click around to interact, gather items to solve puzzles and get past obstacles, and make use of the hint and skip buttons whenever you're stuck... which just might happen because you're not exactly exploring a world where things always make sense. You might have to instigate a genie battle, do something shocking to a tentacle, fix a tiki's teeth, or cheer up a despondent toy dolphin... hey, it's all in a day's work for you, right? All we can say is Tim better be worth the trouble... that guy best know how to make mad chocolate chip waffles.
 Analysis: With detailed animations and an uninhibited take on design, Fears from Childhood might be the most visually impressive game from ERS yet. The surreal setting really lets you explore some interesting places, with some gorgeous and bizarre design, though at the same time you might find the abstract logic in the realms you visit can somewhat inhibit figuring out logically where items should go. It's also not particularly scary, though this is admittedly only an issue if you're a foolhardy coward like myself and prefer your games to leave you blubbering incoherently under the covers. If what you want is a creative, weird hidden-object adventure that doesn't veer into particularly dark territory, Fears from Childhood might be for you.
If Fears From Childhood disappoints at all, in fact, it's the fact that the gameplay is both mildly repetitive and predictable. It's not uncommon to have to repeat a hidden-object scene twice in around five minutes, and most puzzle solving is fairly predictable... find the obvious missing piece somewhere nearby, kick puzzle's butt like a bawss, wash, rinse, repeat. Still, at over four hours for your average gamer's play time with plenty of odd surroundings and things to investigate, Haunted Halls: Fears from Childhood is a smashing follow-up to Green Hills Sanitarium and a great way to spend an evening. Still, if your doctor shows up with a roiling mass of slimy tentacles underneath his labcoat, you should probably ask to see a diploma... or at the very least have one or two plucky, wisecracking teenage superheroes on speed dial... just in case.
A Collector's Edition is also available. It contains a bonus chapter, art gallery, strategy guide, and more. Remember that Big Fish Game Club Members pay only $13.99 for Collector's Editions (or 2 club credits), and collector's editions count 3 card punches of 6 total needed for a free game.
![]() Windows:
Windows:
Download the demo
Get the full version
Also available: Collector's Edition
![]() Mac OS X:
Mac OS X:
Download the demo
Get the full version
Also available: Collector's Edition


Walkthrough Guide
(Please allow page to fully load for spoiler tags to be functional.)
Haunted Halls: Fears from Childhood Walkthrough
General Information
IMPORTANT NOTE: Many of the puzzles and hidden object scenes are randomized between games, therefore screenshots should be used as a reference, rather than a definitive solution.
At the start of each game, the player has a choice between Regular or Expert Mode.
Regular Mode provides a faster charging Hint and Skip buttons and highlights active zones with sparkles.
Advanced Mode does not indicate active zones and charges the Hint and Skip buttons more slowly.
At the beginning of a new game you will be prompted to start the Tutorial, which will teach you the basic functions of the cursor and game mechanics.
The cursor changes to a hand when it is over an area where you can pick up an item, interact with the area, or manipulate an object in a hidden object scene.
The cursor changes to an eye when it is over an area where you can zoom in for a closer look.
The cursor changes to a navigation arrow when it is over an area where you can click to move to a new location.
Sparkling areas indicate hidden object scene locations.
Hidden object scenes consist of one screen with a randomized list of concealed items that must be found and collected; some items must be interacted with before you can discover them.
At the end of each hidden object scene, you will receive one of the collected items which is then placed in your Inventory.
Your Inventory is the bar located at the top of the screen and contains all of the objects you will need to progress through the game.
Throughout the walkthrough, these collected items will be indicated in bold.
In the bottom right corner of the screen is the Hint button. Click the button to highlight any interactive areas in the current scene, or to reveal an item in a hidden object scene.
The Hint button will change to the Skip button while a puzzle is in progress; clicking the Skip button will immediately complete the puzzle.
In the lower left corner of the screen are the Notes.
Important plot information as well as clues that may help you along your adventure are all noted in the Entries section.
Clicking the tab at the bottom will take you to the fairy tales section, which contains a collection of short stories that you discover as you play through the game.
Beside the Notes button is the Menu button; click the Menu button to pause the game, access the in-game Options, find the Help instructions, or return to the Main Menu.
Chapter 1
Floating Walkway
Click any part of the scene to begin, then speak with the little girl.
Take the Pick stuck in the left wall.
Take the Suction Cup beside the pipe at the bottom of the right wall.
Click the large red pipe on the left to zoom in.
Use the Pick on the rusted section of the pipe.
Use the Suction Cup on the water leaking from the broken pipe to receive the Wet Suction Cup.
Click the door at the end of the walkway for a closer look.
Use the Wet Suction Cup on the glass.
Click the door to open it, then go forward to the Subway Station.
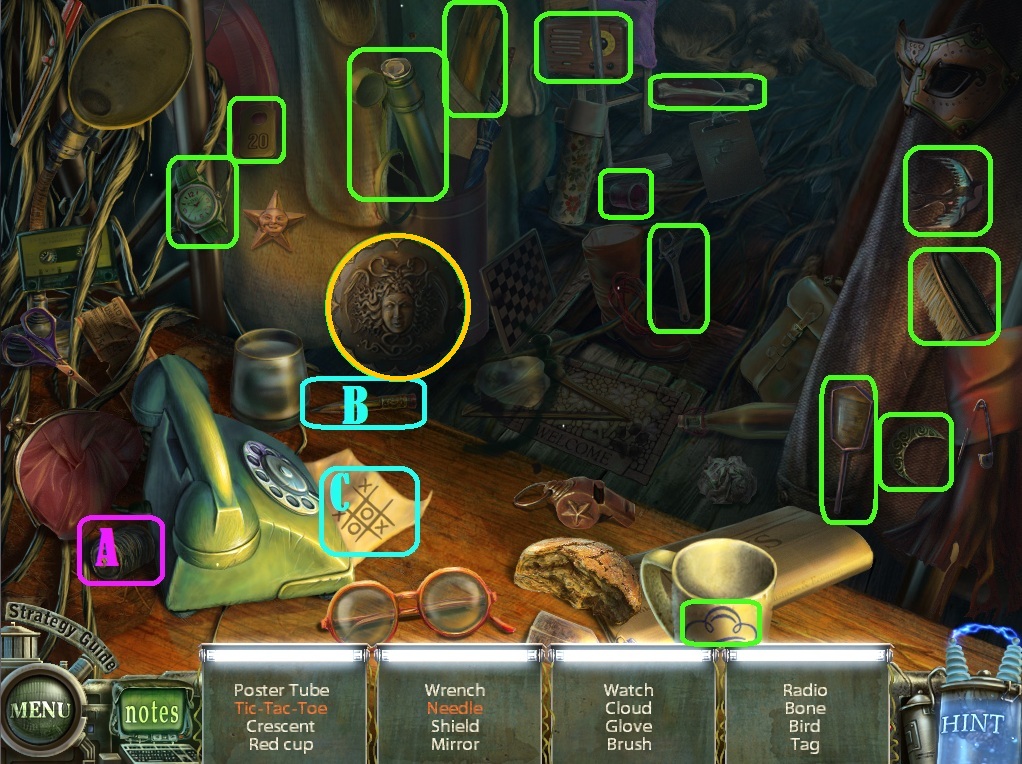
Subway Station
Click the television screen under the broken roof.
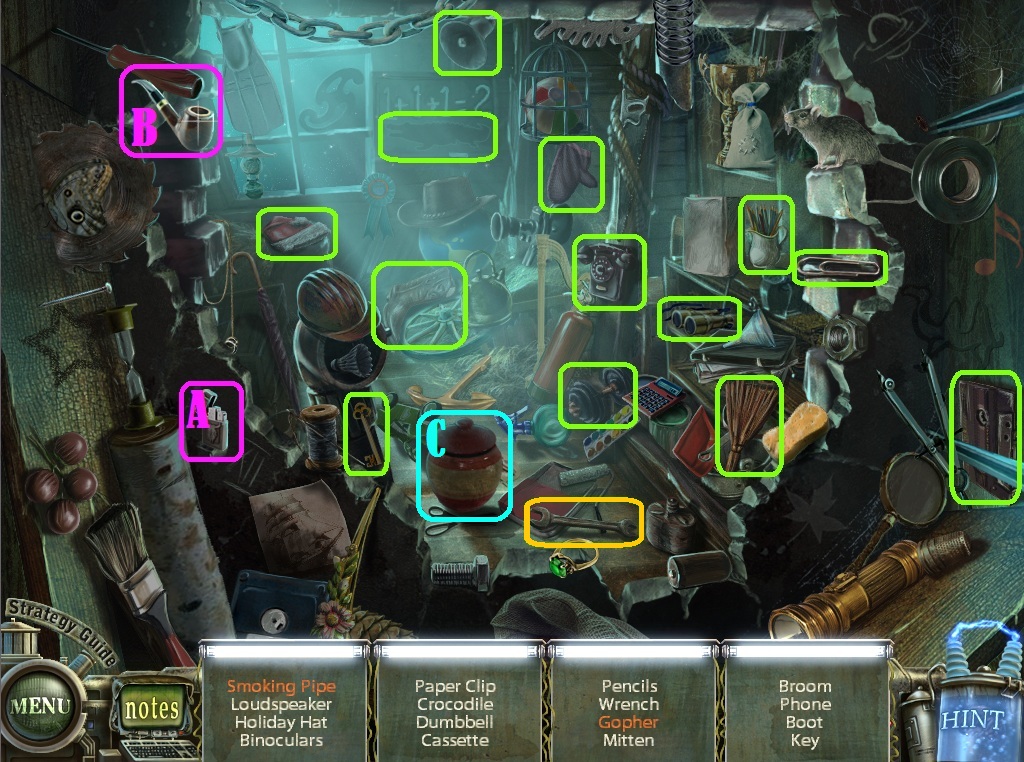
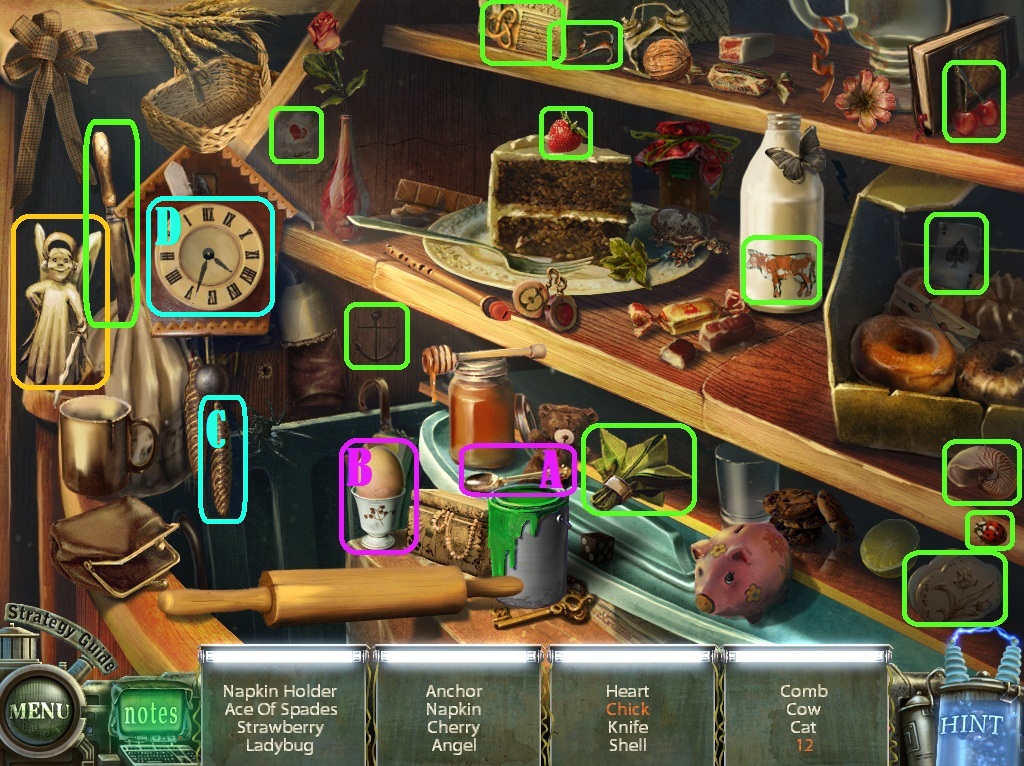
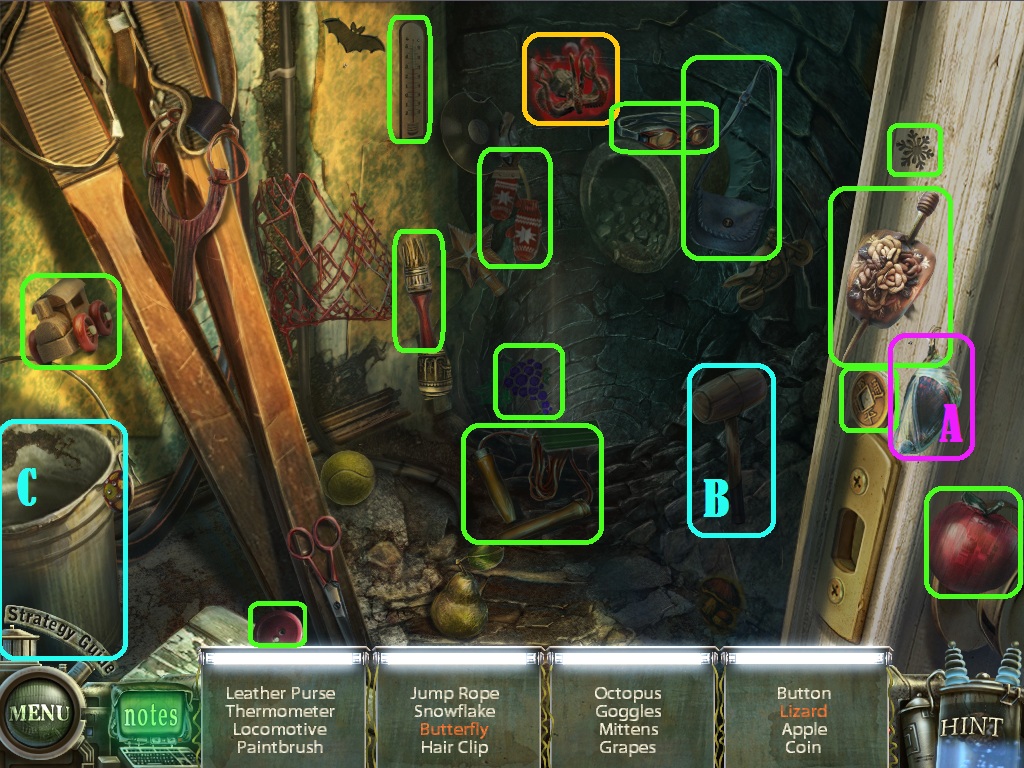
Click the green cabinet on the wall beside the right escalator to open it, then click the cabinet again to start the hidden object scene.
Use the lighter (A) on the pipe (B) to make a Smoking Pipe.
Click the cookie jar (C) to reveal the Gopher.
Screenshot.
Once the hidden object scene is complete, you will receive the Wrench.
Click the crack in the floor to zoom in and take the Tile (1/7).
Click the short table to the right of the right escalator to zoom in and take another Tile (2/7).
Click the right escalator mechanism for a closer look.
Click the lever in the mechanism to repair the escalator.
Go down into the Cave.
Cave
Take the Fishing Rod on the stand to the right of the bridge.
Click the ground in front of the bridge to zoom in and take the Lever.
Click the large chalice between the left stalagmites to zoom in and take the Tile (3/7).
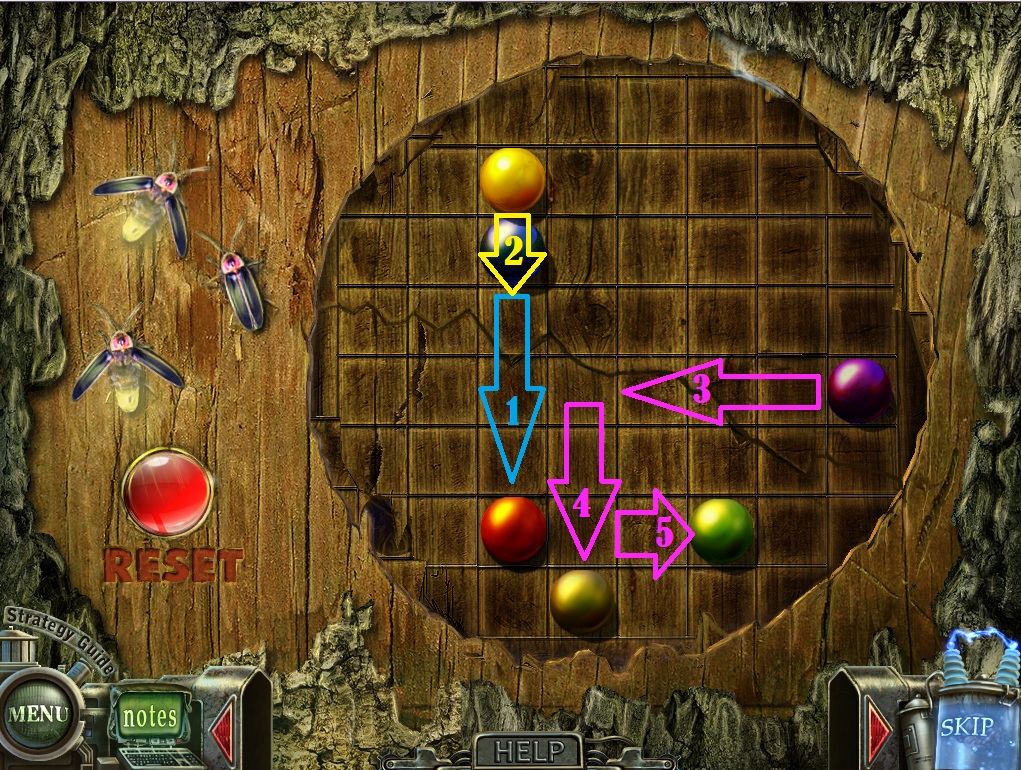
Click the stone platform on the right side of the cave across the bridge to cause the rock avalanche.
Use the Pick (from the left wall in the Floating Walkway) on the pile of rocks.
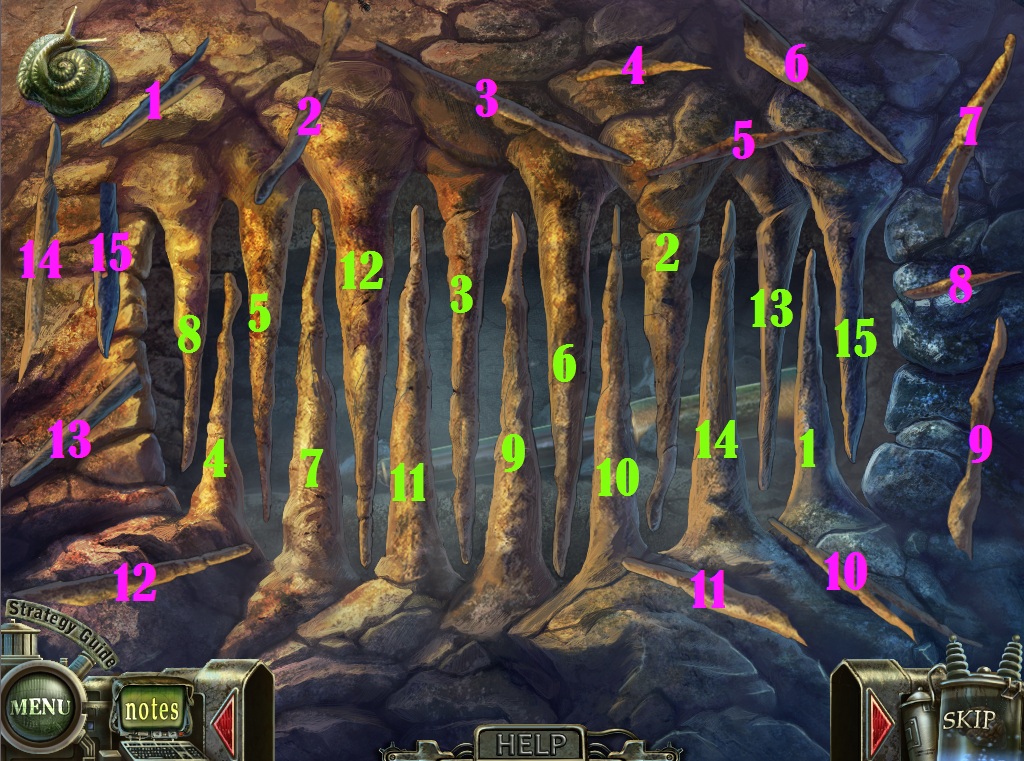
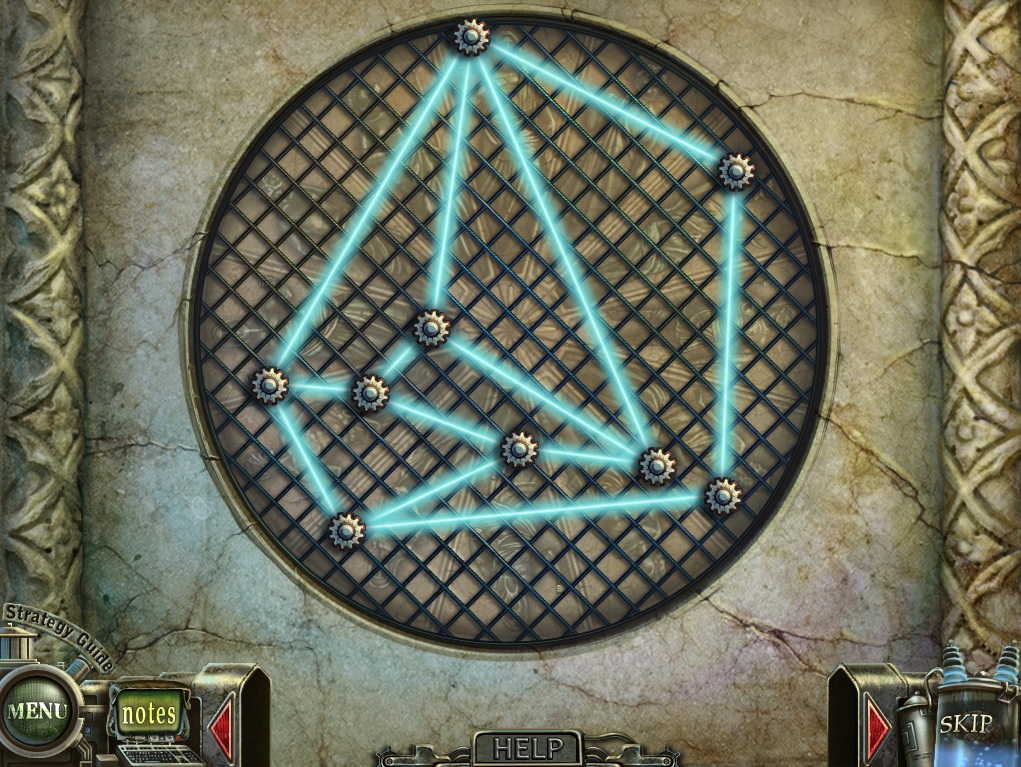
Click the jagged rock wall next to the burning torch to start the puzzle.
To solve the puzzle, place the stone fragments in the correct positions to complete the stalagmites and stalactites.
Click a fragment to select it, right click to rotate it vertically, then click a broken rock to set it in place.
The snail light at the top left corner will glow the closer you get to the correct placement area, going in order of distance from farthest to closest, from red to orange to yellow to green.
If correctly positioned, the pieces will connect and lock in place.
Solution.
Once the puzzle is solved, take the revealed Escalator Lever.
Go back to the Subway Station.
Subway Station
Click the left escalator to zoom in.
Place the Escalator Lever (from the rock wall puzzle in the Cave) on the escalator mechanism, then click the lever to repair the escalator.
Go up to the Rooftop.
Rooftop
Click the ventilator to zoom in and take the Tile (4/7).
Click the Broken Bottle on the floor next to the pair of sandles to zoom in, then click it again to add it to your inventory.
Click the package on top of the ledge.
Click the ledge to look over it.
Use the Fishing Rod (from the stand in the Cave) on the hanging package.
Use the Broken Bottle on the twine to open the package.
Take the Tile (5/7) and the Book.
Click the satellite for a closer look.
Use the Wrench (from the Subway Station hidden object scene) on the four large bolts in the bracket, then take the Antenna.
Click the scaffold mechanism to the right of the steps to zoom in.
Use the Lever (from the Cave on the ground in front of the bridge) on the switch device, then click the lever to raise the scaffold.
Click the scaffold to zoom in and take the Tile (6/7) and the Squeegee.
Go back to the Floating Walkway.
Floating Walkway
Click the broken red pipe to zoom in.
Use the Squeegee (from the scaffold at the Rooftop) on the water leaking from the pipe to make it a Wet Squeegee.
Return to the Cave.
Cave
Click the stone platform on the right side of the cave across the bridge to zoom in.
Use the Wet Squeegee (from the scaffold at the Rooftop, made wet at the leaking pipe in the Floating Walkway) on the mica three times.
Use the Pick (from the left wall in the Floating Walkway) on the lower left section of the rock to reveal the Tile (7/7).
Go back to the Subway Station
Subway Station
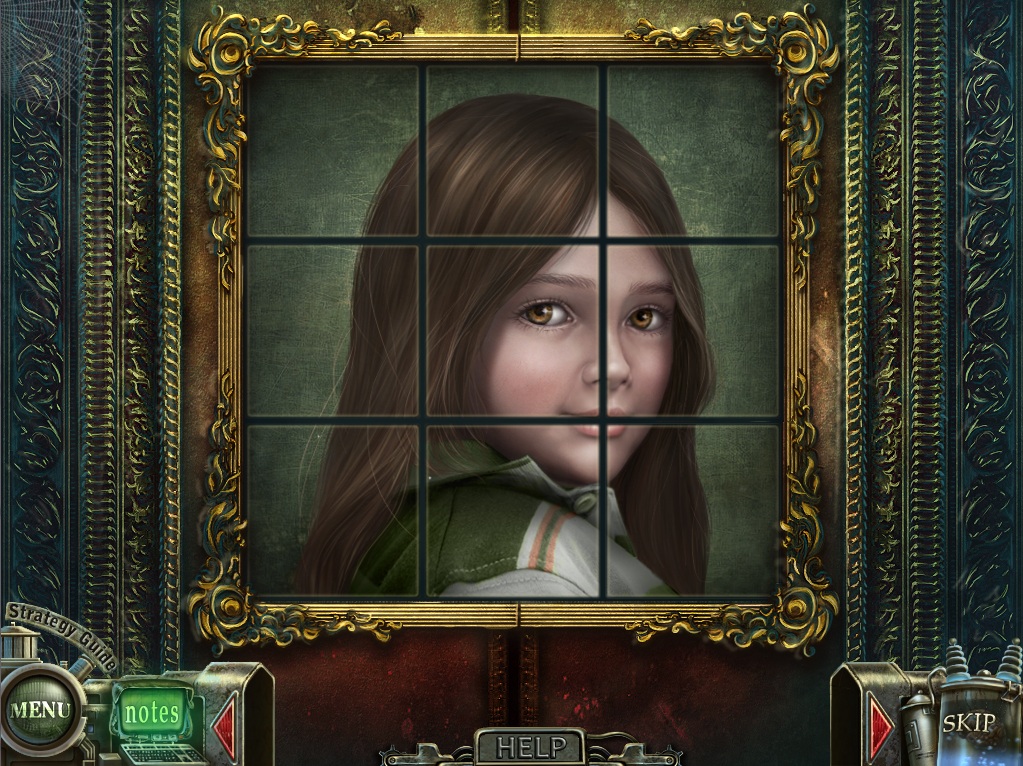
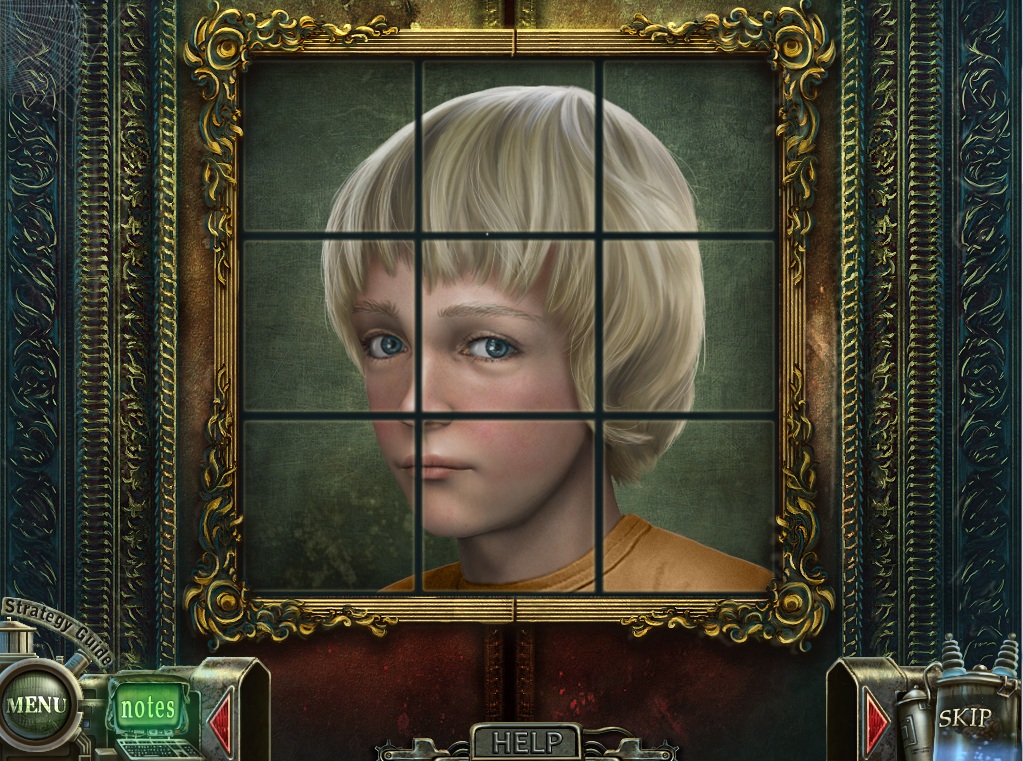
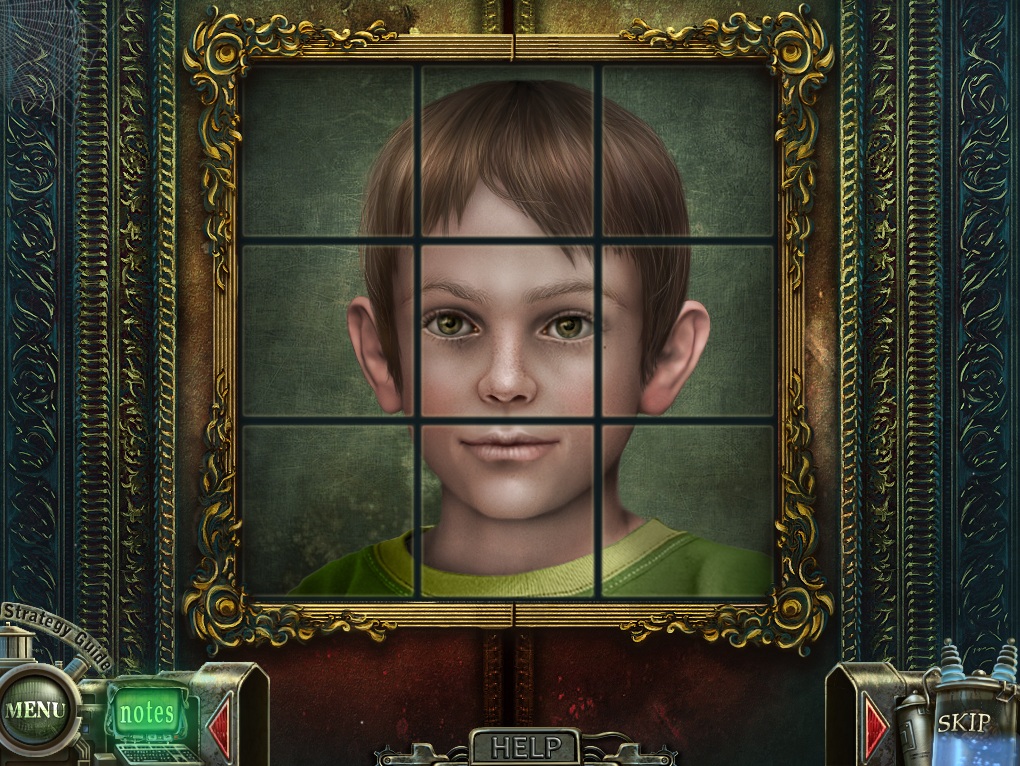
Click the painting frame in the doorway under the television for a closer look.
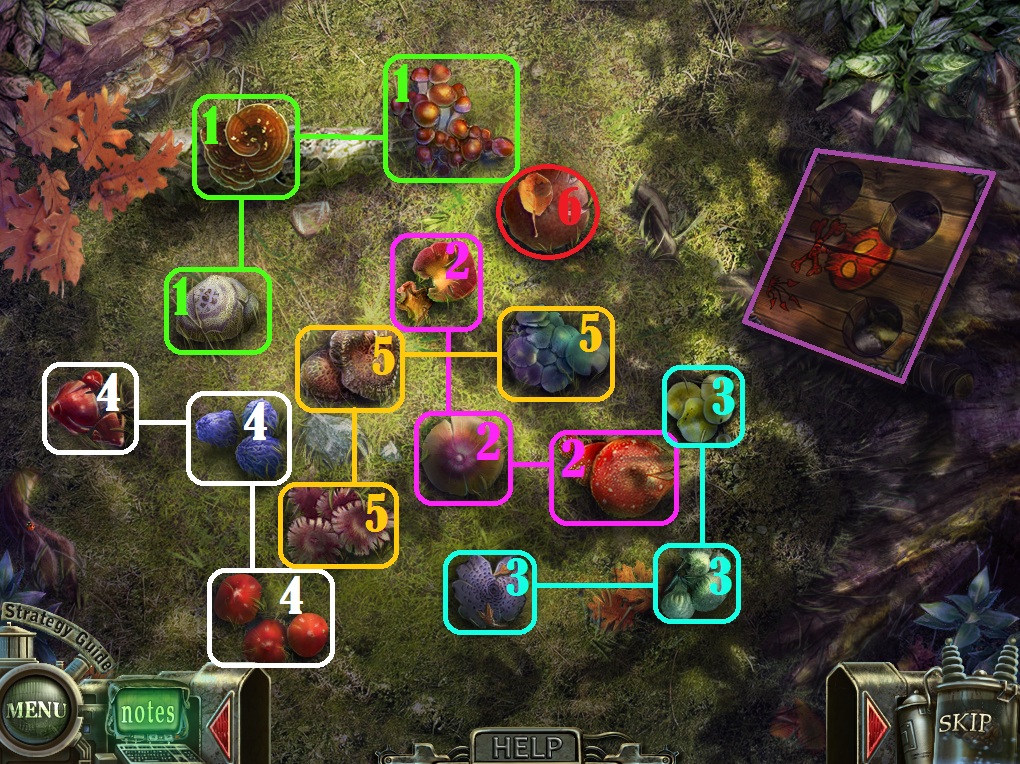
Add each of the Tiles (1/7 from the cracked floor and 2/7 from the short table in the Subway Station, 3/7 from the inside of the chalice and 7/7 behind the mica in the Cave, 4/7 from the ventilator, 5/7 from the package, and 6/7 from the scaffold at the Rooftop) to the frame to start the puzzle.
To solve this puzzle, arrange the tiles to complete the portraits of the five children.
Click a tile to cycle through its image.
When a portrait has been correctly assembled, it will glow briefly and then its tiles will be removed from the choice of images.
Solution #1.
Solution #2.
Solution #3.
Solution #4.
Solution #5.
Once the puzzle is solved, go forward to the Room of Doors.
Room of Doors
Click the bottom right door to zoom in.
Place the Book inside the small frame in the middle of the door.
Go through the open door to the Forest Entrance.
Chapter 2
Forest Entrance
Click the bushes on the left side of the path to start the hidden object scene.
Click the leaves in the grass (A) to reveal the Nippers.
Click the pile of leaves on the path (B) to reveal the Worm.
Screenshot.
Once the hidden object scene is complete, you will receive a Hose.
Take the Branch on the ground in the middle of the path.
Follow the left path to the Cabin Entrance.
Cabin Entrance
Click the hollow of the tree on the right to zoom in and take the Key.
Click the squirrel on the tree trunk to zoom in and take the Claw (1/2).
Click the front door of the cabin for a closer look.
Use the Key on the keyhole, then turn the key to unlock the door.
Go inside the Cabin.
Cabin
Take the Chair Leg on the floor.
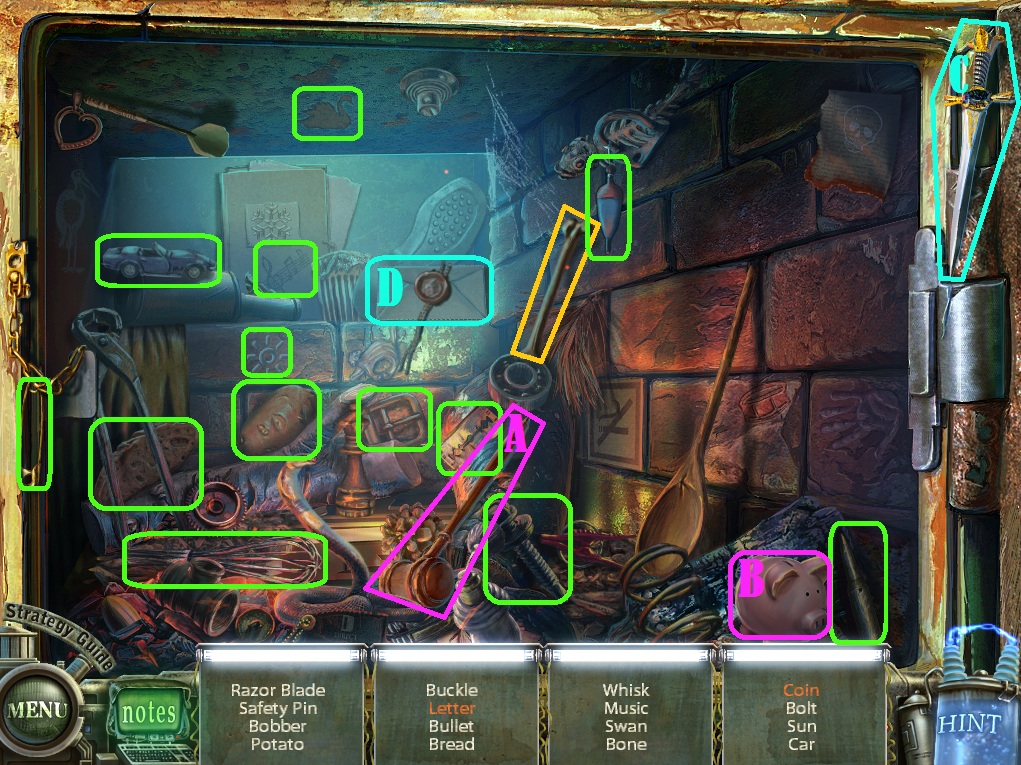
Click the oven to open the top door, then click it again to start the hidden object scene.
Use the mustache (A) on the bust (B) to make the Mustached Man.
Use the beaker (C) on the snake (D) to fill it with the Poison.
Screenshot.
Once the hidden object scene is complete, you will receive a Pitcher.
Go back outside to the Cabin Entrance.
Cabin Entrance
Click the fuel barrel on the left side of the porch for a closer look.
Add the Hose (from the Forest Entrance hidden object scene) to the top of the can.
Use the Pitcher (from the Cabin hidden object scene) on the hose to receive the Fuel.
Return inside the Cabin.
Cabin
Click the chainsaw at the foot of the bear to zoom in.
Click the fuel cap to remove it, then use the Fuel (from the gas can in the Cabin Entrance) on the hole in the handle to receive the Chainsaw.
Go back to the Forest Entrance, then take the right path to the Treehouse.
Treehouse
Use the Chainsaw (from the floor of the Cabin) on the tree blocking the pathway.
Take the sawn off Log on the ground.
Click the mushrooms in the grass on the left side of the path to start the puzzle.
To solve this puzzle, find the non-poisonous mushroom.
Click the wooden board with the painted skull to pick it up and right click to rotate the board clockwise.
Position the board so that a mushroom is shown through each of the three holes, then left click to highlight those mushrooms as poisonous.
Solution.
Once the puzzle is solved, you will receive a Mushroom.
Follow the path forward to the Wolf Woods.
Wolf Woods
Click the leaves on the ledge at the left side of the path for a closer look.
Click the leaves again to reveal the Hazelnut.
Return to the Cabin Entrance.
Cabin Entrance
Click the squirrel on the stump for a closer look.
Give the Hazelnut (from the pile of leaves at the Wolf Woods) to the squirrel.
Take the yellow Marble on the stump.
Go back to the Forest Entrance.
Forest Entrance
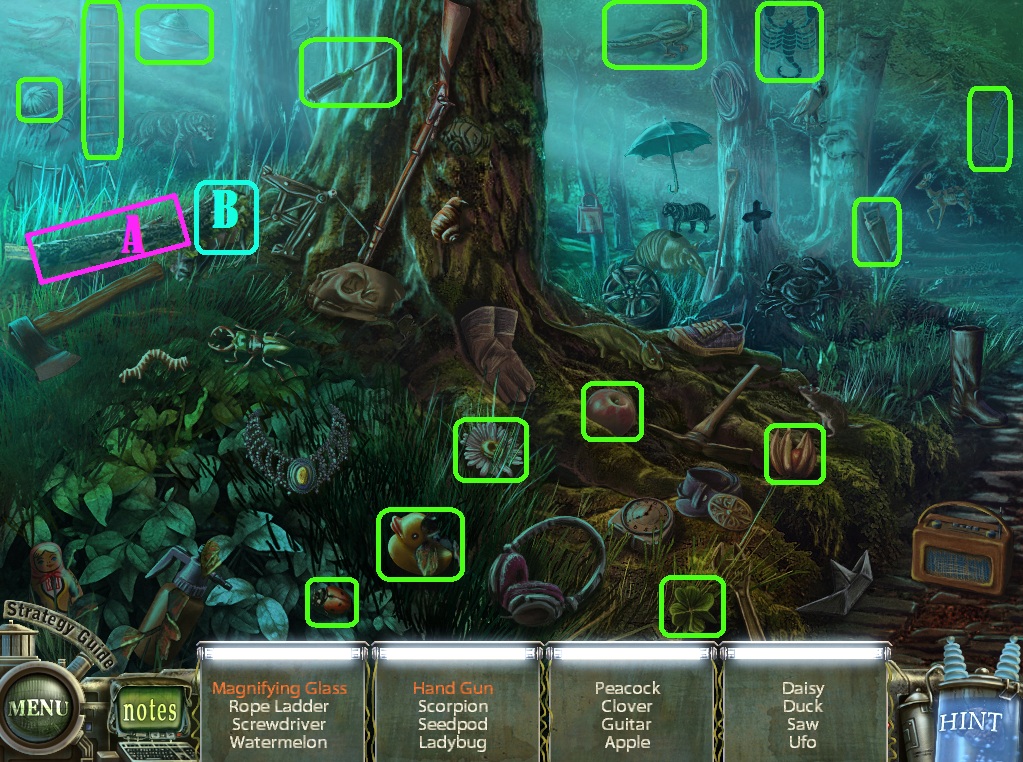
Click the bush on the left side of the path to repeat the hidden object scene.
Click the broken branch (A) to reveal the Magnifier.
Open the backpack (B) to find the Hand Gun.
Screenshot.
Once the hidden object scene is complete, you will receive the Magnifier.
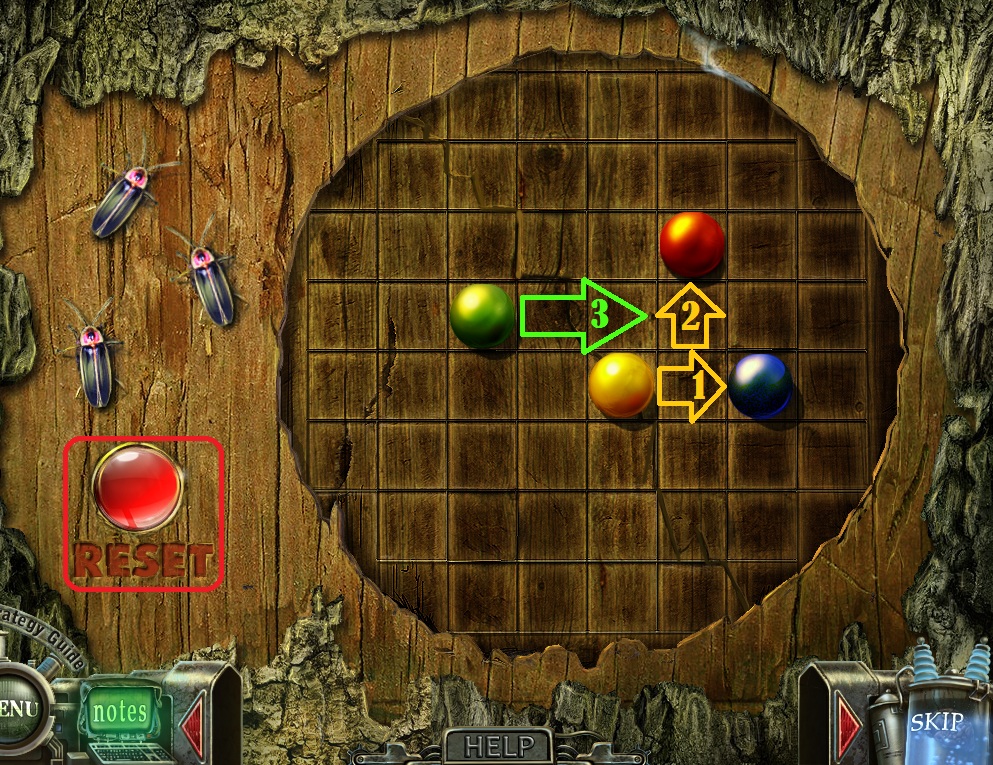
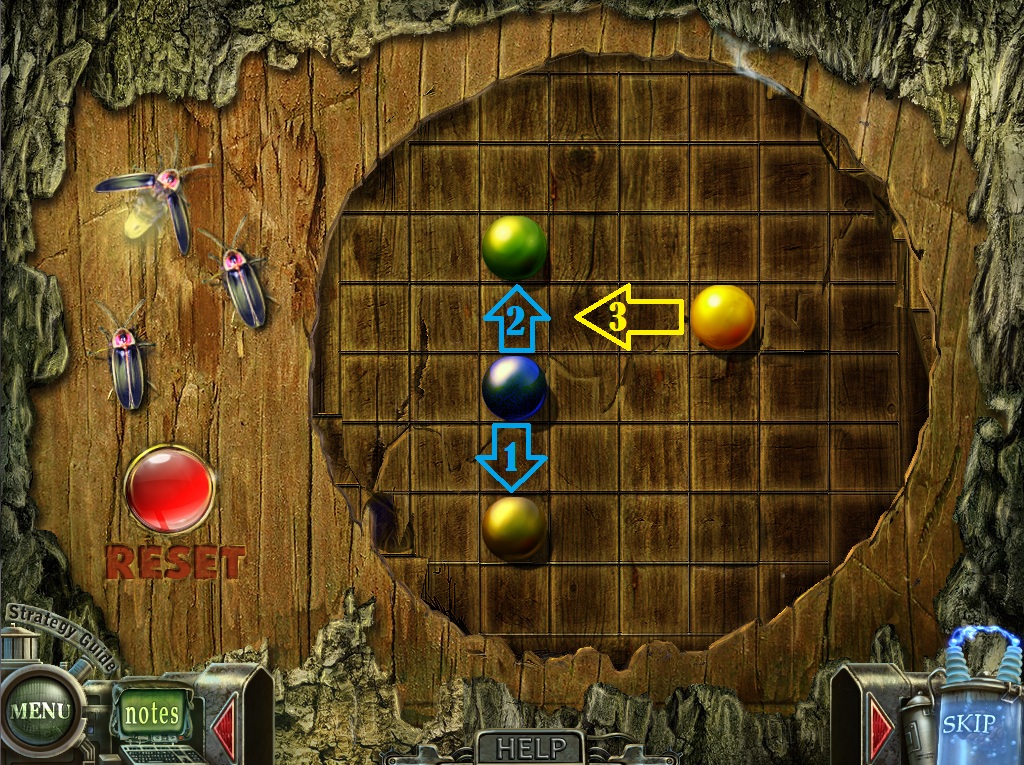
Click the round board in the torn bark of the tree trunk for a closer look.
Use the Marble (from the Squirrel on the stump at the Cabin Entrance) on the board to start the puzzle.
To solve this puzzle, knock all of the marbles except one off the board.
Click a marble to select it, then click a directional arrow to move it left, right, up, or down.
A marble will continue to move until it strikes another marble.
Click the reset button to reset the marbles on the board.
Solution #1.
Solution #2.
Solution #3.
Once the puzzle is solved, you will receive the Apple.
Click the hedgehog by the roots of the right tree to zoom in.
Place the Apple and the Mushroom (from the mushroom puzzle at the Treehouse) on the hedgehog's back.
Take the revealed Claw (2/2).
Return to the Cabin.
Cabin
Click the oven to repeat the hidden object scene.
Use the hammer (A) on the piggy bank (B) to reveal the Coin.
Use the blade (C) on the letter (D) to find the Letter.
Screenshot.
Once the hidden object scene is complete, you will receive a Bone.
Click the stuffed bear's head to zoom in.
Use the Claws (1/2 from the stump at the Cabin Entrance and (2/2) from under the hedgehog at the Forest Entrance) on the empty holes in the bears claws.
Take the Lightbulb from the bear's open mouth.
Place the Log (from the fallen tree at the Treehouse) on the floor under the ceiling lamp, then click the lamp to zoom in.
Use the Lightbulb on the lamp socket to turn on the light.
Click the large closet to open it, then zoom in and take the unlit Torch.
Go back outside to the Cabin Entrance.
Cabin Entrance
Click the fuel barrel for a closer look.
Use the Torch (from the closet in the Cabin) on the hole in the lid to make it a Fuel-Soaked Torch.
Return to the Treehouse.
Treehouse
Click the stump on the right side of the path to zoom in.
Use the Magnifier on the flame carving.
Left click and drag the beam of light to trace the flame outline into the stump.
Use the Fuel-Soaked Torch (from the fuel barrel at the Cabin Entrance) on the flames inside the stump to make it a Burning Torch.
Click the rope ladder under the treehouse for a closer look.
Place the Branch (from the ground at the Forest Entrance), the Chair Leg (from the floor at the Cabin), and the Bone (from the hidden object scene in the Cabin) on the empty rungs of the rope ladder.
Click the completed Ladder to pull it from the treehouse, then click it again to add it to your inventory.
Go forward to the Wolf Woods.
Wolf Woods
Use the Burning Torch (from the fire under the stump at the Treehouse) on the dry brush pile to light it on fire.
Put the Ladder (completed at the Treehouse) on the tree branch next to the boy.
Take the Book atop the small tornado.
Go back to the Room of Doors.
Room of Doors
After the bridge is extended, click the lower left door to zoom in.
Place the Book (from the tornado at the Wolf Woods) inside the frame in the middle of the door.
Click the door to open it, then go forward to the Ice Cream Parlor.
Chapter 3
Ice Cream Parlor
Click the food shelves to the right of the gumball machine to start the hidden object scene.
Use the green paintbrush (A) on the red ball (B) to make it a Green Ball.
Use the screwdriver (C) on the Screw (D) to remove it from the wall.
Screenshot.
Once the hidden object scene is complete, you will receive a Pirate Hat.
Click the white cake on the left side of the counter to start the puzzle.
To solve this puzzle, color each section of cake with the icing so that no two areas of the same color are touching.
Click any of the four tubes of icing to select it, then click an area of the cake to fill it with that color.
Use the white icing to remove the color from an outlined section of cake.
Solution.
Once the puzzle is solved, click the completed Cake to add it to your inventory.
Click the top cupboard to the left of the doorway to zoom in and take the Saber.
Go forward to the Toy Store.
Toy Store
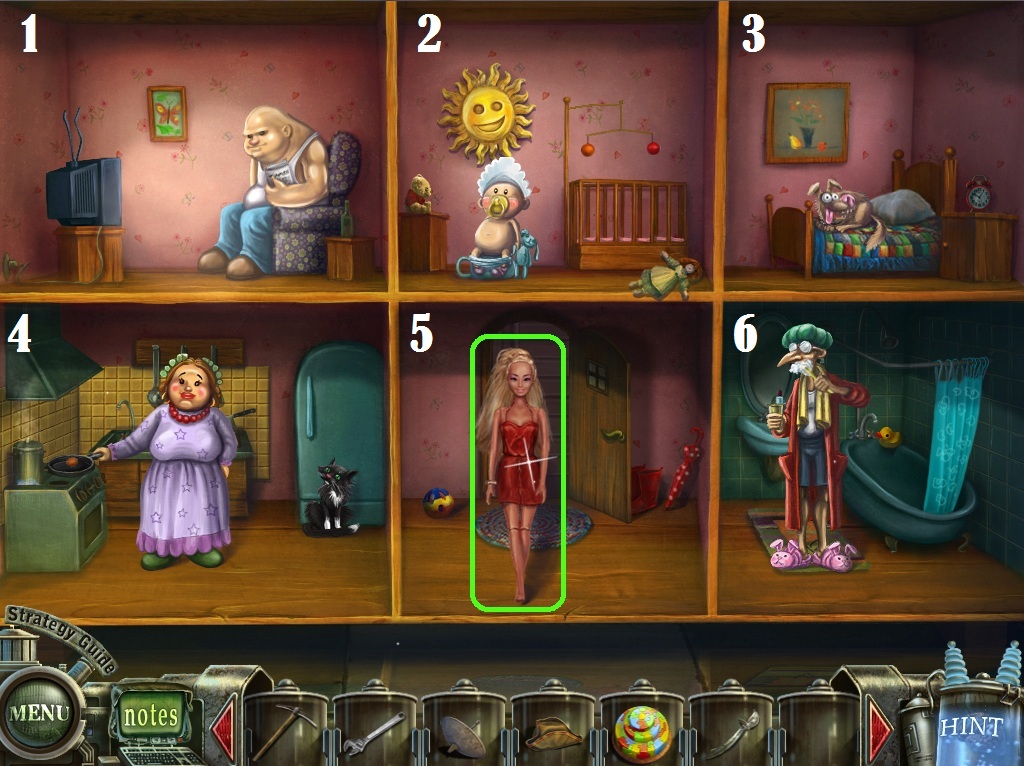
Click the doll house on the floor at the right side of the screen to start the puzzle.
To solve this puzzle, place all of the figurines in the correct rooms.
Click a figurine to select it, then click a room to place them inside it.
Put the bald man with the newspaper in the TV room (1).
Put the baby in the nursery (2).
Put the dog in the bedroom (3).
Put the woman and the cat in the Kitchen (4).
Put the man in the bathroom (6).
Solution.
Take the Doll that walks through the front door of the dollhouse (5).
Go forward to the Figurine Display Room.
Figurine Display Room
Click the toy robot on the pedestal to zoom in.
Use the Wrench (from the Subway Station hidden object scene) on the bolts in the robot's head to receive the Nut.
Click the top right display case to zoom in and take the Tin Soldier.
Go forward to the Book Store.
Book Store
Click the pile of books on the floor to start the hidden object scene.
Click the right page of the open book (A) to reveal the Lion.
Screenshot.
Once the hidden object scene is complete, you will receive the Scissors.
Click the book on the small shelf above the stack of books in the front left corner of the screen.
Click the open book again to find a hint to the cash register code, which is added to your Notes.
Click the book on the stand at the bottom of the bookshelf in the rear left corner of the room to zoom in.
Open the pop-up book to the picture of the knight, then cut his lance with the Scissors to receive the Metal Segment.
Go through the doorway to the Arcade.
Arcade
Give the Cake (from the puzzle on the counter of the Ice Cream Parlor) to the sad dolphin sitting at the table.
Take the Hat from the dolphin.
Take the Parrot from the middle toy shelf.
Click the teddy bear on the top shelf to zoom in and take the Eyepatch.
Click the toy dwarf on the right edge of the second shelf to zoom in and take the smoking Pipe.
Go back to the Ice Cream Parlor.
Ice Cream Parlor
Click the shelves of food to the right of the counter to repeat the hidden object scene.
Use the spoon (A) on the egg (B) to reveal the Chick.
Click the weight at the bottom of the cuckoo clock (C), then click face of the clock (D) to turn the minute and hour hands to 12.
Screenshot.
Once the hidden object scene is complete, you will receive an Angel.
Click the bald doll at the miniature table for a closer look.
Place the Doll (from the dollhouse puzzle in the Toy Store) into the empty chair.
Take the gold Ring on the table.
Click the cash register to zoom in.
Click the CE button to clear any numbers from the register.
Press the buttons on the register to enter in the combination using the clues found from the book in the Book Store.
Screenshot.
Take the Coin from the opened register.
Go forward to the Toy Store.
Toy Store
Click the miniature monastery on top of the toy shelf to zoom in.
Place the Angel (from the hidden object scene in the Ice Cream Parlor) onto the stand at the left.
Take the Holy Water from the toy monk's hand.
Click the small, smoking cave in the bottom left corner to look inside.
Use the Holy Water on the little devil.
Take the pile of Sulfur on the cave floor.
Click the miniature crane to zoom in.
Use the Scissors (from the hidden object scene in the Book Store) on the rope to receive the Hook.
Click the model castle for a closer look, then click the toy wizard to zoom in and take the Ramrod.
Use the Hat (from the birthday dolphin in the Arcade) on the wizard.
Return to the Figurine Display Room.
Figurine Display Room
Click the toy soldiers by the cannon on the right stand for a closer look.
Give the Ramrod (from the wizard figurine in the Toy Store) to the left toy soldier.
Give the Pipe (from the toy dwarf on the shelf in the Arcade) to the right toy soldier.
Click the destroyed miniature tank on the pedestal to zoom in and take the Cannonball.
Click the miniature pirate display case to look inside.
Give the pirate the Pirate Hat (from the hidden object scene in the Ice Cream Parlor), Parrot (from the middle shelf in the Arcade), Eyepatch (from the teddy bear on the shelf in the Arcade), Metal Segment (from the knight's lance in the pop-up book at the Book Store), the Saber (from the top cupboard of the Ice Cream Parlor), and the Hook (from the toy crane in the Toy Store).
Go forward to the Book Store.
Book Store
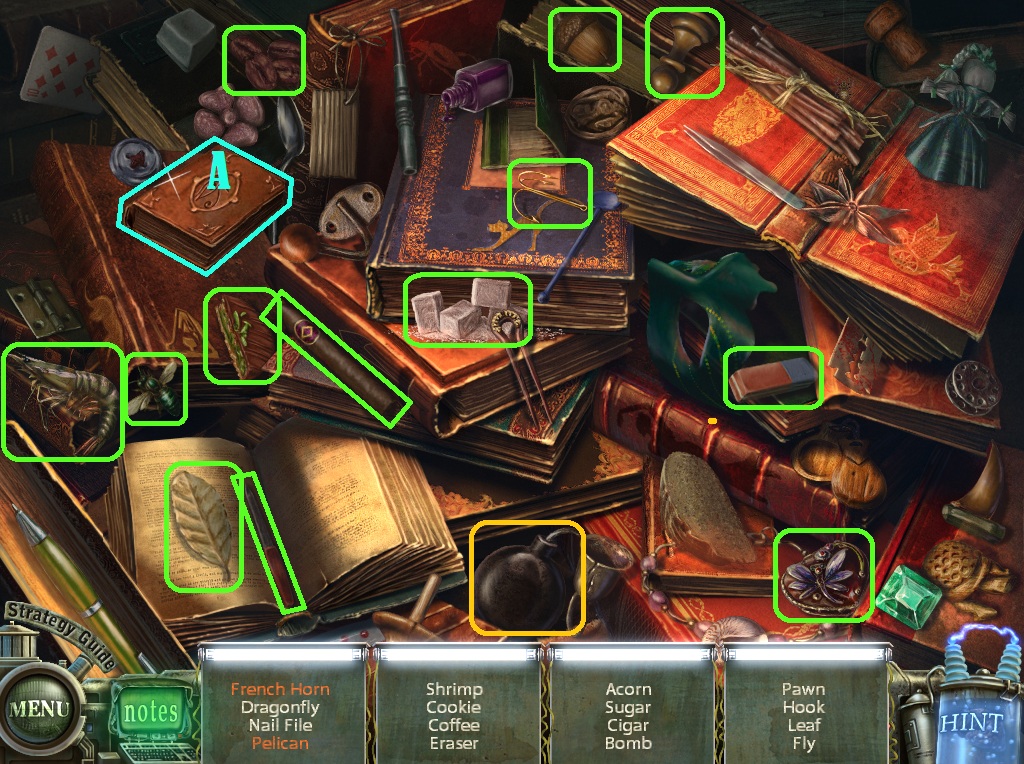
Click the pile of books to repeat the hidden object scene.
Click the closed book (A) to open it, revealing the French Horn and the Pelican.
Screenshot.
Once the hidden object scene is complete, you will receive the Bomb.
Go back to the Figurine Display Room.
Figurine Display Room
Click the pirate display model to look inside.
Give the toy pirate the Bomb (from the hidden object scene in the Book Store).
Take the Plate the pirate throws onto the sand.
Return to the Book Store.
Book Store
Click the large book on the stand at the right side of the room to open it, then click it again for a closer look.
Note that each circle is labelled with the latin word for a specific material.
Place the items from your inventory into the correct circle on the book for their corresponding element.
Place the Cannonball (from the toy tank in the Figurine Display Room) into the ring "plumbum" for lead.
Place the Sulfur (from the miniature cave in the Toy Store) into the ring "sulphur" for sulfur.
Place the Tin Soldier (from the display case in the Figurine Display Room) into the ring "stannum" for tin.
Place the Coin (from the cash register in the Ice Cream Parlor) into the ring "cuprum" for copper.
Place the Plate (from the pirate dislpay in the Figurine Display Room) into the ring "argentum" for silver.
Place the Ring (from the doll's table at the Ice Cream Parlor) into the ring "aurum" for gold.
Place the Nut (from the toy robot's head in the Figurine Display Room) into the ring "Ferrum" for iron.
Screenshot.
Take the Staff from the center of the book.
Go back to the Toy Store.
Toy Store
Click the wizard in the miniature castle for a closer look.
Give the toy wizard the Staff (from the elements book in the Book Store).
Take the Emblem from the dragon's cave.
Return to the Arcade.
Arcade
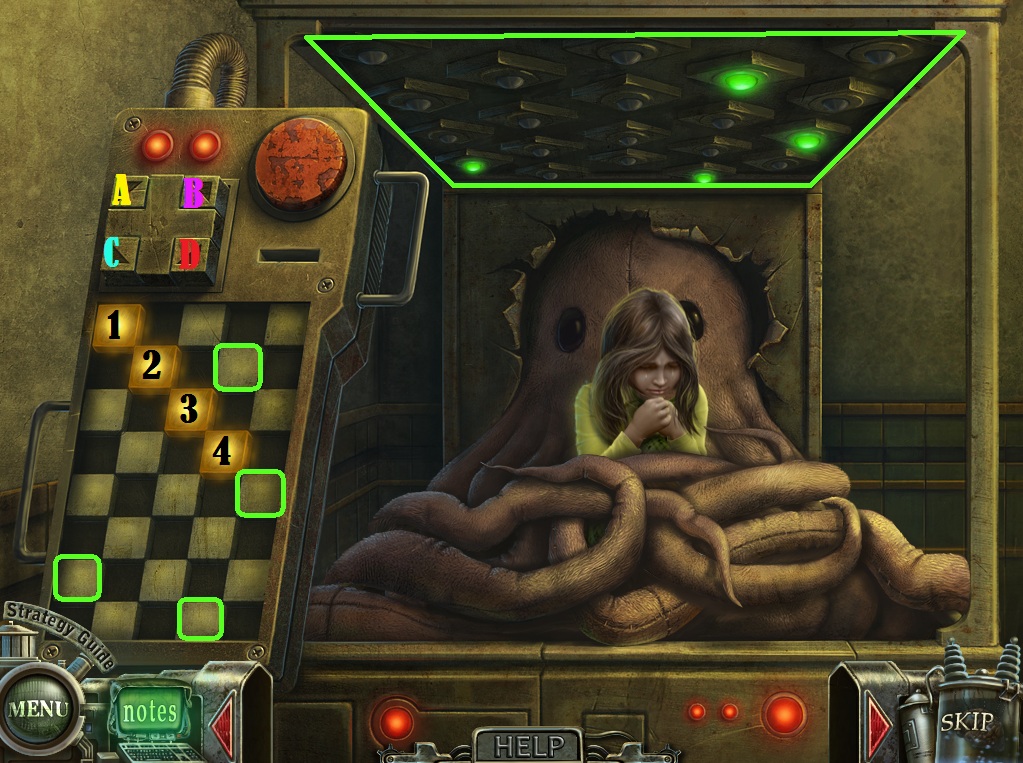
Click the girl in the octopus arcade prison for a closer look.
Use the Emblem (from the miniature dragon's cave of the castle display in the Toy Store) on the coin slot to start the puzzle.
To solve this puzzle, arrange the yellow squares on the board so they are in the same position as the green lights on the ceiling of the arcade game.
Click a yellow square to select it, then click the four direction arrows at the top of the control panel to move the yellow square in that direction.
A yellow square will move to the nearest adjacent tile in the selected direction, and will jump over and other yellow square into the next empty tile.
Press the red button to send out electricity from the roof of the arcade game; if the tiles are correctly positioned, the green lights will switch to blue and electricity will come from each of them.
Screenshot.
Select tile 1.
Click arrow D, arrow C twice, then arrow D.
Select tile 4.
Click arrow C three times
Select tile 3.
Click arrow B.
Select tile 2.
Click arrow D three times.
Solution.
Once the puzzle is solved, speak with the girl, then take the Broken Mirror and Book from the whirlwind.
Go back to the Room of Doors.
Room of Doors
Click the middle red door on the right to zoom in.
Put the Book (from the whirlwind in the Arcade) into the frame in the middle of the door.
Go through the open door to the Bedroom.
Chapter 4
Bedroom
Take the Paint Can on top of the suitcase to the left of the banister.
Click the small heater at the foot of the stairs to zoom in.
Use the Scissors (from the Book Store hidden object scene) to cut the plug, then take the Electrical Cord.
Click under the bed to zoom in and take the Shoe Lace from the boot and the Jam Jar next to the stack of magazines.
Wait for the far left tentacle to retract, then click the baseball to block the far left hole.
Plug the Electrical Cord into the outlet in the wall between the holes.
Back up to the full view of the bedroom, then go through the window on the right to the Jungle Room.
Jungle Room
Take the Axe and the Salamander on the log.
Click the Flask lying on the ground in front of the waterfall, then click it again to add it to your inventory.
Use the Jam Jar (from under the bed in the Bedroom) on the left carnivorous plant.
Use the Axe on the middle carnivorous plant.
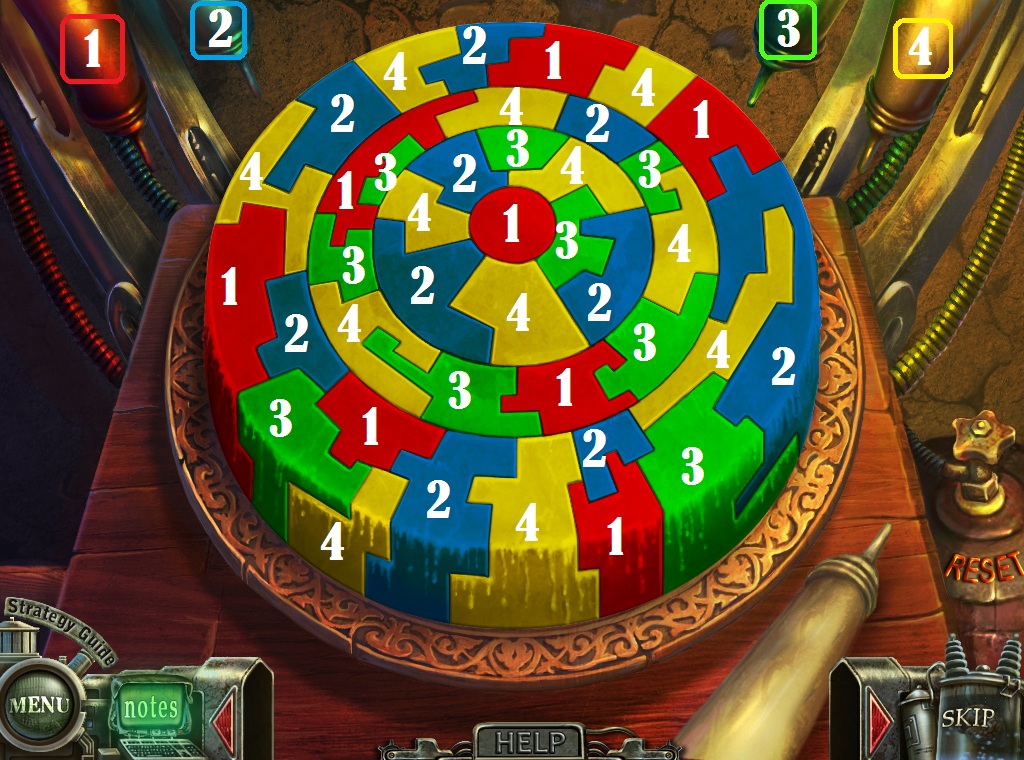
Click the large idol to the left of the waterfall to start the puzzle.
To solve this puzzle, align all the images on the sides of each tile.
Click a tile to select it, right click to rotate it 180 degrees, then left click a position on the board to set it in place.
Solution.
Once the puzzle is solved, take the glowing Eyes from the idol.
Click the beehive hanging above the right carnivorous plant's head, then click it again when it falls on the ground to zoom in.
Use the Paint Can (from the suitcase on the shelf in the Bedroom) to paint the hive black.
Add the Eyes to the black hive.
Go back to the Bedroom, then go through the middle window to the Desert Room.
Desert Room
Click the side of the ruined stone building to start the hidden object scene.
Empty the bag of bird seed (A) to lure the Bird.
Open the box (B) to reveal the Doll.
Screenshot.
Once the hidden object scene is complete, you will receive the Shovel.
Wait for the jinn to finish throwing a whirlwind at you, then use the Flask (from the ground at the Jungle Room) on the jinn to receive a Bottle Tornado.
Use the Salamander (from the log at the Jungle Room) on the large rock at the front of the sand dune.
Place the Antenna (from the stand on the Rooftop) on the fastening attached to the side of the wall of the ruined stone building.
Add the Broken Mirror (from the whirlwind in the Arcade) to the sides of the antenna.
Click the antenna to start the puzzle.
To solve this puzzle, correctly position all the glass shards into the bowl of the antenna.
Click a glass shard to select it, right click to rotate it, and then left click the antenna to set it. If correctly positioned, the shard will lock in place.
Solution.
Go back to the Bedroom, then go through the left window to the Snow Room.
Snow Room
Click the small den in the snow to start the hidden object scene.
Melt the block of ice (A) to reveal the Rose.
Click the sleeping crocodile's head (B) to open the Crocodile Eye.
Screenshot.
Once the hidden object scene is complete, you will receive the Tongs.
Use the Bottle Tornado (from the captured jinn's tornado in the Desert Room) on the tall pile of snow to the right of the snowman.
Click the ice sculpture of the doctor for a closer look.
Use the Pick on the item stuck inside the frozen mouth.
Click the pile of ice to zoom in, then click the ice again to clear the blocks away, revealing the Puzzle Piece (1/2).
Use the Shovel (from the Desert Room hidden object scene) on the snow drift in front of the snowman to reveal the Bowling Ball.
Use the Pick on the ice hanging in the top right corner of the screen, then use the Pick again to free the Puzzle Piece (2/2) from the fallen ice.
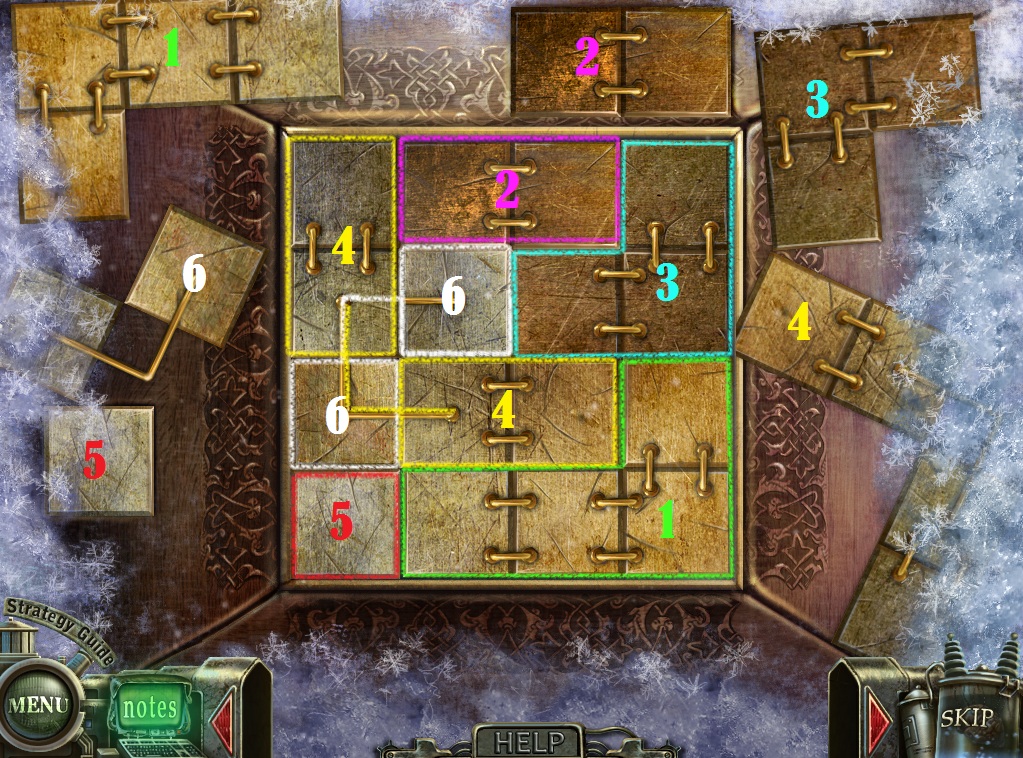
Click the wooden box buried in the snow for a closer look.
Add the two Puzzle Pieces to the lid of the box to start the puzzle.
To solve this puzzle, correctly place the blocks so that they all fit inside the square.
Click a block to select it, right click to rotate it, then left click the board to place it.
Solution.
Once the puzzle is solved, take the Lamp from the open box.
Return to the Desert Room.
Desert Room
Click the rubble beside the destroyed building to repeat the hidden object scene.
Click the dusty wall (A) to reveal the Heiroglyph.
Open the basket (B) to reveal the Snakes.
Screenshot.
Once the hidden object scene is complete, you will receive a Balloon.
Click the lamp under the jinn for a closer look.
Place your own Lamp (from the box puzzle in the Snow Room) on the ground next to the jinn's lamp.
Click the evil jinn's lamp again to banish him.
Use the tongs to pick up the heated salamander on the rock to receive the Fiery Lizard.
Go back to the Snow Room.
Snow Room
Use the Fiery Lizard (from the rock in the Desert Room) on the snowman.
Take the Three Gallon Hat from the pile of melted snow.
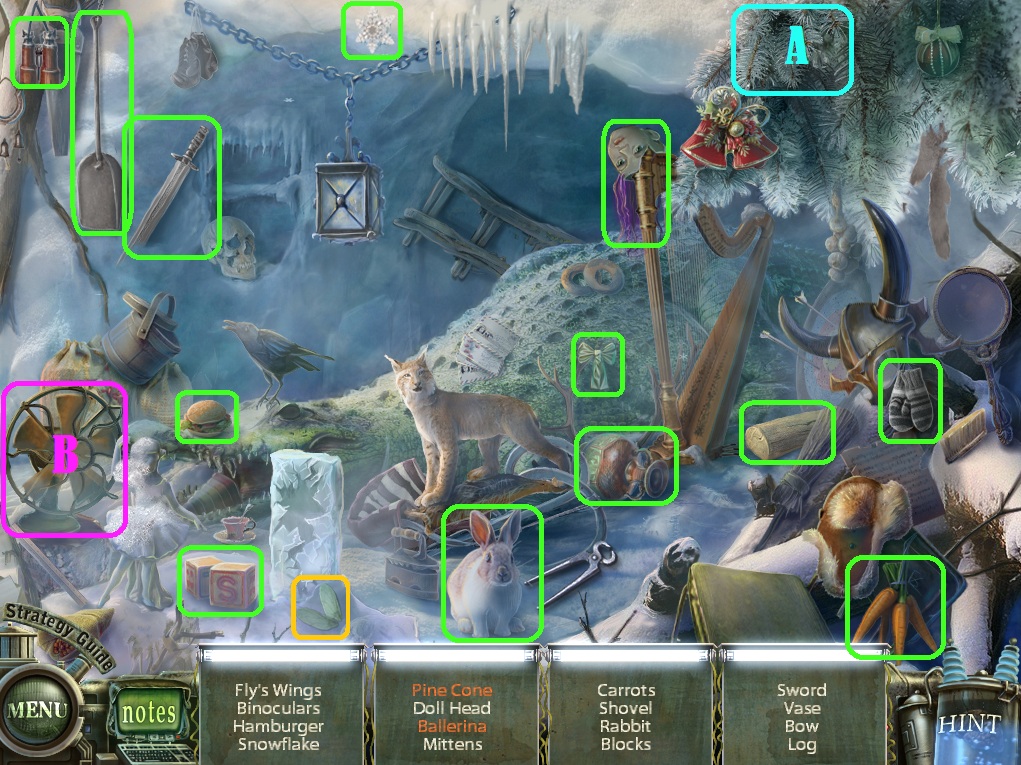
Click the snow den to repeat the hidden object scene.
Move the branches (A) to reveal the Pine Cone.
Turn on the fan (B) to reveal the Ballerina.
Screenshot.
Once the hidden object scene is complete, you will receive the Wings.
Go back to the Jungle Room.
Jungle Room
Click the painted hive on the ground in front of the carnivorous plant to zoom in.
Add the Wings (from the Snow Room hidden object scene) to the hive to complete the fake fly.
Go back to the Bedroom.
Bedroom
Click underneath the bed for a closer look.
Use the Balloon (from the Desert Room hidden object scene) on the air pump stuck between the right bed boards.
Use the Shoe Lace to secure the balloon, then click the air pump to inflate it.
Place the Bowling Ball (from underneath the snow drift in the Snow Room) on the rug, then click the ball to roll it into the 4th hole.
Go back to the main view of the bedroom.
Speak with the boy, then take the Book from the whirlwind.
Go back to the Room of Doors.
Room of Doors
Click the black doorway at the upper left to zoom in.
Place the Book (from the whirlwind in the Bedroom) into the frame in the middle of the door.
Click the door to open it, then go forward to the Gate.
Chapter 5
Gate
Click the top of the gate to zoom in and click the Keys, then pick them up off the ground to add them to your inventory.
Use the Pick (from the wall in the Floating Walkway), then pick up the loose Stone.
Go back to the Subway Station.
Subway Station
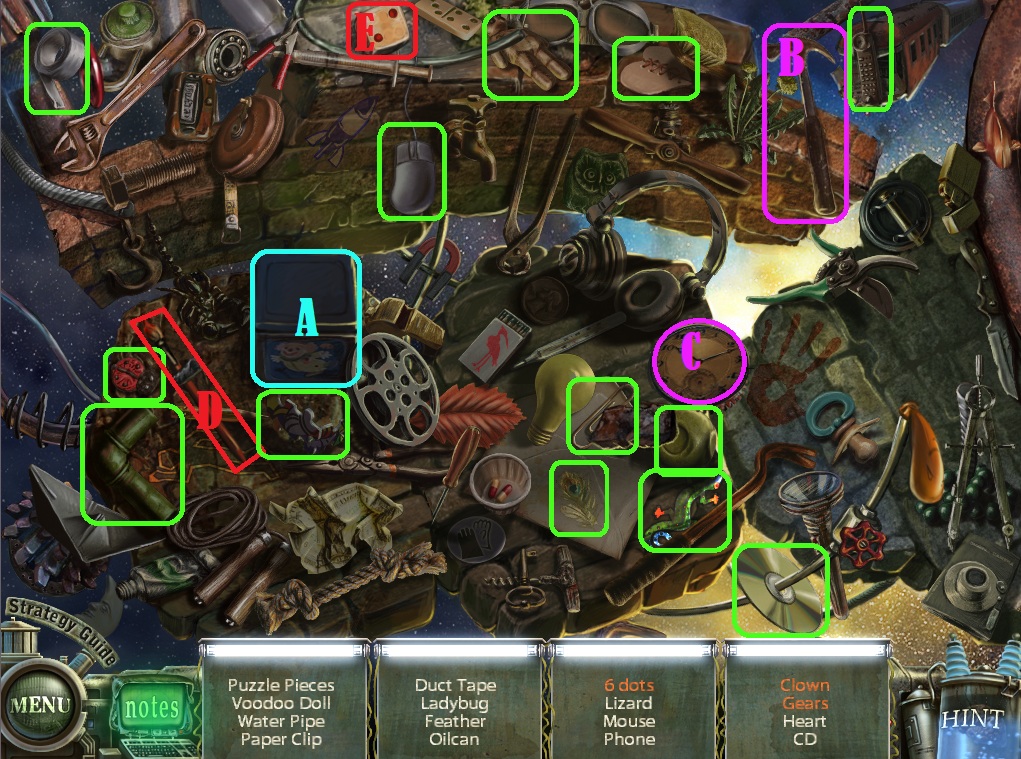
Click the wall cabinet to repeat the hidden object scene.
Use the nail (A) on the roman numeral on the broken wall (B) to scratch the number XIII.
Use the sponge (C) on the blackboard (D) to fix the equation 1+1=2.
Screenshot.
Once the hidden object scene is complete, you will receive a Lamp.
Go back to the floating walkway.
Floating Walkway
Click the leaking pipe to zoom in.
Use the Three Gallon Hat (from the melted snowman) on the water to make it a Hat with Water.
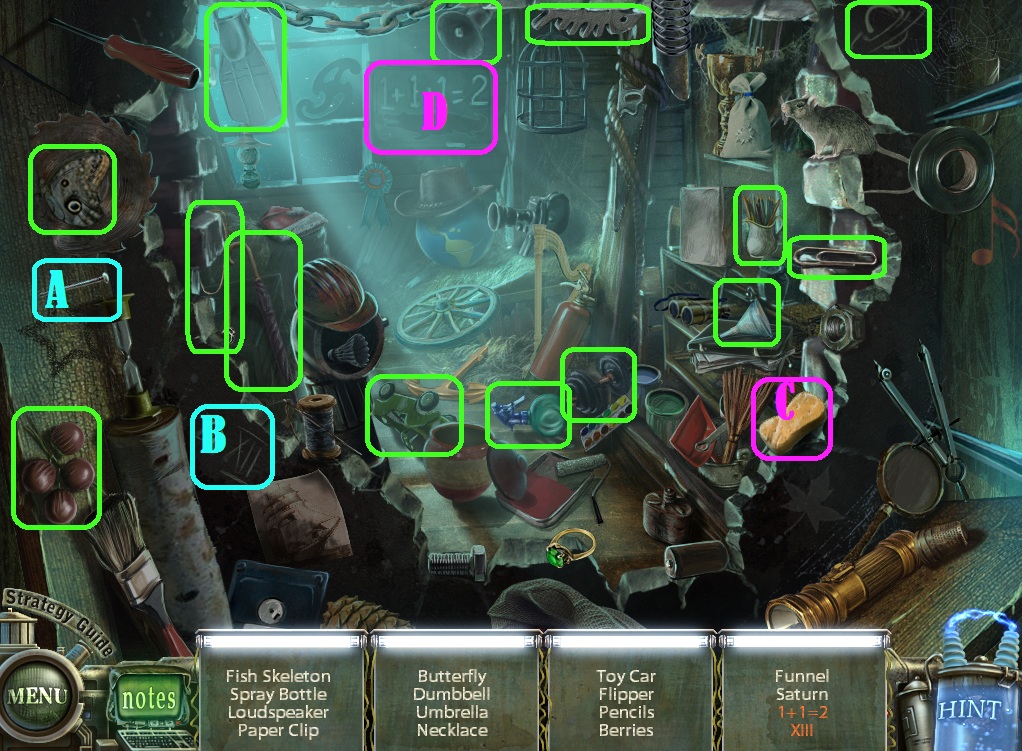
Click the broken floor beside the right pipe to start the hidden object scene.
Click the jack-in-the-box (A) to reveal the Clown.
Use the hammer (B) on the clock face (C) to reveal the Gears.
Use the paintbrush (D) on the die (E) to paint 6 Dots.
Screenshot.
Once the hidden object scene is complete, you will receive a Water Pipe.
Return to the Gate.
Gate
Use the Hat with Water (from the Floating Walkway) on the dead plants blocking the small gate to the right of the main entrance.
Click the lock of the small gate to zoom in.
Use the Keys on the keyhole to open the gate.
Go forward to the Graveyard Entrance.
Graveyard Entrance
Click the stick in front of the skull on the rocks to zoom in and take the Tow.
Place the Stone (from the pile of rocks at the Gate) on the first step leading to the tomb on the left to rase the gate.
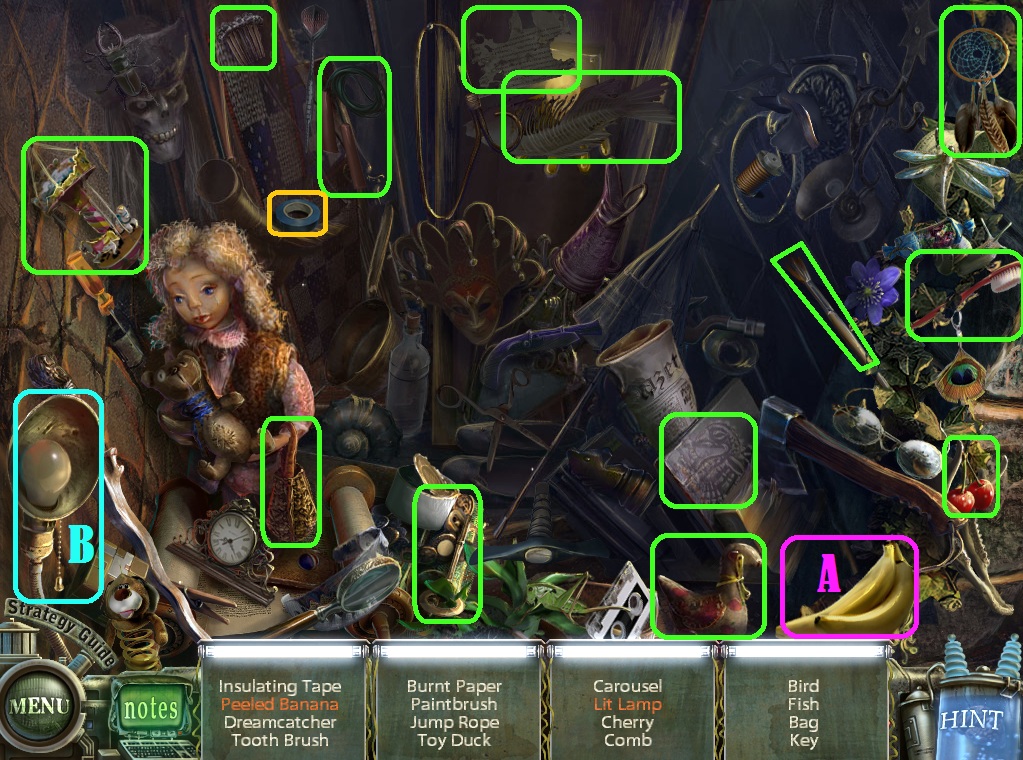
Click the open tomb to start the hidden object scene.
Click the bananas (A) to make it a Peeled Banana.
Pull the chain attached to the lamp to make it a Lit Lamp.
Screenshot.
Once the hidden object scene is complete, you will receive Insulating Tape.
Click the grate in the ground beside the fountain to remove it, then click it again to look inside.
Use the Water Pipe (from the Floating Walkway hidden object scene) on the empty space between the two pipes.
Click the valve to start the flow of water.
Use the Tow and then the Insulating Tape on the leaking pipes.
Click the floating paper boat to unfold it, then click the piece of paper to receive the Instruction.
Go right to the Graveyard East area.
Graveyard East
Take the Shield (1/3) on the ground beside the grasping skeleton arms.
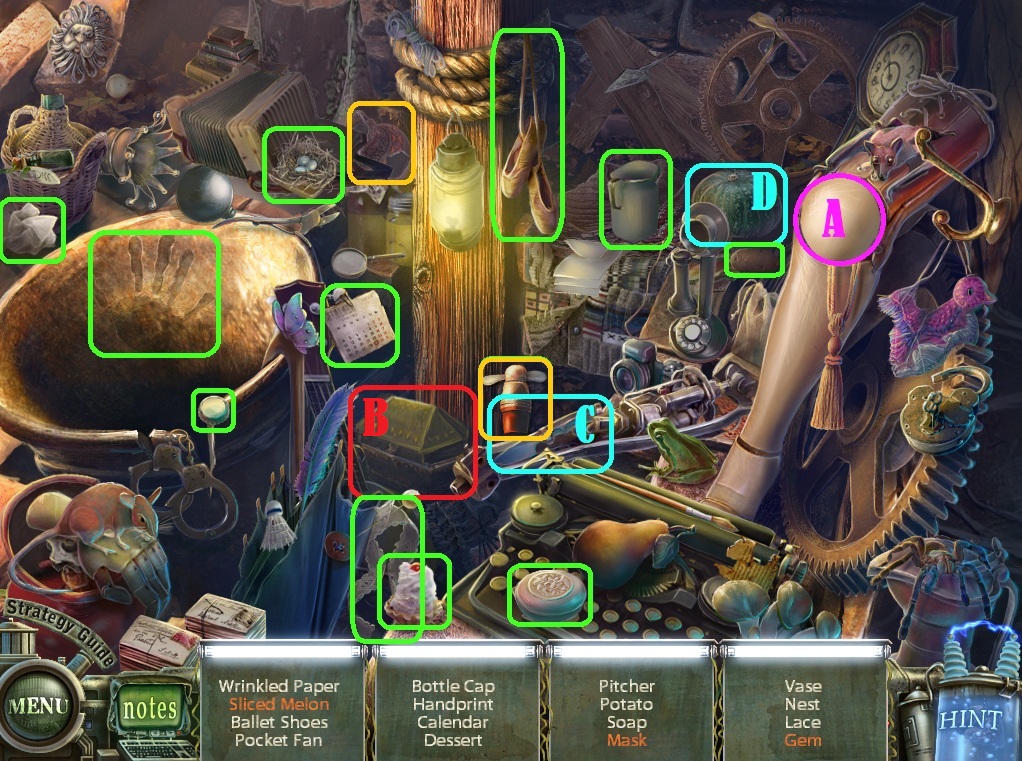
Click the archway to the right to begin the hidden object scene.
Click the kneecap of the plastic leg (A) to reveal the Gem.
Open the small chest (B) to reveal the Mask.
Use the knife (C) on the melon (D) to make a Sliced Melon.
Screenshot.
Once the hidden object scene is complete, you will receive a Fan.
Click the archway again to repeat the hidden object scene.
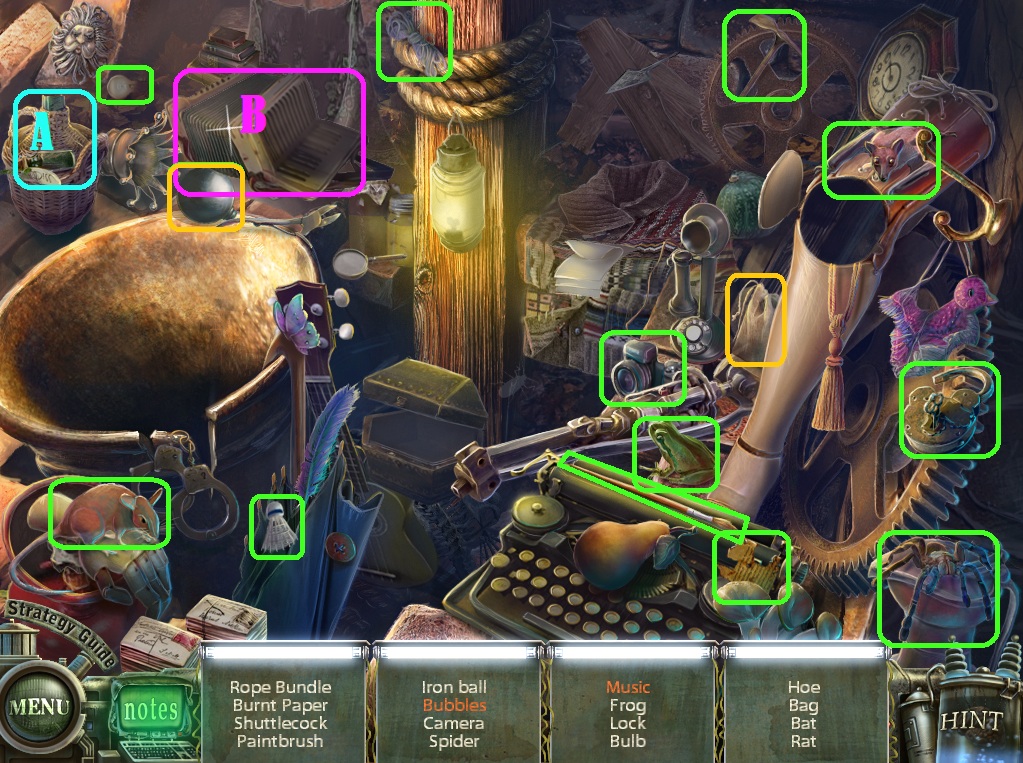
Open the bottle (A) to release the Bubbles.
Click the accordion (B) to play the Music.
Screenshot.
Once the hidden object scene is complete, you will receive an Iron Ball.
Go back to the Graveyard Entrance.
Graveyard Entrance
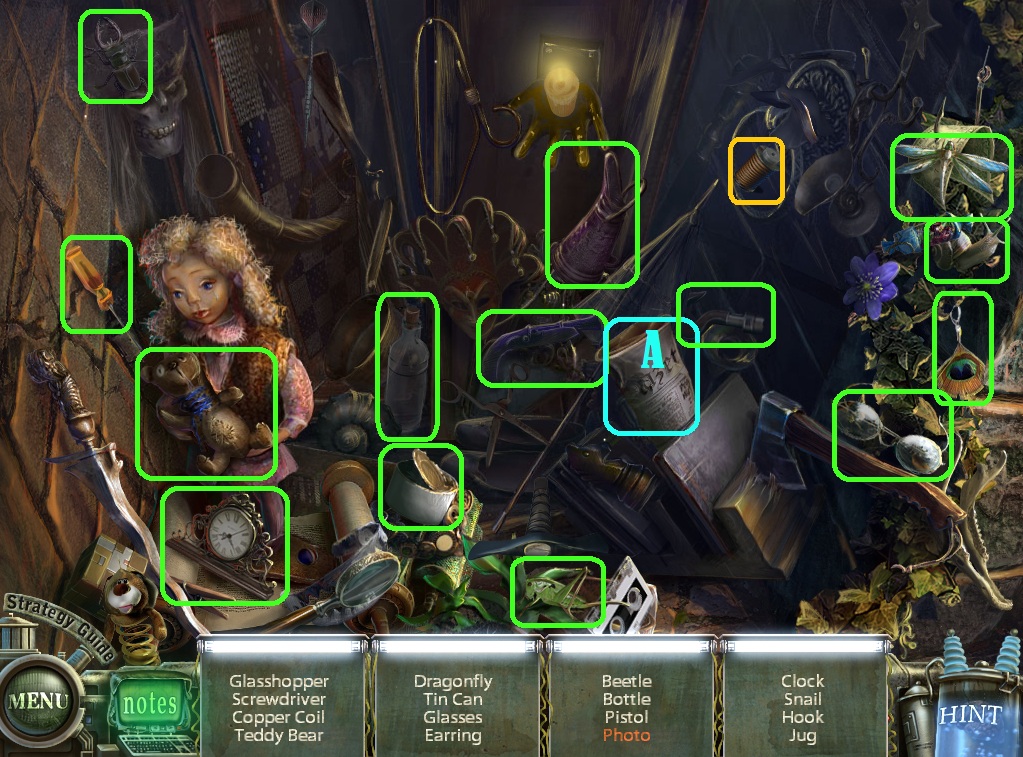
Click the open tomb to repeat the hidden object scene.
Click the newspaper to reveal the Photo.
Screenshot.
Once the hidden object scene is complete, you will receive a Conductor.
Follow the left path to the Graveyard West area.
Graveyard West
Click the door to the tomb up the flight of stairs for a closer look.
Take the head of the Spear from the right guard's weapon.
Click the front right grave to zoom in.
Use the Fan on the pile of leaves.
Use the Spear to pry the Shield (2/3) from the top of the grave.
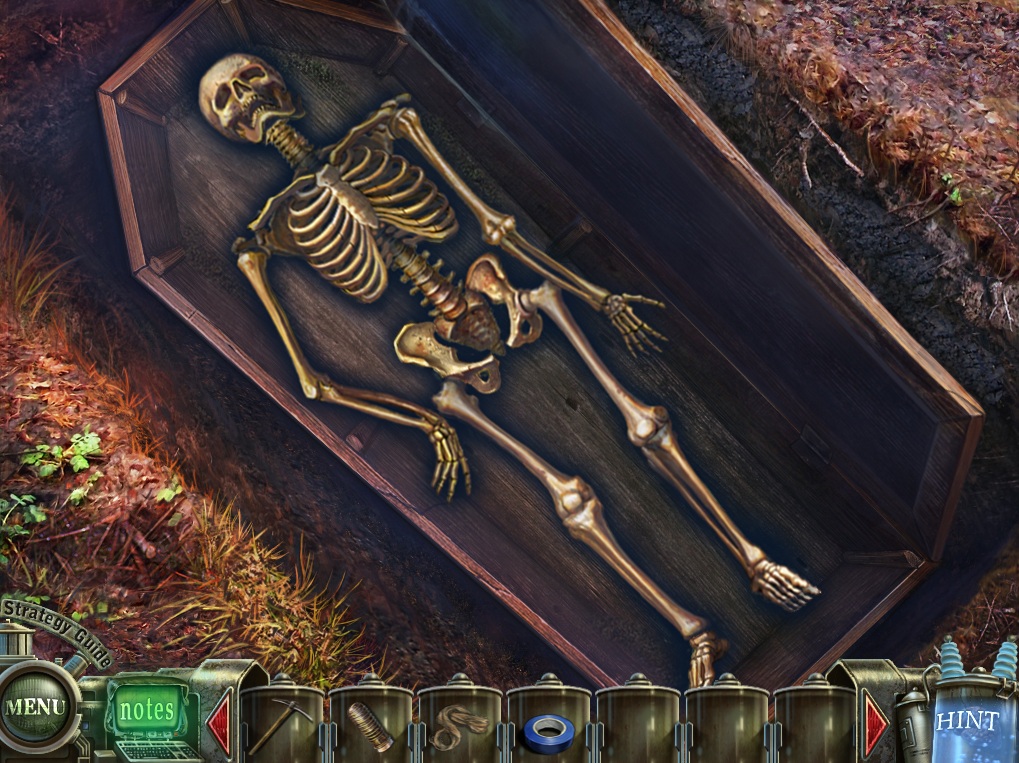
Click the dug up grave on the left side of the path to start the puzzle.
To solve this puzzle, assemble all the bones to complete the skeleton.
Click a bone to select it, then click a place inside the coffin to set it.
If correctly positioned, the bone will lock in place.
Solution.
Once the puzzle is solved, take the Shield (3/3) from the closed casket.
Click the door of the tomb again to zoom in.
Replace the right guard's Spear tip so that they no longer block the doorway.
Place each of the three Shields (1/3 from the ground in the Graveyard East, one from the grave in the Graveyard West, and one from the skeleton puzzle) into their matching empty spaces on the door.
Go through the open door into the Crypt.
Crypt
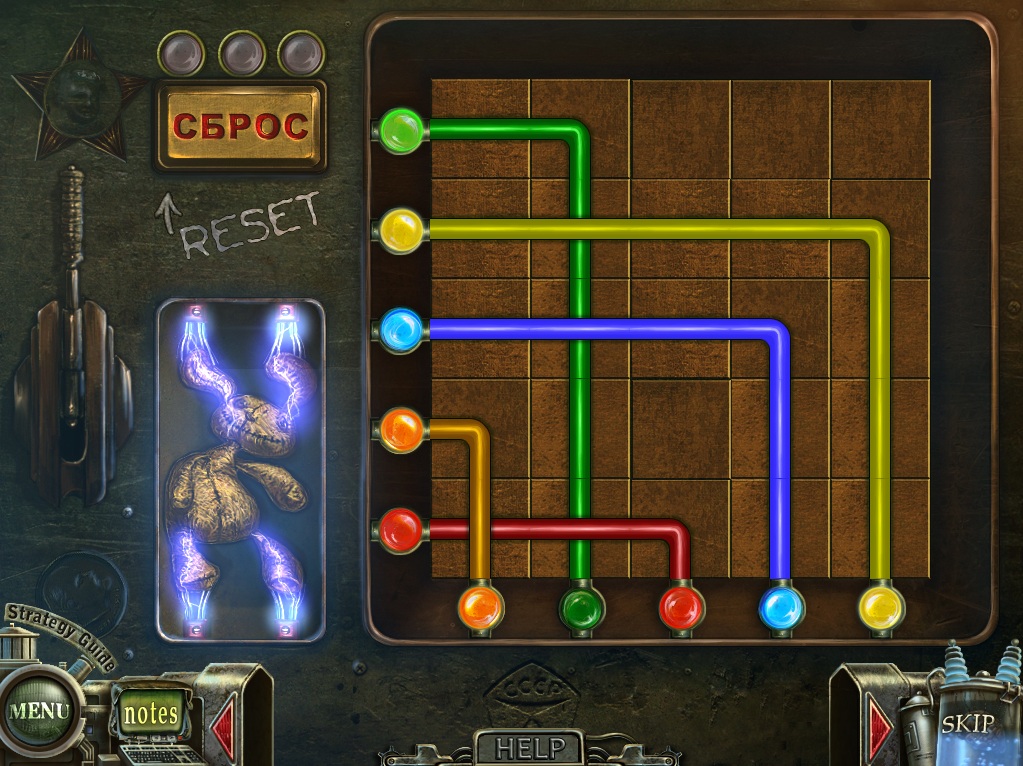
Click the machine behind the skeleton to zoom in.
Place the Instruction (from the fountain in the Graveyard Entrance) onto the wall, then follow the instructions to complete the device.
Put the Conductor (from the Graveyard Entrance hidden object scene) into the indicated space on the right.
Put the Iron Ball (from the Graveyard East hidden object scene) into the indicated space the top of the left coil.
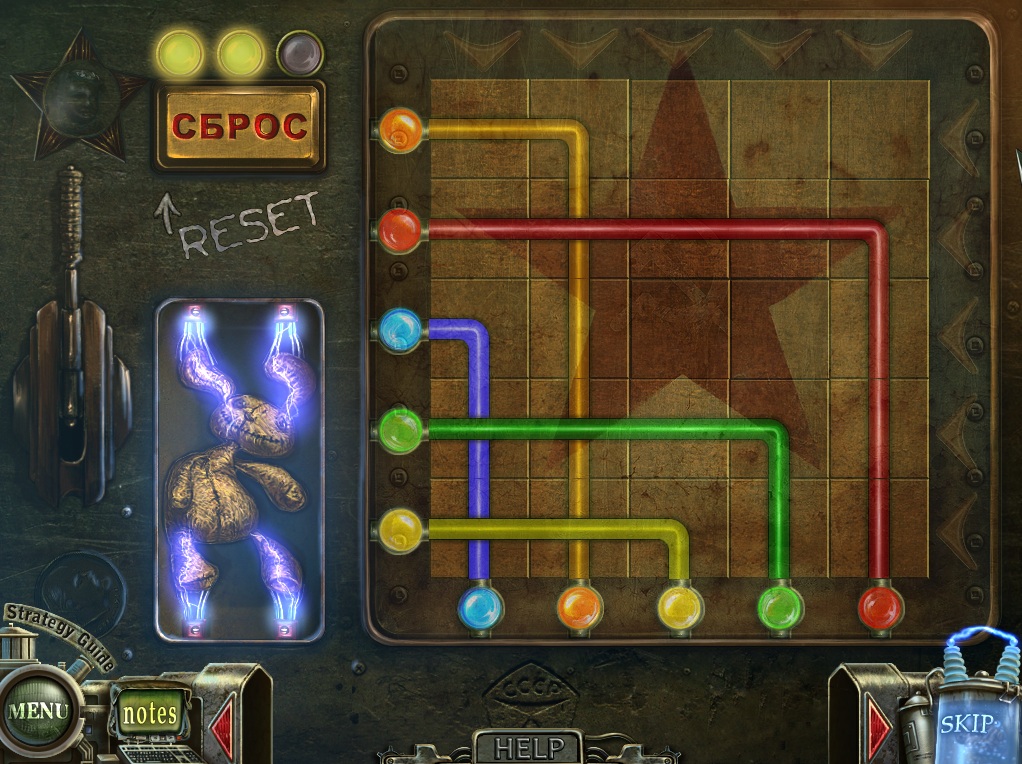
Put the Lamp (from the Subway Station hidden object scene) into the indicated space on the left to start the puzzle.
To solve this puzzle, light all of the blue bulbs inside the three panels.
Click a bulb to select it: This will also turn all other lights connected to it either on or off.
Solution.
Click the ring on the left wall holding the chandelier to zoom in.
Use the Pick (from the wall of the Floating Walkway) on the rod blocking the chain.
Return to the Graveyard East area.
Graveyard East
Use the Pick three times on the unmoving skeletal hands to destroy them.
Speak with the girl, then take the Book at the top of the whirlwind.
Go back to the Room of Doors.
Room of Doors
Click the top right door to zoom in.
Use the Book (from the whirlwind in the Graveyard East) on the frame at the middle of the door.
Click the door to open it, then go forward to the Museum Entrance.
Chapter 6
Museum Entrance
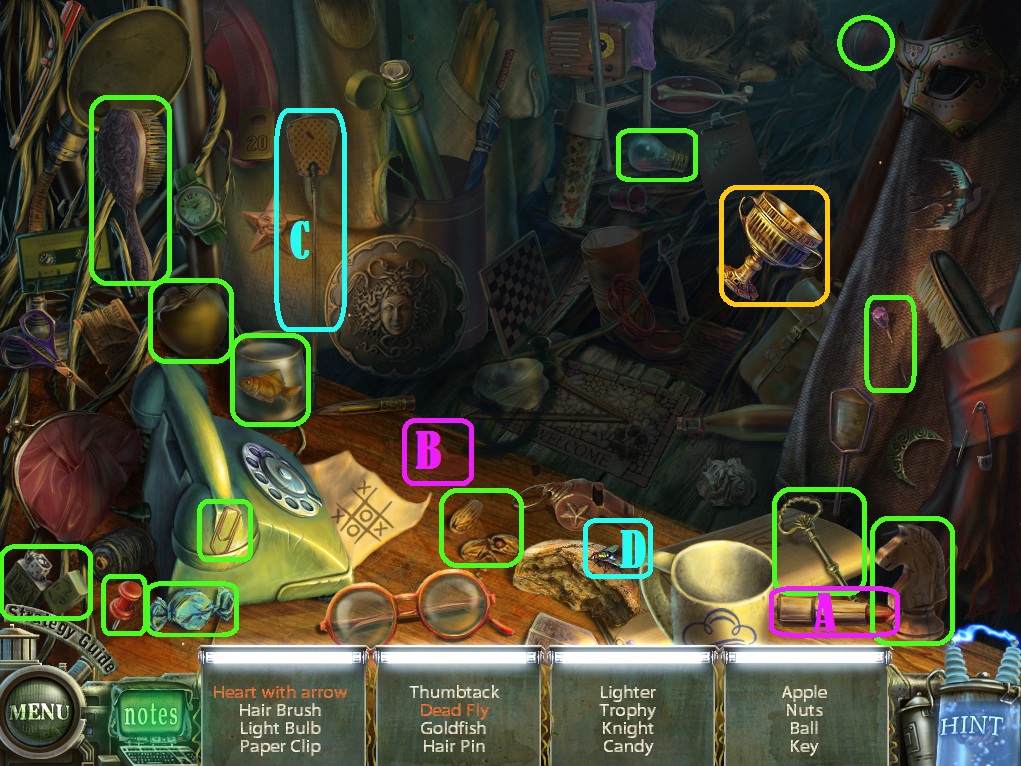
Click the coat rack to start the hidden object scene.
Use the lipstick (A) on the heart (B) to draw the Heart with Arrow.
Use the flyswatter (C) on the fly (D) to make a Dead Fly.
Screenshot.
Once the hidden object scene is complete, you will receive a Chalice.
Click the statuette on top of the right banister to zoom in and take the Lira.
Click the metal elecricity door on the right wall to zoom in and take the Lightning.
Go through the left archway to the Viking Exhibit.
Viking Exhibit
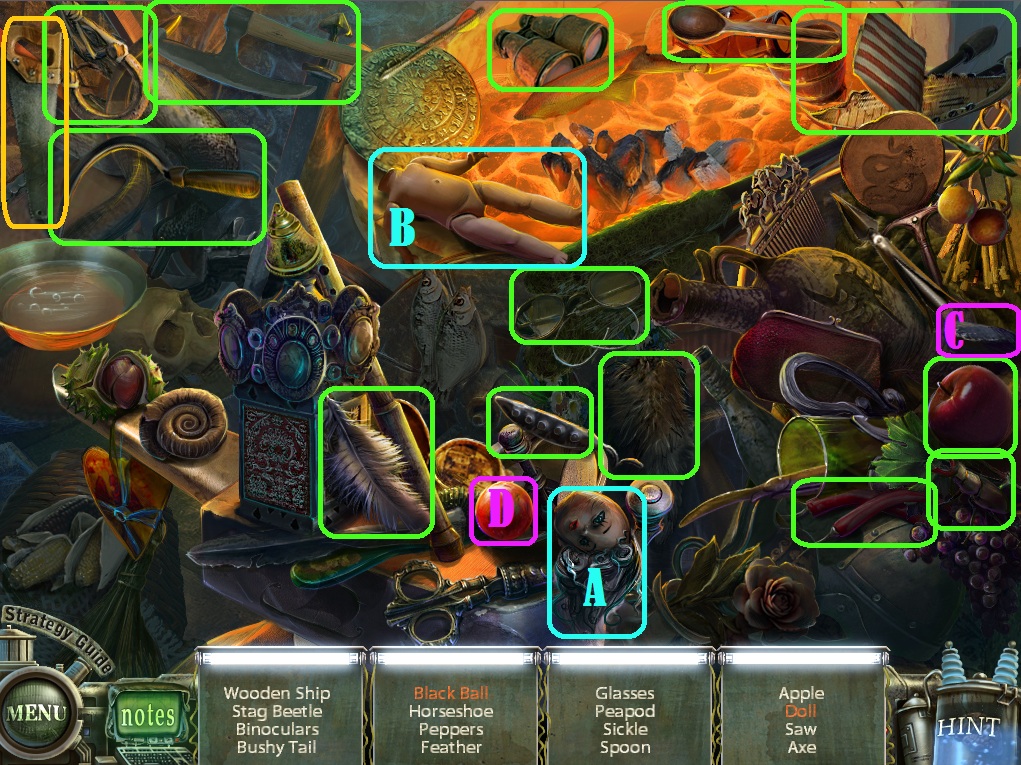
Click the area under the tent to start the hidden object scene.
Put the doll head (A) on the doll body (B) to complete the Doll.
Use the charcoal (C) on the red ball (D) to make it a Black Ball.
Screenshot.
Once the hidden object scene is complete, you will receive a Saw.
Take the Rope on the wooden dock in front of the viking ship.
Click the viking inside the ship for a closer look.
Use the Saw on the viking's helmet to cut off the Horn.
Click the barrel to the left of the ship to zoom in.
Click the lid of the barrel to remove it and take a Fish.
Click the rocks to the right of the ship to zoom in.
Place the Fish on top of the rock.
Take the Wings from the seagull that lands on the rock.
Click the double doors to open them, then go forward to the Middle Ages Exhibit.
Middle Ages Exhibit
Click the visor on the helmet of the suit of armor to reveal the Crown.
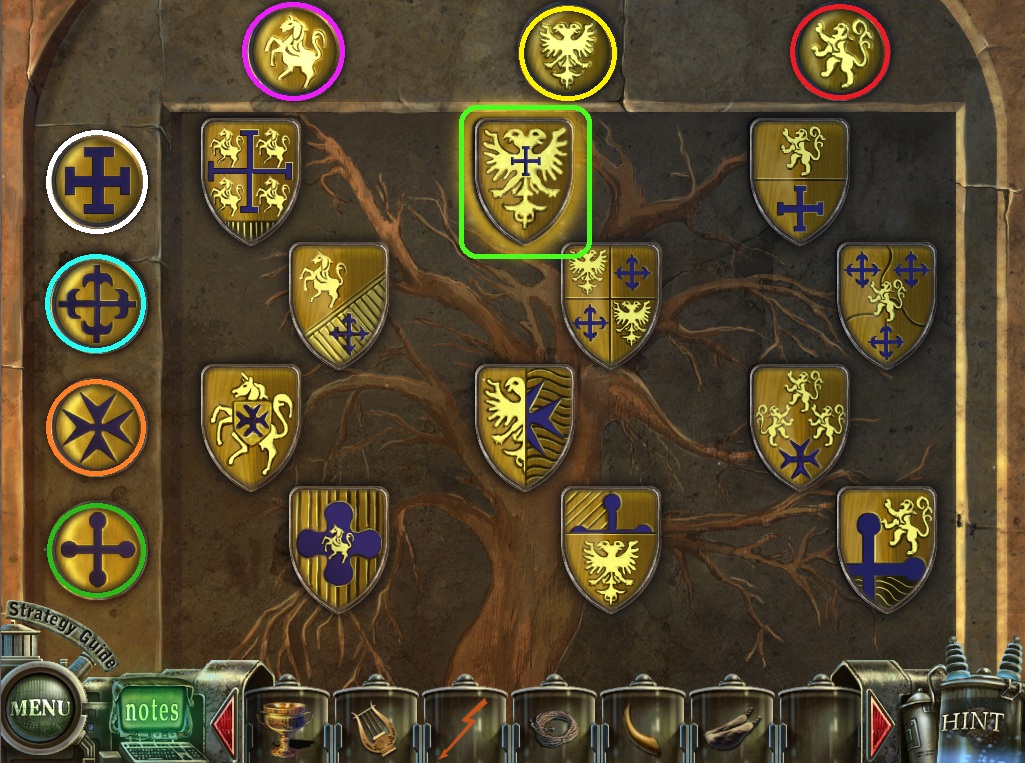
Click the tree relief on the right wall to start the puzzle.
To solve this puzzle, organize all of the shields into the correct rows and columns.
Note the circled symbols on the top and left of the board; each of the shields in their parallel row or column must contain that image in its crest.
Click a shield to select it, then click a different shield to exchange positions.
Solution.
Once the puzzle is solved, take the glowing Shield at the top of the board.
Click the miniature jousting figurines to zoom in.
Give the Shield to the right knight.
Take the Sword from the fallen knight.
Go back to the Viking Exhibit.
Viking Exhibit
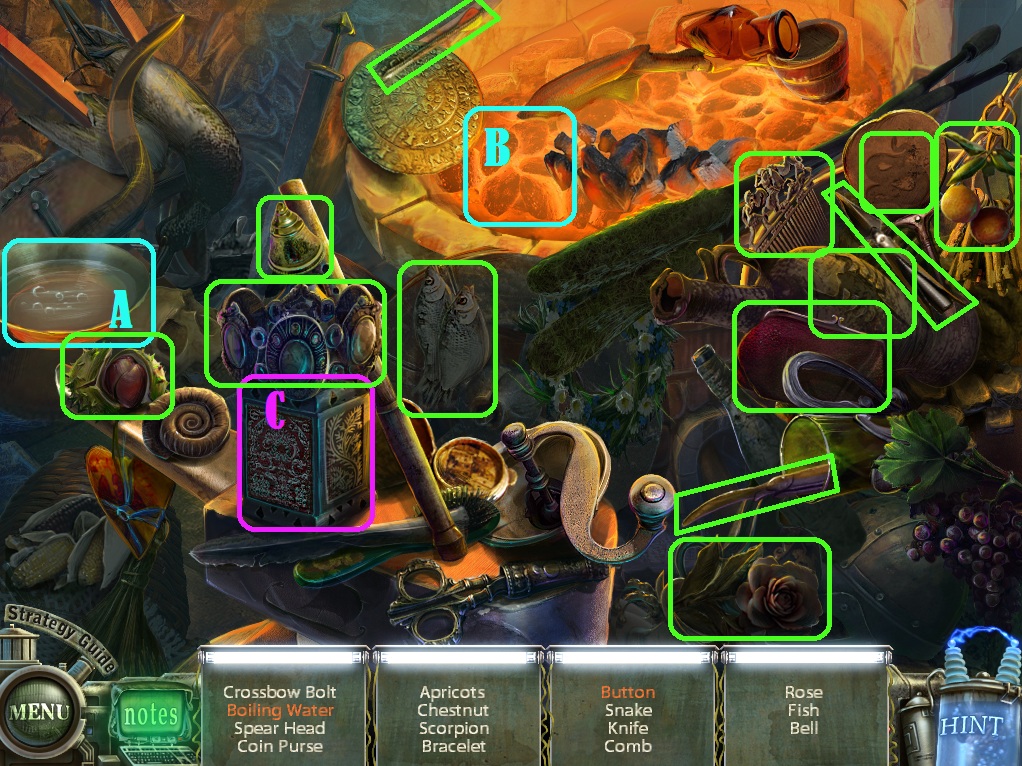
Click the area under the tent to repeat the hidden object scene.
Put the bowl of water (A) over the hot coals (B) to make it Boiling Water.
Open the lantern (C) to reveal the Button.
Screenshot.
Once the hidden object scene is complete, you will receive the Bolt.
Return to the Middle Ages Exhibit
Middle Ages Exhibit
Click the William Tell mannequin to zoom in.
Load the crossboaw with the Bolt (from the Viking Exhibit hidden object scene), then take the Apple that rolls to the ground.
Go back to the Museum Entrance.
Museum Entrance
Click the coat rack to repeat the hidden object scene.
Click the thread (A) to reveal the Needle.
Use the pencil (B) on the paper (C) to draw the Tic-Tac-Toe.
Screenshot.
Once the hidden object scene is complete, you will receive the Shield.
Go through the right archway to the Prehistoric Exhibit.
Prehistoric Exhibit
Click the mannequin sitting beside the fire to zoom in and take the Bow.
Go through the right doorway to the Greek Exhibit.
Greek Exhibit
Click the gladiators to zoom in and take the Hammer and the Trident.
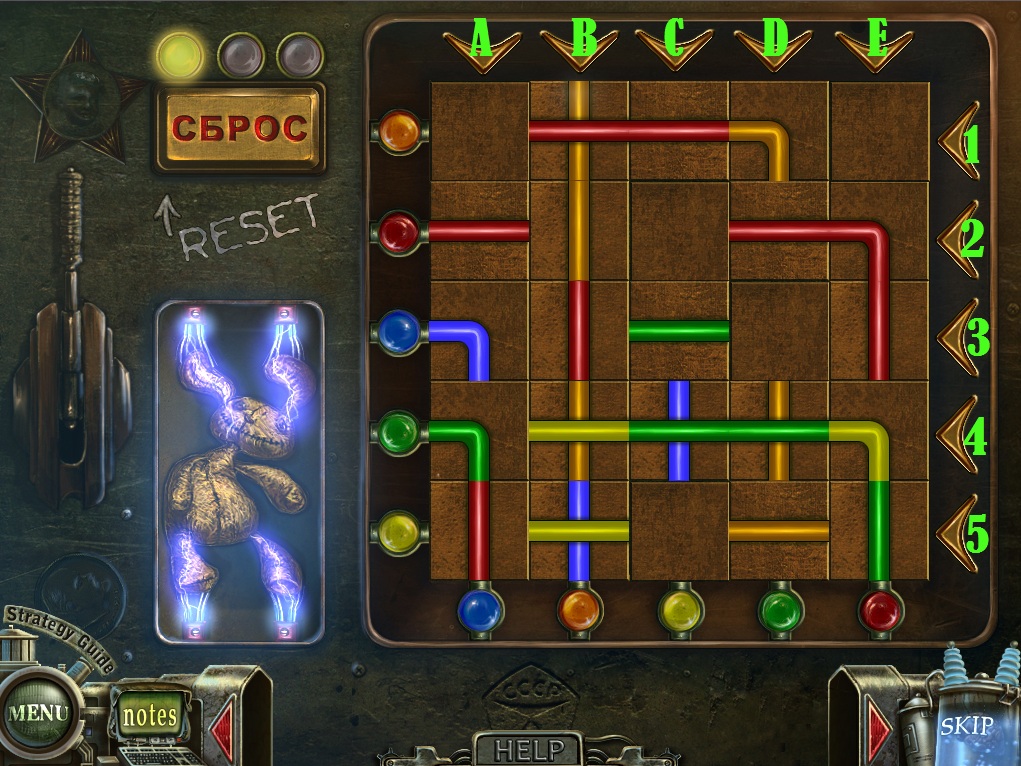
Click the laser grid on the left wall to start the puzzle.
To solve this puzzle, move the nodes so that none of the laser paths are crossing.
Click and drag a node to move it across the board, then release it to set it in place.
Solution.
Once the puzzle is solved, the security block will lift, revealing 12 of the Greek gods who each need an item from your inventory to be complete.
Give the Lightning (from the electricity door at the Museum Entrance) to Zeus at the 12 o' clock position in the circle.
Give the Chalice (from the Museum Entrance hidden object scene) to Bacchus at the 1 o' clock position in the circle.
Give the Apple (from the William Tell crossbow shot at the Middle Ages Exhibit) to Aphrodite at the 2 o' clock position in the circle.
Give the Sword (from the miniature jousting night at the Middle Ages Exhibit) to Hera at the 3 o' clock position in the circle.
Give the Bow (from the hunter mannequin at the Prehistoric Exhibit) to Artemis at the 4 o' clock position in the circle.
Give the Lira (from the statuette on the stair at the Museum Entrance) to Apollo at the 5 o' clock position in the circle.
Give the Trident to Poseidon at the 6 o' clock position in the circle.
Give the Crown (from the suit of armor helm at the Middle Ages Exhibit) to Ares at the 7 o' clock position in the circle.
Give the Wings (from the seagull at the Viking Exhibit) to Hermes at the 8 o' clock position in the circle.
Give the Horn (from the viking's helmet at the Viking Exhibit) to Hades at the 9 o' clock position in the circle.
Give the Hammer to Hephaestus at the 10 o' clock position in the circle.
Give the Shield (from the hidden object scene) to Athena at the at the 11 o' clock position in the circle.
After the minigame is complete, take the revealed Helmet.
Click the broken pedestal in front of the warrior statue.
Use the Helmet on the statue of Hector to the right.
Go back to the Prehistoric Exhibit.
Prehistoric Exhibit
Use the Rope (from the dock in the Viking Exhibit) on the spear sticking out of the wall.
Go back to the room of doors.
Room of Doors
Go through the floating doorway at the upper left to travel to the Space Path.
Chapter 7
Space Path
Click the large building in the distance to zoom in and take the Board.
Use the Board on the gap between the floating stone on the left and the pathway.
Click the Octopus sitting on the stone to add it to your inventory.
Click the building again for a closer look.
Use the Octopus on the relief in the middle of the door.
Click the door to open it, then go forward to Blackmore's Lair.
Blackmore's Lair
Click the bottom of the stairway to zoom in and take the Skeleton.
Go through the middle door to the Child's Bedroom.
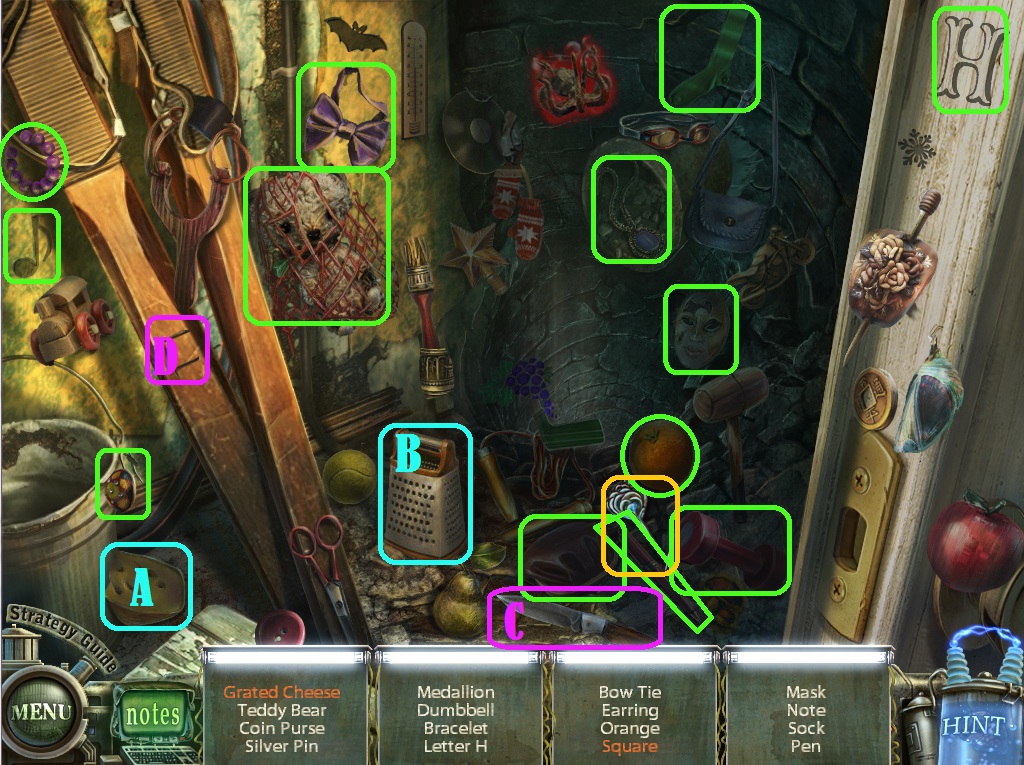
Child's Bedroom
Click the closet door to open it, then click inside the closet to start the hidden object scene.
Use the cheese (A) on the grater (B) to make Grated Cheese.
Use the knife (C) on the carving (D) to complete the Square.
Screenshot.
Once the hidden object scene is complete, you will receive the Pin.
Lift the front left corner of the rug to reveal the Key.
Click the trunk to the right of the bed to zoom in.
Use the Key to unlock the trunk, then take the bundle of Monsters inside.
Go back to Blackmore's Lair, then go through the right door into the Room of Mirrors.
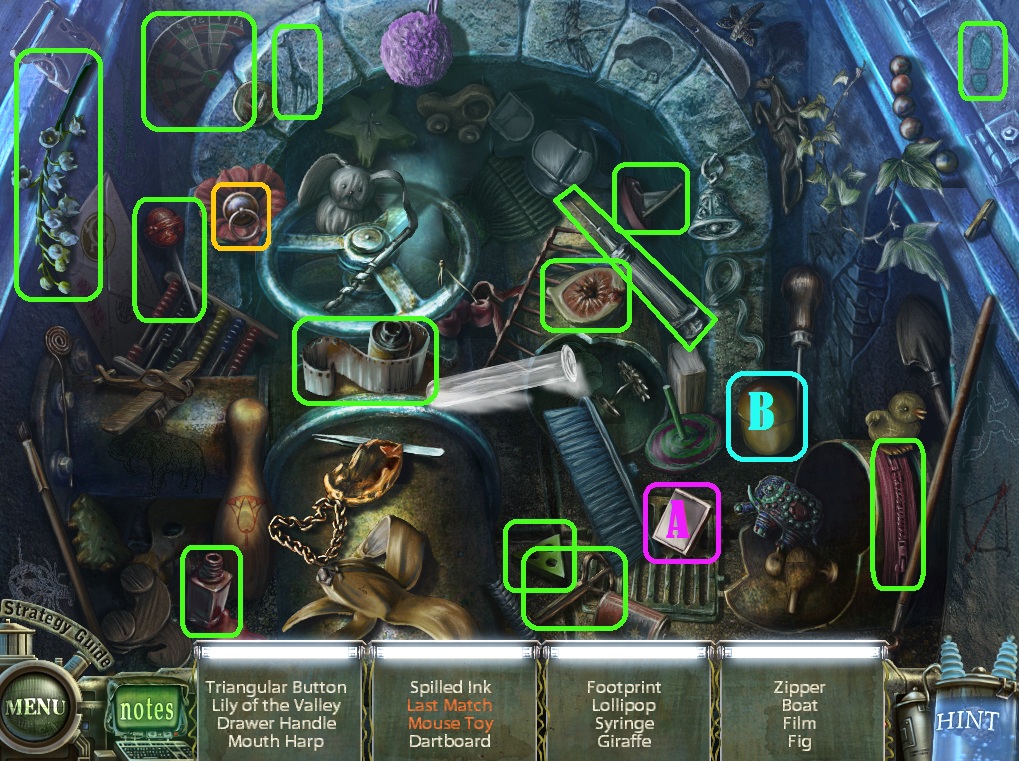
Room of Mirrors
Use the Monsters (from the trunk in the Child's Bedroom) on the mirror hanging on the back wall.
Use the Skeleton (from under the stairs in Blackmore's Lair) on the back right mirror.
Click the grate in the floor to zoom in.
Use the Pin (from the hidden object scene in the Child's Bedroom) on the padlock.
Click the open hatch to start the hidden object scene.
Open the matchbox (A) to find the Last Match.
Open the plastic cup (B) to reveal the Mouse Toy.
Screenshot.
Once the hidden object scene is complete, you will receive the Drawer Handle.
Return to the Child's Bedroom.
Child's Bedroom
Click the open closet to repeat the hidden object scene.
Click the cocoon (A) to reveal the Butterfly.
Use the hammer (B) on the trash can (C) to find the Lizard.
Screenshot.
Once the hidden object scene is complete, you will receive the Octopus.
Click the cabinet to the left of the bed to zoom in.
Use the Drawer Handle (from the hidden object scene in the Room of Mirrors) on the space in the middle of the top drawer.
Open the drawer and take the Dinosaur inside.
Go back to the Room of Mirrors.
Room of Mirrors
Use the Octopus (from the Child's Bedroom hidden object scene) on the rear left mirror.
Use the Dinosaur (from the top cabinet drawer in the Child's Bedroom) on the front right mirror.
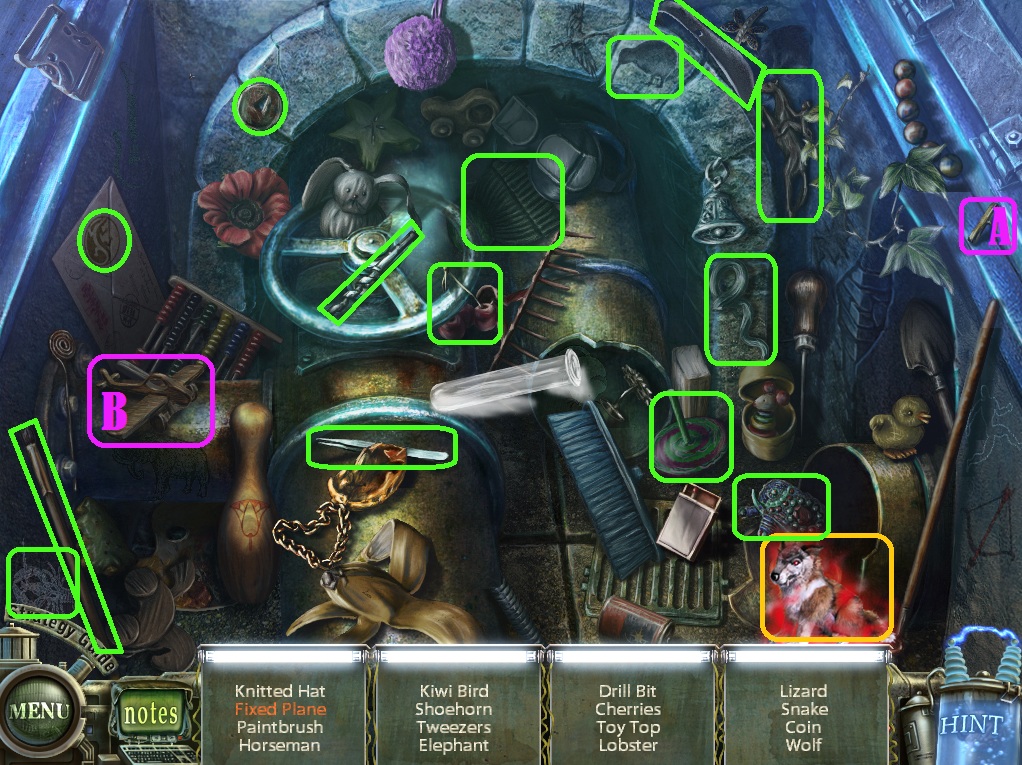
Click the hatch to repeat the hidden object scene.
Use the propeller (A) on the toy plane (B) to make the Fixed Plane.
Screenshot.
Once the hidden object scene is complete, you will receive the Wolf.
Use the Wolf on the front left mirror.
After all of the mirrors have been dispelled, take the Toy floating over the hatch.
Go back to Blackmore's Lair, then go through the door on the left to the Broken Room.
Broken Room
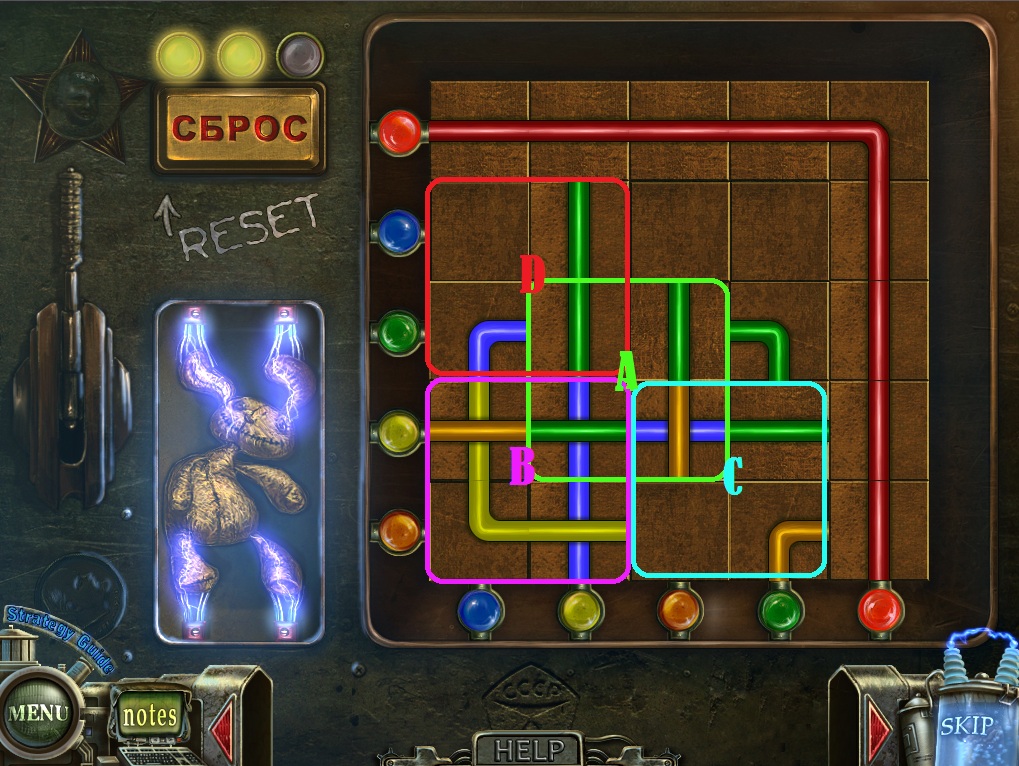
Click the umbilical machine to zoom in.
Place the Toy (from the empty mirrors in the Room of Mirrors) into the device to start the puzzle.
To solve this puzzle, correctly align all of the wires to connect the bulbs of matching colors on the left and bottom of the board.
Click the reset button to start the level over: The light at the top will track which of the 3 levels you are currently on.
On the first level, click a tile to select it, then click a different tile to swap positions.
Solution #1.
To solve the second puzzle, tiles can no longer be swapped individually; click the arrows at the left and right sides of the board to move their corresponding row or column.
Screenshot.
Click the arrows in this order: 5, B, 4 twice, C, 1 twice.
Solution #2.
To solve the third puzzle, tiles must now be rotated 4 at a time; click the point in the middle of four square tiles to rotate each of them counter clockwise.
Screenshot.
Click the squares in this order: A three times, B two times, C three times, D three times.
Solution #3.
Once the puzzle is solved, speak with Tim.
The End
Posted by: Trinn |
October 21, 2011 4:18 PM
|
October 21, 2011 4:18 PM