

Voodoo Chronicles:
The First Sign
Platform: Windows

![]() Often when game designers try to throw everything but the kitchen sink into an adventure/hidden object hybrid, what you end up with is an incoherent mess. In the case of Voodoo Chronicles: The First Sign by Space Monkey Games, start with a hard-boiled detective film noir, cross it with a horror movie, add in elements of steampunk, and the result is a fantastic, glorious sprawling mess of a game that is very difficult to put down and harder still to walk away from.
Often when game designers try to throw everything but the kitchen sink into an adventure/hidden object hybrid, what you end up with is an incoherent mess. In the case of Voodoo Chronicles: The First Sign by Space Monkey Games, start with a hard-boiled detective film noir, cross it with a horror movie, add in elements of steampunk, and the result is a fantastic, glorious sprawling mess of a game that is very difficult to put down and harder still to walk away from.
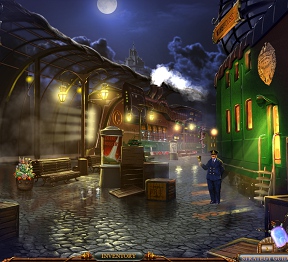 This is not the story of New Orleans/Haiti religious group gone wrong. No indeed. The Voodoo in the title refers to the main character, a Chandleresque private detective named Voodoo. The game begins with a dark, horrifying tale of greed splashed out in an epic cut-scene of three characters committing dastardly deeds. The hero of the story, private investigator James Voodoo, receives a phone call about a mysterious break-in involving one of those characters, and suddenly you're off into a fantastical alternate universe America investigating murder, greed, magic, and a giant squid attacking the city. Can James Voodoo solve the multiple mysteries he is presented with before the city falls victim to this tenticular menace and save the day? That all depends on your puzzle-solving, hidden object finding, and wolf-bashing skills.
Gameplay is the standard adventure hybrid setup navigating your way through multiple areas. A changing cursor indicates places to check out, items to investigate, or various objects that can be picked up for later use. Depending upon the mode of play there are also glints of light to indicate hotspots and a cascade of question marks to highlight hidden object scenes. Clues as to what is going on are derived from notes, newspaper articles, conversations with a vast array of colorful characters, and the detective's handy notebook, which keeps track of not only what he's learned but keeps a nice running list of goals on helpful post-it notes within the pages. A refilling hint timer is nice, but what is even better are the little "spies" embedded within the game. Find them and you can rack up "instant" hints that don't need to refuel, and earn more by not skipping the mini-games!
 Analysis: Voodoo Chronicles: The First Sign creates a stunning, fantastical roller-coaster ride of an adventure hybrid with memorable characters, astonishing scenery, breathtaking animations, and amazingly amusing gameplay. A nice blend of hidden object finding, puzzle solving psychedelia is the result of this imaginative blending.
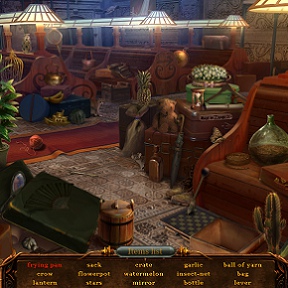
The hidden object scenes are difficult, of the "shrink objects and put them in a dark shadow in the background" variety. The puzzles cover a wide range of familiar (pipe, gear, slider, etc.) and refreshingly new. Gameplay is broken into easy to manage chapters, so while there is a lot of wandering and backtracking within each area, the overall gameplay is refreshingly linear. Or as linear as you can get when jumping from the mean streets of the city to a wild zeppelin ride, then to a dark foreboding town with wolf problems and eventually to the acid-flashback-inducing end. Half the fun of Voodoo Chronicles is the amazing tonal shifts from chapter to chapter, as you're never quite sure which genre will leap to the forefront as the game progresses.
 While the mish-mash of genres works surprisingly well within the structure of the game, there are a few downsides. The clickable areas to pick up hidden objects is occasionally tiny, making some of the hidden object scenes frustrating. The characters, while nominally American, all appear to have been imported from somewhere in Europe, what with all of the British, French, Italian, and generic Romanian villager accents flying around. Other minor annoyances include some dodgy grammar and strange item names in the hidden object finding lists.
Despite the flaws, Voodoo Chronicles: The First Sign is a gloriously loopy and beautiful ride through someone's imagination, although you can't help wonder if that imagination was fueled by, well, let's say a wide variety of pharmacopeia, shall we? A ton of fantastic gameplay awaits those who dare to solve the mystery and take a ride on the steampunk/noir wild side.
A Collector's Edition is also available. It includes wallpapers, concept art, screensavers, the soundtrack, an extra adventure, and a built-in strategy guide. Remember that Big Fish Game Club Members pay only $13.99 for Collector's Editions (or 2 club credits), and collector's editions count 3 card punches of 6 total needed for a free game.
![]() Windows:
Windows:
Download the demo
Get the full version
Also available: Collector's Edition
![]() Mac OS X:
Mac OS X:
Not available.
Try Boot Camp or Parallels or CrossOver Games.


Walkthrough Guide
(Please allow page to fully load for spoiler tags to be functional.)
Voodoo Chronicles - The First Sign Walkthrough
General Information
Game Options
You can choose to play Hard or Casual difficulty levels.
Casual mode provides sparkles for clickable areas.
There are no sparkles in Hard mode.
Options include volume controls.
Cursor and Icons
The cursor changes as you hover over items and areas.
A grasping hand indicates objects that can be collected and areas that require interaction.
A magnifying glass indicates an area that will provide information on closer inspection.
Moving gears indicate that an object is needed for further interaction.
Directional arrows show other areas for exploration.
When a Hidden-Object game becomes available, some floating question marks will appear. Hover your mouse over the question-marks and click to start the games.
Bottom Toolbar
The diary that sits at the left is your information tool and task list. Click on newspapers and other documents that can be found in the game to add information to the diary. If you are unsure of what to do next, the diary displays a task list, and as tasks are completed they are crossed out.
The inventory is generally hidden from view during game play. To access the inventory, hover your mouse at the bottom of the screen, and it will appear.
To use items from the inventory, click once on each item, then hover your mouse over the area where you wish to use objects and click again.
For puzzles, there is an Info icon and a Skip function. The Info button provides information on what is required in each puzzle.
The Skip function is only present for puzzles, and slowly charges.
The Hint Machine needs to be constructed early in the game. The tutorial, if you choose to use it, will help you to put it together.
Hints take the form of Small Spies. These little creatures with skull-like heads appear periodically throughout the game and will fade in and out. When you see a Small Spy, click on it to add hints to the Hint Machine.
Hints can also be gained through solving puzzles.
Hints can still be accessed even when the machine shows a 'zero' reading. Wait for the hint machine to charge to access one hint at a time.
Navigation
Directional arrows will appear when there is an area to move to.
The arrows show forward, back, right and left, but sometimes will also appear at odd angles; upper-right for example.
To move to another area, click on the directional arrows as they appear.
Hidden Object Games and Puzzles
Hidden Object Games initially appear as floating question-marks. Click in the question-marks to start a game.
Items as indicated in red-type are doubly hidden, meaning you need to interact with the environment in some way to locate that item.
The lists for each hidden-object game change every time you play.
The presence of a puzzle to be solved is indicated by a magnifying glass. If an extra item is needed to start the puzzle, moving gears will appear.
Whilst the puzzles are the same each time you play, the solutions for each vary a little.
For the purposes of this walkthrough, there are some screenshots that show an outcome for a puzzle but may not necessarily be the solution you need.
Main Walkthrough
Detective Voodoo's Office
There are 3 puzzles and one hidden-object game to solve in the office.
The Safe
The key
In the room adjoining the office, locate the shelves to the left. Find the beaker with the KEY and click on it to take the key (see the Lab Screenshot).
The Bullets
The BULLETS are on top of the workbench where the Hint Machine is constructed. Click on them to take them (see the Lab Screenshot).
The Gun
Use the key on the safe, click on the bullets in your inventory and click on the GUN. Take the gun.
Feeding the Cat
Click on the Cat that's resting on the sofa, then click on the food bowls on the floor next to the desk.
You realize you need milk; clicking on the fridge in the adjoining room shows that it needs a handle.
Once you've solved the Safe puzzle and taken the gun, the cat will get up from the sofa and start pacing.
Click on the cushion on the sofa to get the FRIDGE HANDLE.
Use the handle on the fridge in the next room, inspect the fridge and take the MILK.
Use the milk on the Cat's food bowl.
Finding the Detective's Badge
Some question marks will appear near the cabinet next to the Detective's desk. Click on them to start the hidden-object game and find the DETECTIVE'S BADGE.
Screenshot.
Constructing the Hint Machine
Shortly after you start the game, a Demon Spectre will appear and shoot green lightning into the office.
A Small Spy will appear on the desk. Click on the Small Spy to learn that a machine needs to be constructed.
In the room adjoining the office is a workbench. Click on the contraption on the workbench for a puzzle.
The idea is to place the four belts (sitting in the top right of the scene) on the contraption to get the green wheels turning in the directions indicated by the arrows.
Click on each belt, then click on the wheel that you wish to place it on. Move your mouse to the wheel that you wish to attach the other end of the belt to.
Here's one Casual solution - Screenshot.
You should now be ready to head to Richtown.
Office Screenshot.
Lab Screenshot.
The Train Station
The Street
The only thing needed here is one of the roses growing in the pot at left. To collect a ROSE you need garden shears.
The GARDEN SHEARS are at the Ticket Booth in the Train Station.
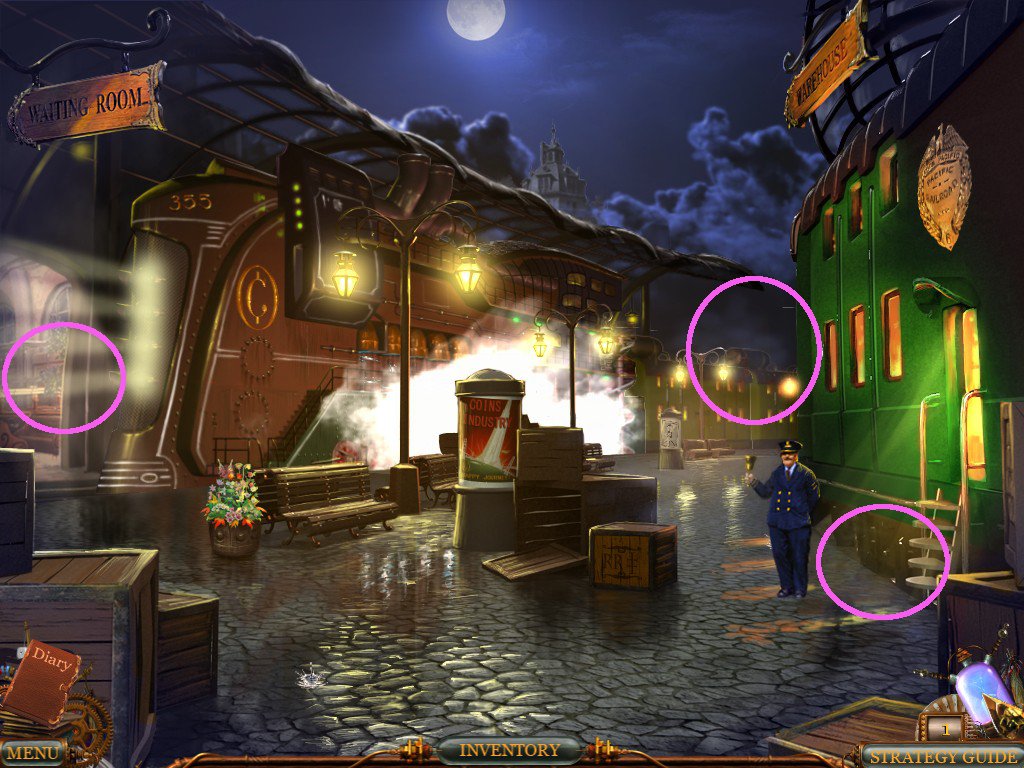
The Platform - part 1
The Demon Spectre will appear and disappear.
Click on the unperturbed Conductor to find out you need a ticket.
Click just to the right of the conductor to collect some GEARS.
Screenshot.
Head to the Waiting Room.
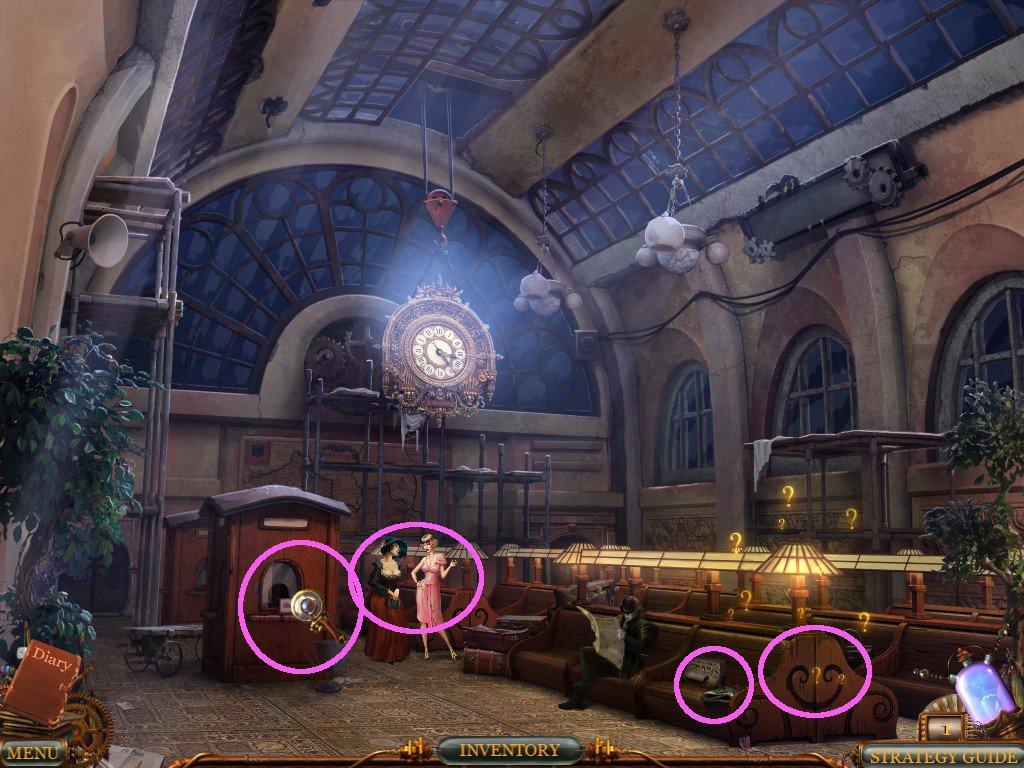
The Waiting Room
Click on the Ticket Booth and note that it's closed.
Click on the newspaper to add info to the diary.
Click on the GARDEN SHEARS to take them.
Click out and click on the ladies, who will ignore you.
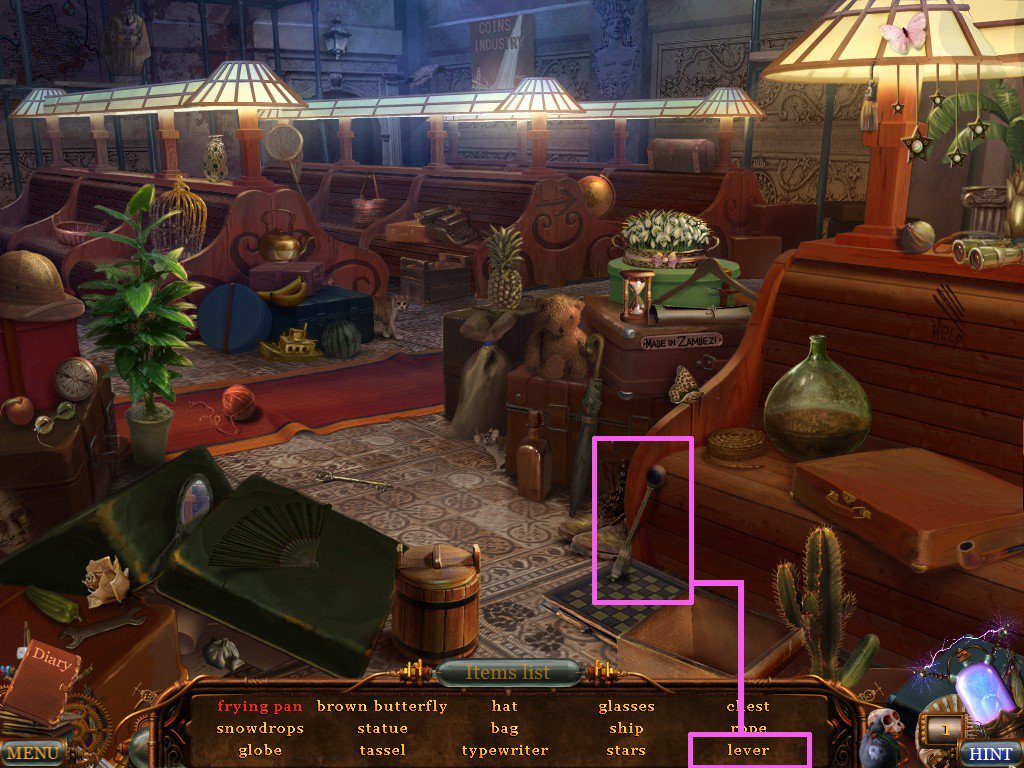
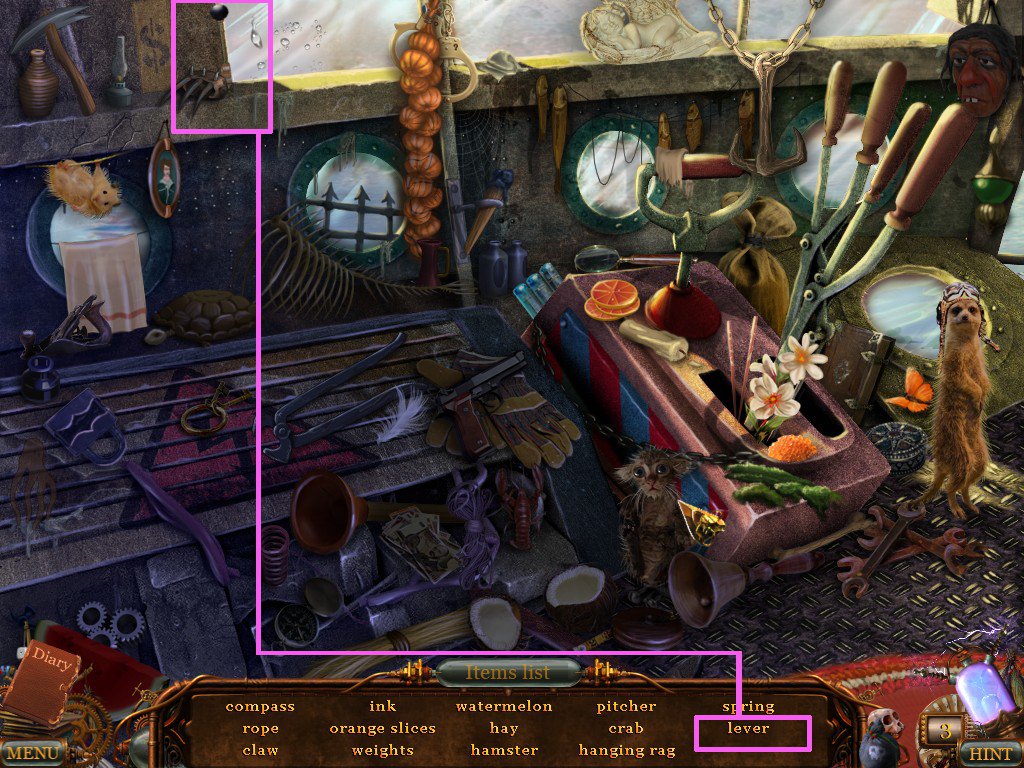
Click on the question marks for a hidden object game.
Find the LEVER.
Screenshot.
Go back to the roses outside the office and use the garden shears to take a ROSE.
Take the rose back to the Ladies in the Waiting Room for information on the whereabouts of the Cashier.
Click on the newspapers on the bench near the stranger for diary info.
Screenshot.
Head to the Warehouse.
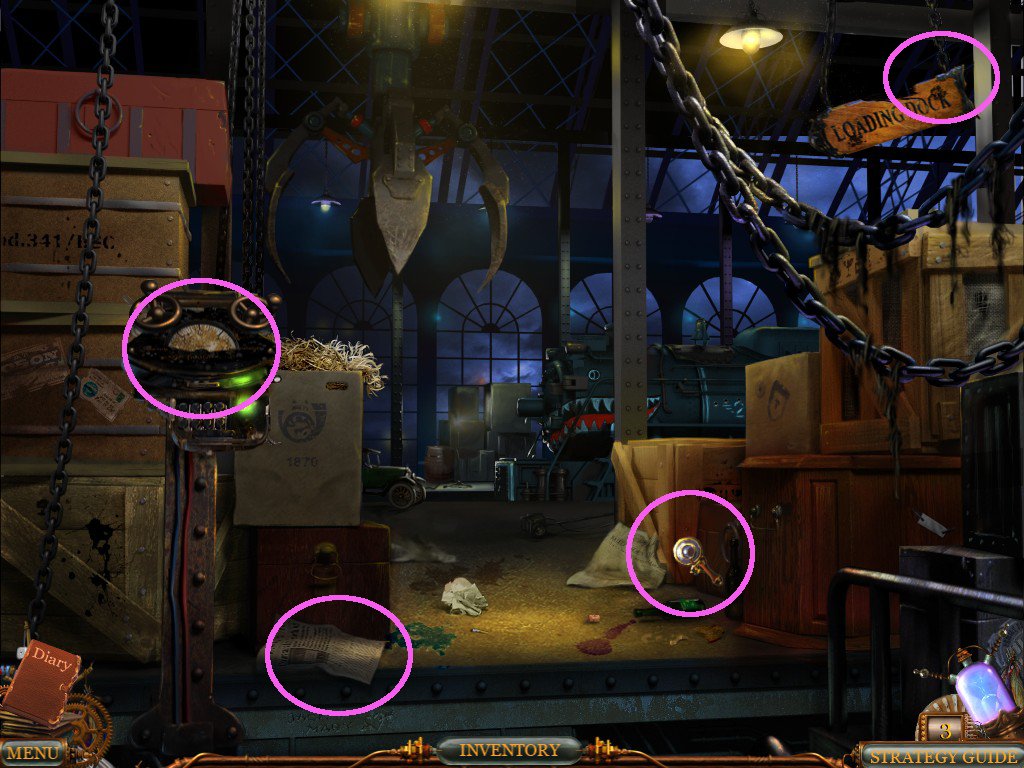
The Warehouse
As you approach, some crates will collapse in front of you, blocking your way.
Click on the paper at lower left to add more info to your diary.
Click on the mechanism on the left side of the screen and use the GEARS on it; a mini-game will start.
The aim is to plan the path of the claw to collect each box. Click on the arrows at the top of the machine to plan your moves, a box at a time. When you're ready to move the claw, click Take Box. As each box is collected, the claw's path deteriorates, adding barriers and stopping the claw from travelling along some of the paths. The routes to each box and the barriers presented will change each time you play.
Before going ahead to the Loading Dock, click near the overturned wine bottle to get a CROWBAR.
Warehouse Screenshot.
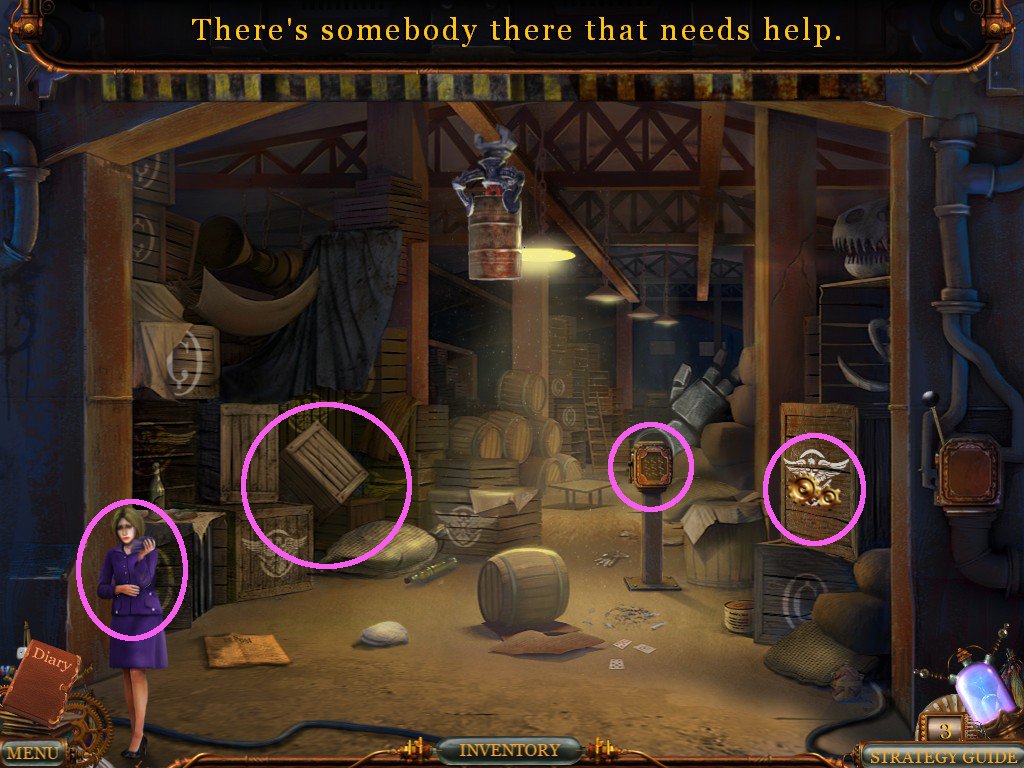
The Loading Dock
Note the crying Cashier, the wonky door, and the mechanism to the right of the screen.
Click on the Cashier to find out she has lost a diamond necklace.
Click on the mechanism and use the LEVER on it.
When the gate opens, sending rats and cockroaches scurrying, click on the mechanism inside to find out it needs another part to work.
Click on the moving barrel in the claw at the top of the screen to find out someone needs help to get out of it.
Click on the crate at the right, with the white symbol drawn on it, and use the CROWBAR on it.
Look inside the crate to take the NECKLACE and click on the Telegram to read it.
Give the NECKLACE to the Cashier, who tells you that the DIAMOND is missing from it.
Loading Dock Screenshot.
Go back to the Waiting Room.
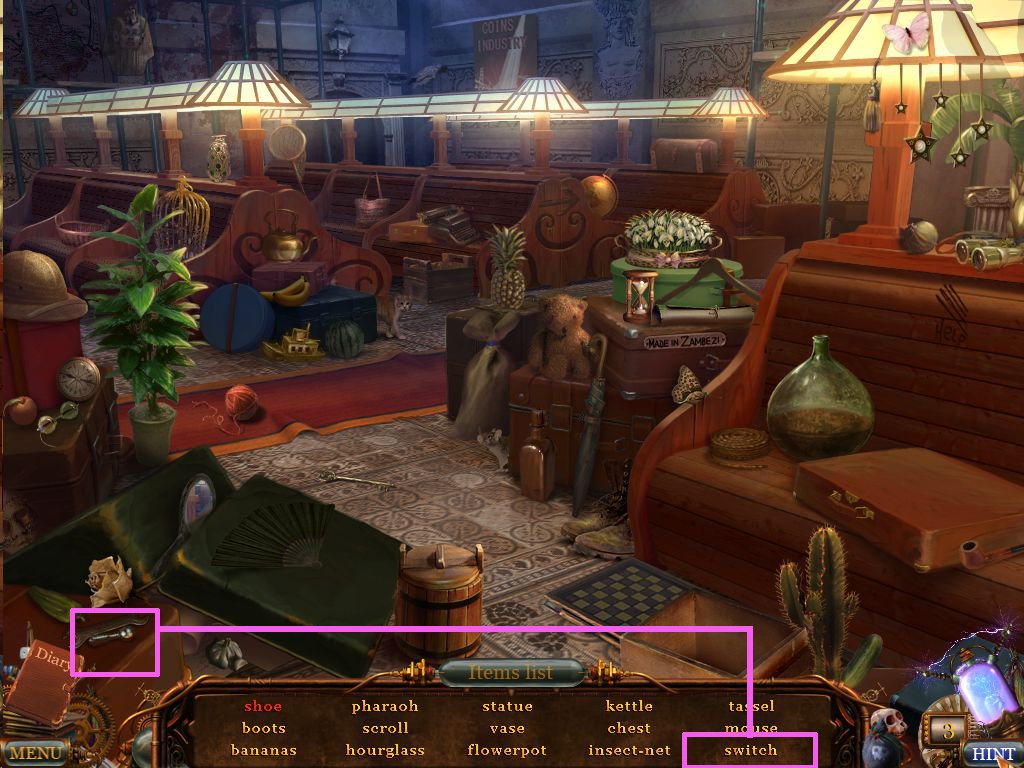
The Waiting Room - part 2
Click on the question marks to play a hidden object game and find the SWITCH.
Screenshot.
Go back to the Loading Dock.
The Loading Dock - part 2
Use the SWITCH on the mechanism and play the mini-game. The aim is to get all switches to the ON position. The solution for this changes every time you play.
When all the switches are on, the barrel will fall and open, revealing Gregor.
Click on Gregor to chat to him about the location of the DIAMOND.
Click back out and click on the question-marks to play a hidden object game. Find the DIAMOND.
Screenshot.
Give the DIAMOND to the Cashier and she will give you a ticket to Rich Town in return.
Go to the Platform, give the ticket to the conductor and board the Coin Express.
Coin Express
The Travelling Compartments
Click on the first compartment to enter, and note the two Ladies you spoke to at the Train Station.
Click on the upper right baggage rack and click on the newspaper.
Leave the compartment and click on the door of the 2nd compartment. It turns out it's yours, but it's locked from the inside.
Click on the 3rd compartment and note the Stranger who was also at the station.
Click on the Top Secret document that just happens to be sitting on the table.
Leave the compartment carriage and go forward to the Dining Car.
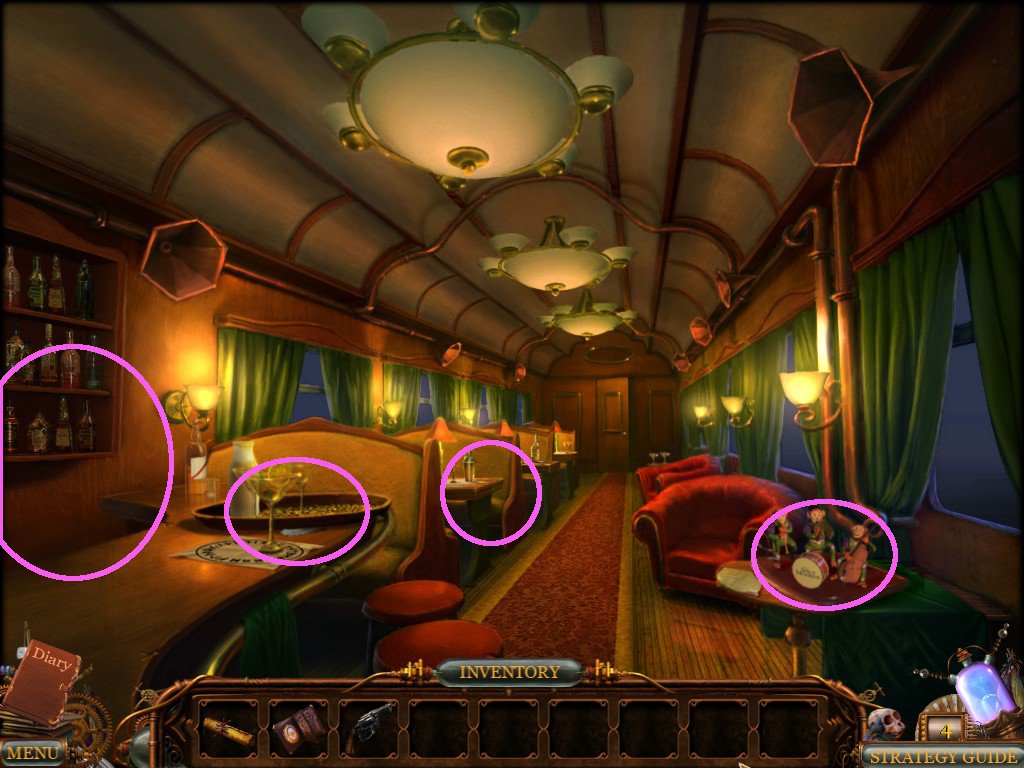
The Dining Car
As you enter the Dining Car, some screams will be heard. Before you go back to investigate, click on the drinks tray on the bar at left to take a COIN.
In the main view, click on the monkey figures at the right for a close up view of a music making machine that coincidentally requires a COIN.
Use the COIN on the Monkey Music Machine to listen to some monkey music, then take the COMPARTMENT KEY when it appears.
Dining Car Screenshot.
Go back to the Compartment Carriage.
The Compartments - part 2
Use the KEY on the second compartment and enter to find that someone has messed it up.
Click on the Small Spy in the window to get a hint.
Click on the table, then click on the newspaper.
Click on the seats, right-hand side, and move each of the objects by clicking and dragging. Take the SMELLING SALTS that are protruding from the seat stuffing.
You should also gain two more hints.
Compartment 2 Screenshot.
Go back to the Ladies' compartment.
Use the SMELLING SALTS on the lady who has fainted, then head to the Dining Car.
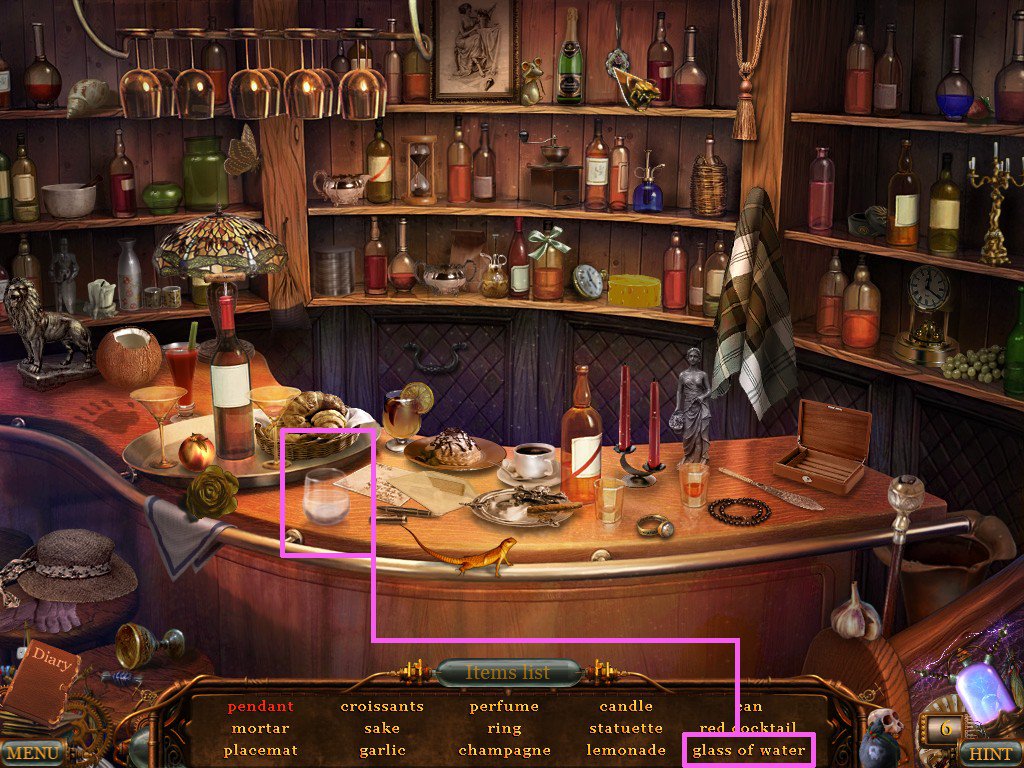
Play the hidden object game in the Dining Car to find the GLASS OF WATER.
Screenshot.
Take the GLASS OF WATER to the Ladies and use on the one who had fainted. You practically wish you'd thrown it on her when they start ignoring you again.
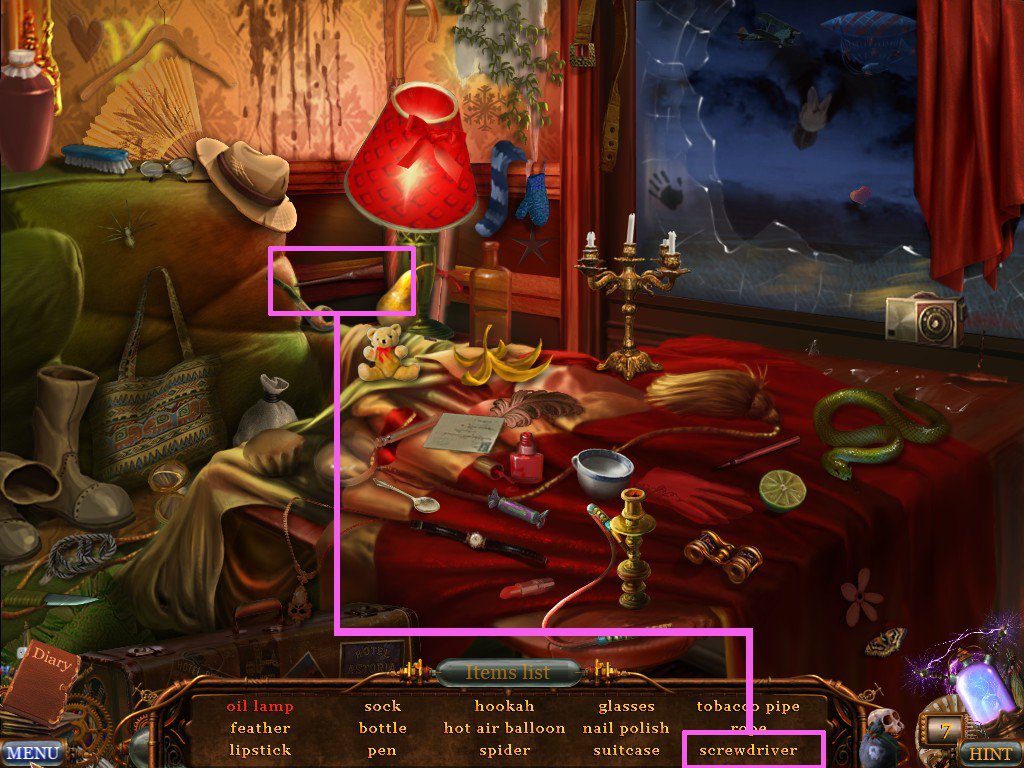
Go back to your compartment and click on the parchment that's draped over the arm of the right side seat.
Play the hidden object game to find the SCREWDRIVER.
Screenshot.
Move forward to the Dining Car and click the dining booth on the left to collect the VALVE.
Move forward to the Engine Car.
The Engine
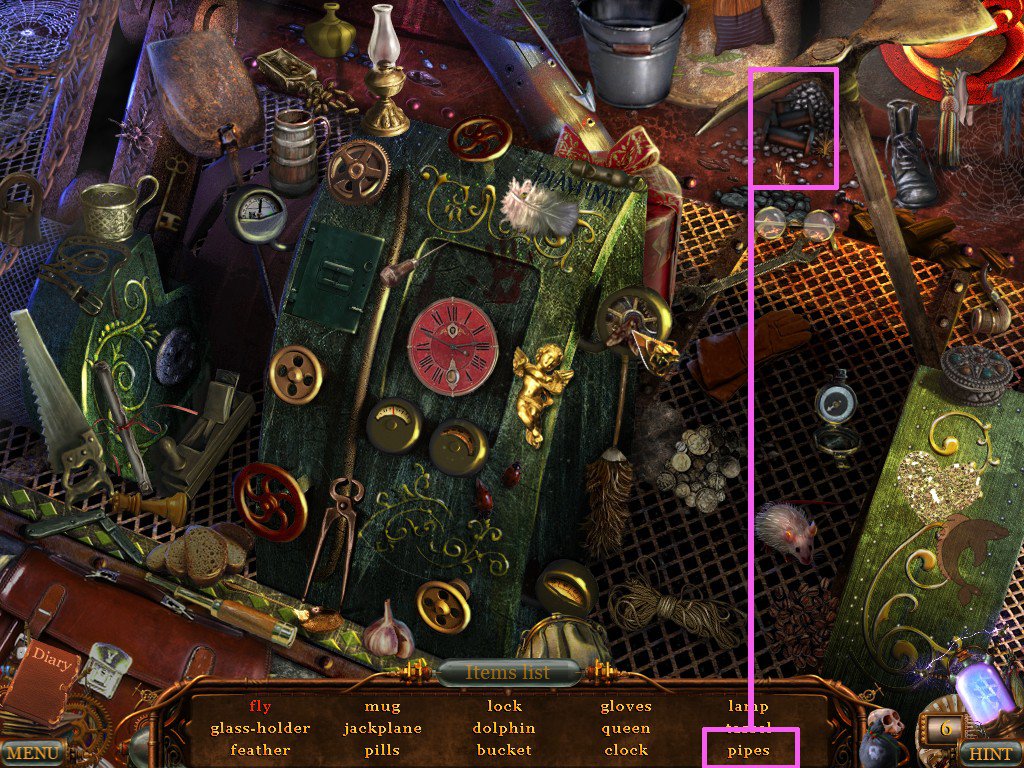
Use the SCREWDRIVER on the loose panel at the top of the screen.
Click on the question marks that appear at the right to play a hidden object game, and find the PIPES.
Screenshot.
After completing the hidden object game, click to the right again to note that a vitally important connecting bolt is missing.
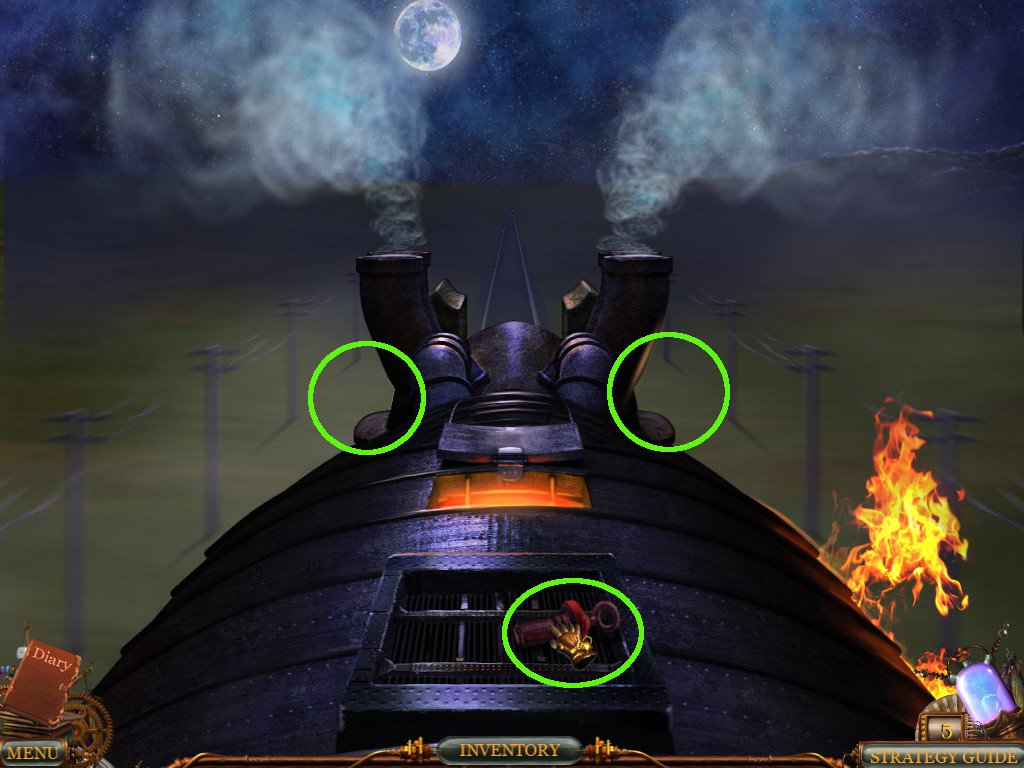
Click out, then click on the ladder at left to go to the top of the Engine Car.
Take the BOLT that happens to be sitting right there.
Click on the 2 Small Spies that are either side of the front funnels, and collect two more hints.
Screenshot.
Go back into the Engine Car and use the BOLT.
Use the VALVE at the top right where steam is hissing out.
Use the PIPES at the top of the screen and play a mini-game.
The object is to connect the pipes so that steam can travel from one side to the centre panel. Then add the different sized cogs that are sitting at the bottom of the screen so that all cogs are turning. Finally, complete the pipe sequence for the 3rd panel.
Here's one solution - Screenshot.
After a brief cutscene, the train arrives at RICH TOWN.
Rich Town
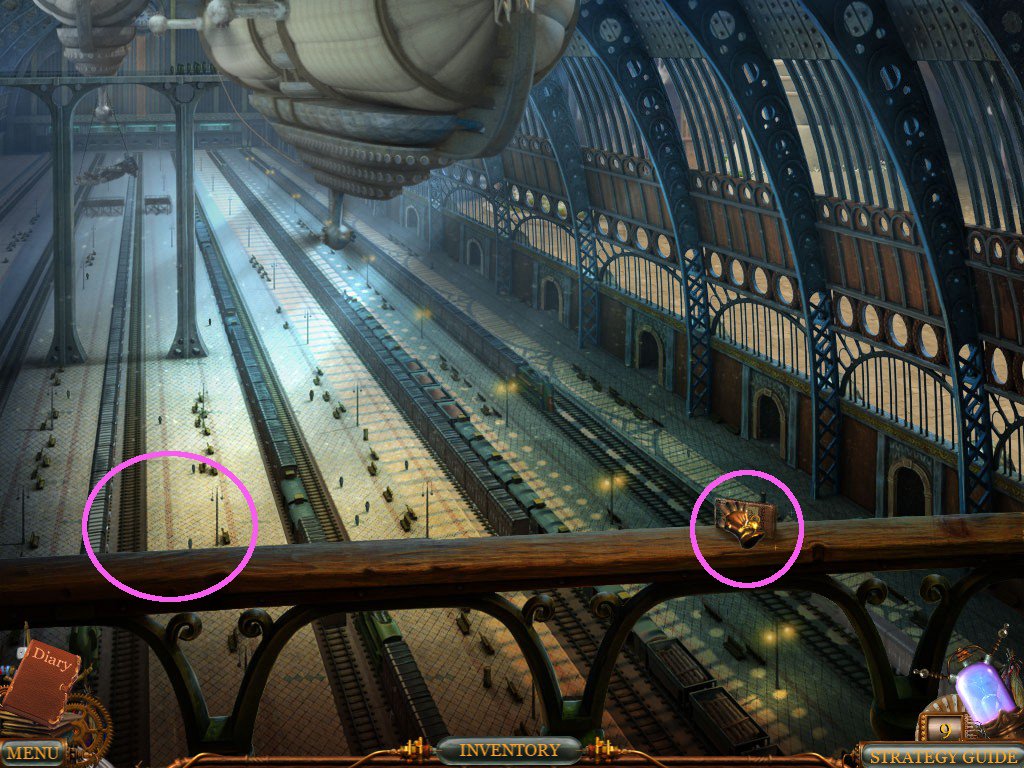
The Terminal
Take the MATCHES that happen to be sitting there on the railing.
Capture the Small Spy at left to add to your Hint Machine.
Hover the cursor above the railing until it changes into an arrow indicating the exit as being forward and to the right.
Screenshot.
Exit to the Main Square.
The Main Square - part 1
Click on the statue for a close-up and click on the newspaper to add information to your diary.
Click left of the statue to go forward to the Bank.
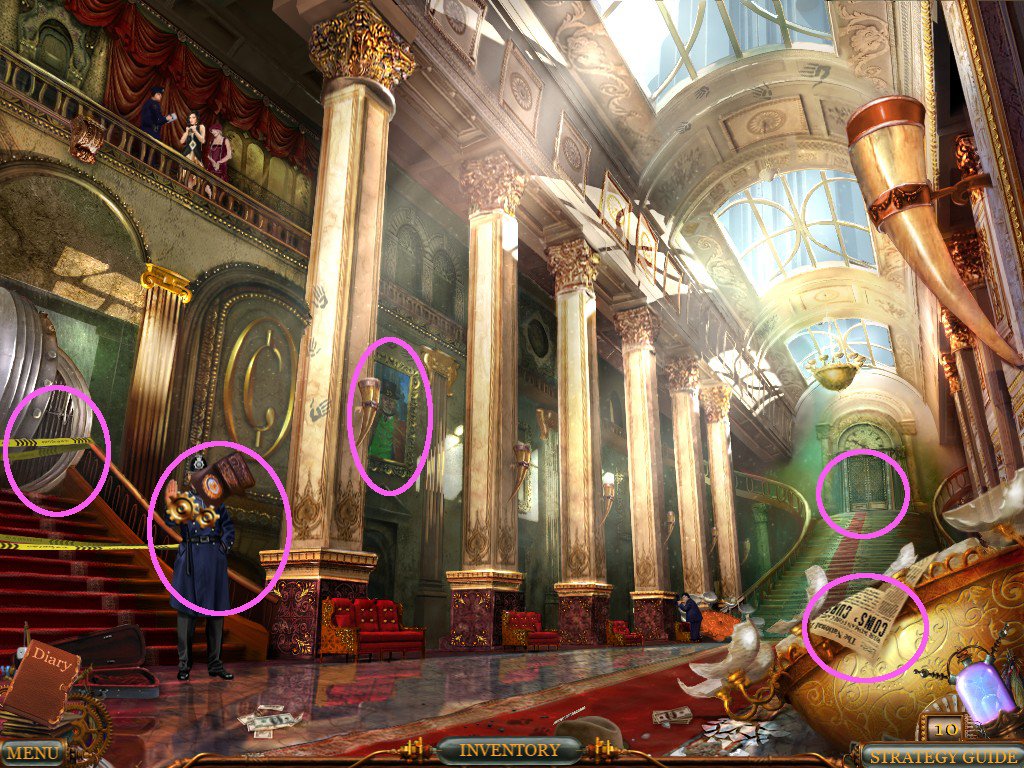
The Bank Entrance - part 1
Use the DETECTIVE BADGE on the Policeman.
Click on the Vault for a close-up and click on the newspaper.
Click on the newspaper at right.
Bank Entrance Screenshot.
Click to go up the staircase to Mr Coins' office.
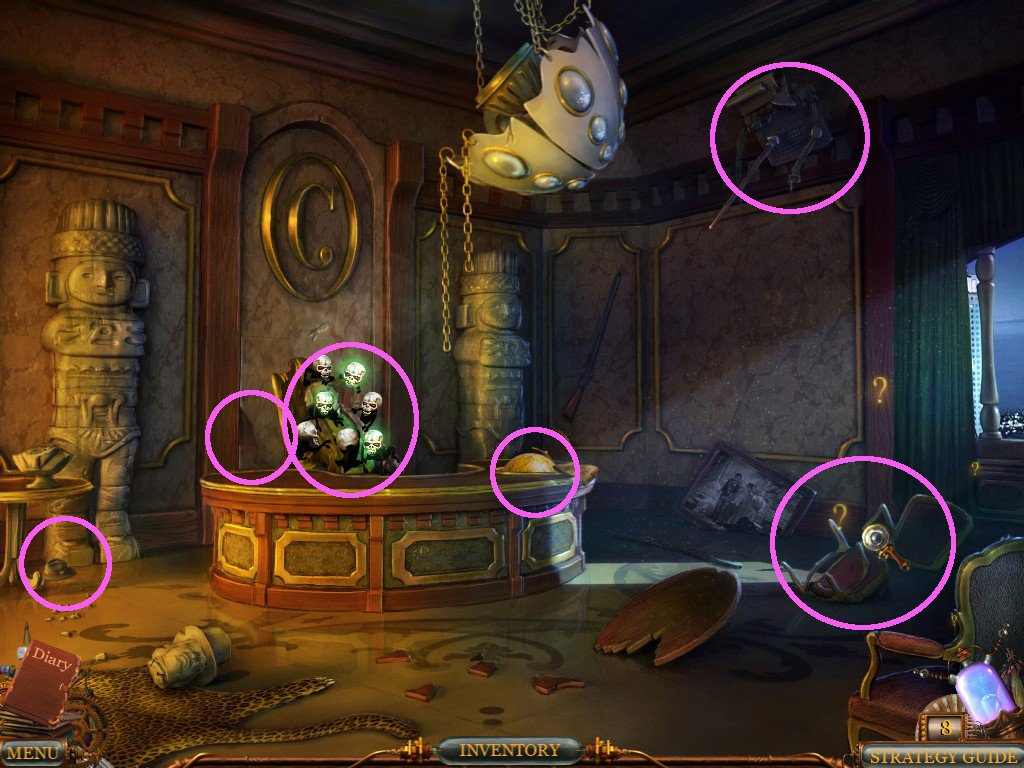
Mr Coins' Office
In Mr Coins' office, click on the Small Spies that are swarming over his corpse behind the desk.
Click to the left of the desk to take MR FILLINI'S HAT.
Click behind Mr Coins to reveal a locked safe.
Click on the dome on the desk to reveal a globe.
Click on the globe for a close-up, and click on the parchment to read a threatening note.
Click on the flag that's sticking out from the globe to acquire a NAIL.
Click back out and in the main view click on the painting that's fallen to the floor.
Play the hidden-object game to find the COINS SIGN.
Screenshot.
Click on a Small Spy that's lurking upper right of the screen.
Click upper right to take the INSULATING TAPE.
Coins Office Screenshot.
Go back to the Bank Entrance.
Bank Entrance - part 2
Click on the portrait at the left, behind the Policeman.
Use the COINS SIGN on the Coins symbol next to the portrait.
When the picture slides to the right, take the COINS KEY that is revealed.
Go back to Coins' Office.
Coins' Office - part 2
Use COINS KEY on the safe to collect a VOODOO BAG and FILLINI'S CARD, and note the ornate box that requires a LOCK PICK.
Exit the Bank to the Main Square and go to the right of the statue to the Lane.
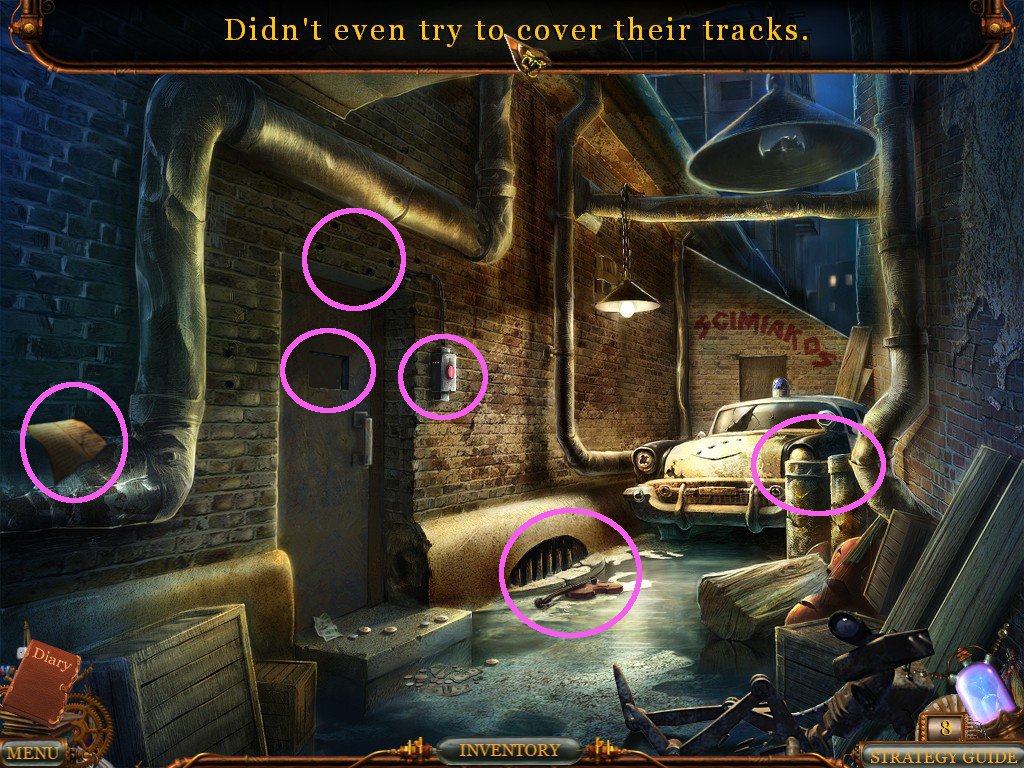
The Alley
Click on the Diary Pages sitting atop the duct pipe at left.
Click on the door and note the intercom.
Click on the button next to the door to find out it's broken.
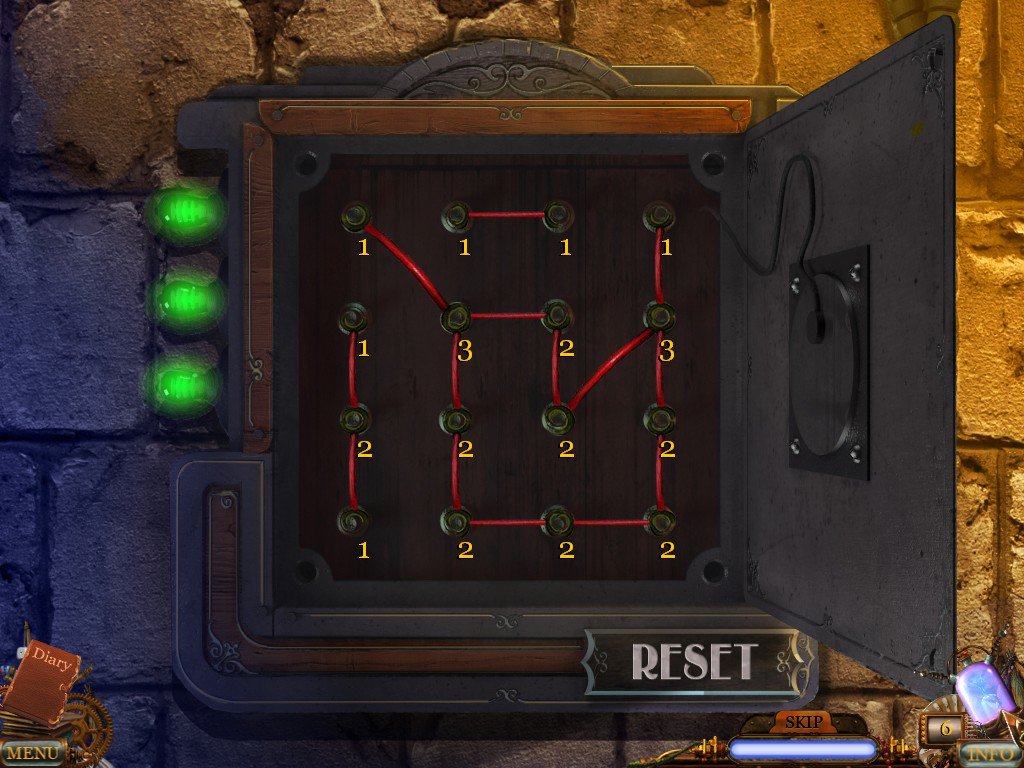
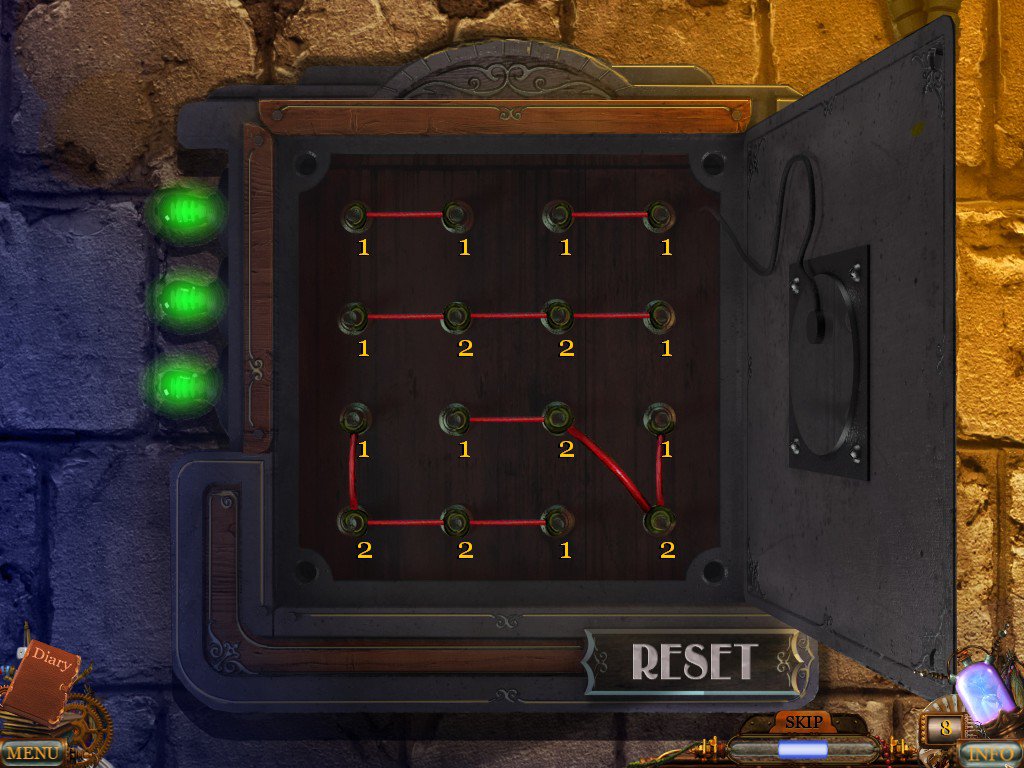
Use the INSULATION TAPE on the button to play a mini-game.
The aim in the intercom puzzle is to connect wires to each of the nodes. The number on each node indicates how many other nodes it will be connected to. For example, a node with the number 4 will be connected to three other nodes, while a node with the number 1 will be connected to only one other node.
Here's a solution for the Casual Mode - Screenshot.
Here's a solution for the Hard mode - Screenshot.
When the puzzle is solved, click on the grate in the gutter and take the HAMMER.
Head back to Coins' Office at the Bank and play the Hidden Object Game to find the WHISKEY on the table back left.
Back in the Alley, click on the intercom and then the door and converse with the Goon. Use FILLINI'S CARD, which will be torn up by the goon.
Use the NAIL on the brickwork at the top of the door.
Use the HAMMER on the nail, then hang the VOODOO BAG on the nail.
Use the WHISKEY on the two barrels at the right of the screen near the abandoned car.
Use the MATCHES on the Whiskey, and the goon will run out. Whack his head on the voodoo bag, and he will fall over.
The Alley Screenshot.
Click left to enter the Hideout.
The Hideout
Click on the chair at right with the voodoo doll on it and take the GLASS EYE.
Click the newspaper at the left.
Click on the Gangsters for a conversation of sorts.
Use FILLINI'S HAT on the gangsters to gain permission to look around.
Play the Hidden Object Game and find the LOCKPICKS.
Go back to Coins' Office and use the LOCKPICKS on the box in the safe to get the GOLD COINS.
Return to the Hideout and give the GOLD COINS to Luigi.
After the conversation, play the Hidden Object Game to find the VOODOO CARD and to discover that one of the Ladies from the Train, the one in the pink dress, is hiding under a rug.
Screenshot.
Go back to the Main Square and click left to enter the terminal.
One of the Gangsters will appear with some extra information, and will give you a VOODOO BAG.
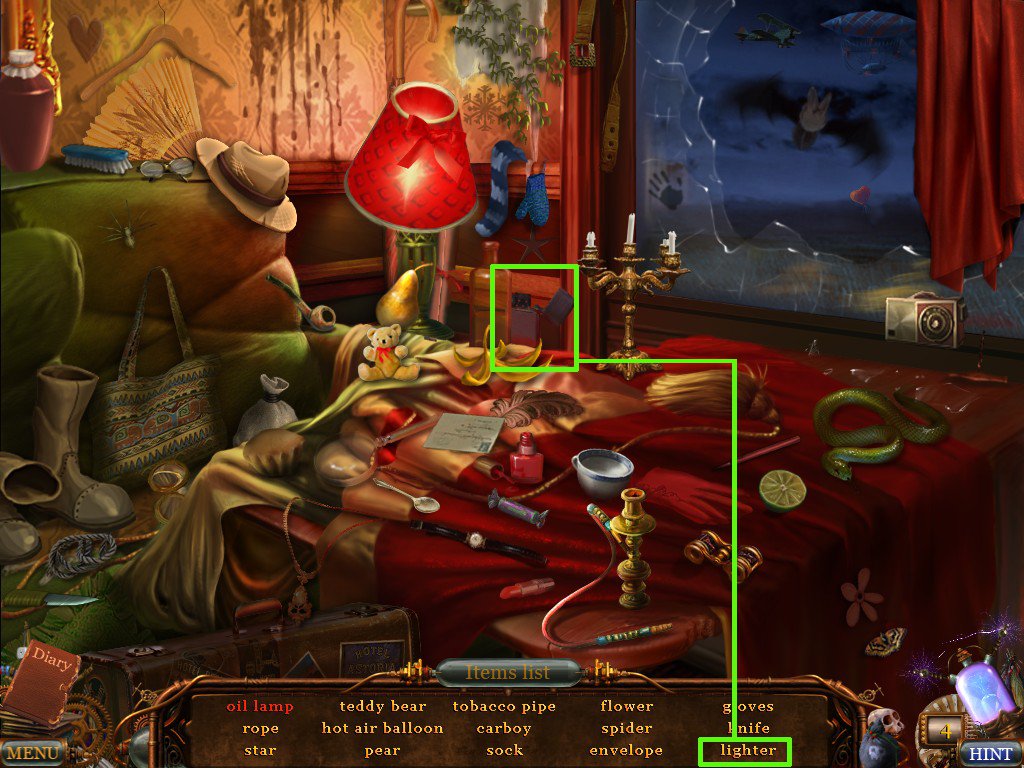
Coins Express - Part 2
Enter the middle compartment and play a Hidden Object Game to find a LIGHTER.
Screenshot.
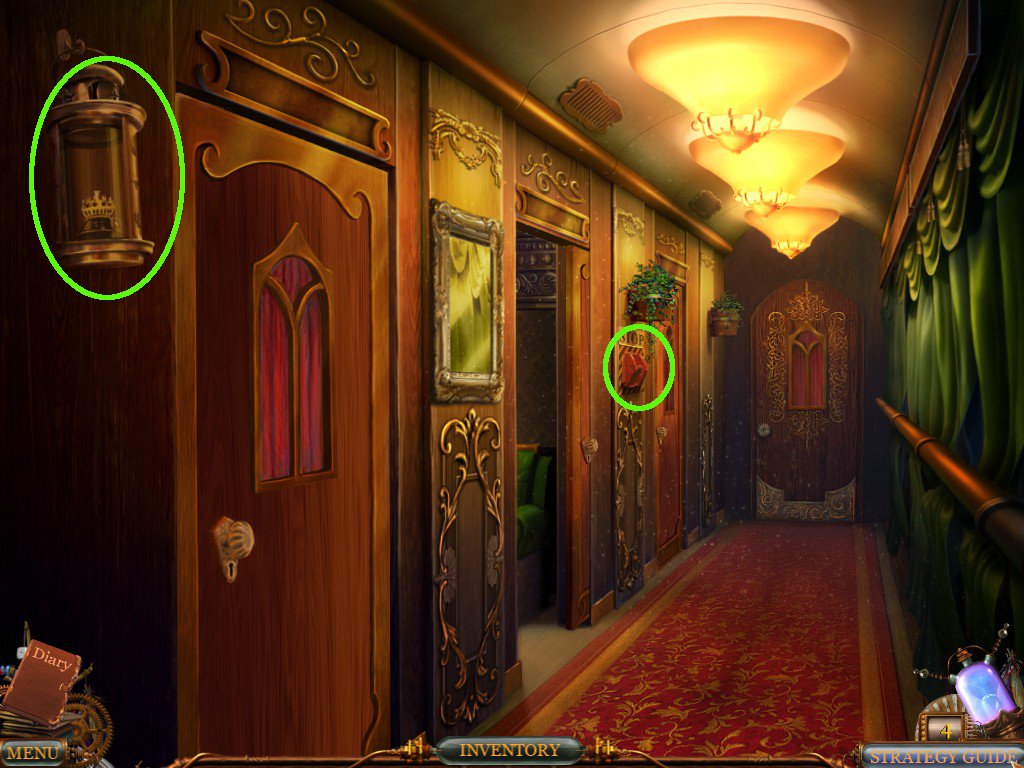
Exit the compartment and use the LIGHTER on the LANTERN hanging at the left.
Take the lighted LANTERN.
Click on the Emergency Brake that's between compartment doors to find it needs fixing.
Click to go into the Dining Car.
In the Dining Car, click on the lighted LANTERN in the inventory to combat the sinister darkness.
Play the Hidden Object Game to find a BROOCH.
Screenshot.
Go to the Engine Carriage and play the Hidden Object Game at right to get the BRAKE HANDLE.
Screenshot.
Go back to the compartments and use the BRAKE HANDLE on the broken emergency brake.
Compartment Carriage Screenshot.
Village
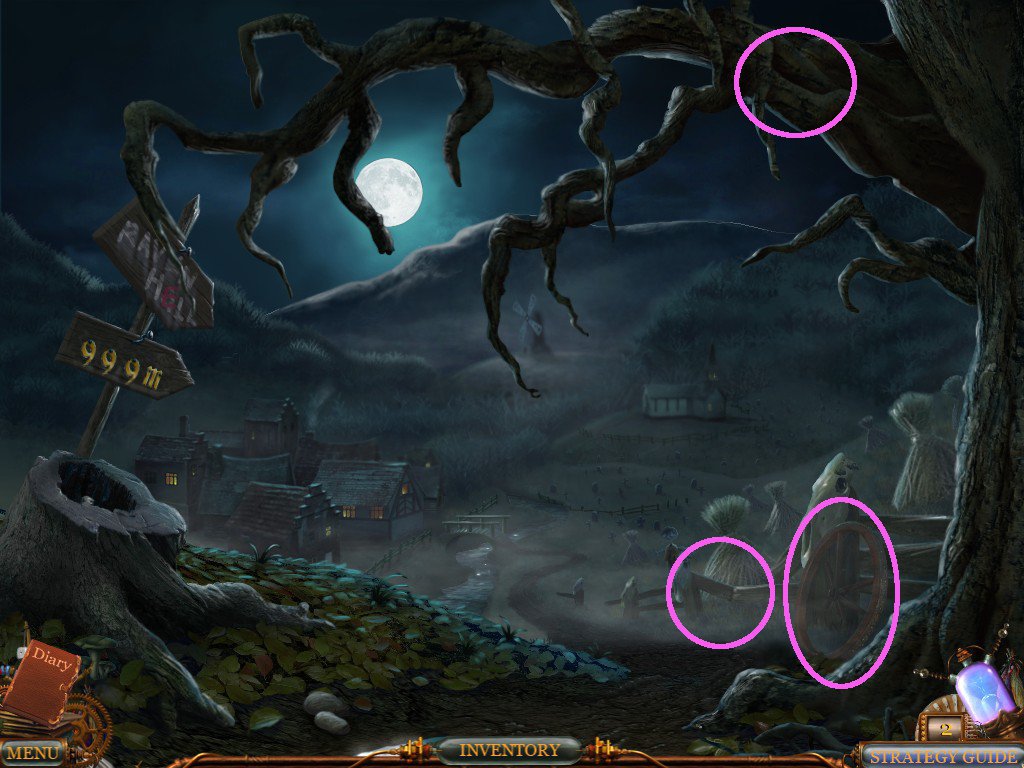
On the Hill
Click on the BROKEN WHEEL at right to take it.
Click near where the broken wheel was for a close-up of a Scarecrow, and take the HORSESHOES.
There's also a Small Spy, top right in the tree.
Hill Screenshot.
Go forward to the Village.
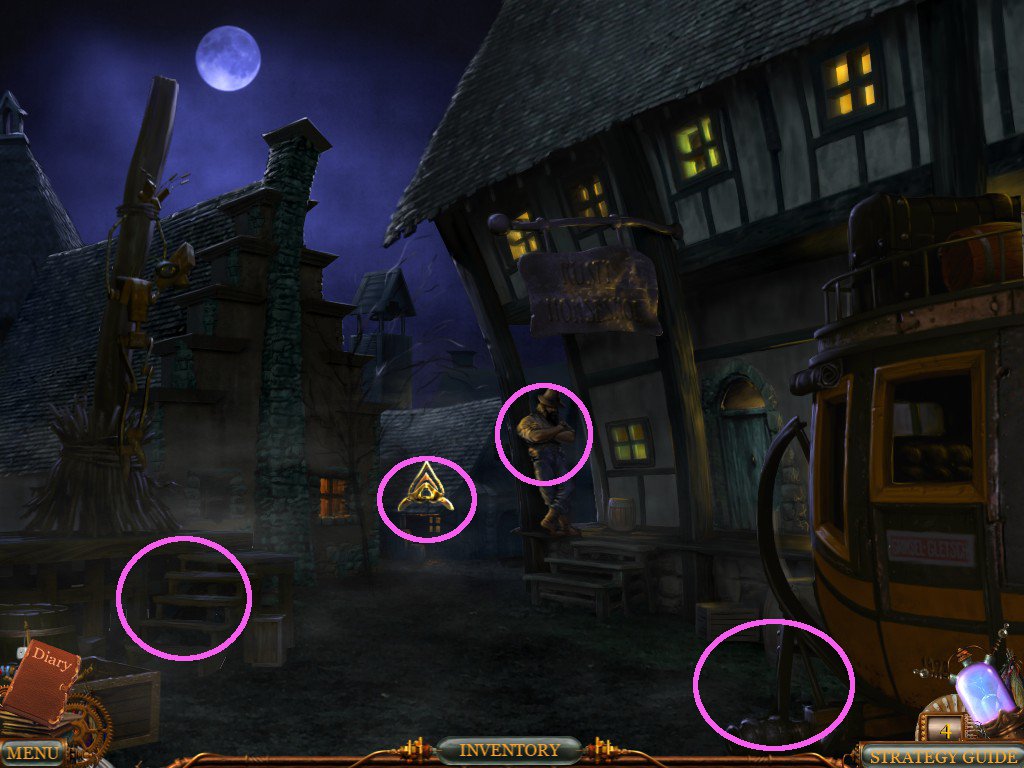
Rusty Horseshoe Inn
Click on the Farmer/Bouncer, who won't let you in to the House party, but will talk to you about the broken cart.
Click on the stairs at left for a close-up and take the HAMMER.
Village Screenshot.
Go forward to the Blacksmith's Shed.
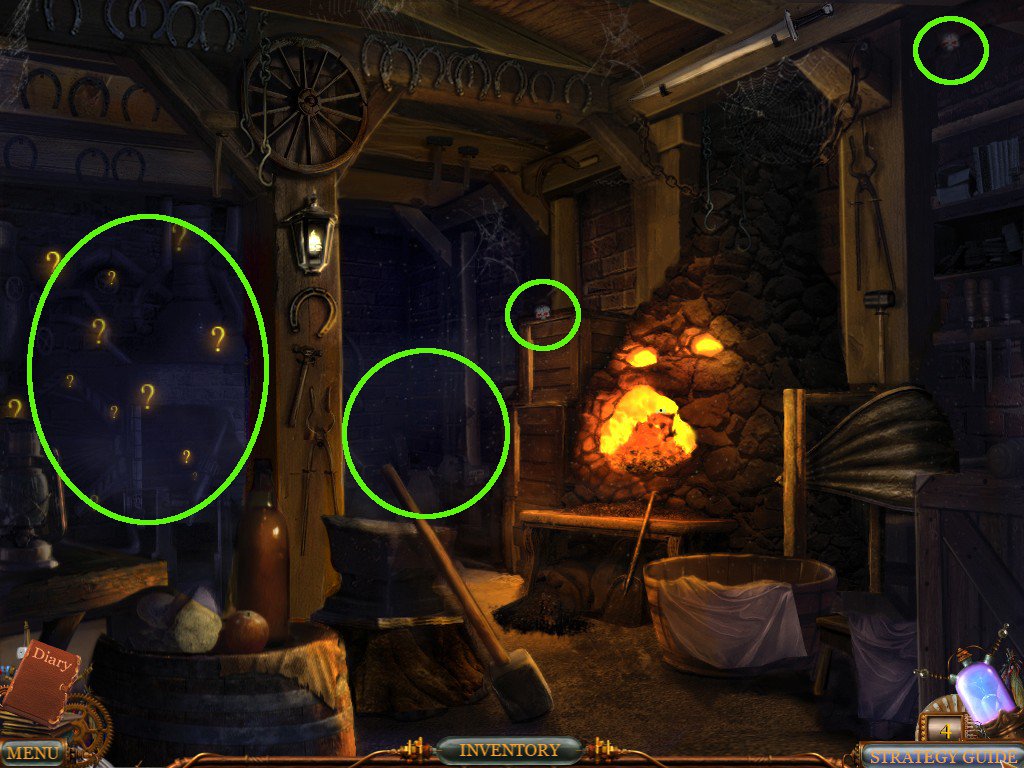
The Blacksmith's Shed
Take the two Small Spies; one on top of the crates and one very top right of the screen.
Screenshot.
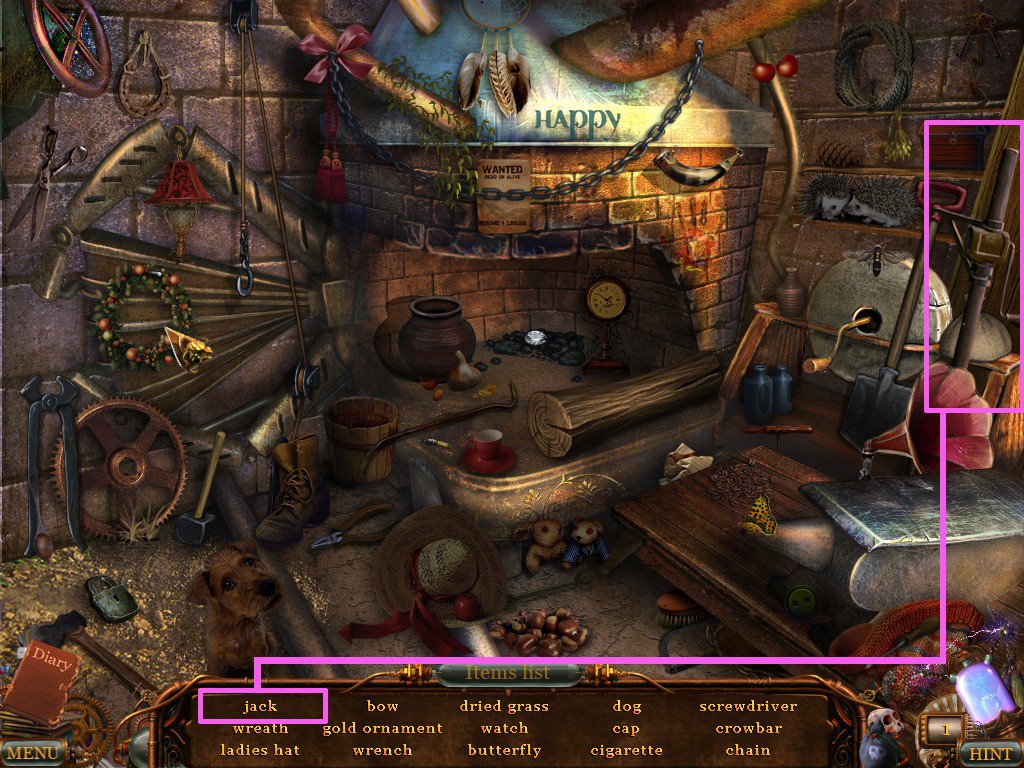
Play the Hidden Object Game to find the JACK.
Screenshot.
Go back to the Broken Cart and use the JACK, and then crank it 3 times.
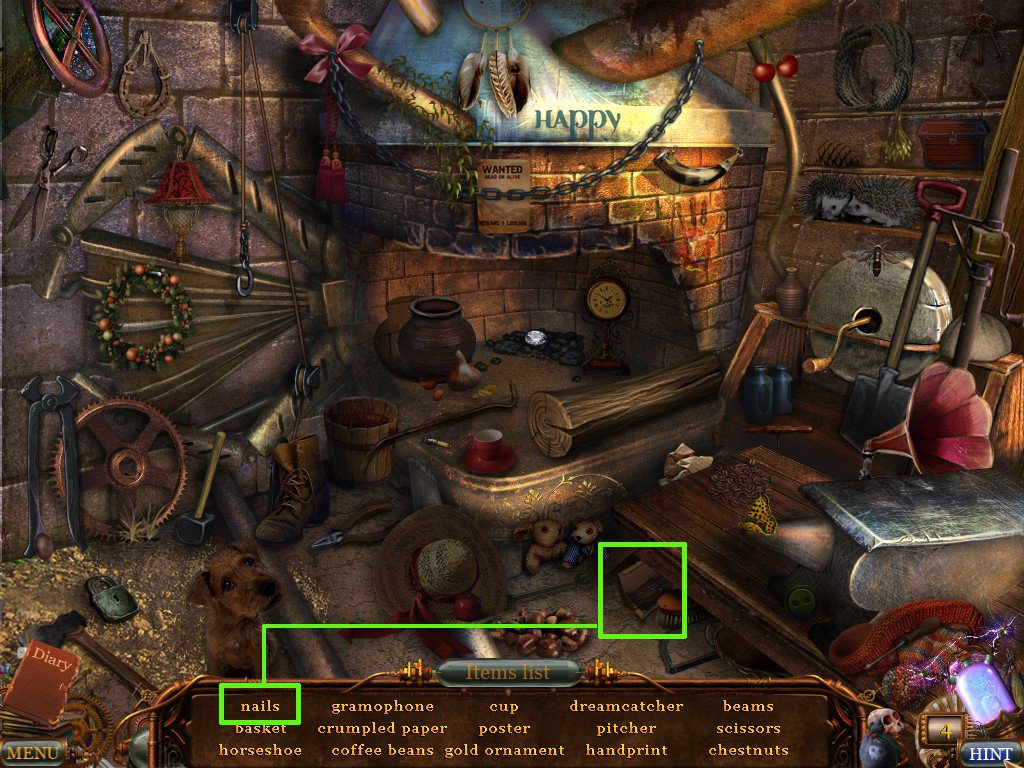
Back at the Blacksmith's Shed, play the Hidden Object Game to get the NAILS.
Screenshot.
After completing the Hidden Object Game, click forward and use the BROKEN WHEEL, HAMMER and NAILS on the bench.
To repair the wheel:
Place the small round wooden piece with the hole in the centre of the wheel.
Use the wooden slats.
Use the curved black metal rims on the outside of the wheel.
Use the second small round piece and place it in the very center of the wheel.
Use the screws in the centre.
Use the screwdriver to secure the screws.
Use the nails on the outer rims, then use the hammer on the nails.
Use the paintbrush by dipping it into the green paint.
Use the paintbrush on the wheel.
Go back to the cart and use the repaired wheel on the cart.
Click on the horseshoes in the inventory, then click on the Farmer/Bouncer.
Click on the brooch in the inventory and use it with the Farmer/Bouncer.
Click right to enter the cart.
One Step Away From Home
Bats!
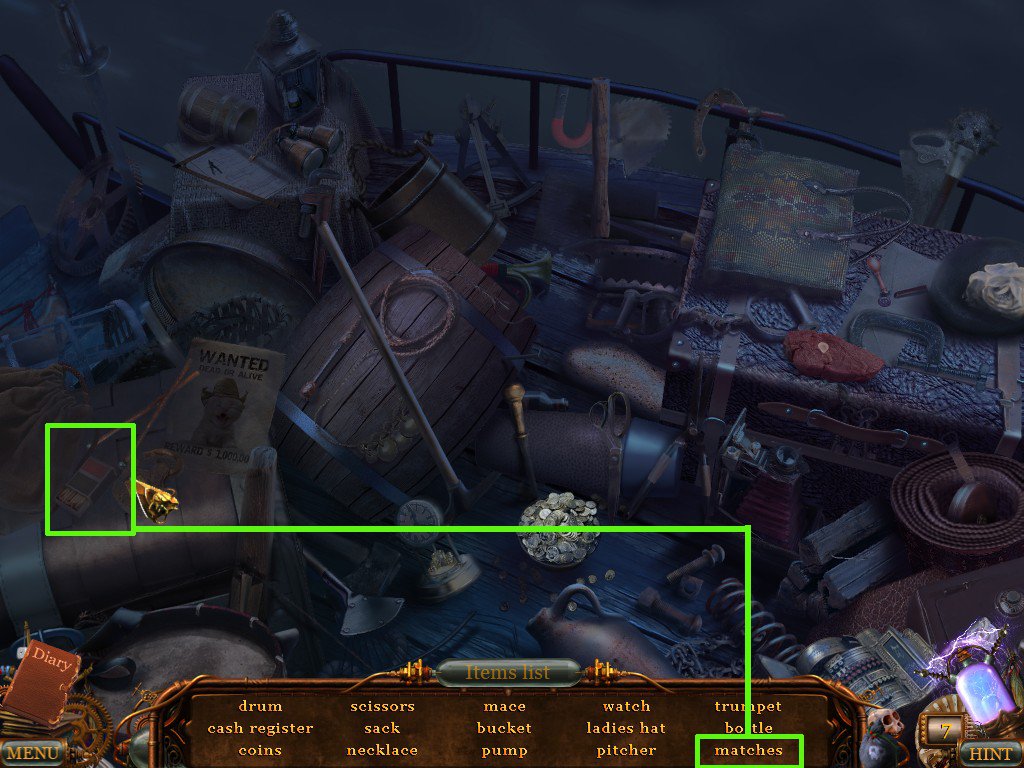
Click to go back to the rear view of the carriage and play a Hidden Object Game to find the MATCHES.
Screenshot.
Out of the Hidden Object Game, click on the LANTERN to take it.
Go back to the view with the Bats, hang the LANTERN on the hook at the right, and use the MATCHES on it.
Branches!
Go back to the rear view of the carriage and take the POLES.
Return to the front view and use the POLES on the slots.
Wolves!
Return to the rear view and play the Hidden Object Game to find the MEAT.
Screenshot.
Out of the Hidden Object Game, open the trunk at right and take the TRAP.
Click to take the TORCH.
Use the MEAT on one of the Wolves, and use the TRAP on the other.
Use the TORCH in the fitting at left and use the MATCHES on the TORCH.
Take the TORCH, and while in use, click on each of the 20 wolves that will appear around the screen.
Score 2 more hints.
Carriage Screenshot.
Back at the Office
Click on the sofa to read a letter.
Click on the desk to read another letter.
Screenshot.
Play the Hidden Object Game to find a TOY MOUSE.
Screenshot.
Click on Kitty's food bowls to find out she wants to play.
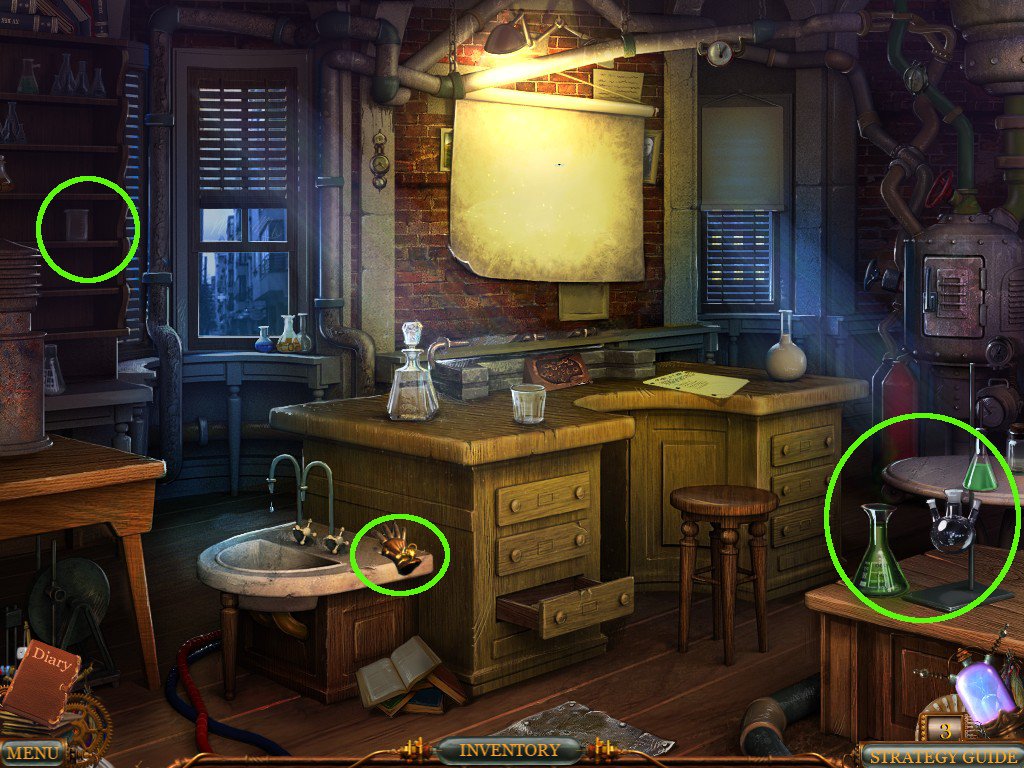
Go right and click on the Chemistry Set at right.
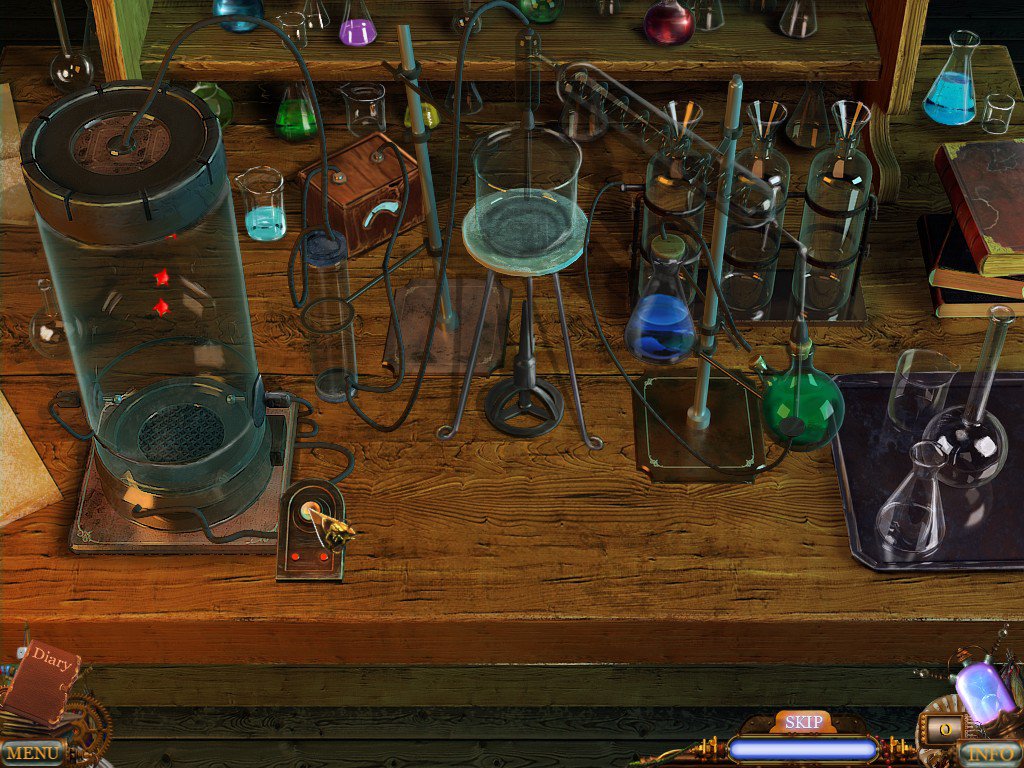
Use the VOODOO BAG on the Chemistry Set and find 9 pieces of lab equipment. Place each piece in its rightful place to start a mini-game.
Screenshot.
The object of the mini-game is to stop the red spiky molecules from reaching the bottom of the flask. To do this, use the button on the desk just right of the flask to zap the red molecules.
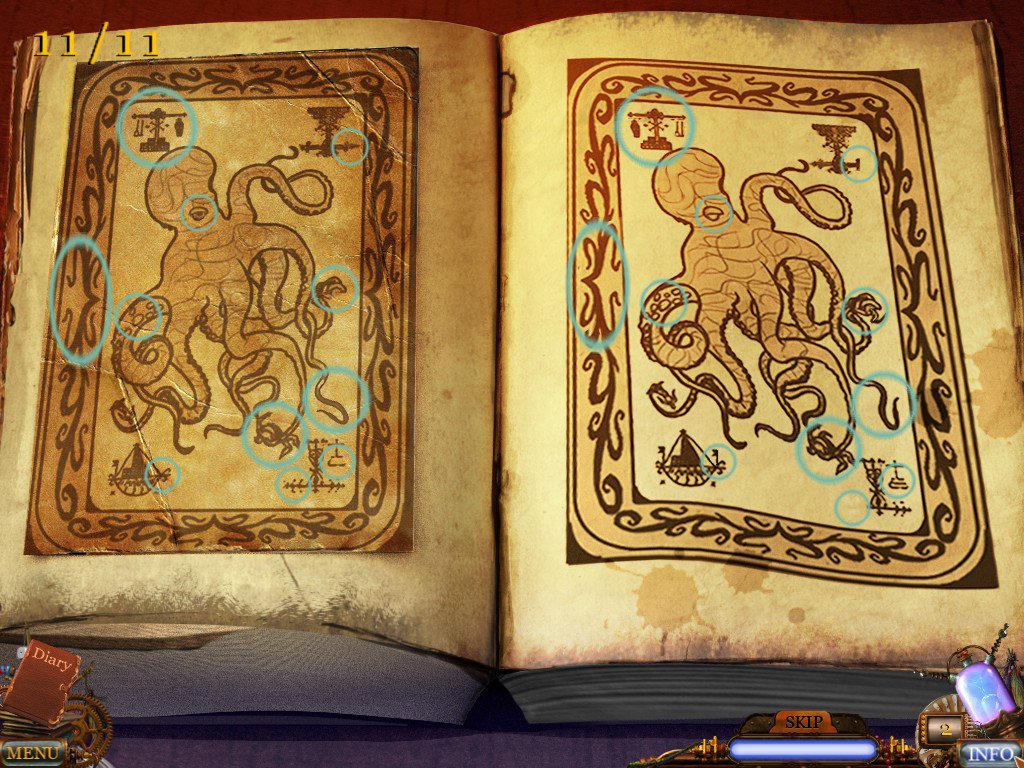
Back in the main view of the room, use the VOODOO CARD on the shelves at left to play a Spot-The-Difference Game.
Screenshot.
Find 11 differences.
Take the CLOCKWORK KEY from the the sink, near the taps.
Lab Screenshot.
Go back to the office view and put the TOY MOUSE near Kitty's food bowls.
Use the CLOCKWORK KEY on the mouse and click to turn the key.
Leave the Office and in the Street view, go right to City Hall.
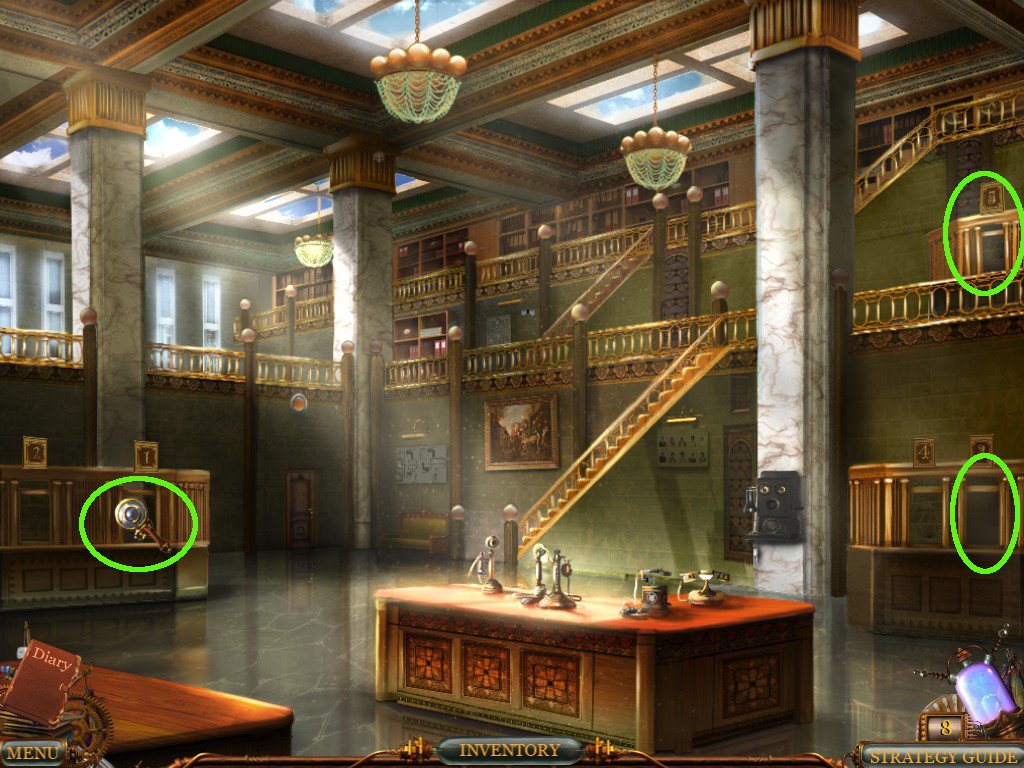
City Hall
Click Window #1 at left and talk to the woman, who will tell you that you need to fill in Form #3 from Window #5.
Click out and go to Window #5, top right.
Click on the woman in Window #5 who will tell you to fill out Form #2 at Window #3.
Click out and go to Window #3 at bottom right.
Click on the woman there who will ask you about a registration card and give you Form #2.
Go back to Window #5 and give the woman Form #2 to get Form #3.
Go back to Window #1 and give Form #3 in return for some information on Paul Seeker.
City Hall Screenshot.
Click back out to the Street view and click on the ambulance at the back left of the scene to go to the Asylum.
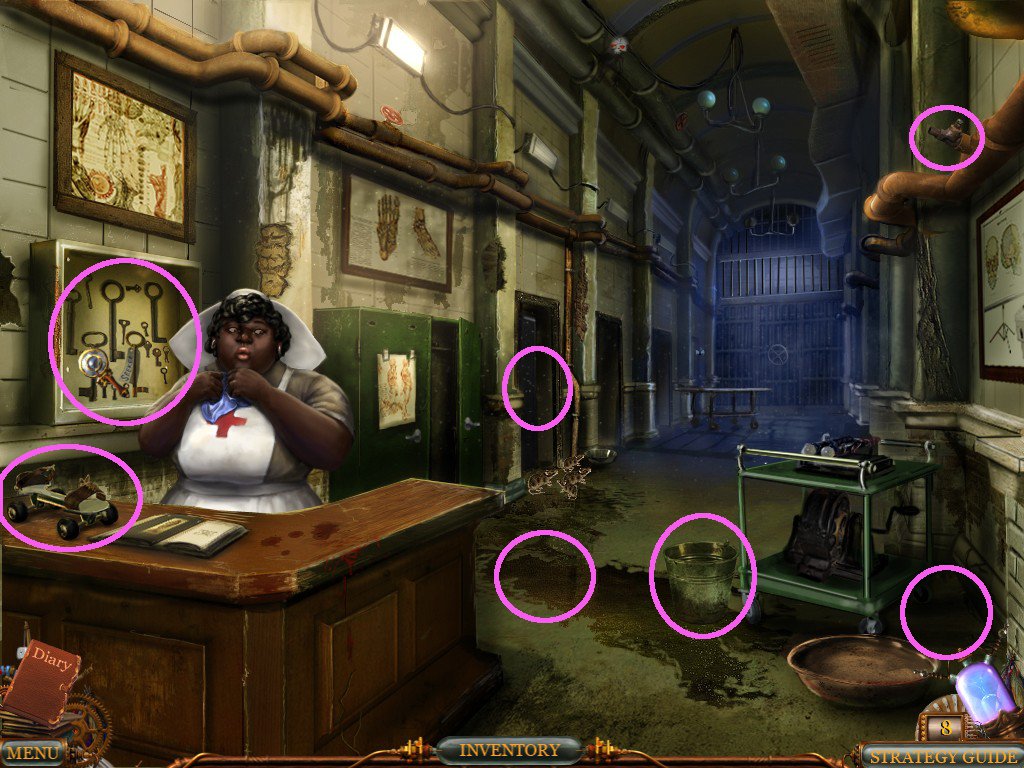
The Asylum
Click on the BUCKET to take it.
Click on the ROLLERSKATE on the Nurse's desk, at left.
Click on the Nurse, who will tell you that Paul Seeker is in Ward 7.
Click upper right of the screen on the pipe to find it's missing a valve.
Click on the Key Box next to the Nurse and take the WARD KEY marked 'Seeker'.
While in the close-up view of the Key Box, take the CHEESE that's sitting to the right.
Put the ROLLERSKATE in the puddle near the rats and use the CHEESE on it.
Click on the skate to move it, and the rats will disappear after it.
Click on the door behind the Nurse and use the WARD KEY on it.
Asylum Screenshot.
Enter Ward 7.
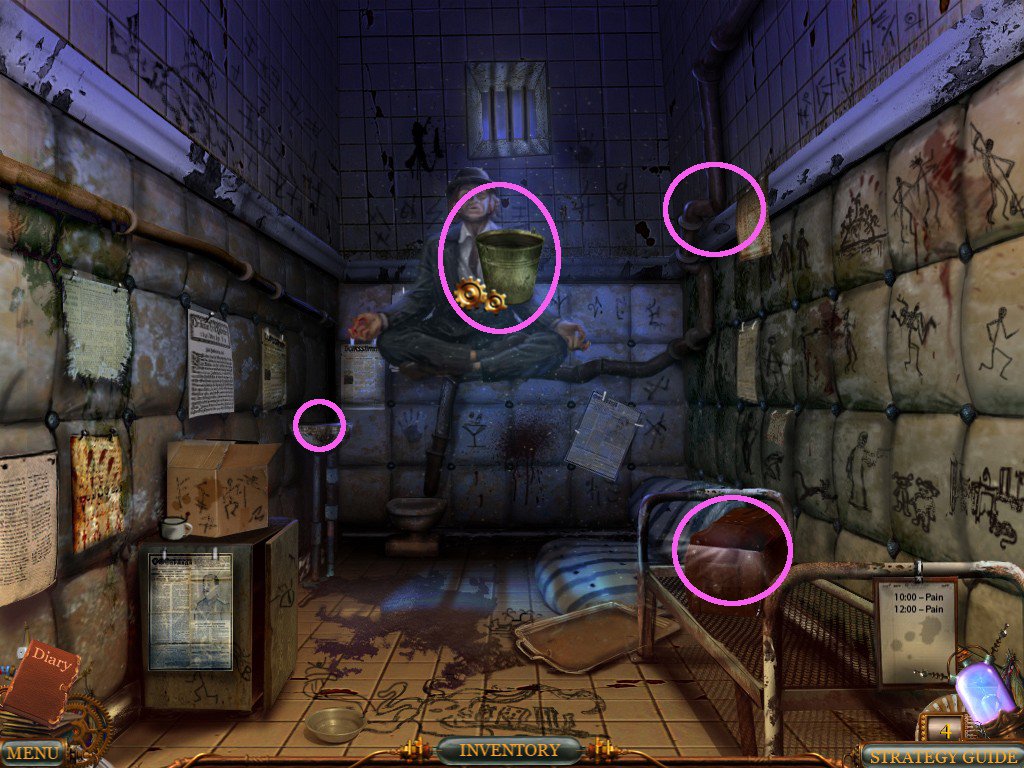
Ward 7
Click on the levitating Paul Seeker.
Take 2 Small Spies, one on the sink at left and one on the pipe top right.
Click on the paper top right above the bed for a close-up and take the VALVE.
Ward 7 Screenshot.
Go back to the view with the Nurse.
Use the VALVE on the pipe top right and put the BUCKET behind the dish on the floor below the VALVE.
Click on the VALVE to fill the BUCKET and click on the BUCKET to take it.
Go back to the Ward.
Use the BUCKET on Paul Seeker and then converse with him.
Click on the chest that's on the bed and a VOODOO HEAD will appear on the tray on the floor.
Click on the VOODOO HEAD for some more brief conversation, then go back to the Office.
The Office - again
Once back in the office, click on the desk to view the VOODOO HEAD and use the GLASS EYE on it.
Converse with the HEAD until the phone rings.
Answer the phone and then head out of the office to go to the Harbor.
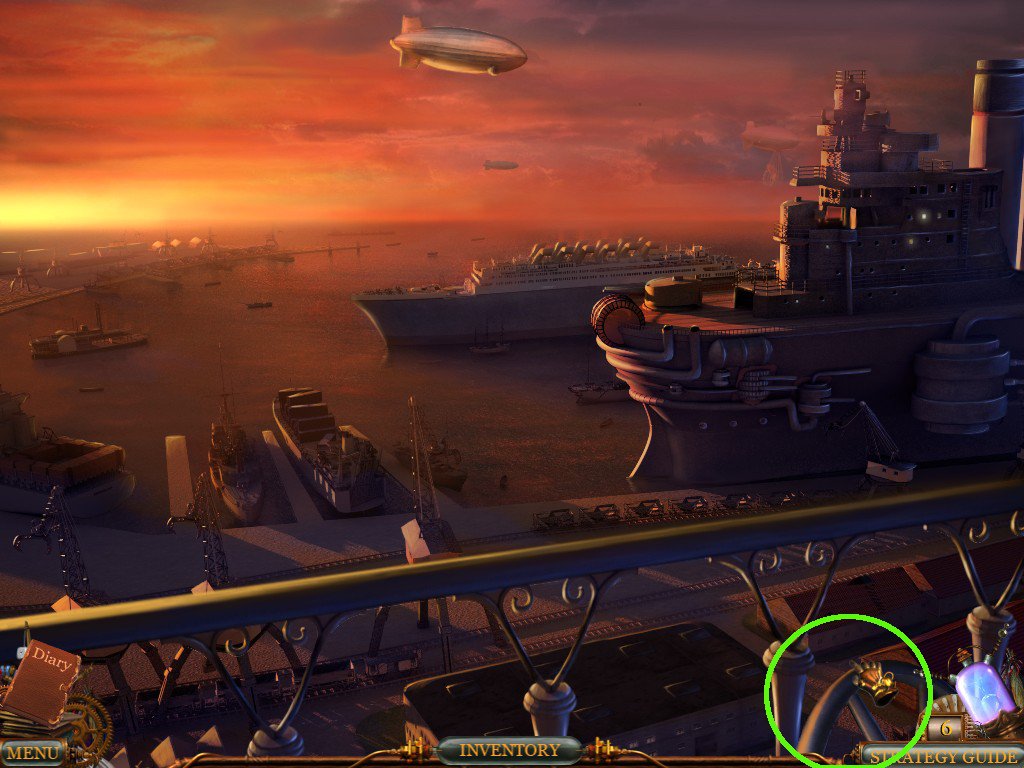
The Harbor
In the bottom right of the screen, click to take the METAL WHEEL.
Screenshot.
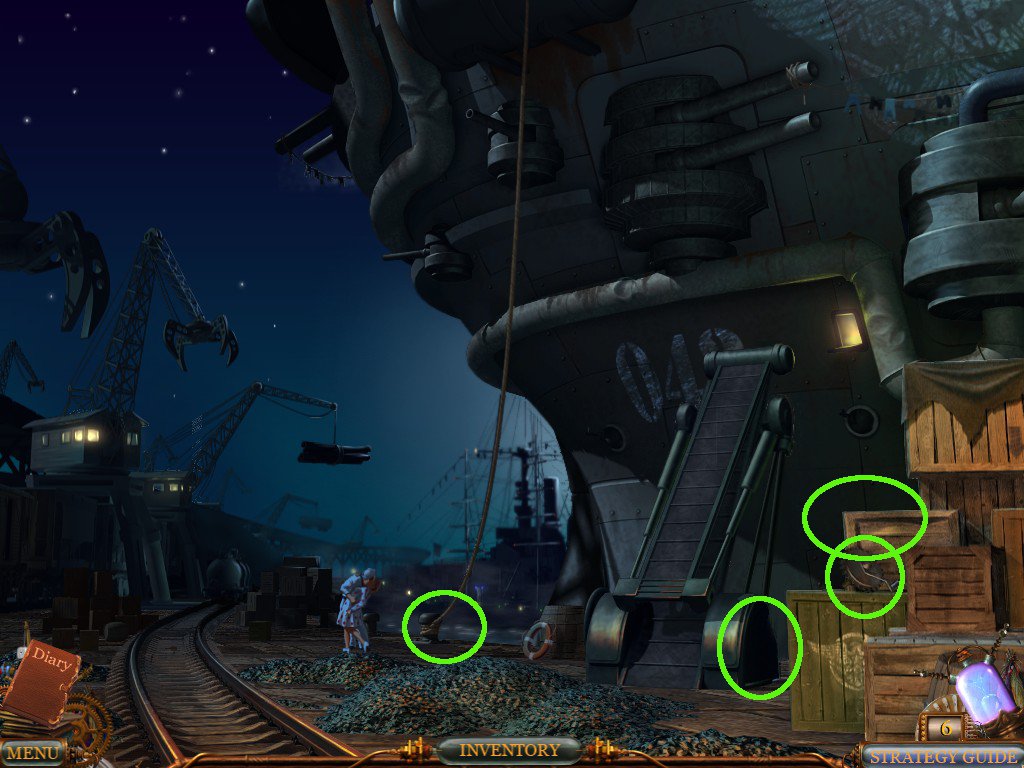
Click on the big ship, right foreground.
At right on the crates, take the PART FROM A LADDER.
Click on the ladder next to the ship for a close-up and add the PART and the METAL WHEEL.
Click the crates again to take an AXE.
Click on the mooring between the ship and the canoodling couple and use the AXE three times on the rope.
Pier Screenshot.
Click back out and click to enter the ship.
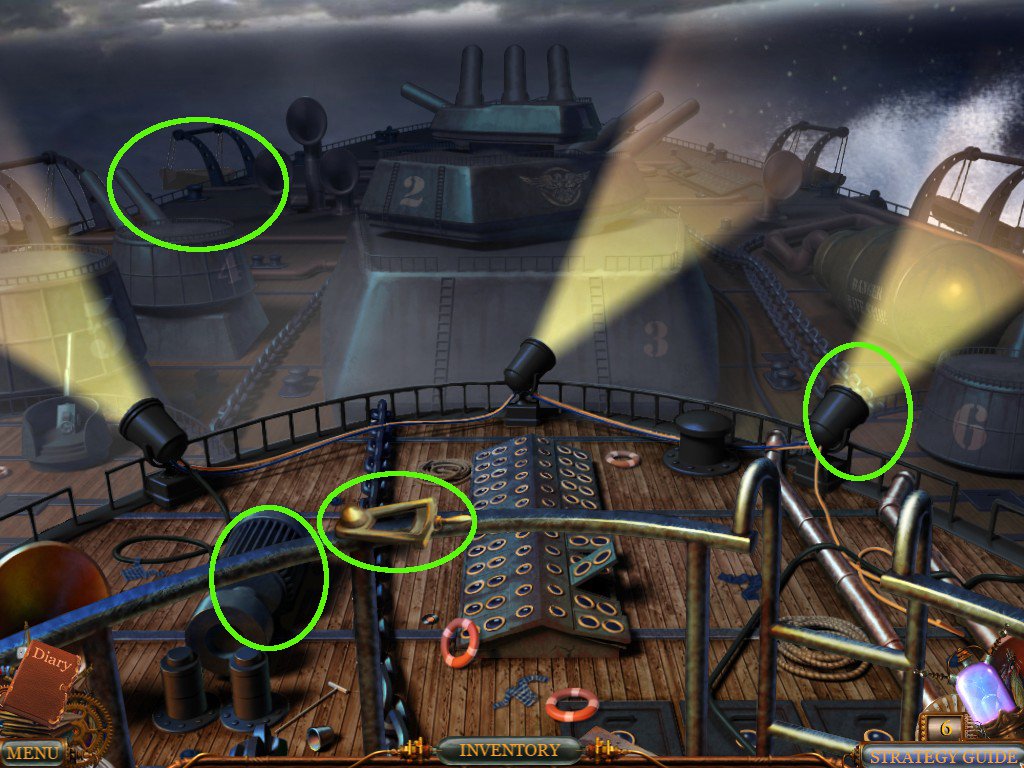
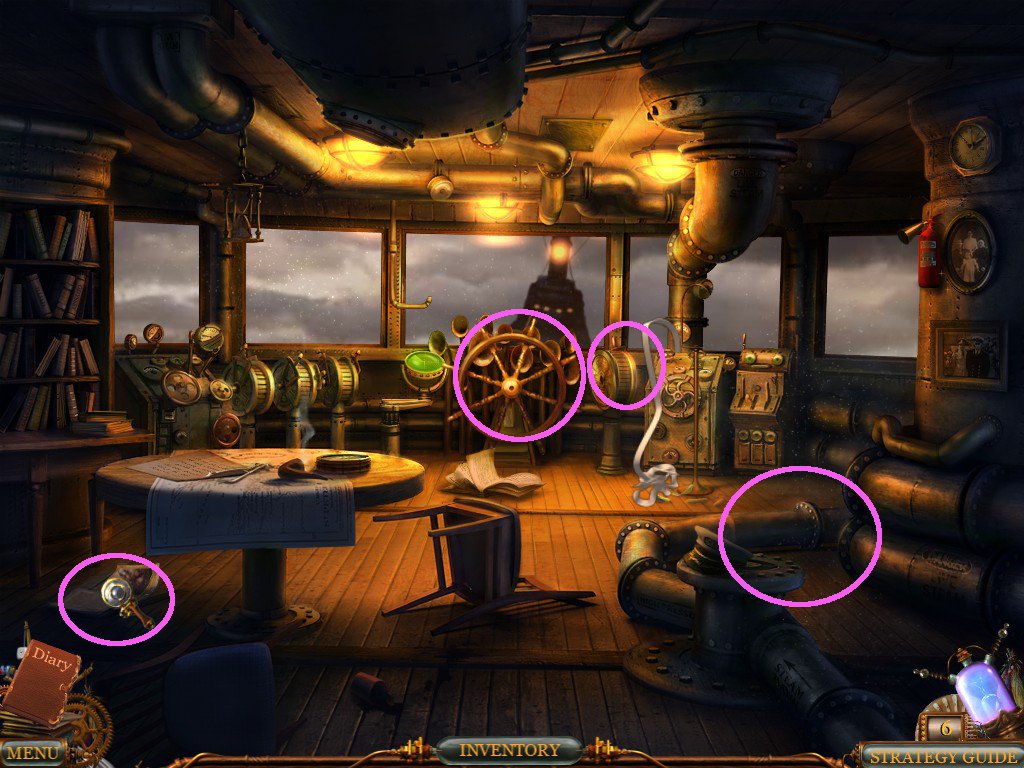
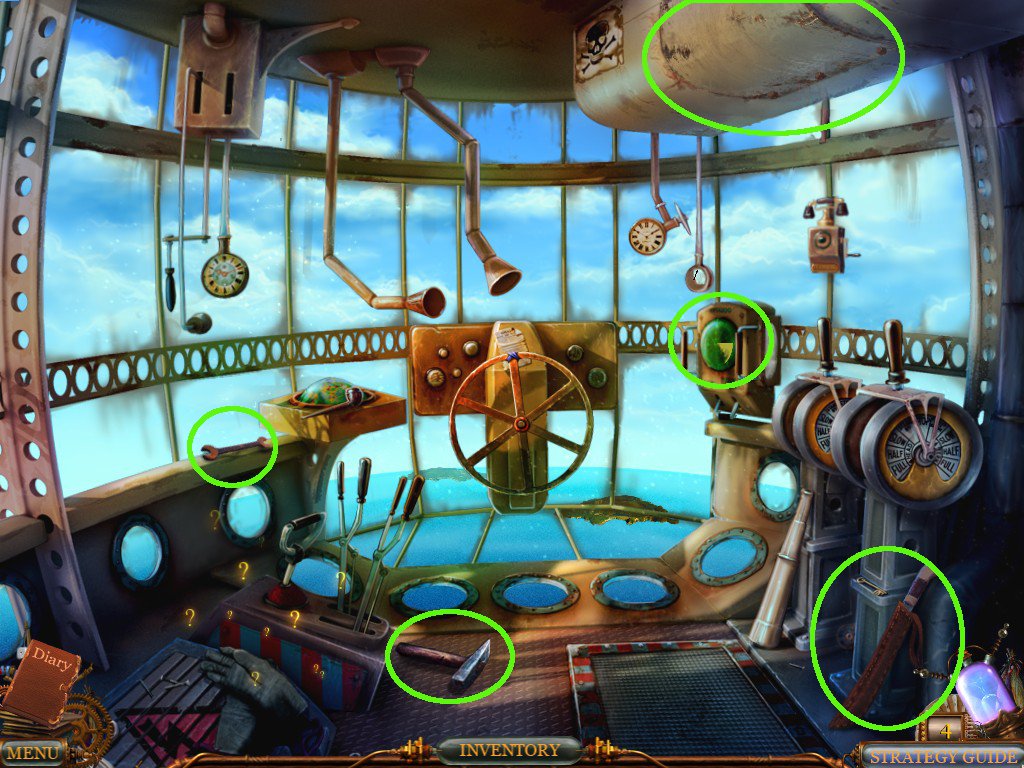
The Iron Liberty
Click upper left for a close-up view of a Giant Squid swimming past.
In the foreground of the main view, click to acquire a SPEED LEVER.
Go back to enter the Control Room and click the steering wheel to see that another boat is about to collide with the Iron Liberty.
Click left on the open book on the floor to collect some ELECTRIC FUSES for the pump.
Click upper right to get a FIRE EXTINGUISHER.
Click on the big pipes lower right to get SEARCHLIGHT LAMPS.
Go right to return to the deck.
Click on the Searchlight at right and use the SEARCHLIGHT LAMPS on it to fix all the beacons.
Go back to the Control Room to see the other boatmove away.
Return to the deck to see it's on fire.
Use the FIRE EXTINGUISHER on all the flames to douse the fire.
Click left of the pump that's billowing smoke and use the ELECTRIC FUSES.
Solve the puzzle by placing the Safeties so that each safety is in a different column and row from the others.
Go back to the Control Room.
Click on the steering wheel for a close-up and use the SPEED LEVER to the right, then click again on the speed lever to avoid the rocks.
Deck Screenshot.
Control Room Screenshot.
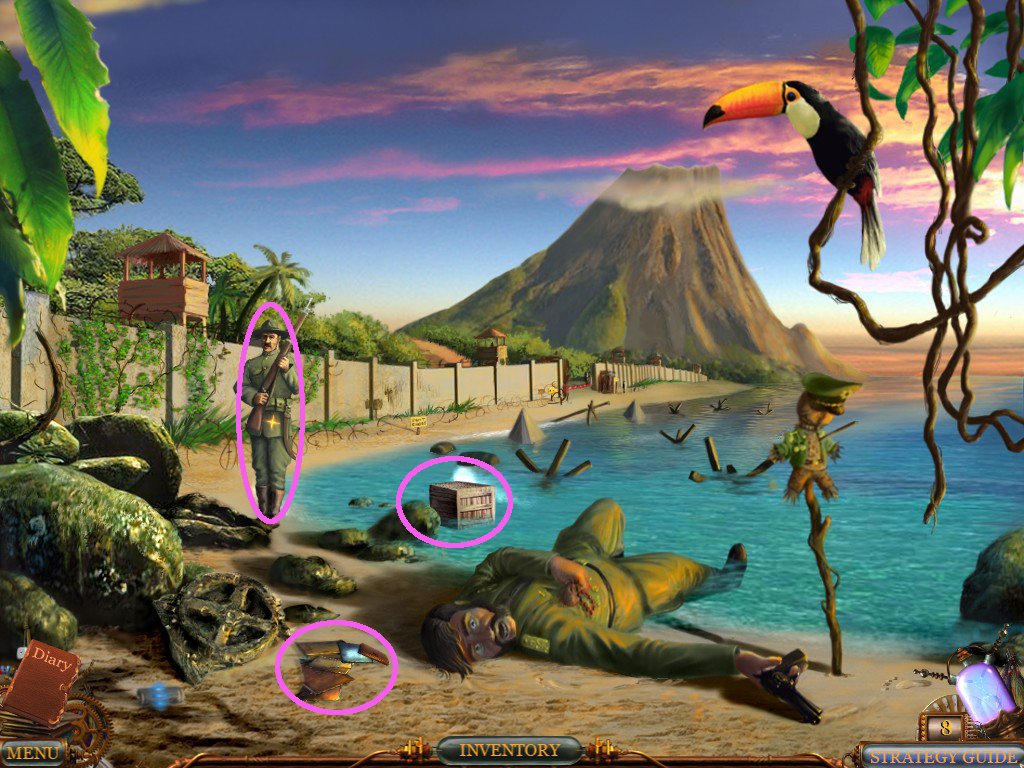
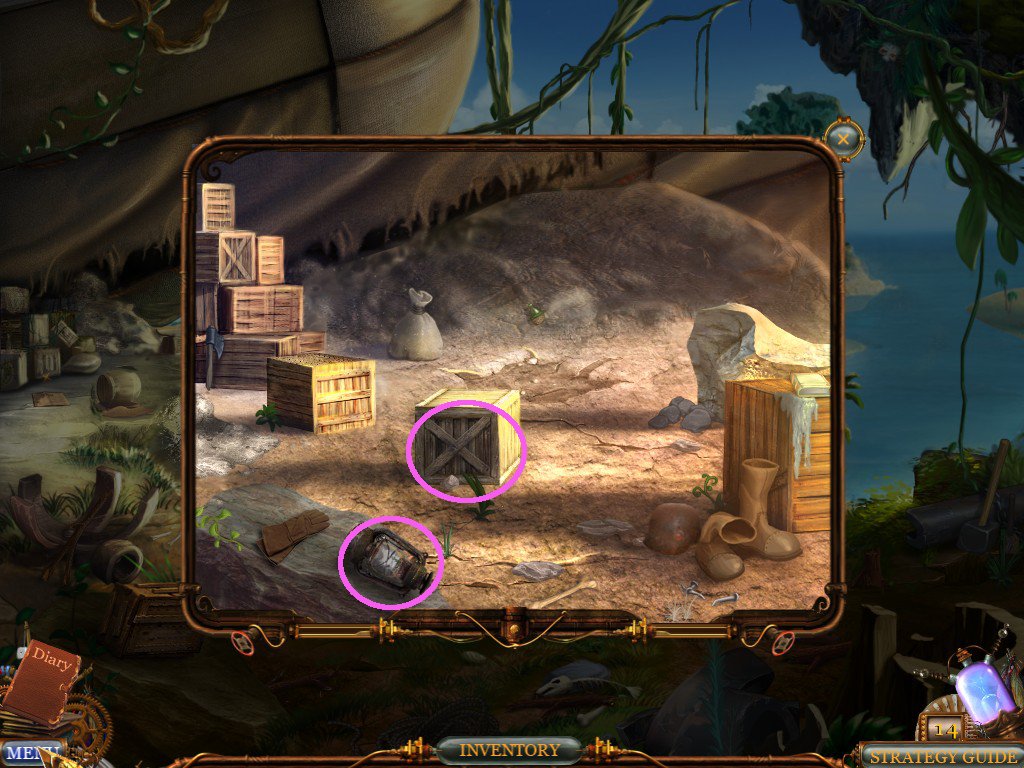
The Military Base
Click on the items that are lying on the sand behind the dead man's head to get an AXE.
Use the AXE on the crate in the water.
Click for a close-up and get a SCREWDRIVER.
Use your DETECTIVE BADGE on the Guard.
Beach Screenshot.
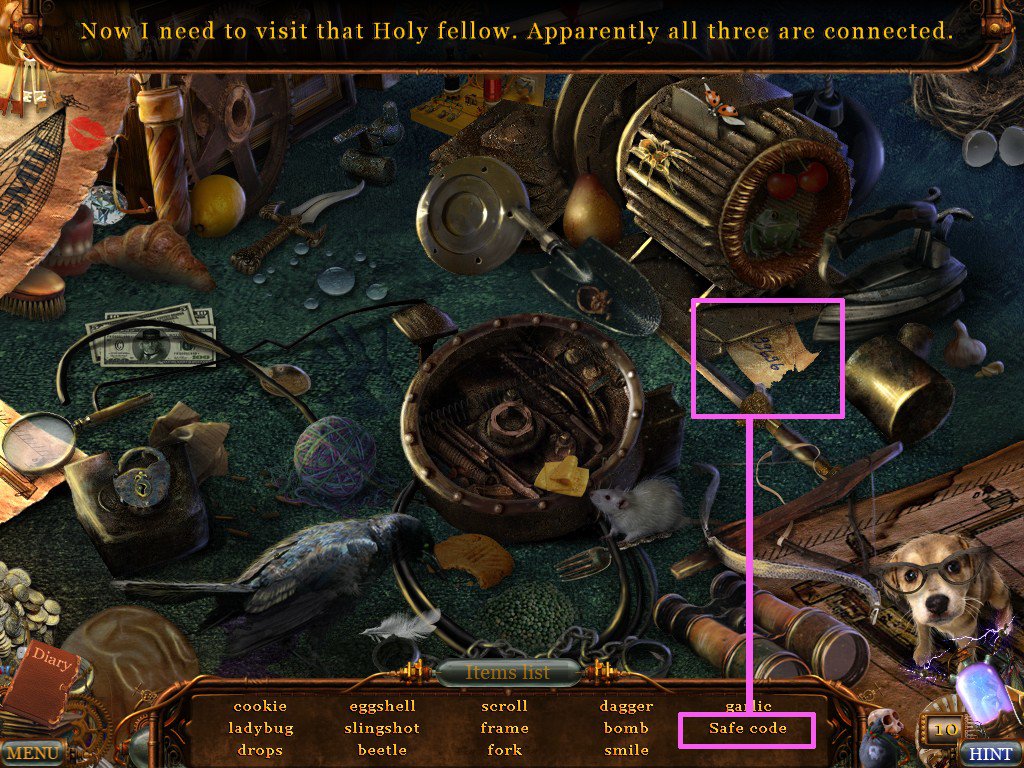
Click on the gap in the wall in the distance to enter the Base.
Play the Hidden Object Game to get a SAFE CODE.
Screenshot.
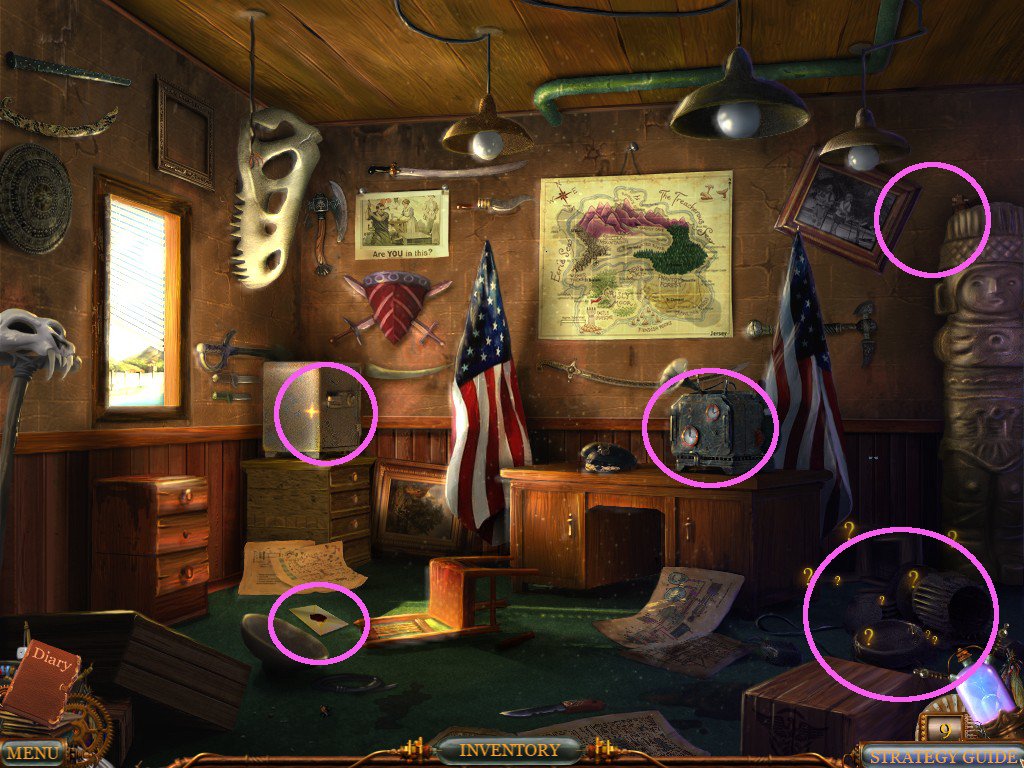
Use the SAFE CODE on the safe at left to get a VOODOO AMULET.
Click on the letter on the floor.
Click on the skewed framed photo on the top right for a close-up and take the GENERAL'S LIGHTER.
General's Quarters Screenshot.
Go outside and talk to the Guard.
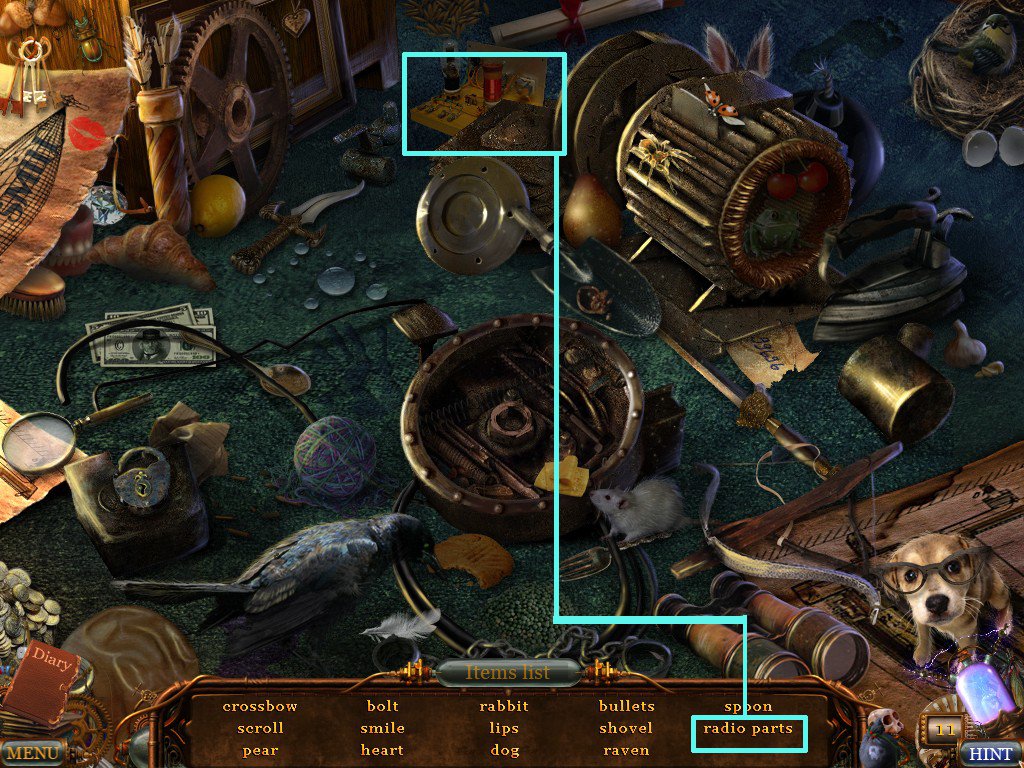
Go back inside and click on the Radio Apparatus.
Use the SCREWDRIVER on the Apparatus and click back out to play a Hidden Object Game.
Find the RADIO PARTS.
Screenshot.
Use the RADIO PARTS on the Apparatus.
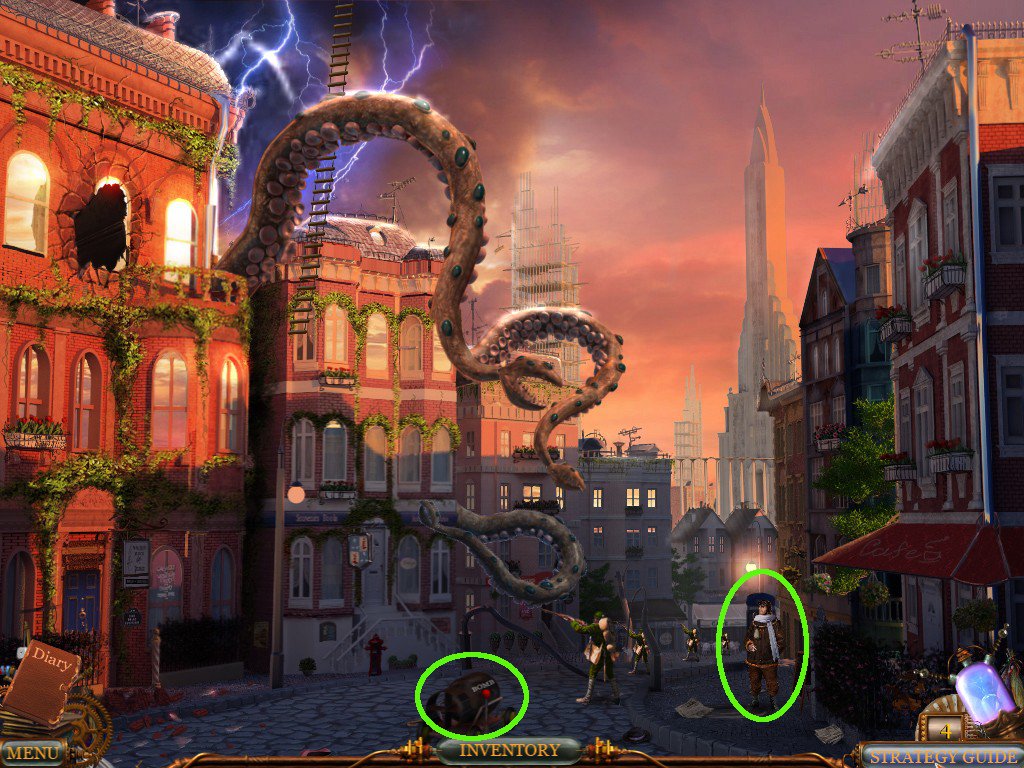
The Kraken!
Click on the Phone Booth at right for a close-up and take the CAR KEYS that are lying on the ground near it.
Click out and use the CAR KEYS on the red car at left. Click on the Column Shift to get the car rolling down the hill.
The Lady in the Pink Dress will escape the phone booth, so click it the booth again for a close-up and take the GAS CAN.
Click to the right of the Phone Booth to find an IDOL.
Use the GAS CAN on the building at left and then use the GENERAL'S LIGHTER on it to set the Kraken's tentacle on fire.
Street View Screenshot.
Enter the building and click on the AXE in the inventory, then click on each of the tentacles to drive them away.
Click on the stone tablet that's on the wall near the floating pyramid to note something is missing.
Use the IDOL on the stone tablet, then click on the floating pyramid for a close-up of a burning diary.
Click back out and take the GLASS OF WATER from the left.
Use the GLASS OF WATER on the burning diary, then click to read the scorched pages.
Interior Screenshot.
Go back outside and talk to the Pilot at right. Click on the contraption at the centre of the screen to send it rolling downhill, and the Pilot will chase after it.
Second Street View Screenshot.
Click up to board the Airship.
The Airship
Play the Hidden Object Game to get ELECTRIC TUBES.
Screenshot.
Click on the HAMMER on the floor nearby to take it.
Click on the MACHETE lower right of the screen.
Click to the right of the Steering Wheel for a close-up and use the ELECTRIC TUBES.
A HULL PART will fall, so click on it to add to the inventory.
Click left to take the WRENCH.
Put the HULL PART back where it came from and use the WRENCH on it.
Airship Screenshot.
The Lost Temple
The Cliff
Click on the crate at left to take the CRAMPS.
Click around the area to find 6 pieces of BRUSHWOOD.
Screenshot.
Use each piece of wood on the smoldering fireplace.
Click left for a close-up and take the LANTERN.
In the same view click on the crate at center to take the LADDER MACHINE.
Cliff Screenshot.
Click back out and use the LANTERN on the BRUSHWOOD.
Click just left of centre of the scene for a close-up of the cliff and use the LADDER MACHINE, CRAMPS and HAMMER.
Click back to go inside the crashed Airship and play the Hidden Object Game to find the LEVER.
Screenshot.
Exit the Airship, go back to the LADDER MACHINE and use the LEVER on it.
Click on the machine to lower the ladder and head down to the Temple Entrance.
Temple Entrance
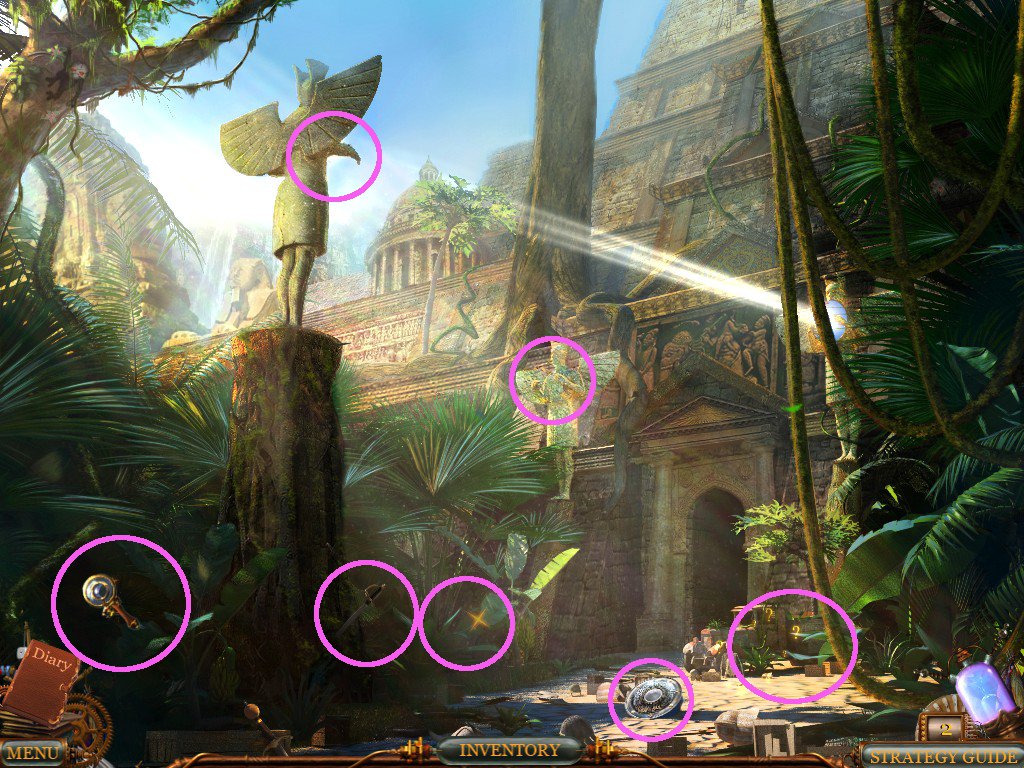
Click left to take the MIRROR.
Click on the SABER wedged in the tree stump to take it.
Click on the palms slightly left of centre and acquire the RED MONKEY STATUE.
In the same view, use the SABER on the wooden box a few times to get the DYNAMITE.
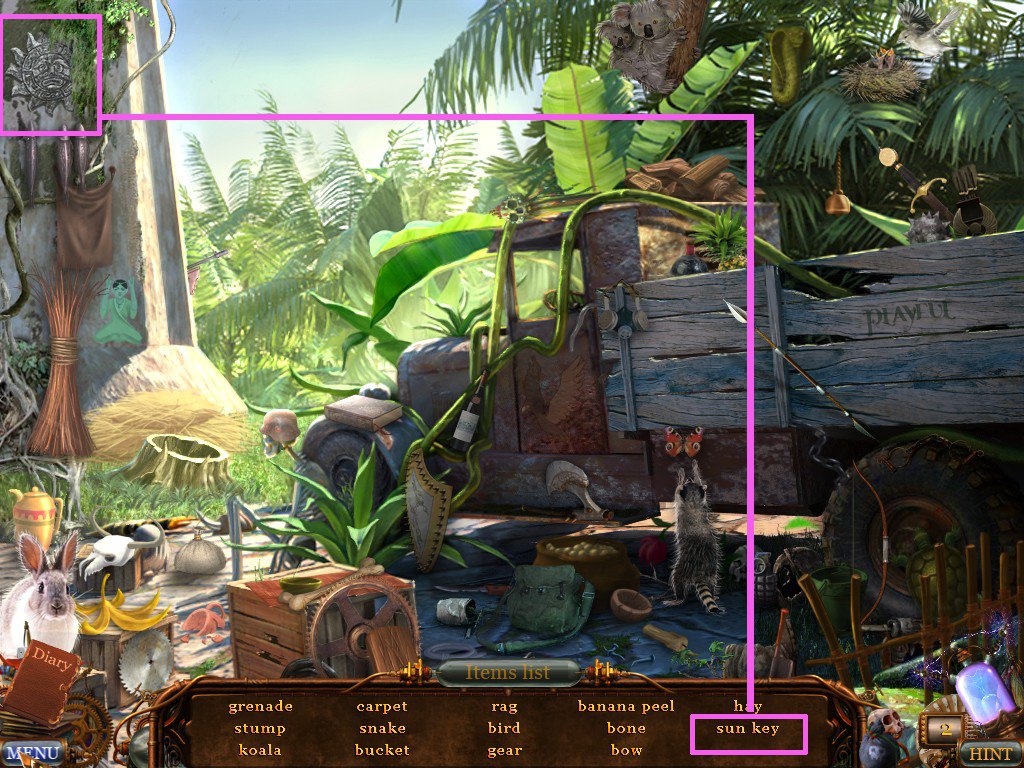
In the main view, play the Hidden Object Game to find a SUN KEY.
Screenshot.
On the ground is a SHINY SHIELD: click to take.
Collect 2 Small Spies, one from the right in the palm leaves and one from the left at the top of the tree branches.
Use the MIRROR on the statue in the centre of the screen and use the SHINY SHIELD on the statue that's facing the temple door.
Temple Entrance Screenshot.
Click to enter the Temple.
Use the MACHETE on the foliage blocking the entrance, then click lower right to acquire a ROPE.
Click left to take a YELLOW MONKEY STATUE.
Click on the ROPE at right.
Click to move forward.
Use the SUN KEY on the door, and some rocks will tumble down to block your way.
Use the DYNAMITE on the rocks and then use the SUN KEY on the door again.
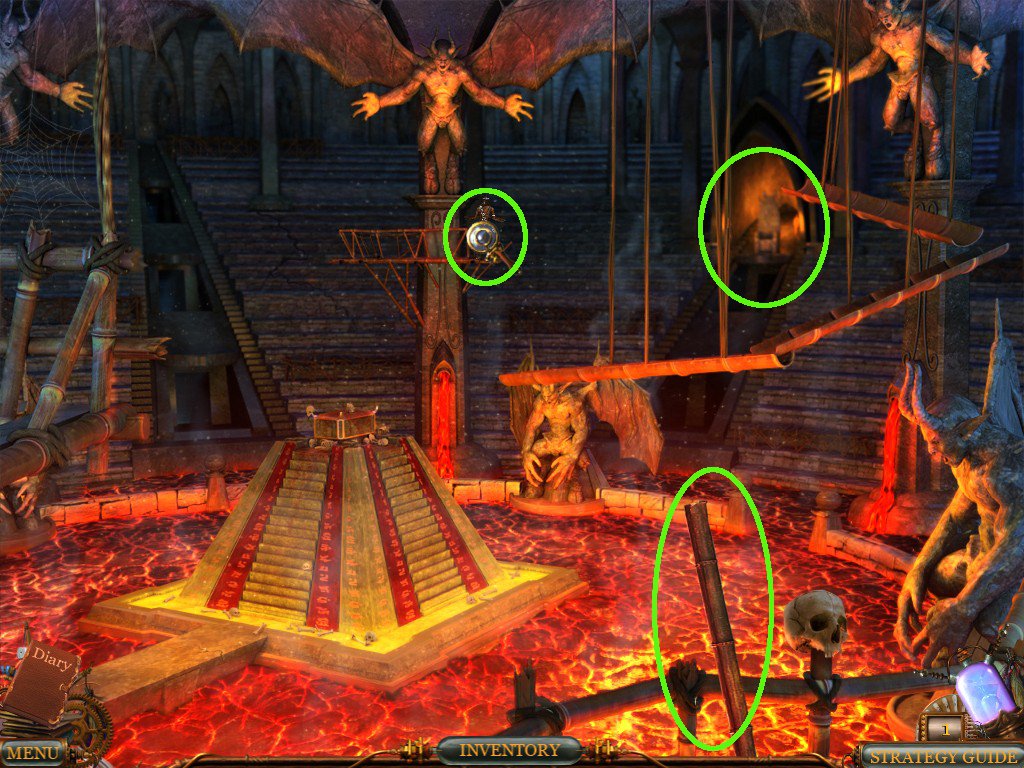
Lava Chambers and Tunnels
Take the BAMBOO STICK that's in the foreground.
Click on the moving figure for a close-up and use your GUN on him.
Click on the Little Man for some Yoda-like dialogue.
Click on the glowing area at the back of the room for a close-up and take the BLUE MONKEY STATUE.
Click on the slab with the hole to note something is missing.
Lava Chamber Screenshot.
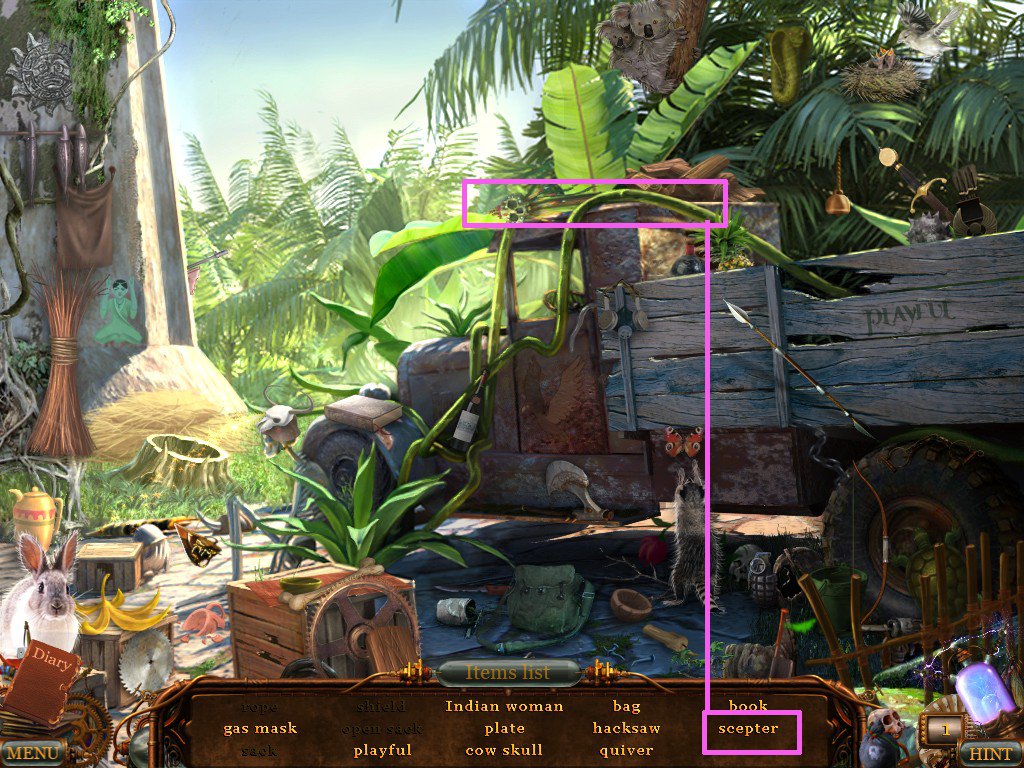
Click back out and return to the temple entrance to play a Hidden Object Game and get the VOODOO SCEPTER.
Screenshot.
Back in the Lava Chamber, use the SCEPTER on the hole in the slab.
Use the MAGIC SCROLL in your inventory on the Round Stone. At last a use for the MAGIC SCROLL!!!
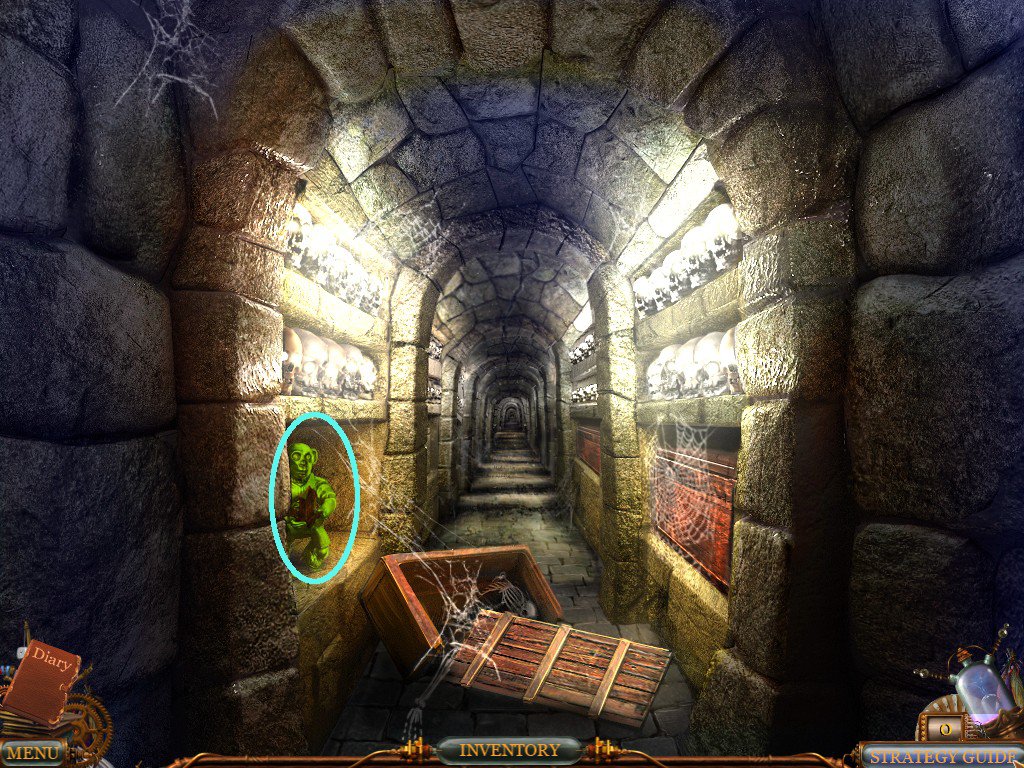
In the main view, click to go forward into the Tunnel.
Screenshot.
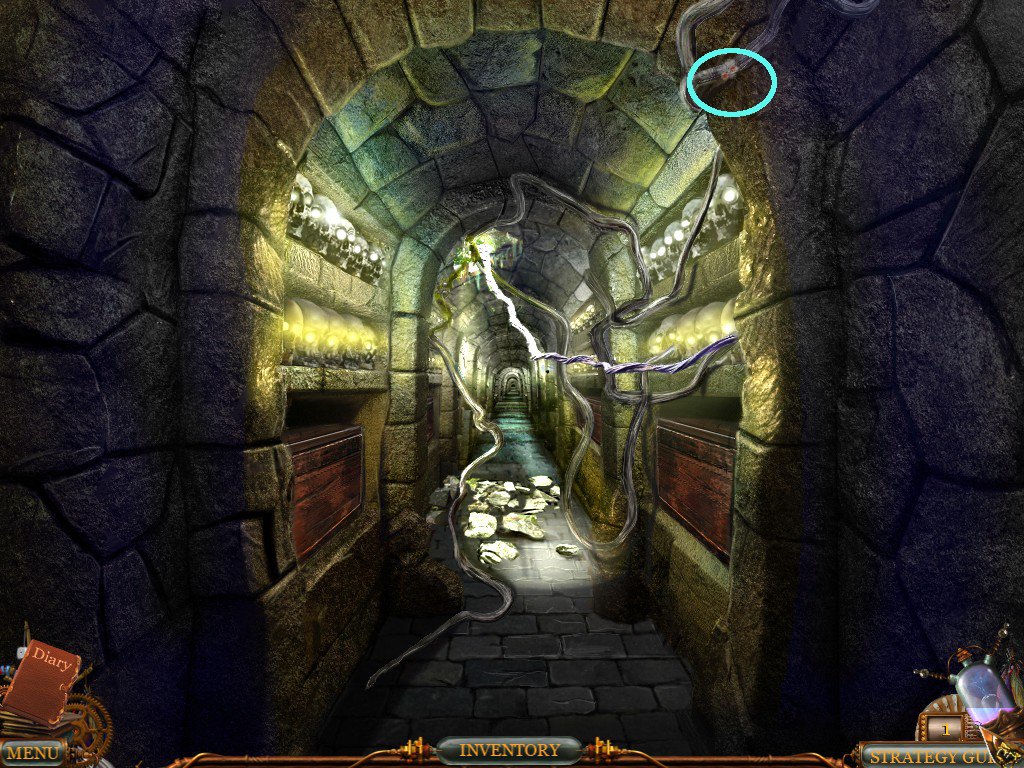
Move forward once and take another Small Spy from the top of the screen.
Screenshot.
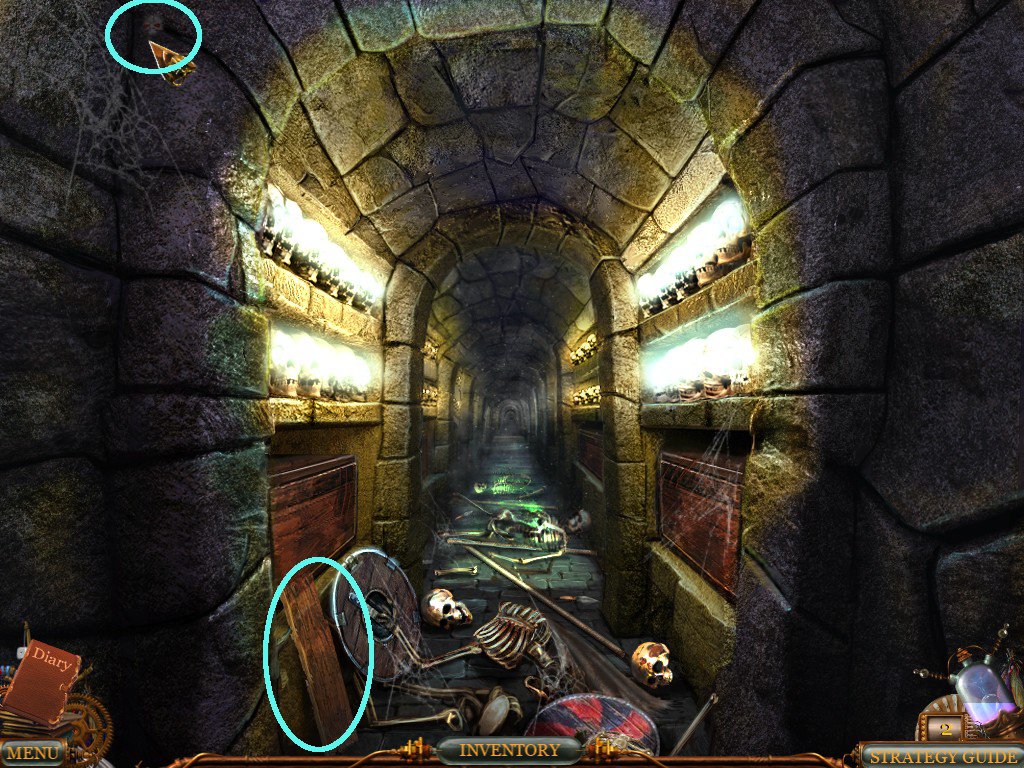
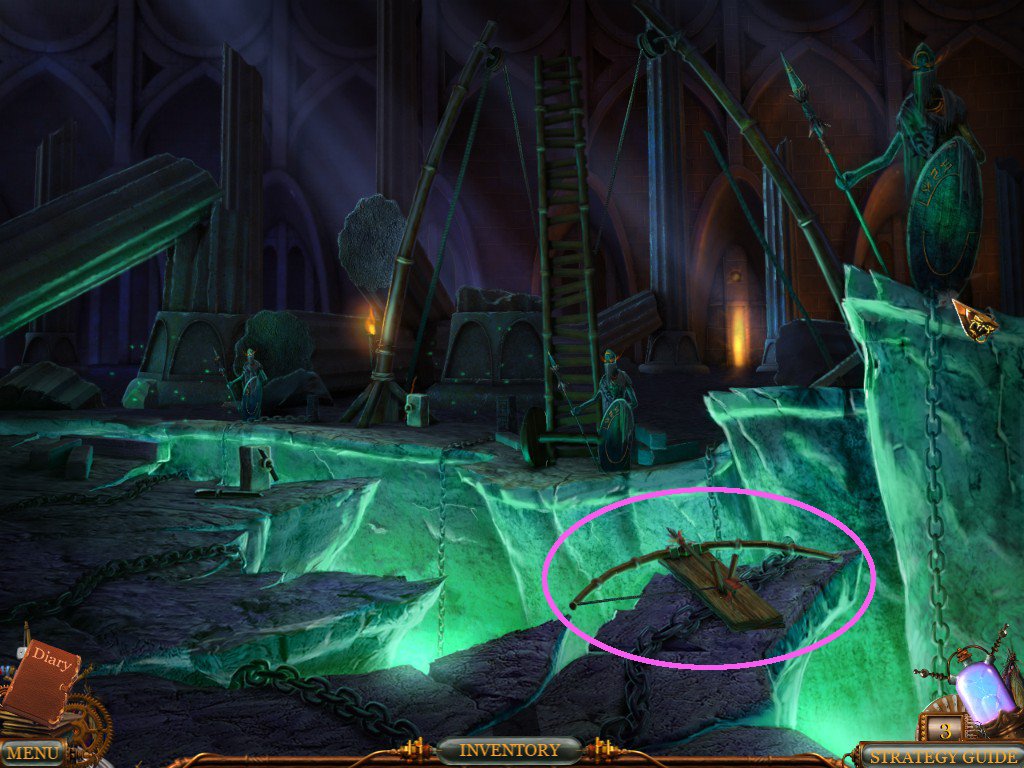
Move forward once more and take the WOODEN BOARD from the left and another Small Spy from top left.
Screenshot.
Move forward into the next chamber.
Use the WOODEN BOARD on the ledge at right.
Take the ARROW from center screen and collect 2 Small Spies, one from the left and one from the right.
Use the BAMBOO STICK, the ROPE and then the ARROW on the WOODEN BOARD.
Click on the contraption to fire the Arrow and lower the Bridge.
Click on the Bridge for a close-up and take the MAGENTA MONKEY STATUE.
Bridge Chamber Screenshot.
Go forward to the next Chamber.
The Snake Chamber
Collect the Small Spy from top right.
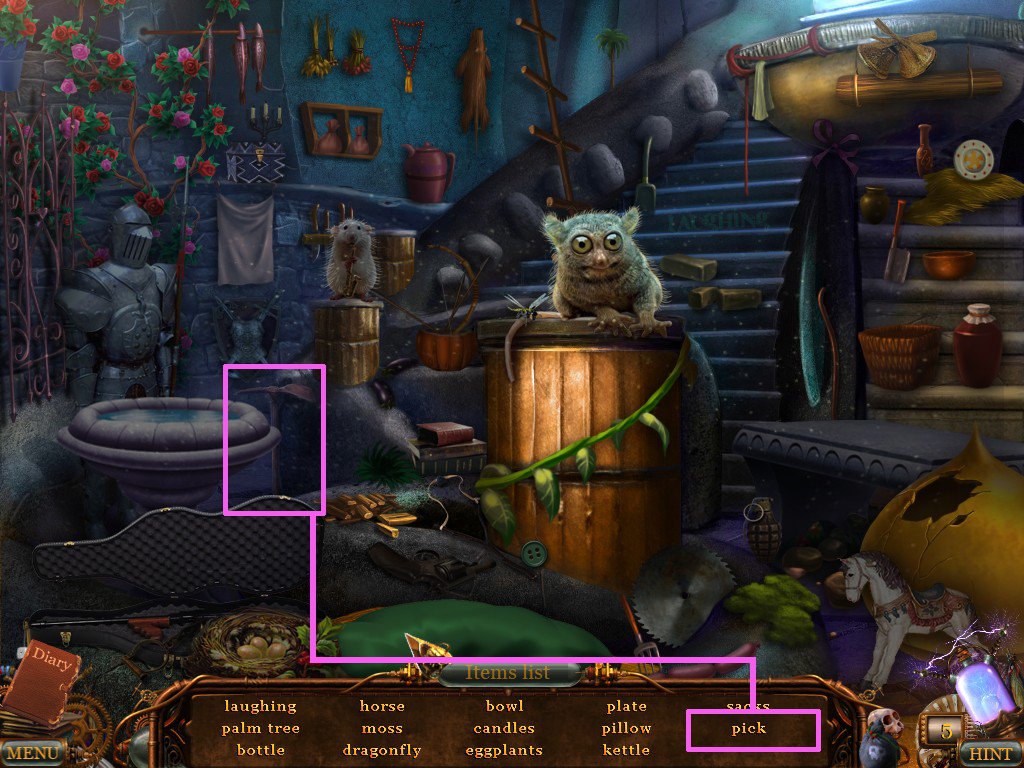
Play the Hidden Object Game at left to find a PICK.
Screenshot.
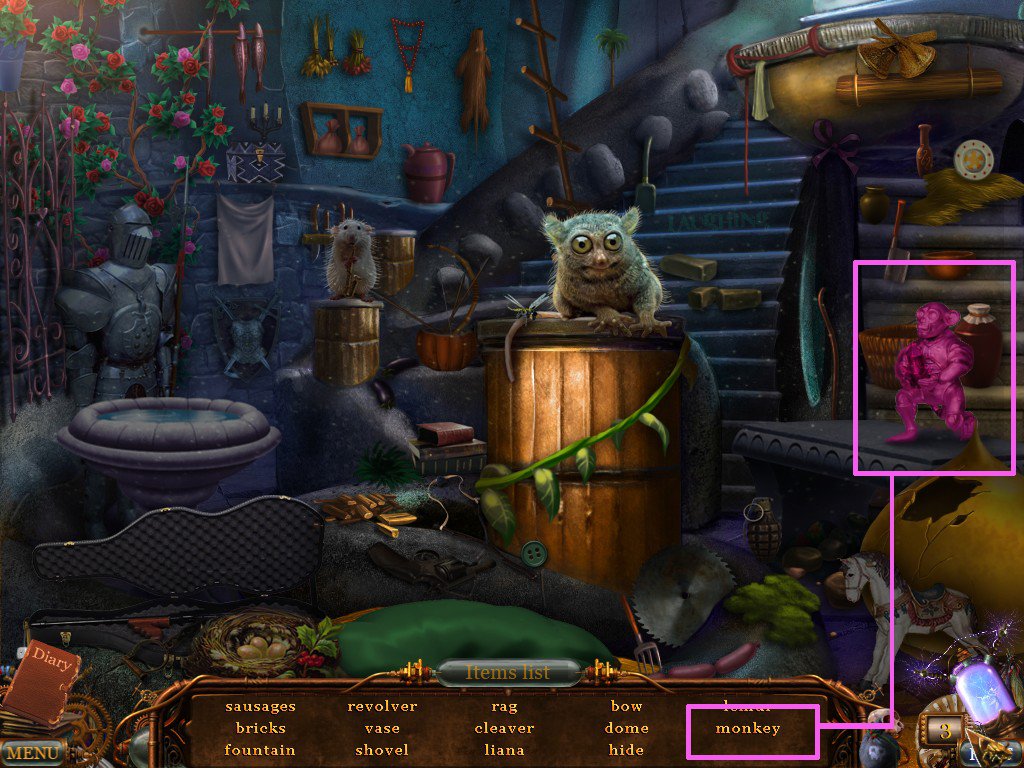
Use the PICK on the two front small columns to remove the fragments.
Play the Hidden Object Game that appears to collect the PURPLE/PINK MONKEY STATUE.
Screenshot.
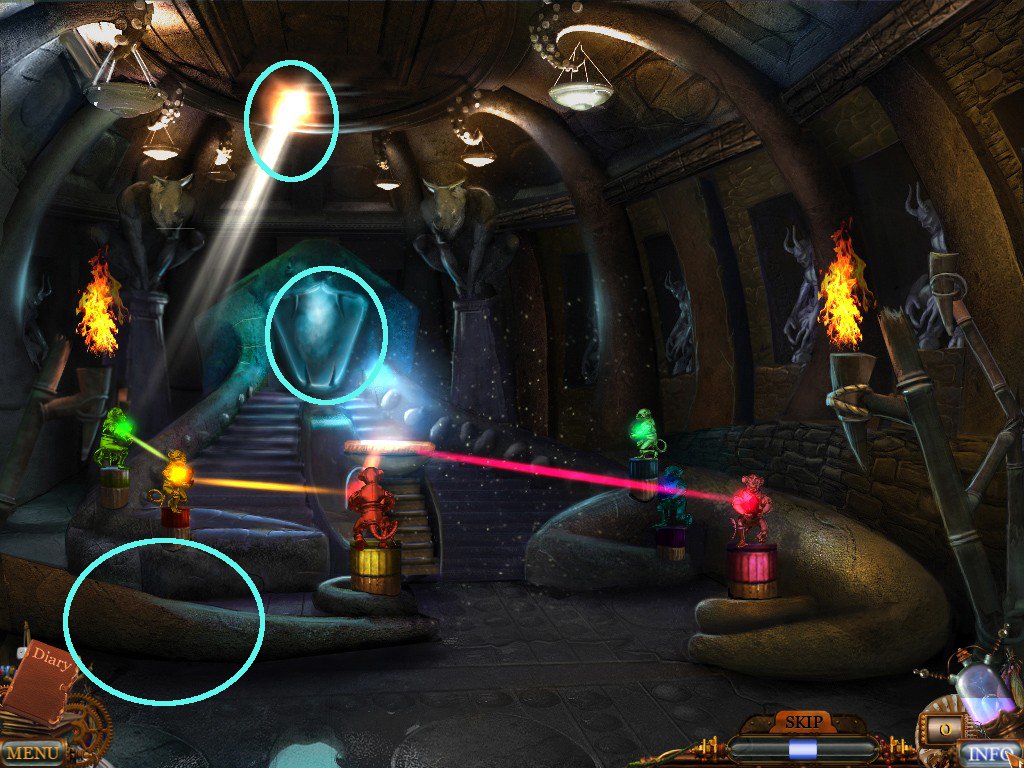
Place the MONKEY STATUES on their respectively coloured column stands.
Click on the ceiling where the beam of light is coming through and use your GUN on it.
Click each of the MONKEY STATUES to turn them so that the crystals they are holding light up. This varies each time you play.
Collect 2 more hints.
Snake Chamber Screenshot.
The Lady in the Pink Dress appears, then after a brief dialogue and an apology she disappears.
Go forward into the Mouth of the Snake.
The Land of... Karma?
Suddenly your little black Kitty appears and runs ahead.
Click on each of the cages to view each member of the Trio, including Coins.
Click towards the front of the scene to collect the GOLD MONKEY IDOL.
Move forward.
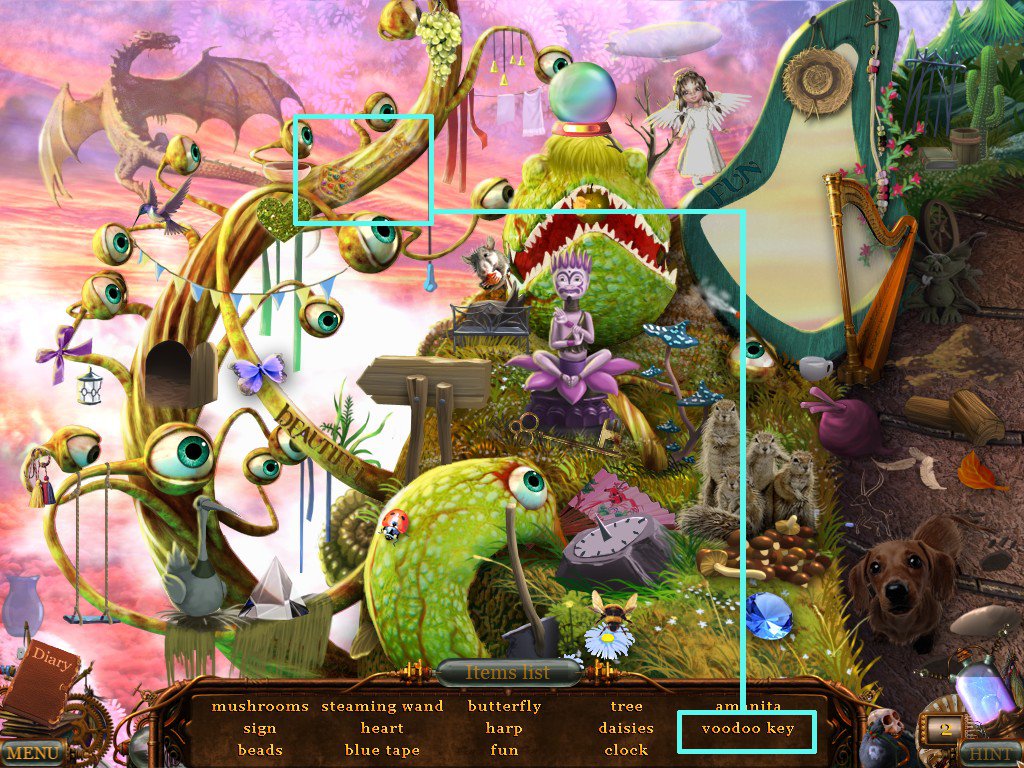
Click left to play the Hidden Object Game and find the VOODOO/SPIRIT KEY.
Screenshot.
Place the MONKEY IDOL on the pink pyramid and use the SPIRIT KEY on the box that appears to get the SPIRIT BONE.
Use the SPIRIT BONE on the 3-Headed Dog. Kitty will run in and chase the Dog away with some magic.
Click the upper-right of the screen to move forward.
Kitty will run upstairs to the Throne. Click on the majestic looking being that's seated on the Throne.
Use the VOODOO AMULET on the Little Native Man at left.
Kitty will turn into the Lady in the Pink Dress.
Click through the dialogue to find out you need to perform a ritual.
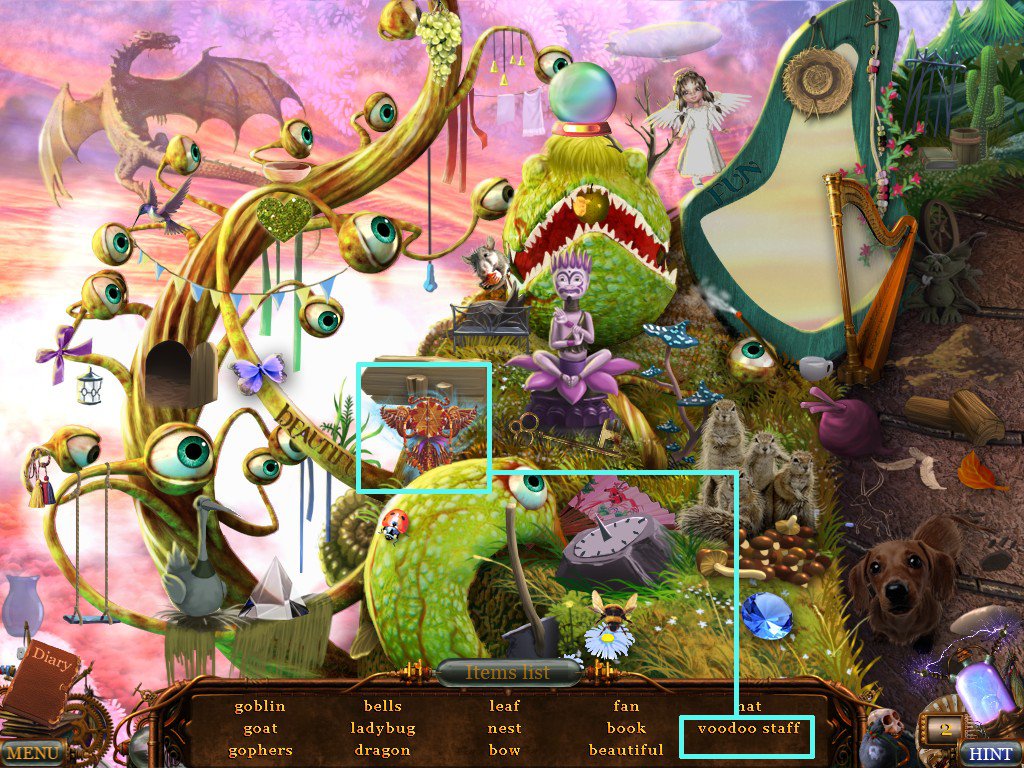
Click back out and play the Hidden Object Game to find the VOODOO STAFF/SCEPTER.
Screenshot.
Go back to the Throne Room and use the SCEPTER on the left side of the Throne.
Click again to play a game, the ritualistic battle that is the culmination of this adventure.
You are James the White Snake, playing Loki the Black Snake. Use the mouse to steer your snake around the screen and glide over pieces to collect them.
The object of the game is to be the first to collect 10 pieces.
If Loki happens to collect 10 pieces before you, the game simply resets.
You can block Loki's progress by swimming over his black pieces and preventing him from getting them.
Back Home
Suddenly you find yourself back in your Detective's Office, with your little black Kitty on the sofa.
The phone rings, and you are being called out on another case.
You wonder if it was all just a dream.
But then...
Thanks to chiktionary for the walkthrough!
Posted by: Mike |
October 3, 2011 4:32 PM
|
October 3, 2011 4:32 PM