

Twisted Lands: Insomniac
Platform: Mac, Windows

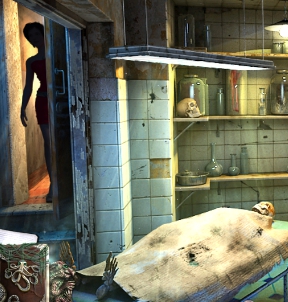
![]() "I don't want to scare you, but we're going to do a lobotomy." Here's a protip; if anyone ever says that to you... worry. Especially when you're the one strapped to a hospital bed. In Alawar Games' hidden-object adventure Twisted Lands: Insomniac, you play Angel, whom you might remember, an amnesiac young woman who was found wandering on a beach and has since been committed to psychiatric care after terrifying visions and hallucinations have reduced her to hysterics. Rather than succumb to the (questionable) efforts of her doctors, she decides to escape, but her bizarre nightmares won't leave her alone and she might not be as crazy as she appears.
"I don't want to scare you, but we're going to do a lobotomy." Here's a protip; if anyone ever says that to you... worry. Especially when you're the one strapped to a hospital bed. In Alawar Games' hidden-object adventure Twisted Lands: Insomniac, you play Angel, whom you might remember, an amnesiac young woman who was found wandering on a beach and has since been committed to psychiatric care after terrifying visions and hallucinations have reduced her to hysterics. Rather than succumb to the (questionable) efforts of her doctors, she decides to escape, but her bizarre nightmares won't leave her alone and she might not be as crazy as she appears.
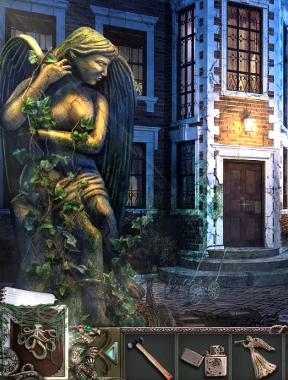
 In this direct continuation of Twisted Lands: Shadow Town, as Angel you'll travel between the sinister hospital she's been locked in, and a bizarre dark other world. The gameplay is your standard pointy-clicky, puzzle-solvey affair, and you'll hunt for objects and clues under the watchful eyes of a whole host of creepy ghost kids. (Is there any other kind?) While the "skip" button on puzzles takes a long time to charge, the game's "hint" button is extremely helpful and will even point you exactly where you need to go if you click on it during normal gameplay. As such, you might want to resist the temptation to use it unless you want the experience to feel like you're being lead around by the hand by a fussy, over-protective mother. "Did you tie your shoes? Are you sure you have all the puzzle pieces you need to open the infernal gate to the Hellmouth? Make sure you take a tinkle before you go... you don't want to have to turn back!" *sigh* Yes, moooooooom...
 Analysis: Insomniac is vastly superior to Shadow Town in nearly every way. Sporting significantly flashier visuals, cutscenes, and even a bit of voice acting, Insomniac is not only presented beautifully but plays great too. Strange things constantly happen around you, clues and scenes drive the plot forward, and the hidden-object scenes are clean and well-rendered so you never feel like you're straining your eyes. The downside is there's a fair amount of backtracking, and the game is more than happy to make you repeat some hidden-object scenes in a relatively short window of time. Fortunately, Insomniac really works to keep you interested and rarely lets more than a few minutes pass without something strange and spooky happening, or the plot advancing in some fashion. You might not call it scary unless you're the sort of person who generally jumps at shadows, but it definitely isn't boring. Having finished Shadow Town isn't necessary a strict requirement to enjoy the game, but there are so many nods and mentions and answers directed at it that a lot of the plot might go right over your head otherwise.
The game's biggest flaws, however, might be both that the hint system makes the game extremely easy if you rely on it, and that even if you've played Shadow Town the plot is sort of confusing. Don't get the wrong impression; if you're looking for an eye-catching, surreal hidden-object adventure then Insomniac is a great choice for a relaxed evening's play, but as you're bombared with strange images and cryptic notes you'll probably be doing your own version of an adorable YouTube pug-head-tilt video more than once. On the other hand, this strangeness works in the game's favour to a certain degree, since you're always driven to find out more about what's going on, and if a purple skeleton or a creepy shadow pops up once in a while as you're doing so, all the better. Twisted Lands: Insomniac isn't quite perfect, but it's a game you can have a lot of fun with, packed full of surprises and weirdness. You can probably expect a playthrough to last over four hours, and if you've been wanting a not-too-spooky but definitely ambitious and well made title to lose an evening in, you'll definitely want to check out the demo.
A Collector's Edition is also available. It contains a bonus chapter to play, wallpapers, strategy guide, and more. Remember that Big Fish Game Club Members pay only $13.99 for Collector's Editions (or 2 club credits), and collector's editions count 3 card punches of 6 total needed for a free game.
![]() Windows:
Windows:
Download the demo
Get the full version
Also available: Collector's Edition
![]() Mac OS X:
Mac OS X:
Download the demo
Get the full version
Also available: Collector's Edition


Walkthrough Guide
(Please allow page to fully load for spoiler tags to be functional.)
Twisted Lands:Insomniac Walkthrough
General Information
Many of the puzzles in this game have solutions that are randomized between games. Screenshots for puzzles must therefore be used as an example for reference, rather than a definitive solution.
There are two modes of difficulty that can be chosen at the start, or changed at any time from the options menu.
Regular Mode includes a faster charging Hint button and interactive zones are highlighted with a glittering area.
Expert mode does not highlight interactive zones, and the Hint button will recharge much more slowly.
The Hint button can be found at the lower right corner of the screen.
Click the Hint button to reveal an item in a hidden object scene or to show the next step in your adventure.
Beside the Hint button is the Inventory bar.
Items that you collect throughout the game are placed within the Inventory bar, where they can be kept for future use.
Often once an item from your Inventory is used, it will disappear from the bar.
To the left of the Inventory is the Journal and the Notebook.
The Journal contains important information found as you play the game and may contain hints to solving future puzzles.
The Notebook lists the tasks you need to complete in order to progress through the story.
The cursor will change to a hand when it is moved over interactive areas like the Hint button, Notebook, Journal, and also any area in the game where you can interact with the environment or pick up an item.
The cursor changes to a gear over areas that require further interaction or the use of an inventory item.
The cursor changes to a magnifying glass over an area where you can zoom in for a closer look, or if it is moved over a hidden object scene area.
A hidden object scene is a single scene that includes a list of items that are concealed in that area. Find and collect all of the items from the list, and one will be added to your inventory.
Chapter 1
Patient Ward
Click the doctor to speak with him.
Take the Pitcher on the bedside table.
Use the Pitcher on the empty glass, then click the Glass Shard to add it to your inventory.
Click the bottom of the bed to zoom in.
Use the Glass Shard on the leather straps around your ankles.
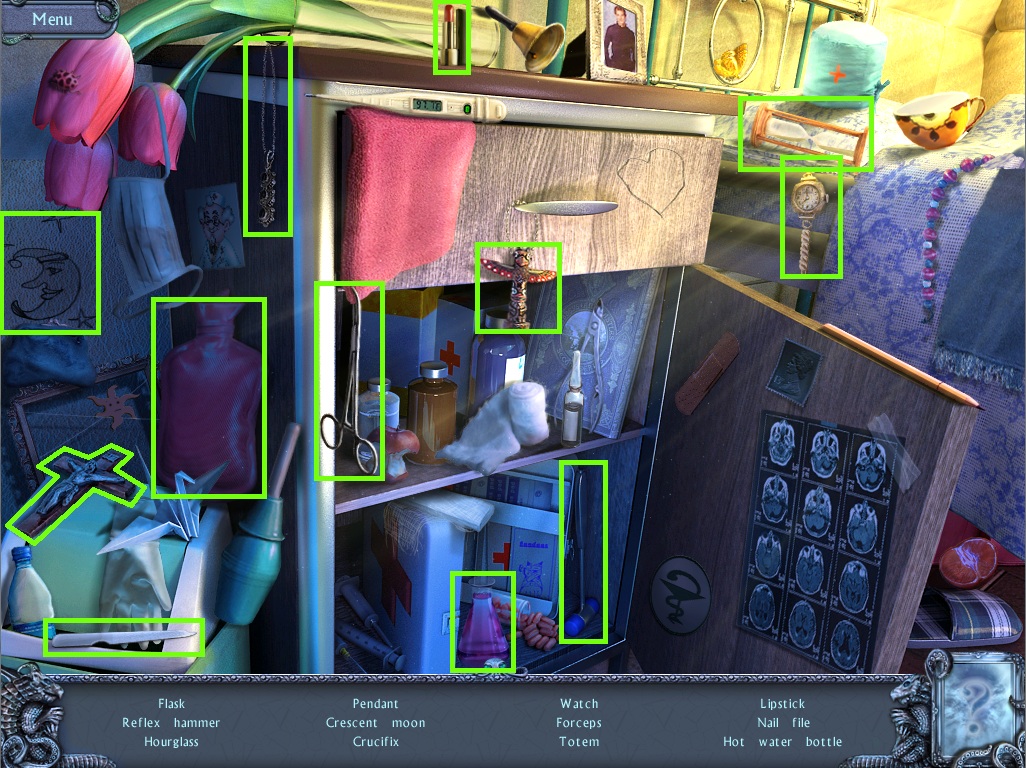
Click the bed to start the hidden object scene.
Screenshot.
Once the hidden object scene is complete, you will receive a Nail File.
Click the newspaper on the wheelchair to zoom in, then click the picture on the left page.
Click the newspaper under the bed for a closer look.
Click the window in the door to look through.
Click the air vent on the wall to zoom in.
Use the Nail File from your inventory on the four screws at the top and bottom of the vent.
Click down to go inside.
Inside the Vent Shaft
Take the Crowbar leaning against the left wall.
Click the air vent to look through.
Go left further down the vent passage.
Click the second air vent for a closer look.
Use the Crowbar twice to remove the grate, then go down to the bathroom.
Bathroom
Click the curtains around the bath and in front of the windows to draw them both back.
Click the crumpled newspaper on the table to the right of the bath to zoom in and take the Key.
Click the sink on the left wall to zoom in.
Take the Faucet Handle on the rack above the sink.
Use the Key from your inventory on the padlock at the left cabinet.
Click the cabinet door to open it and take the Stopper inside.
Click the bath tub for a closer look.
Use the Stopper from your inventory on the drain in the tub.
Use the Faucet Handle on the valve on the wall, then click the handle to start the water.
Go down the hole in the floor.
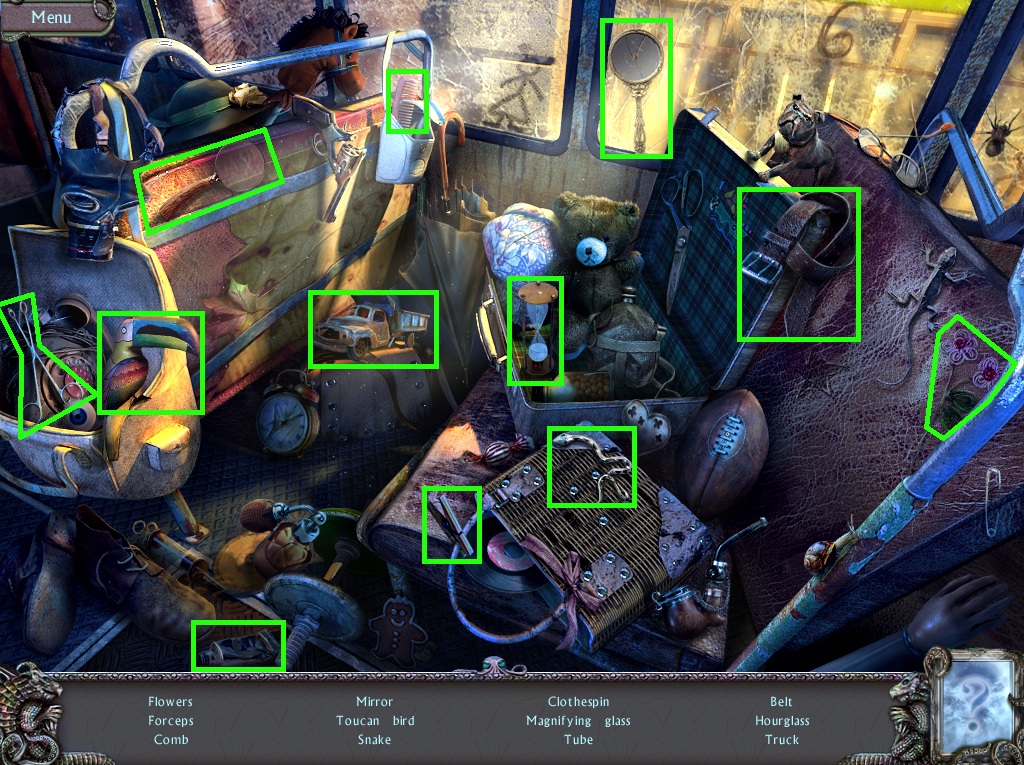
Bus
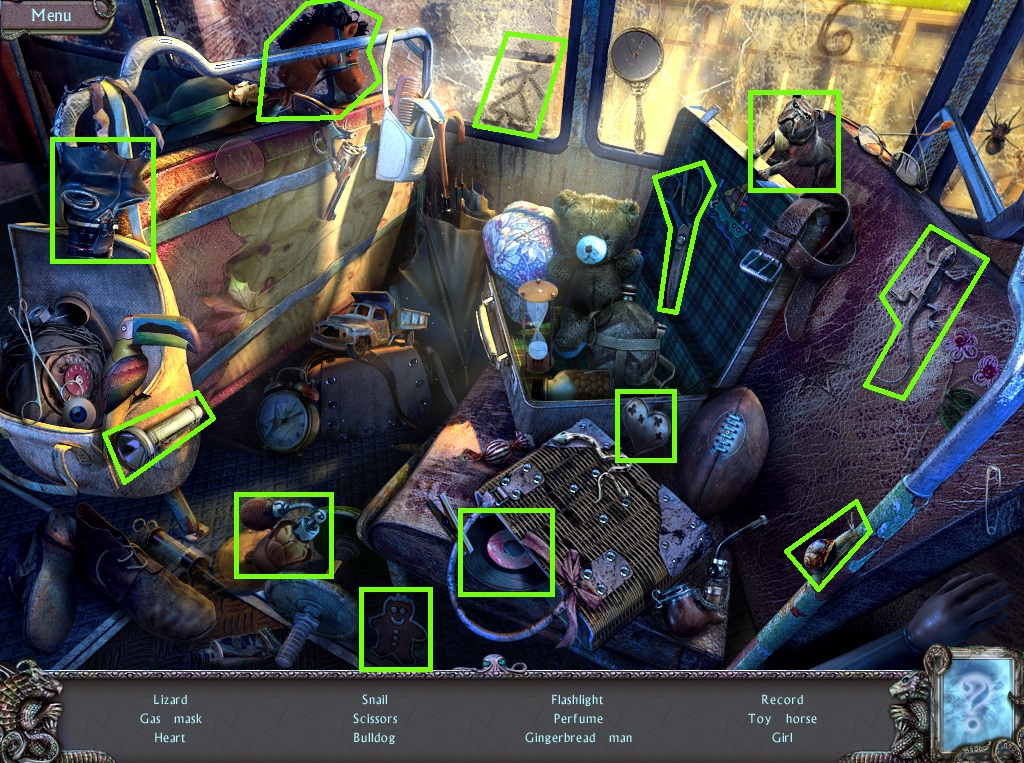
Click the right seats to begin the hidden object scene.
Screenshot.
Once the hidden object scene is complete, you will receive a Flashlight.
Go forward to the front of the bus.
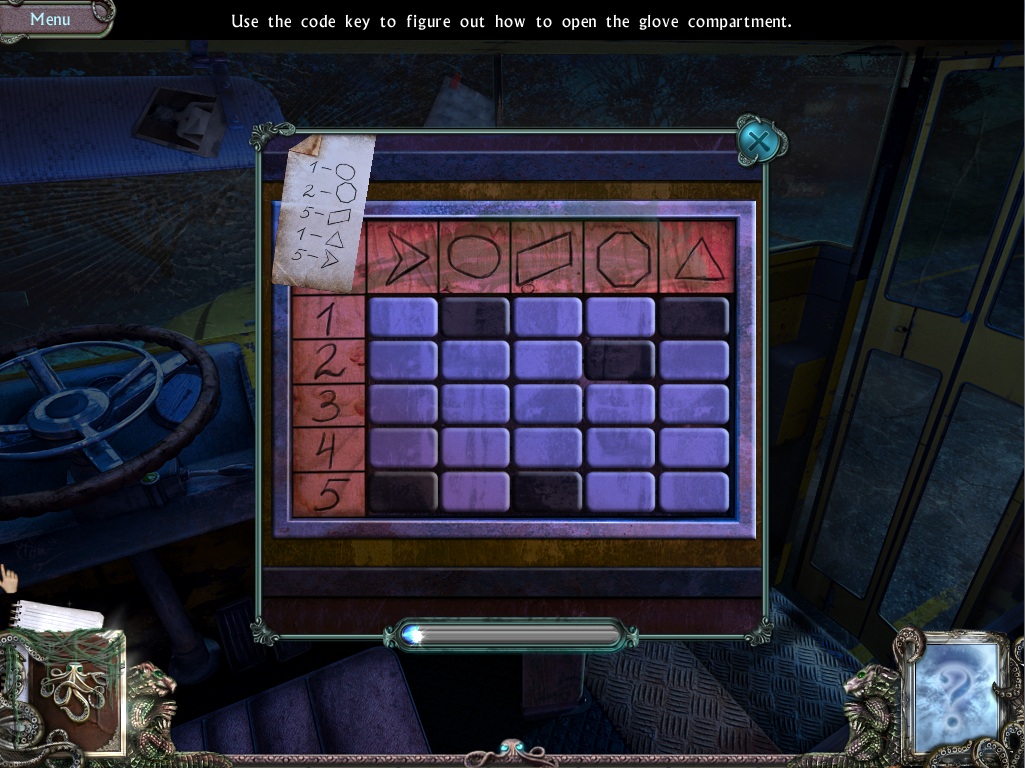
Click the note taped to the crack windshield. Note the shapes and their matching numbers.
Click the glove compartment to zoom in.
Enter in the numbers according to their matching shapes from the note you just viewed.
Screenshot.
Click the Photo Album to add it to your Notebook.
Take the Insulating Tape inside the open glove compartment.
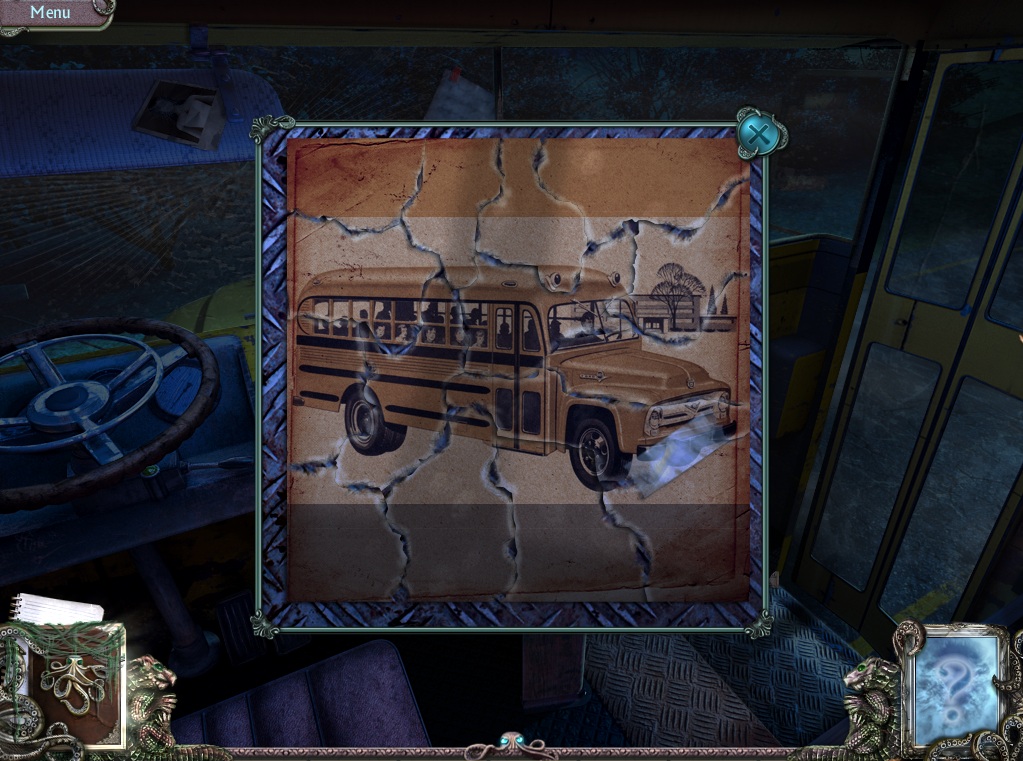
Click the torn pieces of paper on the steps to start the puzzle.
To solve this puzzle, arrange all the torn paper fragments to complete the image.
Click a paper piece to select it, then click an area on the ground to place it. If correctly positioned, the fragment will lock in place.
A strategy to simplify the puzzle is to start with the flat-sided edge pieces first, then to fill in the pieces in the middle.
Solution.
Once the puzzle is solved, use the Insulating Tape to tape the pieces together; the paper will then become attached to the control panel on the dashboard.
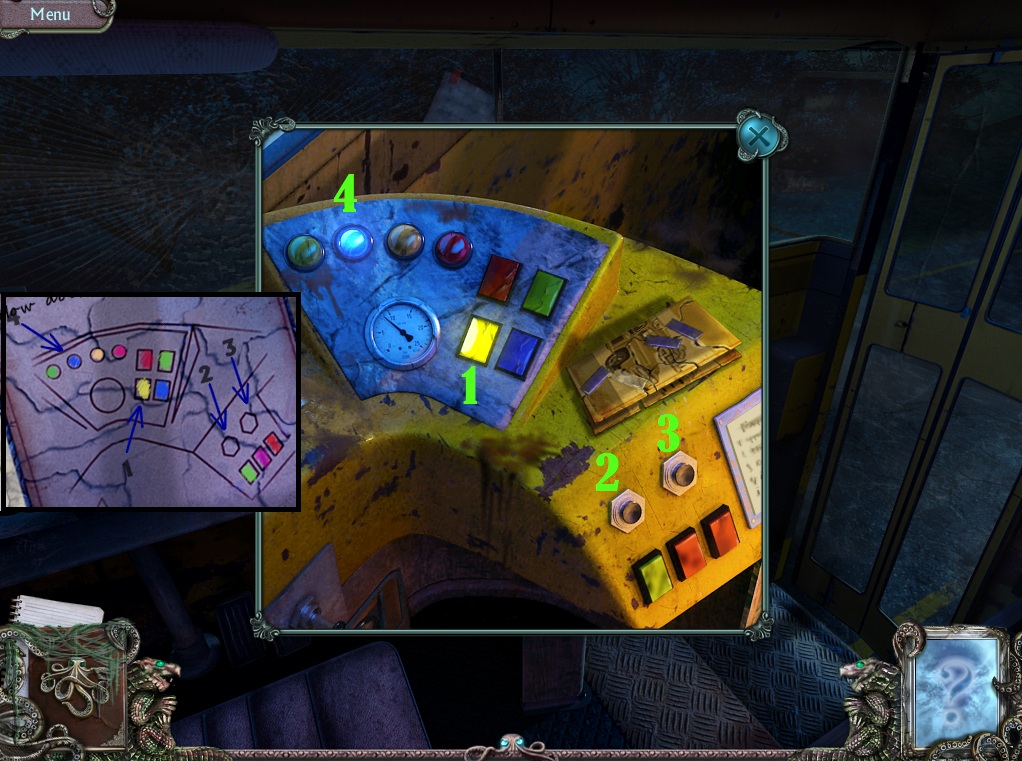
Click the control panel to zoom in.
Click the buttons according to the order shown on the paper.
Screenshot.
Exit through the door to the street.
Street
Click the small grotto at the bottom of the right wall to zoom in.
Use the Flashlight from your inventory to illuminate the area.
Take the sparking fuses out of the fusebox.
Click the window of the cabin to zoom in.
Take the Scissors off the counter and note the carving of the colored cube.
Click the door of the ambulance for a closer look.
Click the bible to open it and take Picture #1 inside.
Click the diary under the bible to read it.
Go further down the road past the tree house and right to the park.
Park
Click the toolbox beside the left bridge to zoom in.
Take the File inside the box and the Hammer on the ground beside it.
Click the park bench for a closer look to read another newspaper article.
Go left to the gazebo.
Gazebo
Take the Empty Bottle on the left bench.
Click the wrapped present to zoom in.
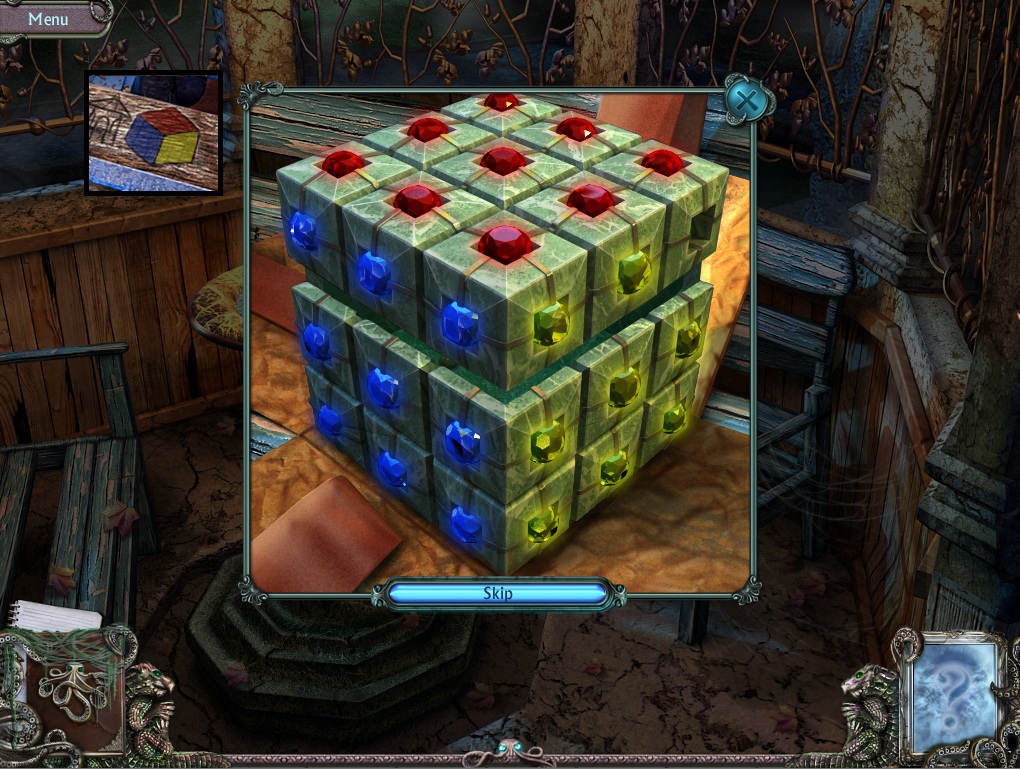
Use the Scissors from your inventory to cut through the ribbon to start the puzzle.
To solve this puzzle, arrange the gems around the cube so that only gems of the same color are on each side.
Click a gem to move it into an adjacent space; gems cannot pass over other gems and can only follow a horizontal or vertical path.
Solution.
Once the puzzle is solved, take Picture #2 and the Handle inside the open box.
Click the bracelet on the bench to the left of the box.
Go back to the street.
Street
Click the window of the cabin for a closer look.
Use the Handle from your inventory on the broken jack-in-the-box.
Enter the cabin through the open door.
Click the key template on the work table to zoom in.
Use the File to carve the teeth and complete the Key.
Return to the treehouse.
Treehouse
Click the ladder of the treehouse to zoom in.
Use the Hammer from your inventory to repair the broken steps.
Go up the ladder to the treehouse door and open the lock with the Key.
Take the Rope Ladder inside the hatch.
Click the book on the bed to zoom in and take Picture #3.
Go back to the bus.
Bus
Click the seats to repeat the hidden object scene.
Screenshot.
Once the hidden object scene is complete, you will receive Forceps.
Use the Rope Ladder from your inventory on the hooks hanging from the open space in the roof.
Climb up the rope ladder to the roof of the bus.
Click the metal ladder to pick it up and place it over the gap between the bus and the windowsill.
Climb through the open window into the mortuary.
Chapter 2
Mortuary
Click the jar on the shelves for a closer look.
Open the jar and use the Forceps from your inventory to pull out the Dragon Ring.
Click the frozen body cooler on the right to zoom in.
Use the Dragon Ring on the seal to open the door.
Click the corpse to pull it out, then click it again to zoom in.
Note the four symbols etched onto the inside of the door.
Take the Key from the dead man's hand.
Click the door up the stairs to zoom in.
Use the icy Key to open the lock.
Go through the open door to the corridor.
Corridor
Click the flowerpot on the small table.
Patient Ward
Click the bed to repeat the hidden object scene.
Screenshot.
Once the hidden object scene is complete, you will receive Nail Clippers.
Click the slippers under the bed to zoom in and take the Broken Pencil.
Click the bottom of the wheelchair for a closer look.
Use the Nail Clippers to break off the Wheel Spoke.
Click the small table to the right of the bed to zoom in.
Take the Reflex Hammer from the drawer and use it to hammer in the nails on the tabletop.
Use the Wheel Spoke on the outline to bend it in the shape of the Lock Pick.
Click the handle of the door to zoom in and unlock it with the Lock Pick.
Go through the open door to the hallway.
Hallway
Click the clipboard behind the doctor to zoom in and take the Access Card.
Go forward to the corridor.
Corridor
Use the Broken Pencil from your inventory on the pencil sharpener on the table.
Click the notepad on the table for a closer look.
Take the Sticky Tape on top of the paper.
Use the Pencil on the ripped corner to reveal the 4 digit combination.
Click the medicine cabinet to zoom in.
Open the glass door and take the Powder inside.
Click the telephone on the table to zoom in and take the Flower Key.
Go back to the patient ward.
Patient Ward
Click the box on the windowsill to zoom in.
Use the Flower Key from your inventory on the engraved flower at the top of the box.
Take the Makeup Brush from the open box.
Return to the corridor.
Corridor
Click the water cooler to zoom in.
Use the Powder on the side of the coffee cup.
Dust off the powder with the Makeup Brush.
Collect the imprint with the Sticky Tape to receive the Fingerprint.
Repeat this process with the receiver of the telephone.
Click the digital lock on the gate to zoom in.
Use the Access Card on the slot, then place each of the Fingerprints from your inventory on the thumb pad.
Enter in the combination found on the notepad on the table.
Click the open gate.
Corridor
Click the cabinet drawer to zoom in and take the Matches.
Click the telephone on the wall for a closer look.
Take the Diary Lock Fragment (1/3) from the receiver and Picture #4 from the board at the bottom.
Go forward to the top of the stairway.
Stairway
Click the seat of the chair to zoom in.
Click the photograph to add it to your notebook.
Continue down to the bottom half of the stairway.
Use the Matches from your inventory on the unlit blowtorch at the side of the stair to receive the Lit Torch.
Click the large door for a closer look.
Use the Lit Torch to burn through the chains around the handle.
Go through the open door to the cellar.
Cellar
Click the barred window to zoom in and take the Diary Lock Fragment (2/3).
Go up the small steps to the rear of the cellar.
Click the framed painting on the wall for a closer look, then click it again to remove the dust.
Take Picture #5 and note the three roman numerals scrawled at the bottom left corner.
Click the tank on the desk to zoom in and take the Key.
Go back to the corridor.
Corridor
Click the cabinet drawer to zoom in.
Use the Key from your inventory on the padlock to open the top drawer.
Take the Hammer and Chisel, then click the notepad to find the three numbers for the pressure gauges in the cellar.
Go back to the roof of the bus.
Bus
Click the briefcase for a closer look.
Enter in the three roman numerals found on the painting in the cellar.
Take the Silver Cross from the open briefcase.
Return to the gazebo in the park.
Gazebo
Use the Silver Cross from your inventory on the dirty rain water.
Use the Empty Bottle on the purified water to receive Holy Water.
Go back to the small cabin at the street.
Street
Use the Holy Water from your inventory on the ghost, then take the Key that falls to the ground.
Click the cabinet on the wall for a closer look.
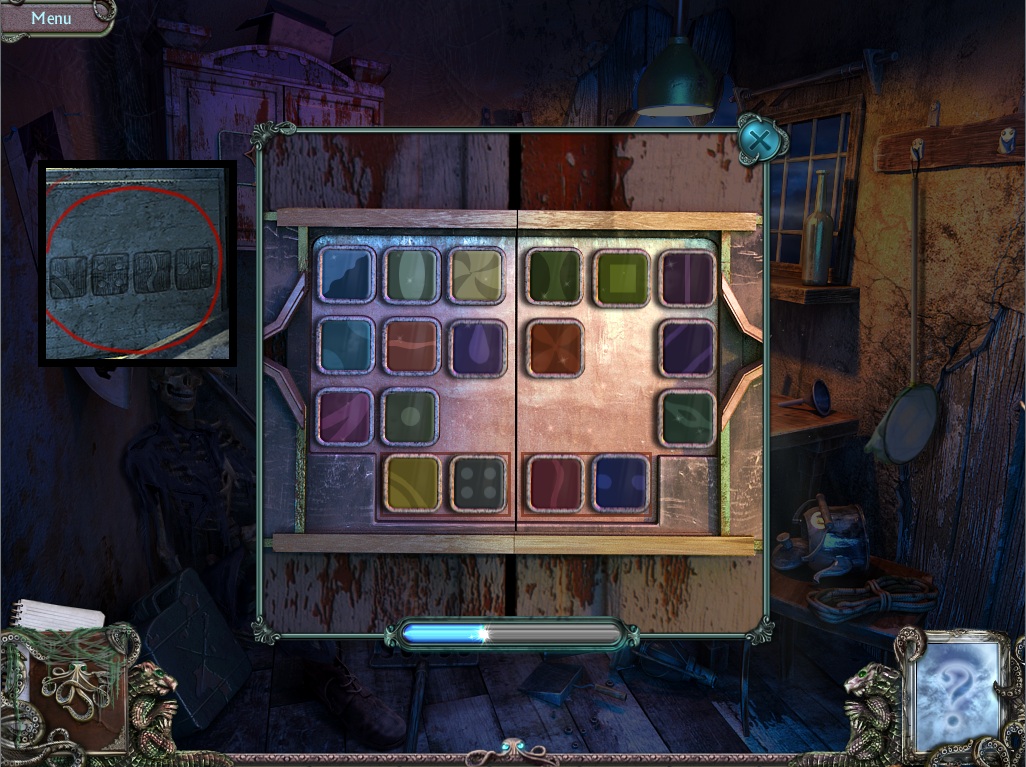
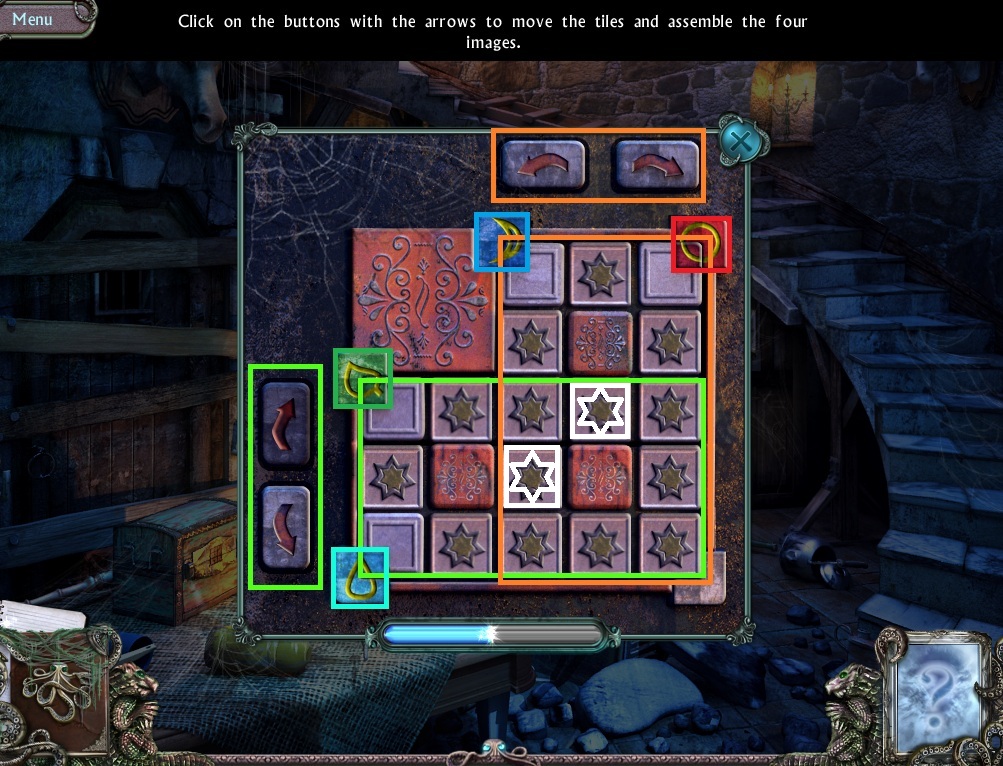
Use the Key on the diamond shaped lock to start the puzzle.
To solve this puzzle, place the four tiles with the symbols seen on the body cooler door in the mortuary.
The tiles must be in order from left to right inside the small red box at the bottom of the board.
Click a tile to select it, then click a position on the board to set it in place.
Tiles cannot move through obstacles such as the walls of the board or other tiles.
Solution.
Click the open cabinet to zoom in and take the Wrench and Diary Lock Fragment (3/3).
Return to the inside of the treehouse.
Treehouse
Click the diary on the bed to zoom in.
Place the three Diary Lock Fragments from your inventory into the lock, then click the lock to start the puzzle.
To solve this puzle, arrange the tiles to complete the three images.
Click a tile to select it, then click a different tile to swap their positions.
The innermost tiles are immovable, so base your solution on their positions.
Solution.
Click the unlocked diary to zoom in and note the three digit combination written on the paper inside.
Go back to the cellar.
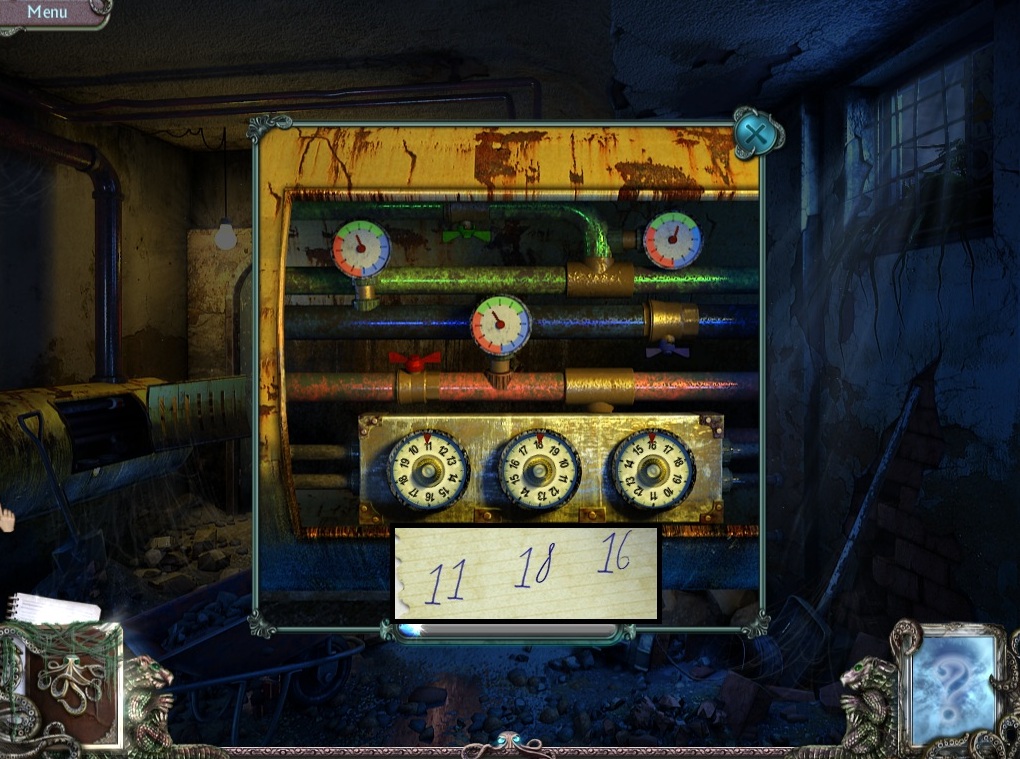
Cellar
Click the large pipe to open the door, then click it again to zoom in.
Enter the three numbers for the pressure gauges found on the note from the cabinet in the corridor.
Screenshot.
Click the large iron door to zoom in.
Enter in the three digit combination found from the diary in treehouse.
Click a numbered round tile to select it, then click an empty space from the square at the bottom to place the number inside that space.
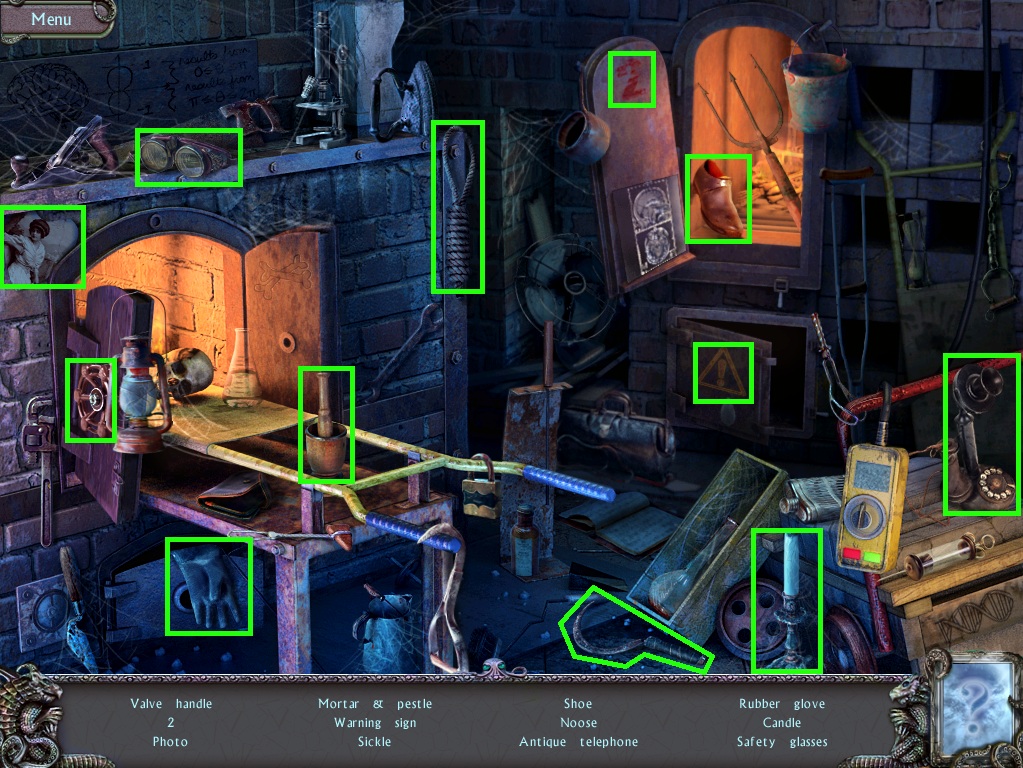
Click the opened door to start the hidden object scene.
Click the switch to turn on the fire inside the furnace, revealing the Handprint, the X-ray, and the Pitchfork.
Screenshot.
Once the hidden object scene is complete, you will receive the Scissors.
Click the barred window to zoom in.
Use the Hammer and Chisel from your inventory to break through the cracked plaster.
Go to the rear of the cellar.
Click the tank to zoom in, then remove the Tap with the Wrench.
Cut off a piece of the Hose on the left wall to add it to your inventory.
Return to the view of the window, then place the Tap into the valve space on the barrel.
Add the Hose to the tap and take the fueled Chainsaw.
Click the door to the furnace room to repeat the hidden object scene.
Screenshot.
Once the hidden object scene is complete, you will receive a Photo.
Go back to the mortuary.
Mortuary
Click the frozen corpse for a closer look.
Click the locket around the body's neck, then place the Photo from your inventory on the right side.
Click the cooler again to zoom in and take the Metal Disc.
Return to the park.
Park
Click the lion statue to zoom in.
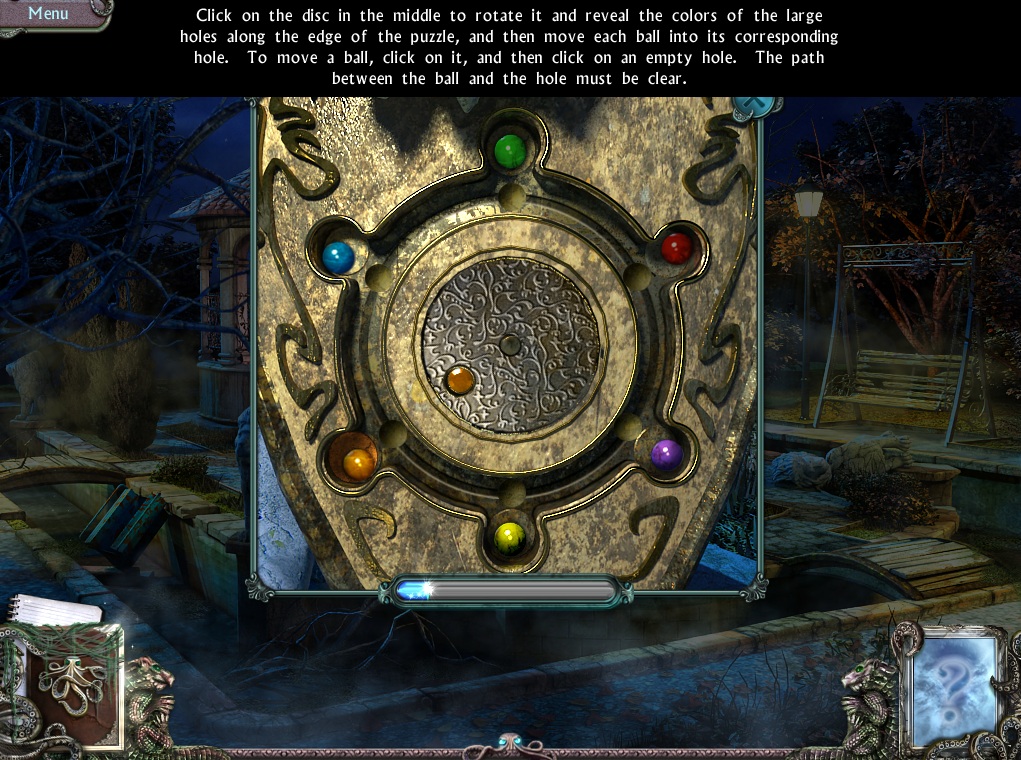
Place the Metal Disc from your inventory into the middle of the shield to start the puzzle.
To solve this puzzle, place the spheres into their matching colored spaces.
Click the disc in the center to rotate it clockwise.
Whatever colored sphere is shown in the hole of the disc will also reveal the similarly colored holes around the circle.
Click a sphere to select it, then click either an indented space or one of outer holes to place it.
Solution.
Take the Lens from the opened cache inside the shield.
Go back to the treehouse area.
Treehouse
Click the left fork in the road to move up towards the chasm.
Use the Chainsaw from your inventory to cut down the tree to the right of the path.
Go across the tree to the forest.
Chapter 3
Forest
Go forward and then left to the area with two park benches and a streetlight.
Take the Pickaxe jutting out of the left tree.
Go back, take the right fork this time, then move forward.
After you run away, take the right fork again and move forward to the lighthouse entrance.
Lighthouse Entrance
Use the Pickaxe from your inventory on the bricked up window.
Climb through the entrance to the first floor of the lighthouse.
Lighthouse 1st Floor
Click the bed to zoom in.
Pull at the feathers in the seam of the pillow to rip it open, then remove the feathers to reveal the Gun.
Click the small chest on the table to start the puzzle.
To solve this puzzle, rotate the tiles to complete each of the four images.
Click the up and down arrows to move the tiles in their corresponding sections clockwise or counterclockwise.
To keep a tile stationary in order to move the pieces around it, position it in the square between two blocks.
Solution.
Once the puzzle is solved, read the letter inside the opened chest, noting the 6 numbers at the bottom.
Go down the hatch to the basement.
Basement
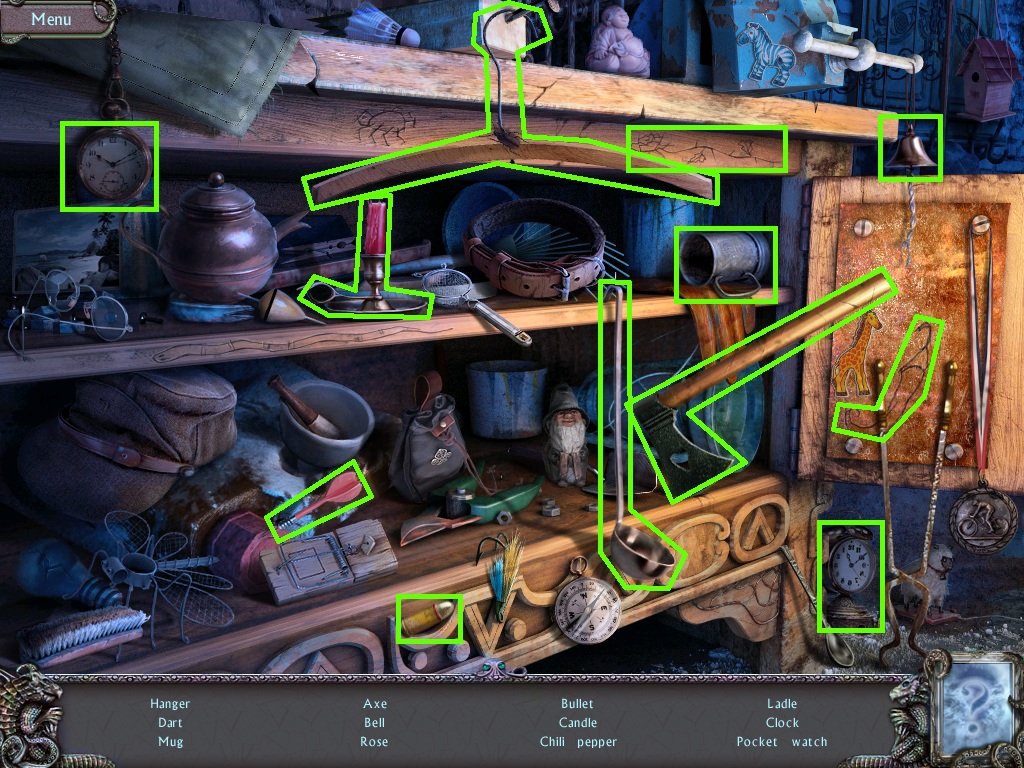
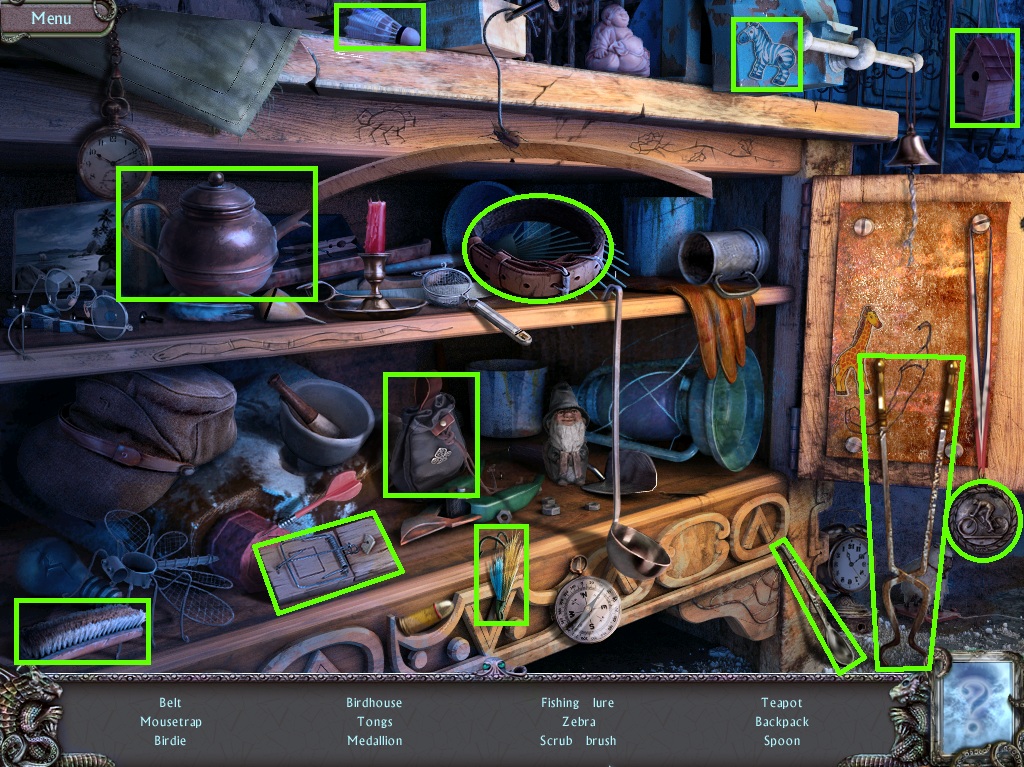
Click the worktable to start the hidden object scene.
Screenshot.
Once the hidden object scene is complete, you will receive an Axe.
Click the saw stuck in the log.
Click the cabinet to the left of the furnace to zoom in and take the Lighter.
Go left towards the barrels in the rear of the basement.
Use the Axe from your inventory to break through the large cask.
Click the note to view the lights of the candlesticks.
Go back up to the first floor, then climb the stairs to the 2nd floor.
Lighthouse 2nd Floor
Click the two candlesticks in the small alcoves and arrange their lights from left to right to match the image found in the basement.
Screenshot.
Click the door to the balcony for a closer look.
Use the Hammer from your inventory to smash through the glass, then click the handle to open the door.
Go back to the view of the 2nd floor, then up the stairs to the 3rd floor.
Lighthouse 3rd Floor
Click the cache under the window to zoom in and take the knife and the note with the safe combination .
Click the table for a closer look.
Click the overturned lamp to light the area, then take Photo #6 inside the lampshade.
Use the Lighter from your inventory on the unlit candle, then take the Cache Key from the melted wax.
Attach the torn scraps to the paper by dragging them to the letter on the table.
If correctly positioned, the paper will lock in place.
Once the paper is pieced together, use the Feather on the bottle of iodine, then use the liquid covered feather on the paper to reveal the hidden message.
Go up the stairs to the 4th floor top of the lighthouse.
Lighthouse 4th Floor
Click the diary on the floor to read it.
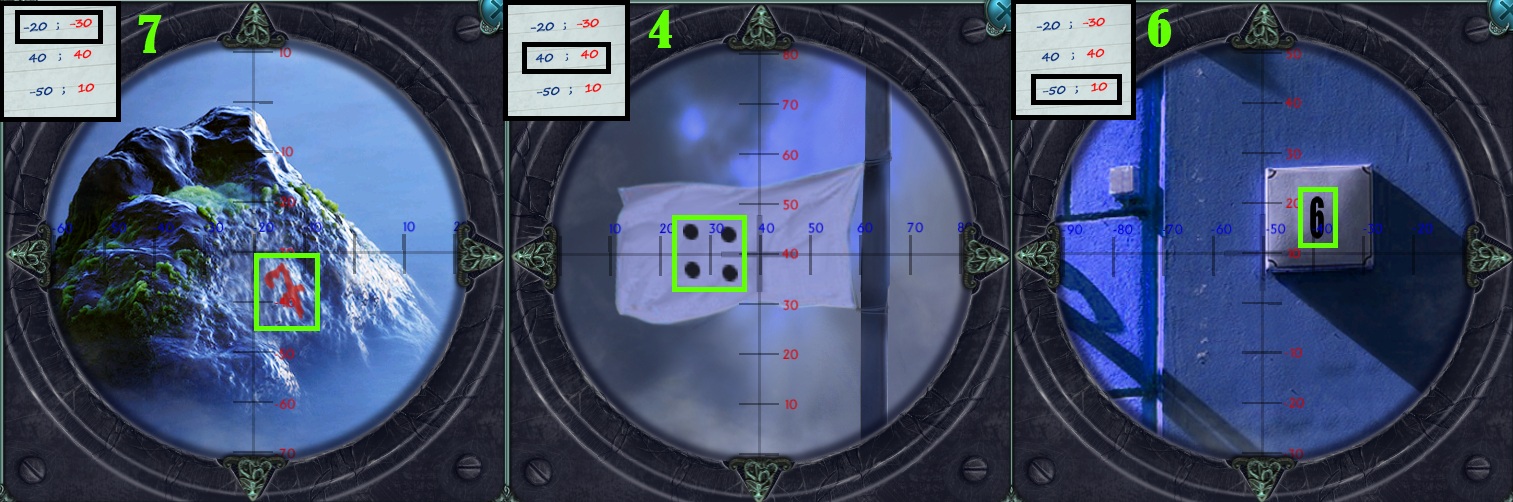
Click the telescope on the tripod to zoom in.
Add the Lens from your inventory to the hole in the telescope, then click it again to start the puzzle.
To solve this puzzle, position the telescope at the coordinates found in the note inside the chest on the 1st floor.
For each of the three pairs of numbers the left number is the X-axis, and the right number is the Y-axis.
Solution.
Once the puzzle is solved, note the three numbers found from the landmarks.
Return to the balcony on the 2nd floor.
Lighthouse 2nd Floor
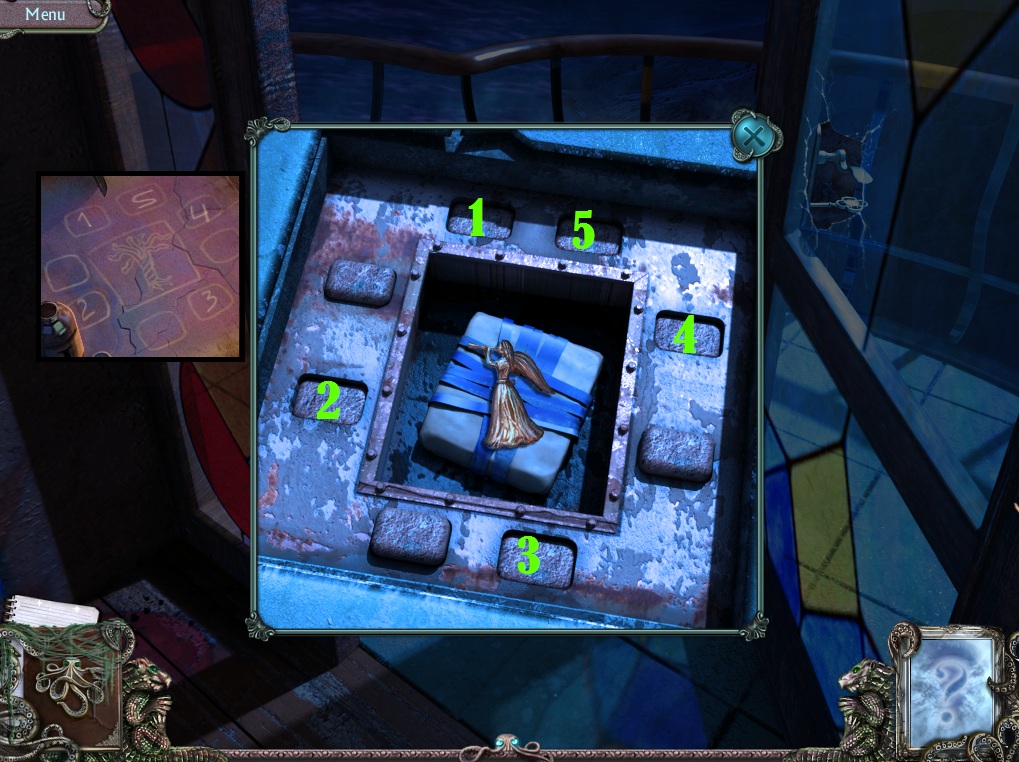
Click the cache in the stone floor to zoom in.
Use the Cache Key from your inventory on the recess in the center to start the puzzle.
To solve this puzzle, press the buttons in the correct order.
The combination can be found in the secret note from the 3rd floor.
Solution.
Take the Angel from the opened cache.
Use the Knife to tear through the package, revealing the Spider Key and the note with the encoded alphabet.
Go back downstairs to the 1st floor.
Lighthouse 1st Floor
Click the safe on the back wall to zoom in.
Enter the combination found in the note under the window from the 3rd floor.
Click and drag the glass frame over the three tiles at the top, entering in the correct number by pressing the corresponding button for each tile.
Pull the lever to enter in the combination and open the safe, then take the Ignition Key inside.
Go down to the basement.
Basement
Click the work table to repeat the hidden object scene.
Screenshot.
Once the hidden object scene is complete, you will receive Tongs.
Click the furnace for a closer look.
Use the Tongs from your inventory to retrieve the Jewelry Box Cover from the flames.
Click the cupboard on the wall to zoom in.
Place the Jewelry Box Cover into the space at the top of the jewelry box, then take Picture #7 inside.
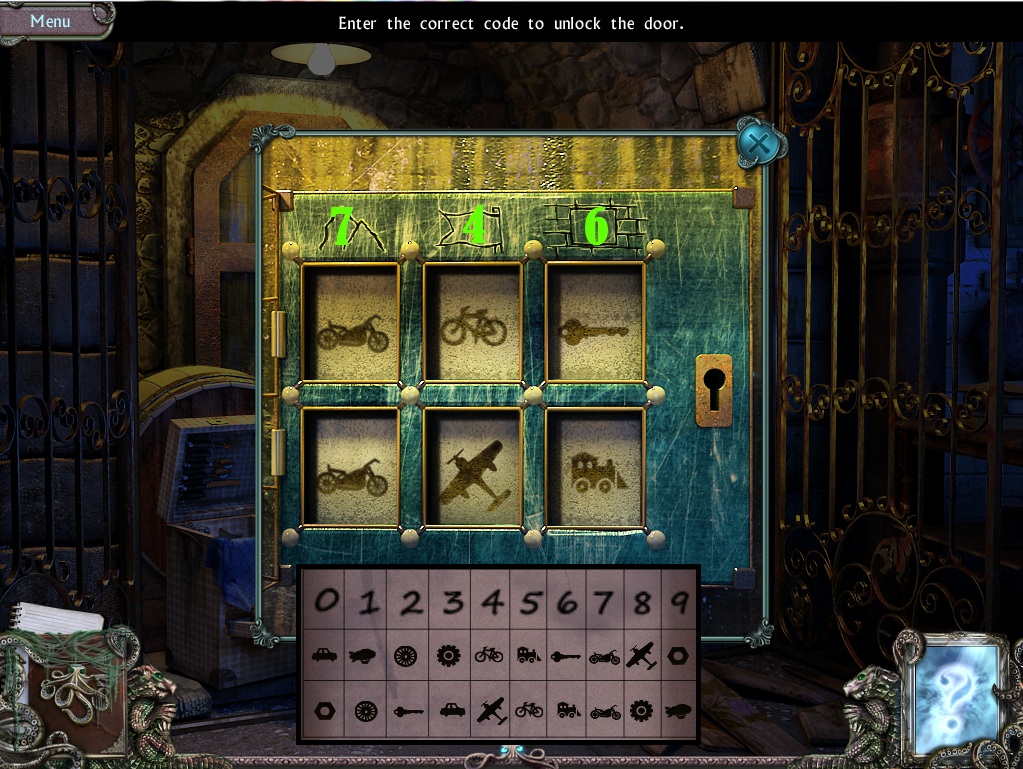
Go left to the door in the antechamber, then click the doorhandle to zoom in.
Use the Spider Key from your inventory on the intricate lock to start the puzzle.
To solve this puzzle, enter in the correct combination of symbols that equal the number in the landscapes viewed from the telescope on the 4th floor.
Use the note from the cache at the balcony as a reference.
Solution.
Go through the open door into the tunnels.
Tunnels
Go through the doorway to the right.
Click the chest to open it, then click it again to zoom in.
Take Picture #8 and the Saw Blade inside, then click the rolled up newspaper to read it.
Go through the doorway straight ahead to travel further into the tunnel.
Take the Chain on the ground under the torch.
Use the Gun from your inventory on the padlock blocking the right door.
Go through the open door into the garage.
Garage
Click the work table to zoom in and take Picture #9.
Add the Saw Blade from your inventory to the unfinished Hacksaw on the table.
Click the geared mechanism to the right of the garage door for a closer look.
Place the Chain inside the device to open the door.
Take the Steering Wheel on the ground outside.
Click the car door to open it, then click the car to go inside.
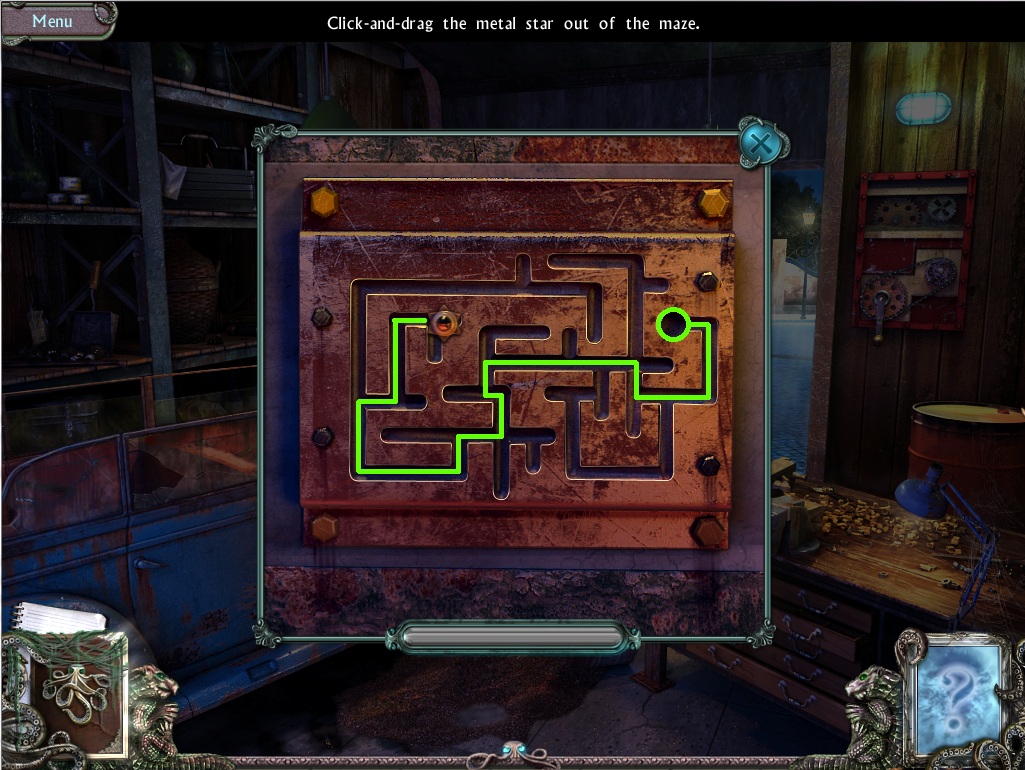
Use the panel on the right side of the dashboard to start the puzzle.
To solve this puzzle, navigate the star outside of the maze.
Click and drag the knob around the paths to the circle at the end.
Solution.
Once the puzzle is solved, take the Dragon from the opened compartment.
Add the Steering Wheel to the pole on the left side of the dashboard.
Use the Ignition Key on the control panel, then turn the key to start the car.
Take the Cloth in the puddle of oil on the ground where the car was.
Go forward to the mansion entrance.
Chapter 4
Mansion Entrance
Click the front door to zoom in.
Add the Dragon from your inventory to the space under the door handle.
Go through the open door to the foyer inside the mansion.
Foyer
Click the staircase.
Use the Hacksaw from your inventory on the broken chandelier.
Click the drawer of the round table to open it, then click it again to look inside.
Take the Wooden Leaf (1/4) and the Paperclip, then cilck the newspaper to read the article.
Go right towards the grandfather clock at the rear of the foyer.
Click the closet to zoom in and view all of the photos lying on the ground by the discarded hat and gloves.
Note the clue on the picture of the gargoyle.
Click the sofa chair for a closer look.
Use the Paper Clip on the broken zipper.
Click the white doors to open them, then go through to the dining room.
Dining Room
Remove the shroud to reveal the wardrobe.
Click the fountain to zoom in and take the Ruby (1/2).
Return to the foyer, then go up the stairs to the 2nd floor.
Mansion 2nd Floor
Go left, falling down into the storeroom.
Storeroom
Click the pot of roses on the ground.
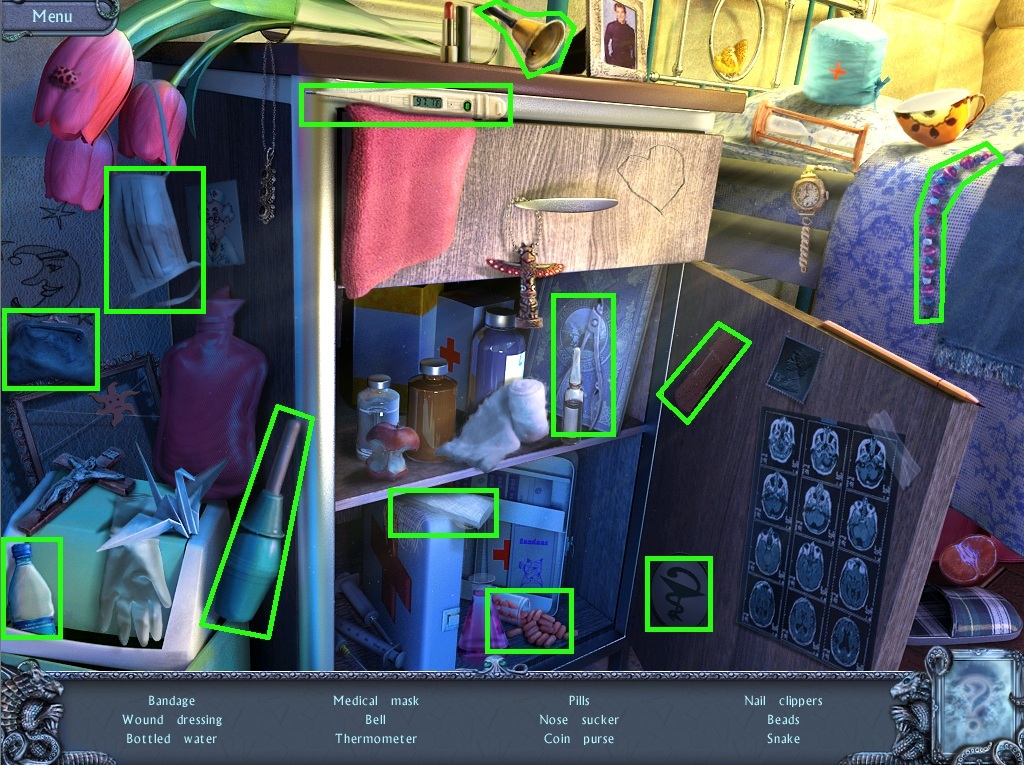
Operating Room
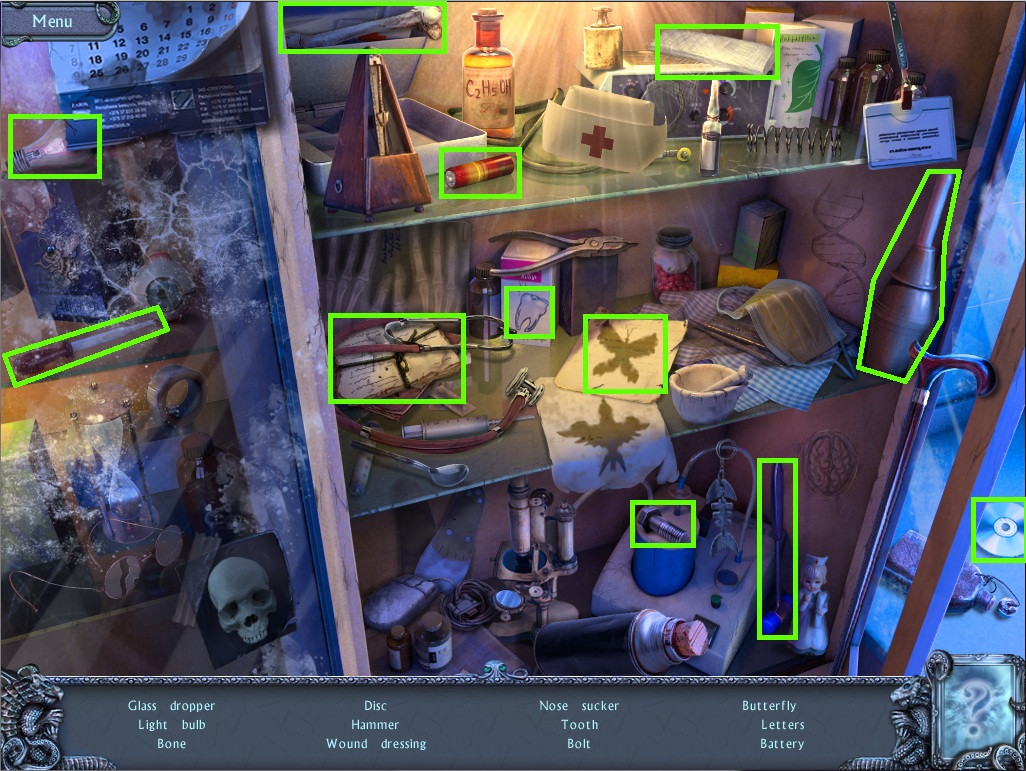
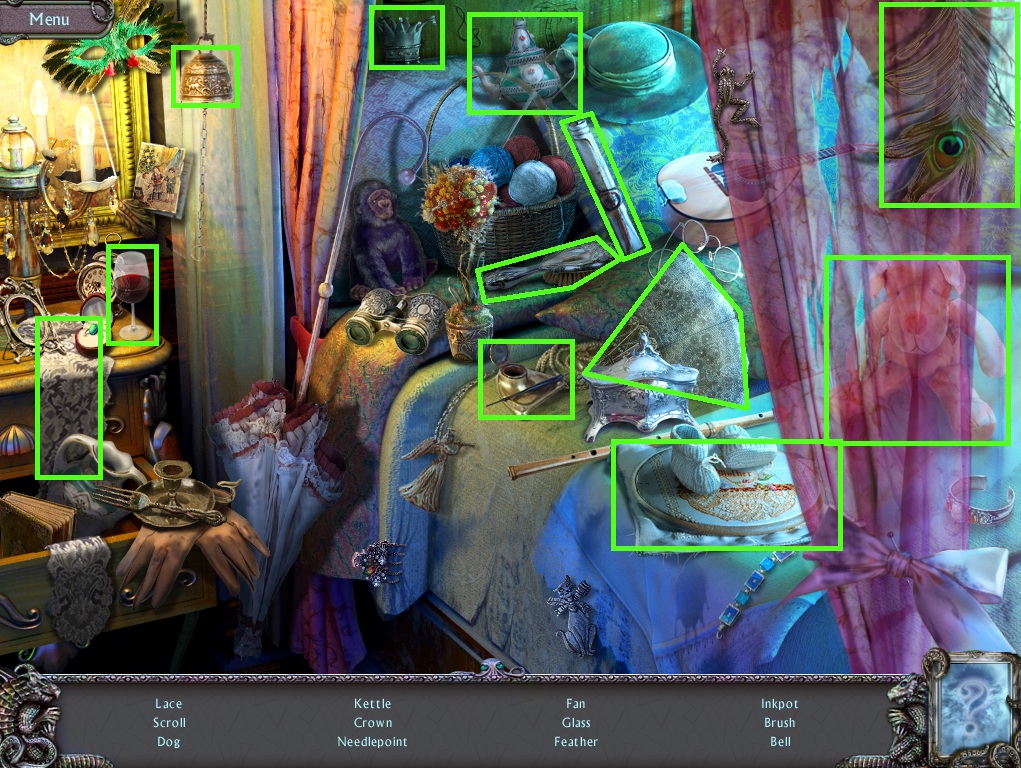
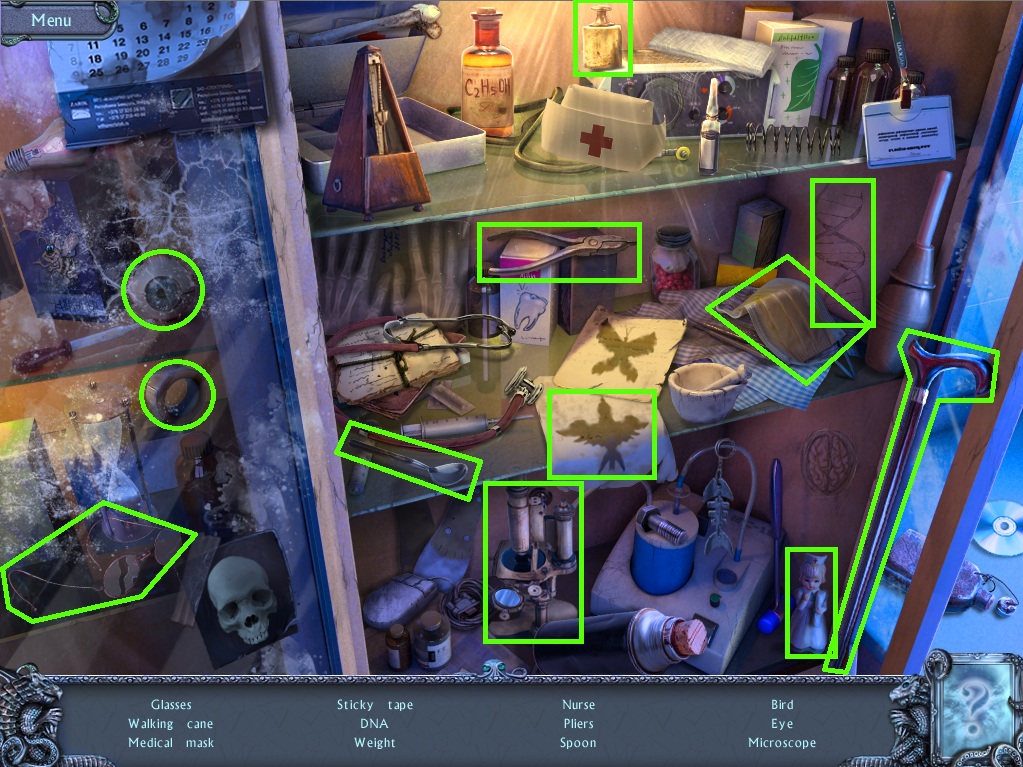
Click the medicine cabinet to start the hidden object scene.
Screenshot.
Once the hidden object scene is complete, you will receive a Battery (1/3).
Take the Iron on top of the orange scale.
Click the blinds to draw them, then click the window for a closer look.
Click Dr. Torpse's ID card and note the combination written on the back.
Take the Battery (2/3) on the windowsill.
Click the locked box on top of the counter to zoom in.
Enter the 4-digit combination found on the doctor's ID card to open the lock (ignore the first marking that looks like a 1).
Take the Battery (3/3) inside the opened box.
Place all three Batteries from your inventory into the charger beside the green box, then retrieve the Charged Batteries.
Click the Bone Saw inside the box to inspect it, then insert the Charged Batteries to complete it.
Click the window again to zoom in.
Break the glass with the Iron, then cut through the bars with the Bone Saw.
Click the blue sheet on the operating table and the yellow cloth hanging over the screen to place them both over the window.
Click the window again for a closer look, then click the cloths twice to attach them into a makeshift rope.
Climb out the window.
Storeroom
Take the Oil Lantern on the shelf to the right of the ladder.
Click the rolled up rug on the ground to reveal the Shovel.
Click the top of the ladder to zoom in and take the Wire Cutters.
Click the medusa head on the wall to zoom in.
Clean the stone head with the Cloth from your inventory.
Place the Ruby inside one of the eyes.
Use the Oil Lantern on the rusted plates at the left and right sides of the ladder.
Go up to the 2nd floor.
2nd Floor
Click the hole in the bricked up wall to enter the bedroom.
Bedroom
Click the bed to start the hidden object scene.
Screenshot.
Once the hidden object scene is complete, you will receive a Candle.
Click the corset of the mannequin to read the letter; note the time written at the bottom.
Click the drawers by the window to zoom in.
Take the Hairpin, read the book on the table, and note the odd picture frame.
Go back to the 2nd floor hallway, then go left to the lounge.
Lounge
Use the Lighter from your inventory to burn away the cobwebs.
Click the bird cage on the table to zoom in.
Use the Wire Cutters to open the cage and take the Wooden Leaf (2/4).
Return to the 2nd floor hallway, then go right to the study.
Study
Remove the poster on the wall to reveal the safe.
Click the table to zoom in.
Use the Hammer from your inventory to smash the crystal ball, revealing the Pins and a note with a picture of two hands and several red points.
Go back to the dining room.
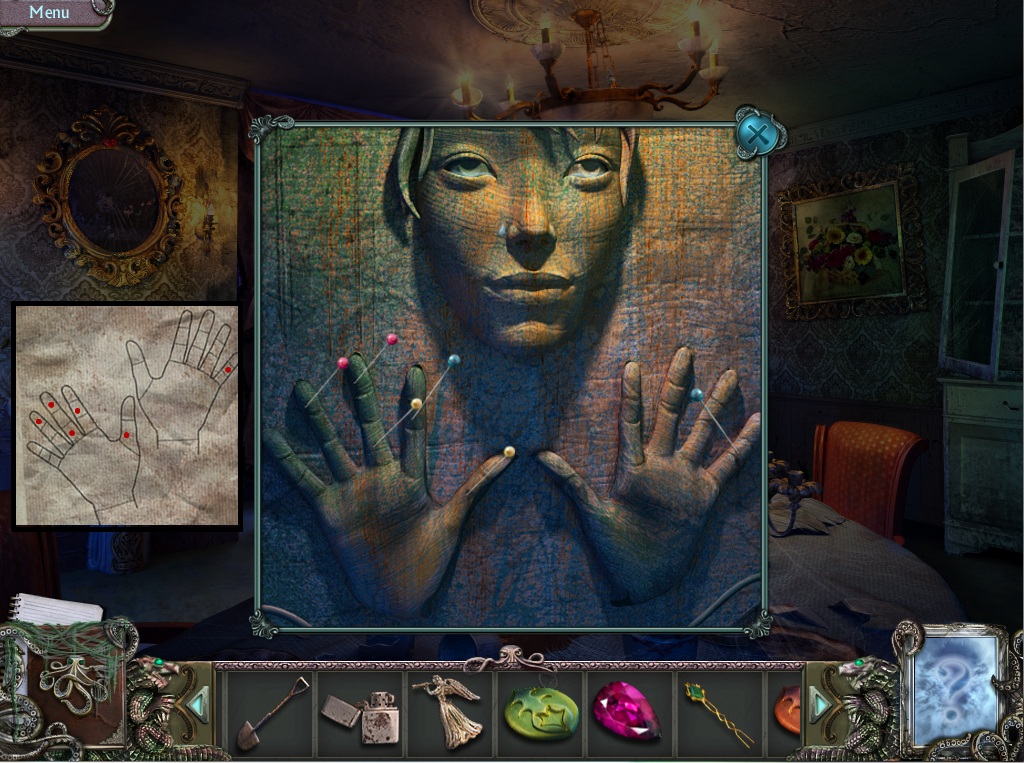
Dining Room
Click the wardrobe to zoom in.
Use the Pins from your inventory on the carved girl's hands to start the puzzle.
To solve this puzzle, place the pins into the different segments of the fingers so that they match the note from the study.
Click a pin to select it, then click a digit to position it. Alternatively, click an incorrectly positioned pin on a finger to remove it
Solution.
Click the opened wardrobe to zoom in and take the Wooden Leaf (3/4) and the Minute Hand.
Go back to the grandfather clock in the foyer.
Foyer
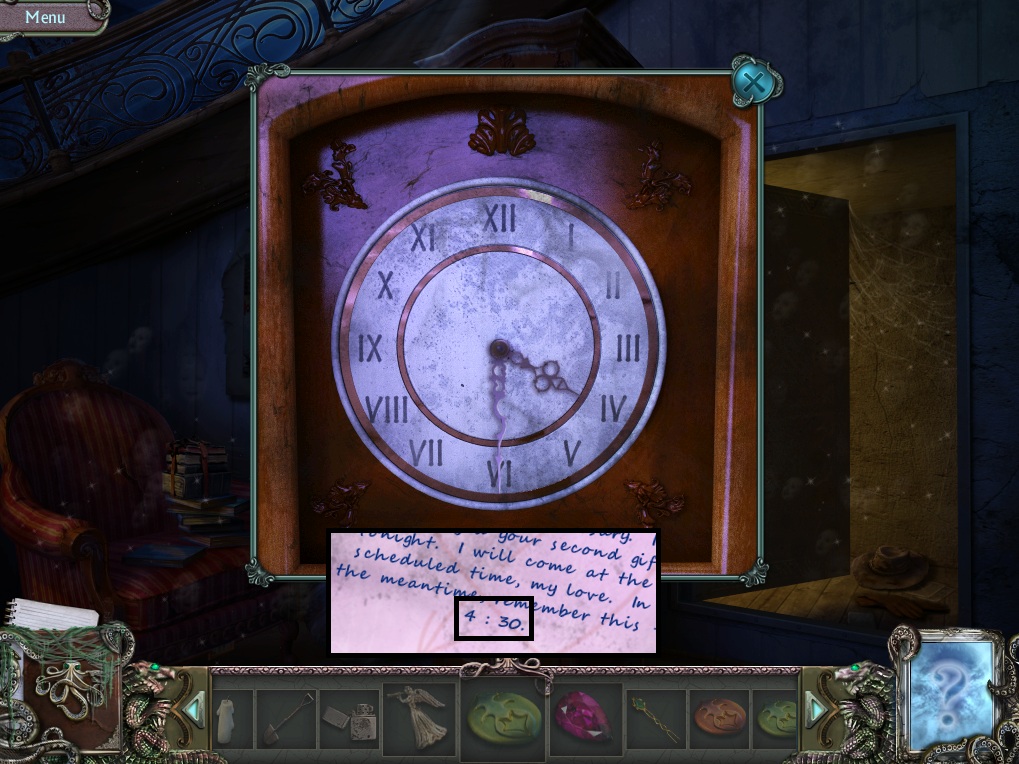
Click the face of the grandfather clock to zoom in.
Add the Minute Hand from your inventory to the clock.
Set the hands to match the time from the note in the Bedroom.
Screenshot.
Take the Wind-up Key from the gears of the opened clock face.
Go back to the main view of the foyer.
Click the ballerina jewelry box on the table to zoom in.
Use the Wind-up Key on the keyhole at the right side of the box.
Take Picture #10 and the Pen inside the opened box.
Return to the view of the grandfather clock in the foyer.
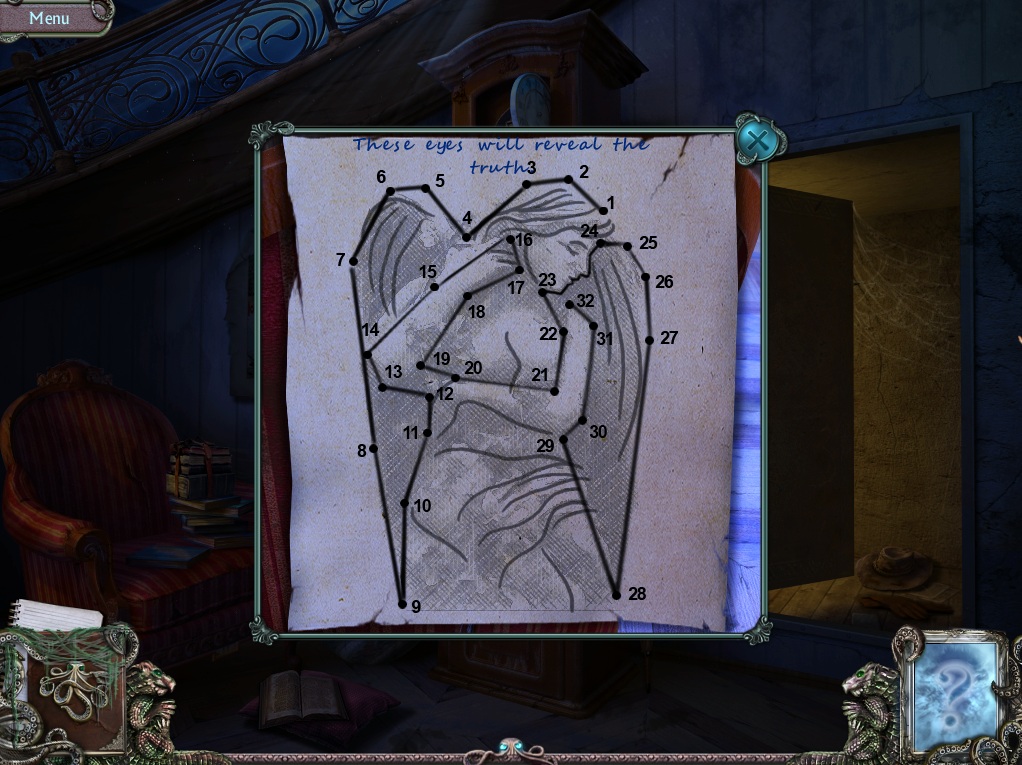
Click the sofa chair to view the connect-the-dots paper.
Use the Pen from your inventory to trace the lines following the points numbered 1 to 32 to complete the image.
Screenshot.
Go outside to the mansion entrance.
Mansion Entrance
Click the angel statue to zoom in.
Click the statue's eyes to reveal the 4 digit combination carved into the eyelids.
Click the gargoyle statue for a closer look.
Place the Candle from your inventory inside the gargoyle's mouth.
Light the candle with the Lighter.
Click the plot of ground that the glowing eyes of the gargoyle point to.
Use the Shovel from your inventory to dig around the dirt, then click the revealed chest to zoom in.
Read the papers at the top of the chest to find the riddles guiding you to each of three keys.
Return to the bedroom.
Bedroom
Click the bed to repeat the hidden object scene.
Screenshot.
Once the hidden object scene is complete, you will receive a Brush.
Return to the study.
Study
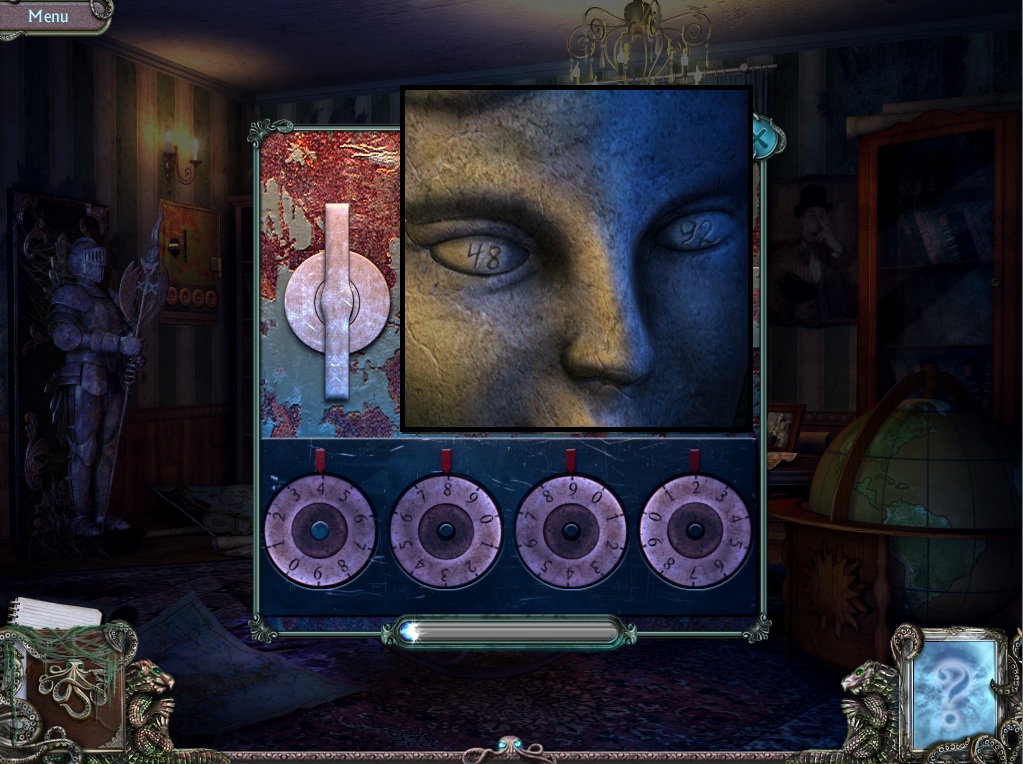
Click the wall safe to zoom in.
Enter the combination found on the angel statue's eyelids at the mansion entrance.
Click the dials to rotate them clockwise, then turn the handle once the correct combination is entered.
Screenshot.
Take the Bullet from the opened safe.
Use the Hairpin from your inventory to unlock the small box.
Take Picture #11 and the Ruby (2/2) inside the small box.
Go back to the 2nd floor hallway.
Mansion 2nd Floor
Click the rifle mounted on the wall for a closer look.
Click the barrel of the gun, then load the Bullet from your inventory inside the cartridge to receive the Rifle.
Go back inside the study.
Study
Click the telescope to zoom in.
Use the Rifle from your inventory to shoot the lion statue.
Click the plate behind the statue and note the numbers beside the colored circles.
Return to the bedroom.
Bedroom
Click the drawers by the window to zoom in.
Click the jeweled picture frame for a closer look.
Press the jewels around the frame in the order of the numbered circles seen behind the lion head from the telescope.
Screenshot.
Take the Key (1/3) from the opened compartment behind the frame.
Go back to the storeroom.
Storeroom
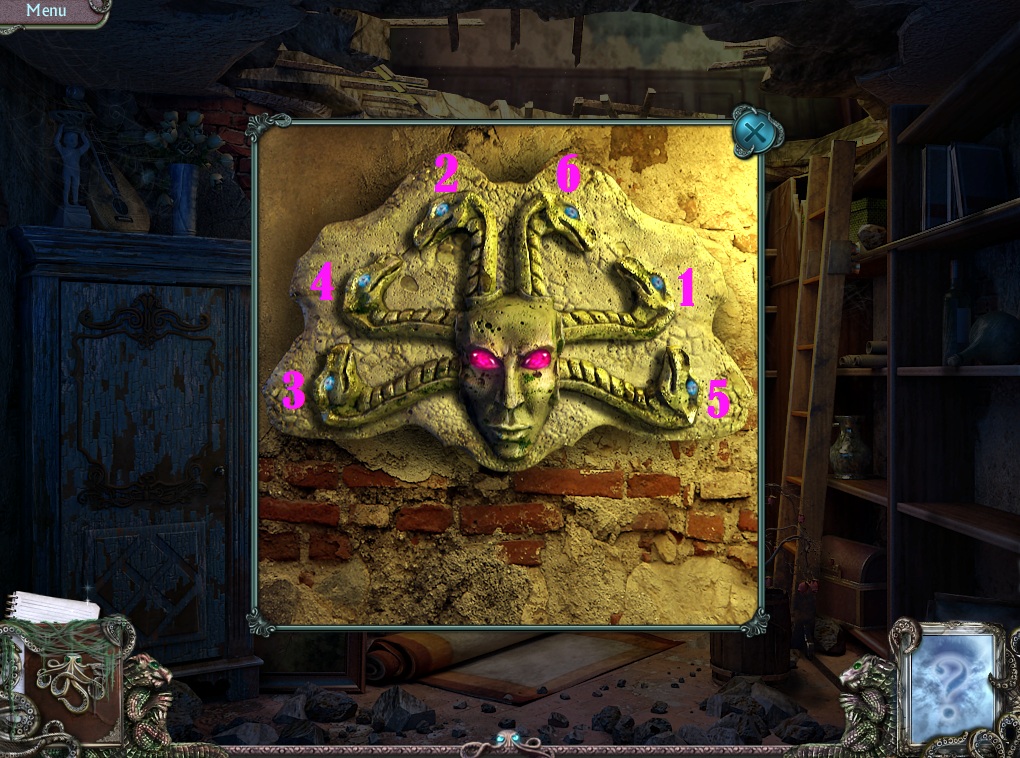
Click the medusa head on the wall for a closer look.
Place the Ruby from your inventory into the empty eye socket to start the puzzle.
To solve this puzzle, click the snake heads in the correct order using trial-and-error.
Click a snake head to test it: if it stays down, it was clicked in the correct sequence.
If the wrong snake is clicked, then all the snakes will revert to their original position.
Solution.
Once the puzzle is solved, the head will lift, revealing Picture #12 and a Key (2/3).
Go back to the dining room.
Dining Room
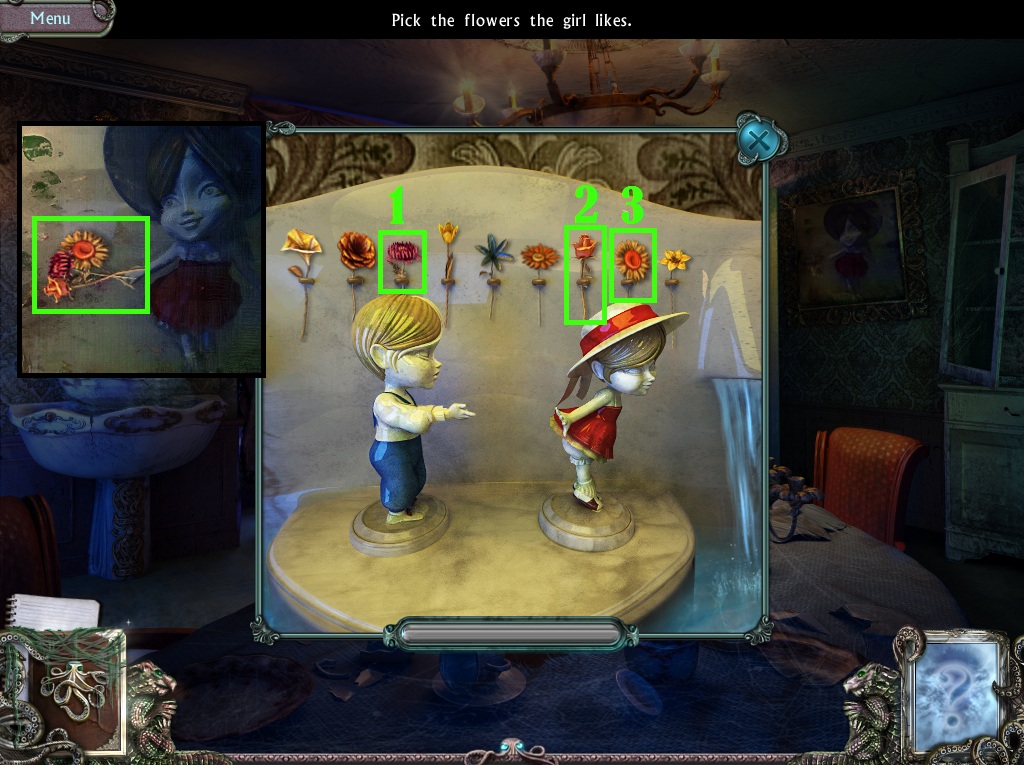
Click the flower painting on the wall to zoom in.
Use the Brush from your inventory to reveal the picture underneath; note the three types of flowers she has in her hand.
Click the fountain for a closer look.
Pick the three flowers seen in the painting, then put them in the boy's hand.
Screenshot.
Take the Key (3/3) from the opened compartment under the girl figurine.
Go back outside to the mansion entrance.
Mansion Entrance
Click the chest on the ground to zoom in.
Place the three Keys into their matching keyholes at the front of the chest.
Take the Silver Rose and the Wooden Leaf (4/4) inside the chest.
Click the diary to read it.
Return to the lounge.
Lounge
Click the framed picture on the wall for a closer look.
Add the four Wooden Leaves from your inventory to the frame.
Take the Human Figurine from the revealed cache.
Go all the way back to the cabin in the street.
Chapter 5
Street
Click the large cameo on the wall for a closer look.
Add the Human Figurine from your inventory next to its pair on the frame to reveal Picture #13.
Return to the cellar in the hospital.
Cellar
Go to the rear of the cellar room.
Add the Silver Rose from your inventory to an empty space on the large iron doors.
Click the roses growing from the barrel by the left wall.
Patient Ward
Click the window to zoom in and take the Hairpin from the open box.
Go out into the hall, then enter the first door on the right to reach the operating room.
Operating Room
Click the medicine cabinet to repeat the hidden object scene.
Screenshot.
Once the hidden object scene is complete, you will receive the Pliers.
Go back out into the hallway.
Hallway
Click the second door on the right to zoom in.
Click the key in the lock to turn it.
Use the Pliers from your inventory on the broken key.
Go through the open door into the archive.
Archive
Click the security panel on top of the counter to start the puzzle.
To solve this puzzle, click the selections of text scrolling up the screen that match the text in the three boxes at the top under "Find".
Solution.
Once the puzzle is solved, the laser grid will be removed.
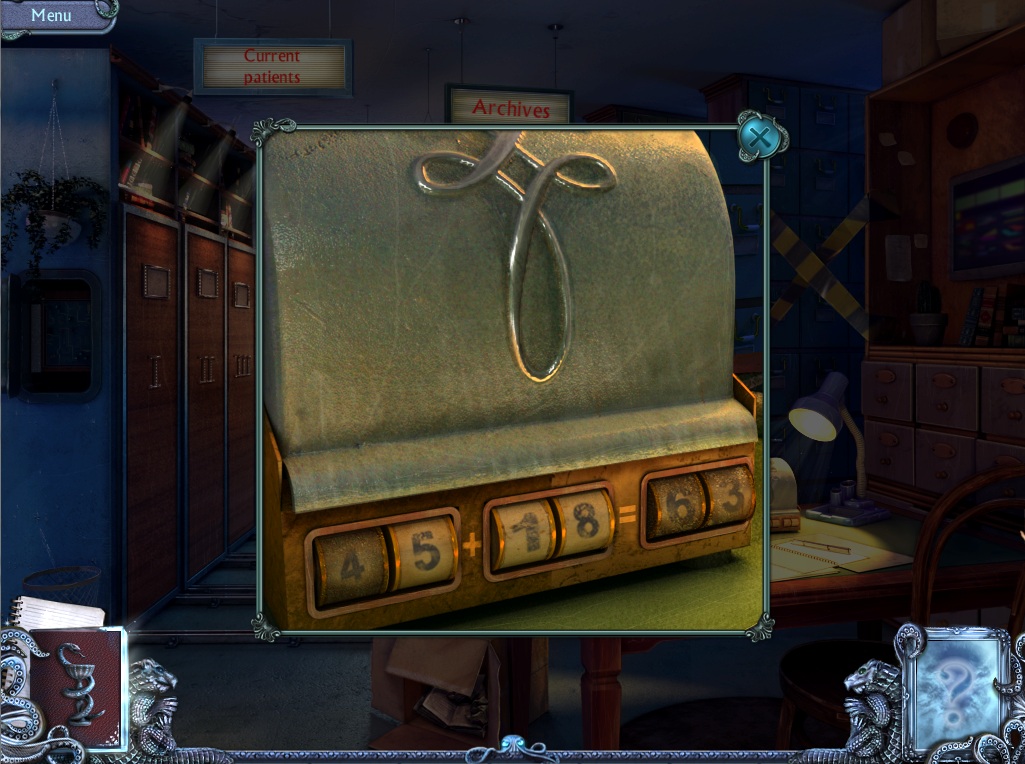
Click the index on the table to start the next puzzle.
To solve this puzzle, arrange the numbers to complete the equation.
Click the numbered dials to cycle the digit from 1-9.
The darkly shaded numbers are stuck in place and cannot be moved.
Change the numbers so that the equation is correct.
Solution.
Note the number of the file drawer where the medical records are kept.
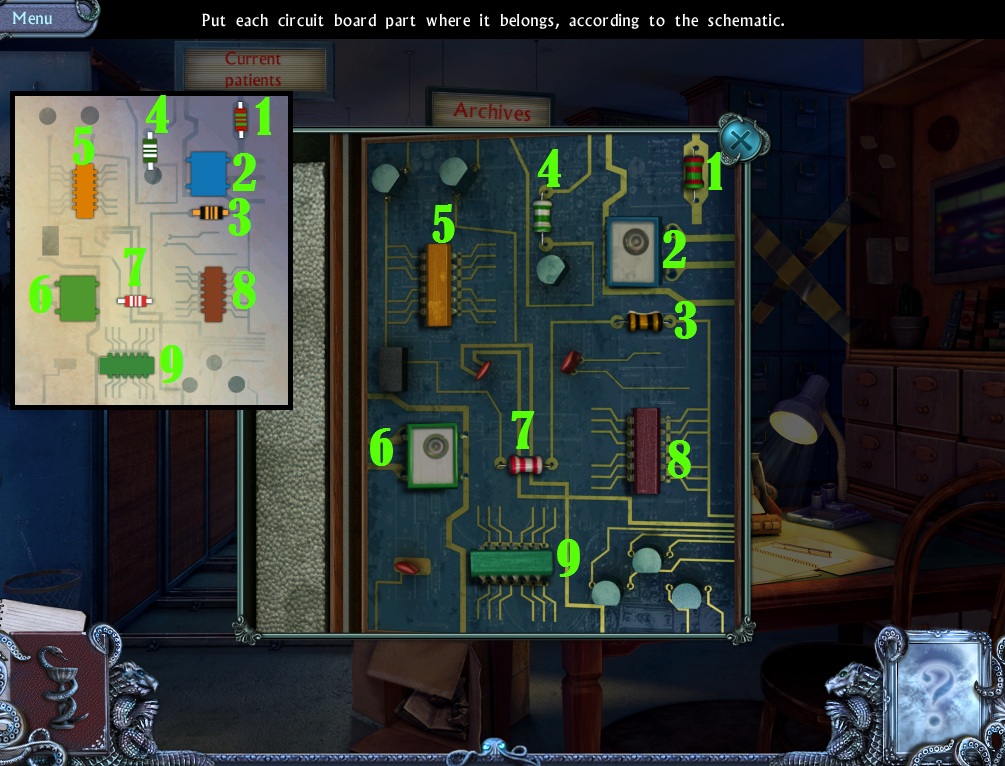
Click the open package on the table to zoom in and take the Circuit Board Parts.
Click the paper at the bottom of the box to view the schematic.
Click the circuit panel on the left wall for a closer look.
Add the Circuit Board Parts from your inventory to the board to start the puzzle.
To solve this puzzle, arrange the parts to match the image of the circuit board found inside the box.
Click a part to select it, then click a position on the board to set it in place.
Solution.
Once the puzzle is solved, the control panel for the "Current patients" file lockers will be accessible.
Click the button on the panel that matches the number on the file drawer card found earlier.
Use the Hairpin to unlock the correct drawer.
Click the opened drawer to zoom in and take the Cross.
Click through each of the papers, then click the drawing on the last piece of paper.
Cellar
Go back to the top of the stairway.
Stairway
Click the seat of the red chair for a closer look.
Add the Cross from your inventory to the space on the box cover.
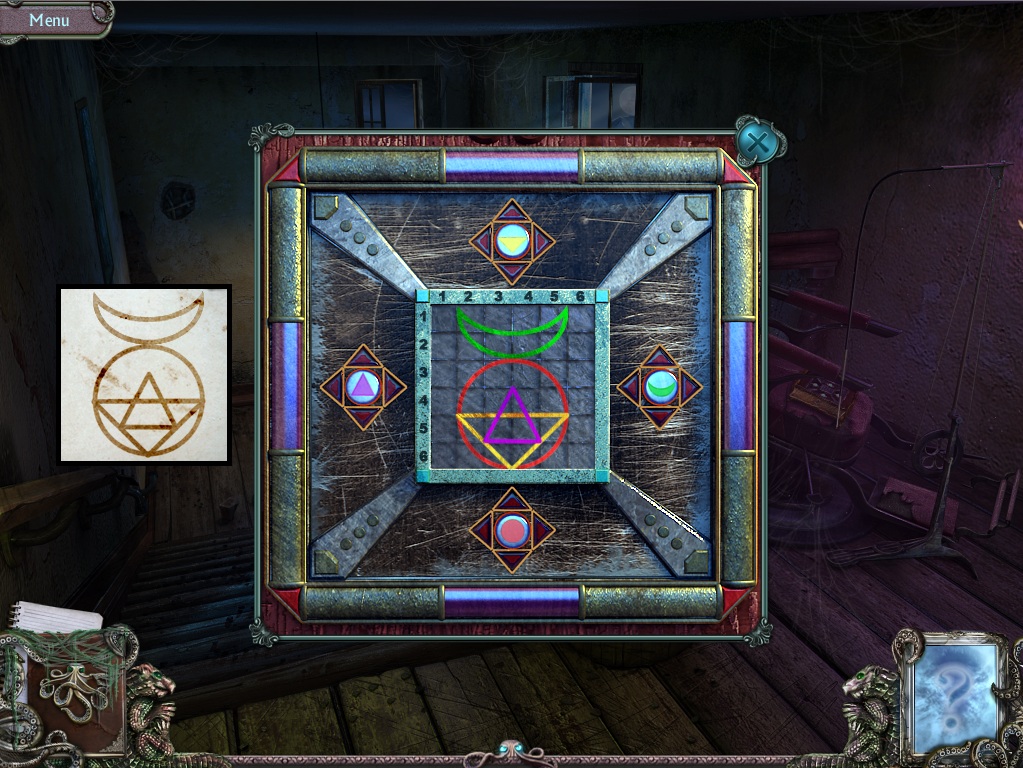
Click the opened box to start the puzzle.
To solve this puzzle, position the symbols to complete the image.
Click the up, left, down, and right buttons outside of the square to move their corresponding symbols within the grid.
The top button moves the yellow downward facing triangle, the right button moves the green crescent moon, the bottom button moves the red circle, and the left button moves the purple equilateral triangle.
Solution.
Once the puzzle is solved, the box will open, revealing Picture #14 and the second Silver Rose.
Return to the iron doors in the rear of the cellar.
Cellar
Place the Silver Rose from your inventory into the space on the door.
Go through the iron door into the tunnels.
Tunnels
Take the path to the left three times to reach the double doors.
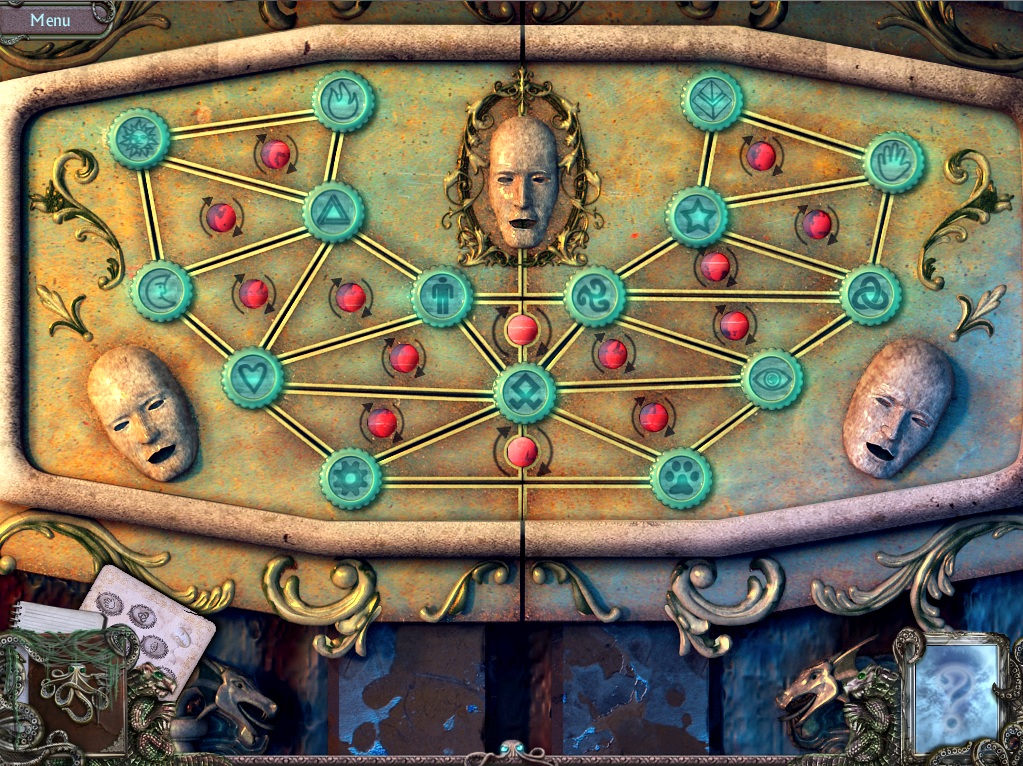
Click the doors to zoom in and take Picture #15 to start the puzzle.
To solve this puzzle, arrange the symboled tiles to match the image of the symbols on the photo album picture.
Click the red buttons between the triangles to rotate their adjacent tiles clockwise.
If a tile is correctly placed, it will glow green.
Solution.
Click the woman in the open doorway.
Go forward into the chamber.
Chamber
Click the lock around Mark's chest to zoom in.
Place the Angel from your inventory inside the space on the lock.
Patient Ward
Exit to the hallway, then go forward to the corridor.
Corridor
Click the files on top of the table to zoom in and take the Lighter.
Go back to the operating room.
Operating Room
Click the Oxygen Tank in the corner of the room to add it to your inventory.
Click the window for a closer look.
Place the Oxygen Tank on top of the windowsill, then click the top of the hose to start the leak of gas.
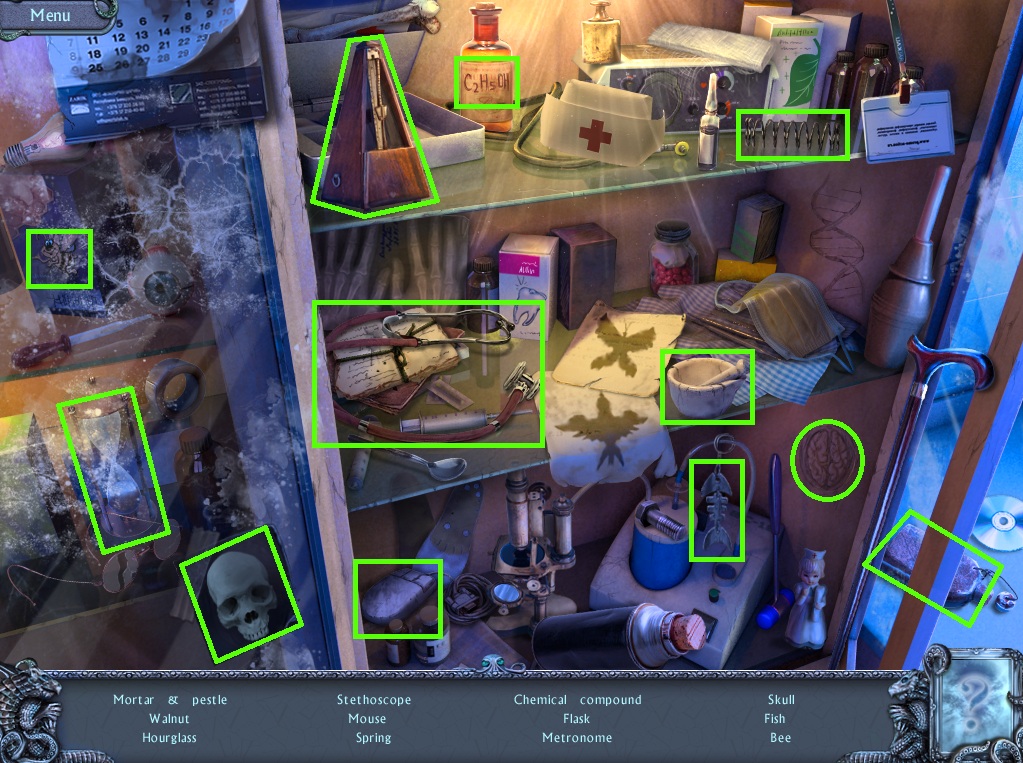
Click the medicine cabinet to repeat the hidden object scene.
Screenshot.
Once the hidden object scene is complete, you will receive a Chemical Compound.
Use the Chemical Compound on the tank of oxygen.
Use the Lighter on the trail of chemical fluid.
The End
Posted by: Trinn |
September 17, 2011 2:55 PM
|
September 17, 2011 2:55 PM