

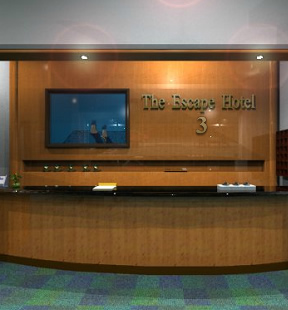
The Escape Hotel 3

![]() Of all of the weird, wild set-up scenarios in Tesshi-e escapes, one of the stand-outs is arguably the Escape Hotel. Just think of it, a place to go on vacation where everything becomes a real-life room escape. Hopefully our faithful readers here at Weekday Escape find the concept just as charming, since it is the central theme to this week's slice of escaping heaven. Yes, the Escape Hotel is back in The Escape Hotel 3, and this time the fun begins before you ever make it to your room.
Of all of the weird, wild set-up scenarios in Tesshi-e escapes, one of the stand-outs is arguably the Escape Hotel. Just think of it, a place to go on vacation where everything becomes a real-life room escape. Hopefully our faithful readers here at Weekday Escape find the concept just as charming, since it is the central theme to this week's slice of escaping heaven. Yes, the Escape Hotel is back in The Escape Hotel 3, and this time the fun begins before you ever make it to your room.
 How hard can it be to escape a hotel lobby, you might ask? Harder than you'd think, especially since you're not escaping to get out, but to get into your room. All you have to do is navigate around the spacious area, figure out your hotel room number, discover how to make the elevator work, and break into a few "employee only" areas. Tesshi-e has packed a lot into this fabulous escape, lots of puzzles, lots of keys, and even returns to that trademark puzzle type that we love so well, construction. But wait, there's more! Escape Hotel 3 relies heavily not only on problem solving skills but observational skills as well, including at least one color puzzle that may bedevil those with impaired eyesight. The game includes the usual bells and whistles of a fantastic control structure, beautiful visuals, tricky puzzles, and of course the alternate "happy coin" ending that is another Tesshi-e trademark.
What is there left to say about Tesshi-e's latest effort? Beautiful? Surely. Logical? Of course. Fun? Do you even have to ask? Harder than usual? Well, there is that. It's nice to see the difficulty level ramped up a bit after the last few mild escapes. Definitely an amusing challenge for the mid-week, one you know you want to accept. Come, let's take a vacation tailor-made for those of us who find pleasure in being locked in small spaces and forced to logic our way out of the situation. You know, like MacGyver, but for couch potatoes who don't happen to carry duct tape wherever they go.


Walkthrough Guide
(Please allow page to fully load for spoiler tags to be functional.)
The Escape Hotel 3 Walkthrough
General Information
Remember to examine every object you pick up, items may be hiding other things.
Observation is key here, examine everything carefully.
Try combining things in your inventory, you might be surprised at what you end up with.
There are two endings, regular and happy coin.
This walkthrough will contain directions for the colorblind.
Enjoy your stay!
Exploration
You begin by facing the front desk. To the right is a nice seating nook with comfy couches, to the left is a door.
Click on the front desk for a close up.
Now that you are closer to the desk you can see that there are four objects on top. Click on the object on the far left of the front desk for a close up.
What you have here is a small white picture with a blue cross. There is also a lovely flower here (1).
Note on the back wall behind the desk are five of those glass birdie figurines that should be very familiar to anyone who has played a Tesshi-e game before.
Back up.
Now click on the second from the left object on the front desk (white and yellow object) for a close up.
Here we have a blank memo pad. Shame we don't have a pencil, we could maybe get a clue. Back up.
Click on the next object from the left for a close up.
Here we have three bells set in a white base. Looks like we need to figure out a pattern to ring the bells. Back up.
On the far right of the front desk is another small white picture, almost invisible against the white wall. Click on it for a close up.
Okay, looks like a 7 of diamonds. Back up.
On the back wall behind the desk, underneath the "Escape Hotel" sign, is an object in the notch in the wall. Click on the object for a close up.
Looks like an arrow in a stand, but we can't reach it from in front of the desk.
Back up twice to the long view.
You can click on the door on the left for a close up, there's a sign next to it that says staff only. And of course the door is locked.
Back up.
To the right of the front desk is a cozy seating area, click on it for a close up.
Here in the seating area are three couches around a brown table. There's a picture on the table, click on it for a close up.
Okay, it's a picture of a red heart. Back up.
On the back wall of the seating area is a bookcase, click on it for a close up.
In the bookcase are a bunch of books, colored red, green, yellow, and blue. Notice that each book also has a number.
Back up twice to the long view.
Turn right.
Now we are facing an elevator, another door, and a large fish tank. There is also a low brown table underneath the fish tank.
You can click on the elevator for a close up, but it's not working right now.
You can click on the door for a close up, but it's another staff only door and it is also locked.
Click on the brown table for a close up.
On top of the table is another single flower in a vase (2). On the right side of the table is a small picture, click on it.
The picture is of a green hexagon. Back up.
The front of the table has a handle, but the pull door is, of course, locked.
Back up to the long view and turn right.
You are now facing the front door of the hotel. The door is, of course, locked.
Up on the ceiling, above the door, is a purple balloon. You can't reach it, of course, but it's pretty.
To the left of the doors is a wooden table with two wooden chairs. Click on the table for a close up.
On top of the table is a picture with a cross, a star, a heart, and a hexagon.
Note that the table has two drawers. The left drawer requires a four digit code.
Click on the right drawer to open it and take the paper from the drawer. You now have a picture of a ghost leg puzzle that also has the word "bell" at the bottom.
Back up to the long view and turn right.
You are now facing two more seating arrangements, each arrangement has three sofas around a small brown table. On the back wall is a large painting.
To the left of the large painting is a small cubbyhole in the wall, to the right is a mysterious set-up that looks like lockers.
Click on the picture for a close up. Notice that there is something balanced on the top of the frame, but you can't reach it. Back up.
Click on the cubby to the left of the picture. Here you will find a yellow star and another pretty flower (3). Back up.
Click on the locker looking thing to the right of the picture. Looks like they are lockers, or safes, and that you need a key card. Back up.
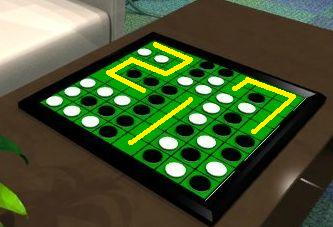
Click on the left seating arrangement for a close up. Here you will find a game of Othello and another single flower (4). Back up.
Click on the right seating arrangement for a close up. There's a puzzle here with four buttons and a key under glass. There is also another single flower (5). Back up.
Turn right to face the front desk again.
Time to solve some puzzles!
The Bell Puzzle
Pull up the note from your inventory.
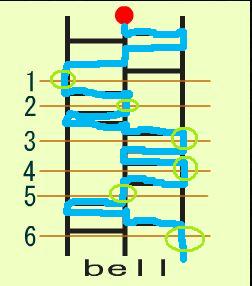
If you don't know how a ghost leg works, here's a simple explanation.
You start at the top (in this case, where the big red dot is). You follow the vertical line down until it crosses a horizontal line. At that point you turn and follow the horizontal line.
When the horizontal line hits a vertical, follow the vertical down to the next horizontal line. Continue until you hit the bottom of the puzzle.
In the case of this ghost leg puzzle, only pay attention to the dark, thick lines. Ignore the lighter, thinner lines that have numbers beside them.
When you've traced your way to the bottom of the puzzle, now go back and see where your downward path intersected the lighter, numbered lines.
Each time you intersect one of these lighter lines, it will be on a vertical line, either on the left, middle, or right.
This is the clue for the bell puzzle. Start with the number 1 line and see where it intersects the downward path of the ghost leg. It intersects on the left vertical line.
The number 2 line intersects on the middle vertical line, the number 3 on the right line, the number 4 on the right line, the number 5 on the middle line, and the number 6 on the right line.
Therefore the order to push the bells on the bell puzzle is: left, middle, right, right, middle, right.
Here's a screenshot to show the downward path and where it intersects the numbered lines.
Once you've figured out the order to push, click on the bells on the front desk for a close up.
Push the bells in the correct order and a little slot will open up. Inside you will find a magnet (take it) and the number 1074.
Back up twice.
The Left Drawer
Turn right twice to face the exit doors of the lobby.
Click on the small table to the left of the door for a close up.
The left drawer needs a four digit code. Perhaps it has something to do with the picture of four symbols on top of the table?
We've seen pictures of those symbols scattered around the room, each one a different color.
If you were very observant, you will have noticed that the colors of the four symbol pictures corresponds to the colors of the books on the wall in the small seating area to the right of the front desk.
The trick is to combine these two clues.
Turn left (or right) twice to face the front desk.
Click on the seating area to the right of the desk.
Click on the bookcase for a close up.
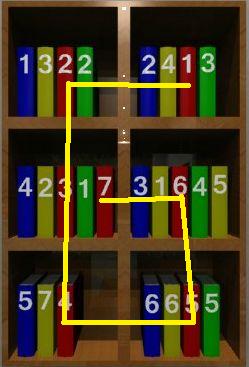
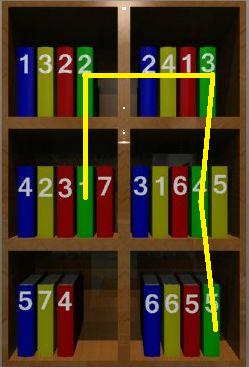
The trick is this: concentrate on one set of books by color at a time. Since the picture on the table starts with the cross, and the cross we found was blue, let's concentrate on the blue books.
Start with the number 1 blue book. Trace a line from that book to the number 2 blue book.
Keep tracing lines from 2 to 3, from 3 to 4, from 4 to 5, and from 5 to 6.
What you should see is now the shape of a number. In fact, it is the number 2.
Now do the same things for the yellow books (star), the red books (heart), and the green books (hexagon).
Each color will give you a number: yellow - 9, red - 6, and green - 7.
The code is therefore 2967.
Here are four screenshots illustrating the lines: screenshot 1, screenshot 2, screenshot 3, and screenshot 4.
Once you have the code, back up twice to the long view, then turn left (or right) twice to face the exit doors.
Click on the table for a close up, then click on the left drawer for a close up.
Enter the code to open the drawer.
There are two items in the drawer, a piece of elastic and a small pencil. Take both.
Back up.
The Four Button Puzzle
Turn left (or right) twice to face the front desk.
Click on the blank notepad on the desk for a close up.
Use the pencil on the notepad to see some numbers.
Note how the numbers are clustered? Almost as if they were corners.
Back up twice and turn left.
Click on the right seating area for a close up.
Notice that the puzzle with the four buttons (and the key under glass).
Maybe those numbers on the notepad correspond to the buttons?
The numbers on the notepad cluster in the upper right, upper left, lower right, and lower left of the pad.
The numbers themselves show the order in which to push the buttons.
Using the numbers, the order is: upper right, upper left, lower right, upper left, upper left, lower right, lower left.
Push the buttons in the order you learned from the notepad and you will free the spade key. Take the key and back up.
The Aquarium Table
Turn right (or left) twice to face the elevator doors.
Click on the low table underneath the aquarium for a close up.
Use the spade key to open the door of the table.
Take the object from inside (mop) and back up.
The Large Painting
Turn left (or right) twice to face the couches.
Click on the large painting of a woman on the back wall for a close up.
Use the mop to knock down the object from the top of the painting frame.
You now have a strange tool.
While the tool is in close up, click on it to turn it over. You will now see that you need a four digit code and you will have the clue diamond x bell.
Remember the numbers we saw in the bell puzzle?
When you solved the bell puzzle you got a number clue, 1074.
You should have also seen the diamond clue, the 7 of diamonds on the far right of the front desk.
Simple math: 7 x 1074 = 7518.
Enter the code into the strange tool and it will open up to reveal a club key. Take the key.
Pull up the strange tool again, then click on it to turn it over.
Notice that there was a screw behind where the key was. If only we could find a screwdriver...
Back up.
The Elevator Staff Only Door
Turn right (or left) twice to face the elevator.
Click on the staff only door to the right of the elevator twice for a close up.
Use the club key to open the door.
Once the door is open, go through.
There is a shelving unit here, with two more birdie figurines and a puzzle box.
Click on the box for a close up and you will see that it needs a three digit code, and that it has Othello pieces on it.
Back up once and turn left.
On the wall is a metal plate. If you click on it for a close up you will see that it is screwed down. Another thing we need the screwdriver for...
Turn left.
You can see through the open doorway to the main lobby. Turn left.
Now that you can see the aquarium from the back, you can see that there is a key inside there. How to get it out, though?
The Othello Box
Turn left to face the shelving unit and the Othello box.
Click on the box for a close up. We need a three digit number here, and our only clue is the Othello pieces.
Remember the Othello board we found in the lobby?
You can go back to the Othello board to refresh your memory if you'd like.
The clue is not the pieces themselves, but the spaces that don't have pieces.
The empty spaces, or "negative space" on the board forms numbers.
The numbers are 217.
Screenshot.
Enter the three digit code you got from the Othello board.
A slot will open up to reveal a screwdriver and a keycard. Take both and back up.
Using the Key Card
Turn left (or right) twice to face the open doorway.
Click on the open doorway to go through. You should be back at the lobby facing the large picture and the two sofa groupings.
Click on the locker/safe mechanism to the right of the picture for a close up.
Here's a card slot, and we now have a card.
Before you place the card in the slot, pull it up from your inventory and note the numbers on the front: 2514.
Place the card in the slot. The four digit code lock will now activate.
Enter the code from the card, 2514.
Note that one of the lights on a locker is now glowing green (bottom row, third from the left).
Click on the locker to open it and take the string.
Click on the locker door to close it and then take the key card back. You never know, we might need it again.
Back up.
The Aquarium Key
You now have everything you need to get the key out of the aquarium.
Turn right (or left) twice to face the elevator.
Click on the staff only door twice for a close up, open the door, and go in.
Once you are in the staff room turn right to face the aquarium.
Time for construction!
Pull up the magnet from your inventory.
Use the string on the magnet to tie it on.
Pull up the mop from your inventory.
Use the magnet/string combo on the top end of the mop. You now have a fishing pole!
Use the fishing pole on the key in the aquarium. Congratulations, you now have a round key!
Turn right and go back to the lobby.
Behind the Front Desk
You should be facing the sofas and the large painting again.
You can click on the staff only door to the right (near the front desk) for a close up from this angle.
Use the round key on the door to open it.
Enter the room and turn right.
You are now in the space behind the front desk. Click on the notch on the left wall for a close up (about midway down the wall).
Take the arrow and back up.
Turn right to face the open doorway.
Click on the door to close it.
There is a panel to the left of the door, it needs a key.
On the right side of the door is a clue on the wall, click on it for a close up.
The clue says flower, bird, sofa, and has an arrow pointing to the left.
Back up, click on the door to open it, and go through to the lobby.
The Balloon
Now we need to get the purple balloon down from the ceiling.
Time for more construction!
Pull up the "strange tool" from your inventory.
Click on the tool to turn it over.
Use the screwdriver on the tool and two prongs will pop up!
Once the prongs are up, use the elastic on the tool. You now have a slingshot!
Close down the tool and pull up the arrow.
Notice that the arrow is blunt, but there is a small opening in the front to place something sharp.
Place the pencil stub in the arrow.
Pull up the slingshot, then use the arrow on the slingshot.
Once the slingshot and arrow are assembled, click on the purple balloon for a close up.
Use the slingshot/arrow assembly on the balloon. This will get you a triangle key.
Back up.
Behind the Front Desk Part 2
Turn right to face the large picture, then click on the staff only door by the desk for a close up.
Enter the door then turn left (or right) twice to face the open doorway.
Click on the panel to the left of the door for a close up.
Use the triangle key on the panel. This will activate a three digit code key.
Fortunately, we've seen the clue for the code.
The clue is to the right of the door, the "flower, bird, sofa" clue.
The clues refer to the number of those particular objects in the lobby.
We've seen 5 flowers, 7 birds, and 9 sofas.
Therefore the number is 579.
Enter the code and a slot will open revealing a lever. Take the lever.
Back up then go through the doorway to the main lobby.
Getting Out (Regular Escape)
You should be facing the exit doors at this point. Turn left to face the elevator.
Click on the staff only door by the aquarium twice for a close up, open the door and go in.
Once inside turn left to face the metal panel on the wall.
Use the screwdriver to open the metal panel. Looks like the elevator controls!
Use the lever on the control then click it to activate the elevator.
Back up and turn left.
Go out the door, then turn right (or left) twice to turn around and face the elevator.
Click on the elevator for a close up, then click on the elevator buttons to open the door.
Click on the open elevator door to enter. You will be seeing a prompt that says "escape now?". Click on the prompt.
Enjoy a few drinks at the hotel bar. You've escaped!
Getting Out (Happy Coin Escape)
Follow the regular escape up to the point where you open the elevator doors.
Once the doors open, you need to be able to keep them open.
Use the mop/fishing pole on the open doors (towards the bottom of the doors) to prop them open.
Now look closely at the elevator interior. Notice the abstract pattern running along the back wall?
Yes, that does look like the numbers 5252.
You should also see that a green laser is pointing outwards from the elevator. Wonder what it's shining on?
Back up and turn left (or right) twice to face the large painting.
Click on the locker/safe machine for a close up. Here's where the light was pointing.
You should now see a clue: Elevator + 1234.
Add the elevator number (5252) to 1234 to get the clue, 6486.
Place the keycard in the slot to activate the code lock.
Enter the new number, 6486 into the code lock.
Another locker has now activated, this time in the third down row, far right column.
Click on the locker to open it and take the happy coin.
Back up and turn left (or right) twice to face the elevator.
Click on the elevator for a close up, then click on the mop to remove it from the door.
Enter the elevator and choose "escape now".
Enjoy your tea and snack.
Happy coin will bring happiness to you!!
Posted by: grinnyp |
August 31, 2011 4:30 AM
|
August 31, 2011 4:30 AM