

Paranormal Crime Investigations: Brotherhood of the Crescent Snake
Platform: Mac, Windows
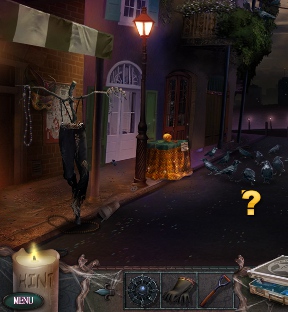
![]() It's Mardi Gras, home of costumed pedestrians, masked partiers, parades, dancing, food, and more crazy things than you can imagine. What could possibly go wrong with everyone in the throes of celebration? Try murder. Murder, and a number of occult happenings shortly thereafter. As you arrive on the scene of the crime, you learn something very strange has been going on in Louisiana, and judging by the glowing tattoo on the dead body, you know it's not going to be an ordinary case. Pick up your fingerprint kit and brush up on your voodoo knowledge, as in the new adventure/hidden object game Paranormal Crime Investigations: Brotherhood of the Crescent Snake, you're going to do some investigating of the supernatural kind!
It's Mardi Gras, home of costumed pedestrians, masked partiers, parades, dancing, food, and more crazy things than you can imagine. What could possibly go wrong with everyone in the throes of celebration? Try murder. Murder, and a number of occult happenings shortly thereafter. As you arrive on the scene of the crime, you learn something very strange has been going on in Louisiana, and judging by the glowing tattoo on the dead body, you know it's not going to be an ordinary case. Pick up your fingerprint kit and brush up on your voodoo knowledge, as in the new adventure/hidden object game Paranormal Crime Investigations: Brotherhood of the Crescent Snake, you're going to do some investigating of the supernatural kind!
 Paranormal Crime Investigations: Brotherhood of the Crescent Snake combines crime scene clues, mini-games, and plentiful hidden object scenes and attaches it all to a sturdy casual adventure backbone. As you investigate crimes, you'll need to explore the area a bit in order to gather more evidence. Your path isn't always a clear one, however, and you must do some puzzle solving in order to continue. The cursor serves as a handy guide, alerting you when there's more information about an object, telling you when you can speak to characters, and allowing you to move from scene to scene.
The Paranormal Crime Investigation kit (PCI) plays a major role in this game, allowing you to extract loads of information from the most unusual pieces of evidence. To use it, simply find an item that glows in your inventory, then move it to the kit on the right side of the screen. A mini-game will appear, usually something very short and not too challenging, and once it's complete, you'll be presented with a bit of evidence. Not too shabby for a magical glowing box of science!
 Analysis: Story is massively important in Paranormal Crime Investigations: Brotherhood of the Crescent Snake, and the tone set by the first scene is carried on throughout the game. You quickly learn an ancient cult is trying to summon an ancient snake god, and by investigating the murders carried out using dark magic, you begin to learn more and more about the Brotherhood of the Crescent Snake. It makes for a painfully long title, that's for sure, but the plot is definitely one of the game's strongest areas.
The mix of hidden object scenes, puzzles, and crime scene investigations is good, if a little heavy on the hidden object areas. Although you won't get stuck very often, the hint system recharges very quickly and can help you in a pinch. Some of the item descriptions can be a bit misleading, though that shouldn't be new to anyone who has played a casual hidden object game before.
On the down side, Paranormal Crime Investigations tends to repeat itself, using backtracking to flesh out the experience and reusing the same few mini-games over and over again. Expect just over three hours of gameplay from this title, nearly an hour more if you factor in the healthy bonus chapter included with the collector's edition. Also, the bonus content extends the ending somewhat, making a must-play if you really get hooked by the game.
Paranormal Crime Investigations: Brotherhood of the Crescent Snake hops right in to the crowded horror/hidden object genre and isn't afraid to start swinging. It's a well-made game from beginning to end, with good visuals, fitting music, and a story that's bound to capture your interest!
A Collector's Edition is also available. It contains exclusive bonus gameplay, wallpapers, a soundtrack, and an in-game strategy guide. Remember that Big Fish Game Club Members pay only $13.99 for Collector's Editions (or 2 club credits), and collector's editions count 3 card punches of 6 total needed for a free game.
![]() Windows:
Windows:
Download the demo
Get the full version
Also available: Collector's Edition
![]() Mac OS X:
Mac OS X:
Also available: Collector's Edition


Walkthrough Guide
(Please allow page to fully load for spoiler tags to be functional.)
Paranormal Crime Investigations: Brotherhood of the Crescent Snake - Collector's Edition Walkthrough
General Knowledge
Paranormal Crime Investigations: Brotherhood of the Crescent Snake is a hidden object adventure game, where the cursor is used to interact with the environment.
When the cursor is over an area where you can further investigate or discover new information, it will change to a question mark.
When the cursor is over an area where you can zoom in for a closer look or start a hidden object scene or puzzle, it will change to a magnifying glass.
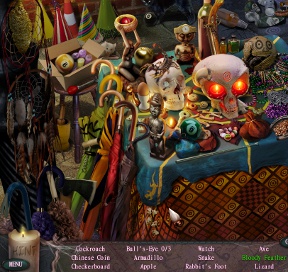
Hidden object scenes are also indicated by a glittering area of the screen.
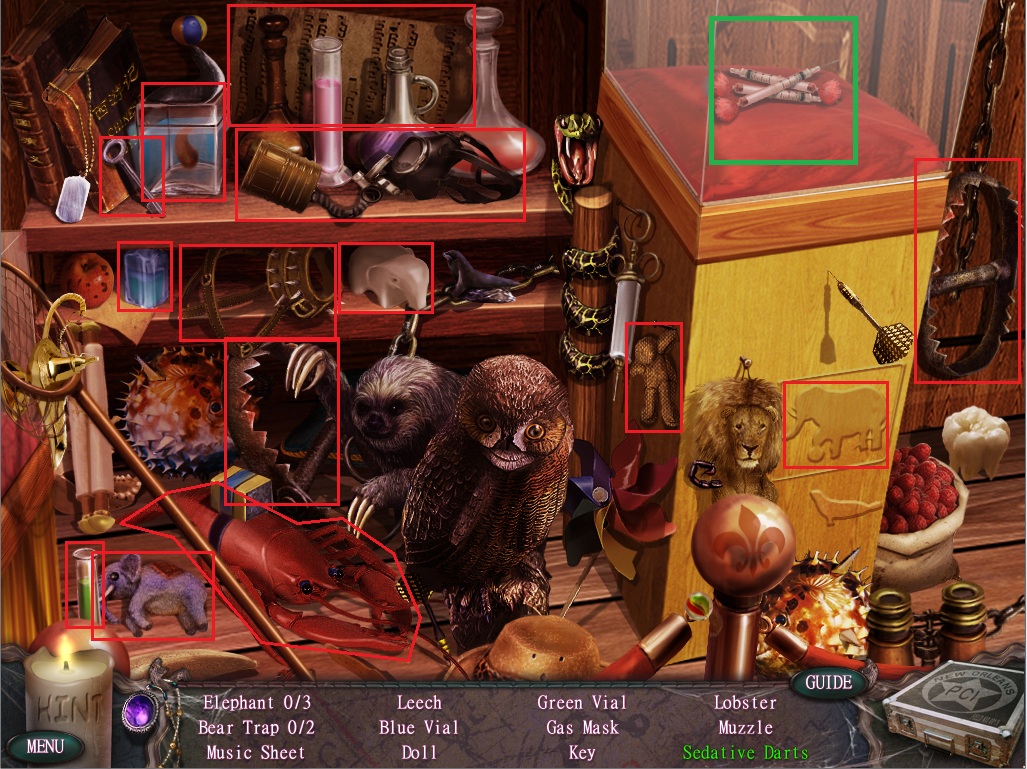
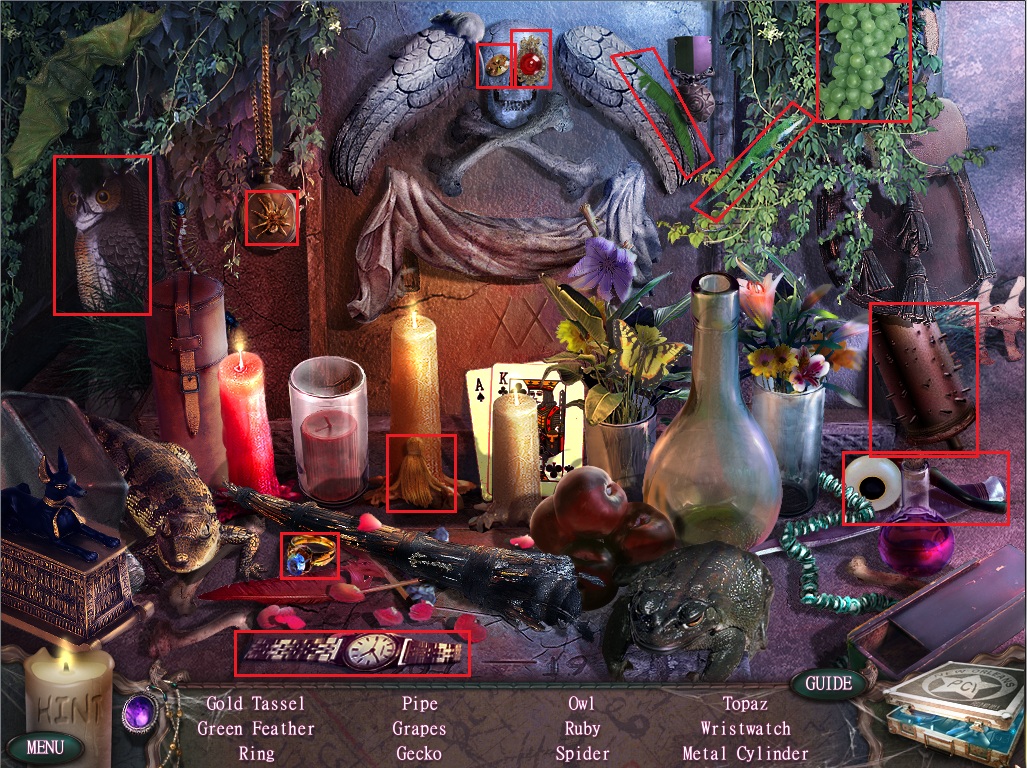
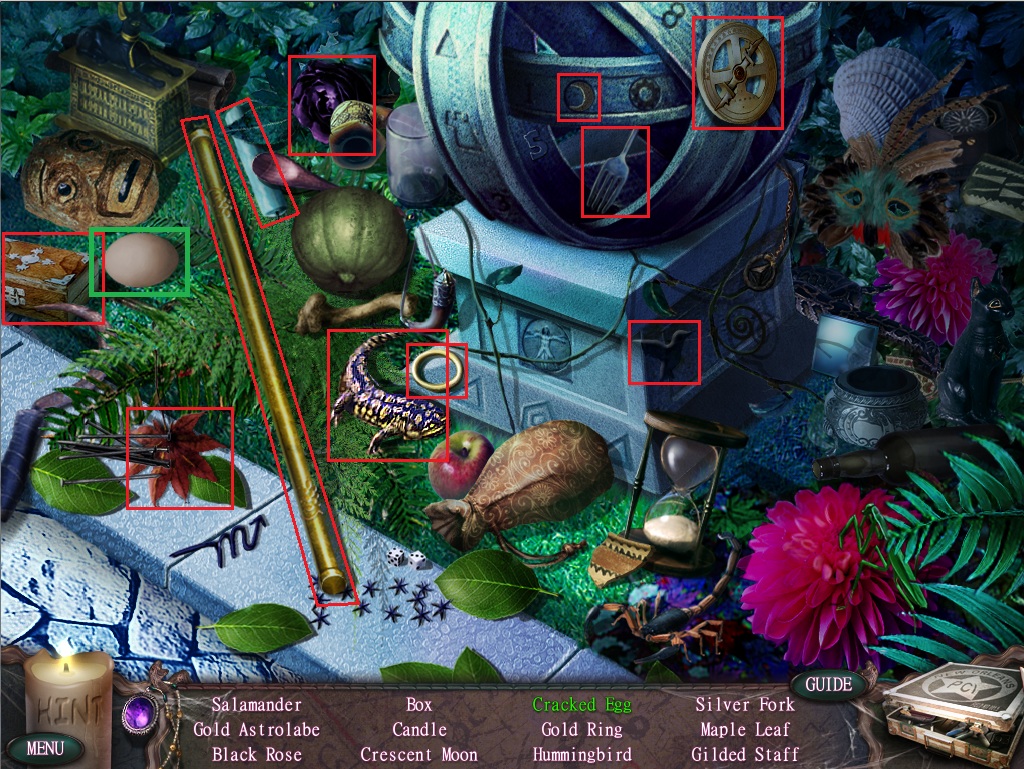
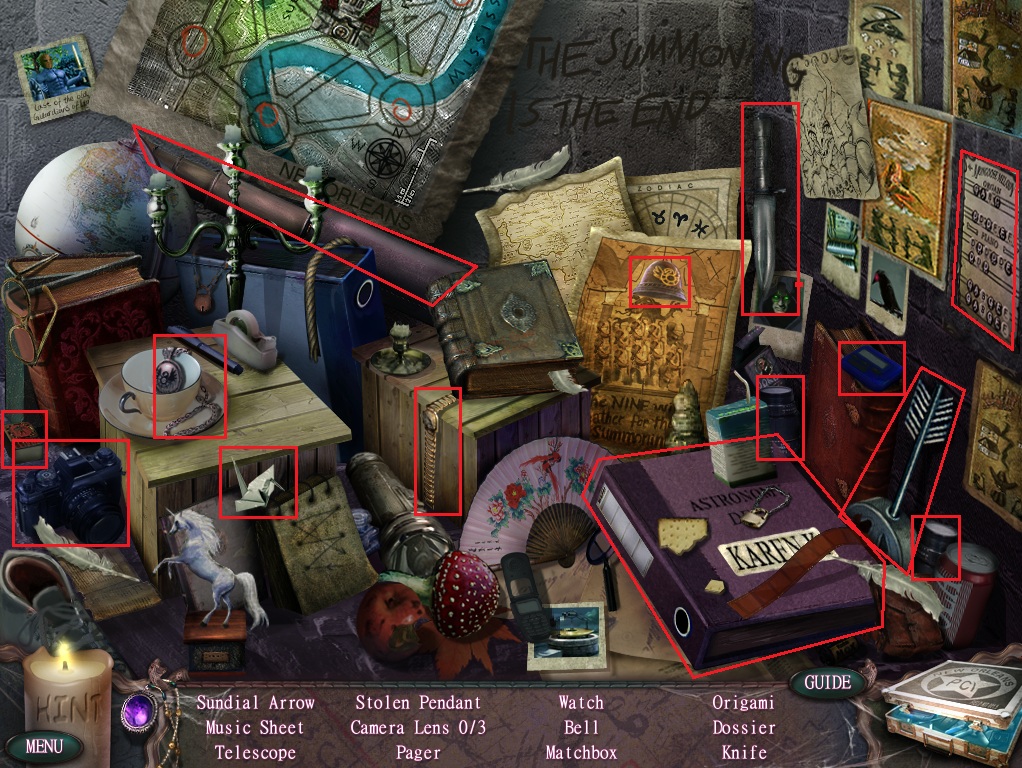
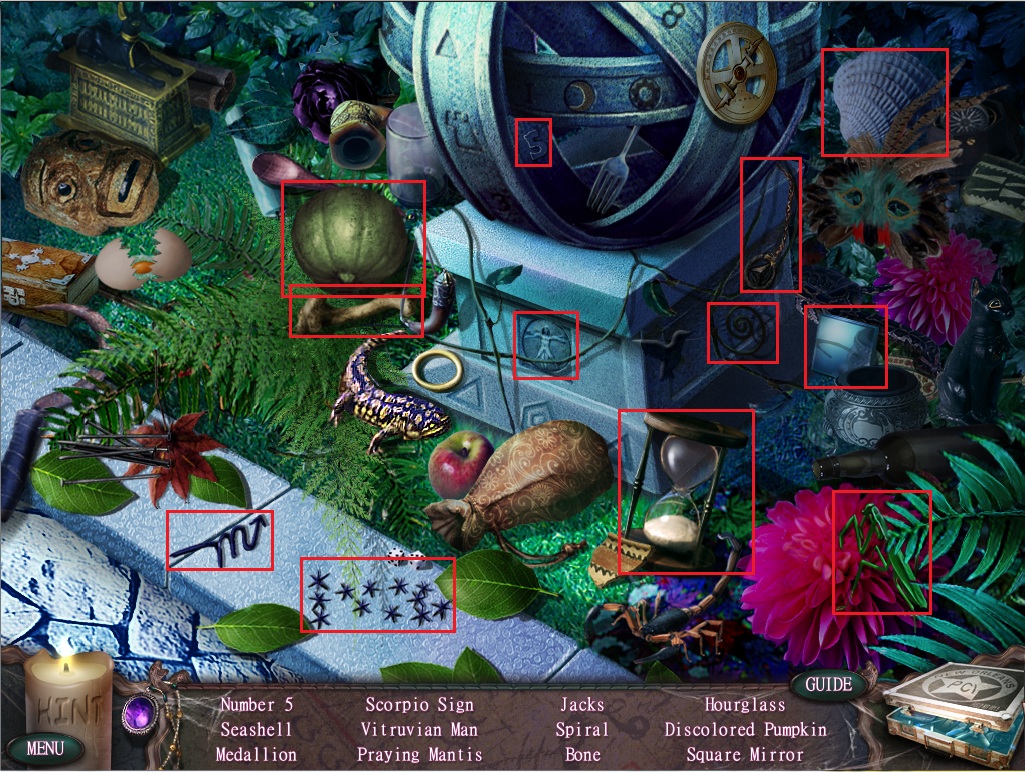
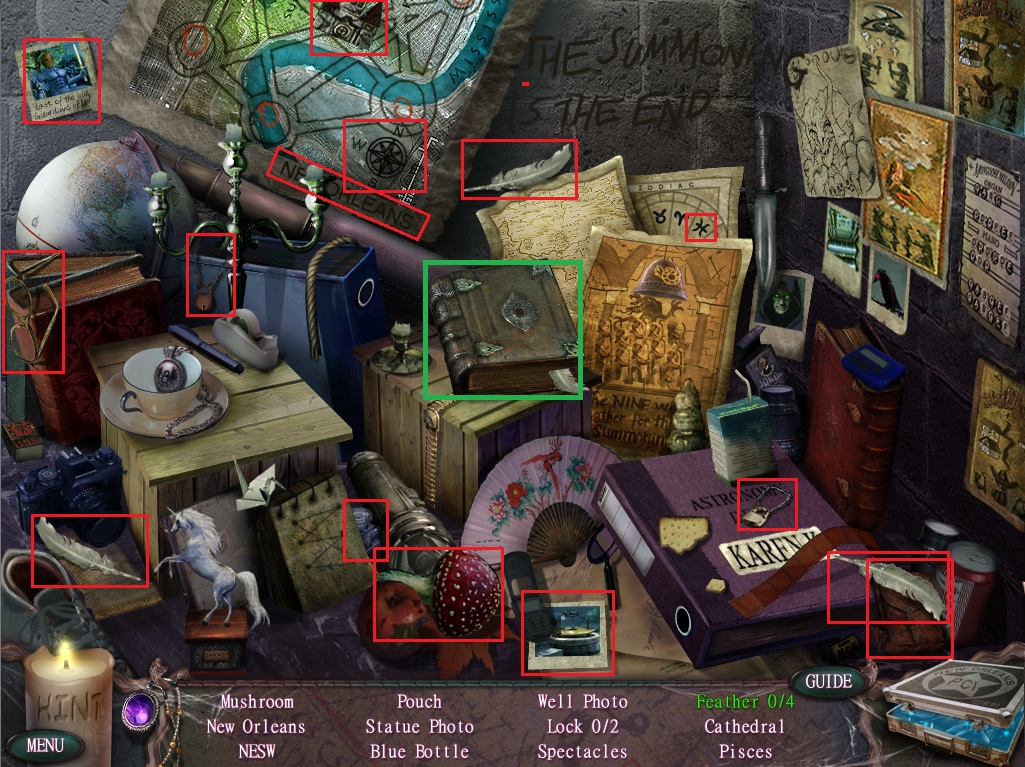
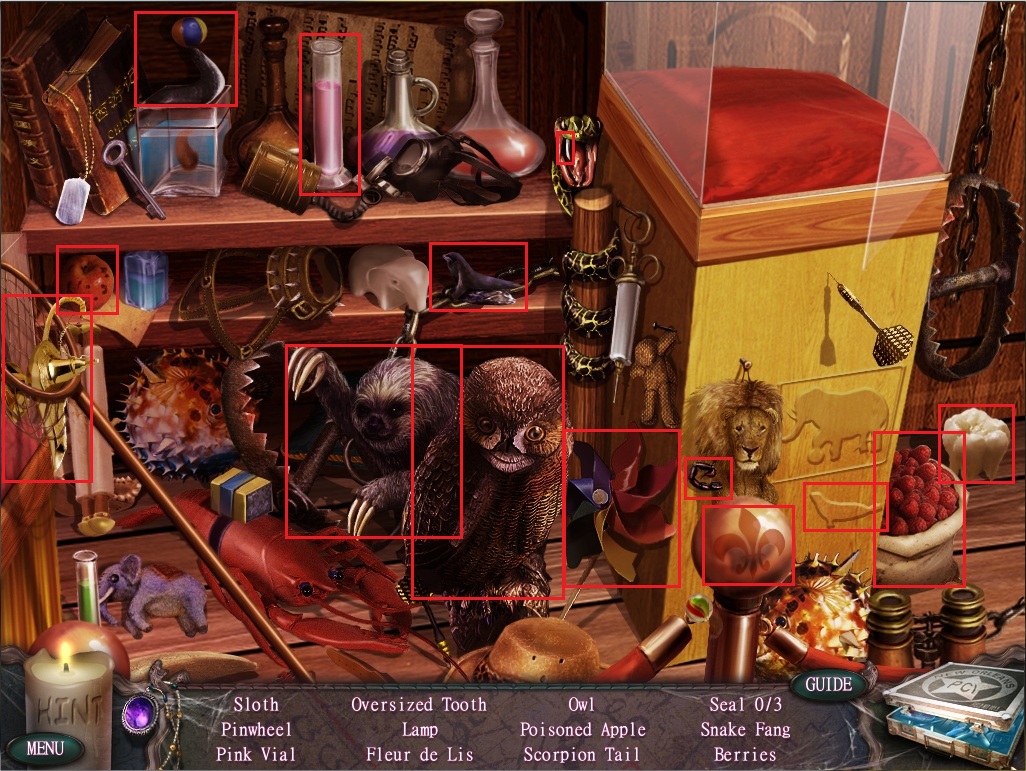
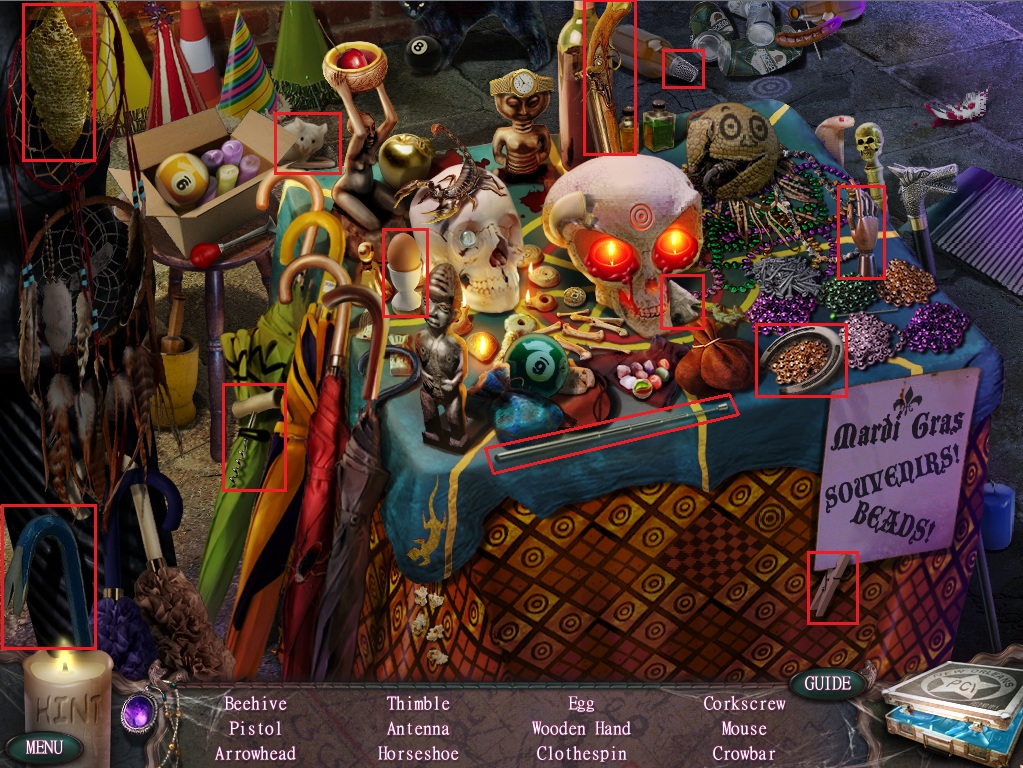
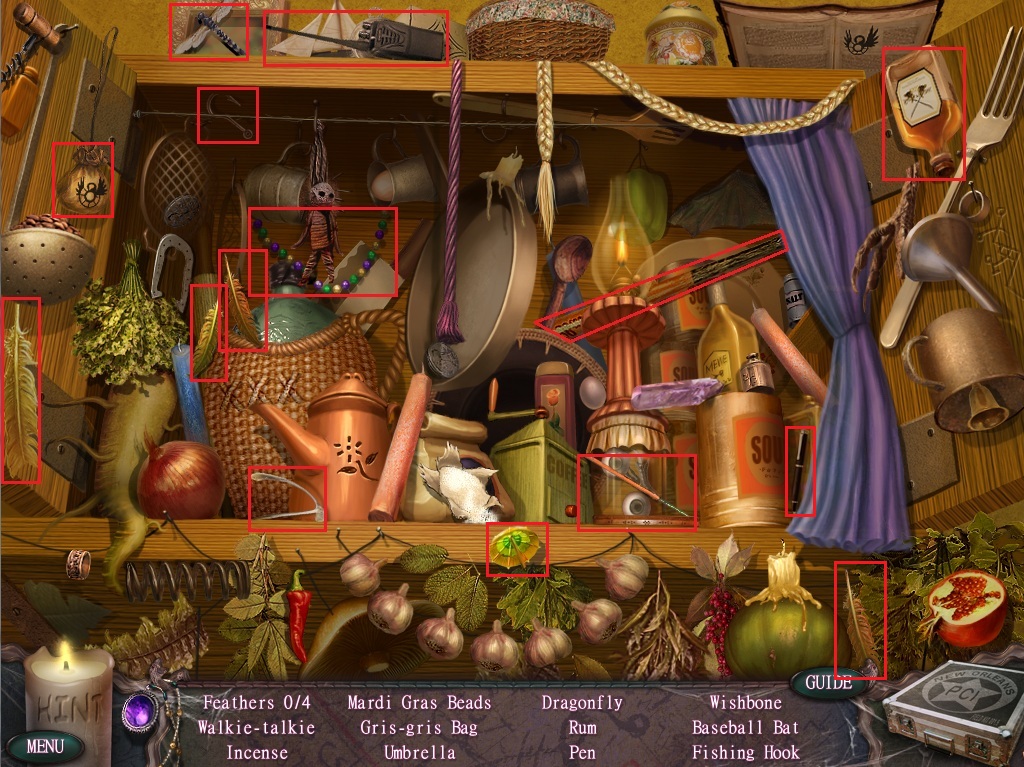
In screenshots, the items listed in each hidden object scene will be surrounded with a red box.
In some scenes, objects need to be interacted with to reveal the listed hidden item. These objects are surrounded with a green box.
When the cursor is over an area or object you can interact with, pick up, or manipulate, it will change to a hand.
Items that you pick up throughout the game are placed in the Inventory bar at the bottom of the screen.
Some items are incomplete and will glow inside the Inventory box. Place these items in the PCI Field Kit case at the bottom right corner of the toolbar.
In the bottom left corner of the screen is the Talisman, which is used to reveal black magic throughout the game.
Next to the Talisman is the Hint button, which can be used to reveal items in hidden object scenes and instruct you on the next step in your journey.
Chapter 1
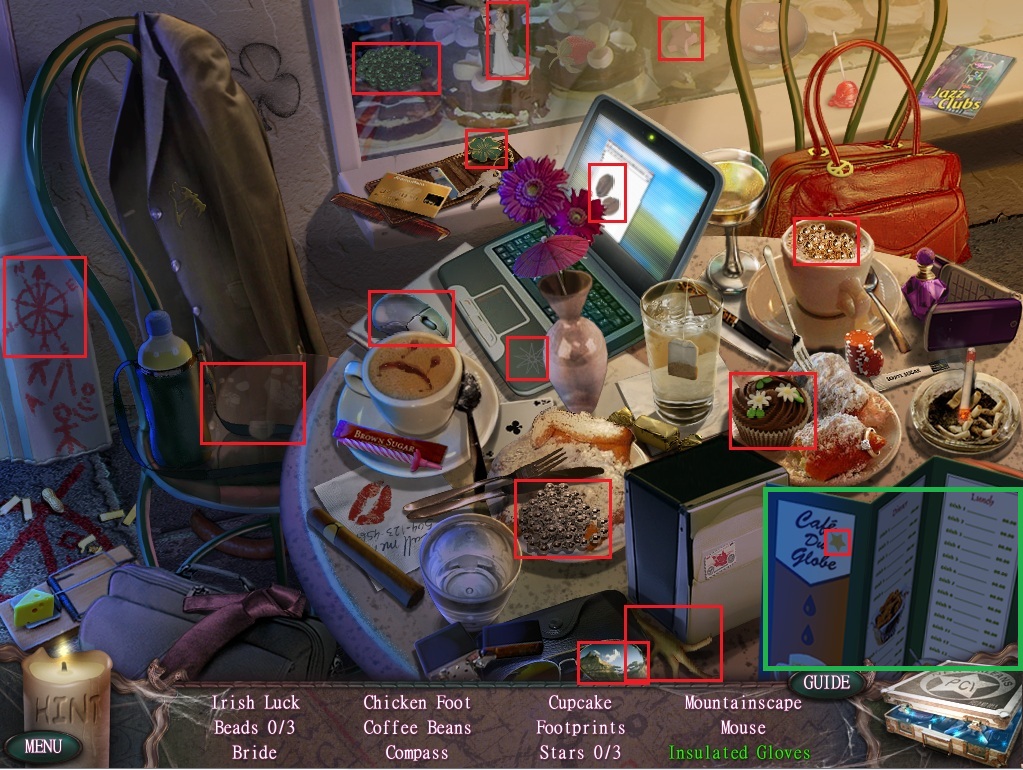
Cafe du Globe
Click the corpse for a closer look.
Click the chalk drawing around the body.
Move the shroud off the lower half of his body.
Take the wallet out of his back pocket to examine his ID.
Take the Iron Star over the victim's shoulder.
Click the runed markings on his arm to take a Sample Analysis: Strange Markings.
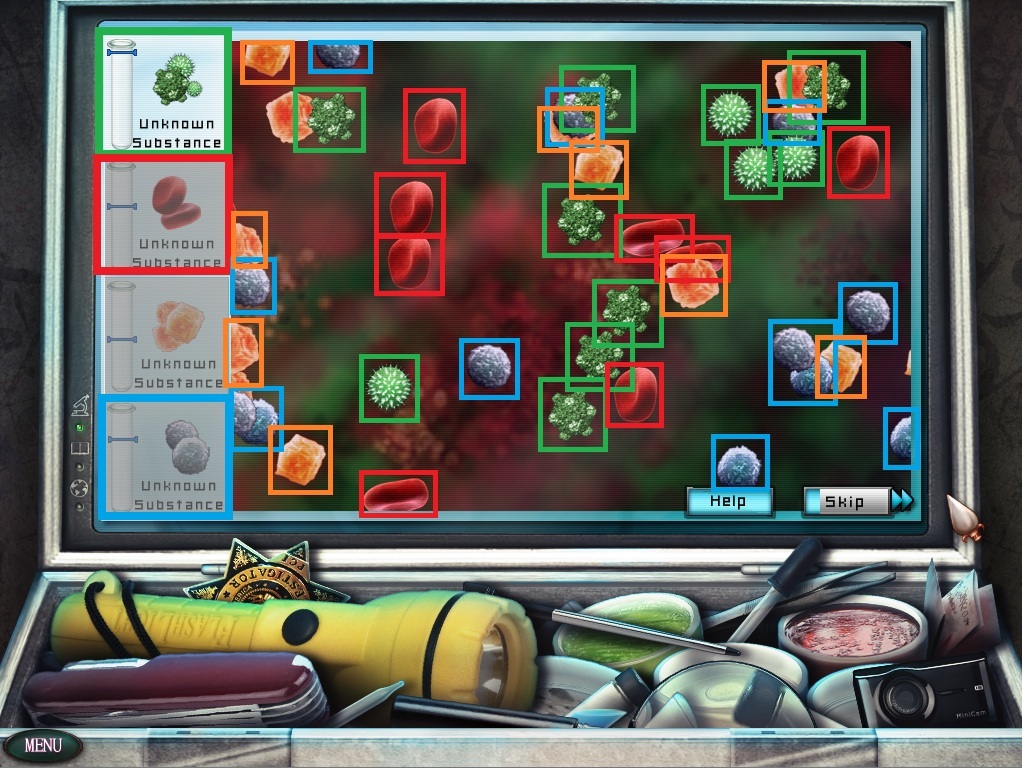
Use the glowing sample analysis from your inventory on the PCI Field Kit to start the analysis puzzle.
To solve this puzzle, collect all of the floating samples to fill the vials.
Green, red, orange, and blue molecules will move across the screen.
At the left is a bar that shows four similarly colored substances.
When each of the sample subtances is alternately highlighted, collect the floating molecule samples of the matching color.
Screenshot.
Click the PCI Field Kit to view the Case Log.
Close the Case Log and click the woman standing in front of the cafe to speak with her.
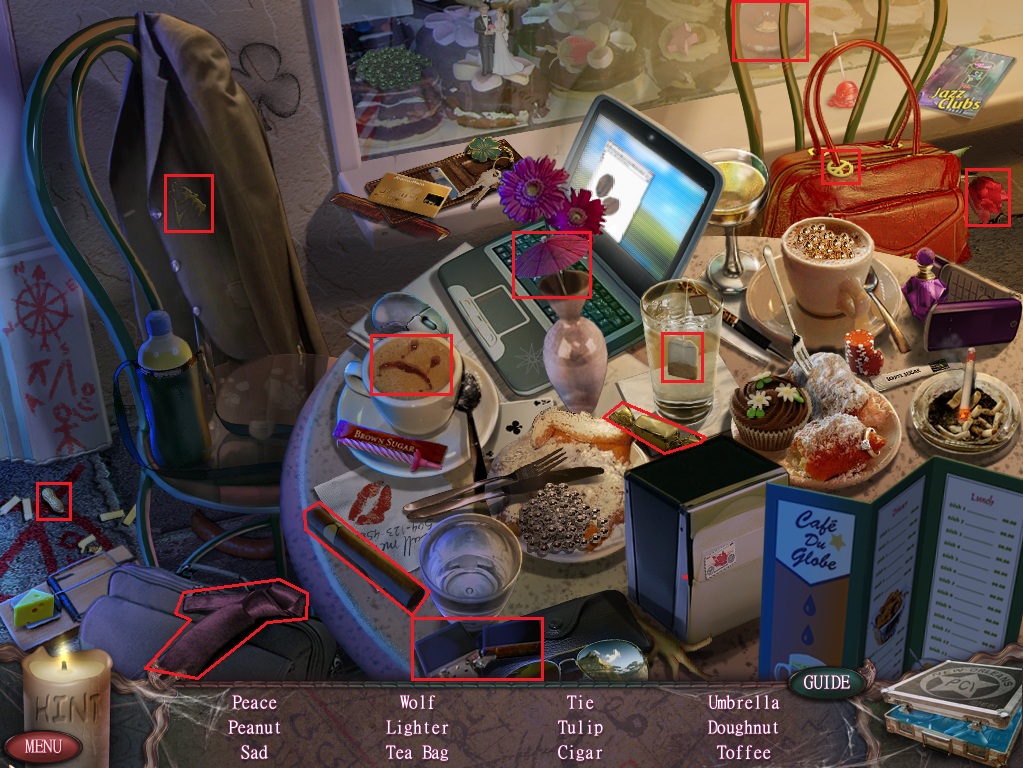
Click the cafe window to start the hidden object scene.
Click the cafe menu to move it aside, revealing the Gloves.
Screenshot.
Once the hidden object scene is complete, you will receive Insulated Gloves.
Click the woman standing in front of the cafe to speak with her.
Go right down the alley towards the riverside apartments.
Riverside Apartments
Click the small table next to the lamppost to start the hidden object scene.
Click the crow to shoo it away, revealing the Bloody Feather.
Screenshot.
Once the hidden object scene is complete, you will receive an Axe.
Go back to the crime scene, then go left to the crossroads, and left one more time to the gate at Jackson Square.
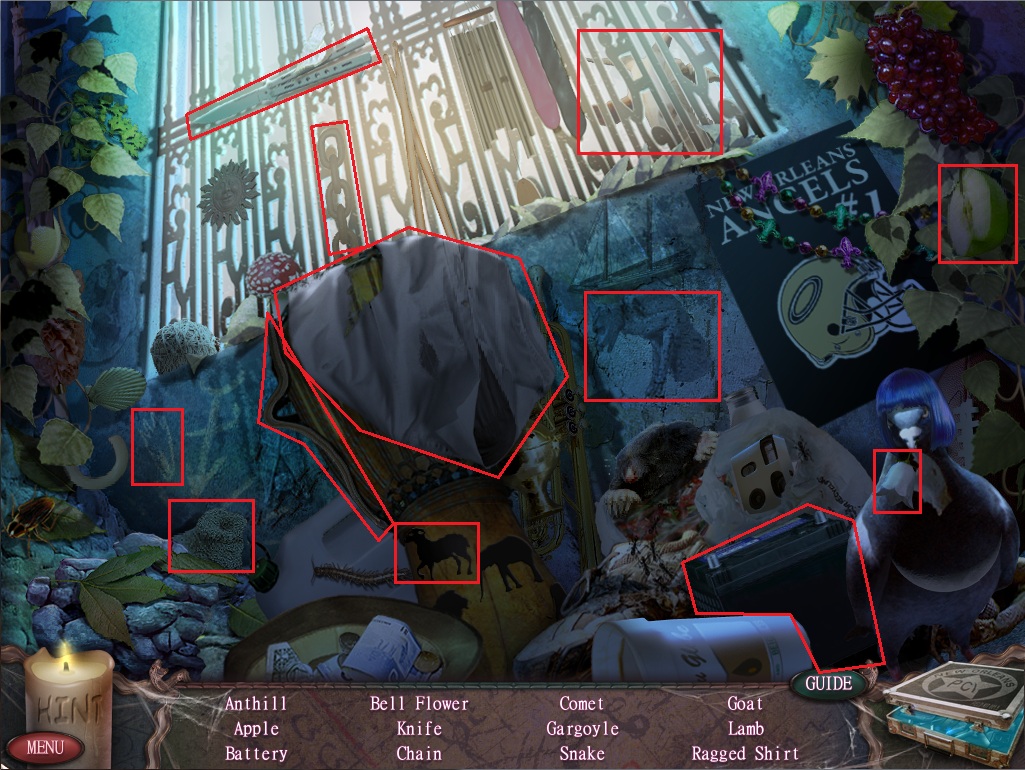
Jackson Square
Attempt to go back one screen, prompting the cutscene.
Take the Shovel Handle on the ground leaning against the right wall.
Click the glowing paper in front of the gate doors to zoom in.
Click the paper a second time.
Click the left side of the gate to start the hidden object scene.
Screenshot.
Once the hidden object scene is complete, you will receive a Ragged Shirt.
Go back to the crossroads and then right to the alley in front of the history of dark arts museum.
Outside the Dark Arts Museum
Attempt to go forward to prompt the cutscene.
Use the axe from your inventory power box to the left of the museum door.
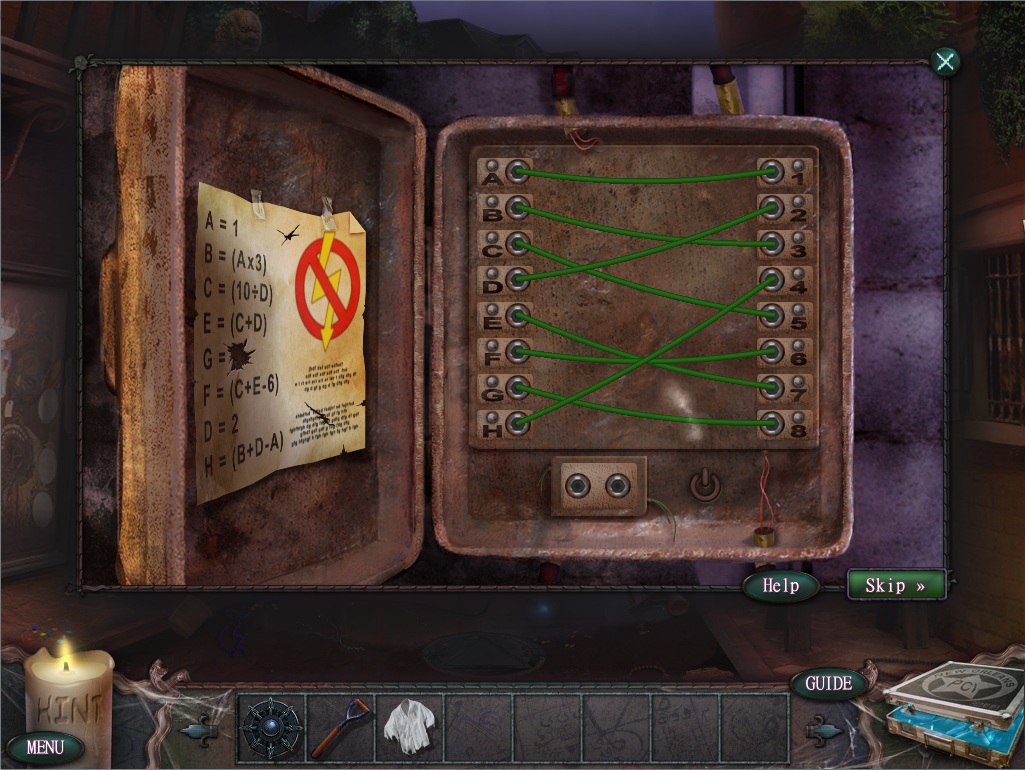
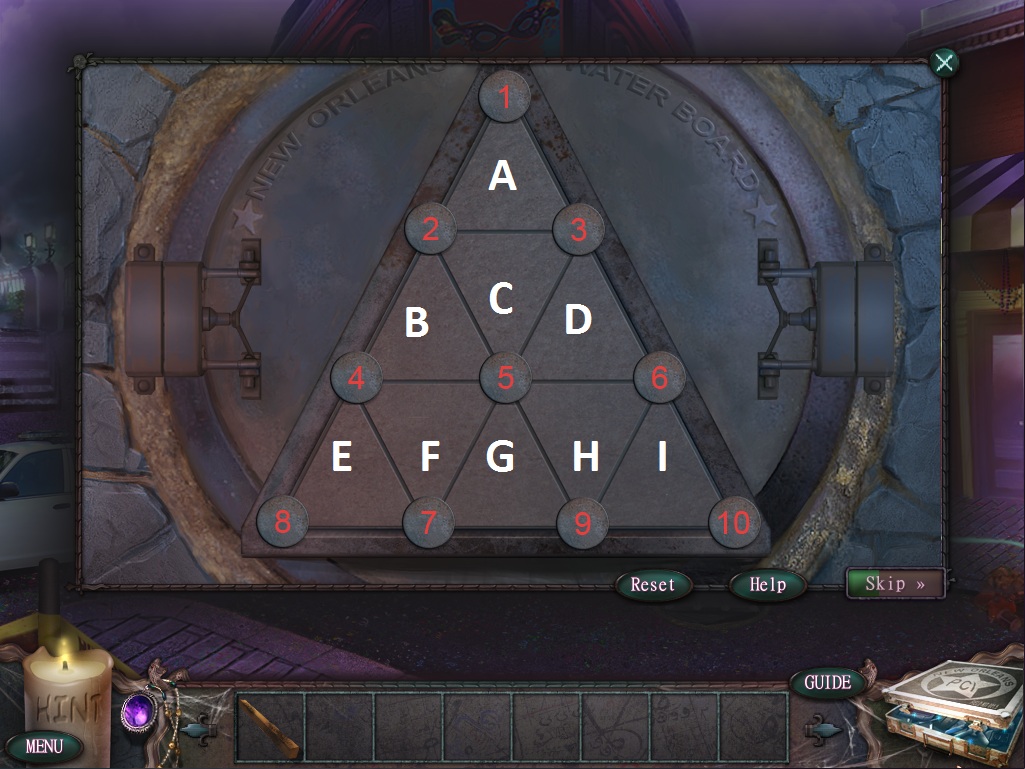
Click the power box to start the puzzle.
To solve this puzzle, match the wire from the lettered fuses on the left to the numbered fuses on the right.
Note the clues given on the left side of the box.
Use the Insulated Gloves from your inventory to move the wires.
A = 1
B = (A x 3); B = 3
C = (10 / D); C = 5
D = 2
E = (C + D); E = 7
F = (C + E - 6); F = 6
G = 8
H = (B + D - A); H = 4
Solution.
Click the drain by the sidewalk gutter to start the hidden object scene.
Click the popcorn box to open it, revealing the Fishing Lure.
Screenshot.
Once the hidden object scene is complete, you will receive a Wreath.
Click the paper under the electrical box to examine the insignia.
Go forward to the memorial at Dumaine Street.
Dumaine Street
Click the Memorial to zoom in.
Place the Wreath from your inventory on the left hook of the arc.
Click the glowing note on the sidewalk in front of the memorial to zoom in.
Click the note again to read it.
Go left towards the magic shop.
Outside the Magic Shop
Click Madame Oracleaux to speak with her.
Take the Pipe from the windchime hanging in front of the doorway.
Go through the door inside the magic shop.
Magic Shop
Speak with Madame Oracleaux to learn how to bring down the barriers.
Take the Pendant from the statuette on the counter.
Exit the shop and go back to the memorial on Dumaine Street.
Dumaine Street
Click the memorial to zoom in.
Place the Pendant from your inventory into the statue's hands.
Go right through the gate into the cemetary.
Cemetary
Attempt to go forward to prompt the cutscene.
Take the Scarecrow Head in front of the gravestone to add it to your inventory.
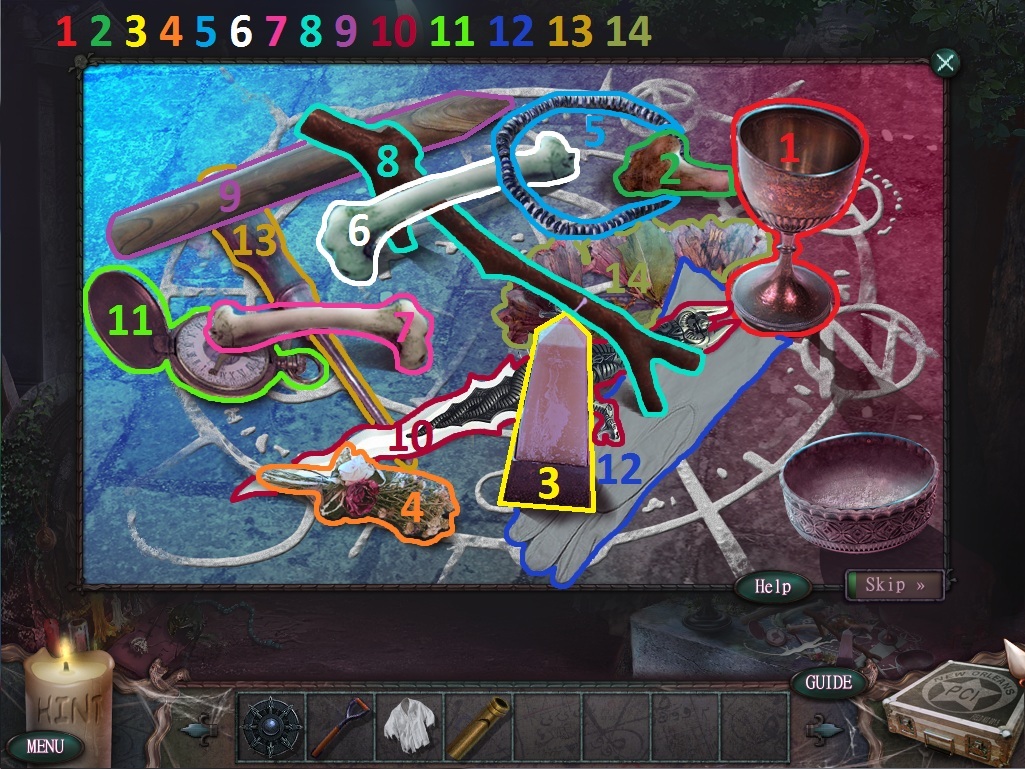
Click the altar under the mourning statue to start the puzzle.
To solve this puzzle, remove all the items obstructing the altar.
Click an object that is not underneath any other object to remove it.
Solution.
Once the puzzle is solved, you will receive a Sample Analysis: White Pigment
Use the sample on the PCI Field Kit to start the analysis puzzle.
To solve this puzzle, find the pairs of matching molecular components.
The number and color of components is listed at the bottom.
Click a component on the Pigment Sample A side to select it, then click the identical component on the Pigment Sample B side to match the pair.
Solution.
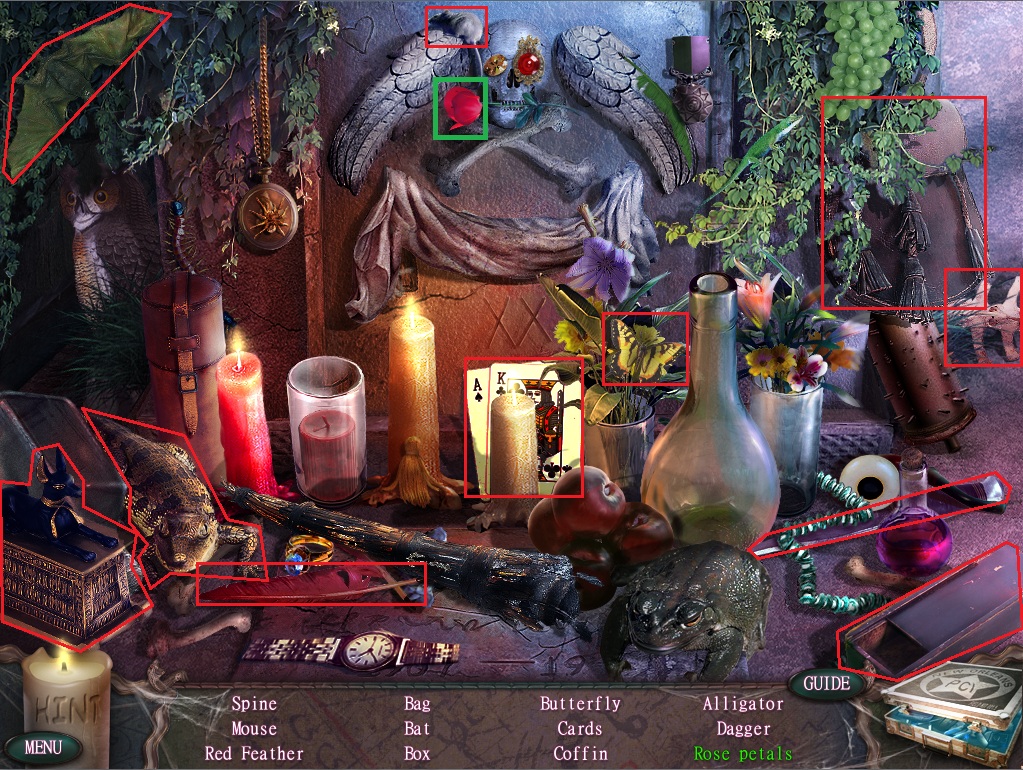
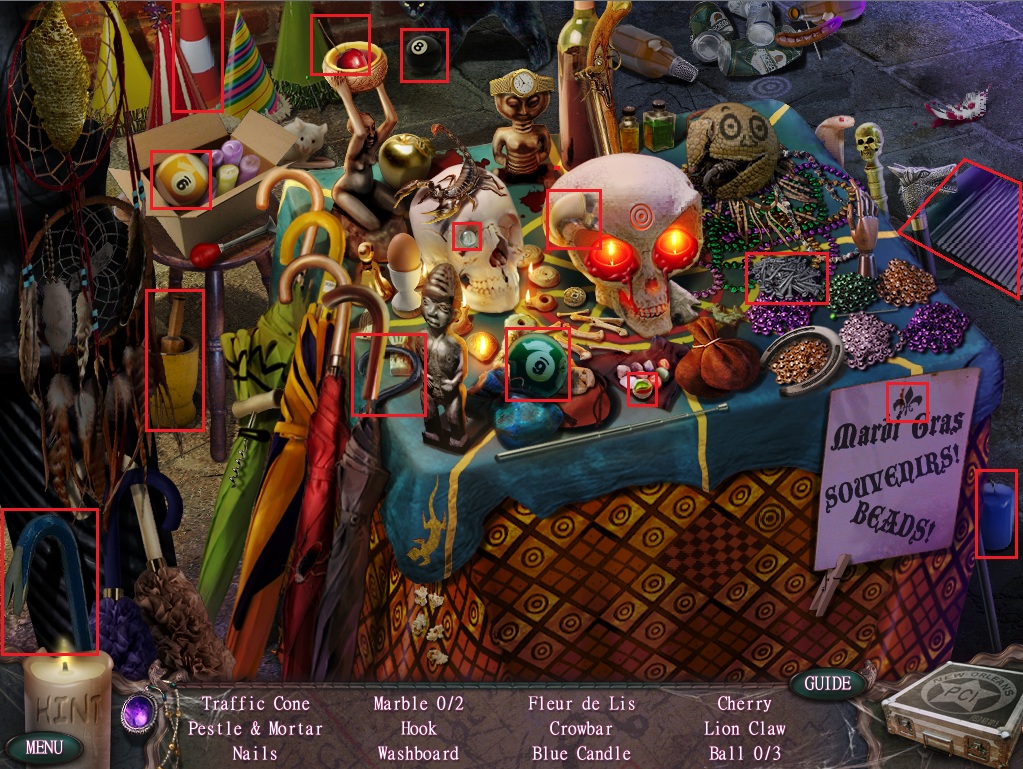
Click the tombstone to start the hidden object scene.
Click the rose in the skull's mouth to drop the Rose Petals.
Screenshot.
Once the hidden object scene is complete, you will receive Rose Petals.
Go back to the Madame Oracleaux's magic shop.
Magic Shop
Click Madame Oracleaux to speak with her.
Click the Eye of Newt on the small shelf under the board of charms and pendants to add it to your inventory.
Exit the shop to receive the Talisman, which reveals dark magic.
Go back to the alley in front of the history of dark arts museum.
Outside the Dark Arts Museum
Click the gutter drain to repeat the hidden object scene.
Screenshot.
Once the hidden object scene is complete, you will receive Chalk.
Go back to the Cafe du Globe.
Cafe du Globe
Click the table outside the cafe to repeat the hidden object scene.
Screenshot.
Once the hidden object scene is complete, you will receive a Tulip.
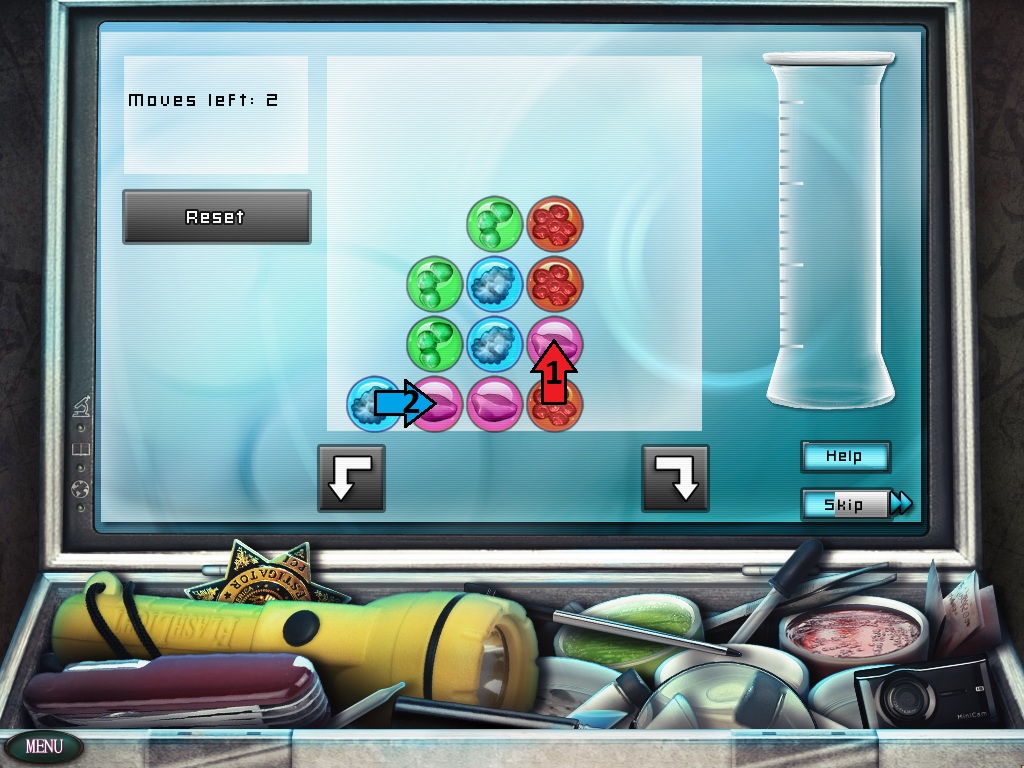
Click Combine to use the ingredients from your inventory to make Mix-Substance White Pigment.
Use the substance on your PCI Field Kit to start the analysis puzzle.
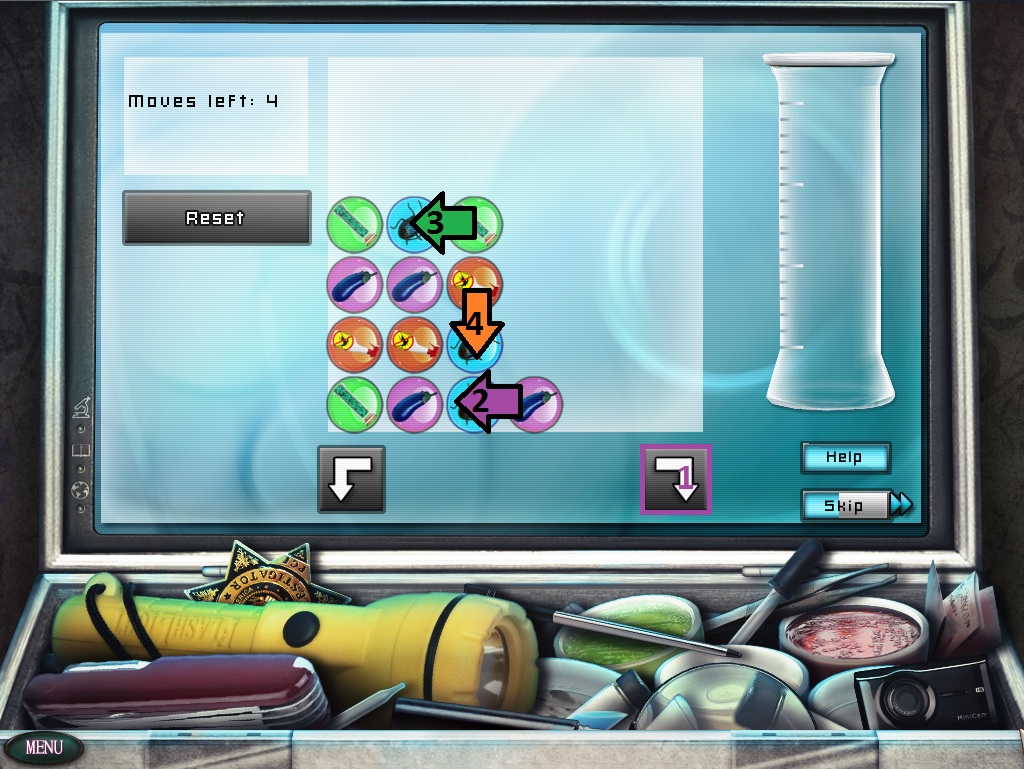
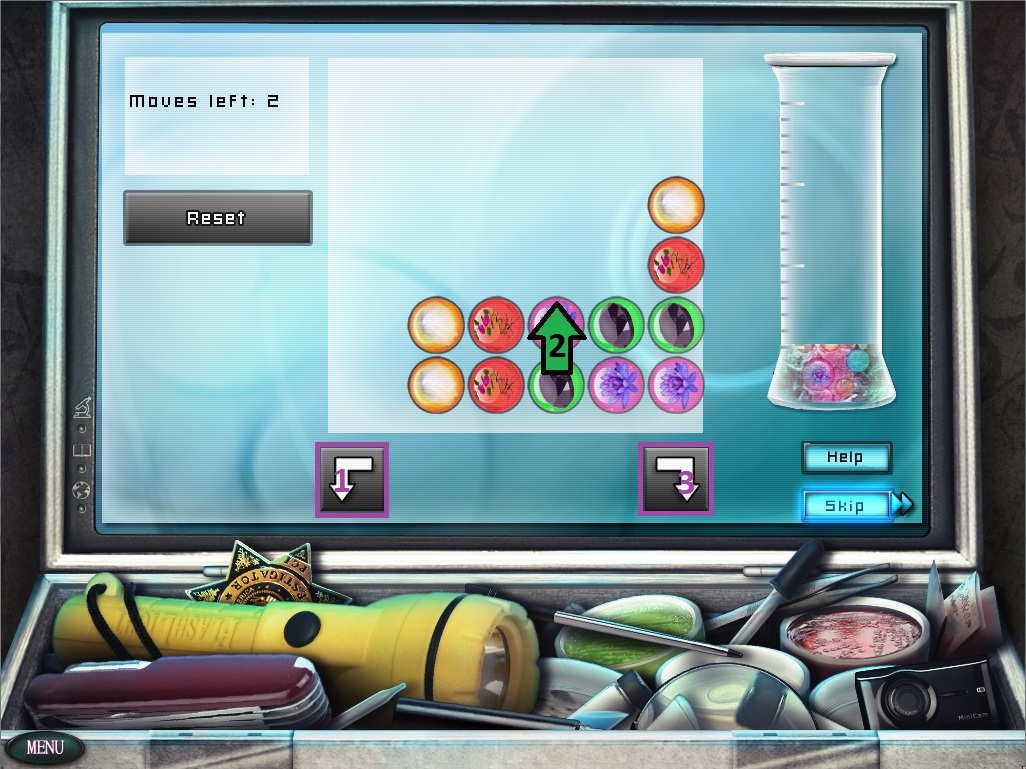
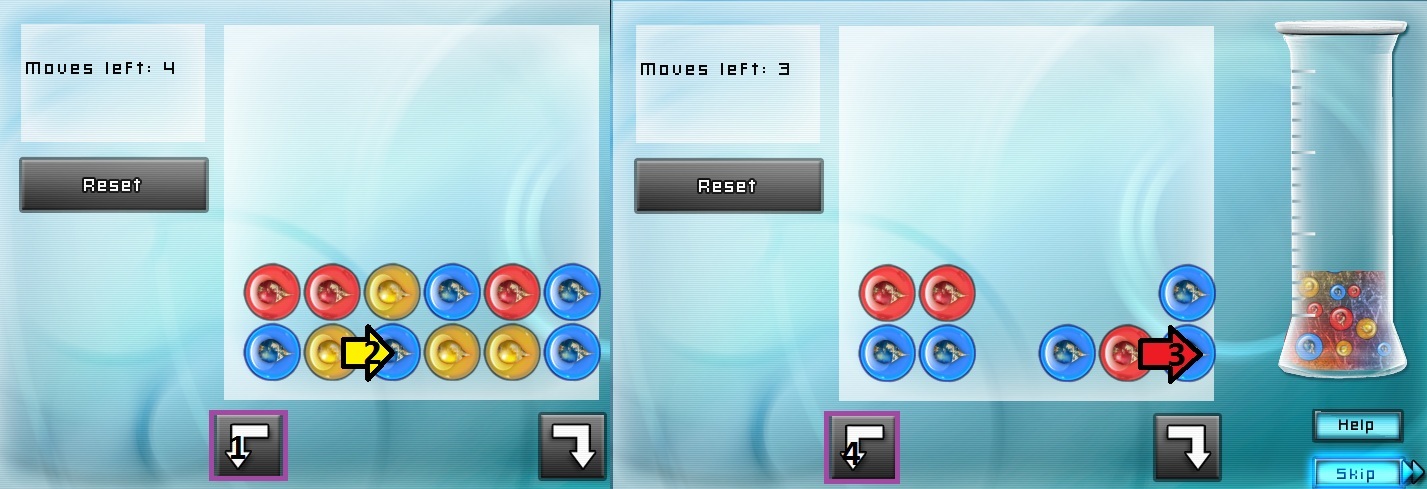
To solve this puzzle, remove all of the ingredients by aligning each of the three similarly colored circles together.
Click a circle to select it, then click an adjacent circle to switch positions.
When three similarly colored circles are touching, they will be removed from the board.
Clear the entire baord in no more than 2 moves, or the puzzle will reset.
Solution.
Once the puzzle is solved, you will receive White Pigment.
Go right towards the Riverside Apartments alley.
Riverside Apartments
Add the Scarecrow Head and Ragged Shirt from your inventory to the incomplete scarecrow by the left sidewalk.
Take the Spade on the ground in front of apartment #3 to add it to your inventory.
Click Combine to add the handle and spade together, making a complete Shovel.
Return to the cemetary.
Cemetary
Click the altar under the mourning statue to zoom in.
Use the White Pigment from your inventory on the small bowl in the lower right corner to start the puzzle.
To solve this puzzle, trace the lines along the red dot to complete the circle.
Click the white pigment to pick it up, then click and hold the mouse on top of a red dot.
Drag the mouse following the dots to trace a complete line.
If you release the mouse too early, click the pigment to pick it back up and trace the line again.
Solution.
Go back to the magic shop.
Magic Shop
Speak with madame Oracleaux.
Give her the Shovel from your inventory.
Take the Red Candle on top of the cash register.
Return to the alley at the Riverside Apartments.
Riverside Apartments
Click the table under the lamppost to repeat the hidden object scene.
Screenshot.
Once the hidden object scene is complete, you will receive a Blue Candle.
Return to the cemetary.
Cemetary Strong
Put the Blue Candle in the left candlestick holder and the Red Candle in the right candlestick holder.
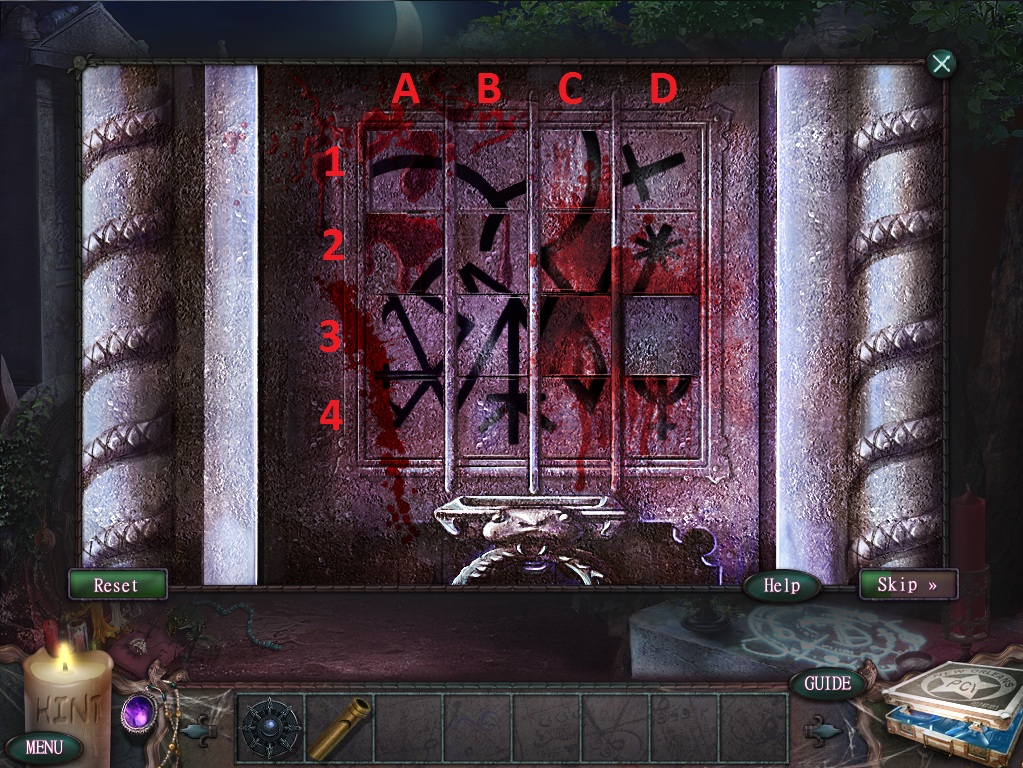
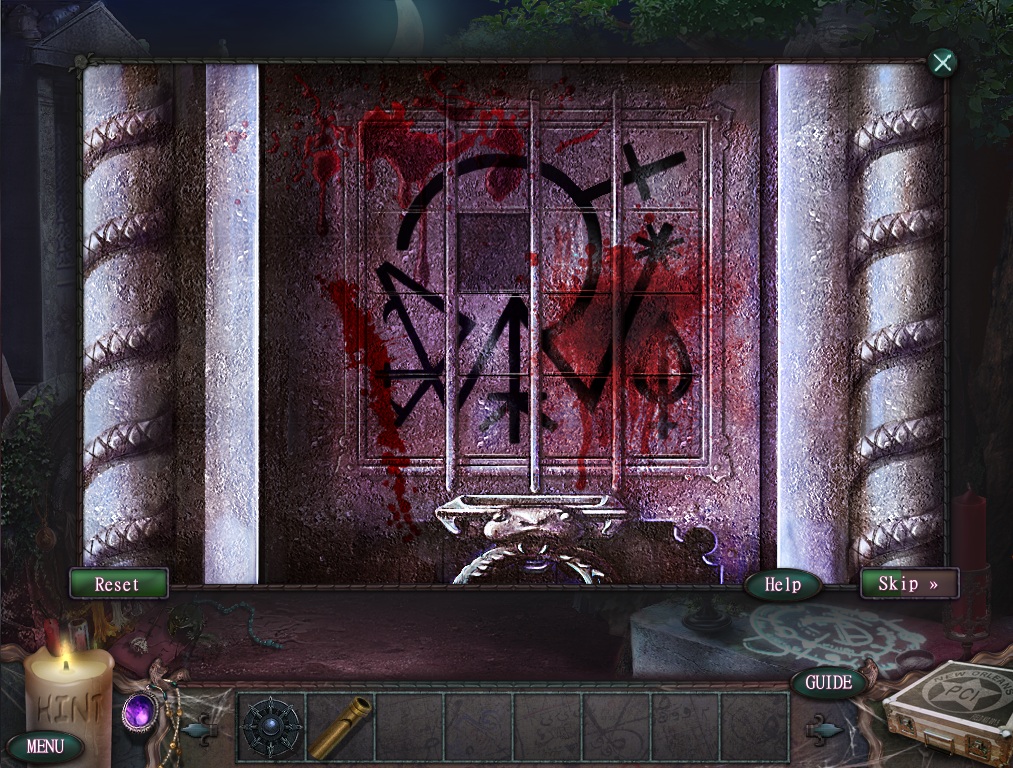
Click the crypt door to start the puzzle.
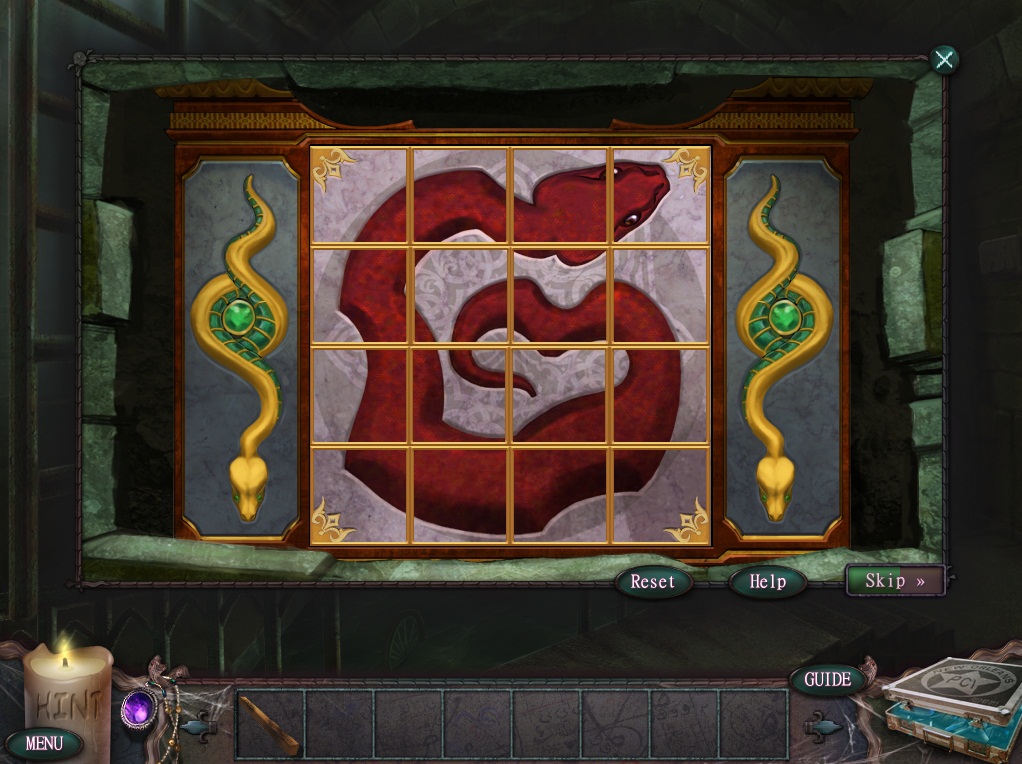
To solve this puzzle, arrange the tiles to complete the image of the runes.
Click and hold a tile to select it, then drag it up, down, left, or right to move it in that direction.
Screenshot.
Move the Tile at C3 to Space D3
Move the Tile at C2 to Space C3
Move the Tile at C1 to Space C2
Move the Tile at B1 to Space C1
Move the Tile at A1 to Space B1
move the Tile at A2 to Space A1
Move the Tile at B2 to Space A2
Solution.
Go through the open tomb door into the gruesome bone crypt.
Gruesome Bone Crypt
Click the mosaic on the left wall to examine it.
Click the altar at the end of the crypt to zoom in.
Take the Iron Star on the right pages of the book.
Take the three Numbered Stones (3/4) on the left and right pages and underneath the clasp of the book.
Click the panels on the ground of the crypt for a closer look.
Take the Numbered Stone (4/4) on the far left panel to start the puzzle.
To solve this puzzle, place the Numbered Stones at the correct panels.
Click a Numbered Stone from your inventory to select it, then click a space at the bottom of a panel.
Read the panel descriptions for a hint of which stone belongs at which panel.
The first panel, Destruction of Pompeii, had the power of 2. Place the Numbered Stone II under Destruction of Pompeii.
The second panel, The Black Death, had the power of 4. Place the Numbered Stone IV under The Black Death.
The third panel, Earthquake in Lisbon, had the power of 6. Place the Numbered Stone VI under Earthquake in Lison.
New Orleans Summoning has the power of 9. Place the Numbered Stone IX under New Orleans Summoning.
Solution.
Click the amulet around your neck, then click the runed purple area of the coffin lid.
Climb out of the grave.
Chapter 2
The Grave
Speak with Madame Oracleaux to learn more about the Guardians and the Crescent Snake.
Take the Pipe from the windchime tied to the far right tree.
Take the Blue Eggplant in the bush at the bottom of the left tree.
Go forward towards the lake.
Firefly Lake
Take the Scraper from the mossy ground.
Use the Scraper to clean the moss off the large object.
Click the boat to turn it over.
Now that the boat is in working order, go right towards the lakehouse.
Lakehouse
Take the large Battery in the back right corner of the platform.
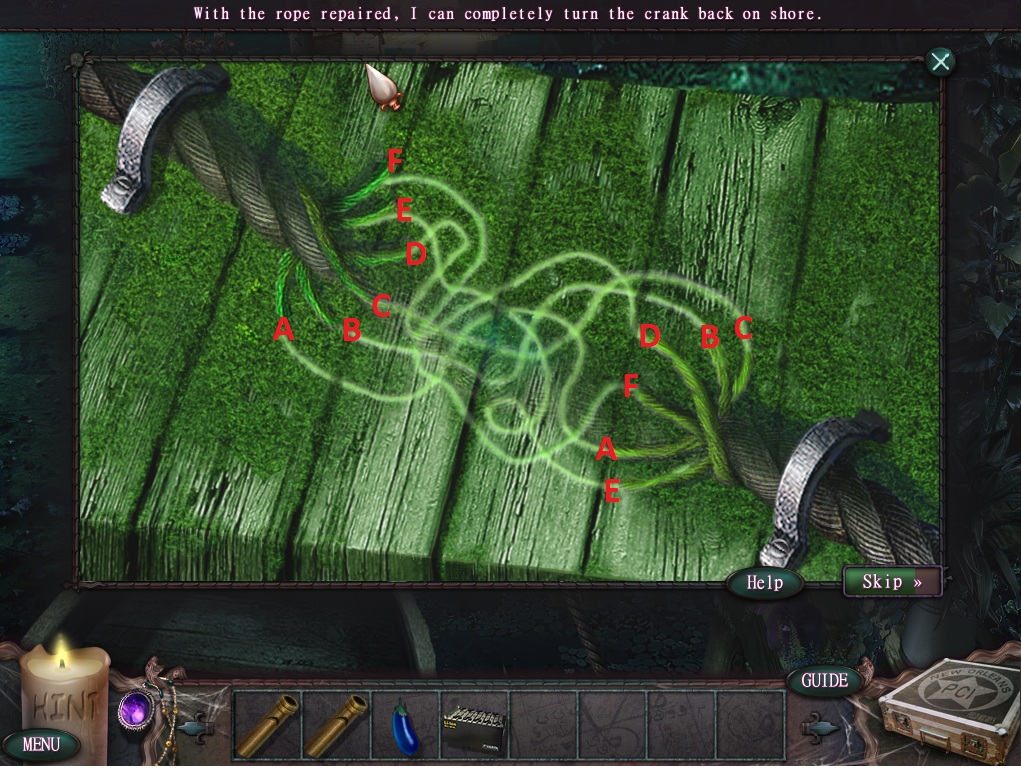
Click the frayed rope in the front of the platform to start the puzzle.
To solve this puzzle, attach the opposite frayed pieces of rope by following the line traced between them.
Click a string to select it, then follow the path drawn to the second string on the opposite side.
Click the other string to attempt to connect the two together. If correct, both strings and the line between them will turn green.
Solution.
Click the cork board to zoom in.
Take the Blue Beetle on the newspaper clipping in the top left corner of the board.
Read the two recipes to note their ingredients.
Mass Solvent requires Blue Eggplant, Blue Beetle, Bug Repellant, and Chemical X.
Chemical X is made of Battery Acid, Zooplankton, and Lighter Fluid.
Go back to the lakeshore, turn the crank of the rope three times until it is taut, then return to the lakehouse.
Click the figure tied up with rope to reveal the Bolt Cutters.
Click the Bolt Cutters to add it to your inventory, as well as a Database ID Scan: Fingerprint.
Use the fingerprint on your PCI Field Kit to find the identity of the figure.
Go back to the lake shore.
Firefly Lake
Speak with Madame Oracleaux, then go left towards the lake greenhouse.
Lake Greenhouse
Use the Bolt Cutters from your inventory three times on the small fenced off crank on the left platform.
Click the crank to open the gate.
Click the flowers to start the hidden object scene.
Screenshot.
Once the hidden object scene is complete, you will receive a Zooplankton Petri Dish.
Go through the open door to the back lot of the Dark Arts Museum.
Museum Back Lot
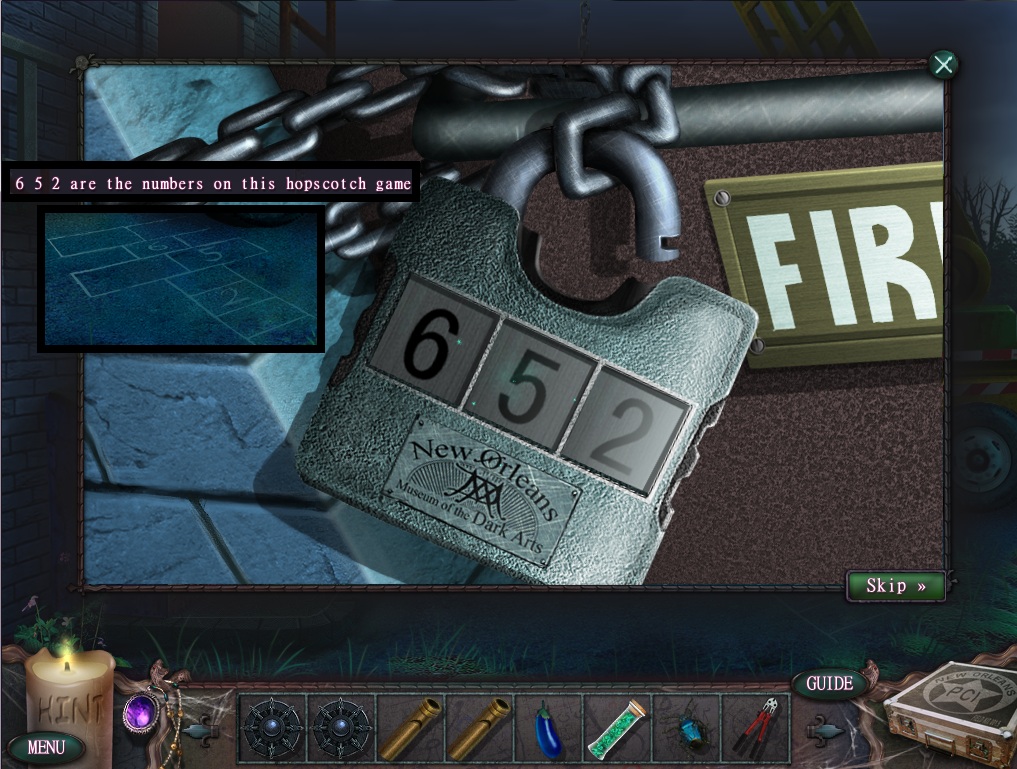
Click the hopscotch game on the ground to note the three numbers, 6-5-2.
Click the door of the crane to step inside.
Take the Hook and the Lighter Fluid off the top of the dashboard.
Click Combine to add the Lighter Fluid, Battery, and Zooplankton to make Mix Subtance: Chemical X.
Use the mix substance from your inventory on the PCI Field Kit to start the analysis puzzle.
To solve this puzzle, collect all of the floating samples to fill the vial.
Battery Acid, Lighter Fluid, and Plankton molecules will move across the screen.
At the left is a bar that shows the three corresponding substances which fill up the vial as you collect molecules.
When each of the sample substances is alternately highlighted, collect the floating molecule samples of the matching color.
Solution.
Once the puzzle is solved, you will receive Chemical X.
Exit the crane to return to the back lot.
Use the Hook from your inventory on the ladder above the railing.
Go up the ladder for a closer look at the lock on the door.
Enter in the combination from the hopscotch game.
Screenshot.
Go through the open door into the museum.
Inside the Museum
Click the small case on the left to start the hidden object scene.
Click the glass case to open it, revealing the Sedative Darts.
Screenshot.
Once the hidden object scene is complete, you will receive Sedative Darts.
Use the Sedative Darts on the barking dog.
Go up the stairs to the doorway.
Click the doorknob to start the puzzle.
To solve this puzzle, click the spaces so that the image inside each space matches the larger picture of its panel.
Click a space to rotate through the six images.
Solution.
Use the Bolt Cutters from your inventory on the chains blocking the doorway.
Click the statue on the ledge to push it over.
Outside the Dark Arts Museum
Speak with Madame Oracleaux to learn about your objectives.
Take the Golden Sword in the middle of the street.
Go right twice to return to the graveyard.
Cemetary
Click the tombstone on the left to repeat the hidden object scene.
Screenshot.
Once the hidden object scene is complete, you will receive a Metal Cylinder.
Go forward one screen to the fence at the edge of the river.
Take the Bug Repellant on the ground next to the fence.
Click Combine to add the Bug Repellant, Chemical X, Blue Beetle, and Blue Eggplant into the Mix Substance: Moss Solvent.
Place the mix substance in the PCI Field Kit to start the analysis puzzle.
To solve this puzzle, remove all of the ingredients by aligning each of the three similarly colored circles together.
Click a circle to select it, then click an adjacent circle to switch positions.
Click the left and right arrows to rotate the board 90 degrees clockwise or counterclockwise.
When three similarly colored circles are touching, they will be removed from the board.
Clear the entire baord in no more than 5 moves, or the puzzle will reset.
Solution.
Once the puzzle is solved, you will receive Moss Solvent.
Use the Sedative Darts from your inventory on the box of meat.
Place the green sedative-coated meat on the hook hanging from the tree.
Cross the river to return to firefly lake, then take the boat to the lakehouse.
Lakehouse
Use the Moss Solvent from your inventory on the corpse in the water.
Take the Iron Star behind the rope tied around the body.
Return to the street outside the magic shop.
Outside the Magic Shop
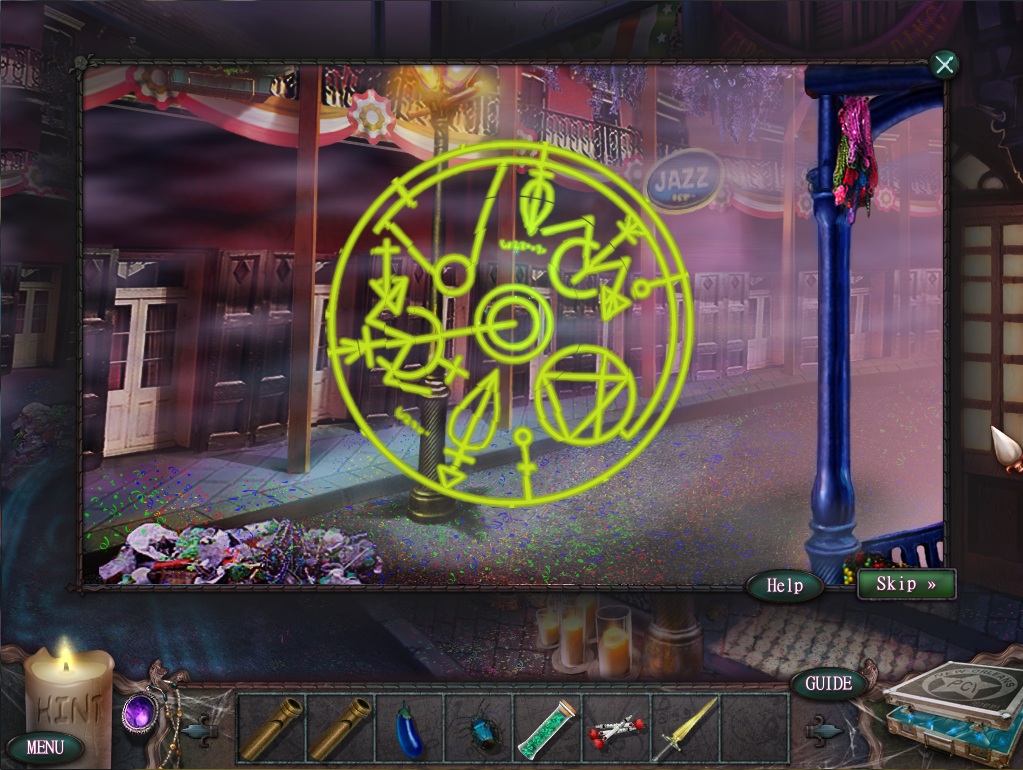
Click the magic barrier blocking the street to start the puzzle.
To solve this puzzle, rotate the rings so the lines connect to complete the image.
Click a ring to rotate it clockwise.
When a ring is correctly positioned, it will glow yellow.
Moving some rings will alter the position of its inner adjacent ring, so start from the outside circle and move inwards.
Solution.
Once the barrier is down, move forward to the jazz clubs.
Jazz Clubs
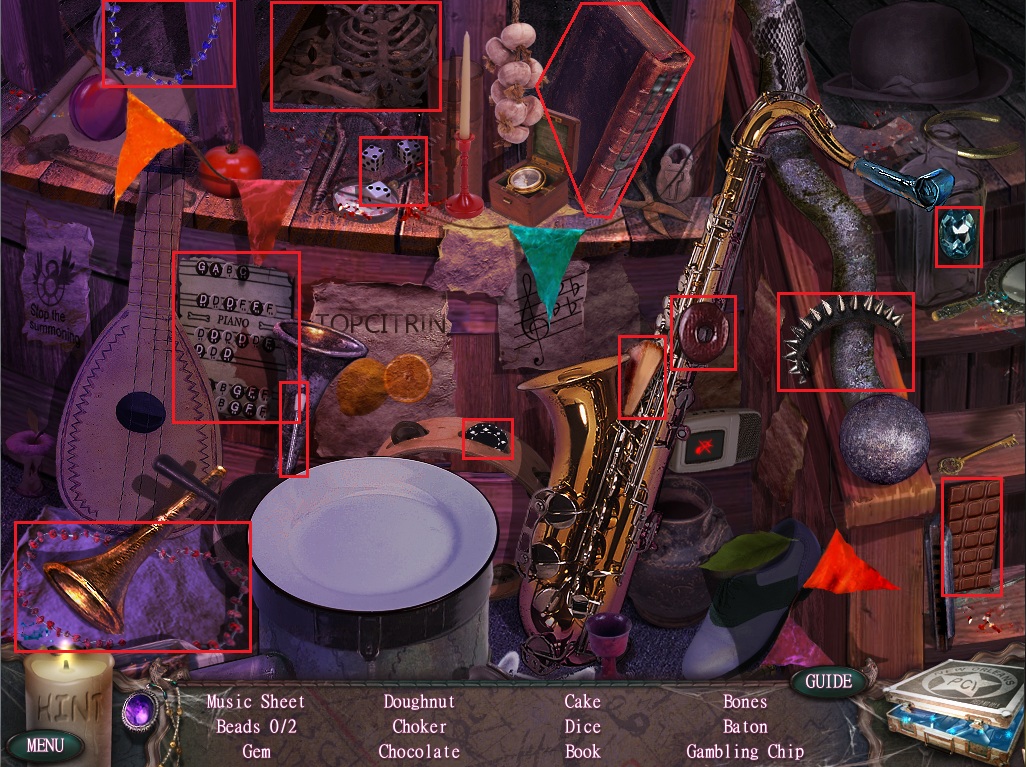
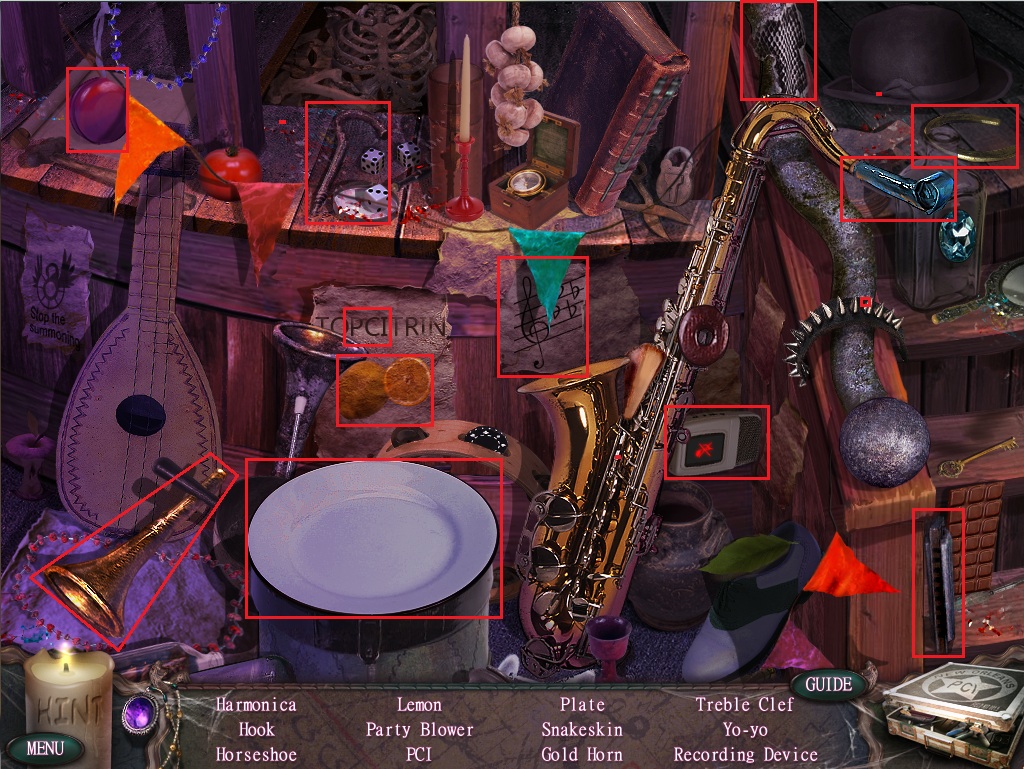
Click the musical instruments at the foot of the stairs to start the hidden object scene.
Screenshot.
Once the hidden object scene is complete, you will receive a Music Sheet.
Click the organ to zoom in.
Take the Skull from the music stand and the 2 Bones from the right organ pipes.
Click Combine to add the skeleton pieces together to make a Database ID Scan: Bones.
Place the bones in the PCI Field kit to analyze their ID.
Put the two Pipes from your inventory into the empty spaces of the organ pipes, then place the Music Cylinder into the open wooden box with the glass door.
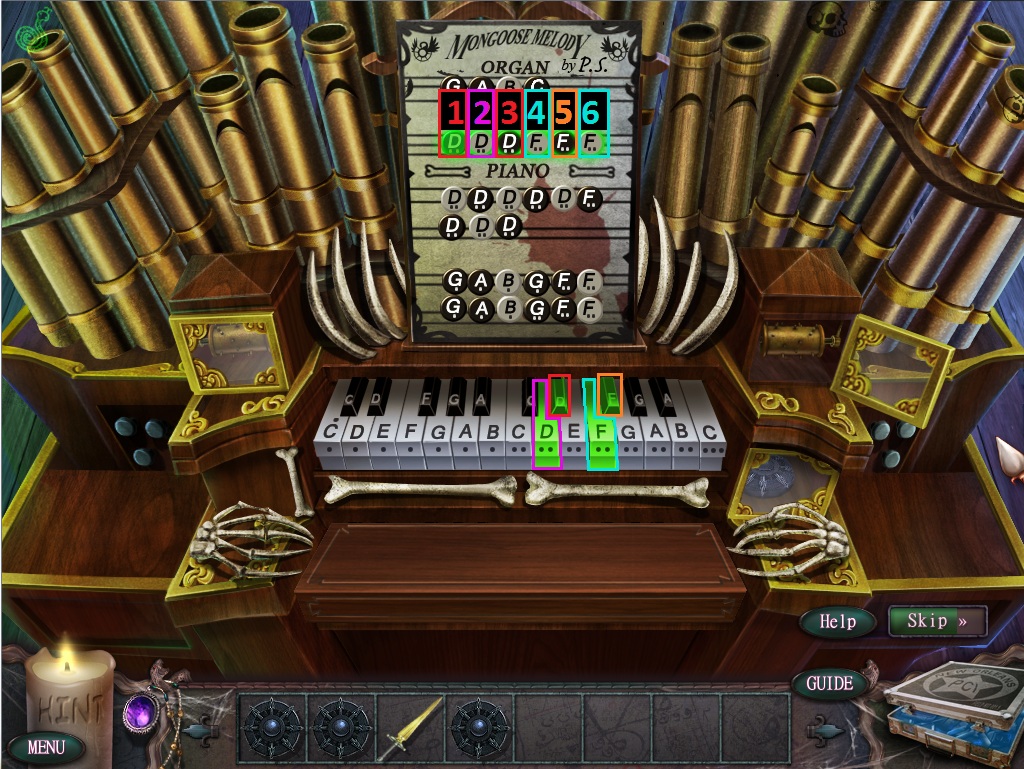
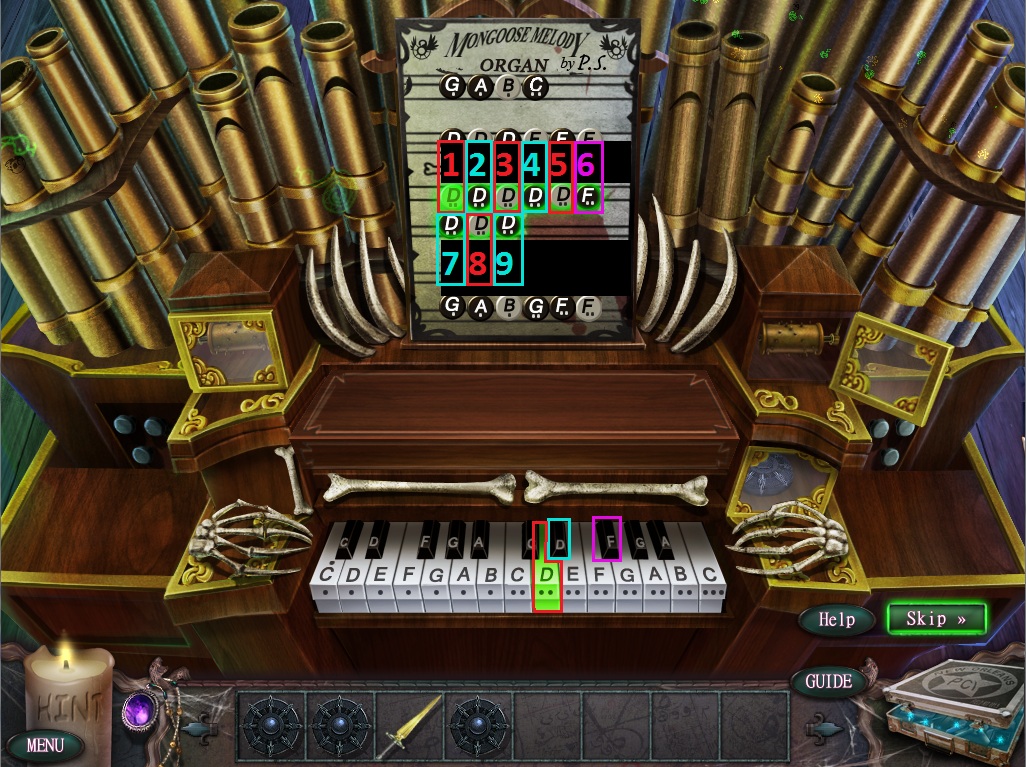
Use the Music Sheet on the music stand to start the puzzle.
To solve this puzzle, play the keyboard following the exact order of the notes on the music.
Letters surrounded by a black circle denote black keys and letters surrounded by a white circle denote white keys.
Solution #1.
Solution #2.
Solution #3.
Solution #4.
Once the puzzle is solved, the third compartment will open, revealing the fourth Iron Star.
Go back to the memorial on Dumaine Street to speak with Madame Oracleaux and receive the Potion, then continue to the gate at Jackson Square.
Jackson Square
Click the center of the gate to zoom in.
Place the four Iron Stars from your inventory into the four spaces in the gate.
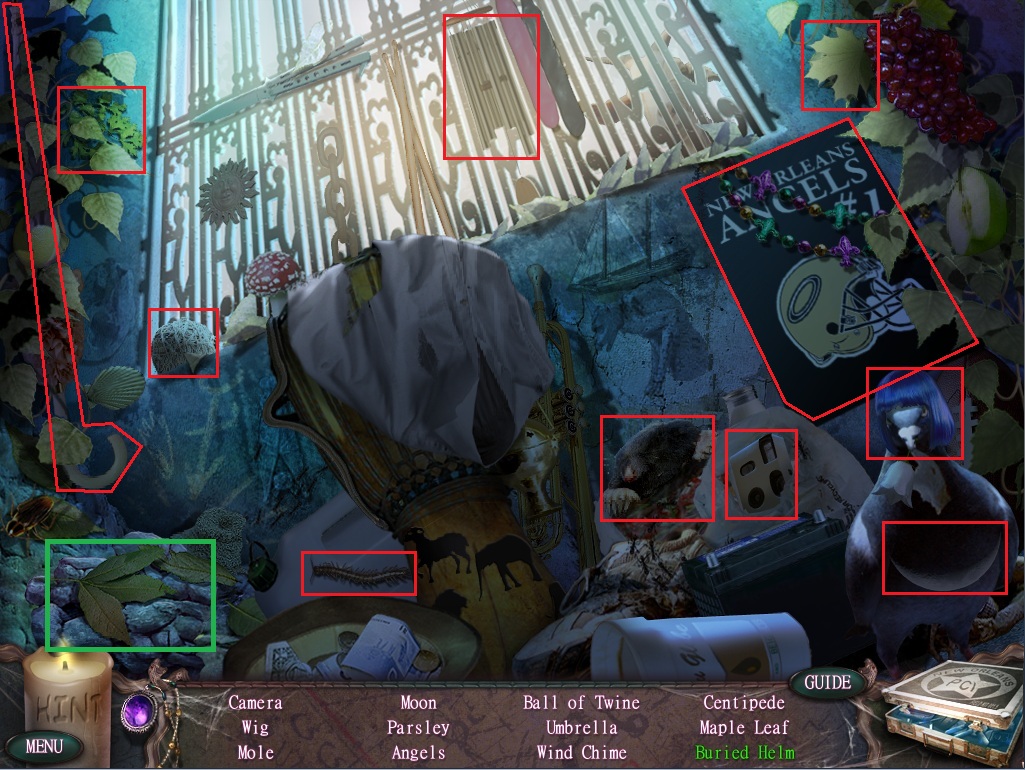
Click the area left of the gate to repeat the hidden object scene.
Screenshot.
Once the hidden object scene is complete, you will receive a Helm.
Go through the open gates to the cathedral entrance.
Chapter 3
Cathedral Entrance
Click the base of the sundial to start the hidden object scene.
Screenshot.
Once the hidden object scene is complete, you will receive a Gilded Staff.
Click the cathedral doors to open them, then click again to go inside to the cathedral's nave.
Cathedral's Nave
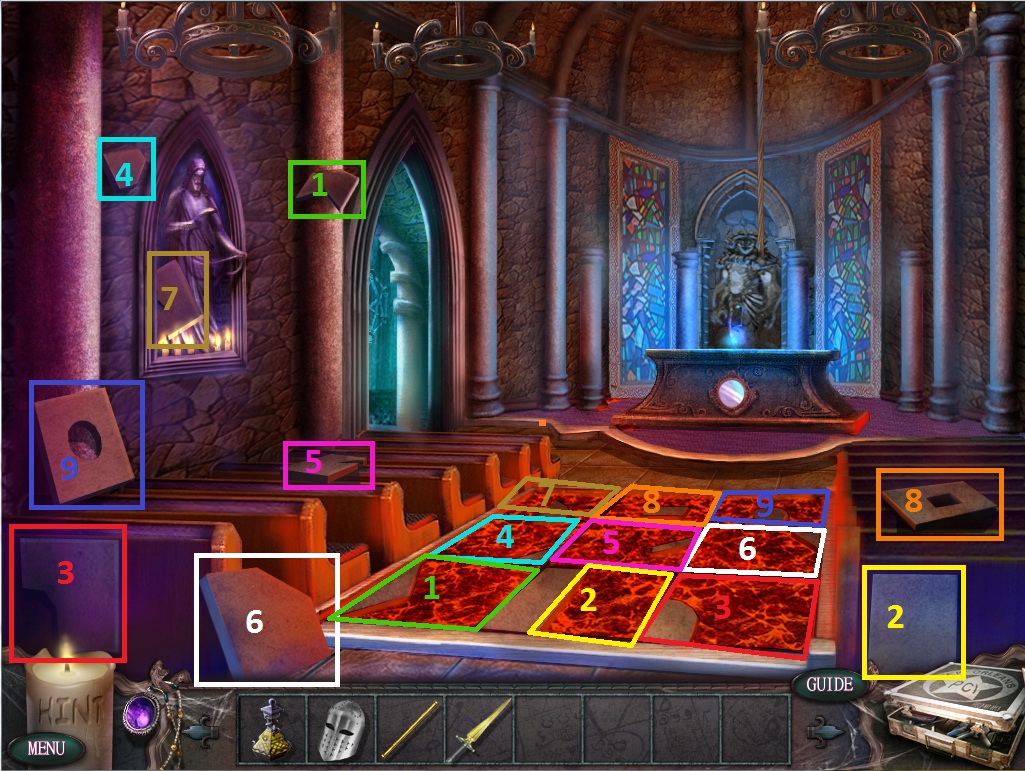
Click the runes on the floor to start the puzzle.
To solve this puzzle, place the floor tiles in the correct spaces.
Click a tile to select it, then click the corresponding space to attempt to place it down.
If placed incorrectly, the tile will revert to its original position, but if correctly set it will lock in place.
Solution.
Exit the room left to go to the hallway.
Hallway
Take the Burned-out Torch on the ground by the rug.
Use the Burned-out Torch on the candles beside the column at the end of the hall.
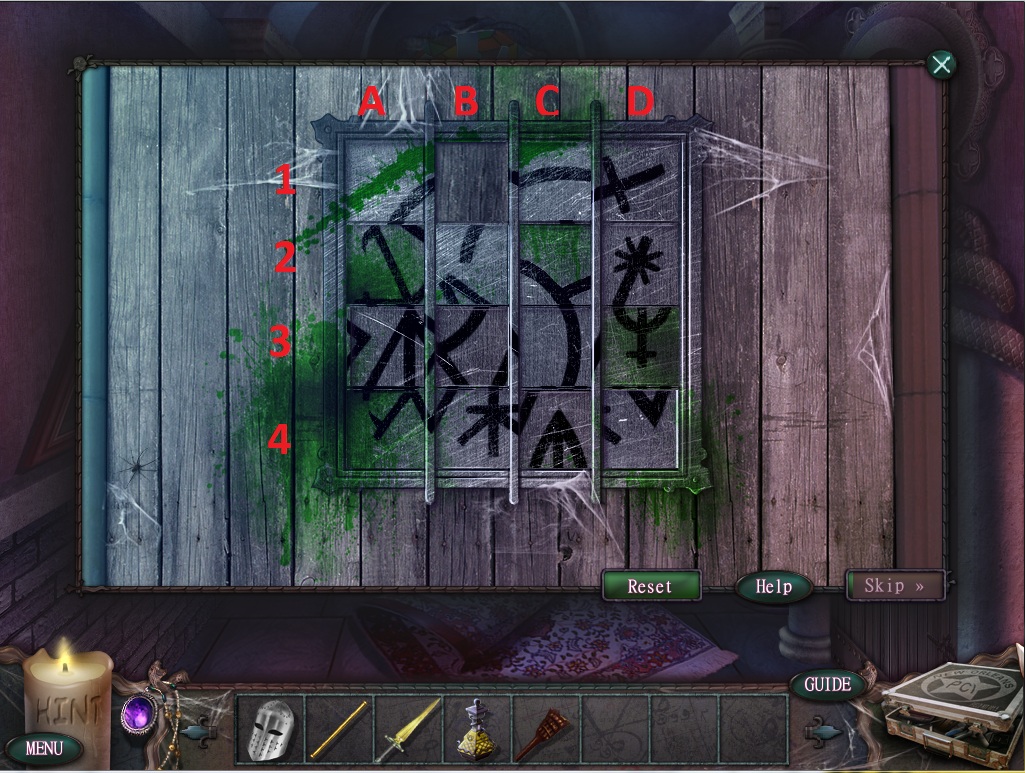
Click the second wooden door to start the puzzle.
To solve this puzzle, arrange the tiles to complete the image of the runes.
Click and hold a tile to select it and it will automatically move up, down, left, or right to the empty space on the board.
Tiles cannot move diagonally or pass through other tiles.
Screenshot.
Move the Tile at C1 to the space at B1.
Move the Tile at C2 to the space at C1.
Move the Tile at C3 to the space at C2.
Move the Tile at C4 to the space at C3.
Move the Tile at D4 to the space at C4.
Move the Tile at D3 to the space at D4.
Move the Tile at C3 to the space at D3.
Move the Tile at B3 to the space at C3.
move the Tile at A3 to the space at B3.
Move the Tile at A2 to the space at A3.
Move the Tile at B2 to the space at A2.
Solution.
Once the puzzle is solved, the door will open, revealing the passage to the catacomb shrine.
Catacomb Shrine
Place the lit Torch from your inventory into the slot on the wall next to the green glowing runes.
Click the constellations on the walls to examine them.
Click the light projection device against the right wall to zoom in.
Take the Black Crystal from the top of the device.
Go down the catacombs to the well.
The Well
Take the unlit Torch from the ground.
Go back one screen and used the unlit Torch from your inventory on the burning torch on the wall, then return to the well.
Place the lit Torch into the slot on the left wall.
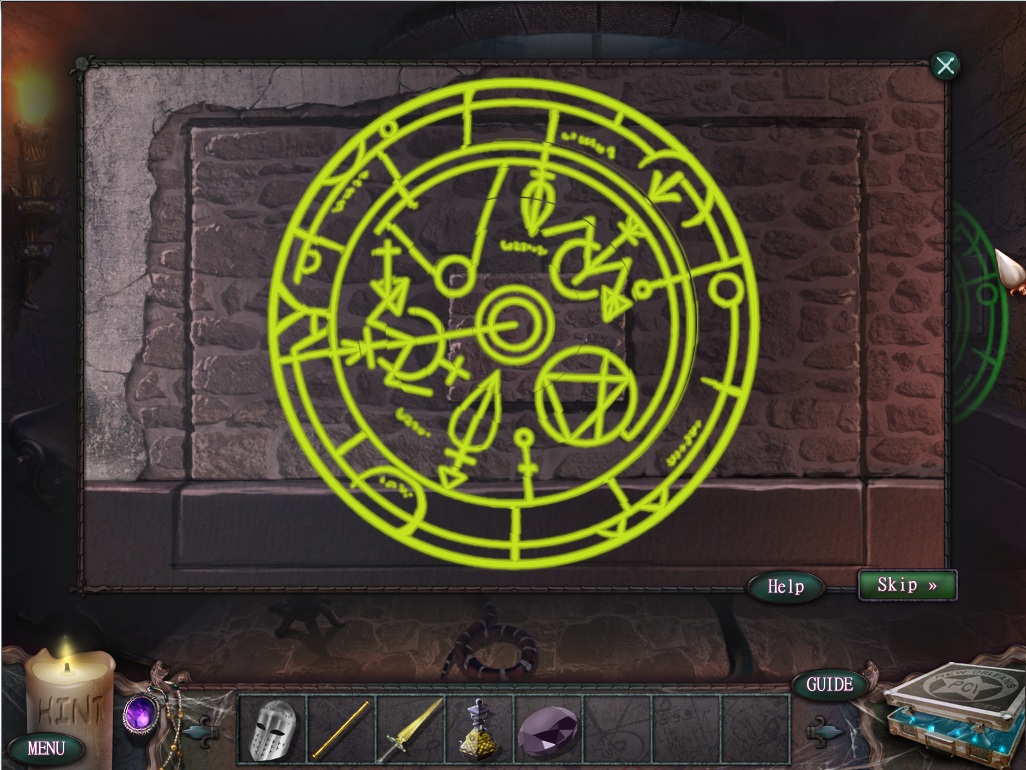
Click the dark magic circle on the right wall to start the puzzle.
To solve this puzzle, rotate the rings of the circle to connect the lines of the image.
Click a ring to rotate it clockwise.
When a ring is in the correct position, it will glow yellow.
Clicking some rings can also rotate an additional ring within the circle.
Starting from the center yellow ring which is immovable at #1, then moving outwards, the last ring is #8.
Turning ring #8 also turns ring #7.
Turning ring #7 also turns ring #5.
Turning ring #6 also turns ring #4.
Turning ring #4 also turns ring #8.
Turning ring #2 also turns ring #8.
Thus, the simplest approach is to start from ring #6, moving inward. Then position ring #8, and lastly, realign rings #7 and #5.
Solution.
Click the pile of junk in the right corner to start the hidden object scene.
Screenshot.
Once the hidden object scene is complete, you will receive a sundial Arrow.
Use the Gilded staff from your inventory on the bucket lying on the ground.
Go back to the cathedral entrance.
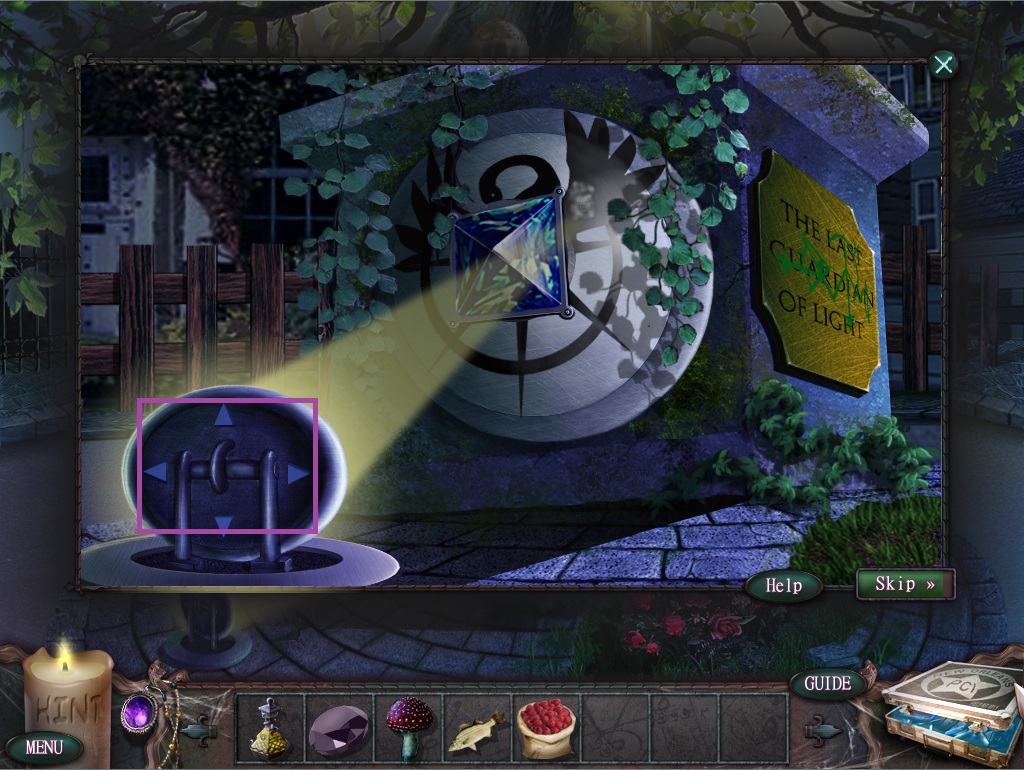
Cathedral Entrance
Click the crank on the side of the well to pull up the bucket and remove the lid.
Use the Arrow from your inventory on the top of the sundial.
Click the area below the sundial to begin the hidden object scene.
Screenshot.
Once the hidden object scene is complete, you will receive a Square Mirror.
Use the Square Mirror from your inventory on the square space at the top of the well.
Speak with Madame Oracleaux to receive the recipe for Swan's Tears.
Return to the underground area below the well.
The Well
Click the corner of the room to repeat the hidden object scene.
Click the old tome to open it, revealing the 4th Feather.
Screenshot.
Once the hidden object scene is complete, you will receive a Mushroom.
Click the blinking panel on the right wall to open the secret door.
Go through the secret door into the tunnel.
Take the Triangular Mirror from the ground.
Go back to the hallway.
The Hallway
Use the Triangular Mirror from your inventory on the triangular space on the left wall.
Click the mirror on the right wall between the two doors to reflect the light towards the last mirror.
Go all the way back to the riverside apartments, then move forward one screen to reach the river.
The River
Click the three newspapers on top of the pier to reveal the Reel.
Use the Reel on the shaking fishing pole, then click the pole three times to reel in the Mississippi Bass.
Return to the area inside the museum.
Inside the Museum
Click the glass case to repeat the hidden object scene.
Screenshot.
Once the hidden object scene is complete, you will receive Sedative Berries.
Go back to Madame Oracleaux's magic shop.
Magic Shop
Speak with Madame Oracleaux, then take the Crane Control Button from the small box on the shelf.
Return to the dark arts museum back lot.
Museum Back Lot
Click the crane door to look inside.
Use the Crane Control Button from your inventory on the empty space in the control panel.
Press the Up button to operate the crane, lifting the bars away.
Move forward to the Cul de Sac.
Chapter 4
Cul de Sac
Fix the statue by placing the broken pieces back on the pedestal, starting from the bottom.
Click a fragment to select it, then click the area on top of the statue to set it in place.
Screenshot.
When the statue is fully assembled, place the Helm from your inventory on its head and the Golden Sword in its left arm.
Click the shield at the base of the statue to start the puzzle.
To solve this puzzle, remove all of the moss from the shield by burning it away with the light from the mirror.
At the back of the mirror are four directional arrows: up, left, down, and right.
Click the arrows to reposition the mirror, which will move the burning light in the corresponding direction.
Wait for the light to burn the first piece of moss then move the mirror: Left, Left, Left, Up, Up, Up, Right, Right, Right, Down, Down, Left, Left, Up, Right.
Solution.
Click the shield to add it to your inventory, then place it in the statue's right hand.
Take the Gold Coin that lands in the flowerbed.
Click Combine to add the Sedative Berries, Bass, Mushroom, and Gold Coin to make the Mix Substance: Swan's Tears.
Use the Mix Substance from your inventory on the PCI Field Kit to start the puzzle.
As before, click the substances moving across the screen when their component is highlighted in the bar to the right.
Solution.
Once the puzzle is solved, use the completed Swan's Tears from your inventory on the blue flames.
Take the Clear Blue Crystal that falls from the shield to the ground.
Go back to the Cafe du Globe.
Cafe du Globe
Speak with Officer Zach to receive the Snake Grabber.
Move left to the crossroads beside the cafe.
Click the box on the sidewalk to zoom in.
Click the top of the box to remove the lid.
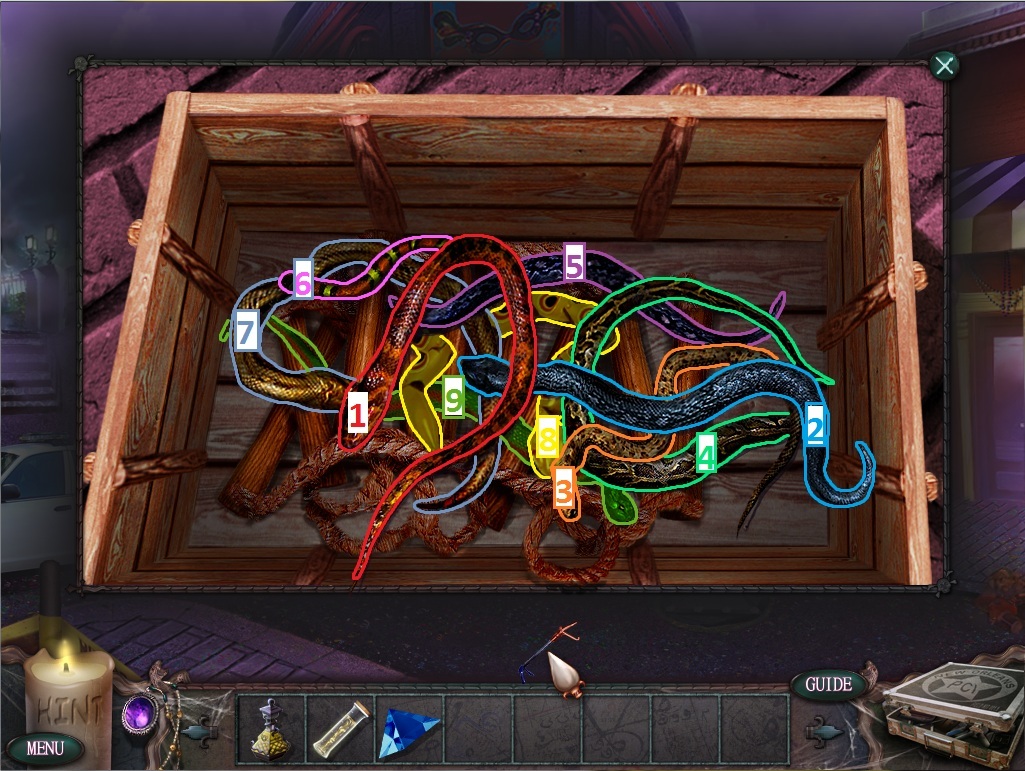
Use the Snake Grabber from your inventory on the pile of snakes to start the puzzle.
To solve this puzzle, remove the snakes by taking the top-most snake above the pile.
Click a snake to attempt to remove it from the pile.
Solution.
Once the puzzle is solved, take the Rope Ladder at the bottom of the box.
Return to the cathedral nave.
Cathedral Nave
Click the altar at the end of the aisle to zoom in.
Use the Swan's Tears from your inventory to douse the blue flames.
Take the eight Guardian's Coins from the altar.
Click one of the Crescent Snake hooded figures.
Return to the Magic Shop to speak with Madame Oracleaux, then go back to the cathedral entrance.
Cathedral Entrance
Use the Rope Ladder from your inventory on the well.
Go down the rope ladder and move back to the catacomb shrine.
Catacomb Shrine
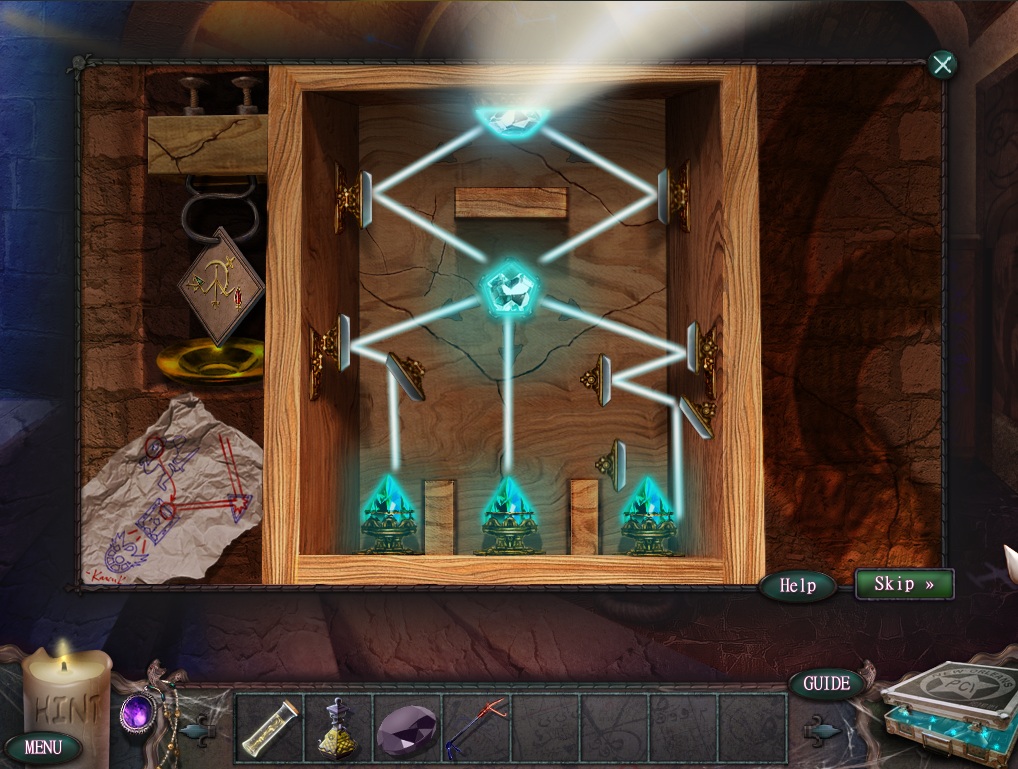
Click the light projection device on the right wall to zoom in.
Place the Clear Blue Crystal from your inventory to the space at the top of the box to start the puzzle.
To solve this puzzle, use the mirrors to reflect the light to the three gems at the bottom of the box.
Click a mirror to rotate it clockwise.
A mirror must be facing a lightbeam to reflect it outwards.
Solution.
Once the puzzle is solved, take the Medallion that drops from the hook to the left of the box.
Click the stairways to attempt to go back
Use the secret passage at the well to return to the cemetary.
Cemetary
Speak to Madame Oracleaux to receive the Guardian's Miracle recipe.
Take the White Pigment from the glowing altar below the mourning statue.
Return to the jazz clubs.
Jazz Clubs
Click the musical instruments beside the stairs to repeat the hidden object scene.
Screenshot.
Once the hidden object scene is complete, you will receive a Recording Device.
Use the Recording Device on the music playing from the organ to receive a Filled Portable Recorder.
Go back to Firefly Lake.
Firefly Lake
Take the Purple Lotus flower floating in the water next to the boat.
Go forward three screens to the cul de sac.
Cul de Sac
Take the Guardian's Blossom from the flowerbed beneath the base of the kneeling statue.
Click Combine to add the Black Crystal, White Pigment, Filled Portable Recorder, Lotus Flower, and Guardian's Blossom to make the Mix Substance: Guardian's Miracle.
Place the substance in the PCI Field Kit to start the puzzle.
To solve this puzzle, remove all of the ingredients by aligning each of the three similarly colored circles together.
Click a circle to select it, then click an adjacent circle to switch positions.
Click the left and right arrows to rotate the board 90 degrees clockwise or counterclockwise.
When three similarly colored circles are touching, they will be removed from the board.
Clear the entire baord in no more than 3 moves, or the puzzle will reset.
Solution.
Once the puzzle is solved, you will receive the completed Guardian's Miracle.
Return to the cathedral entrance.
Cathedral Entrance
Speak with Madame Oracleaux to receive the Swan Key.
Use the rope ladder in the well to return to the catacomb shrine.
Catacomb Shrine
Use the Swan Key from your inventory on the keyhole in the left wall.
Go up the stairs to reach the hallway.
The Hallway
Click the right door to zoom in.
Add the eight Guardian Coins from your inventory to the empty spaces on the doorway, then place the Medallion in the center.
Go through the open door to the bell tower.
Bell Tower
Click the ladder by the right archway to add it to your inventory.
Go back downstairs to the hallway.
The Hallway
Use the Ladder from your inventory on the pillar at the end of the hall.
Take the Sword in front of the broken stained glass window.
Retrieve the ladder, then go back upstairs to the bell tower.
Bell Tower
Use the Sword from your inventory to cut the three ropes at the sides and behind the large bell.
Place the Ladder in front of the bell, then click the bell to zoom in.
Use the Guardian's Miracle from your inventory to burn away the blue rune markings on the bell.
Add the Yellow Potion to the glowing image of the swan to start the puzzle.
To solve this puzzle, trace the purple lines along the bell to complete the image of the swan.
Click the yellow potion brush to pick it up, then click and hold the mouse on top of the swan outline.
Drag the mouse without releasing, following the dots to trace a complete line.
If you release the mouse too early, click the potion to add it back to the brush and trace the line again.
Solution.
Click the bell to destroy the image of Shoggoth.
Collector's Edition Bonus Chapter
The Crossroads
Follow the Brotherhood fugitive to the memorial on Dumaine Street.
Click the paper on the ground beside the sidewalk to zoom in.
Click the paper again to translate the glowing runes.
Take the Scrap of Robe next to the paper.
Speak with Madame Oracleaux, then follow her to the magic shop.
Magic Shop
Click Madame Oracleaux to speak with her again, then go through the doorway into the back room of the shop.
Speak with Madame Oracleaux a third time.
Click the gold box on the table to view the vial device. The device is missing Yellow, Orange, Red, Pink, Blue, and Green vials.
The Orange vial is on the table top in front of Madame Oracleaux.
The Red vial is on the bottom shelf of the glass drawer on the left wall.
The Pink vial is on the upper shelf in the drawer under the blue tablecloth.
Go back one screen to the front of the shop.
The Yellow vial is on the counter top beside the board of trinkets.
The Blue vial is on the shelf above the doorway, to the left of the cat.
The Green vial is on the shelf against the wall on the left side of the screen, next to the tribal mask.
Return to the back room.
Click the mixing device on the table again to zoom in.
Place the Scrap from your inventory into the large beaker.
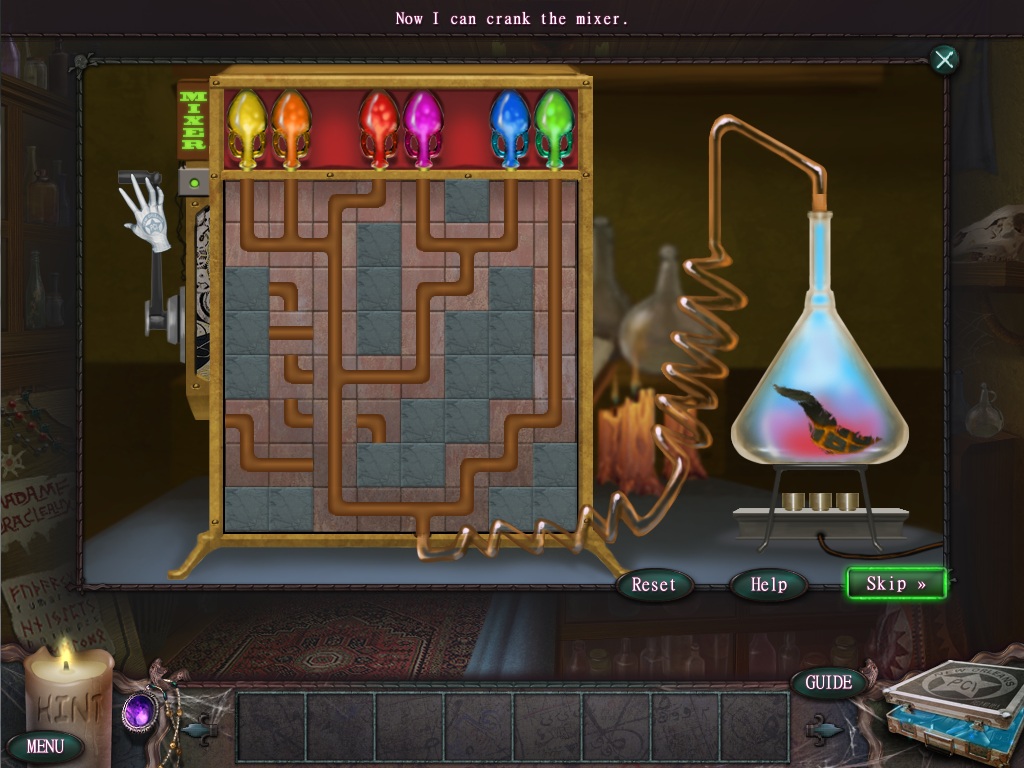
Place the six colored vials into the space with the corresponding colored pictures to start the puzzle.
To solve this puzzle, arrange the tiles so that all of the vials are connected by an uninterupted line down to the tube at the bottom of the box.
Click a tile to select it, then click a different tile to swap positions.
Solution.
Once the puzzle is solved, click the crank to receive the Snake's Potion.
Go back to the river.
The River
Click the bait box in the corner under the right lamppost to zoom in.
Use the Snake's Potion from your inventory on the silver snake inside the box.
Go back to the Riverside Apartment.
Riverside Apartments
Click the small table on the sidewalk to repeat the hidden object scene.
Screenshot.
Once the hidden object scene is complete, you will receive a Crowbar.
Follow the snake's trail past the Cafe du Globe to speak with Officer Zach, then continue to Dumaine Street.
Dumaine Street
Use the Crowbar from your inventory on the padlock across the gate.
Go through the open gate into the cemetary, then move forward to the lake greenhouse.
Lake Greenhouse
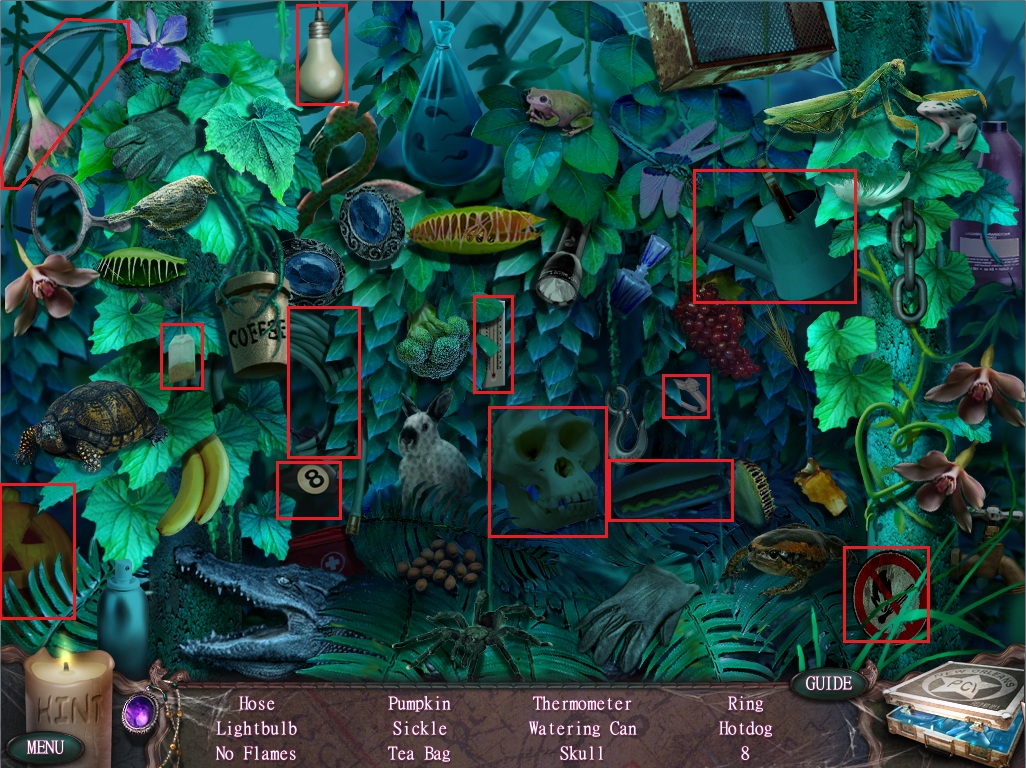
Click the flowers to repeat the hidden object scene.
Screenshot.
Once the hidden object scene is complete, you will receive a Sickle.
Return to the cemetary.
Cemetary
Use the Sickle from your inventory on the vines growing between the tomb door and the mourning statue.
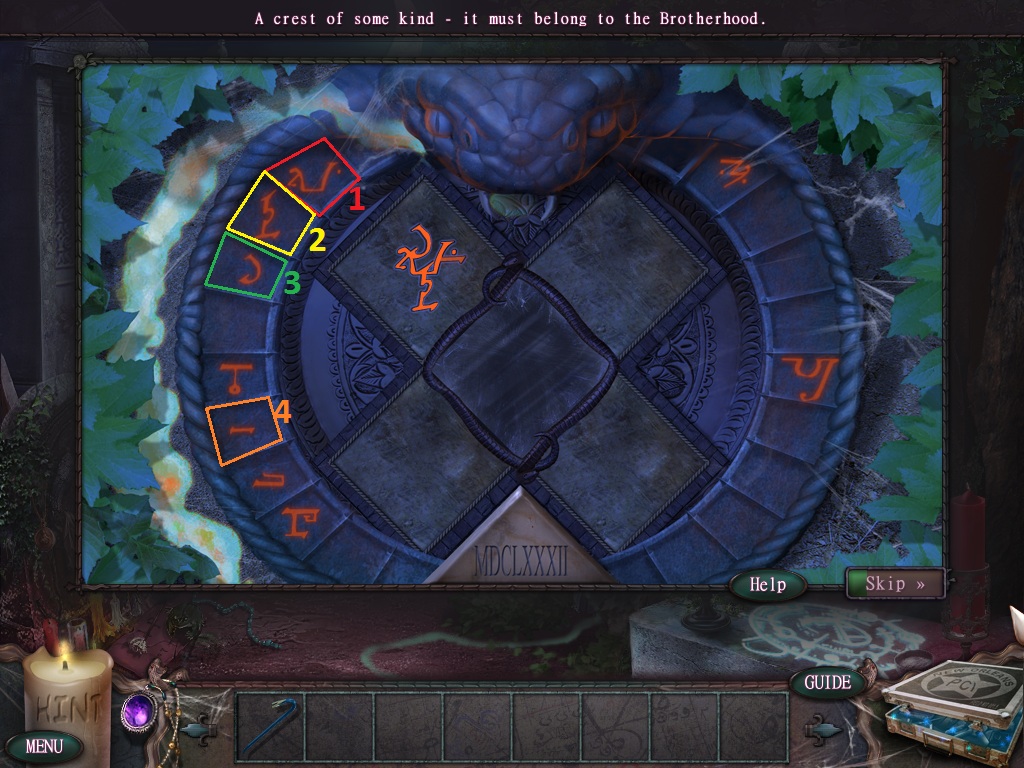
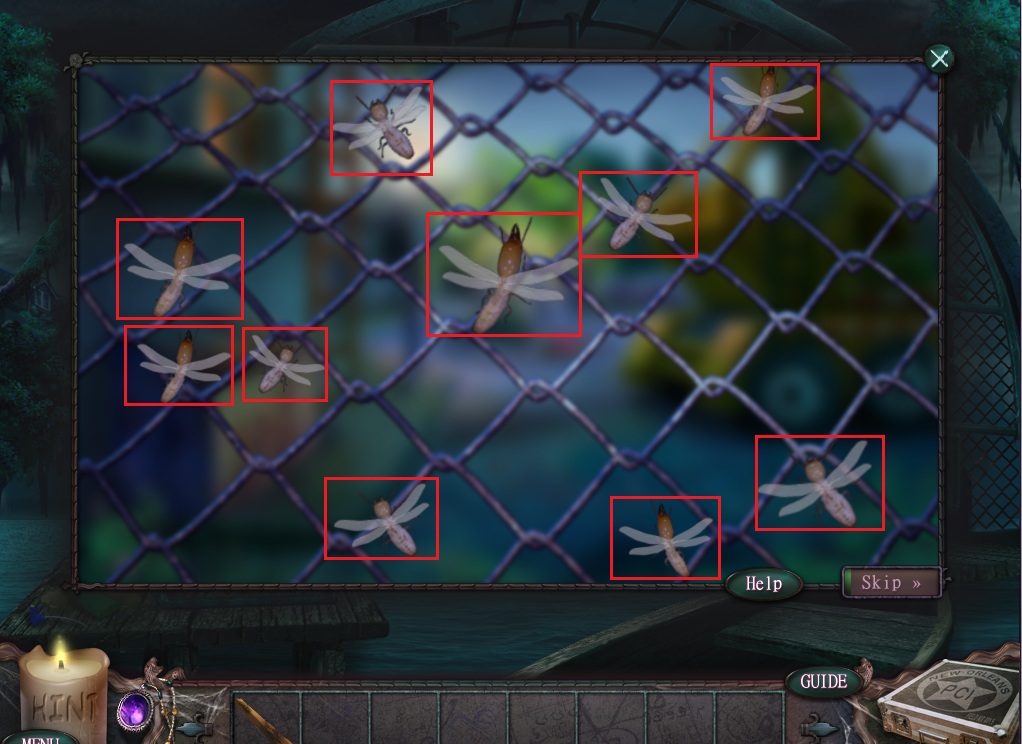
Click the exposed stone crest to start the puzzle.
To solve this puzzle, complete the rune in the diamond by adding the glowing glyphs in the ring around the crest.
Click a glyph to attempt to add it to the full rune picture in the diamond.
If correct, the glyph will move to the rune and lock in place. If incorrect, the puzzle will reset.
Solution.
Once the puzzle is solved, the diamond will reflect the image in the mirror, revealing your next destination.
Return to the back room of the magic shop.
Magic Shop
Click the cupboard in the upper right corner of the room to start the hidden object scene.
Click the curtain to uncover the scene.
Click the bag of flour to reveal the Key.
Screenshot.
Once the hidden object scene is complete, you will receive an Ornate Key.
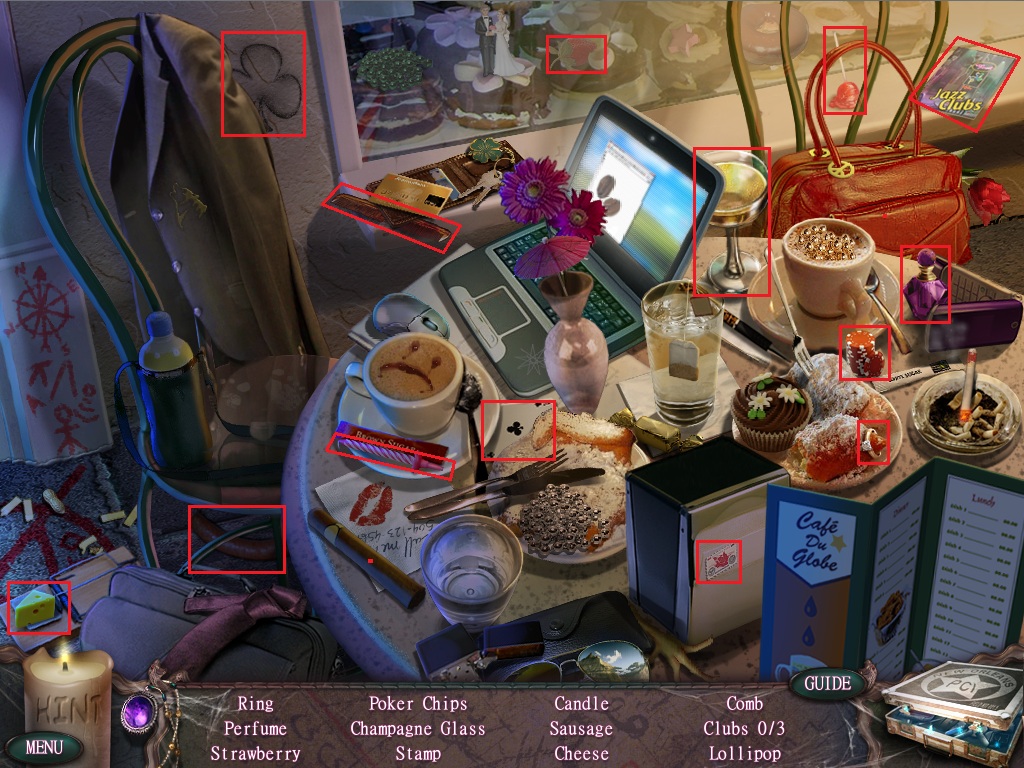
Go back to the Cafe du Globe.
Cafe du Globe
Click the cafe table to repeat the hidden object scene.
Screenshot.
Once the hidden object scene is complete, you will receive Cheese.
Return to the back room of the magic shop.
Magic Shop
Use the Cheese from your inventory on the mouse trap on the ground.
Click the green box to start the puzzle.
To solve this puzzle, trace the lines from the the letters to the corresponding buttons in alphabetical order.
Starting from A, follow the wire to the orange button in the row at the bottom.
Click the button to press it down. If correct, it will glow green. If incorrect, all pressed buttons will reset.
Continue to trace the lines from letters A-J
Solution.
Once the puzzle is solved, use the Ornate Key from your inventory on the keyhole at the top of the box.
Take the Brotherhood Medallion from the opened box.
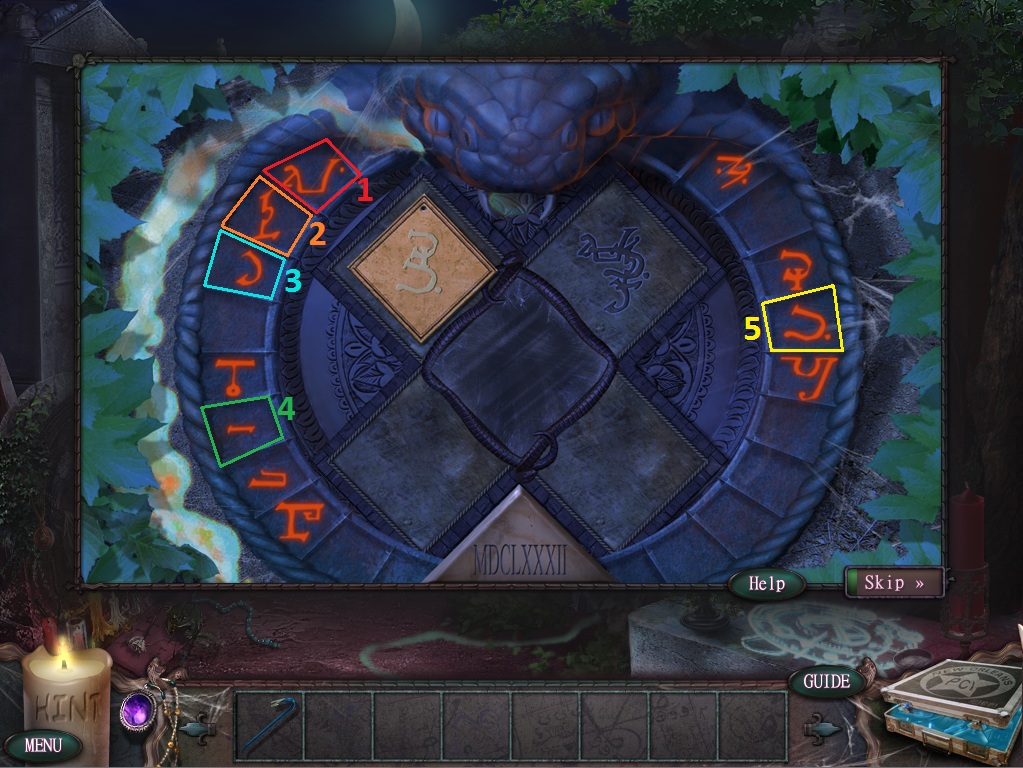
Return to the cemetary.
Cemetary
Click the Brotherhood crest concealed by the vines to zoom in.
Use the Brotherhood Medallion from your inventory on the upper left rune diamond to start the puzzle.
As before, complete the rune in the diamond by adding the glowing glyphs in the ring around the crest.
Click a glyph to attempt to add it to the full rune picture in the diamond.
If correct, the glyph will move to the rune and lock in place. If incorrect, the puzzle will reset.
Solution.
Once the puzzle is solved, the diamond will reflect the image in the mirror, revealing your next destination.
Go back to the jazz clubs.
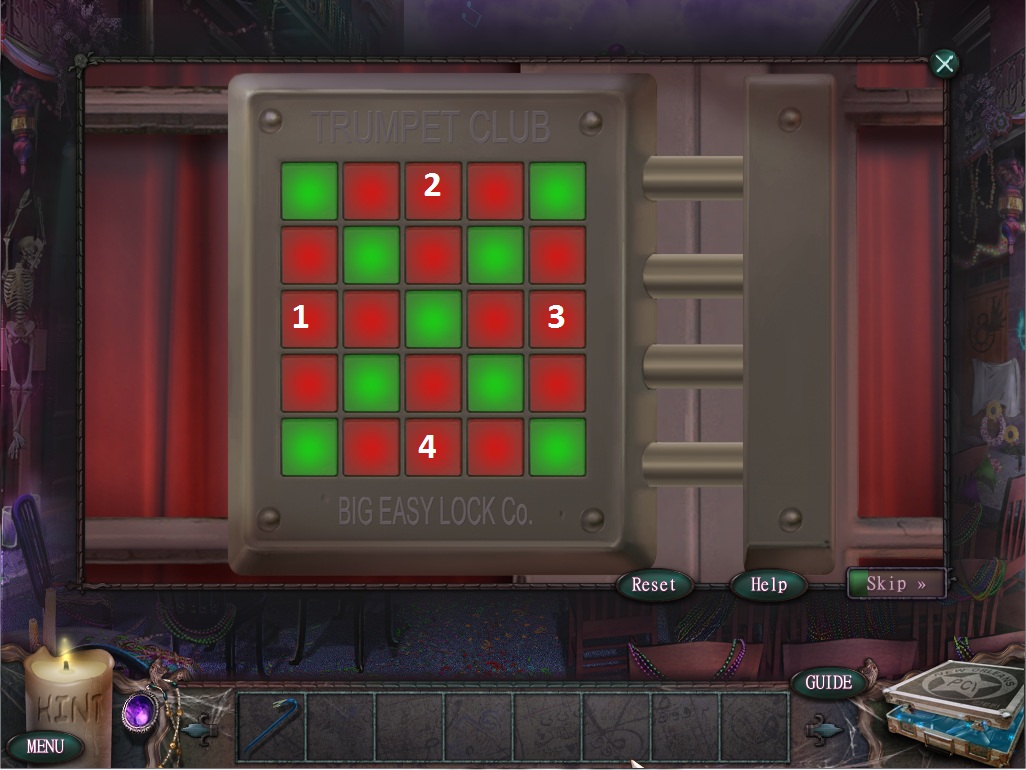
Jazz Clubs
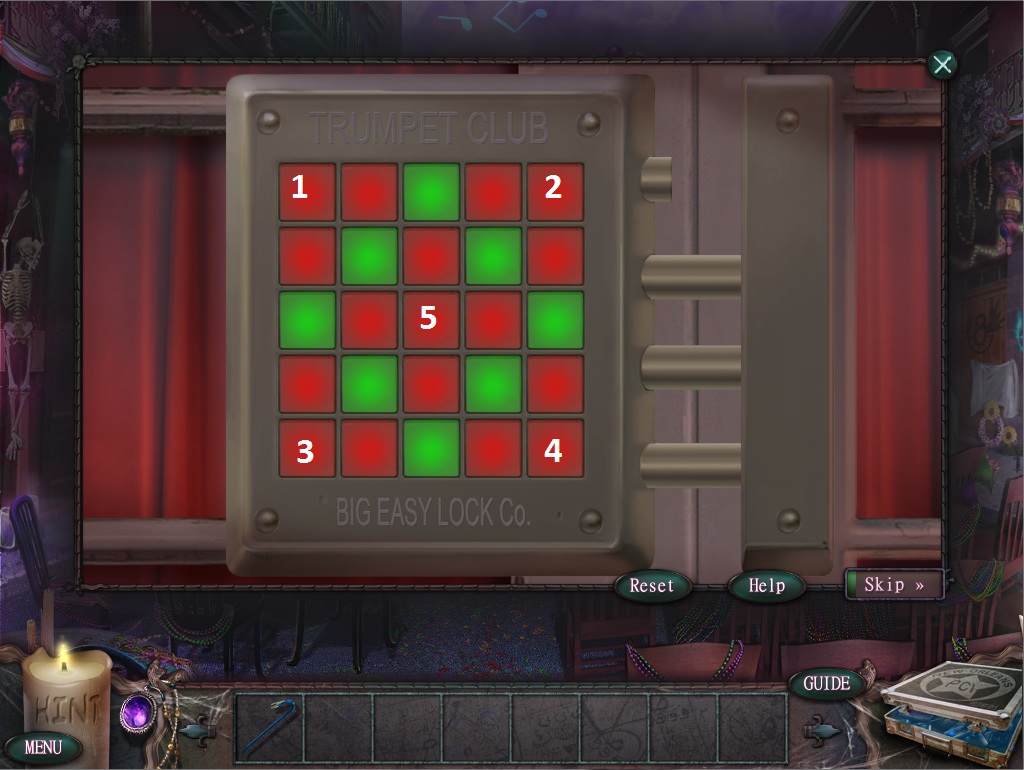
Click the door by the Cajun Trumpet sign to start the puzzle.
To solve this puzzle, click the squares on the grid so that every red square becomes a green square.
Click a square to change its colors. Clicking one square will change the color of all adjacent squares.
Solution #1.
Solution #2.
Solution #3.
Go through the open door into the Cajun Trumpet.
Cajun Trumpet
Use the Crowbar from your inventory to remove the seven roof beams and receive the Plank.
Click the UV light on the bar to receive the Handprint.
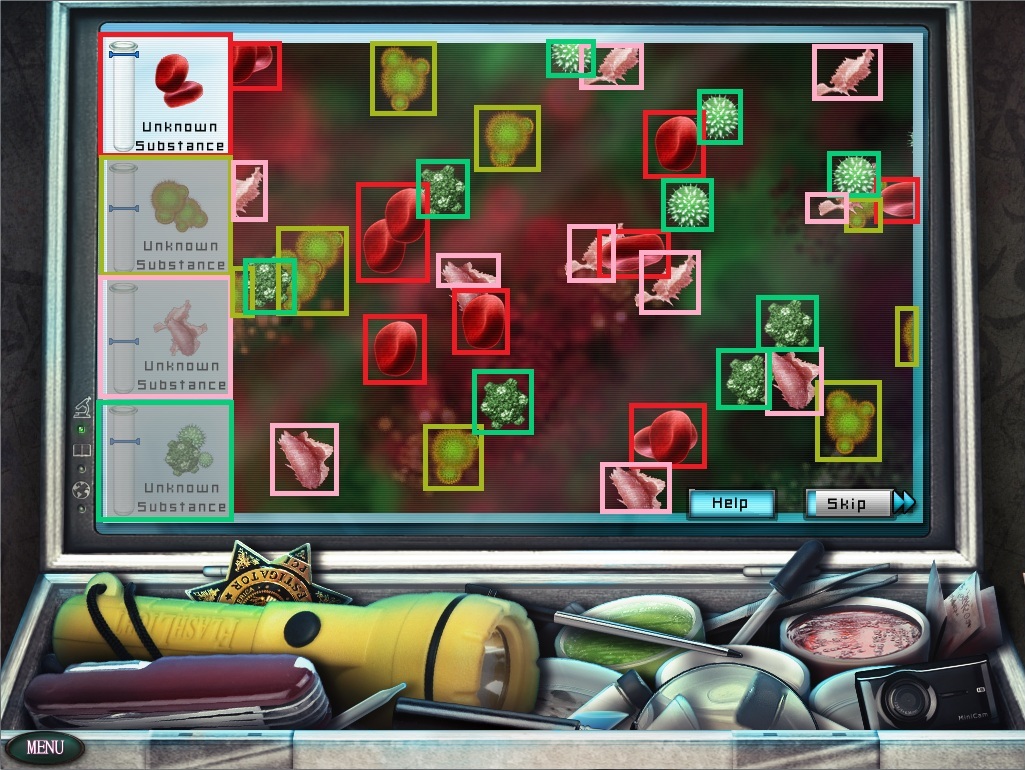
Use the Handprint on the PCI Field Kit to start the analysis puzzle.
To solve this puzzle, collect all of the floating samples to fill the vial.
Four different unknown substance molecules will move across the screen.
At the left is a bar that shows the three corresponding substances which fill up the vial as you collect molecules.
When each of the sample substances is alternately highlighted, collect the floating molecule samples of the matching color and shape.
Solution.
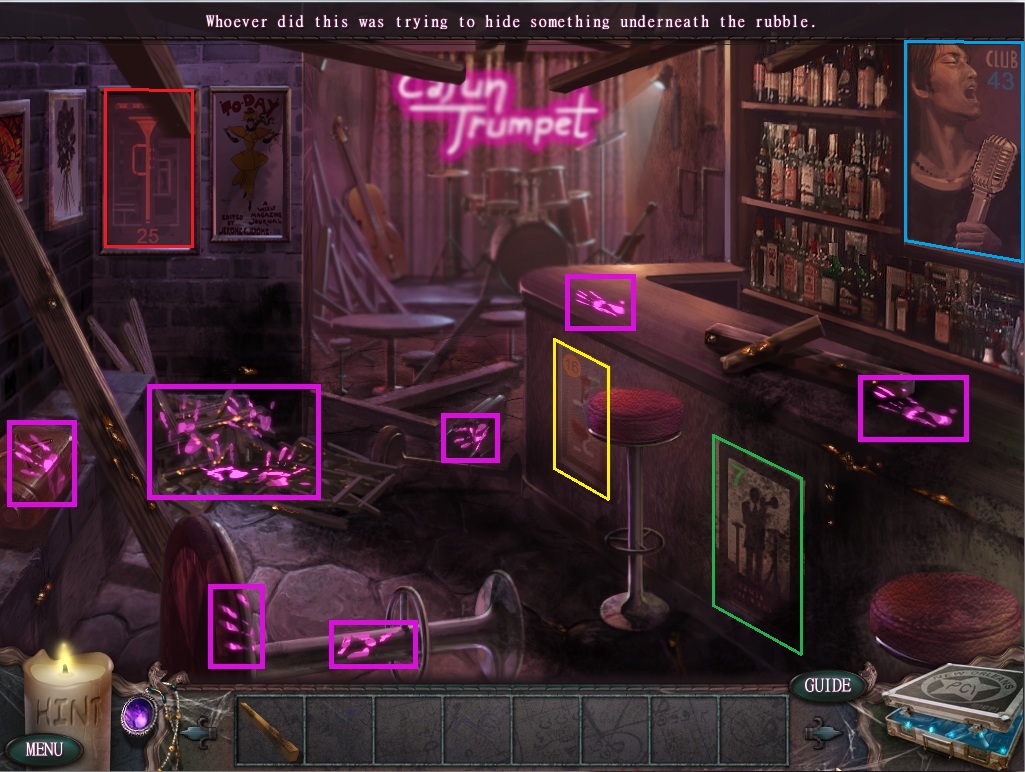
Pick up the UV light on the bar, then drag it around the scene to reveal the 6 handprints left by the Brotherhood fugitive.
Screenshot.
Note the four numbers around the room: The blue 43 on the poster above the bar, the green 7 and yellow 16 on the posters across the bar, and the red 25 on the poster against the left wall.
Return to the back room at the magic shop.
Magic Shop
Click the cupboard in the corner of the room to repeat the hidden object scene.
Click the oven mitt to reveal the Egg.
Screenshot.
Once the hidden object scene is complete, you will receive a Broom.
Return to the Cajun Trumpet.
Cajun Trumpet
Use the Broom from your inventory on the rubble in front of the wall covered with handprints.
Click the revealed safe to start the puzzle.
To solve this puzzle, enter the combination, using the hints from the posters around the room.
Click the right or left sides of the dial to rotate it clockwise or counterclockwise, respectively.
Press the green button on the lower left corner to enter in the number that the arrow of the dial rests on.
The combination at the top is separated by four colored boxes, corresponding with the colored numbers from the posters around the room.
Solution.
Once the puzzle is solved, the safe will open, revealing the second Brotherhood Medallion.
Return to the cemetary.
Cemetary
Click the Brotherhood crest concealed by the vines to zoom in.
Use the Brotherhood Medallion from your inventory on the upper right rune diamond to start the puzzle.
As before, complete the rune in the diamond by adding the glowing glyphs from the ring around the crest.
Click a glyph to attempt to add it to the full rune picture in the diamond.
If correct, the glyph will move to the rune and lock in place. If incorrect, the puzzle will reset.
Solution.
Once the puzzle is solved, the diamond will reflect the image in the mirror, revealing your next destination.
Go to the greenhouse at Firefly Lake.
Lake Greenhouse
Take the Termite Repellant recipe beside the crank that opens the greenhouse gate.
Go back to the grave by the shore of Firefly Lake.
The Grave
Take the Yellow Turnip (1/2) and the Trowel from the small hole in the ground by the casket.
Use the Trowel on the two small dirt mounds to reveal the Yellow Turnip (2/2) and the Red Turnip (1/2)
Go forward one screen to the shore at firefly lake.
Firefly Lake
Use the Trowel from your inventory on the mound of dirt to dig up the Blue Turnip (1/2) under the No Swimming sign.
Go back two screens to the sleeping alligator.
Use the Trowel to dig up the Red Turnip (2/2) and the Blue Turnip (2/2)
Click Combine to add all six Turnips to make Mix Substance: Termite Repellant.
Add the Mix Substance to the PCI Field Kit to start the puzzle.
To solve this puzzle, remove all of the ingredients by aligning each of the three similarly colored circles together.
Click a circle to select it, then click an adjacent circle to switch positions.
Click the left and right arrows to rotate the board 90 degrees clockwise or counterclockwise.
When three similarly colored circles are touching, they will be removed from the board.
Clear the entire baord in no more than 5 moves, or the puzzle will reset.
Solution.
Once the puzzle is solved, you will receive Termite Repellant.
Return to the lake greenhouse.
Lake Greenhouse
Use the Termite Repellant from your inventory on the cloud of termites blocking the doorway.
Click the flowers to repeat the hidden object scene.
Screenshot.
Once the hidden object scene is complete, you will receive an Empty Insect Box.
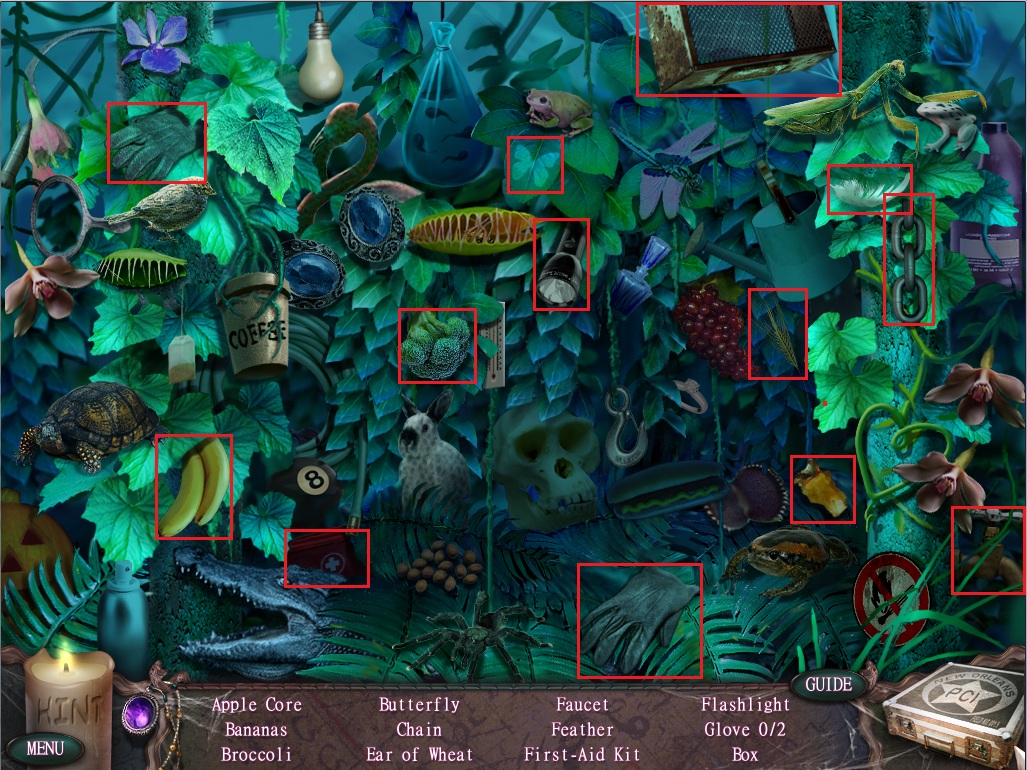
Click the remaining cloud of termites to zoom in.
Use the Insect Box on the termites to start the puzzle.
To solve this puzzle, capture all of the flying termites.
Click a Termite with the box to remove it until all the termites are collected.
Screenshot.
Once the puzzle is complete, you will receive a Filled Insect Box.
Go forward two screens to the Shoggoth statue inside the museum.
Inside the Museum
Use the Filled Insect Box from your inventory on the statue of Shoggoth behind the pillar to reveal the third Brotherhood Medallion.
Return to the cemetary.
Cemetary
Click the Brotherhood crest concealed by the vines to zoom in.
Use the Brotherhood Medallion from your inventory on the lower left rune diamond to start the puzzle.
As before, complete the rune in the diamond by adding the glowing glyphs from the ring around the crest.
Click a glyph to attempt to add it to the full rune picture in the diamond.
If correct, the glyph will move to the rune and lock in place. If incorrect, the puzzle will reset.
Solution.
Once the puzzle is solved, the diamond will reflect the image on the mirror, revealing your next destination.
Go back to the crossroads where you first spotted the Brotherhood fugitive.
The Crossroads
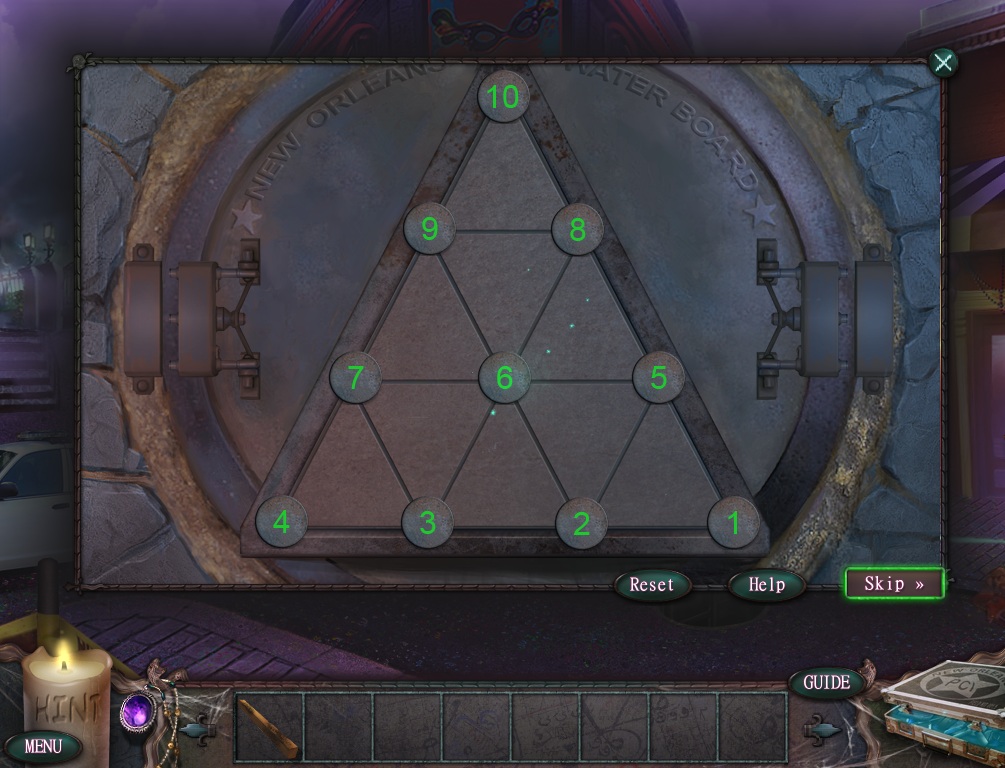
Click the sewer grate in the middle of the street to start the puzzle.
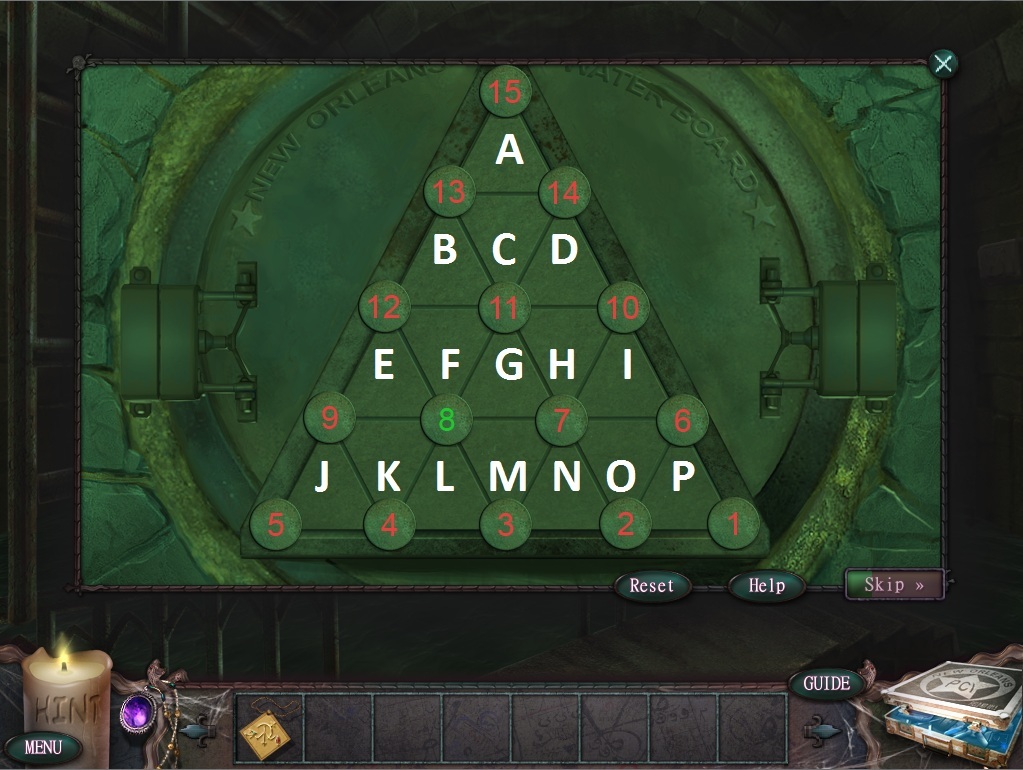
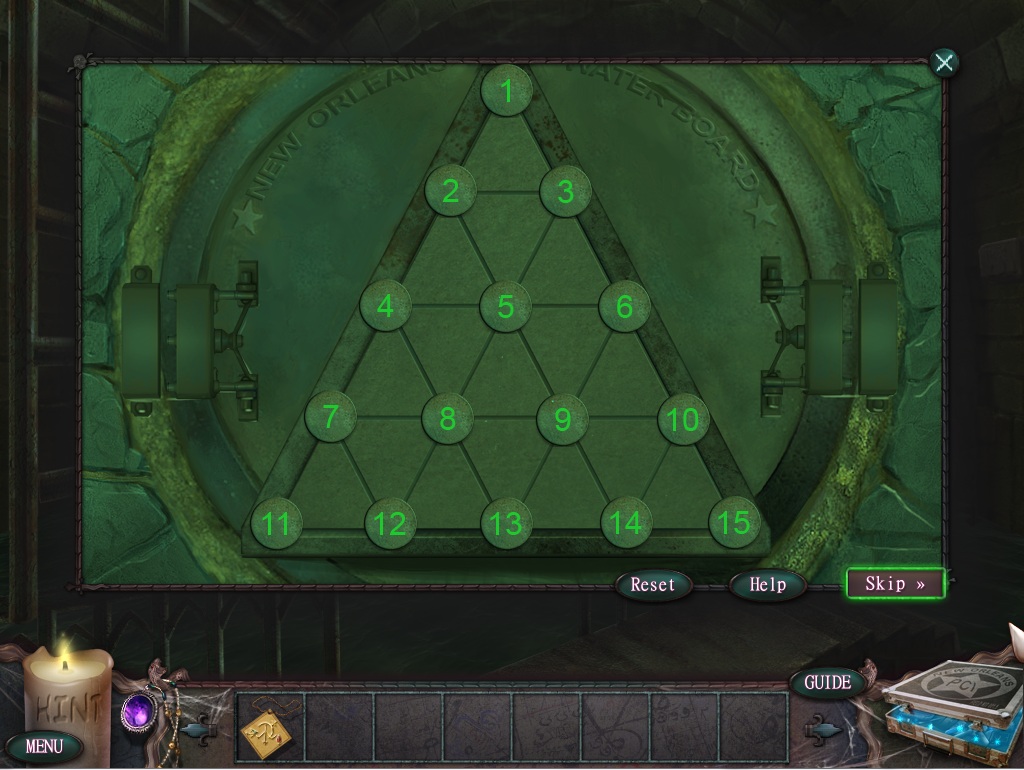
To solve this puzzle, arrange the numbers on the pyramid in reverse order from 10-1, going top to bottom and left to right.
Click a triangular tile to rotate the three numbers at each corner clockwise.
Screenshot.
Click Tile D
Click Tile A x 2
Click Tile D
Click Tile A x2
Click Tile D x2
Click Tile I
Click Tile D
Click Tile I
Click Tile D
Click Tile E x2
Click Tile G
Click Tile I
Click Tile C x2
Click Tile A
Click Tile D x2
Click Tile A x2
Solution.
Once the puzzle is solved, go down through the manhole into the sewers.
Sewers
Use the Talisman from the toolbar to translate the runes on the right wall.
Return to the back room of the magic shop.
Magic Shop
Click the cupboard in the corner of the room to repeat the hidden object scene.
Screenshot.
Once the hidden object scene is complete, you will receive a Baseball Bat.
Go back to the sewers.
Sewers
Use the Baseball Bat from your inventory on the loose brick in the left wall.
Click the hole in the wall to start the puzzle.
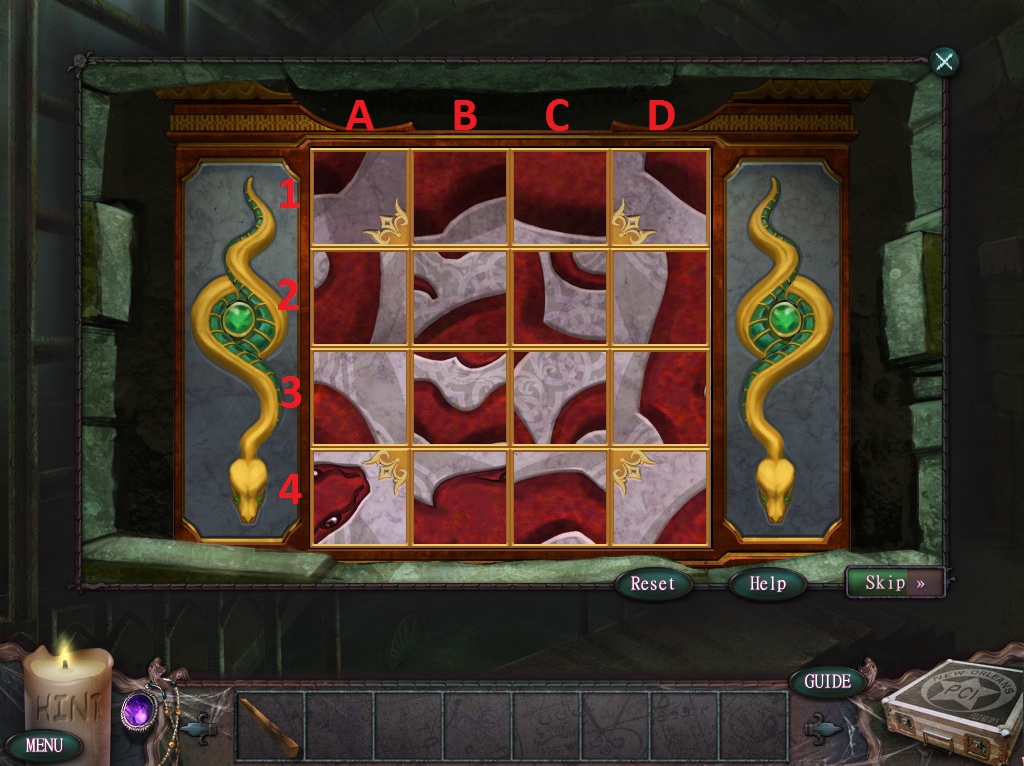
To solve this puzzle, arrange the tiles to complete the image of the serpent.
Click a square tile to select it, then click a different tile to swap positions.
Screenshot.
Switch A4 with D1
Switch B4 with C1
Switch C4 with B1
Switch D4 with A1
Switch A2 with D3
Switch A3 with D2
Switch B2 with C3
Switch B3 with C2
Solution.
Once the puzzle is solved, take the revealed Brotherhood Medallion from the open compartment.
Use the Plank from your inventory to make a bridge to the ladder across the water.
Click the manhole up the ladder to start the puzzle.
As before, arrange the numbers on the pyramid in reverse order from 15-1 going top to bottom and left to right.
Click a triangular tile to rotate the three numbers at each corner clockwise.
Screenshot.
Click Tile P x2
Click Tile I x2
Click Tile D x2
Click Tile A x2
Click TIle P x2
Click TIle I x2
Click Tile D
Click Tile C
Click Tile N
Click Tile H
Click Tile D
Click Tile K
Click Tile E
Click Tile J
Click Tile K
Click Tile G
Click Tile P x2
Click Tile I x2
Click Tile P
Click Tile N
Click Tile L
Click Tile J
Click Tile M
Click Tile L
Click Tile K
Click Tile M
Click Tile L
Click Tile M x2
Click Tile P x2
Click Tile O x2
Click Tile N
Solution.
Go up the ladder through the manhole, then return to the cemetary.
Cemetary
Click the Brotherhood crest concealed by the vines to zoom in.
Use the Brotherhood Medallion from your inventory on the lower right rune diamond.
Go through the open door into the gruesome bone crypt.
Gruesome Bone Crypt
Click the discarded robe on the ground to zoom in.
Take Zach's Badge and the Key to the Riverside Apartments from the ground beside the robe.
Go back to the Riverside Apartments.
Riverside Apartments
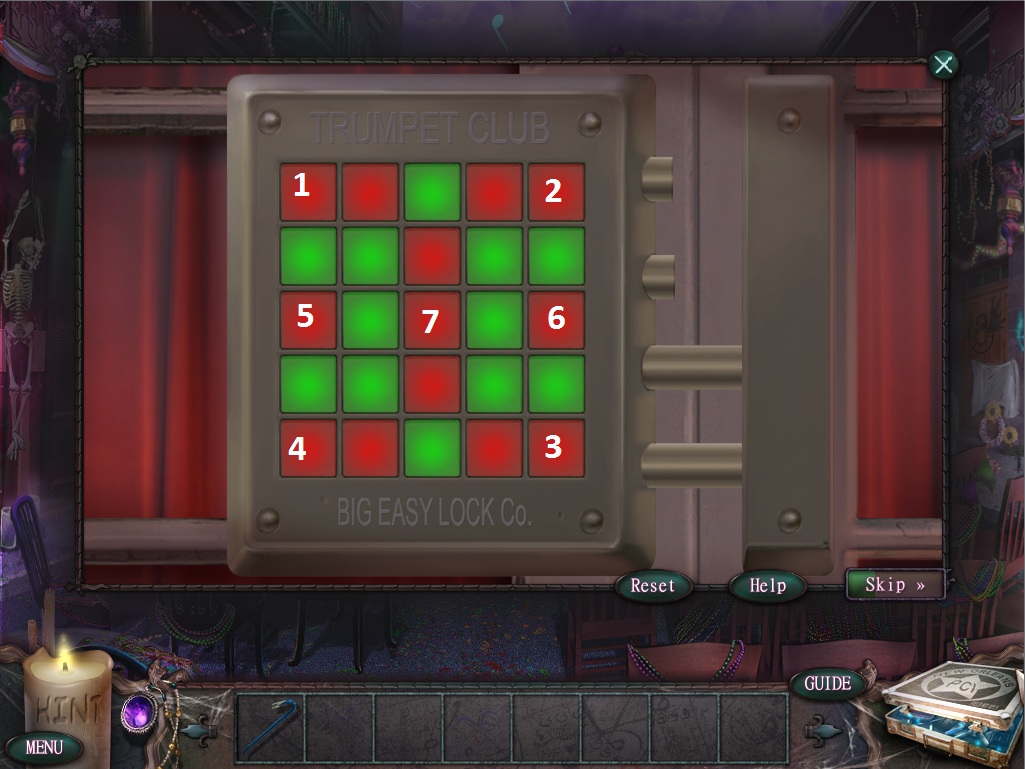
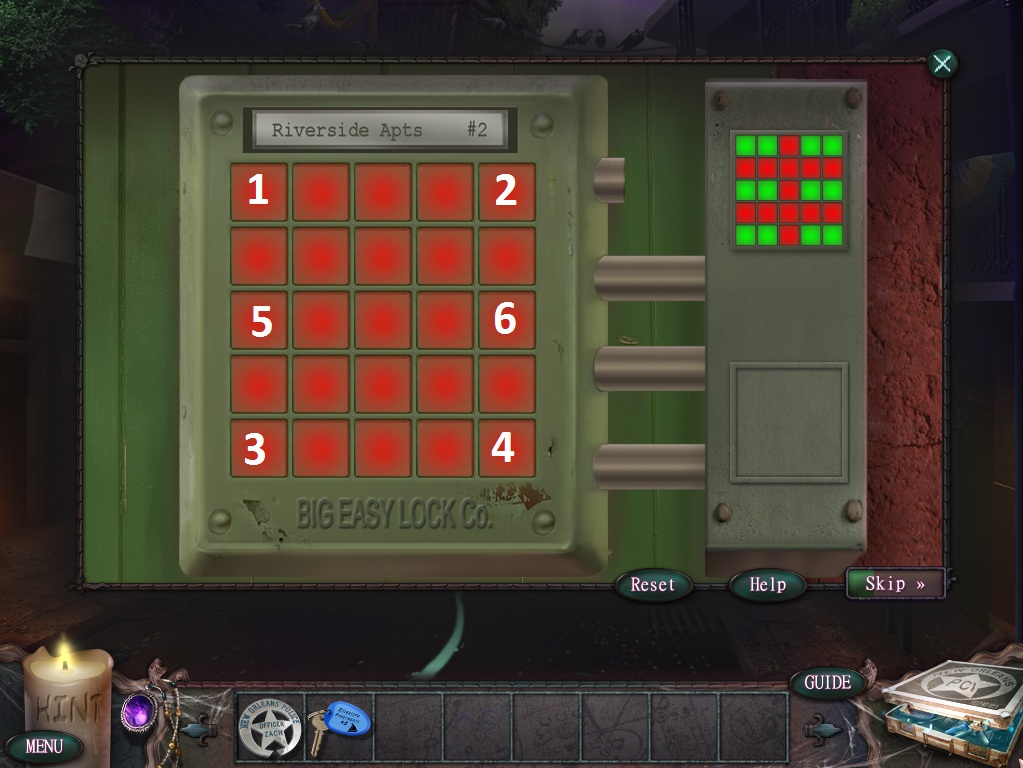
Click door 2 to start the puzzle.
To solve this puzzle, match the tiles on the left grid with the image shown on the right.
Click a tile to switch it from red to green or vice versa.
Clicking one tile will also change the colors of all adjacent tiles up, down, left, and right.
Solution #1.
Solution #2.
Solution #3.
Use the Key from your inventory on the revealed keyhole beside the grid.
Go through the door into Apartment 2.
Apartment 2
Give Officer Zach his Badge from your inventory.
The End
Posted by: Trinn |
August 1, 2011 6:49 PM
|
August 1, 2011 6:49 PM