

![]()
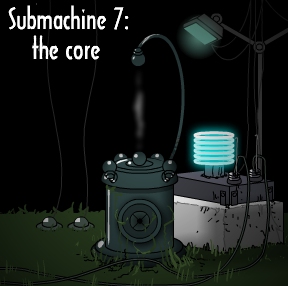 Mateusz Skutnik's Submachine series has kept puzzle and adventure game fans guessing for over five years. With its eerie atmosphere and mysterious narrative, each subsequent installment has only served to raise more questions and wild speculation amongst its fans. If you've been waiting patiently (or not so patiently) for another chapter, your loyalty is about to be rewarded. Submachine 7: The Core is finally here... and it's waiting for you to unlock its secrets.
 Use your mouse to interact with your environment and pick up items, which are stored in your inventory on the right. You can click once on an item you're carrying to pick it up, and then again anywhere else on the screen you want to try using it. Investigate everywhere, sometimes more than once; if something has happened and you've made progress, it's worth revisiting old areas to see if anything has changed, or if you can interact with something new. Since the game saves your progress automatically, you can take time out whenever you want to scrawl "What does it mean?!" over and over on your walls (it's very therapeutic) before picking up right where you left off.
Analysis: I am going to be honest with you; until now, I had never played any of the Submachine games, and playing them all back to back to prepare myself for this review was a lot like wandering around inside a M.C. Escher painting with H.G. Wells and H.P. Lovecraft as travelling companions. (Hunter S Thompson might have been there too, flicking the back of my head every few minutes.) The series is baffling and intriguing, and has only gotten bigger and more complex as it's gone on. To say it's ambitious is putting it mildly, and the fact that Mateusz appears to have only gotten more creative with his brainchild with each chapter is really impressive.
 It's easy to see why the series has earned such a devoted following. Not only is it extremely well made, with subtle ambient noise and clean visuals, but its sparse narrative revealed in notes and snippets for years has fueled a lot of wild speculation. By now Mateusz has his series down to an art and exploring the game just for the sake of enjoying the gorgeous design is rewarding too. The biggest problem you might run into is that like most other games in the series, The Core is prone to giving you very little direction. You might spend a while flailing at switches or spinning valves, not realising that your monkey-like problem solving antics have actually triggered something in a different area even if there was little or no indication anything had changed. You'll also have to keep your eyes open for small items, and be willing to examine all corners of each area; I spent a while going around in circles, not realising I'd actually missed an area transition next to another one.
Play the entire Submachine series:
Although it initially seems like a very small game, The Core quickly reveals itself to have a big environment for you to explore... provided, of course, you can figure out how to unlock it all. Players hoping for more brain-teasing puzzles such as those found in Submachine 3: The Loop might wish the Core found more balance between those and "use this item here" school of puzzling typically found in adventure games. The game is definitely challenging and requires you to keep your eyes peeled and be diligent in exploring your environment, sometimes more than once. Compared to most other games in the genre, making even a little progress in The Core (or even any game in the series) tends to feel like a big achievement, so go ahead... pat yourself on the back now and again. If you've come this far, you've certainly earned it.
Now available: Submachine 7 HD!! Play offline and in fullscreen for only $2. Help support Mateusz and his future games.
If you're hoping for a resolution and answers to all your questions, you might find the "To Be Continued" finale just another reason to camp outside Mateusz's doorstep. Submachine 7: The Core still offers a lot more pieces of the puzzle, and provides a fantastic realm full of secrets to uncover them in. And, perhaps most important for an adventure game, the series as a whole actually feels like an adventure. So, I've got to ask... why are you even still reading this when there's a whole new world out there for you to explore? Allons-y!
We've been here covering the entire Submachine series since the very beginning with reviews and walkthroughs for all of them...Outside the main storyline, and yet still another great Submachine, is a game created for the band Future Loop Foundation:
- The original Submachine
- Submachine Remix (extended version)
- Submachine Zero: Ancient Adventure
- Submachine 2: The Lighthouse
- Submachine 3: The Loop
- Submachine 4: The Lab
- Submachine 5: The Root
- Submachine 6: The Edge
- Submachine 7: The Core
- Submachine Network Exploration Experience
- Submachine: 32 Chambers
- Submachine 8: The Plan
- Submachine 9: The Temple
- Submachine: Future Loop Foundation


Walkthrough Guide
(Please allow page to fully load for spoiler tags to be functional.)
Submachine 7: The Core Walkthrough
General Information
The names for the areas and the sub-sections of the game are my own.
To navigate move your cursor to the edge of the screen (or over an open doorway, staircase, or ladder). If the cursor becomes a hand you can click and move in that direction.
Watch for cursor changes that indicate clickable areas. The cursor will change to a hand.
There are 5 secrets in the game. These secrets are tokens that can be used in the super special secret section of the game.
Good luck!
Outside the Barrier
You begin in front of a strange machine with a coiled blue light bulb. Go left.
Okay, you are at a barrier that you cannot go through. Notice the machine leaning against the square stone block appears to need a key card.
Go right back to the blue light machine and go right again.
More odd machinery, including something that is sitting on what looks like a broken column.
On the ground, to the left of the column, is a long steel tube, pick it up.
Go right.
Now you're at a double light stand, with more bits and pieces of machinery.
To the left of the double light stand is what looks like a stack of round stones in a pile, with a couple of pieces of wood leaning against the pile.
Click on the pieces of wood to move them and pick up the key stone.
Go right.
This looks like a makeshift outdoor dining area, including a cup of coffee on the table.
On the table are two pieces of paper, take them and examine them both. One is a picture (triangle stone key clue) and one is a document.
On the ground next to a large spool of electrical cord is a swipe card, take it.
Notice the box to the right of the spool of cord looks like it needs a key.
Go right.
Okay, looks like the edge of a cliff, no going any further right. On the ground next to the light stand is a picture, take it (key stone clue).
Go left five times until you are back at the barrier.
Put the key card in the machine slot and pull the handle.
The light will go out and the barrier will drop.
Take the light bulb from the lamp and go left.
Behind two partial columns is another barrier.
On top of the taller column (on the right) is a rock, click on it to move it.
Notice that the rock is able to go through the barrier. These barriers are created by the special light bulbs in the round lamps.
Use the steel tube from you inventory on the round light (on the left) to break the bulb and drop the barrier.
The barrier is now down.
Go left.
Inside the Barrier
You should now be at an area with three columns and a pipe running through the bottom of the scene. On the ground in front of the far right column is a valve, take it.
Go left.
A hole has been knocked into a wall on the left to allow cables and pipes to go through. Go left through the hole.
You've arrived at a statue of Buddha, surrounded by glowing blue plants.
To the right of the base of the statue, below a satellite dish looking thing, is a brass gong stick. Take it.
Go left.
Here you will see what looks like two machine guns. On the ground are some of those round stones. To the right of the lower machine gun, on top of one of those round stones, is a key. Take it.
Move left.
There are three flower pots here. The two on the left have some of those blue plants in them, the one on the right is empty. Click on the one on the right for a close up.
There's a red object inside the planter, take it (key stone).
Back up from the close up and go left.
There's nothing here but some broken stone columns. Go left again.
Okay, now we have a brass gong with three planters behind it.
Use your gong stick to ring the gong.
Click on the middle planter (the one with no plants).
Inside you will find a picture (round stone key clue).
Take the paper, back up from the close up, and go left.
More planters here, these ones are overgrown with the glowing blue plants.
There's a clickable area between the middle and the right pots. Click on it for a close up.
Take the token, back out of the close up, and go left.
This is a dead end with another Buddha statue. Notice that this one has something in his outstretched right hand. Take the object (key stone).
Go right fourteen (14) times until you are back at the makeshift outdoor dining area.
You may notice as you go past that the area with the broken stone columns has now become a gateway of some kind.
Once you are back at the table, look at the box to the right of the spool of electrical wire.
Use the key on that box to open it.
Click on the box for a close up and take the object from inside (energy gem).
Back up from the close up and go left eleven (11) times until you are at the gate (what used to be the broken stone columns).
On the side of the gateway is a diamond shaped notch the exact same size as the energy gem. Place the energy gem in that notch.
Symbols on the gateway will now light up.
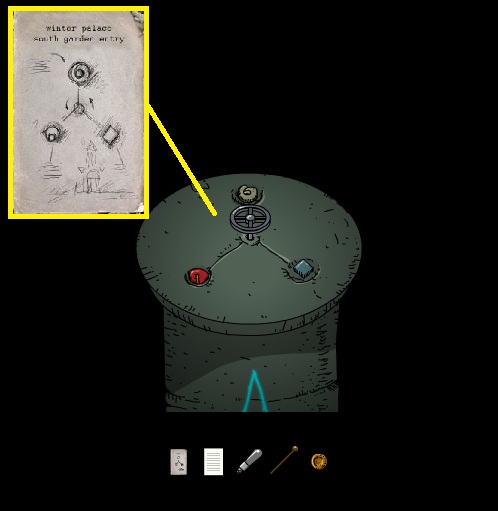
To the right of the gateway is a pedestal, click on it for a close up.
This is where you will place your three key stones. In your inventory you should have a piece of paper titled "winter palace south garden entry" which is the clue to the placement.
The roundest stone goes in the top, the more oblong shaped stone goes in the bottom left, and the diamond shaped stone goes in the lower right.
Once you've placed the key stones place the valve in the hole in the center of the pedestal.
Screenshot.
When everything is in place click on the valve to turn it.
Back up from the close up. The gate is now activated and glowing blue.
Click on the gate to enter the Winter Palace.
The Winter Palace Gardens
You are now at the Winter Palace gardens. There is a note on a music stand next to the gate, take it and read it.
Go left.
There is a fountain here, and an archway to the left. Between the fountain and the archway is a plaque welcoming you to the south gardens.
Go left through the archway.
There is a note here tacked on a map stand. Take the note and read it.
Click on the map stand for a close up.
This is a map of the gardens, with a blue "you are here" dot showing your position. This map will become very important later.
Back up from the close up and go left.
You are now looking at four stone gateways, only one of which is "active" (glowing blue), the third from the left.
Click on the glowing gateway to enter it.
On the other side of the gateway there are a lot of blue plants. There is also another map stand, click on it for a close up.
Once again there is a "you are here" dot, showing you in your new position.
Back out of the close up and go right.
Sitting in the middle of the walkway is a key, take it.
Go right.
You've reached the end of the path. To the right is a stone door with a square notch in it.
Go left twice to the square gateway and go through.
Back up from the view of the four gateways.
Go right twice until you see the gateway that brought you here.
Go right from the gateway (not through the gateway).
This is the entrance to the Winter Palace. There are two ways to go from here: you can click on the open doorway to go inside, or you can click to the right of the doorways to go along the outside of the building.
Go right along the outside of the building.
You can't go any further right from here, but there is a ladder going down. Go down the ladder.
At the base of the ladder is a note, read it.
Go right.
Another dead end, this one with what looks like cables clamped to it, running off into the distance.
Go left to the ladder and left again.
At the very edge of the walkway is a triangular shaped object, take it (stone key).
Go right, then go up the ladder.
Go left to the palace entrance, then go inside the palace.
The Winter Palace
The first thing you see inside is a portable stand. Click on the stand to get a brochure about the history of the palace.
Go right.
There's a locked door here. On the wall above the door is a massive crack. Hover your cursor in the center of the crack and a blue portal will appear.
Click on the portal to travel through it.
There's a note on the wall about the portal, take it and read it.
Go right.
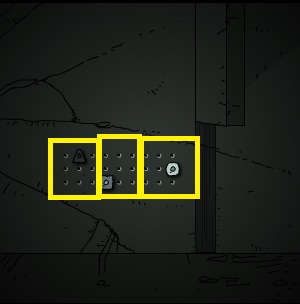
There's a stone wall here preventing you from going further right. There is also a 3 x 9 grid of holes on the wall.
Go left twice.
There is a barred door on the left, click on it to remove the bar.
If you go out the doorway you will be back in the area where you found the first portal.
To the right of the door is a doorway with what appears to be a spiral staircase.
Click on the spiral staircase door to enter, then go up the staircase.
At the top of the staircase is a window. You can click on the window to look out and see a platform hovering in the distance.
Go left from the staircase.
Left of where the floor ends a piece of wall appears to hover in space. If you move your mouse over the large crack in this wall fragment another portal will appear.
Click on the portal to travel through it.
You are now on that platform that you saw through the window by the staircase. On the left edge of the platform is a square shaped object (stone key), take it.
On the piece of wall hovering above the platform is the portal back to where you were, click on it to travel.
Once you are back go right to the top of the staircase, then right again.
There is a locked door here. On the floor near the door is a note, take it and read it.
Notice the large crack in the wall directly in front of you. Hover your cursor over the top left of the crack and watch for it to change to a hand. When it does, click for a close up.
In the crack you will find a second token. Take the token and back up from the close up.
Use the key from your inventory to unlock the door.
Once the door is open click on it to enter.
You are in what appears to be an office. On the desk is a piece of paper, take it and read it.
Above the desk on the wall is another copy of the garden map, this one with no "you are here" dots.
On the desk is a machine of some sort, click on the machine for a close up.
Notice the switches on the machine. Three of them are in the up position, and one is in the down position. The one that is down is third from the left.
This is just like the portal gates in the garden, the third from the left was the only one that was activated.
Pull all of the switches into the down position then back up from the close up.
Go left twice to the staircase, then down the spiral staircase.
Once you are at the bottom of the stairs, go left through the door, then left twice more to the entrance of the Winter Palace.
The Winter Palace Gardens (Part 2)
From the entrance of the Winter Palace go left four times until you are facing the four square gates.
Notice that all of the gates are glowing now.
Click on the far left gate to enter it.
This little platform is a dead end. The map stand appears to have been destroyed.
Go back through the gate.
Now go through the gate on the far right.
Next to the gate is another of those maps showing your location. Go right.
The way appears to be blocked by an enormous tree. On the right, in the roots of the tree, is an object, take it (circle stone key).
Go left and then back through the gate.
You've already been through the third from the left gate, so all that is left to explore is the second from the left gate.
Click on the second from the left gate to enter it.
Now you're on a really cool floating platform. There's another map stand here, showing your location.
There is also a note stuck on one of the broken columns. Take the note and read it.
Go left.
More cool floating platforms. There appears to be a trail going to the upper right, but it isn't complete.
Go left.
This appears to be a crossroads. Click on the trail that goes to the lower left of the screen.
There is an odd machine here. Click on the valve of the machine and part of it will lower.
There is also a picture on the machine, take it. This is the clue for the square stone key.
Go right.
At the crossroads, click on the path that goes to the upper right to move in that direction.
That incomplete trail has now turned into stairs. Click on the stairs to go up.
At the top of the stairs is a machine with a switch. Flip the switch to the down position.
Go back down the stairs and then go to the left.
Notice that the upper left path, which was a dead end, now has a ladder. Click on the ladder to go up.
Up at the top of the ladder is the other part of the machine we saw at the top of the stairs. There is also a portal gate.
On the machine, above the belt, is a plaque. Click on it for a close up and make a note of the symbol there.
Back up from the close up of the plaque and click on the gate to enter it.
You are now in another part of the garden. Near the gate in front of you is another map stand, which you can click on to check your location.
Go left.
At the very edge of the platform, click on the base of the arch post to see another mysterious symbol. Make a note of it.
Back up from the close up of the symbol, go right to the gate, then right again.
On the floor, mostly hidden by a post, is a picture, take it. This is the final clue for the stone keys.
On the fragment of wall to the right is a small portal, click on it.
You are now on the other side of the portal. The portal back is in the wall floating to the left.
Hover your cursor over the large crack to the left of the back portal and click for a close up.
Here's another token, take it.
Go right.
There is a pretty tree with blue leave here. Go right again.
There is a ladder here, attached to some sort of control box. Look at the box closely and you will see that the lever has been broken off.
Use the gong stick on the broken lever.
Now that the lever has been repaired, click on it.
The ladder will drop down, enabling you to continue to the right. Go right.
On a stone overhang above the middle of the walkway is another one of those plaques with yet another mysterious symbol. Make a note of the symbol, then go right.
Recognize this place? This is the dead end platform that you access from using the far left garden gate.
Click on the gate to enter.
You are now back at the view of the four garden gates. Back up and go right three times to the entrance of the Winter Palace.
The Winter Palace (Part 2)
Click on the doorway to enter the Winter Palace.
Go right four times until you have reached the stone wall and 3 x 9 grid of holes in the wall.
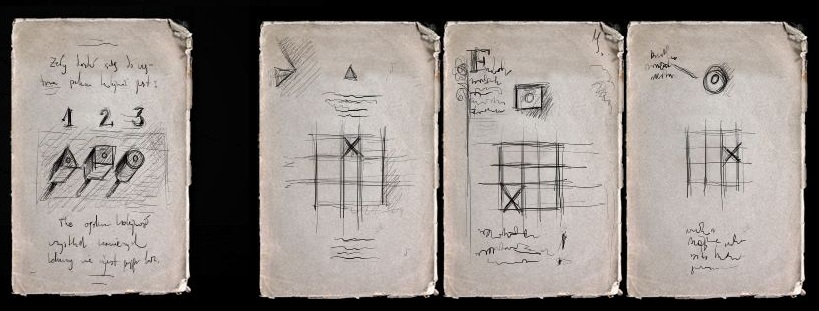
Time to solve the stone key puzzle.
To solve the puzzle you need to have found four pictures: One picture showing the order the shapes go in, and three pictures, one of each shape, showing them in a 3 x 3 grid.
Picture the holes in the wall as three 3 x 3 grids side by side.
Place the stone keys in the appropriate holes in the grid.
Screenshot.
Screenshot.
Once the stone keys are in their proper places the wall to the right will lift up.
Go right.
This is the entrance to a large atrium with several observatories. Go right.
You are facing a statue of a woman and some empty sign posts. There is a doorway in front of you, click on it to enter.
Leaning against the left wall is part of a transmitter, take it.
You can look through the telescope to see a view of...something strange.
Back up to the atrium and go right.
Now there's a statue of a man with his arm upraised. Ahead is another dark doorway, click on it to enter.
The telescope appears to be missing from its mount. At the base of the mount is a picture, take it (capsule call instructions).
There is a large crack in the right wall, click on it for a close up.
In the crack is a glowing box. Take the box and back up from the close up.
Click on the ladder on the left to go up.
There's a box up here that is locked.
Go back down the ladder, then back to the atrium.
Go right.
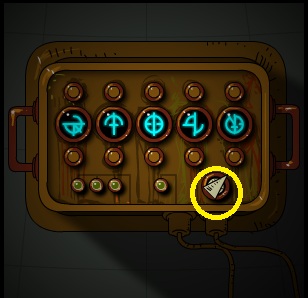
There's a control mechanism here. If you click on it for a close up you will see that some of the lights at the bottom are red.
You will also notice that you need to input five symbols, which look like the symbols you've been seeing in the Winter Palace Gardens.
Back up from the close up and go through the doorway in front of you.
There's a note on the floor, take it.
Back up to the atrium and go right.
On the floor to the left of the statue is a note, take it.
Go through the doorway ahead.
There's a lot of scattered paper on the floor. On the right, underneath the ladder, is one piece of paper that appears to have writing on it. Take it.
Click on the left of the telescope base for a close up. Here's another token. Take it and back up from the close up.
Click on the ladder to go up.
On the walls are three pictures, take them.
In the hole in the ceiling is another transportation portal. Click on it.
On the low railing to the right is an object, take it (solenoid).
Go left.
This appears to be the other side of the giant tree that was blocking the path in the garden. On the tree trunk is another plaque with a symbol, make a note of it.
Go right.
The portal back is in the center of the crack in the wall in front of you. Go back.
Go down the ladder and back to the atrium.
Go right.
There is a doorway in front of you and a break in the wall to the right.
Go right.
On one of the floating stones you will find a key.
Take the key and go left.
Now go forward through the doorway.
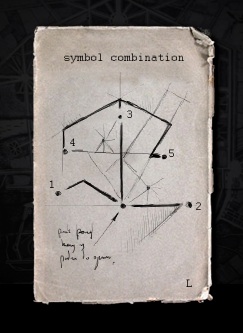
You are on a ledge outside of the atrium. Below the ladder on the right is a picture, take it (symbol combination).
Go up the ladder.
There is a communications dish up here that appears to be missing two solenoids and a transmitter.
Go down the ladder and go through the doorway.
Go left three times until you are facing the statue with the upraised arm.
Go forward into the doorway by the statue.
Go up the ladder and use the key on the locked box.
Take the solenoid from the box.
Go down the ladder and back to the atrium.
Go right three times and forward through the doorway.
Go up the ladder and place the transmitter part and the two solenoids in the dish to repair it.
Once the parts are in place, go down the ladder, through the doorway, and left twice.
Click on the machine controller for a close up and notice that the bottom lights are now green.
Now you just have to figure out the symbol order.
Back up from the close up.
Go left nine times until you are outside the Winter Palace.
Calling the Capsule
Go left four times until you are facing the four garden gates.
Go through the third from the left gate, then go right twice to the stone door with the square notch.
Place the glowing box in the square notch and the door will open.
This is the last symbol, make a note of it.
Time to determine the order of the symbols.
Back up from the close up, then go left twice and through the gate.
Back up from the gates and go right three times to the palace.
Enter the palace and go right eight times until you are back at the controller.
To determine the symbol combination you need to reference the picture you picked up called "symbol combination".
Combine this picture with a map of the gardens. This will tell you the order of the symbols that you found.
Enter the symbols in order and then flip the knob on the right of the machine.
Screenshot.
Screenshot.
Screenshot.
If the knob stays to the right after you turn it, you got the combination correct and you will hear some machinery rattling.
Back up from the close up of the machine, and go left nine times until you are at the entrance of the palace.
Now go right, past the palace doors.
Go down the stairs to the lower platform, and go right.
The capsule has come down the cables and is waiting.
Click on the capsule door to enter.
The Capsule
Click on the lever to move the capsule.
When you reach your destination the door on the right will open, go to the right.
You are now in a larger area. There's a switch above the capsule that you can pull to the right.
Go right.
There is a small switch on the wall, click on it and the floor will extend over to the ladder.
Go down the ladder.
At the bottom of the ladder, to the left, you can see where a lamp fixture has fallen down.
Put the light bulb on the pipe where the fixture sat and the grate to the left will open up.
You can go left into the grate, but it's dark and there's nothing there. Go back up the ladder.
Go up again and you are facing a large window.
Go left.
On the desk is a paper, take it.
Go right twice and you will find two more papers on music stands. Take them.
Go right.
There's a force field to the right. Pull the lever on the control panel to turn off the field.
Go right.
Go up the ladder.
To the left of the ladder is a portal, click on it.
You are facing a broken window. Below the window is a hatch. Move the levers and open the hatch, it is the way to the ladder.
Go right.
There is a letter on the desk, take it.
There is also another copy of the garden map leaning against the right wall.
There is a hotspit behind the left back chair leg of the desk. Click on it to get the last token.
Back up from the close up.
Go left twice.
There is a note taped to the fancy red chair, take it.
You can open the drawers on the desk, but they appear to be empty.
There's a lever to the left of the chair, pull it.
Go left and you will see the large portal through the break in the wall.
Click on the portal and you are finished.
Or don't click, and go find the super secret bonus special stuff.
Super Secret Bonus Special
Instead of clicking on the portal, go right to the fancy chair where you pulled the lever.
Go right, then down the ladder.
Go left three times, then down the ladder twice until you are back where you placed the light bulb.
Go left through the now open grate.
The tunnel has now gotten bigger. If you hover your cursor over the wall of the tunnel, you will find a portal. Click on it.
There's a sign here that welcomes you to the super secret bonus special place.
If you go to the right from here, you will find those observation machines like you find at tourist attractions. Each one has a comment from Matuesz Skutnik about the making of the game.
To make a machine work you need a token. To make all five of the machines work you need to have found all five tokens.
After you've spent the tokens, you can go back and go through the big green portal.
Posted by: grinnyp |
December 16, 2010 3:48 AM
|
December 16, 2010 3:48 AM
Submachine 7: The Core Super Secret Bonus Special Walkthrough
General Information
The super secret bonus stuff consists of six items to be found (a light bulb and 5 tokens) and a special area that can only be found with the light bulb.
Even if you find the special bonus area you need all 5 tokens to make it work properly.
The bonus consists of Mateusz Skutnik's commentary on the making of Submacine 7.
This walkthrough will list the location of the 5 tokens, the light bulb, and instructions on how to open the secret area.
It will also list a summary of the commentary.
Items and Their Locations
The light bulb: in the "Outside the Barrier" section of the game, after you turn off the first barrier take the light bulb from the lamp that put up the barrier. You will need this to open the secret space.
First Token: in the "Inside the Barrier" section of the game. It is in the section with 3 flower pots that is overrun with blue plants (one place to the right of the dead end Buddha statue). The token is between the middle and right planter.
Second Token: is in the Winter Palace, up the spiral stairs and to the right outside the locked door that leads to the machine that activates the garden gate. There is a giant crack in the wall outside the door, the token is in that crack in the upper left area.
Third Token: is in the Winter Palace garden, in the scene to the left of the tree with the pretty blue leaves. In that scene there is a portal in a wall to the left. The token is in a large crack to the left of the portal.
Fourth Token: is in the Winter Palace, in the atrium/observatories. In the observatory with the scattered paper, there is a token behind the base of what was once the telescope mount.
Fifth Token: is inside the ship. At the very top of the second ladder, to the right is a desk and a chair where you find a note and another map of the garden. The token is on the floor behind the back left leg of the chair.
How to Access the Secret Area
After you enter the ship and go right, there is a platform that you need to move (by throwing a switch) to a ladder that goes both up and down.
If you go down the ladder you end up in a small room with a circular door covered by a grate on the left.
At the bottom of the ladder, to the left, you can see where a lamp fixture has fallen down.
Put the light bulb on the pipe where the fixture sat and the grate to the left will open up.
You can go left into the grate, but it's dark and there's nothing there.
At this point you need to find your way to the upper levels.
At the very top level, just to the right of the portal that ends the game, is a fancy red chair and a desk.
There is a large lever to the left of the chair that you need to pull.
Then go back down the ladders to the very bottom room.
Go left through the now open grate.
The tunnel has now gotten bigger. If you hover your cursor over the wall of the tunnel, you will find a portal. Click on it.
There's a sign here that welcomes you to the super secret bonus special place.
If you go to the right from here, you will find those observation machines like you find at tourist attractions. Each one has a comment from Matuesz Skutnik about the making of the game.
To make a machine work you need a token. To make all five of the machines work you need to have found all five tokens.
After you've spent the tokens, you can go back and go through the big green portal.
Commentary Synopsis
This is a synopsis of the commentary from the super secret bonus area.
The first machine covers the beautiful architectural drawings that you find during the game. Matuesz drew them when he was studying architecture 12 years ago.
The second machine talks about references and tributes to things he likes, like TRON, Night Watch, Amanita Design Studio, etc.
The third machine talks about bioluminescence, which Mateusz calls "flourescence", the glowing plants of the submachine environment.
The fourth machine talks about the garden maps from the Winter Palace Gardens. The map is an actual garden map, that of the gardens of Versaille in France.
The fifth machine talks about the future of submachine. Apparently there are only three episodes to go to the end.
Posted by: grinnyp |
December 16, 2010 12:44 PM
|
December 16, 2010 12:44 PM