

Haunted Halls:
Green Hills Sanitarium
Platform: Mac, Windows
![]() If nothing else, adventure games are always great examples of how not to do things. Take Haunted Halls: Green Hills Sanitarium, an adventure/hidden-object hybrid from ERS Game Studio, for example. How not to conduct a missing persons investigation. How not to react to demonic visions that nearly force your car off the road. And, perhaps most importantly, how not to run a sanitarium.
If nothing else, adventure games are always great examples of how not to do things. Take Haunted Halls: Green Hills Sanitarium, an adventure/hidden-object hybrid from ERS Game Studio, for example. How not to conduct a missing persons investigation. How not to react to demonic visions that nearly force your car off the road. And, perhaps most importantly, how not to run a sanitarium.
 You play the role of a distraught young woman whose boyfriend, Tim, went off to investigate the Green Hills Sanitarium and hasn't been heard from in weeks. Rather than contact the authorities, you decide the best course of action is to track him down yourself, and you soon find yourself caught up in a mad doctor's mad experiments in his extremely non-regulation mad house. To escape the sanitarium safely, you'll have to rescue not only Tim, but other patients who are trapped within their own phobias as well, and each of them is held prisoner in a twisted cell that reflects his or her own deepest fears. Once again, I find myself glad I'm not a video game character, since my cell would apparently be full of giant squid, clowns, spiders, and lutefisk.
You'll be using the mouse to play the game, clicking to interact with the world. Objects you can interact with will sparkle slightly from time to time, and your cursor will change to an eyeball when you mouse over points of interest. While a lot of the items you'll need to progress are just laying around for you to pick up (marked by the cursor changing to a hand when you mouse over them), you'll have to search for others by solving hidden-object scenes or puzzles, both of which are indicated by yet more sparkles. Don't forget to check your notes from time to time to read the stories of the sanitarium's inhabitants, which may give you clues on how to help them break free of their torments.
Analysis: When I was a kid, there was a video store across the street from the supermarket that would rent you VHS movies for the princely sum of .47 per night. They had a rather spectacular horror section filled with low-budget schlock flicks, and every Friday after school my friends and I would rent approximately two dozen films with titles like "Luther the Geek" or "Moontrap" and binge all night on them. I tell you this so you know I have seen a lot of crazy stuff, but until I played Green Hills Sanitarium, I had never seen a writhing mass of tentacles playing two enormous electric keyboards. It just hadn't been done, and it was then that I realised this game was rad. That's the sort of thing you encounter in this game, and it happens a lot, making the game less scary, and more bizarre.
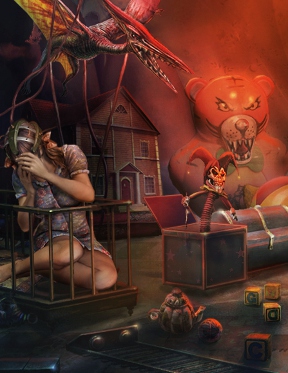 The flipside of this is that Haunted Halls is also extremely creative and is full of strange environment with stranger occupants. It's great to explore a place that deviates so drastically from the standard (boring) haunted house concept and just cuts loose, taking delight in surprising you with impossible concepts and a sort of goofy, cheerful oddness. While the puzzles you'll encounter will probably be variations of ones you've seen before, the manner in which they're presented makes them feel fresh and fun to tackle. The visuals for the whole thing are great; while people tend to look a little odd, the environments are extremely detailed and full of rich colours that bring the experience to life. The design especially shines for the prisons constructed for each patient, and I found myself looking forward to seeing each new one.
One problem you might encounter is that the creative approach to design also extends to the gameplay. While many of the item combinations you'll have to make are logical, such as a dead battery and a battery charger, some of them are just bizarre to better fit in with their strange environment and don't always make sense deliberately. This might not be so bad, but you could be using the right item in the right place, but you might be using it a few degrees off that mystical "sweet spot" the game considers to be correct. You might also want to avoid using the "hint" option outside of hidden-object scenes; it's supposed to point you towards spots you can make progress with inside a room, but it will often point out things even if you don't have the right item for them yet, and doesn't give you much of an idea of what to do with it, which can be confusing.
But despite these few flaws, Haunted Halls: Green Hills Sanitarium is still a wonderfully weird and extremely imaginative game that doesn't take itself too seriously. Although the story isn't outside the realm of cliche, uncovering all the strange sights the sanitarium has to offer is a lot of fun and is definitely worth checking out if the demo you're bored of the same-ol', same-ol' cavalcade of more "serious" adventure horror titles. And now, because you had to know it was coming, say it with me;
It's a mad house! A MAAAAAAAAD HOOOOOOOOOUSE!
A Collector's Edition is also available. It contains a bonus chapter to play, wallpapers, strategy guide, and more. Remember that Big Fish Game Club Members pay only $13.99 for Collector's Editions (or 2 club credits), and collector's editions count 3 card punches of 6 total needed for a free game.
![]() Windows:
Windows:
Download the demo
Get the full version
Also available: Collector's Edition
![]() Mac OS X:
Mac OS X:
Download the demo
Get the full version
Also available: Collector's Edition


Walkthrough Guide
(Please allow page to fully load for spoiler tags to be functional.)
Haunted Halls: Green Hills Sanatorium - Walkthrough
General
All inventory items in this walkthrough are marked in bold.
When inventory items are used, the locations where to find them are also marked.
There is no time limit.
Your journal will store important notes and information.
Hovering over the screen with your mouse may change the cursor.
When your cursor shows a hand, you can grab things.
An eye means important information.
Sparkles indicate a hidden-object scene or a mini game.
Search lists are random.
The hint recharges quickly.
Mini games can be skipped after a short waiting time.
Clicking the question mark in mini game scenes will provide you with information how to play this game.
The "Reset" button will let you start all over.
Do not just keep the puzzles you find for Tim in your inventory; place them from time to time. This will trigger other actions in the game. The first time you will definitely have do it is when you collected five of the buttons.
Chapter 1
Gateway/Entrance
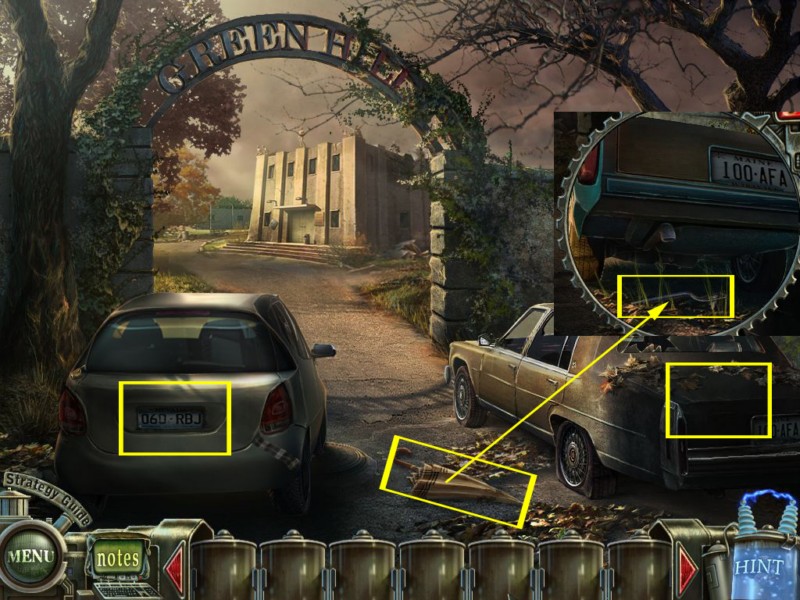
Click the trunk to the left of your car to open it.
Play the hidden-object scene - the match box will go into your inventory.
Grab the umbrella between the cars.
Click the trunk of Tim's car to get a close up view.
Use the umbrella to get the valve from under the car. It will go into your inventory.
Screenshot
Click the door to Tim's car to learn it is locked.
Go straight ahead to the Entrance.
Grab the crumbled newspaper in front of the stairs.
The door is locked. On the right side you find a dripping faucet.
Click the hole in the wall right above the grass to watch something.
Go right.
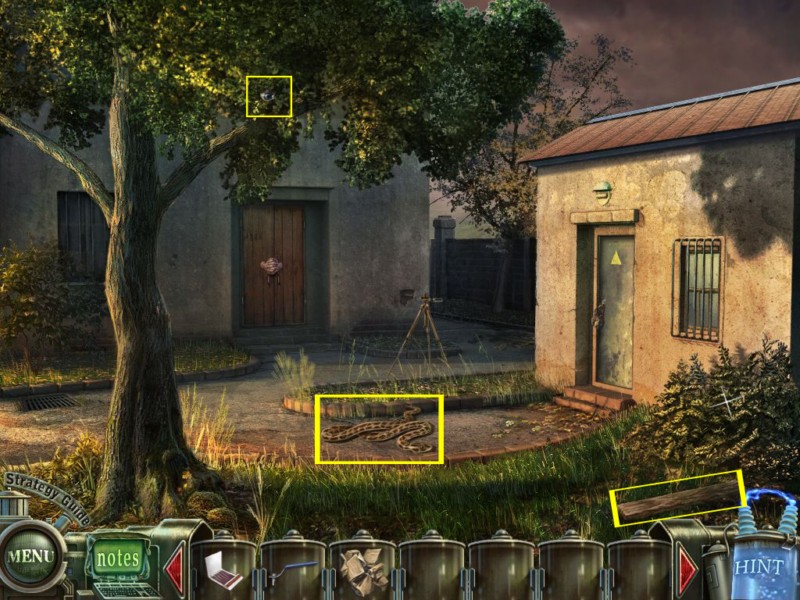
Right Side of the Building
Touch the snake on the ground and it will turn into a hose. Click to get it in your inventory.
Grab the board (1/3) right next to the bush.
Click the tree and take the eye (1/6).
Go back to the entrance and walk left along the house
Screenshot
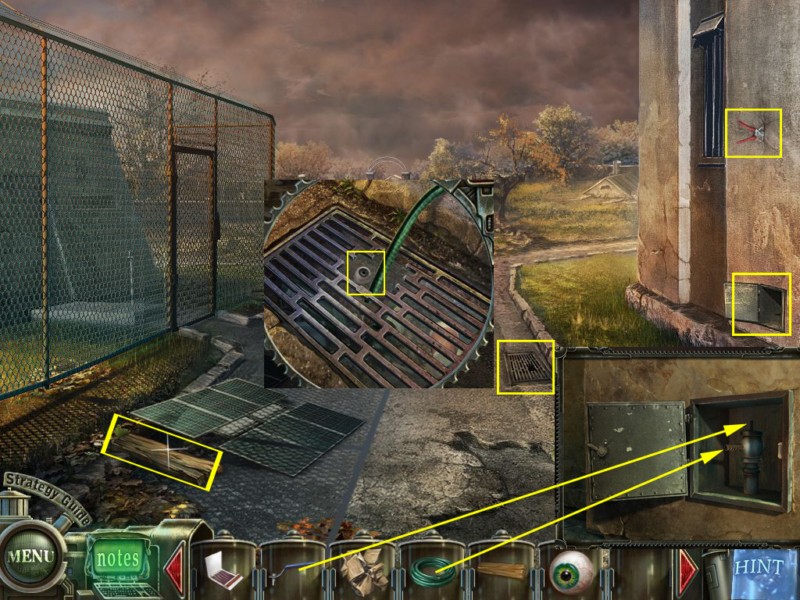
Electric Fence/Right side of the Building
Get the board (2/3) and the clippers into your inventory.
Click the spigot at the wall on the right side to get a closer view.
Attach the valve (found: under Tim's car) onto it and now the hose (ground, right side of the building).
Get the eye (2/6) out of the grate.
Screenshot
Go back to the right side of the building.
Use the clippers (found: in front of electric fence) on the bush to obtain the fence, the twigs will go into your inventory.
Go back to the electric fence and there to the right.
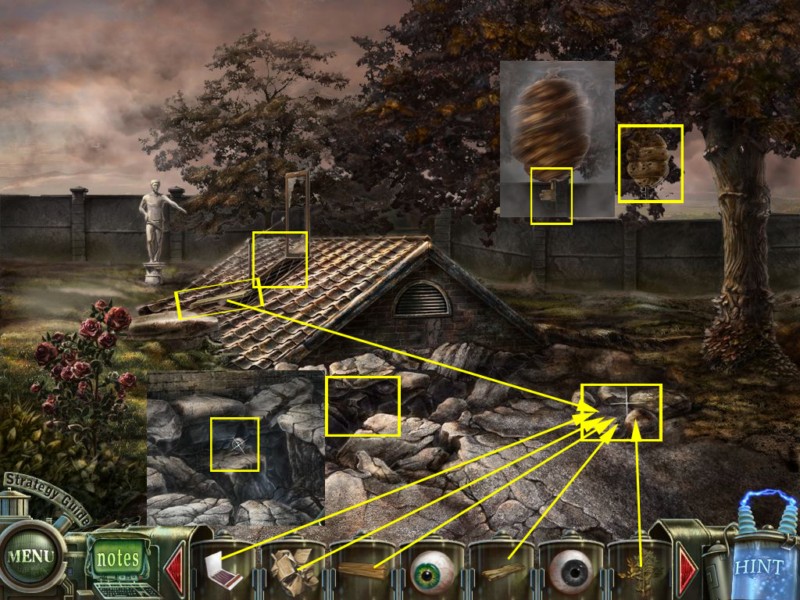
Half sunken House
Zoom into the hole in the ground and grab the eye (3/6) and the stone.
Click the roof to get a closer view and see Tim.
Take the board (3/3).
Click the fire pit below the tree and place the crumbled newspaper (entrance, in front of the stairs), the match box (Hidden object scene, trunk of the car), and the 3 boards (1. right side of the house, 2. in front of electric fence, 3. roof of half sunken house). Add the branches (bush, right side of the house).
Click the beehive and take the key.
Screenshot
Go 1x back and then straight ahead to the cemetery.
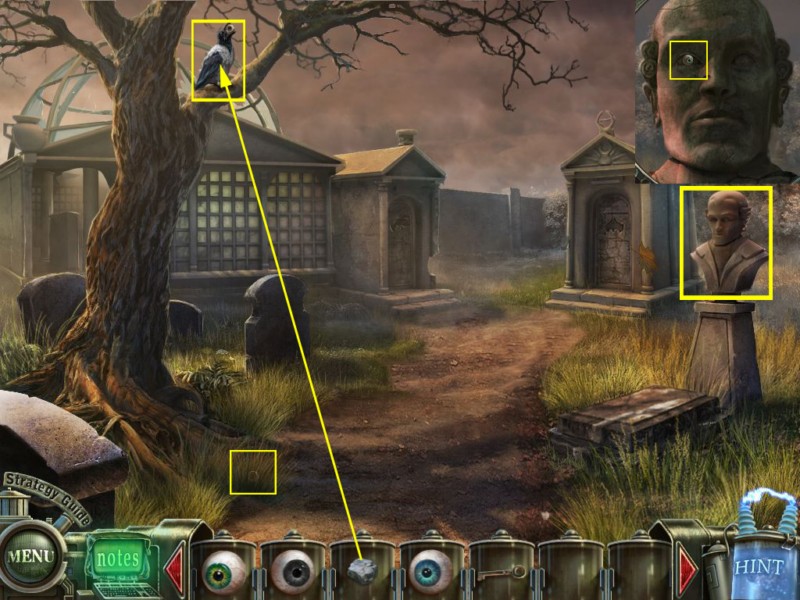
Cemetery
Throw the stone (half sunken house, hole in the ground) at the crow in the tree and grab the eye (4/6).
Click the bust on the grave stone on the right to get a close up view.
Take the left eye (5/6). You will have to click twice to get it into your inventory.
Screenshot
Go 2x back to the entrance.
Entrance
Zoom into the door. Use the key from your inventory and click twice to unlock.
Click the trash bin on the left to get a closer view and grab the eye (6/6) next to it.
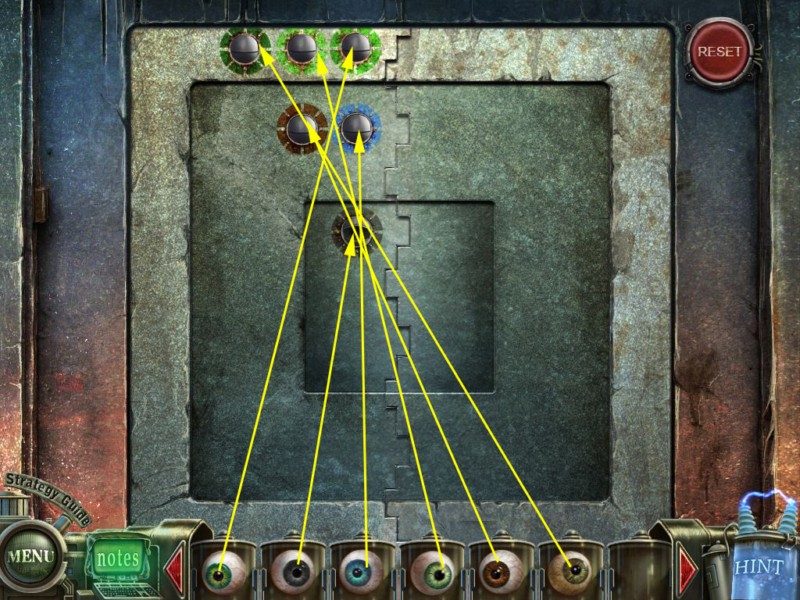
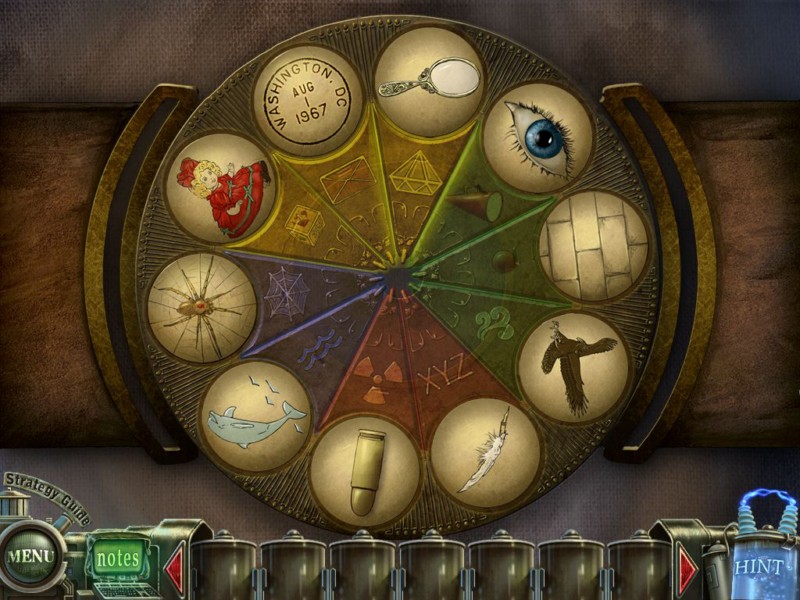
Zoom into the entrance and place all six eyes (1.right side of building, tree, 2. right side of building, grate 3. half sunken house, hole 4+5 cemetery, crow and bust, 6. entrance, trash bin) in the corresponding colored slots.
A correctly placed eye will close.
Screenshot
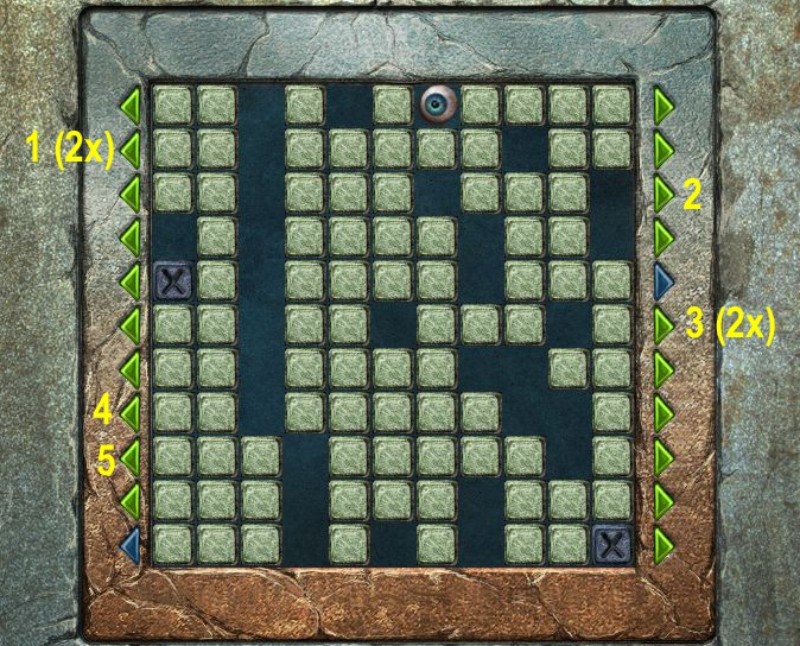
Use the arrows to move the eyes all the way to the bottom. If you get stuck, click on the reset button.
When a tile marked with an x is at the right or left end of the row, you won't be able to move the row further in this direction.
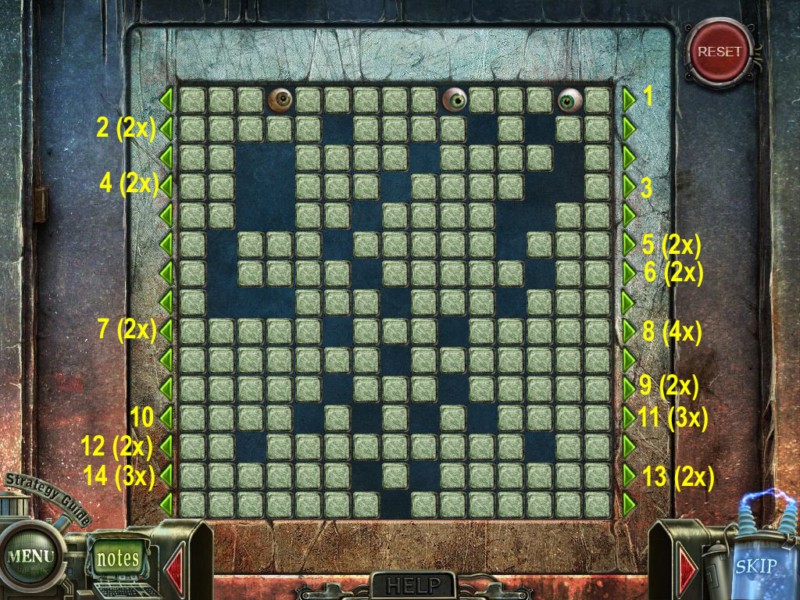
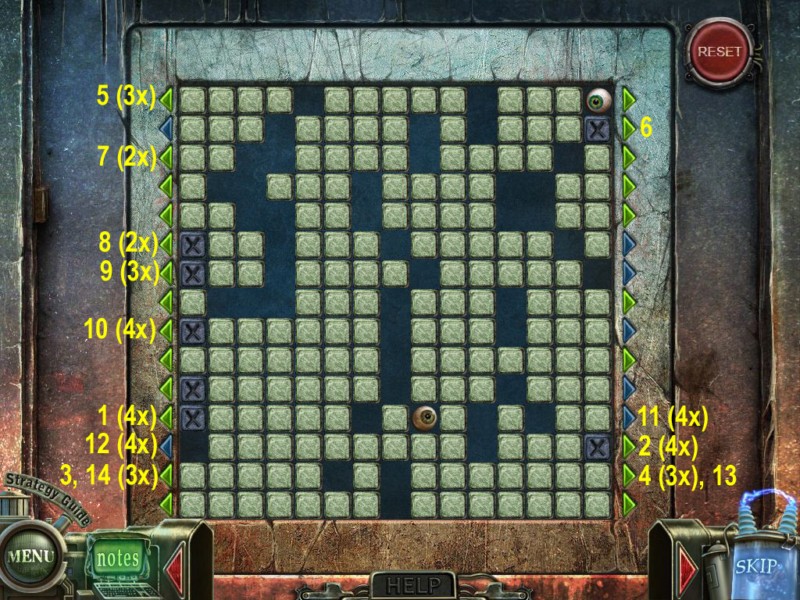
You will have to do this three times, for the solution please see screenshots
Round 1
Screenshot
Round 2
Screenshot
Screenshot
Round 3
Screenshot
Screenshot
Enter the house
Chapter 2
Entrance Hall
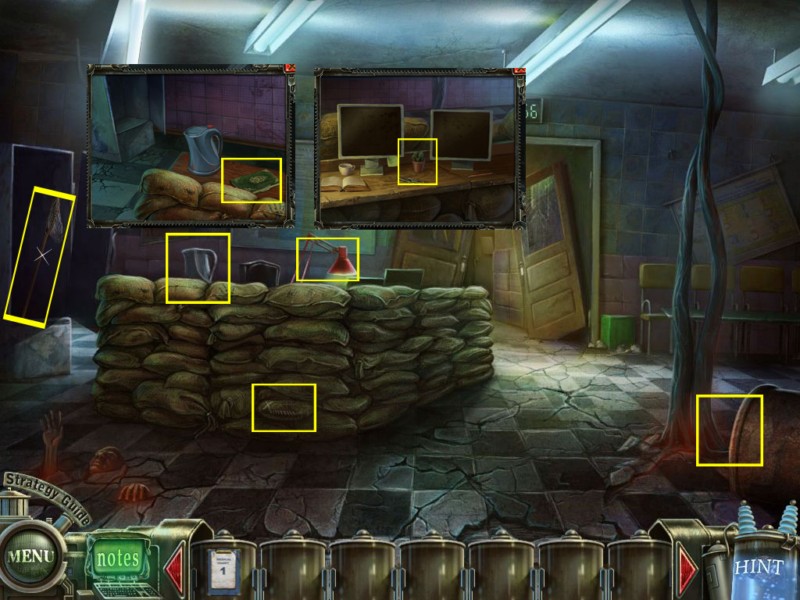
Play the hidden-object scene to obtain the medical chart 1.
Grab the butterfly net in the locker on the far right.
Zoom into the water heater by the sacks and take the book (1/4).
Click the desk lamp and take the cactus.
Look at the emergency plan at the back wall.
Screenshot
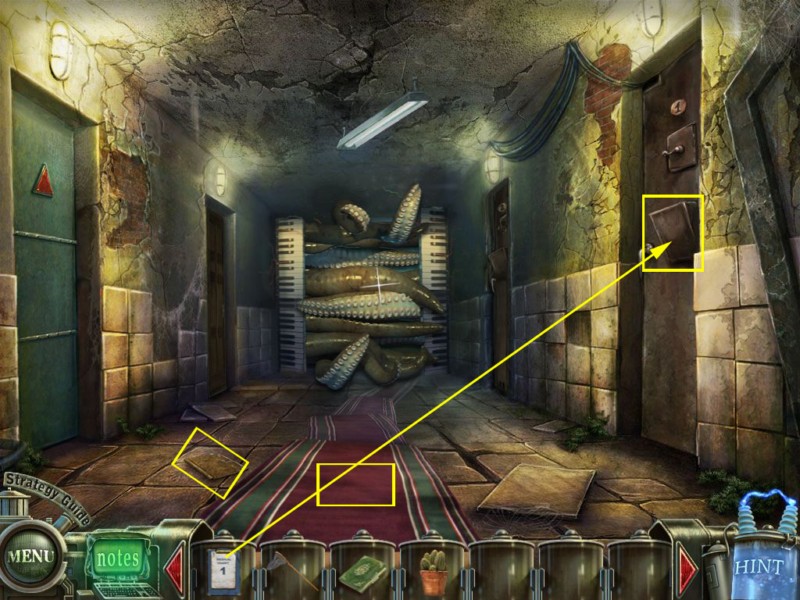
Go deeper through the door into another hall.
Lower Hall
Grab the book (2/4) on the left side
Place the medical chart 1 (Entrance Hall, hidden-object scene) on the first door on the right side and enter.
Screenshot
Room No. 1
Collect the 3 star fish and use them to plug the three gargoyles at the wall.
Zoom into the shelf of the back wall and take the flypaper.
Get the trident from the left wall.
Zoom into the diving helmet and click the lid to open it - the number 2943 will be stored in the journal.
Use the net (Entrance Hall, locker) to get the fish out of the glass and place it in the water - the eel will disappear.
Screenshot
Leave the room and enter the room on the far left.
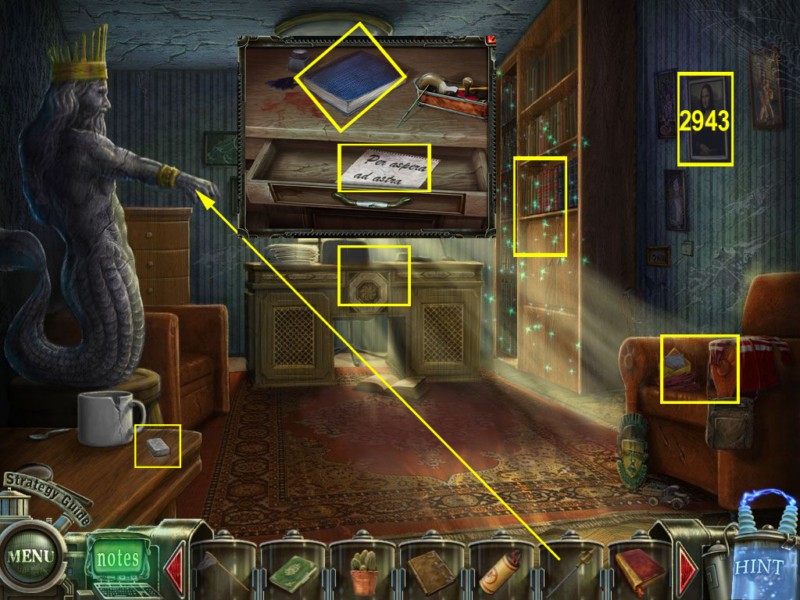
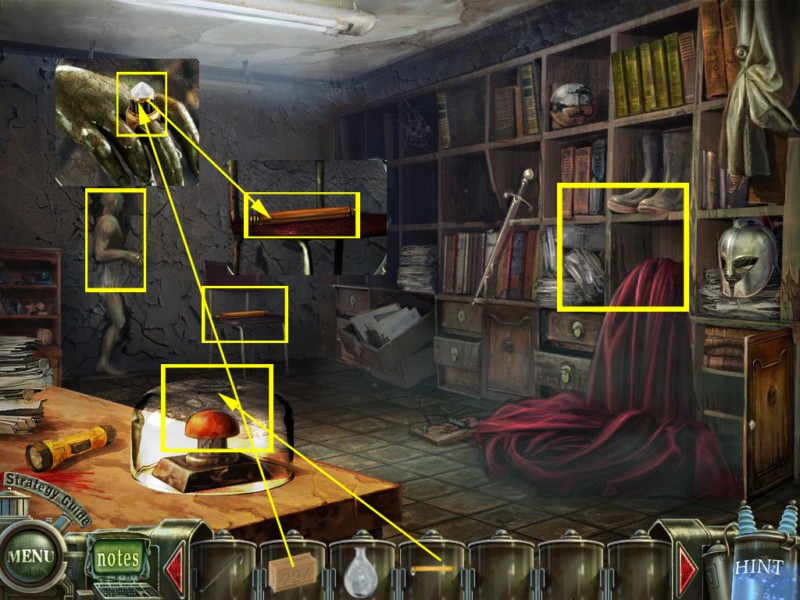
Office/Entrance Hall
Play the hidden-object scene at the chair right side to obtain a knife.
Go 2x down to the Entrance Hall.
Zoom into the sacks and cut open the sack to find a book (3/4).
Return to the office.
Grab the sugar cube from the table in the low left corner.
Place the trident (Room No. 1, wall) on Neptune's hand.
The painting on the right wall will raise and a safe with a keypad appears.
Enter the numbers (Room No. 1, diving helmet).
Get the medical charts 2 and 7 out of the safe.
Zoom into the desk and open the drawer.
"Per aspera ad astra" will be copied into your journal.
Grab the book (4/4) from the desk.
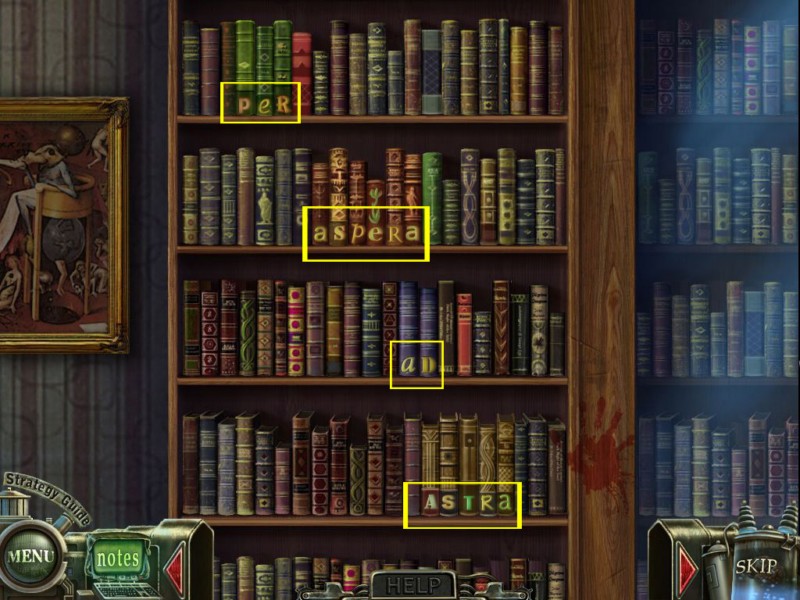
Click the book shelf to activate a mini game.
Screenshot
Place the books according to the colors.
Swap the books by clicking two to spell the words: "Per aspera ad astra".
Screenshot
The shelf moves and reveals a hidden basement office.
Basement Office
Grab the brush on the ground.
Zoom into the poison bottle, click the lid to open and place the sugar cube (office, table) on it.
A poisoned sugar cube will go back into your inventory.
Zoom into the drawer of the desk and take the switch - the engraved image will be copied into your journal.
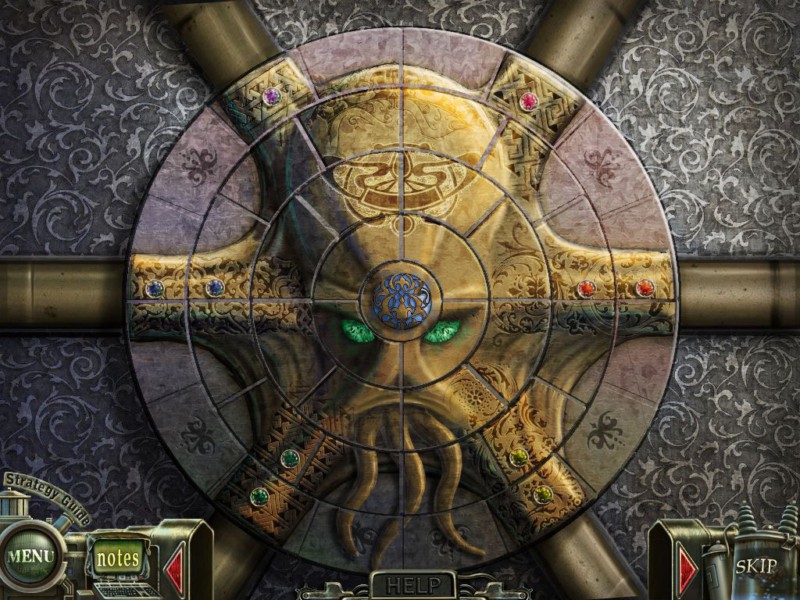
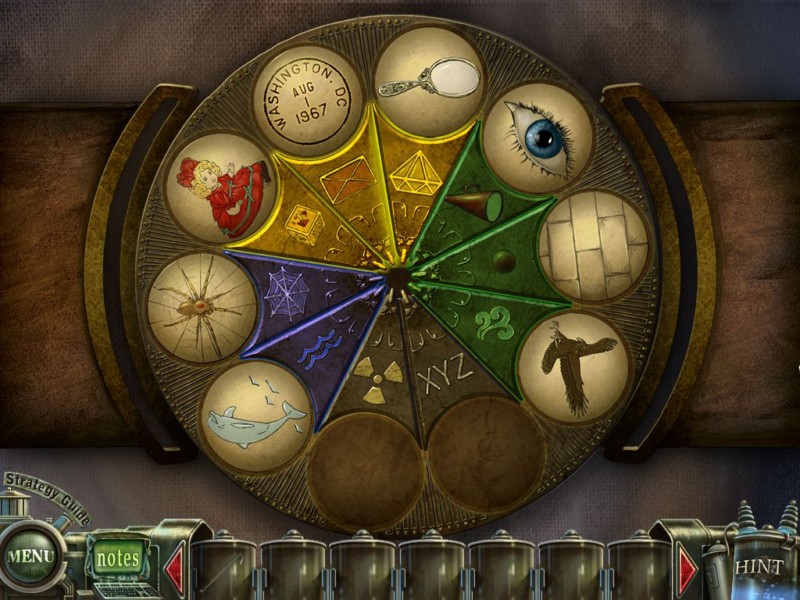
Click the door to activate a mini game.
Screenshot
Click on two tiles within the same disk to swap their positions. Once a disk is set, rotate it to the correct position.
You can't swap tiles of different disks.
Start with the once at the bottom.
Screenshot
When done, the door will open - enter the Room with Tim.
Room with Tim/Entrance/Electrical Fence
Click Tim and get the car keys out of his pocket.
Play the hidden-object scene on the left side to obtain the medical chart 3.
Click Tim again to see that a puzzle appears.
Note: Do not keep the puzzles you find for this puzzle in your inventory. Place them from time to time. This will trigger other actions in the game. The first time you will definitely have do it is when you collected five of the buttons.
Go back twice and play the hidden-object scene in the Office to obtain a corkscrew.
Go back twice and play the hidden-object scene in the Entrance Hall to obtain a key.
Go back once and zoom into the pipe on the right side of the building.
Use the corkscrew ( Office, hidden-object scene) to obtain a pump plug.
Go back once to the Gateway.
Gateway/Right side of the building
Click the trunk of your (the left) car and play the hidden-object scene to obtain a weight.
Zoom into the door of Tim's car.
Use the car keys (Research Room, Tim's pocket) to open the door and get the medical chart 4 from the seat.
Go forward and then right.
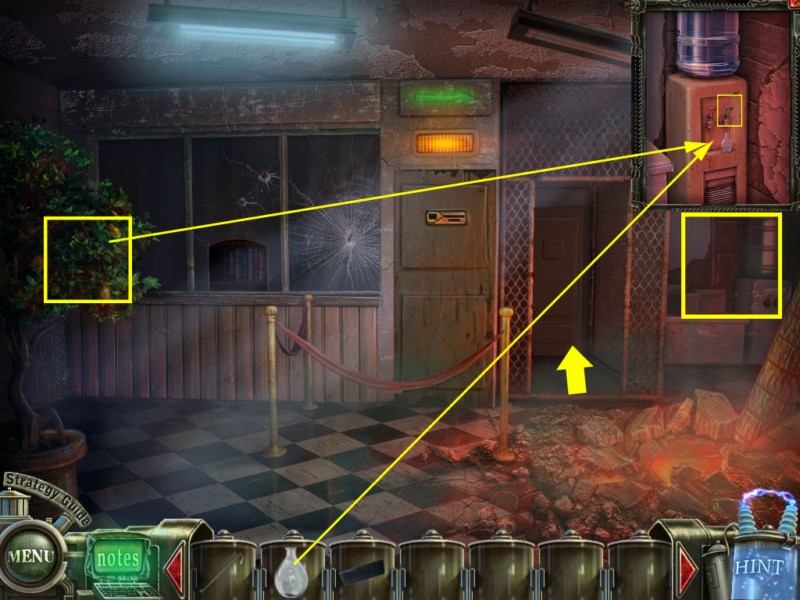
Use the key (Entrance Hall, hidden-object scene) at the lock of the Power House and enter.
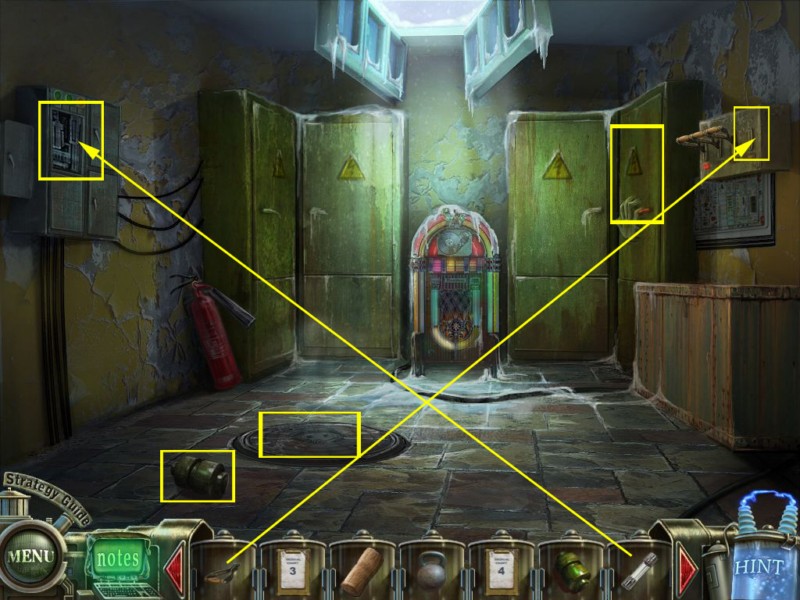
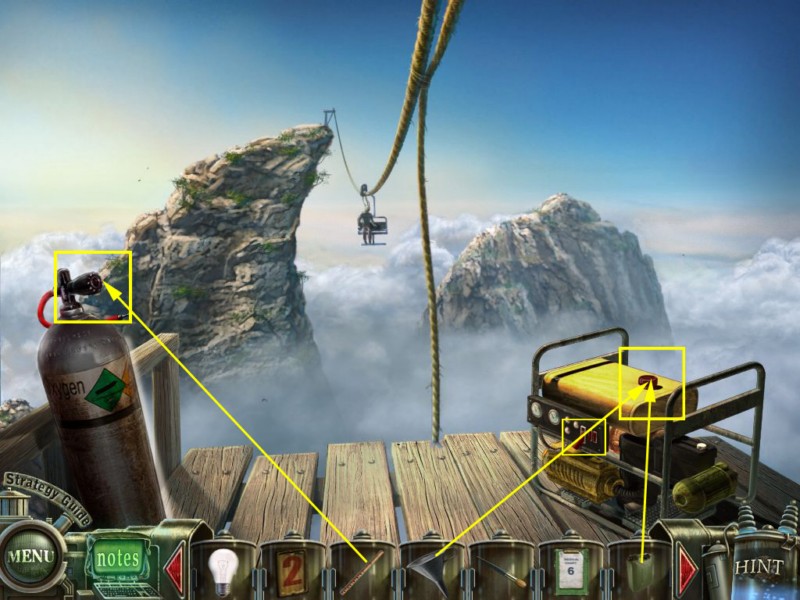
Power House
Grab the generator on the left, next to the trap door.
Open the locker on the right and play the hidden object scene to obtain a fuse.
Click the fuse box on the left side to get a near by view and place this fuse.
Place the switch (Basement Office, drawer) at the right side and click it.
Another hidden-object scene will be activated - play it to obtain rubber gloves.
Screenshot
Go back twice to the Entrance Hall and enter through the door on the left.
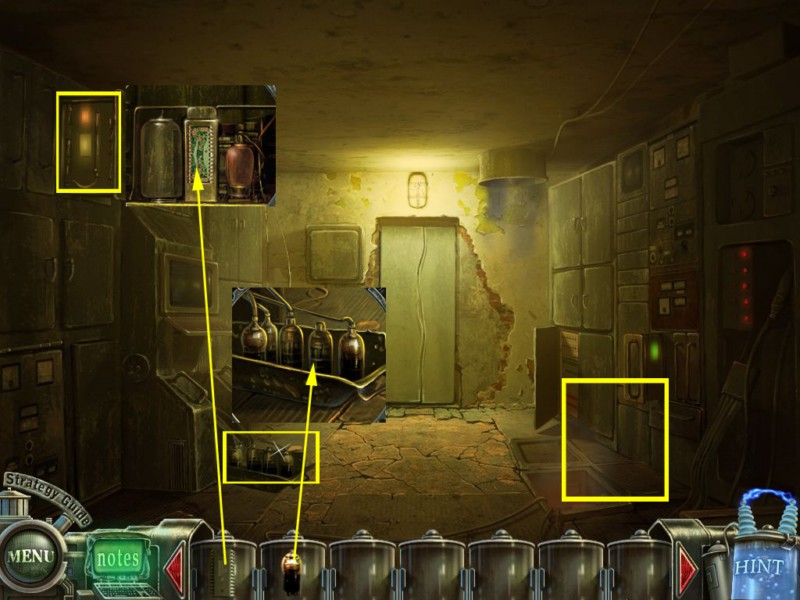
Laboratory/Room No 1
Place the generator into the free space on the left side.
Zoom into the shelf of the cabinet in the far back.
Use the rubber gloves (hidden-object scene Power House) to open the panel and take the wire.
Screenshot
Exit this room and enter Room No 1.
Place the cork (Entrance - right side) on the still water running pipe.
Zoom into the pipe in the middle of the room and use the brush (Basement Office) to remove the dirt.
Click the red button to release the water.
The Dolphin Puzzle will be added to your inventory.
Leave the room and place the medical chart 2 (Office, safe) on the door on the far right and enter.
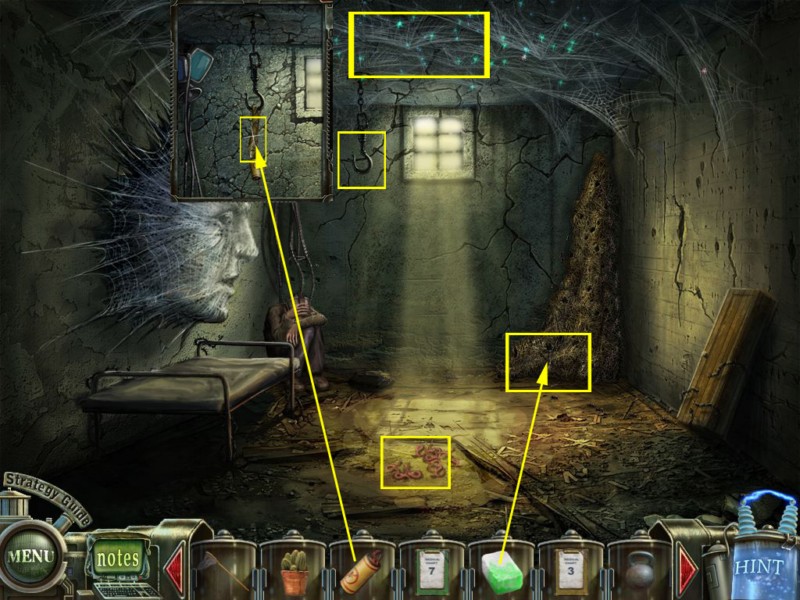
Room No 2/Cemetery
Get one of the worms into your inventory.
Click the hook above the patient and place the flypaper (Room No 1, shelf).
Take one fly.
Zoom into the ant hill in the far right corner and place the poisoned sugar cube (Basement Office, poison bottle).
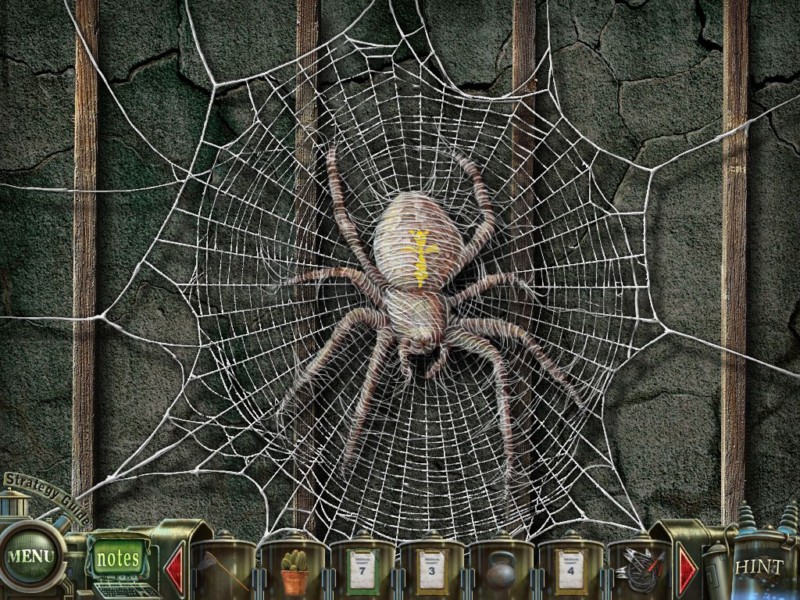
Click the ceiling to activate a mini game.
Screenshot
Reassemble the spider web.
Click and drag the tiles into the middle. Right clicking will rotate them.
Screenshot
Go 3x back to the left and forward - enter the cemetery.
Use the worm (Room No 2, ground) from your inventory with the crow.
Catch the crow with the net (Entrance Hall, far right) and return to Room No 2.
Place the crow at the worms.
A spider puzzle will be added to your inventory.
Exit the room, and enter the office. Go into the basement and from there into the lab (where Tim is captured).
Chapter 3
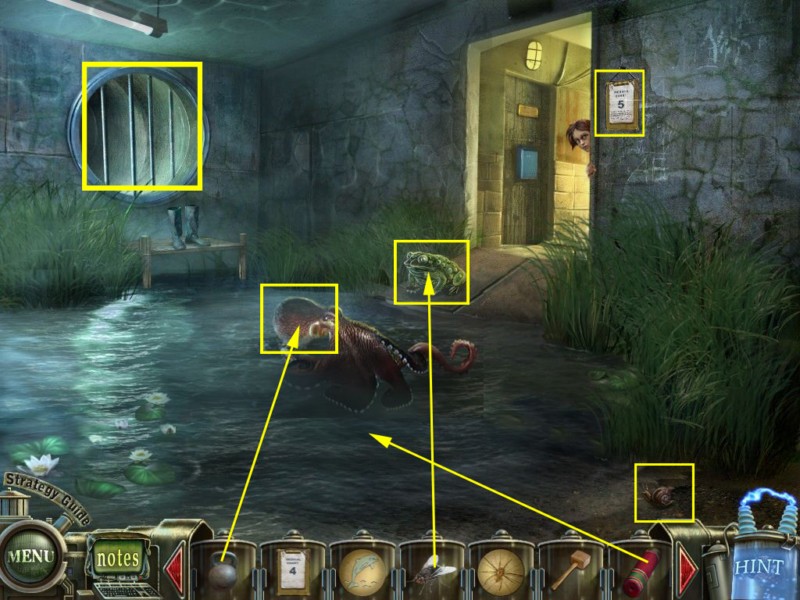
Lab/Hall/Pond
Play the hidden-object scene to obtain a mallet.
Go back into the hall (from where you enter Room No 1 and the Office).
Use the mallet to smash the ceiling lamp and use the wire (Lab, fuse box) on the lamp.
The giant octopus will disappear.
Click the carpet and take it.
Go upstairs.
Grab the snail.
Give the fly (Room No 2, fly paper) to the frog. The frog will be eaten by the octopus.
Hit the octopus with the weight (Gateway, hidden-object scene, trunk left car).
Place the carpet (Hall, ground) and grab the medical chart 5 from the wall on the left.
Enter the 2nd Floor Hall.
Screenshot
2nd Floor Hall/Room No 3/Lab
Use the cactus (Entrance Hall, desk) with camel on the right wall.
The mail box on the left wall opens. Take the envelope.
Place the medical chart 3 (Room with Tim, hidden-object scene) at the door with the mail box and enter.
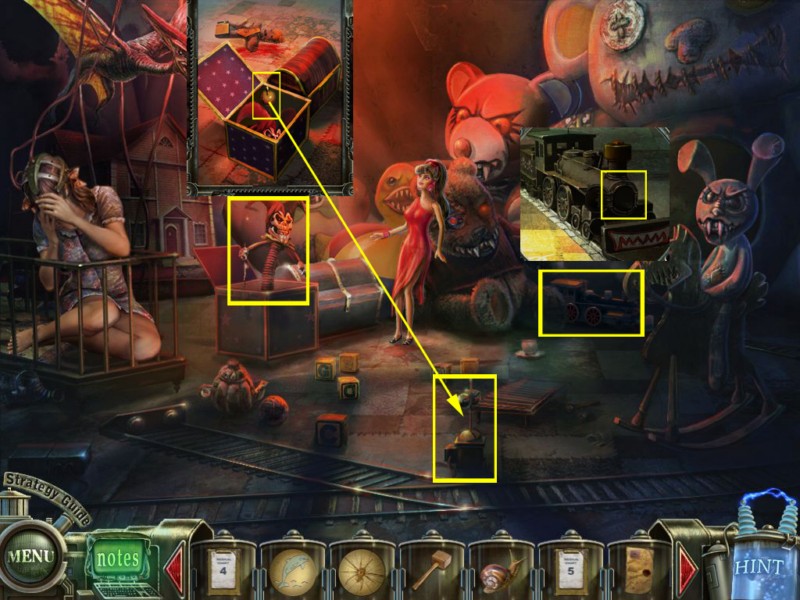
Zoom into the Jack-in-the-box and click again to put him back into his box.
Grab the lever.
Zoom into the railway tracks and place the lever. Click again to move the tracks.
Zoom into the train. Click to open it in the front and take the dead battery.
Screenshot
Go back 3x and enter the Lab.
Place the battery in the charger and take back the charged battery.
Return to the 2nd Floor Hall.
Room No 4
Place the medical chart 4 (Tim's car, inside) at the first door on the right and enter the room.
Grab the locket from the pedestal.
Click the night stand on the right side to get a closer view and take the rose oil.
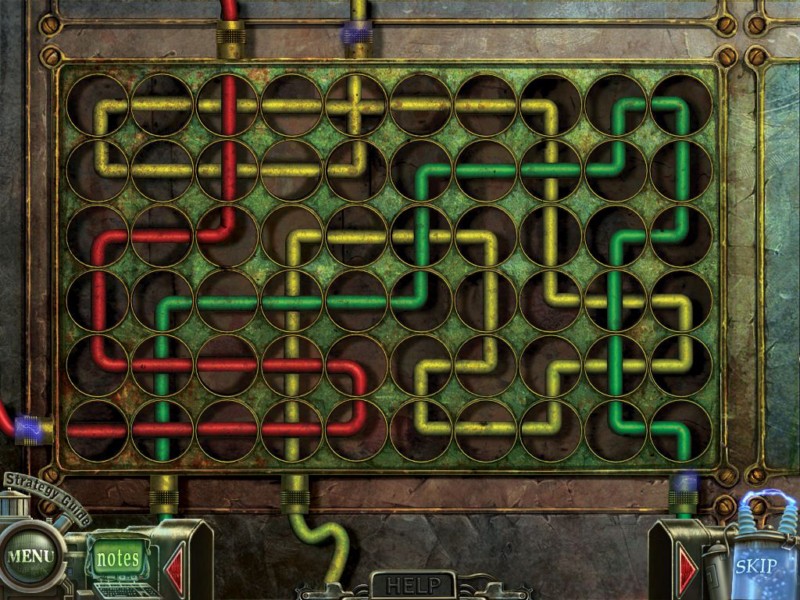
Click the pedestal to activate a mini game.
Click the wires to rotate them. You want to connect wires and connectors according to their color.
Screenshot
Exit the room.
Room No 5
Place the medical chart 5 (Pond, wall) at the door on the far left and enter the room.
Take the bottle with polish from the floor.
Play the hidden-object scene on the left side to obtain a lobster.
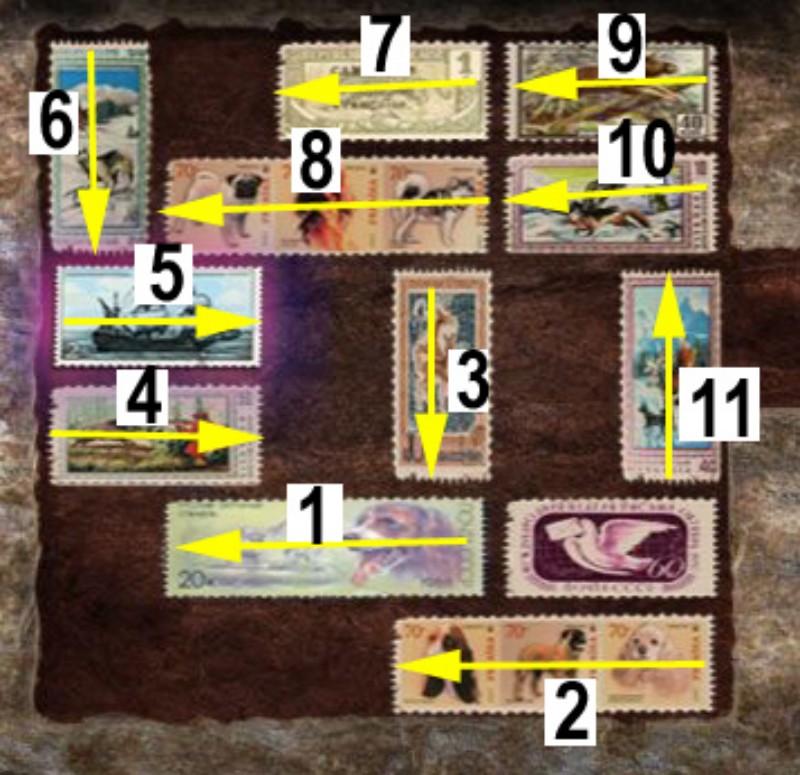
Click to activate the mini game on the right side.
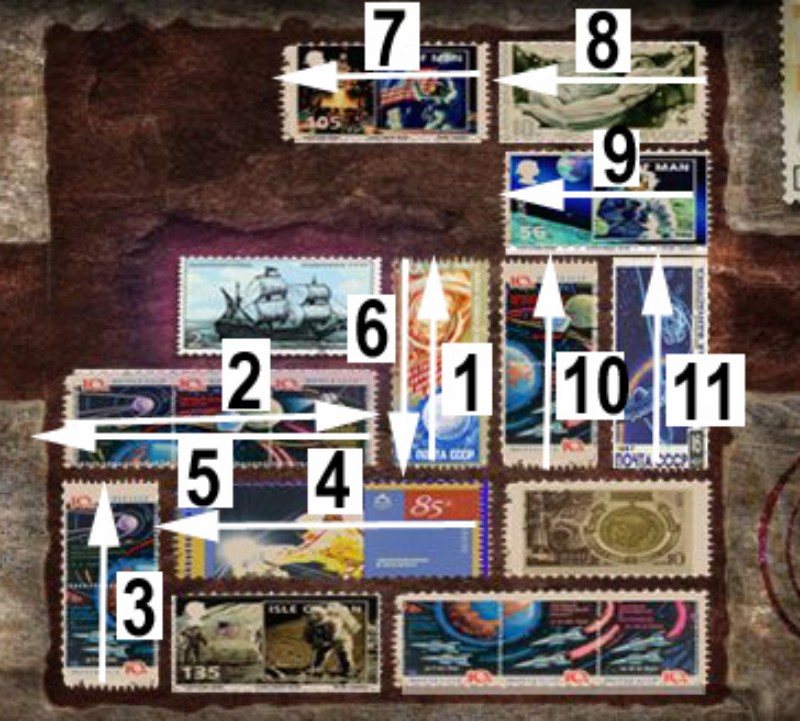
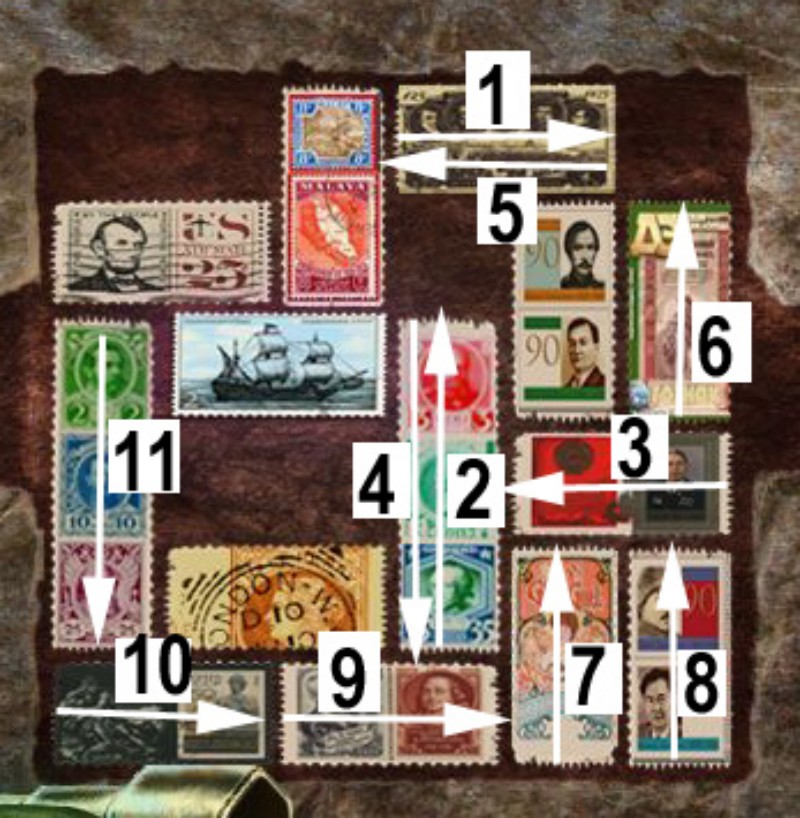
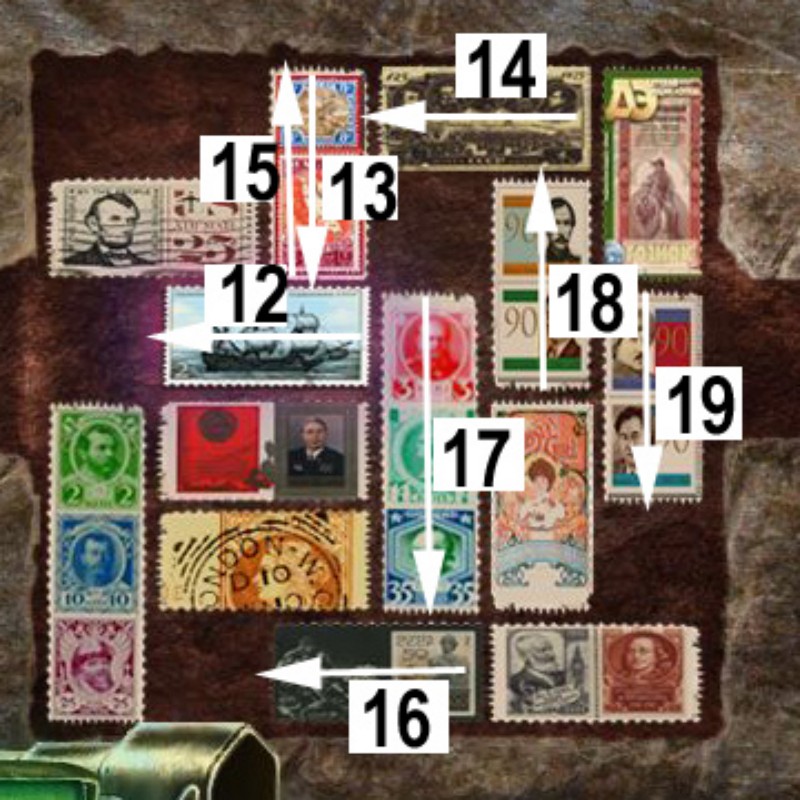
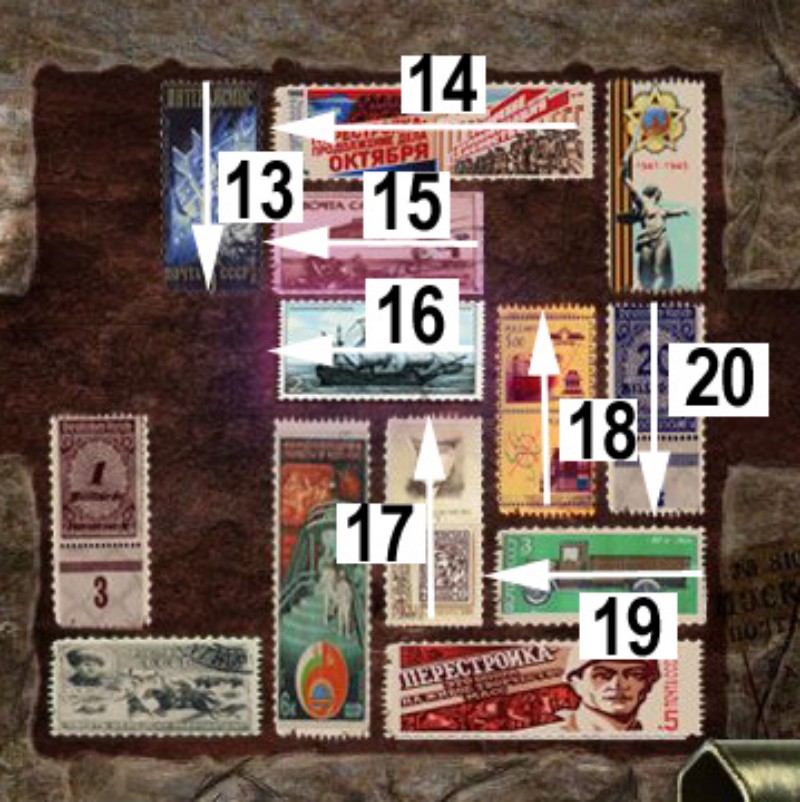
Your goal is to slide the ship 4x to the exit.
To do so slide the stamps to free the way.
Step 1.
Screenshot
Step 2.
Screenshot
Step 3.
Screenshot
Screenshot
Step 4.
Screenshot
Screenshot
The ship stamp goes into your inventory when done.
Go back until you are in the Entrance hall.
Entrance/Half Sunken House
Zoom in the water heater in the far back.
Click to activate it and place the envelope (2nd Floor Hall, mailbox); the stamp with a child goes into your inventory.
Exit the house, go left and then right.
Click the rose bush left next to the half sunken house and use the rose oil (Room No 4, nightstand) with it.
A butterfly appears. Catch it with the net (Entrance, far right) - the butterfly goes into your inventory.
Go once back and then forward to enter the cemetery.
Crypt
Place the lobster (Room No 5, hidden-object scene) at the crypt door and enter..
Grab the magnet from the tree on the left.
Zoom into the name plate on the right and place the locket (Room No 4, pedestal).
Grab the dried roses and click the paper scraps to activate a mini game.
Assemble both sides of the locket. The left picture is colored, the right one black and white.
To do so drag the scraps inside the frames. Correctly placed scraps will lock.
The repaired locket goes into your inventory.
Screenshot
Go back 3x , then forward. Use the stairs to come to the Pond.
Pond/Room No 5
Zoom into the metal bars on the left side and use the magnet (Crypt, tree) to obtain the tablet.
Go forward and enter Room No 5.
Play the hidden-object scene on the left to obtain a stamp without motive.
Zoom into the albums in the back and place the stamps from your inventor.
The stamp without motive goes into the left album, the ship stamp (Room No 5, slider puzzle) in the middle and the stamp with a child (Entrance, envelope with water heater) into the right album.
For this you will be rewarded with the stamp puzzle.
Zoom into the color bottles in front of the man and place the dried roses (Crypt) there - red roses will go back into your inventory.
Screenshot
Exit the room and enter Room No 3.
Room No 3
Zoom into the toy train and place the loaded battery (Lab, charger). Click the panel and start the train with the red button.
When the train comes back zoom in again.
Open the top of the trailer and take the carrot.
Give the carrot to the huge rabbit on the rocking horse.
Give the woman the red roses (Room No 5) and wait until she comes back.
Take the red dress she is carrying over the arm.
You will be rewarded with the doll puzzle
Screenshot
Exit the room and enter Room No 4.
Room No 4
Use the wooden mallet (lab) and smash all three mirrors in the room.
Place the tablet (pond) at the hook between the two mirrors.
Use the polish (Room No 5) with the tablet.
Give the woman on the bed the repaired locket (Crypt), then the dress (Room No 3).
You will be rewarded with the mirror puzzle.
Screenshot
Go back to the lower hall, enter the Basement Office and head down to Tim in the Lab.
Lab
Click Tim and place the puzzle tiles in the corresponding slots.
Tiles can only be placed in the right slots, otherwise they will go back into the inventory.
The tiles have to be placed:
Mirror -> Prism
Stamp -> Envelop
Doll -> Die
Spider -> Web
Dolphin -> Water
Exit the close up - the closet on the right side is open now.
Get the two thumbs out.
Screenshot
Go backwards until you stand outside of the building and head right.
Chapter 4
Right Side of the Building/House on the left/Operating Room
Zoom into the left door, place both thumbs (Lab) on the door and go inside.
Play the hidden-object scene under the ceiling to obtain the medical chart 8.
Zoom into the lamp on the left, click the cover to open the lamp and take the light bulb.
Go right into the hall.
Screenshot
Take the Engine Rotor on the floor, right side.
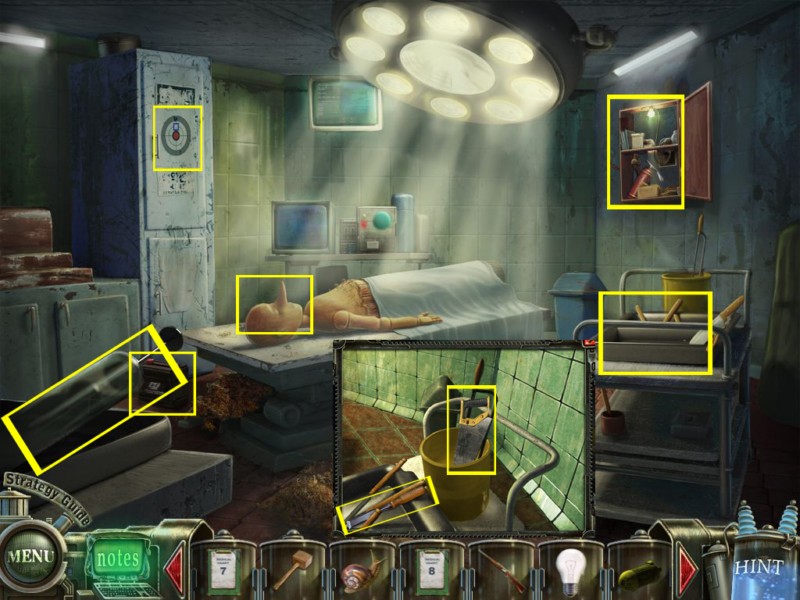
Enter the first room on the left, the Operating Room.
Click the hanging counter on the right and play the hidden object scene to obtain an elevator button.
Take the syringe in the low left corner and the engine accumulator next to the bed.
Zoom in to the table and grab the saw and the chisel.
Screenshot
Exit the room.
Zoom into the small cabinet; put the syringe on the gooey mess, after the plant grows, to obtain a full syringe.
Enter the room on the far left.
Right Side of the Building/House on the left/Relaxing Chamber
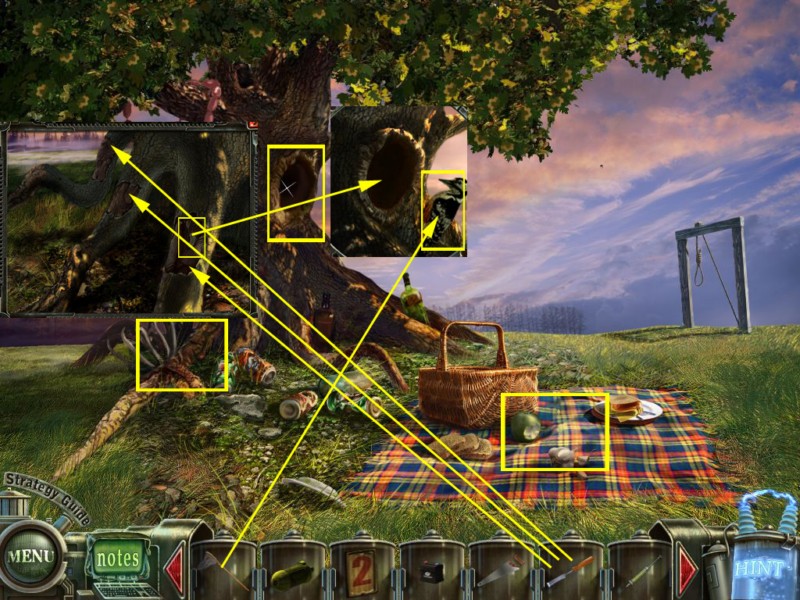
Play the hidden-object scene on the picnic blanket to obtain the rifle.
Zoom into the tree roots.
Use the chisel (Operating Room) to cut of the bark on all three roots.
Take the bark beetle.
Click the hole in the tree and give the beetle to the bird.
Catch the woodpecker with the net (Entrance, far right).
Screenshot
Go back to the Operating Room.
Operating Room
Zoom into the Pinocchio doll and use the full syringe (Operating Room) on its nose.
The syringe will go back into your inventory, still half filled.
Now place the woodpecker (Relaxing Chamber) on the nose and after this, use the saw (Operating Room).
The nose will go as flute into your inventor.
Use the rifle (Relaxing Chamber) at the dart board on the left.
Get the manhole handle out of the blown up closet.
Play the now activated hidden-object scene at the hanging closet to obtain a funnel.
Exit this house and enter the Power Room on the right side.
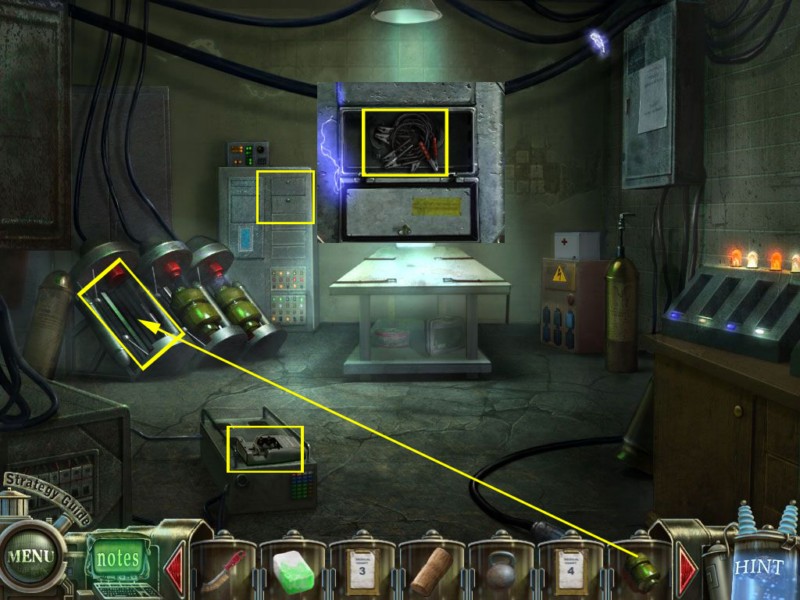
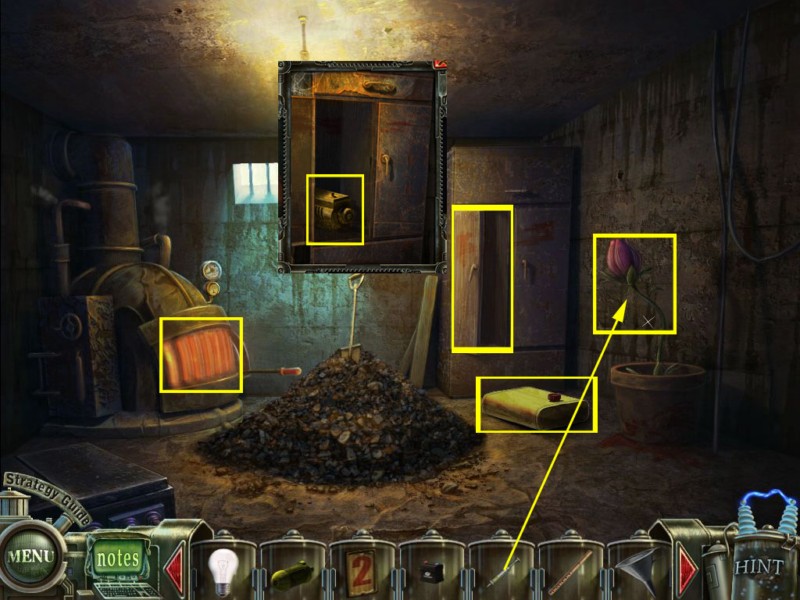
Power House/Boiler Room
Place the manhole handle (Operating Room) on the manhole and go inside.
Take the engine tank on the ground.
Zoom into the cabinet, open the door and take the engine.
Place the half full syringe (Operating Room) on the plant.
Screenshot
Exit this building, enter the building on the other side, and go to the Relaxing Room.
Relaxing Room/Power House
Play the hidden-object scene to obtain a token.
Exit and enter the Power House.
Zoom into the music box and use the token.
The plant will start to dance and freeze afterwards.
Use the mallet (Lab) to smash the plant.
Pick up the valve from the floor.
Exit and enter the building on the other side.
Room No 7
Place the medical chart 7 (Entrance, safe) at the door on the right and enter the elevator.
Grab the engine generator in the lower right
Grab the engine console on the left.
Place the valve handle (Power House) on the elevator and go inside.
Grab the paint brush on the ground.
Take the engine filter on the right side.
Go back into the hall and place the medical chart 8 (Right side of the Building, house on the left) on the left door, enter.
Room No 8
Take the medical chart 6 from the ground and leave the room afterwards.
Play the hidden-object scene on the right to obtain a gas can.
Go back to Room No 8.
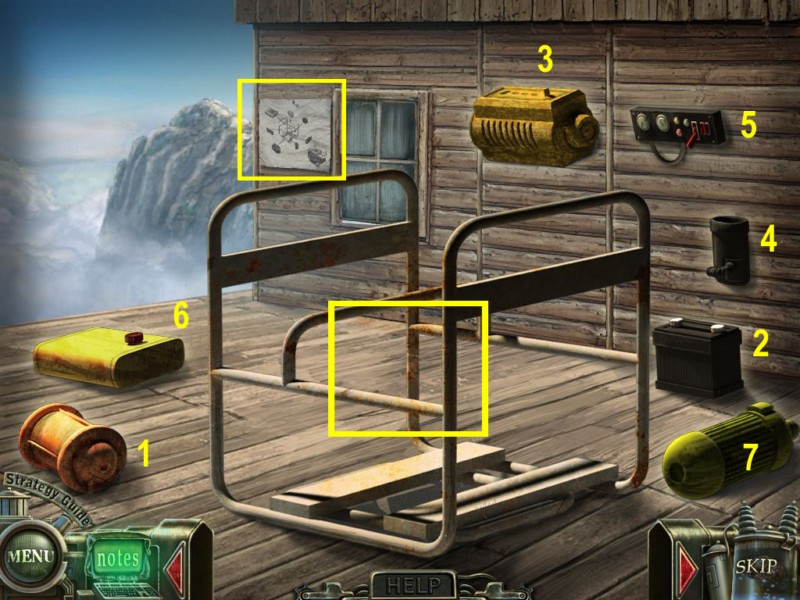
Zoom into the lift in the lower right and place the following items:
Generator, engine console, engine filter (both Room No 7), engine accumulator (Operating Room), engine, engine tank (Boiler Room), engine rotor (hall in front Operating Room).
Now assemble the engine on the lift in the right order.
Screenshot
Zoom into the tank on the left and place the flute (Operating Room) over the hose.
Place the funnel (Operating Room) on the generator and pour the content of the gas can into the funnel.
Click on the generator and the man will come forward.
The bird puzzle will be added to your inventory.
Screenshot
Head back to the main building, go up the stairs, cross the pond and enter Room No 6.
Room No 6
Zoom into the paints and dip the paint brush (Room No 7) into the paint - it will go back into your inventory as brush with white paint.
Leave the room and zoom into the door on the far right.
Place the medical chart 6 (Room No 8) and enter.
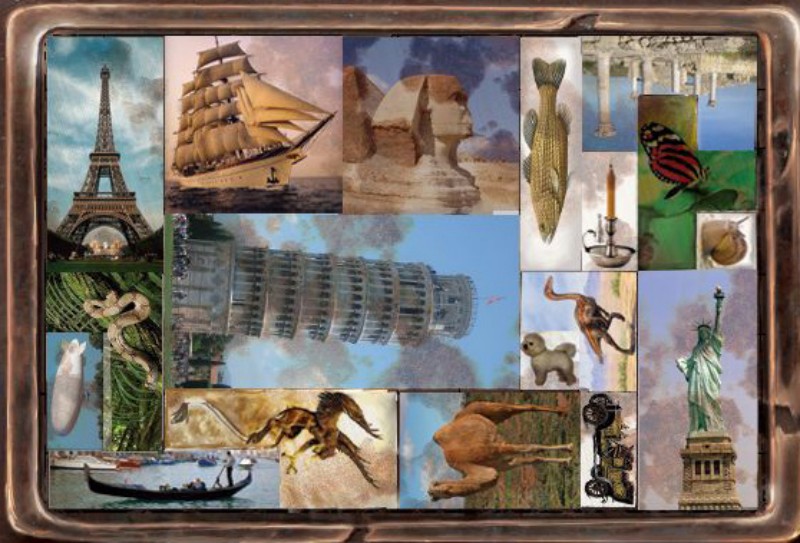
Click the back door to activate a mini game.
Fit all pictures into the slots; you do not want the pictures to overlap, and there should be no empty slots.
Screenshot
Go through the door and play the hidden-object scene on the right to obtain a crowbar.
Go back and use the crowbar to free the lower body part from the bear trap.
Feed the duck with the snail (Pond).
Go back to the room in the back and play another hidden-object scene to obtain a wire cutter.
Zoom into the cable and cut it with the wire cutter.
The eye puzzle goes into your inventory.
Screenshot
Go to the right side of the building and from there to Room No 7.
Room No 7
Enter the elevator and give the man the brush with paint (Room No 6).
Zoom into the lever on the left and place the light bulb. (desk, hall in this building) and the elevator button (Operating Room) to trigger a mini game.
The solution for the puzzle is scribbled on the right wall.
The light bulb in the top left will light up green when a correct sequence has been given, and red when an incorrect sequence has been given.
Screenshot
The wall puzzle will be added to your inventory.
Go back to the main building, from there into the office, and then down to the lab.
Lab
Zoom into Tim and place the puzzle parts.
Eye (Room No 6) -> Lens
Wall (Room No 7) -> Cannon Ball
Bird (Room No 8) -> Wind Symbol
Screenshot
This turned off the electrical fence.
Leave the main building, go left and enter the door at the electrical fence.
Electrical Fence/Graveyard
Play the hidden-object scene on the upper right side to obtain a bat.
Go back once and then forward to the Graveyard.
Place the bat on the right door and enter.
Zoom into the mummy and take the access card out of the right hand.
Go back to the area behind the electrical fence, zoom into the panel on the right side of the door and use the access card to open.
Enter the "Cave of the Lion"
Cave of the Lion
Play the hidden-object scene on the lower right side to obtain soap.
Go through the door ahead of you.
Play the hidden-object scene at the shelf to obtain a flask.
Zoom into the statue and use the soap at the finger with the ring. The ring will be added to your inventory.
Zoom into the chair and place the ring on the pen - this will go into your inventory as glass cutter.
Use it to cut the glass top on the desk and click the red button to open the door on the left.
Screenshot
This also activates a new hidden-object scene. Play it to obtain a keyboard.
Exit the room, zoom into the tree on the left and take a lemon.
Zoom into the water dispenser on the right, place the flask and click the lever.
Add lemon to the filled flask and click to add lemonade to your inventory.
Screenshot
Enter the room on the right, zoom into the desk and take the number 7.
Go 2x back to reach the area behind the electrical fence.
Electrical Fence/Crypt
Play the hidden-object scene to obtain a valve.
Go 1x back and then forward to the Graveyard.
Click the back door, enter and zoom into the mini game at the back.
Zoom into the sparkly area; place the number 7 (Cave of the Lion) on the plaque to activate a puzzle.
Move the tiles around until you form the dates "1952-2007".
Take the medical chart 9.
Screenshot
Go back to the Cave of the Lion.
Cave of the Lion
There is a new hidden-object scene. Play it to obtain glasses.
Go through the right door and zoom into the wall on the right - place the valve (Electrical Fence).
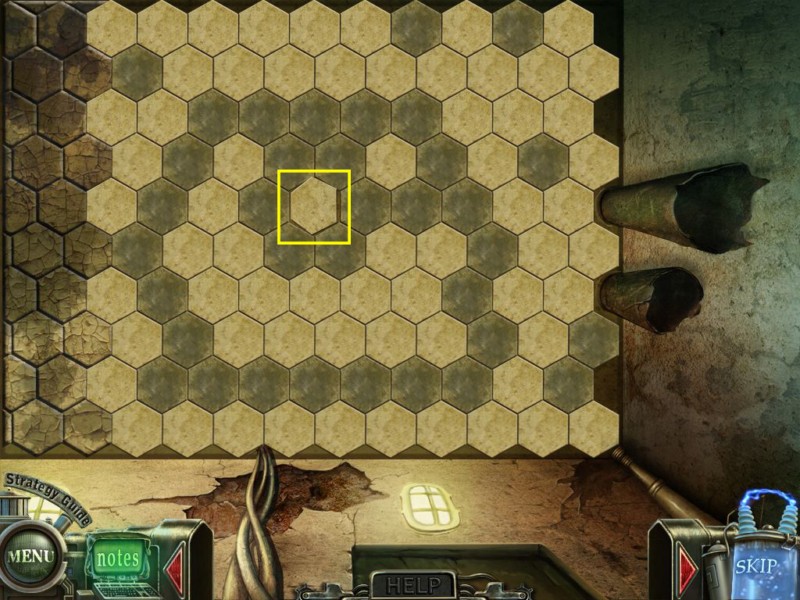
Click to activate a mini game.
Trap the person hiding under the ceiling tiles by blocking their way.
Click on a tile you want to block; water will spray on that spot, darkening it.
After every tile you blocked, the person will make one move.
Do not let the person reach the corners of the ceiling or you will lose that round and have to start over.
It is better to block off the corners of the ceiling first, and then start closing the tiles in around until there is no place else to go.
Screenshot
Get the wooden amulet that falls on the ground.
Place the medical chart 9 (Crypt) on the left door and enter.
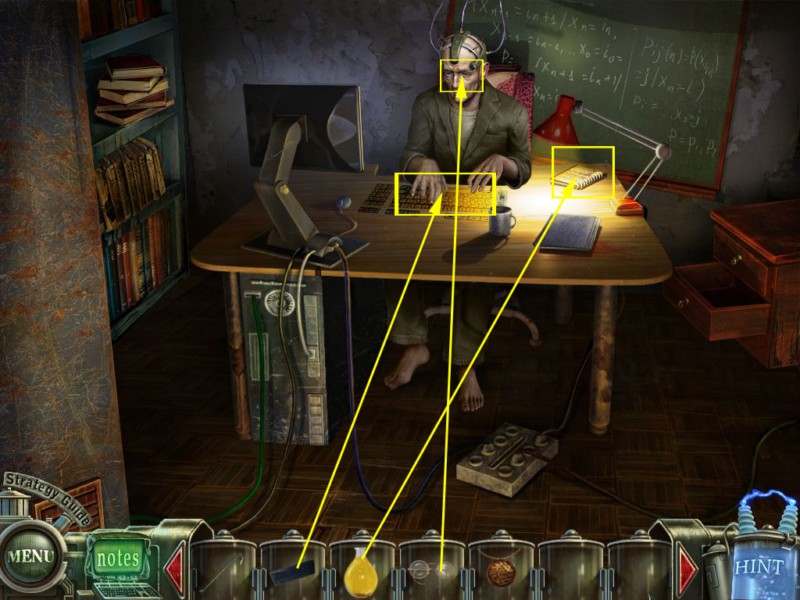
Room No 9
Zoom into the notebook next to the man and pour the lemonade (Cave of the Lion) over it to make the notes visible.
Give him the glasses (Cave of the Lion) and you will be rewarded with the pen puzzle.
Screenshot
Exit, head over to the main building and go left, enter the Power House and from there the Boiler Room.
Boiler Room/Graveyard
Open the furnace by clicking the lever on the right.
Place the wooden amulet (Cave of the Lion, right door) in the furnace. After burning use the crowbar (Room No 6) to get the now revealed key.
Leave the Power House, back to the main building and right to the Graveyard.
Go right through the door with the bat.
Zoom into the compartment on the top right and use the key to open it.
Take the medical chart 10, return to the electrical fence and enter the Cave of the Lion.
Cave of the Lion/Room No 10
Enter the right door and place the medical chart 10 (Graveyard).
Zoom into the box on the left and use the crowbar (Room No 6) to open it.
Take the dynamite, zoom into the crack in the wall and place it there.
The bullet puzzle will be added to your inventory.
Screenshot
Go back to the main building and from there into the lab; it is time to free Tim.
Lab
Zoom into Tim and place the last two puzzle tiles.
The bullet puzzle (Room No 10) goes into the slot with the radioactive symbol, the pen puzzle (Room No 9) to the slot with the letters.
Screenshot
Follow Tim through the right door and play the hidden-object scene to obtain a chip.
Zoom into the panel on the upper left and place the chip in the slot.
This triggers the hidden-object scene again - play it to obtain a small light bulb.
Zoom into the device on the left and place the light bulb. in the slot.
Screenshot
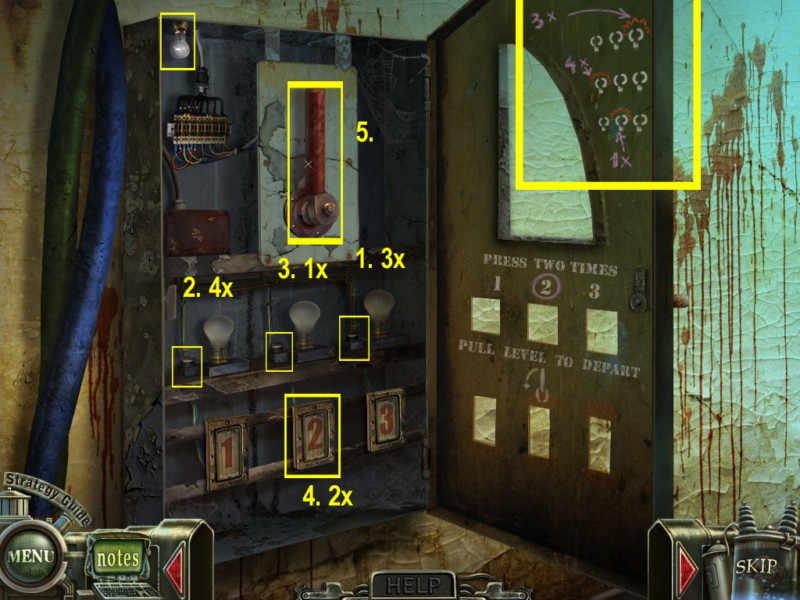
Go through the door and click the panel on the left.
Look at the lights on the console.
Reproduce the light sequence you are shown.
If you make a mistake, a red light will appear on the right; get three red lights and you will have to start over from the beginning.
The sequences are random; you will need to win 10 rounds to win.
Congratulations! You've completed Haunted Halls: Green Hills Sanitarium!
Thanks to Kayleigh for the walkthrough!
Posted by: Mike |
January 4, 2011 11:40 PM
|
January 4, 2011 11:40 PM