

Sherlock Holmes: The Hound of the Baskervilles
Platform: Windows

![]() I do not like Sherlock Holmes. While I acknowledge he has some pretty awesome adventures, there's just something about him that makes me want to slap that hat off his head every time he opens his mouth and girl-bully the heck out of him. Then again, that's par for the course when you're talking about a character who gets called "the greatest detective who ever lived"; with a title like that, you practically have to be campaigning for Most Insufferably Smug Genius of the Year. What I do like, however, is Sherlock Holmes: The Hound of the Baskervilles the new hidden-object adventure game from Frogwares. In fact, I like it quite a bit. Combining rich visuals, moody environment, and a mass of tricky puzzles to crack, it's an exceptionally well made game... if not exactly wholly accurate to the source material.
I do not like Sherlock Holmes. While I acknowledge he has some pretty awesome adventures, there's just something about him that makes me want to slap that hat off his head every time he opens his mouth and girl-bully the heck out of him. Then again, that's par for the course when you're talking about a character who gets called "the greatest detective who ever lived"; with a title like that, you practically have to be campaigning for Most Insufferably Smug Genius of the Year. What I do like, however, is Sherlock Holmes: The Hound of the Baskervilles the new hidden-object adventure game from Frogwares. In fact, I like it quite a bit. Combining rich visuals, moody environment, and a mass of tricky puzzles to crack, it's an exceptionally well made game... if not exactly wholly accurate to the source material.
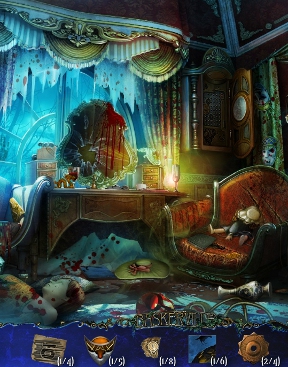 If you were expecting or hoping the story would stay true to the original, well, uh, don't. The basic premise is still intact; Henry Baskerville returns home after his father's death, and seeks out the legendary Sherlock Holmes to find out the truth behind the curse that has taken the life of every member of his family. Holmes (and Watson, because they are Best Friends Forevar) follow Henry to the Baskerville estate, where you quickly find a whole lot of ominous lighting, strange shadows, and Dark Forces Are At Work™... or are they? It isn't long before Holmes and company begin to suspect they aren't dealing with any ordinary beast... and that's before the mystical powers show up.
As Holmes and his companions, you'll scour the spacious Baskerville estate, hunting for answers and solving puzzles. The game comes with two difficulty modes, and while "easy" marks interactive areas and offers more hints, "hard" comes with more difficult puzzles and hidden-object scenes. The only penalty for repeated misclicks is that the cursor will eventually go flying around the screen temporarily and Holmes will chastise you for being too hasty. Hey, shut up, Sherlock! I always liked Watson better anyway. Early on, you'll also gain access to the Book of the Baskervilles; while it might sound boring by title, this actually serves as a map you can use to instantly jump to any location you've already visited, and also marks places that still have clues with an exclamation mark.
 Analysis: Clearly, this is not canon Holmes material. How big of an issue this is for you largely depends on how much of a fan/purist you are, and if your answer to that is "a very big one", you probably hit the words "mystical powers" in this review and your monocle probably popped right out in shock. In fact, one of the reasons that compelled me to finish (you know, apart from the game being fun and well made) was because I wanted to see if there really was some logical explanation for it all, true to Holmes fashion. Granted, it would have to be massively complicated and convoluted on a Scooby-Doo-like scale, or at least involve a Batman supervillain or two, but it could still happen. Does it? Well, that'd be spoiling things, now, wouldn't it?
What I will tell you is that apart from a woefully overexcited soundtrack, most everything about Hound of the Baskervilles exudes high production values. The design, clearly, is gorgeous, with deep, vibrant colours in highly detailed environments, but the gameplay is sort of a mixed bag. None of it is bad; as you'd expect from a Sherlock game, much of it revolves around solving puzzles, and both the variety and the scale of difficulty is a wonderful treat. However (there's always a however) the game has a disappointing tendency to have puzzle pieces just "show up" when they're required by popping up in places they previously were not in, which means you have to revisit places just on the off chance something you need has "spawned". The gameplay also winds up being a little predictable; track down all the missing pieces of a puzzle or lock, move to the next location, and do it again.
Fortunately, Sherlock Holmes: The Hound of Baskervilles is still worth playing for everything else it gets right, from its beautiful design, to its crazy (but interesting!) spin on the classic tale, to the absolutely brilliant addition of that simple but wonderful instant travel map more games should make use of. It's rare to find a hidden-object game that really forces you to use your brain, and the puzzle difficulty on hard mode ranges from simple tile swapping to code deciphering. Depending on your chosen mode and whether you skip any puzzles, the game should take anywhere from three to five hours to complete. While die-hard Holmes fans might be disappointed by how many liberties it takes with the source material, those looking for just a quality adventure with some challenging gameplay will find a lot to like here, and should definitely check out the demo. One might say... it's elementary.
A Collector's Edition is also available. It contains extra material such as three bonus chapters to play, an in-game strategy guide, and more. Remember that Big Fish Game Club Members pay only $13.99 for Collector's Editions (or 2 club credits), and collector's editions count 3 card punches of 6 total needed for a free game.
![]() Windows:
Windows:
Download the demo
Get the full version
Also available: Collector's Edition
![]() Mac OS X:
Mac OS X:
Not available.
Try Boot Camp or Parallels or CrossOver Games.


Walkthrough Guide
(Please allow page to fully load for spoiler tags to be functional.)
Sherlock Holmes and the Hound of the Baskervilles - Walkthrough
General
You can play the game in easy or hard mode.
Hard mode will mean longer time to recharge the hint and skip buttons, no additional help from highlighting important objects, and harder puzzle.
The book in the low left corner contains a map.
Clicking on one of the active (colored) locations will bring you immediately to this room/place.
A location with an exclamation marks shows locations with a pending task.
A lot of puzzles will need several objects or several parts of one object.
The numbers in your inventory will show you the remaining amount.
The hint will show you an object in the hidden-object scenes or a place at your location where something could be done or picked up.
The problem with the hint is that it will show you puzzle locations even though you do not have all needed parts.
The powers you will receive from the portraits can always be used. They do not need time to recharge.
When you come into a room or an area with a blue sign on top that says "Area completed," there is definitely nothing more to find or do.
Coat of Arms - List
Rodger's Coat of Arms
Portrait Hall - Steps on the right side.
Secret Garden - Mouth of the dragon
Secret Garden - Ground on the low left side.
Rodger's Room (Past) - desk, left side
Secret Garden - werewolf
Luisa's Coat of Arms
Luisa's Room, chair.
Luisa's Room, chaise lounge.
Luisa's Room (Past), top of wardrobe.
Luisa's Room (Past), couch
Luisa's Room, desk drawer
James' Coat of Arms
James' Room, on the floor
James' Room (Past), on the floor
James' Room (Laboratory), bottom shelf
Winter garden, hatch
James' Room (Laboratory), cage
Lily's Coat of Arms
Lily's Room, globe
Lily's Room, desk shelf
Lily's Room (Past), wall
Lily's Room, after butterfly-puzzle
Kitchen, wax mold
Edward's Coat of Arms
Henry's Room, on the floor right side
Henry's Room, on the floor left side
Edward's Room (Past), low left
Edward's Room (Past), under the chair (Perception-Power)
Elizabeth's Room, floor
Elizabeth'ss Coat of Arms
Henry's Room, behind left mask
Elizabeth'ss Room (Past), left side
Elizabeth'ss Room (Past), unfinished painting (Materialization-Power)
Elizabeth'ss Room (Past), dark spot
Elizabeth'ss Room, painting puzzle
Charles' Coat of Arms
Charles' Room, on the floor
Charles' Room (Past), bed
Charles' Room (Past), floor
Charles' Room (Past), stairs (dark spot)
Mine, bat puzzle
Puzzle Pieces/Crystal Eyes - List
Yellow crystal eyes for Rodger's wolf head (2)
Rodger's Room, table on the low left side
Secret Garden, hand of the Minotaur
Red crystal eyes for Luisa's wolf head (2)
Luisa's Room, mannequin's necklace
Rodger's Room, tiger on the floor
Red crystal eyes for James' wolf head (2)
James' Room, dark spot top right
Luisa's Room (Past), marionette
Blue crystal eyes for Lily's wolf head (2)
Lily's Room, lamp,
Lily's Room, molding puzzle
Red crystal eyes for Edward's wolf head (2)
Edward's Room, dark spot top right
Edward's Room, chest-puzzle
Green crystal eyes for Elizabeth'ss wolf head (2)
Elizabeth'ss Room, damaged painting puzzle
Henry's Room, behind right mask
Red crystal eyes for Charles' wolf head (2)
Charles' Room, stone planet (Strength-Power)
Observatory, dark spot
Puzzle piece for Rodger's door (1)
Portrait Hall, on the steps left side
Crossbow (3)
Rodger's Room, low right corner
Rodger's Room (Past), hidden-object scene
Rodger's Room (Past) on the ground
Strange Sign (4)
Secret Garden, wooden board
Luisa's Room (Behind the Mirror), wall
Henry's Room, on the floor
Henry's Room, after chess-puzzle
Keys for the second floor (5)
Rodger's Room (Past), left side
Luisa's Room (Past), vase left
James' Room, on the floor
Winter garden, floor
Lily's Room past
Scheme piece (8)
Rodger's Room (Past), right side
Luisa's Room (Behind the Mirror), stool
James' Room, low right
Winter garden, stairs
Lily's Room (Past), wall
Edward's Room (Past), left wall
Elizabeth's Room (Past), unfinished painting
Portrait Hall, Charles' Portrait
Gear (4)
Rodger's Room (Past), vase
Luisa's Room, statue on nightstand
Luisa's Room (Past), vase right
Rodger's Room - hidden object scene, below the window
Parts of Painting (6)
Rodger's Room (Past), vase
Luisa's Room, top of wardrobe
Luisa's Room (Past), below the desk
James' Room, on the floor
Luisa's Room (Behind the Mirror), chair
Luisa's Room (Behind the Mirror), top of wardrobe
Fangs (2)
Luisa's Room, chest on nightstand
Luisa's Room, mannequin's hand
Part of James' door lock (4)
Luisa's Room (Past), desk
Hall, dark spot right side
Kitchen, pot left side
Kitchen, dark spot above hoot
Black Candle (4)
Luisa's Room (Past), hidden-object scene desk
Luisa's Room, hidden-object scene wardrobe
Kitchen, niche next to fire place
James' Room, medical cabinet
Cabinet Lock Part (2)
Kitchen, dark spot on shelf
James' Room - skull on top shelf
Circular Key (3)
James' Room, skull on bottom shelf
James' Room (Past), cabinet
James' Room (Past), hidden-object scene
Fountain Part (wolf head) (3)
James' Room (Laboratory), low left
James' Room (Laboratory), hidden-object scene
Winter garden, cage
Molding part (3)
Winter garden, right side
Winter garden, flower pot (Speed-Power)
Winter garden, hidden-object scene
Tetravex (8)
Lily's Room, book stand
Lily's Room, desk
Lily's Room (Past), wall
2nd Floor Hall, left side
Henry's Room, after Pentagram puzzle
Henry's Room, fire place
Charles' Room, dark spot
Charles' Room, left next to book cabinet
Rose (2)
Lily's Room Past, desk
Lily's Room (Past), broken sphere
Butterfly (3)
Lily's Room (Past), Speed-Power on chrysalis
Lily's Room, globe
Lily's Room (Past), branch after rose-puzzle
Cub (2)
Henry's Room, flower pot
Edward's Room, shelf
Wood Piece (3)
Edward's Room, shelf
Edward's Room (Past), top left
Elizabeth's Room, low left
Pentagram (3)
Edward's Room, table
Elizabeth's Room, right side (Materialization-Power)
Edward's Room, after rope puzzle
Charles'Door Key (2)
Edward's Room (Past), wall
Portrait Hall, Elizabeth's Portrait
Stair board (2)
Henry's Room, hidden-object scene
Charles' Room, low left
Strange Stone (3)
Garden, hidden-object scene
Garden, ground
Garden, after branch puzzle
Metal Plaque (3)
Ritual Place, dark hollow (Perception Power)
Ritual Place, stump low right, (Strength Power)
Garden, hidden-object scene
Single Inventory Items - List
Pitcher with water - Portrait Hall, table
Book (Map) - Rodger's Room, table
Red curtain ribbon - Rodger's Room, table
Knife - Rodger's Room, lower right side
Paper - Rodger's Room, on the floor
Horn - Rodger's Room, on the floor
Oiler - Rodger's Room, hidden-object scene 1 below the window
Piece of coal - Rodger's Room, fireplace
Padlock key - Secret Garden, puzzle upper right corner
Rag - Secret Garden, right side
Wet rag - Rodger's Room, spilled Whiskey on the floor
Key for wardrobe - Luisa's Room, chest on nightstand
Handle - Luisa's Room (Past), grandfather clock after gear puzzle
Key for Kitchen - Portrait Hall, dark corner right next to the stairs
Fire poker - Kitchen
Cauldron - Kitchen, stairs
Jug - Kitchen, table
Filled Jug - Winter garden, fountain
Matches - Kitchen, table
Marionette Ruler - Luisa's Room (Behind the Mirror) after painting puzzle
Surgery Saw - James' Room (Laboratory), low left corner
Lung - James' Room (Laboratory), top shelf
Heart - James' Room (Laboratory), Frankendog
Syringe - Winter garden - hidden-object scene
Filled Syringe - James' Room (Past), hidden-object scene
Dry Twigs - Winter garden, palm tree
Seeds - Winter garden, fountain
Key for Lily's Room - Winter garden, flower pot (Speed-Power)
Butterfly Net - Lily's Room, wooden chest
Termites - Lily's Room (Past), hidden-object scene terrarium
Wax Mold - 2nd Floor Hall, left side
Lens - 2nd Floor Hall, right side
Key to Henry's Room - 2nd Floor Hall, portrait (Materialization-Power)
Key to Elizabeth's Room - Edward's Room, diving helmet
Palette - Elizabeth's Room (Past), floor
Brush - Elizabeth's Room (Past), jar of brushes
Painting Tube - Elisabeth' Room, hidden-object scene
Mars - Charles' Room, representation (Materializing-Power)
Padlock Key - Charles' Room (Telescope), bottom shelf
Saturn - Observatory, top shelf
Empty flask - Charles' Room (Past), floor
Telescope focuser - Charles' Room (Past), scheme (Materialization-Power)
Ocular - Charles' Room (Past), hidden-object scene
View finder - Charles' Room, hidden-object scene
Dog - Observatory, telescope puzzle
Flask with Blood - Elizabeth's Room, bloody painting
Torch - Garden, ground
Lit Torch - Garden, fire bowl
Shovel - Ritual Place, hidden-object scene
Map for Mine - Ritual Place, chest
Pick axe - Mine
Oiler - Ritual Place, hidden-object scene
Lizard - Mine, hidden-object scene
Venus - Henry's Room, scheme puzzle (Materialization-Power)
Meteorite - Charles' Room, solar system puzzle
Chapter 1: Rodger Baskerville
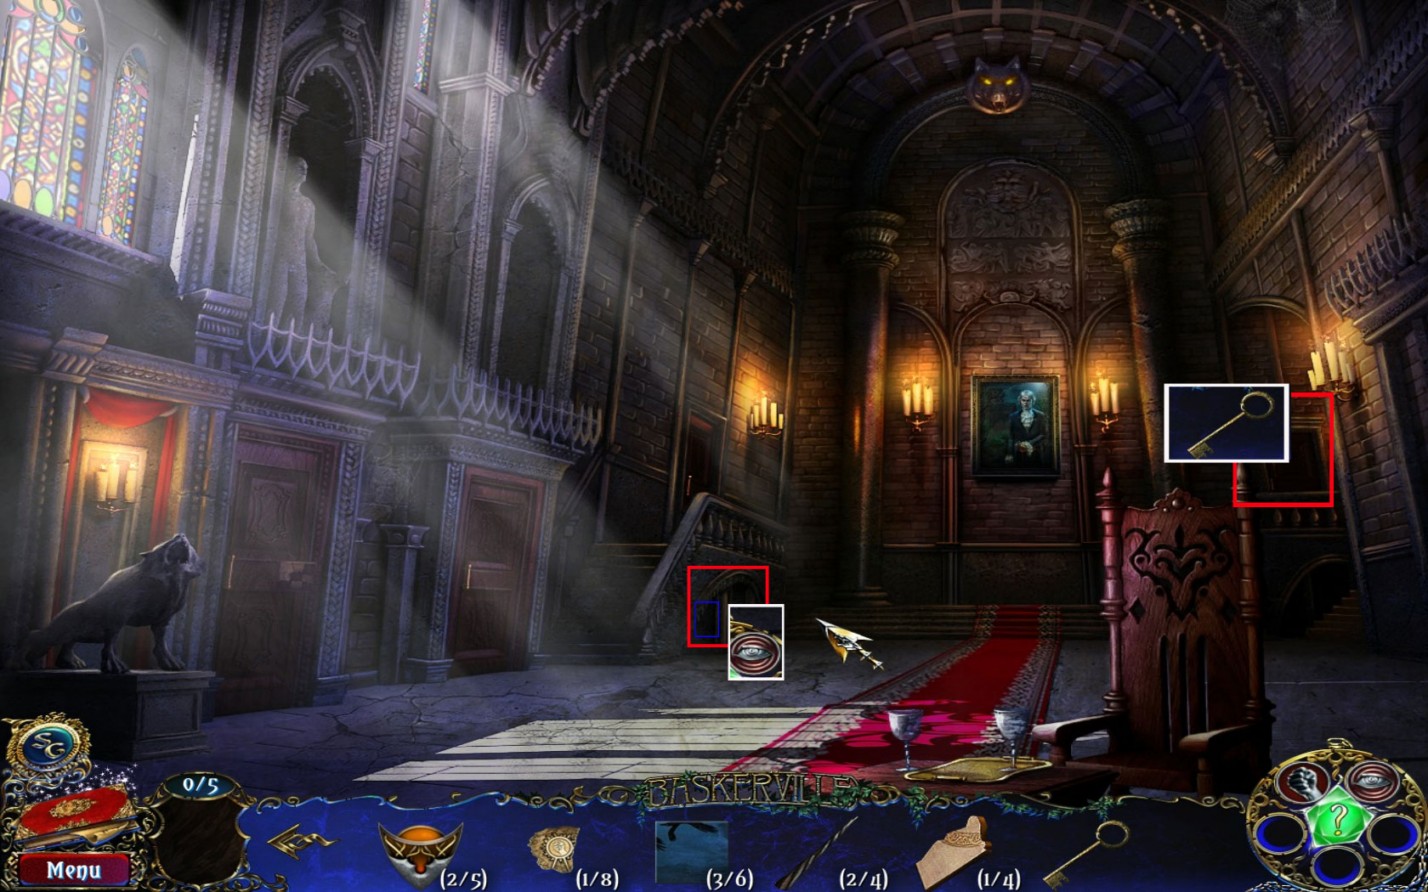
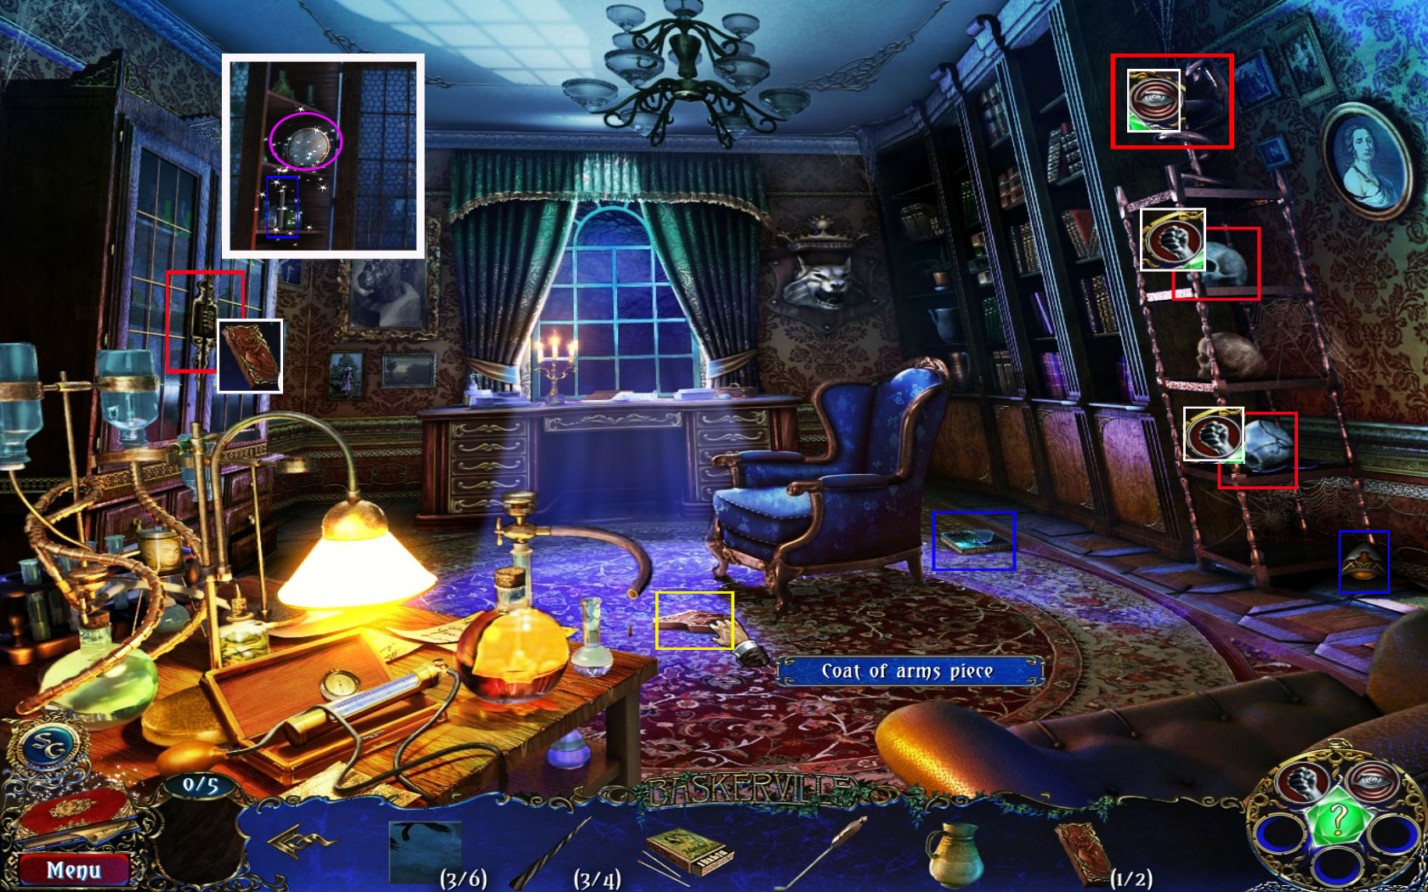
Portrait Hall
Grab the pitcher with water from the table on the low left.
Pick up a piece of Rodger's coat of arms (1/5), on the steps right side.
Pick up the puzzle piece for Rodger's door, on the steps, left side.
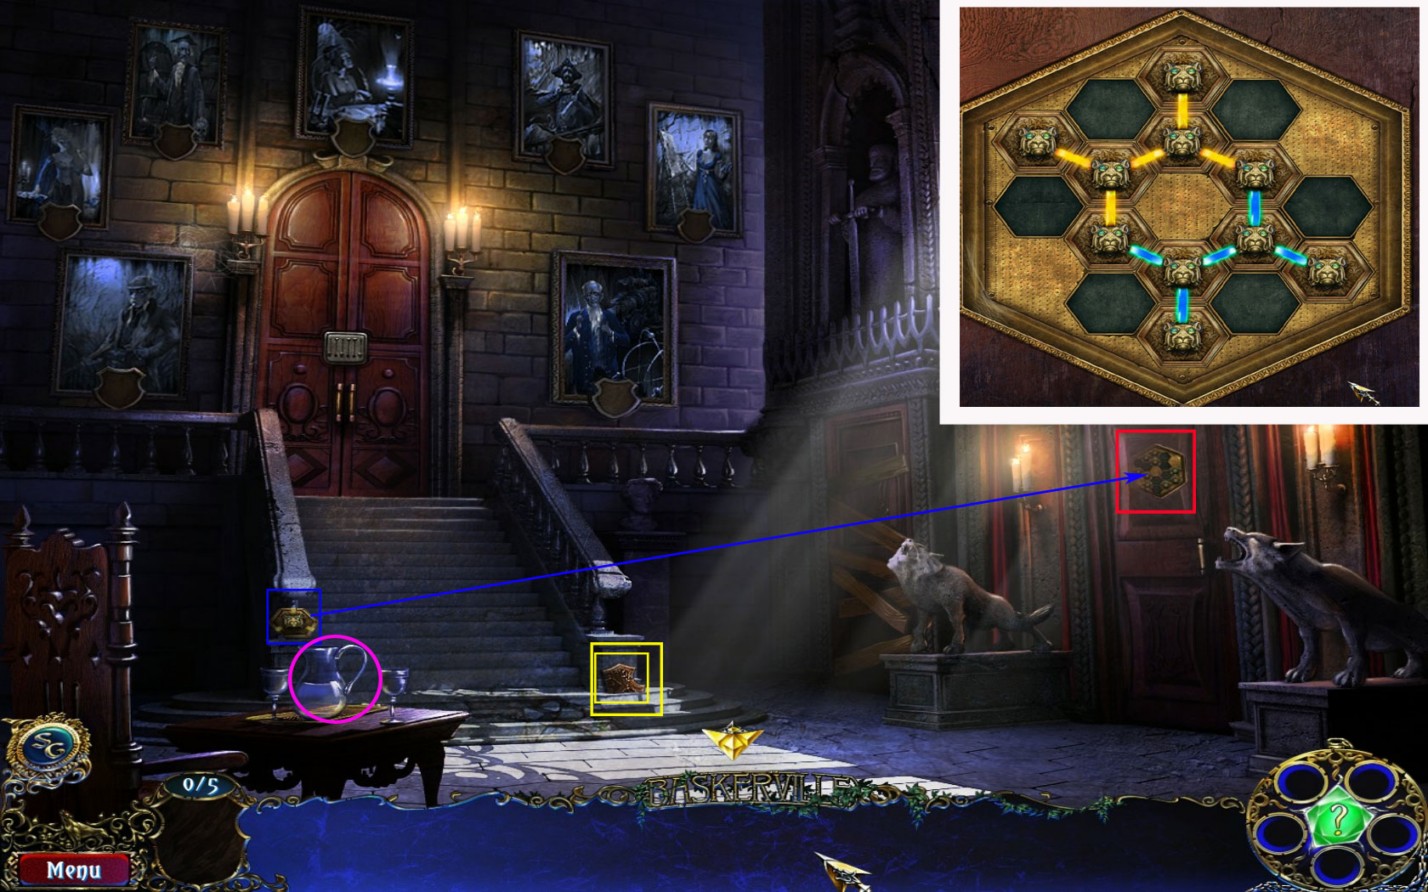
Drag the puzzle piece onto the right door on the right side to trigger the puzzle.
Place all pieces in such a way that the yellow and blue beams are connected to each other.
To do so, click a piece an click again to place it into one of the slots.
You will have to use all pieces.
The door opens - enter.
Screenshot
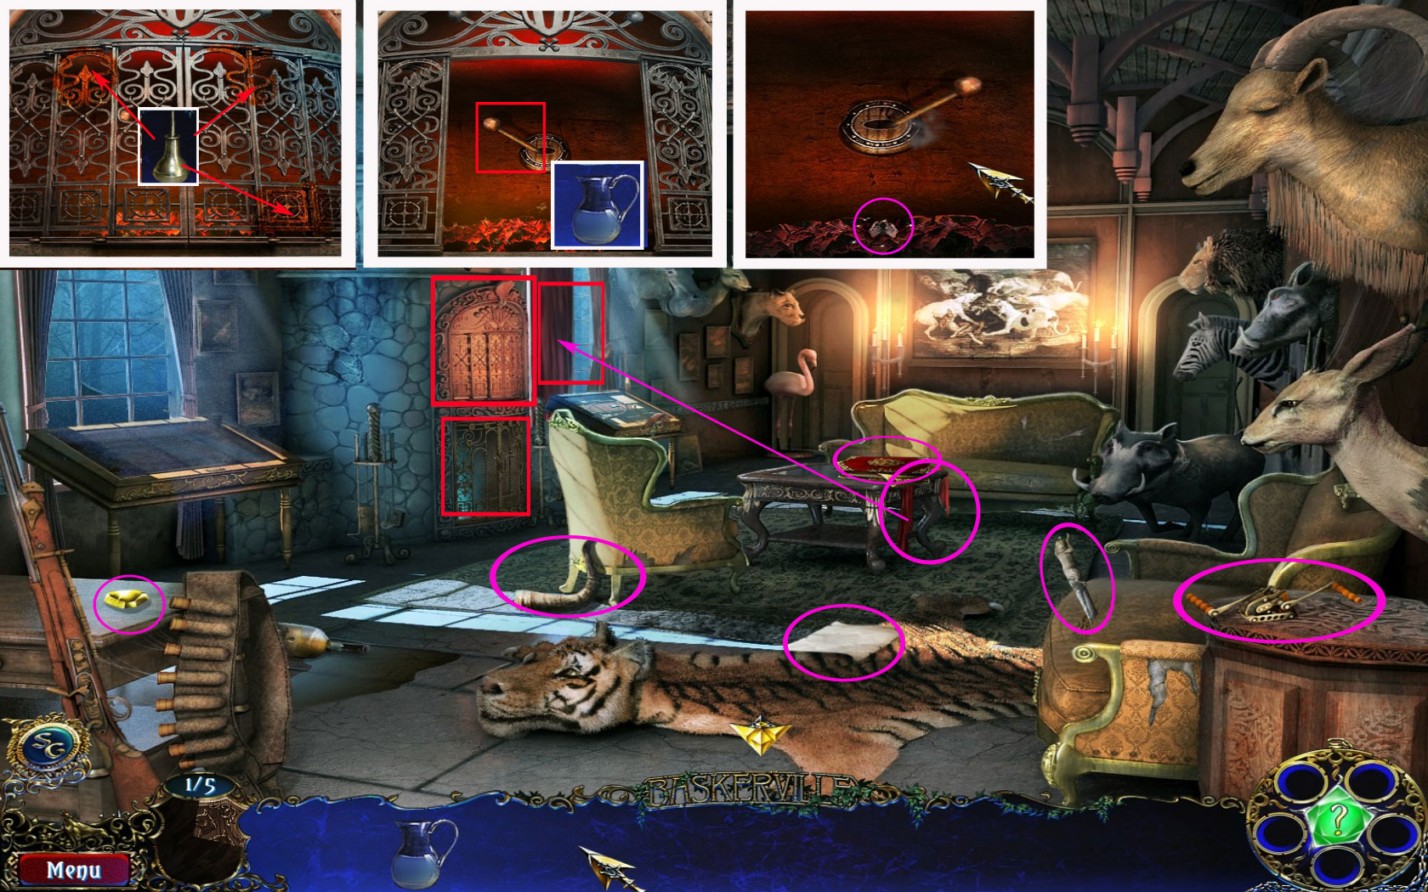
Rodger's Room - Present
There are a few piece to pick up:
The book on the table in the middle of the room - it will go in the low left corner and stay there. This is your map: Use it to see where pending tasks are, or to head fast from one location to the other.
The red curtain ribbon from the table.
The crossbow piece - on the drawer, low right corner.
The knife stuck in the chair on the low right side.
The paper on the floor above the tiger.
The horn, leaning against the chair in front of the fireplace.
The yellow crystal eye on the table on the low left side.
Click the curtain ribbon on left curtain of the far left window.
Click the window to trigger a hidden-object scene.
Play the hidden-object scene to get an oiler.
Click the fireplace grate and use the oiler to remove the three rusty spots.
Use the pitcher with water to extinguish the fire.
Grab the piece of coal.
Click the lever and exit the scene.
Below the fireplace a passage to the Secret Garden opens - Enter it.
Screenshot
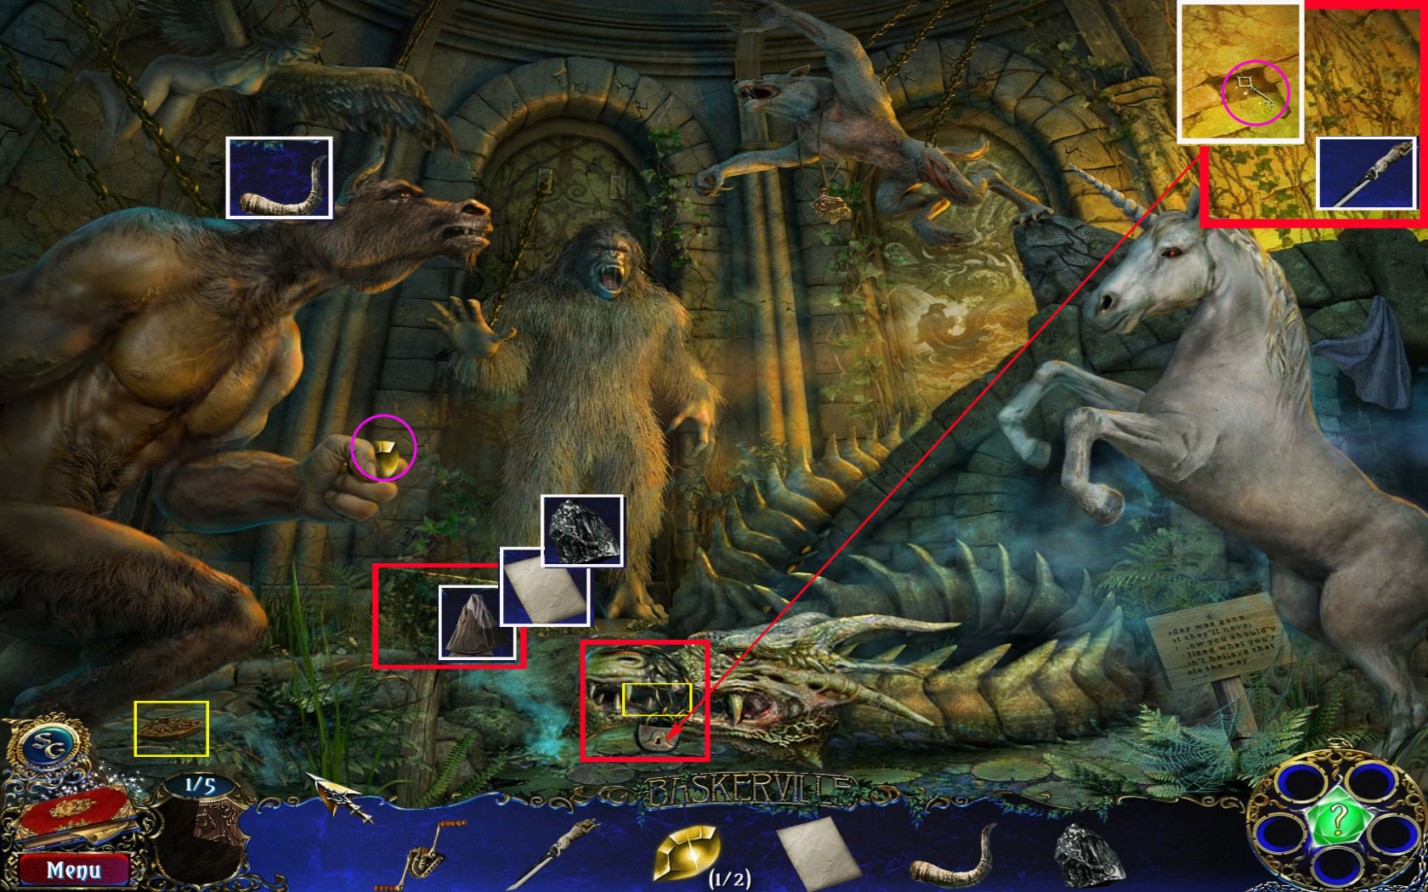
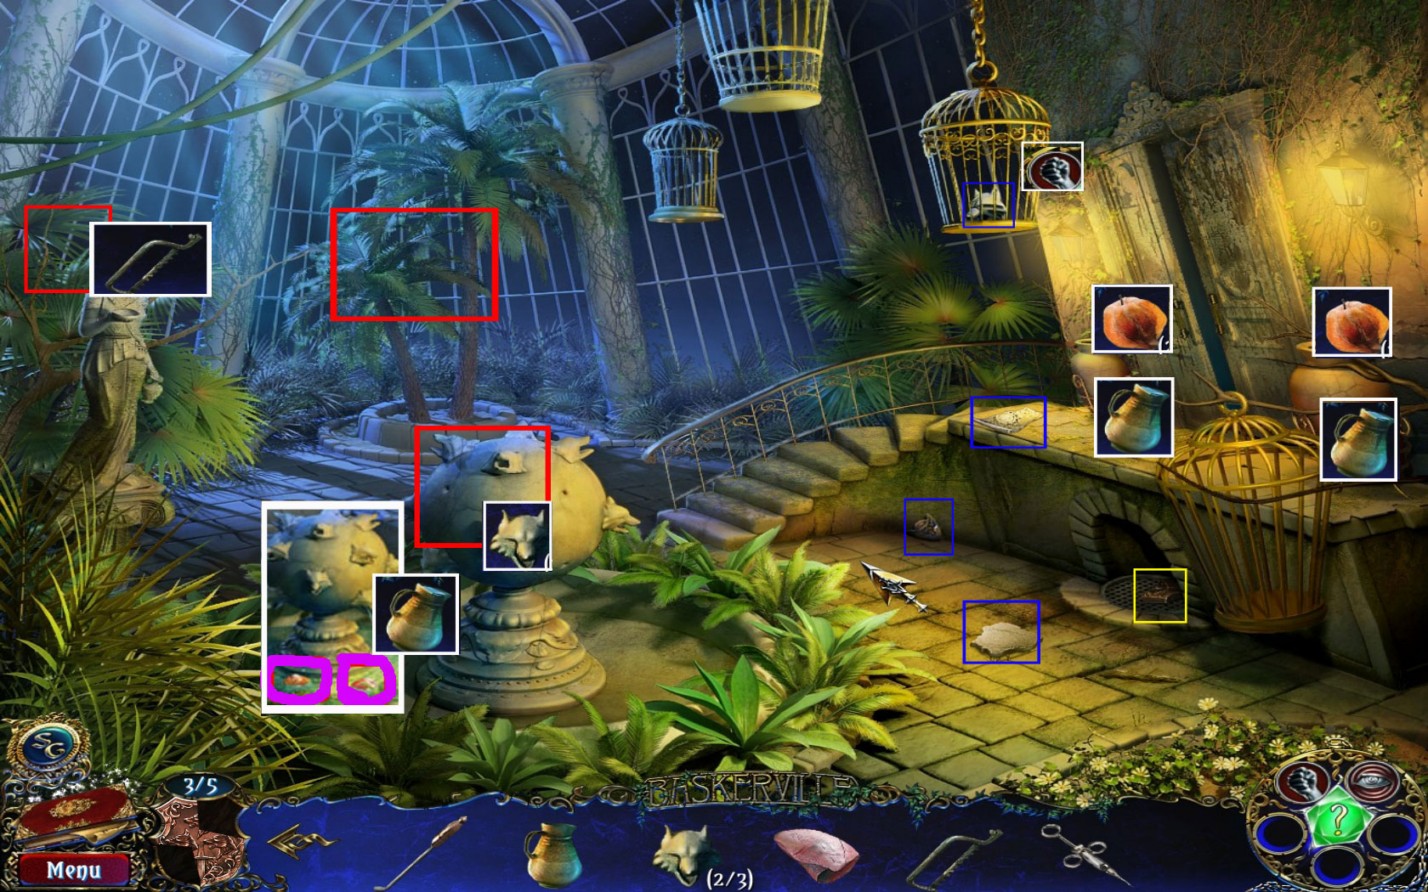
Secret Garden
Use the knife to click the vine in the upper right corner two times.
A puzzle appears - click the tiles to get a complete image.
Every time you click one tile, you will see a part of another image (three in total).
Find out which image is needed and assemble it by turning all tiles.
One hint: All animals in the Secret Garden are mythical beasts.
Please see screenshot for the solution.
Screenshot
Finishing the image will open a little compartment and reveal a key.
Grab the key and use it to open the padlock at the dragon's mouth.
Get the piece of Rodger's coat of arms (2/5) out of the dragon's mouth
Grab the rag from the right side, behind the unicorn's head.
Leave the Secret Garden and click the Rag on the spilled Whiskey on the ground, left side.
Go back.
Clean the mossy wooden board in the lower-middle of the scene.
Place first the paper onto it, then the coal on the paper.
A strange sign (1/4) will go into your inventory.
Grab a piece of Rodger's coat of arms (3/5) from the ground in front of the Minotaur.
Place the horn from your inventory on the Minotaur's head - now he opens his hand. Grab the yellow crystal eye (2).
Screenshot
Return to Rodger's Room.
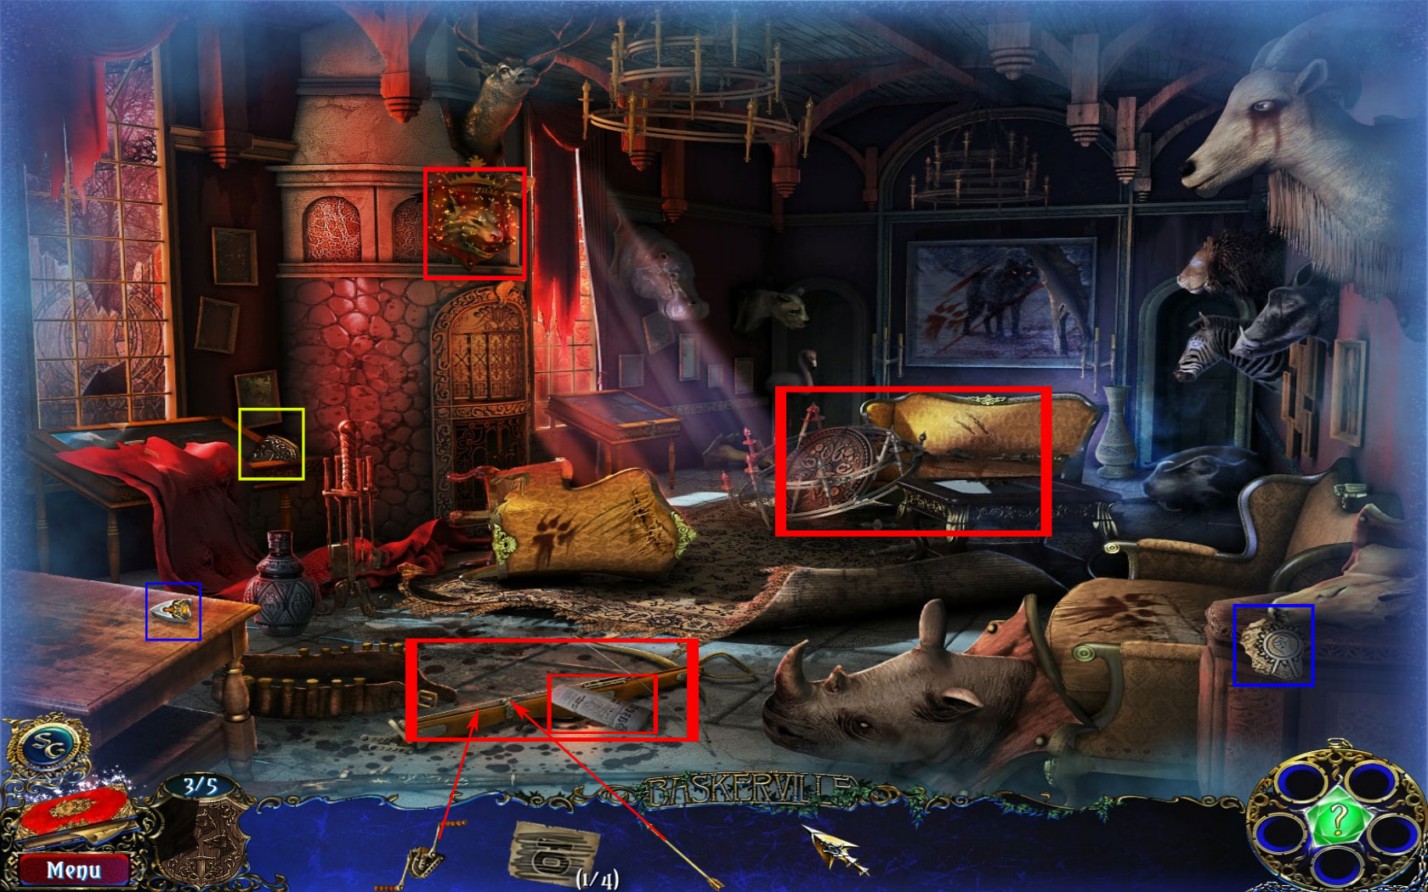
Rodger's Room - Past
Click the wolf head above the fireplace and click the two yellow crystal eyes into their places.
Click the wolf head again to enter Rodger's Room in the past.
Click the newspaper on the ground to learn that the news are around 90 years old.
Play the hidden-object scene on the table in the middle of the room to obtain an arrow.
Place the arrow on the crossbow on the ground.
Place the piece of a crossbow from your inventory on the crossbow.
Take the completed crossbow into your inventory.
Grab the piece of Rodger's coat of arms (4/5) from the desk under the first window on the left side.
Grab the key part of the second floor (1/5) from the table on the lower left.
Grab the scheme piece (1/8) from the chair on the lower right.
Go back by clicking the wolf head and enter the Secret Garden.
Screenshot
Secret Garden/Portrait Hall
Use the crossbow from your inventory to get the werewolf down from the ceiling.
Pick up the last piece of Rodger's coat of arms (5/5).
This area is completed now.
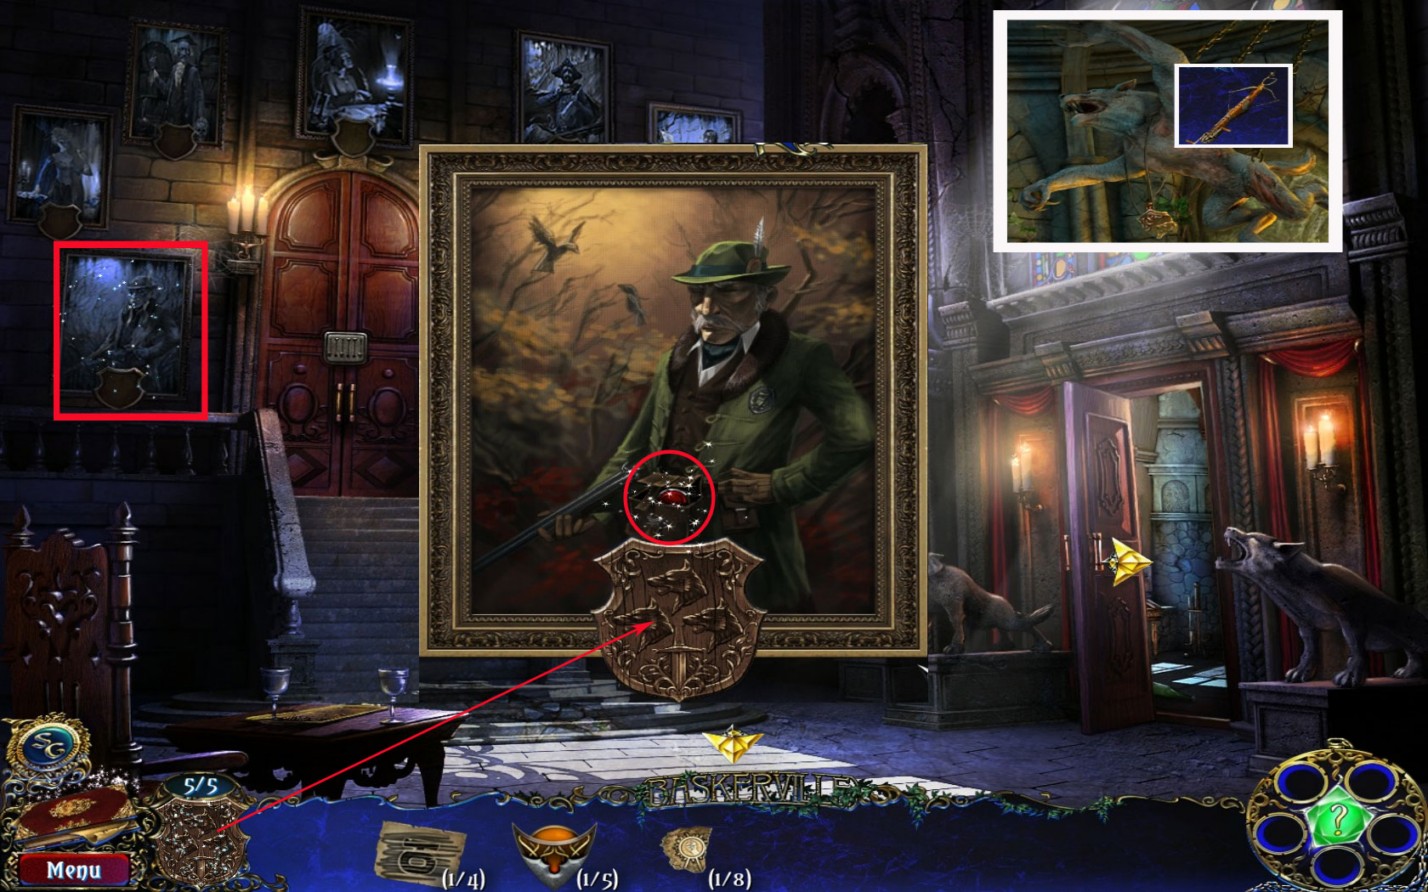
Return to the Portrait Hall.
Click Rodger's Portrait on the low left side and drag the coat of arms onto the slot.
Click the Strength - Power - it will go into your medallion in the low right corner.
Return to Rodger's Room in the past.
Screenshot
Chapter 2: Luisa Baskerville
Rodger's Room - Past/Portrait Hall
Click the Strength-Power and use it on the vase low left and on the vase far right.
Grab the gear (1/4) from the broken vase on the left and a part of a painting (1/6) from the broken vase on the right.
The area is now complete.
Return to the Portrait Hall and use the Strength-Power at the wooden boards on the left door, right side.
Click the door to open and enter Luisa's Room.
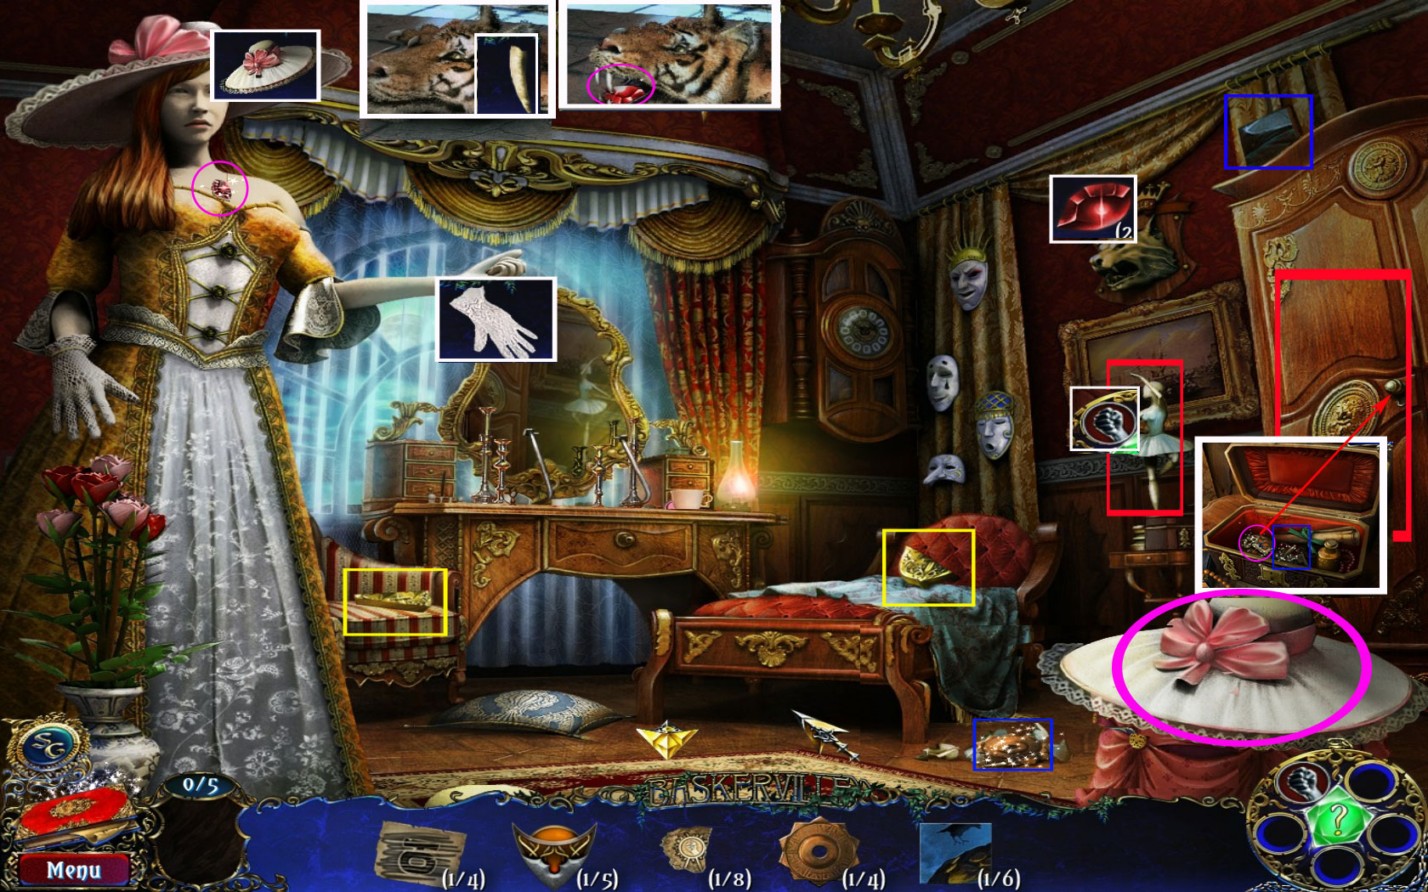
Luisa's Room
Grab the pieces of Luisa's coat of arms from the chair (1/5) and the chaise lounge (2/5).
Take the piece of a painting (2/6) from the top of the wardrobe, right side.
Use the Strength-Power to break the statue on the nightstand to the left, next to the wardrobe. It will fall on the floor. Pick up the gear (2/4).
Grab the head low right corner and place it on the mannequin's head. A necklace will appear - take the red crystal eye (1/2).
Click the box on the nightstand to trigger a puzzle.
Your goal is it to move the colored stones to their corresponding places - click them and they will glide along the connecting lines.
You only have a limited amount of moves.
There are several solutions possible, the following spoiler gives you a solution to do it in eight steps.
Click: Red, yellow, blue, red, green, purple, yellow, green.
The box opens - take the little key and a fang (1/2).
Use the key to open the wardrobe and trigger a hidden-object scene.
You will get a glove.
Place the glove on the mannequin's hand - the hand opens and you can grab the fang (2/2).
Head back to Rodger Baskerville's Room.
Place the fangs on the tiger head on the ground - the mouth opens, take the red crystal eye (2/2).
Return to Luisa's Room.
Use the red crystal eyes on the wolf head on the wall above the chaise lounge.
Click the wolf head to enter Luisa's Room in the past.
Screenshot
Luisa's Room - Past
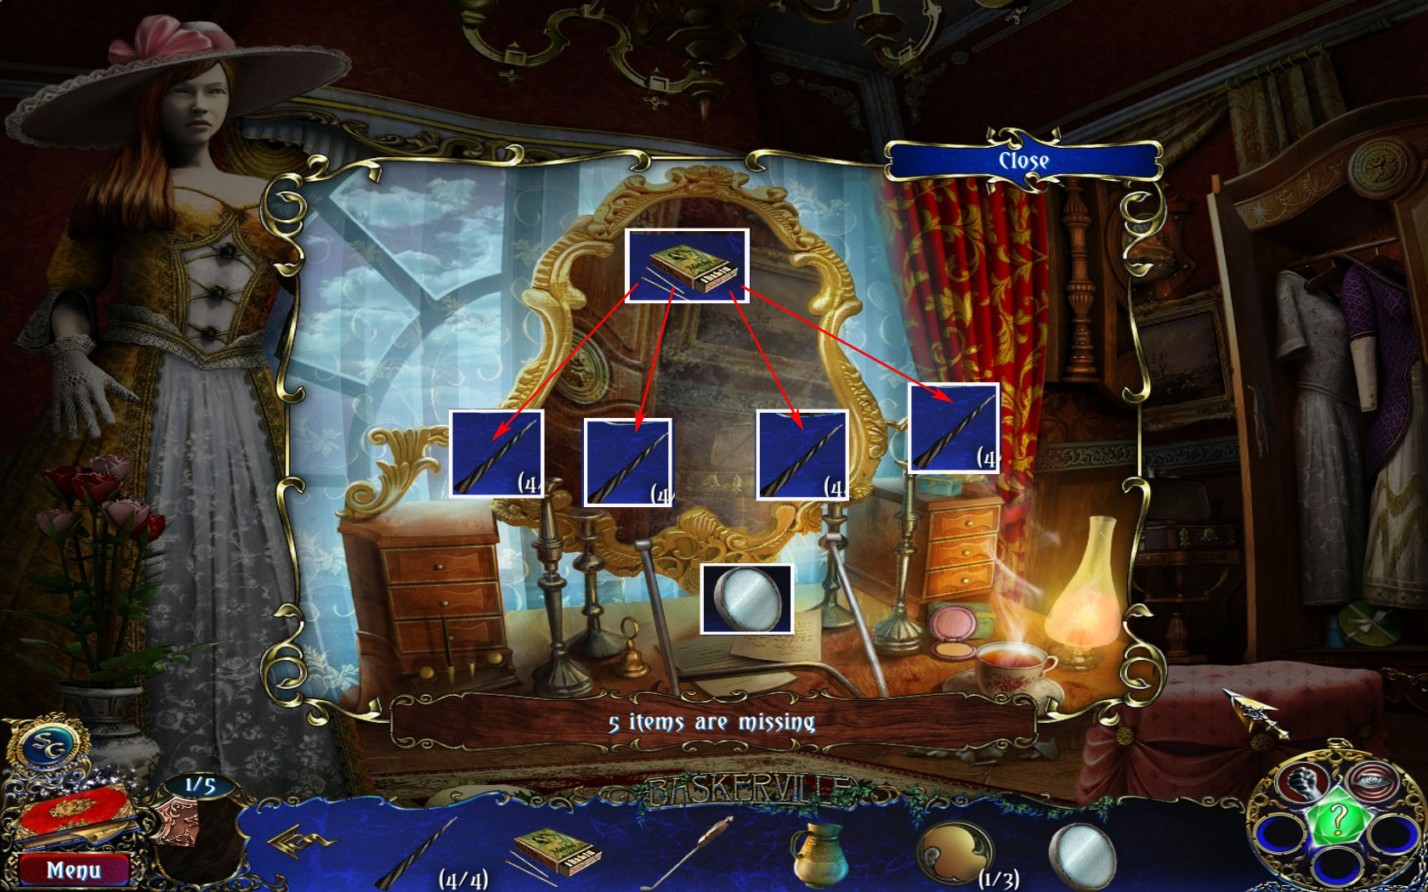
Play the hidden-object scene at the desk to obtain a black candle (1/4).
Grab the piece of Luisa's coat of arms (2/5) from the top of the wardrobe on the right.
Grab the piece of Luisa's coat of arms (3/5) from the couch on the left.
Get the piece of a painting (3/6) from below the desk on the bloody cloth.
Pick up the part of James' door lock (1/4) from the desk, next to the mirror.
Use the Power-Strength on the two vases on the floor.
Pick up a key for the second floor (2/5) on the left and a gear (4/5) on the right.
Screenshot
Return to the Present.
Luisa's Room/Rodger's Room
Play the hidden-object scene at the wardrobe to obtain a black candle (2/4).
Go to Rodger's Room and play the hidden-object scene below the window to obtain a gear (4/4).
This location is now complete.
Return to Luisa's Room (Past)
Luisa's Room (Past)/Luisa's Room/Portrait Hall
Click the grandfather clock in the far right corner to trigger a mini-game.
Place the gears on the silhouettes.
Your goal is to connect the gears from the lower right corner to the upper right corner.
You may drag the gears and place them where ever you want to get space to work.
There are several solutions possible - it is not required to use all gears but you can if you wish.
One solution can be seen on the screenshot in the spoiler Luisa's Room (Past) above.
When the gears are working, a compartment opens on the top of the clock. Take the handle.
Return to Luisa's Room.
Place the handle on the desk drawer and take the last piece of Luisa's coat of arms (5/5).
Return to the Portrait Hall.
Click Luisa's Portrait and drag the coat of arms onto the slot.
Click the Perception - Power. It will go into your medallion in the low right corner.
Use the Perception-Power on the dark area left next to the stairs to find the key for the kitchen.
Go down one time.
Chapter 3: James Baskerville
Hall/Kitchen
Use the Perception Power on the dark spot on the right side to obtain a part of James' door lock (2/4).
Use the key you just found on the kitchen door on the far right.
Screenshot
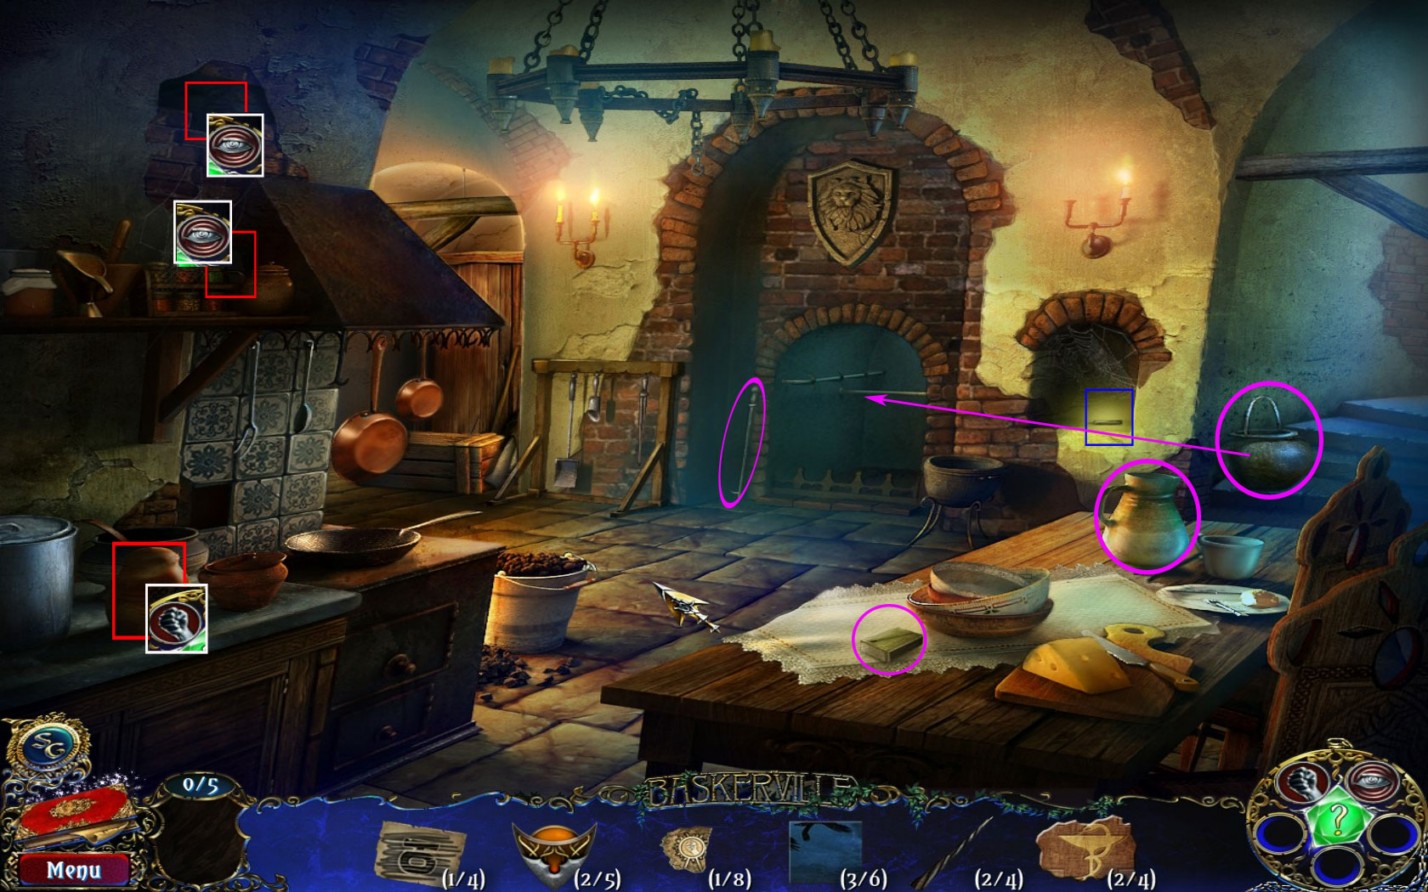
Enter the kitchen.
Grab the fire poker from the left side of the fire place.
Grab the cauldron on the stairs on the far right.
Take the black candle (3/4).
Take the matches and the jug on the table.
Use the Strength-Power on the light pot on the right side of the counter to find a part of James' door lock (3/4).
Use the Perception-Power on the dark spot behind the herbs on the shelf to obtain a cabinet lock part (1/2).
Use the Perception-Power on the dark spot above the hoot to find a part of James' door lock (4/4).
Place the cauldron on the fireplace.
Go back to the Hall and click the door of James' Room (first door left side).
Screenshot
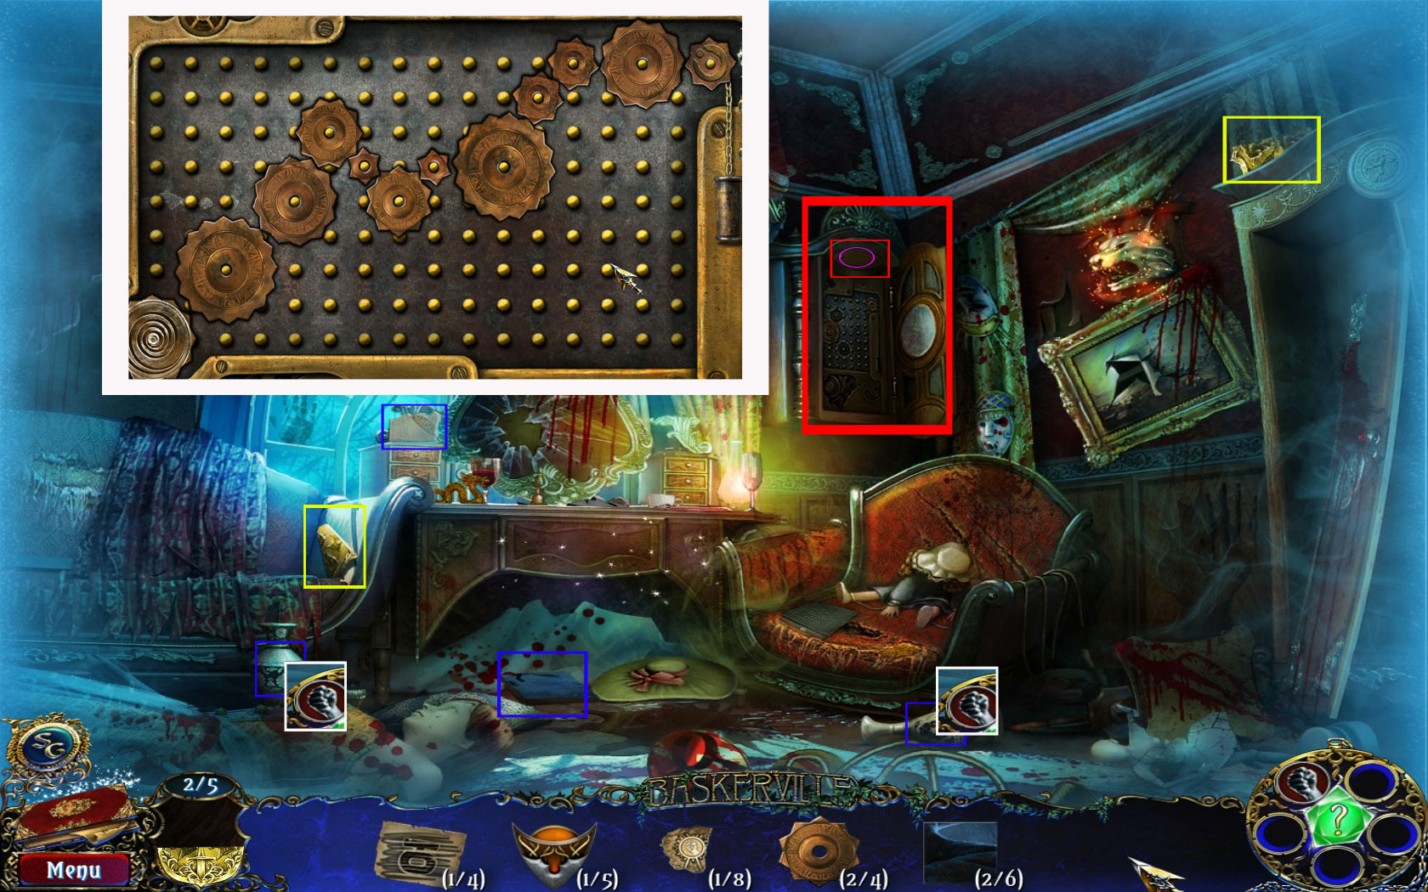
Place the four parts of James' door lock on the board to trigger a mini game.
Your goal is to depress all parts.
For a solution please see spoiler.
Pressing one part will affect all the parts connected to it.
You can see which tiles are affected by which on the outer lines.
You have nine parts: 1-3 top row (left to right), 4-6 middle row (left to right), 7-9 bottom row (left to right)
Press 1-7-9-3-5-2-8-9-3-1
The door opens - enter.
James' Room
Pick up the piece of James' coat of arms (1/5) in front of the chair.
Pick up the painting part (4/6) behind the chair.
Pick up the part of the key for the second floor (3/5) on the low right side, next to the shelf.
Use the Strength-Power to destroy the two white skulls on the shelf right side.
Take the cabinet lock part (2/2) from the skull on the top shelf and the circular key (1/3) from the skull on the bottom shelf.
Use the Perception-Power for the dark spot, upper right corner, to obtain a red crystal eye for James' wolf head (1/2).
Place the cabinet lock parts on the cabinet on the left side.
Screenshot
A puzzle opens.
Switch the red tiles from left to right, the black tiles from right to left.
Tiles move by clicking but only move in one direction and jump another piece of the different color into an empty space.
For a step-by-step-solution please see screenshot.
Screenshot
The closet opens and you can take out a black candle (4/4) and a small mirror.
Go back to Luisa's Room.
Luisa's Room
Click the desk.
Place the candles into the four candle sticks and the mirror in the holder in the front.
Light the candles with the matches.
Go through the mirror.
Screenshot
Luisa's Room (Behind the Mirror)
Pick up the circular key (2/3) from the stool, left of the mirror.
Grab the painting part (5/6) from the chair on the far right.
Take the strange sign (2/4) from the wall on the far right.
Grab the painting part (6/6) from the top of the wardrobe.
Click the unfinished painting on the left wall.
Place the painting parts on it and assemble the painting by turning the tiles.
When the painting is complete, you can take a marionette ruler from the frame.
This location is complete now. Go back through the mirror to Luisa's Room in the Past.
Click the marionette ruler at the marionette on the chair.
Pick up the red crystal eye for James' wolf head (2/2) from the marionette's necklace.
The location is complete now, as is Luisa's Room.
Screenshot
Go back to James' Room.
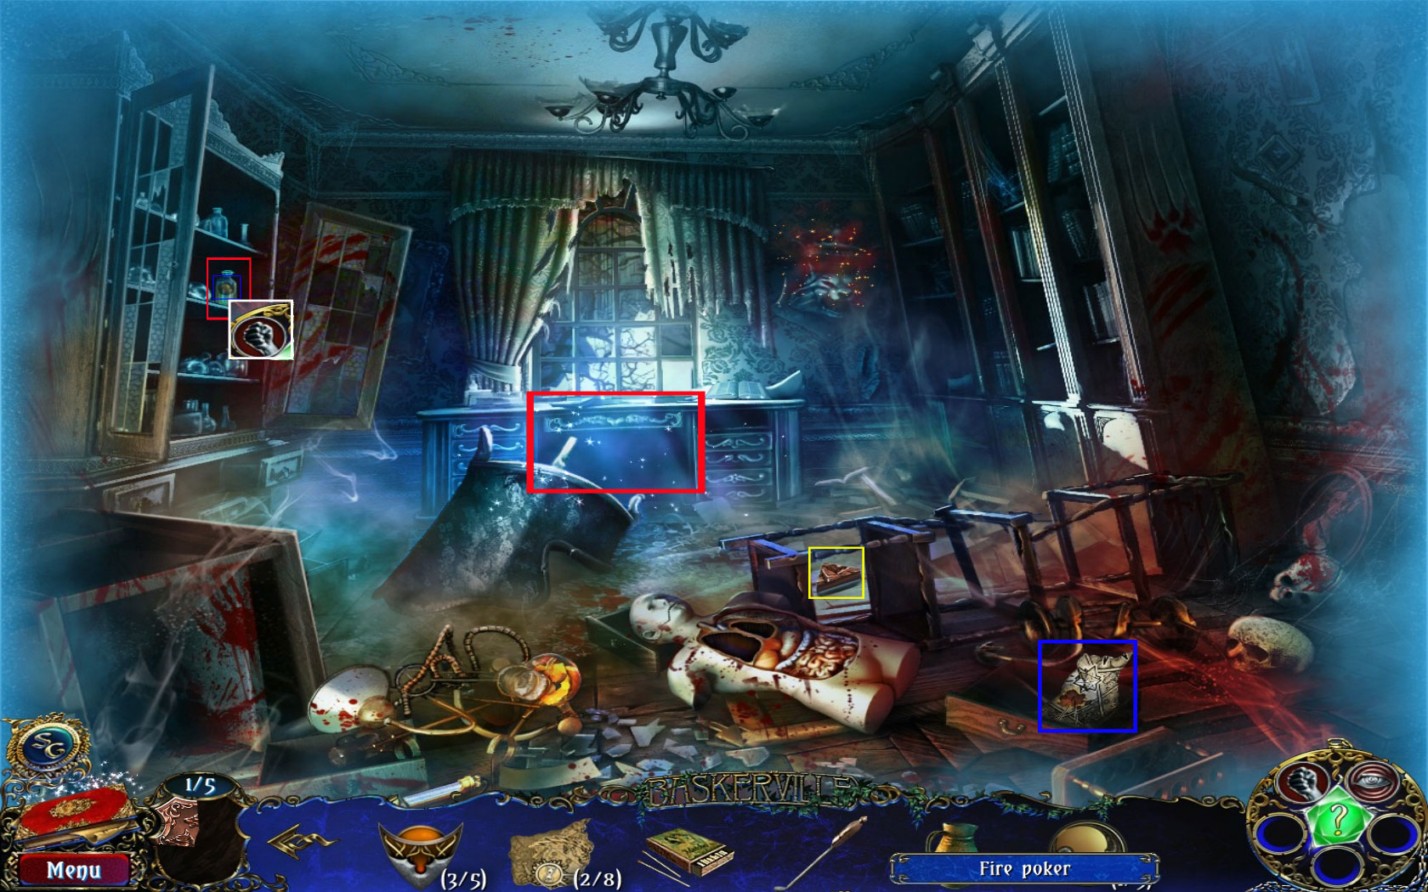
James' Room (Past)
Place the two crystal eyes on the wolfs head and enter James' Room in the past.
Grab the scheme piece (3/8) from the drawer on the low right side.
Pick up the piece of James' coat of arms (2/5) from the floor behind the anatomic model.
Use the Strength-Power to break the flask inside the cabinet on the right and obtain a circular key (2/3).
Play the hidden object scene at the desk below the window to obtain a circular key (3/3).
Return to the present.
Screenshot
James' Room
Click the low-right edge of the carpet to discover a trap door.
Place the circular keys on the door to trigger a mini game.
You will need to bring the red tile completely from the left to the right side by sliding the gold tiles.
You can slide the three vertical columns and the horizontal row.
For a step by step solution please see spoiler.
Slide the horizontal row to the right.
Slide the left column down.
Slide the horizontal row to the left.
Slide the right column up.
Slide the horizontal row to the right.
Slide the middle column down.
Slide the horizontal column to the left.
Slide the middle column up.
Slide the horizontal row to the right.
Slide the right column down.
Slide the horizontal row to the left.
Slide the right column up.
Slide the horizontal row to the right.
The hatch opens.
Enter the laboratory.
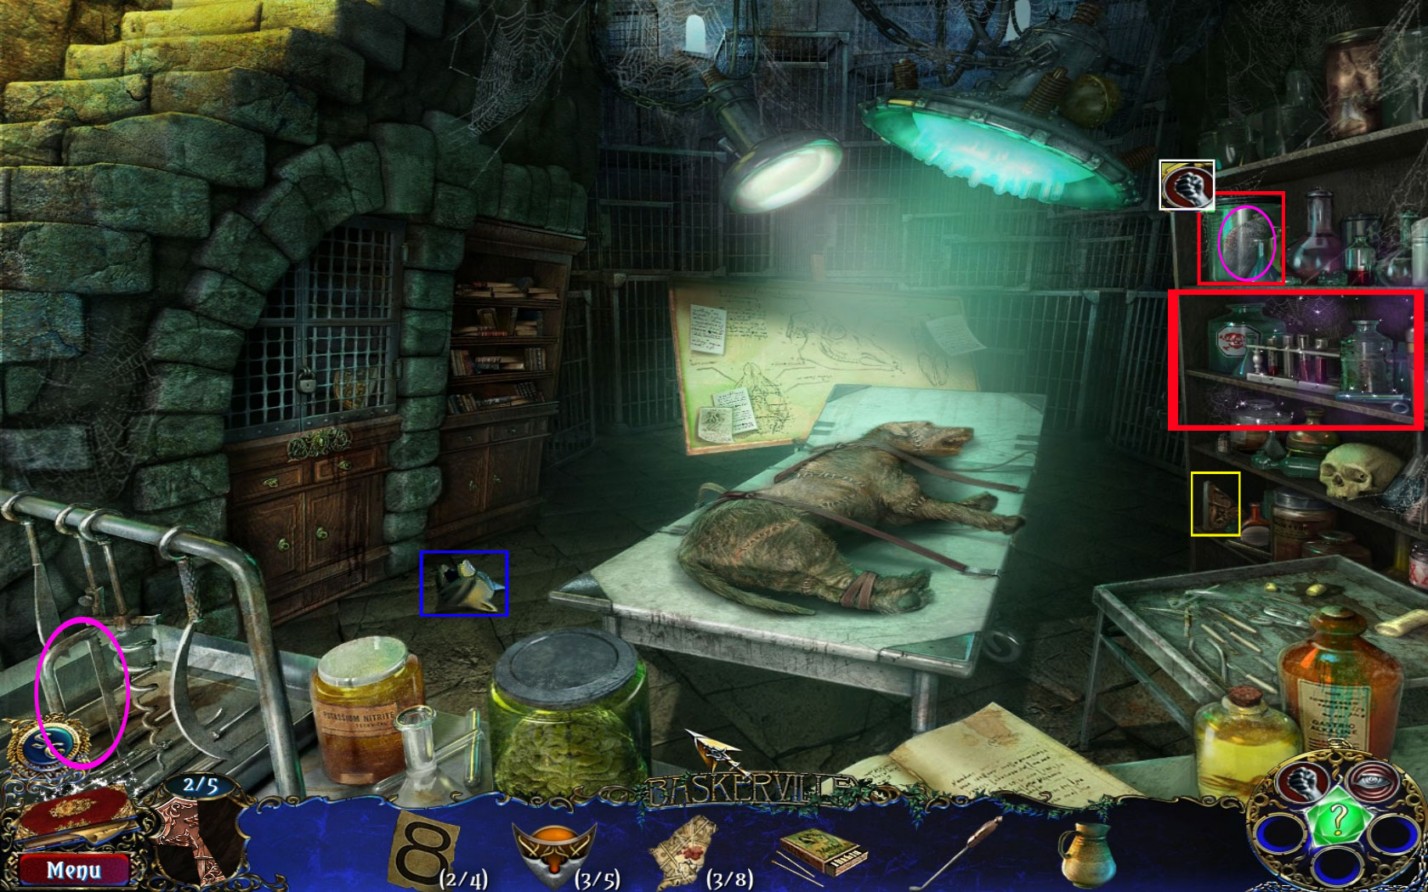
James' Room (Laboratory)
Grab the surgery saw on the low left corner.
Pick up the fountain part (1/3) from the floor on the low left.
Use the Strength-Power on the glass on the top shelf to obtain a lung.
Play the hidden-object scene on the shelf, right side to receive a fountain part (wolf head) (2/3).
After the hidden-object scene you can grab a piece of James' coat of arms (3/5) from the bottom shelf.
Screenshot
Return to the Hall.
Hall/Winter Garden
Use the surgery saw to open the door on the far left.
Enter the winter garden
Pick up the scheme piece (4/8) from the top of the stairs.
Grab a part of the second floor key from the ground next to the stairs.
Grab a molding part (1/3) form the floor on the low right side.
Grab a piece of James' coat of arms (4/5) from the hatch on the right.
Use the surgery saw to obtain dry twigs from the far left palm.
Use the Strength power on the first cage next to the door and take the fountain part (3/3).
Use the fountain parts on the fountain on the left side.
When the fountain is full of water grab the two seeds and fill the jug from your inventory with water.
Place one seed in each flowerpot standing left and right next to the door.
Use the jug with water on both flower pots.
Play the hidden-object scene on the palm tree in the far middle to obtain a syringe.
Screenshot
Head back to James' Room (Past)
James' Room - Past and Laboratory/Portrait Hall
Play the hidden-object scene on the desk below the window to obtain a filled syringe.
Go to the present and enter the Laboratory.
Use the syringe on the Frankendog and take the heart after the dog disappears.
Go back to the past and place lung and heart from your inventory on the anatomic model.
Grab the key from the model's mouth.
Go back to the Laboratory and use the key on the cage's padlock on the left.
Take the last piece of James' coat of arms (5/5).
All three parts of James' Room are now complete.
Head back to the Portrait Hall.
Click James' Portrait and place the coat of arms into the slot.
Take Speed-Power; it will go into the medallion automatically.
Go back to the Winter garden
Chapter 4: Lily Baskerville
Winter garden
Use the Speed-Power on both flower pots.
After the flowers grew, pick up a molding part (2/3) on the left pot and the key for Lily's Room on the right.
Head back to the Hall and use the key to open Lily's Room.
Lily's Room
Get the Tetravex (1/8) from the bookstand on the left, next to the round.
Get a piece of Lily's coat of arms (1/5) from the globe.
Use the Strength-Power to break the lamp on the desk and grab the blue crystal eye for Lily's wolf head (1/2)
Get a piece of Lily's coat of arms (2/5) from the bottom desk shelf.
Head back to the Winter garden and play the hidden-object scene on the palm tree on the far middle.
You will get a molding part (3/3).
Return to Lily's room.
Click the far wall and place the moldings onto it.
Your goal is to assemble the picture of a grass hopper.
Click a molding part on the left and it will jump on the place where it should be.
You can't use all molding parts, so take care that the one you clicked fills out the space properly.
If you think it does not fit, click it again and it will jump back.
Finishing the picture will let you grab a blue crystal eye for Lily's wolf head (2/2)
The screenshot shows you which parts to click.
Screenshot
Use the blue crystal eyes on the wolf head and enter the past.
Lily's Room (Past)
Take the Tetravex (3/8) from the right side of the wall.
Take the scheme piece (5/8) from the left side of the wall.
Take the rose (1/2) from the desk.
Take a piece of Lily's coat of arms (3/5) from the fallen chair on the right.
Use the Perception-Strength on the broken sphere right next to the desk to find a rose (2/2)
Use the Speed-Strength at the Chrysalis on the low right side. A butterfly appears.
Use the Power-Strength on the terrarium on the left to trigger a hidden-object scene.
You will receive termites.
Screenshot
Return to the present.
Lily's Room/Lily's Room (Past)
Use the termites with the wooden chest on the lower right side.
Use the Speed-Power to make them destroy the chest faster.
Get the butterfly net out of the chest.
Use the butterfly net to catch the butterfly (1/3) that appeared on the globe.
Go to the past.
Use the butterfly net to catch the butterfly (2/3) on the low right side you made appear by speeding up the chrysalis.
Click the vase on the windowsill.
Place the two roses into the vase - a butterfly (3/3) will appear on the branches next to the vase.
Catch it with the net.
Use the net to get the part of the key for the second floor (5/5) that is stuck in the net, top left.
Return to the present.
Click the butterfly-collection on the wall and place the three butterflies on it.
By clicking the matching pairs only the butterfly bottom row, second from the left, will stay.
The mini game closes and you can grab a piece of Lily's coat of arms (4/5) from the frame.
Screenshot
Return to the Portrait Hall.
Portrait Hall
Click the door to the second floor and place the keys for the second floor onto the board to trigger a mini game.
To open the lock you will have to click the keys in the right order. Each key will affect itself and one or more other keys.
For the solution please see spoiler.
Click the first and the last key.
The door opens Enter the 2nd Floor Hall
Second Floor Hall/Kitchen/Portrait Hall
Grab the Tetravex (4/8) from the table on the low left.
Get the wax mold from the table on the far left.
Get the lens from the table on the low right.
Head over to the Kitchen.
If you haven't done already, place the cauldron in the fireplace.
Place the dry twigs under it and light the twigs with the matches.
Place the wax mold in the cauldron.
Use the fire poker at the cauldron.
Grab a piece of Lily's coat of arms (5/5) from the spilled wax.
Screenshot
Return to the Portrait Hall.
Click Lily's portrait and place the coat of arms.
Click the Materialization-Power; it will go into your medallion automatically.
Enter the 2nd Floor Hall.
Chapter 5: Edward Baskerville
2nd Floor Hall/Henry's Room
Use your Materialization-Power to materialize the key on the portrait, right side.
Use the key to open the door on the right and enter.
Play the hidden-object scene on the far left side to obtain a chess piece.
Take the piece of Edward's coat of arms (1/5) from the floor on the far right side.
Take the strange sign (3/4) from the floor in front of the chair.
Take the piece of Edward's coat of arms (2/5) from the floor on the low left side.
Get the cube out of the flower pot in the low right corner.
Place the chess piece on the chess table to trigger a mini game.
Your goal is to bring the chess piece into the black slot.
Use the arrows on the four sides of the board to move the chess piece around.
You will have to do this three times; each time another chess piece will be added.
For a step-by-step-solution please the screenshot.
Screenshot
After finishing the puzzle the mirror on the left wall will lift and reveal a compartment.
Grab the strange sign (4/4).
Screenshot
Leave the room and click the door on the far left side.
2nd Floor Hall
Place the four strange sign on the door to trigger a mini game.
Look at the signs they are not that strange as it seems.
The numbers you are looking for are written 2 times on each paper - normal and mirrored.
Use the arrows to change the numbers on top.
For the solution please look the spoiler.
5, 1, 2, 4, 3
The door opens, enter.
Edward's Room
Take the cube (2/2) from the top shelf.
Take the wood piece (1/3) from the bottom shelf.
Use the Strength-Power on the diving helmet on the middle shelf to obtain the key for Elizabeth's room.
Use the Perception-Power on the top right corner to get the red crystal eye (1/2) for Edward's wolf head.
Take the Pentagram piece (1/3) from the table.
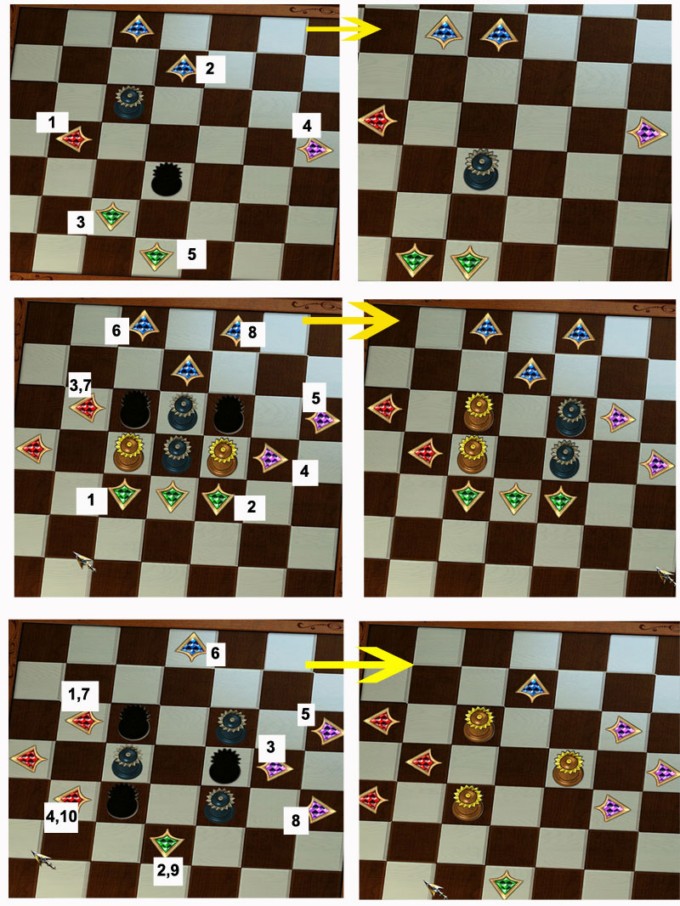
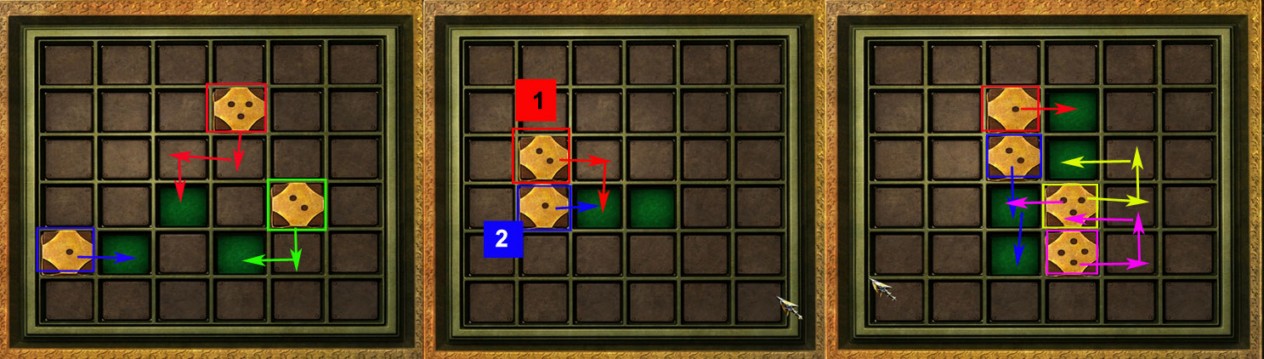
Click the wooden chest on the floor and place the two cubes from your inventory onto it.
Your goal is to move the dice to the green square - dice can be moved by dragging.
Each die has to reach a square in the numbers of moves stated on its top. More or fewer moves are not allowed.
Dice can push each other.
You will have to do this three times; each time more dice will appear on the board.
For a step-by-step-solution for all three stages please see screenshot.
Screenshot
The chest opens and you can grab the red crystal eye (2/2) for Edward's wolf head.
Place the crystal eyes onto the wolf head and enter the past.
Screenshot
Edward's Room (Past)
Take the part of Charles' door key (1/2) from the wall on the right side.
Take the scheme piece (6/8) from the wall on the left side.
Grab the wood piece (2/3) from the rope hanging down the ceiling on the left side.
Pick up a piece of Edward's coat of arms (3/4) from the floor on the low right side.
Use the Strength-Power under the fallen chair in the middle of the room to find a piece of Edward's coat of arms (4/5).
Head back to the 2nd Floor Hall and use Elizabeth'ss door key on the door on the left side.
Screenshot
Elizabeth's Room/Portrait Hall
Grab a piece of Edward's coat of arms (5/5) from the floor in the middle of the room.
Return to the Portrait hall.
Click Edward's portrait, place the coat of arms on its spot and click the Telekinesis-Power.
It will go into your inventory automatically.
Return to Elizabeth's Room
Chapter 6: Elizabeth Baskerville
Elizabeth's Room
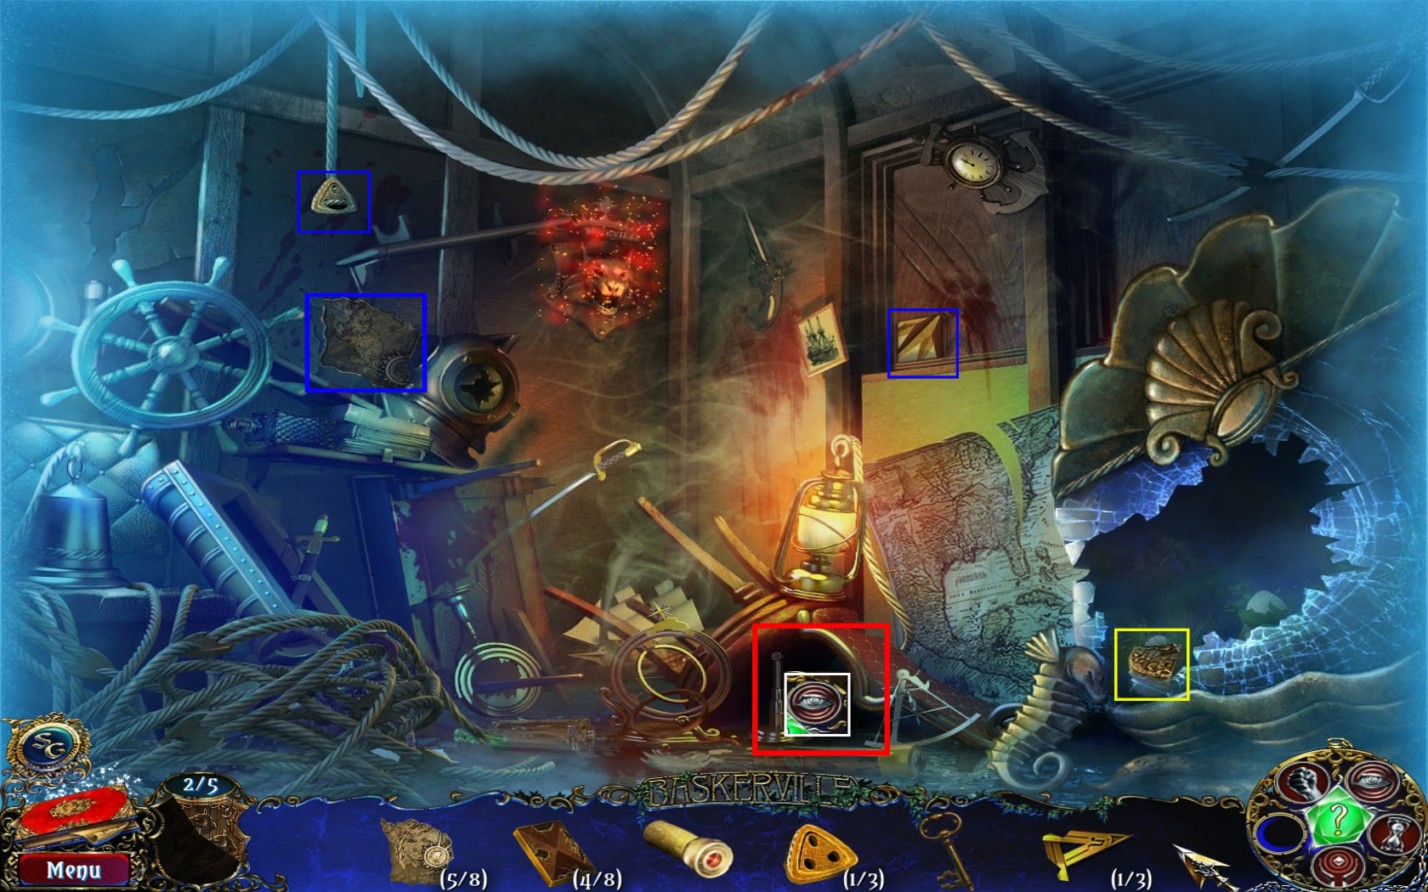
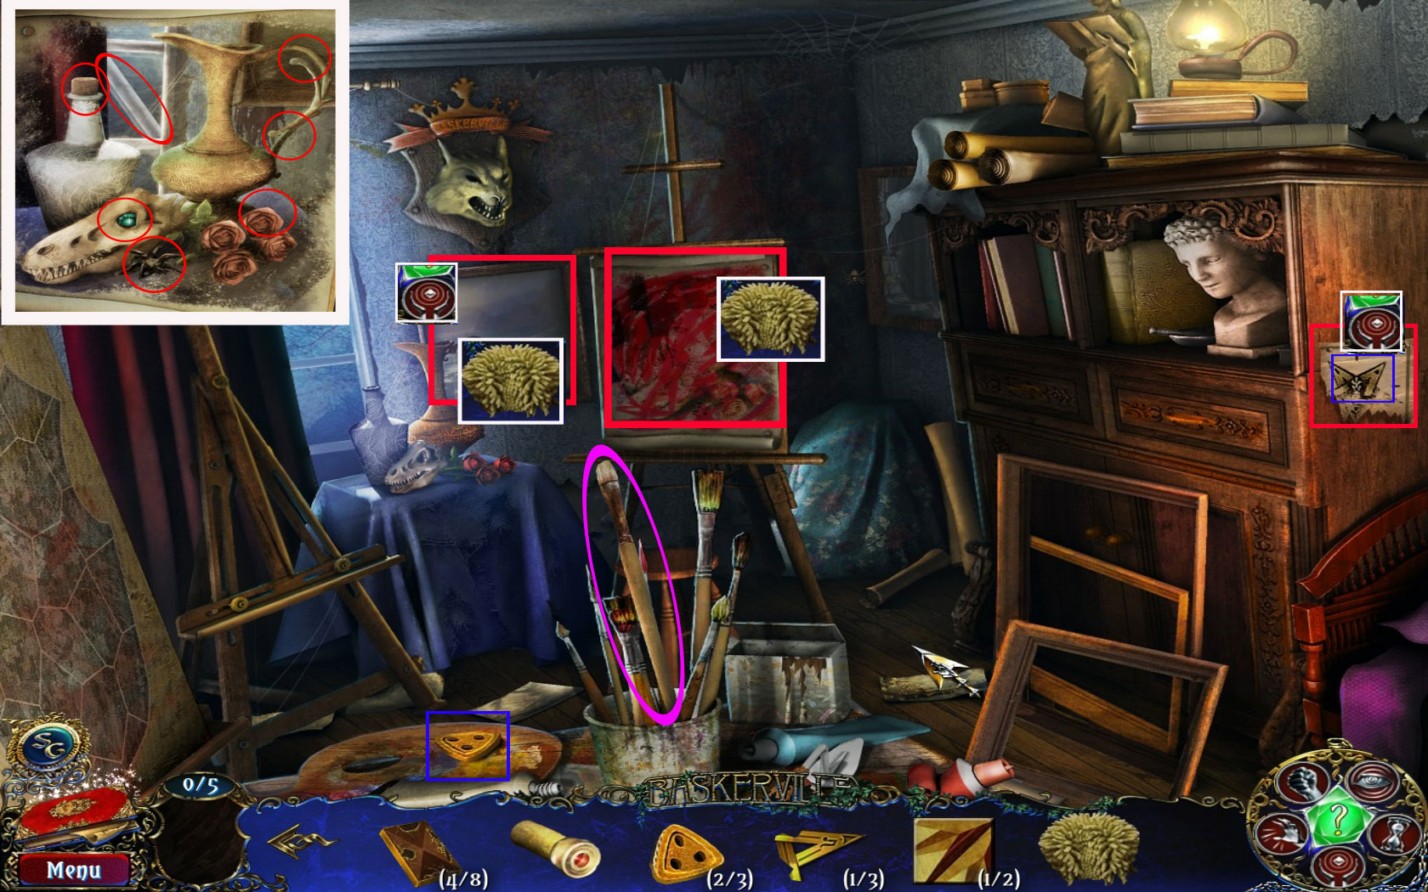
Play the hidden-object scene on the left to obtain a sponge.
Take a brush out of the jar of brushes on the table at the bottom of the scene.
Grab the wood piece (3/3) from the palette on the left side at the bottom of the scene.
Use the Materialization-Power on the ripped pentagram image on the low right and get the pentagram part (2/3).
Use the Materialization-Power on the seaside painting right next to the window.
Place the sponge on the water drops on the painting.
Click the damaged painting in the middle of the room.
You will need to click and drag the sponge over the painting until all blood is gone.
NOTE: Some players experienced a minor problem with that mini game. Even though the picture seems to be clean the mini game does not stop or there is a tiny spot blood left, but the sponge does not clean it. If this happens to you, use the reset button on the top right to start the mini game over. This time it will go right.
As soon as the painting is clean, you will be asked to find the 10 differences between the painting and the room to the left.
After finding them all, a green crystal eye for Elizabeth's wolf head (1/2) goes into your inventory.
Screenshot
Leave the room and go back to Edward's Room (Past).
Edward's Room (Past)
Click the rope in the low left corner.
Place the wood pieces on the corresponding spots.
Untie the tangled ropes by rearranging them so that none of them crosses the others.
Crossing ropes are shown in red.
Finishing this puzzle will trigger a hidden-object scene.
Play it to obtain a pentagram part (3/3).
Both of Edward's rooms are now complete.
Head over to Henry's Room.
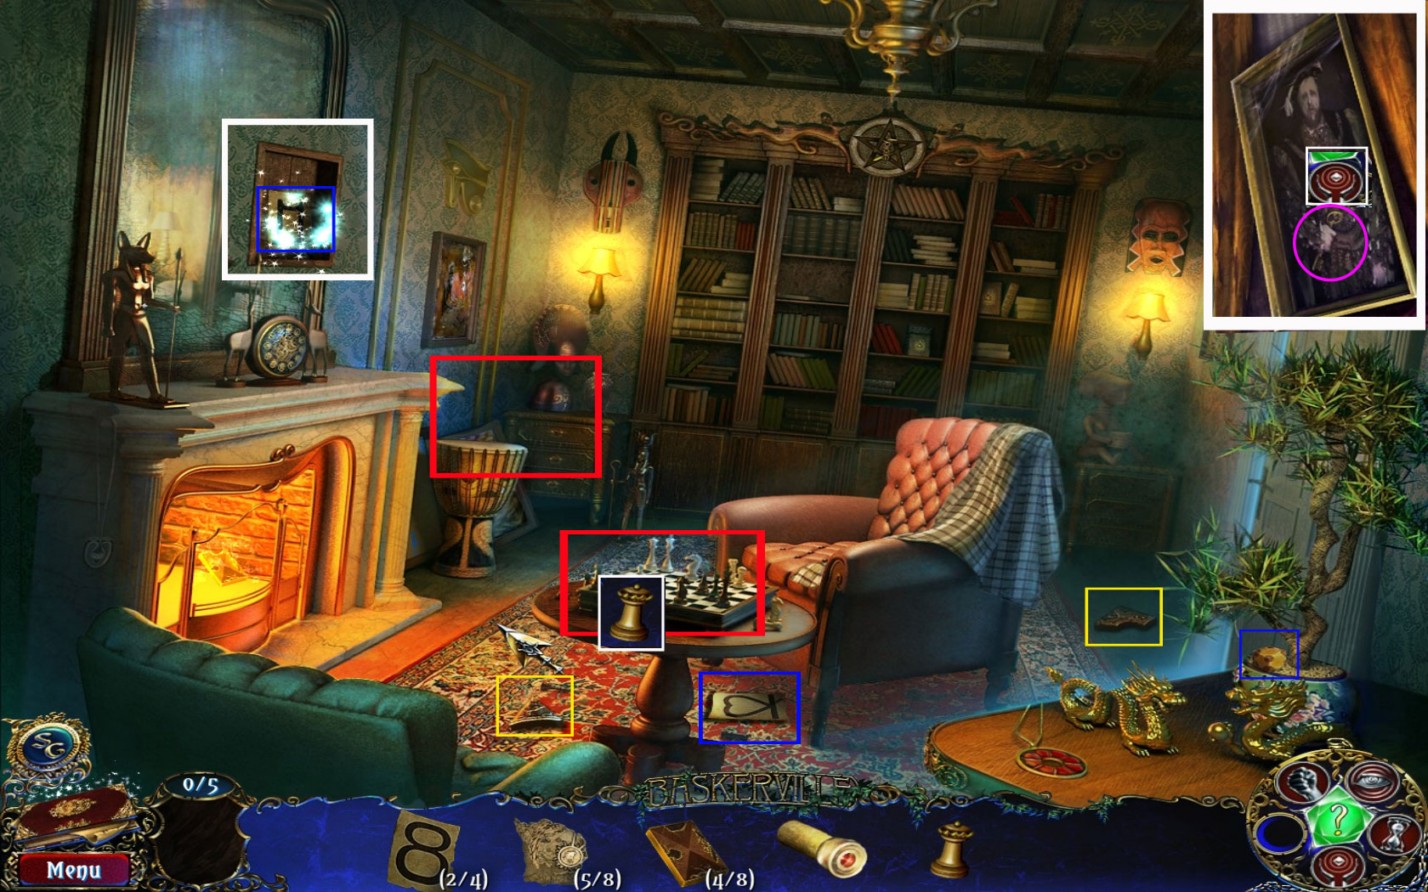
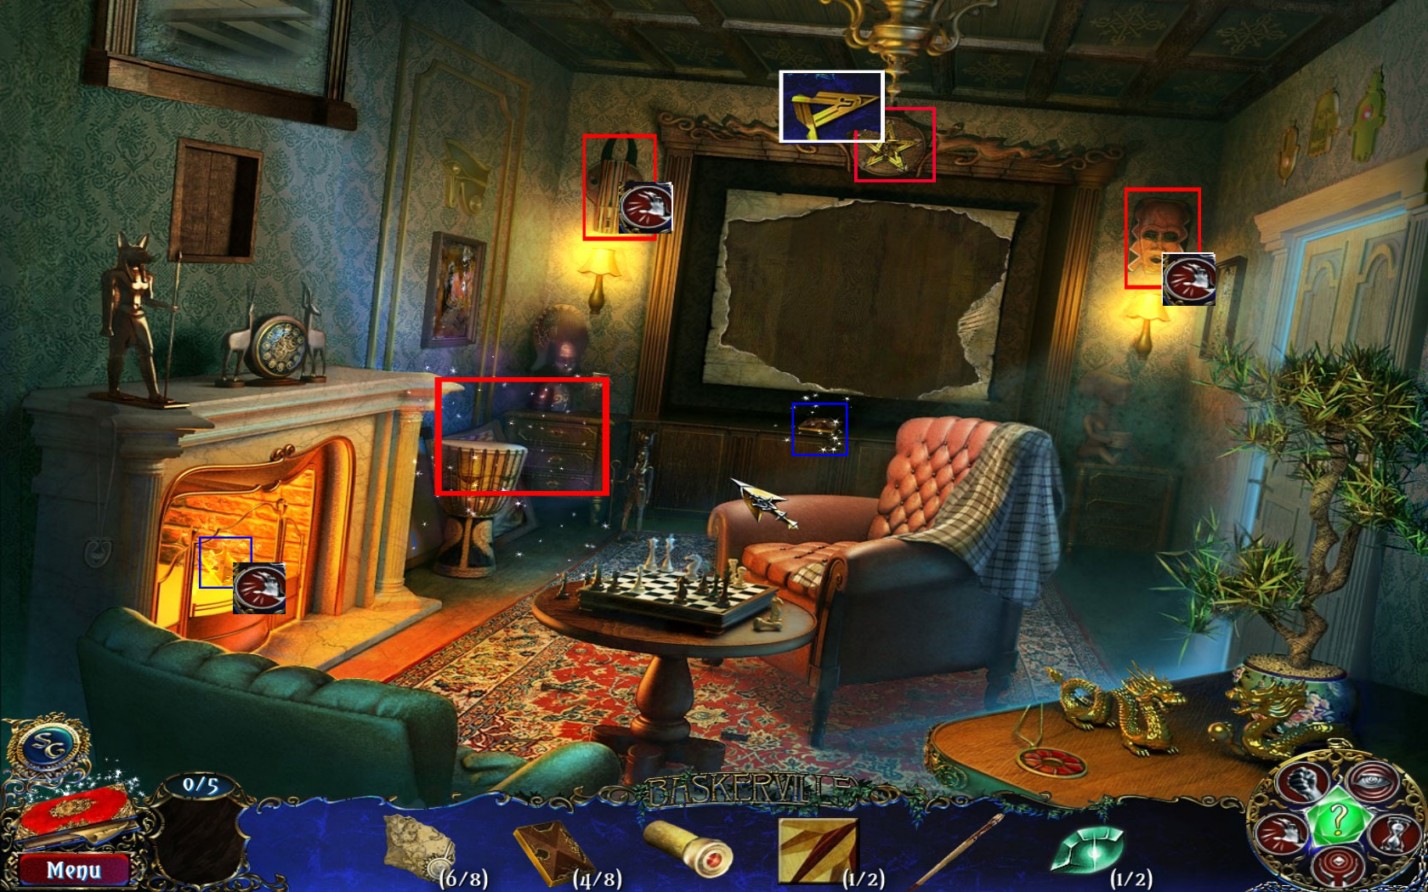
Henry's Room
Use the pentagram pieces on the Pentagram above the book shelf.
The shelf opens and shows a part of a scheme.
Take the Tetravex (5/8) from the bottom of the scheme.
Use the Telekinesis-Power on the masks on the right and left upper corner.
This will reveal two compartments.
Take a piece of Elizabeth's coat of arms (1/5) out of the left and a green crystal eye for Elizabeth's wolf head (2/2) of the right one.
Use the Telekinesis-Power on the Tetravex (6/8) inside the fire place. It will fall out; grab it from the floor.
Return to Elizabeth's Room and place the crystal eyes on the wolf head.
Play the hidden-object scene to obtain a stair board (1/2).
Screenshot
Enter Elizabeth's Room in the past.
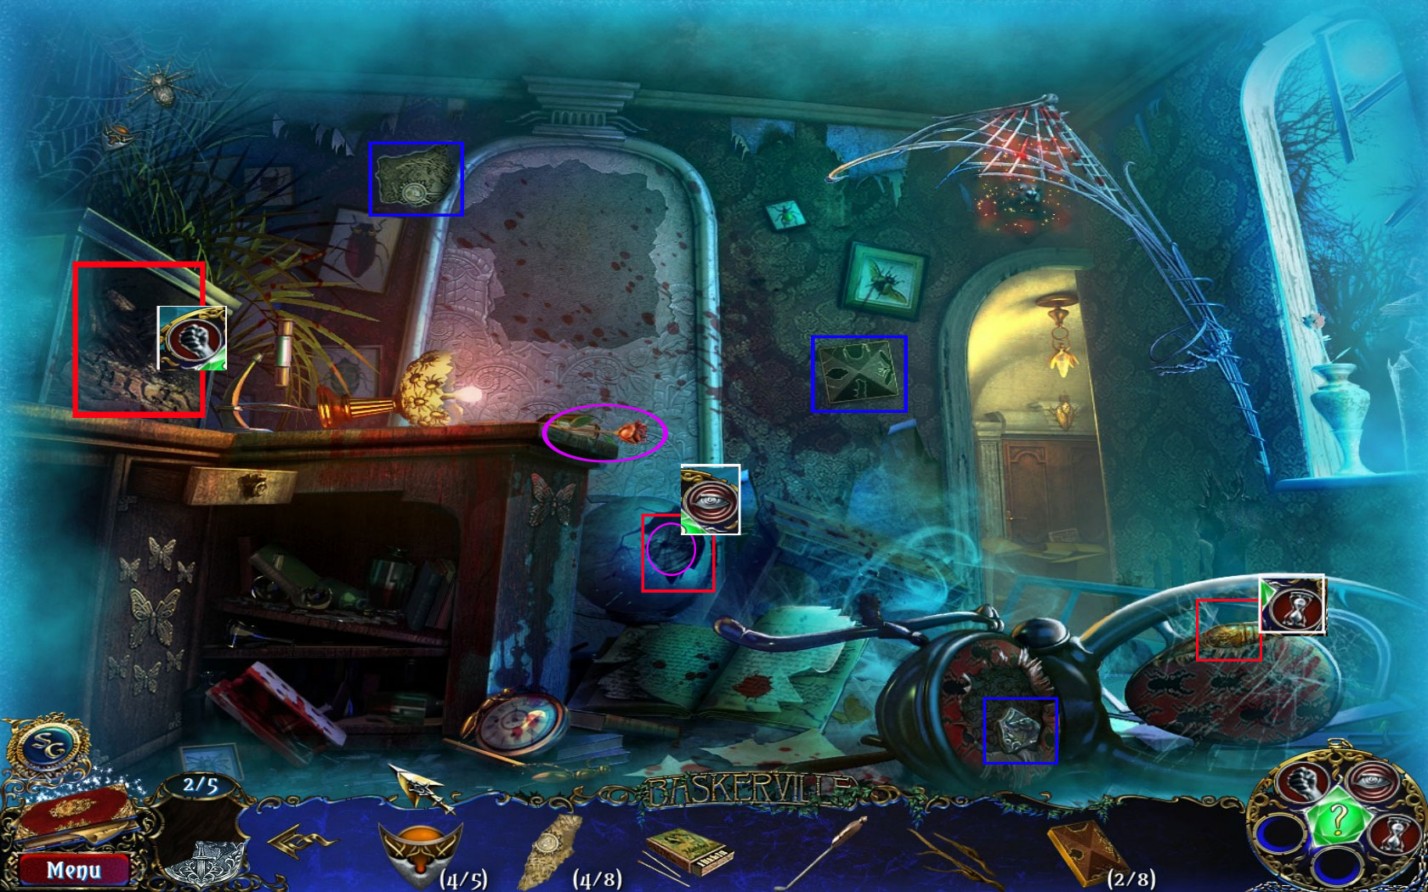
Elizabeth's Room (Past)
Take a piece of Elizabeth's coat of arms (2/5) on the low left side.
Take the scheme piece (7/8) from the unfinished painting.
Grab the palette from the floor on the right side.
Use the Perception-Power on the dark spot on the top right of the cabinet to find a piece of Elizabeth's coat of arms (3/5).
Use the Materialization-Power on the unfinished painting and take a piece of Elizabeth's coat of arms (4/5).
Screenshot
Exit to the present.
Elizabeth's Room/Portrait Hall
Play the hidden-object scene on the right side to obtain painting tubes.
Click the canvas on the left and place first the palette, then the painting tubes, and at last the brush onto it to trigger a mini game.
Paint the shield using all four color so that no piece of the same color touches.
To paint a piece, click the brush into the color on the palette and then on the spot you want to paint.
To remove a color click it with another one.
There are several solutions possible. The screenshot shows one of them.
Screenshot
When you are done, take a piece of Elizabeth's coat of arms (5/5) from the canvas.
Head over to the Portrait Hall.
Click Elizabeth's Portrait and take Charles' key part (2/2) from the portrait.
Go to the 2nd Floor Hall
Chapter 7: Charles Baskerville
2nd Floor Hall
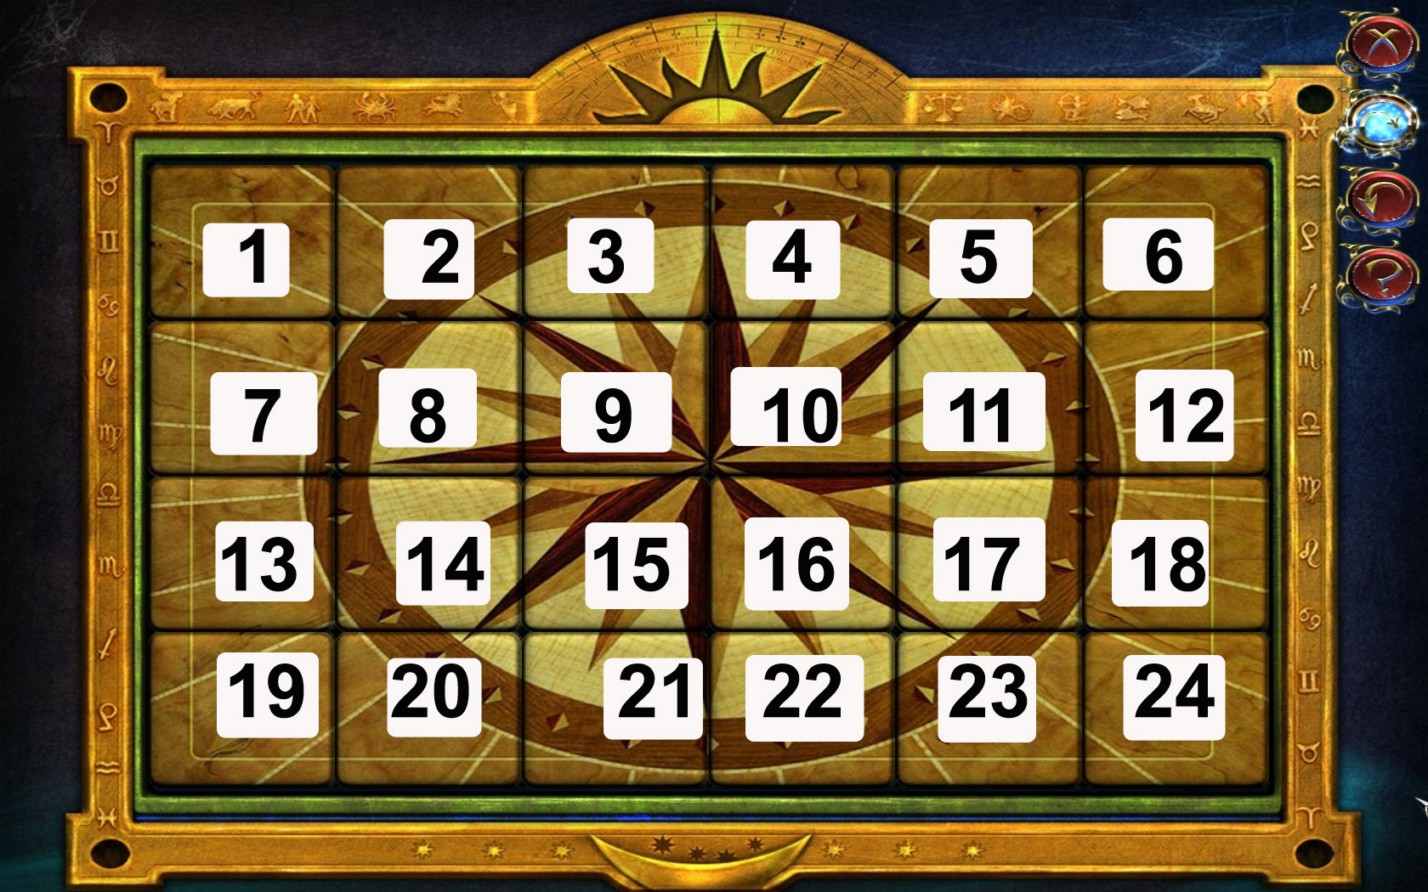
Place the 2 parts of the key onto the board to trigger a mini game.
In order to reassemble the picture you will have to click the parts in the right order.
Imagine the tiles from 1-24 seen from top left to low right.
Screenshot
First number gives you the tile number, second number shows you how often to click.
1=2x
3=1x
4=1x
5=1x
6=2x
1=2x
4=2x
2=2x
5=2x
16=1x
13=2x
16=2x
14=2x
17=2x
19=2x
21=3x
22=3x
24=3x
19=2x
22=2x
20=2
23=2x
9=2x
3=2x
21=2x
10=3x
4=1x
22=1x
11=3x
5=1x
23=1x
12=1x
6=3x
24=3x
1=3x
4=3x
19=3x
22=3x
7=1x
10=1x
8=3x
11=3x
2=1x
5=1x
20=1x
23=1x
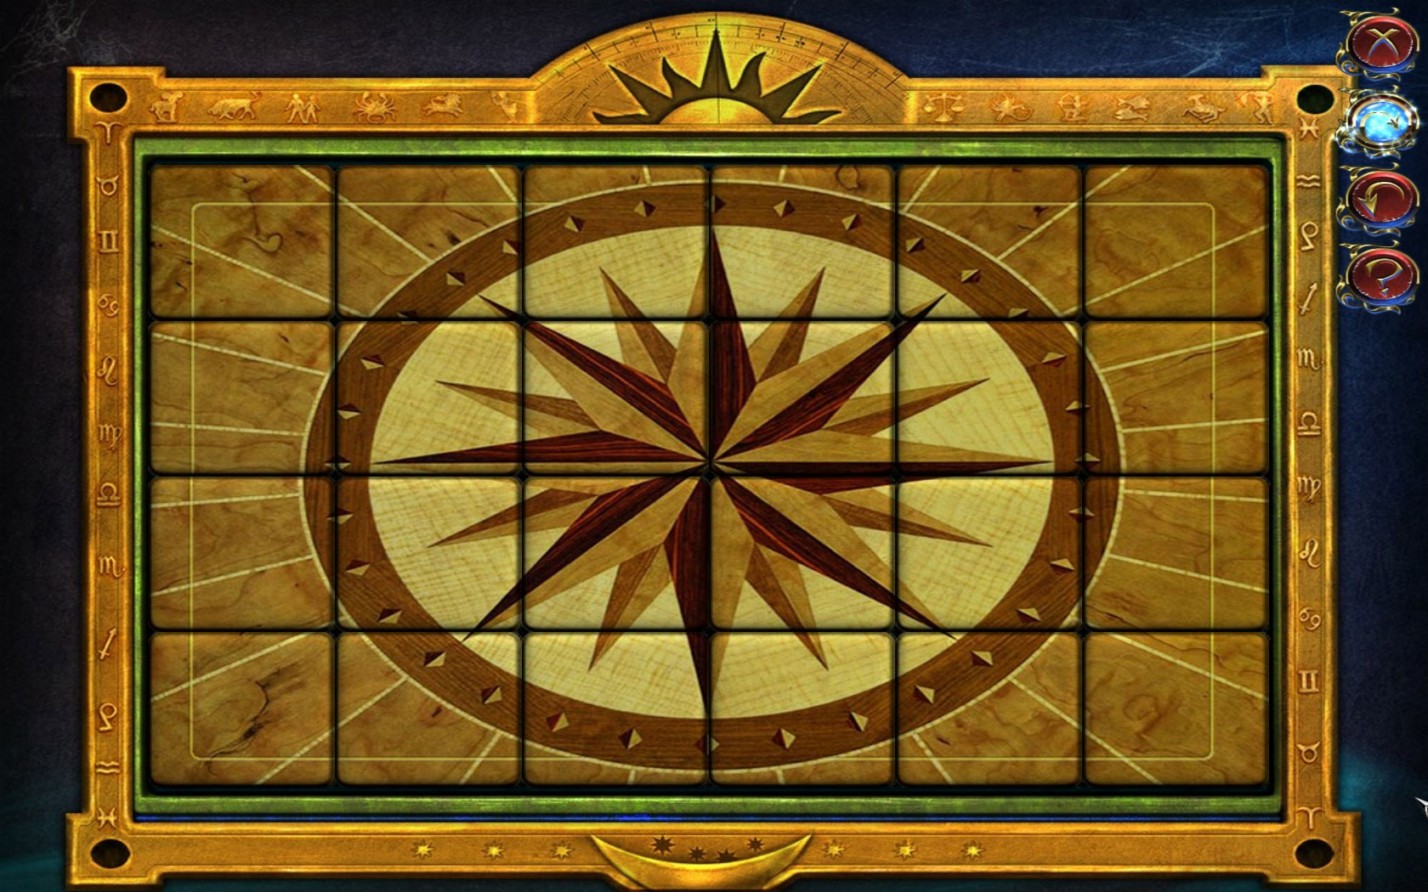
The screenshot show how the picture must appear.
Screenshot
The door opens - Enter.
Charles' Room
Gab a piece of Charles' coat of arms (1/5) from the floor.
Use the Perception-Power on the right side under the bed to find a Tetravex (7/8)
Use the Strength-Power on upper stone planet on the right side to obtain a red crystal eye for Charles' wolf head (1/2).
Use the Materialization-Power on the Mars representation right next to the book cabinet.
Grab the stair board (2/2) on the low left.
Place the two stair boards at the broken steps on the top left.
Screenshot
Go upstairs.
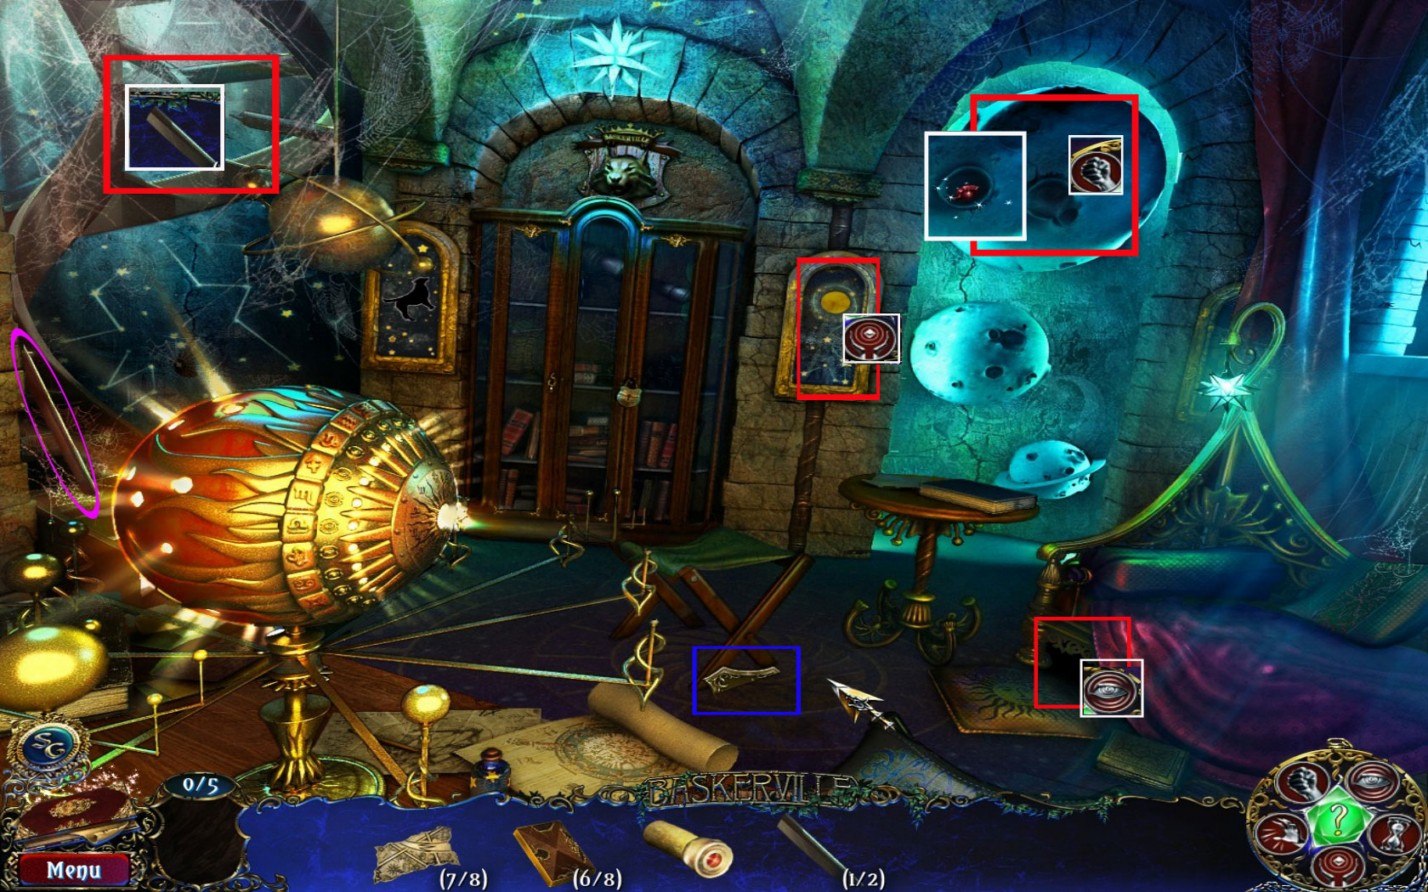
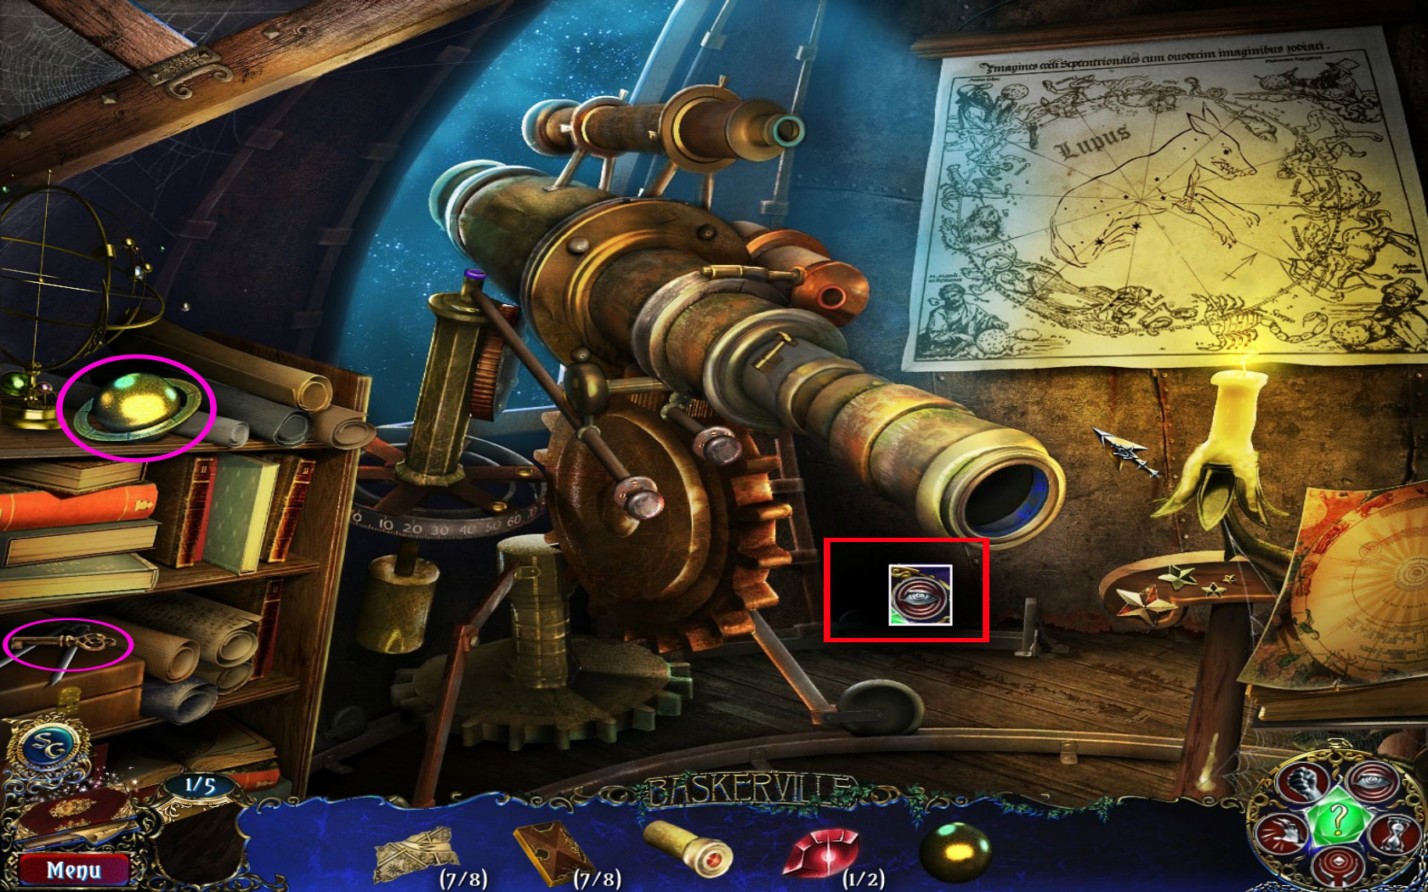
Observatory
Grab the padlock key from the bottom shelf on the low left side.
Take Saturn from the top shelf.
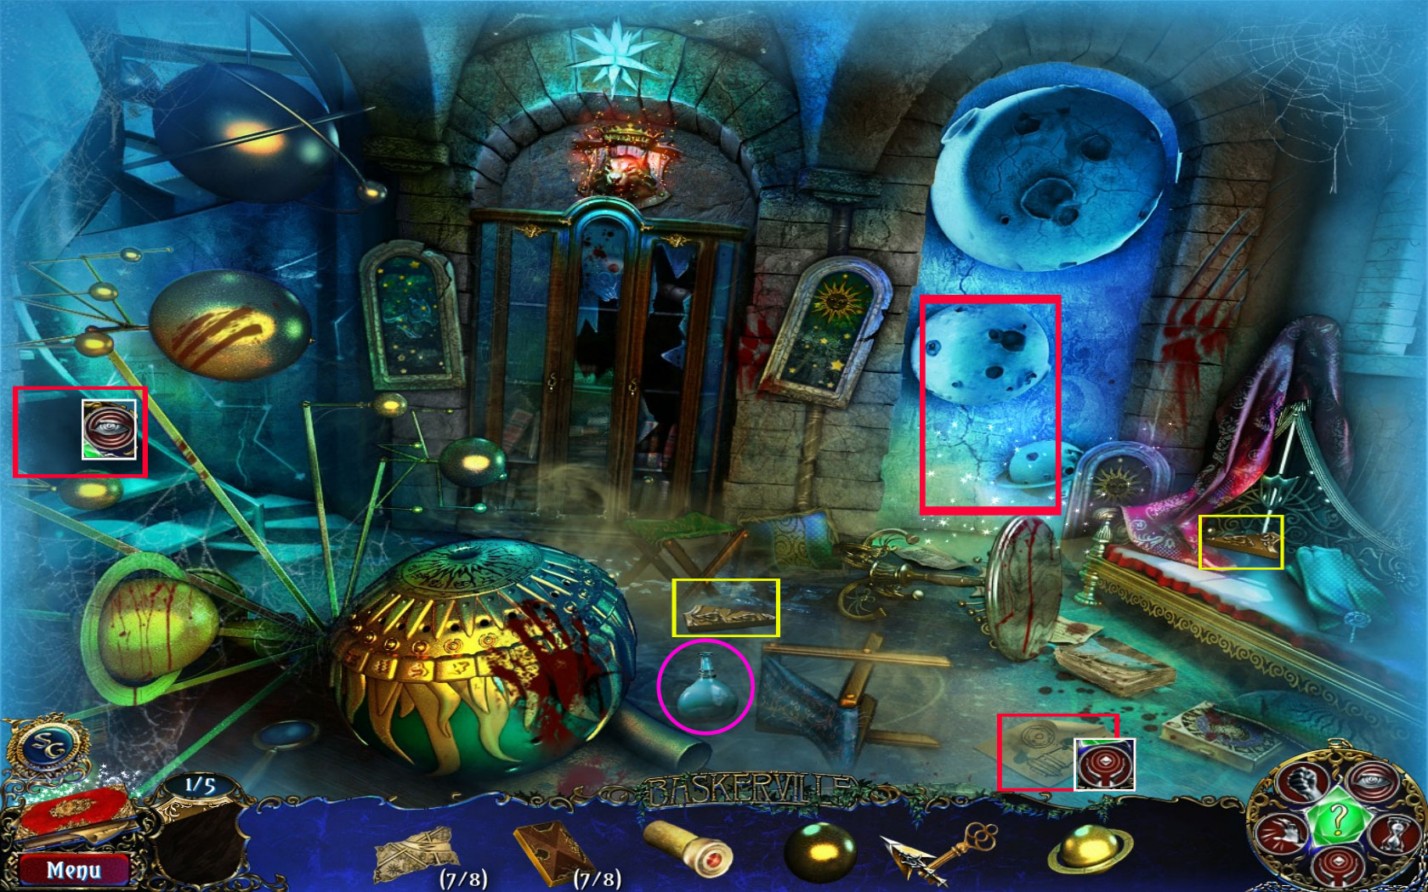
Use the Perception-Power to find a red crystal eye for Charles' wolf head (2/2) below the telescope.
Screenshot
Return to Charles' Room, place the red crystal eyes on the wolf head and enter the past.
Charles' Room (Past)
Play the hidden-object scene at the stone planets to get an ocular.
Grab a piece of Charles' coat of arms (2/5) from the floor.
Grab a piece of Charles' coat of arms (3/5) from the bed on the right side.
Use the Perception-Power on the dark spot at the stairs to find a piece of Charles' coat of arms (4/5)
Use the Materialization-Power on the telescope scheme on the floor on the low right side and take the telescope focuser.
Grab the empty flask from the floor.
Screenshot
Return to the present.
This location is complete.
Charles' Room
Use the key on the book cabinet and play the hidden-object scene to obtain a viewfinder.
Go up to the Observatory.
Observatory
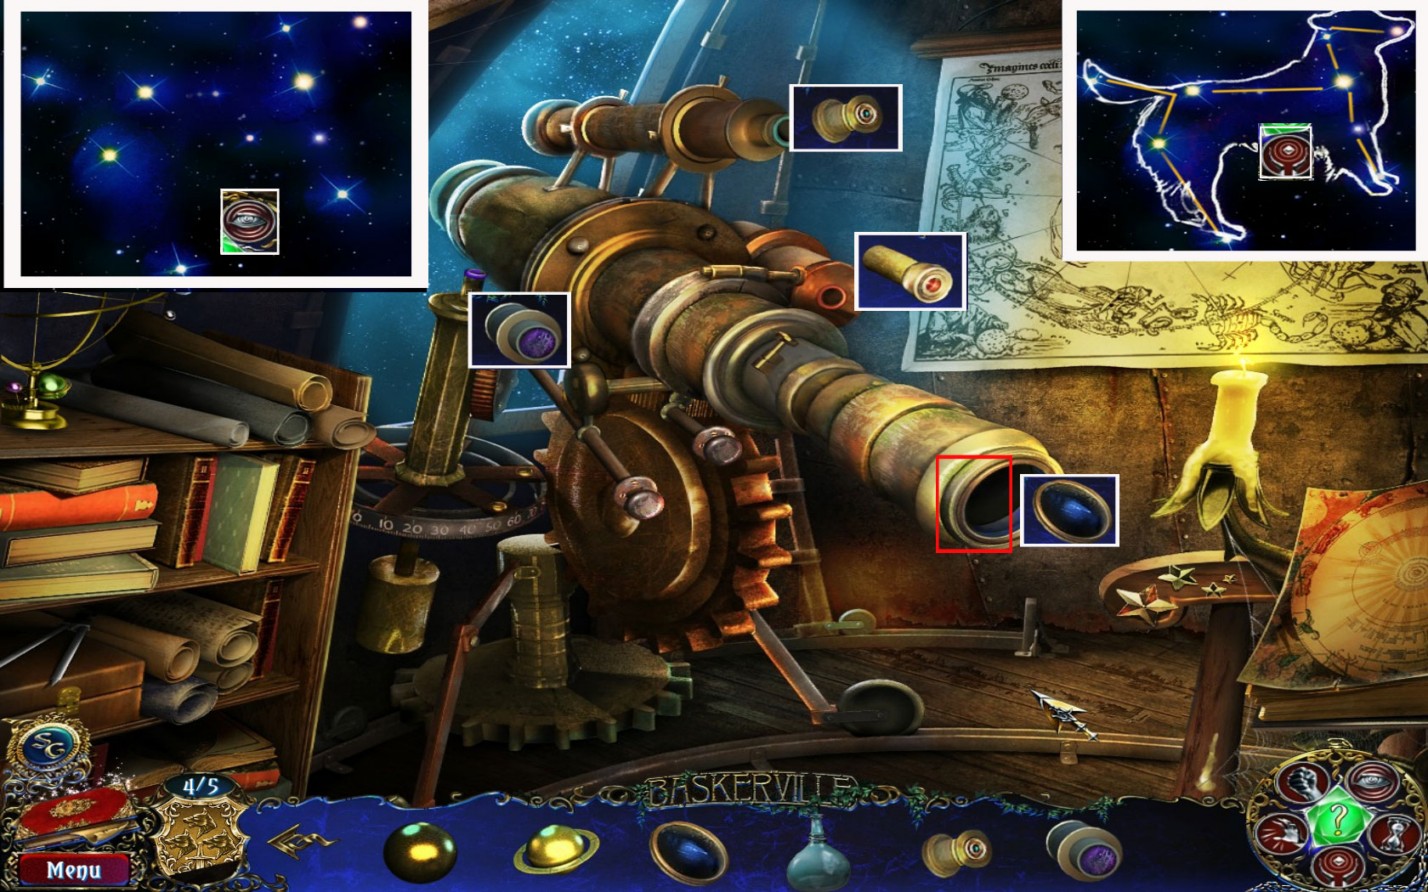
Place the telescope objects on the telescope.
The colors will give you an orientation for what goes where.
Click the ocular to see a star constellation.
Use the Perception-Power to see a dog.
Use the Materialization Power on the dog and take it.
Screenshot
This location is complete.
Go to Charles' Room.
Charles' Room
Place the dog on the spot left next to the book cabinet.
A compartment opens and you can take the Tetravex (8/8).
Head over to Elizabeth's Room in the Past.
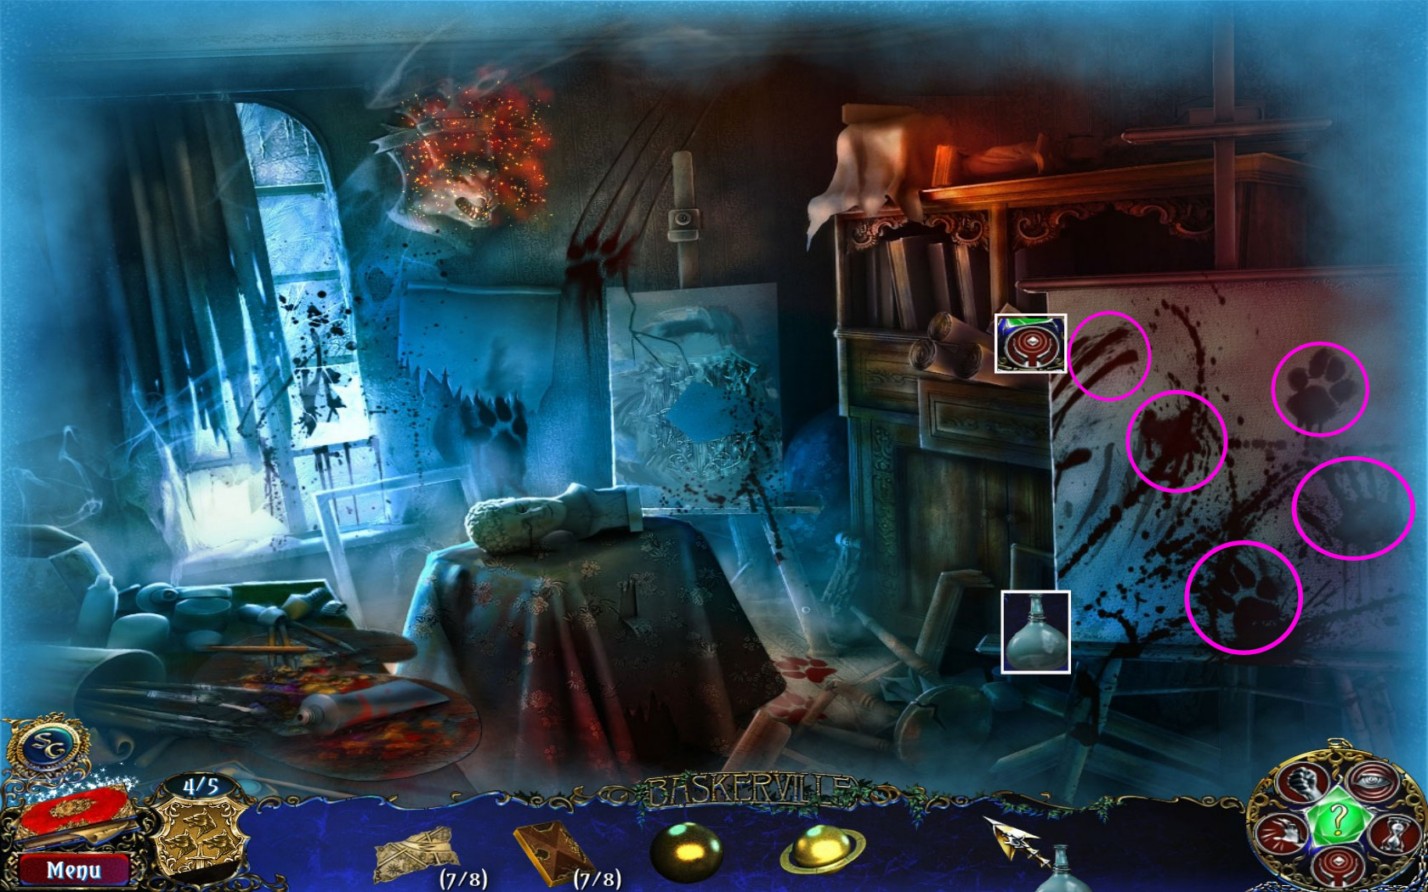
Elizabeth's Room
Use the Materialization-Power on the bloody painting on the low right side.
Click the empty flask on the five blood splatters to fill the flask.
Screenshot
Elizabeth's both rooms are now completed.
Go to Lily's Room.
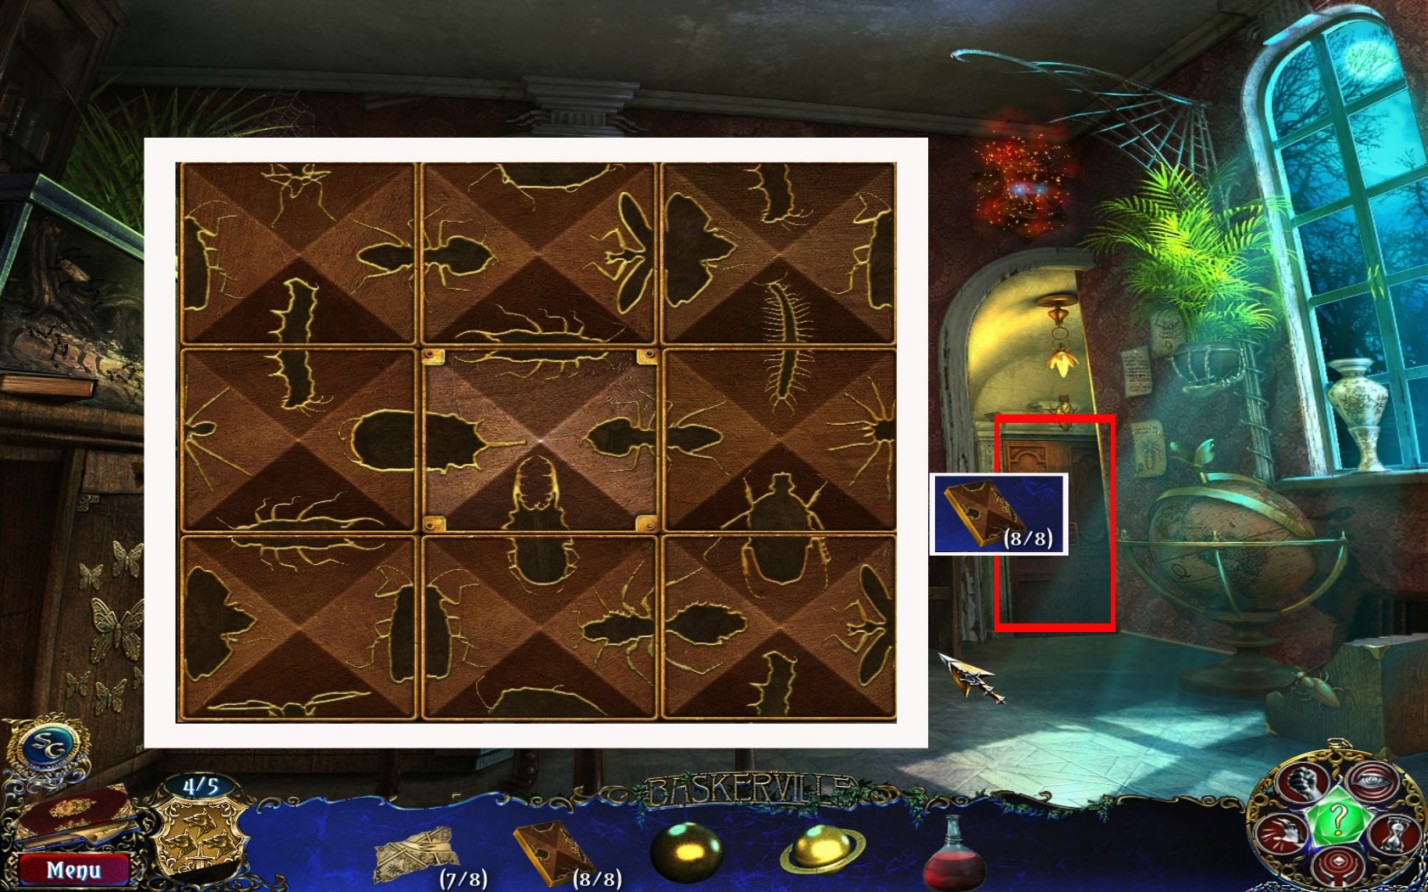
Lily's Room
Click the Tetravex on the door on the far right to trigger a puzzle.
Swap the tiles to reassemble the picture and use the locked middle tile for orientation.
Screenshot
Lily's Room is now complete.
You will be brought to the garden.
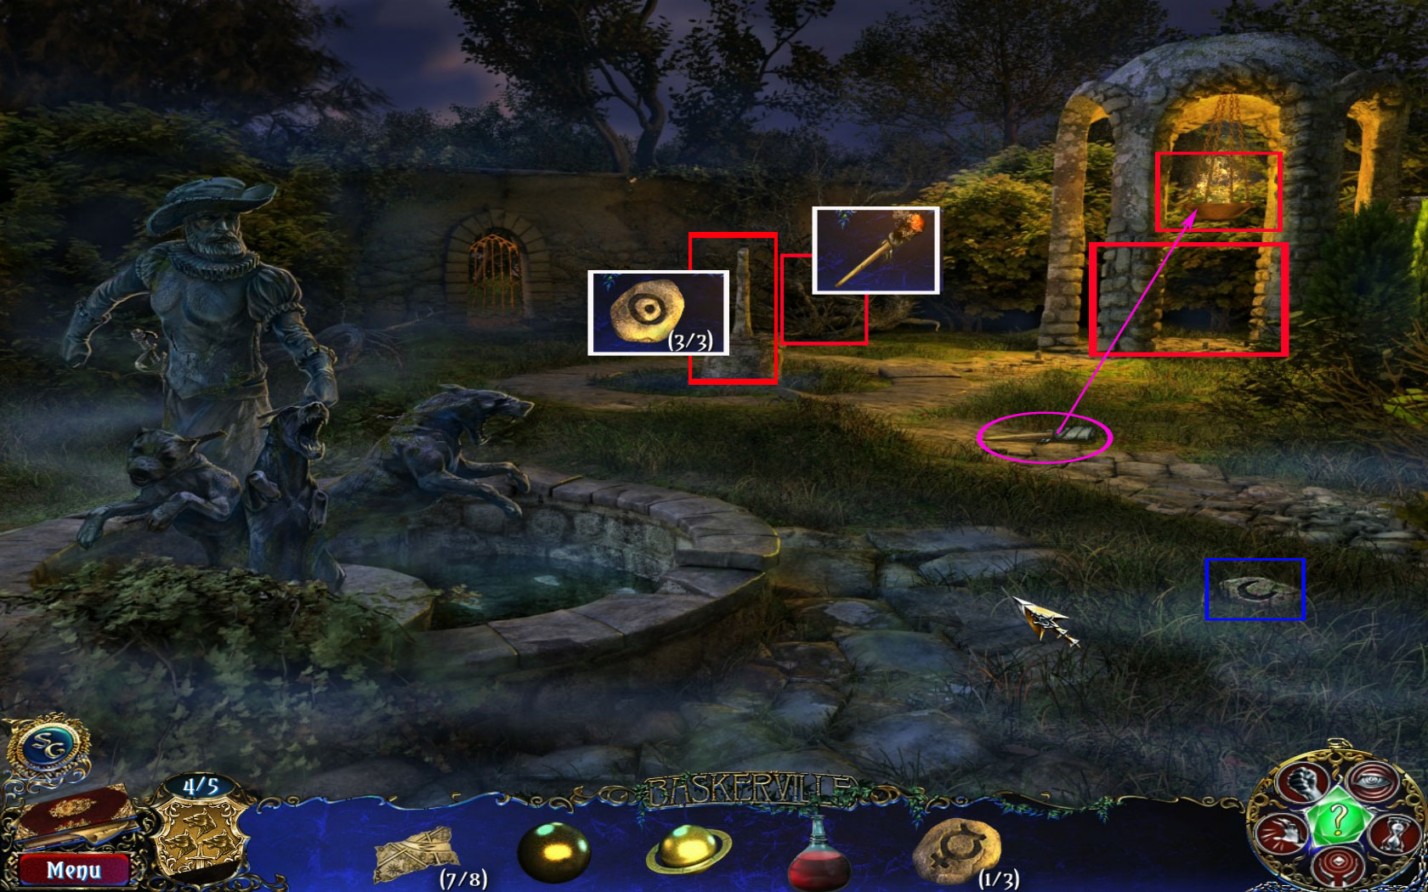
Garden
Play the hidden-object scene under the arch to obtain a strange stone (1/3).
Pick up the torch from the ground and light it at the fire bowl inside the arch.
Pick up the strange stone (2/3) from the ground on the low left side.
Use the lit torch at the dry branches right next to the gate in the far back.
Use the Speed-Power to let it burn faster.
When the branches are gone, pick up the strange stone (3/3).
Click the sundial in the middle of the scene and place the strange stones to trigger a mini game.
Repeat the shown sequences until the sun in the middle is fully colored.
If you make a mistake, the sequence will shown again.
Completing (or skipping) this mini game will open the gate.
Screenshot
Click to enter the Ritual Place.
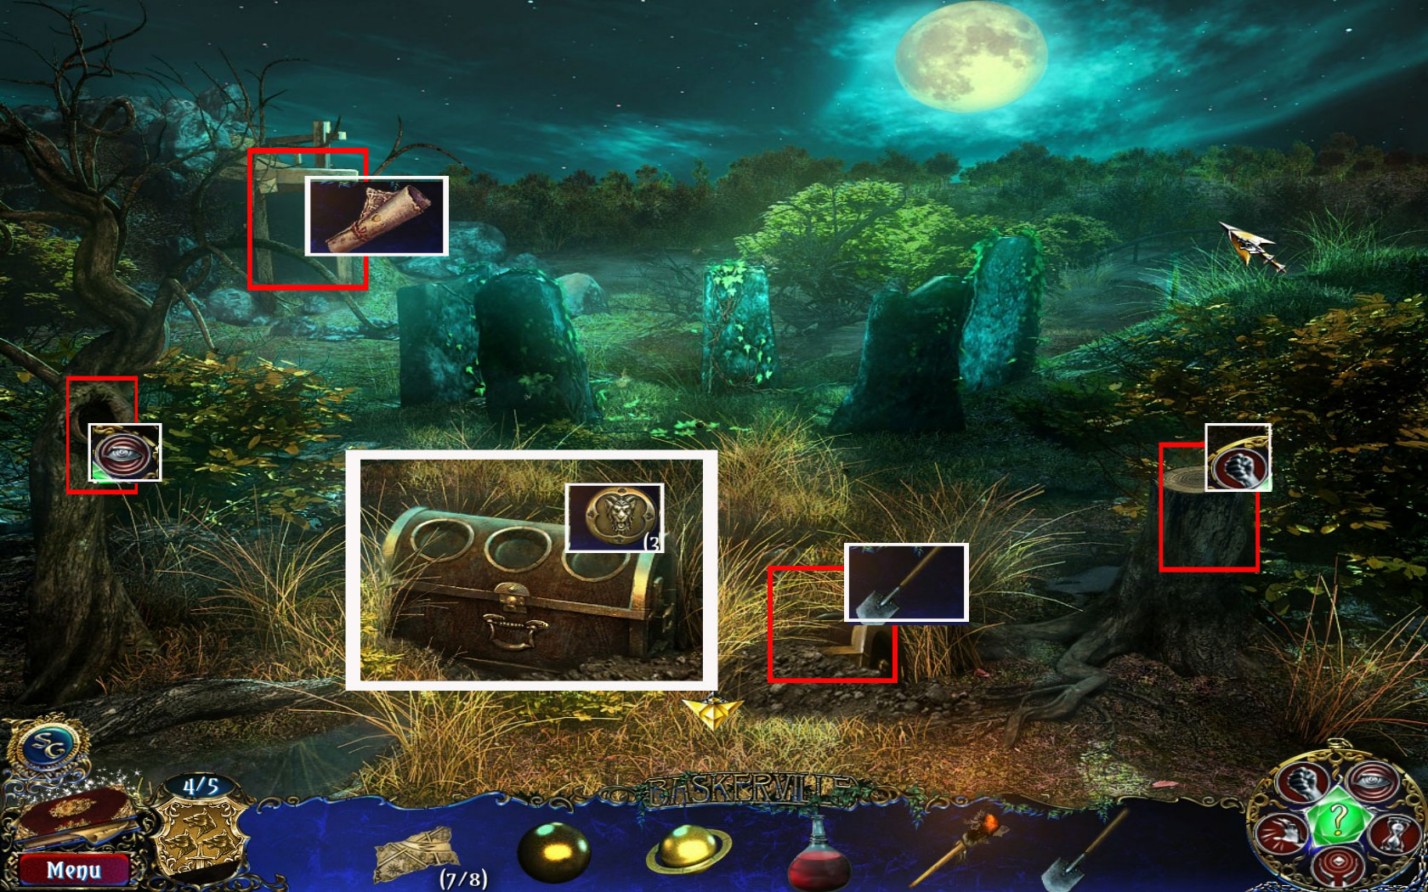
Ritual Place
Play the hidden-object scene on the upper left side to obtain a shovel.
Use your Perception-Power to find a Metal Plaque (1/3) in the dark hollow of the tree on the left.
Use your Strength-Power at the stump on the lower right side to find a Metal Plaque (2/3).
Return to the Garden and play the hidden-object scene under the arch to get the last Metal Plaque (3/3).
The Garden is now complete.
Return to the Ritual Place.
Use the shovel to dig out the chest at the bottom of the scene.
Place the 3 Metal Plaques onto it.
The chest opens. Grab the map for the Mine.
Click the map on the mine entrance on the far left.
Screenshot
Mine/Portrait Hall
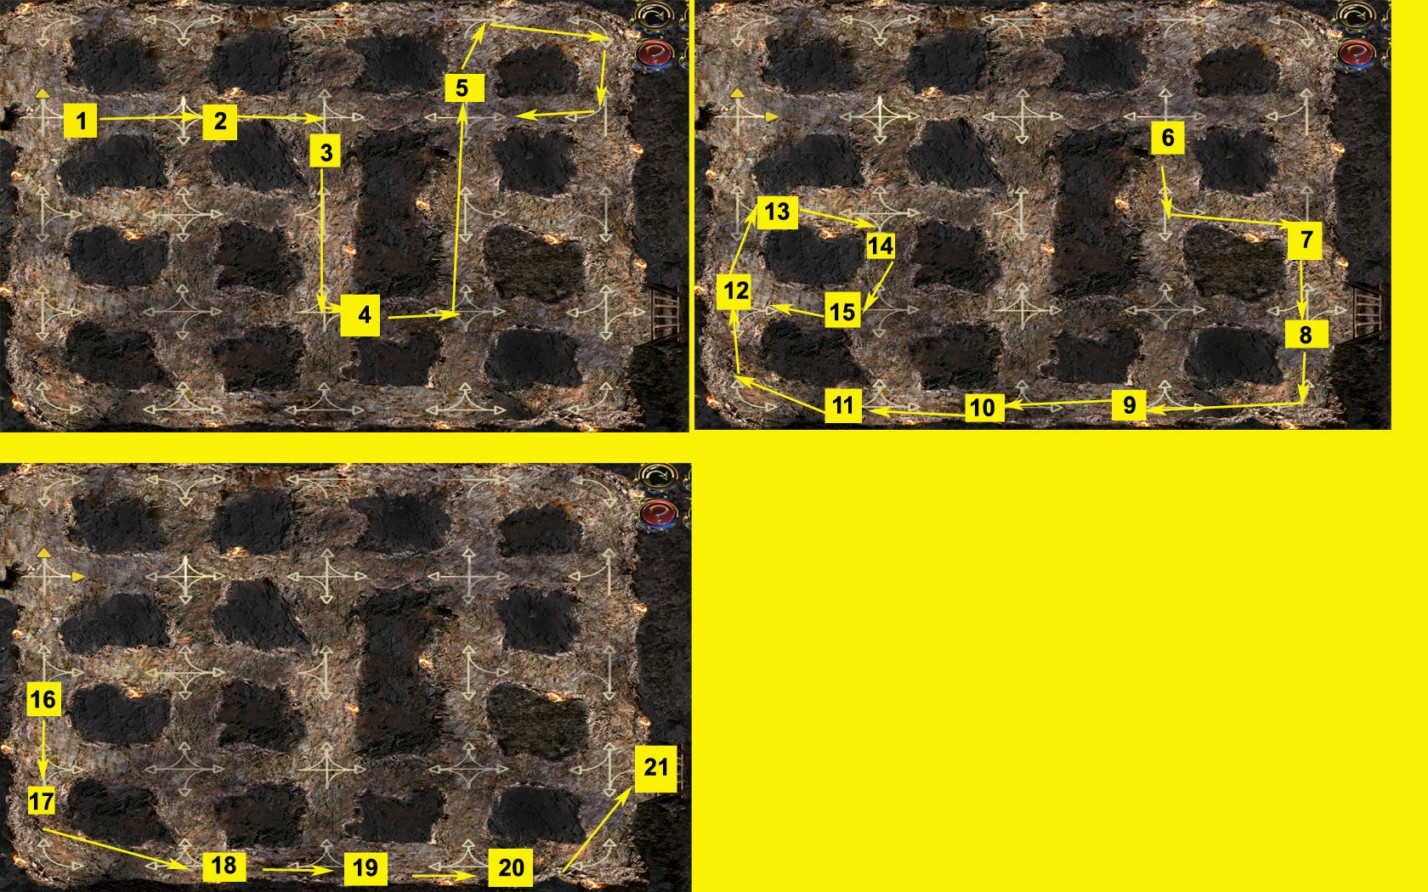
Entering the Mine will bring you into a Maze.
You will need to find your way to the exit on the far right.
To move Holmes click the small arrows - watch them carefully.
The straight lines will show the direction but curved lines will show you which way you go before you stop again.
After the stop you may choose the next step to go.
For a step-by-step solution please see screenshot.
Screenshot
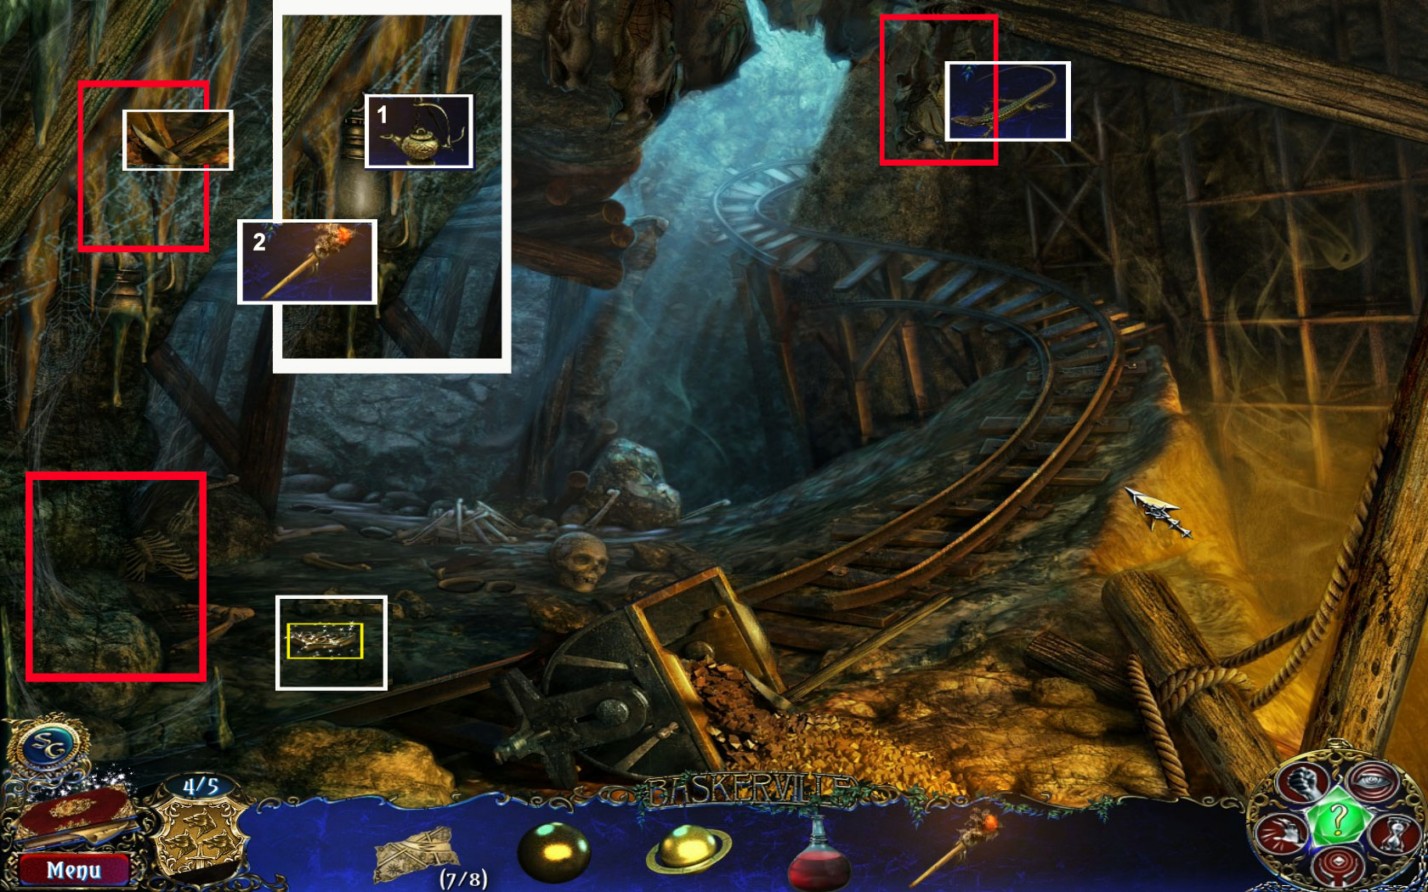
Inside the Mine click the pick axe right next to the mine wagon.
Use it to get rid of the dirt above the lamp on the top right side.
Leave the Mine and play the hidden-object scene on the Ritual Place to obtain an oiler.
Use the oiler to fill the lamp and light the lamp with the torch.
This triggers a hidden-object scene below the lamp - play it to receive a lizard.
Give the lizard to the bat at the top of the scene - it will let fall down a piece of Charles' coat of arms (5/5).
Screenshot
The location is complete now.
Return to the Portrait Hall.
Click Charles' Portrait and place the coat of arms.
Take the last scheme piece.
The location is complete now.
Head over to Henry's Room
Henry's Room
Click the wall far back and place the scheme pieces one by one on the board.
They will fit into the right space automatically.
Use the Materialization-Power on the venus drawing and take the venus.
Screenshot
This location is complete now.
Go to Charles' Room.
Charles' Room
Click the solar system on the low left and place the three planets from your inventory.
Your goal is to seal all dots at the end of the rays.
Click on a dot to see two move possibilities and choose one.
The chosen dot will get sealed
You will need to choose the right moves in the right order.
The seal after the second click can't be removed anymore.
You can't use a sealed dot for another move.
When you have no moves left use the reset button.
For the solution please see spoiler.
Click B - choose G
Click A - choose D
Click F - choose A
Click C - choose F
Click H - choose E
Click C - choose H
Finally click C to seal it.
Get the meteorite out of the now open solar system.
This location is complete now.
Head over to the Ritual Place.
Ritual Place
Click the Ritual Place.
Place all Powers on the stones with the corresponding symbols on it.
Place the blood and the meteorite in on the middle stone.
Watch what happens.
Congratulations, you finished the game!
Thanks to Kayleigh for the walkthrough!
Posted by: Mike |
November 17, 2010 11:02 PM
|
November 17, 2010 11:02 PM