

![]()
 Back in the dawn of time (around the late 1980s to mid-90s), it seemed like most computer games worth playing had the title "Quest" attached to them. This was thanks in part to the designers at Sierra On-Line, who led the way with their classic "3-D Graphic Adventures." These innovative 16-color games took players to distant pixelated lands, where they could save princesses (or princes), arrest bad guys, or try their best to pick up girls with a few basic keyboard commands. Eventually these adventure games would grow up to become point-and-click affairs, with enhanced graphics, realistic animations, and more compelling stories. 20 years later, there are still designers out there who have been influenced by this classic style, as evidenced by TenthPlay's new Flash-based mystery adventure, Dark Visions.
In Dark Visions, the year is 1928 and you play the role of Emma Fischer, an inquisitive-minded young niece of Dr. Frank Mahler. The doctor runs a mental clinic at his mansion in New Hampshire, and he just sent a letter to his sister requesting Emma's help as an assistant. Upon arrival, however, something doesn't seem right. Where is the doctor? Why is his colleague, James Thaxton Smith, so evasive on the subject of the doctor's whereabouts? And why does the mansion seem deserted? Thus begins your adventure as you seek to find answers and understand just what's been going on at the mysterious Hill Crest Manor.
Like classic adventure games such as King's Quest V, Dark Visions uses a standard point-and-click interface. Three icons change your cursor so Emma can walk around, look at things, or use objects on screen. You also have an inventory at the bottom containing objects to use with your environment. A scoring system on the Main Menu similar to those found in Sierra games (with 112 points possible) helps you figure out your progress as you go along.
 There are many elements to Dark Visions that go beyond what we've come to expect out of most Flash games. Unlike standard room escape titles, this game triggers dynamic events and actions based on how far along you progress. Certain characters will only show up to talk to you at certain times, and you may not be able to collect particular items until their purpose is made clear. In addition, previously inaccessible areas may yield new clues later in the game. While much of the game involves walking around and picking up objects to use elsewhere, there are a number of puzzles that need to be solved to advance through the story. Like Myst, much of the mystery unfolds through discovered diary entries, papers, and books. Reading these can be key to getting past the puzzles, which range from different types of code entries, to following various instructional sequences.
Analysis: I was very impressed with Dark Visions, which has the robustness of a downloadable point-and-click adventure contained within a free Flash game. The graphics are good, with high-quality rendered scenes and realistic character animation. I also found the storyline to be quite compelling; you really find yourself drawn in to the events as you uncover the game's backstory and see Emma's place in all of it. Gameplay can take about two hours, and you may need to save your progress and come back to it if you can't get through the whole thing in one marathon run.
Dark Visions has a lot going for it, but it's not without its few faults. Maybe I'm just used to adventure games where you can pick up anything not bolted down, but I felt a little frustration in having to return to an area to get an item that previously was deemed "too heavy" or "not needed." There's actually quite a bit of returning to areas you previously couldn't do anything in, though that seems to be a staple of classic adventure games where the designers tried to get maximum playability out of limited screens.
Other than that, though (and maybe the title's minimal use of in-game music) I couldn't find too many problems with this ambitious free title, which once again shows the robustness of making games in Flash. If you're feeling that classic adventure game itch and want to try something interesting that's both fun and free, Dark Visions is definitely worth playing.


Walkthrough Guide
(Please allow page to fully load for spoiler tags to be functional.)
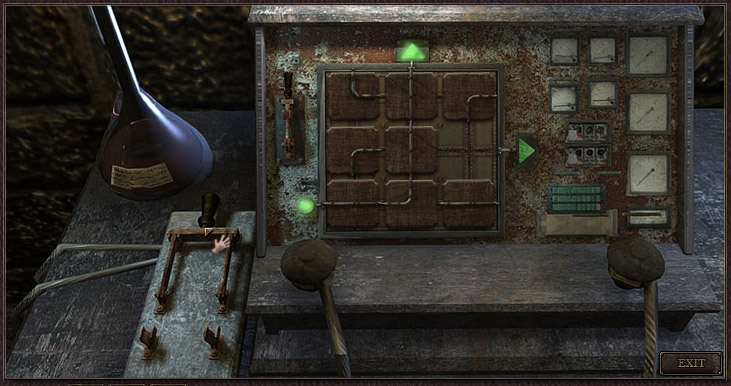
Here is an image of the basement puzzle solution. hope that helps.
just pull the level where the hand icon is to solve the puzzle
Basement Puzzle Solved
Posted by: darkj |
November 10, 2010 12:57 AM
|
November 10, 2010 12:57 AM
Dark Visions Walkthrough
Foyer
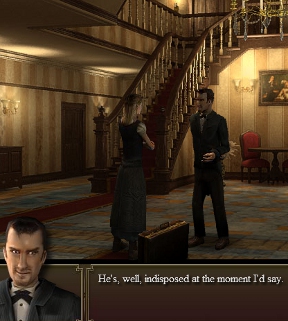
As Emma Fischer, you start out exchanging pleasantries with Dr. Mahler's assistant, James Smith. He'll then escort you to the guest room.
Guest Room
You can spend time looking at various furnishings around the room but the only notable item here is the heavy statue which you will need later. Exit the guest room by clicking on the down arrow.
Hallway
You can head either left or right, but for now we'll head right (Emma's left) to go to the servant's quarters. You'll head into a storage area , and take the fuse that's on the shelf. Then head right to the servant's quarters. On the right, take a dusty record, and you might want to have a closer look at the clock and note the name of it. Also take the bucket next to the clock. Head back out to the storage area and then click on the left arrow to go down to the kitchen.
Kitchen
In the kitchen you'll make your way to where the cook is preparing food. Using the hand icon, click on him to ask him about Dr. Mahler's whereabouts. He'll play dumb and tell you he has lost his keys. Head back upstairs and out of the storage area. Once in the hallway, click left a couple of times,
Hallway
Before heading further to the left, click on the closed door to knock on it. James Smith will open it and tell Emma that she is not able to enter, and advise her to look around the house. Head left into the library.
Library
In the library, there's an open book on a table. Use the hand or eye cursor to read it. It will give you some information regarding how to turn the dial
Turn the dial clockwise to the first number, turn left to the second number and right to the third number
and the unsecure practice of using birth dates as codes. On the bookshelf near the table, take the book on the second shelf from the top and read about clocks and secret compartments. Take note of the dates. In particular
April 18 1775, Last Quarter, Red Moon. Note the illustration. Also note the clock‘s name and corresponding time.
Head downstairs.
Downstairs
Emma will notice that the front door has been chained and locked. Exit the screen and head back to the left of the stairs.
Parlour
You can look at the various furnishings here but for now there's nothing significant. Click on the gramophone and take the record that's playing and replace it with the old record from the servant's quarters. It will give you a lecture on Paul Revere and his midnight ride when the British troops were moving inland. Take note of the date
April 18 1775, and there are times mentioned as well - 11 and 11:30. Head now to the room next to the parlour, also known as Reception.
Reception
Go to the desk area, and note that there are filing cabinets that need a key for access. There's also a fusebox. Place the fuse in the top right corner.
This will activate the lighting for the patient's rooms downstairs.
There's also a locked door
to the patient's rooms
which will be accessible later.
Head back to the foyer.
Foyer
Click on both of the dining room doors from which party sounds are emanating. You'll hear snippets of conversation now that the music has stopped. Interesting. Head back upstairs.
Hallway
Knock on the door where James is and have a conversation about the chained front doors. He will tell you it's because of the patients being treated. Head back to the servant's quarters.
Servant's Quarters
Click on the clock and move the moon mechanism to the Red Moon phase and match it to the illustration in the book in the library. Also change the clock hands to the time of 11:30. You may have to tweak the hands and the moon phase a little bit here. You'll know when it's worked when you step back from the clock and a dialogue box lets you know that the clock has moved. Take the floor plan that's inside the secret compartment, and read the notes towards the end that mention an attic and the possible existence of a cellar. Now head down to the kitchen.
Kitchen
As soon as you enter the kitchen you'll notice that the cook has been bludgeoned, and Emma will have a brief exchange with the attacker before she flees upstairs locking the door behind her. This is something that James will most certainly need to know about so head back to his room, knock on his door and a brief conversation will ensue before Emma is escorted back to the guest room and locked in.
Guest Room
Remember the statue on the bureau. Take it now and use it on the entry door. You'lll have to click four or five times. The closet door will be accessed later. Exit the guest room and go left to the storage area near the servant's quarters. Note the blood pooling form underneath the locked door. Head to the kitchen, and note the blood on the floor. In the view where you once spoke to the cook, look on the floor near the stove and take the key ring. You may also wish to experience the aroma of the soup bubbling on the stove. Head back upstairs to James' room.
Master bedroom
Now that James has gone to deal with a situation, Emma has a chance to look around. Click on the desk and read through Dr. Mahler's journal. Click on the left side drawers and obtain a small key. Click on the visible door and enter the bathroom where you can use the bucket at the sink to fill it up. Take it back to the bedroom where you can use the bucket of water to extinguish the fire, which will then expose a ladder. Head up the ladder to the attic.
The Attic
Head to the low cabinet that has framed pictures on it. Use the hand cursor to inspect and get a name and a date.
Anne Marie Mahler. July 25 1910 - 1921.
You may also want to check Dr. Mahler's journal in the drawer to learn more about his bizarre experiments. Check the table to the right of the cabinet and by clicking on it Emma finds out it's her uncle's mixing table. Nothing else to do for now, except to head back downstairs to the reception room.
The Reception Room
When Emma attempts to enter the reception area, there will be the sound of footsteps. Using the hand icon, click on the cupboard to her right and hide. James will then exit the parlour and head away upstairs. Emerge from the cupboard and enter the reception. The small key is for the filing cabinet, so use it to read patient files. These will provide an interesting insight into the people's voices you heard in the dining room, as well as James Smith. Now use the key-ring to access the locked door.
The Patient's Rooms
The rooms should be lit now if you placed the fuse in the top right corner earlier. Go into the first door on your left. Click on the papers on the table near the bed to get a clue about the tic-tac-toe game on the wall. You can try pushing the padded walls, but nothing will happen for now. Leave the room and head around the corner further down the passage. You will hear some shuffling. Head right to the end and look through the door slot on the left. See Ronald Dempsey pacing around in his padded cell. Head back upstairs.
Hallway
As soon as you get to the hallway, there will be the sound of shuffling and muttering, and Emma will indicate the someone is heading this way soon. Hide in the cupboard and watch as James enters, lifts the painting and expresses frustration at not being able to access the safe. He'll exit towards the servant's quarters, so head back into the guest room.
Guest Room
With the key-ring you can now access the closet. Open the door and click on the box on the floor of the closet to obtain a fuse. Head back down to reception.
Reception
Open the fuse box and place the second fuse in the bottom right corner. Head into the patient wing and down to Ronald Dempsey's cell.
Ronald Dempsey's Cell
Look into Ronald's cell and note the beam of light emanating from the back wall. Head back to the empty cell with the tic-tac-toe game.
Empty Cell
In the empty cell, check the scribbled-on pages on the table again. On the second page there is a clue to the wall puzzle.
"O's Win!!!" with an arrow pointing to a tic-tac-toe game.
OXO
OXX
XOX
Using this game as a guide, click on the wall panels that correspond with the ‘O's in the game. If successful, there will be the sound of a distant rumbling.
Time to head back to the safe in the hallway.
Hallway
Click on the painting to reveal the safe. Remember the birth date that was located in the attic.
7-25-10. Turn the dial to the right to 7, left to 25 and right again to 10.
Open the safe to retrieve a gold coin and a formula recipe. Time to head back to the attic, via the master bedroom.
The Attic
At the mixing table, take note of the rat in the cage and read the notes next to the cage that outline the rat's reactions to various serums. Also check the ingredients on the table and the recipe. Note that the recipe calls for sugar in water, and that there is no sugar on the table. Where else can you find sugar in a house?
The kitchen
The Kitchen
Click on the shelves to locate and take some sugar, and head back up to the attic. You might want to take note of the spreading ppol of blood on the way. And you might not.
The Attic
Back at the mixing table, pour the sugar into the jar of water. Using the hand cursor, click on the table to bring up the utensils inventory. Here's where it gets a bit fiddly. You'll need to click between the eye and hand cursors quite a lot here. Refer to the formula notes to create the mixture.
The recipe is:
2 tablespoons of Sugar Water
1 tablespoon of Lithium Citrate
3 drops of Concentrated Insulin Solution
1 tablespoon of Ergotamine Powder
Click on the tablespoon and click twice on the sugar and water and click on the bowl in the inventory. Still with the tablespoon , click on the unlabelled bottle in front of the codeine once and then click on the bowl. Locate the flask in front of the sugar box and sugar water bottle. Use the hand cursor to select the dropper, and take three drops, one at a time, and add them to the bowl. Now select the tablespoon again and from the bottle in the back row, second from left, take a tablespoon of ergotamine powder and add it to the bowl.
Then take an empty syringe from the table and click on the formula to fill the syringe. Now take the syringe and use it on the rat. If you've mixed the formula correctly, when you look at the rat it will be calm and attentive.
Now head down to Ronald's cell.
Ronald's Cell
When Emma returns to Ronald's cell, it will be open and a panel at the back wall will be revealed. When you click on the panel, there will be a familiar sound of shuffling and Ronald will appear and block Emma‘s way. Use the syringe on him and after a brief conversation you will be able to go forward. Head into the secret room and down the stairs to the cellar.
The Cellar
Head into the first cell on the right, and click on the table with the machinery. You will find a larger switch to the far left of the machine, and a smaller switch on the left of the machine. Slide the tiles so that there's a connection between the green light on the left and the green arrow at the top. Click on the smaller switch and then on the larger switch to hear a door sliding open. In this room is a letter that you can read relating to the fate of Dr. Mahler's daughter, Anne. Exit the cell and then go into the next cell along. Take the crowbar which is hanging off a crate to the left. Exit the cell and go back up the stairs. I think the general idea of visiting the cellar is solely to gain more insight into what Dr. Mahler has been up to with his experiments. Once back up the stairs, use the crowbar on the wooden door. Now head back upstairs to the locked room next to the guest room, the one where the pool of blood is seeping from.
Mystery Room
Use the crowbar on the door of the room from which the blood is seeping from. The door will creak open and there's Emma's Uncle Frank slumped in the corner with blood dripping from his head. There's nothing to be found on the body, only a cause of death, namely a bullet wound. Head back to the attic.
The Attic
In the attic Emma will confront James who is frustrated that he can't find the formula. After the confrontation, James will chase Emma into the library.
The Library
Once in the library, use the crowbar to secure the door. James will bang on it repeatedly. Head further into the library and Ronald will be there. Inject Ronald with the serum and Emma will instruct him to go to the door and club the man who enters. Watch the ensuing battle, and after Ronald leaves, search James' body for a key. This is the key to the padlock on the front door. Use it to escape.
Posted by: Chiktionary |
November 10, 2010 7:29 AM
|
November 10, 2010 7:29 AM