

![]()
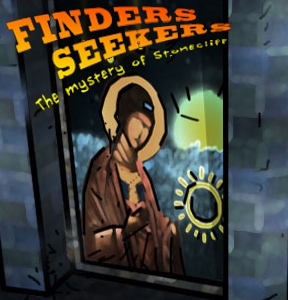 Good ol' Uncle Whatsisface has disappeared, according to a letter from a British consulate in Africa, and it's up to you to solve the mystery of Finders Seekers: Mystery of Stonecliff. Somehow, Uncle Noname has left you clues to find in an old, dilapidated church in Wales. Atomic Cicada has crafted this ambient point-and-click adventure which will have you searching every little nook and cranny for clues, objects and solutions. As in any escape game, you need only your mouse to navigate, pick up and manipulate objects, and solve puzzles. Easy, right? Well this little adventure might have you thinking "What the...?" more than once.
Navigation is at first a little disorientating. Big, yellow arrows point the way, whether forward, backward or off to the sides. Occasionally, an arrow will appear on the opposite side of the screen to your cursor. Fortunately, it doesn't take long to work it all out, especially as you'll be needing to head backwards and forwards to solve some of the puzzles.
As can be expected when thrust into an old roofless church without electricity, you will literally be fumbling around in the dark, or at least clicking everywhere possible. Unfortunately this makes for some pointless clues as some objects and solutions can be stumbled upon accidentally. Clicking also produces text boxes which, while informative, can be mildly irritating as they need to be clicked again to disappear, and they can hamper the much needed view of a clue or scene.
 Analysis: Standing at the entrance of an old Welsh church in the rain, you find yourself in possession of an ancient polaroid camera and a lighter; two very handy items, and make sure to put them to good use to save you backtracking later in the game. Of course you're going to accumulate many more objects throughout your quest, and many of them, whether fixed or movable, will need to be used more than once. You can easily select items from your inventory bar, but dropping them is a little awkward. Basically, when you select an object, it becomes your cursor with which you can still navigate and manipulate things around you. I felt a bit awkward adventuring on with an object as my cursor. Being a diehard Myst fan, it felt more natural to reselect the hand tool after using an item.
Some of the puzzles are fairly straightforward, while others a little more obscure. Seeking your Uncle would be practically relaxing with the soft soundtrack in the background and the meditative candlelight flickering around you, if it wasn't for some pretty challenging puzzles. In fact, one in particular is so vague in terms of how to solve it, that even brute-forcing it will take up a considerable chunk of your valuable seeking time.
Despite the occasional idiosyncrasies, this game is highly appealing for its unique presentation and puzzles with a difference. Atomic Cicada has crafted a thoroughly enjoyable adventure, creating a somewhat esoteric atmosphere with unintrusive musical backing and comic book style graphics. The flickering candlelight adds to the ambience, and almost enables a good sense of concentration, which you'll be needing. Trust me.


Walkthrough Guide
(Please allow page to fully load for spoiler tags to be functional.)
Walkthrough:
Foyer
To start your quest, you need to check everything , take photographs of four murals, note the giant compass on the ground and light the chandelier candles. You also need to find the room off to the side, where you put the wood in the fireplace, light the fire, pull back a cloth and find a crumpled photo with a valuable clue. Note the keyhole.
First secret door
Note the crumpled photo and find where it may have been taken.
3rd mural to the right
With the hand cursor, click on the small blue thing repeatedly, and a door should swing open before you
First floor of the Bell Tower
Quite a few places to explore here. You'll be looking at a stairwell that you can either go up or down. You can also go back left or back right. First, go back left.
West door
Note the clue to getting the key engraved on the door. There's also a cage in the ceiling. Close up, you'll see a key and a piece of string. Take the string, and go back, twice.
First floor
Now you're looking at the stairs, so go back right and you'll be facing a small room, with an inscription over a bar-covered opening. Also, note the winch without a rope. Close up on the inscription and take a photo. Away from the inscription, close up on the small opening. Click on the rope. Nice, you can make the bell ring. Remember the clue on the west door? Ring the bell as much as you can. Voila, the West key appears. Take it and back out.
You can turn to look behind you in the winch scene. You'll have a bird's eye view of the church entry and the giant compass. Nothing to do here for now. Turn back around and make your way to the West door.
West room
Use the west key and open the engraved door, then in you go. You'll need to light the torch before you can progress.
Items to collect in this room: hand-held compass, Hand lantern, rope, and South key. Note another giant compass. Now go back to the first floor of the bell tower and up one flight of stairs.
Here's a small hole in the floor and a hook. Tie the string to the hook. Go back to the West door and locate the ceiling cage. Tie the string to the key, then back to the stairs. Pull the string and get the East key. Take back the string, you'll be using it again shortly. Now go all the way up into the bell tower.
Bell Tower
Close up on the narrow window. Can't quite pull that lantern through. But yay, there's another hook. Tie the string to both hook and lantern and push the lantern out the window. Don't back out just yet though.
Getting the Lodestone
This is where the compass comes in handy. Select the compass and move it around the room. Towards the right of the screen you'll see it start to spin very quickly and hone in on a point on the wall. With the compass still selected, click where it indicates and collect the lodestone.
Nothing more to do here, so go back to the winch scene.
Now you have some rope for the winch. But first you need something to tie the rope to. Go the bird's eye view and note a rope to the left, above the winch. That's your securing point. Tie the rope and turn the winch. The chandelier lifts up. Time to go and investigate further, so go back to the church foyer.
Foyer
Giant compass
Close up on the giant metal compass. Insert the lodestone. Doesn't quite fit. Take it back out, and it's awesome magnetic properties have attracted the North key. Take the key and reset the lodestone.
Chandelier
Close up on the chandelier, and take the first constellation plaque. Go back to the room with the fireplace.
North Room
Use the North key on the engraved door and enter a dark passage. Click around in the dark and locate a candle holder. Move one step forward and locate a candle. Light it, and take it. If you take it before lighting it, no probs, you can just light it once you've placed it in the first candle holder. Note the holes in the wall to the right.
Cemetery
Now you're in a very old graveyard. Note the lantern swinging from the window which is too high to reach. Below that is a grappling hook to take, and to the left is some flowing water. Close up on the water and take some clay. Note the dates on the gravestones, and the constellation engraved in the fountain. We'll come back later, so head back to the room with the fireplace.
North door
You're probably wondering what the clay is for. Above the fireplace is a recessed engraving. Squish the clay into it, then take back a hand-made constellation plaque. Now go the wall mural with the praying monk and the moon.
Moon mural
You'll have to take another photo, now that the candle behind the wall has lit up the holes. Note one of the flickering stars looks slightly different to the rest. With the hand cursor, click on it. Now head back to the fireplace room and the North door. In the passageway, locate the scroll now poking out and take it. It's a clue. Nothing more to do here, so head back to the winch.
Winch
The rope is still attached to the winch, but the other end is lying slack on the floor. Where can we tie it now?
Onto the bell rope.
Turn the winch and head up to the top of the bell tower. On your way though, check the left side tapestry and close up on a narrow window. Use the grappling hook to pull in the Lightning lantern. Also, check the narrow window next to the West door and you'll be able to pull in the Moon lantern.
Bell Tower
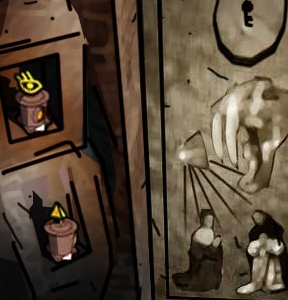
Now, with the bell hoisted up there are more places to explore. Firstly, check the bell and take the Sun lantern. Next, go to the top of the bell and around to the side, and you'll find a ladder heading down. First step in and there's a keyhole with an S engraved around it. Use the South key and take the constellation plaque attached to the wall. Go forward and note the pyramid constellation of the chandelier candles. Take a photo. Back out twice and go further down the ladder.
Go all the way down and click around for a candle, then light it, of course. Now down to the floor and turn around. Two more lanterns here: the Pyramid and the Eye lanterns. And another keyhole.
East room
The only thing you'll see here is a puzzle to solve. This is where the constellation plaques go, and so far you only have three. You can refer to your photos to place them now, or wait until you have all of them. Full solution later. Back out and go up the ladder one step.
Scroll clue
The scroll indicates something hidden behind the 19th rung.This puzzle seems to be a little incongruent, so you can try counting rungs or
where you lit the candle towards the bottom of the ladder, you'll notice one of the stones close to the ground is bluer than the rest. Click on that to retrieve another constellation plaque.
Now head back to the West room in the bell tower, where one of the giant compasses is.
West room
Okay. This is where one of the more obscure puzzles is. Basically, the idea is use the hand-held compass to locate where to put each of the keys. It's not clear cut, so I've posted a partial solution.
More info
The keys will form a rectangle of sorts. You can see in the screenshot that the South key is upper right, West key is lower right, East key is lower left, and so the North key would go somewhere upper left.
You'll know you've got it when the lid of the compass lifts up and off, revealing the final constellation plaque. Now time to head back to the cemetery.
Cemetery
Check your photos and read through the inscription from the bell tower, to work out the order of the lantern's symbols, and in which direction they each face. Now place the lanterns, with the first symbol Moon being placed on the oldest grave and facing North.
Order of lanterns
Moon - 687: John - North
Sun - 705: Mark - East
Pyramid - 927: Al' Sapheed - South
Lightning - 1154: Luthos - South
Eye - 1237: Raphael - East
Hand - 1291: Thomas - West
Once you've placed the lanterns correctly, a text box will indicate that it looks right. You'll notice that the spots of light on the wall mirror the fountain's constellation. Note the circled star in the fountain, and click on the mirror spot on the wall to find your last constellation plaque. Now back into the church, up to the bell tower and all the way down to the East room.
East room
Look at your photos again to match the constellation plaques to the symbols. This solution to this puzzle is a little out of whack with the rest of the clues, so you can tweak the directions until you find the solution or
Constellation plaque directions:
Moon - North
Sun - North
Pyramid - South
Lightning - South
Eye - East
Hand - West
Now you'll notice that the constellation plaques resemble letters. Turn the cogs below the plaques to match the constellation lettering.
COVNIW
The End..?
Now just click through the end scenes and find yourself off to Africa...
Posted by: Chiktionary |
September 16, 2010 11:23 PM
|
September 16, 2010 11:23 PM