

Flux Family Secrets:
The Rabbit Hole
Platform: Mac, Windows

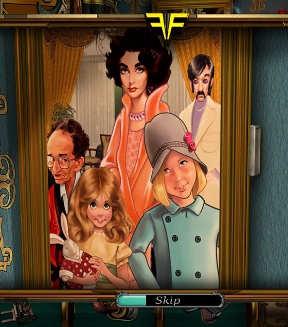
![]() In 2009 we first met the Flux family, and now the time has finally arrived to uncover even more of their secrets. Flux Family Secrets: The Rabbit Hole continues the story of Jesse, a young woman who discovers her real family may be stranger than anyone else's. (Yes, even your Aunt Marge who insists you set a plate for her poodle at the dinner table.) Following the events of the first game, Jesse is stuck in the past, and has no idea how to get home. Fortunately, with a little help from you (and, um... herself?), she can set history straight and return to her own time. And, if you have the computer capabilities, she'll do it all in glorious high definition. Yes, that's right; this hidden-object/point-and-click hybrid is the first true HD title from Big Fish Games. Please note that this game is currently only available as a Collector's Edition; the standard edition will be available in a few weeks.
In 2009 we first met the Flux family, and now the time has finally arrived to uncover even more of their secrets. Flux Family Secrets: The Rabbit Hole continues the story of Jesse, a young woman who discovers her real family may be stranger than anyone else's. (Yes, even your Aunt Marge who insists you set a plate for her poodle at the dinner table.) Following the events of the first game, Jesse is stuck in the past, and has no idea how to get home. Fortunately, with a little help from you (and, um... herself?), she can set history straight and return to her own time. And, if you have the computer capabilities, she'll do it all in glorious high definition. Yes, that's right; this hidden-object/point-and-click hybrid is the first true HD title from Big Fish Games. Please note that this game is currently only available as a Collector's Edition; the standard edition will be available in a few weeks.
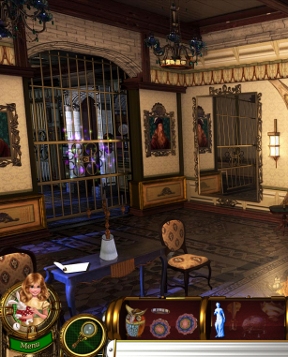
 The gameplay revolves around melding standard object hunting with old fashioned point-and-click concepts. Within each chapter, you're given a goal, and you can keep track of what you need to find at the bottom of the screen. (Or click on your current companion for a hint!) The hidden-object hunting is split into two categories; tracking down parts of an item in an area that you need to combine to progress, and standard hidden-object scenes. You'll also have to keep an eye out for objects in the environment that you can simply pick up to be used later. For your searching convenience, the game also offers the ability to skip puzzles, and a blink-and-you'll-miss-it hint option, but don't worry; both timers refill very quickly. You can also click on the magnifying glass in the tool bar so you can get a close-up view of areas... which, more than likely, you'll need to do to track down certain pieces.
As Jesse, you'll travel through time trying to make sure events happen the way they're supposed to; you'll find yourself, for example, ensuring Lincoln gets to give the famous Gettysburg Address, or that Henry Ford winds up making cars, not watches. This sort of means that you have to either be American or a history buff to really get the most out of certain sequences, but even if you're neither the game never stops being fun. In between fixing history, you'll get to explore more of the Flux mansion, and uncover the truth about Jesse's unusual childhood... and, maybe, her sister's bad attitude...
 Analysis: It's been a little over a year since we first met the Flux family, and apparently the answer to "So what have you been up to?" is "Why, making ourselves fabulous, darling." Even if you don't possess the monitor or graphics card capable of rendering the game in high definition, The Rabbit Hole still looks pretty luxurious. Environments are detailed with period-appropriate items, and For me the biggest standout of the presentation is actually the music. Audio tends to get overlooked in most casual games, I think, and The Rabbit Hole features a lovely orchestral soundtrack made up of several pieces that are very easy on the ears.
Flux Family Secrets definitely has a Disney-esque vibe to it... specifically, it's a little bit Meet the Robinsons, at least in spirit. There are times when some of the notes you find left by members of the Flux family are surprisingly poignant, and I wish there were more of them. Frankly, the workings of Jesse's unique clan are more interesting than the edutainment the game likes to offer up in other chapters. And yet, despite that, you still manage to stay invested in the story, largely due to the interesting characters and setting... what? If all this happened to Jesse when she was a child, why doesn't she remember any of it? Well, listen, it's not that simple. There's all this... wibbly-wobbly... timey-wimey... stuff... Look, stop asking silly questions!
 But while it's gorgeous and engaging and all that jazz, it's also not very long. Or at least, not as long as you might hope. The game encompasses twelve chapters (with six "bonus" chapters in the Collector's Edition), and you'll probably find yourself going through them quite quickly. A big reason for this is that the difficulty is very hit and miss. The puzzles tend to be fairly simple, but some items can be ridiculously hard to find in the rest of the gameplay; it's not uncommon to reach for a hint and find that what you're searching for was only visible by a corner poking out from behind something else, or simply just small, thin, and tucked away into a dark corner. The hidden-object scenes do seem to get a little lazy the farther you go; one asks you to find eight coffee cups, four Brussels sprouts, four liberty trees, and three mallets as part of its list. Really? These are bumps along an otherwise smooth road, but they're still worth mentioning.
While Flux Family Secrets: The Rabbit Hole isn't perfect, it is an extremely fine example of the genre. If you were a fan of the original, this return to the unique Flux clan and varied locations won't disappoint. Even if you haven't played the first, The Rabbit Hole will manage to hook you from the beginning. You can probably expect to spend around four to five hours on the game, and don't be surprised if you're left wanting more.
A Collector's Edition is also available. It contains six bonus chapters, the game's excellent soundtrack in MP3 format, and a built-in strategy guide along with some miscellaneous extras. Remember that Big Fish Game Club Members pay only $13.99 for Collector's Editions (or 2 club credits), and collector's editions count 3 card punches of 6 total needed for a free game.
![]() Windows:
Windows:
Download the demo
Get the full version
Also available: Collector's Edition
![]() Mac OS X:
Mac OS X:
Download the demo
Get the full version
Also available: Collector's Edition


Walkthrough Guide
(Please allow page to fully load for spoiler tags to be functional.)
Flux Family Secrets: The Rabbit Hole
General Information:
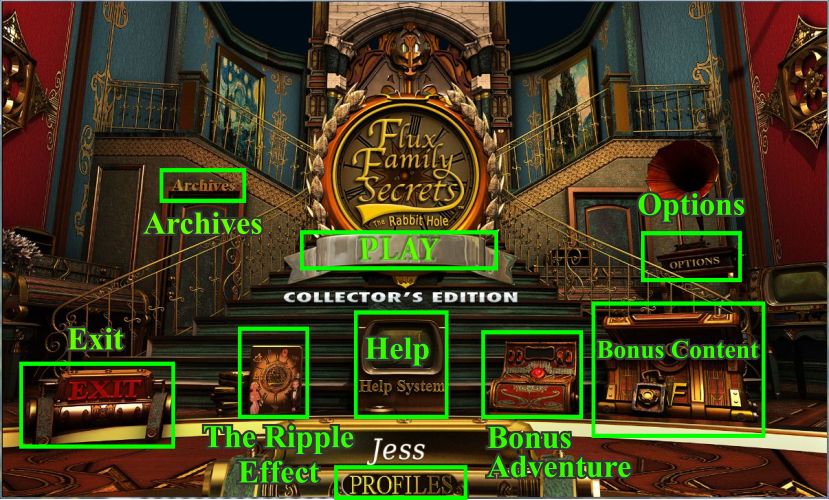
Main Menu:
The following choices are available on the Main Menu: Profiles; Play and Exit; Archives; Options; The Ripple Effect; Bonus Content; and a Bonus Adventure.
Options include adjustment of Music and Sound Effects; choice of Full versus Windowed screen; Custom Cursor or not; using the Tutorial; and in the Collector's Edition there is a special High Definition feature.
The Ripple Effect gives you a background look at the previous Flux Family game.
The Help System shows you how to navigate the scenes.
The Bonus Content includes Screensavers; MP3 downloads of some of the music; Concept Sketches; and the Strategy Guide if you have the Collector's Edition.
The Collector's Edition also has a Bonus Adventure of 6 missions after you have completed regular game play.
Archives has the list of credits, high scores list, and your Collectibles.
Collectible include 3 types of Badges you can collect throughout the game: Flux Badges; Secrets Badges; and History Badges.
Screenshot
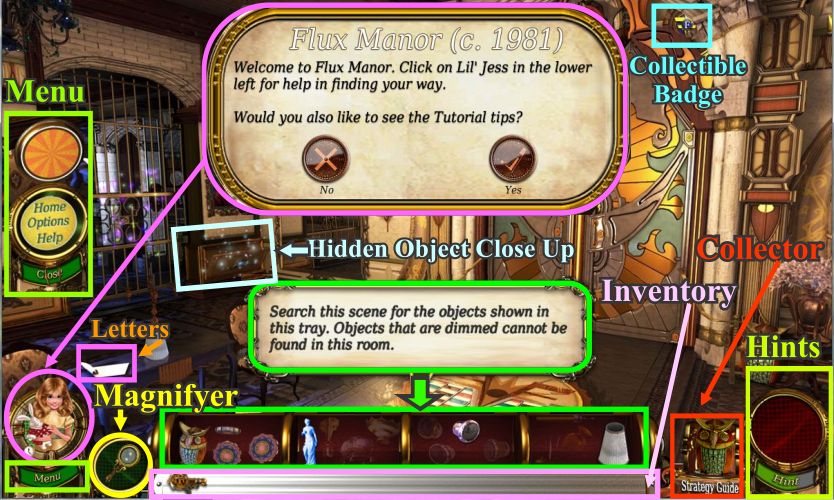
Scene Components And Navigation:
As you begin the game you will have "Lil' Jess" as your helper but the characters will change as the game progresses.
Under Jess' picture is a link to the Menu from which you can choose "Home" to go to the Main Menu; Options; and Help. Click "Close" to get rid of it.
Next to Jess is a magnifier to zoom in on a scene. Right click or press the spacebar to zoom out.
Your Task Bar is a tray at the center bottom of the scene and your Inventory is located beneath it.
When you have collected Oscar the Owl, he will become your Collector of the items you find.
At the far right is your Hint Button which is unlimited and refills fairly fast. Some scenes will also have Badges for you to collect that will go into your Collectibles in the Archives.
Your cursor will turn into a green arrow to show you how to exit a scene and navigate to another scene.
There will be "Hotspots" in a scene which may indicate a Mini Game. If your cursor gets an attachment of a green critter, check out that spot. You may need to use an item from your tray or inventory to trigger whatever is to come.
You will see small papers in some scenes so click on these Letters for information about the people and places.
Screenshot
Hints:
There are 3 types of Hints: Goal, Object and Silhouette.
"Goal Hints" are obtained by clicking on the character at the far left of the scene but each of these hints will cost you a 30 second penalty off your total game time.
Object Hints are located at the far right corner of the scene and each use of this Hint Button will cost you a 1 minute penalty.
The Object Hint button has a dual purpose. If you click on an object to find on a hidden object list or a fractured item piece, it will show you a silhouette of the item.
If you choose Hint while a silhouette is showing, it will show you where that particular item is located.
Silhouette Hints do not have a penalty involved but the Hint button must be fully charged for the object to be seen.
Badges:
There are 10 each of the 3 Badges for a total a 30 to collect which will be marked in red in the scenes where they appear.
FB is the Flux Badge. SB is the Secrets Badge. HB is the History Badge.
Tasks:
Objects to locate come in several varieties. There are fragmented items, hidden object lists, items to be combined with other objects, and items collected for your Inventory for later use.
Fractured items are shown in maroon niches in tray above your Inventory. If an object is available in a scene it will be prominently shown.
Items not available in a particular scene will be there but dimmed. Some objects will be shown in blue because you will need to perform another task in order to collect them.
Once you have collected all the piece of an item, it will be assembled in its niche and the background will turn to green to show it is available for use.
Hidden object close up scenes can be identified by the sparkles on them. If you place your cursor over the sparkles, it will turn into a magnifying glass.
Hidden object lists are semi-random but will be marked for the list shown.
Inventory items are usually obtained from hidden object tasks or mini games and can be identified by 1 sparkle.
Objects displayed in blue may be hidden in a drawer or you may need to move another object in order to see it. The objects to move can also be identified by 1 sparkle but they will get a "Hand Cursor" showing they need to be moved.
Mini Games:
Some Mini Games will be activated by what they call "Recipe Puzzles". Recipe Puzzles will present you with a circle that has 2 or more smaller circles attached to it. Place items from your inventory into the circle to solve the puzzle.
Some Mini Games require the use of completed fractured items or items from your inventory.
There is a skip option once the "Skip" button is full.
Walkthrough
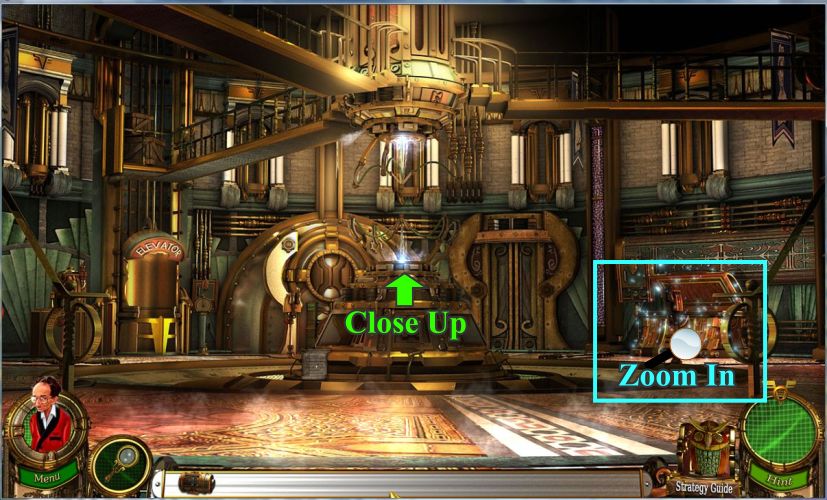
Chapter 1: Flux Mansion Foyer
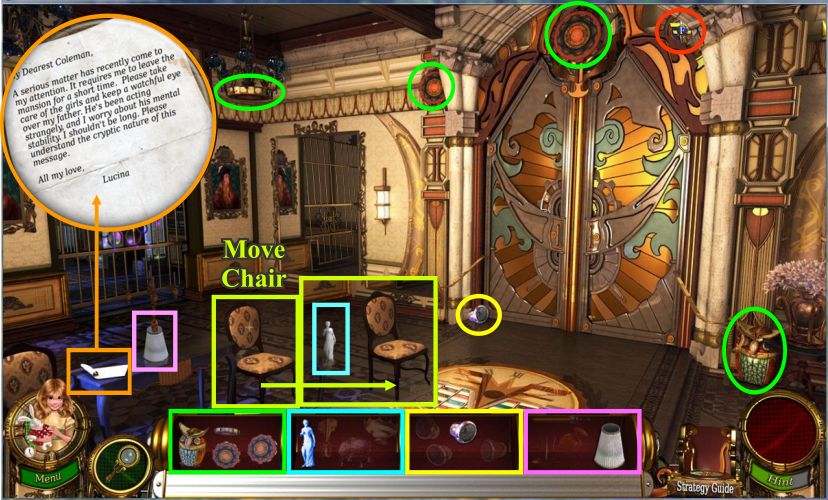
Collect the color coded components.
Move the chair to pick up the statue.
Pick up the badge marked in red.
Click on the letter to read it.
Screenshot
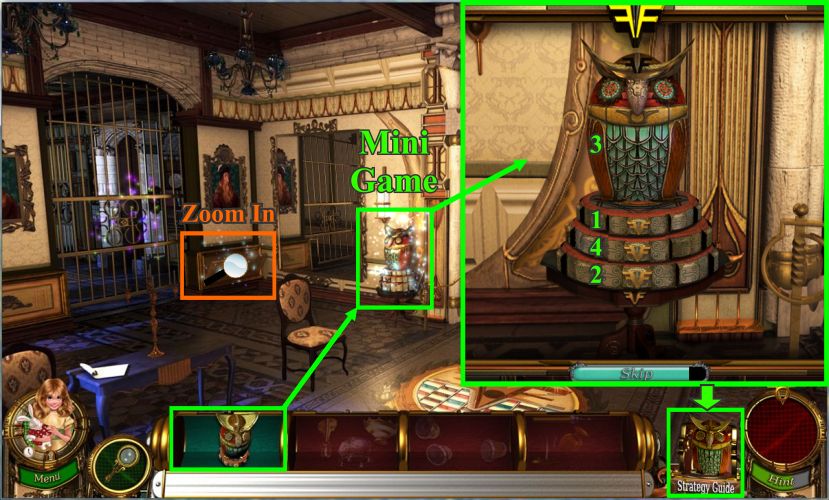
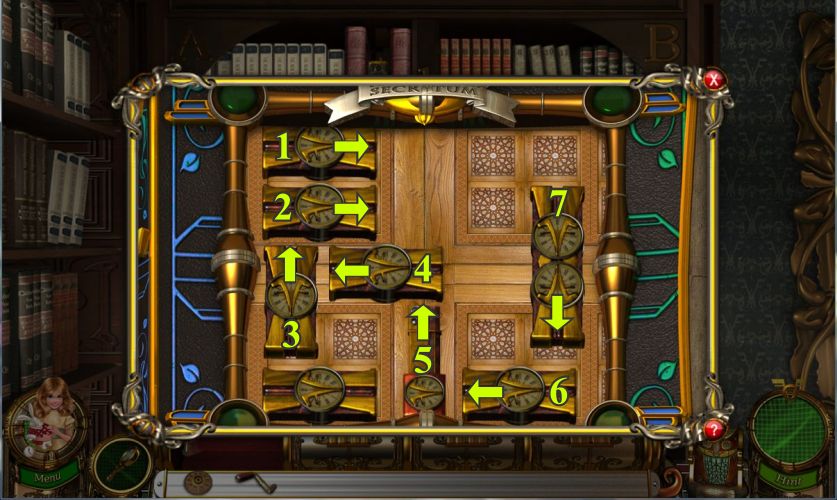
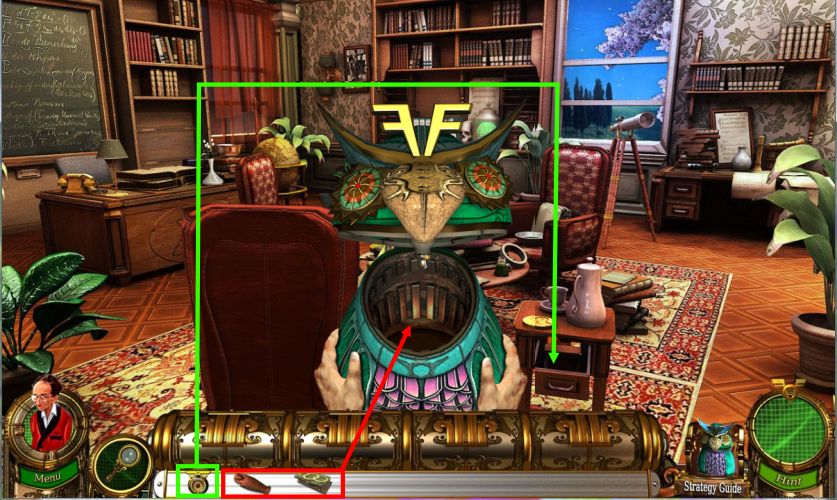
Place the owl on the table to bring up a mini game.
Your goal is to align the 3 Flux symbol and the owl facing forward.
Click on the cogs and owl in the order numbered.
The last cog is the only component that has no effect on the others.
When you have completed the game Oscar will take his place as Collector.
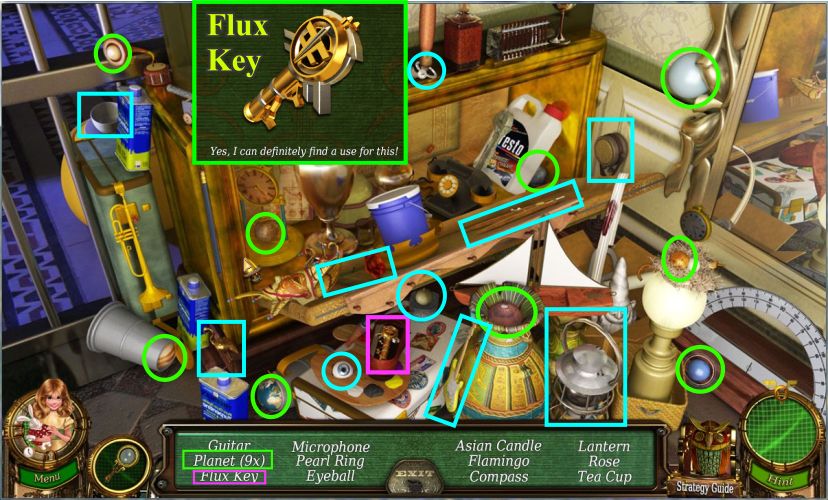
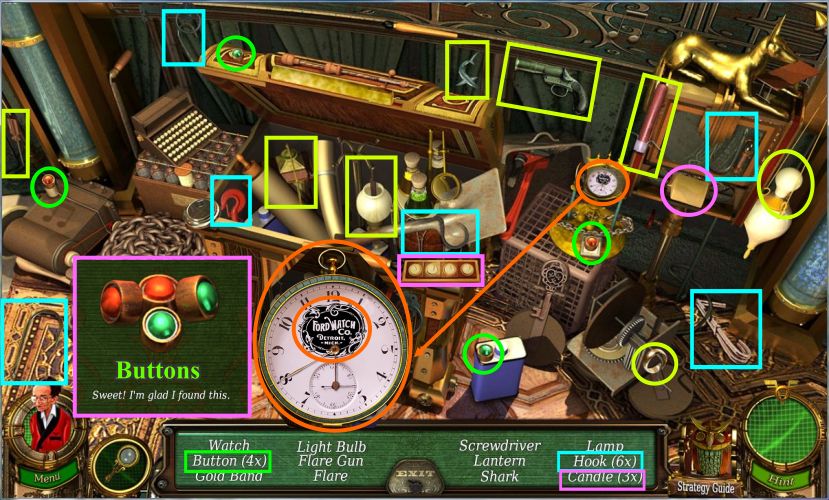
Zoom in on the drawer for a hidden object scene.
Screenshot
Collect the 9 planets and the other items on your list including the Flux Key.
Screenshot
Put the Flux Key in the lock on the gate and click to turn it to open the gate to the Sitting Room.
Screenshot
Chapter 2: Flux Mansion Sitting Room
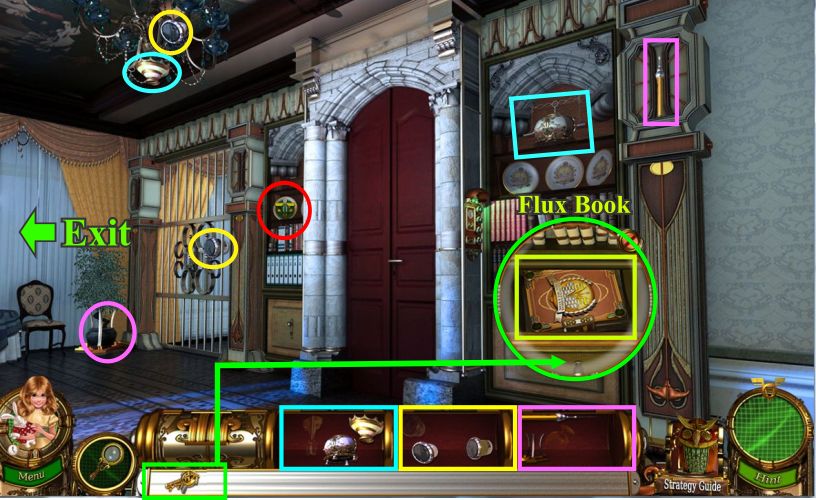
Pick up the badge and the color coded pieces.
Use the Flux Key to open the drawer and take the Flux Book.
Exit to the other end of the room.
Screenshot
Pick up the badge and read the letter.
Collect the color coded pieces.
Screenshot
Place the lamp on the table.
The music box goes on the top shelf of the cabinet and will trigger a mini game.
Pick up the key and place it in the music box.
Click to turn the key and the music box will give you a punch card to collect.
Zoom in on the drawer for a hidden object scene and then exit back to the other part of the room.
Screenshot
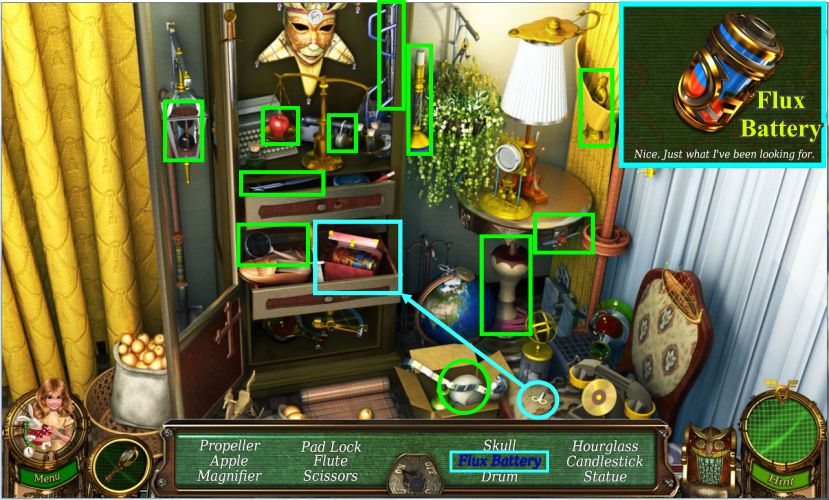
Collect the items on your list.
Pick up the key marked in blue and use it on the box to get the Flux Battery.
Screenshot
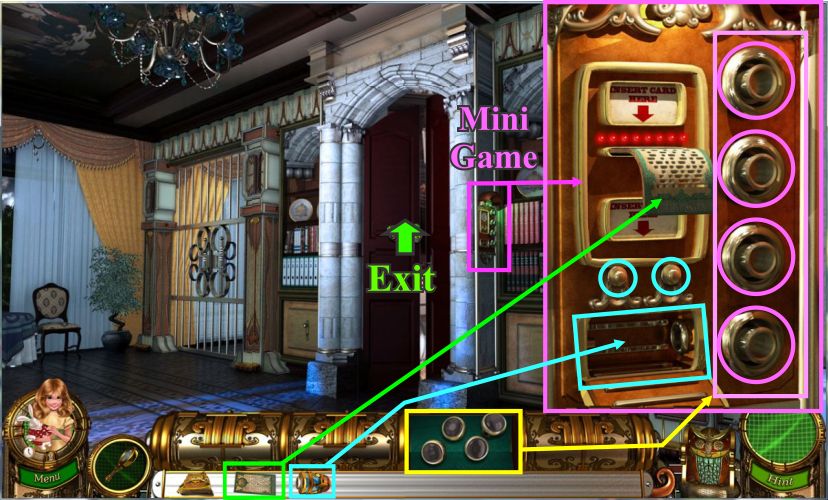
Click on the panel next to the door for a mini game.
Place the Panel Buttons. You will need to place them on each of the buttons.
Place the punch card in the slot.
Click on the 2 buttons marked in blue to open the battery compartment.
Put the Flux Battery there and click on the 2 buttons again to close the compartment.
There will be 4 rounds of random light sequences.
Each sequence will repeat the same lights and then add another one.
When in doubt write down the colors.
At the end of the game they Library door will open so go there.
Screenshot
Chapter 3: Flux Mansion Library
There is a hidden passage in the Library that you need to find so you need to visit several sections more closely in order to reach your goal.
You can travel from one close up to the next but you sometimes need to exit to the main area.
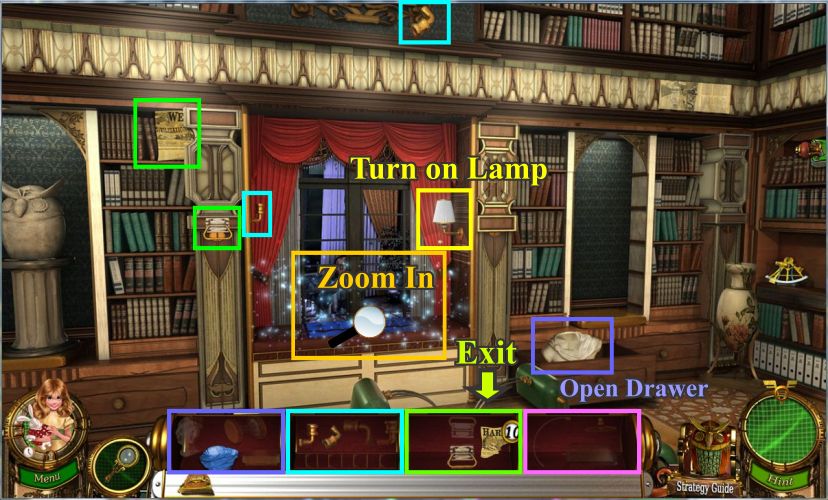
Collect the badge and the fragments and then go to the left close up.
Screenshot
Turn on the lamp and open the drawer.
Collect the fragments and zoom in for the hidden object scene.
When you are done with the that scene, exit at the bottom out to the main room.
Screenshot
Collect the items on your list including the crank arm.
If Adhesive Tape is on your list, you will need to move the box to get it.
Screenshot
Go across the room to the fireplace and pick up the badge and the fragments.
Zoom in on the statue for a hidden object scene and exit left when you are done with it.
Screenshot
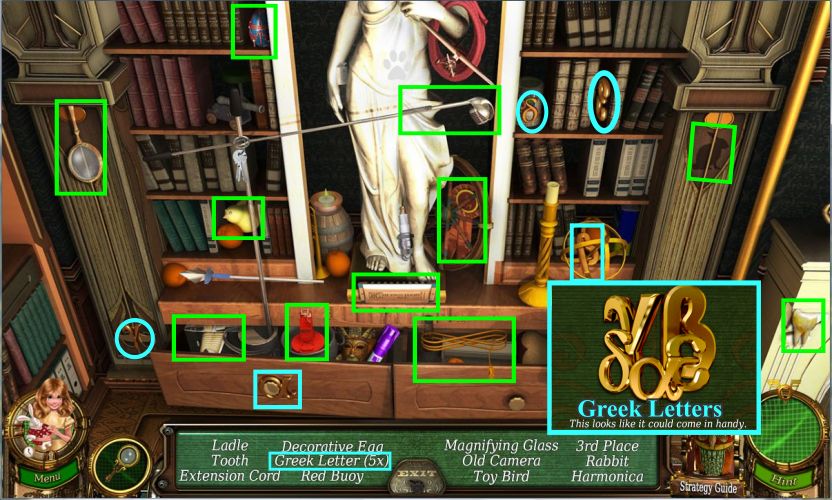
Collect the Greek Letters marked in blue as well as the other items on your list.
Screenshot
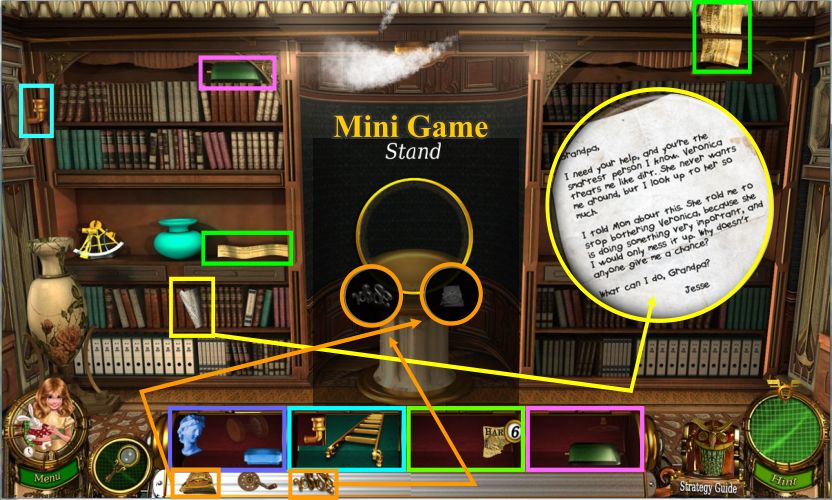
Collect the fragments and read the letter.
Click on the stand for a recipe puzzle mini game and place the Greek Letters and Flux Book in the circle.
Screenshot
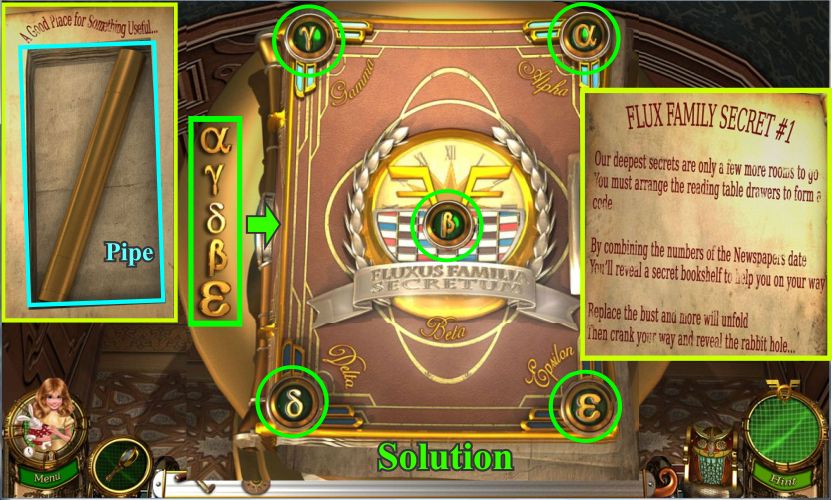
Place the Greek Letters as shown and the book will open revealing Flux Family Secret #1 and give you the pipe to pick up so you can shut off the steam.
Screenshot
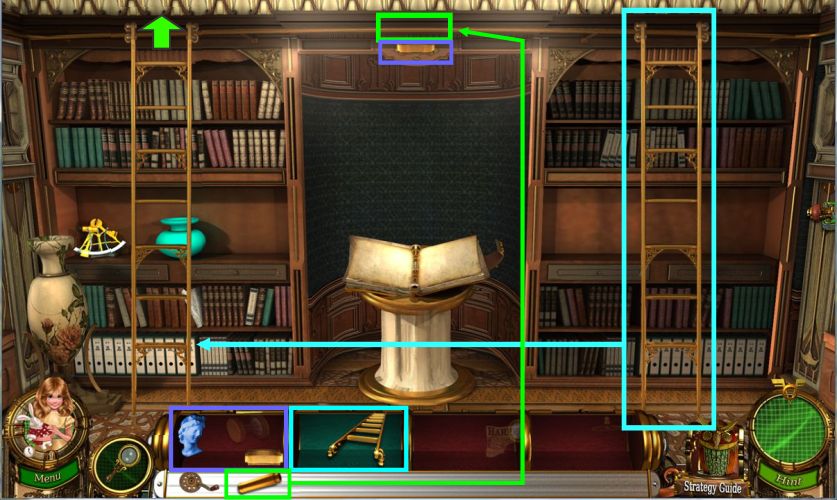
Place the pipe so you can pick the piece of the statue.
Put the ladder where shown and push it to the left side of the scene so you can climb up to the level above.
Screenshot
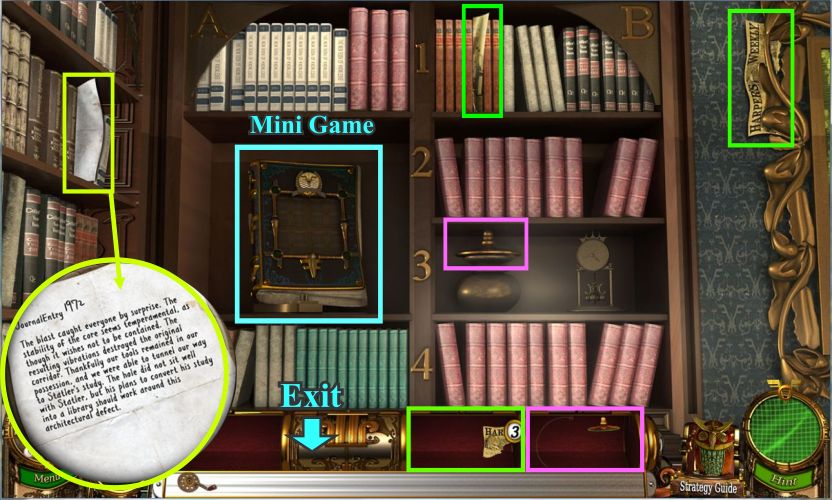
Collect the fragments, read the letter and click on the book for a mini game.
Screenshot
Your goal is to get the red piece at the bottom to the top.
Move the sliders as numbered.
Screenshot
Move the final pieces and take the piece of newspaper.
Screenshot
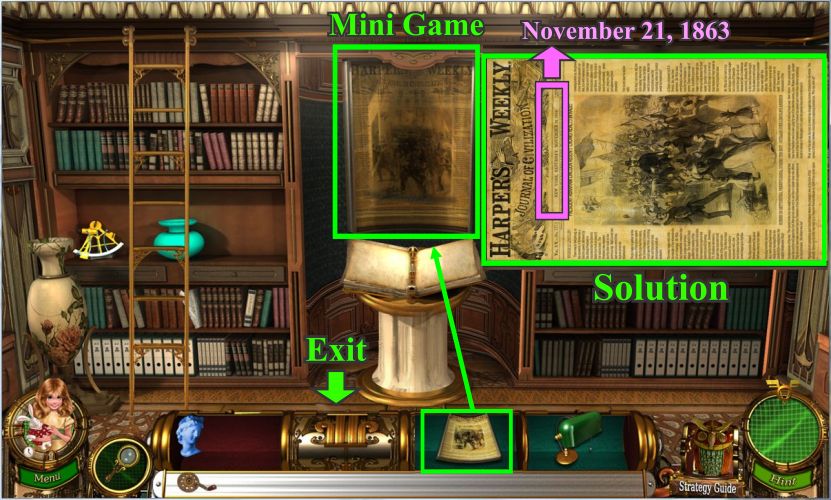
Go back down the ladder the place the newspaper over the book stand.
Click on it for a jigsaw puzzle mini game to put the paper together.
Note the date on the paper which indicates Lincoln never made his Gettysburg Address....November 21, 1863.
Exit to the main part of the room.
Screenshot
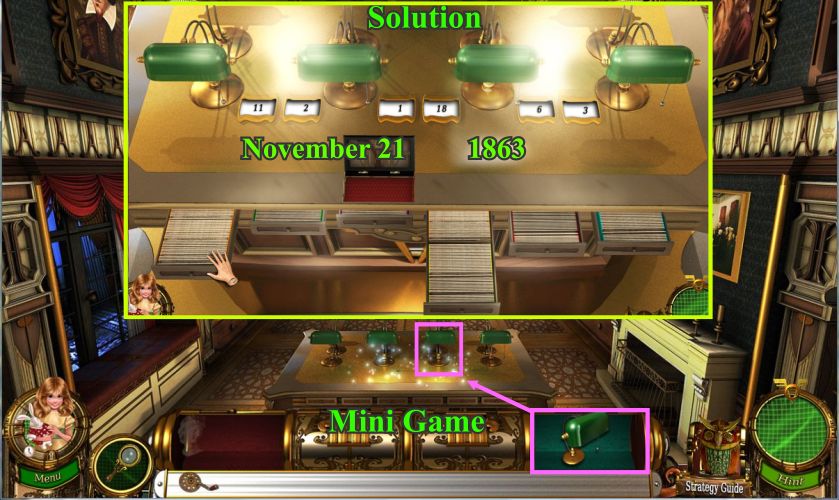
Put the completed lamp with the others on the table and click for a mini game.
Pull the drawers out as shown to create November 21, 1863.
Screenshot
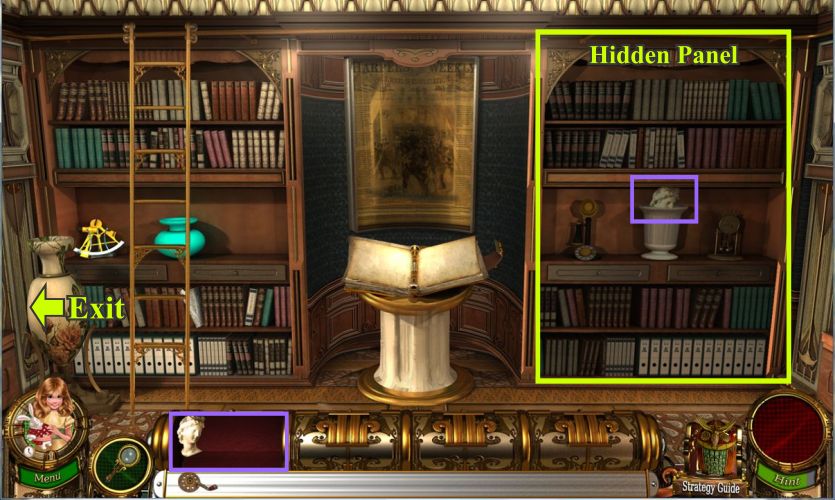
The game will cause a hidden panel to appear next to the book stand.
Take the last piece of the statue and go left.
Screenshot
Place the statue in the niche and the crank where the little door opens.
Exit to the right.
Screenshot
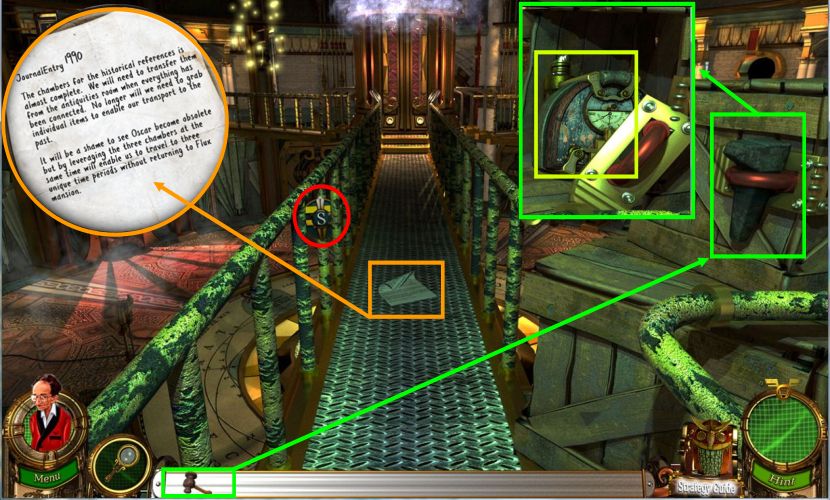
Spin the dial and the book stand will sink revealing the secret Rabbit Hole so go there.
Screenshot
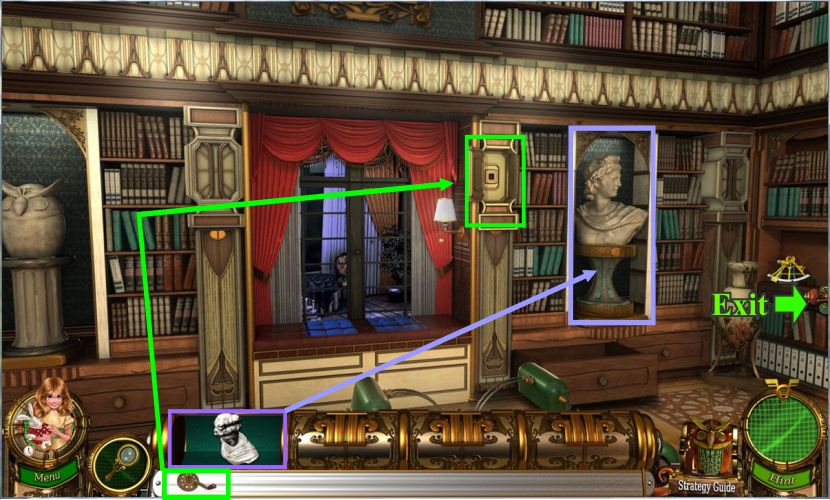
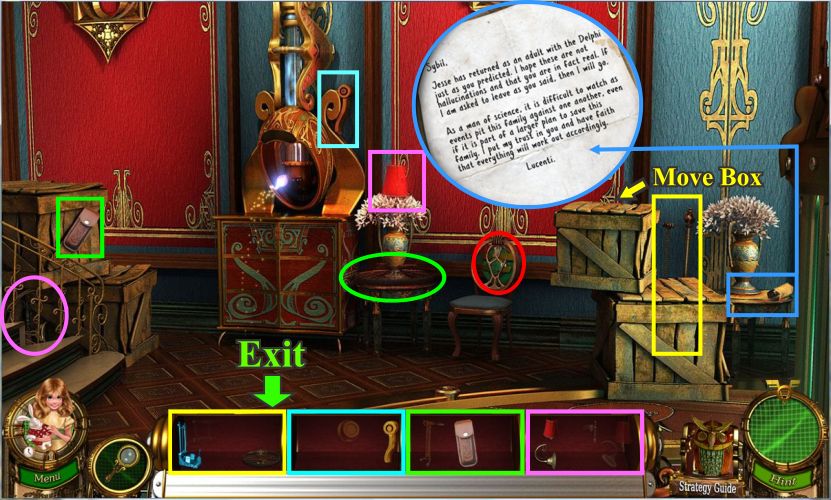
Chapter 4: Down The Rabbit Hole
Move the plants indicated and collect all the fragmented parts.
Exit to the left by Lincoln's picture.
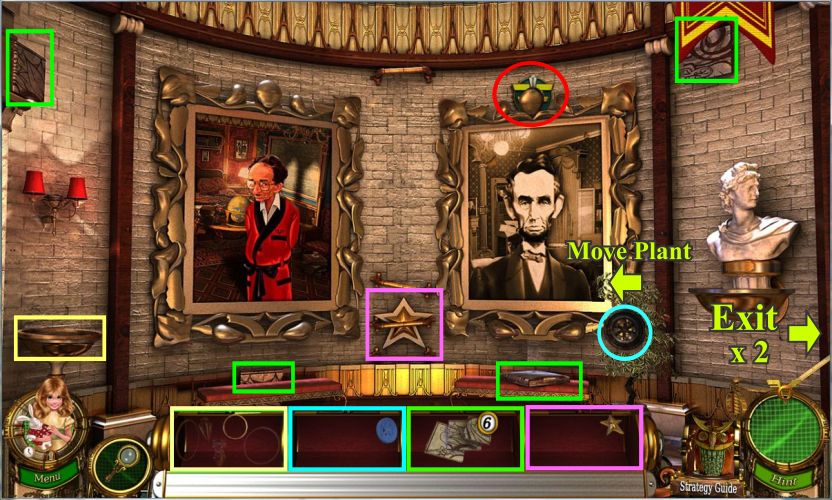
Screenshot
Pick up the badge and move the plant so you can collect all the fragments.
Exit to the right twice to get to the fireplace room.
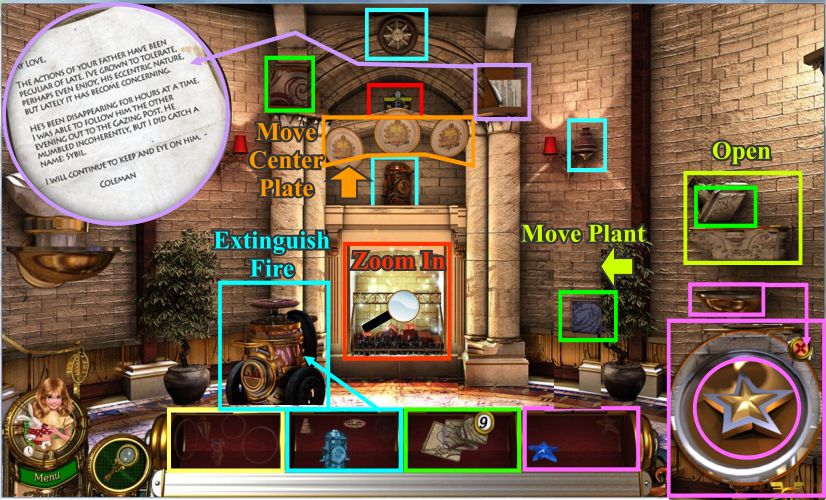
Screenshot
Pick up the badge, move the plant and center plate.
Open the container on the right wall and click on the bowl under it.
You can now collect all the fragments.
Read the letter and place the fire extinguisher where indicated.
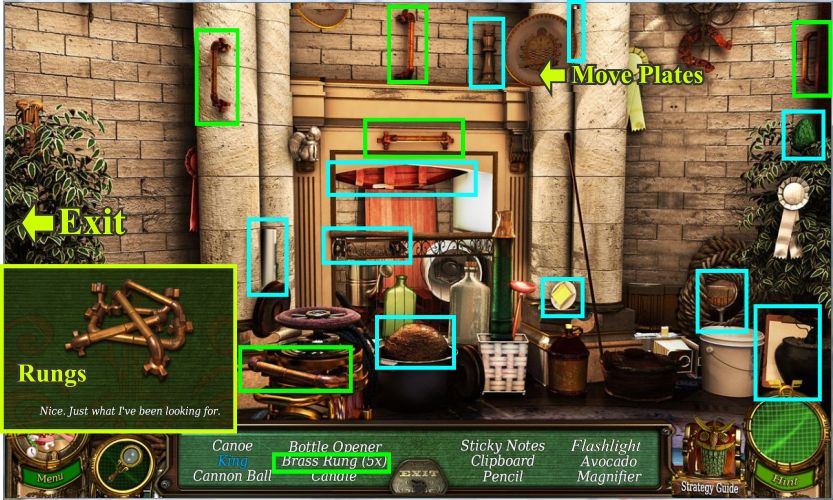
Once the fire is extinguished, zoom in on the fireplace for a hidden object scene.
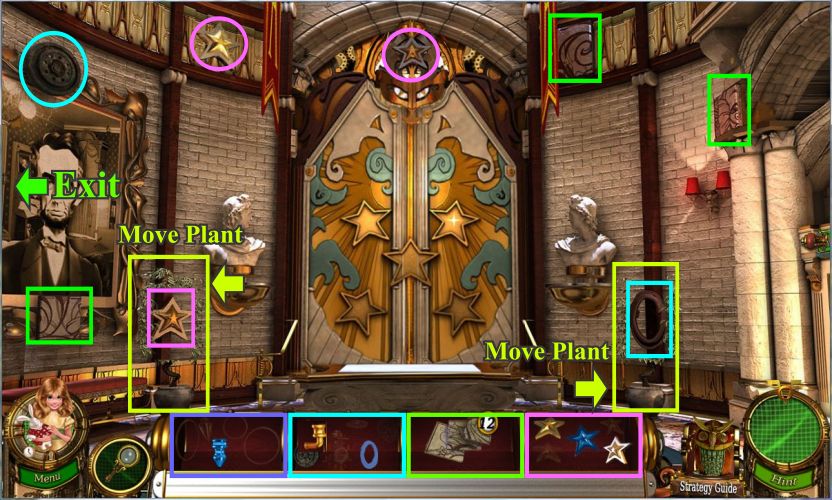
Screenshot
Pick up the 5 brass rungs marked in green and move the plates above the fireplace so you can collect everything on your list.
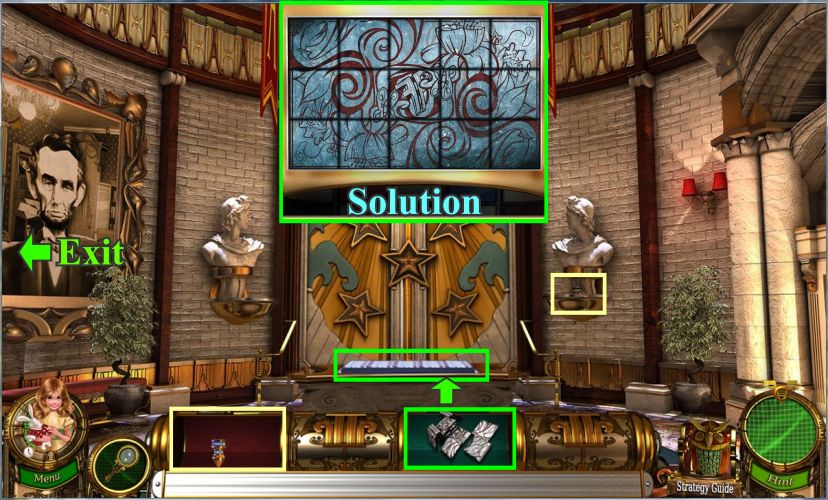
Exit to the left.
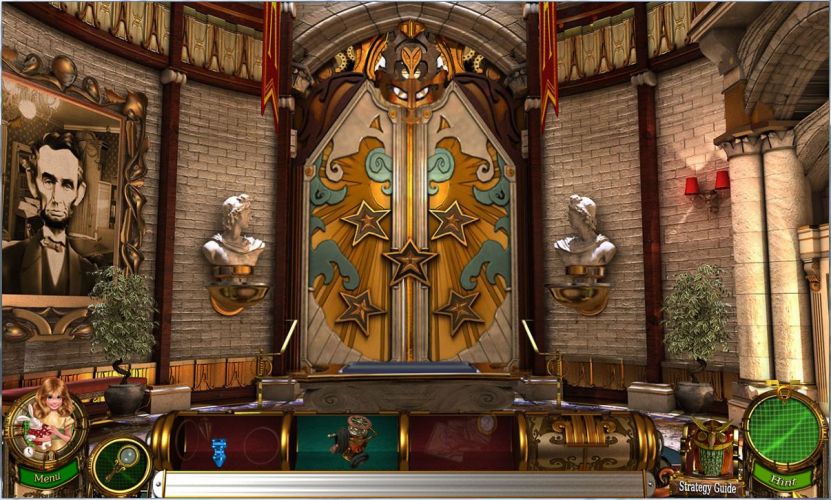
Screenshot
Place the stars in each of the 5 stars on the door and exit left.
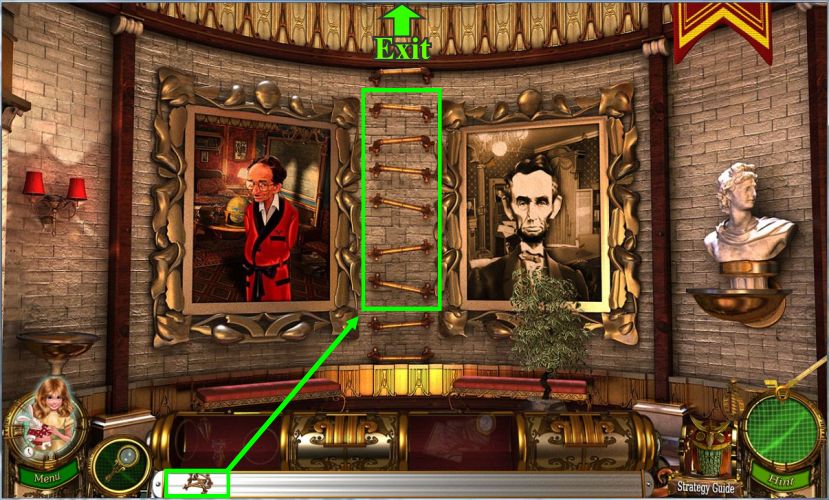
Screenshot
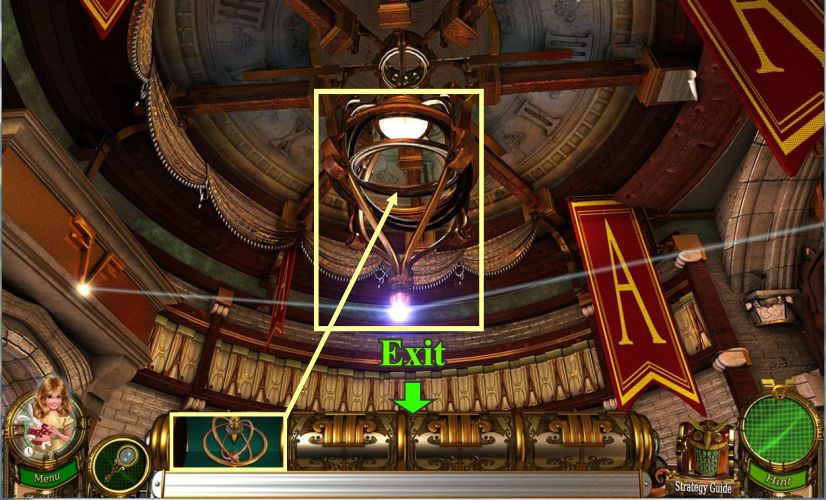
Place the rungs on the wall between the two pictures and climb up.
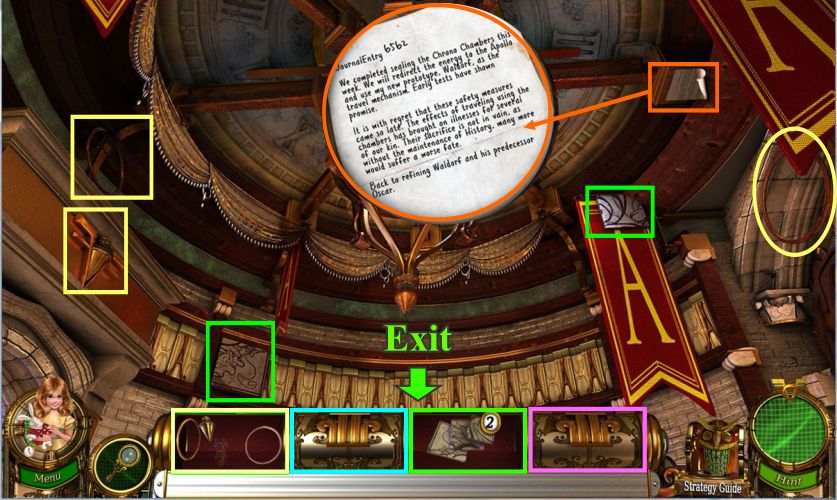
Screenshot
Collect the fragments and read the letter.
Go back down the rungs and exit right.
Screenshot
Place the tiles in front of the door and click for a mini game.
Turn the tiles to form the picture shown so you can get the last piece of the gyro.
Exit left and go back up the rungs.
Screenshot
Place the gyro and go back down the rungs and exit right.
Screenshot
The doors to Apollo have opened to go into the Apollo Room.
Screenshot
Chapter 5: The Apollo Room
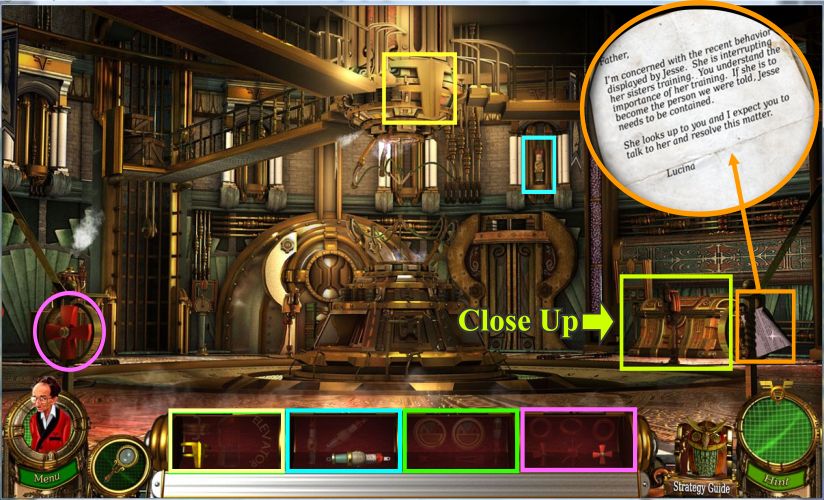
Collect the fragments and read the letter.
Click on the chest for a closer look.
Screenshot
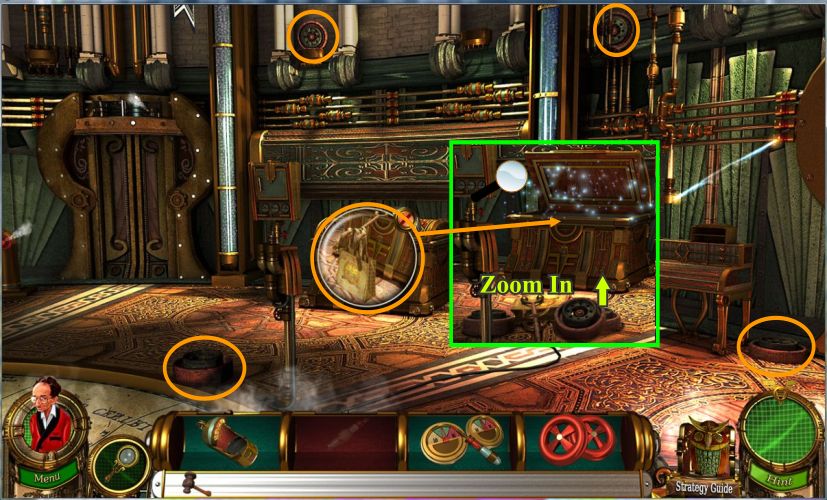
Pick up the badge and fragments.
Click on the chest and place the post digger and satchel in the circle.
Screenshot
The satchel needs to be weighted down so place the 4 heavy objects in it and the chest will open.
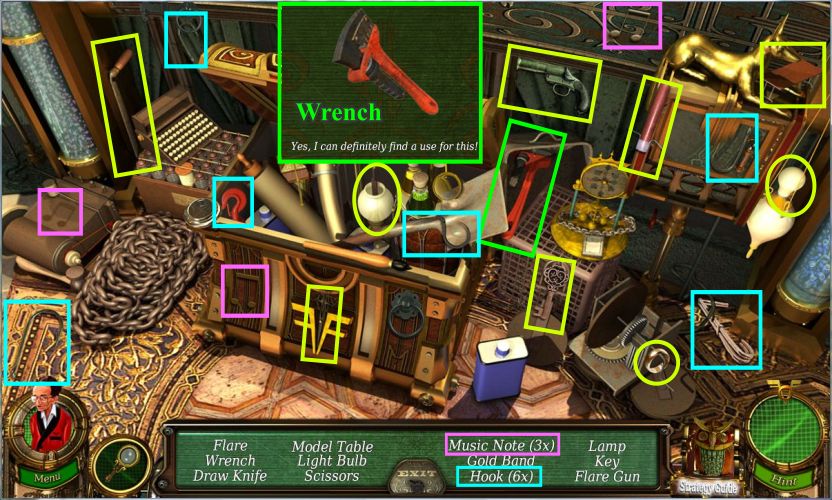
Click on the chest for a hidden object scene.
Screenshot
Pick up the wrench and the rest of the items on your list including the hooks marked in blue.
Screenshot
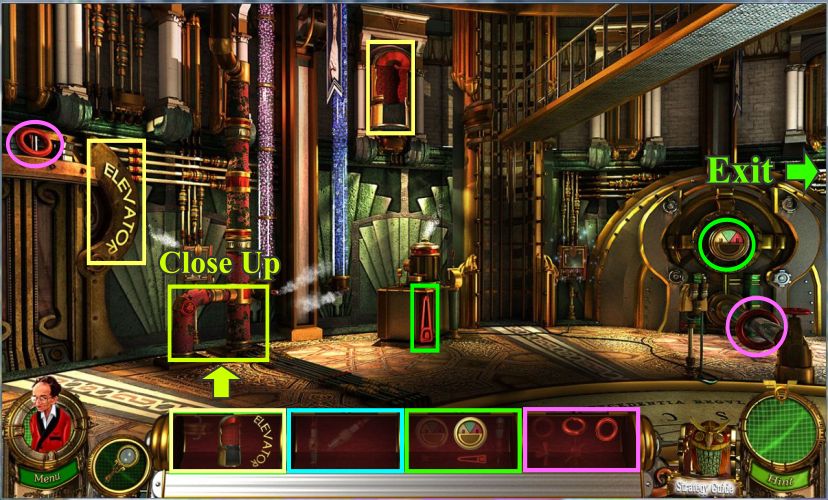
Go left and collect the fragments.
Click on the pipe area for a closer look.
Screenshot
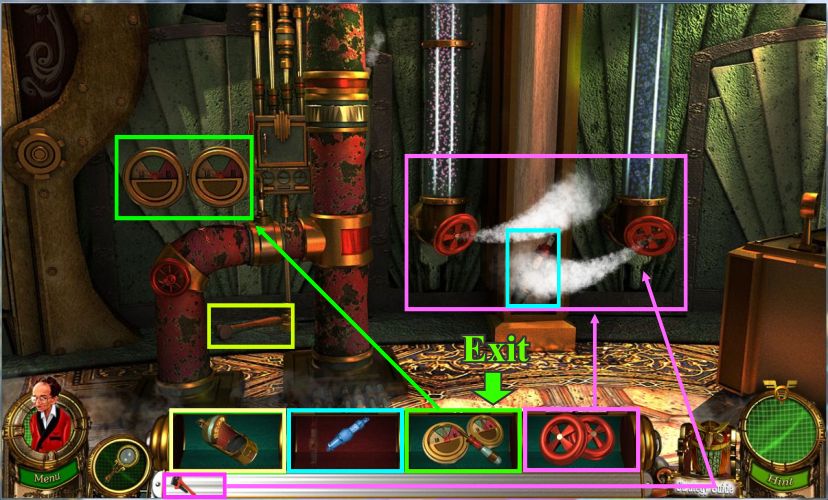
Pick up the hammer and place the valves where indicated.
Place the gauges in their place and use the wrench on the valves to shut off the steam.
Collect the last fuse and exit to the main room.
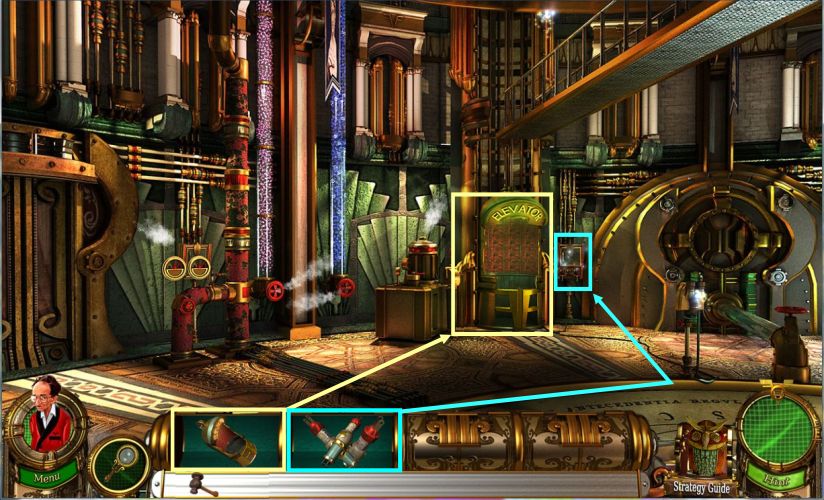
Screenshot
Install the elevator and click on the fuse box to the right of it.
Screenshot
Place the fuses in the box so that all the dials point up into the green area.
Screenshot
Click on the elevator to go upstairs.
Pick up the badge and read the letter.
Use the hammer to break the spike and collect the Apollo Calibrator.
Exit down, go right, exit down again and then go forward to the Apollo.
Screenshot
Click on Apollo and place the calibrator.
Place the spike in Oscar and you will be transported to Lincoln's time.
Screenshot
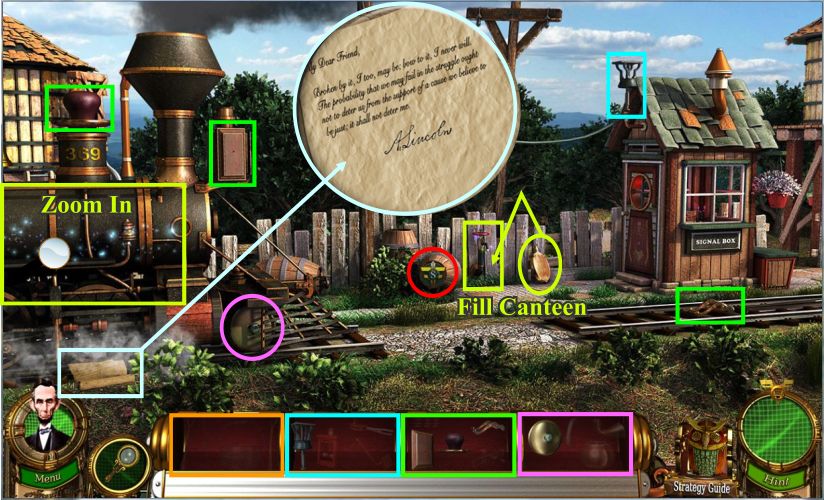
Chapter 6: Lincoln At The Train Station
Pick up the badge and read the letter.
Fill the canteen with water and collect all the fragments.
Zoom in on the engine for a hidden object scene.
Screenshot
Pick up the 7 rail ties marked in green.
Get the newspaper and other items on your list.
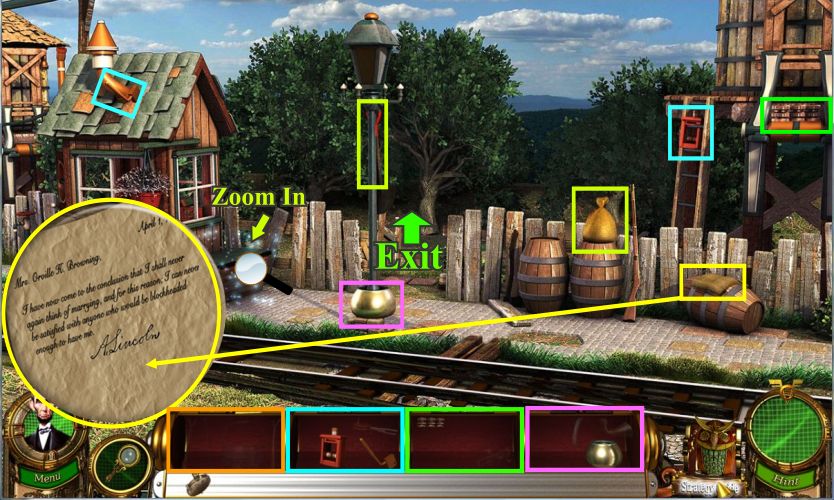
Screenshot
Go to the right side of the scene and read the letter.
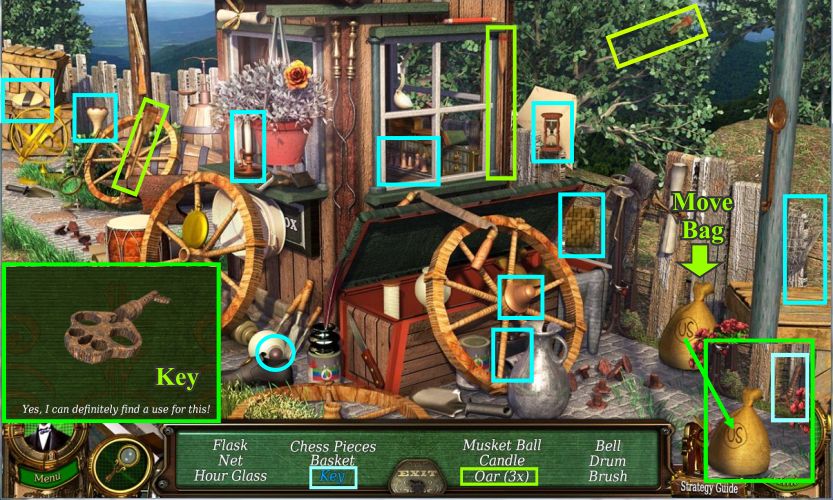
Collect the fragments and zoom in on the box for a hidden object scene.
Screenshot
Move the bag to get the key and collect the items on your list.
Screenshot
Go through the gate to the back of the station.
Collect the fragments and move the box to get the last piece of the switch.
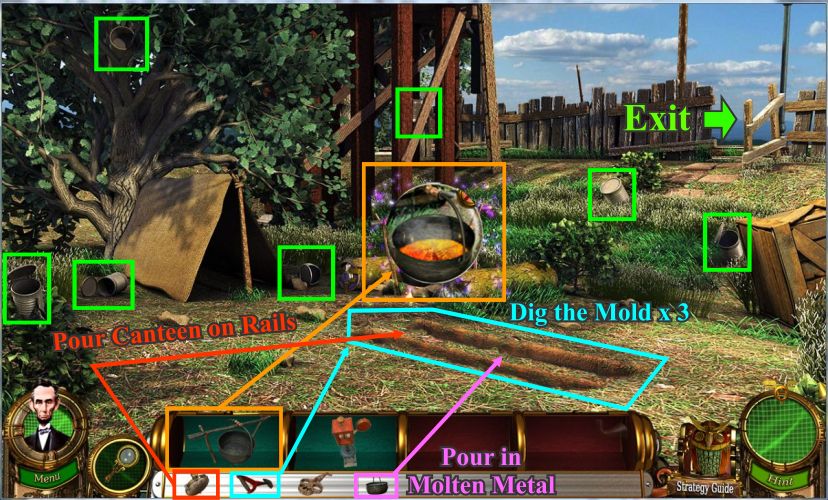
Click on the fire pit and put the gun powder from your inventory in the circle.
Pick up the flint stone and dry leaves and put them in the fire circle.
Screenshot
Place the caldron on the fire and use your shovel 3 times on the blue area to dig the mold.
Put the 7 metal cans in the caldron and then use the molten metal to fill the mold.
Cool the metal with your canteen full of water and exit back through the gate.
Screenshot
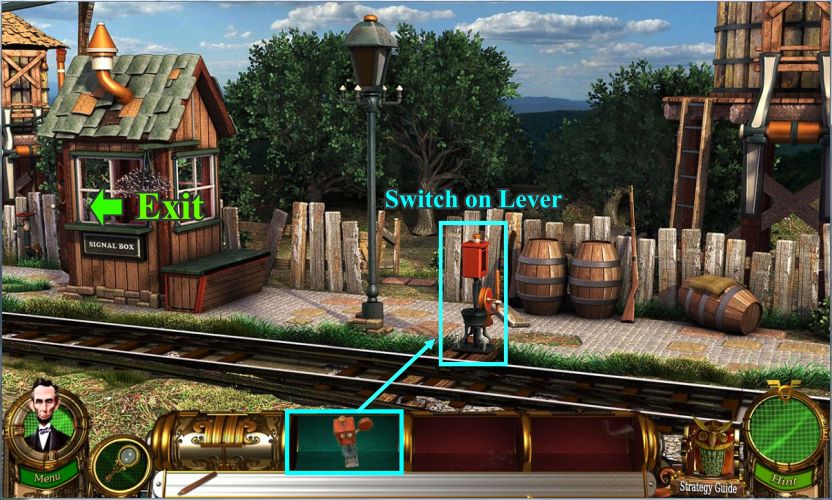
Put the switch in its place and throw the lever.
Exit left to the train.
Screenshot
Put the ties and rails to repair the tracks.
Use your key to unlock the signal box and go inside.
Screenshot
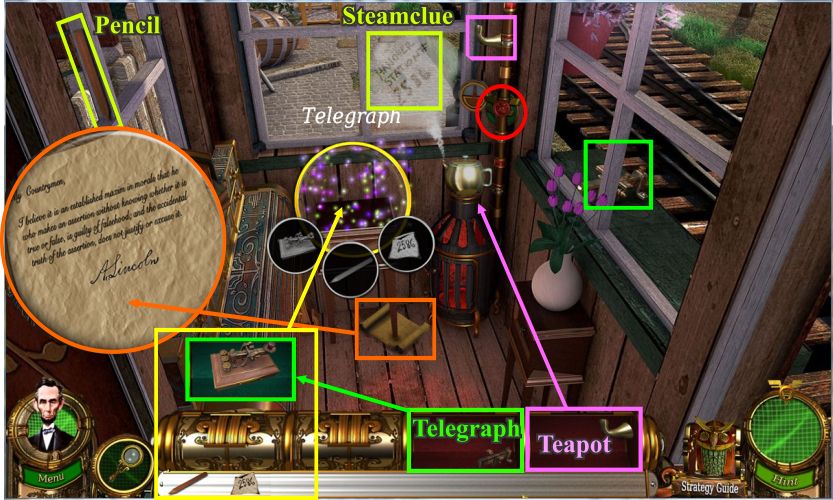
Pick up the badge, read the letter and collect the fragments.
Pick up the pencil and place the teapot on the stove to get the steam clue.
Click on the place where the telegraph belongs for a recipe puzzle and place it along with the pencil and steam clue in the circle to bring up a mini game.
Screenshot
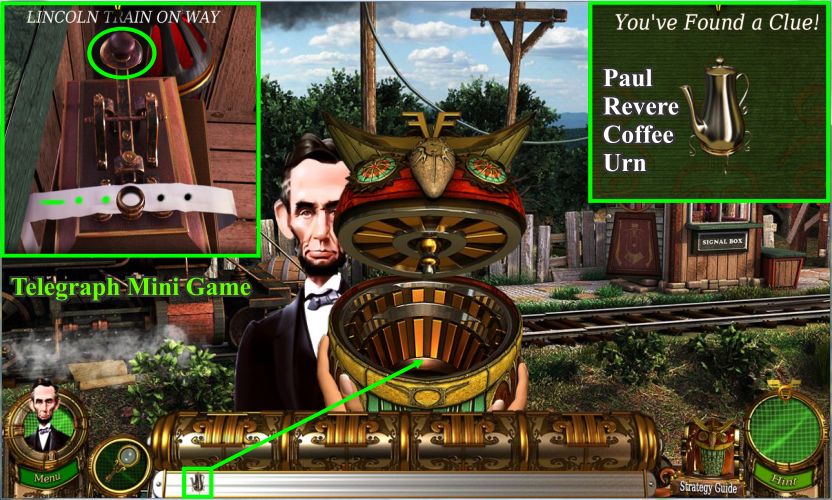
Your goal for the telegraph mini game is to turn all of the dots and dashes green.
If you miss, you have to start over so just keep clicking the lever until the message reads Lincoln Train on Way.
Lincoln will give you the Paul Revere Coffee Urn which you need to put in Oscar so he will transport you to see Paul Revere.
Screenshot
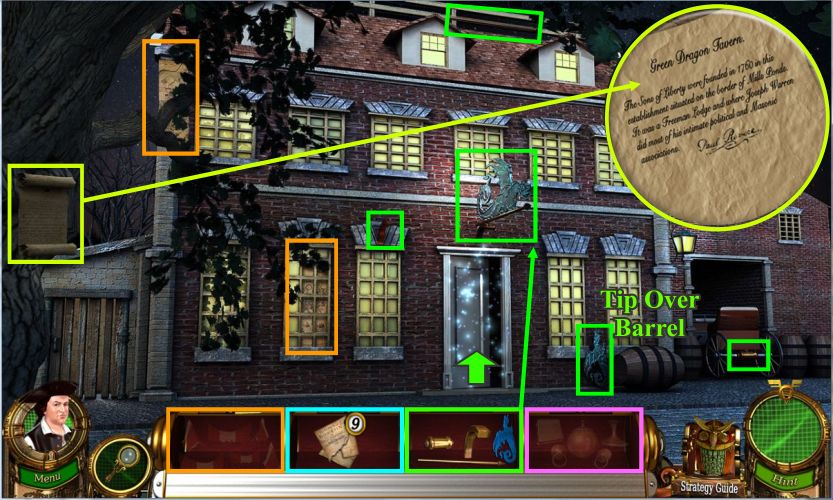
Chapter 7: Paul Revere At Green Dragon Tavern
Tip over the barrel and collect the fragments.
Read the letter and place the sign above the door so it will open and you can enter the tavern.
Screenshot
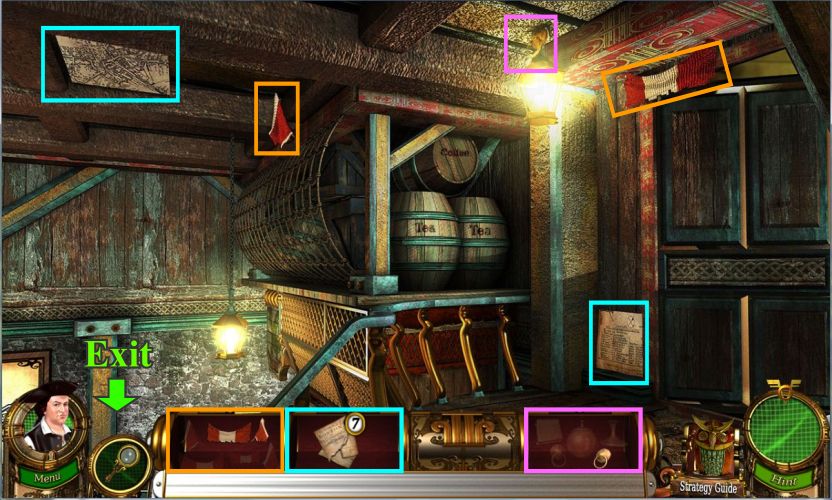
Collect the fragments and go downstairs.
Screenshot
Pick up the badge and collect the fragments.
Zoom in on the barrel for a hidden object scene.
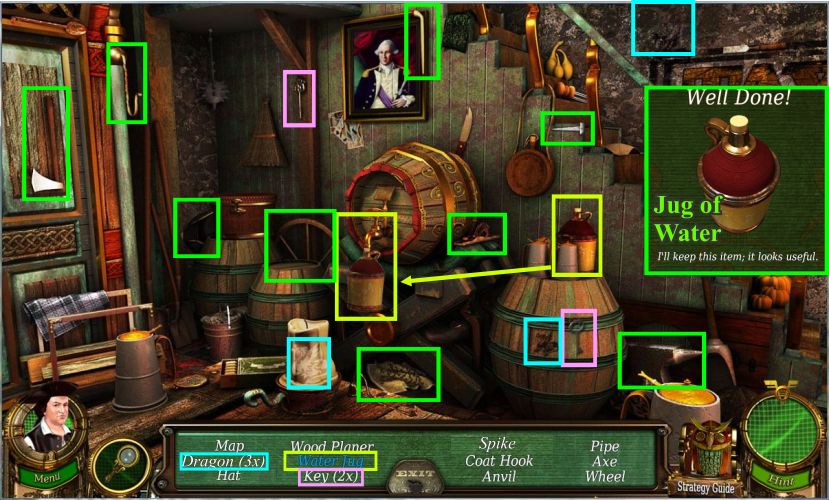
Screenshot
Put the jug under the tap to fill it with water.
Collect everything on your list.
Screenshot
Click on the area next to the door in the back for a closer look.
Move the candle to collect all the fragments and click on the sparkles for a mini game.
Your goal is to make all the buttons on the lock turn green.
There is not just one solution so experiment how the buttons change the other buttons.
Clicking the top right or left buttons will have an effect on the buttons next to them.
Clicking the middle buttons will also change the buttons to the left and right of it.
Screenshot
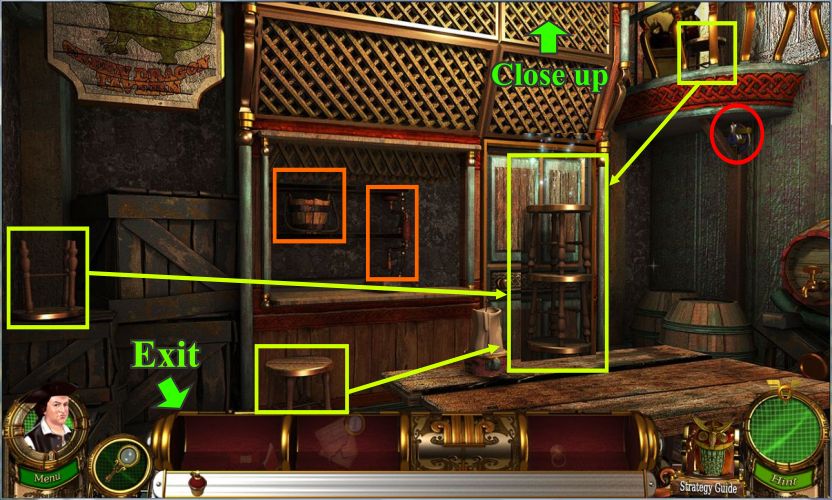
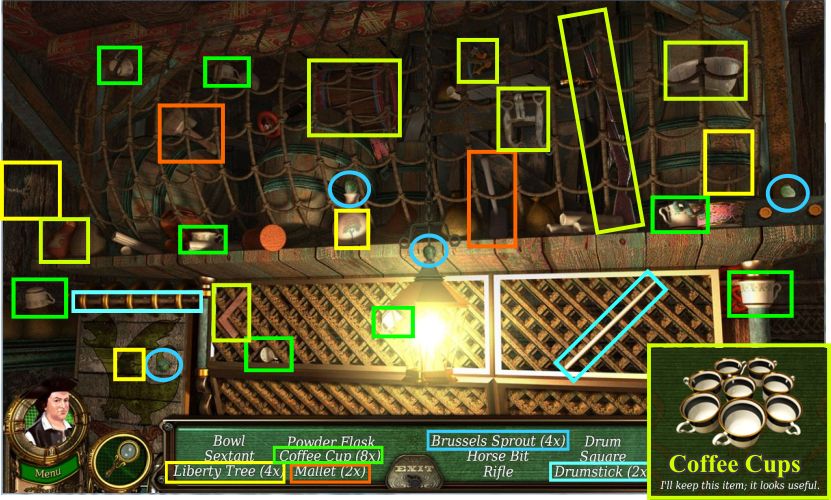
Collect the badge and the orange items for your inventory.
Place all 3 stools on top of each other so you can get a close up of the area above.
Screenshot
Collect the 8 cups and the other items on your list.
Screenshot
Back out of the close up scene the go upstairs where you entered the tavern.
Use the drill to make a hole in the coffee barrel and then place the bucket under it to catch the coffee.
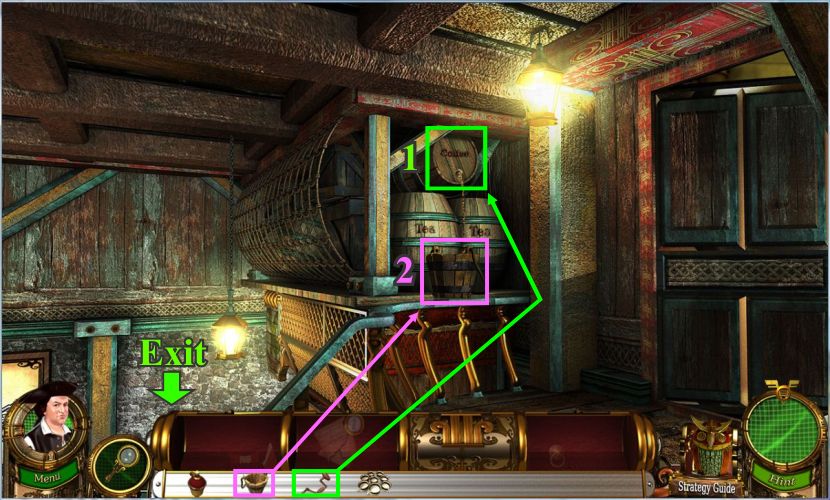
Go back downstairs and to the room on the left.
Screenshot
Collect the fragments and read the letter.
Pick up the axe and use it on the box to get the wood.
Open the stove door and put the wood inside and close the door.
Place the jug of water on the stove to heat it.
Put the flag on the back wall and exit to the right.
Screenshot
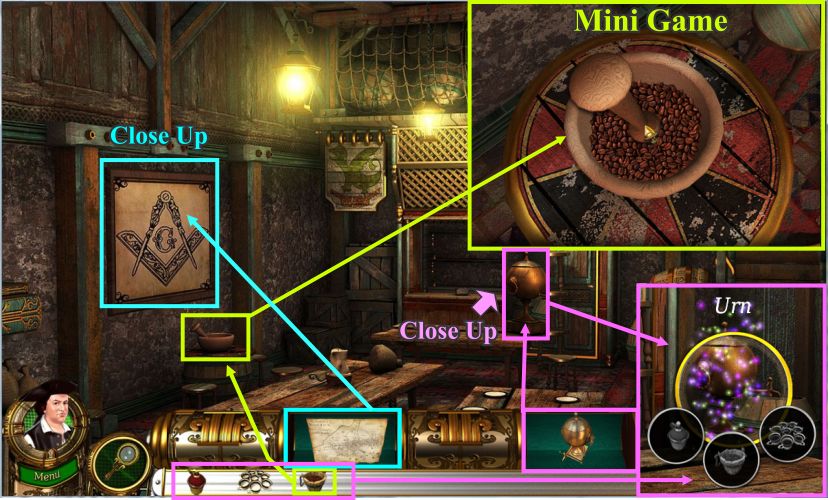
Put the coffee beans in the mortar and pestle and click to grind the coffee.
Click the close up area and place the coffee urn on the table.
Click on the urn and put the coffee, hot water and cups in the circle.
Put the map on the Masonic sign and click for a close up.
Screenshot
The map shows Paul Revere's Ride...click to read the letter.
Screenshot
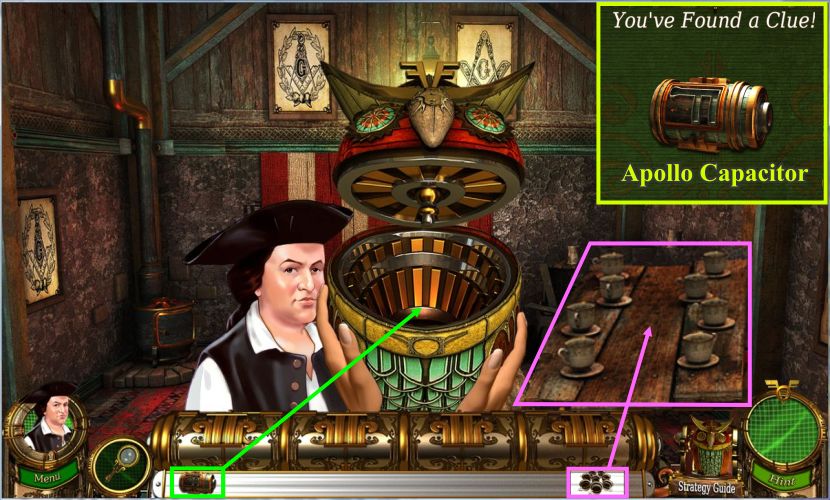
Go to the room on the left and place the cups on the far end of the table to distribute them on the saucers as shown in the insert.
Paul Revere will reward you with the Apollo Capacitor which you need to put into Oscar to be transported back to the mansion.
Screenshot
Chapter 8: The Apollo Room
Zoom in on the chest for a hidden object scene and then click for a close up of Apollo.
Screenshot
Pick up the 4 buttons and the other items on your list.
Note that Henry Ford was making watches and not cars.
Screenshot
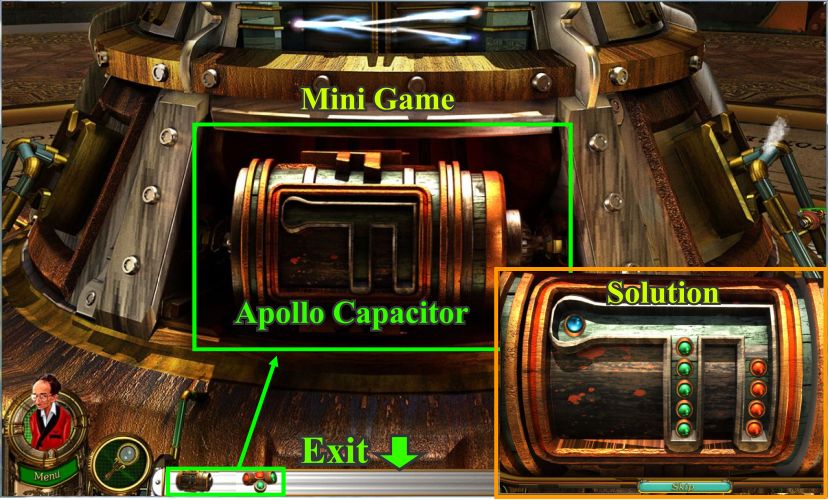
Place the capacitor in Apollo and the buttons on the capacitor to bring up a mini game.
Your goal is to slide all the buttons so that the blue one is on the top left, the green buttons are in the center row and the red buttons are in the row on the right as shown in the screen shot solution.
Screenshot
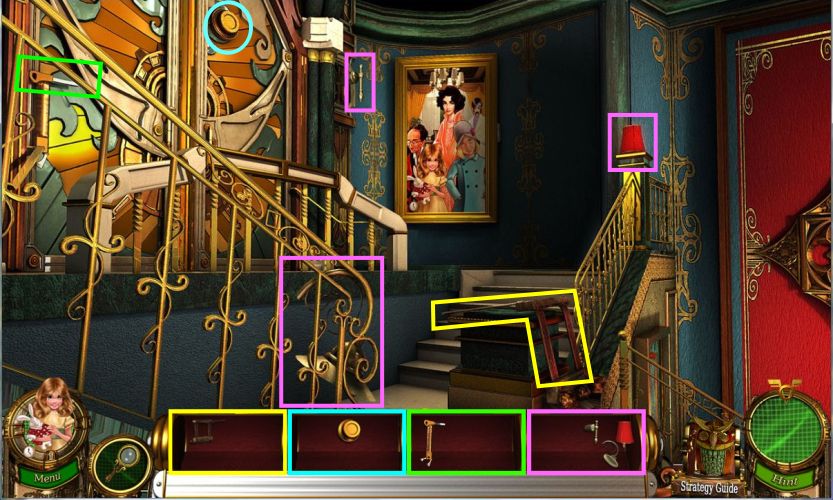
Chapter 9: Antiquities Room
You are now in the Antiquities Room of the mansion so pick up the badge and read the letter.
Collect the available fragments and then click on the cabinet for a close up view of that corner.
Screenshot
Pick up the badge and read the letter.
Collect the fragments...move the box to get the piece behind it.
Exit out of the corner and go to the stairs.
Screenshot
Pick up the fragments on the stairs and above.
Screenshot
Put the sconce up on the wall and zoom in on the picture.
Collect the 4 numbers that are on the picture for a mini game.
Place the numbers in correct order so that when you press the "open" button all 4 lights turn green.
The solution is random but when your mission is accomplished you can collect the bolt cutters from behind the picture.
Go back downstairs and click for a close up of the cabinet.
Place the lever and lock pick on the cabinet for a mini game to open the lock.
Screenshot
Use the pick to open each tumbler of the lock.
The order is random but the solution is always the same...all of the tumblers should be in the up position.
Screenshot
When you have opened the cabinet you will get a hidden object close up.
Move the plate and vase so you can collect all the necessary items including the water bottle.
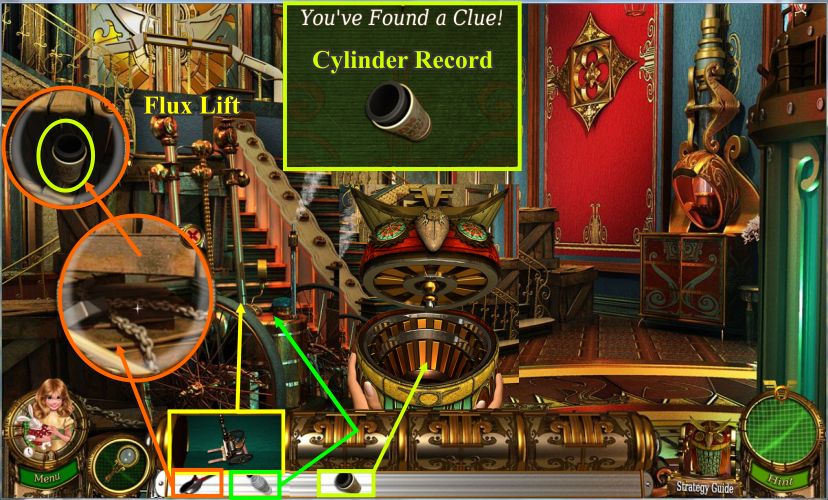
Screenshot
Place the Flux lift near the boxes at the left of the stairs.
Click on the sparkles and use your bolt cutters on the chain.
Click on the Cylinder Record and collect it to put into Oscar.
Screenshot
Chapter 10: Ford Motor Company
Pick up the badge and read the letter.
Move the rock and collect all the fragments.
Zoom in by the tree for a hidden object scene so you can get the key to unlock the door and go inside the building.
Screenshot
Dig up the dinner bell and collect everything on your list including the key.
Screenshot
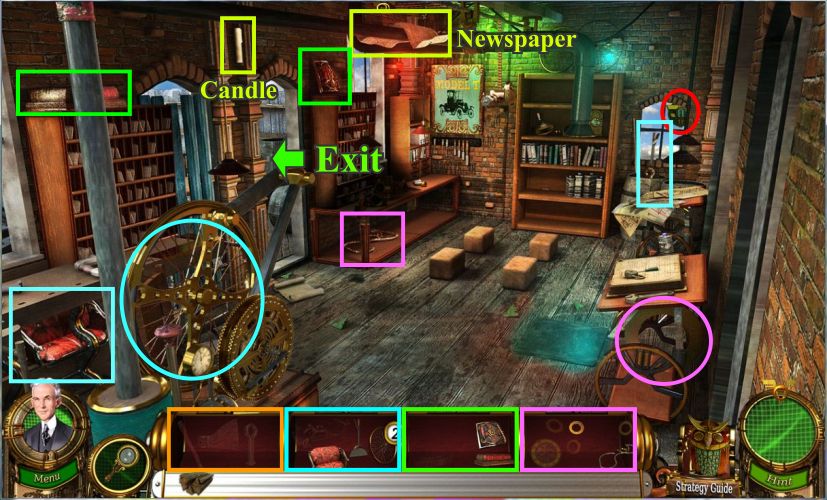
Once inside read the two letters and collect the wood plus the fragments,
Exit right to the quadricycle room.
Screenshot
Pick up the badge, candle and newspaper.
Collect the fragments and exit left to the yard.
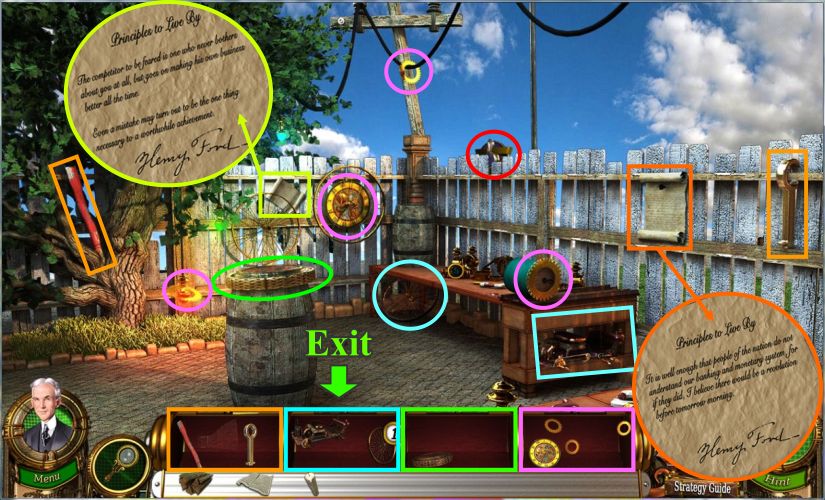
Screenshot
Pick up the badge and read the two letters.
Collect the fragments and go back inside.
Screenshot
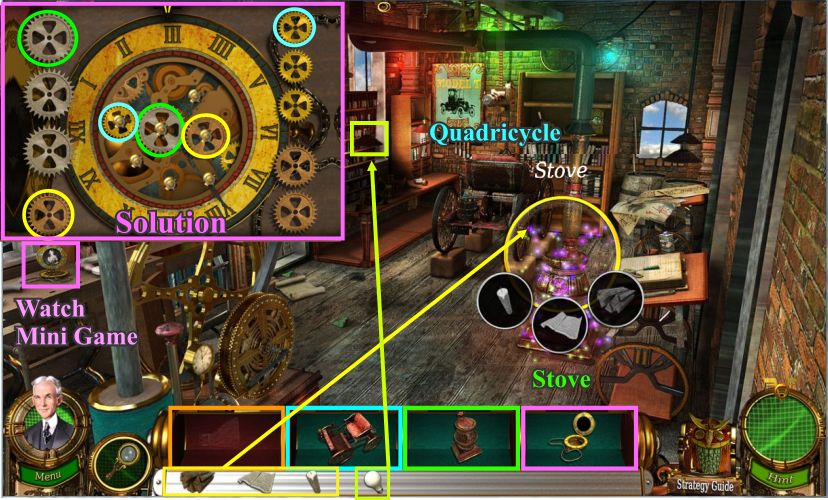
Place the quadricycle and stove and click on the stove to put the wood, candle and newspaper in the circle.
When you place the watch you will get a mini game.
Your goal is to connect the two stationary gears so they all move.
You don't need to use all the available gears, just 1 of each size as shown in the solution.
Place the light bulb to light up the table.
Screenshot
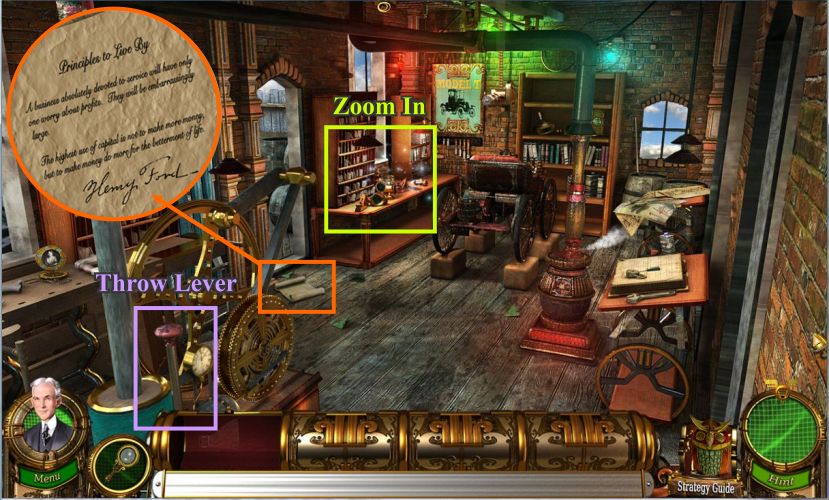
Throw the lever in the lower left of the scene and read the letter on your way to zoom in on the table for a hidden object scene.
Screenshot
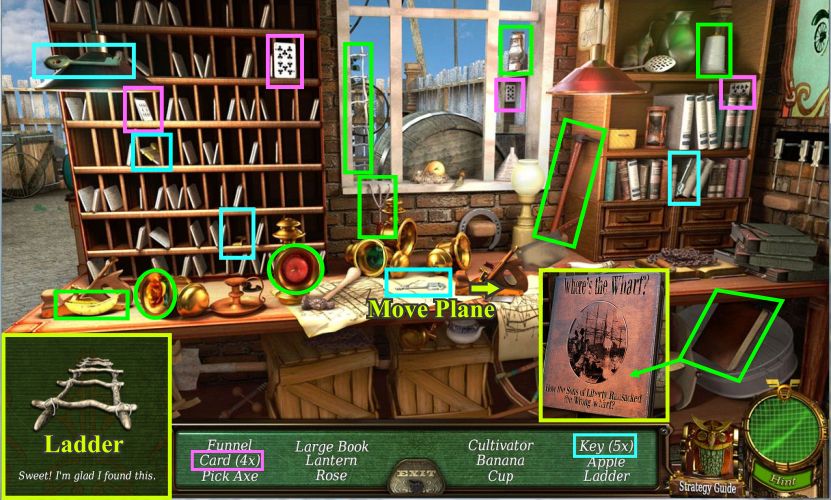
Collect everything on your list including the ladder out the window.
Move the wood plane to pick up a key.
The large book shows a close up of its cover when collected.
Screenshot
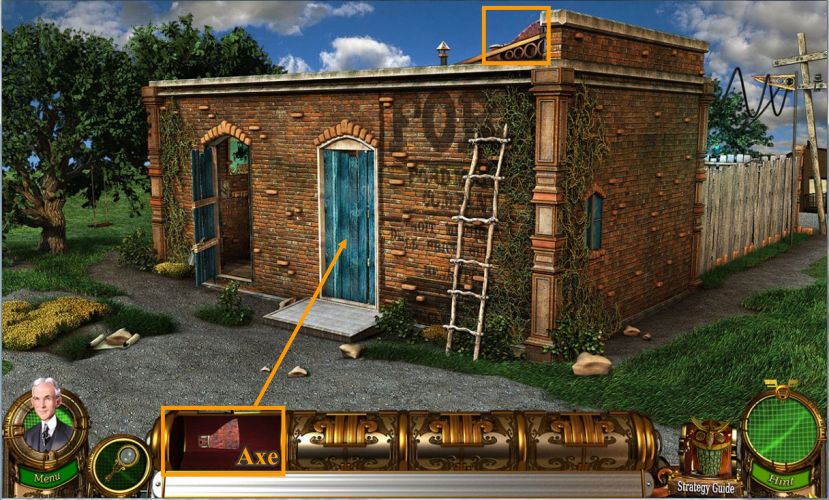
Go back out front and place the ladder to get the last fragment of the axe.
Use the axe on the closed door so the quadricycle can come out.
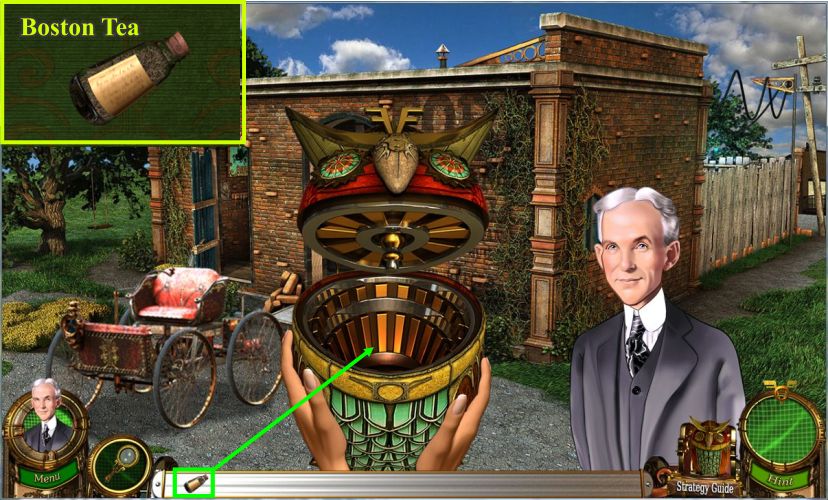
Screenshot
Henry Ford will give you some Boston Tea to place in Oscar.
Screenshot
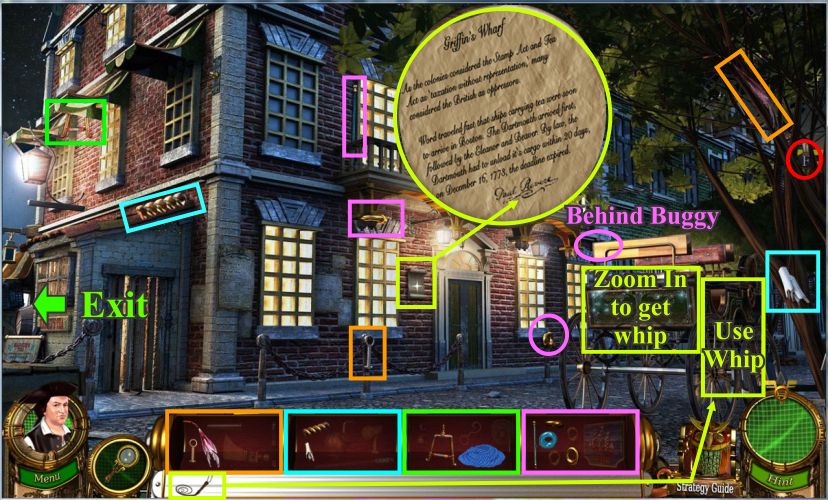
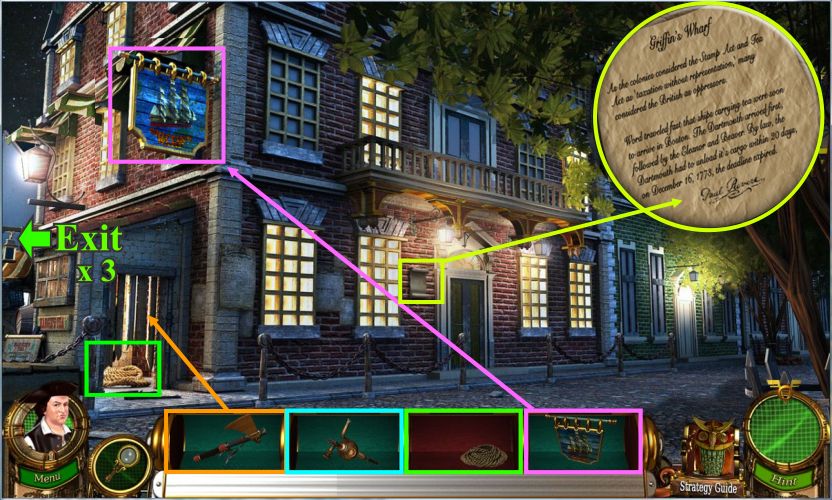
Chapter 11: Paul Revere At Griffin's Wharf
You are back in front of the Green Dragon Tavern so pick up the badge and read the letter.
Collect the available fragments...one will become visible when the buggy moves.
Zoom in on the buggy for a hidden object scene.
Once you have the whip, use it on the horse and he will take off with the buggy.
Exit left on your way to Griffin's Wharf.
Screenshot
Collect the items on your list including the whip.
Move the seat to get the book.
Screenshot
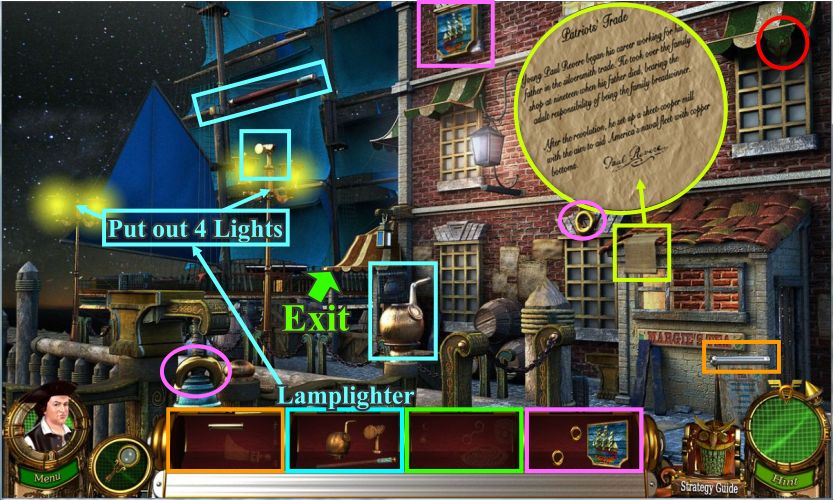
Pick up the badge and read the letter.
Collect the fragments and use the lamplighter to put out the 4 lights before going around the corner toward the wharf.
Screenshot
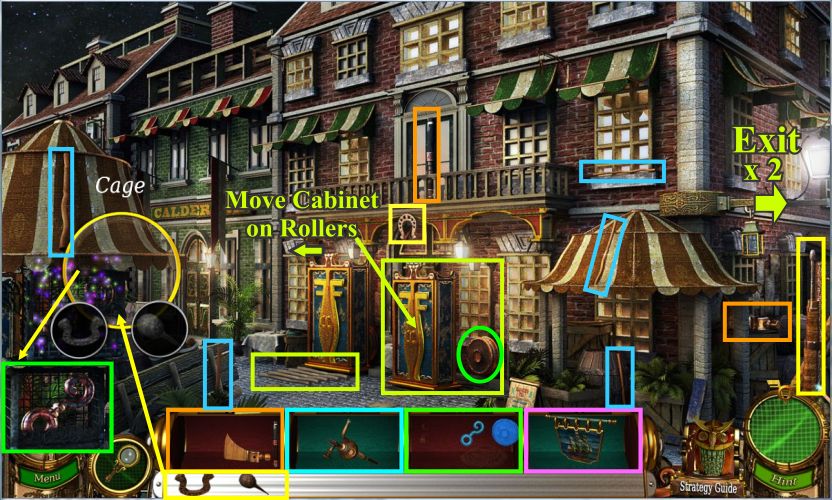
Collect the fragments and click on the cage to place the horse shoe and ram in the circle to get the fragment inside.
Pick up the 5 rollers and place them in front of each other in front of the cabinet.
Click on the cabinet to move it and take the fragment behind it.
Exit to the right 2 times.
Screenshot
You are back in front of the tavern so read the letter and use the axe on the door of the shed.
Pick up the rope and place the sign where it belongs.
Exit to the left 3 times.
Screenshot
Pick up the badge and use your lamplighter to put out the lights.
Collect the marked items and click on the catapult area for a recipe puzzle.
Place the board and cannon in the circle and you will get the cannon with the board on top of it.
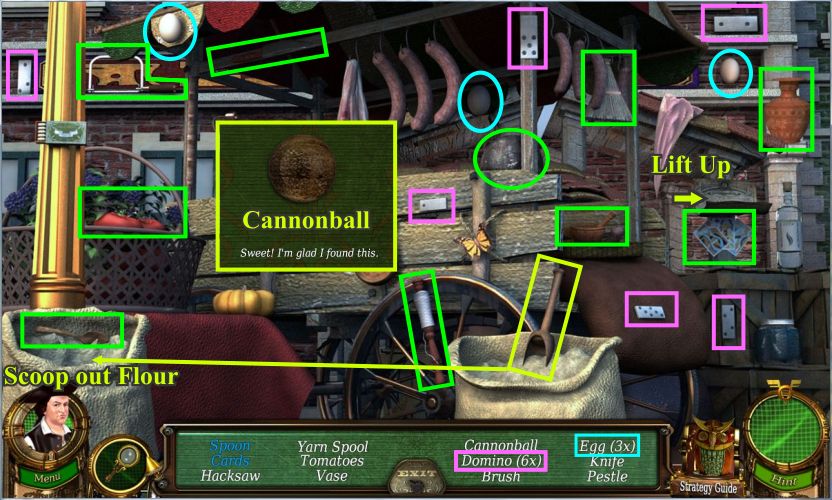
Zoom in on the cart for a hidden object scene.
Screenshot
Get the cannonball and the other items on your list.
Use the scooper to get rid of some of the flour in the bag on the left to pick up the spoon.
The shiny bowl is under the lamp shade which you need to lift up.
Screenshot
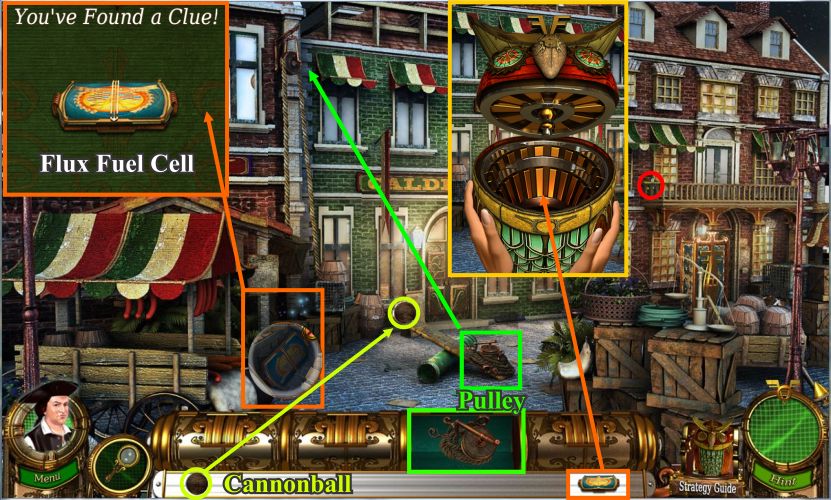
Put the pulley on the right side of the board and the cannonball on the left.
The pulley will end up on the building so you can move the box and pick up the Flux Fuel Cell to place in Oscar.
Screenshot
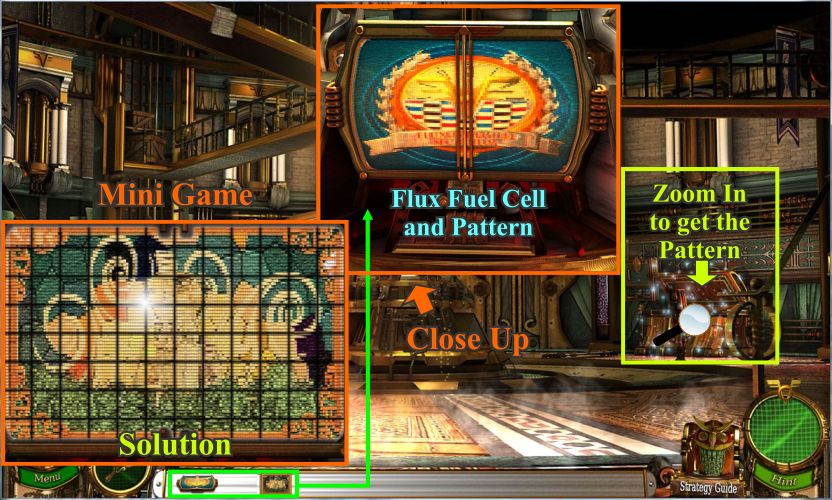
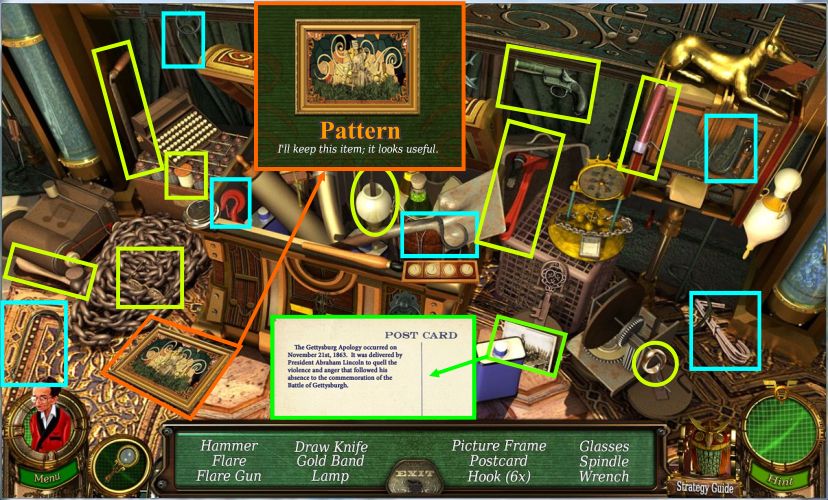
Chapter 12: The Apollo Room
Zoom in on the chest for a hidden object scene to get the pattern.
Once you have the pattern place the Flux Fuel Cell and the pattern on Apollo for a mini game.
Rotate the tiles to form the picture shown.
Screenshot
Pick up the pattern and collect the rest of the items on your list.
Screenshot
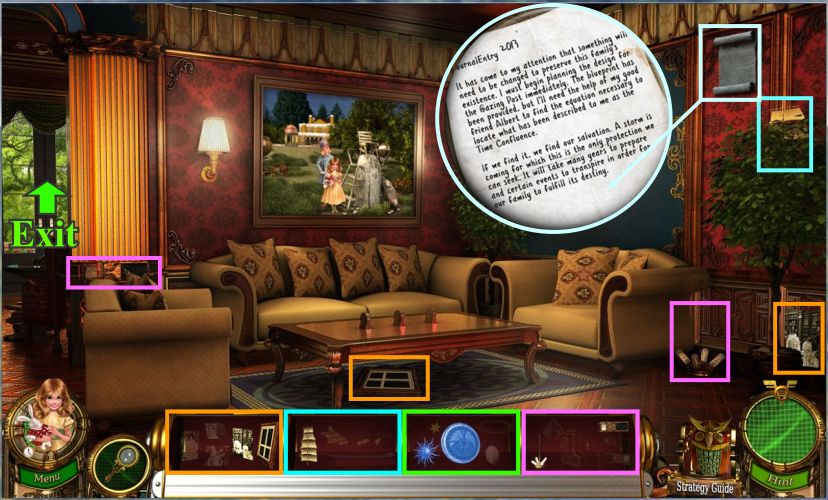
Chapter 13: Master Bedroom Suite
Grandpa sends you off to the Master Bedroom so read the letter and collect the fragments before exiting to the next room.
Screenshot
Pick up the badge and collect the fragments.
Zoom in on the patio door area for a hidden object scene.
Screenshot
Move the picture, open the drawer and use the key of unlock the suitcase so you can collect everything on your list including the eraser.
Screenshot
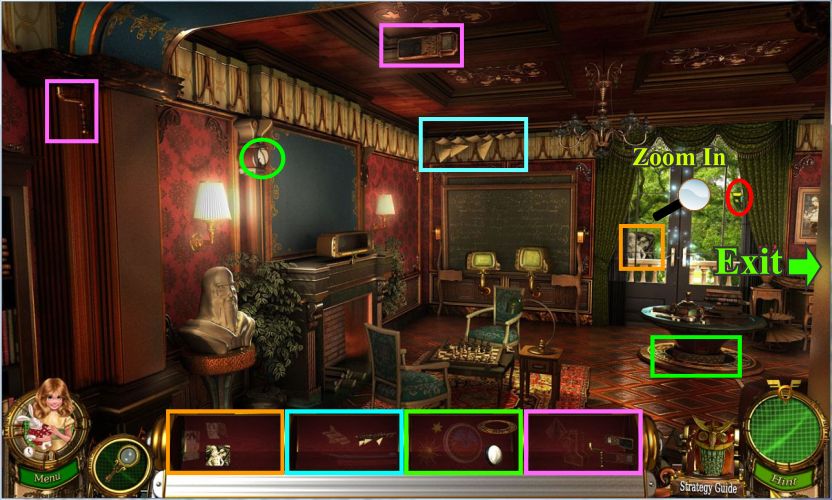
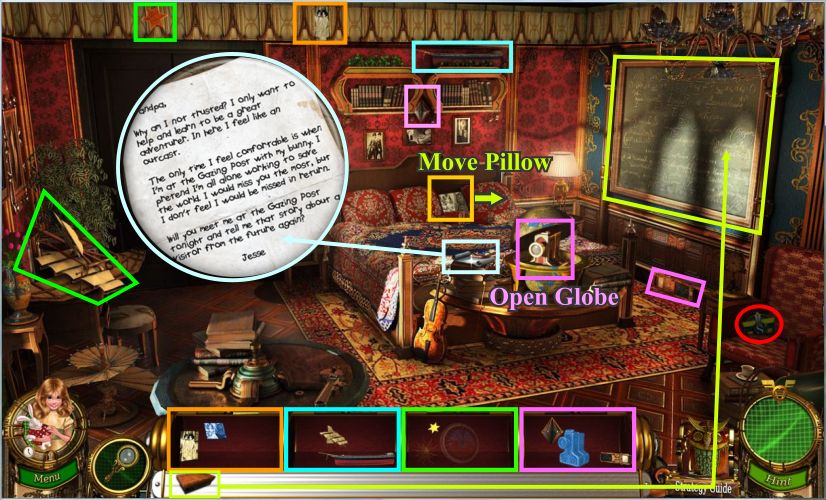
Go right to the bedroom and read the letter.
Pick up the badge and use the eraser to clean up the blackboard.
Open the globe and move the pillow to be able to collect all the fragments.
Screenshot
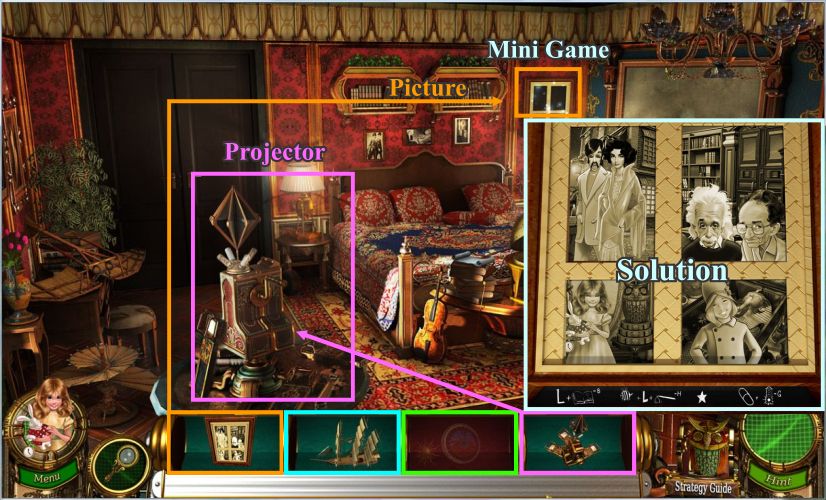
Put the projector on the table and the picture on the wall.
The picture will trigger a mini game for you to place the 4 photos as shown in the solution.
Screenshot
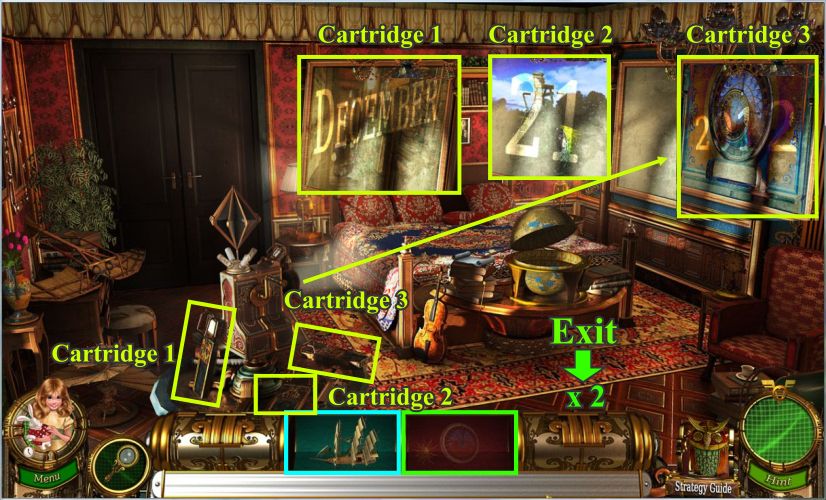
Place each cartridge individually in the projector and the images will show up on the blackboard.
Cartridge 2 is a little tricky to get until there is a fix in the game because it wants to exit you from the room.
All 3 cartridges produce December 21, 2012, which the date that the Mayans and Nostradamus predicted for the beginning of the Fifth Sun.
Exit down twice.
Screenshot
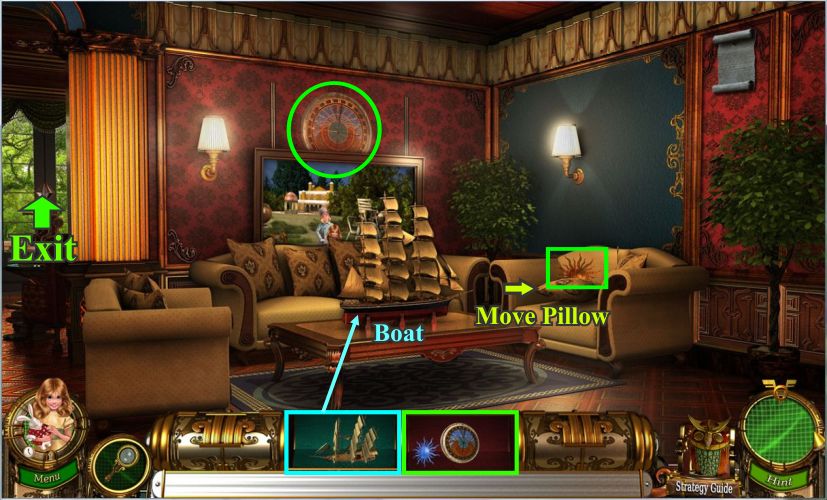
Place the boat on the table and move the pillow on the right chair.
Collect the w fragments and exit to the next room.
Screenshot
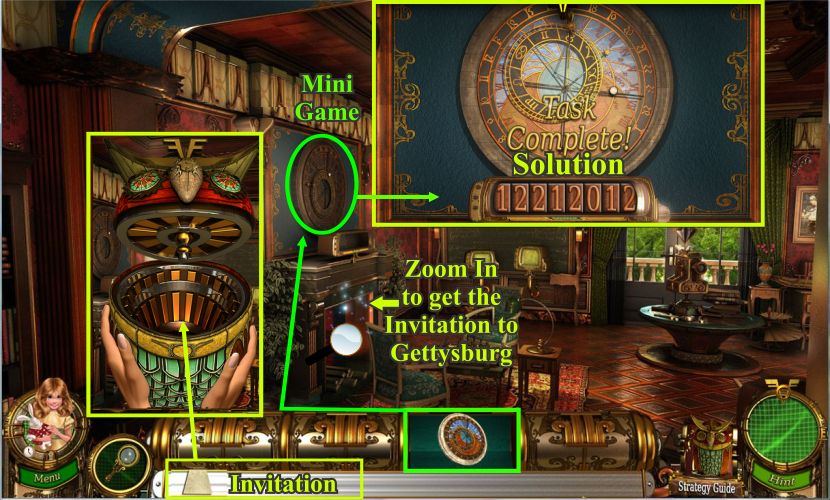
Place the clock on the wall above the fireplace to trigger a mini game for you to enter the date you got from the projector.
Zoom in on the fireplace for a hidden object scene to get the Wills invitation for Lincoln to go to Gettysburg.
When you get it, put the invitation in Oscar.
Screenshot
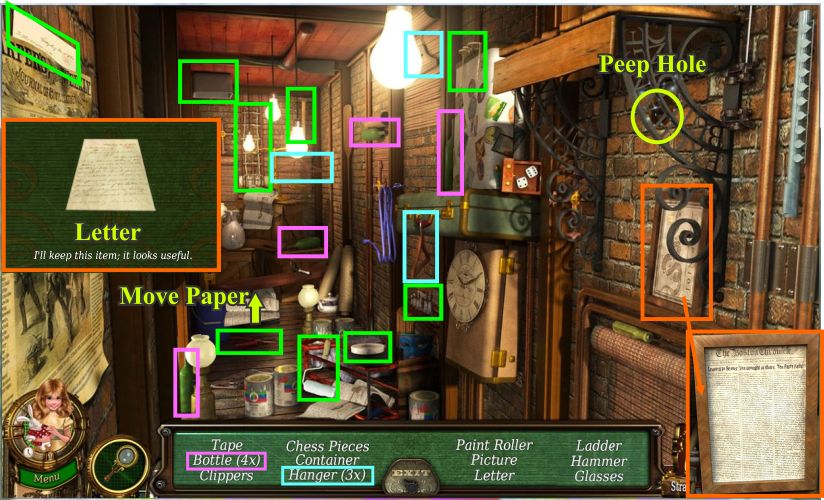
Look through the peep hole and collect all the items on your list, including the letter.
There will be a close up of the newspaper and you will need to move the paper to get the clippers.
Screenshot
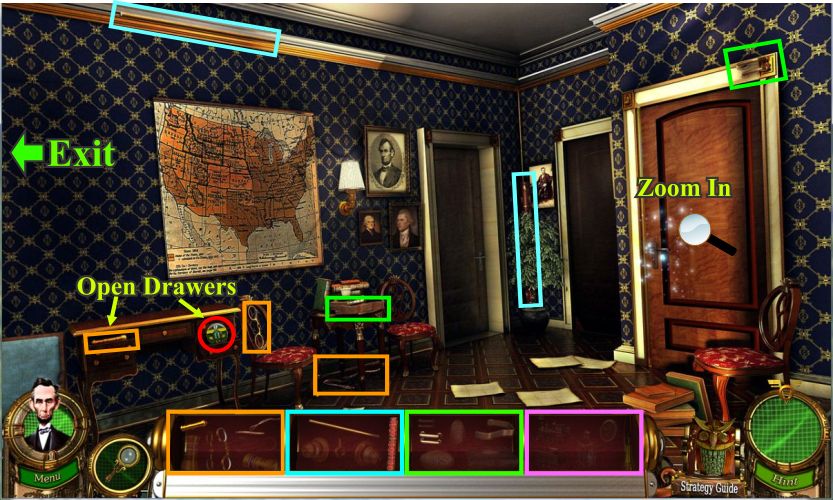
Chapter 14: Lincoln's Office
Open the 2 drawers in the side table to get the badge and a fragment.
Collect the rest of the fragments and zoom in on the closet door for a hidden object scene.
Screenshot
Open the cabinet door, open the book on the chair, move the box at the bottom center of the scene, and open the box in the closet.
Collect the 13 stars marked in pink, the letter opener and the rest of the items on your list.
Screenshot
Go left to the room with the fireplace and read the letter.
Collect the fragments and exit right.
Screenshot
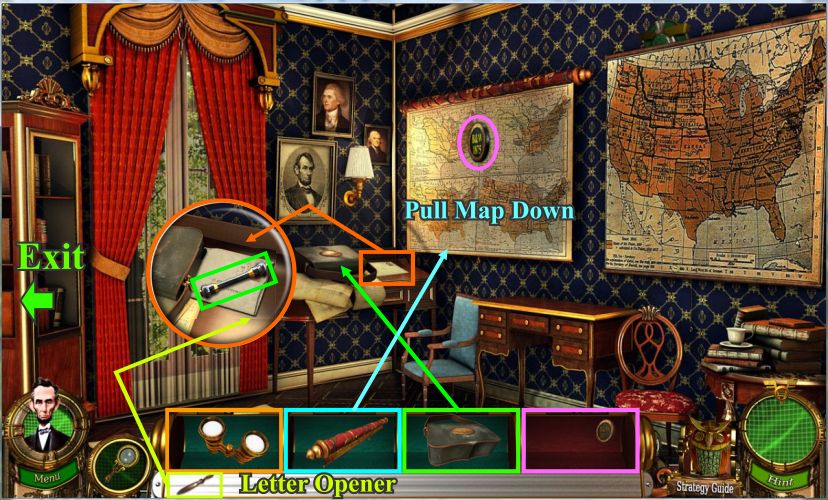
Pick up the badge, open the drawer and collect the fragments.
Screenshot
Place the map on the wall and pull it down.
Put the mail bag on the table and a letter will fall out.
Click on the letter and use your letter opener to slit it open so you can take the safe handle and go back to the other end of the room.
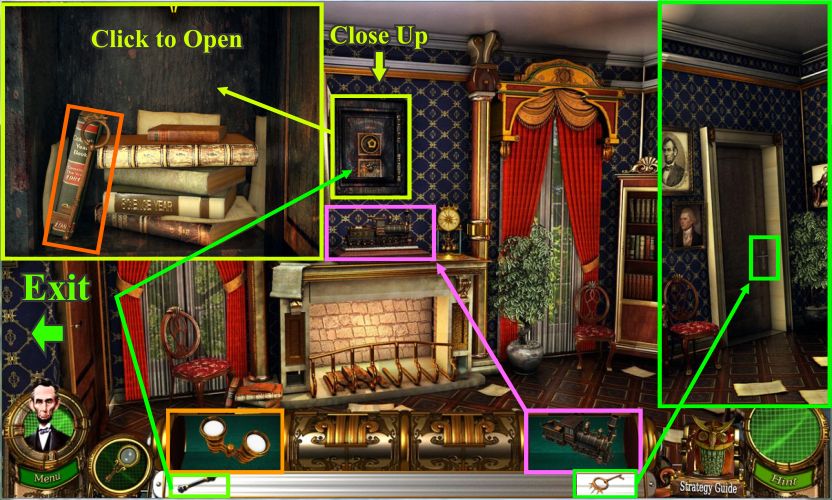
Screenshot
Put the train on the mantle to get access to the safe.
Put the handle on the safe and get a close up to click anywhere to open it and get the key.
Exit left back to the foyer and use the key on the door as shown in the insert.
Screenshot
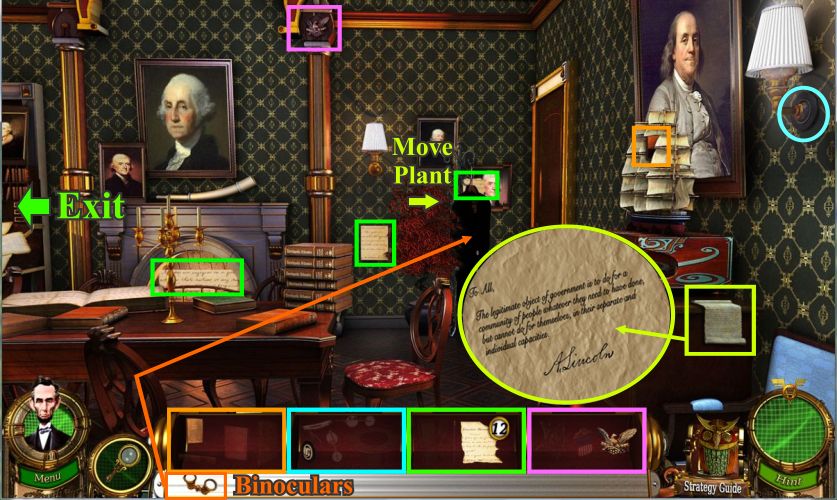
Move the plant, put the binoculars in the coat and read the letter.
Collect the fragments and exit left.
Screenshot
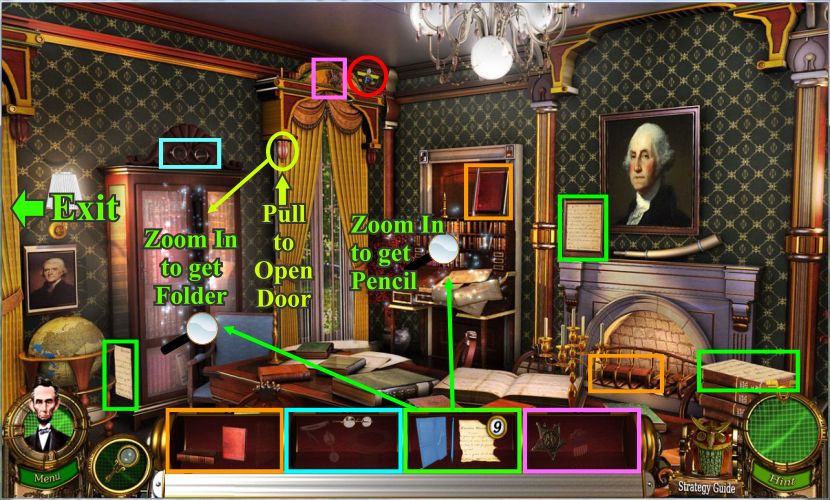
Pick up the badge and collect the fragments.
Zoom in on the desk in back for a hidden object scene.
Pull on the drapery cord to open the cabinet door and zoom in there for another hidden object scene.
When you are done with the hidden objects, exit left.
Screenshot
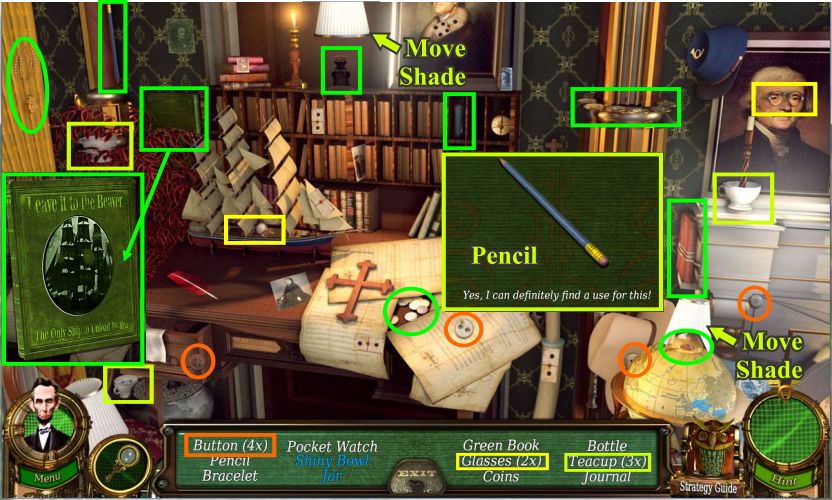
Move the lamp shade and click on the book to see the cover.
Pick up all the items on your list including the pencil.
Screenshot
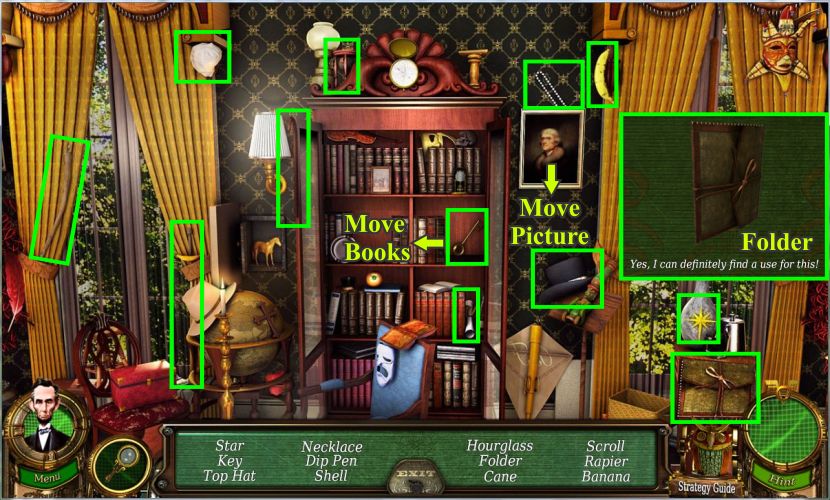
Move the books and picture in the cabinet corner so you can collect all the items on your list which will include the folder.
Screenshot
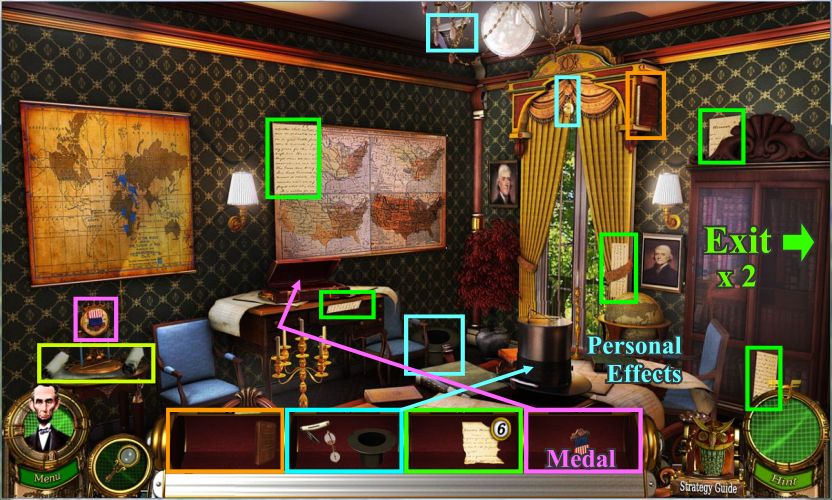
Collect all the items and place the personal effects on the table.
Put the medal in the attaché and exit right twice.
Screenshot
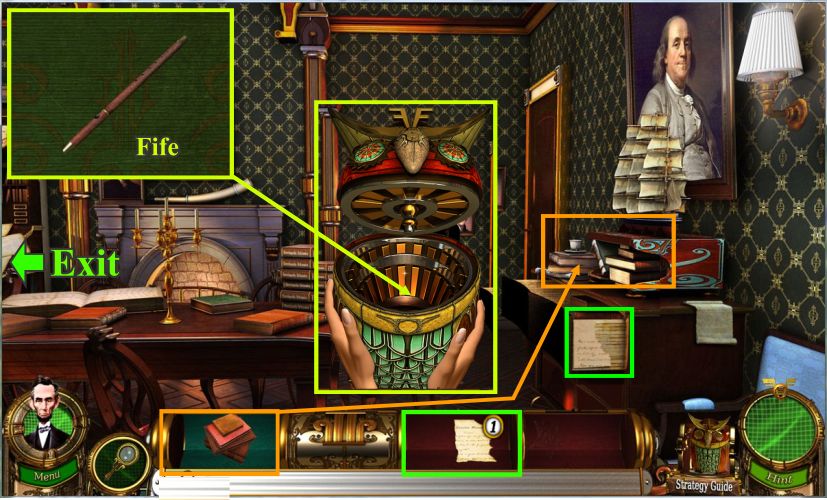
Put the books on the table by the ship and the drawer will open for you to get the last address sheet.
Go back to the room on the left and when you are finished there, come back with the fife and put it in Oscar.
Screenshot
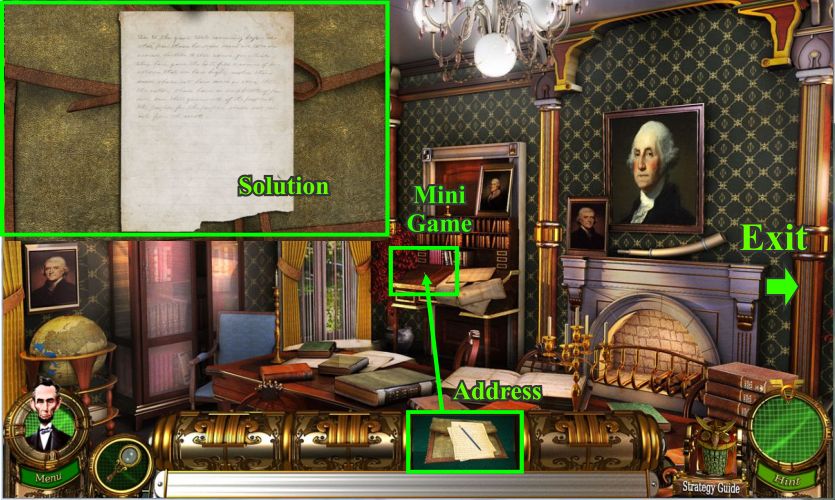
But the address on the desk for a jigsaw puzzle mini game to assemble the address.
Go back to the room on the right so Oscar can transport you to Paul Revere.
Screenshot
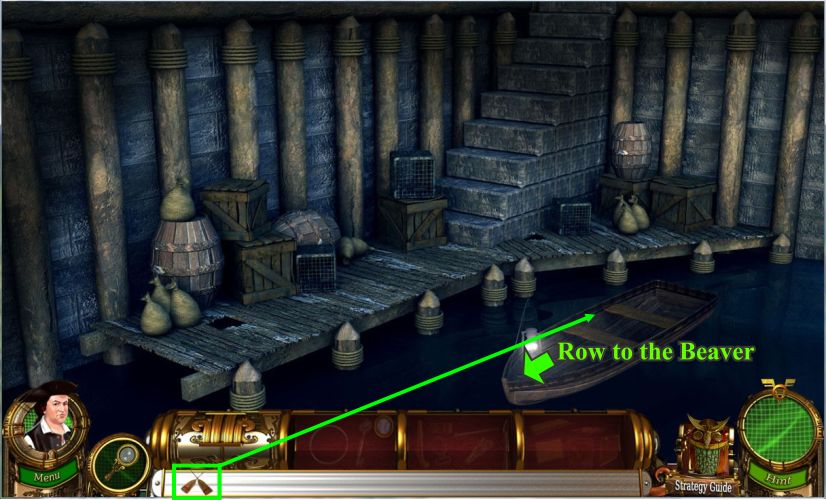
Chapter 15: Paul Revere And The Good Ship Beaver
You finally made it to the wharf but will have to row the dinghy out to the Beaver.
Move the barrel and pick up the dinghy pieces and place the completed dinghy in the water.
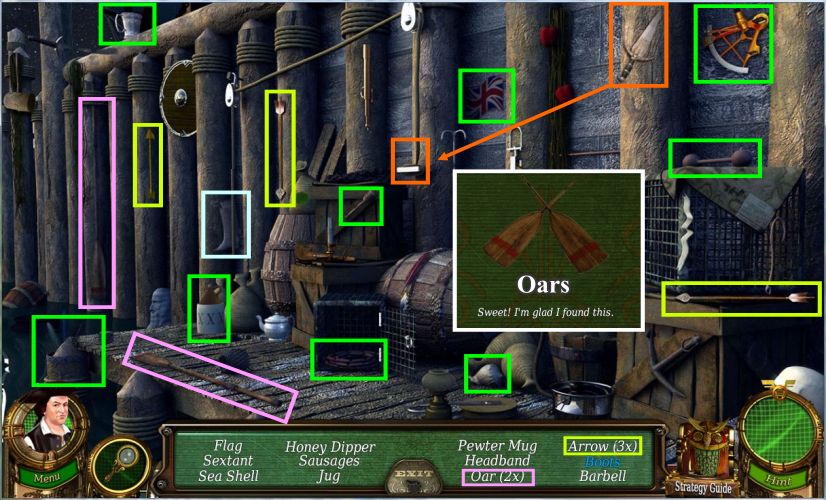
Zoom in for a hidden object scene to get the oars.
Screenshot
Collect all the items on your list and the 2 oars.
Use the knife to cut the rope and get the boots.
Screenshot
Put the oars on the dinghy.
Click and watch it take off for the Beaver.
Screenshot
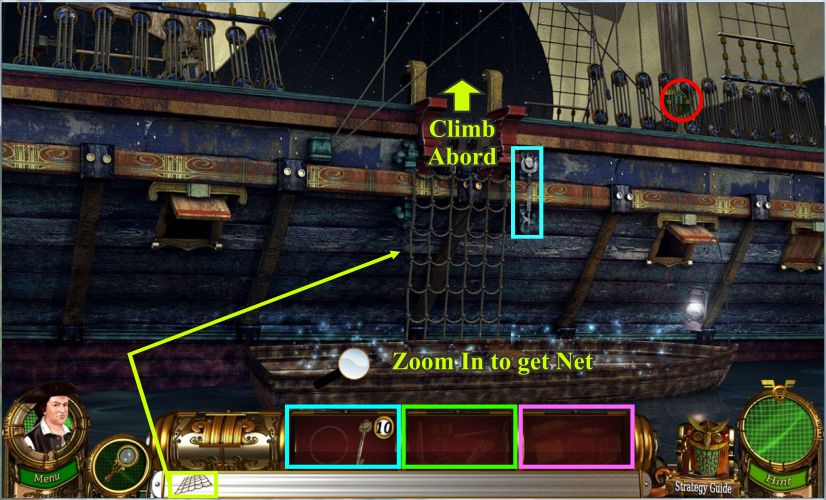
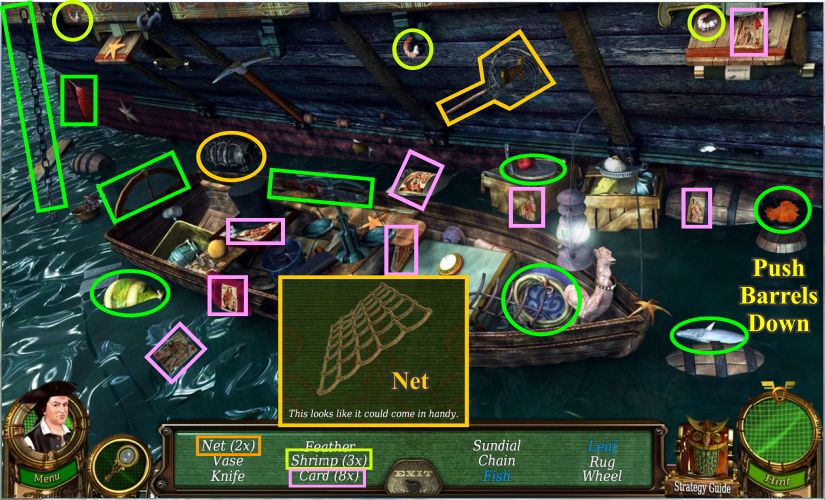
Pick up the badge and fragment and zoom in to get the net so you can climb aboard.
Screenshot
Push the 2 barrels down and collect all the items on your list including the net.
Put the net on the ship and go onto the deck.
Screenshot
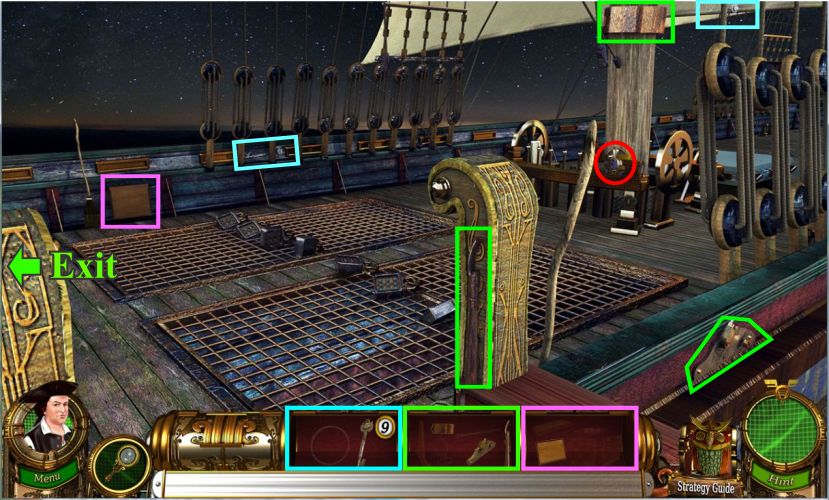
Pick up the badge and the fragments and exit left.
Screenshot
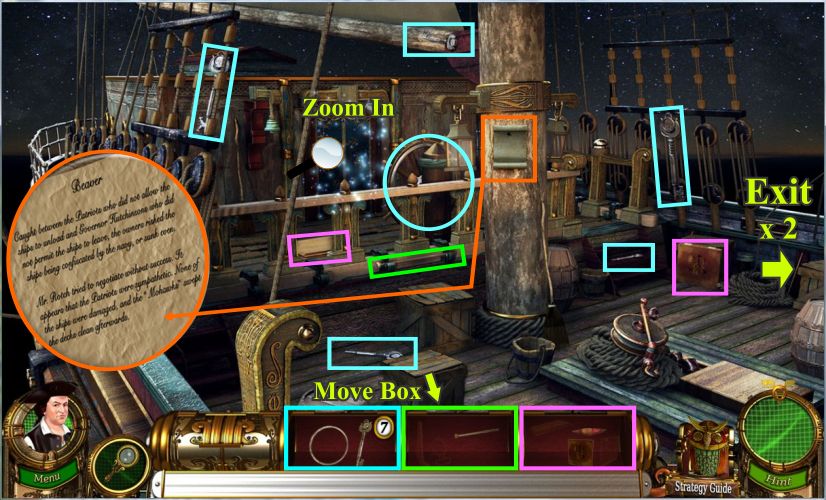
Read the letter, move the box and collect the fragments.
Zoom in for a hidden object scene and then exit to the right twice.
Screenshot
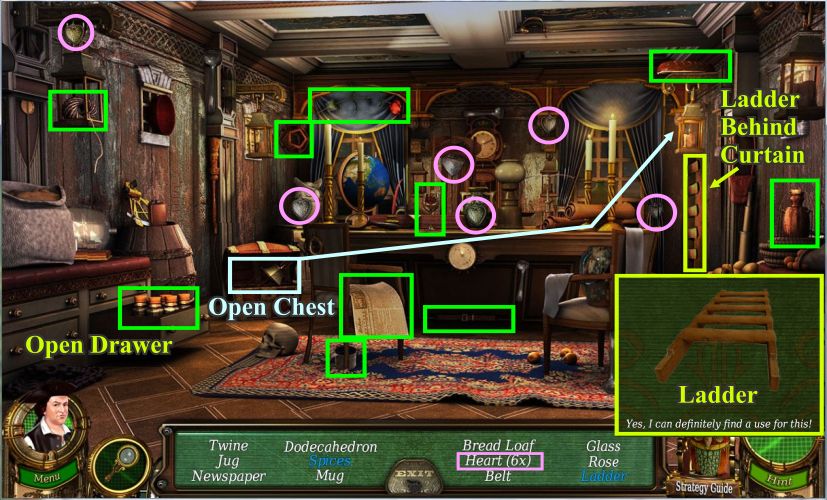
Open drawer and chest and hang lantern by curtain to get ladder.
Collect everything on your list.
Screenshot
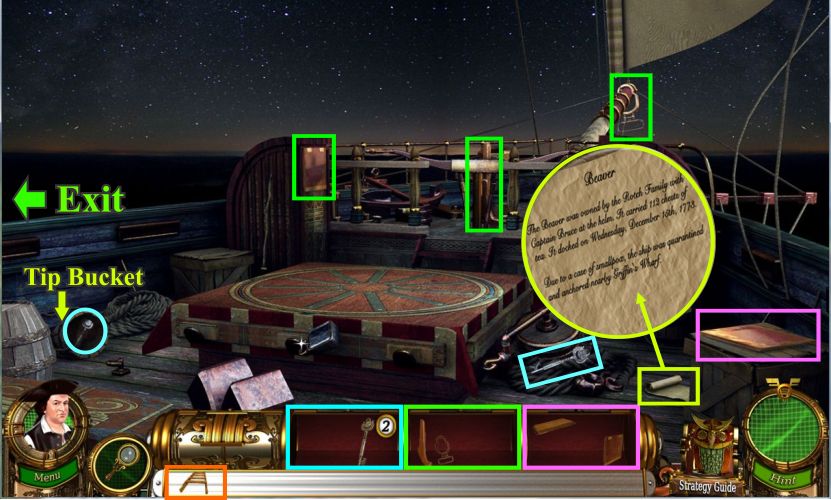
Tip the bucket over and read the letter and collect the fragments....go left.
Screenshot
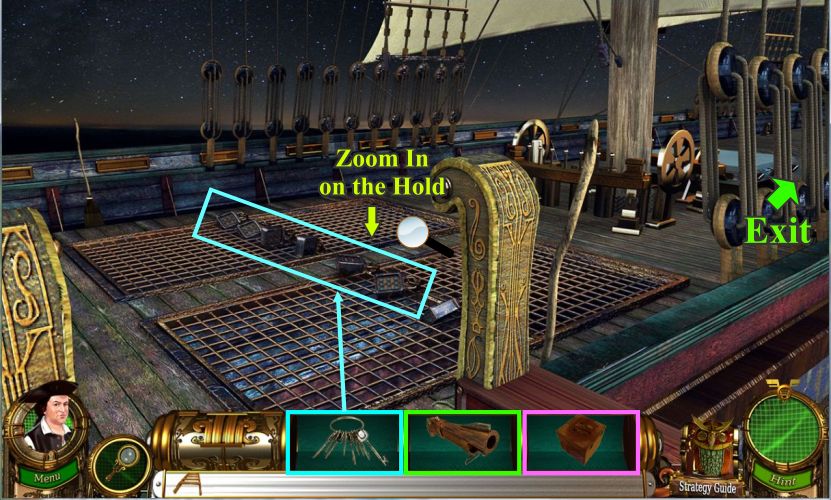
Use the keys to open the hold and zoom in on it for a hidden object scene.
Screenshot
Move the box and the circular lid.
Pick up the 9 hatchets and whatever else is on your list before going back to the aft hold.
Screenshot
Use the pistol on the lock and place the ladder in the hold and climb down.
Screenshot
Pick up the badge and use the axe on the pyramid of boxes to get the marbles.
Click on the sparkles for a recipe puzzle mini game and put the box and marbles in the circle.
Your goal the tic tac toe game is to eliminate your opponent's pieces from the board by putting 3 pieces in a row.
Once each player places their 9 stones on the board, pieces can be moved to an open spot by clicking on the piece and then the destination.
If you get you in a row you can take one of your opponent's pieces from the board but you cannot take one of his that is part of 3 in a row unless there is no other option.
If a player cannot make a move, the other player wins.
At the end of the game you get the last Apollo component.
Screenshot
Chapter 16: The Apollo Room
Jesse in going to install the last Apollo component by herself without Grandpa's help.
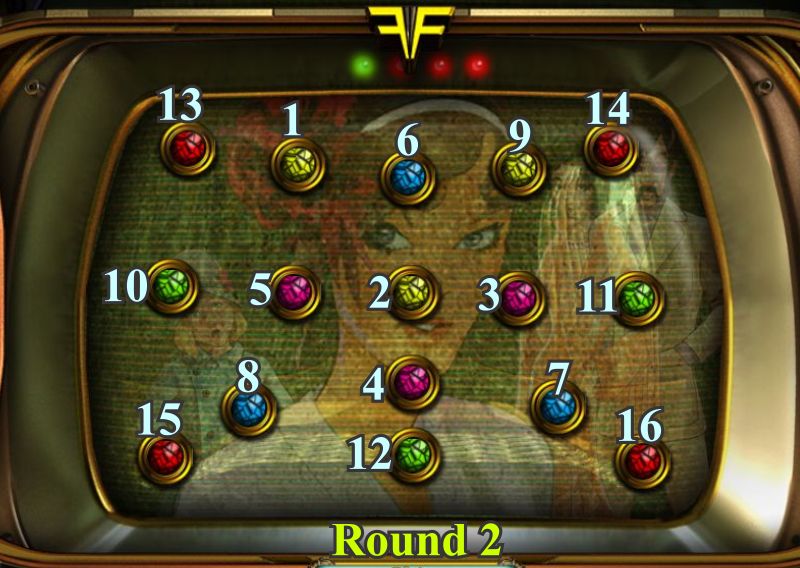
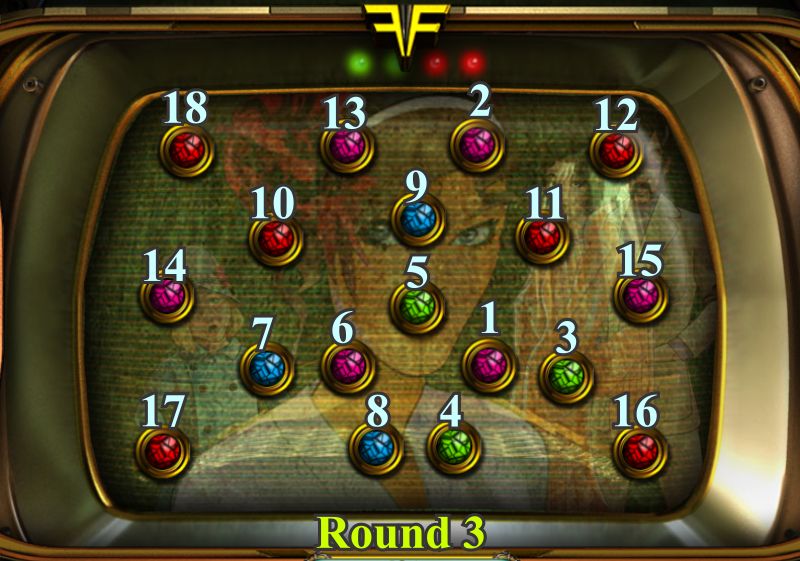
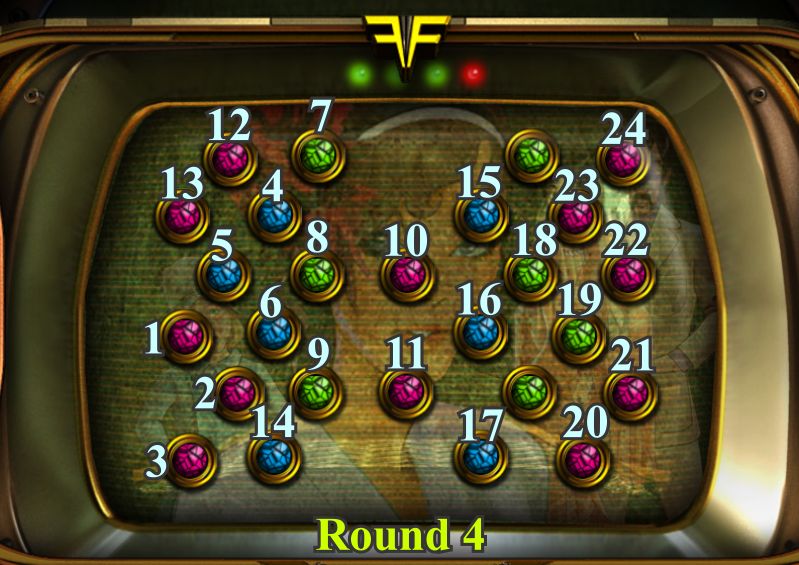
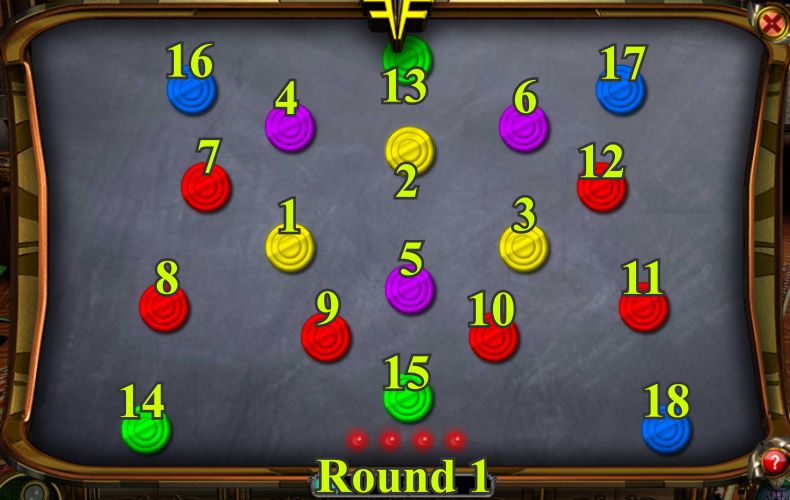
There are 4 rounds to the atom mini game and it works the same way as the atom game in the first Flux Family adventure.
Your goal is to get rid of as many matching atoms as you can so that there are no more than 2 of the same color left.
Click on an atom to activate it and click again to deactivate it.
When they are active the atoms are attracted to other active atoms of the same color so if 3 or more active atoms of the same color come together, they will disappear off the board.
If atoms of a different color come in contact with each other, they will explode and you will have to start over.
The instructions get a little more complicated and there is more than one way to reach your goal but the easiest is to just follow the numbers on the screen shot for each round.
Round 1
Screenshot
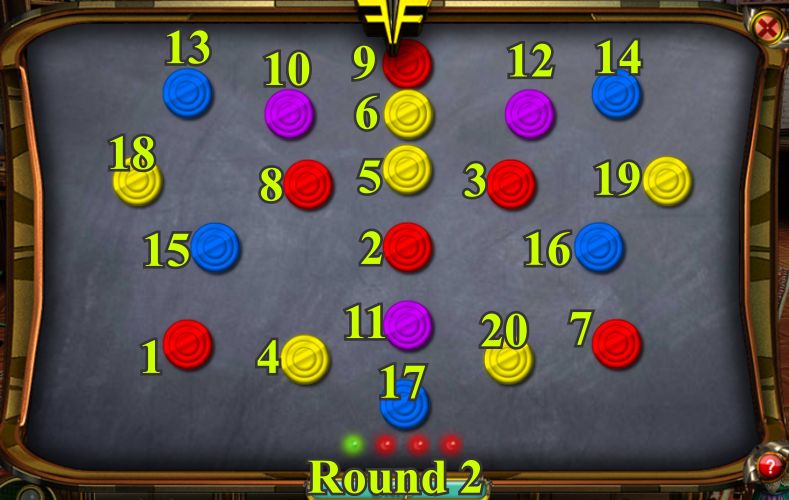
Round 2
Screenshot
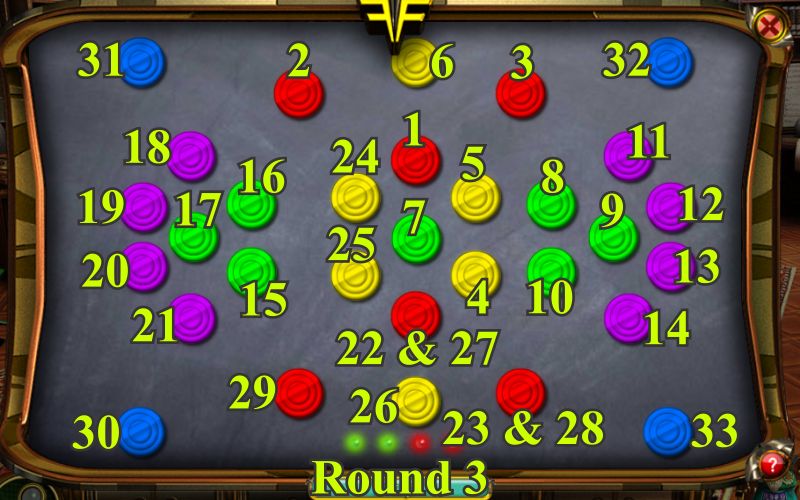
Round 3
Screenshot
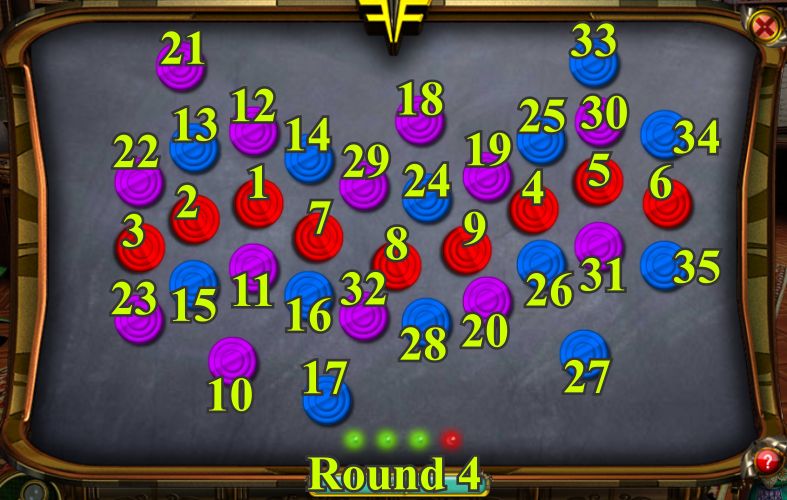
Round 4
Screenshot
The saga of the Flux Family is not over. We are promised that the adventure will be continued.
You have finished the basic adventure in Flux Family Secrets: The Rabbit Hole. If you have the Collector's Edition, you can now play the Bonus Adventure.
Special thanks to Jazz for this kicking walkthrough!
Posted by: grinnyp |
June 27, 2010 5:53 AM
|
June 27, 2010 5:53 AM
Flux Family Secrets: The Rabbit Hole Bonus Adventure
Now that you have finished the Basic Adventure you have the opportunity to see how it all started by playing the Bonus Adventure.
Background Information:
Be sure to check out the Archives, which are at the left on the Main Screen, and read the Badges.
Since Delphi, the original time travel device, proved to be unstable, Jesse's Grandpa decided to shelve the project.
In the Bonus Adventure you get to help Lucenti hide the pieces of the device throughout time.
Unfortunately Jesse found all the hidden pieces in the first adventure Flux Family Secrets: The Ripple Effect and so the story begins.
Screenshot
General Information:
All of the same information applies that was provided for the Basic Adventure except that the first owl was named Waldorf and we are now dealing with parts for the Delphi rather than the Apollo.
To start the game click on the Bonus Adventure chest on the Main Menu.
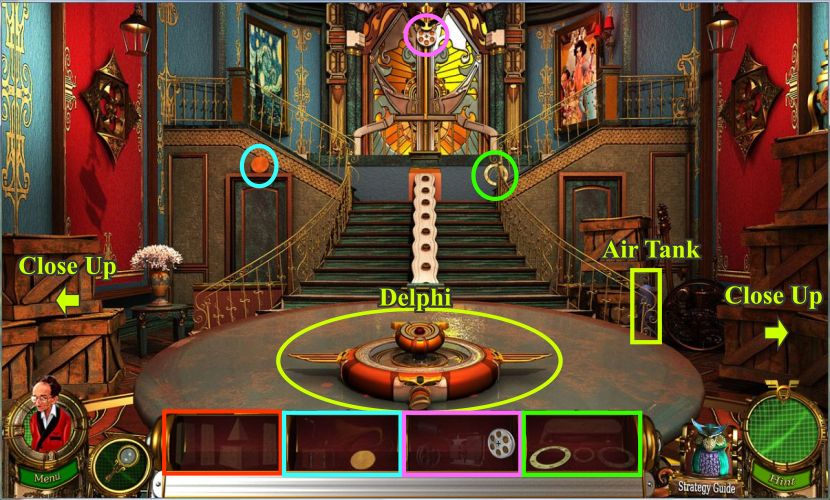
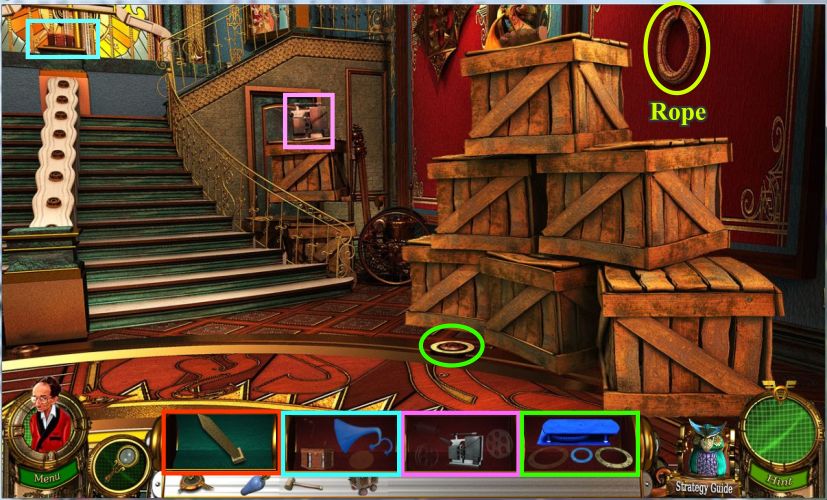
Flux Mansion Antiquities Room:
There are close up areas on both sides of the room.
Pick up the Delphi and air tank.
Collect the color coded pieces and go to the left close up.
Screenshot
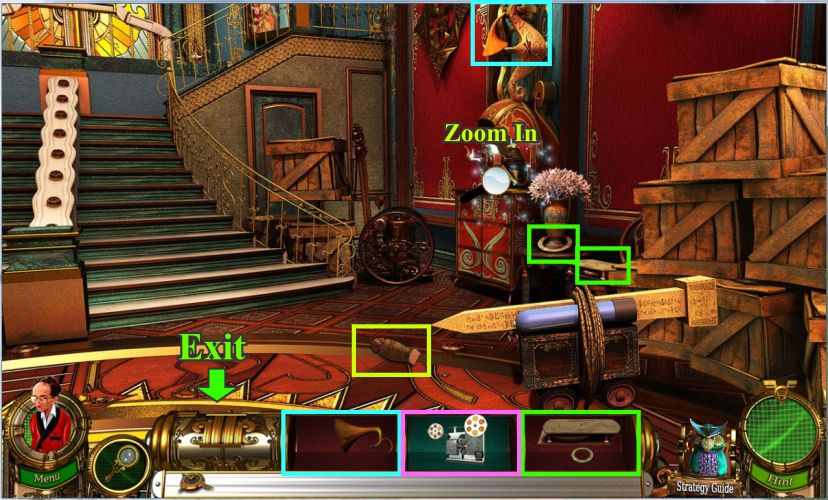
Move the boxes indicated and pick up the hammer.
Collect the color coded pieces and go across the room to the other close up.
Screenshot
Pick up the rope and the fragments.
Screenshot
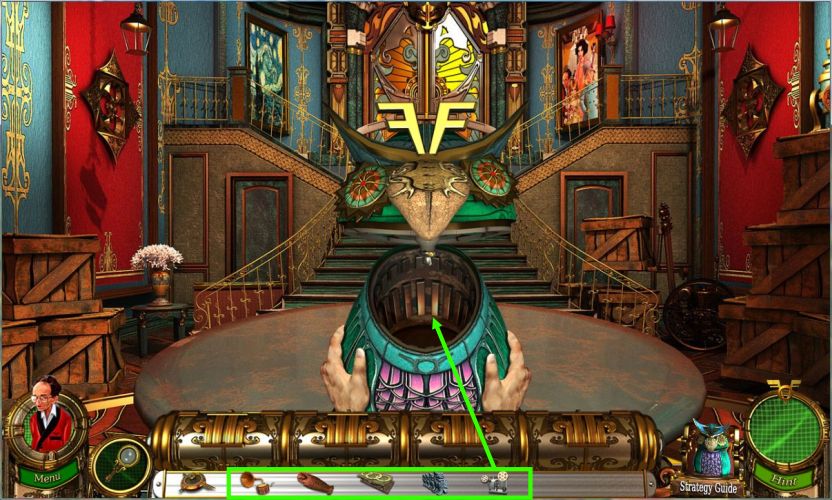
Assemble the battering ram by placing the obelisk on the cart with the air tank and tying them up with the rope.
Hit the tank with the hammer.
Screenshot
Pick up the sarcophagus that flies out of the boxes and collect the other fragments.
Zoom in on the cabinet for a hidden object scene.
Screenshot
Move the items indicated and collect the items on your list including the 5 Dragons of Confucius.
Screenshot
Place all of the antiquity items where they belong and they will go into your inventory.
Screenshot
You can choose to place the antiquities in Waldorf in any order that you wish but I'm going to deal with them in alphabetical order to make it easier to find the various eras.
Screenshot
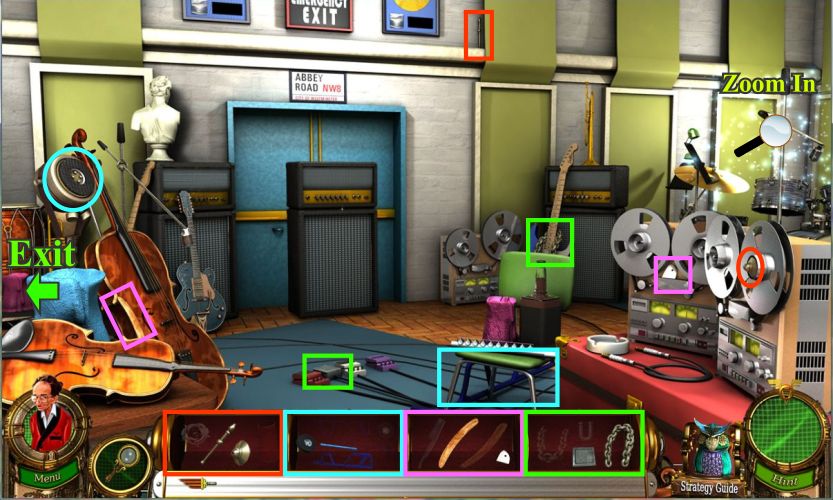
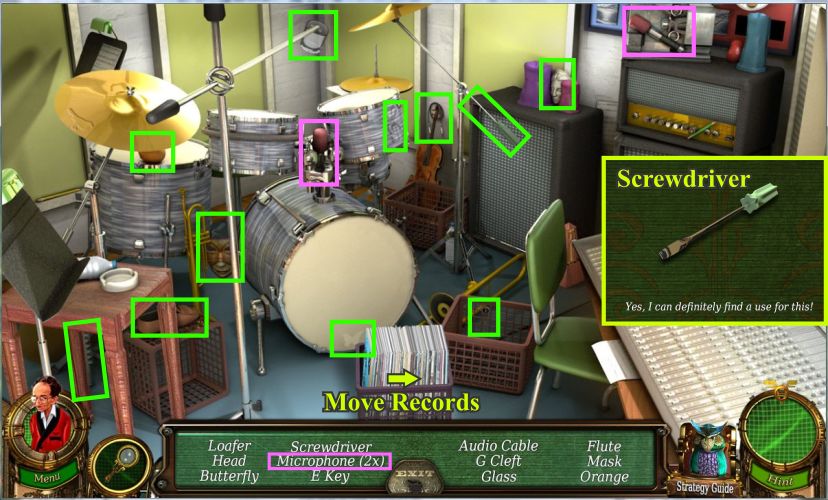
Abby Road Studios:
Collect all the fragments and zoom in on the sparkles in the upper right corner.
Screenshot
Move the record box and collect everything on your list including the screwdriver.
Screenshot
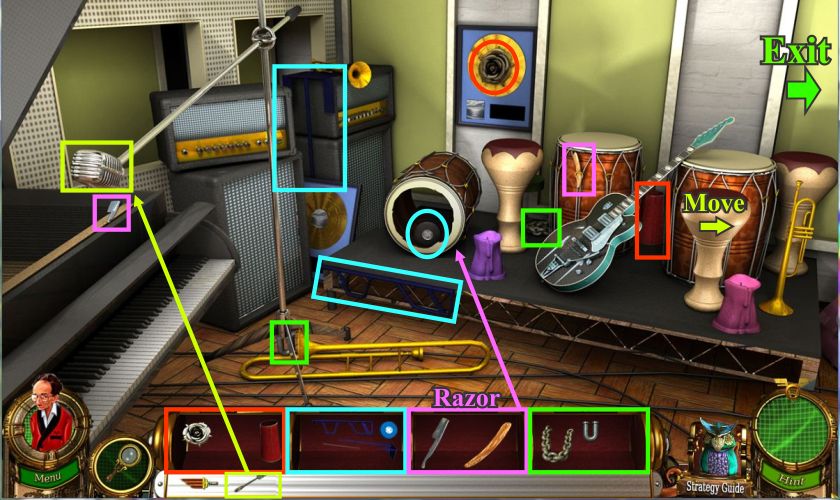
Exit to the left of the main scene and collect all the fragments.
Move the drum to get the piece of lamp and use the completed razor on the tipped over drum to collect the dolly piece.
Exit right and return to the main part of the room.
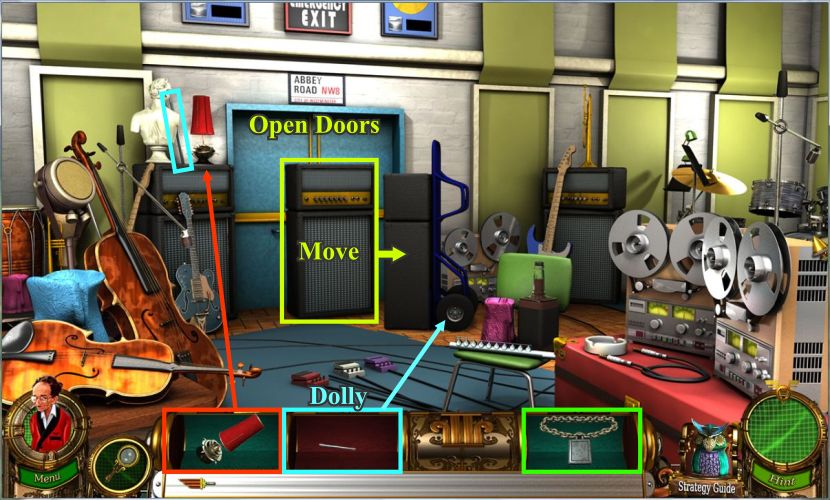
Screenshot
Place the lamp on top of the left speaker and use the dolly to move the speaker in front of the door.
Click on the door to open them.
Screenshot
Place the Delphi piece on the floor and attach the lock and chain to the doors when they close.
Choose your next stop...this walkthrough will use the Dragons of Confucius...and place the appropriate item in Waldorf.
Screenshot
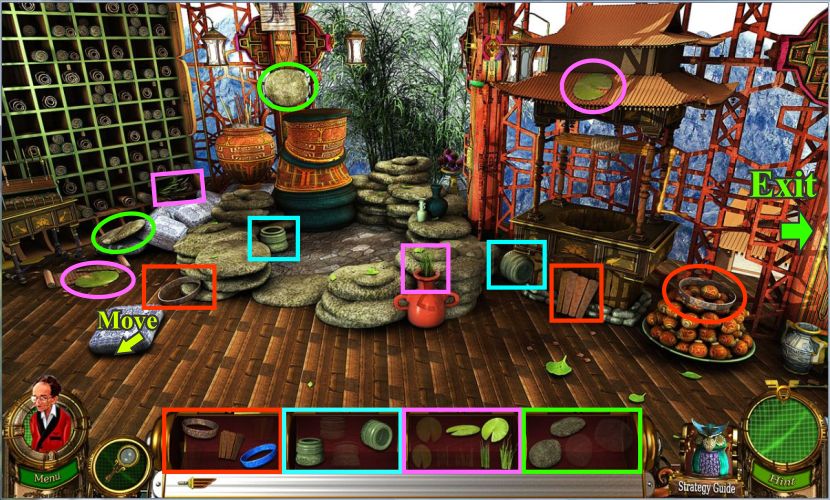
Confucius' Temple:
Move the pillow, collect all the fragments and go right.
Screenshot
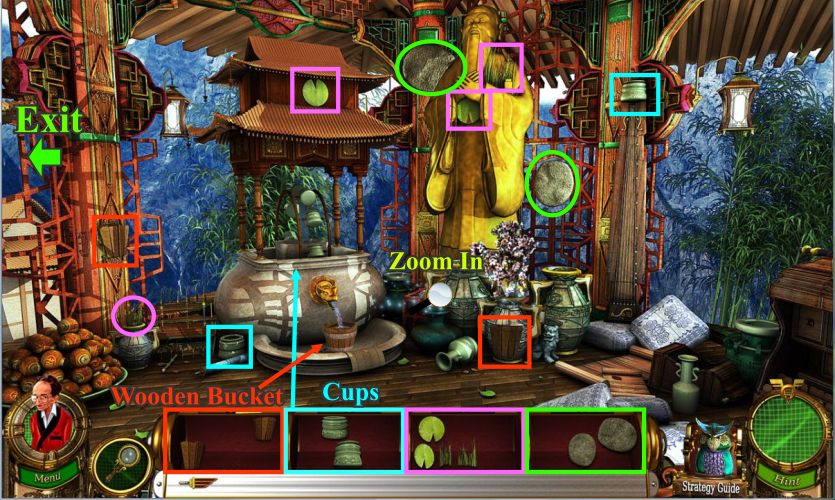
Collect the fragments and zoom in on the sparkles for a hidden object scene.
Install the cups and use the wooden bucket to collect the water and go back to the left side of the room.
Screenshot
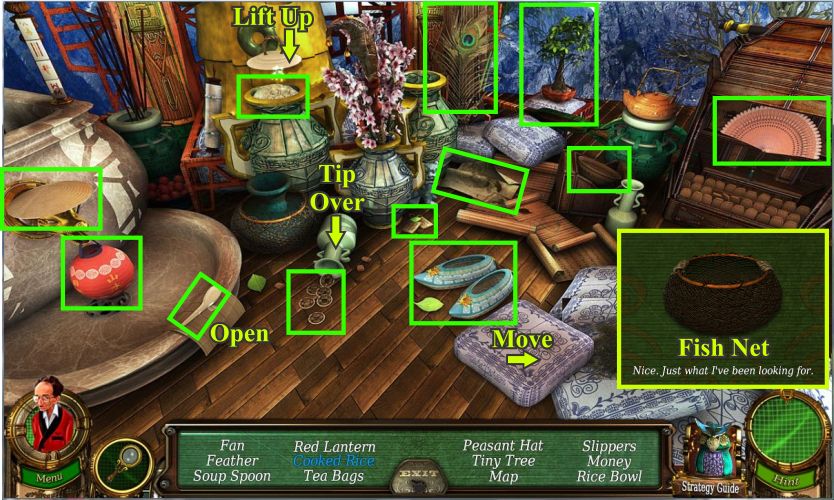
Tip over the vase, move the pillow, open up the mat, and lift up the lid to get the rice.
Collect the rest of the objects on your list including the fish net.
Screenshot
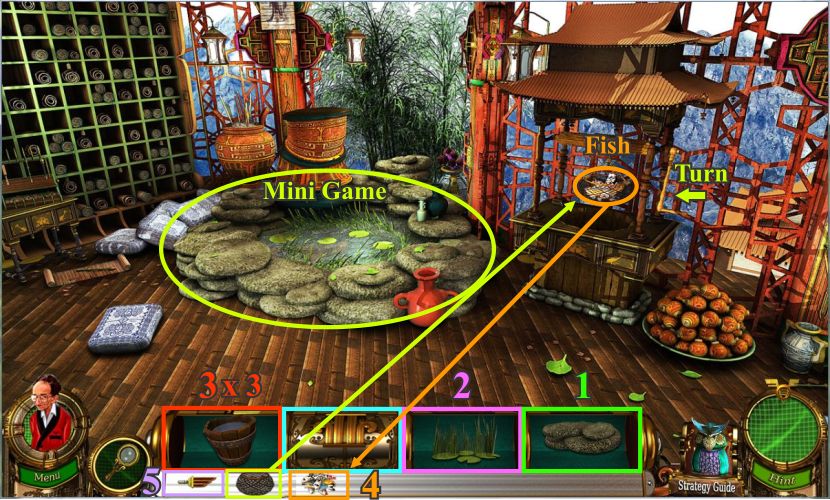
Time to finish the Koi pond so first place the rocks and install the greenery.
Pour in the first bucket of water and go back to fill it up again. After that it will require one more bucket full to complete the pond.
Use your fish net on the well and turn the lever to get the Koi.
Take the Koi for your inventory and place them in the pond.
Click on the completed pond for a mini game.
Screenshot
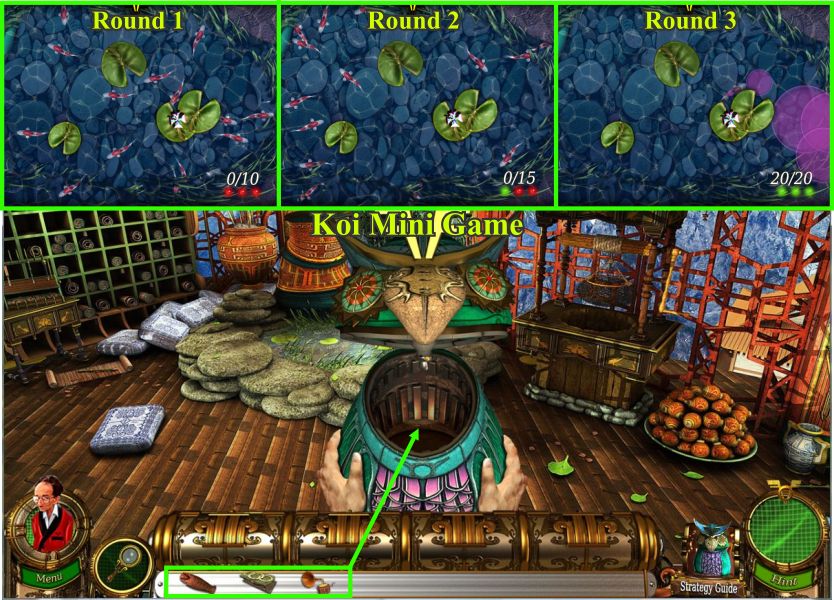
Your goal is to create a ripple capable of hitting a certain number of fish.
Click anywhere on the water to start the ripple which created more ripples when it hits a fish.
There are 3 rounds to the Koi mini game with an increasing number of fish to target.
Since you only get 1 click, pick your spot carefully because if you don't reach your goal, you will have to try again.
When you have completed the mini game, place the Delphi piece in the pond and watch it sink.
Choose your next stop...Einstein's phonograph is going into Waldorf this time.
Screenshot
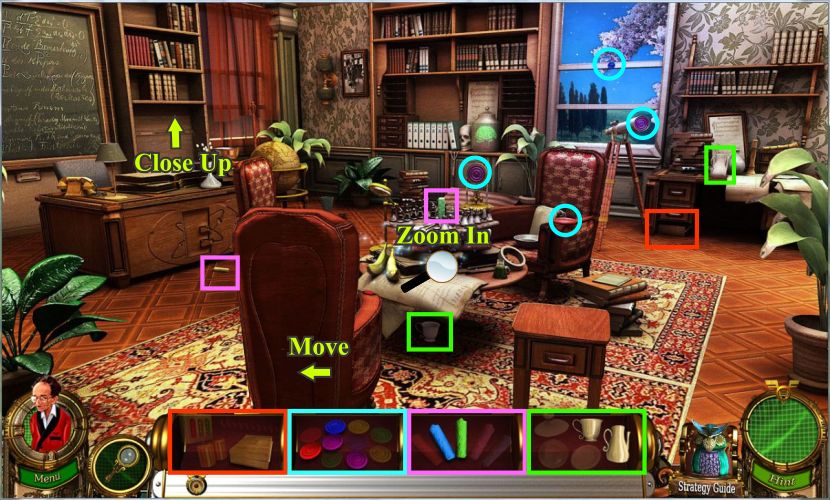
Einstein's Office:
Pick up the candle in front of the desk and move the chair so you can collect the available fragments.
Zoom in on the table for a hidden object scene.
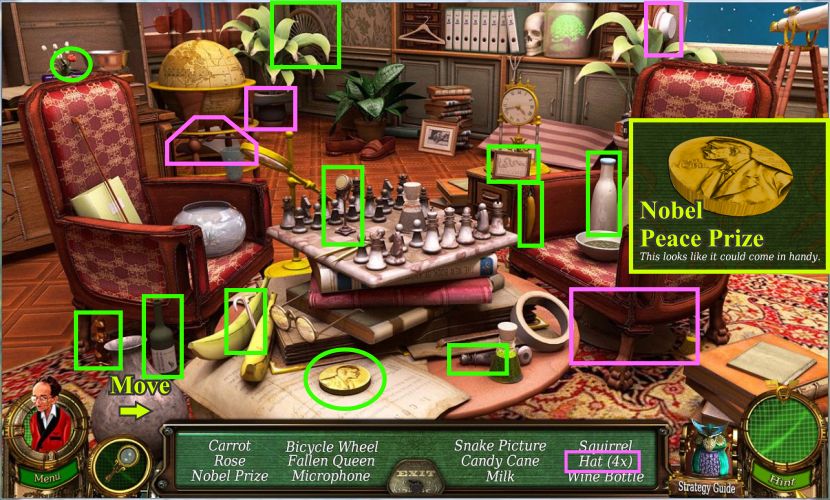
Screenshot
Move the vase and collect all the fragments include the Nobel Peace Prize.
Go to the close up on the left when you are back in the main scene.
Screenshot
Collect the fragments and click on the chalkboard for a recipe puzzle.
Place the chalk in the circle and exit at the bottom of the scene.
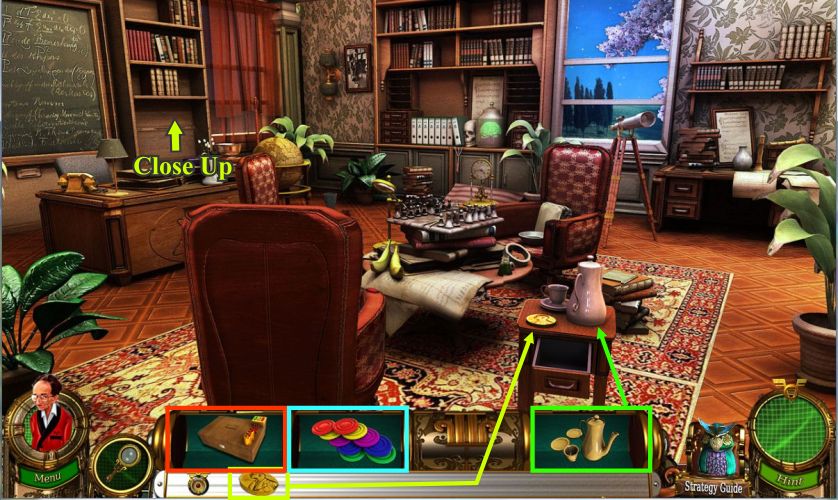
Screenshot
Place the completed tea set and the Nobel Peace Prize on the small table and the drawer will open.
Inside is a book with the diagram Lucenti has been wanting so take it back to the close up.
Screenshot
Click on the chalkboard again and put the diagram in the recipe puzzle circle.
Take the small chalkboard and exit at the bottom of the scene.
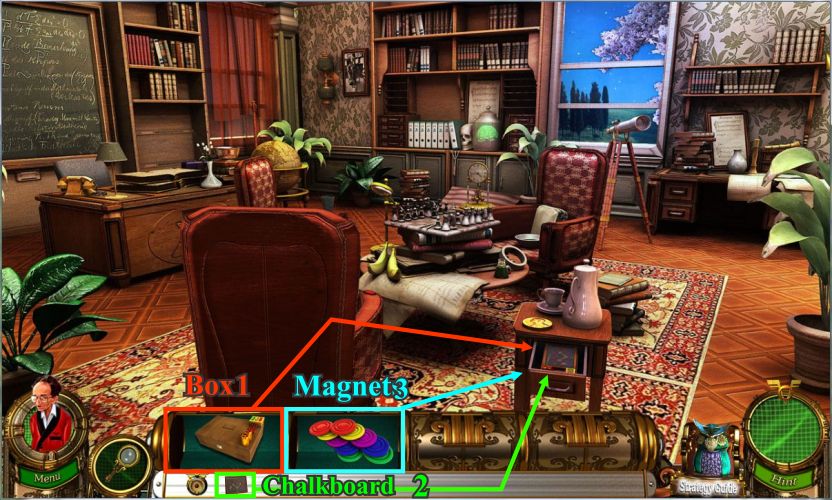
Screenshot
Place the box in the open drawer of the small table, then the chalkboard, and the magnets on top of them.
Click on the magnets for a mini game.
Screenshot
There are 4 rounds of increasing difficulty in the Magnet Mini Game.
It works the same way as the Atom Mini Game in the Basic Adventure.
Try to activate the sets as quickly as possible because you will have to start the round over if they collide with a magnet of a different color.
There is more than one way to go about it but the pieces are numbered in the screen shots for a way that works.
There are 18 magnets to eliminate in Round 1.
Screenshot
There are 20 magnets for Round 2 so follow the numbers.
Screenshot
Round 3 is a little trickier in order to eliminate all 31 magnets.
Follow the numbers for the first 21 magnets.
The red magnets numbered 22 and 23 will not be matched the first time so after you have activated them to come together, click on both of them to deactivate them.
Get rid of 24, 25 and 26 and then you will have a clear shot at the 3 red magnets which are now 27 through 28.
Activate 30 though 33 and you have finished the round.
Screenshot
Round 4 has 35 magnets and works if you follow the numbers.
Screenshot
Place the Delphi piece in the box and you are ready to move on.
Next stop requires the sarcophagus to be placed in Waldorf.
Screenshot
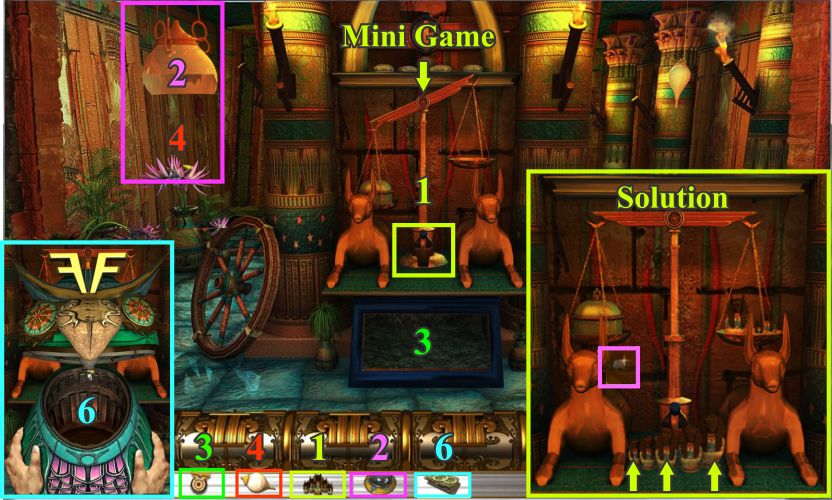
Hatshepsut's Burial Tomb:
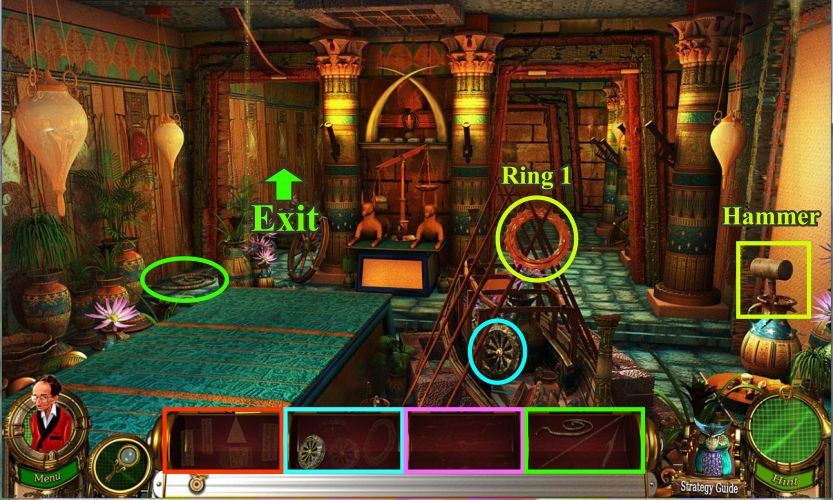
Pick up Ring 1 and the Hammer and collect the other fragments.
Screenshot
Move the container, pick up the sconce and collect the fragments before exiting to the next room.
Screenshot
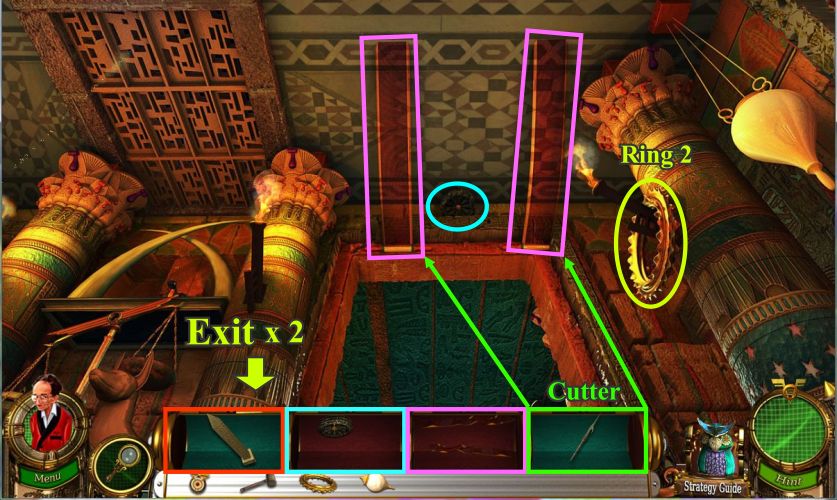
Pick up the ring and the fragment.
Use the cutter to detach the ribbon strips and exit twice at the bottom of the scene.
Screenshot
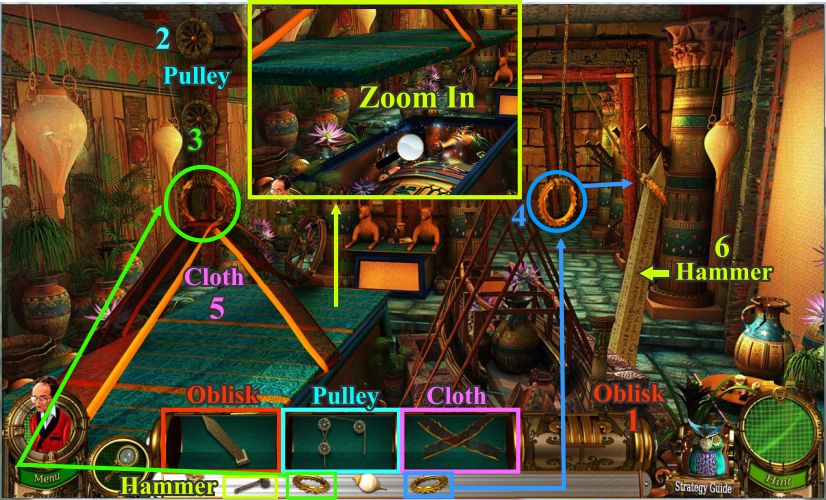
Attach the items for the lift in the order numbered.
When you hang the second ring on the rope, click on it and it will attach to the obelisk.
After everything is in place, us the hammer on the obelisk and the lid will open revealing the sarcophagus as shown in the insert.
Zoom in on the sarcophagus for a hidden object scene.
Screenshot
Pick up the 5 dog weights marked in pink as well as the rest of the items on your list.
Be sure to lift the lids on the bowls at the upper left to see if there is anything for you to collect.
Screenshot
Place the dog weights where shown and click to trigger the mini game.
Your goal is to make the scale balance so choose the smallest, middle and largest dog weight for the right side of the scale.
Pick up the throwing scarab for your inventory and use it on the sconce at the left.
Place the Delphi piece on the area below the dogs which has now opened.
Put the sconce from you inventory on the broken sconce to repair it and close the secret compartment.
Place the last antiquity in Waldorf.
Screenshot
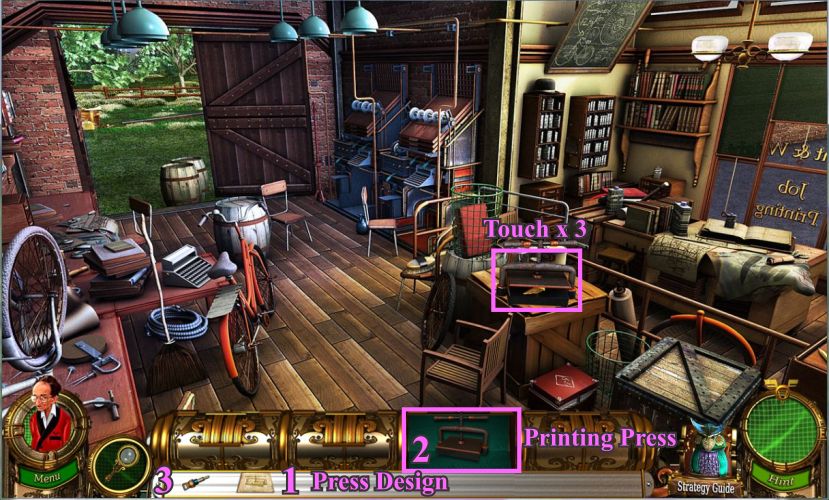
The Wright Brothers' Workshop:
Collect all the available fragments in the workshop.
The printing press parts marked in pink will not be available until after the hidden object scene so zoom in on the area to the right.
Screenshot
Move the two items shown and collect everything on your list including the press design.
Collect the now available printing press parts and exit to the yard.
Screenshot
Move the barrel and collect all the available fragments.
Place the 3 axis, motor, and propellers on the lower wing in the order numbered.
The plane will move and you will be able to pick up the last printing press piece that was under the wing before going back inside.
Screenshot
Place the press design, the printing press and finally the Delphi piece where shown on the table.
Touch the printing press 3 times to stash the Delphi piece.
Screenshot
You have hidden all the Delphi pieces and completed the Bonus Adventure so watch the ending scenes.
Thanks again to Jazz for the bonus supplement!
Posted by: grinnyp |
June 27, 2010 5:54 AM
|
June 27, 2010 5:54 AM