

Escape from the Rest House

![]() So you've decided this year is the year to finally get into some sort of shape, and your first step is cardio. A nice stroll, whether down the block, on the beach, or to a nearby park is the best way to get started. But what happens if you get tired, or winded? Well, if you're the protagonist of many of Tesshi-e's games, you find the nearest structure (house, cottage, concrete hole in the ground) and immediately get trapped inside. In Escape from the Rest House, the latest room escape from Tesshi-e, you have done this once again. You know, there's something to be said for the internal combustion engine. Or public transportation. Or staying off of other people's property. Just saying.
So you've decided this year is the year to finally get into some sort of shape, and your first step is cardio. A nice stroll, whether down the block, on the beach, or to a nearby park is the best way to get started. But what happens if you get tired, or winded? Well, if you're the protagonist of many of Tesshi-e's games, you find the nearest structure (house, cottage, concrete hole in the ground) and immediately get trapped inside. In Escape from the Rest House, the latest room escape from Tesshi-e, you have done this once again. You know, there's something to be said for the internal combustion engine. Or public transportation. Or staying off of other people's property. Just saying.
 So what makes this one so different? Well, dear reader, the difference is noticeable the instant you hit the new game/intro button. Wait, could it be? Is that...English? Well, at least it's Engrish, along with the Japanese text. Finally, you can play a Tesshi-e game and know what the heck is going on from the opening introduction, even if you don't read Japanese. And the story is...well, pretty much what you'd expect, actually. "I was walking along and went into this house..." is basically it. For those of us who can't read Japanese it was always a bit mysterious. For all we know it could have been something like: "I was running from these evil Russian nuclear zombie spies, and I had to duck into the nearest structure to get away before they could catch me carrying the secret blueprints/microfilm/whatever." Oh well, letdown or not, at least we know what is going on!
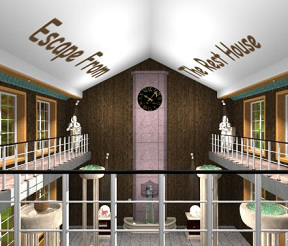
Well, sort of. What is a Rest House, anyway? Is it something in a park or public place where you can sit and rest for a bit? Let's presume so, since the Rest House has a very public feel to it, with its columns, benches, and fountains. A nice idea and one which can be appreciated by anyone who has tromped all over a park or national monument until their feet are bloody stumps. A fabulous place to take a load off. If only you hadn't inadvertently locked yourself in...
Navigation can be a bit tricky at first, as this is a large open space. There are some navigation bars and arrows which appear when hovered over with the cursor, but exploration of the side walls can be confusing at first. However, it is not that large a space, and eventually the navigation will become second nature as you explore the always lovely interior. Look around, open things (if you can), and explore every square inch to find your way out. The game is Tesshi-e's usual blend of use of found objects, some combining, and several fun and tricky puzzles. What makes Rest House stand out amongst the rest is not only the use of English but the lack of color-based puzzles; making life easier for our friends with color-blindness who like solving their way out of a room as much as the rest of us.
Everything you expect from a Tesshi-e game is here: tight design, easy inventory control, a save button that can come in handy when looking for the happy coin escape, occasional pixel hunting, unique combinations and animation, and some very familiar music. The games, though, keep evolving. Play the Tesshi-e games from earliest to latest and you can see the evolution. Ever more intriguing and challenging puzzles, lovely graphical design, and increasing accessibility to those who don't live in Japan or who can't see certain colors.
Granted, the English translation can be a little ...shaky at times. And once in a while you will click on something and get nothing but Japanese, but for the most part Escape from the Rest House is Tesshi-e's most accessible escape to date. Not terribly difficult, but fun, challenging, and finally you know what the heck is going on! Now if only someone would let Tesshi-e know about a changing cursor these Mild Escapes would be perfect! Well, even more fun than they are now, which is saying a lot. So play Escape from the Rest House! Now with 50% more Engrish!


Walkthrough Guide
(Please allow page to fully load for spoiler tags to be functional.)
Escape from the Rest House Hint Through
Art Object Appreciation
This art really needs some electricity, don't you think? Hmm, how could I harness the power of the tulips to give this display some spark?
Yes, the answer must lie, for all time, in the eyes of the binoculars' beholder. Er, uh, yep, that's what I mean.
Now, I've always thought that roses and tulips look great together. Maybe Tesshi-e thinks so, too? What a winning combination! Let's take it up to another level.
Okay, I've Appreciated the Art, What's Next?
Well, what a lovely view from up here! I'll just go right to the window and see what I can find. Let's be truthful, I'm hooked on this escape escapade!
Hmm, what luck! A knight in shining armor, ready and willing to help me unlock another mystery (And come to your emotional rescue? - grinnyp).
What's that in the back? A mini bar? No, it's a different way to arrange flowers - like, say, roses and tulips?
Ahh, now here's an idea that will really take off. I'd better get things hooked up so that I can be propelled forward.
All set. I think the tulips have one more thing to offer me before my flight.
Great Flight! What's Next?
Checking the basket might be a wrenching experience. Don't forget to inspect both sides, or you might miss a key step.
Speaking of steps, let's take things down a level. Like, say, all the way down to the base of a column?
Hmm, what needs unlocking around here? Seems to me there was a gate that needed opening. Maybe it's over my head?
Up, up, and unlocked! Hey, what's this, another knight? Helpful guys, aren't they?
While I'm up here, I might as well check out the view. Er, views. Top o' the columns to you, sir! That's quite a combination. Let's break it on down(stairs).
Downstairs Denouement
Exactly what kind of columns are these, anyway? If they were more orderly, then they would be quite a combination.
Great, now we've got some leverage on the situation.
Still waters may run deep, but that's why we invented rakes (a.k.a., besoms). "Besom, besome mucho . . ."
Yep, a capsule a day keeps (singing) escapers away. But don't go putting me on a pedestal just for that nugget of wisdom. Just get on out there and be happy!
Special thanks to Lavamuffin for this whacky and wonderful hint through.
Posted by: grinnyp |
June 30, 2010 3:42 AM
|
June 30, 2010 3:42 AM
Escape from the Rest House Walkthrough
General Information
Examine everything you pick up! Some things are not what they seem, and may be hiding secrets.
Don't be afraid to combine odd things, you never know what might work.
There is a happy coin escape.
There is a save feature, making finding both endings easier.
Good luck!
Exploration (Main Floor)
When will you learn not to go into strange buildings?
You begin in a large open space, with pillars to the right and left, and a fountain with a clock above it in front of you.
Turn right.
Hey, a spiral staircase! But it's gated, and if you do a close up, you will see a padlock. Back up.
Turn right.
There's the door out, and yes, it's locked. Nothing to do here yet, so turn right.
On the wall to your left is a wheel, looks like a Mercedes symbol or one of those wheels that opens or closes an airtight door. Click on the wheel for a close up.
Well, the wheel turns, and there is (as it helpfully points out) a diamond, spade, and a heart on the turning part of the wheel. We don't know what to do here yet, so back up.
Turn right and you are facing the fountain again. Time to explore the rest of the room!
Click on the nearest pillar on your right to look at the side wall.
Your view has changed and you are now looking at the right wall with windows and benches. Also notice that the two pillars have a different number of columns. The near one consists of two columns, the one further to the left has only one.
Click on the nearest window (the one on the far right) on the bottom sill for a close up.
There's a small blue object on the sill, take it (battery).
Back up.
Now notice between the left two windows is something that looks like a giant card mounted on the wall. Click on the card for a close up.
Yup, that's a giant 7 of spades mounted there. Notice the handle? Click on the handle to open the cabinet.
Cool, binoculars! Also notice the Roman numeral IV and the brackets at the bottom of the cabinet.
Back up twice until you are again looking at the fountain and the clock.
Click on the fountain to go forward.
Now you can see the fountain more closely, notice the low tables to the right and left, each with a crystal globe on them.
Click on the table to the right of the fountain for a close up.
Click on the front door of the table for a close up. Looks like we need a key. Back up.
Click on the crystal globe for a close up. Pretty tulip! Back up.
Click to the right of the table to see the other side.
Okay, we have a puzzle here. It says SINCE and has a four digit code. Nothing to do yet, so back up twice.
Now click on the table to the left of the fountain.
Click on the front of the table. Looks like we need another code here. We have a four digit code that corresponds to four groupings of dots, from 1 to 4. We don't know this code either, so back up.
Click on the globe and look at the pretty rose. Back up.
Click to the right of the table (between the table and the edge of the fountain) to see behind the table.
There's a small gold object on the floor behind the table, take it (knob).
Back up twice.
Click on the fountain for an even closer close up.
Nice, cold, clear water coming out of an armor head. We can see that the water is deep, and there's a hole on the wall to the left of the fountain.
You can try the knob in the hole, but it doesn't work. Back up twice until you have a full view of the room with the fountain at the far end.
Oh yeah, there's a clock above the fountain, I wonder if it has a clue?
But the clock is up pretty high, we can't get close to it for a better view.
We do have a pair of binoculars, though.
Use the binoculars on the clock for a close up.
Wow, what a nice old-fashioned clock face. Hey, did you notice that there's something hanging from the minute hand? Looks like a capsule of some sort.
Notice anything else?
Like the phrase "Since 1896" on the clock face? Where have we seen the word Since before?
That's right, the table to the right of the fountain, on the side.
Back up and click on the fountain to move forward.
Click on the right table for a close up, then click to the right of the table to view the side.
Enter the code learned from the clock face (see spoiler above).
Click on the brown bit below the code. It opens to reveal a button. Should we push it?
You know, it's not wise to randomly push unknown buttons.
Oh heck, if we were that cautious, we would have never gotten locked in here in the first place. Push the button and it turns blue. Wonder what that means? Back up.
Hey, look at the crystal globe! The tulip is gone! Click on the globe for a close up.
Looks like 5157 in block numbers. A clue! Back up twice.
Look, the crystal globe on the left table has changed as well! Click on the left table for a close up, then click on the globe.
This one looks like block letters spelling out SELC. I'm sure that means something.
Back up three times until you are at the long view of the room, facing the fountain.
Click on the closest pillar to your left for a view of the left side wall.
Again the pillars appear to have a different number of columns. The one closest to you has four, the one further away appears to have three.
Is there something at the base of the pillar closest to you? Click on the base for a close up.
Yep, that's something, all right. Looks like we need a wrench. Back up.
There is what appears to be another large card mounted on the wall between the two farthest windows on the left. Click on the card for a close up.
And we have a Jack of Diamonds. But there's no knob to open the cabinet!
Good thing we found that knob behind the crystal globe table, isn't it?
Use the knob on the hole on the left of the cabinet, then click on the cabinet to open it.
Take the revealed object (blue propeller) and note the Roman numeral X on the back of the cabinet.
Back up twice.
Problem Solving (Main Floor) Part 1
You should be in the long view, facing the fountain.
Turn left.
Let's take a look at that wheel on the left wall. Click on the wheel for a close up.
Let's think about this logically.
We saw that the 7 of spades had the Roman Numeral IV in its cabinet.
We also saw that the Jack of diamonds had the Roman Numeral X in that cabinet.
The numbers on the clock were in Roman Numerals.
Click on the ball on the outside of the wheel that would correspond to the 10 o'clock position (or X) on the clock. Keep clicking until the diamond shape is nearly there, and the ball will pop out and expose a key. Just keep clicking until the ball pops up, the number of clicks depends on where the wheel was in the first place. Take the key (club key).
Now click on the ball in the 4 o'clock position and keep clicking as the wheel turns until it pops up and reveals a battery. Take the battery.
Once you've gotten both objects from the wheel, back up and turn right twice until you are facing the spiral staircase.
Click on the spiral staircase for a close up and use the club key on the padlock.
Click on the open lock and the gate will swing open. Let's go upstairs!
Click on the open gate to climb the stairs.
Exploration (Loft Area) Part 1
You are now in a loft type balcony that runs around the outside of the large space.
You should be facing the clock, and can now see the top of the pillars. Notice that three of them appear to be filled with water, and the fourth has...is that a basket?
Turn right.
You should now be facing the right wall, with more windows. You can also see the top of the spiral staircase in this view.
If you hover the cursor over the spiral staircase, you will see a line of arrows appear indicating the direction "down". We don't want to go back down yet, so don't click.
Instead, click on the area between the spiral staircase and the rail around the loft to move forward.
You are now on the right balcony, facing a suit of armor. Hey, is there something hanging from the latch of the window nearest you?
Click on the closest window for a close up.
There is something on the latch! Take the object (S hook) and back up.
Click on the suit of armor to move forward.
Click on the exposed arm of the armor for an extreme close up.
In extreme close up, the hand of the armor looks like crystal! Click on the hand to receive a spade key.
Back up and turn left.
Neat, you can see down to the floor below. The pillar is indeed filled with water, how pretty!
Turn left and you are facing the spiral staircase. Click on the staircase to move forward.
Now that you are close to the staircase, hover the cursor over the staircase.
If you hover over the left of the staircase, you will see down arrows to take you to the ground floor. If you hover to the right of the staircase you will see arrows going to the right, around the staircase. Click on the right arrows to move around the staircase.
You are back where you started, facing the fountain and the clock. Turn left.
You can now see the left side of the loft. Is that a gate blocking the way? Notice the top of the nearest pillar. Yeah, that's a basket with a handle.
Click on the gate for a close up.
Of course it's locked! Of course the spade key doesn't work!
Back up and turn left.
Cool, a mysterious machine against the wall! Click on the machine for a close up.
Hmmm, a four digit code with the clue rose + tulip.
Well, the crystal globes downstairs had pictures of a rose and a tulip on them, before we pushed the mysterious button.
The rose changed to SELC, and the tulip changed to 5157. Wonder what you get when you add them together?
Think visually on this one, as both are blocky, digital letters/numbers.
If you overlay 5157 onto the SELC, you will get the number 5860. There's your code.
Enter the code into the machine and click on the gray button below. Cool, a toy helicopter that is missing a propeller. Don't we just happen to have one?
Put the propeller onto the helicopter.
You know, if we could find a remote, we could fly the helicopter over to the top of the pillar and get the basket.
Well, we've got a key, is there anything downstairs that needs a key to be unlocked? Besides the main door?
Back up and turn right three times until you see the staircase.
Go down the staircase to the main floor.
Problem Solving (Main Floor) Part 2
Click on the fountain to move forward, then click on the right table for a close up.
Click on the front of the table and yes, that's where we need a key.
Use the spade key on the table to open the door.
And we have a remote!
Click on the front of the remote, below the controls, to open the battery compartment.
Place your two batteries into the remote. Yeah, yeah, I know it said that they are "dry".
Close down the remote, let's go upstairs and fly a helicopter!
Back up three times, turn right, and go up the staircase.
Exploration (Loft Area) Part 2
Once you are upstairs turn left twice and click on the machine that has the helicopter.
You know, you could use this to snag the basket, but it needs a hook or something.
Fortunately, you should have that S hook that you found on the window latch.
Attach the S hook to the helicopter tail.
Use the remote on the helicopter, and enjoy the show.
The helicopter will fly over and pick up the basket. Once it is hovering in front of you, click on the basket to look inside.
Yay, a wrench! We needed that.! Take the wrench.
While the wrench is in close up, let's look at it a little more closely.
Click on the wrench to turn it over. Hey, is that a secret compartment?
Click on the gray rectangular area of the wrench to reveal a circle key! Take the key.
Turn right until you are facing the locked gate blocking the left side of the loft.
Click on the gate for a close up and use the circle key to unlock it.
Go forward through the gate once. Okay, another suit of armor awaits at the end of the loft.
Before you go there, though, turn right and look at the top of the pillar. This one doesn't have water in it like the other three.
Instead, it has the number 3 written in it. A clue!
Turn left and click on the suit of armor to go closer.
Nice weapon he's carrying there. Is that a rake?
Take the rake and turn right twice.
Go forward once and hover your cursor in front of you. Notice the arrows curving to the left? Click on them.
You are now back at the main loft view, facing the fountain and clock. Turn right and go down the spiral staircase.
Solving the Left (Rose) Table Code
Let's think about the clue on the left (rose) table.
It's a four digit code, and each digit had a dot above it, from 1 to 4 dots.
Is there anything else in this room that corresponds to that?
The pillars, perhaps?
You may have noticed that each pillar has either 1, 2, 3, or 4 columns.
We know at least one has a number visible on the top, the other three are filled with water.
If only there was some way to drain the water from the other pillars!
Where have we not explored yet?
There's always that mysterious panel in the nearer left pillar, the one with 4 columns.
And we did find a wrench.
Click on the base of the 4 column pillar (near left).
Click on the base again for an extreme close up.
Use the wrench on the bolts then click on the panel to remove it.
Look, a lever! Let's click on it and see what happens.
Well, it turned. Let's go upstairs to see if it worked.
Back up twice, turn right, and go up the spiral staircase.
Once upstairs, turn left, click on the gate, click on it again to open it, and go through.
Turn right and look at the top of the pillar.
This is the top of the 4 column pillar, and the number is 3. We already knew that.
Turn left, click on the armor to move forward, then turn right.
This is the top of the 3 column pillar, and the number now visible is 5. Yes, it worked!
Turn right, go forward, and use the arrows to go back to the main view.
Turn right and click between the staircase and the rail to move forward.
Turn left and you will see that the top of the 2 column pillar now has the number 6.
Turn right, go forward, and turn left to see the top of the 1 column pillar, which has the number 7.
Time to get that left table open!
Turn left, go forward, and go down the staircase.
Click on the fountain to go forward, then click on the left table for a close up.
Click on the front of the left table to see the code.
Using the numbers from the pillars, the code is 7653, from the 1, 2, 3, and 4 columned pillars in that order.
Enter the code and click on the gold knob beneath the code.
Take the revealed object (a lever).
What do we need a lever for? We need a key!
Back up twice.
Regular Escape
Okay, what's left?
There's that strange capsule hanging from the minute hand of the clock.
We have a lever, where can it go?
Remember the hole to the left of the fountain?
Click on the fountain for a close up.
Use the lever on the hole, then click on the lever.
Well, that made the clock hands move! Now the capsule is in the deep water of the fountain.
Good thing that suit of armor was using a rake as a weapon, as opposed to, say, a sword.
Use the rake on the capsule to get it out of the water.
Click on the near end of the capsule to open it. Take the heart key!
Back up three times, turn right twice, and use the heart key on the door.
Congratulations on your escape! Enjoy a nice relaxing walk in the woods.
Happy Coin Escape
Follow the directions for the Regular Escape until you get the heart key out of the capsule.
Back up three times until you are in the main view, facing the fountain.
There's still something unaccounted for, isn't there?
Click on the near right column for a view of the wall with the windows.
Click on the 7 of spades on the wall for a close up, then click on it again to open the cabinet door.
Yep, see the brackets at the bottom of the cabinet?
Click on the brackets for a close up.
You have something in your inventory that would just fit in those brackets.
Place the now empty capsule in the brackets and back up once.
The back of the cabinet has slid down, revealing the happy coin!
Take the happy coin and back up twice.
Turn right twice, use the heart key on the door, and escape.
Enjoy the pretty flowers and the tasty ice cream cone!
Happy Coin will bring happiness to you!!
Posted by: grinnyp |
June 30, 2010 3:45 AM
|
June 30, 2010 3:45 AM