


Sherlock Holmes: The Awakened - Walkthrough
~~~~~~~~~~~~~~~~~~~~~~~~~~~~General Tips
- The game does not automatically save. Make sure, that you always do a save (press Esc-key on your keyboard to come to menu) before you shut down the game.
- Your inventory with all documents, dialogs maps and all items you can see with right mouse click.
- The item inventory you can also activate with your mouse wheel. You will see the items in the right upper corner.
- To use an inventory item it needs to activated, then simply click, where you want to use it. If you want to use an item on Sherlock Holmes you do not need to click. As long as the object is activated, he will automatically use it.
- To can choose between playing in 1-person-view and 3-person-view.
- You can activate the preferred view in your inventory by clicking right mouse button.
- There are scenes, you might not be able to walk, see or take an object in 3-person-view, so you will have to change.
- You cannot die in this game. Even though, there are a view scenes you can do wrong, you will always start at the point, where you made the mistake.
- In each location you will get a map, which will mark important locations as soon as you find your way time yourself (or have been automatically brought there the first time). As soon as you have a yellow button on your map, you will be able to reach this point by simply clicking on it.
- Double click your left mouse button will make Sherlock (or Watson) run.
- Dialogs and cut scenes can be skipped by clicking the space bar on your keyboard.
London[top]
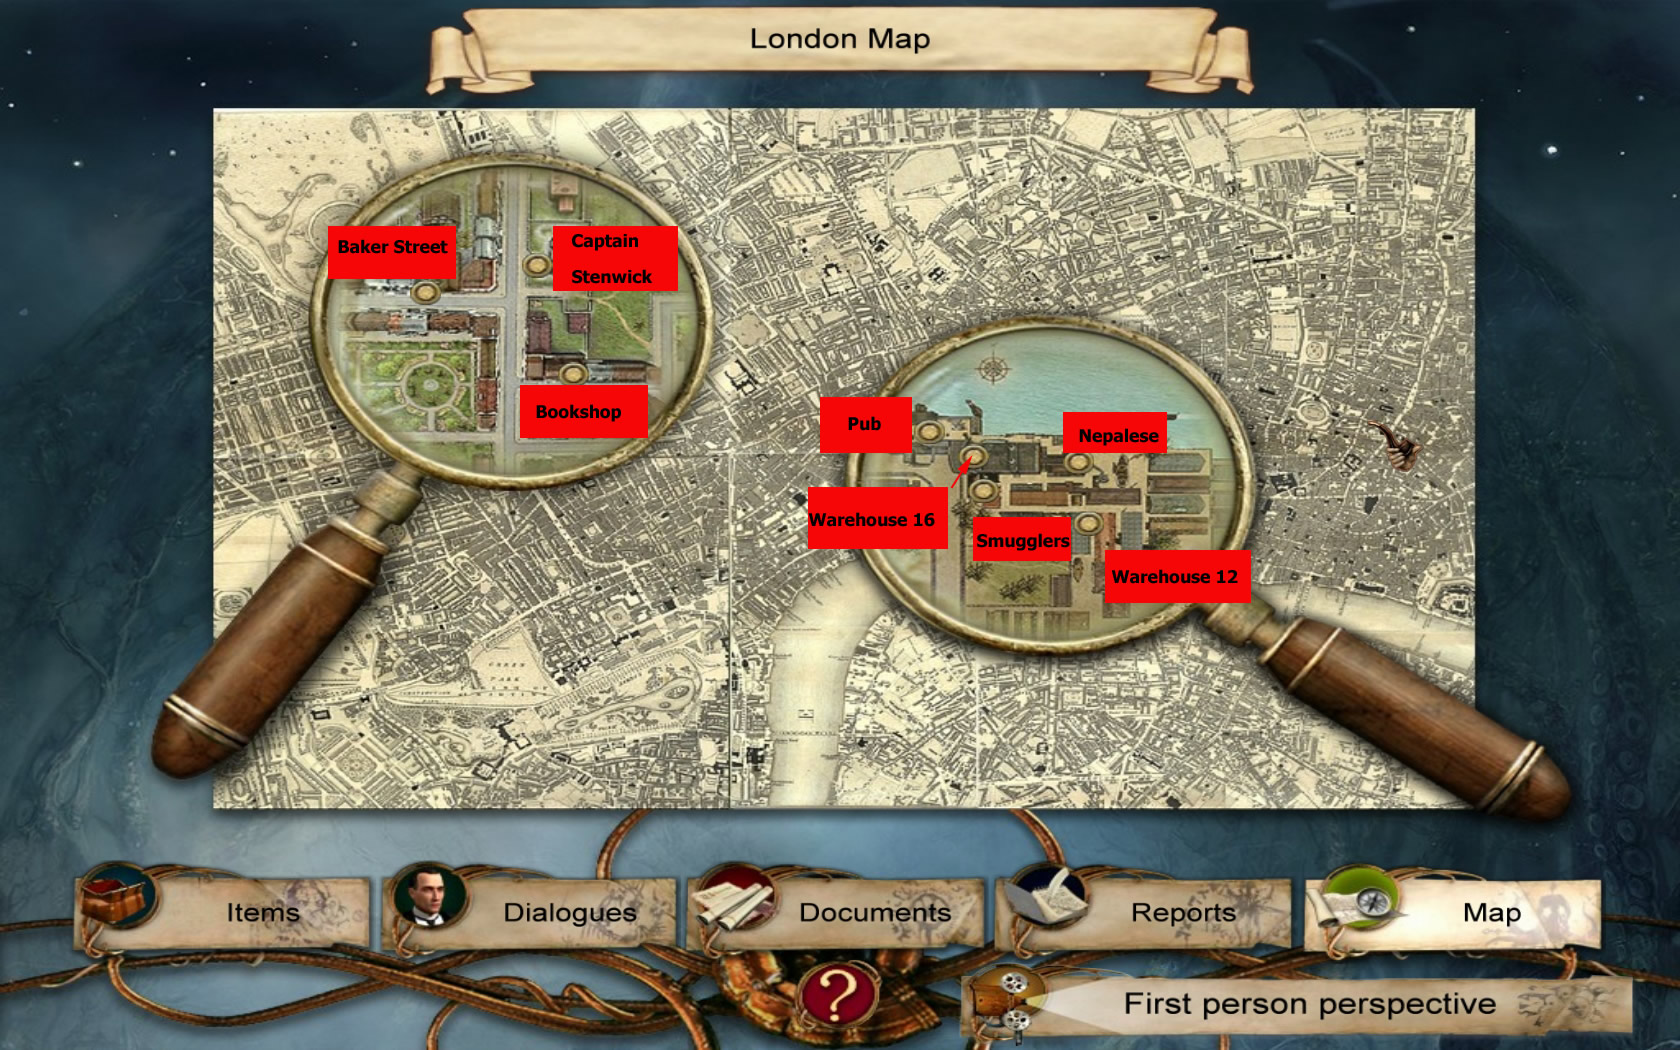
Baker Street 221B/Book Shop
- Turn to the right and pick up the matches from the desk

- Turn around, use the door right next to the closet and go downstairs.
- Leave the house and go over the street to talk to the newspaper boy.
- Buy a newspapers and after you will sent the boy to get more information about the Scandinavian princess.
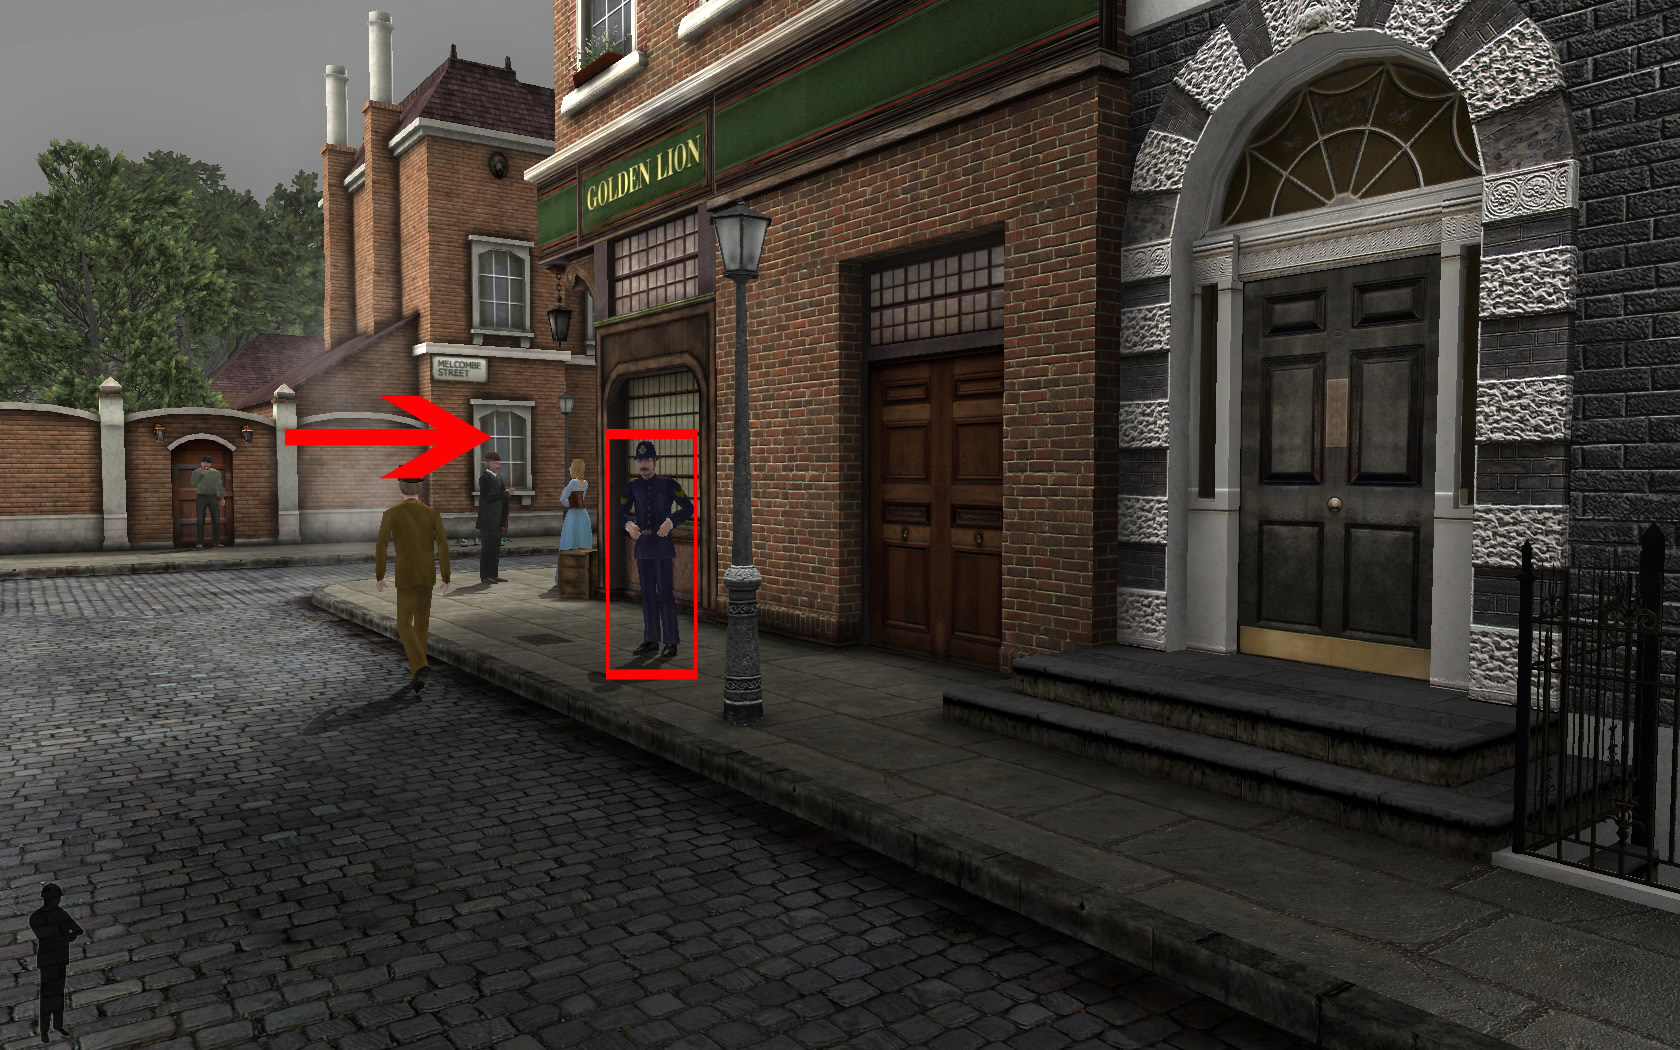
- Turn to the right - at the end of the street you see a policemen; you can ask him about the way to bookshop if you want.
- How ever, at the end of the street you have to go right (Melcombe Street) and then the first left.
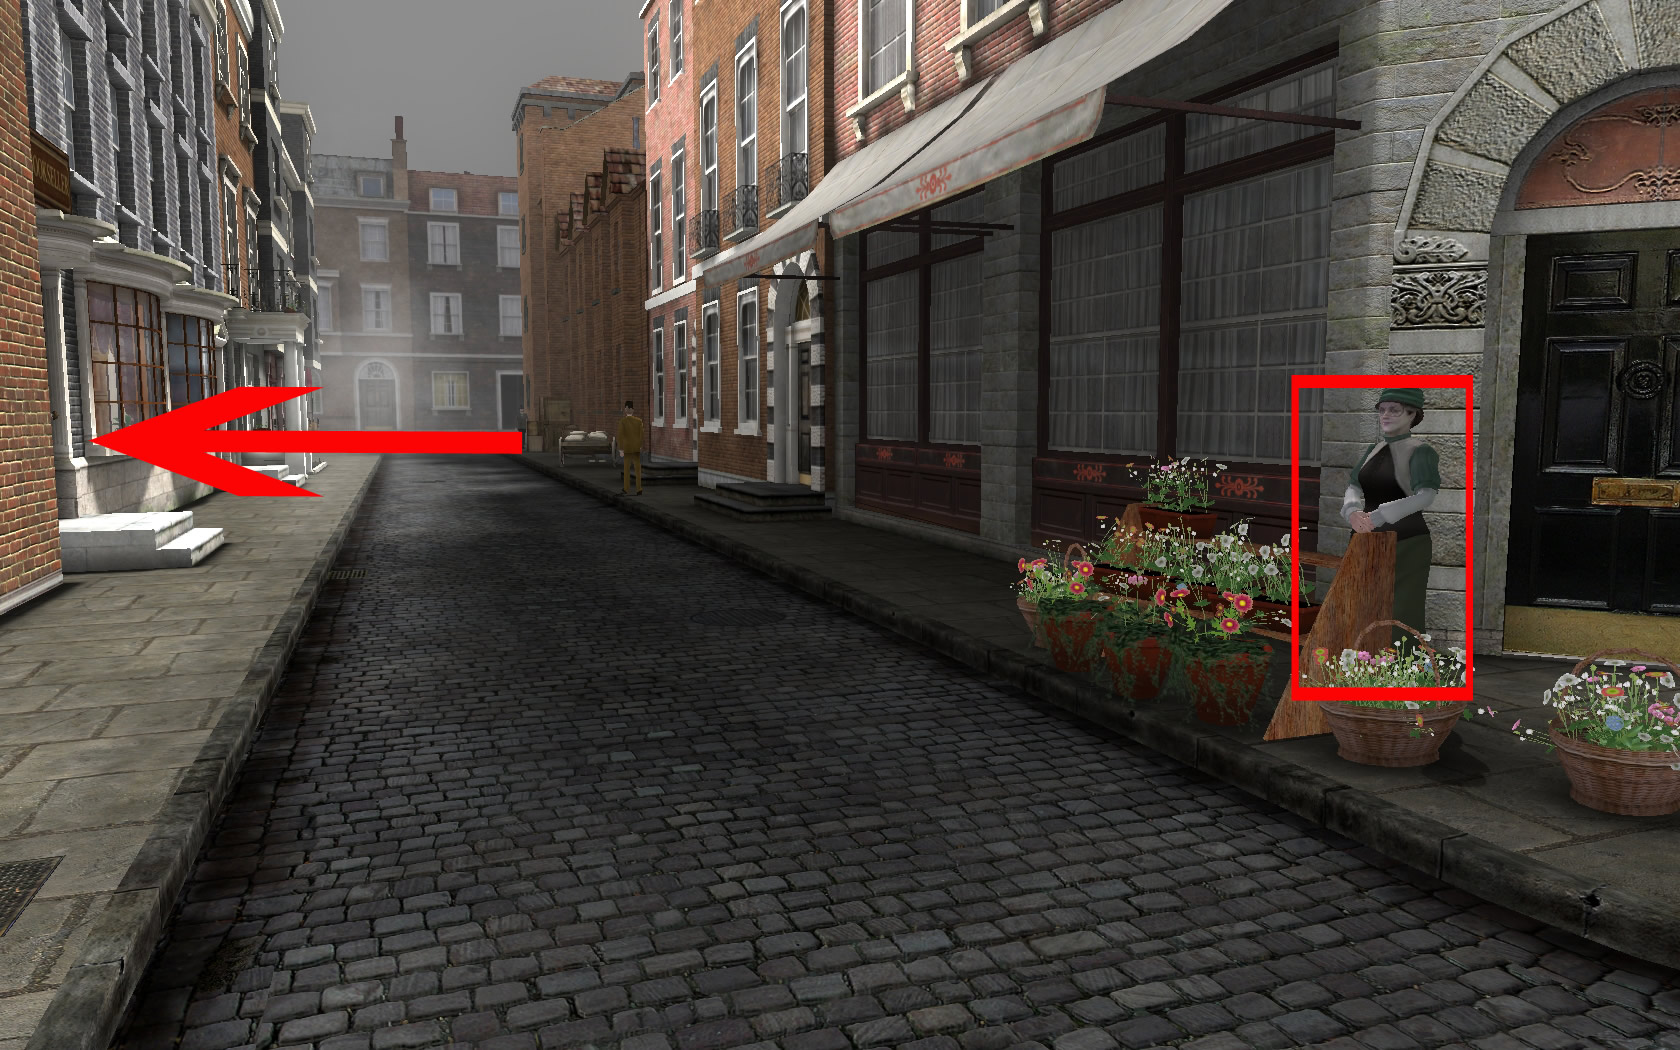
- At the corner you will greet Ms. Flemming, the flower woman.
- Enter the bookshop
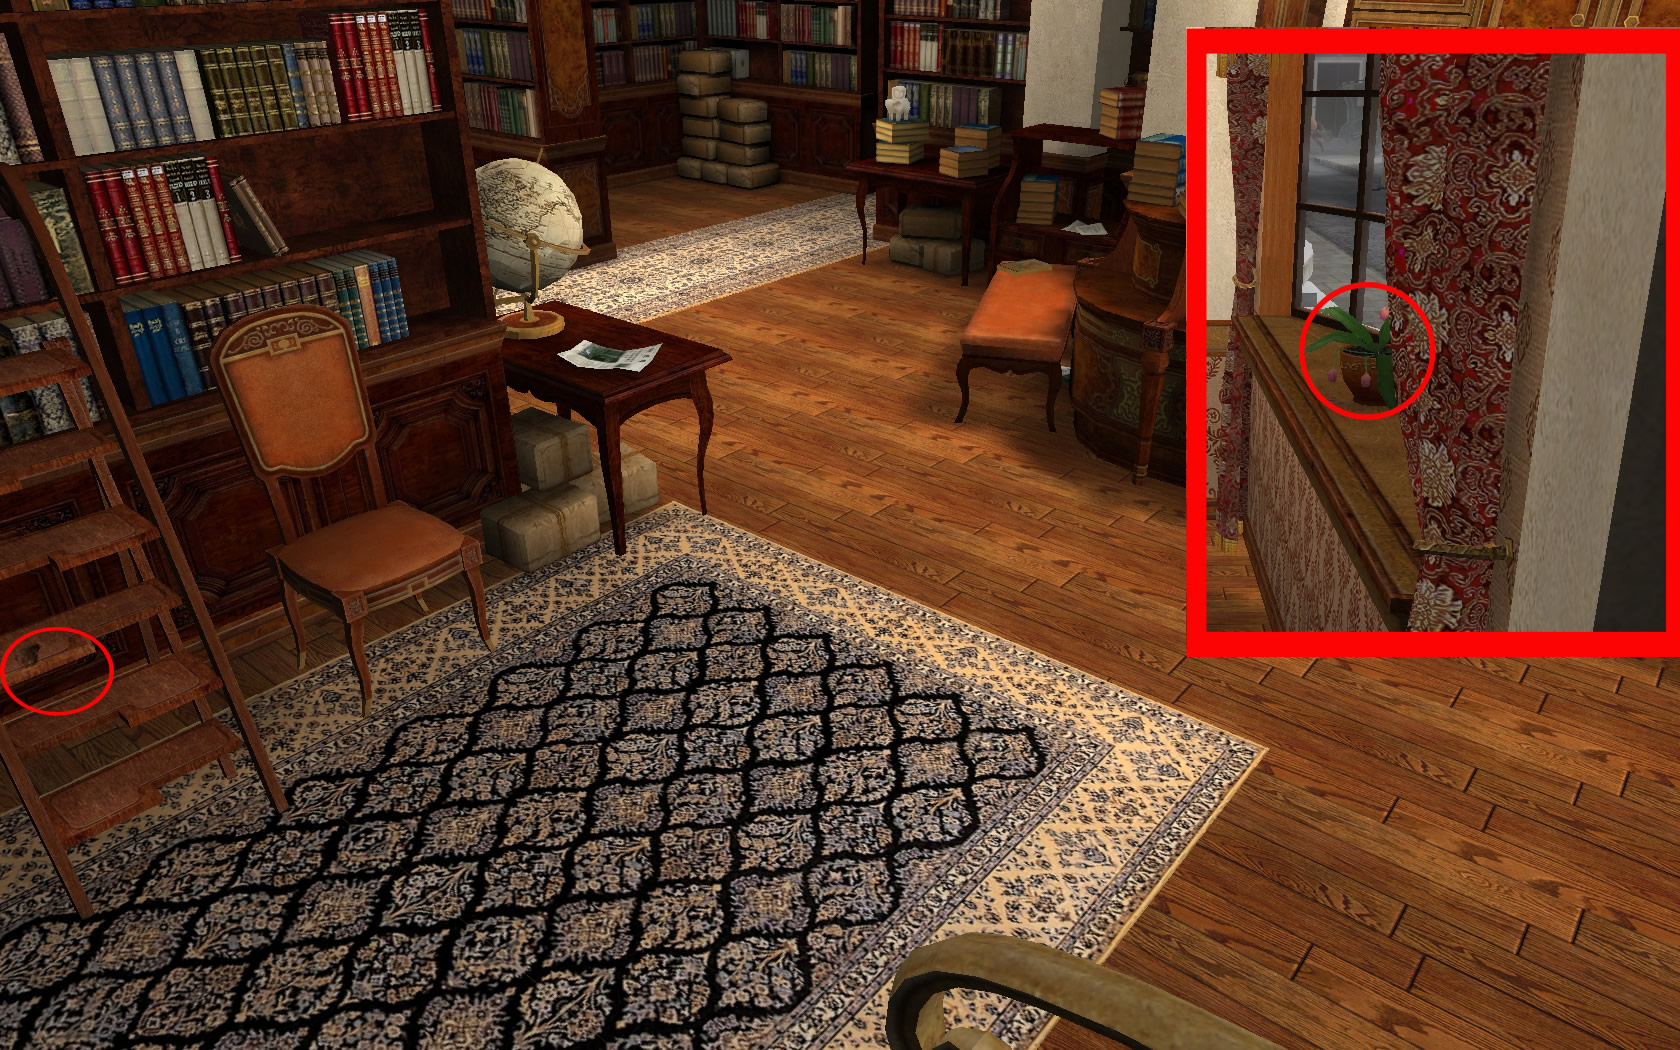
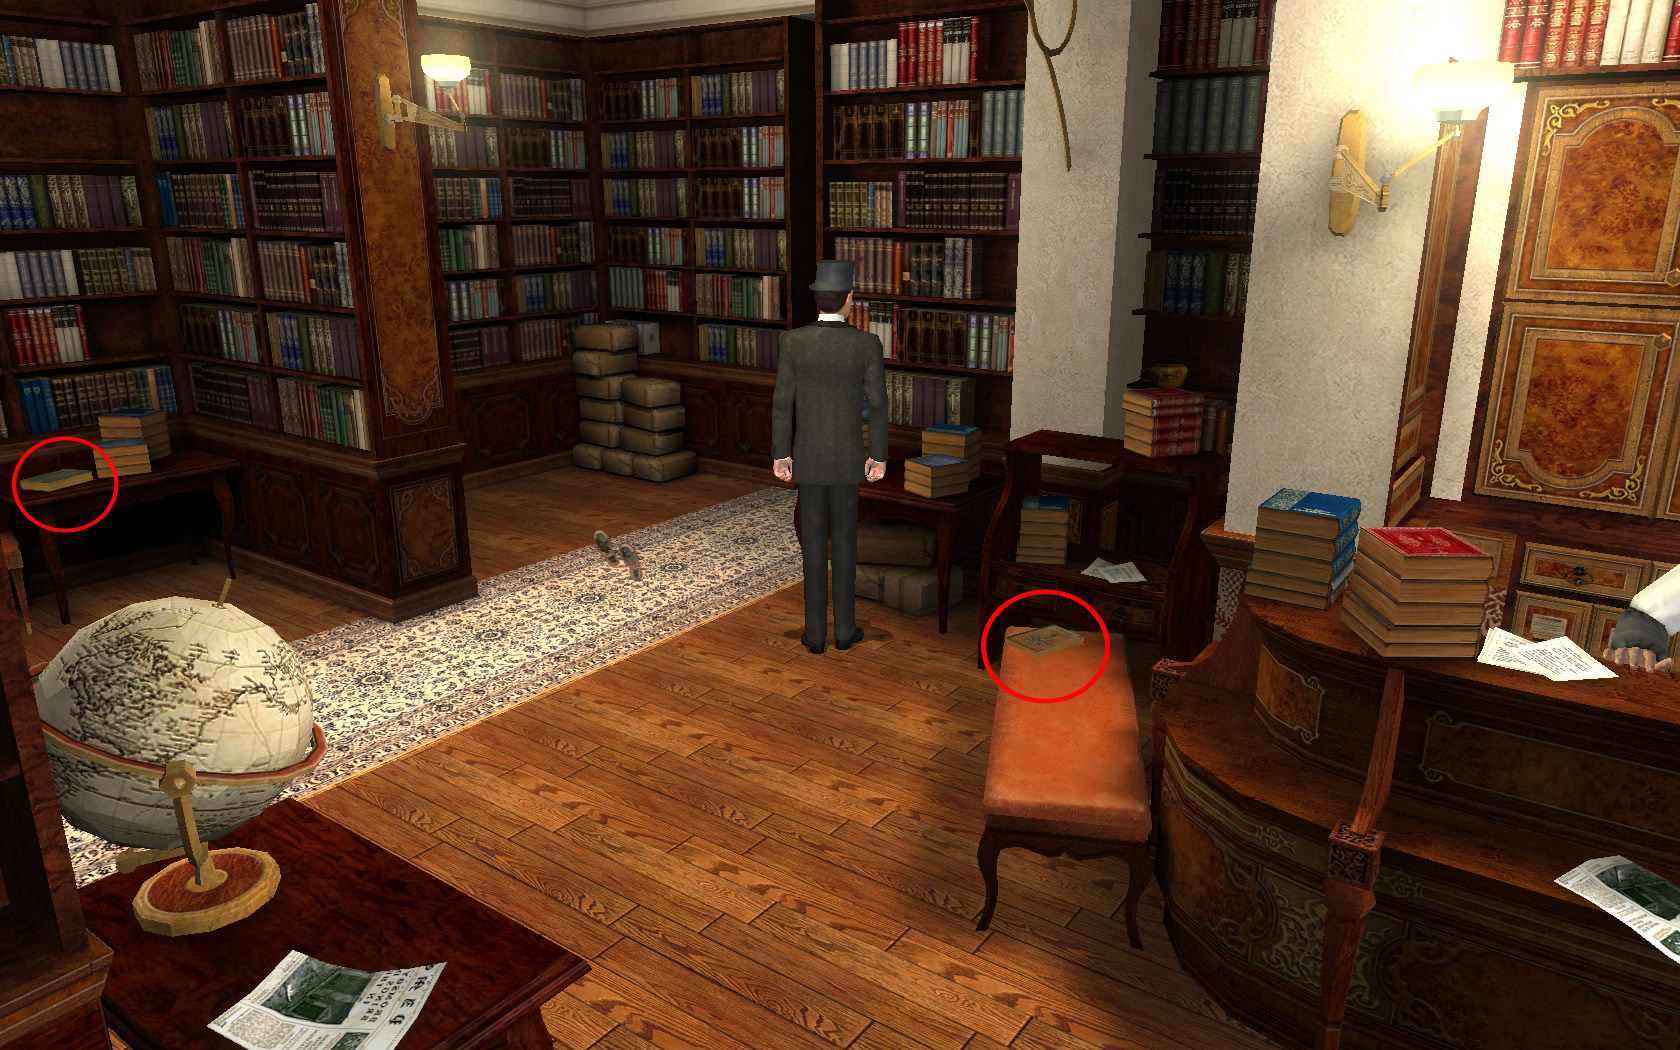
- Straight ahead, you see a step ladder. Have a closer look at the third step from bottom and examine the black spot.
- Turn to the right and have a closer look at the flowerpot on the windowsill.
- Now talk with Mr. Barnes, the shop owner.
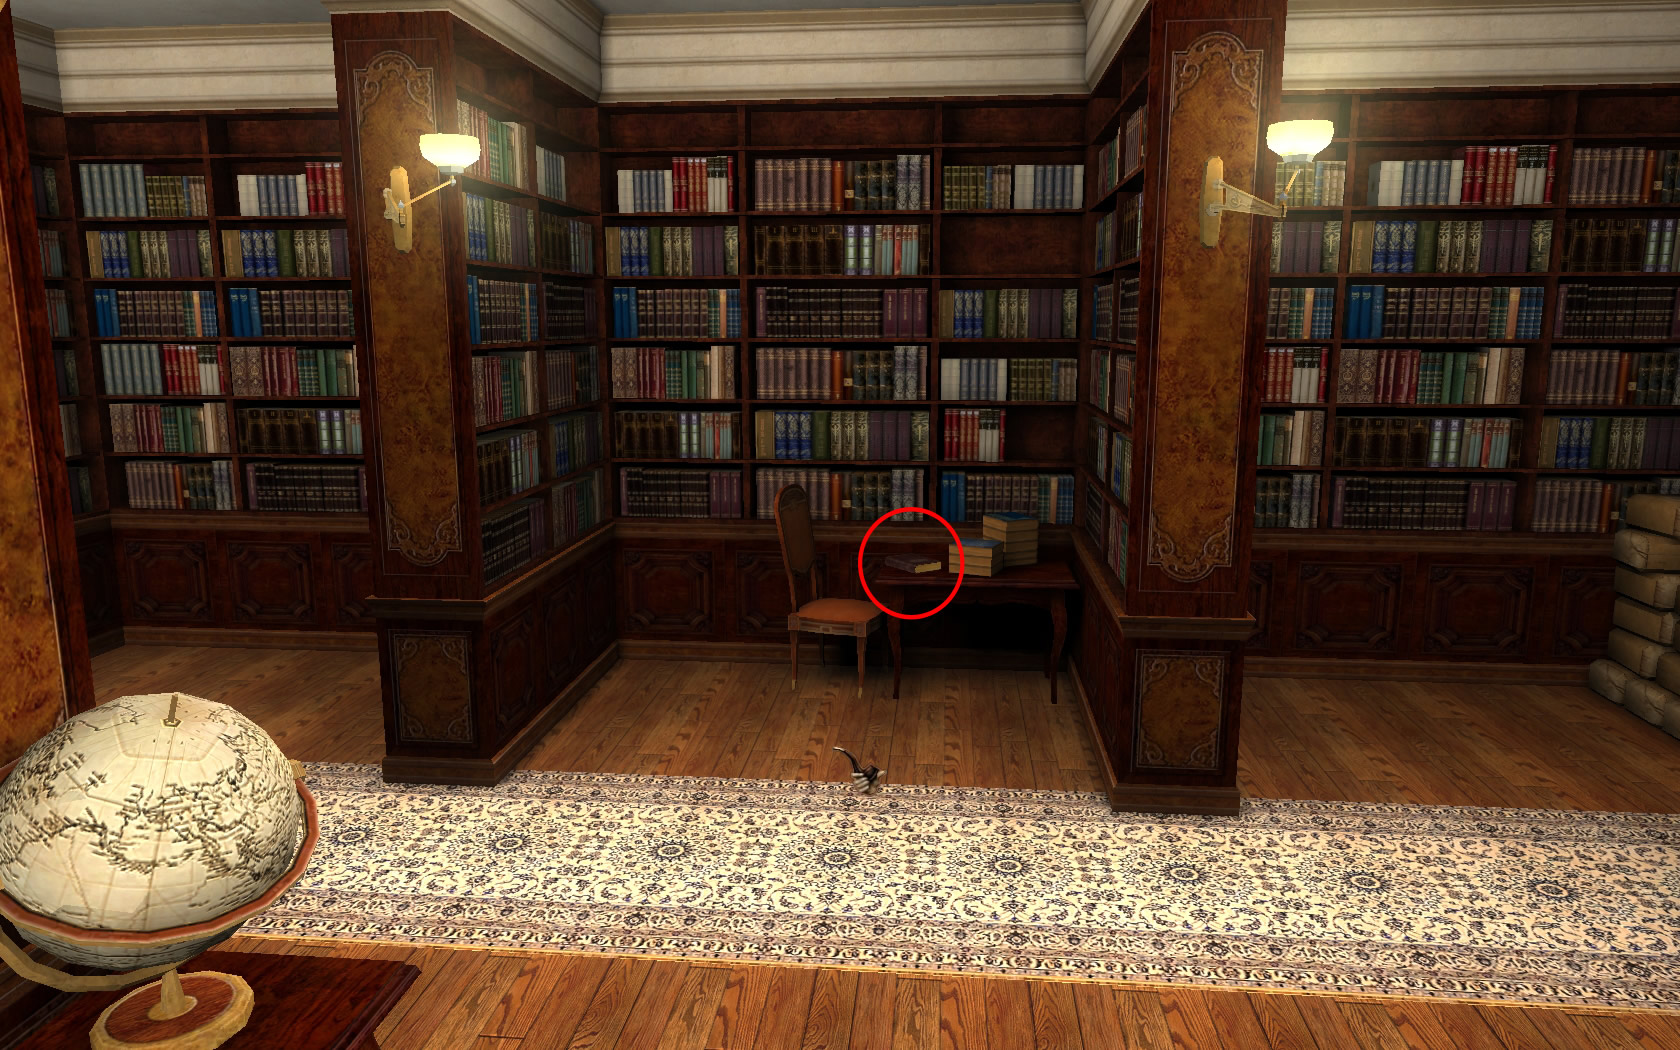
- Look for the book, Dr. Watson already and now Mr. Barnes as well mentioned.
- One you will find on the small bench left next to the desk, Mr. Barnes stands at.
- The second one you will find in the middle alcove at the right.
- Go back to the desk and you will talk automatically with Mr. Barnes.
- Leave the shop, turn to the right and at the corner right again.
- Go straight ahead.
- When you are at the corner to Baker Street, Dr. Watson will ask you to come over.
- Go a little bit further ahead. Dr. Watson is standing in front of the house of Captain Stenwick. Talk to Dr. Watson and enter the garden after.
House Captain Stenwick
- Talk first to Captain Stenwick and listen carefully to what he says.
- Now talk to Sergeant Rufles.
- After this conversation you will ask Watson to look for evidence right here, while you have to follow other traces.
- Go left to reach the back of the house.

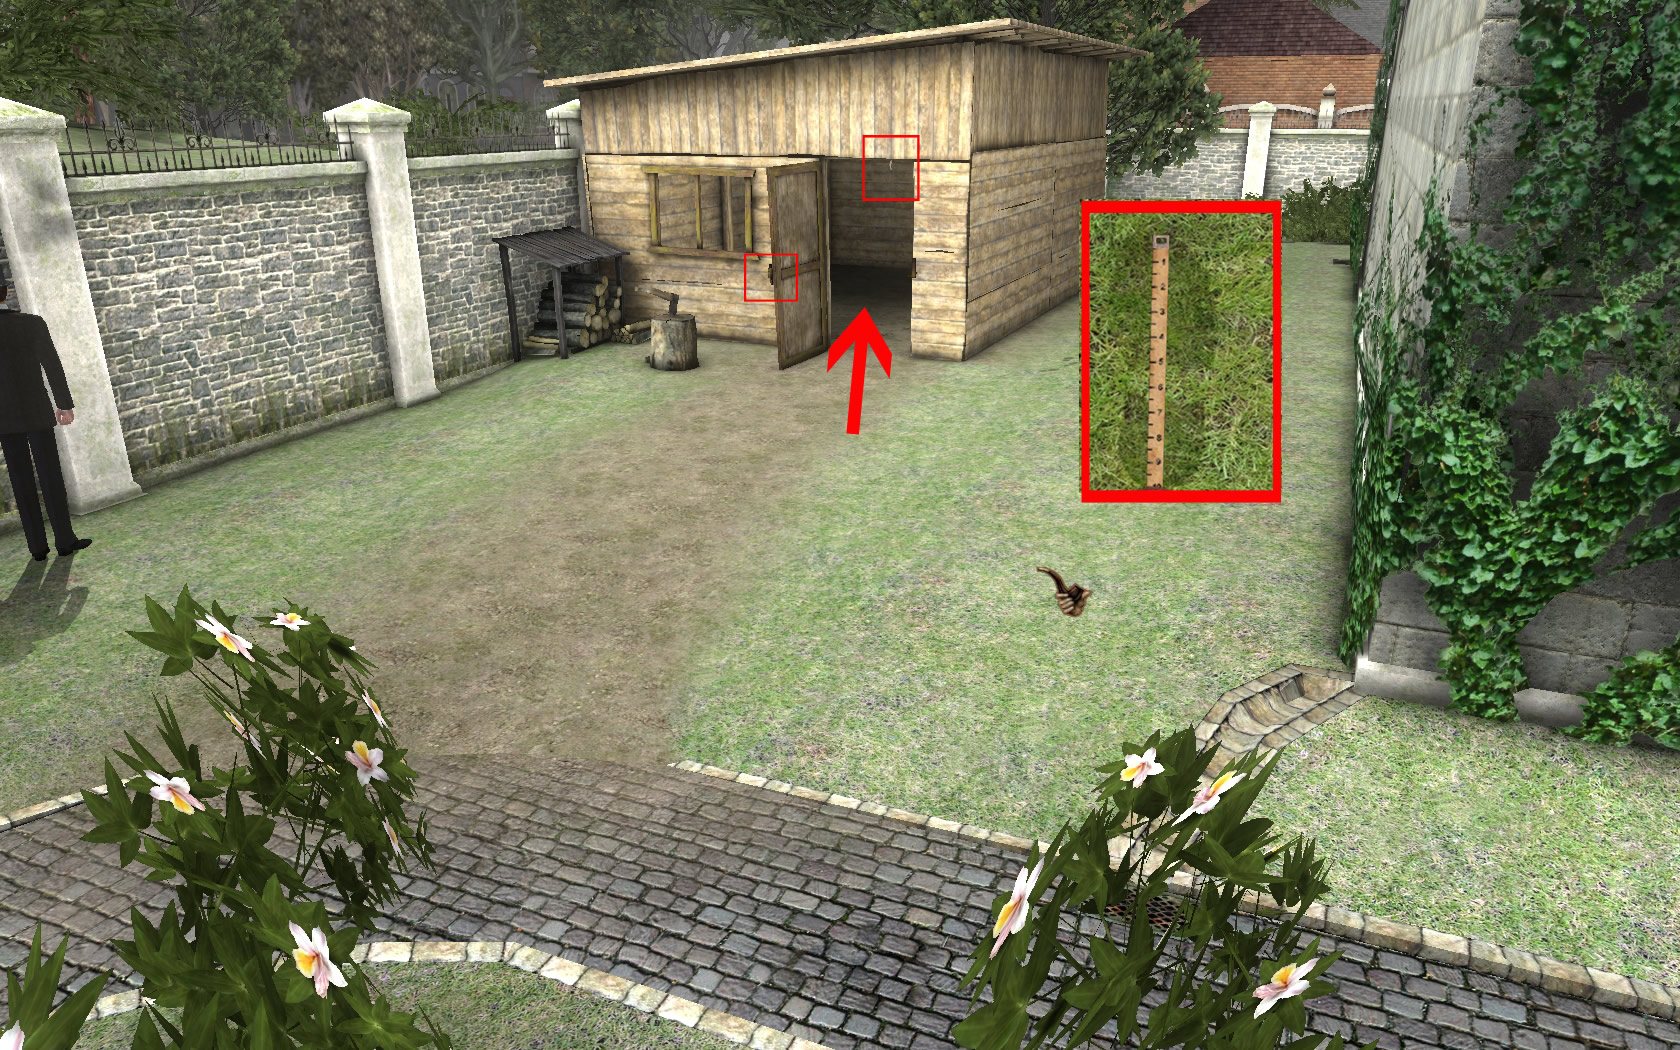
- After walking around the house, you see a wooden shed.
- Take a look at the lock and grab the piece of cloth from the upper frame.
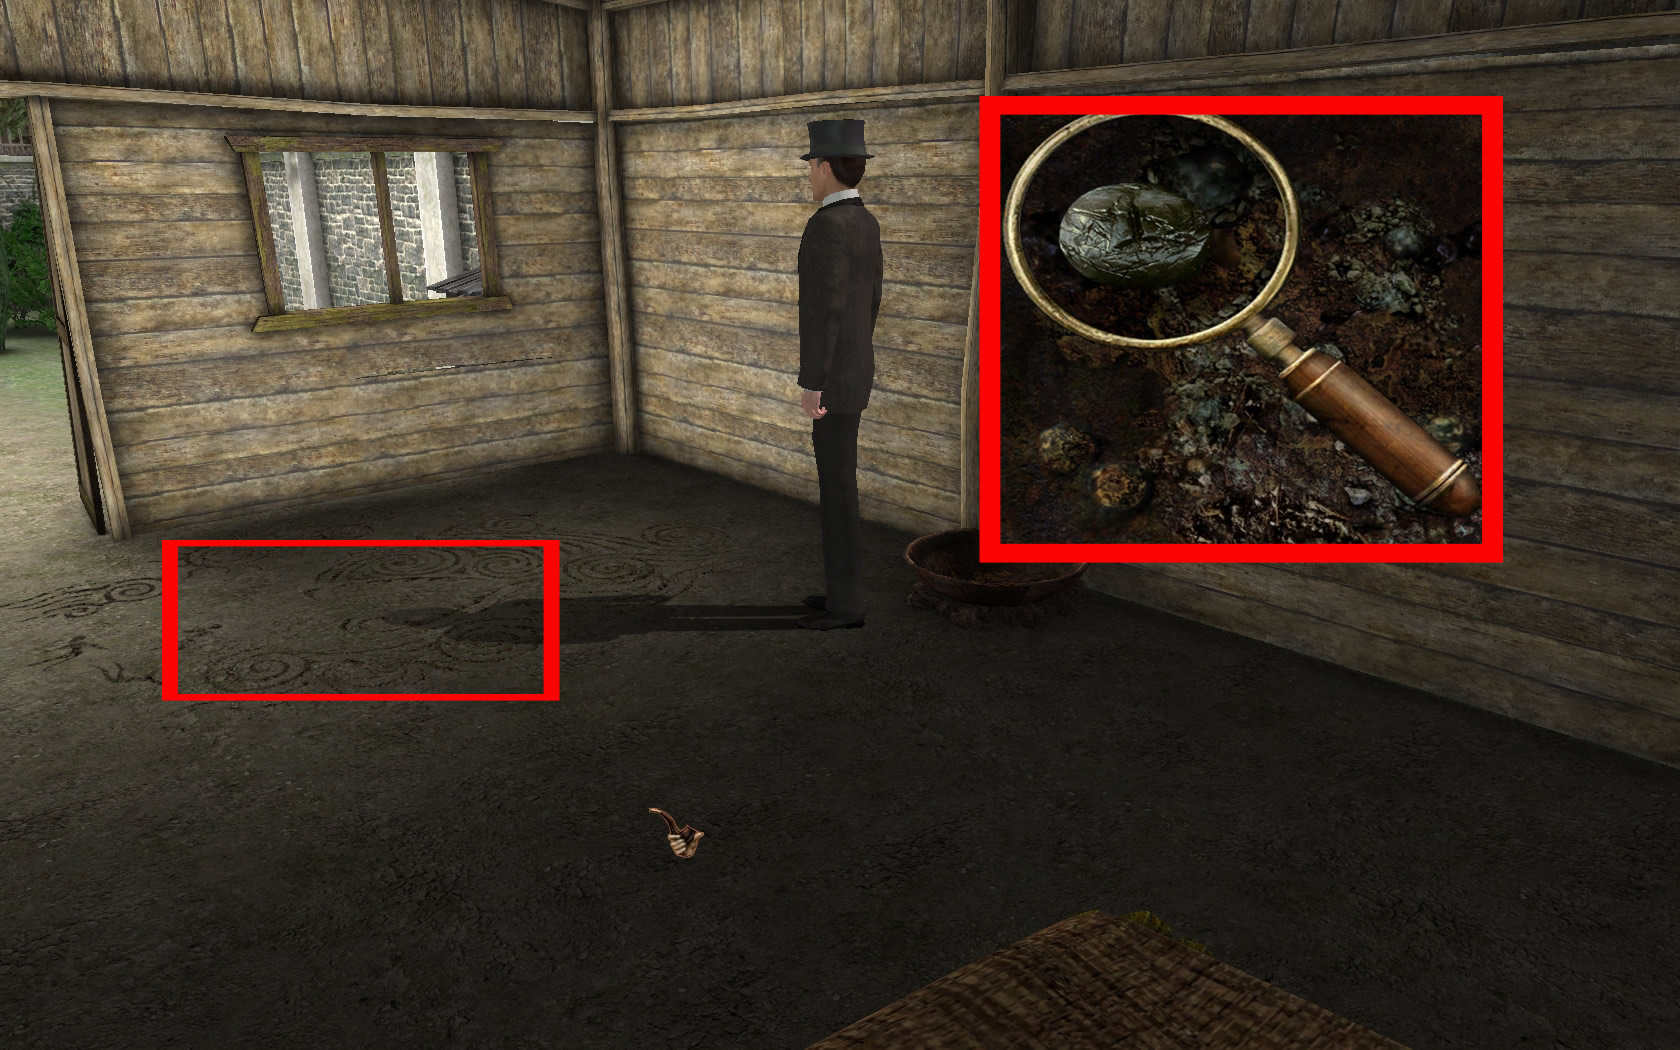
- Go inside and see the strange drawing on the floor.
- Have a closer look at the bowl left side.
- Use the magnifier to see the small lump (silver ball)
- Leave the shed and have a look at foot prints on the ground right next to the shed.
- Use the measuring tape to find out the size
- To do so you click the measuring tape at the top of the print. Hold the left mouse button pressed and drag the measuring tape to the bottom of the print, till Sherlock tells you about the size.
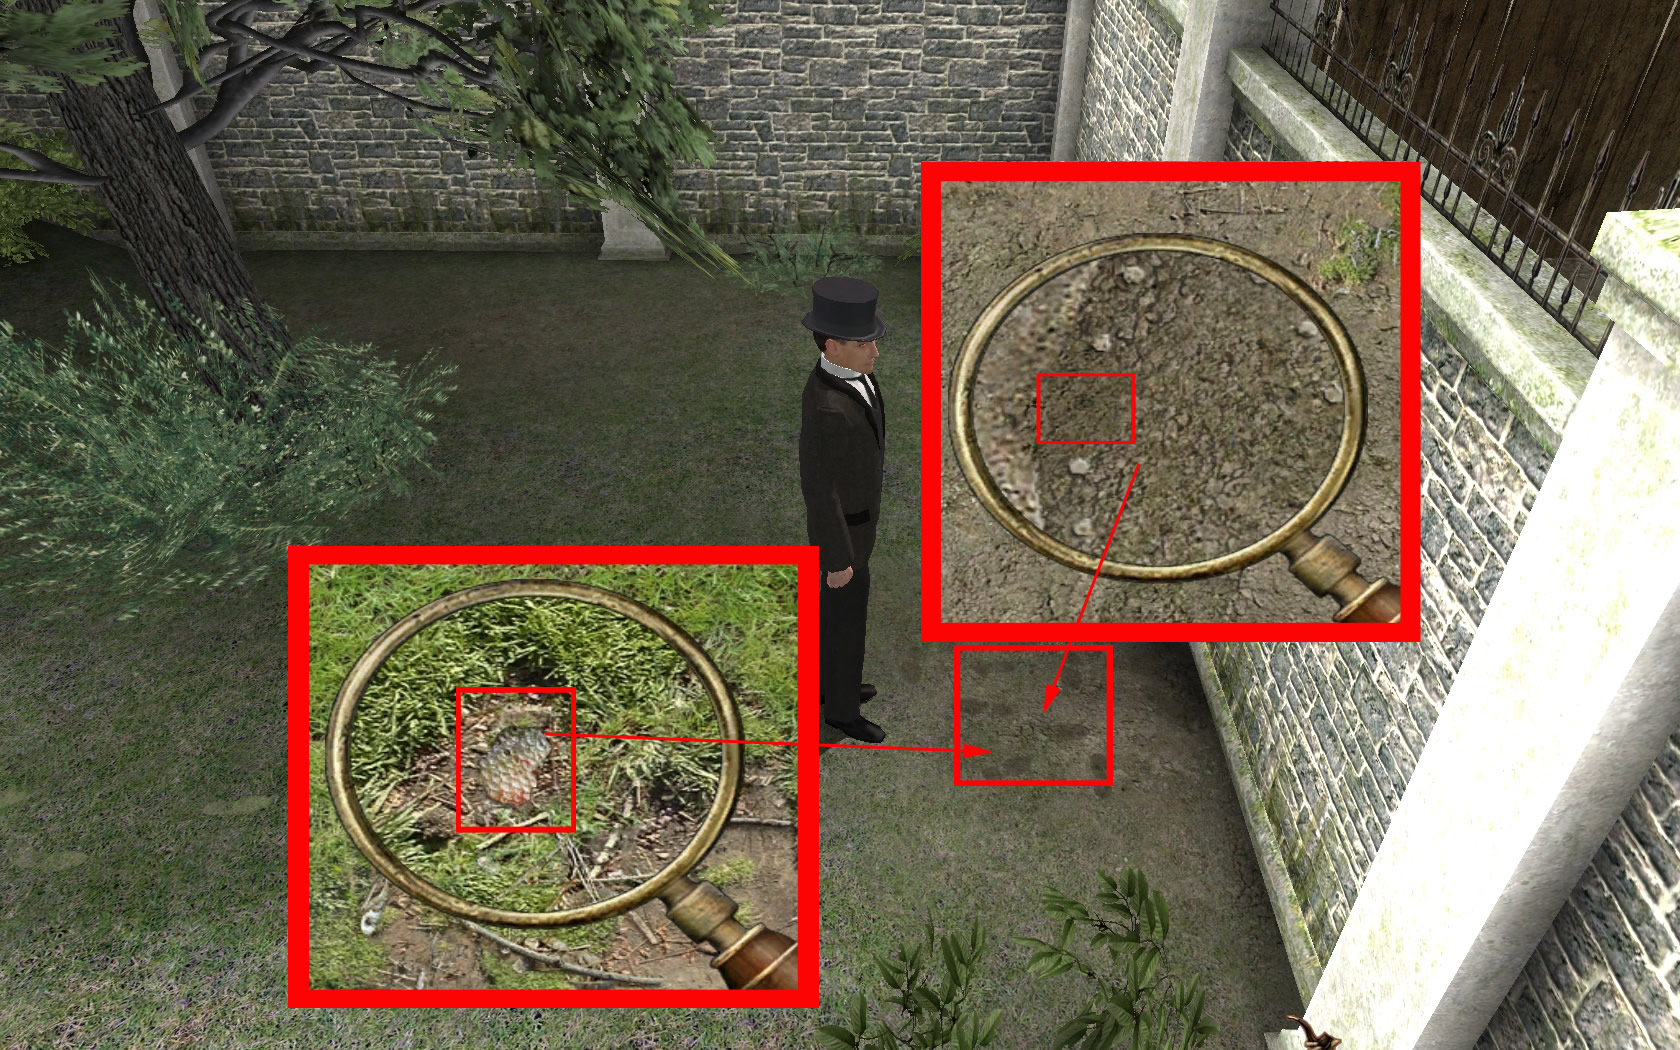
- Follow the footprints to wall.
- Use the measuring tape to find out, that it is the same size.
- Use the magnifier at the right print. You will see, that there is a nail at the right side of the print missing. Click to show, that you mentioned it.
- Use the magnifier left above the left foot print. You will find a fish scale.
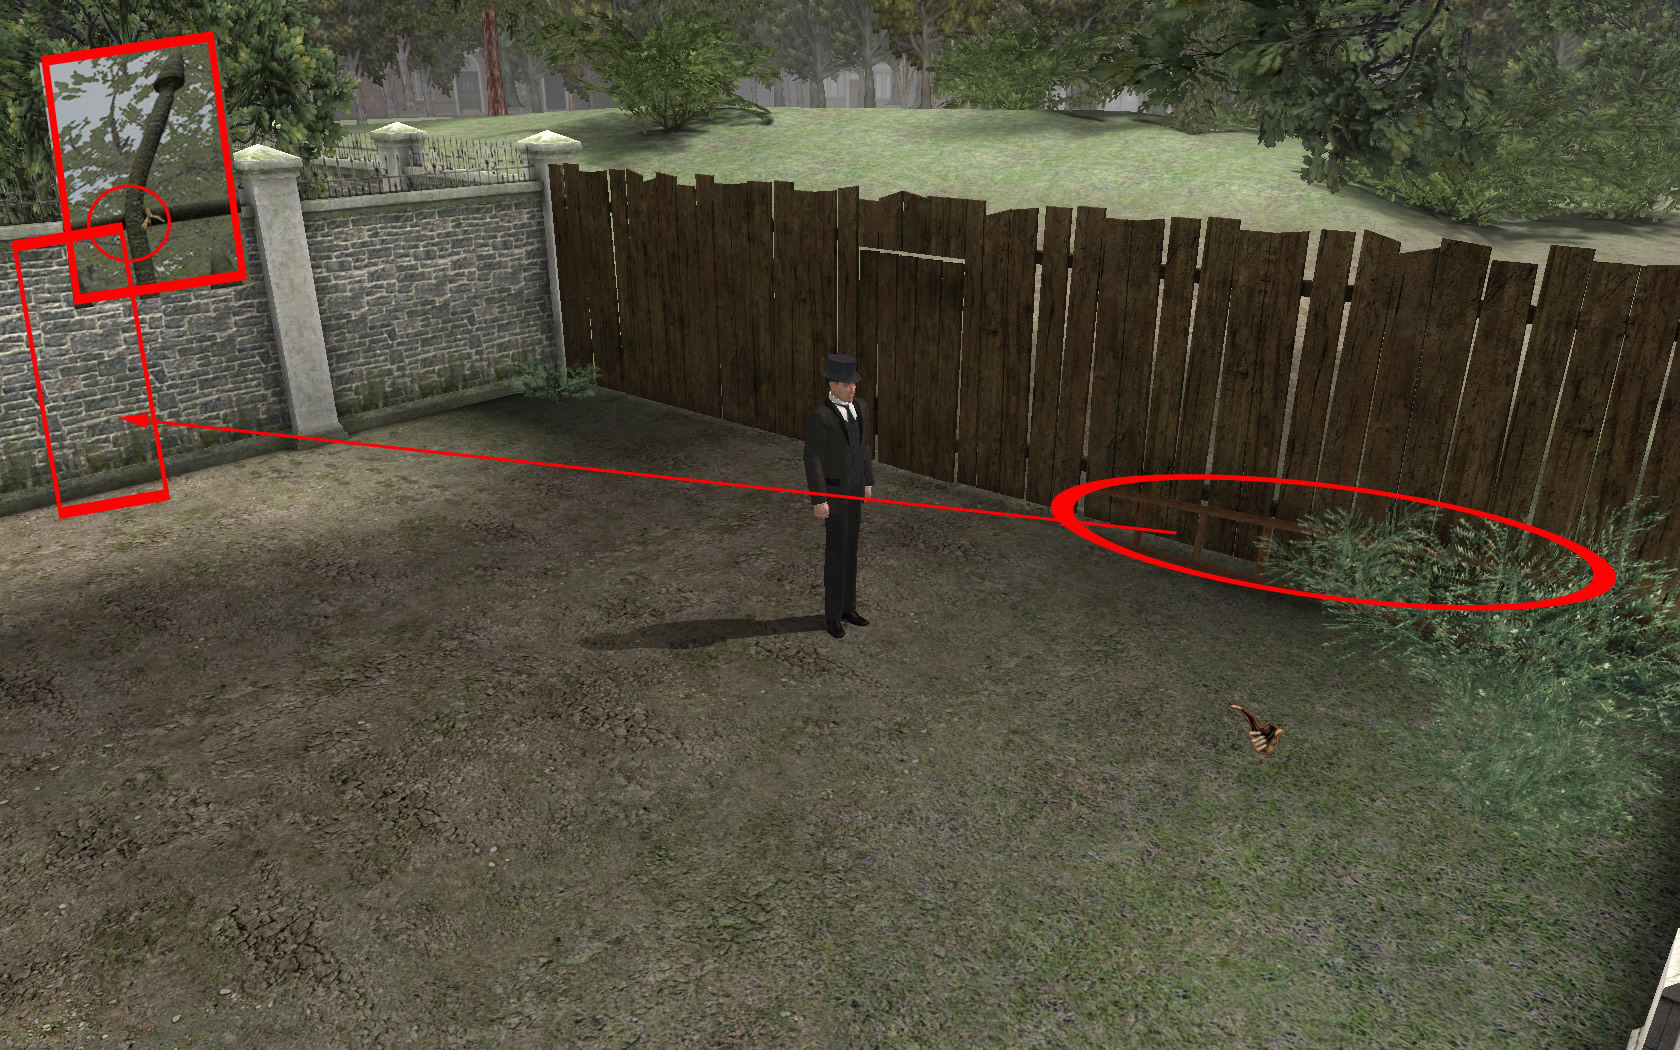
- Move your mouse along the top of the wall. When you see the hand icon click once.
- There is something, but you can't reach it.
- Go back to the front of the house and on the street.
- Move to the left and next street left.
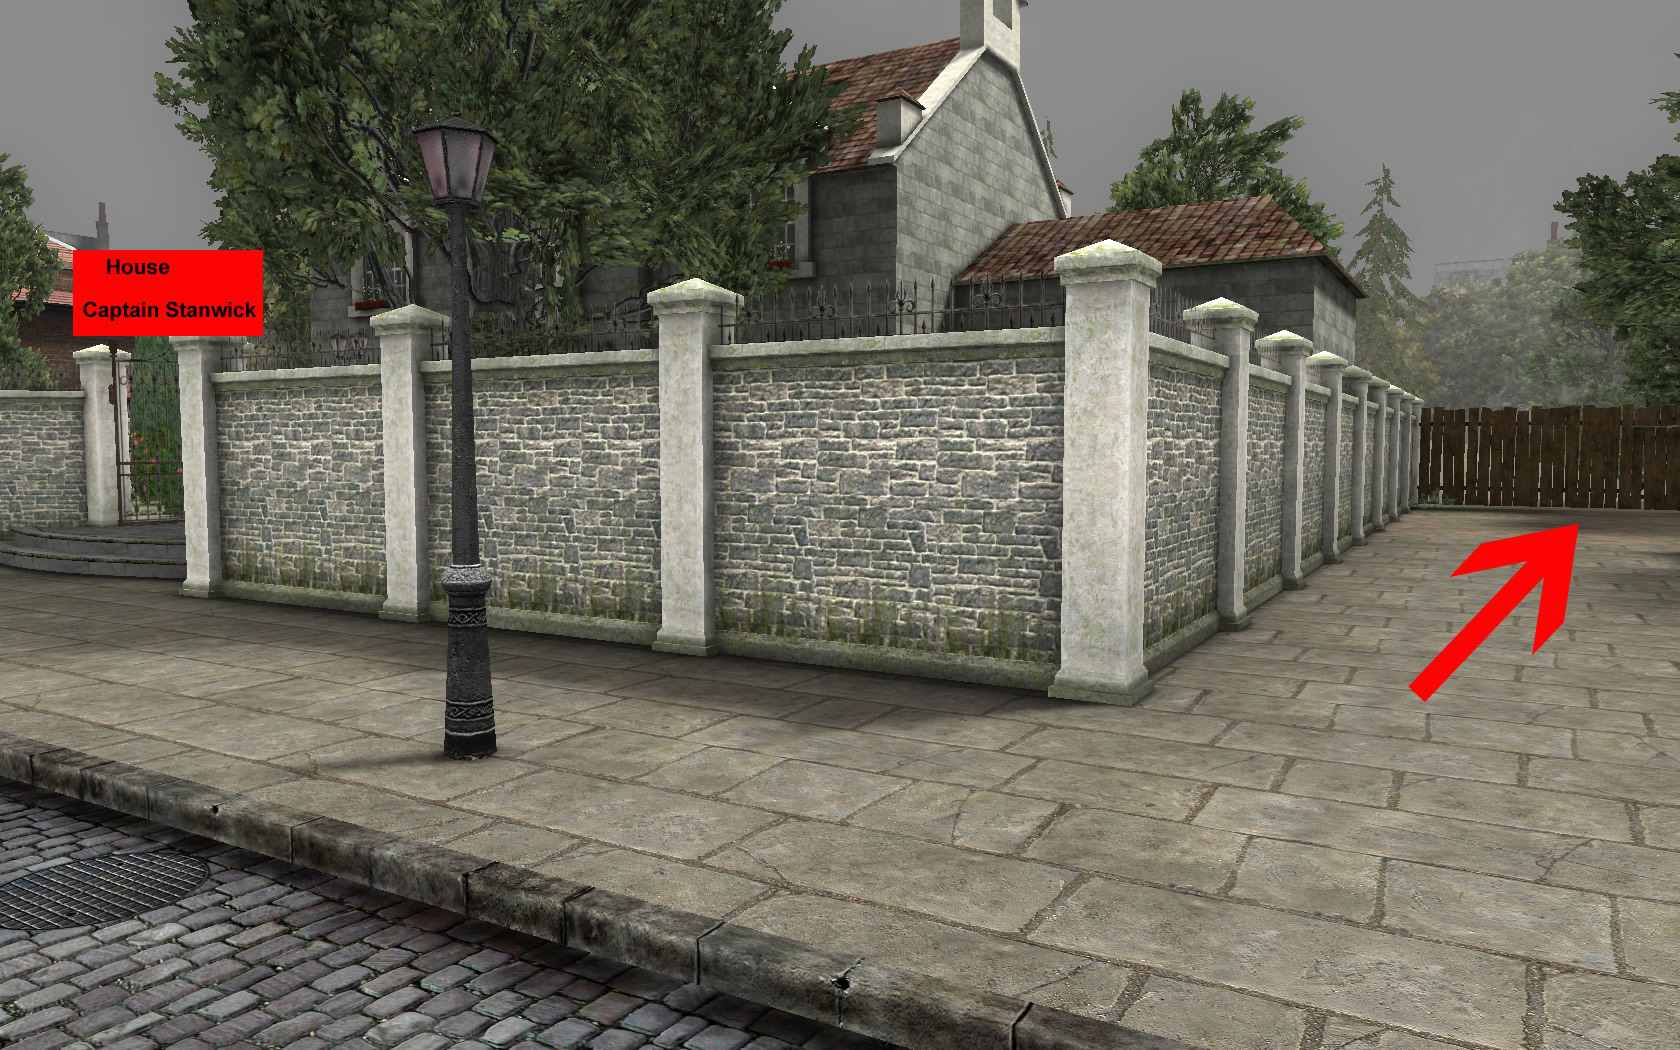
- Walk to the wooden fence and grab the ladder right side.
- Place it at the wall - second wall part from left.
- On top you will see a small cloth fibre. Take it.
- Go back to Captain Stanwicks house and talk with him.
- You will be brought back to Baker Street.
Baker Street 221b

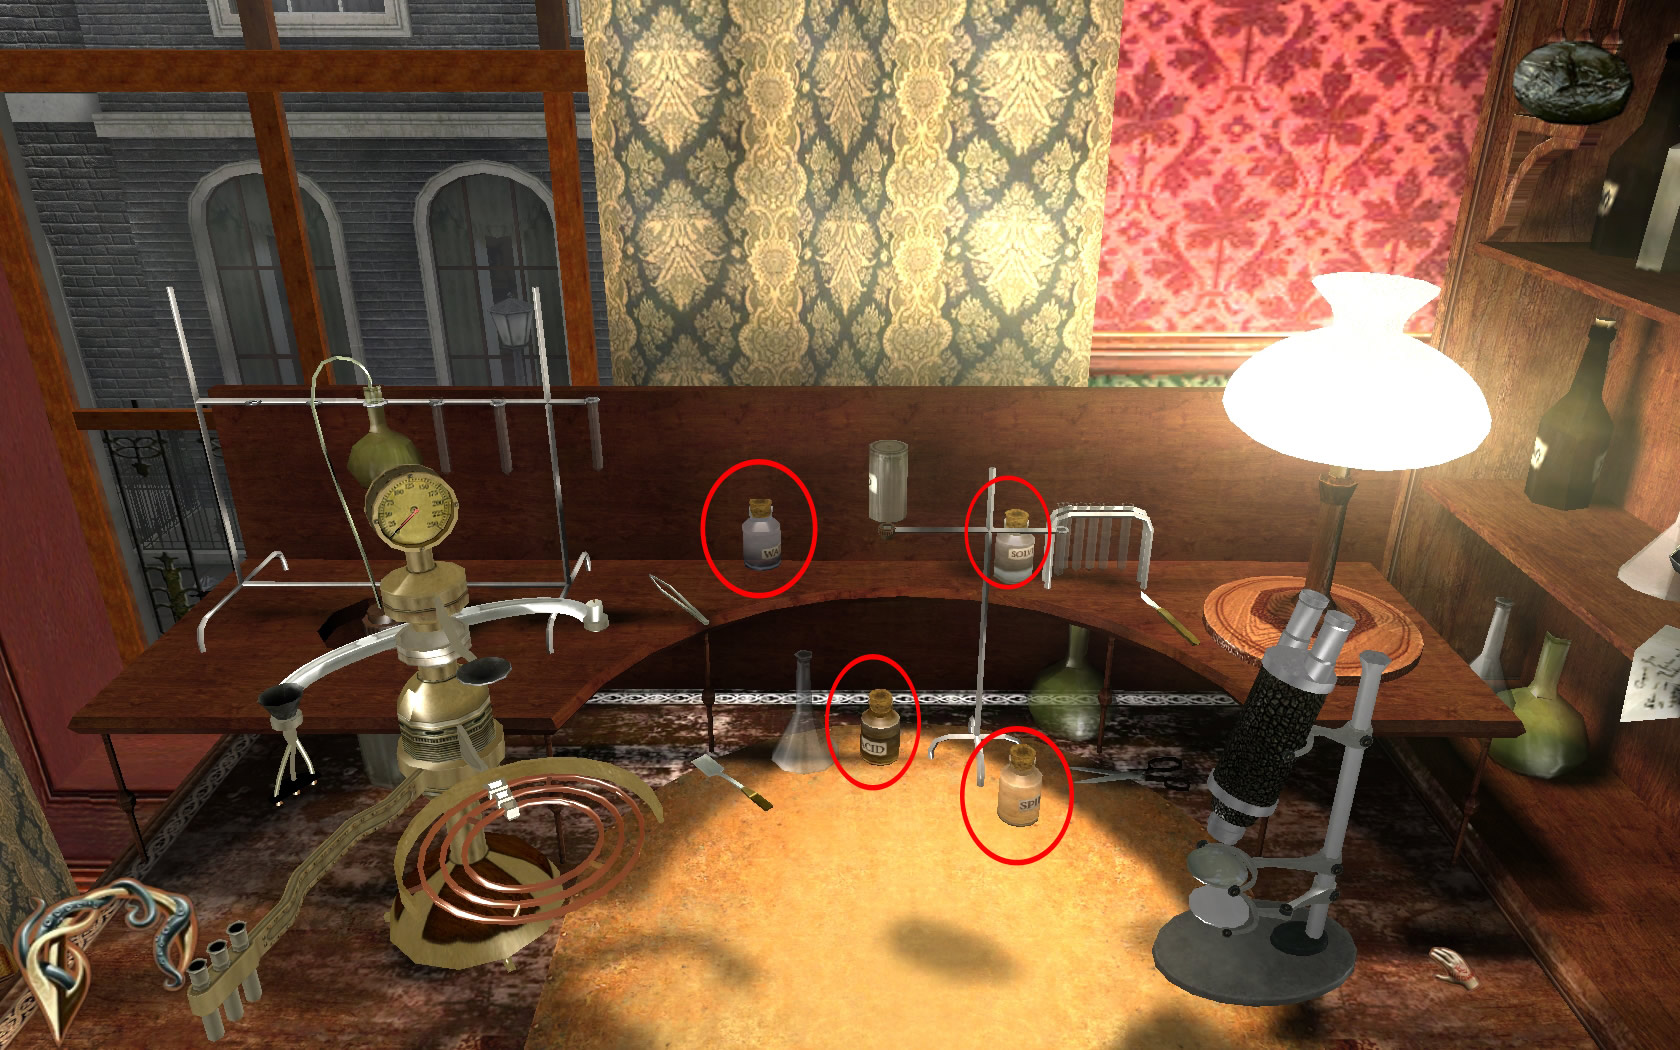
- After the conversation with Dr. Watson click the laboratory desk.
- Grab the four flasks: Water, solvent, acid and spirit of alcohol.
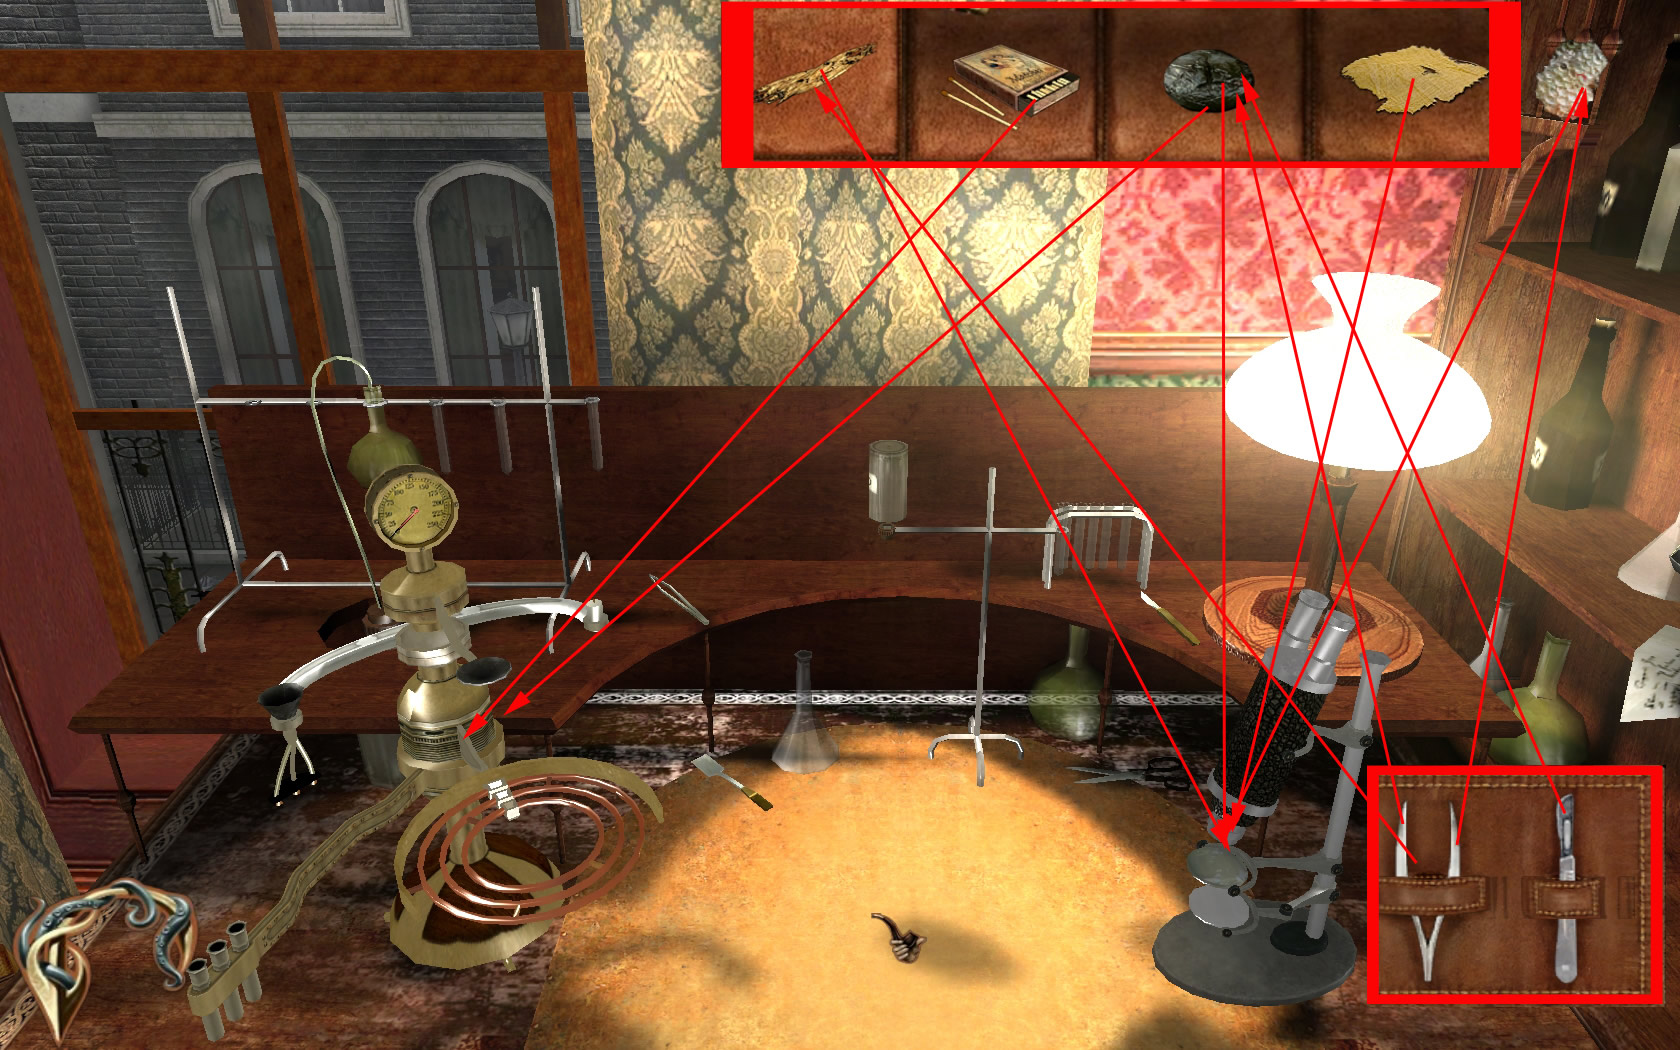
- On the top right, you see one of your inventory items. With the mouse wheel you can scroll to all items in your inventory. When you do not have a mouse wheel just open you inventory with right click and get out what you need.
- Choose the fish scale and place it on the microscope, right. You will get a closer look. Get the pincer from the low left corner and grab a little piece of the scale. Sherlock will tell you about the results.
- Now place the cloth under the microscope.
- Next is the lump - use first the scalpel to cut it open, then the pincer to get a few of the grains.
- The fibres also go under the microscope. Get a single one with the pincer.
- Now you use the device on the left - Place the grains on the device and use the acid.
- Now use the fibre and use the solvent with it.
- Click the window to see, what Dr. Watson is doing.
Dr. Watson - Newspaper Boy and Bookshop
- Click the newspaper boy to talk with him.
- Click the map, choose the bookshop and enter it.
- Talk with Mr. Barnes.
- The book you are looking for is not on the shelf, but on the table in the middle alcove.
- Use the map to go back to Baker Street 221b
- Holmes will ask you a question: From what part of London does one of the two kidnappers of the young maori come?
- Use the offered keyboard to answer. The answers WHARF, DOCKS or THAMES will be accepted.
- Choose the map and see that you have a new location. Choose the docks.
Docks
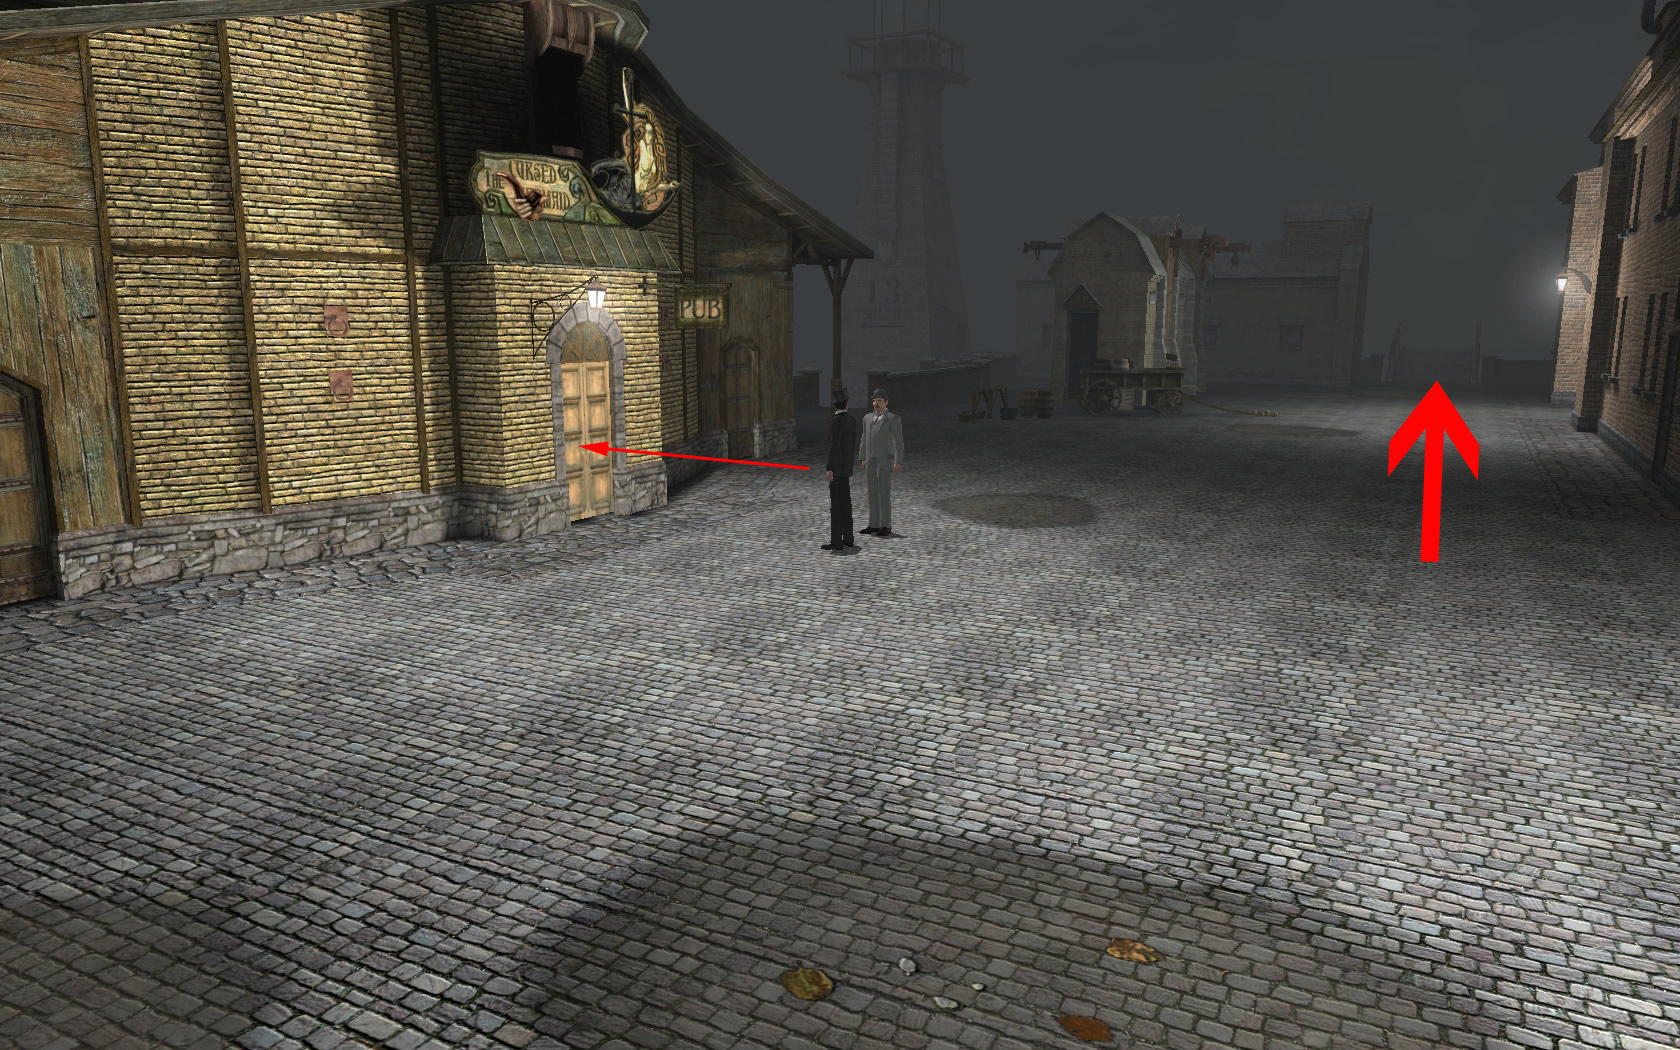
- Turn to the right and enter the pub
- Talk first with the barkeeper. He gives you information about where to go next.
- Now talk to the old man. He is missing a package.
- More information you won't get now, so leave the pub and turn to the left
- Go straight ahead over the bridge - you will already see the anchor, the barkeeper was talking about.
- After the bridge go right and then left - left side is the house of Mr. Harper.
- The door is closed, but grab the rope, laying on the sacks next to the door.
- Turn around and enter the house opposite of Mr. Harpers house.

- Talk with the nepalesian woman and grab after the conversation the pendant from the altar at the right.
- Leave the house again and turn to the right.
- After the video scene talk with the mail man.
- A bottle with a rest of alcohol will go automatically into your inventory.
- After the conversation go left and next possibility right.
- Go upstairs then forward, pass the square and go into the small street between two houses at the right.
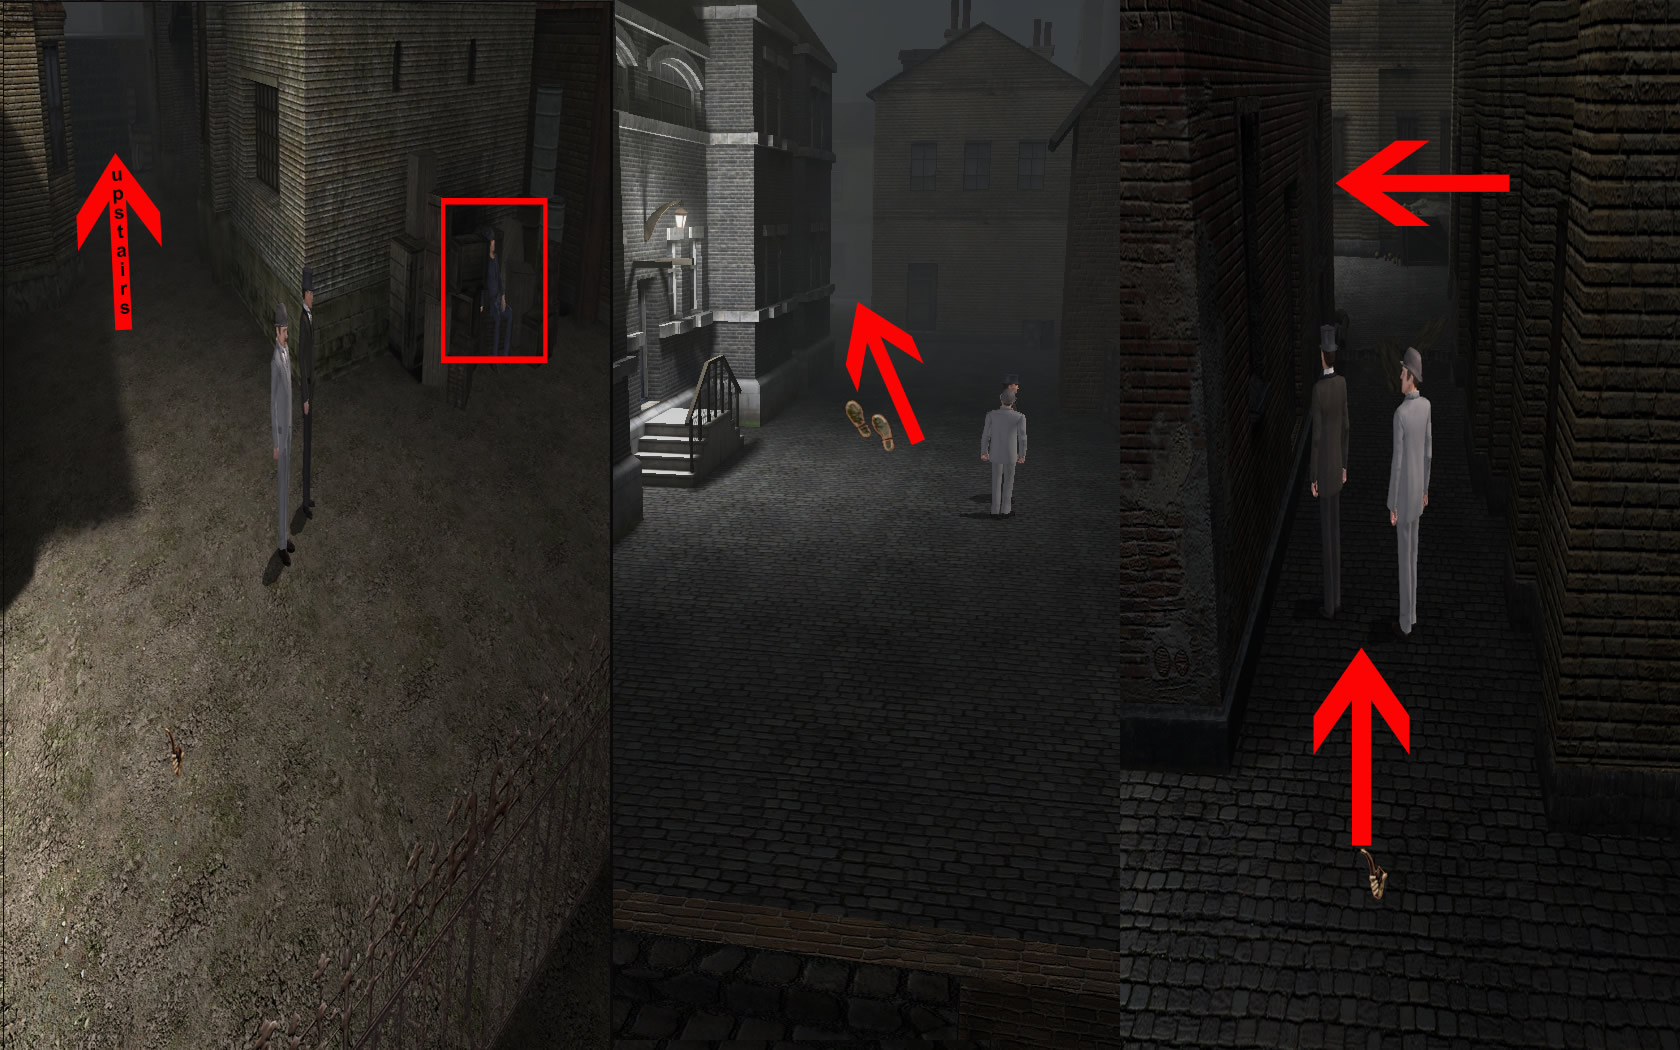
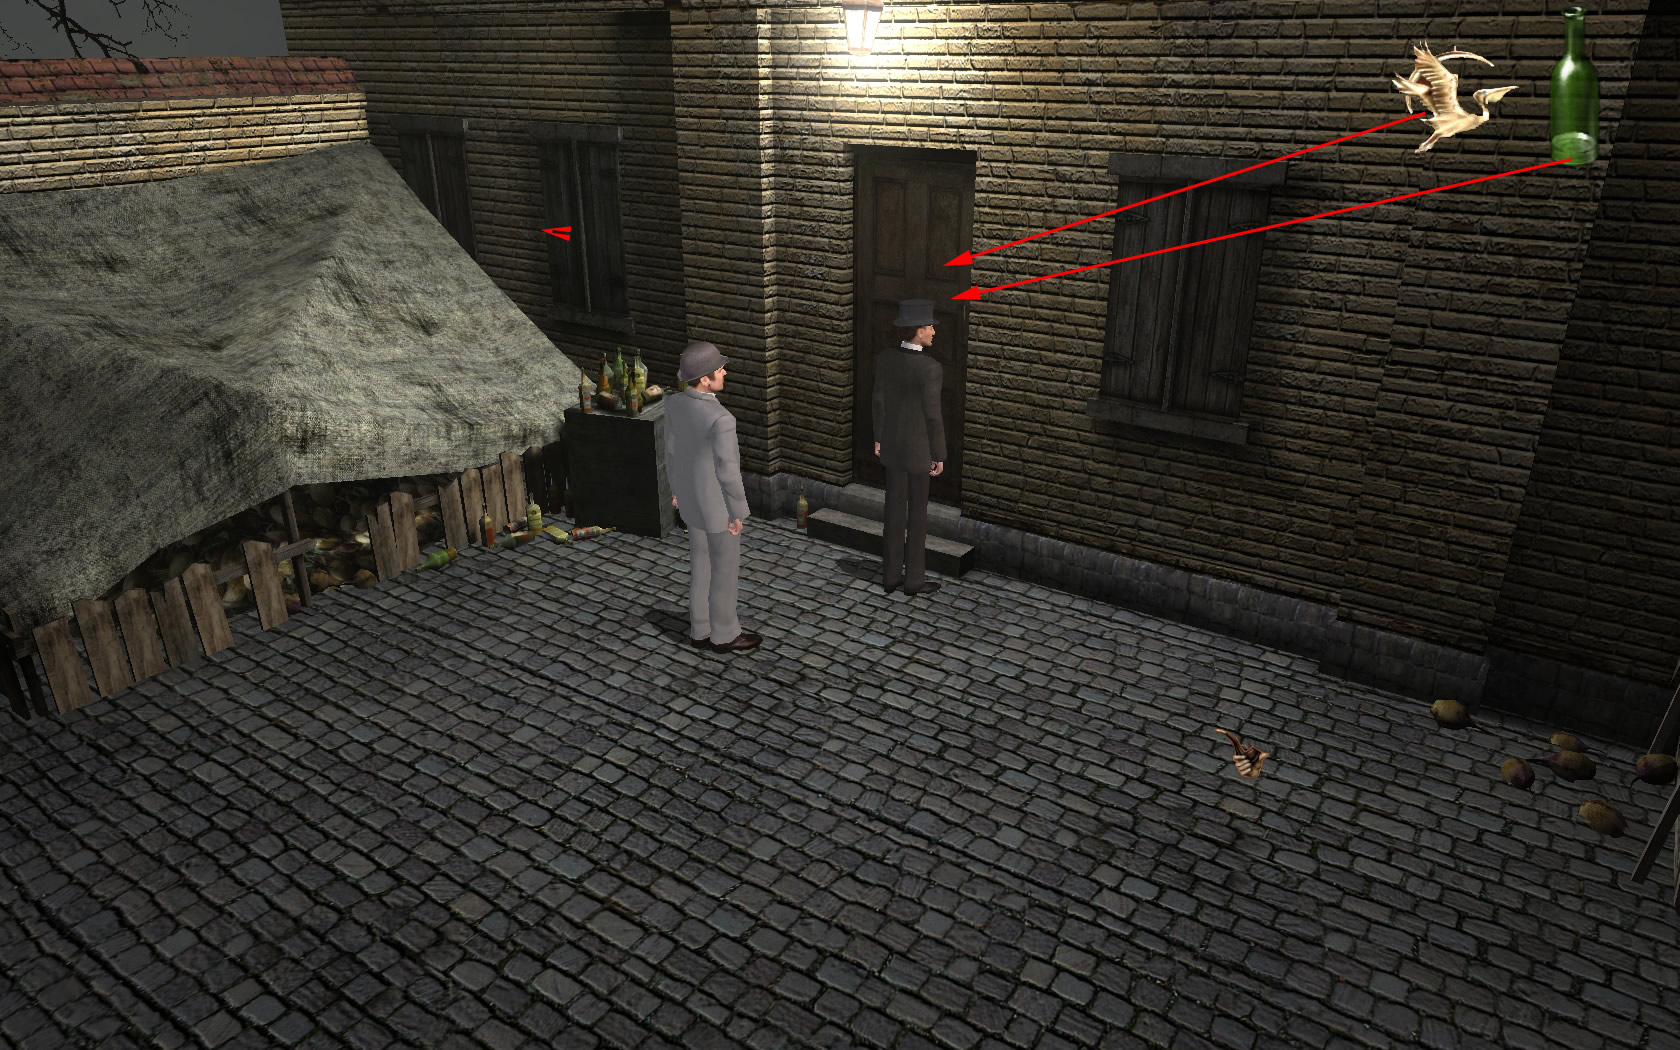
- Go right and knock the door.
- Talk with the man, who opens the door and show him the bottle.
- He will give you the missing parcel.
- Ask him about the pendant also by activating it in your inventory.
- After the conversation open your inventory and combine the knife with the parcel to open it.
- You know have the wooden arm for the old drunk in your inventory.
- Use the map to return to the pub.
- Give the arm to the old drunk.
- Take the hook from the desk, it will be of use later.
- Talk again with the barkeeper.
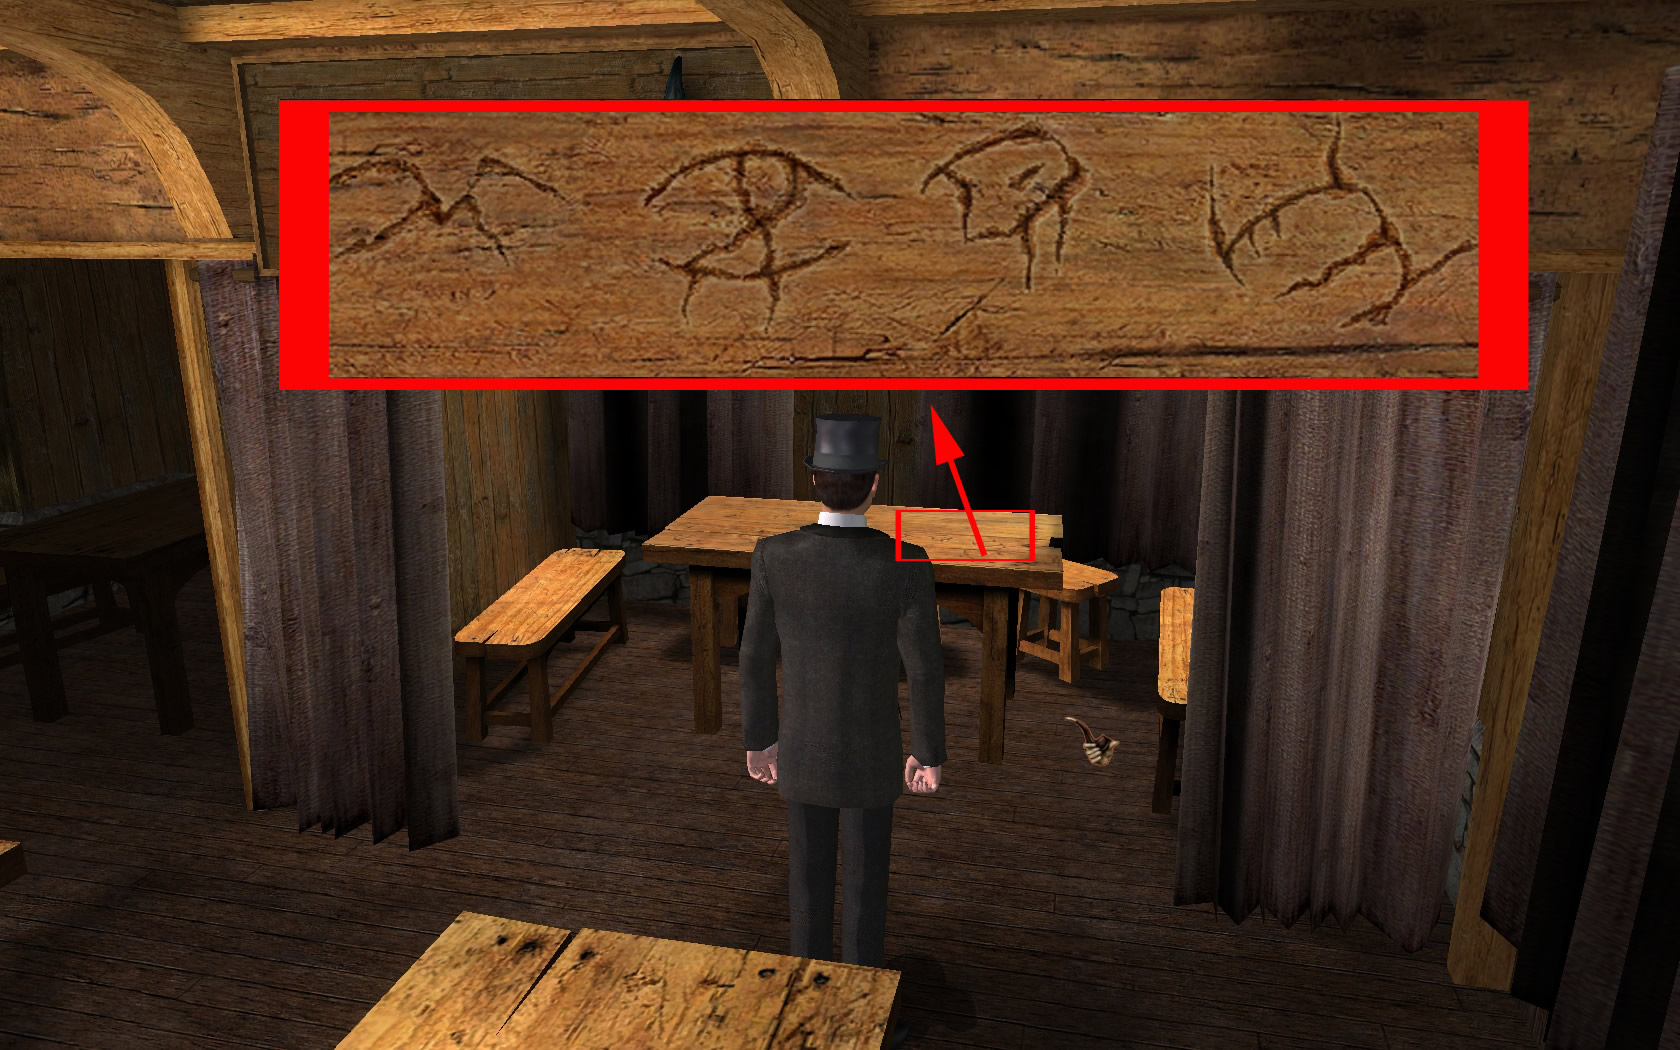
- Turn around and open the curtain at the other side of the room.
- Click the table to get a closer look. They symbols will be written down in your reports.

Warehouse 12
- Now you have to find warehouse 12.
- Use the map and choose the smugglers house.
- Go back through the small street and turn to the right.
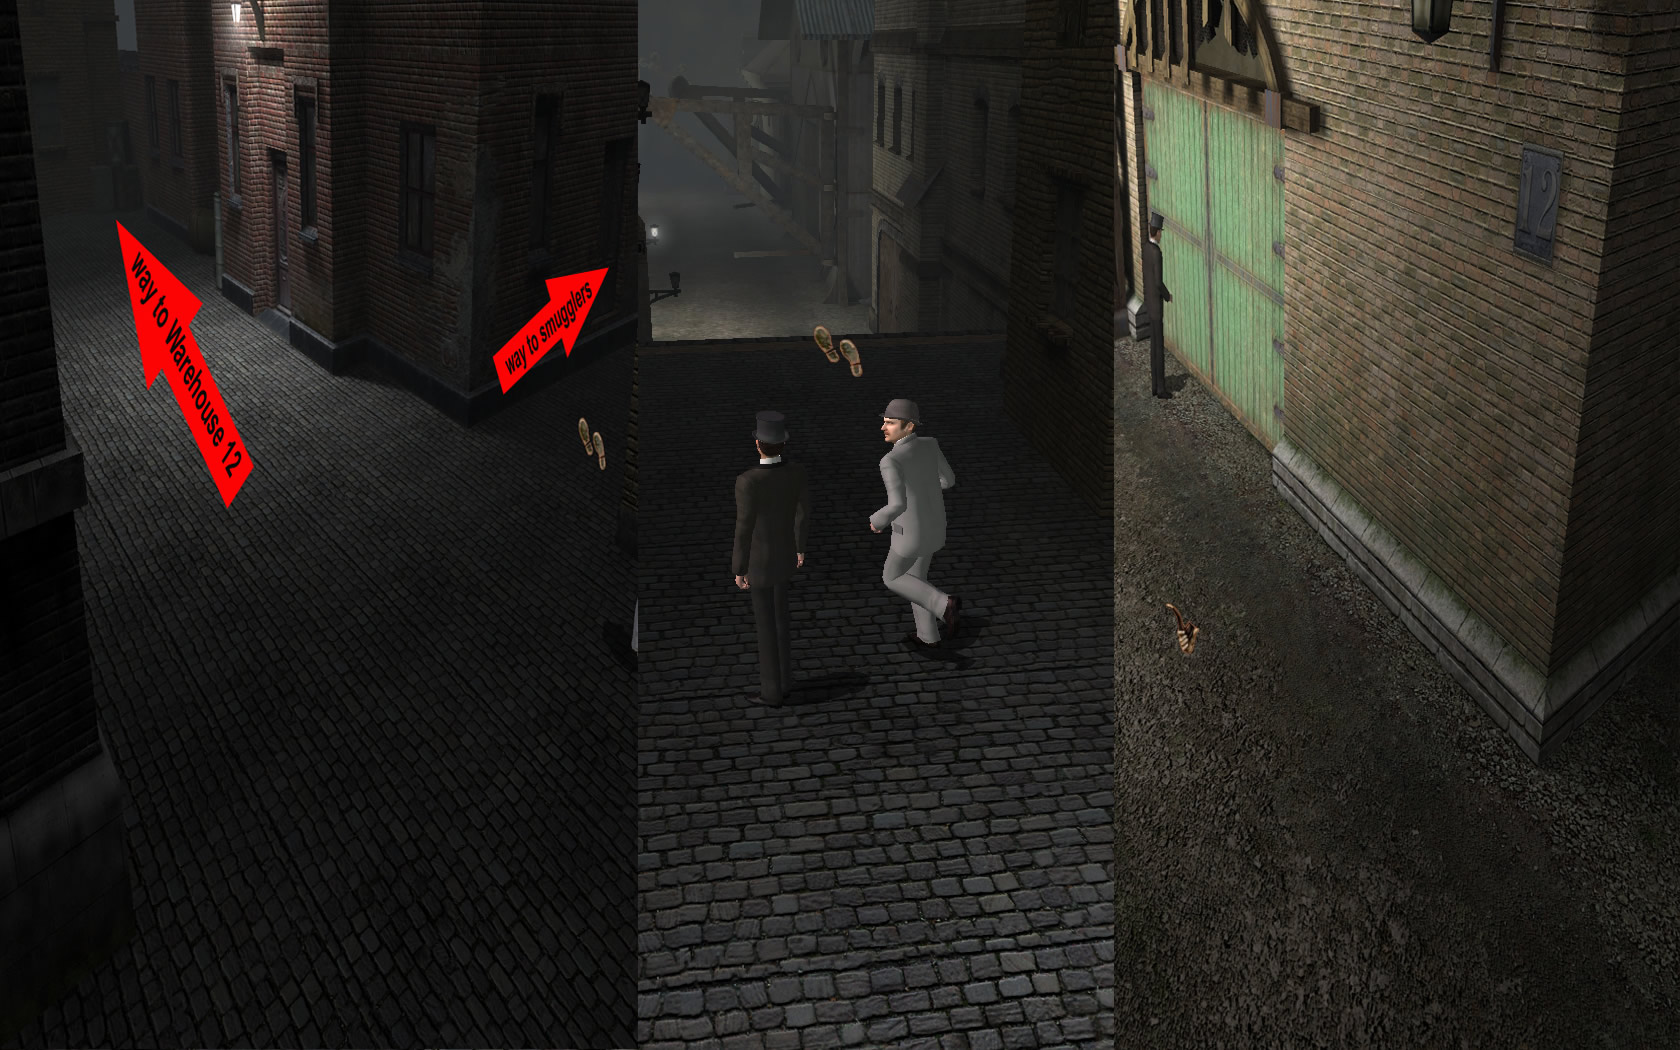
- Follow the way down the stairs, straight ahead and pass a well at the left.
- The first green door on the right is warehouse 12, but the door is closed.
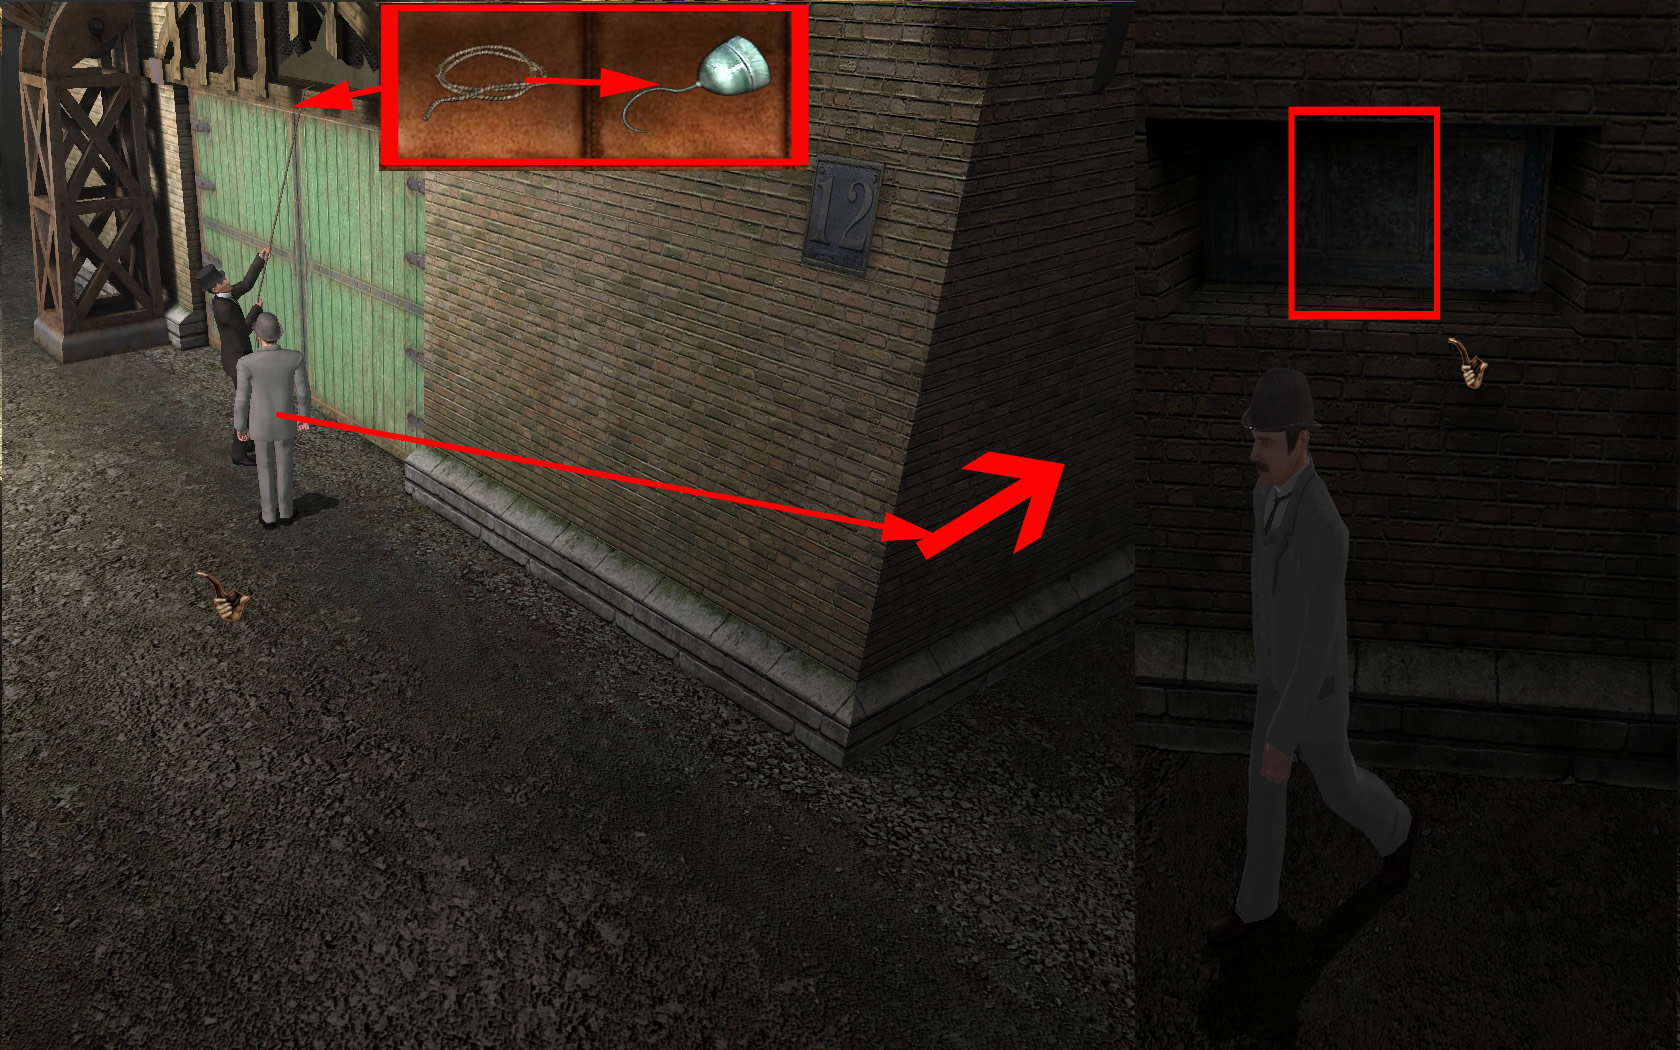
- Open your inventory and combine the rope with the hook.
- Have a look above the door, there is a hole.
- Place the hook there. Holmes will grab the role.
- Now the player changes to Dr. Watson.
- Go right next to the house and click the window you will see there.
- Look how Holmes opens the door.
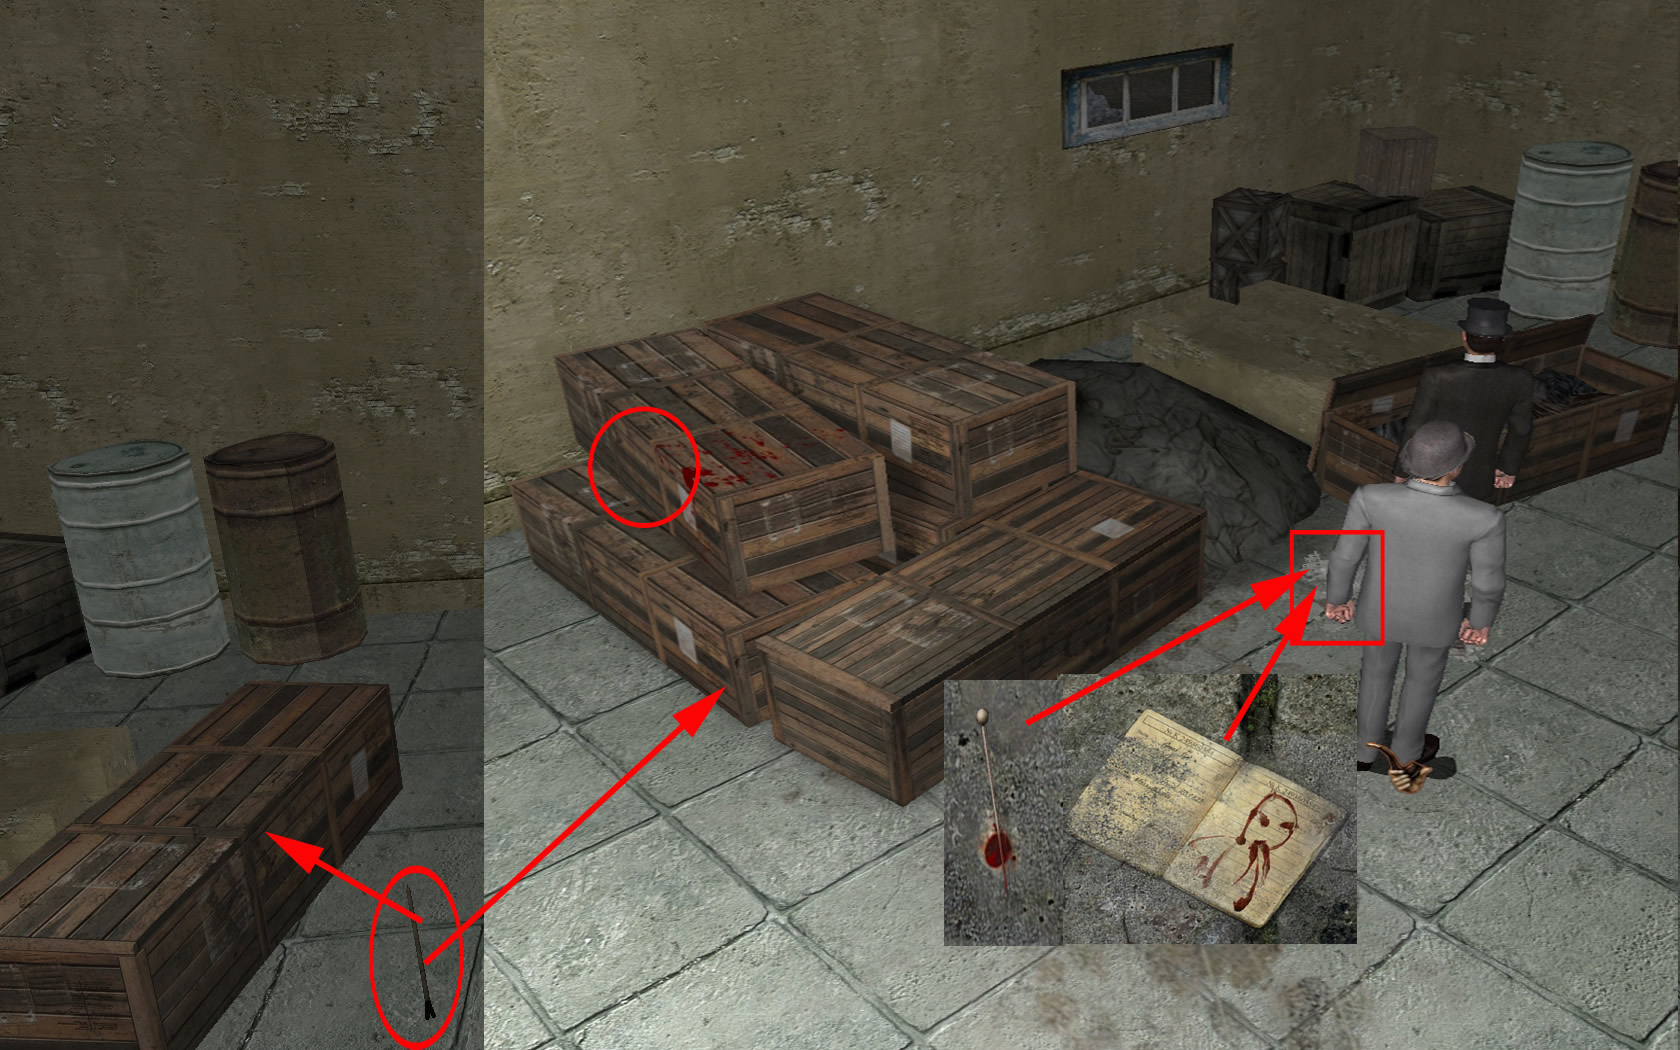
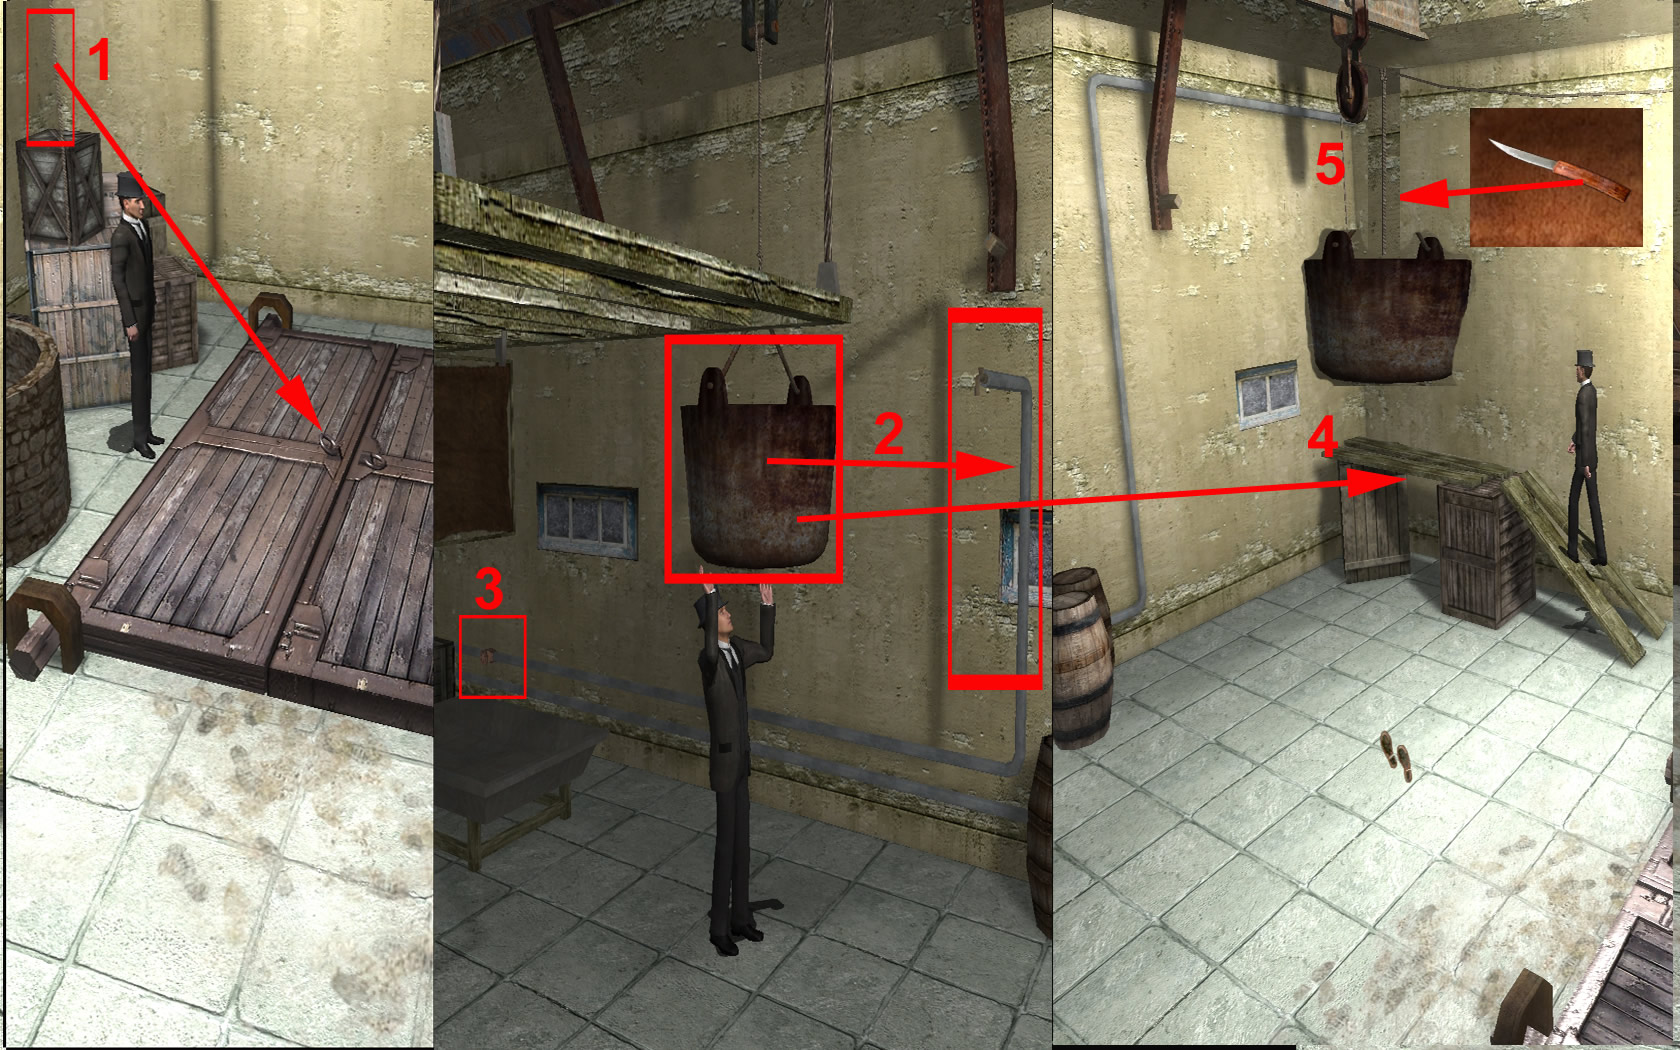
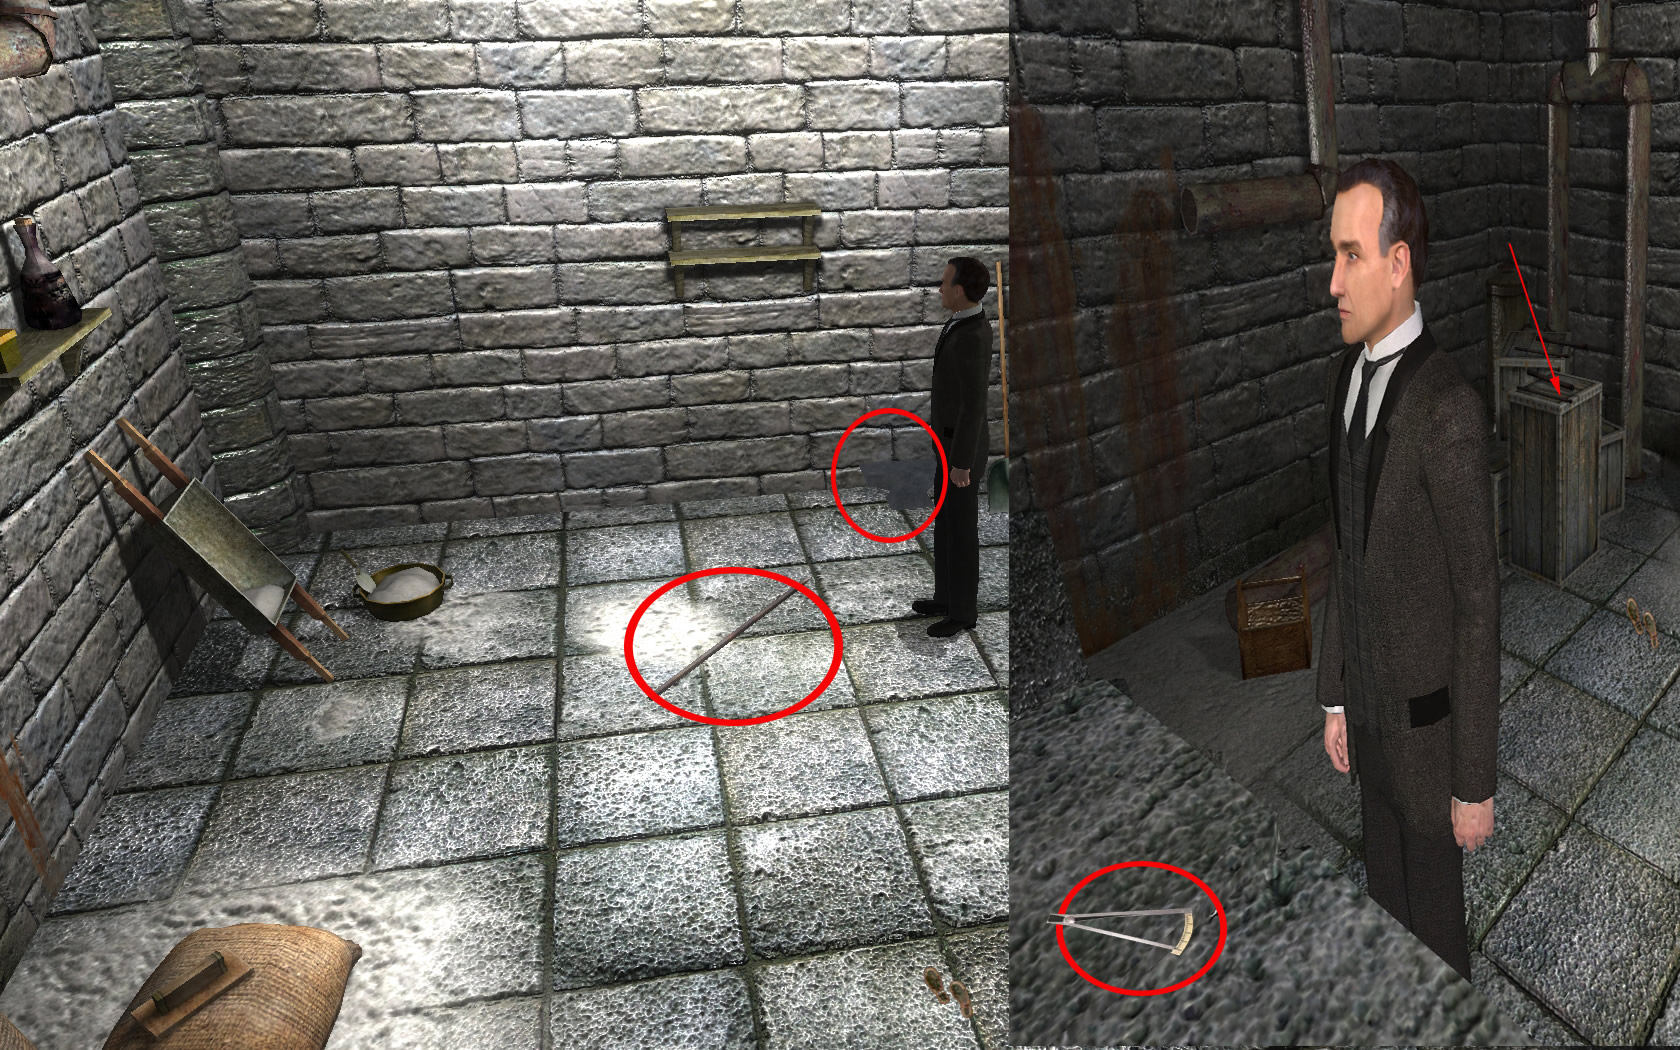
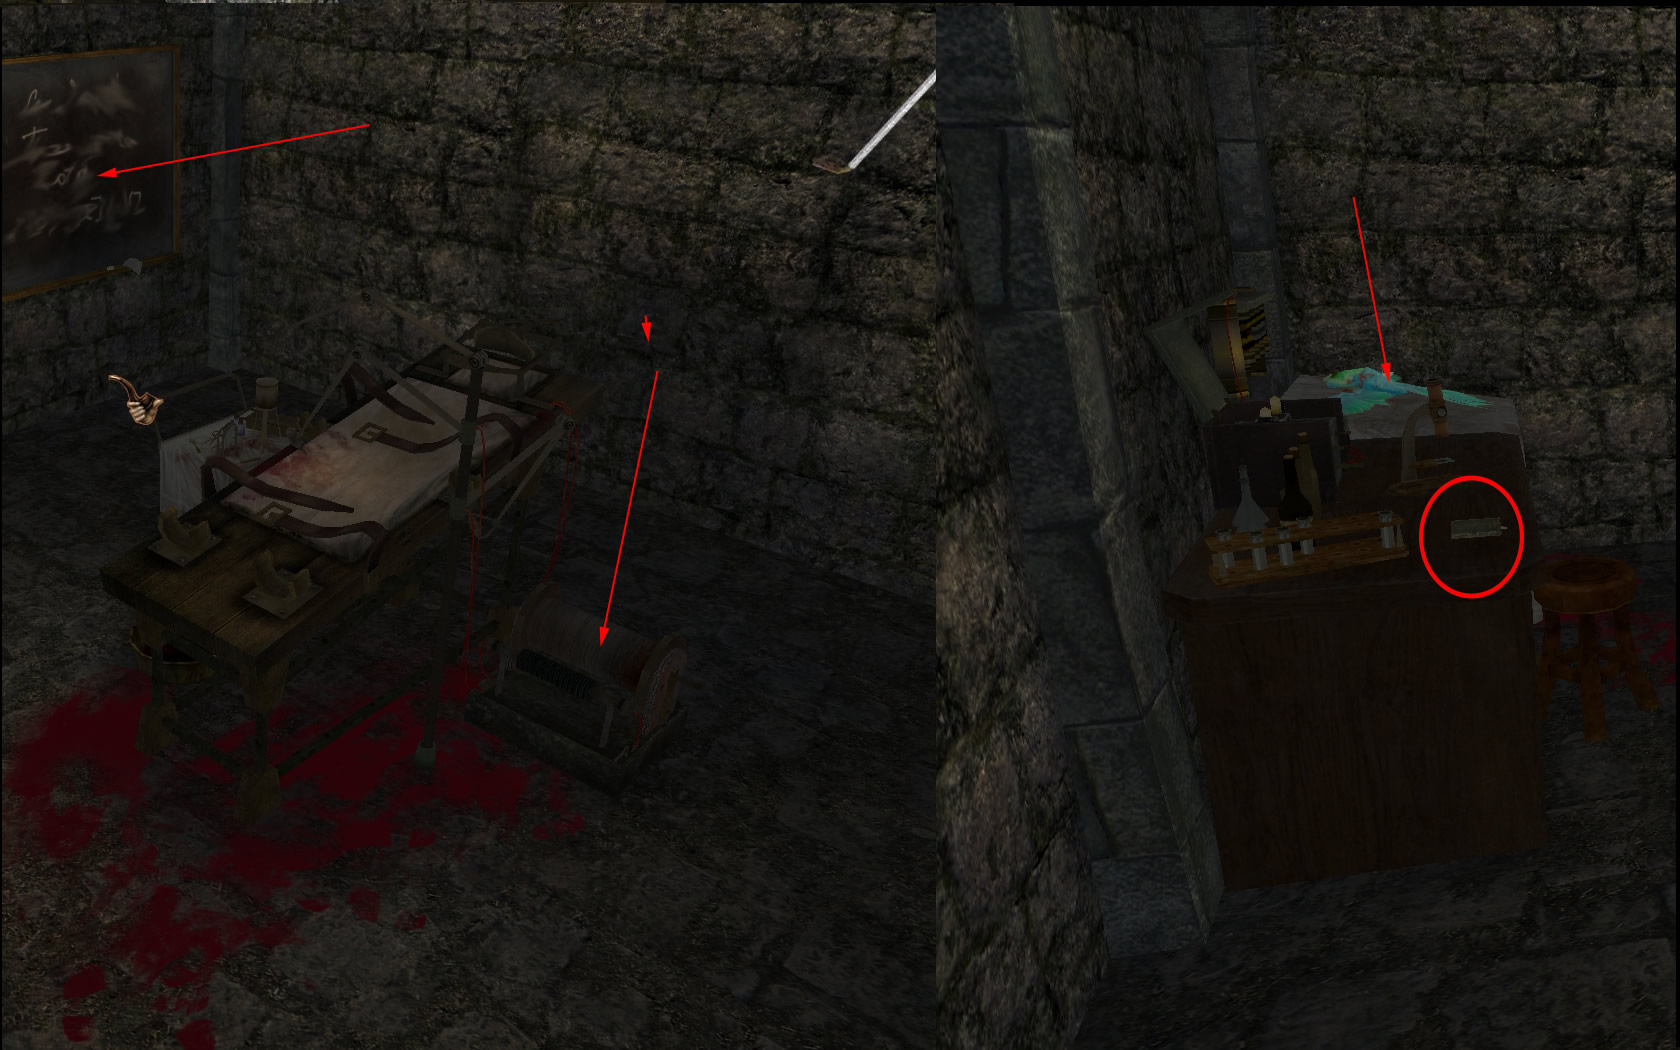
- To the right you will see a rod laying on the floor. Grab it and open the crate with it.
- Use the rod again to open the crate left next to it.
- Get the lantern out.
- In front of the crate you see something like paper laying.
- Look at it closer.
- You will find a page of an American passport, on the back a demon was drawn with blood.
- Left next to it you can grab needle with blood at the tip.
- Now have look at the crate with the blood spots.
- Left side on the ground you see a huge trap door, try to open it.
- As this does not work, go more left, behind the crates.
- Grab the rope, hanging from the ceiling and click at once the handle of the trap door to connect it.
- Go to the other side of the room and see the big keg hanging from the ceiling.
- Stand behind the keg (left side) and click the keg to push it to the right till you see, that it is under the place, where the pipes go up the wall.
- At the end of the pipe you see kind of faucet.
- Follow the pipes to the left and open the valve you will find at the pipe.
- The keg will be filled with water.
- Now push the keg all way to the right side.
- Go over the planks laying there
- Grab the rope in the corner and connect it with the keg. The other end of the rope is connected to the trap door.
- Get the knife from you inventory and cut the rope the keg was held with before.
- Because of the weight of the water, the trap door will open now.
Warehouse 12 - Cellar
- Go down the stairs and follow the way. You will automatically use the lantern to have light.
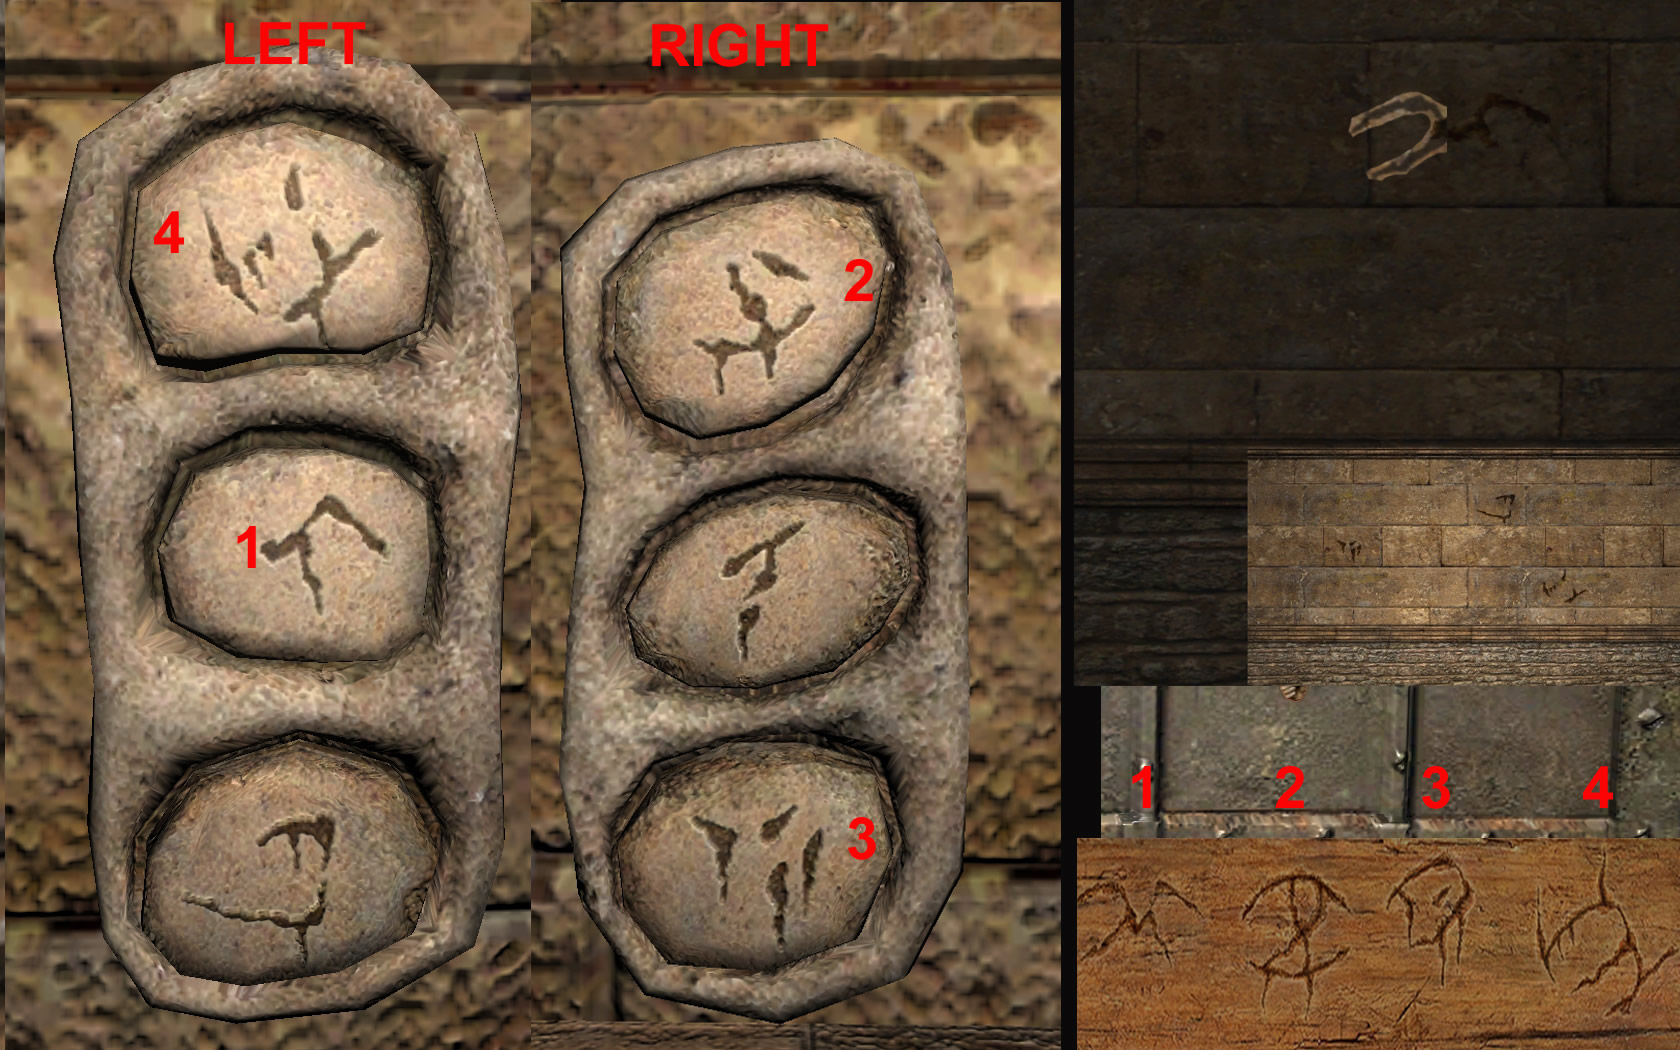
- You come in kind of a vestibule where you see symbols left and right side at the wall.
- Next to the door you see left and right a panel with three buttons showing the same symbols as the walls
- Place your lantern on the pillar in the middle.
- You mouse pointer now is a symbol, or better a symbol fragment.
- All symbols are only fragments.
- Which one your mouse pointer shows can be random.
- Open your inventory and have a look at the symbols, you found on the pub's table.
- Your mouse pointer fragment and one of the fragments at the wall do show together one of the symbols from the table.
- You cannot click the fragment at the symbol neither Holmes or Watson will say some.
- Your goal is it now, to press the buttons at the door in the same order, the table showed the symbols.
- For this you will have to examine the fragments carefully, finding out which one belongs to which symbol.
- The wall is not important, in fact its only to give you hint to let you know, that you do only see fragments.
- When you push the wrong button, you can pull it back by pushing again.
- You will have to push the buttons at the door in the right order, so when one symbol was wrong, you have to withdraw all buttons and start all over.
- If you are right or wrong, you will only see after pushing all four buttons. When you are right the door will open.
- The correct order is: left side - middle button, right side - top button, right side - button button, left side - top button.
 7
7
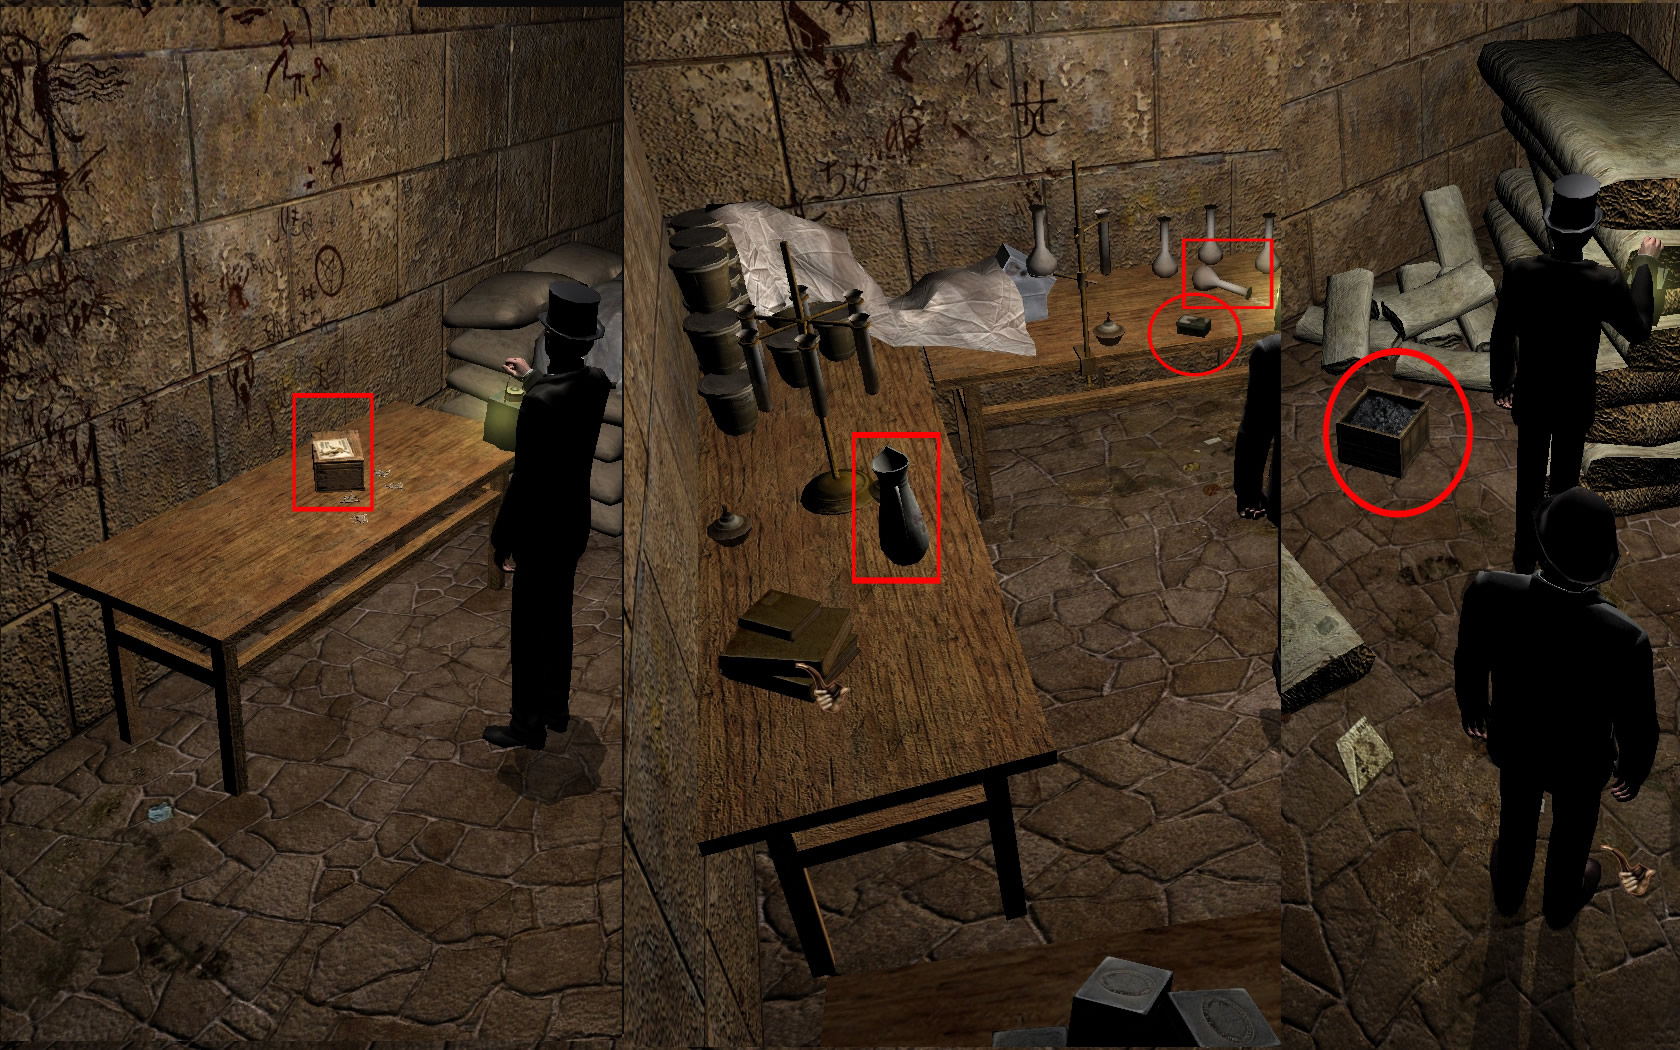
- You will come into a large room with columns left and right.
- Behind the column you will find on both sides mattress.
- Go first to the right side.
- You will see a box with coal standing on the ground. Grab a peace, it will come handy.
- Walk over to the left - on the table you see a box with pendants, same as you found one on the altar.
- Walk over the mattress to the other side.
- On the first table you will see a water jug. Click it to learn, that Holmes can smell opiate.
- At the other table you will find a little box made of black edelweiss. Take it.
- Have also a look at the laying jug, the white powder came out of it, is clearly an opiate.
- Go to the other side but not behind the columns. Have a look at the black spot on the floor.
- Next to it, you will see a shirt with blood at one of the sleeves.
- A piece of paper you will find at the shirt pocket. It goes into your inventory,
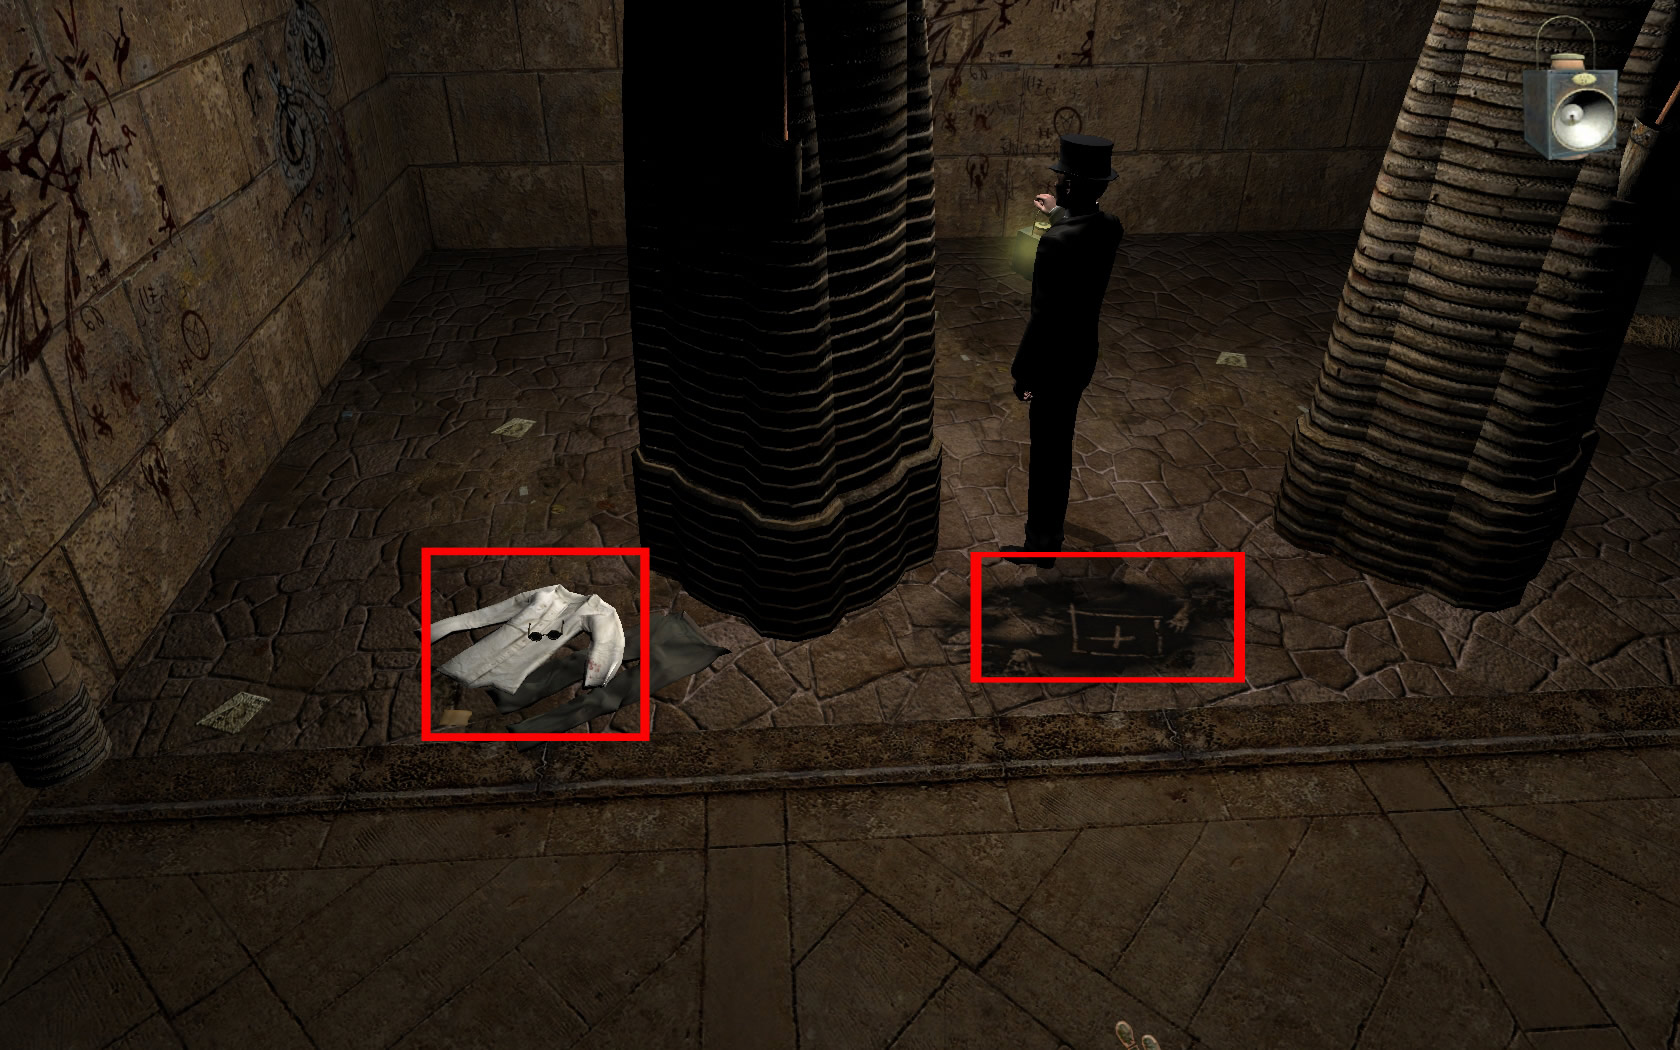
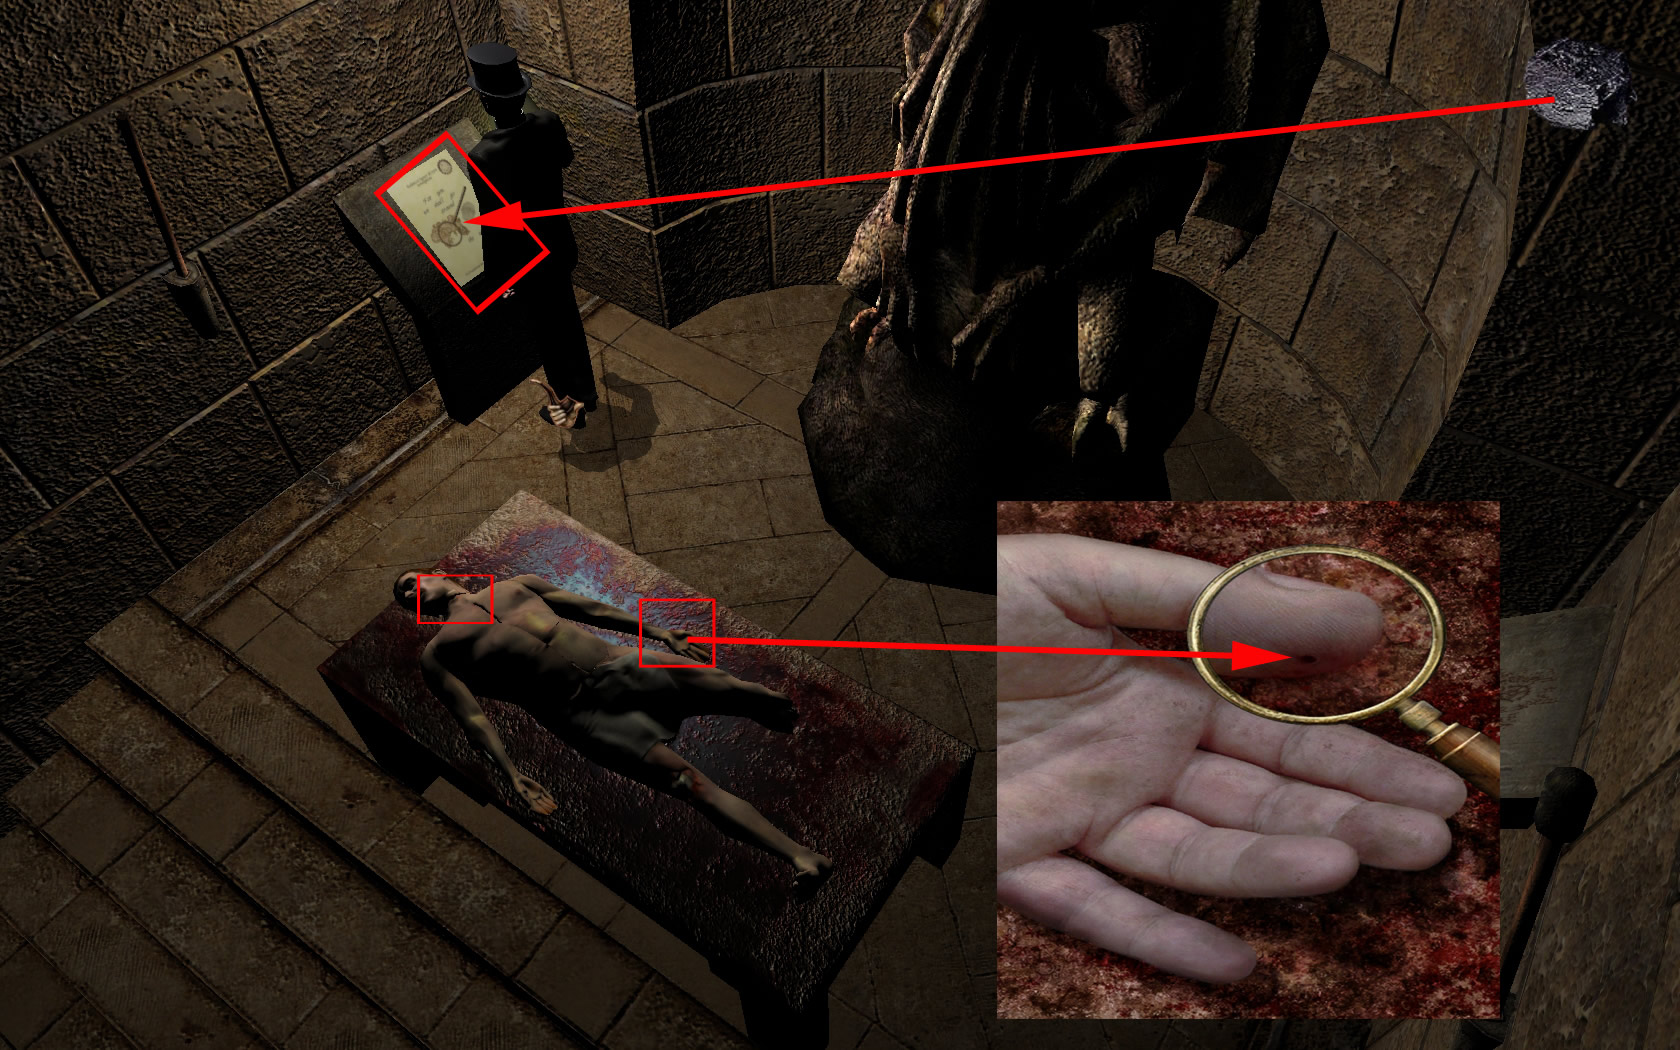
- Now finally look at the podest in the middle.
- You will see a horribly mutilated body.
- Examine first the neck of the man after that the right hand.
- Use the magnifier and have a look at the thumb. You will find a needle puncture.
- Click to show, that you saw it.
- Right and left you see kind of lecterns. It does not matter, which one you choose.
- Get the paper, you found before, out of your inventory and place it on the lectern.
- Now use the coal on the paper. Get the paper back.
- On the floor behind the man's head, you will find a statue.
- After the cut scene, you will be brought back to Baker Street automatically
Baker Street 221b
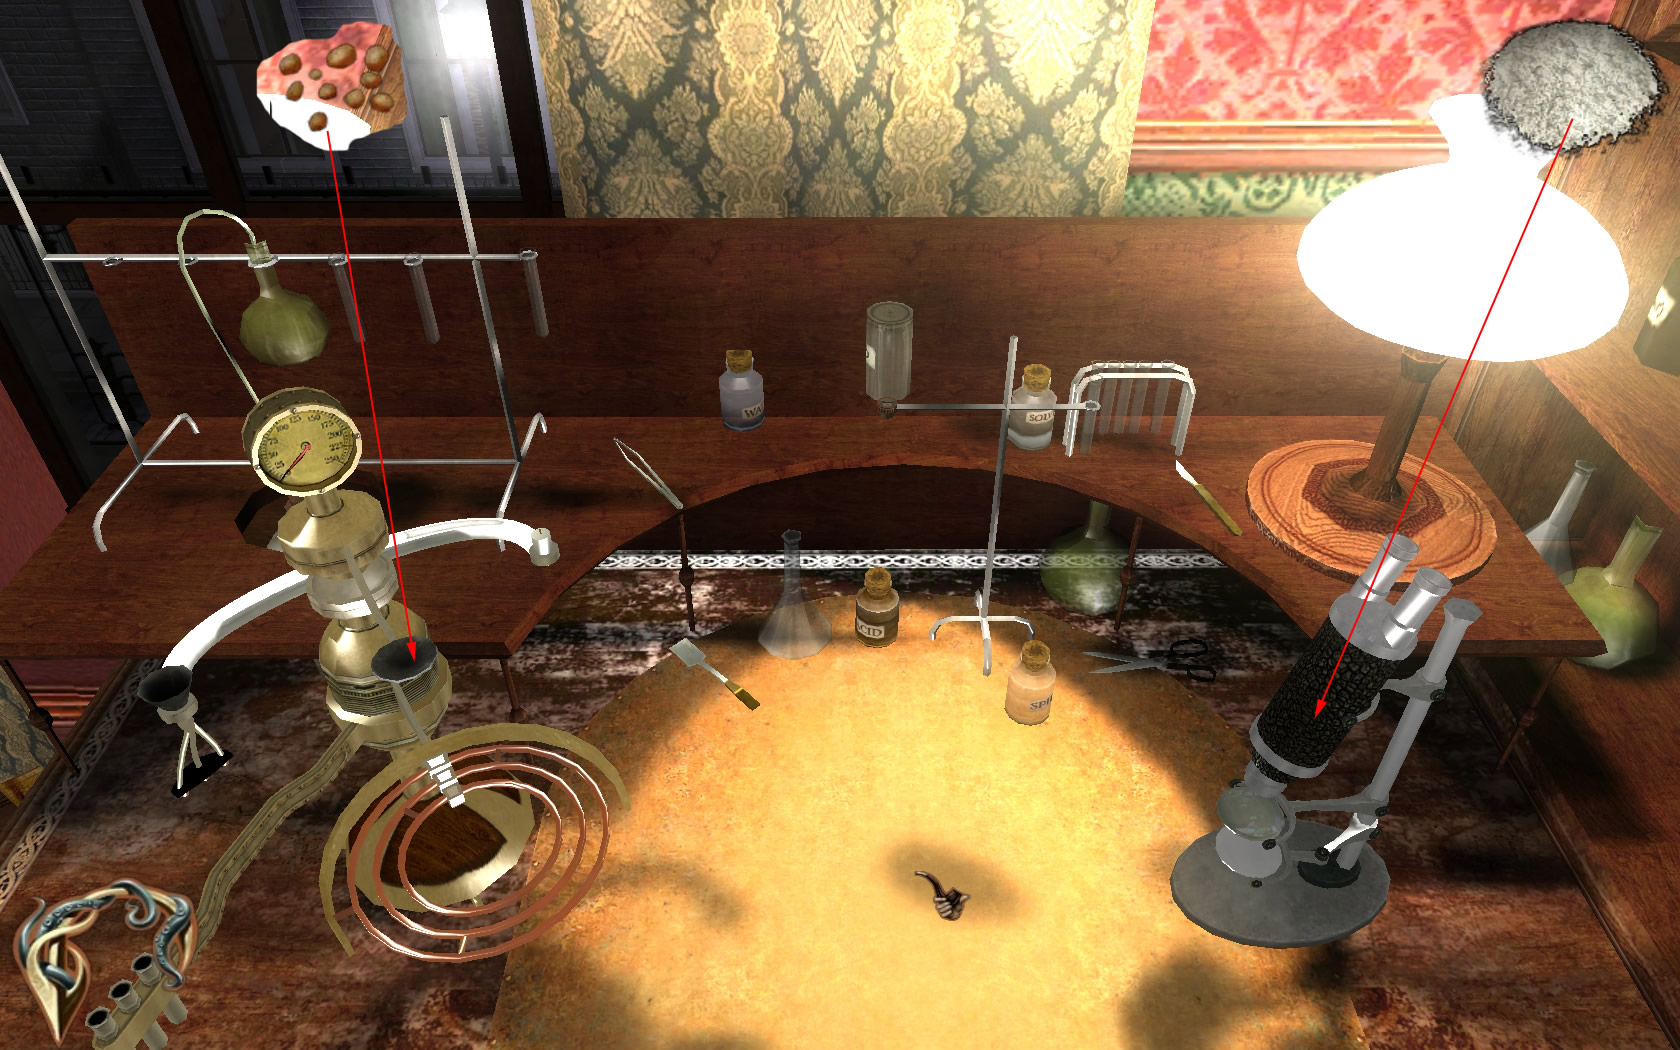
- After the cut scene you need to examine the box with the black edelweiss.
- Click the table with the lab equipment.
- Open your inventory and open the box with the knife - you will receive white powder.
- Place it under the microscope and get a few grains with the pincer.
- Put the grains on the device to your left.
- Use the matches to light the candle.
- After the talk with Dr. Watson use the map to go back to the docks.
- Choose the pub first.
Docks
- Enter the pub and talk to the barkeeper.
- He will tell you where to find the custom agent.
- Use the map to come to the house of the nepalese and there go straight ahead.
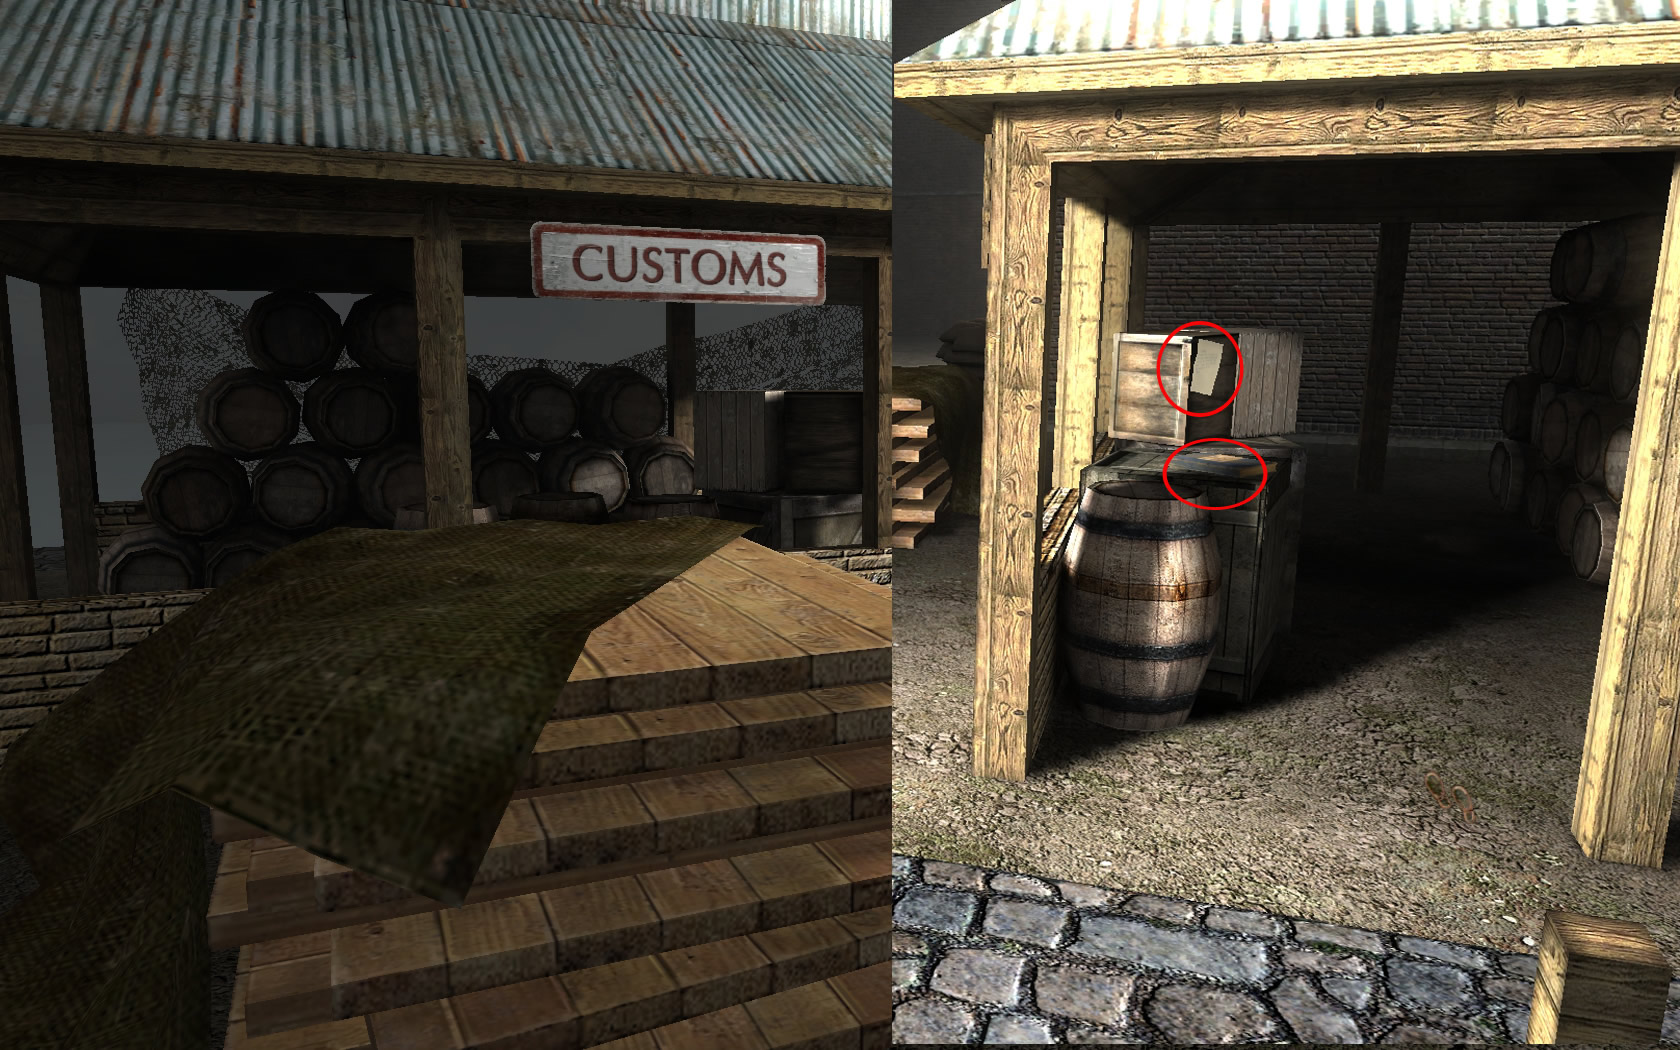
- At the left side you see the costume service.
- Read the note at the crate and have a look at the register, laying in front of the crate with the note.
- Use the map to to go to warehouse 16.
Warehouse 16
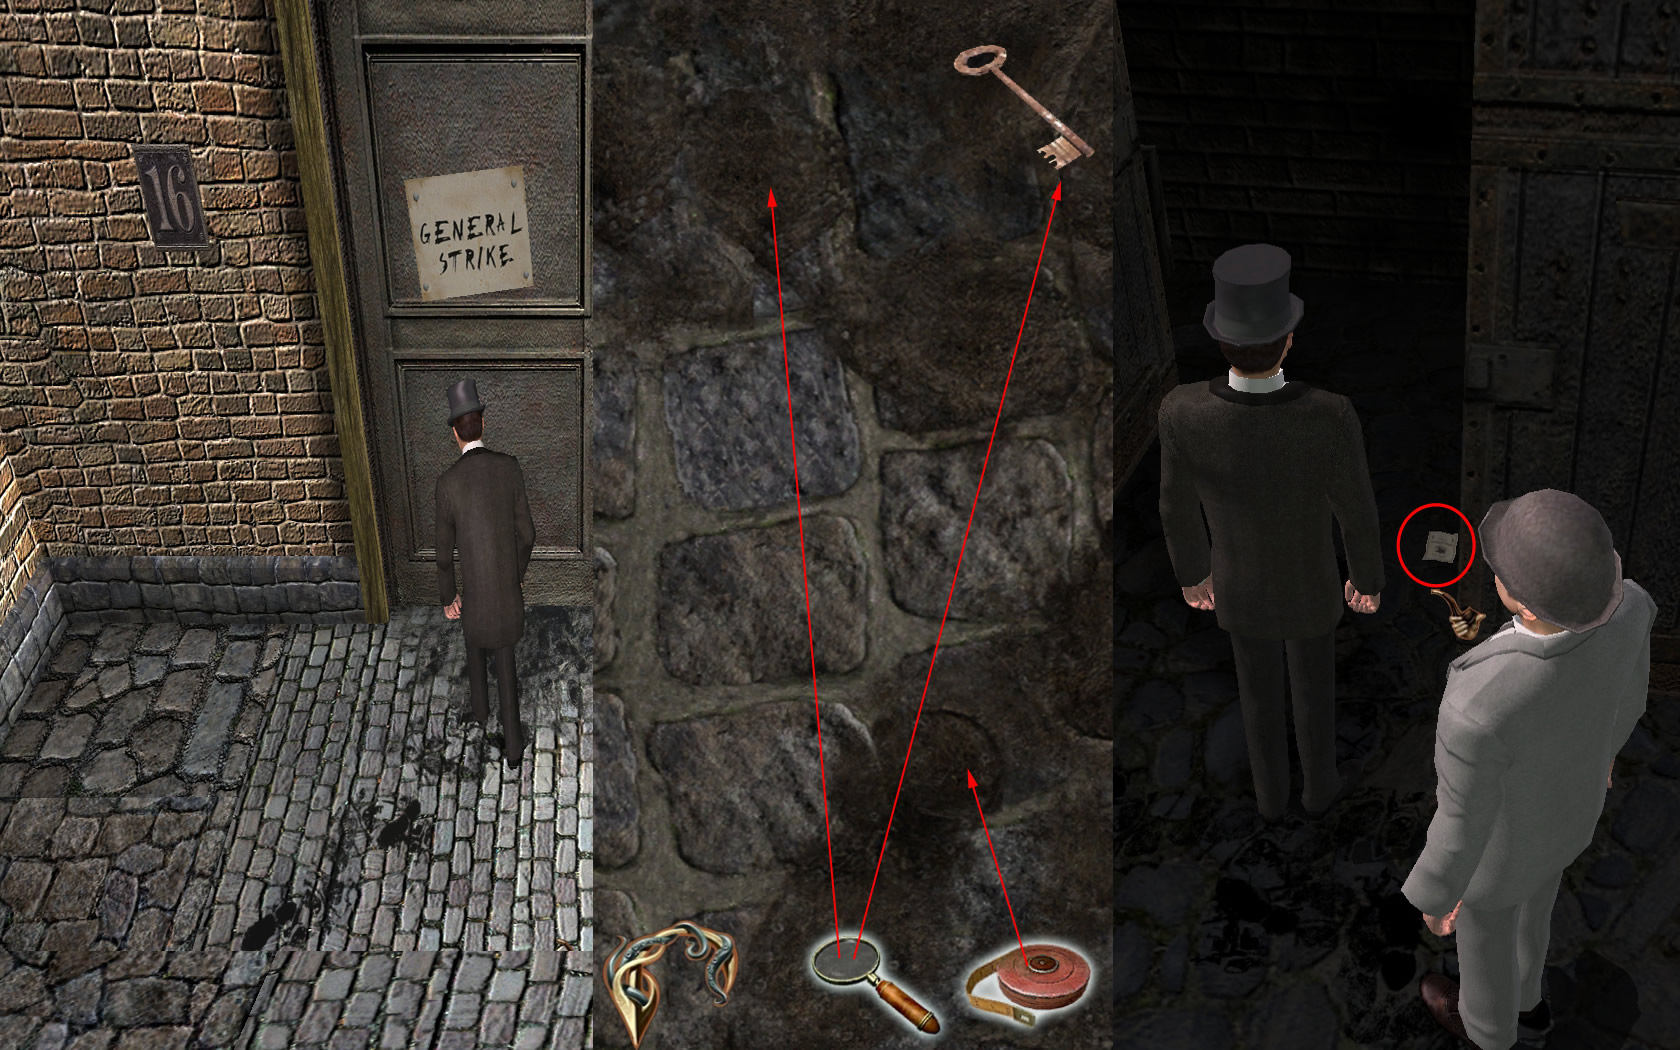
- The door is closed, the employer's are on strike.
- Have a look on the ground and examine the footsteps.
- Use the measuring tape to find out, that it is size 7 again.
- Use the magnifier at the footstep on top left and see, that there is a nail missing.
- Use the magnifier again to get the key from the top right.
- Follow the footsteps, first to the left, then down the stairs, till you come to a door.
- Open the door with the key you just found and grab the paper, laying on the floor.
- Use the map to go back to Baker Street.
Baker Street 221b
- Follow the conversation with Dr. Watson.
- When you have to answer the question about your next goal, answer "SWISS"
- You are leaving London now, going to Swiss.
Swiss [top]
Lobby
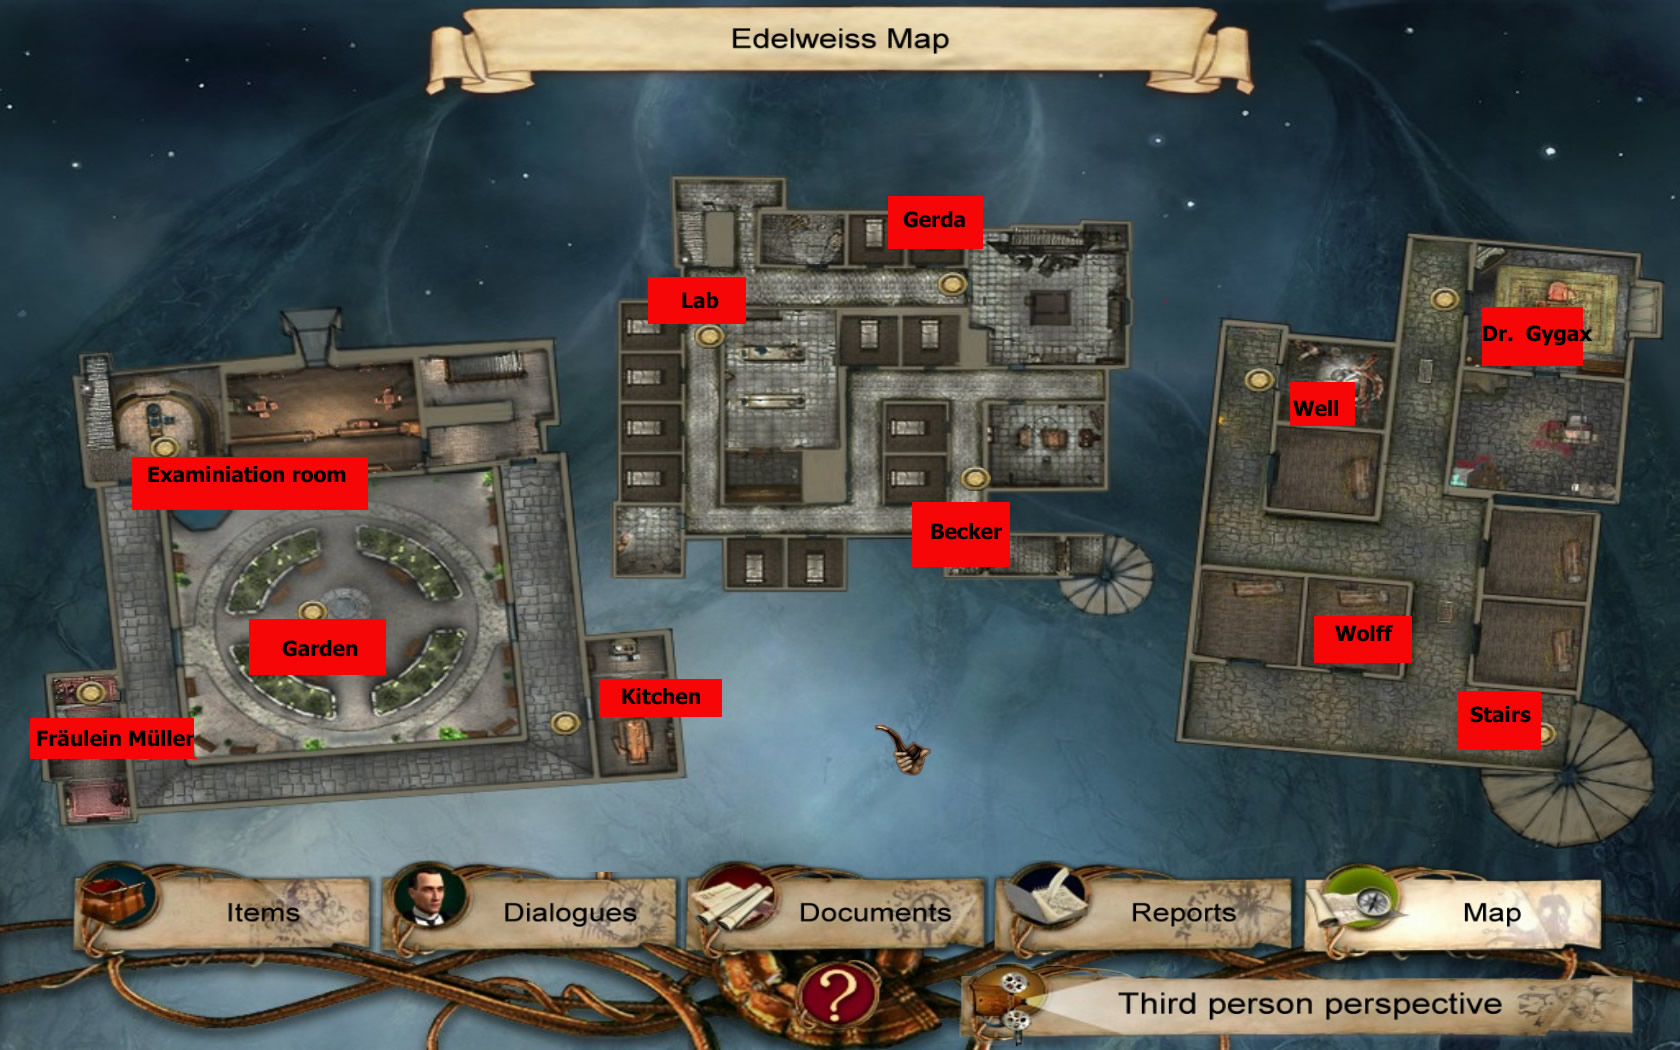
- After the train trip and a carriage ride, Dr. Watson is standing in front of the Edelweiss Sanatory.
- Enter the sanatory and talk with Ms. Müller. She will call Dr. Gygax.
- Talk to him.
- After Watson left, you see, that someone calling himself Amos Colby will be brought in the examination room.
Examination Room
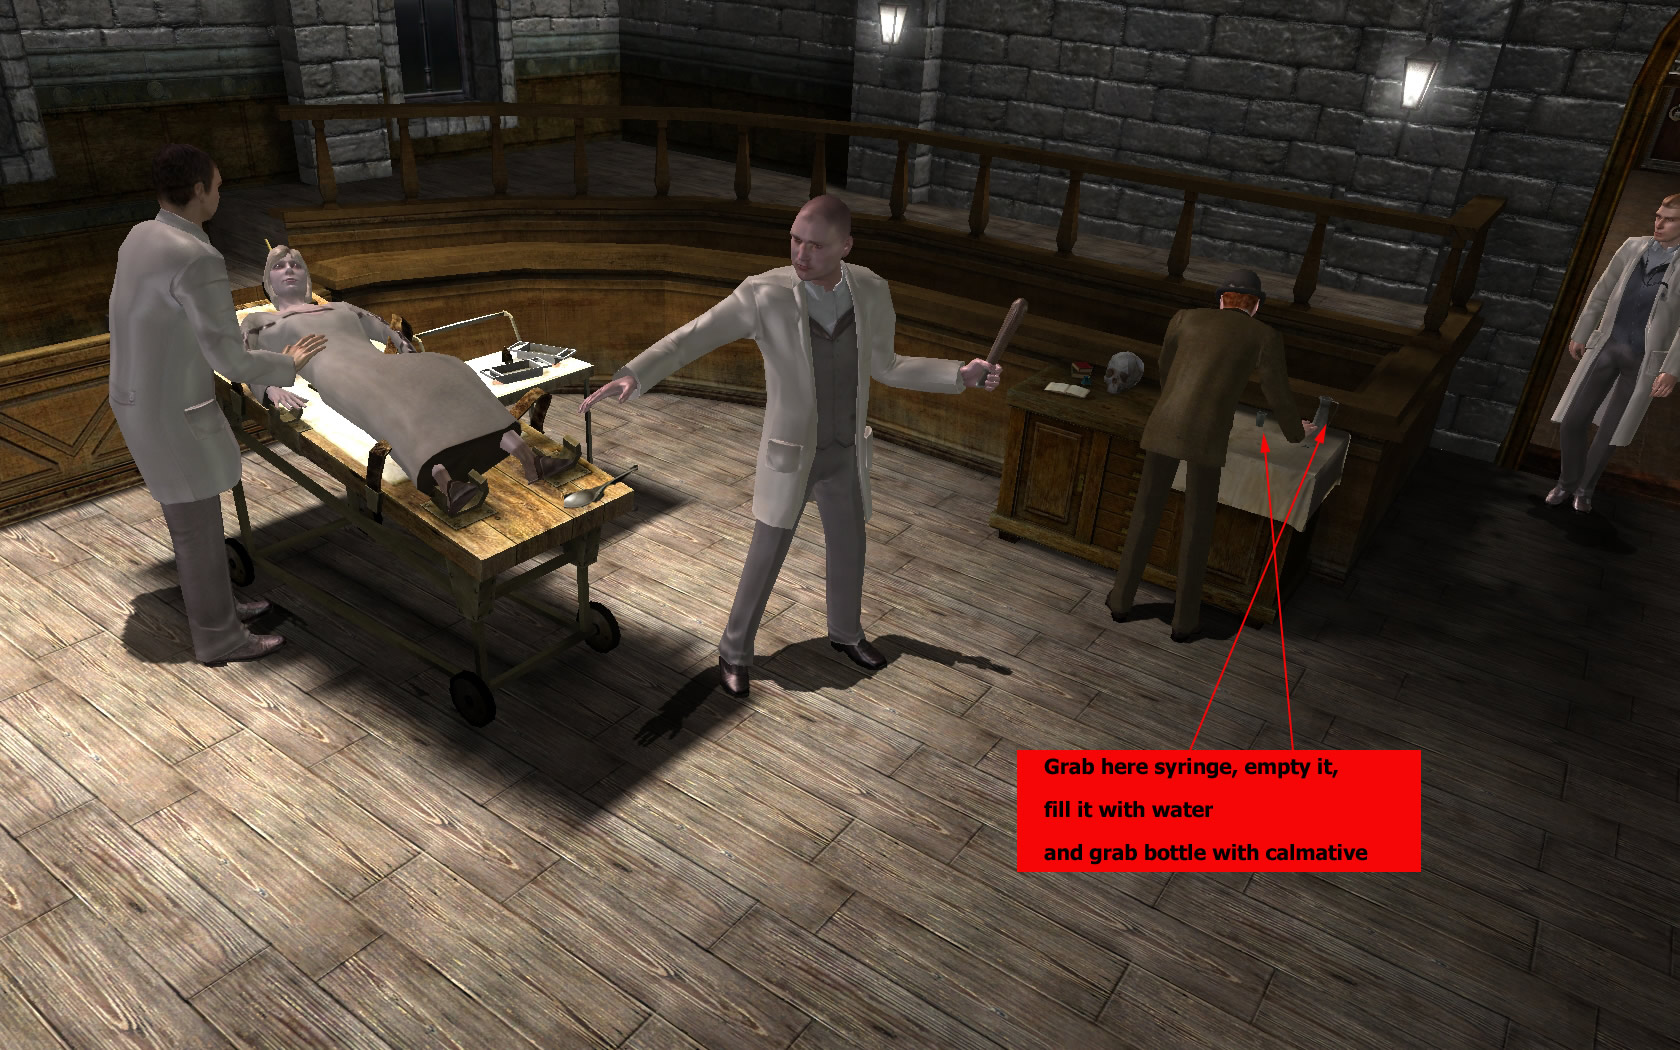
- You for sure already figured it out - Sherlock Holmes is Amos Colby.
- You have to be quick now: Turn to the right, grab the syringe and click it first on the little mug to empty it and then at the water jar, to fill it with water.
- Grab the bottle with calmative also.
- If you can't make it fast enough, don't worry.
- You will be able to come back after and get the calmative.
- But as you couldn't change the content of the syringe, you will be dizzy for a few moments in the next seen.
- The scene will look blur, but it will be over soon.
Cell
- On the ground, next to the head of the sleeping man, you will find a bucket and a spoon.
- Turn around to the matress.
- Get the jug right next to it and place it on the matress.
- Now get the blanket, laying as a roll on the ground left next to the mattress and place it also there.
- Get the hat out of your inventory and place it on the jug.
- Get the coat out of the inventory and click it on the blanket.

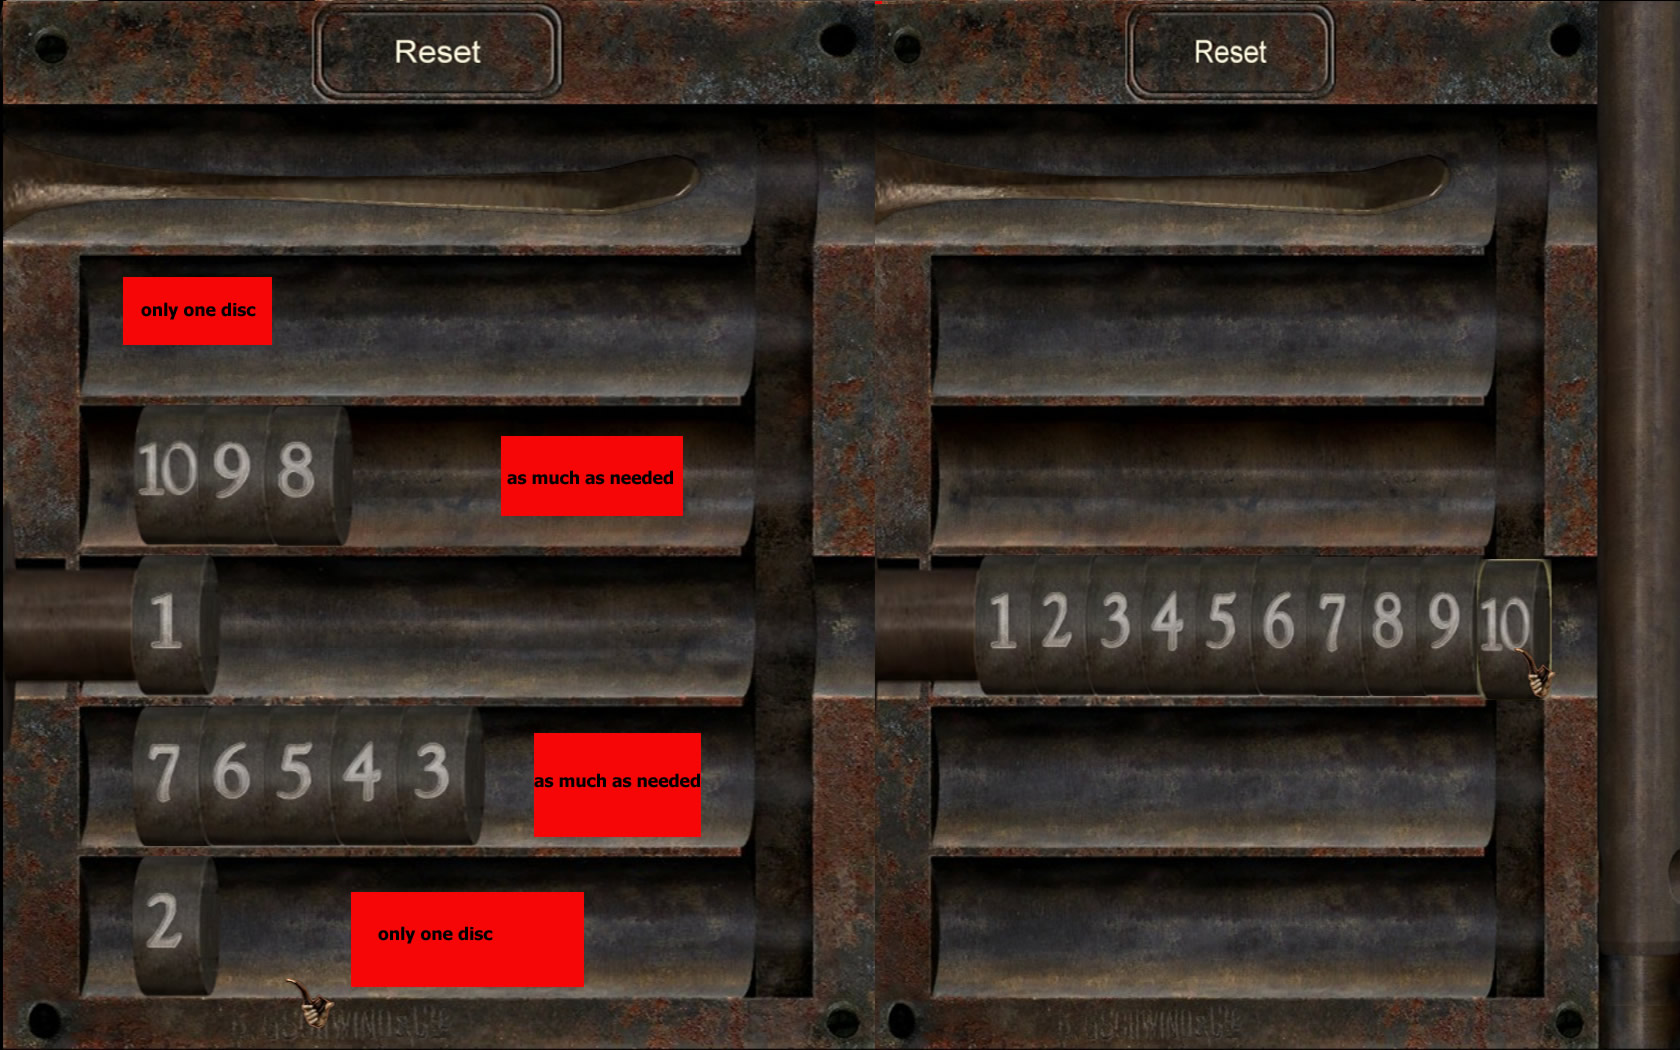
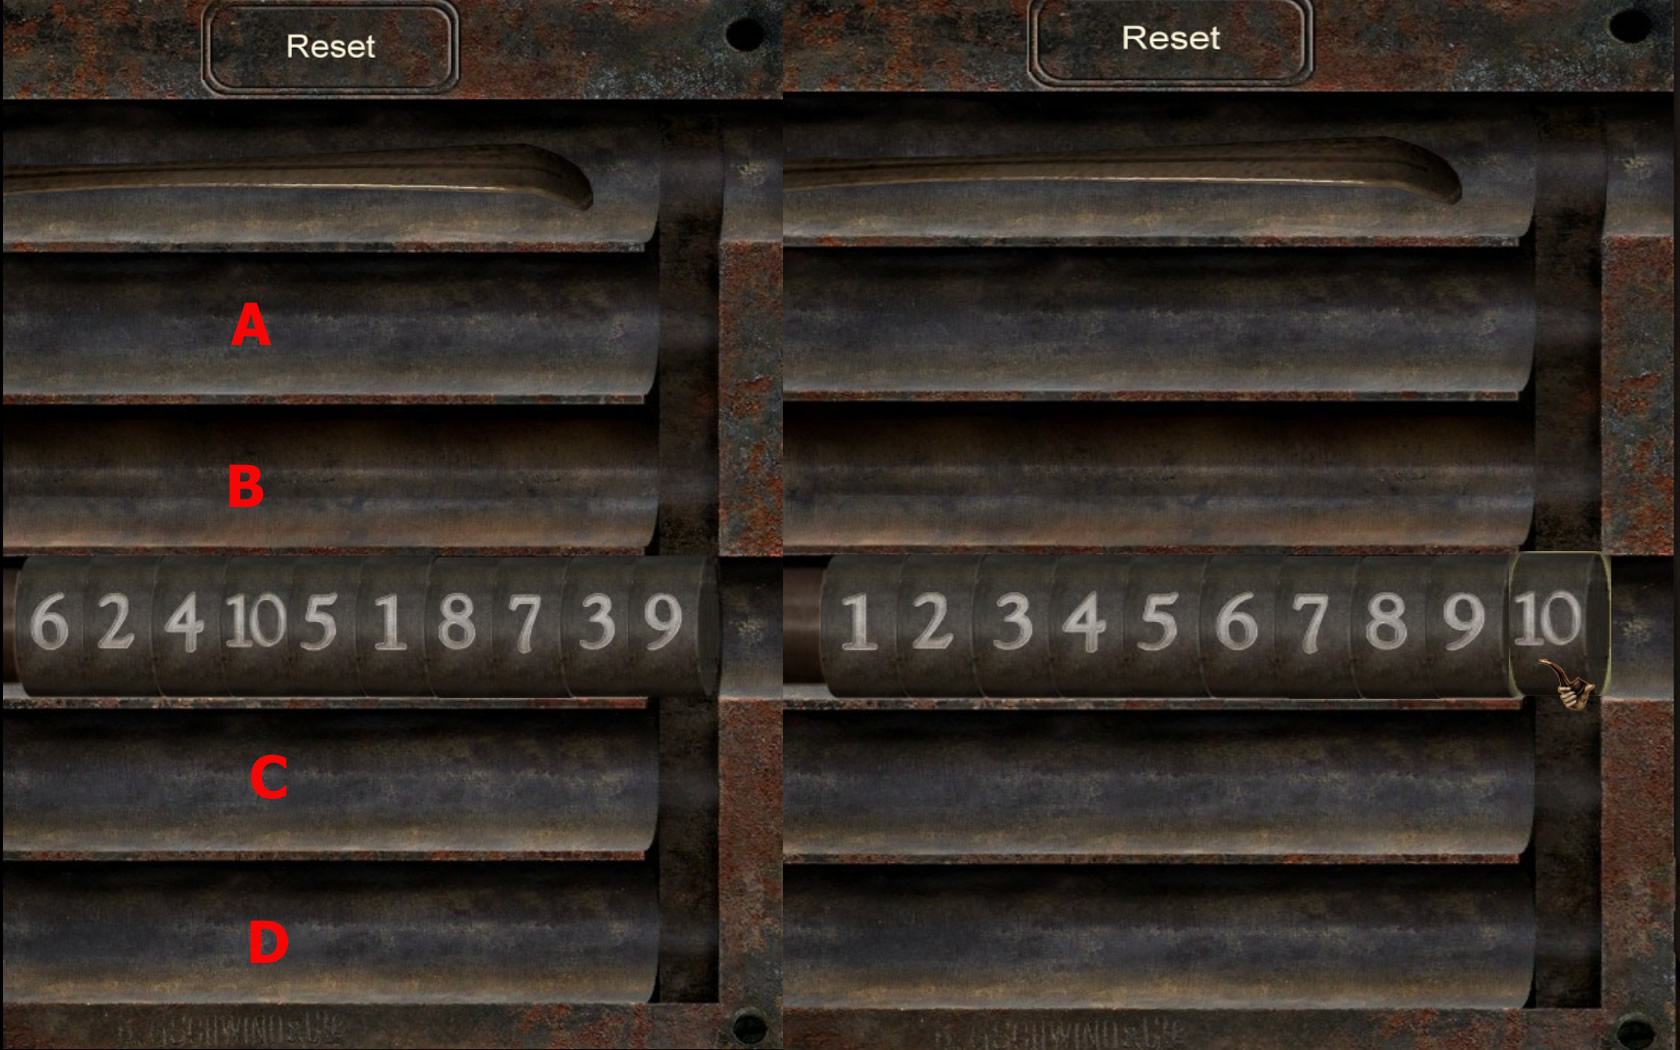
- Use the spoon at the cell door - a mini game opens.
- You will have to place the number discs from left to right 1 - 10
- You move the discs, you have 4 empty spaces - two on the top, two at the bottom.
- You can place at the first from top and the first from bottom one disc at a time.
- In the two middle spaces you can place as much as you need, but the have to be connected from high to low (7, 6, 5 ...for example)
- Seen the empty spots from top to bottom as A, B, C, D, this is the way to go:
- 10 in B
- 3 in A
- 9 in B
- 7 in C
- 6 in 6
- 2 in D
- 5 in C
- 4 in C
- 8 in B
- Now the 1 is standing free and you can place the others numbers from 2 - 10 back in the right order.
- When you did it right, the door will open.
Cell Block/Lab
- The door to your left is locked, so go to the right and turn to the left at the end of the way
- To your left is the lab, read the message left to the door.
- Enter the room, but be carefully: Do not double click for running, just single click.
- There is a nurse inside the lab, as long as you walk normal, he won't recognize you.
- If you get caught, you will be brought to the scene before and you will have to try again.
- Go one step inside and have a look at the drawer to your left.
- Click the bowl in the upper shelf and grab the three syringes.
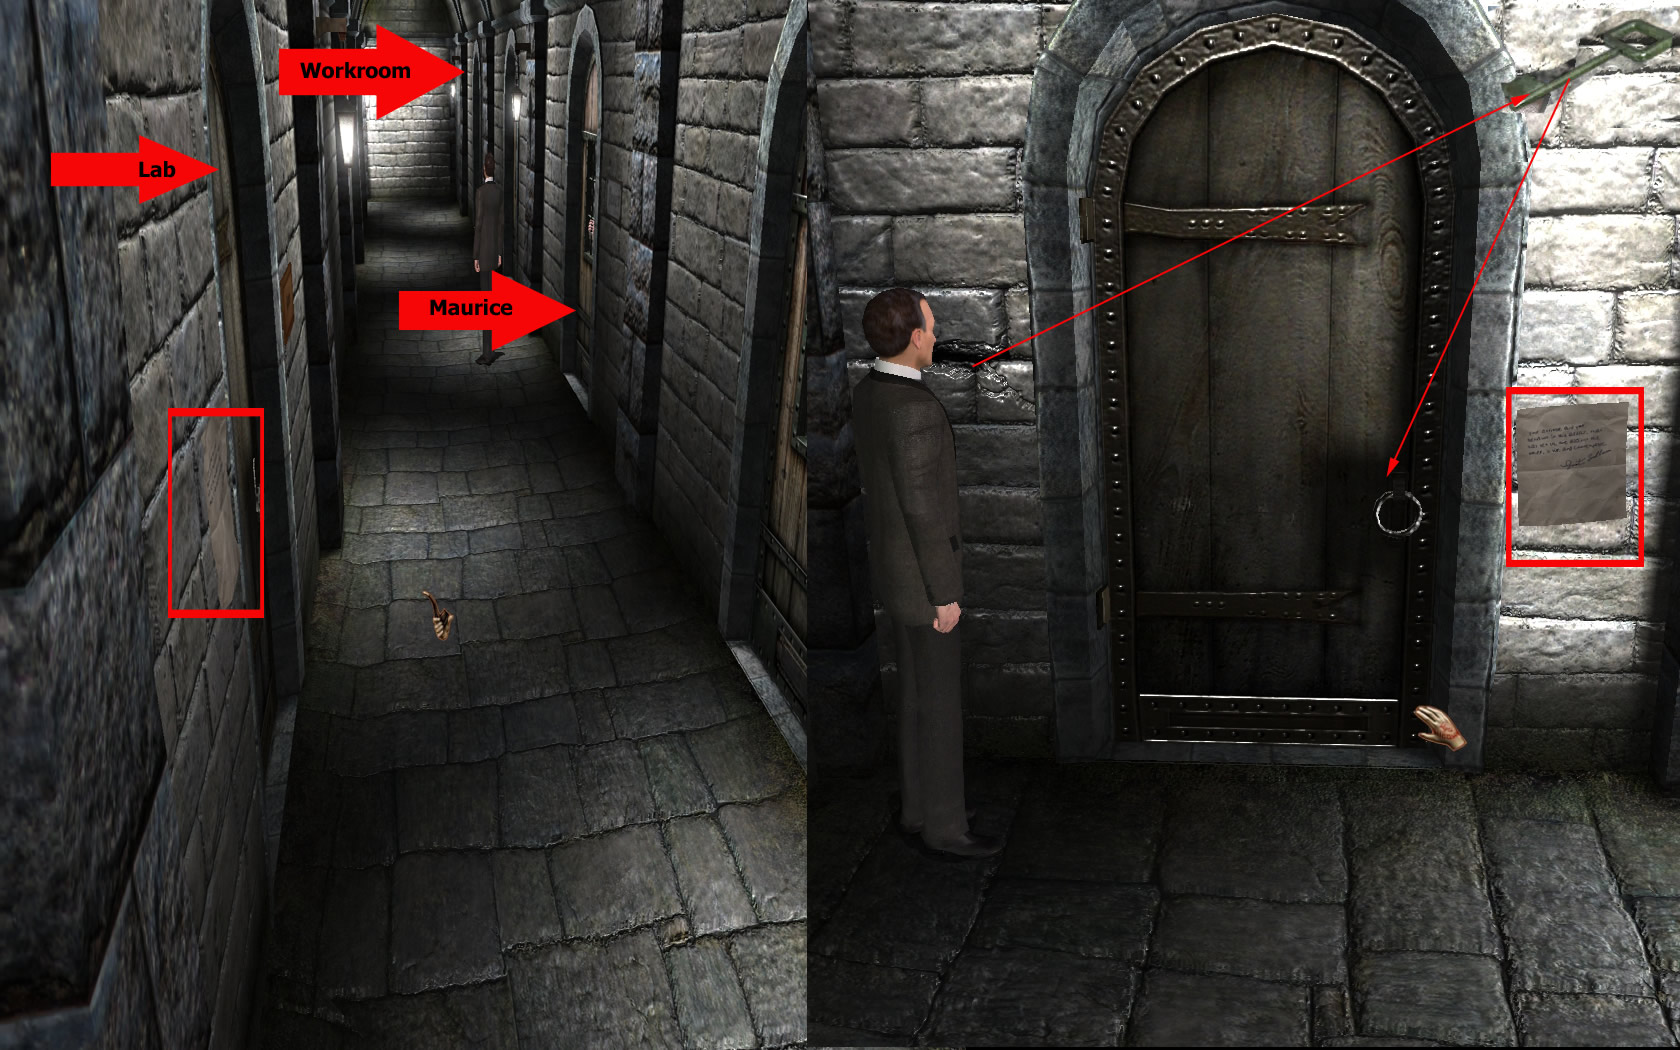
- Leave the lab and go on this way till the cut scene starts.
- Go till the end of the hall - the last door right side is the working room.
- Read the note, right to the door.
- Get the key out of the wall crack, left to the door.
- Open the working room with the key and enter.

Working Room
- At the wall on the floor, right side, you can grab the anvil.
- There is an iron rod laying on the floor, get it.
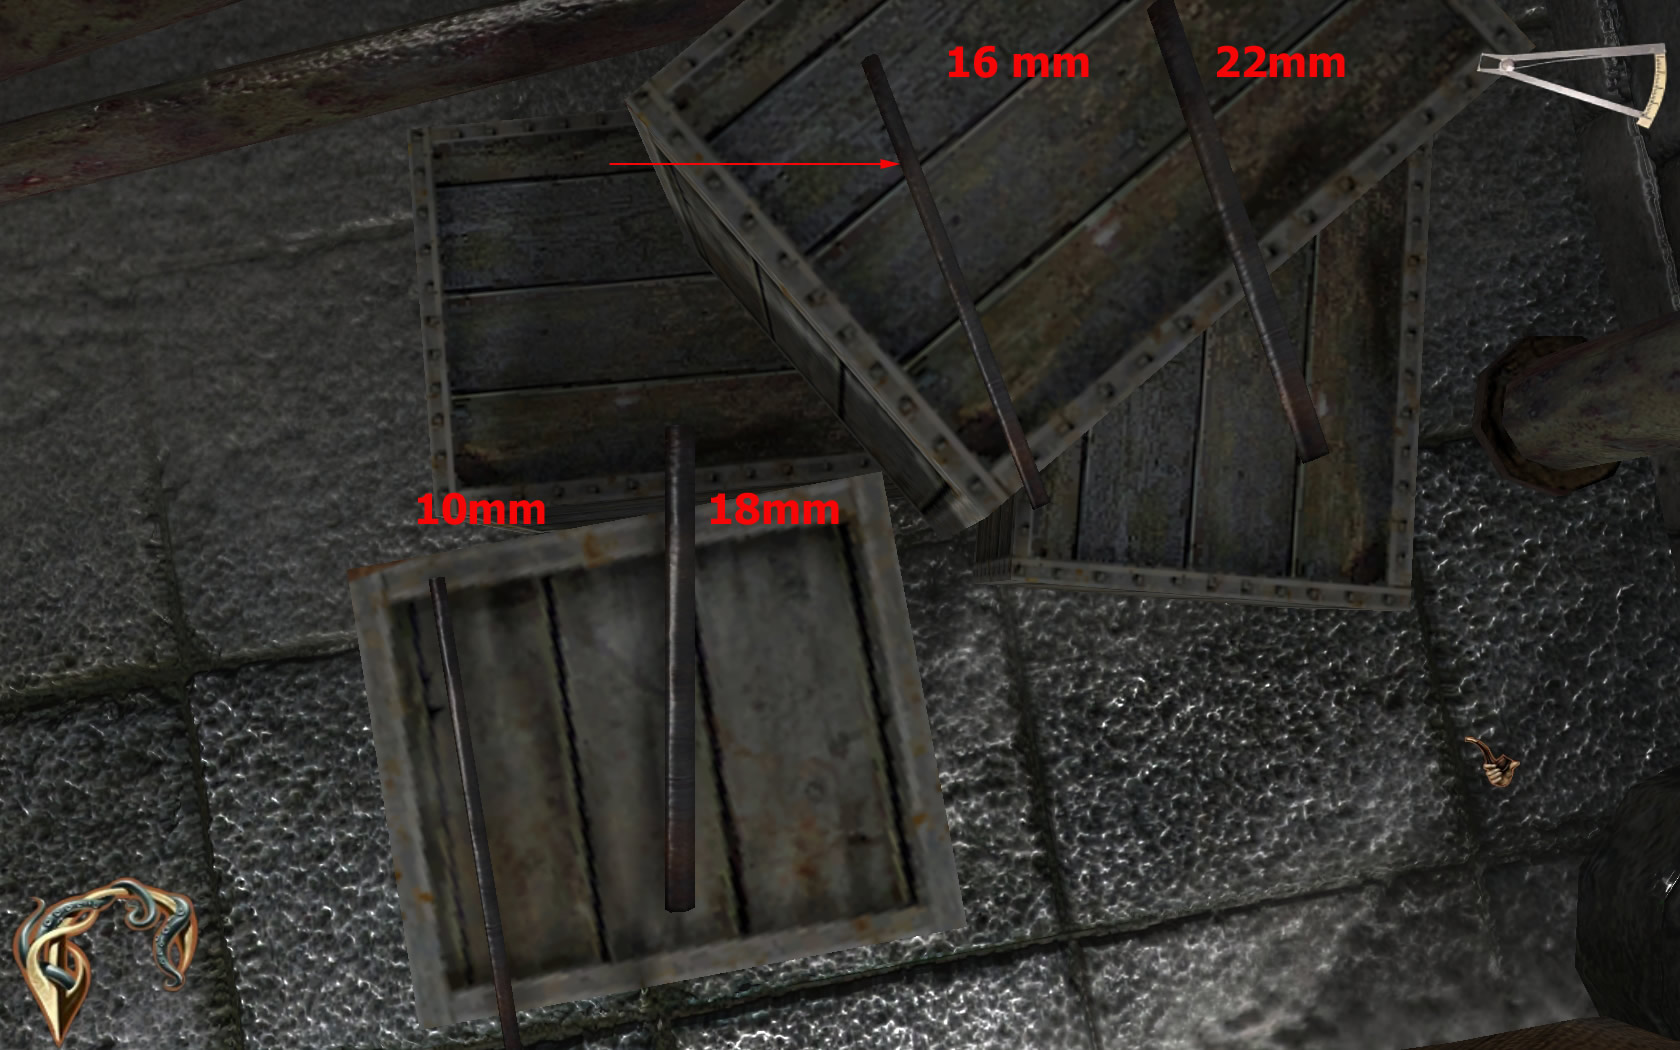
- There is a calliper at the left on the table, get it and turn around to the crates with the pipes on.
- Get the calliper out of the inventory and measure the rods.
- There are four pipes with, 10, 16, 18 and 22 mm bore.
- Your syringes do have 12, 15 and 16 mm - The pipe has to be a little bit bigger, than the syringe, so the only pipe of use for you is the one with 16mm.
- Grab it and open you inventory.
- Combine the calmative with the 15 mm syringe and then the syringe with the pipe.
- For those not having the calmative yet, you will go and get it in a minute.
- Now you have a blowgun.
- Leave the room and go back to Maurice.
- Give him the iron rod.

- After the cut scene with Maurice it's time to go back to the examination room for those of you, didn't get the calmative before.
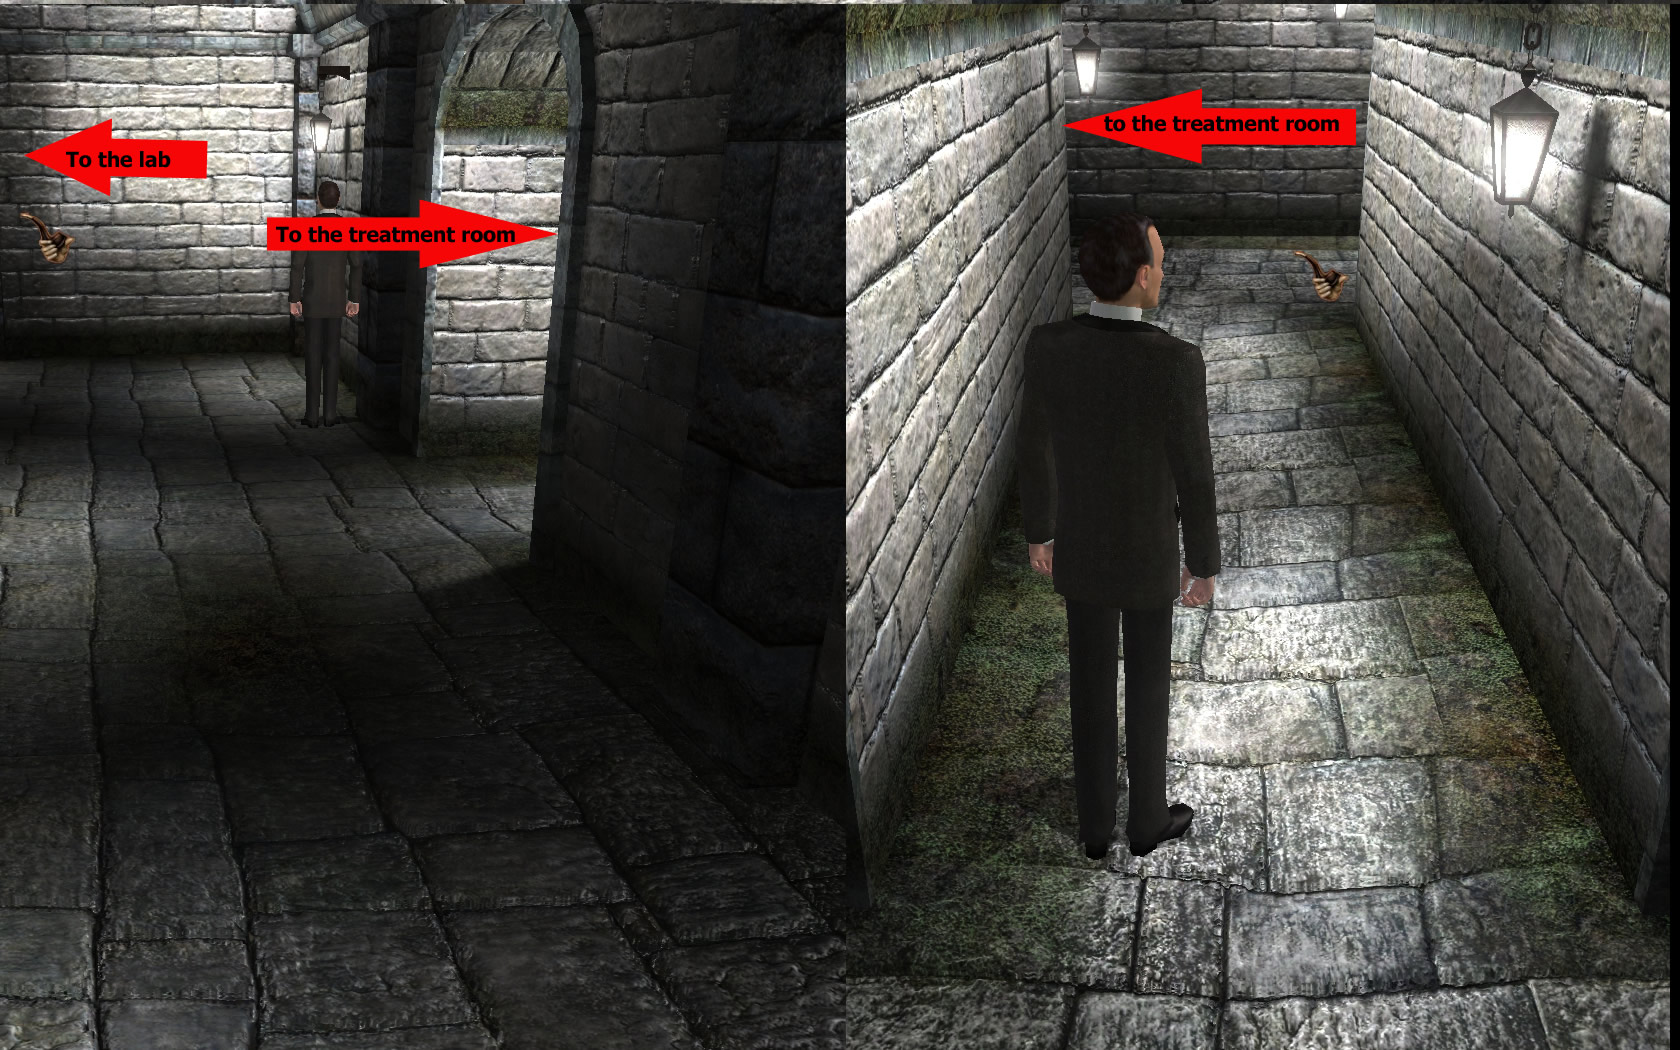
- Go to the lab and then right.
- Go left through the arch and right at the end.
- Go up the stairs and left straight ahead. Grab the bottle from the little drawer.
- Combine calmative, syringe and pipe as described before and go back to the lab.
- All others enter carefully the lab (do not double click to run)
Lab
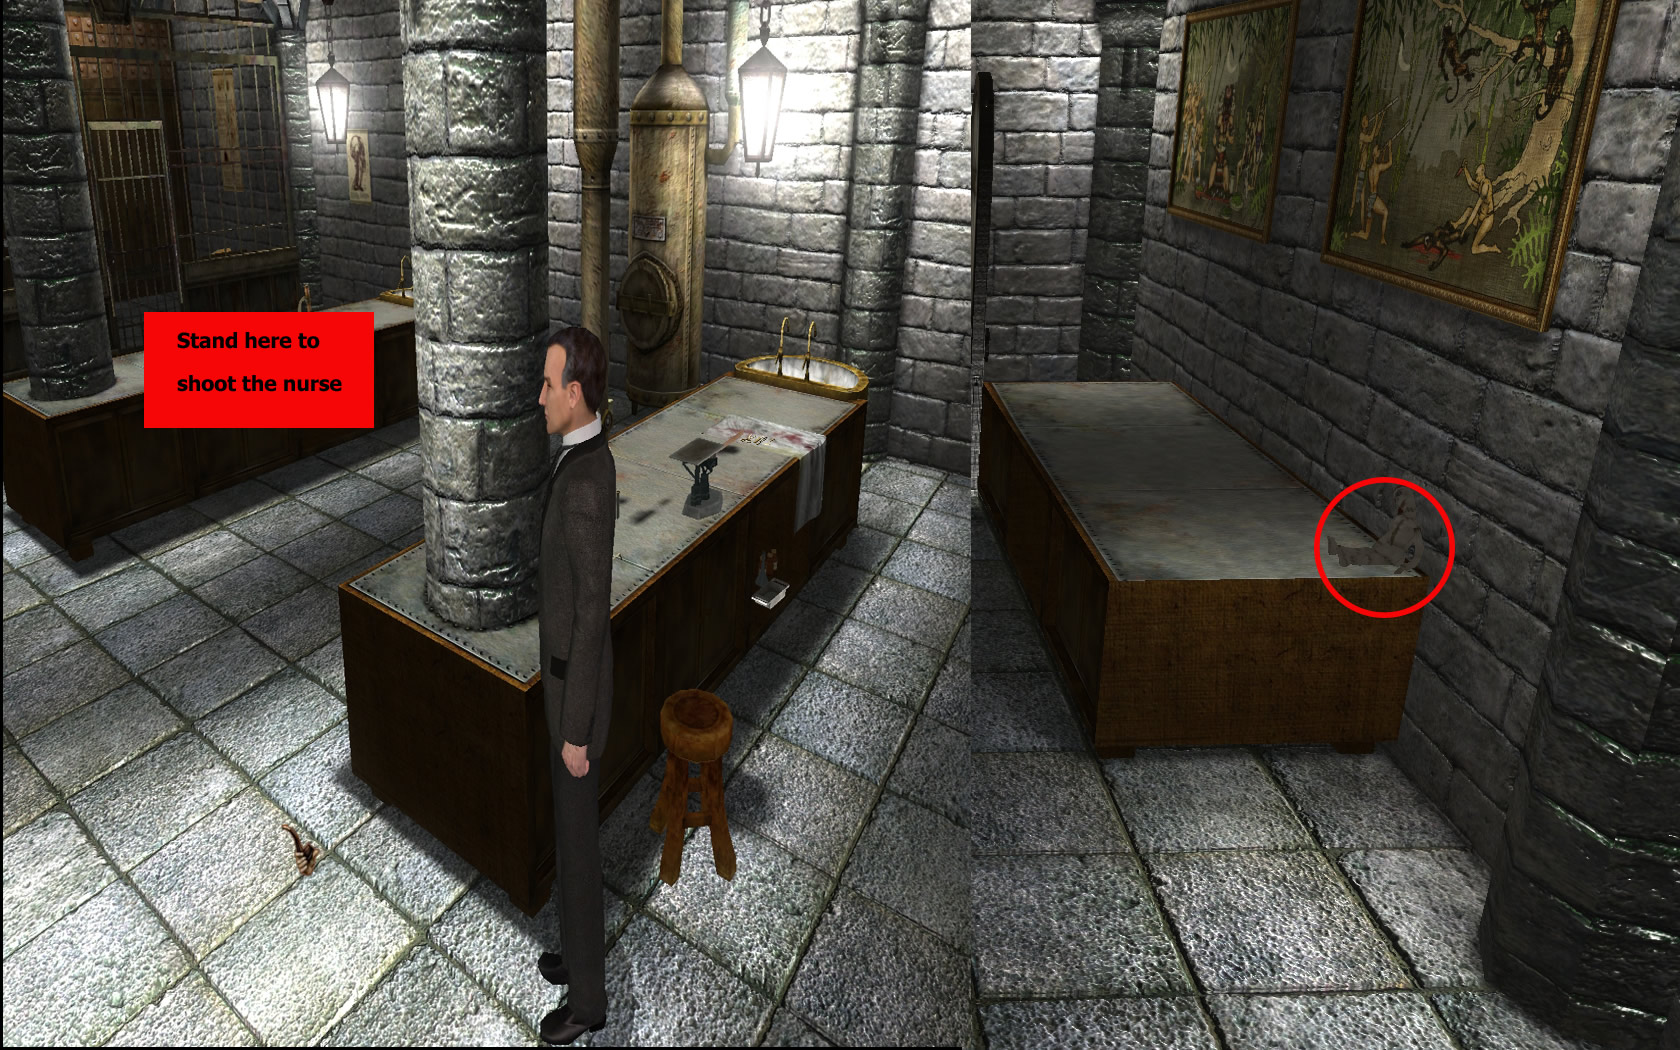
- Grab the doll from the drawer right.
- Go around the tables and stay in the middle of the two.
- You will shoot the nurse automatically.
- Go over to the part, where the nurse is and get a letter out of his pocket.
- Turn to the shelf and grab on of the bottles with the edelweiss-tag, the bottle chloride and the pink crystals from the middle shelf (you might have to use 1 Person View to have a chance to grab all).
- Turn around and get the letter out of the book on the lectern (you might have to use 1 Person View to have a chance to grab it).
- Leave the room and go to the examination room.
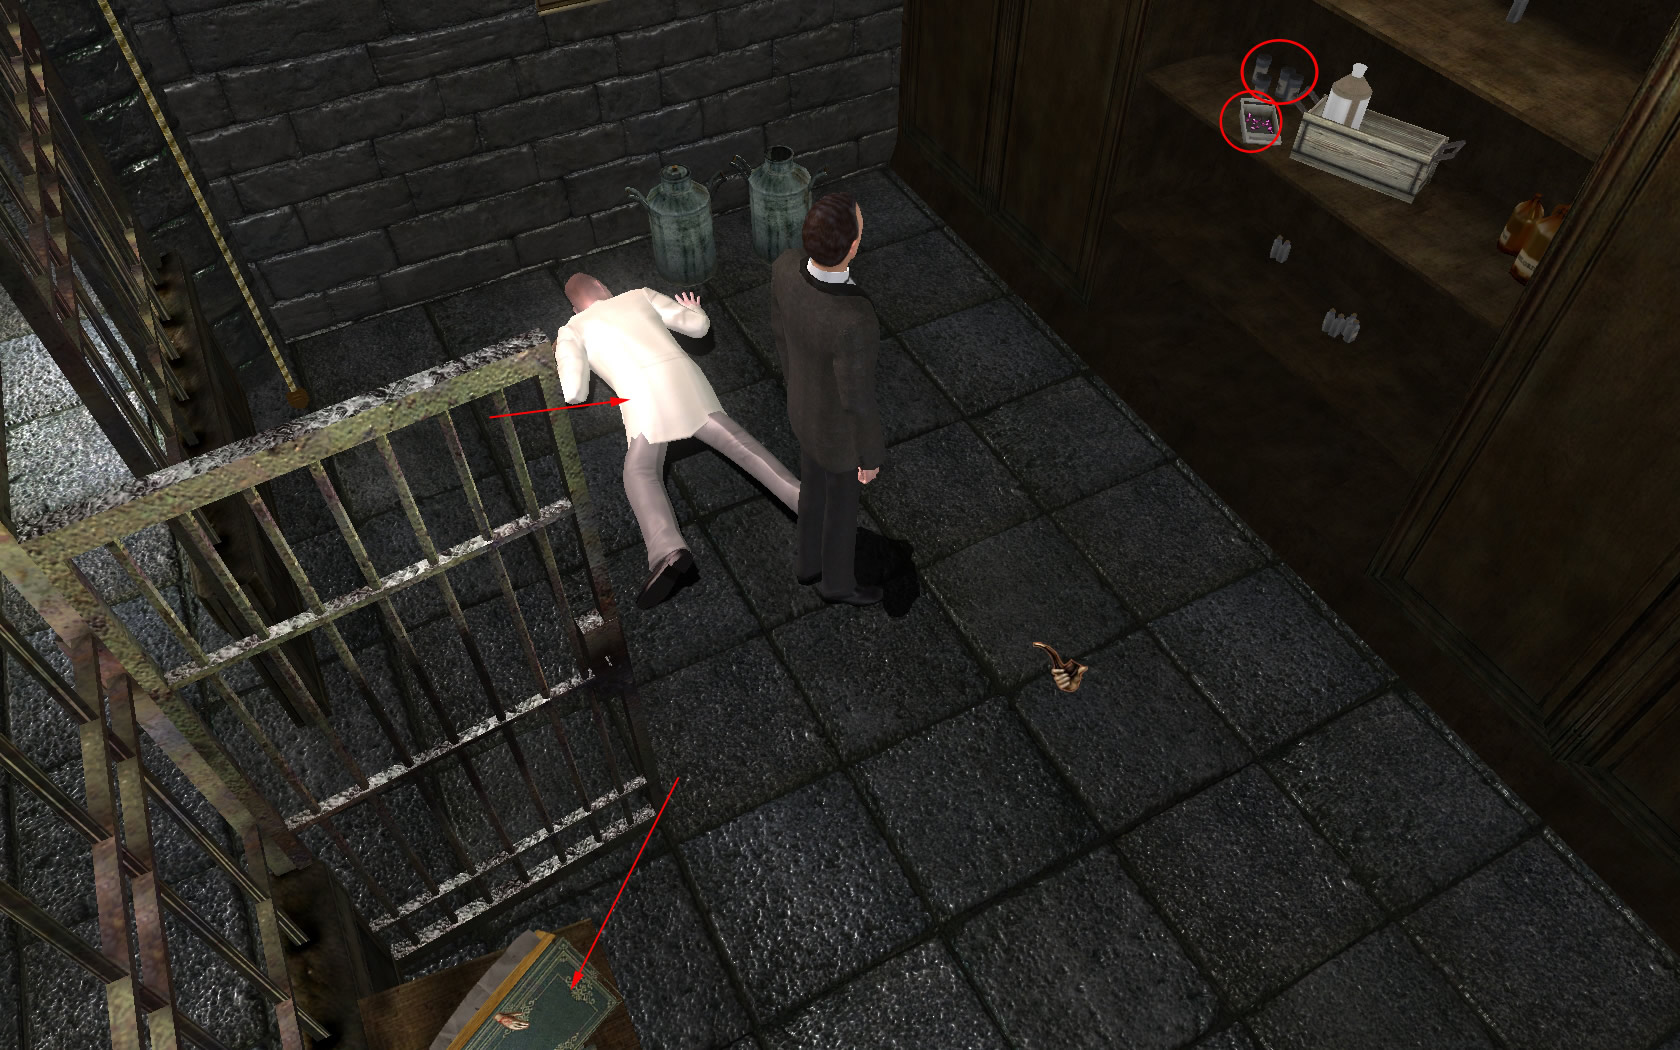
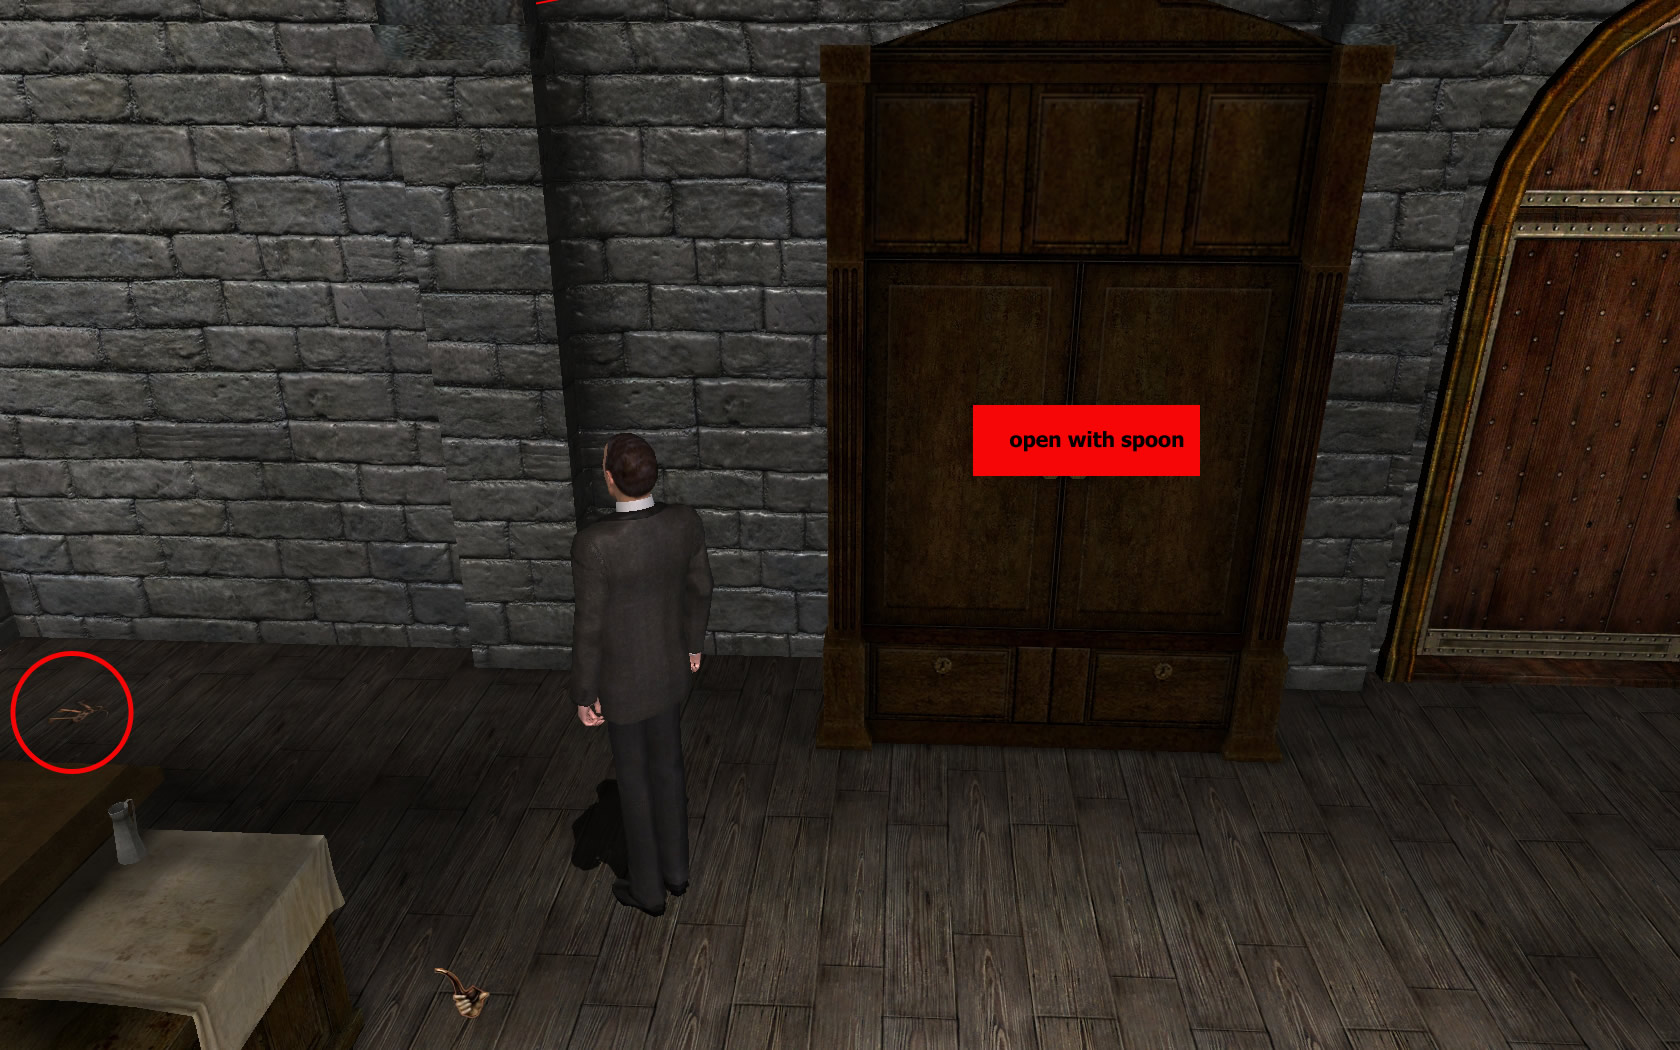
Examination Room
- Go to the door on the right side.
- Sherlock does not want it, but force him, as you need the bunch of key, laying on the floor in front of it.
- Open the huge closet with your spoon and click the white lab coat. Sherlock will put it on automatically.
- Open the door right to the closet - when it is locked, use the bunch of keys you just found.
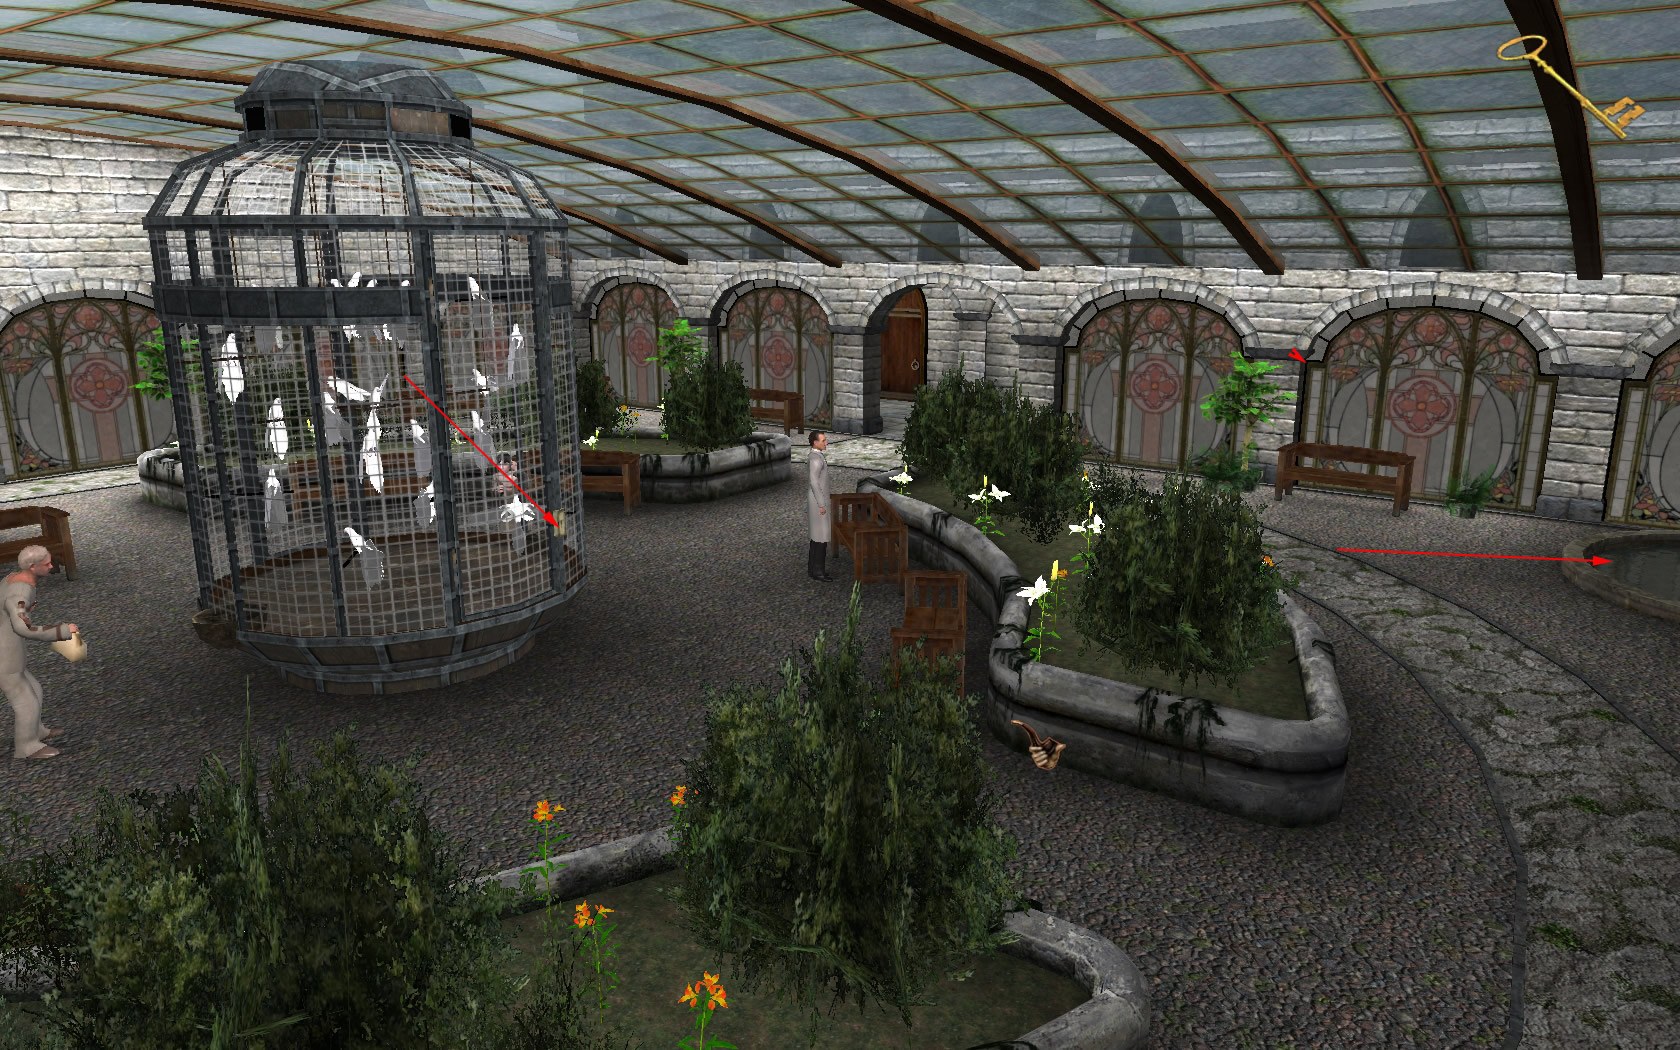
Garden
- Go two steps forward and then right into the garden.
- Go to the bird cage.
- After the cut scene go to the right and fill the bucket from your inventory at the well.
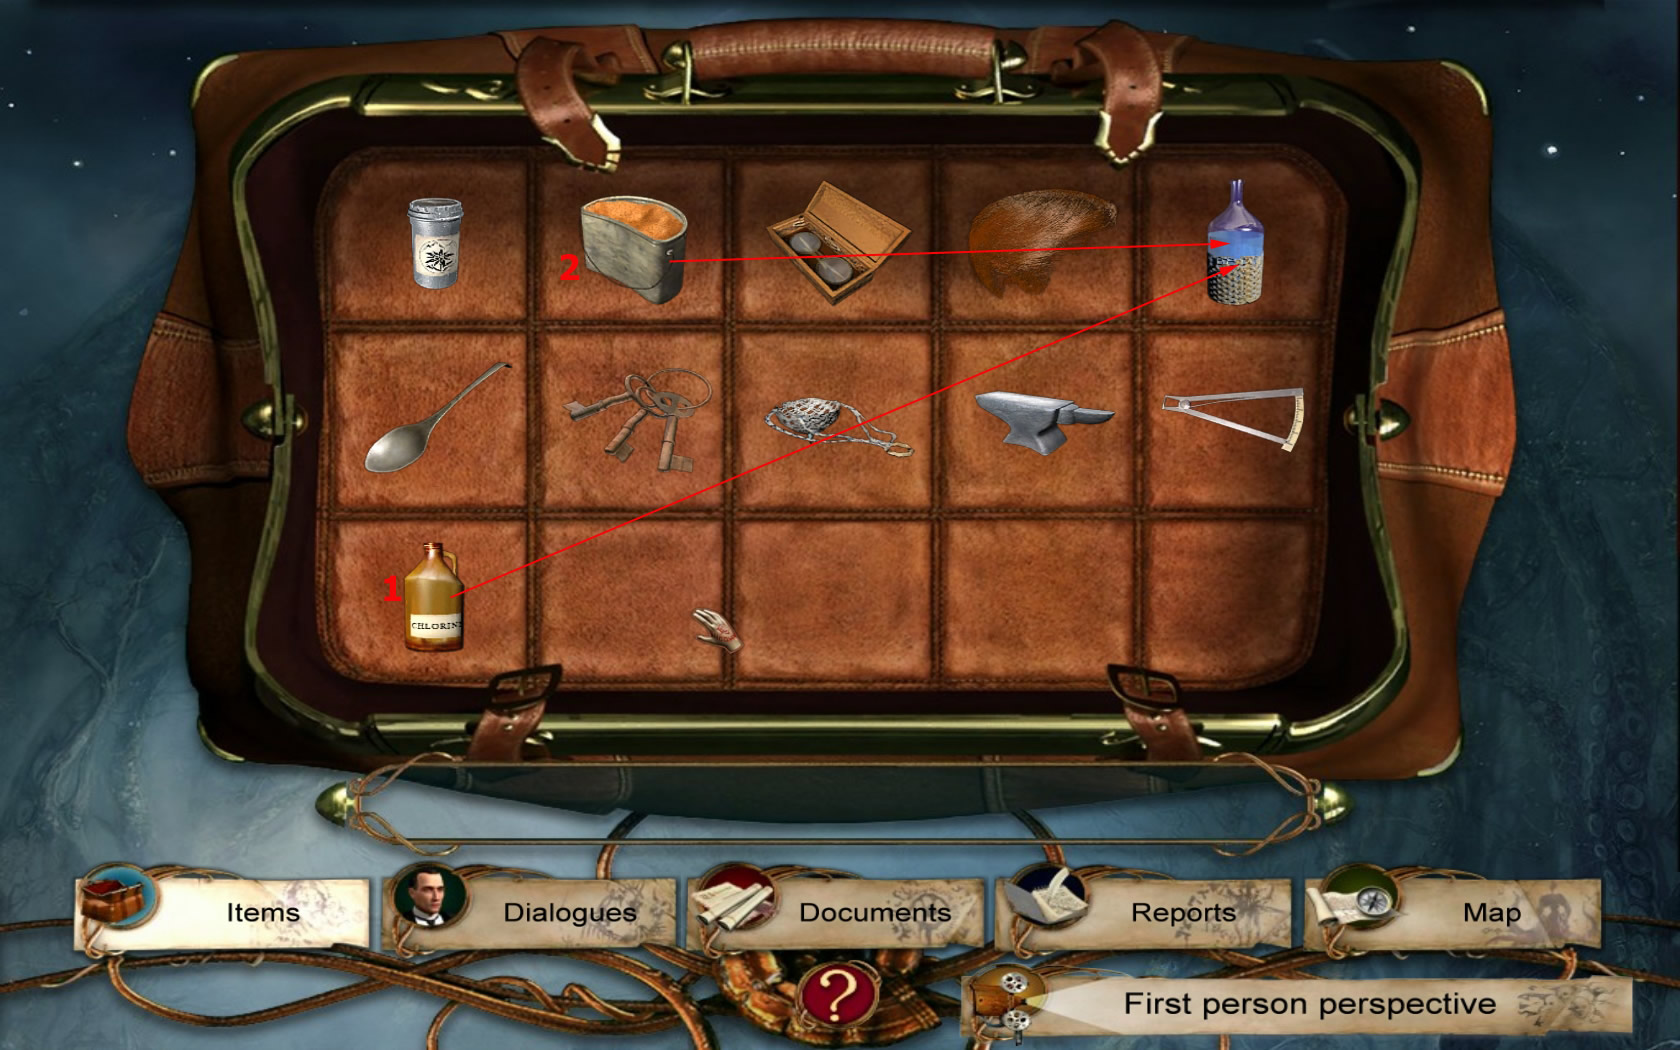
- Open you inventory and combine the pink crystals with the water bucket.
- Go all the way back to your cell.
Cell Block
- With the keys you open the door behind your cell.
- Go straight ahead - the door of the washing room is closed.
- Try to talk to Gerda in the cell left next to the washing room.
- Leave here and use the map to go to the lab and from there to the working room.
- Follow the way to the left and open the next door with your bunch of keys.
- Go straight ahead and left at the end.
- You see a trolley in front of a cell, talk with Becker, the man inside the cell.
- He needs his medication.
- Give him the bucket with the crystal water (if you haven't combine the pink crystals with the water yet, now you have to).
- He tells you, that Gerda has the key you need and that you have to give her her doll back in trade.
- You can use the map to go back to Gerda.
- Give her the doll.
- After the cut scene you will have the key for Ms. Müllers room.
- Go back to the hall from where you can enter the garden.
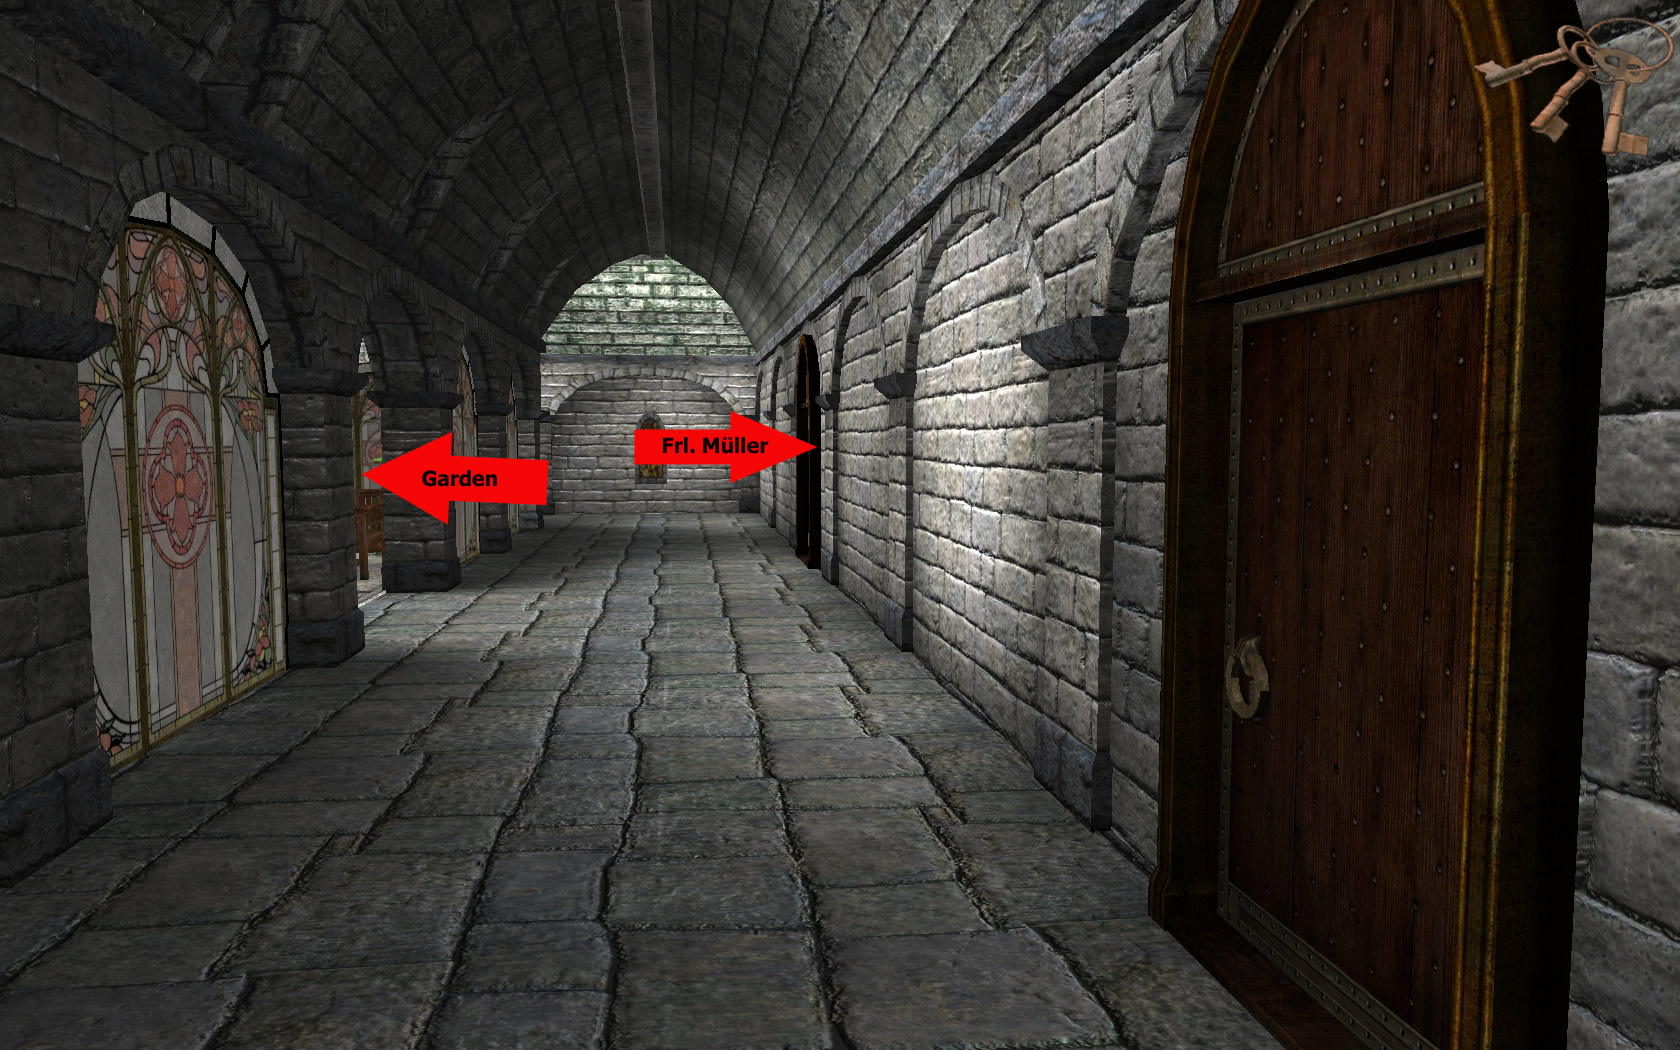
Ms. Müller's Room
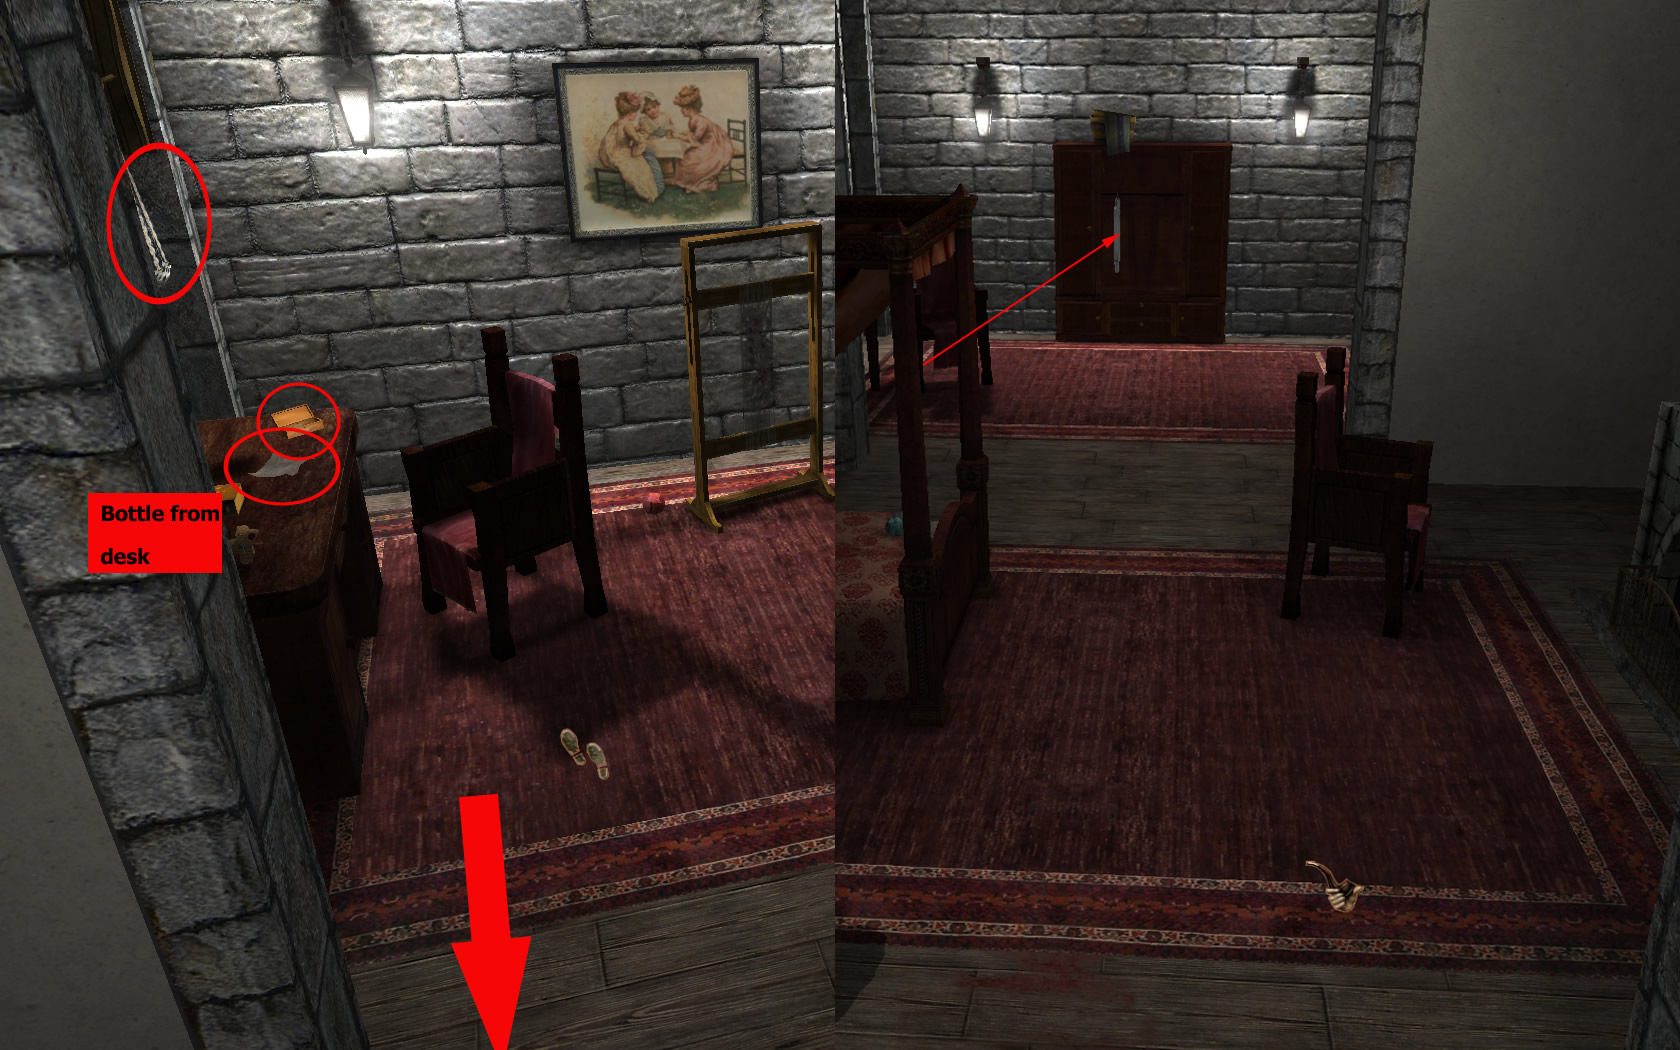
- Go to the second room on the right side and open it with the key.
- Get a letter from the desk, the bottle, have a look at the book and grab the spectacles.
- Right side next to the desk, you can get a hanging basket.
- Turn to the left and go to the closet at the other end on the room.
- Click the white lab coat and receive the key for the bird cage.
Garden
- Return into the garden.
- Fill the bottle with water at the well and open the cage then.
- Go to Fräulein Müllers room and walk all the way till you see at the right side the kitchen.
Kitchen
- Opening the door and you hear the cook singing.
- You need some to make her leave.
- Use the map to go to the lab.
Lab
- Go to the place, where the nurse is laying and fill your bucket with potash.
- Go back to the first table and see the scale.
- Click first the water bottle and after it the bucket with potash.
- Sherlock knows now how to mix the different ingredients.
- Open you inventory and combine first the chloride with the water and after the potash.
- Use the map to go back to the kitchen.
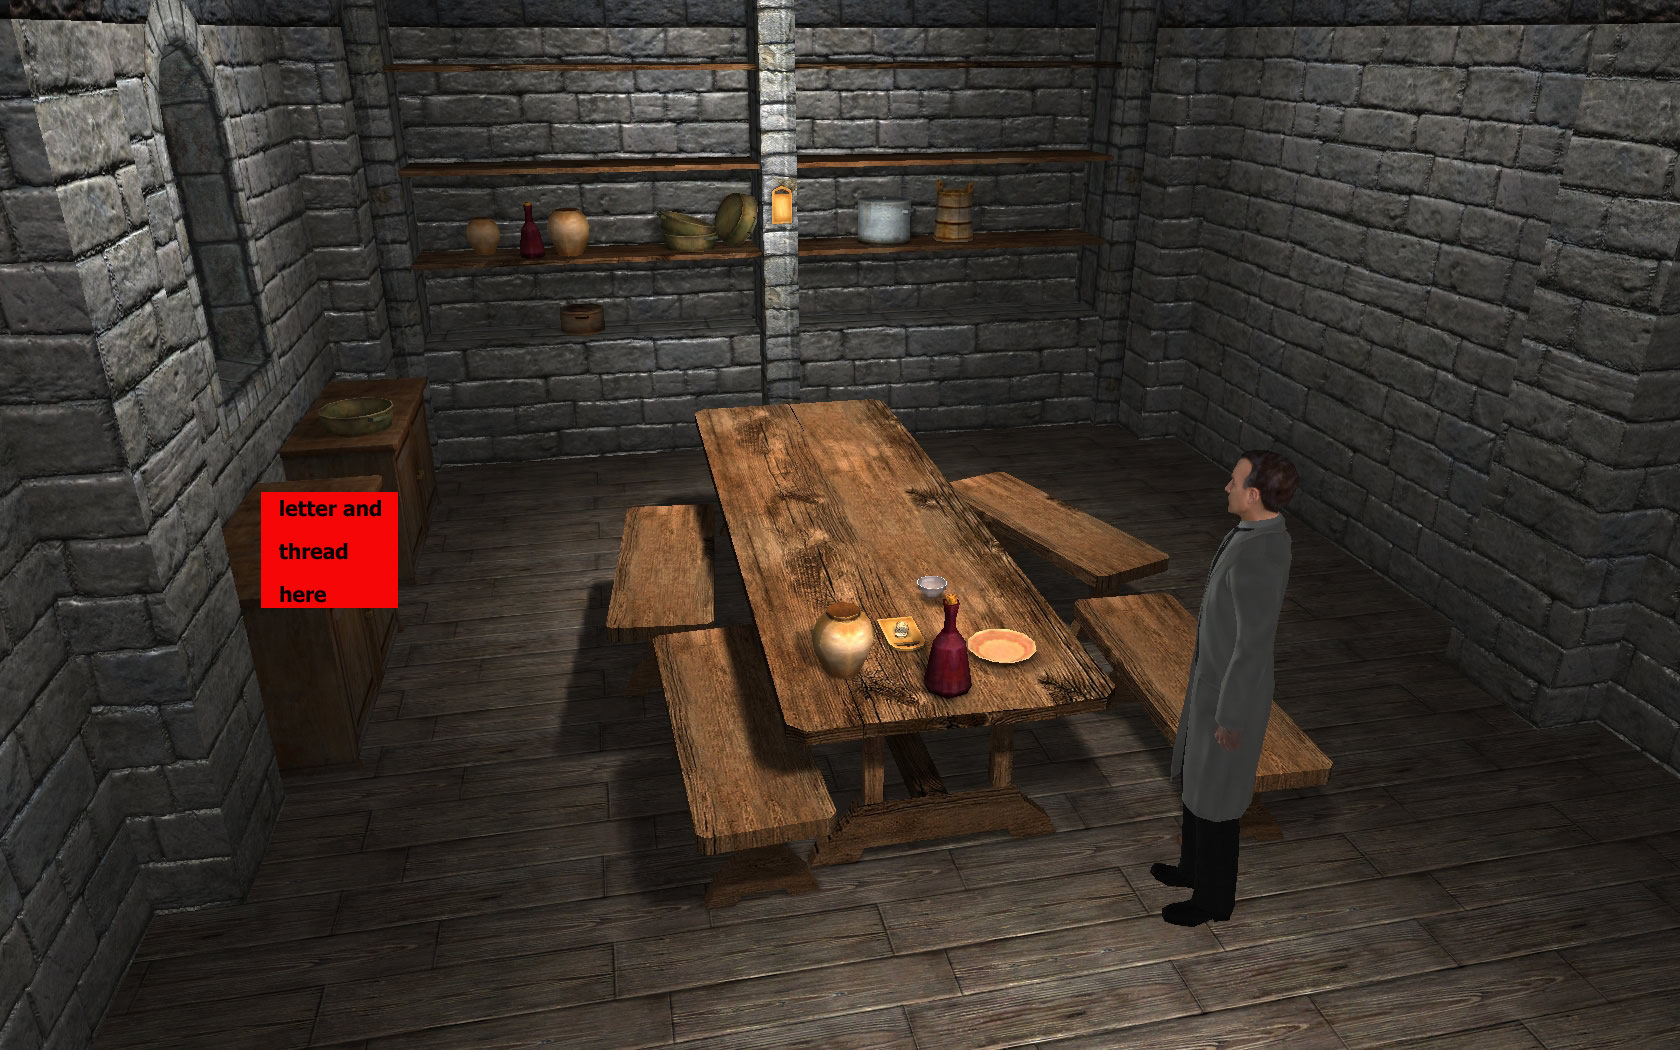
Kitchen
- Open the kitchen door - the bomb will be placed automatically.
- The cook leaves and you can enter the kitchen.
- Get the letter and a thread from the drawer left to the table.
- Read the letter, you will need this information later.
- Use the map and choose Beckers cell.
Cell Block
- Talk with Becker, he has interesting information.
- Take the tea trolley.
- Facing Becker go left now.
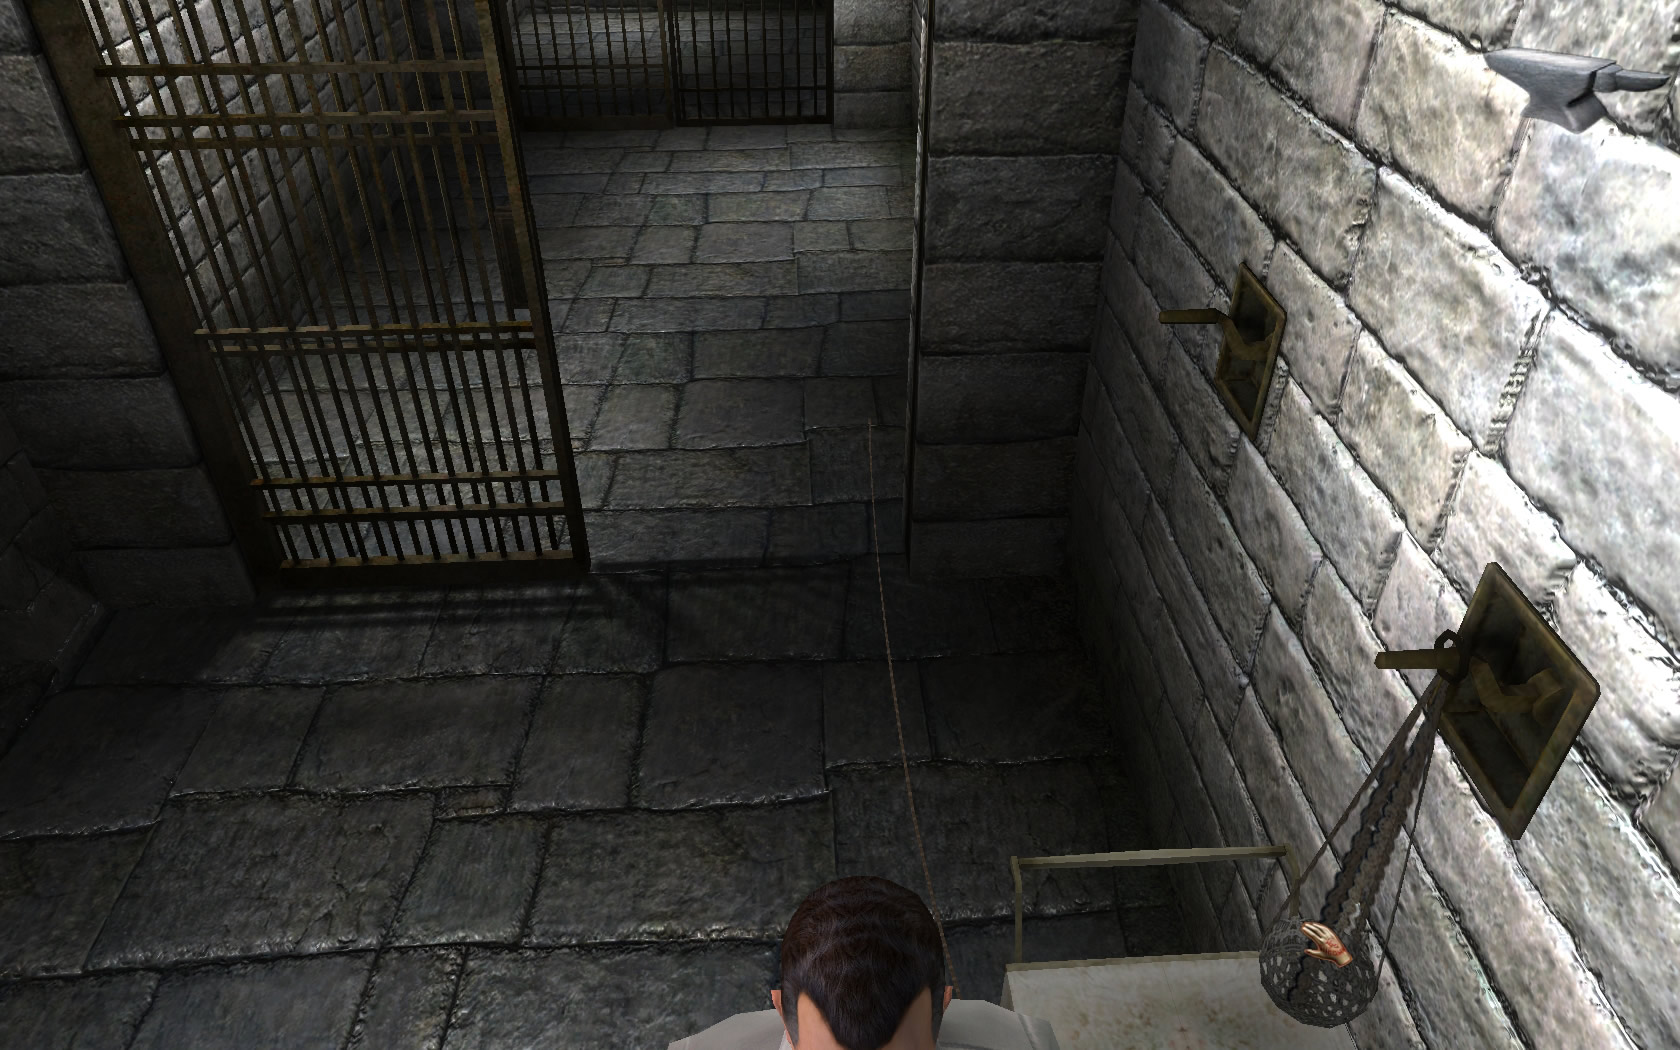
- Follow the way till you are standing in front of a closed gate, another closed gate is right behind this one.
- At right side you see two handles.
- Clicking the left handle will open the first gate.
- Clicking the right handle will open the second gate, but close the first same time.
- You will have to do the following steps in first - person - view.
- Place the tea trolley under the right handle.
- Now get the hanging basket at the right handle.
- The anvil goes into the hanging basket.
- The thread has to be connected with the handle of the tea trolley, left side.
- Now pull the left handle to open the first gate and walk through.
- On the floor next to the wall you will find the end of the thread.
- Pull it and the second gate will open, the first will close.
- Go through the second gate.
- At the wall on the other side, you will find another handle.
- Pull it and the first gate will open without closing the second one.
- Go down the stairs.
Basement/ "Kein Zutritt"
- Go straight ahead.
- The first door to the right is "Wolff".
- He will only talk with Professor Schwarz.
- Go back and right, where the arrow says "Dr. Gygax", but don't follow but go next left.
- The arrow there says "Kein Zutritt" (No Enter)
- At the end of the way right side a door has a sign with "Kein Zutritt" also.
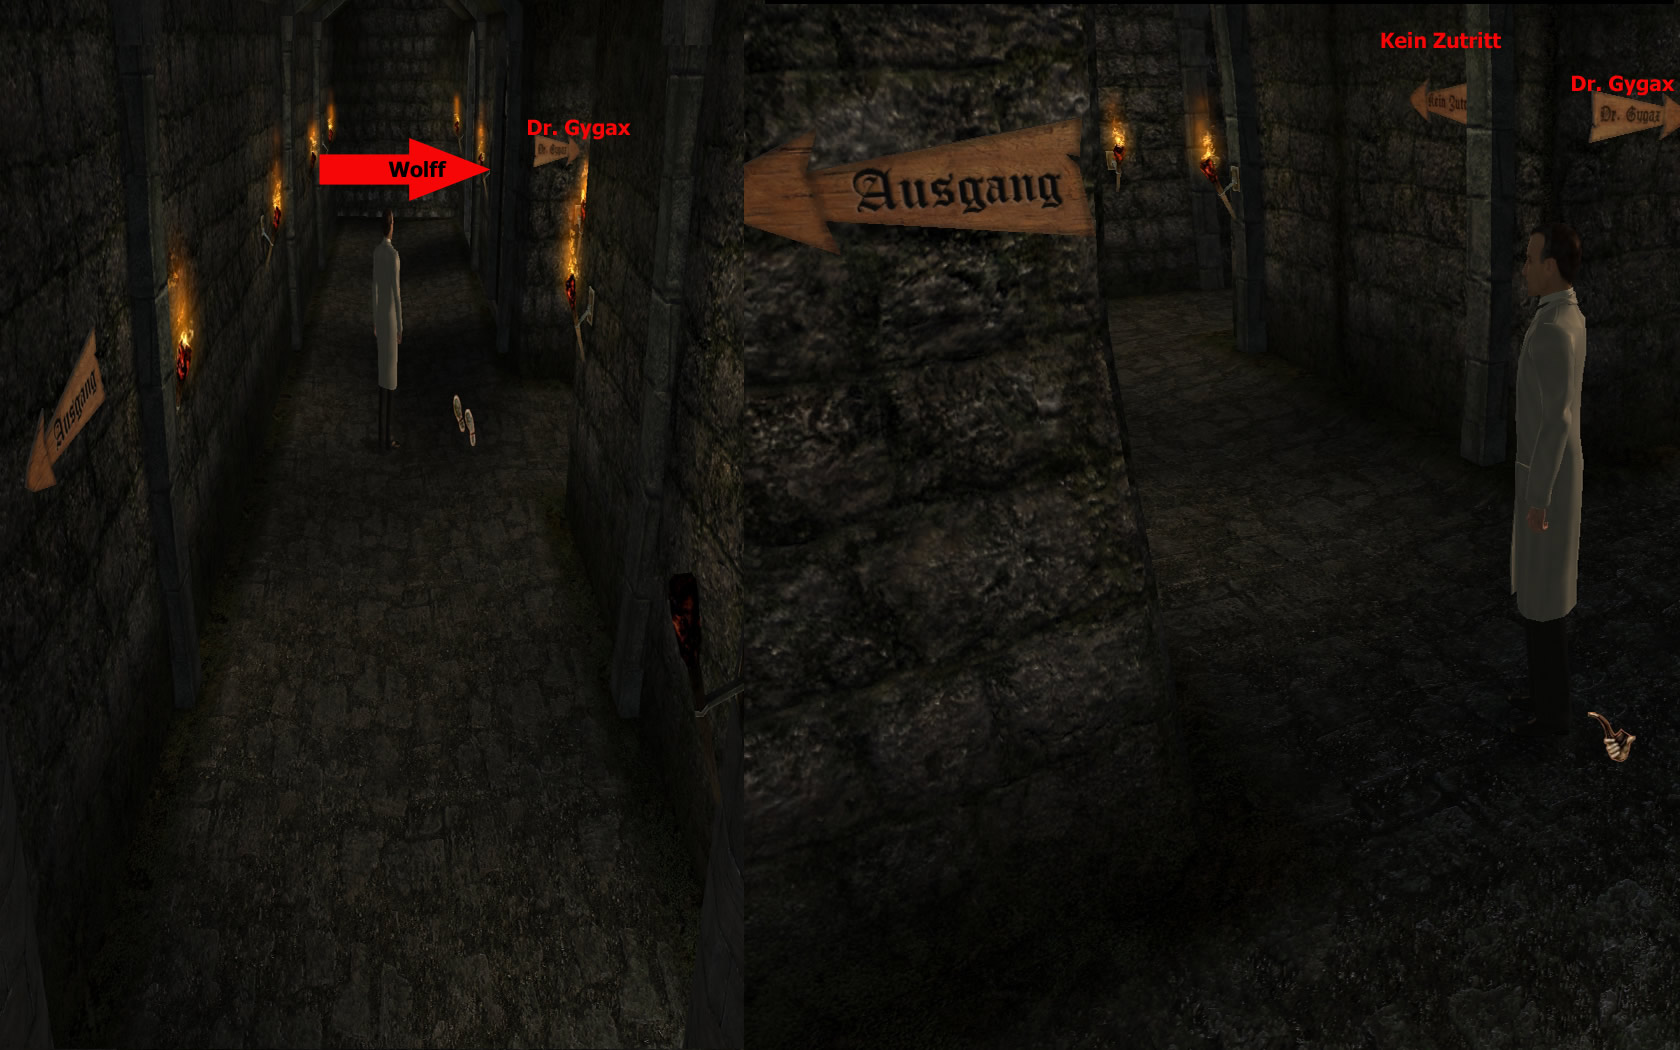
- Have a look at the red spots on the floor.
- Open the door with the spoon.
- It is the same puzzle as you had with your cell door, just a bit more complex.
- The top and the bottom space can only hold one disc.
- In the two middle spaces you can place as much as you need, but the have to be connected from low to high (7, 8, 9 ...for example)
- Seen the empty spaces from top to bottom as A, B, C, D, here is how to do it:
- 9 in A
- 3 in D
- 7 in C
- 8 in C
- 9 in 7
- 1 in A
- 5 in B
- 4 in B
- 3 in B
- 2 in B
- 1 in B
- 6 in A
- 1, 2, 3, 4, 5, 6 in the middle
- 10 in A
- 9 in D
- 8 in B
- 7, 8, 9, 10 in the middle
- When everything is right, the door opens.
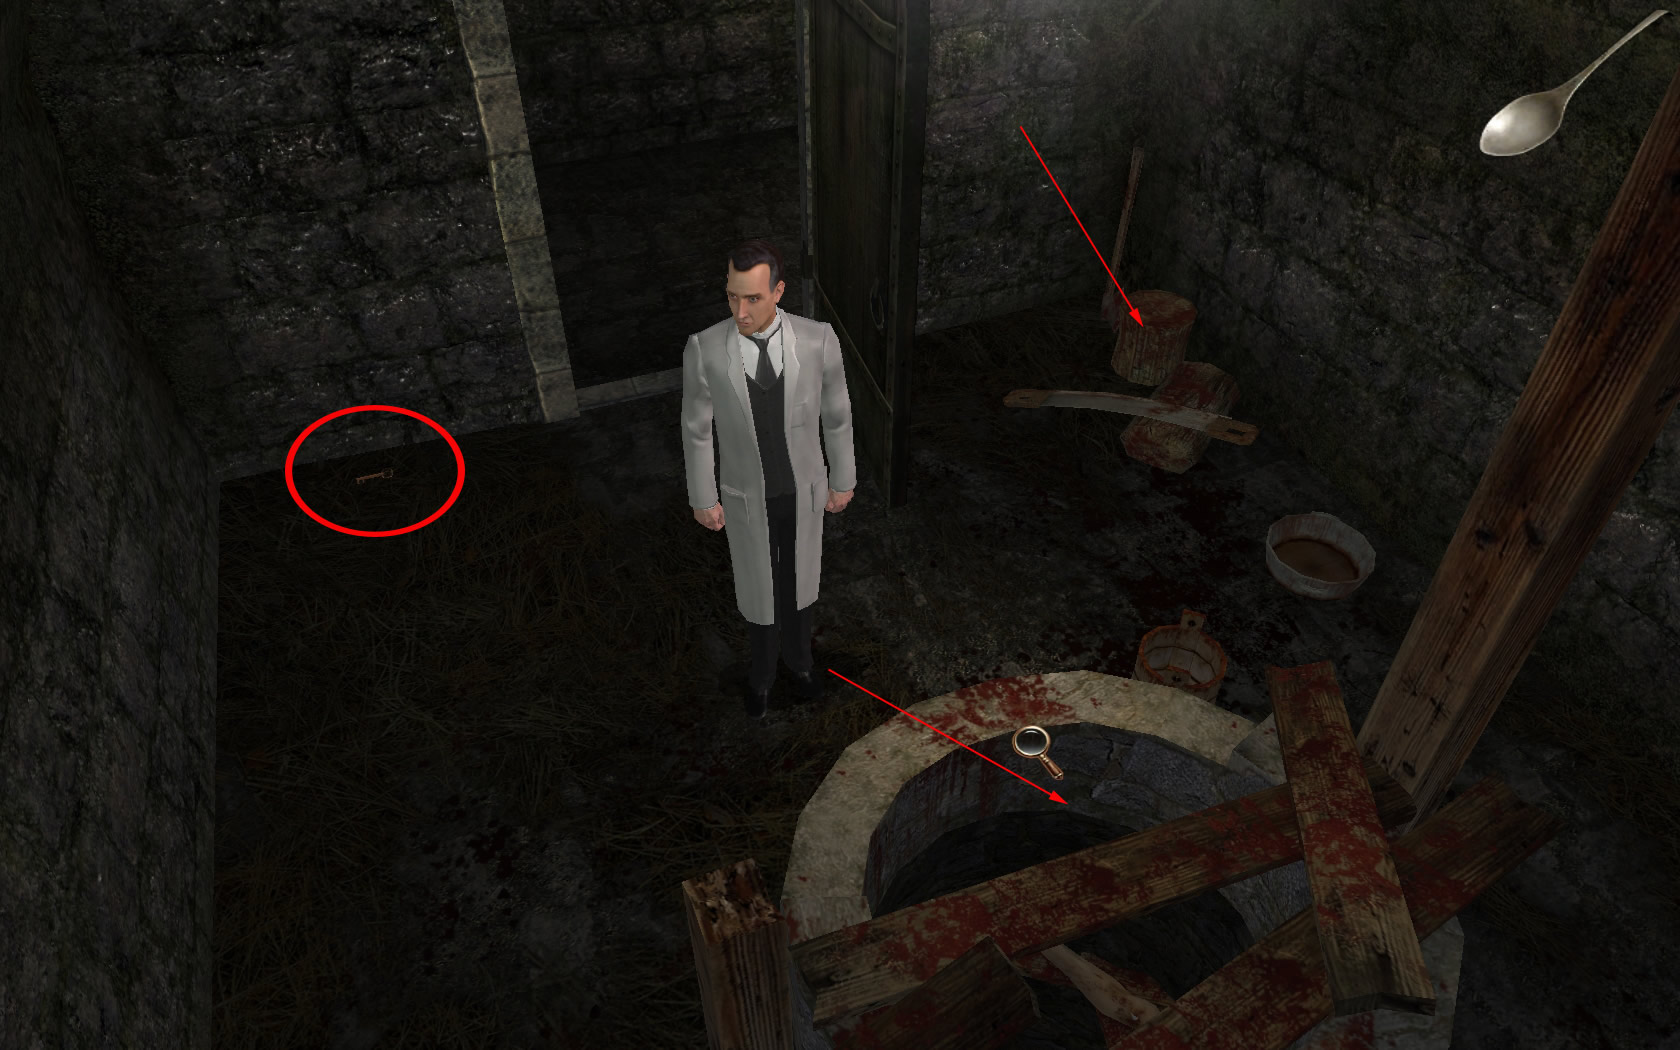
The Well
- Have a look at the well and inside, you will find a dead body.
- Have a look at the ground right next to the well and you will see, that recently someone was searching there for something.
- Turn around and see in the right corner next to the door the butcher's tools.
- Pick up the key from the floor left side of the door.
- Leave the room and go back to the cross way.
- Follow this time the arrow, saying Dr. Gygax.
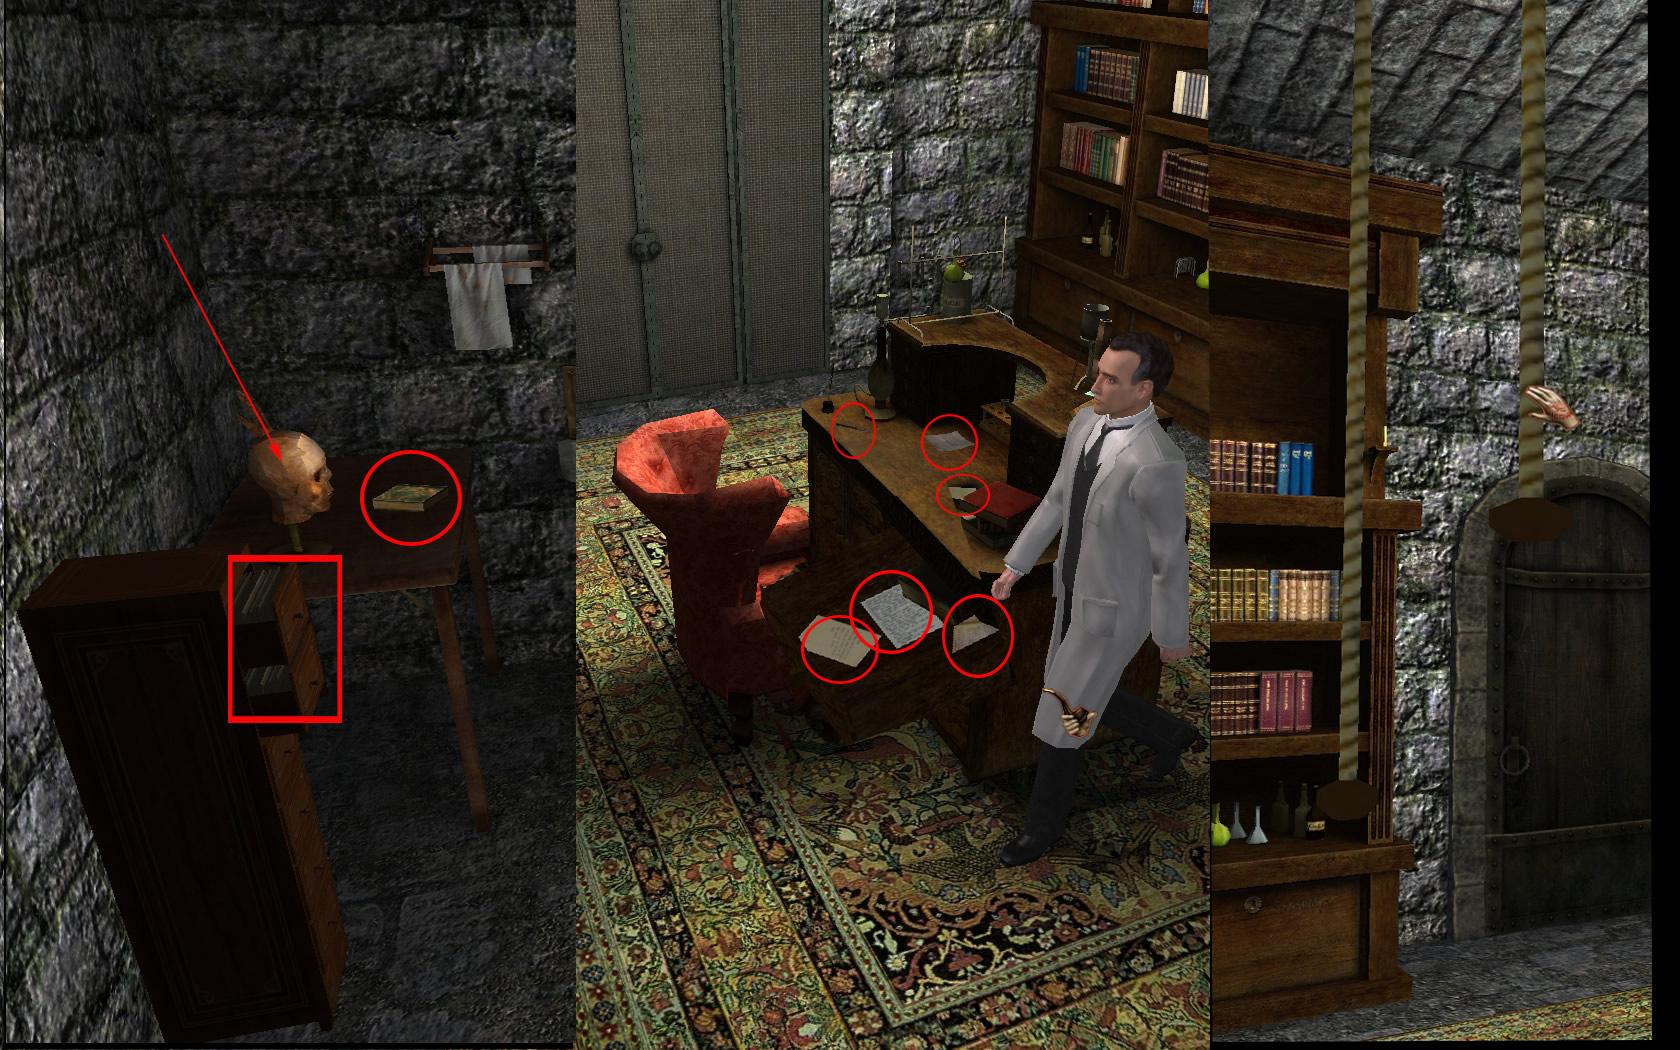
Office Dr. Gyax
- Open the door with the key you just found.
- Turn right, have a look at the book and the skull on the table.
- Turn right and click the case file cabinet.
- Look for the file of "Wolff" and read it.
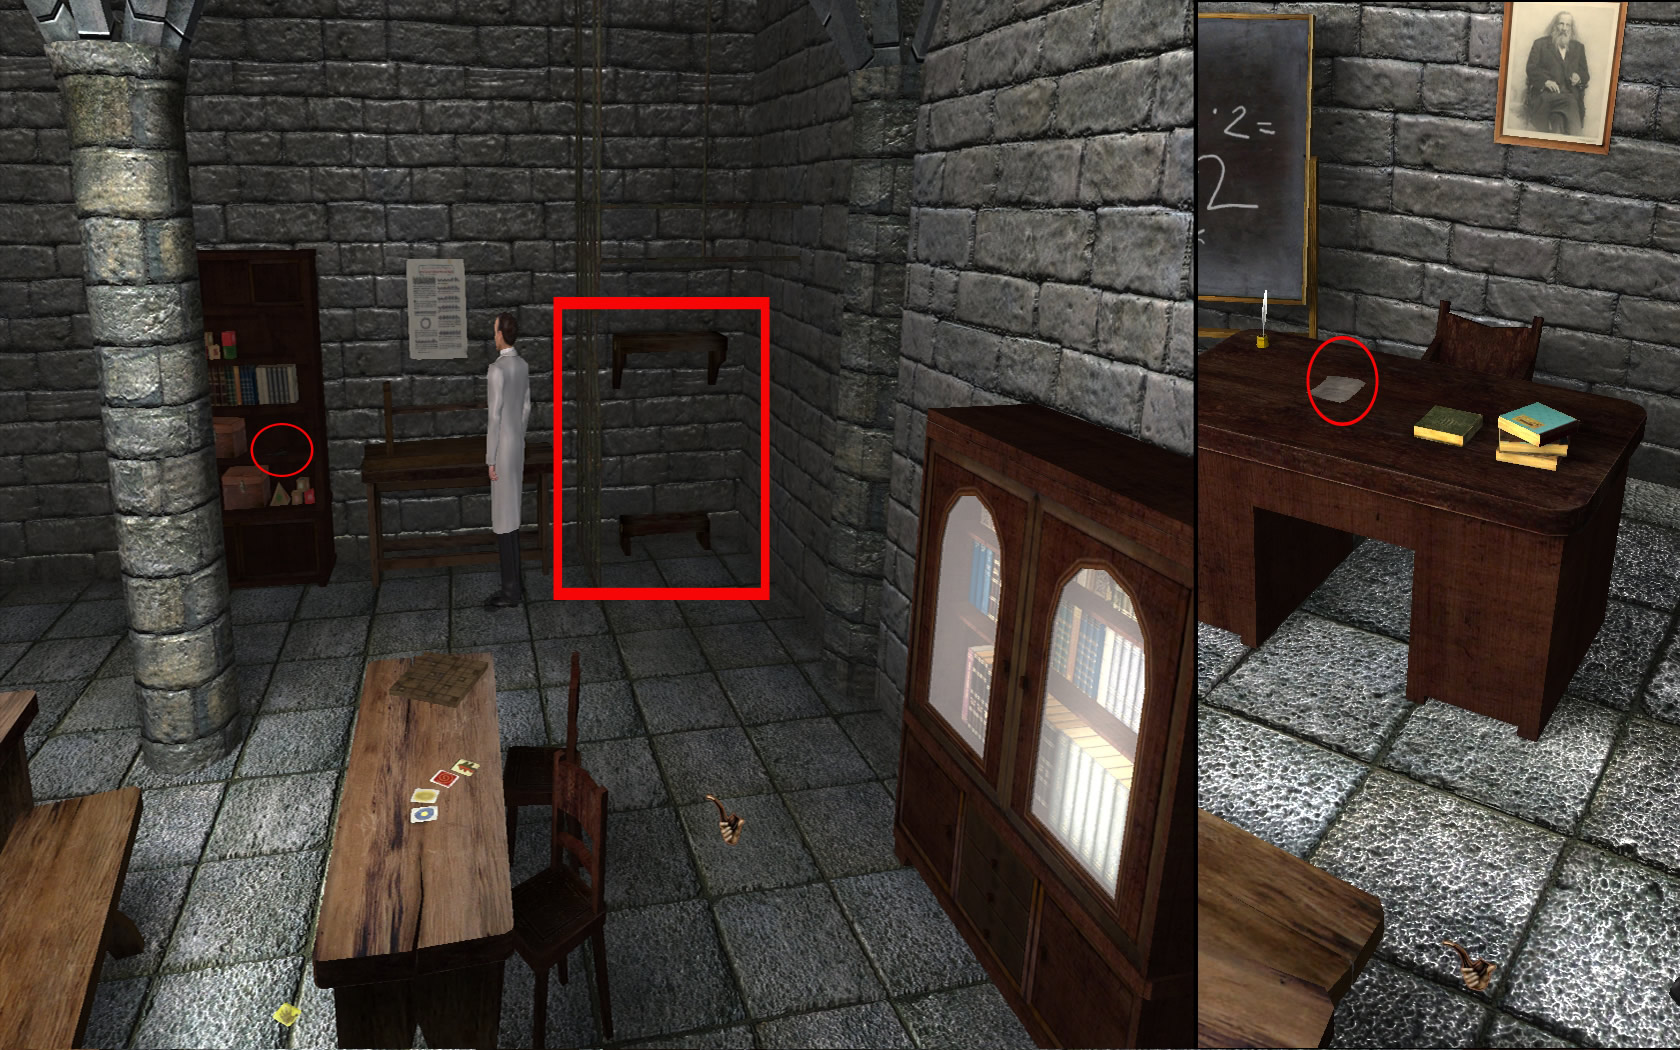
- Get the poker, in front of the fireplace, other side of the room.
- Turn to the desk and open the top drawer with the poker.
- Read all documents inside.
- Get the letter on the desk and at the other end of the desk the key with a tag saying "Classroom".
- Use the 1-person-view to see the ropes, hanging up from the ceiling.
- Use the poker to open the door opposite of the desk.
Operation Room
- Have a look at the board, left from the door.
- Have a look at the operation table and the battery behind the table on the floor.
- On the desk, look at the note book and the bird.
- Use the map to come to Becker
Classroom
- Use the map to go to Becker.
- Facing Becker walk right till the end and right again.
- The first door on the right side is the classroom.
- Go straight ahead and have a look at the boards - it seems they are meant for punishment.
- Get a beard out of the shelf to the left.
- Go left and pick up the letter from the lectern in the front.
- Read it. Seems, it is about an anonymous patient.
Wolff
- Use the map an go to the stairs and walk forward to Wolff.
- Open you inventory and combine the beard with the glasses.
- You now have a "Professor Schwarz" - disguise.
- Use it and talk to Wolff.
- In his way, he tells you the code to enter the secret room behind the well.
- But first use the map to Dr. Gygax room
Dr. Gygax
- Open the file cabinet and get the file with the question mark.
- Read it and leave the room.
- From the outside face the door and click the torch left to the door.
- She is moving nearer to the wall.
- Use the map to the stairs and go to Wolff.
Wolff
- Stand with the back to Wolff and click the left torch.
- Use the map to go the well.
Well
- Click the torch at the left wall and finally the door to the secret room opens.
Secret Chamber
- Go one step inside the chamber and left.
- You see an very old man.
- Talk to him - during conversation, he wants to know, if you know his name.
- Type: LIGHT OF ABYSS
- The guy talks and makes such a noise, that the guards are coming.
- Use the map and escape to Dr. Gygax room.
Dr. Gygax
- Walk to the back of the room.
- In the corner left to the elevator the ropes are hanging.
- Remember the note, you found in the kitchen.
- Pull three times the short rope, one time the long rope.
- The elevator doors open slowly.
- Step in and you will be automatically brought to the laundry.
Laundry
- To the left, you see a patient in kind of cage - go over and open the door with the spoon.
- This time it will work without a puzzle.
- Talk to the man - it seems to be the anonymous patient.
- Talk again with him, till Sherlock recognizes, that this is his old enemy Dr. Moriarty.
- Talk again with him.
- After the cut scene go around the closet and up the stairs.
- You are in the dressing room now.
Dressing room
- Go around the closet and pick up coat and hat.
- Now you can play Amos Colby again.
- Click the lobby and watch the cut scene.

Train
- During travelling, Sherlocks asks Watson where to go now.
- The answer is: NEW ORLEANS
- You should pay attention to the following cut scene:
- A little boy steps in - he needs help by opening a box.
- Sherlock gives him a hand.
- The name of the little boy is: Hercule Poirot
New Orleans [top]
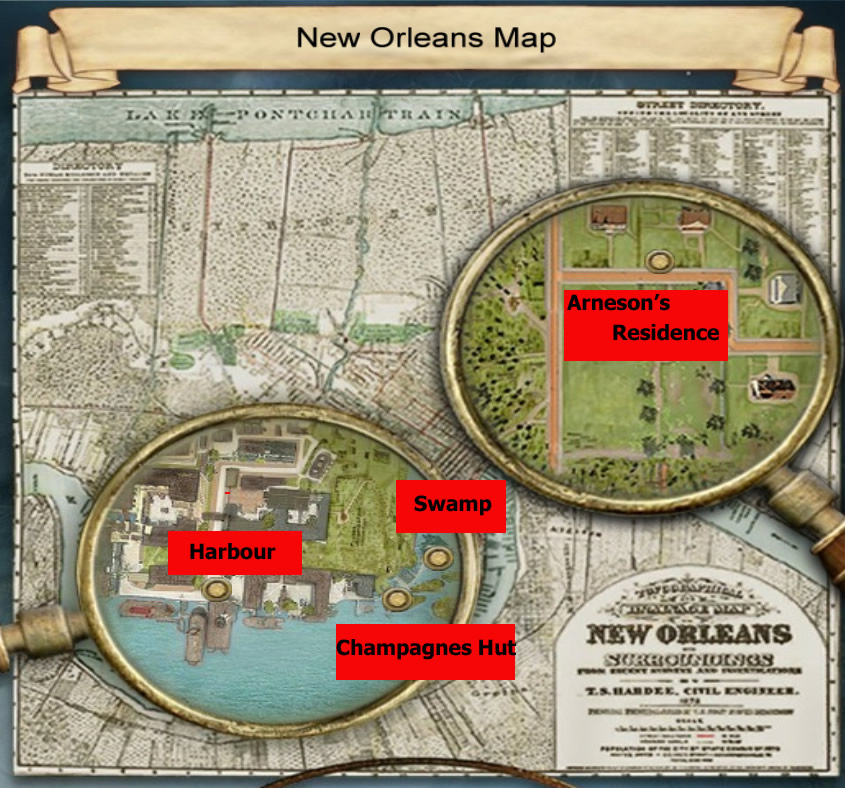
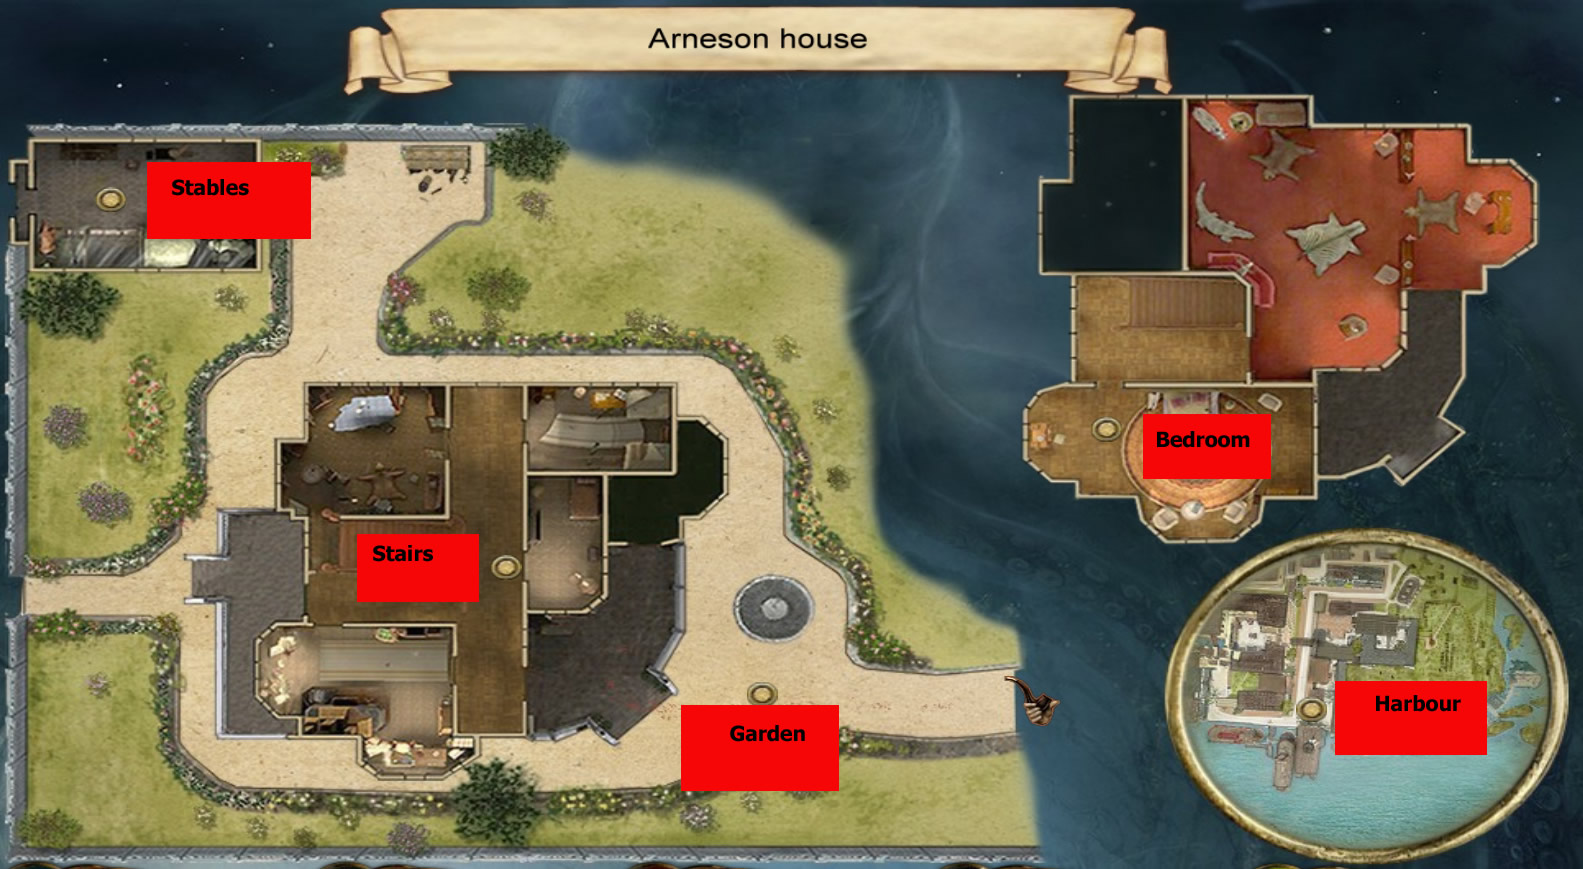
Harbour
- You are standing in front of a hotel - go right and follow the street.
- After being around the corner, you will see a man with a rifle on the right side.
- Talk with him.
- Now activate the money from your inventory and talk again with him.
- He will give you more information now and tell you, that you have to look for Champagne.
- Turn around and see the grey fence with a gate. Enter it.

Champagnes Hut
- After entering the gate and walk across the yard - open the gate on the left side.
- Walk through the hall, open the next gate.
- Go left along the hay rack, then to the hall straight ahead, open the gate.
- Choose the left gate now and open the next hall.
- Walk across the yard to the sign "Saloon"
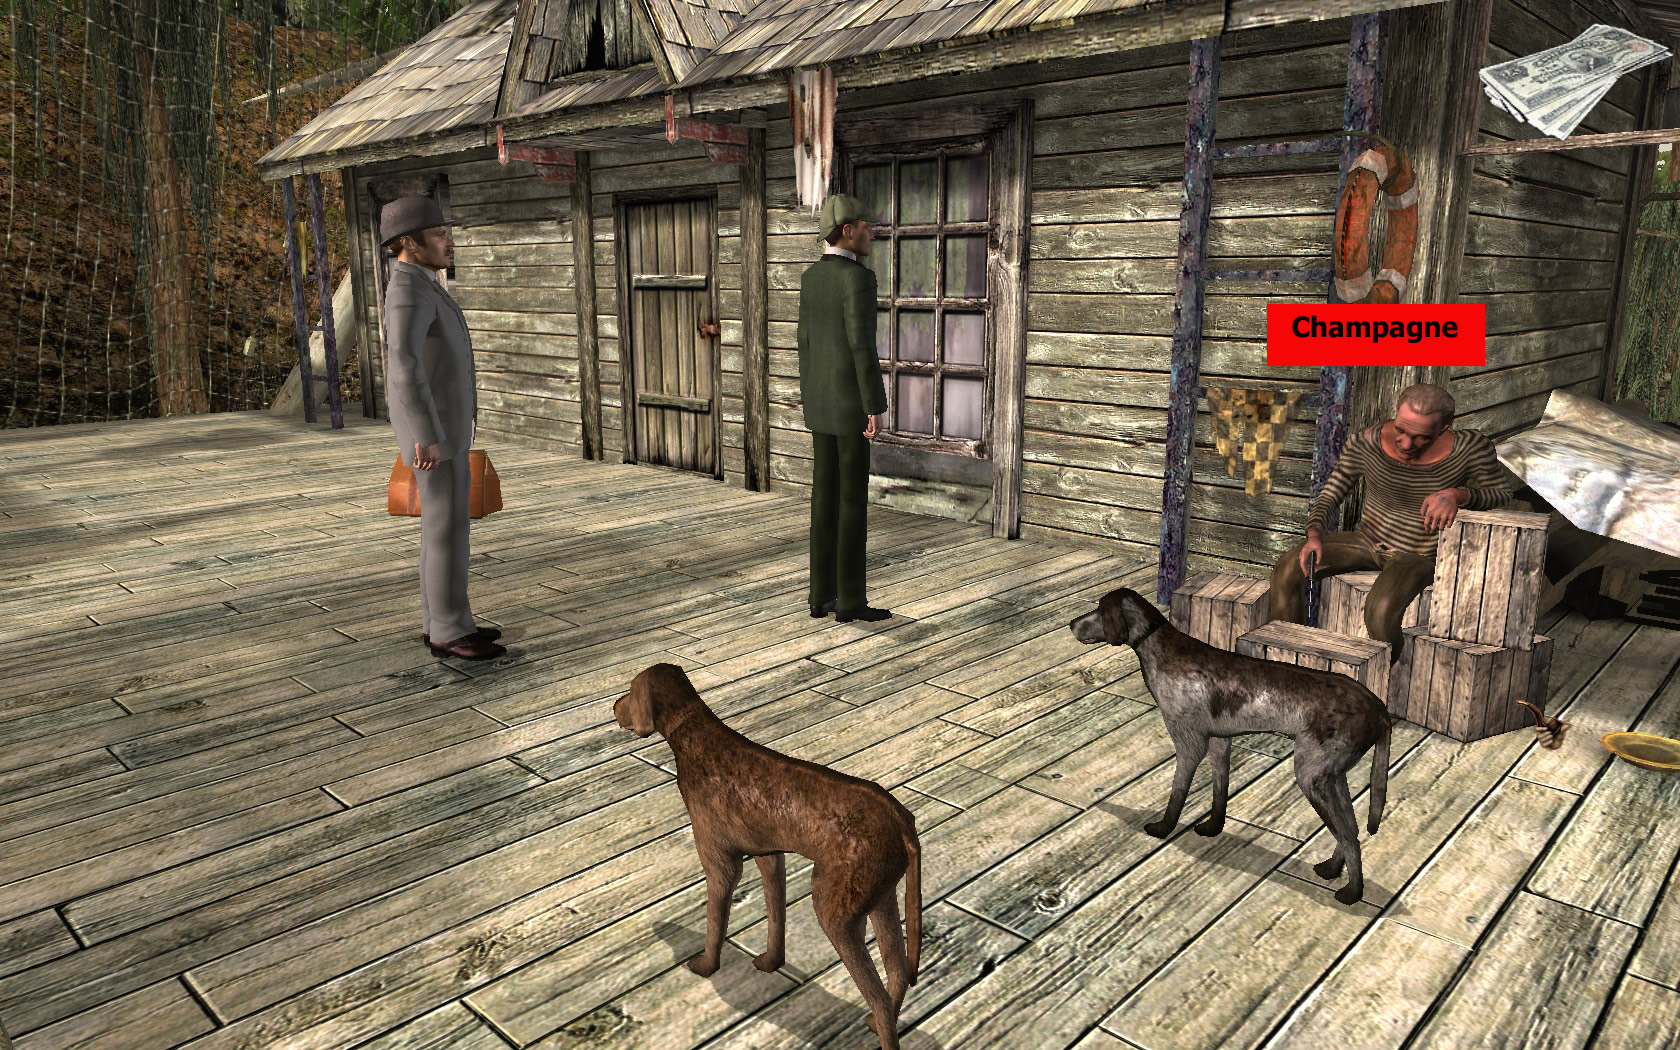
- Follow the footbridge straight forward till you come to the last hut.
- Champagne is sitting there with his two dogs.
- Talk with him, but his memory has also a few holes, which can be filled with money.
- Talk again to him with the money from your inventory activated.
- Now use the map and choose "pub".
- Go on the street and walk till Watson get robbed.
- Follow the thief.
The Chase
- Follow the thief through the gate and the hall.
- When you are near the hay rack, a tractor comes in your way.
- Use the patio to your right, touch the gate door to close it and you can move on.
- Now over to the footbridge left, where the hay bales are hanging and swinging. Be carefully to not get them at the head ;).
- On the boat to the right, till you stand in front of the huge water wheel.
- Climb up and run over the planks.
- Walk along the balcony and jump down at the end.
- Look where the dog is, there you go on the porch and follow it.
- And the end, boards are missing. Use the net above you to swing over.
- On the porch along right till someone opens a door and you can't go further.
- Enter the hall and use the door at the other end on the left.
- Follow the way to the bank.
- On the other side of the bank, there is a gate with Chinese symbols.
- Enter, run across the yard to the left, use the grey boards to the go up and the angular board to reach the porch.
- At the end jump down and straight forward.
- In front of you is a lifting ramp with two crates.
- Stand on it and push the crates down.
- The ramp goes up - go right, along the sleeping man.
- Behind him turn left to come back outside.
- Jump down, across the yard and go up the stairs at the end.
- Follow the footbridge till there is a a way to the right.
- Use it to reach the canopy, use the ladder to your left and enter the door, when you are on top.
- Inside the house go always left and through two closed doors.
- Go outside, where you see the working men.
- Use the footbridge and the pile of sacks to reach the opposite porch roof.
- Use the ladder to your right to swing to the other side.
- Over the roofs and a bridge to the next yard.
- Follow the thief over the spur and then left into the next house.
- Straight ahead through the room and at the end left.
- At the next turnoff again left and then right.
- Go down the stairs and up on the other side.
- Right into the next room.
- Use the iron ladder and turn around when you are on top.
- Go left around the hole with the ladder till the boards.
- After they fall down turn right and use the sack to swing over the abyss.
- Follow the balcony into the next building and go left.
- Follow the way to the end.
- Use the ladder to your right and on the canopy to the end, where a board goes to the right.
- At the end of the board go left into the building.
- Jump off the crates and to the left, up the stairs.
- Push the cement mixer into the rotor, now you move right along them.
- Now follows a glissade into a yard.
- After going through the door you see the sheriff with two men.
- Talk to him.
- Use the map to get to the french quarter.
It is important, that you look at and do everything as mentioned described in the walkthrough. Otherwise, you might have a problem, that necessary actions cannot be done or later you wont be able to leave the house again. It is not necessary to do it in the same order.
Arneson Residence/Stable
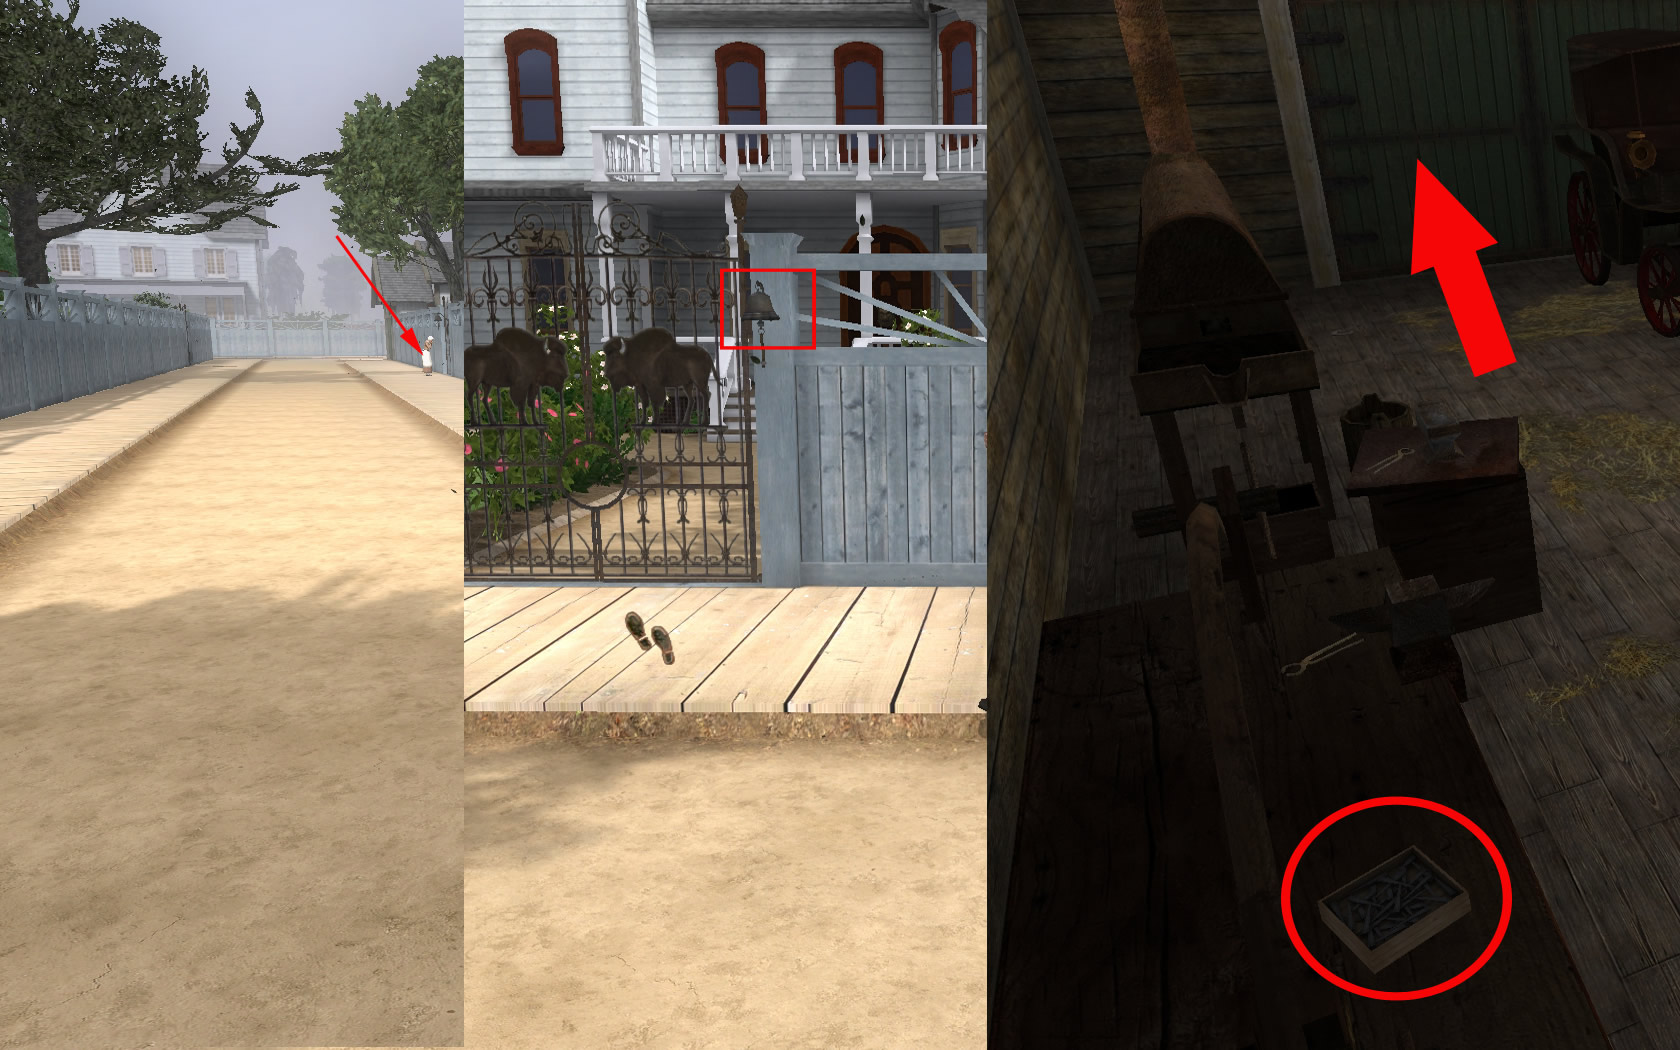
- You see a woman standing in front of a house, but when you go over, she will run away.
- Go to the house and learn, that it is Arneson's house.
- Ring the bell, but nobody seems to be home.
- The young woman is coming back - talk with her.
- She will bring you to the stables.
- Open the gate with the knife from your inventory
- You will find a horse, in urgently need for water.
- On the table you can grab a box with nails.
- Go to the other end of the barn and leave it through the door.
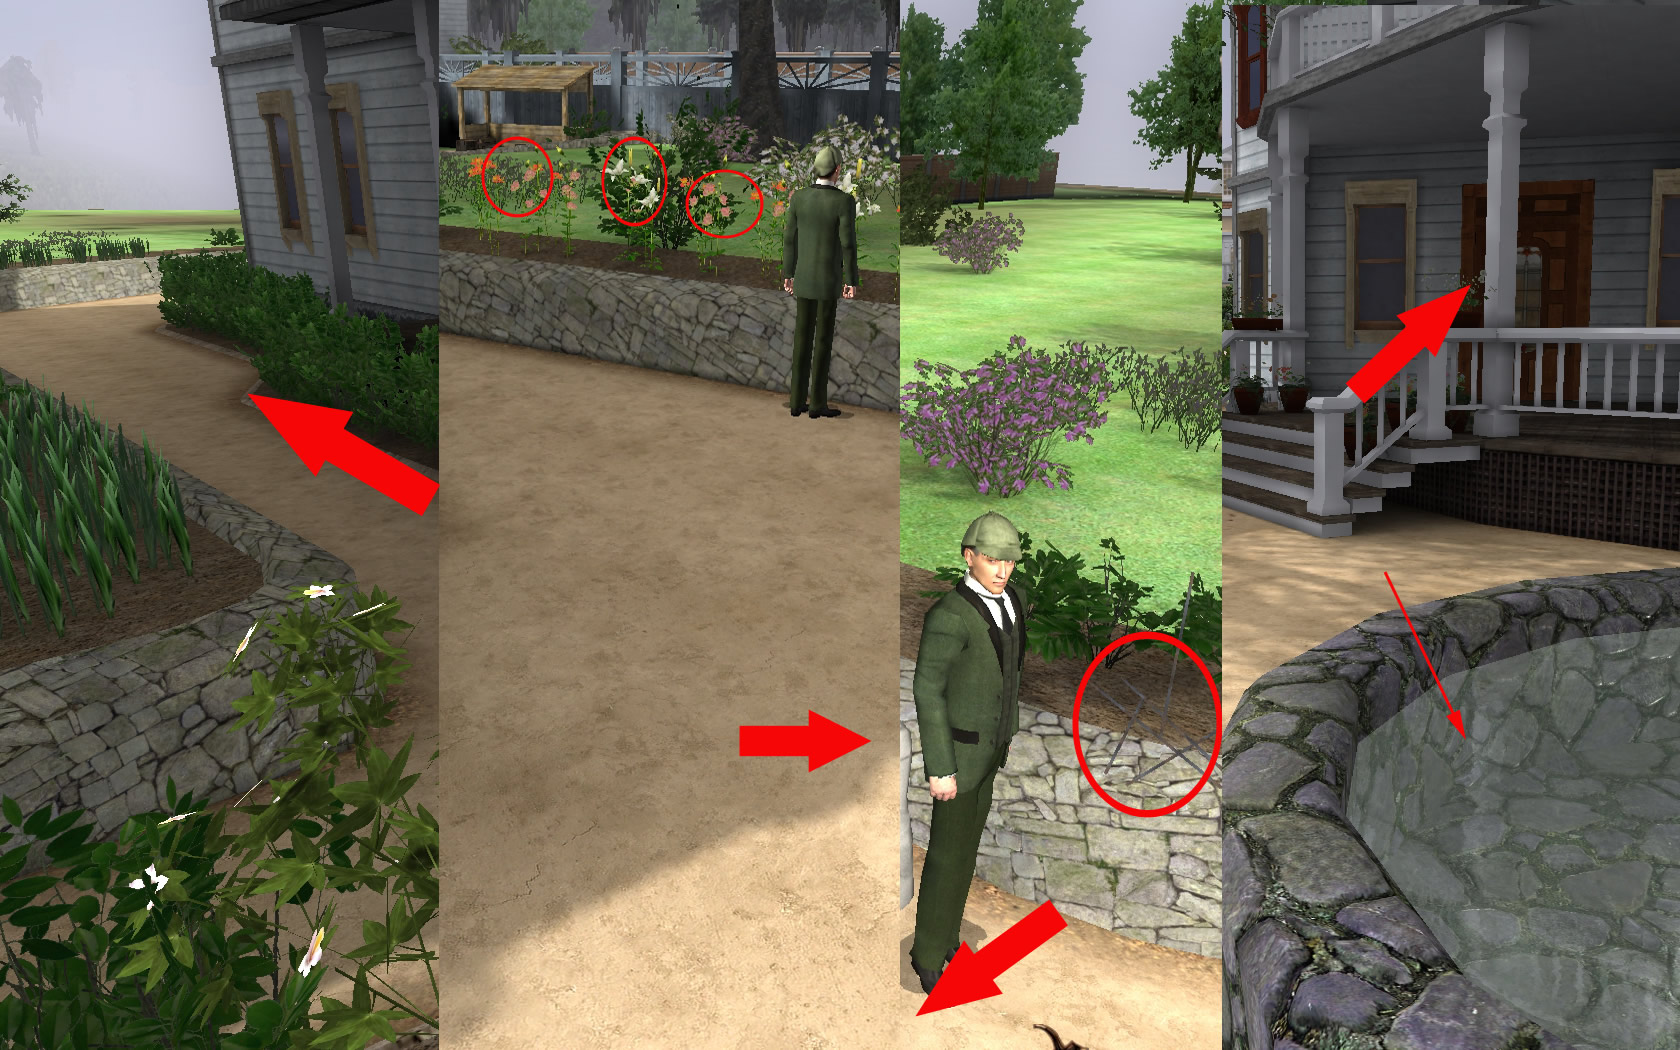
Arneson Residence/Garden
- Follow the way into the garden and have a look at the flowers.
- Someone is taking care for them.
- You come to a well, but you do not have a bin yet.
- Left side of the walk way you can grab a metal rod.
- Also pick up three of the flowers.
- Open your inventory and combine the flowers to a bouquet.
- No go right to the porch.
- You see a little raccoon, but when you come more near, he runs away.
- Use the stairs and enter the house through the door on the left.
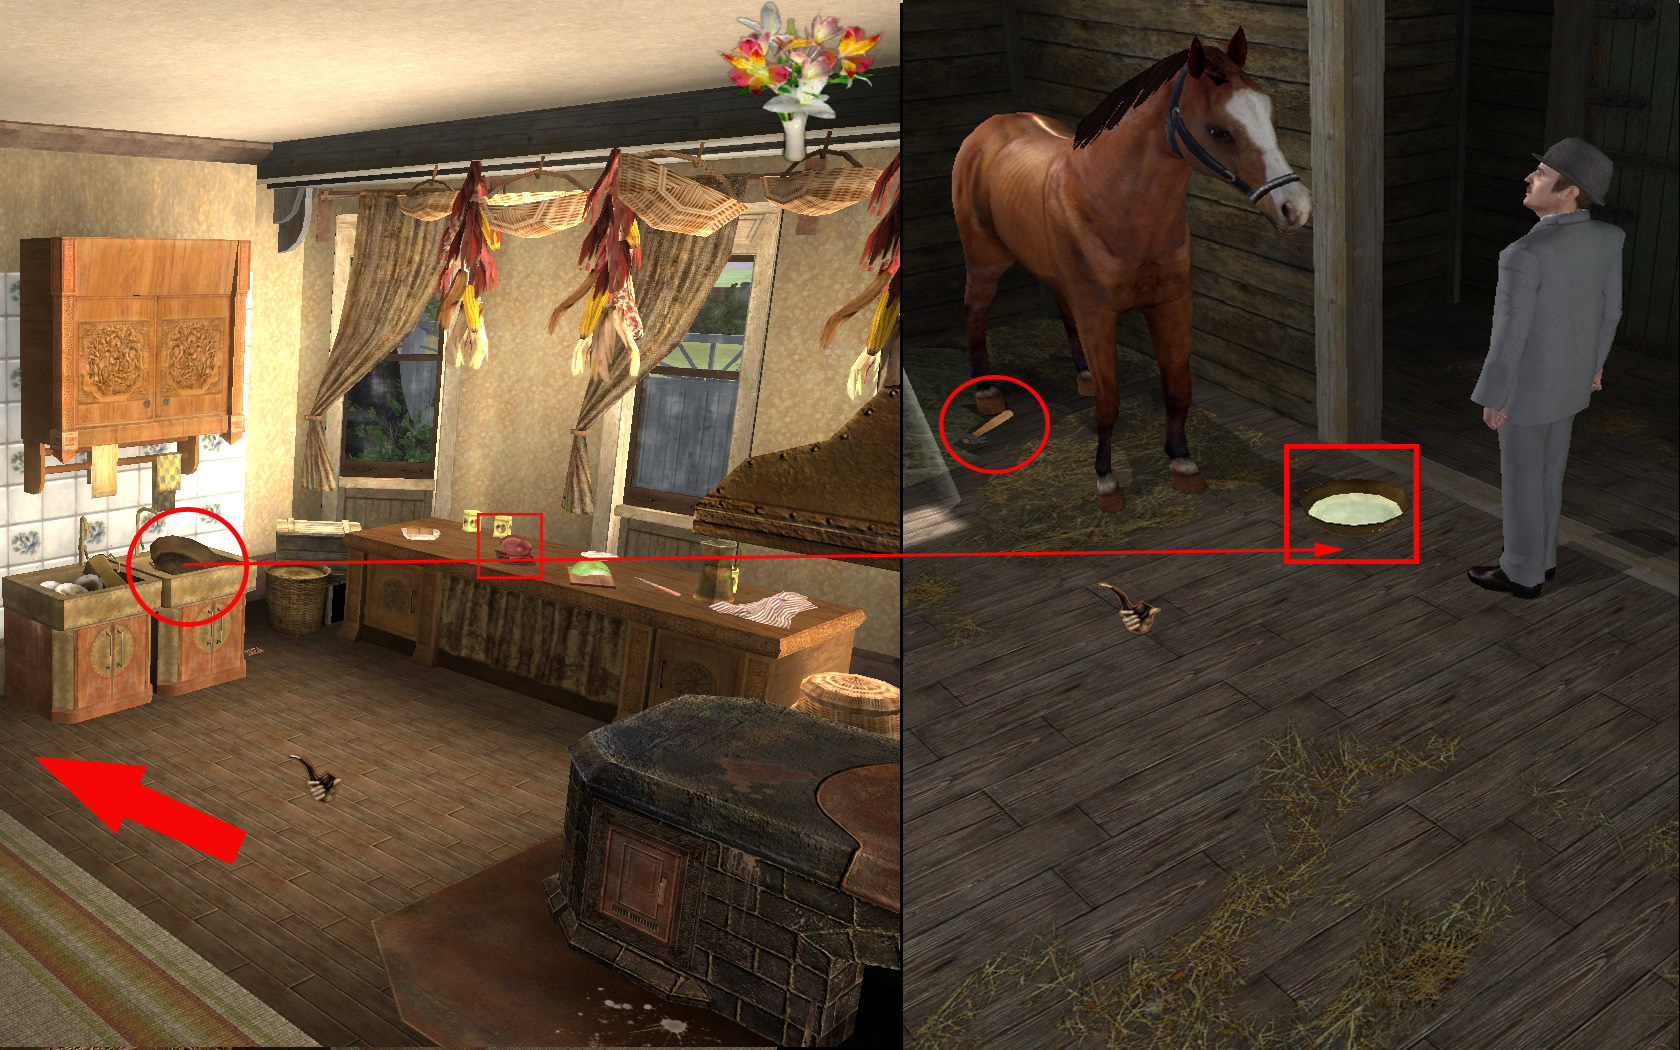
Arneson Residence/Kitchen/Garden/stables
- Look around and see, the adulterated food and the flies.
- In the sink, you will find a pan.
- Sherlock will give it to Watson, so you will step in his feet now.
- Leave the house.
- Fill the pan with water at the well and move on to the stables.
- Stand right next to the horse and click the water pan at the horse.
- The horse will slowly stand up, wait till it is completely back on its feet.
- Now walk left to the horse and look on the ground, pick up the hammer.
- Go back to Holmes and give him the hammer.
- He will take over again.
- Have a look at the ham on the kitchen counter.
- Leave the kitchen through the door to the right into a hall.
- The front door is locked, but the opposite door you can open
Arneson Residence/Living room
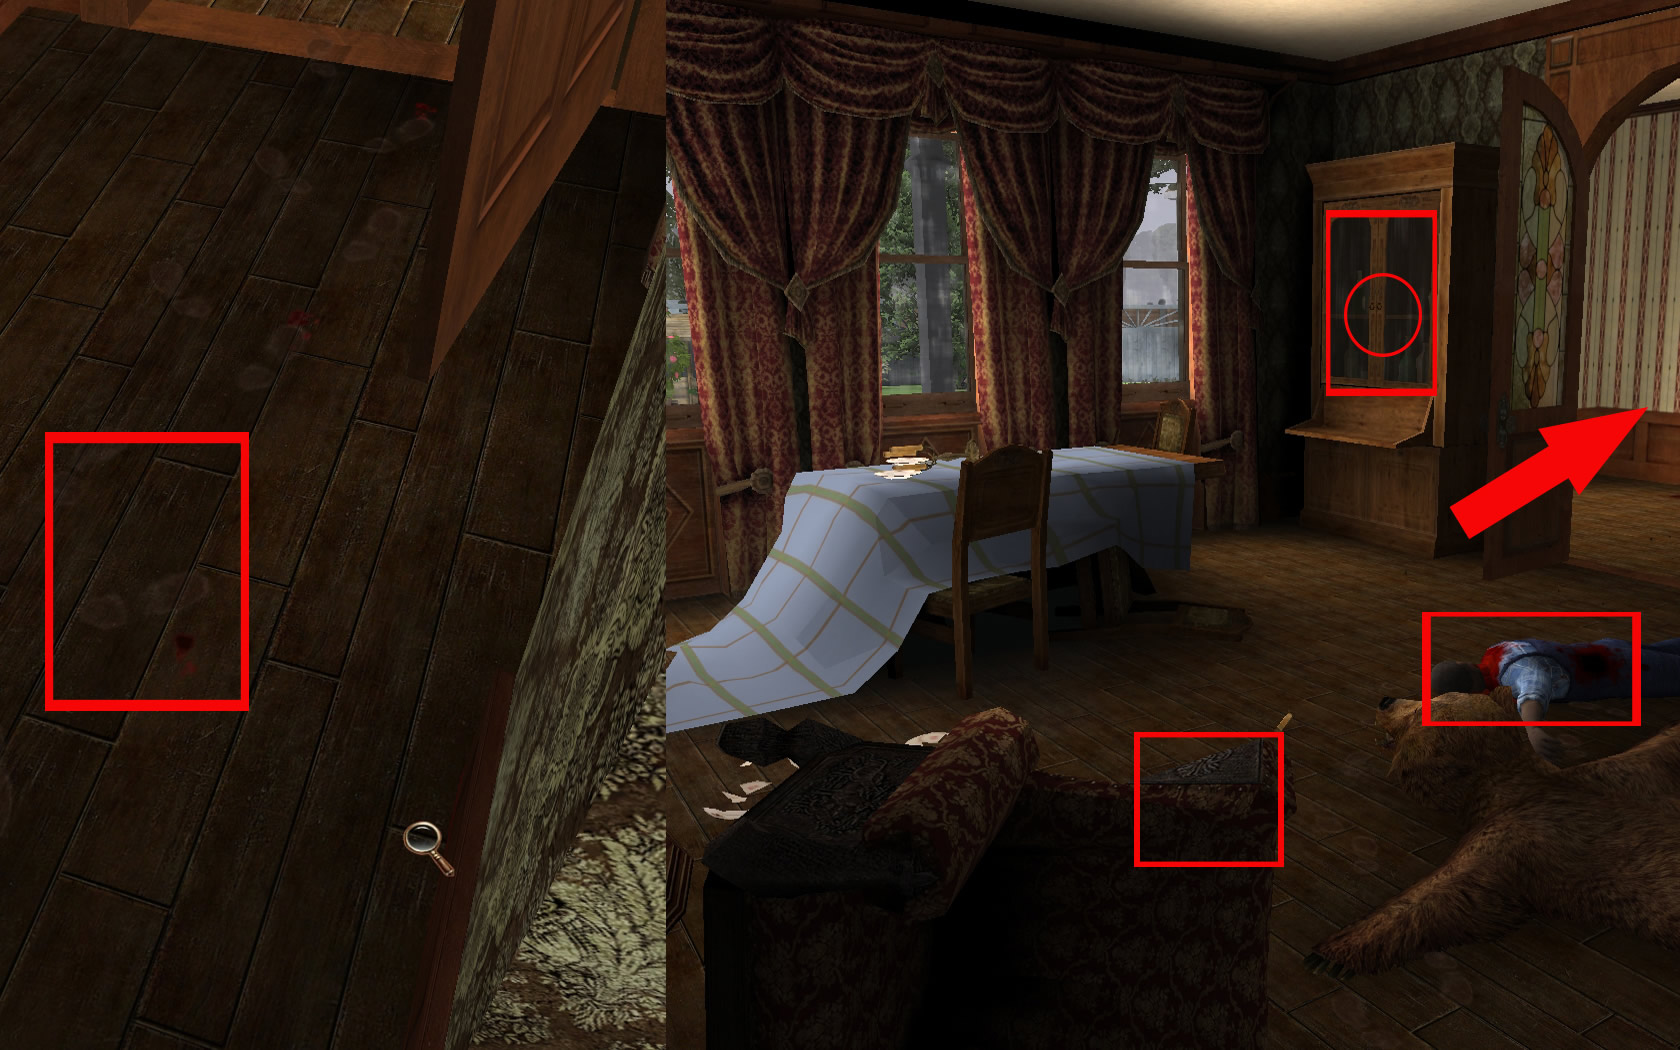
- When you enter the living room you see left at the wall near the ground blood traces.
- A little further a man is laying on the ground, dead.
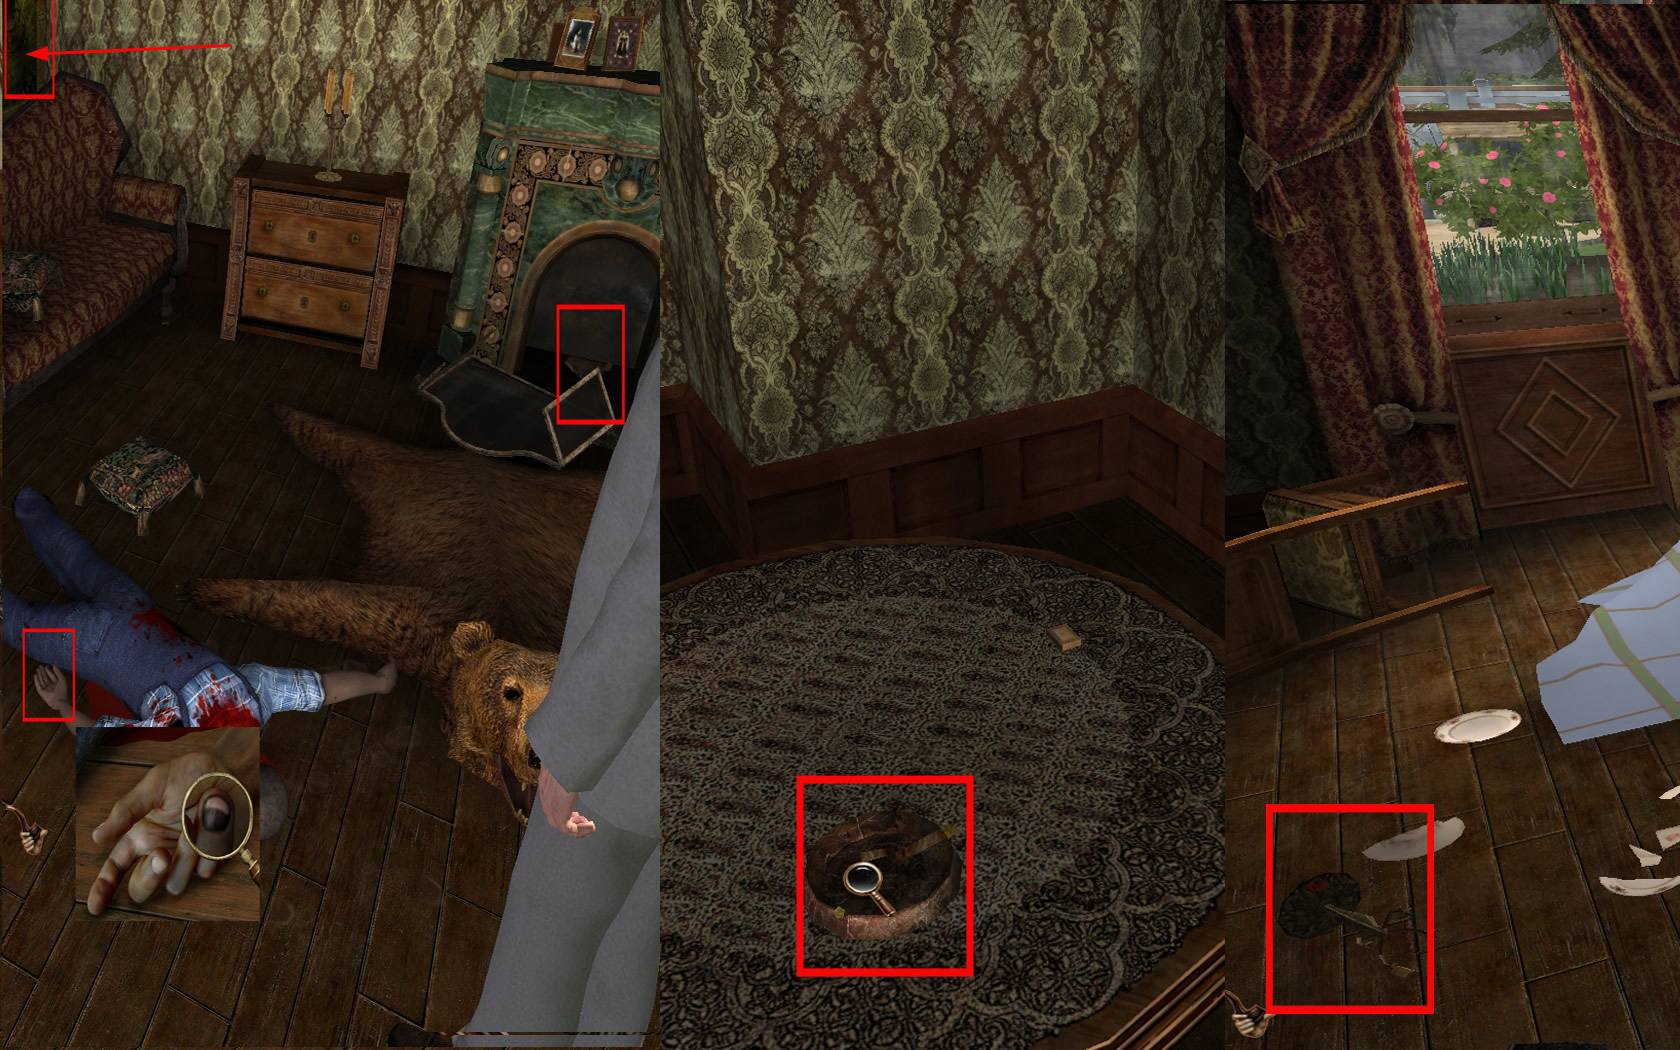
- Look at this right hand and examine it closer by using the magnifier.
- The overthrown chair also shows blood traces.
- On the small round table, you will find a cigar.
- Right next to the table a candle holder, cover with blood, is laying.
- Now go right to the fireplace - seems, someone burnt papers.
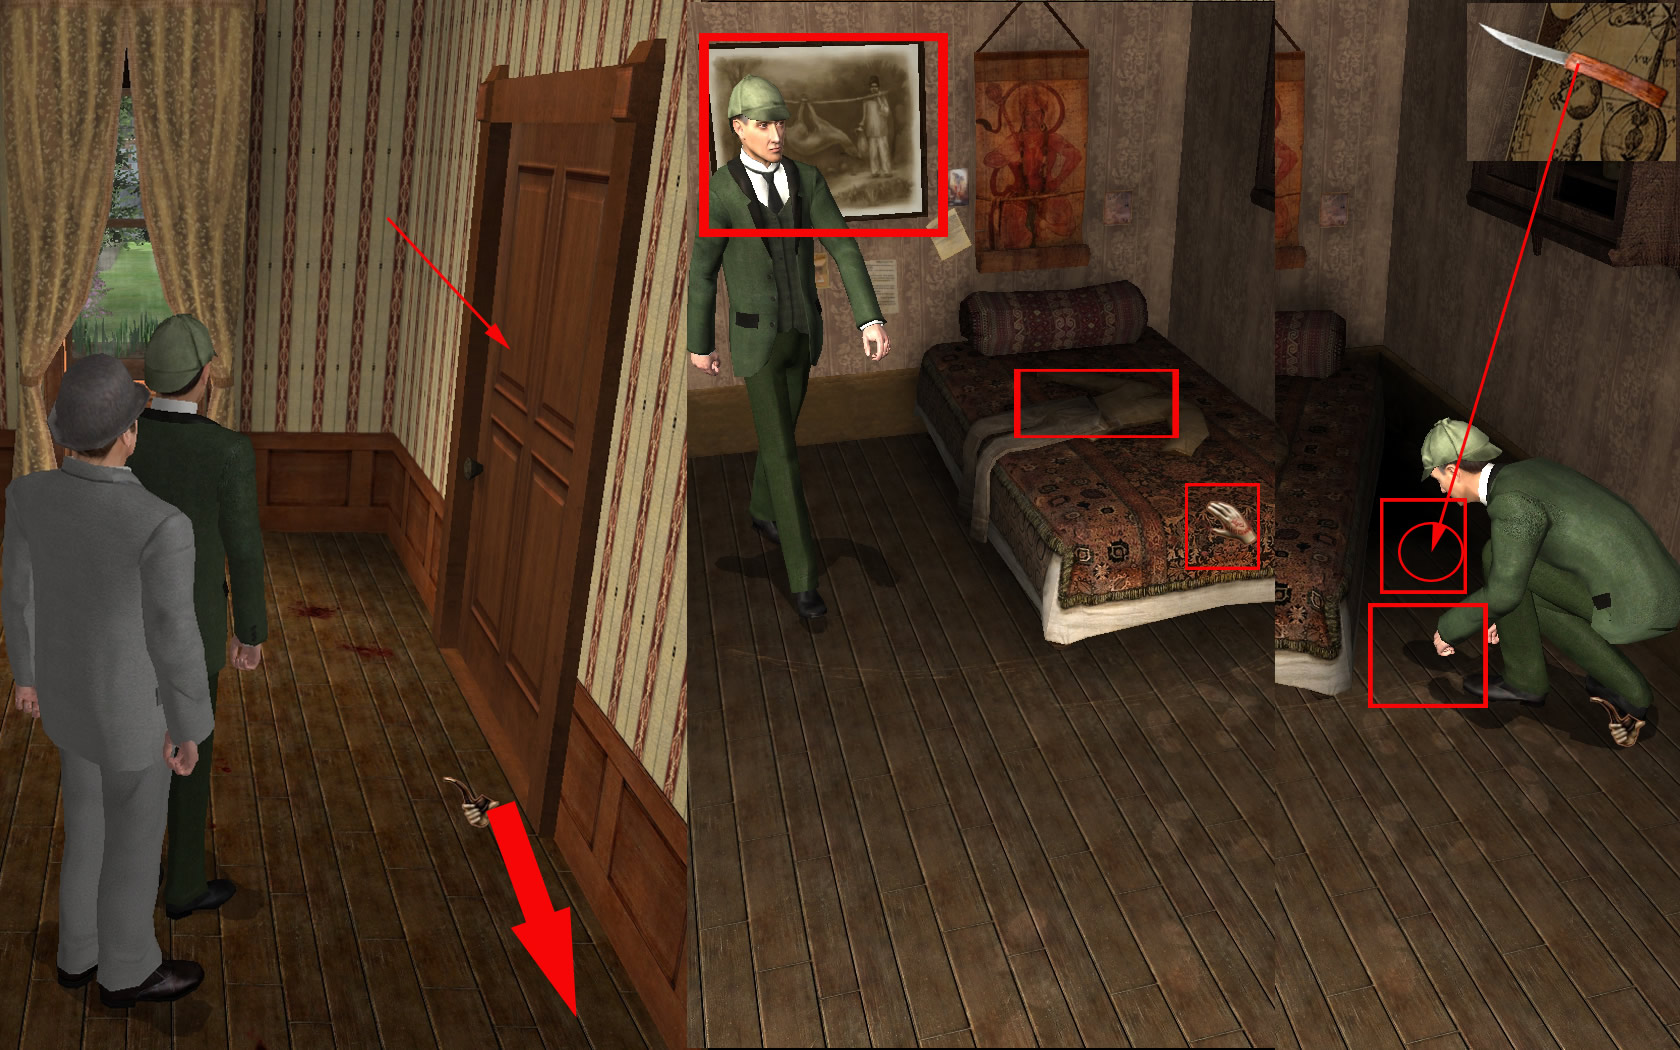
- Turn around to the left and look at the picture at the wall, it's Arneson at a hunt.
- Left next to the door, you will find a bottle of champagne inside the glass cabinet.
- Leave the room to the door next to the glass cabinet.
Arneson Residence/Hall
- On the ground in front of the next room, you find blood traces as well.
- You cannot open the door, but Sherlock can hear someone inside.
- As there is no success by talking, go right to the next door and open it.
Arneson Residence/servant quarter
- Go to the left side of the bed.
- Examine the clothes and move the bed by clicking right to the clothes.
- Go to the other side - something seems to be under the floor.
- Use your knife and find a ruby.
- Have again a closer look at this part and see, that there is mud on the floor.
- Also have a look at the picture at the wall, it shows Arneson and his servant.
- Leave the room.
Arneson Residence/Hall
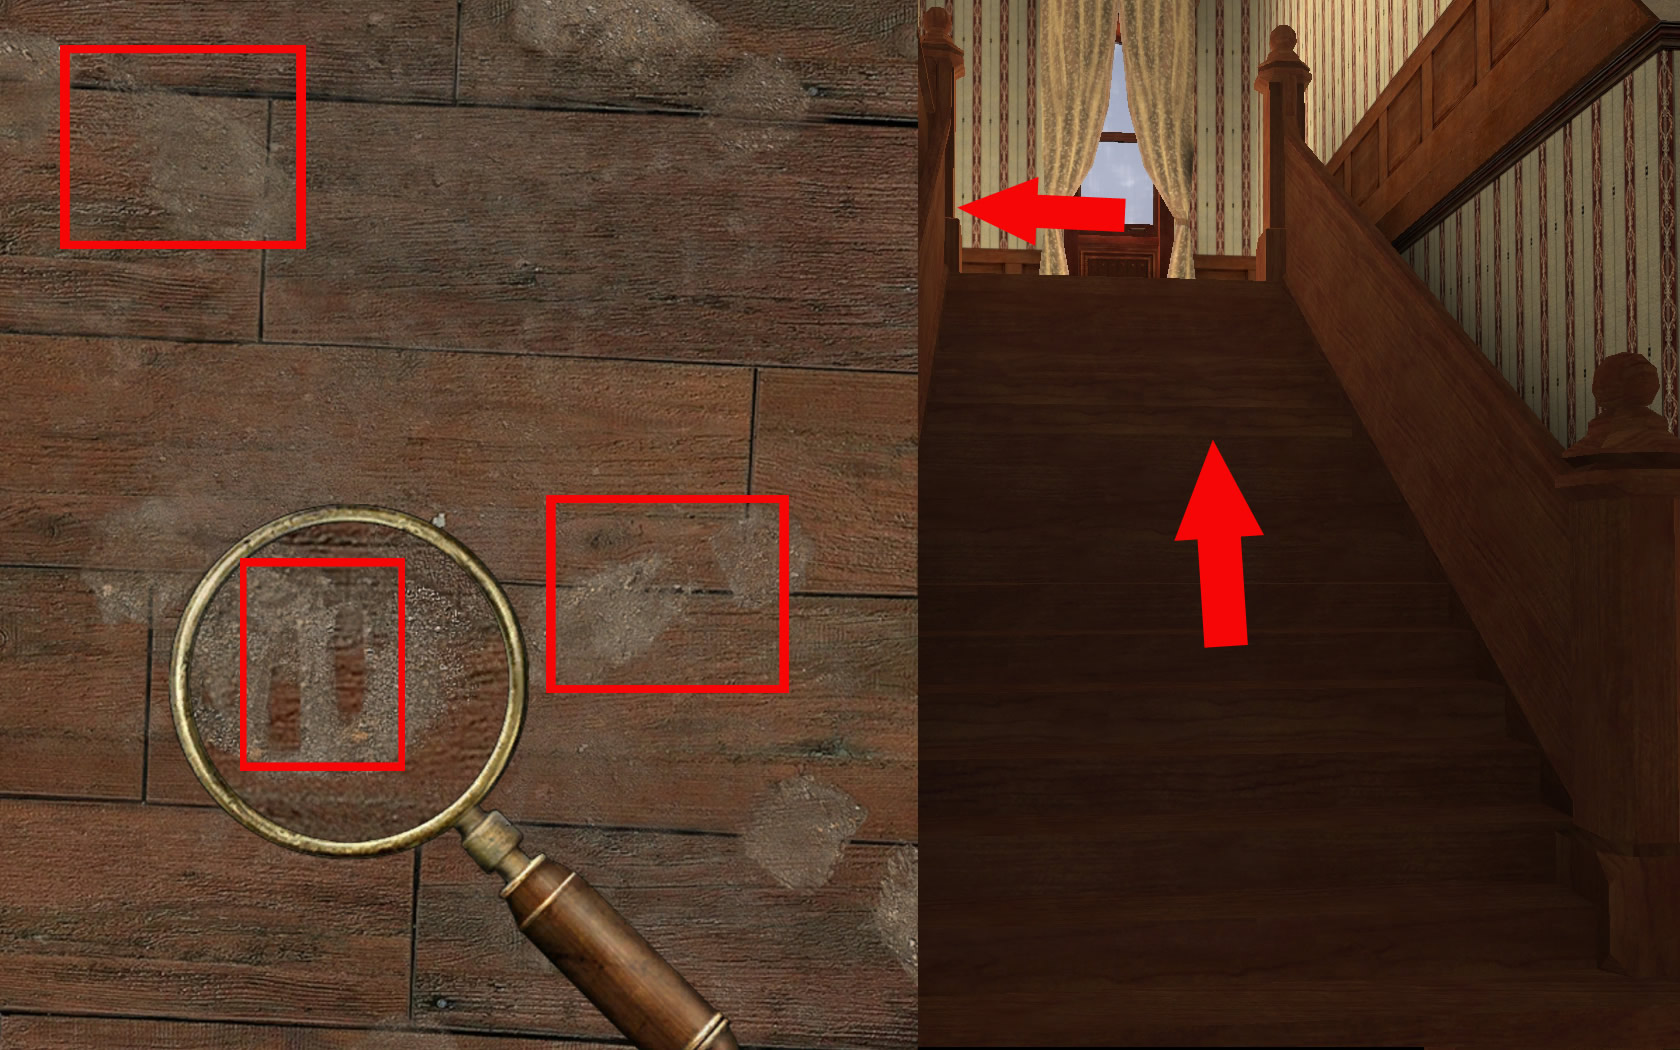
- In front of the door you recognize footsteps - examine them with the magnifier.
- In one of the traces you also see finger prints.
- Go upstairs.
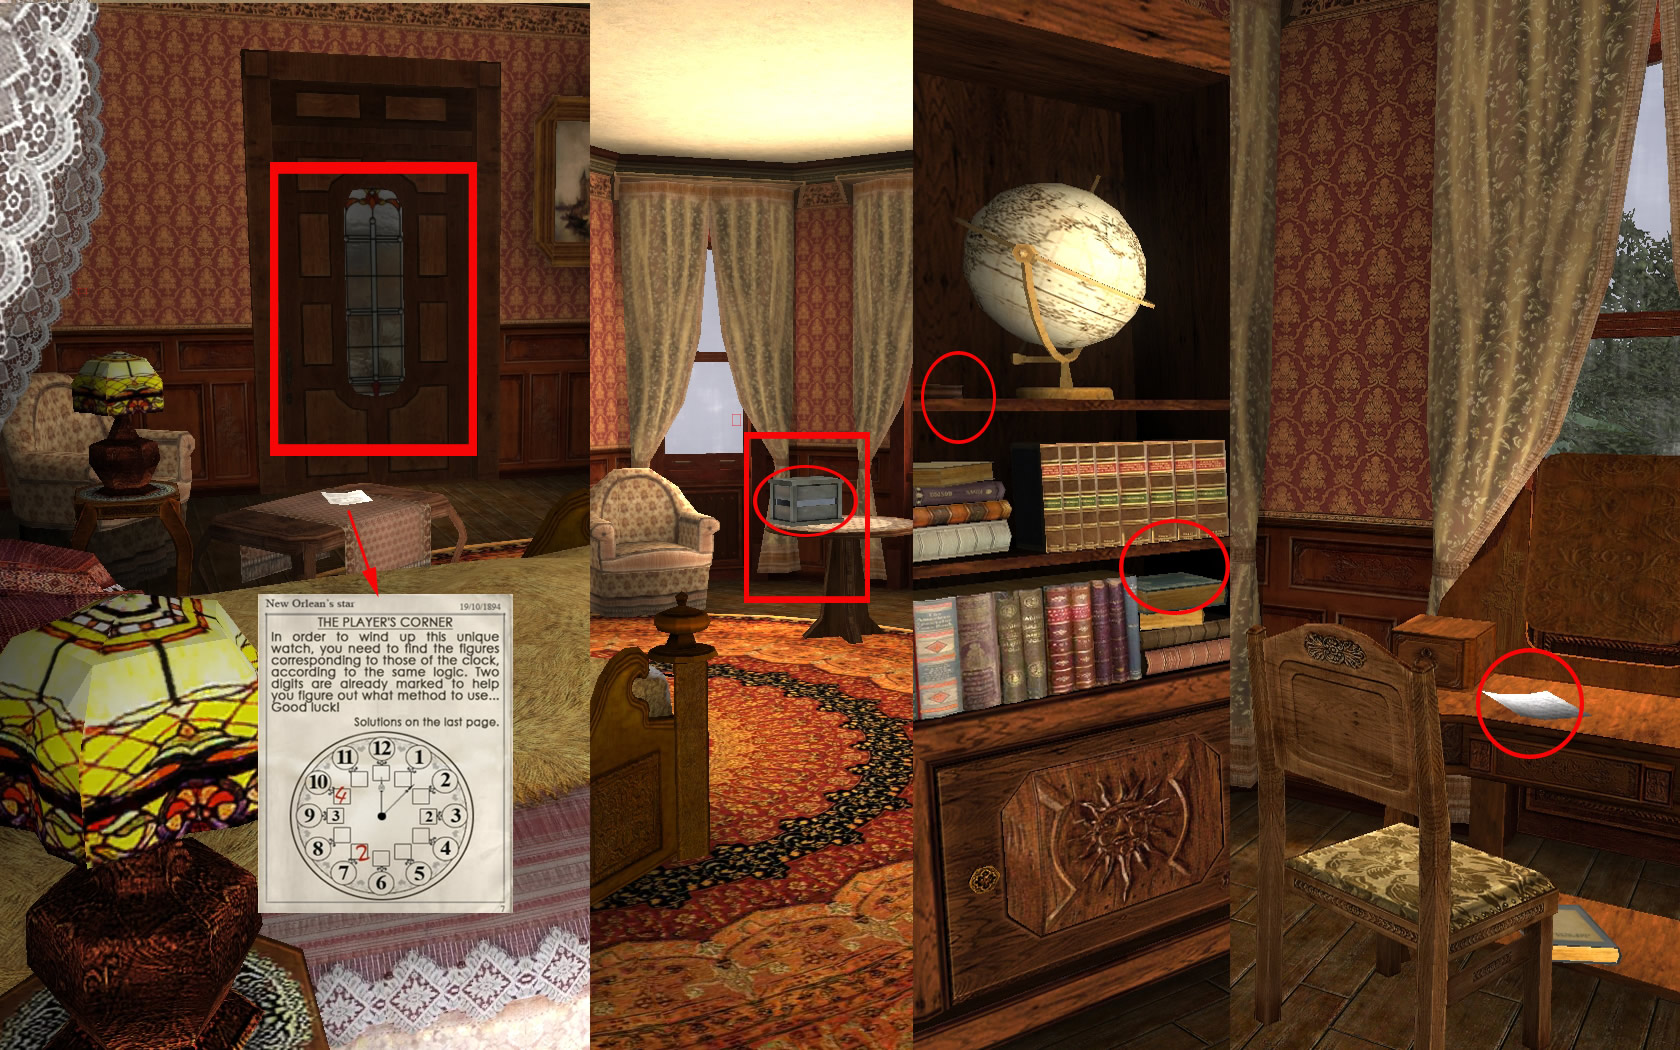
Arneson Residence/Bedroom
- Turn right to the desk and get the letter.
- Left you see a book shelf.
- Get the book about fauna and flora in Louisiana out and a book with hunting legends.
- Left side on the round table, you see a wooden box.
- Open it an get out the metal pipe and read the note from I. Otis.
- Next to the bed, you will find a newspaper, five days old. The last page is missing.
- Have a look at the mathematical problem - you will need this later.
- The door to the right brings you onto the balcony, grab the lemon tree and go back.
- More you can't do here right now, so go down to the servant's room.
Arneson Residence/Following the traces
- Look again at the footsteps in front of the servants door.
- Follow them in direction to the locked door left. Between these two doors you find more blood- and footmarks.
- Follow the traces into the living room, around the overthrown chair and open the door to the hall.
- In the hall you find the next blood traces.
- Follow them to the front door. In front of the door on the ground you also find blood.
- Go to porch and down the stairs.
- Again blood- and foot marks. This ones you can examine closer with magnifier.
- Use the magnifier with both, blood- and footmarks.
- Follow them along the garden way in front of you. Again you will find the traces.
- Listen to what Sherlock says, then move on forwards.
- A lot of mosquitoes are bothering you, Watson will mention it and Sherlock decides, that you can't go on.
- Now Watson calls from inside the house, that he found a safe.
- When Watson does NOT find the safe at this point, go back and make sure, that you did everything, mentioned here in the walkthrough.
- Make sure, that you clicked every mentioned blood- and foot trace to show, that you recognized it. It's also important, that you clicked the ham in the kitchen, the two pictures and found all three flowers.
- As soon as you have done everything, Watson will call you. You will automatically be brought back to the bedroom.
Arneson Residence/Bedroom
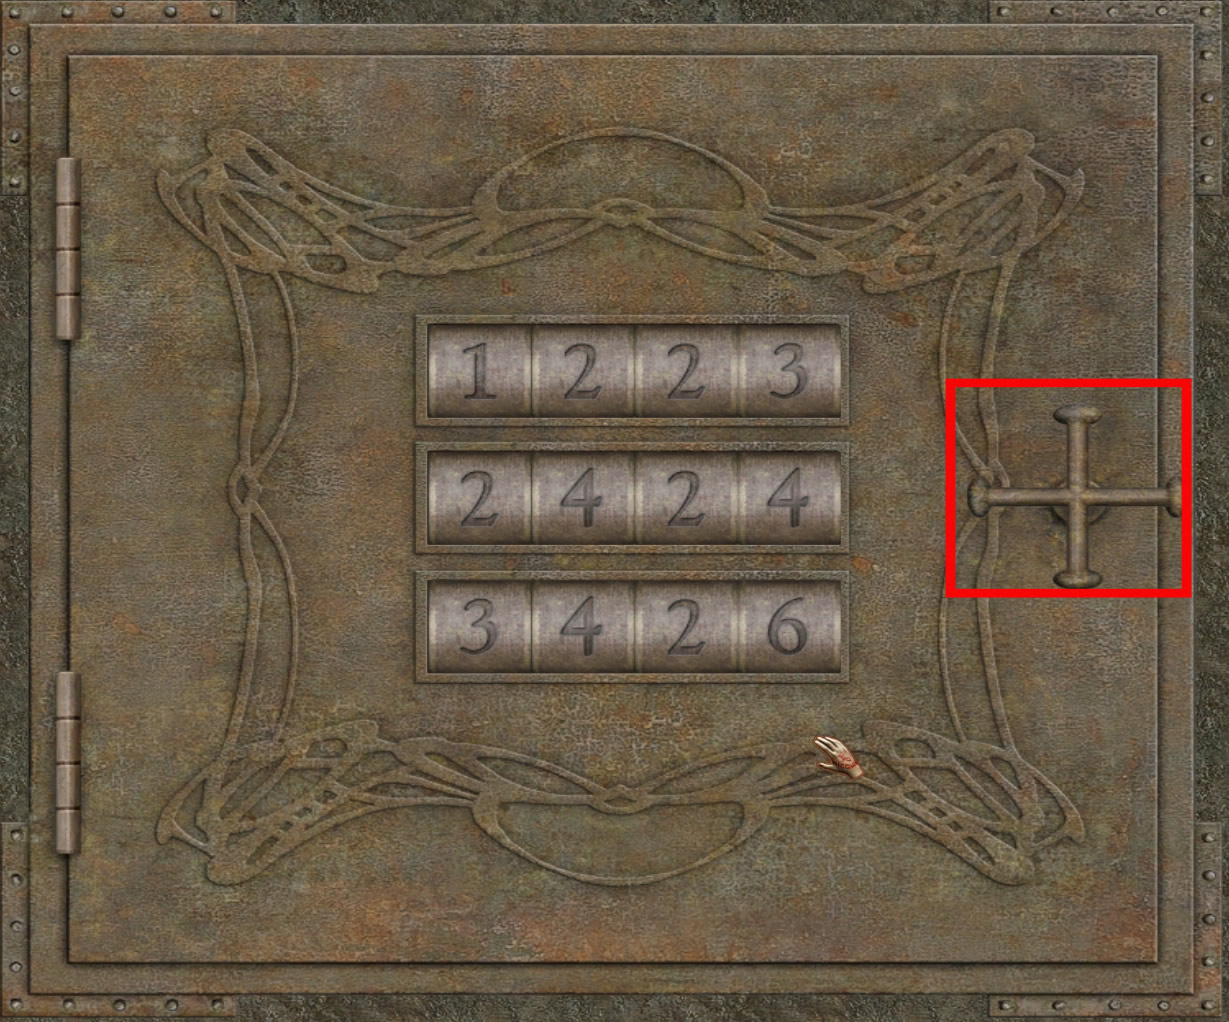
- The code has to be discovered.
- Have a look at your documents, the puzzle in the newspaper.
- You have to find out, by how many numbers each hour is divisible.
- 1 is only divisible by 1 => 1
- 2 is divisible by 1 and 2 => 2
- 3 is divisible by 1 and 2 => 2
- 4 is divisible by 1, 2 and 4 => 3
- 5 is divisible by 1 and 5 => 2
- 6 is divisible by 1, 2, 3 and 6 => 4
- 7 is divisible by 1 and 7 => 2
- 8 is divisible by 1, 2, 4 and 8 => 4
- 9 is divisible by 1, 3 and 9 => 3
- 10 is divisible by 1, 2, 5 and 10 => 4
- 11 is divisible by 1 and 11 => 2
- 12 is divisible by 1, 2, 3, 4, 6 and 12 => 6
- So the code for the safe is, seen from top to bottom:
- 1 2 2 3
- 2 4 2 4
- 3 4 2 6
- Now you can open the safe - get the key out.
- Now go to the next room - you can reach it over the balcony or the hall.
- As soon as you go in, you will hear a scream, coming from the stables.
- You will have to run, you cannot use the map in this case.
Arneson Residence/stables
- The door is locked, so grab the log, laying in front of the wood shed and open it with this.
- In the cutscene Watson finds a note with a warning to Sherlock on Eulah.
- Watson will stay and take care for Eulah while you can use the map now, to come back to the bedroom.
- Go into the trophy room.
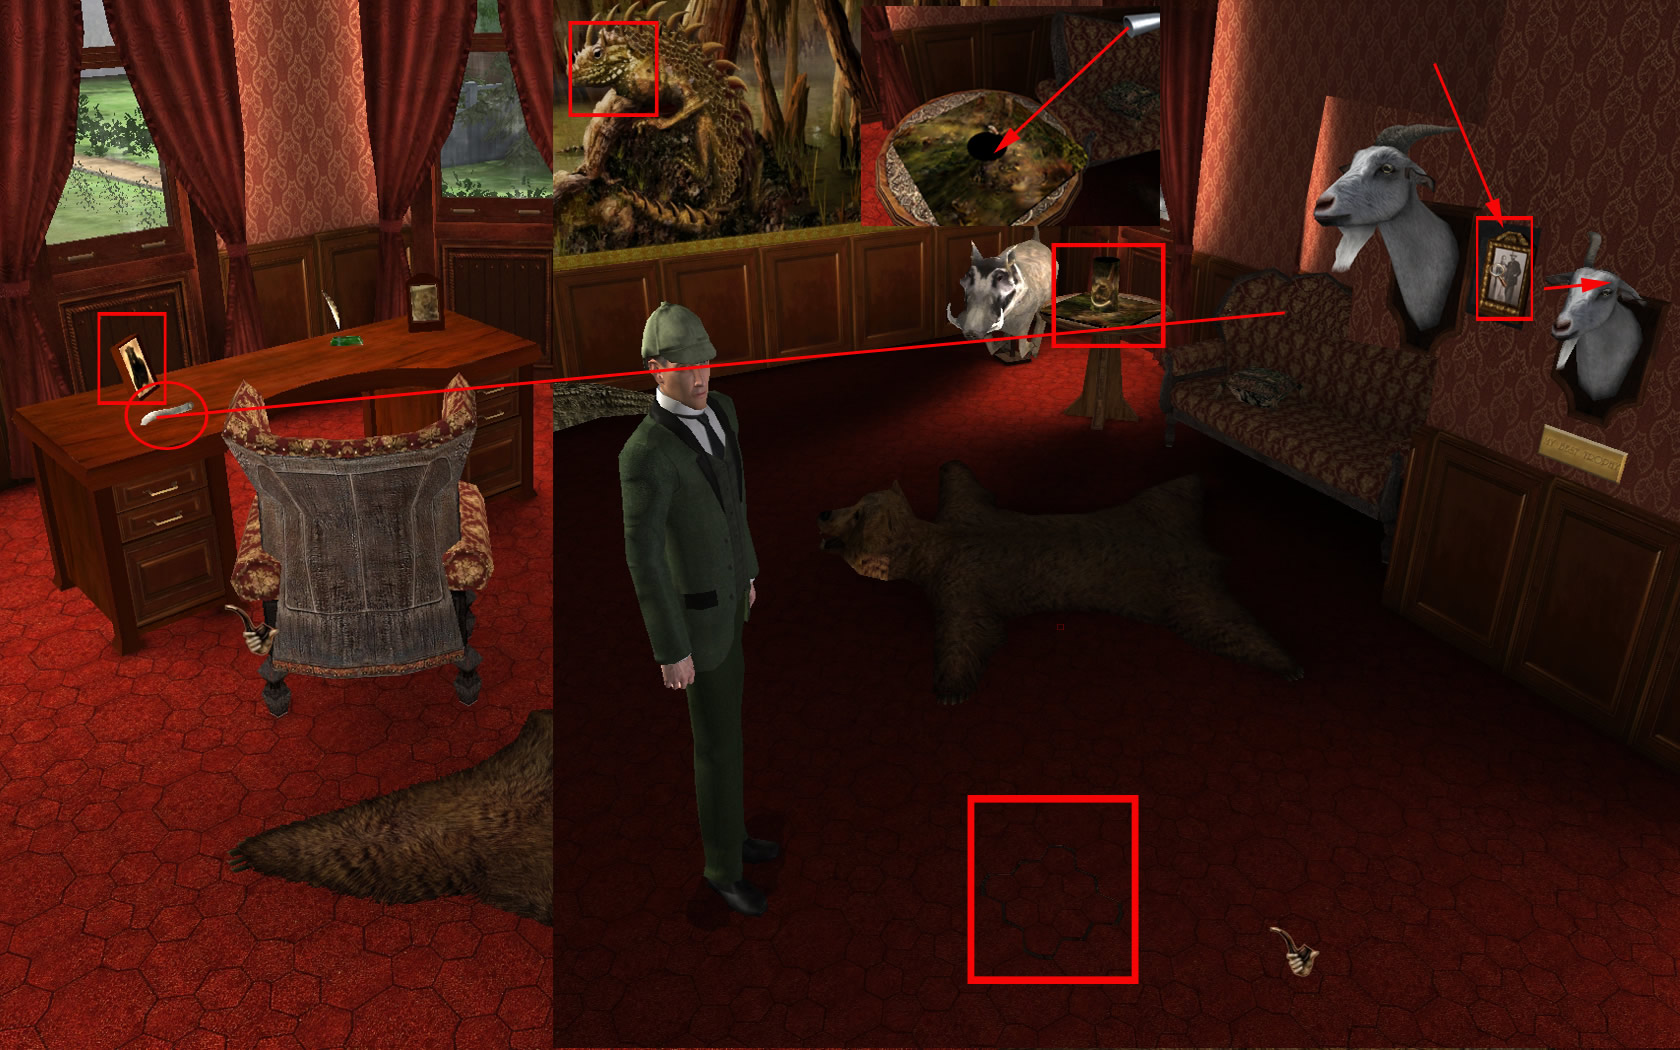
Arneson Residence/Trophy Room
- Go over to the desk, under the window next to the door to the hall and grab the horn.
- Go to the left and see the huge painting.
- The alligator eye has a hole.
- Have a look on the little round table to the left - there is an empty space.
- Place the metal pipe from your inventory there.
- Turn to the right - a Capricorn head with only one horn is hanging there.
- Get the horn from your inventory and place it there - now it moves to the side and you see a picture.
- Examine the floor - between the table and the zebra fur one of the tiles seems to have a mechanism.
- Step on it to hear it.
- Step away and place the lemon tree from your inventory there.
- Go over to the painting, get the metal rod from your inventory and stick it into the alligators eye.
- Left a secret door opens.
- Enter the secret room.
Arneson Residence/Secret Room
- Go to the desk and grab the letter.
- Beside some information about the servant and the gardener, you will find directions to a certain place in the swamp.
- Look at the picture and see the flowers, Arneson's girlfriend is holding.
- Turn to the left.
- The weapon cabinet is locked.
- Leave the secret chamber and return to the first floor.
- After Davy hides in his room again, use the map to move to the stables.
- Talk with Watson and Eulah - all three of you return to the house.
Arneson Residence/Davy's Room/Garden/Trophy Room
- This is more less just a cut scene
- After you brought Davy and Eulah to her master, you will find yourself back in the garden
- As you can't go further, because of the mosquitoes, use the map to reach the bed room, go into the trophy room and grab a lemon.
- Go back in the garden and give Watson the lemon
Arneson Residence/Garden
- Now you can move on this way - have a look at the ground and see the traces.
- A few step further, you will see find a huge blood spot and a part of a bush was stripped.
- Follow the way to the footbridge and see the rope on the left.
- You know now, that all traces lead to the swamp, so you need Champagne.
- Use the way through the stable, to use the house, when you are outside on the street, you can use the map.
- You will first have a cut scene, then find your self back in front of the bagnio boat.
Bagnio Boat
- Enter the boat and talk with the mistress.
- Give her the flower bouquet from your inventory.
- Now talk to Lucy - she tells you about Arneson's seal ring to open the weapon cabinet.
- Use the map to go to Champagnes hut.
Champagne's Hut
- Give the bottle of champagne to the old guy.
- You will get a few wooden planks for it and a lantern.
- Open your inventory and combine the nails with the planks and use the hammer on it after.
- Now you have a ladder in your inventory.
- Use the map to go back to the french quarter.
Arneson Residence/Garden
- You are standing on the porch.
- Sherlock asks Watson, who might have taken Arneson's cut off hand.
- Use the in game keyboard to answer: RACCOON
- Go to the kitchen and get the ham from the kitchen counter.
- Near by the porch you see a big tree.
- In front of it, on the way, you see little raccoon paws.
- Place the ham there and watch the cut scene.
- Use the map to reach the bedroom and go from there to the balcony.
- Use the ladder from your inventory at the point, you have seen the raccoon disappear.
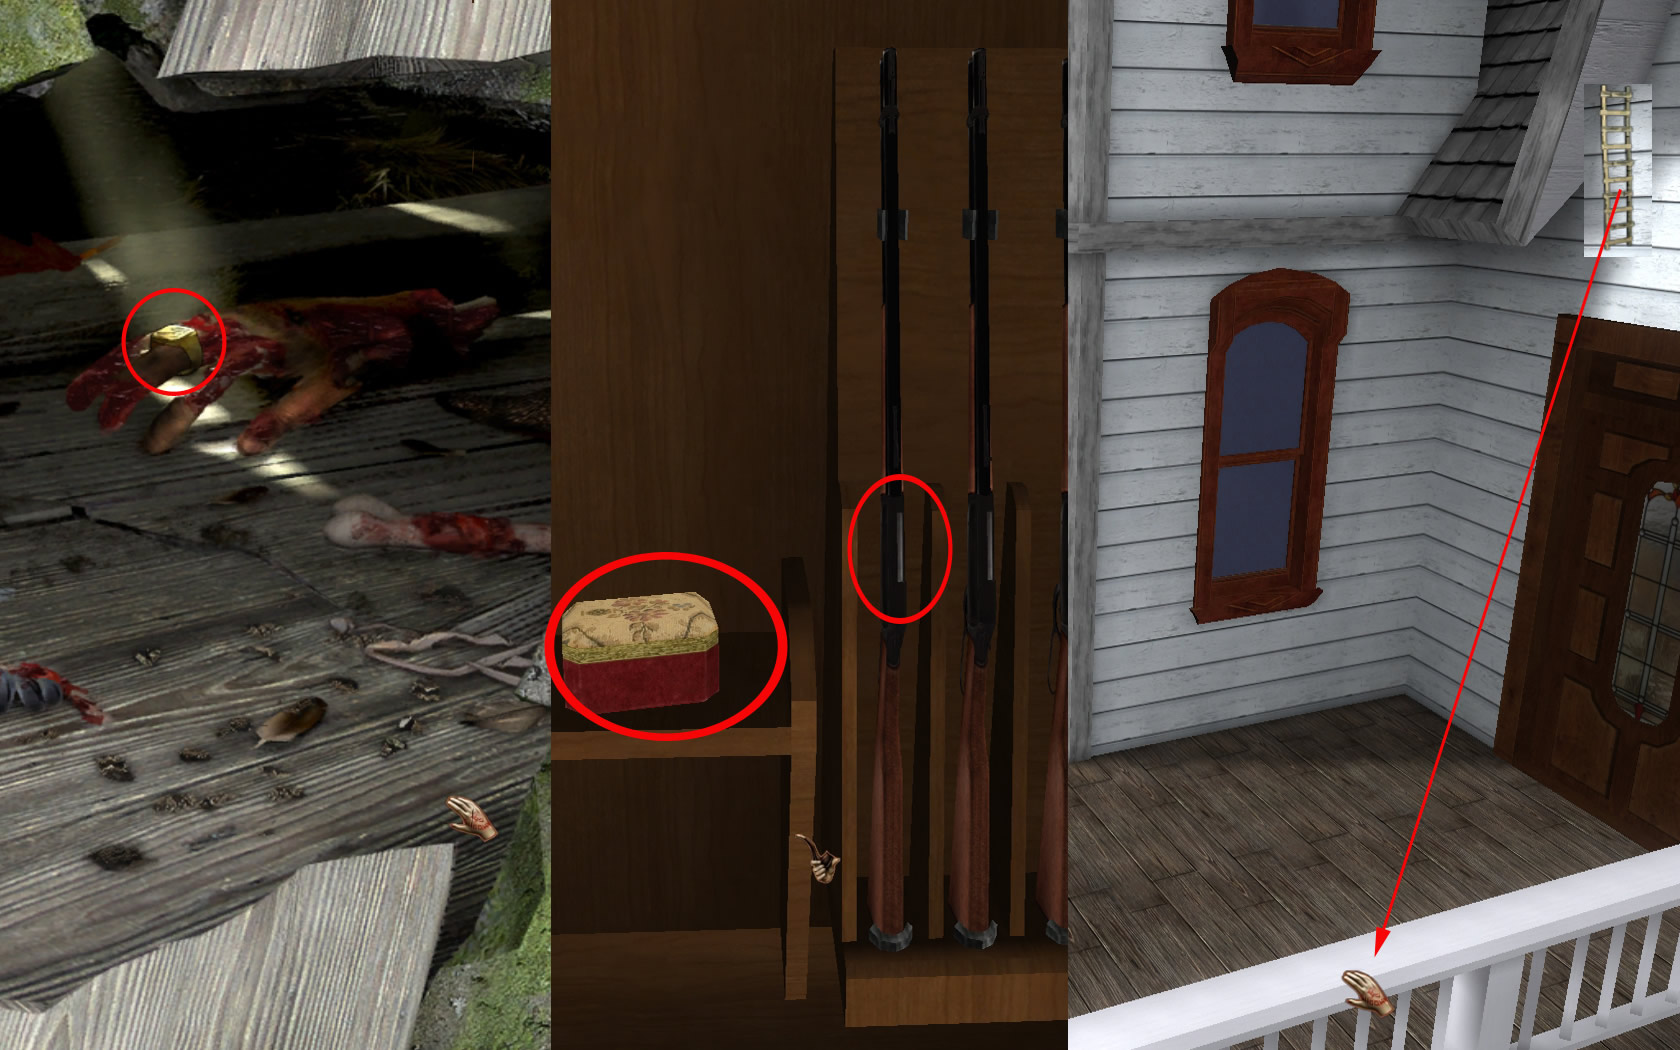
- And right, in the nest, you will find the hand with the ring.
- Click the ring to receive it.
- Go into the secret room

Arneson Residence/Secret Room
- Open the little box left and get out the money.
- Grab one of the rifles from the right side.
- Go back into the hall, but the sheriff and his men are waiting for you.
- Go back into the bedroom and from there on the balcony.
- Get the ladder back from the house wall and place it at the balustrade.
- Click to use it.
Champagnes Hut
- Back in the harbour, use the map to Champagnes Hut.
- Give him money and he will give you a boat.
- Listen to what he says about Sam's nets.
- Now you have to find your way through the swamp.
The Swamp
- Read the description from the note in Arneson's house.
- Go straight ahead and left at the next crossing.
- Follow this way till you come to a small island.
- Go left, till you see behind the island the blue-white ropes.
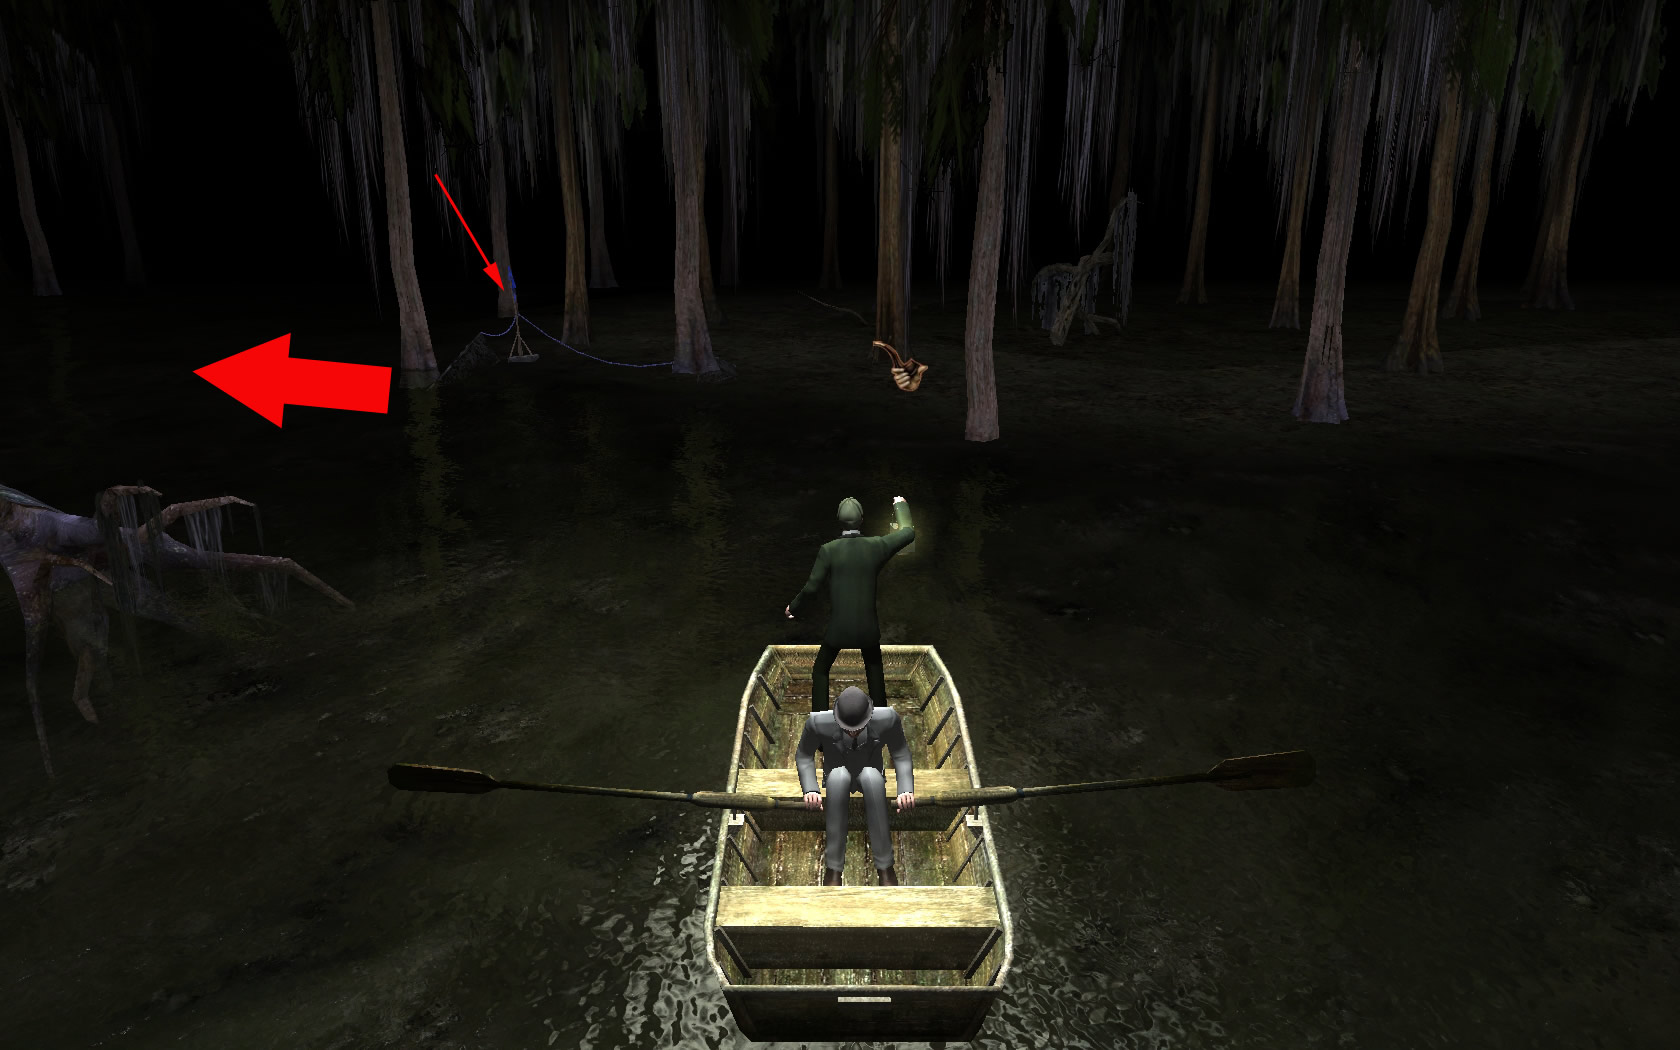
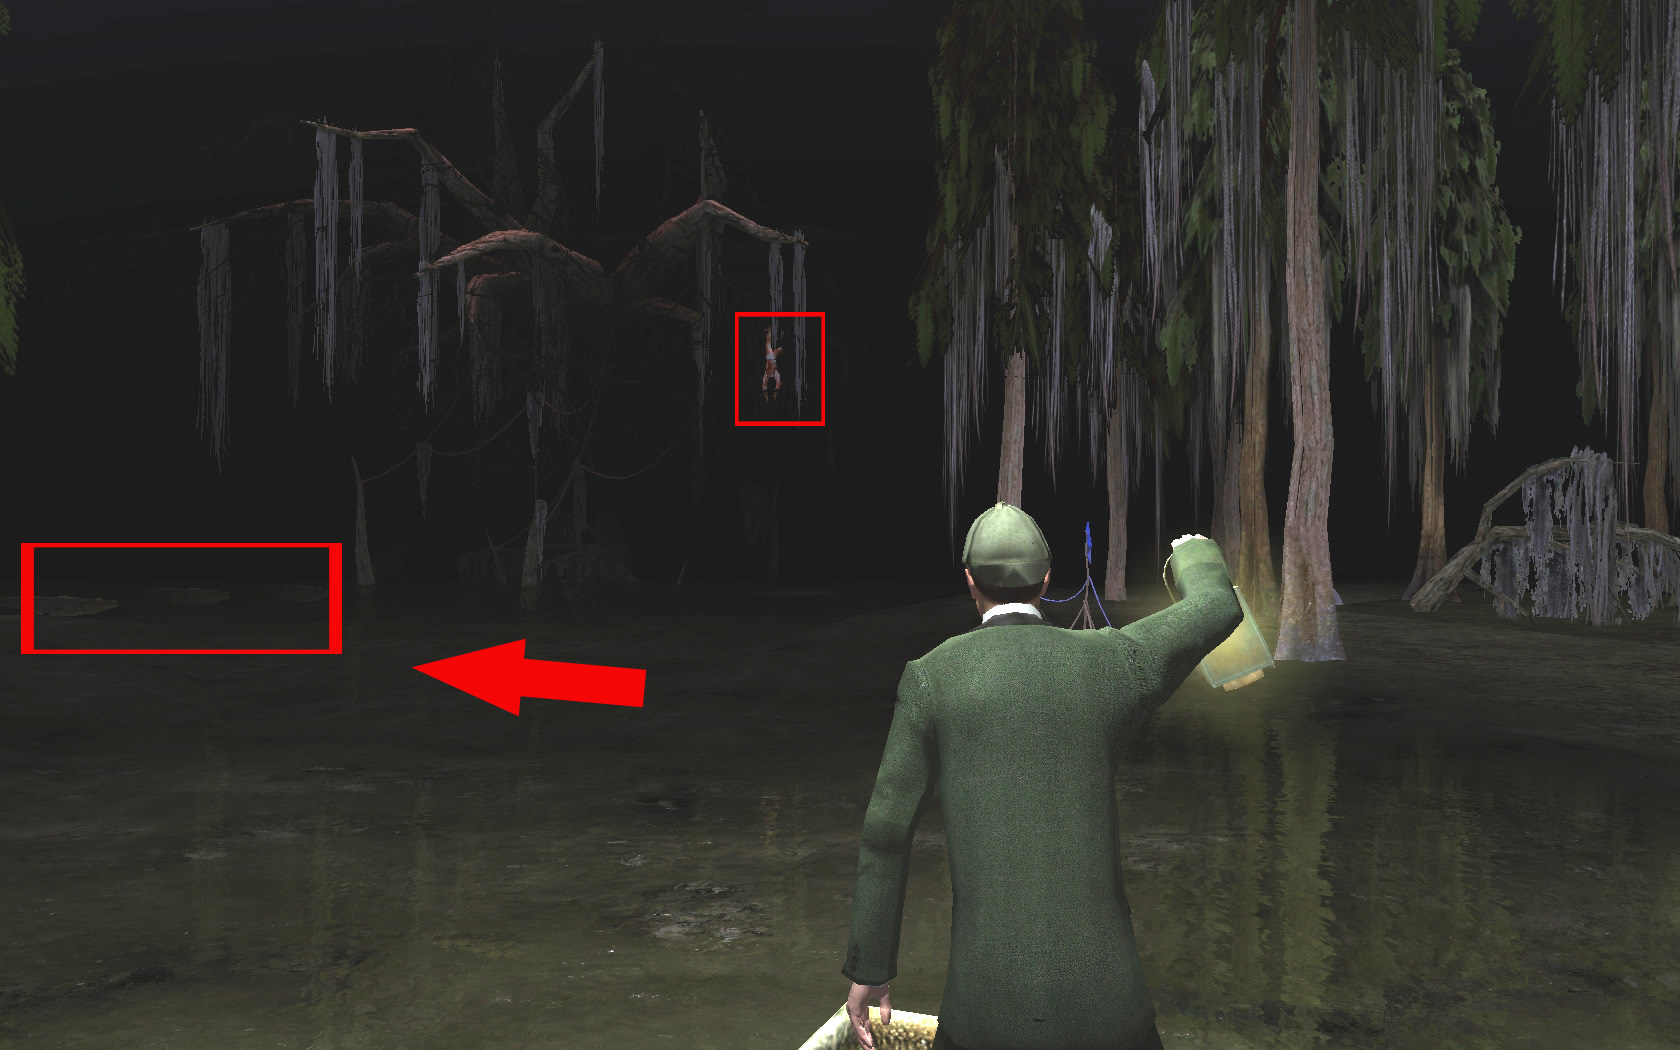
- Follow the rope direction till you see a rock covered with blood.
- You see in front a huge tree, dead body hanging down from it.
- You need to go the left, but there are crocodiles.
- Get the rifle and target the far right dead body on the tree.
- You will see cross lines, click, when they point on the body.
- The body is a good lure for the cradles and the way is free now.
- Follow the way straight ahead, till you reach a footbridge.
- Leave the boat.
- To your left you will see Arneson. He is still alive.
- Sherlock tells Watson to take care of the man.
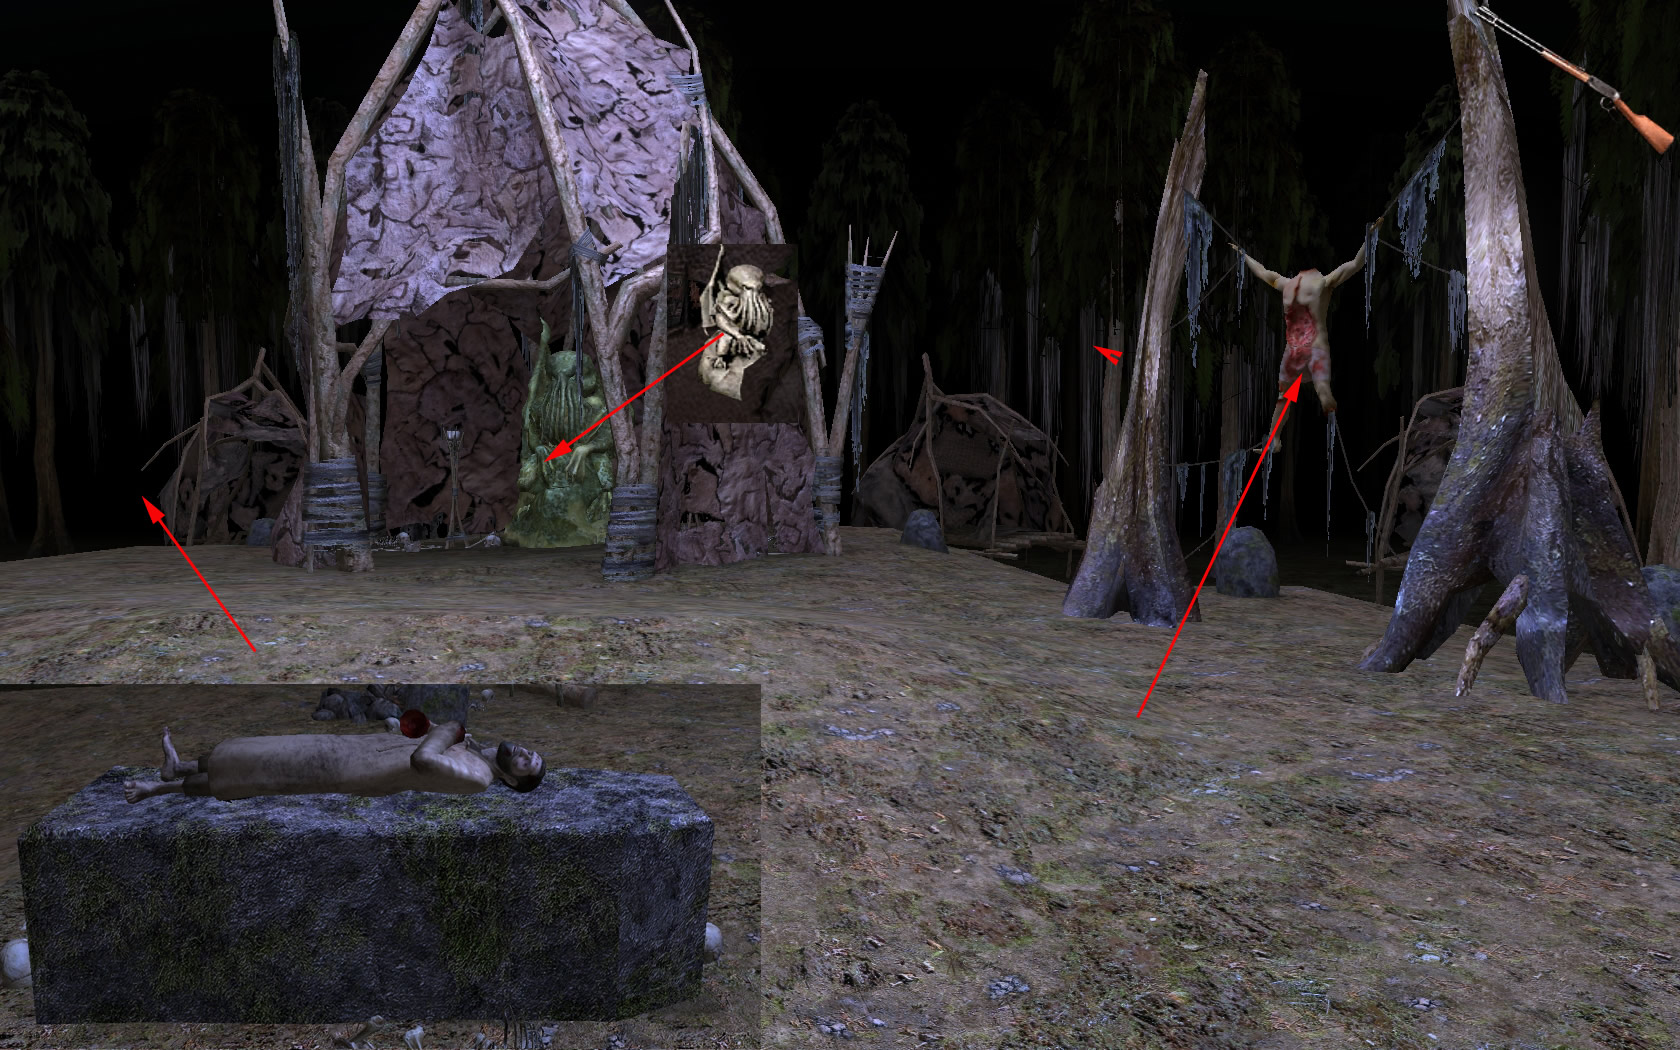
- Far left you can see a few huts.
- Right next to the statue you see a dead body without head is fixed with ropes between trees.
- When you come near a black man will come out and start yelling about the same stuff as the old guy in the "Black Edelweiss".
- Watson shoots him and you can examine the body.
- Now turn left to the statue and have a closer look.
- On the statue's lap you can see a circle.
- Place the statue from your inventory there.
- A book is falling down, grab it.
- Now go back to Watson and Arneson.
- Help Watson to bring him to the boat.
- The rest is a cut scene.
- Give the mistress the money to make her accept the care of Arneson.
- Now its time to go home to London.
London [top]
Baker Street 221b
- You will have to decipher the Davy's number's to answer Sherlock Questions.
- Have a look at the note, Watson made.
- After the first 9 numbers a slash follows.
- You will always find the numbers from 1 to 9 in diffrent orders.
- By thinking, that Davy left a clue with the slash, it might mean, that you have to have blocks of nine.
- That does not bring us further, so maybe it's an inverse hint. Its not about the nine numbers, but 8 and the missing one.
- For the next numbers it would mean, that the 5 is missing.
- 21467983 = 5
- 93421758 = 6
- 8123665497 = -
- 52761938 = 4
- 57986421 = 3
- 24538971 = 6
- 597248613 = -
- 37589214 = 6
- 82974365 = 1
- 96752481 = 3
- 98256371 = 4
- Answer Holmes: 56436 6134
- You will have to use the space between the two sixes, other way it will not work.
- After the following conversation use the map to go to the book store.
Bookstore
- Speak with Mr. Barnes and give him the book to translate.
- Use the map to go back to Baker Street.
Bakerstreet 221b
- Do not go inside the house, go over the street and buy a newspaper.
- Read the article to learn, that you need a map of Scottland.
- Use the map to go to the pub in the harbour.
Pub
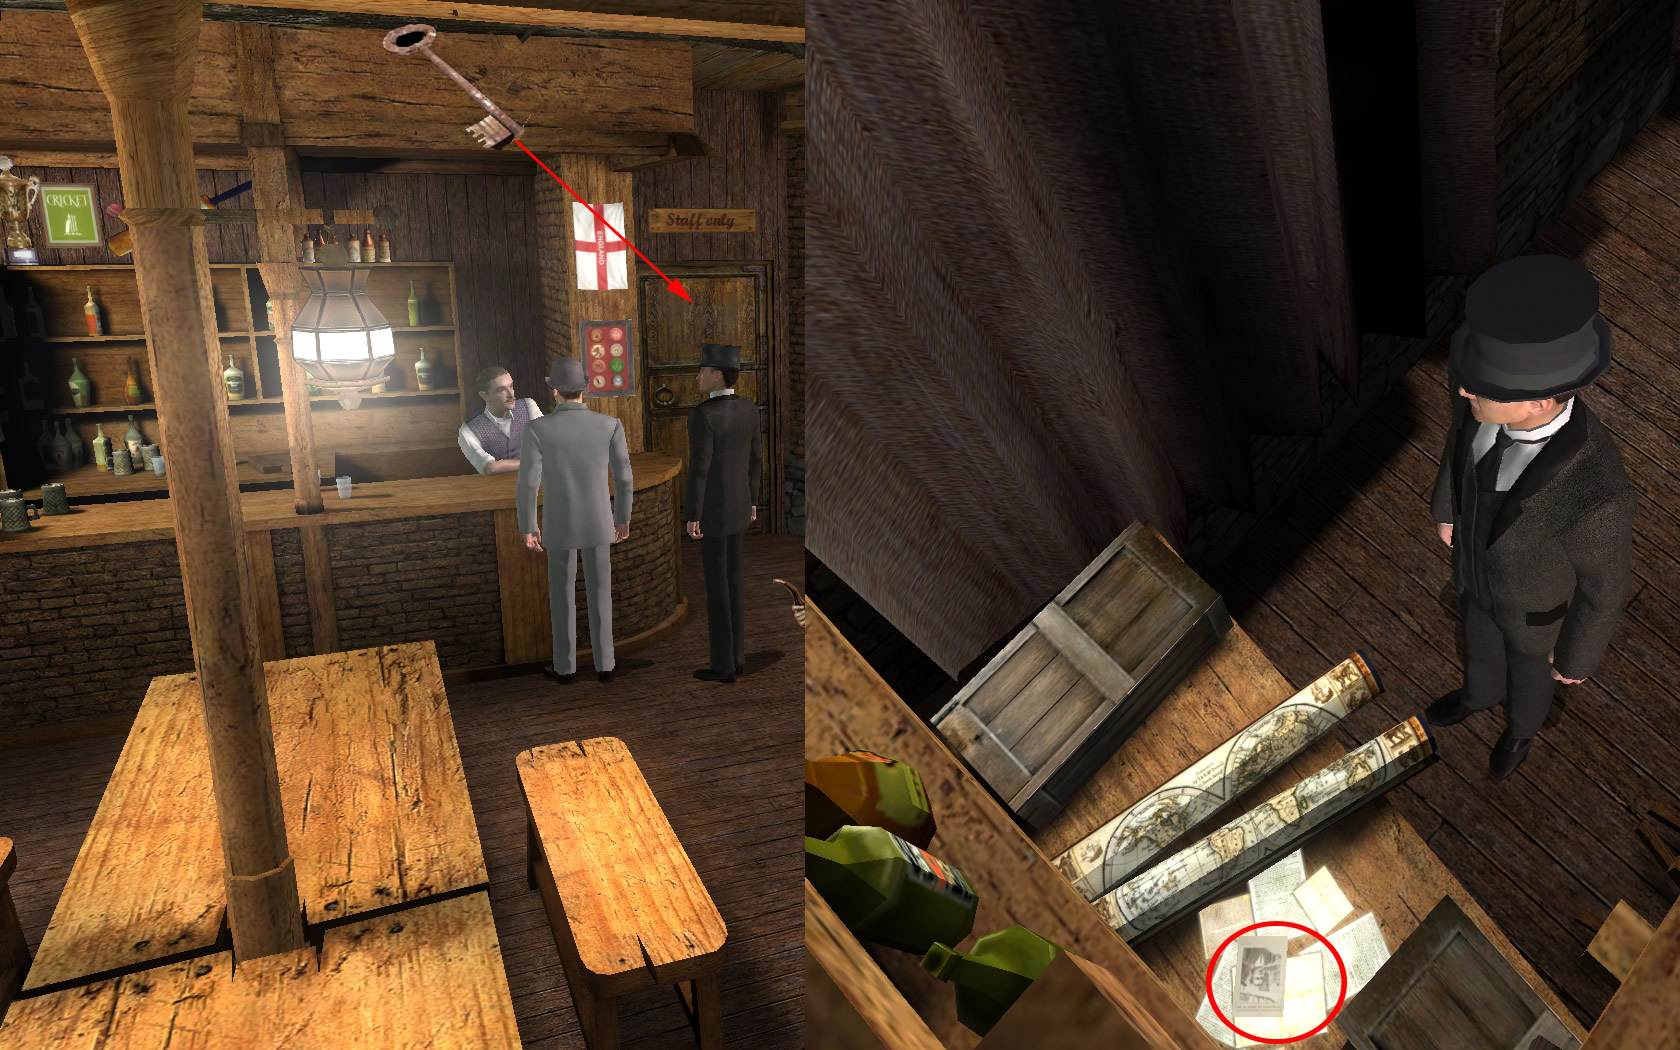
- Talk with the bar keeper.
- He gives you the key for room next to bar "Staff only".
- Go inside and around the closets.
- Go to the table, pick up the photo and click the map.
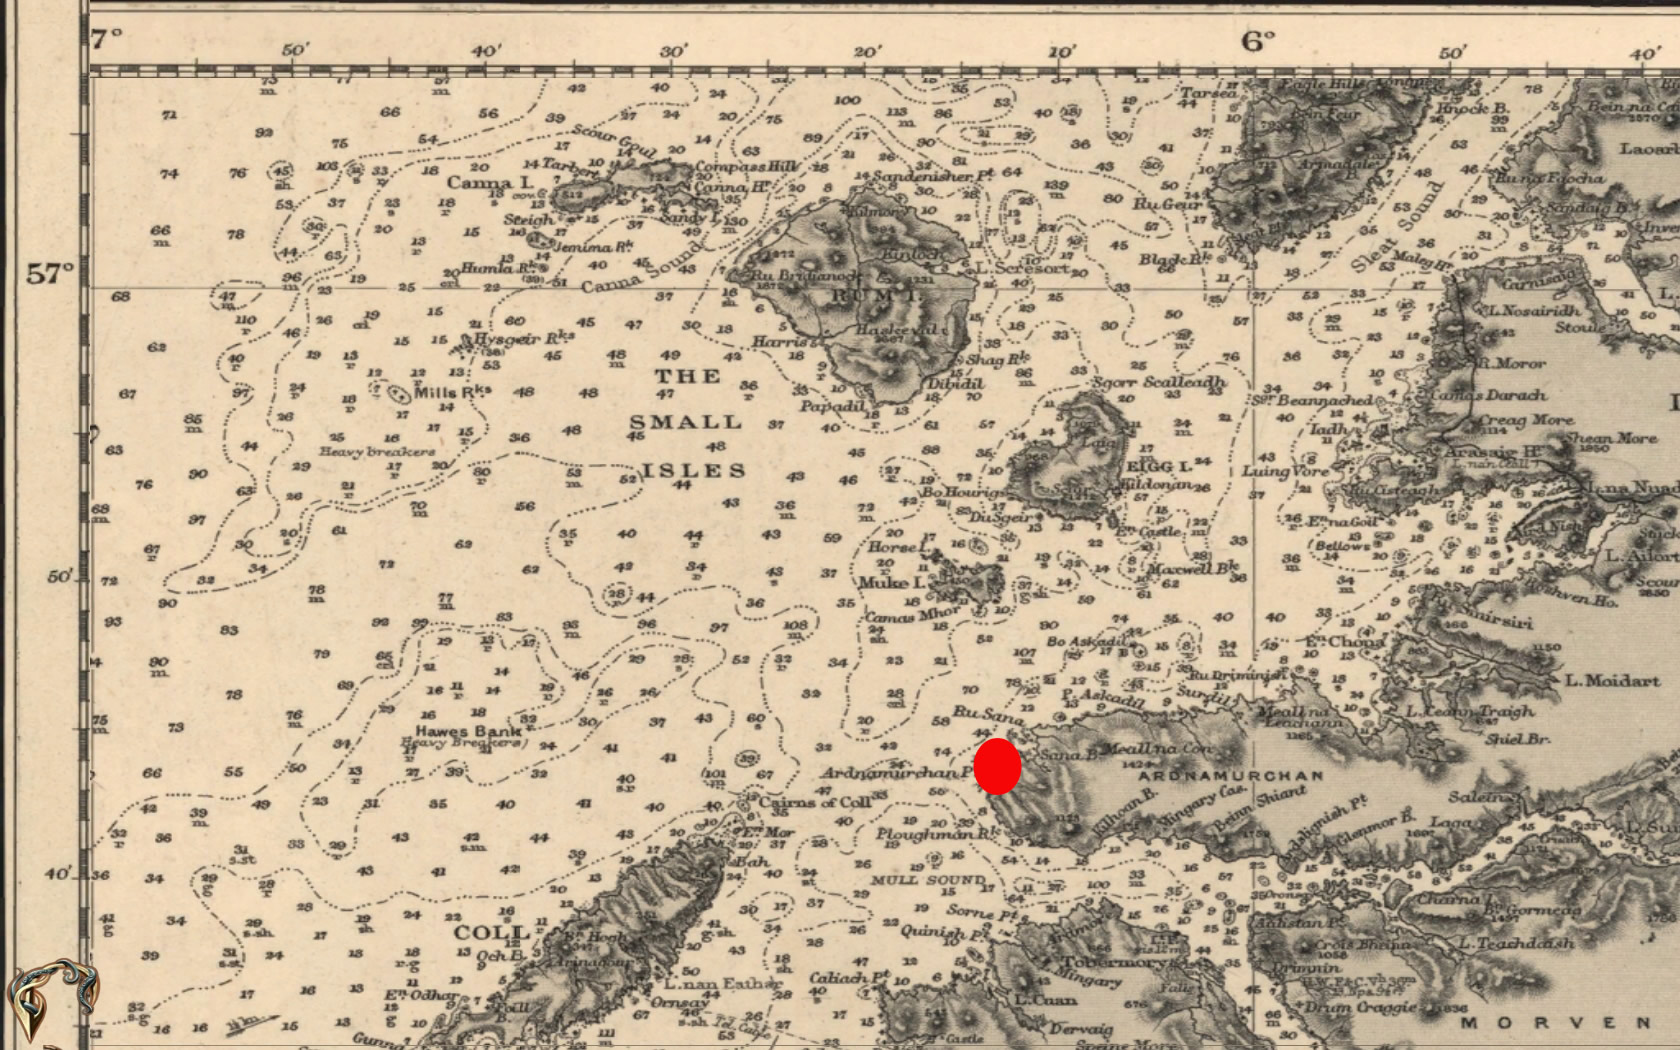
- You now have to find out, what's the name of the place in Scottland, you have to go.
- The numbers, Watson figured out from Davy's note are coordinates.
- 56°43'6" and 6°13'4"
- Drag the card with pressed left mouse button to the lower right corner, so that you see "The Small Islands"
- Now look first for the right data on the left, then on the top.
- The lines will make a cross at a certain point, then look for the lower numbers.
- The place you are looking for is Ardnuamurcham.
- Click there.
- Bring the key back to the barkeeper and talk with him about this place.
- Use the map to go back to the book store.
Bookstore
- Talk to Barnes.
- You will automatically be brought back to Baker Street.
- After another cut scene, you will be in Scottland.
Scottland [top]

Coast
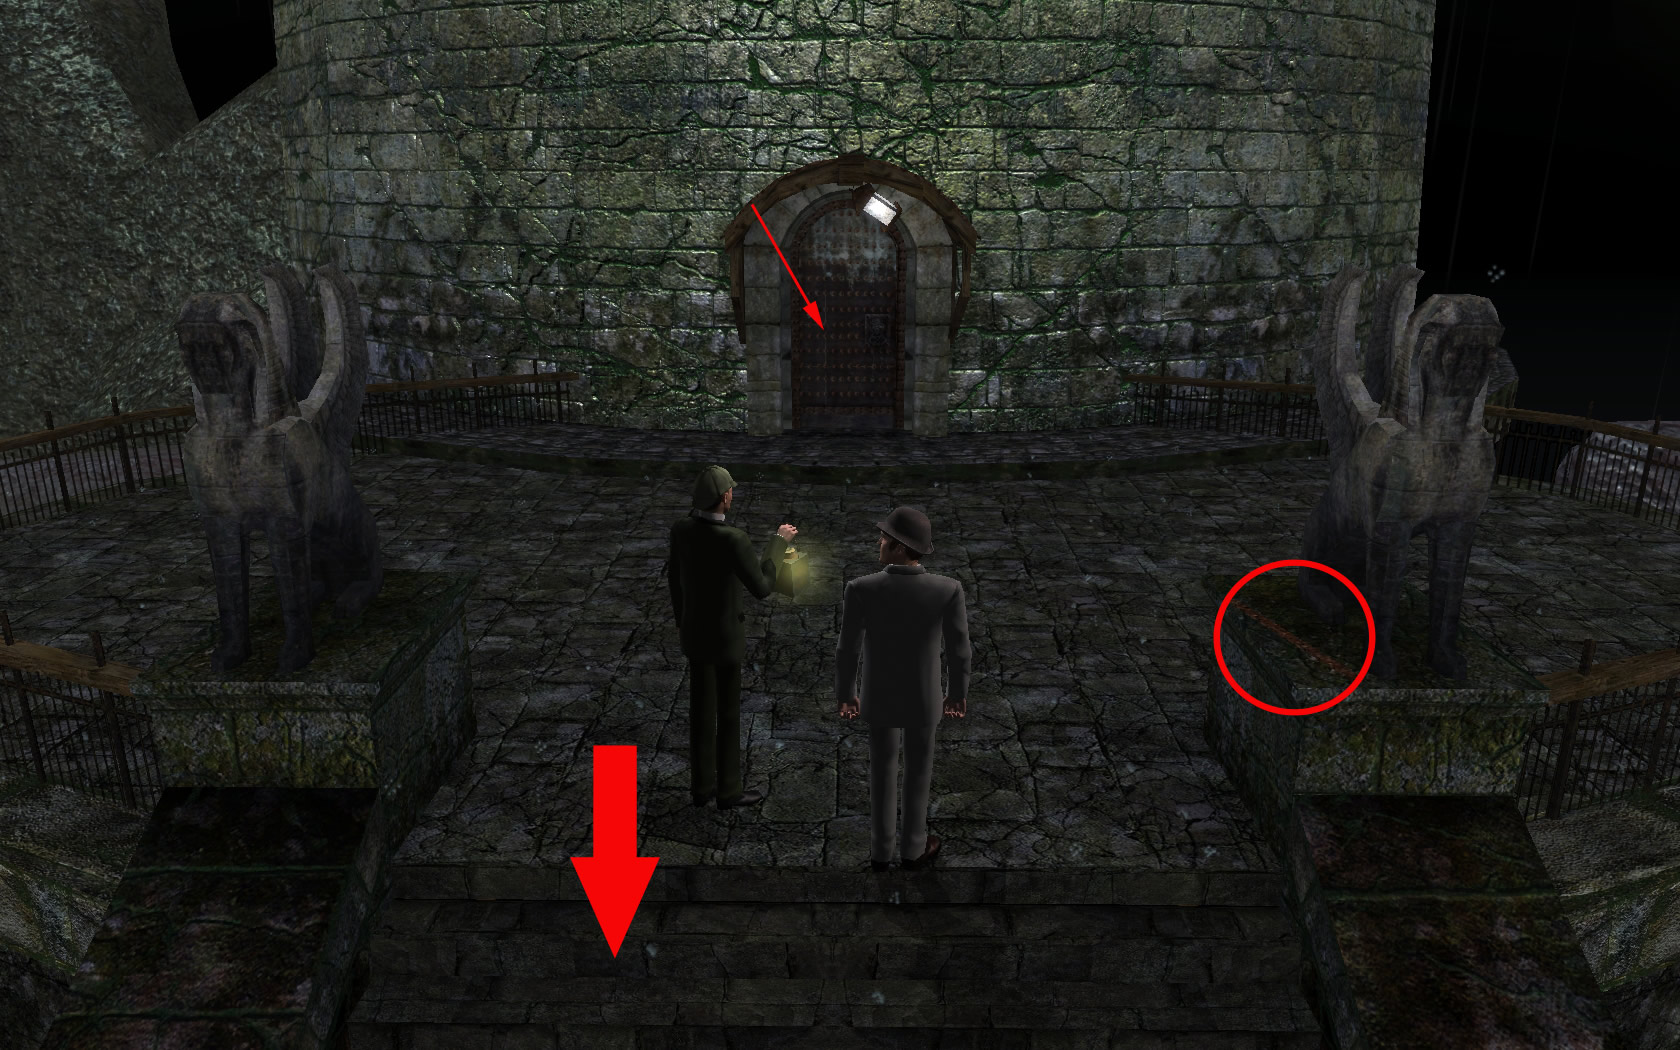
- After finally arriving go to the lighthouse on the left.
- The door is closed, so only grab the iron rod from the right statue's podest (seen from the point standing with the back to the door)
- Walk over to the other side, where you will find an old shed.
 8
8
- Pick up the old rope from the floor and look at the barrel right side.
- It contains drink water.
- Use the first - person vision - with the back to the shed on the left, you see steam coming up.
- Walk over there and find three geysers.
- Have a look in the pirate book. On page 54 you will find a sentence "Form the middle of the three throwing mouths, thirty steps towards the ram"
- Use the first - person vision and look around. You will see a rock with horns like a ram.
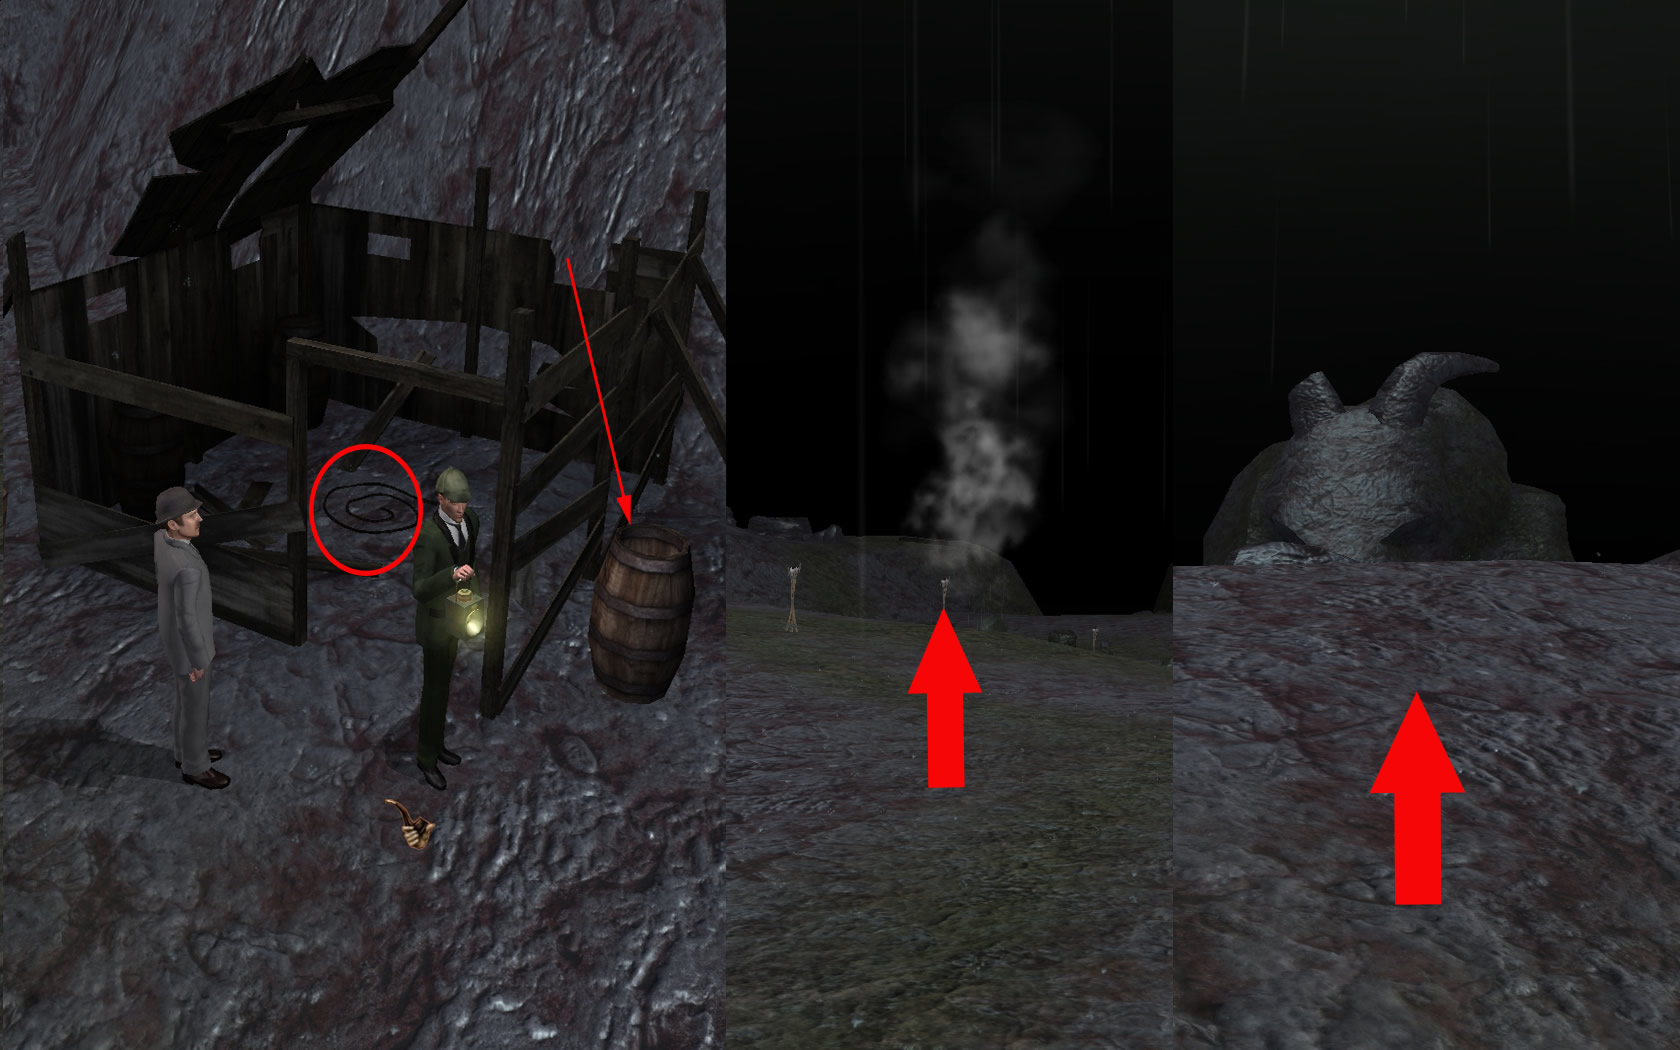
- Go in its direction till you stand in front of a small rock.
- Use the iron rod with it and you discover a hole into a cave.
- Use the rope with the rock left next to the one, you moved with the rod.
Cave
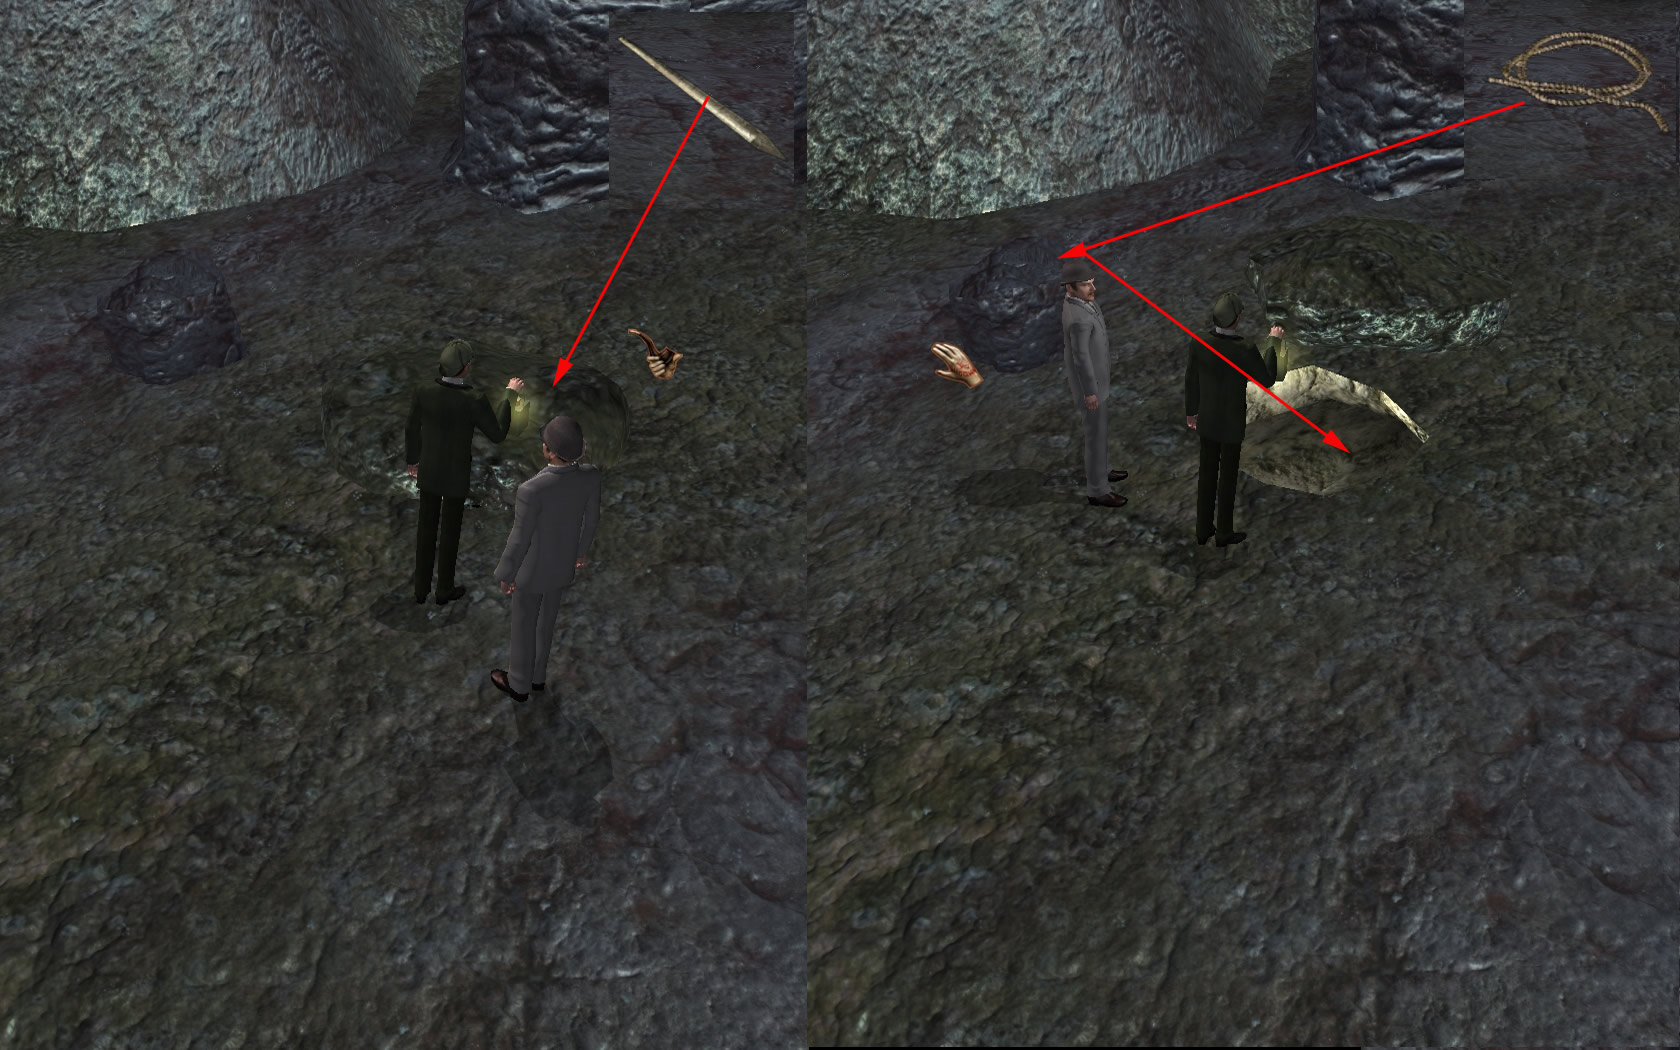
- After the cut seen, go to the right (seen, when you stand with your back to the wall).
- You will see an old skeleton, next to it an old knife.
- Grab the knife and move on.
- At the end, the way is blocked. Use first the knife, it will break,
- Now use the hand and the rock moves - go ahead.
- Go, till you come into a cave.
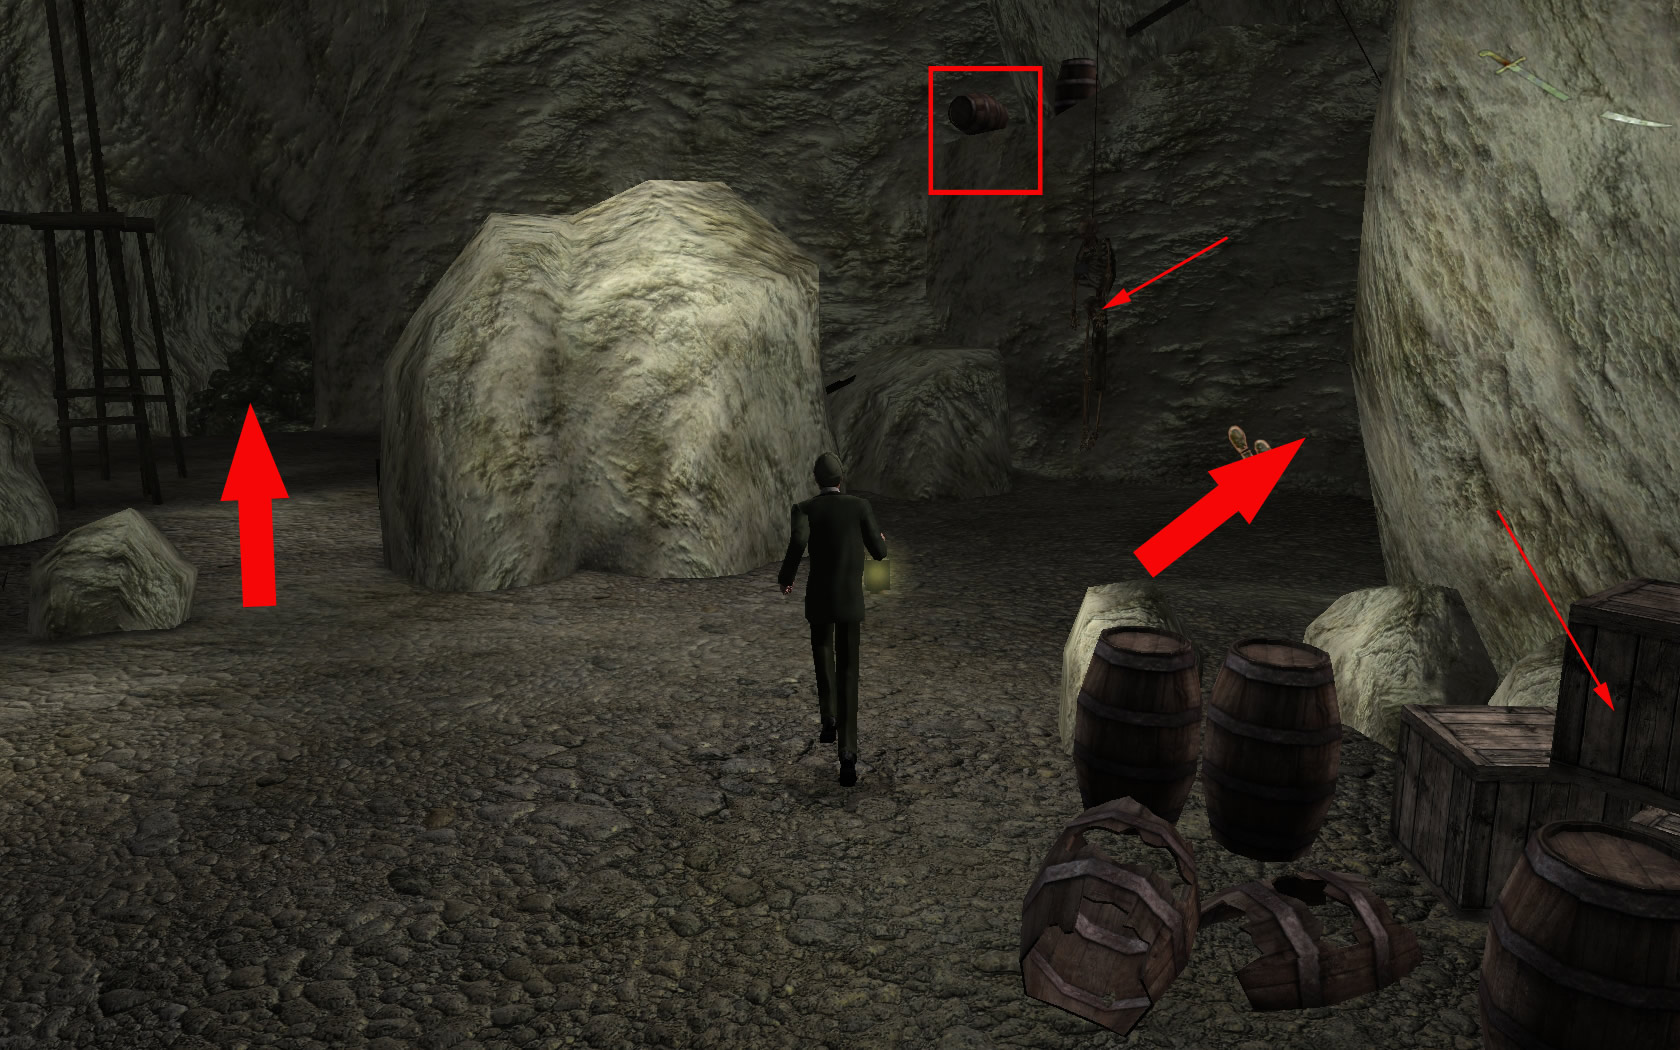
- Have a look at the crates to your left.
- One you can open and get out some rags.
- Go to the right and click the skeleton hanging at a hook.
- It comes down, together with a small barrel.
- Pick up the barrel.
- More to the right, you can enter a small cave.
- Right next to the skeleton on the floor you will find a flask with rum.
- A little further you will find a funnel.
- Left at the wall, you can take a part of a gate.
- Now leave this cave, go back to the first skeleton, further and right around the stones an wood.
- Right in the back corner you see two planks.
- Climb up and have a look at the top. Something is there, but you cannot see it clearly.
- Turn to the right and place your lantern at the hook (best to do with first-person-vision)
- Go back to the skeleton an one step further - at the left wall you will find a handle.
- Pull the handle and the lantern will move.
- Back over the planks on the stone. Now you can see the barrel.
- Use the part of the door you found before and place it to your feet and can be now of use as a ladder.
- Get the little barrel out of your inventory and use it with the big one on the left side. It has gun powder inside.
- Open your inventory and use the flask with the gunpowder barrel. Now use a rag with this and you have a bomb.
- At the left you see a pile of debris. Climb over it.
- Left is a little aisle, you can go, but soon you are stopped because you can't come over the abyss.
- Go back and use the next aisle, where you can pick up a few bones.
- Go completely back and get your lantern.
- Go back, but on the way back it falls down and breaks.
- Open your inventory. Combine a bone with a rag and this with the flask. You now have a torch, but you need some to lit.
- Go all the way till you are in a light cave.
- Look at the top, its a hole - use your funnel from the inventory and click at the top of the screen. As this, you will start to call for Watson.
- It might be, that you have to do it a second time.
- Watson will throw down matches. Combine them with the torch.
- Go back to the aisle with the abyss. Use the bomb at the rock to your left. Now you can move on.
- Get the red belt from the skeleton you will find and move on till you stand in front of a gate.

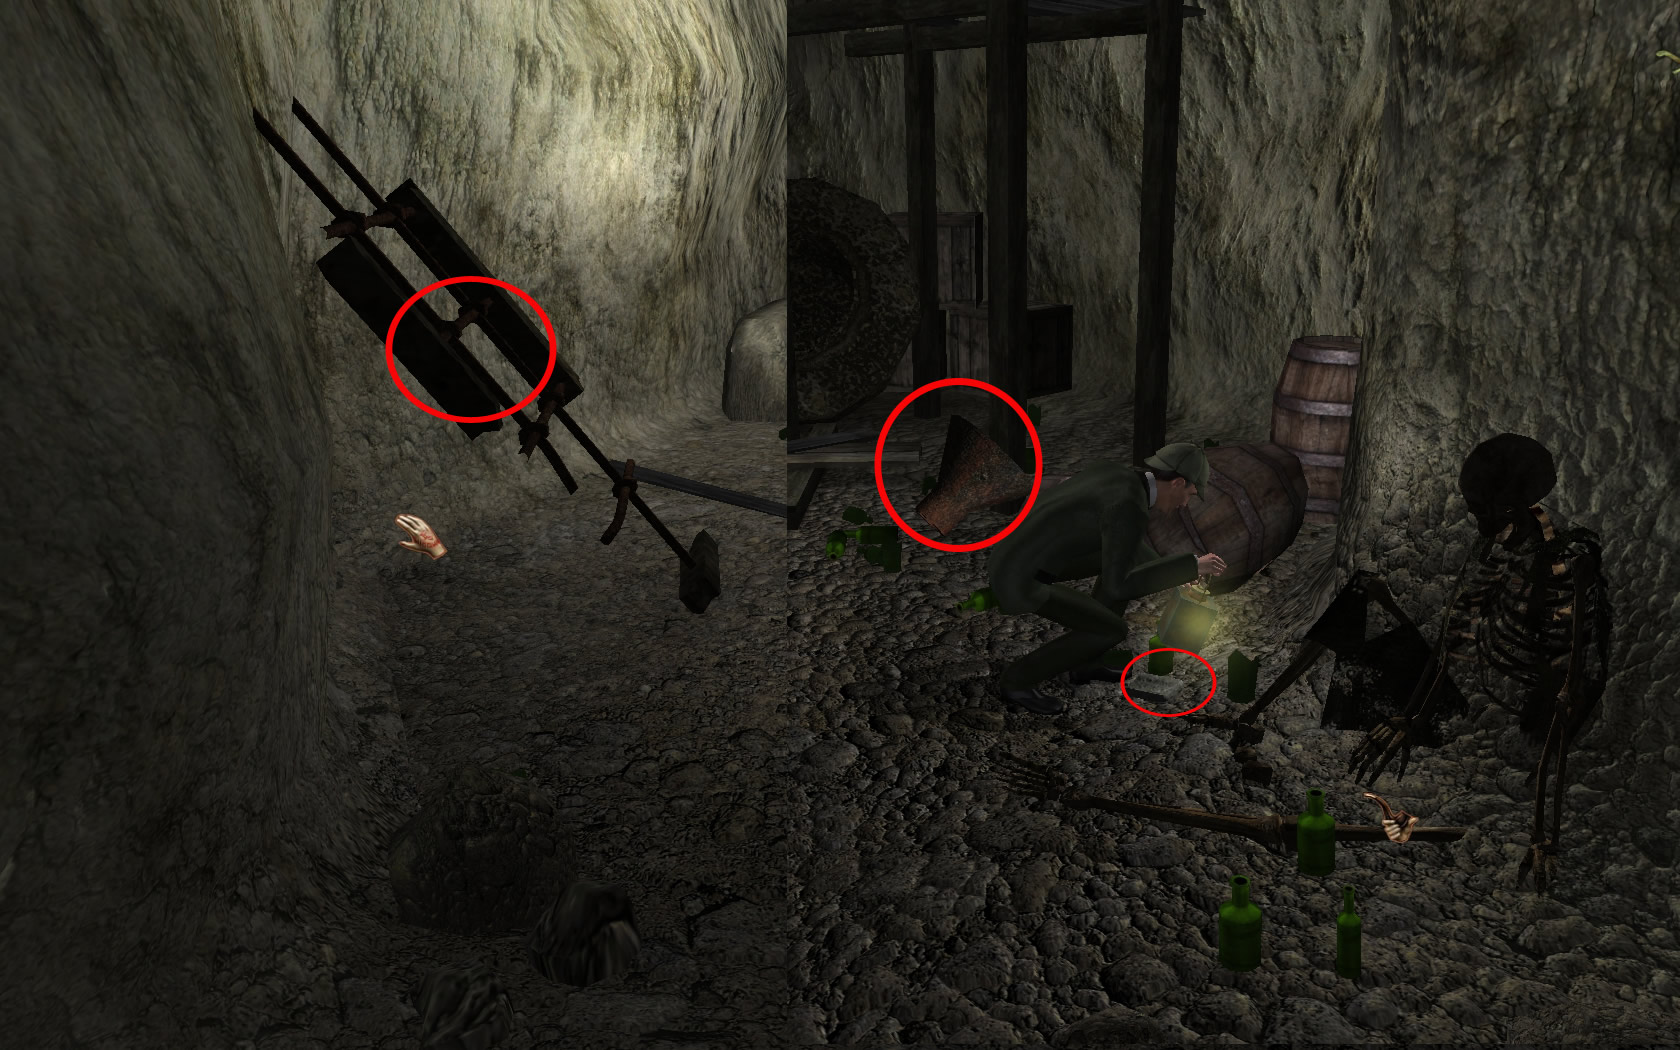
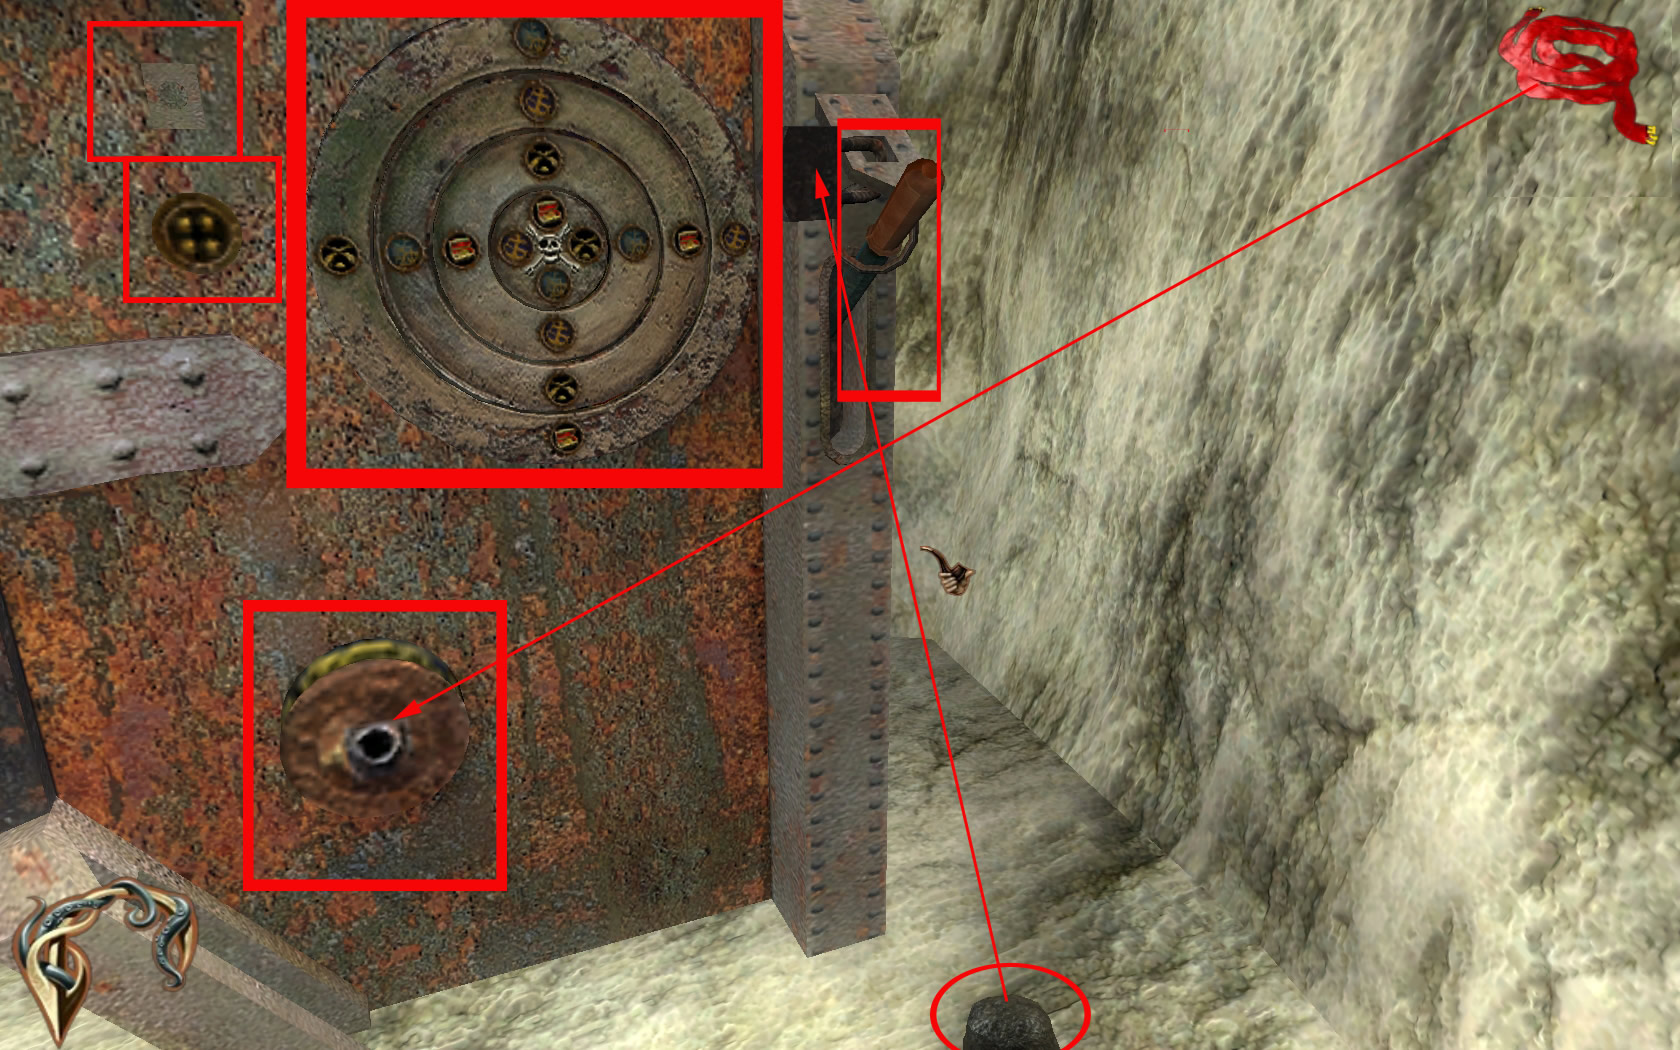
- Look to the left, there is a machine.
- Pick up the stone from the ground in front of the machine.
- Use the red belt on the lower gear of the machine, then click the circles.
- You will get a closer view and see four circles, which are movable.
- Each of it shows four buttons with the same symbols.
- Left to the circles you see four little lamps, one is already burning, above a button.
- Your goal is it, to light up all four lamps and for this, all circles have to be in the right position.
- Easy going: Move all circles, so that the crossed swords are all at the left.
- Now move one of the circles one step further and click the button.
- When a lamp lights up, it is in the right position and you can do the same with the next ring.
- Do not move the inner circle, as this is the lamp, that is already burning.
- When all four lamps are burning, leave the close up view.
- There is a lever at the right side of the machine, but its locked with a rusty padlock.
- Use the stone, you picked up before, to smash the padlock.
- Now pull the lever and the gate will open.
- Move on till you come to the cave with the five holes.
- To find out, which is the right one, you will have to throw in each hole a burning torch.
- You will have to make the torch each time again by combining bone, rag, flask and matches.
- The one back right is the hole you want to use.
- Go back to the machine and get the belt.
- Use the belt with the rock in the middle and you will automatically climb down.
- Go to the left, between a rock and wall, you will find a wooden leg. Grab it.
- Now go to the right till you reach the next door.
- When you click it, it says, that only a man with a wooden leg will be able to move on.
- Stand on the left spot in front of the door and use the wooden leg with the right spot. The door opens.
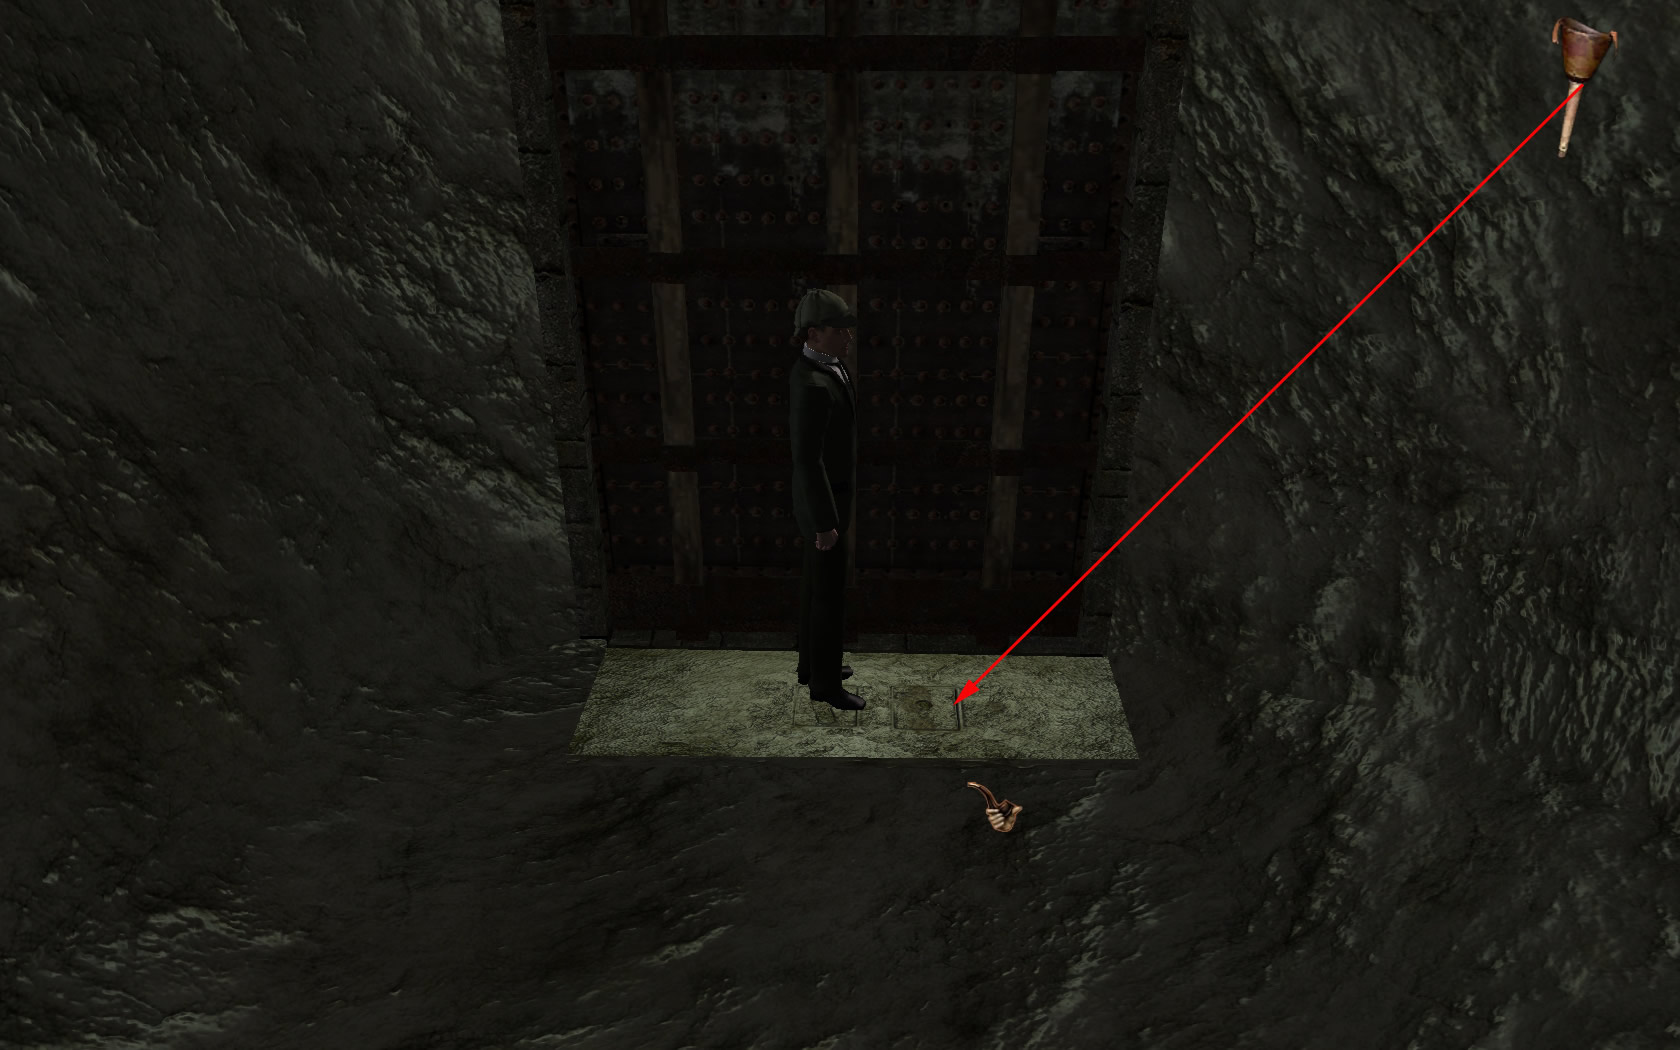
- You are in a treasure room, but its not that much of a treasure. Get the sword and move on.
- Kind of a river is in front of you, so call again for Watson.
- He has to bring you a mast from one of the wrecked ships.
Coast
- As Watson you might use the map or walk.
- Right from you is the lighthouse, so go left through the rocks and grab the mast.
- Walking or by map you go back to the hole and click the mast at it.
Cave
- Back as Holmes you can move on now.
- Walk till you see at the end an iron ladder. Climb up.
Lighthouse
- Go to the right and open the door for Watson.
- The metal rod from the door goes into your inventory.
- As the green fog is a bit.. unhealthy, go over to the shed.
Shed
- Get the bucket left and fill it at the water barrel right side of the shed.
- Back to the lighthouse.
Lighthouse
- Extinguish the fire right side of you by using the bucket with water and go then to the left.
- Amashi, the servant from Arneson appears and screams around.
- Extinguish the two fires on your way till you stand in front of something looking like a shelf.
- Left of it, you see two handles, use the left one and a crate will fall on Amashi, but he can jump to the side and runs up the stair.
- Go right now, extinguish the last fire and follow Amashi upwards.
- On a platform you will find a piece of paper and a lot of blood.
- Connect the paper with the blood.
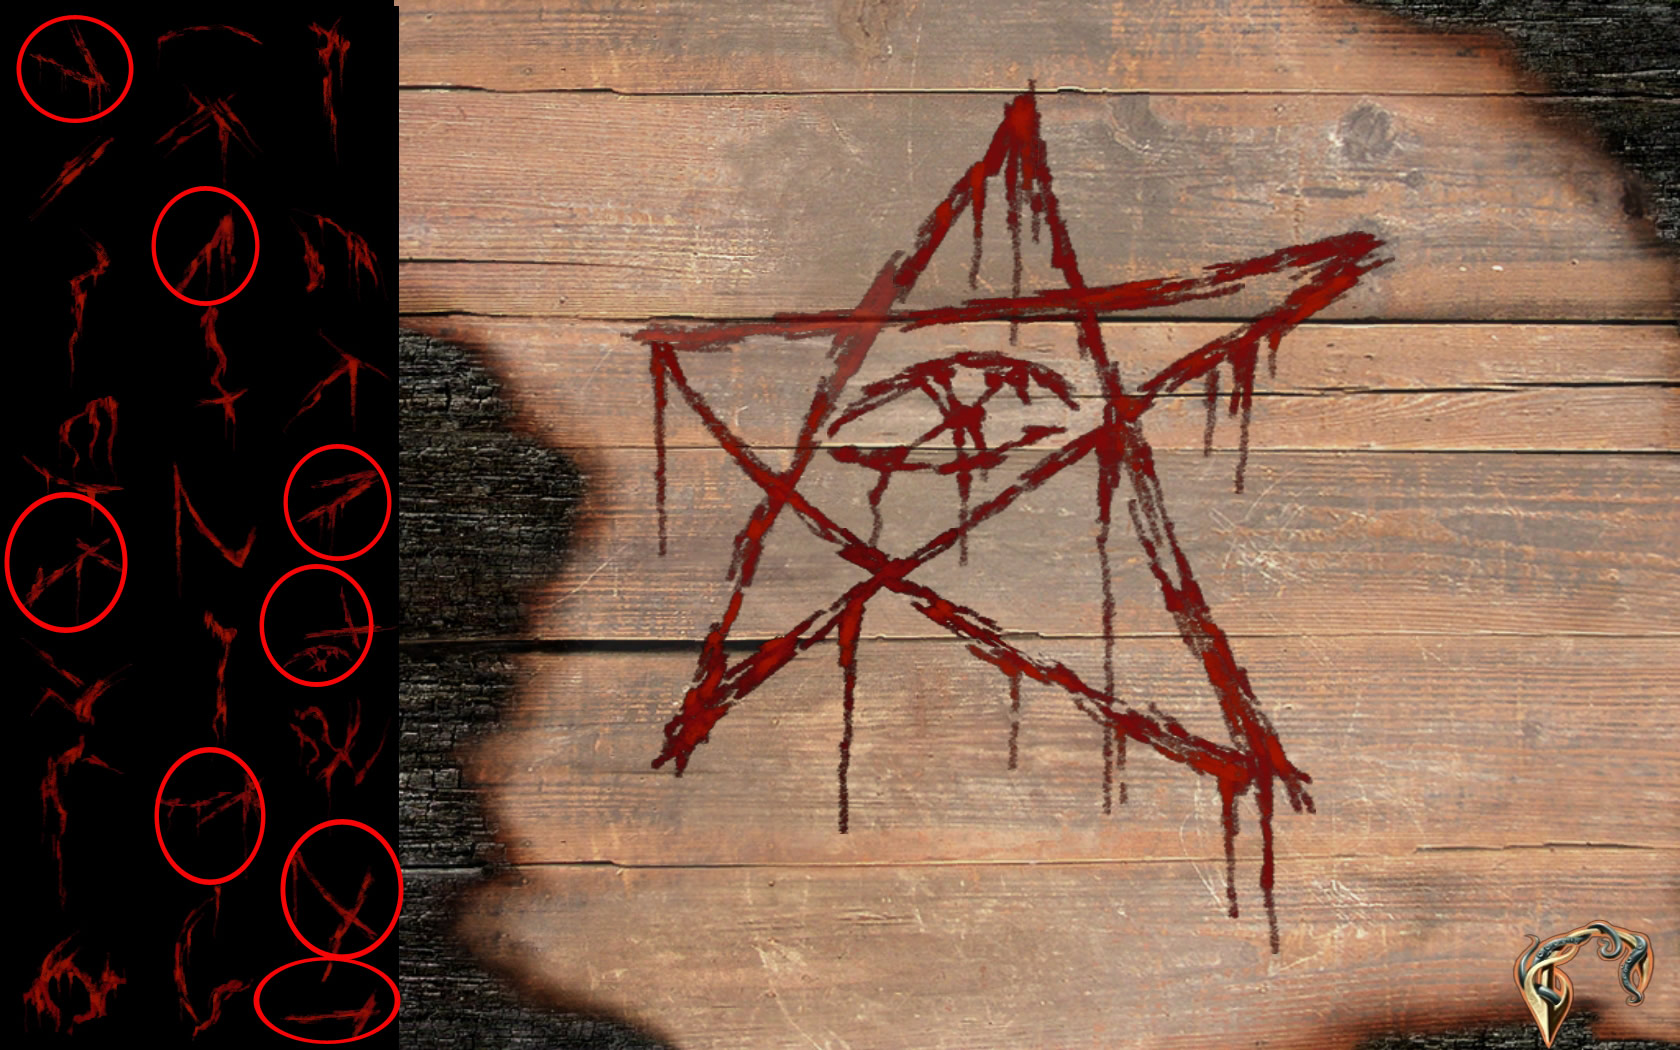
- You now have to draw a sign, that can help you to defeat Amashi.
- The right one you will find in your documents, second page of the accursed book text.
- Left side of the paper you only see fragments. You have to find the right ones to draw that symbol.
- Left column: 1. and 6. fragment
- Middle column: 3. and 7. fragment
- Right column: 4., 5., 7., and 8. fragment.
- Now just make one step ahead and the rest goes automatically.
- Follow the stairs up and open the next door with the iron rod from your inventory.
- Two attackers are awaiting you. One is for you, one is for Watson.
- You do not have to do any, its all a cut scene, but pay attention to what the guy is telling you.
- Follow the stairs up. Half way you will find a note. The rites can only be done, when the lighthouse is not enlightened.
- The next door is closed and you need a key.
- Holmes asks Watson for where the key is: Remember what the attacker said and combine: STOMACH
- Automatically you will be downstairs again and Watson will get the key out of the stomach of the dead guy.
- Run up the stairs and open the door.
- After the cut scene, grab the empty bottle on the floor.
- Place it under the blue bottle on the right and turn the handle.
- Get the bottle and place it under the green bottle at the left.
- Turn the handle.
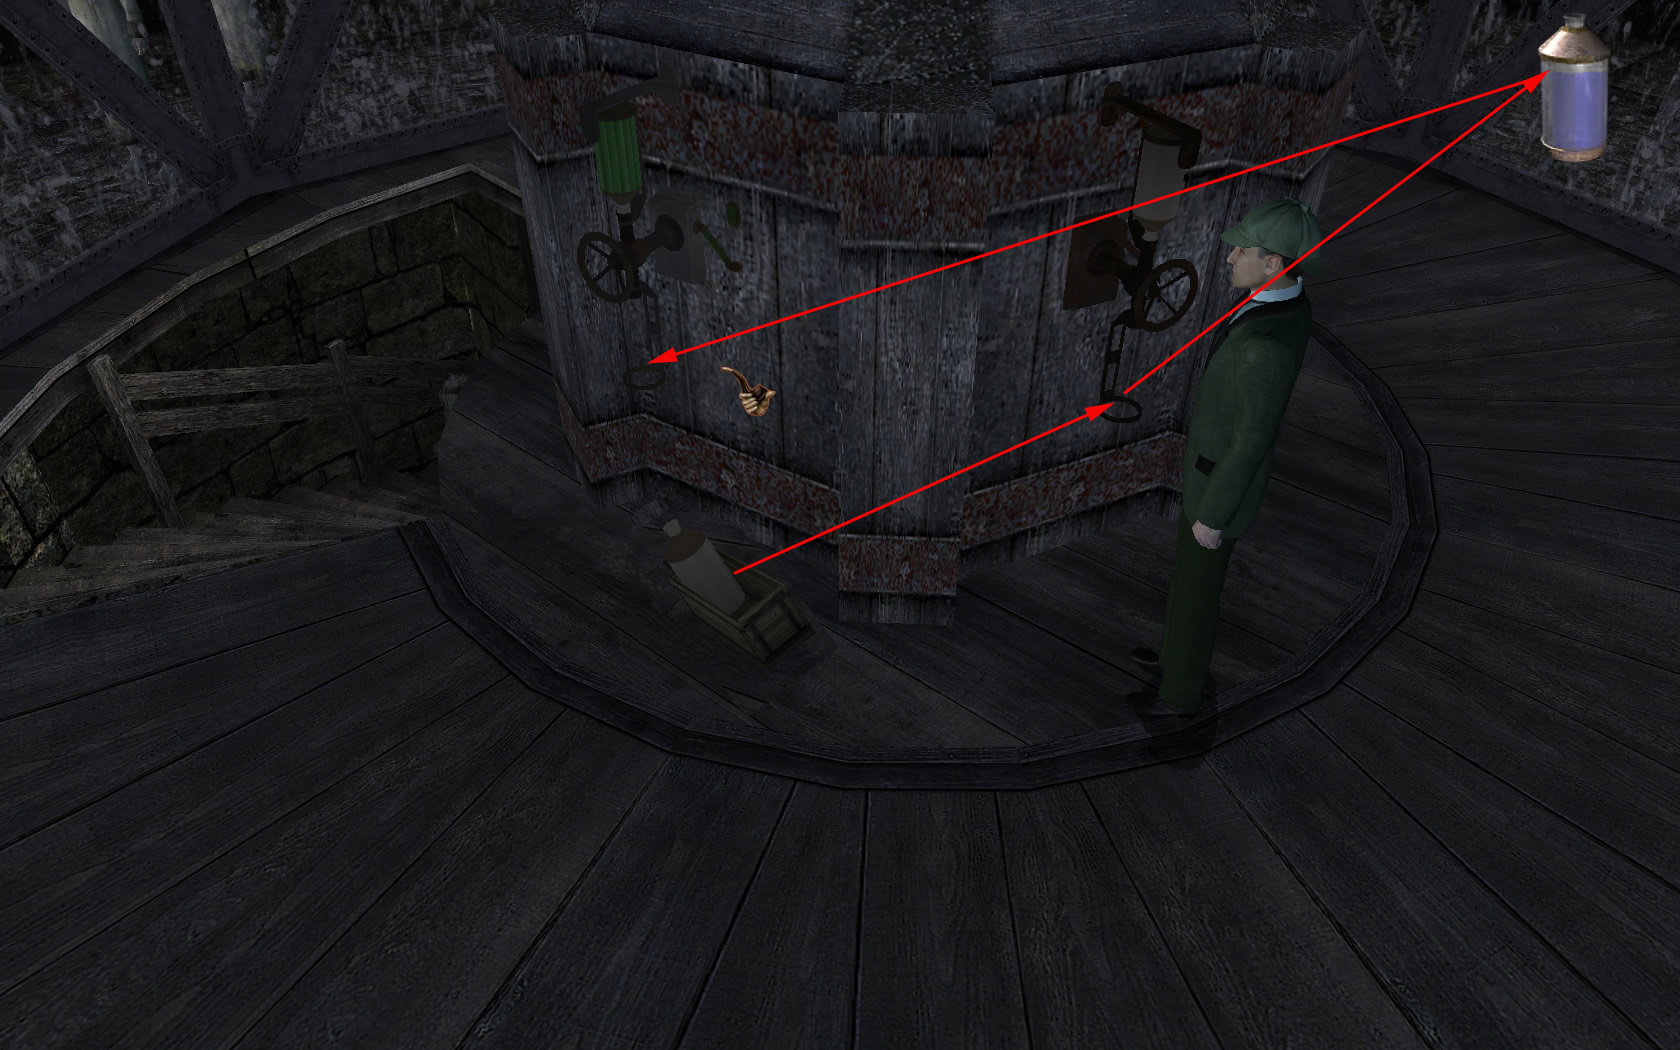
- The rest is cut scene.
- Congratulations, you've made it!


Update