


![]() Women's Murder Club: A Darker Shade of Grey (or, if you want to get really fancy and see the full title, James Patterson Women's Murder Club: A Darker Shade of Grey) is the latest installment in the mystery/hidden object adventure series started by Women's Murder Club: Death in Scarlet, both of which are based on the books and television program of the same name. Investigating the death of a young boy, you play the role of several different experts, each with a specialization and accompanying gameplay mode. Gather evidence and clues and piece things together in the forensics lab to solve the mystery!
Women's Murder Club: A Darker Shade of Grey (or, if you want to get really fancy and see the full title, James Patterson Women's Murder Club: A Darker Shade of Grey) is the latest installment in the mystery/hidden object adventure series started by Women's Murder Club: Death in Scarlet, both of which are based on the books and television program of the same name. Investigating the death of a young boy, you play the role of several different experts, each with a specialization and accompanying gameplay mode. Gather evidence and clues and piece things together in the forensics lab to solve the mystery!
 Most of your time in Women's Murder Club: A Darker Shade of Grey will be spent playing as Detective Lindsay Boxer, an investigator with the San Francisco police department. You'll be the first on the scene to question suspects, gather information by talking to witnesses, collect evidence and take photographs for later analysis. These first-person scenarios are much like a hidden object game, though there's a good variety in the types of tasks you'll undertake. One scene has you searching for a way to turn off a fan, for example.
After some evidence has been gathered, it's back to the forensics lab where medical examiner Claire Washburn performs her magic. By completing simple mini-games you'll distill facts from the evidence gathered by Lindsay. For example, the first mini-game involves mixing various chemicals from three moving belts to determine the blood type of two samples taken from the crime scene.
Much of the game progresses in this manner, with Lindsay's hidden object scenes gathering data while the other women play supporting roles. You visit a number of locations to interview suspects and question locals who may have a connection with the deceased. The story unfolds in a rather linear manner, but the mystery is well-cooked, so you'll want to sink your teeth in for bite after bite of delicious (and intelligent) plot.
 Analysis: The first Women's Murder Club game took the familiar mystery/hidden object concept and made things a bit different with a more crime-focused slant. The sequel continues in the same vein and doesn't really change the formula beyond adding different mini-games and an entirely new plot. The puzzles in A Darker Shade of Grey are where things get interesting, as they're very well-thought-out and actually make you think, not just blindly go through the motions. This doesn't carry through to some of the mini-games, unfortunately, as most of them (especially the forensic games) are pointless busywork.
While the story is intriguing, I have to admit I wasn't really drawn into the experience as much as I was in the other game. Many of the characters seem stiff and unresponsive with dialogue that's almost completely void of flavor. Sometimes you might as well be reading from a textbook. The strength of a game like this is often in its writing, and here I can't help but feel it slightly missed the mark.
Despite its few writing flaws and less-than-stellar mini-games, the story and progression of events in Women's Murder Club: A Darker Shade of Grey make it worth a visit. Murder and mystery drench every scene, and playing as three different characters, each with her own unique gameplay mode, livens things up to make this hidden object adventure a tier above the rest.
![]() Windows:
Windows:
Download the demo
Get the full version
![]() Mac OS X:
Mac OS X:
Not available.
Try Boot Camp or Parallels or CrossOver Games.
Women's Murder Club: A Darker Shade of Grey is available to download from these affiliates:


Walkthrough Guide
(Please allow page to fully load for spoiler tags to be functional.)
Women's Murder Club:Darker Shade of Grey - Walkthrough
General Tips
You have no time limit, but a scoring system
For each right answer and solving of the scene, you will get points
The highest score to reach is 540 points
Wrong answers, using hints, or skipping a puzzle will reduce your points
For each investigation, you will get 5 hints
There is no way to add hints in an investigation
But when you do not use all hints in one investigation, they will be added to your hint amount in the next investigation
Investigation 1
Crime scene
Take photos by clicking the shimmering areas of the dead body
Click first hand, then finger tips
Click first head, then tongue
Click first the hip - then pick up the red thread, after this click the letter on the shorts
A mini game will open
screen shot - Crime scene
Mini game: Re-do the letters
Your goal is to complete the words by writing the letters to the end
To do so, grab the pink marker out of your inventory on the left side
Now use the marker on the missing parts of the letter
Hold the left mouse button down
Take care that you always have a connection with the original letter and that you stay in the light outlines you can still see
You have to do it one way - when you need two lines, it won't work out
In this case, click the marker back into the inventory and grab the eraser
Delete your writing with the eraser and try again
When you have done it right, the letter will be shown in complete white (but you can still see your marker lines)
You have to complete all letters
The words show: JACKSON MOORE ACADEMY
screen shot - Crime scene
Go to the map and choose Commander's Office
Office - The Fan
The fan is running and papers fly around
Turn off the fan by clicking the fuse box on the left side
screen shot - Office
The only way to shut down the fan is to provoke a short-circuit by putting on all fuses
Each fuse acts different
1 puts on or off 1 and 8
2 puts on or off 2, 4 and 7
3 puts on or off 3
4 puts on or off 4, 2 and 1
5 puts on or off 5
6 puts on or off 6
7 puts on or off 5
8 puts on or off 8
To put all on, press the fuses in the following order
1 - ON are now 1 and 8
2 - ON are now 1, 2, 4, 7 and 8
6 - ON are now 1, 2, 3, 4, 6, 7, 8
5 - now all fuses are ON
screen shot - fuse box
Collect all 20 pieces of paper
screen shot - 20 Papers
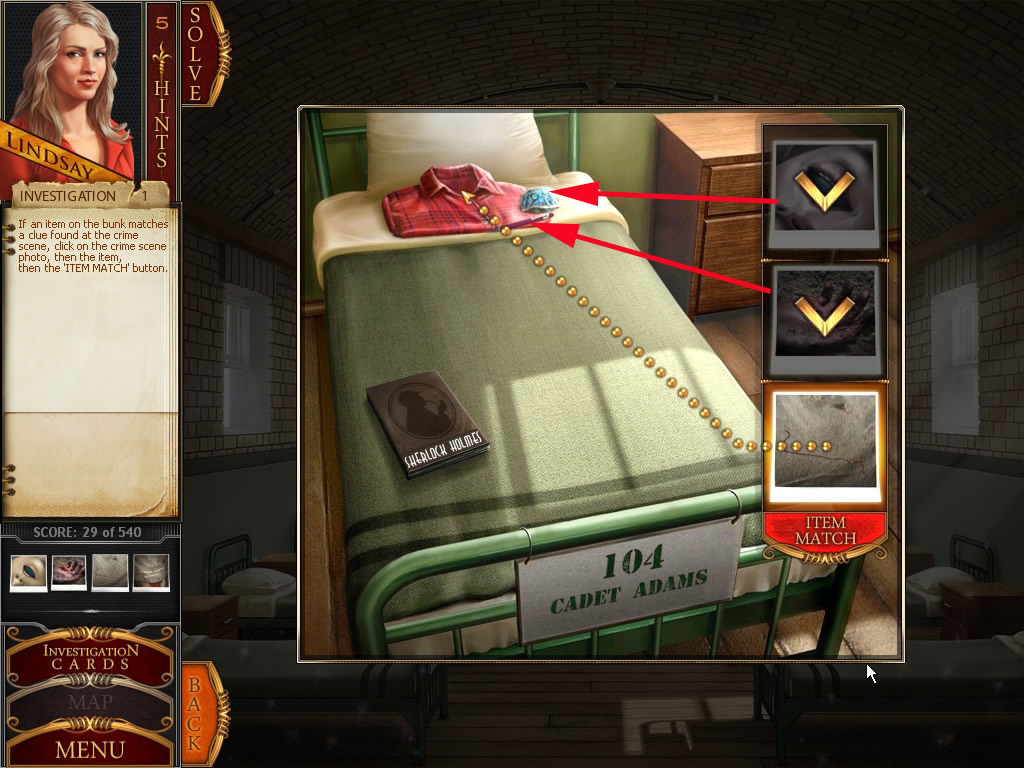
Barrack 4
It's your goal to find what connects the clues from the crime scene with items laying on the cadets' beds
Click a bed to get a closer look
You will see three pictures at the side, the clues
Click on the picture and then on the item that you think matches it. A line will connect the two times. Click on the word "item match"
If it's correct, you will have an item match.
If it's not correct, you will have to keep looking until you find the one bed that matches all 3 pictures
Always click the pillow to see what is below
The bed you are looking for is
Number 104 - left side, the bed that is second closest to the back wall
The pajama jacket matches with the thread of the victim's shorts
The blue tongue matches with the candy under the pillow
The purple fingertips match with the color of the pen ink under the pillow
screen shot - Office 1
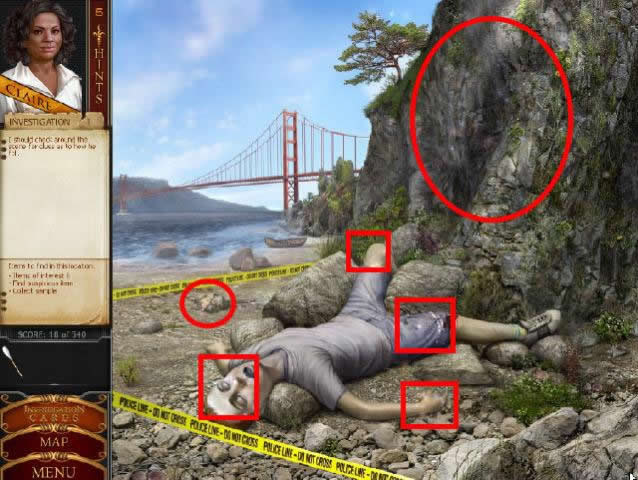
Crime scene with Claire
Examine the dead body at the shimmering parts
Head - click at neck and tongue
Hip - click thread and wound
right hand - click palm and fingertips
right knee - click the marks
Then examine the stone, located left of the victim
screen shot - Crime scene
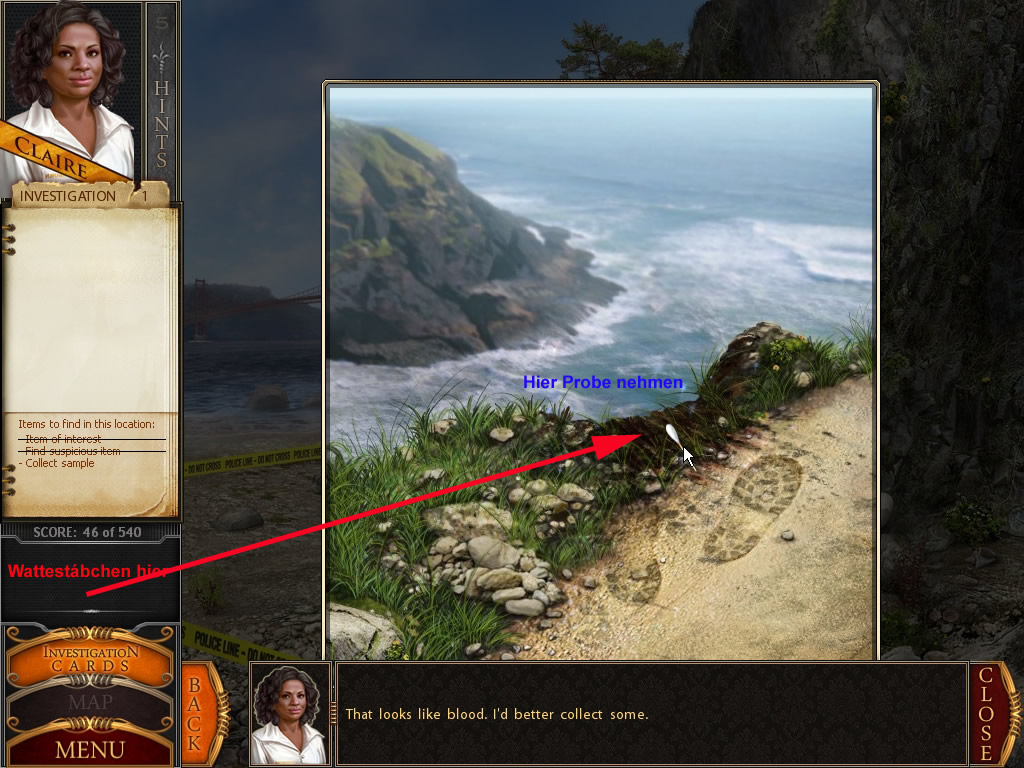
Click at the rock, an arrow is pointing to the top, so click it
On the top, you will find a foot step and blood behind this footstep
Get the cotton swab out of your inventory and click the blood to get a sample
screen shot - Get blood sample
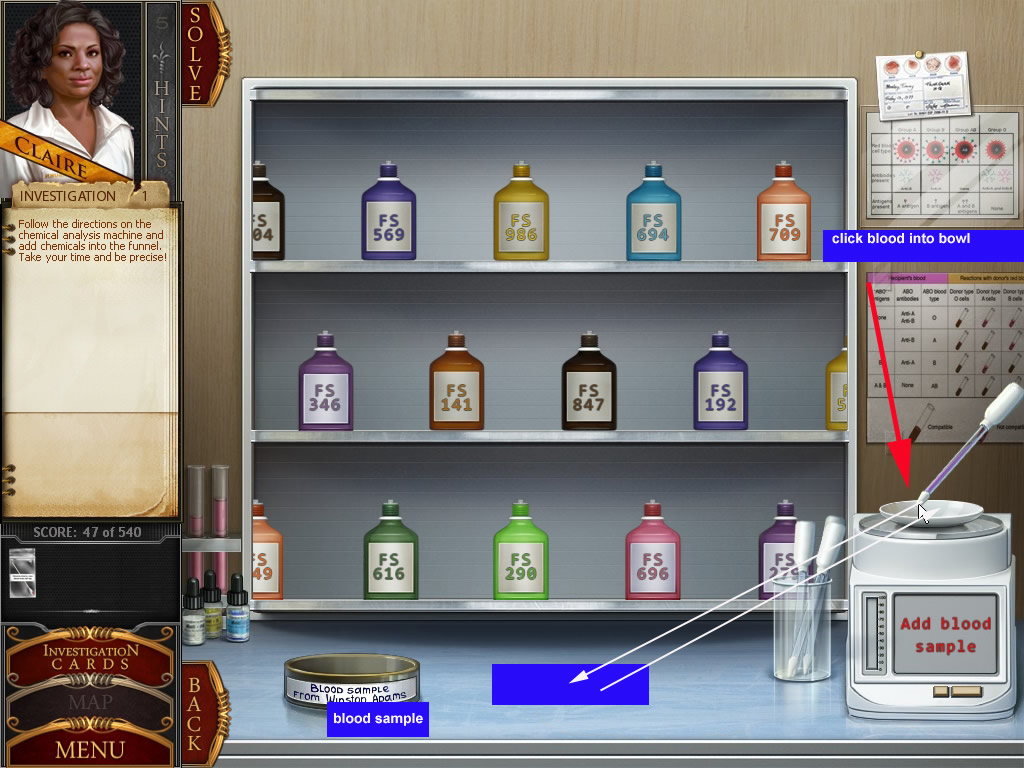
The Lab
Click the shelf in the back right and you will get a closer look
It's your goal to get a blood typing
To do so, first get the dropper from the middle of the table and click it into the blood sample left
Empty the dropper with a click into the flat bowl on the right
screen shot - Blood Sample 1
The display under the bowl shows you the number of the liquid bottle you need and the amount of drops
In the back you see the shelves as kind of a roundabout - find the bottle you need and click the needed amount of drops into the bowl
When you have enough, the display will show you the next bottle number
There is no harm when you click too often - if you did not click often enough, you want see the new information
Place the bottle back where you got it from and get the next one
The results will show
that both blood samples are AB
Investigation 2
Academy
You have to ask questions to the cadets
Have a good look at the screen
After each question, one of the cadets will make a (sometimes very slightly move)
Click the cadet, that made a movement and he will answer
There will be two answers that won't be answered right away
You will have to ask them at the end again until you get an answer
These are the questions:
"Did anyone see Winston leave the morning he died?" 5
"Did he say or do anything unusual lately?" no one answered
"Was he planning to jog with someone?" 1
"Was there any reason he might have been prone to falling?" 3
"Was Winston having any problems lately?" No answer
"Did Winston always get up so early to run?" No one answers
"How did Winston fall during practice?" 1
"He went out running the next morning with a badly scraped knee?" Drill Sergeant
"What happened after Winston scraped his knee?" 1
"Was Winston having any problems lately?" 10
"I asked if Winston always got up so early to run?" 9
"Was Winston having any problems lately?" 1
"What happened after Winston scraped his knee?" 8
It might be, that the solution is random about who is answering, but not about the not answered questions
Each number means a cadet, seen from left to right
screen shot - Cadets Questioning
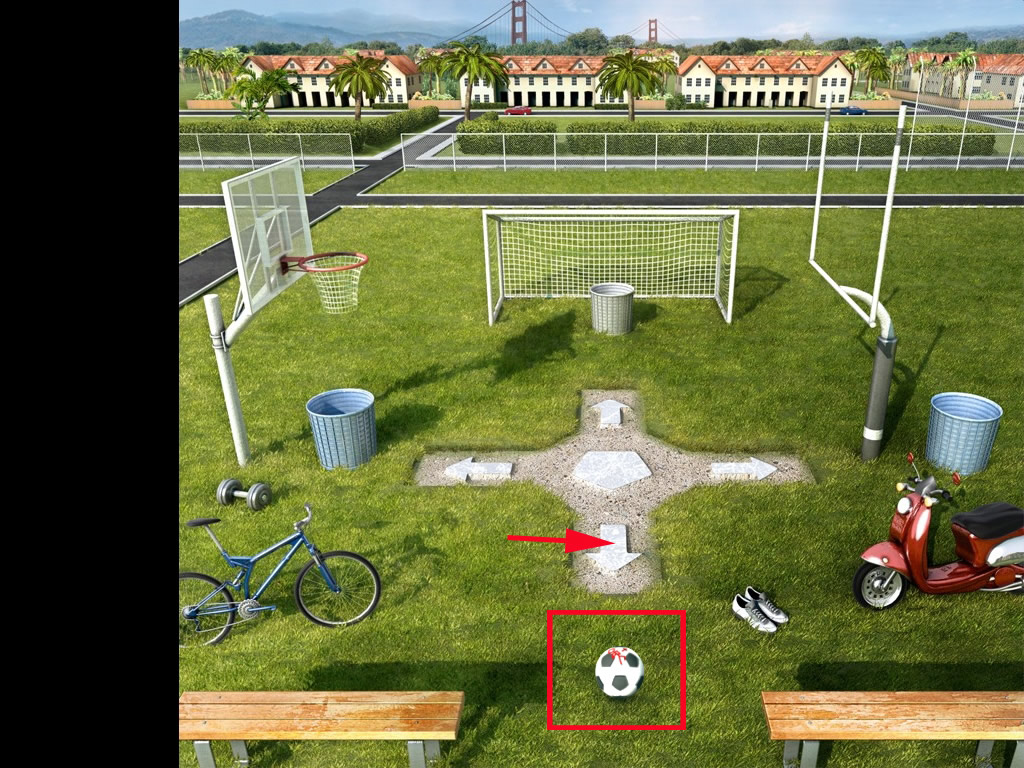
Sports Field
Your goal is to find a soccer ball with traces of blood
To do so, you have to organize the balls
When a ball appears in the middle, click the right arrow to get them into appropriate sections
The soccer ball goes to the top
The basketball goes to the left
The football goes to the right
When you see the soccer ball with the blood marks, click the arrow in the lower part of the scene, pointing to the south
screen shot - Ball with blood marks
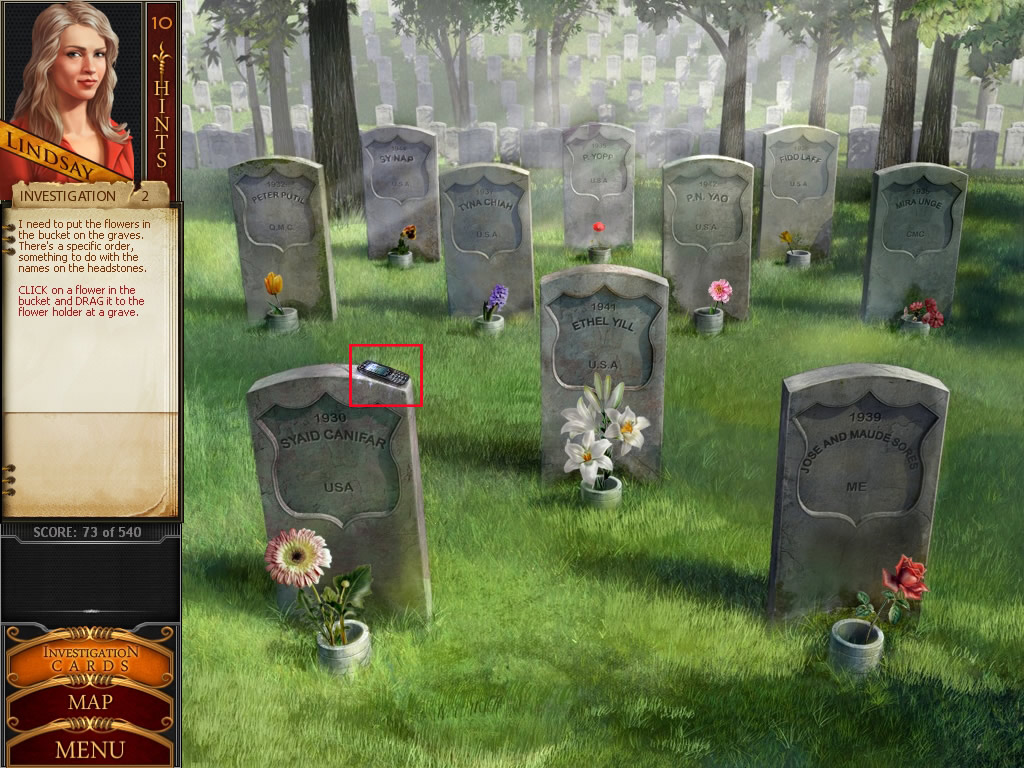
Cemetery
You goal is it to place the flowers in the right buckets that are in front of the gravestones
Look at the gravestones, letters of the names are the same letters you use for the flower names
Syaid Canifar = Daisy
Ethel Yill = Lilly
Jose and Maude Sores = Roses
P. Yopp = Poppy
Tyna Chiam = Hyacinth
Peter Putil = Tulip
For more details please have a look at the screen shot
screen shot - Flowers
After finishing this job, the cemetery guard will give you Winston's cell phone
Get it from the gravestone, left
12 Envelopes
You have to find all 12 envelopes
Please have look at the screen shot for all positions
screen shot - 12 Envelopes
Investigation 3
The video
You need to find the tape of July 12, 2009 and we know that Winston died in the early morning of this day
As you have no clue about the code that is used to store the tape, just grab one out of the inventory
In the right lower corner you can see the date and the time
Now try to figure out what connection is between the real date and time shown on the tape and the numbers written on the tape
The first letter gives you the months - July = 7th month = 7th letter= G
The next two letters are giving you the date of the day = 12
The following two 0 do have no meaning
A number in the 70th is following, the last number give you the year - 79 = 2009
Alpha shows that the tape was made a.m., Beta is for p.m. - Winston died in the morning = Alpha
We are looking for the tape G 1200 79 Alpha
The position of this tape is random, but it's always the same tape
Put it in the player
Remember what the technician said? The camera is standing around 5 minutes away from the place where Winston fell
Winston died at 6:30 a.m.
So we need to see the part of the tape from around 6:25 a.m.
Use the arrow above the time to change the numbers
The 6 is ok
Change the first 0 to 2 and the second one to 5
Click play
After looking at the video, click on ZOOM to see a nearby view of the shirt
At last click print to take a picture as evidence with you
screen shot - Tape
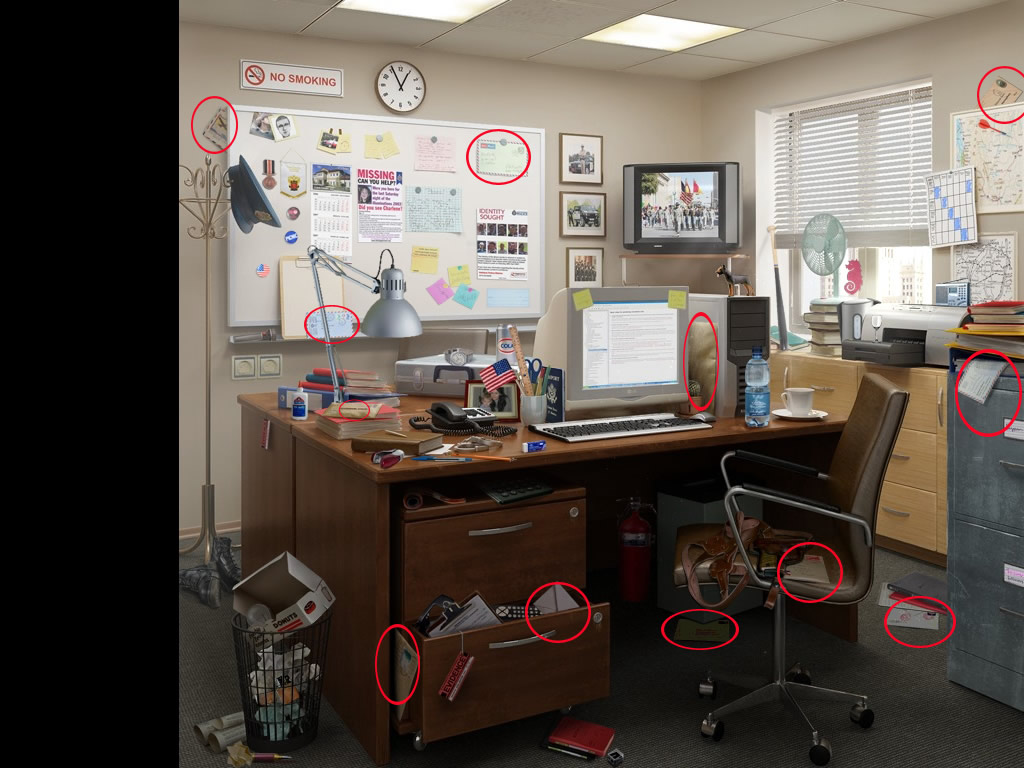
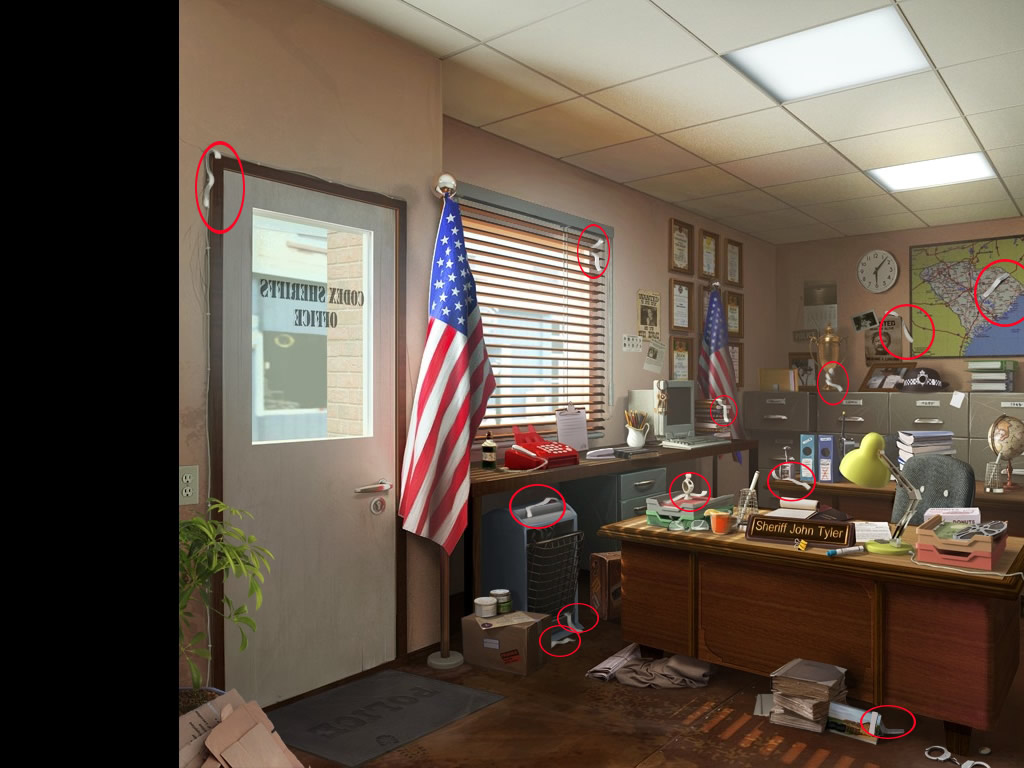
Sheriff's Office
Click the note hanging at the door to read it
Click the red fax machine in front of the window
Now find all 12 paper scraps
screen shot - 12 Paper Scraps
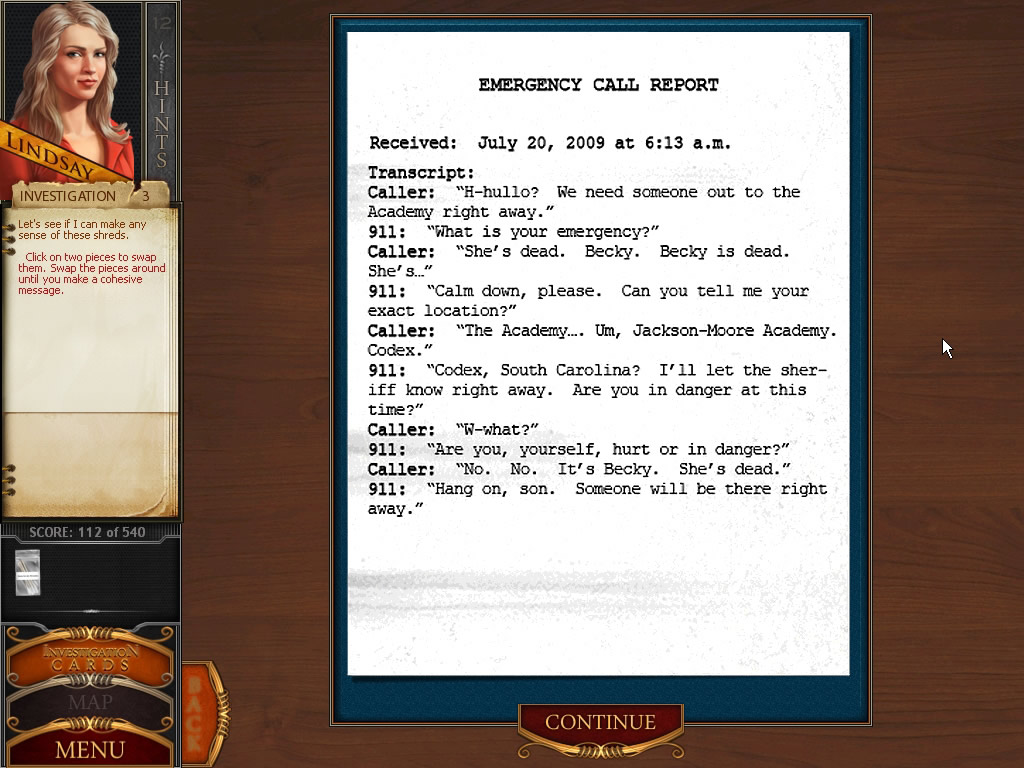
After finding them all, you will have to pick them up from the left side of the desk to open the mini game
You have to assemble the fax
By clicking two pieces, they will change their places
Please have a look at the screen shot for the solution
screen shot - Fax
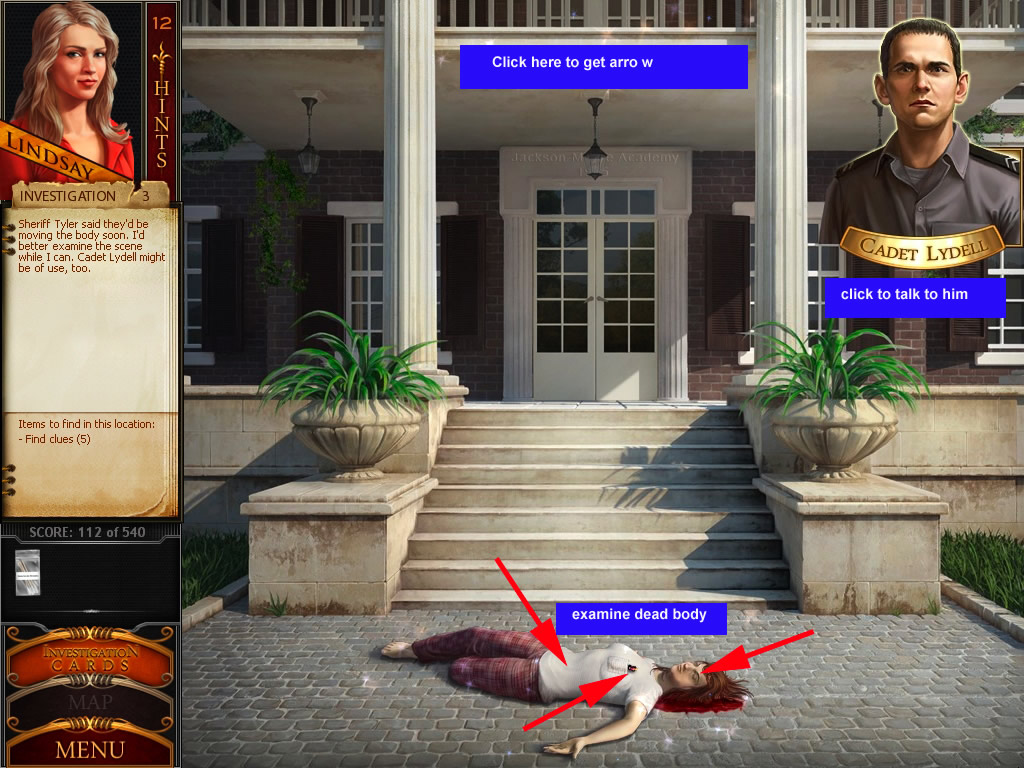
Crime scene
After the conversation, examine the dead body
Click the upper part of the body to zoom in for a closer look
Click the face
Click the pepper spray in the breast pocket of the shirt
Click the shirt at one other part and read Lindsay's conclusions
Exit the zoom view and click at the top of the screen
You will see an arrow, click it for a nearby look of the window, Rebecca falls out
Leave the nearby look and click the picture from cadet Lydell to talk to him
screen shot Crime scene
Attic
First look for the leaves and the seedpods
Click the dot on the floor
Click the picture of Cadet Lydell and try to get rid of him
Now get the bowling ball from the floor and let it fall onto the left side of the see-saw
When Lydell leave, get the evidence bag from your inventory and click it at the liquid
screen shot - Attic
In the lab, you have to test the liquid the same way as you did before with the blood
Investigation 4
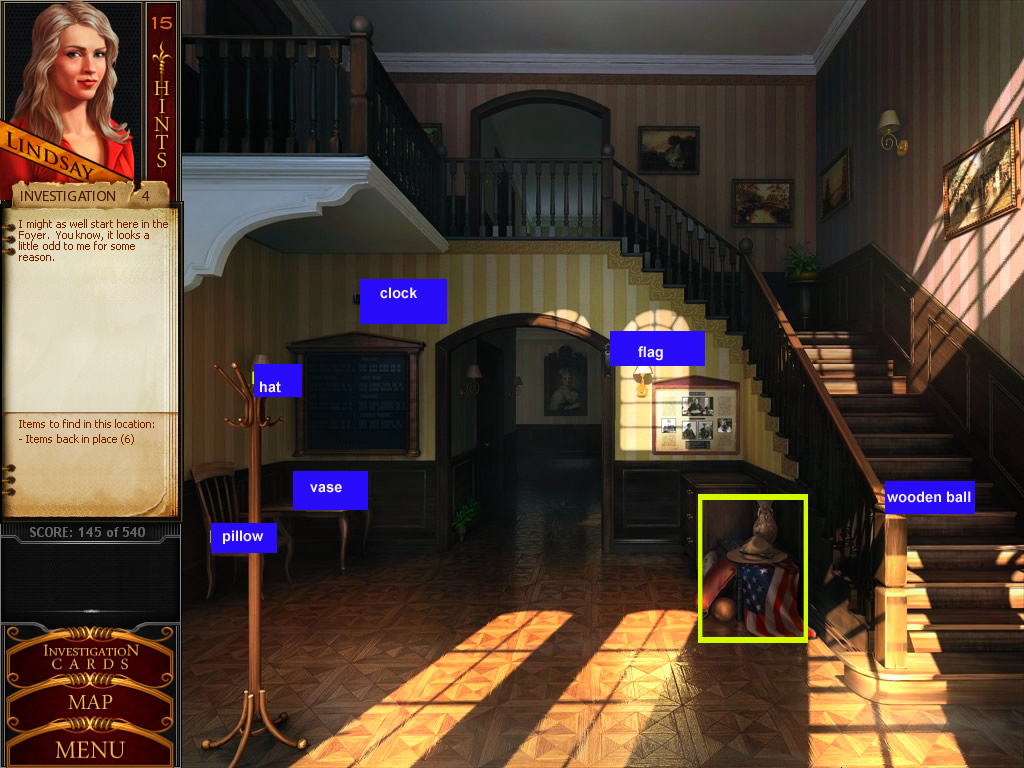
Foyer
You have to put the things that are laying on the chest left of the stairs back to where they belong
Flag - top right of the door
Vase - left at the wall next to the door
Hat - on the coat rack
Pillow - on the chair in front of the table
Wooden ball - on the banister lower right side
screen shot - Foyer
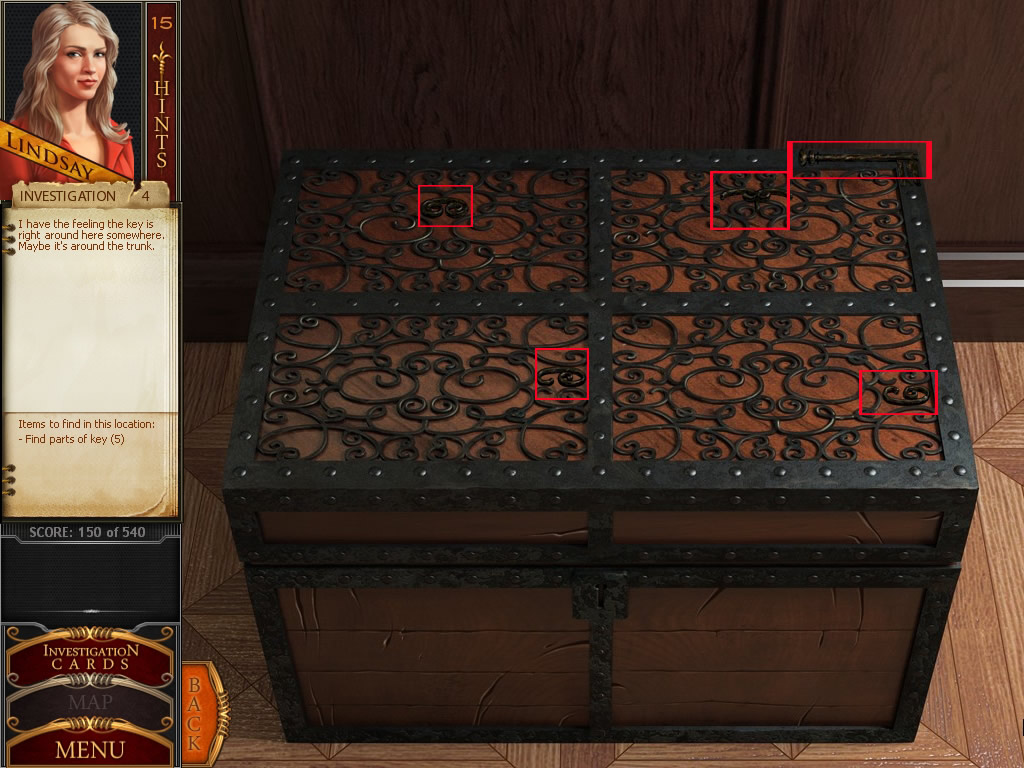
Click the chest and find the key parts
screen shot - Chest
Get the key out of the inventory and open the chest
Grab the little bottle on the left side
Room 34
Click the bird nest in the upper right corner of the window
Find 21 scraps of a letter in the zoom view
screen shot - 21 Letter Pieces
You now have to assemble the torn pieces
If needed, you can turn the pieces around by clicking them with the right mouse button
screen shot - Letter
Locker
Click the closets on the locker to get a nearby view
You have to find out which of the ones was the locker from Winston
By clicking the cadets, they will give you hints
Analyze the hints and click away the lockers that can't be Winston's
When you analyze all hints, there will be only one locker left at the end
From the left cadet to the right one
It can't be 13
The number can't be even - so it can't be:10, 12, 13, 14, 16, 18, 20, 22, 24, 26, 28, 30, 32, 34, 36, 38
It can't be in the same row as number 33, so not in the lowest row - so it can't be: 10, 12, 13, 14, 16, 18, 20, 22, 24, 26, 28, 30, 31, 32, 33, 34, 35, 36, 37, 38, 39
It can't be number 27 or the one above - so it can't be 10, 12, 13, 14, 16, 17, 18, 20, 22, 24, 26, 27, 28, 30, 31, 32, 33, 34, 35, 36, 37, 38, 39
It can't be a number with two equal numbers - so it cant be:10, 11, 12, 13, 14, 16, 17, 18, 20, 22, 24, 26, 27, 28, 30, 31, 32, 33, 34, 35, 36, 37, 38, 39
It can't be number 14 or lower, but we already had all these numbers: 10, 11, 12, 13, 14, 16, 17, 18, 20, 22, 24, 26, 27, 28, 30, 31, 32, 33, 34, 35, 36, 37, 38, 39
It can't be at the end: 10, 11, 12, 13, 14, 16, 17, 18, 19, 20, 22, 24, 26, 27, 28, 29, 30, 31, 32, 33, 34, 35, 36, 37, 38, 39
It can't be a number with a 5 included: 10, 11, 12, 13, 14, 15, 16, 17, 18, 19, 20, 22, 24, 25, 26, 27, 28, 29, 30, 31, 32, 33, 34, 35, 36, 37, 38, 39
It can't be directly before or after the 24: 10, 11, 12, 13, 14, 15, 16, 17, 18, 19, 20, 22, 23, 24, 25, 26, 27, 28, 29, 30, 31, 32, 33, 34, 35, 36, 37, 38, 39
Winston's locker HAS to be the number 24
Click it, read the letter and have a look at the book
screen shot - Locker
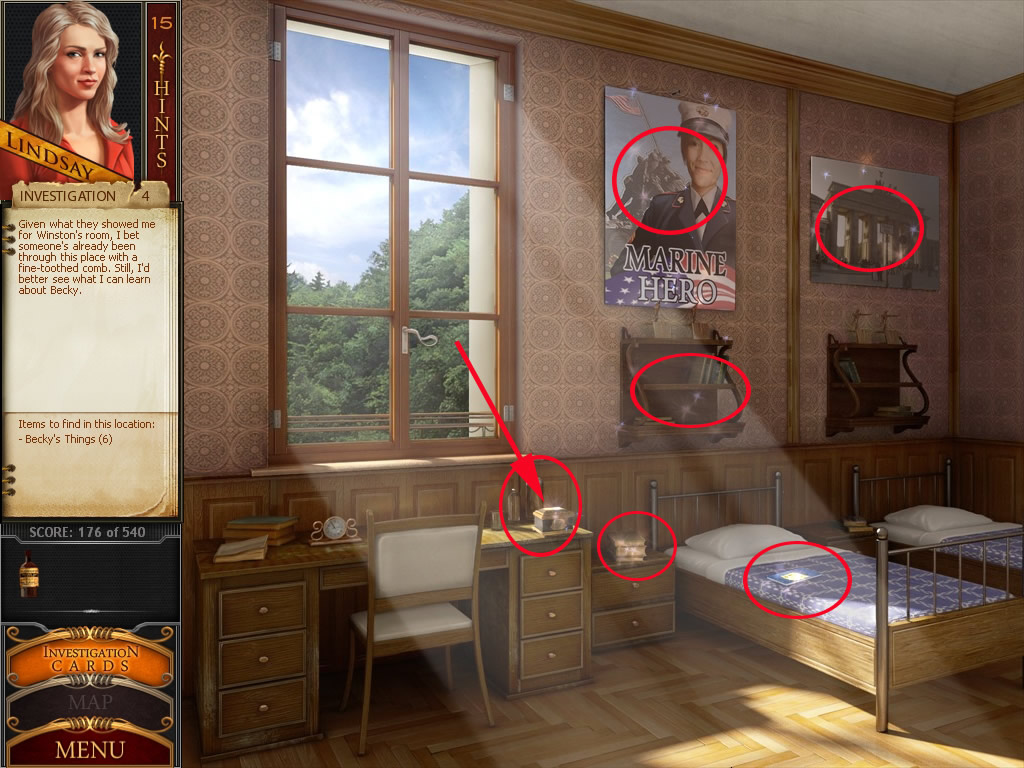
Becky's Room
Click on everything that is shimmering in the room
screen shot - Becky's Room
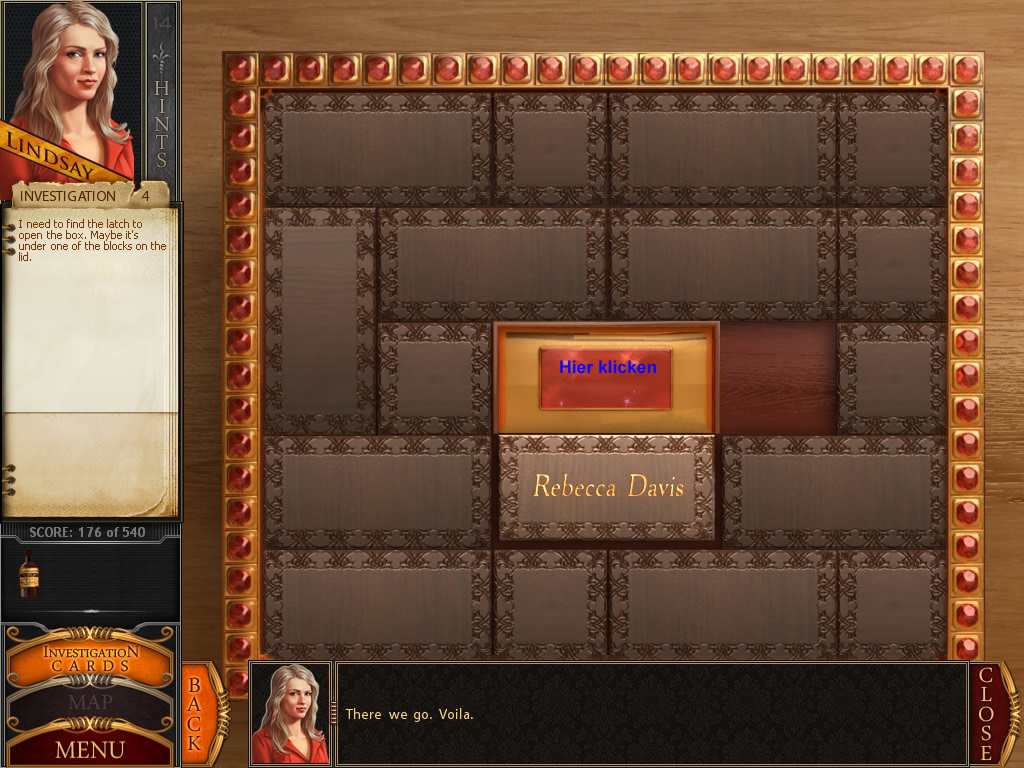
Only the journal on the bed an the jewelry chest is of any interest
Your goal is to move the pieces around until you can get the piece that says "Rebecca Davis" to move downwards
The tile pieces can be moved left to right or up and down. The only piece that will only move in one direction is the tile in the middle
Once the bottom part is cleared, drag it downwards to show what is underneath
screen shot - Chest 1
Click the part and the box will open
screen shot - Chest 2
Click the envelope you see there
Investigation 5
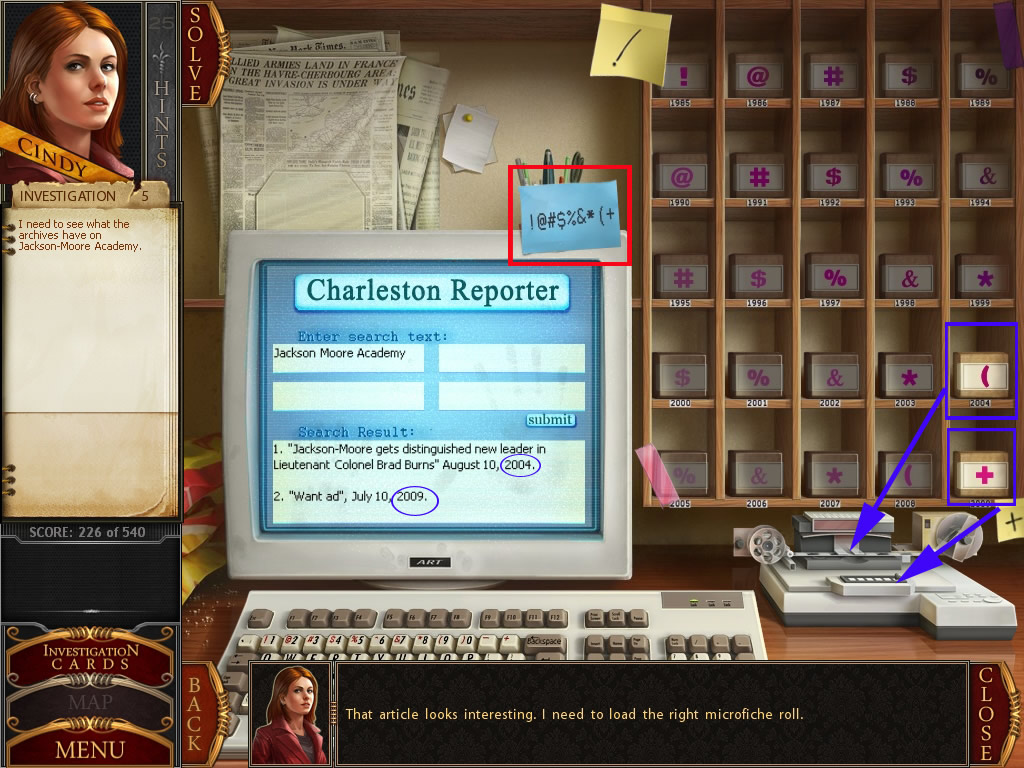
Charleston Reporter
Find all 25 micro fiches
screen shot - 25 Micro Fiches
You have to bring them in the right order, but first you have to find out which system the journalist uses
By clicking on micro fiches, they change their positions
At the screen, left side, you see a note with punctuation marks
Now bring the first row from the top in the order according to the order on the note
Start with the ! and end with % >
The colors do have to start with light and go to dark
For the second row you now start with the second punctuation mark on the note @ and go on until you are at the &
The colors always have to start with the lightest and go on until the darkest
The third row starts with the # and ends with *
The fourth row starts with a $ and ends with (
The last row starts with % and ends with+
A micro fiche that sits at the right place will get a little in the back and gets paler
screen shot - Order Micro Fiches
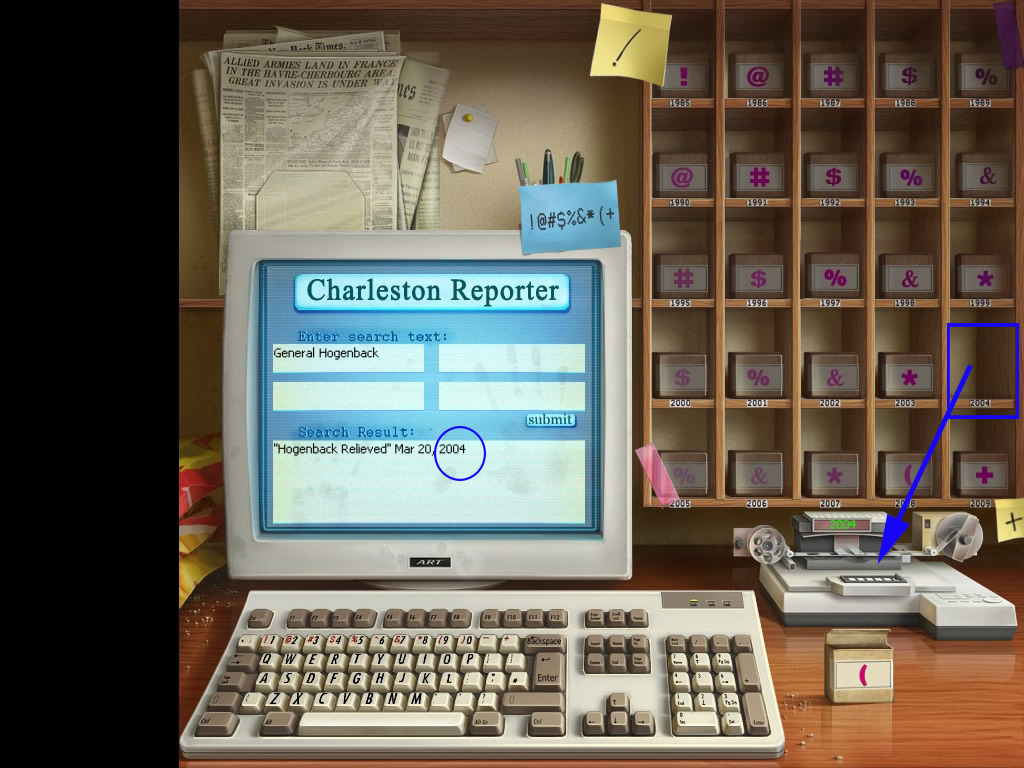
Now click the screen
Write (with your keyboard) in the first empty slot on the top Jackson More Academy and click submit
Two articles will be shown, click the box with from the year 2004 and click it at the reading machine in front of the shelf
After reading the article, put the box back where you got it from
Get the second article from 2009
Put it back after reading also
Now you have to find out something about General Hogenback
Write General Hogenback in the first empty field and click submit
This time you only will get one article
Get it and read it
screen shot - Article
Bar
Click the video game
It's kind of memory, but with another goal
You have to find a card with a chick and a farmer, so that the farmer can save the chick
A snake is swimming in the water will randomly eat one of the cards >
If the snake eats the chicken you have to start again
You have 3 lives and have to save the chicken 5 times
If you loose all three lives, you will have to start all over again
You can skip the puzzle any time
If you do so, you won't get any points for your score
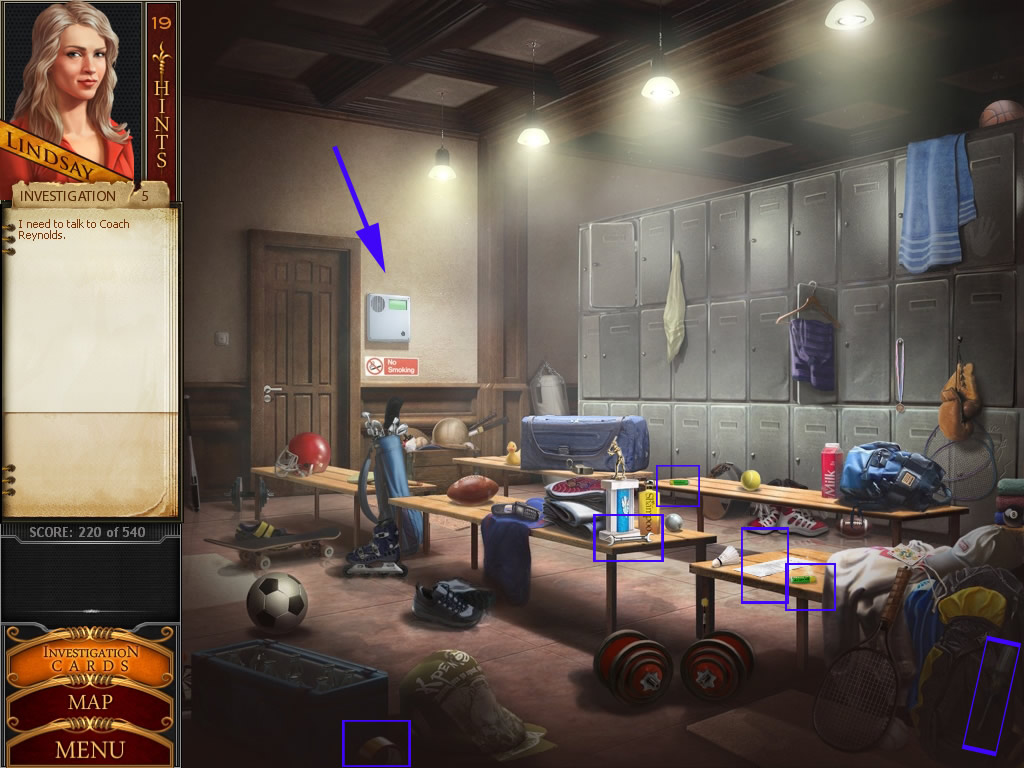
Locker
Click first the letter that is laying on the wooden bench in the middle of the scene
Now click the intercom in the back, right next to the door
It needs batteries
Leave the close up view and look for 2 batteries, a screwdriver, a wrench and tape
Please have a look at the screen shot for the locations
screen shot - Locker
Click the intercom again and use the screwdriver to loosen all four screws
Put the batteries in the empty slot
One battery does not fit right, click the tape on it
Now use the wrench at the yellow cable in the middle of the intercom
It's working again, press the button in the lower right corner and talk to the coach
House of Rebecca's parents
Find all 25 cards in the flower bouquets
After the last card, a letter from Rebecca to her mother will come through the mailbox in the door
Click it and read it
screen shot - Cards
Sheriff's office
Talk to the Sheriff
When you are brought into the inventory, place all items you find left on the table
It doesn't matter which order you use
screen shot - Proofs for the Sheriff
Investigation 6
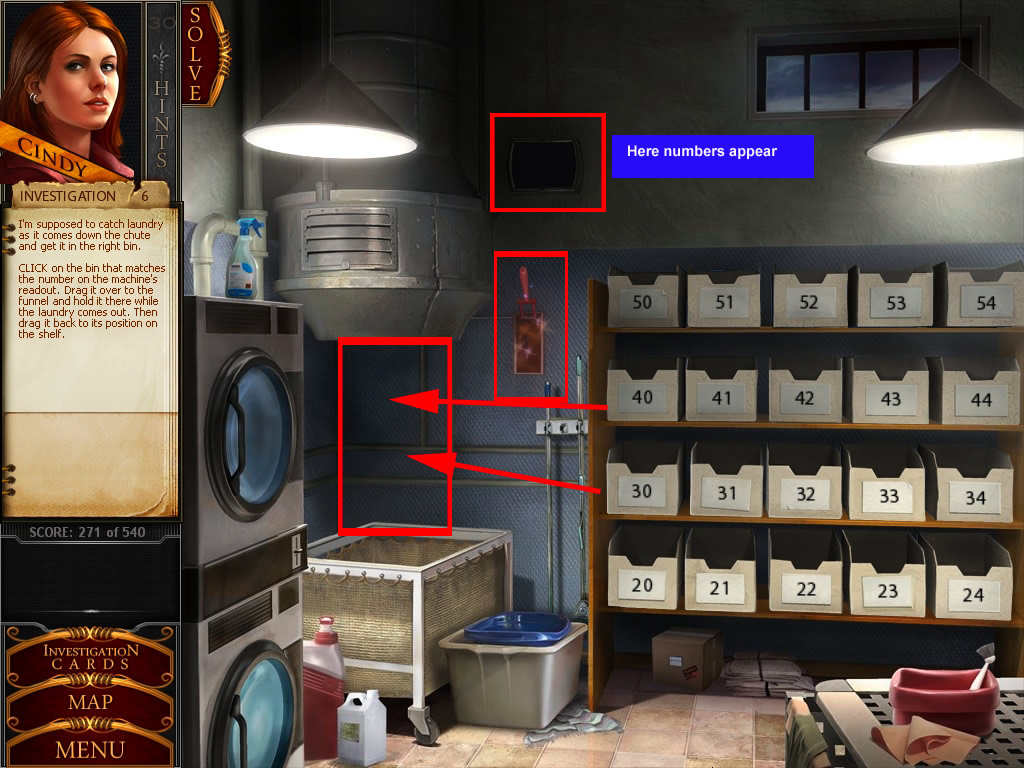
Laundry Room
Before you do anything else, look at the numbers on the bins in the shelf
The bottom row starts with 20, the next one with 30, the second from the top with 40 and the top row with 50
Click the red handle
The display above shows you the number of the bin you will need next
Get the bin, click it and place it quickly under the opening of the slide
As soon as the wash is in, put the bin back and take the next one - the number is again shown on the display
You have to be quick
Loosing two or three won't matter, most of it will come back and you will only lose a few points
When you lose too much laundry, you will have to start again
screen shot - Laundry Room
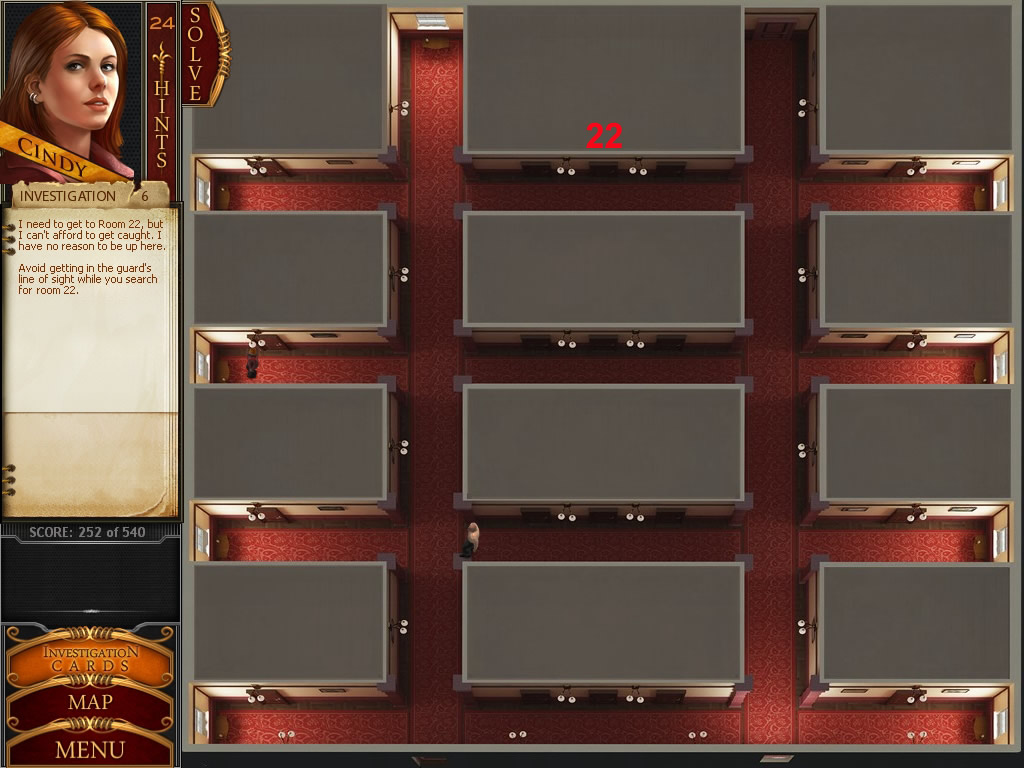
Dorm Hallway/Room 22
Your goal is to find room 22 without being seen by the guard
Go forwards by clicking on the floor in the desired direction
When you want to go to the left or right, you have to stand directly in front of the alley
The game is random about the moving of the guard, so I do not have a solution, just try to stay out of his way
The guard can see you when you are standing in the front of the alley
When you walk along the doors, the numbers will be shown
Room number 22 two is
in the top row, middle part, middle room
screen shot - Dorm Hallway
Room 22
When you are inside, look for the three pieces of evidence
The newspaper under the mattress
The pea shooter that is on the desk
Click the window and it will open
screen shot - Room 22
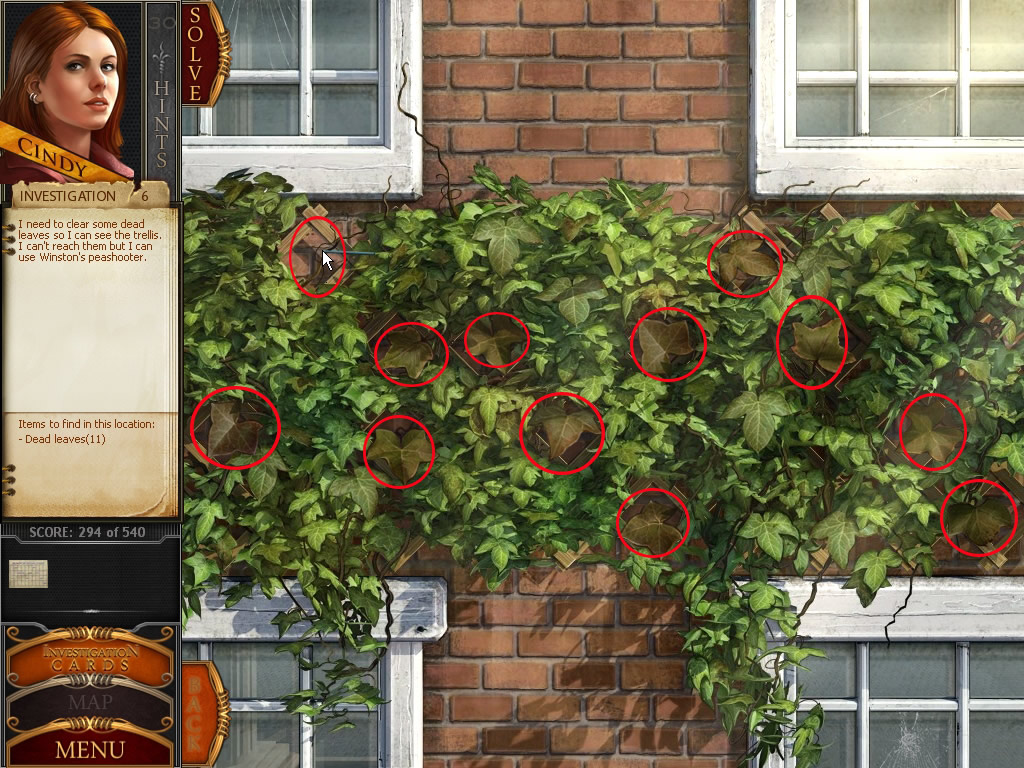
You will come into a close up view of a vine
Get the pea shooter out of your inventory and get rid of twelve dead leaves (brown) by clicking on them
screen shot - Leaves
Now you have to climb
You have to click on a bare spot on the wall and your cursor will turn into a hand. Your goal is to move your way down the lower right corner of the trellis
Place the hand over one of the empty spots that you cleared and the hand will grip that section of the wall
You can't jump over empty sections; you have to follow the empty spots until you get to the right side of the scene.
screen shot - Way to Climb
Investigation 7
Café
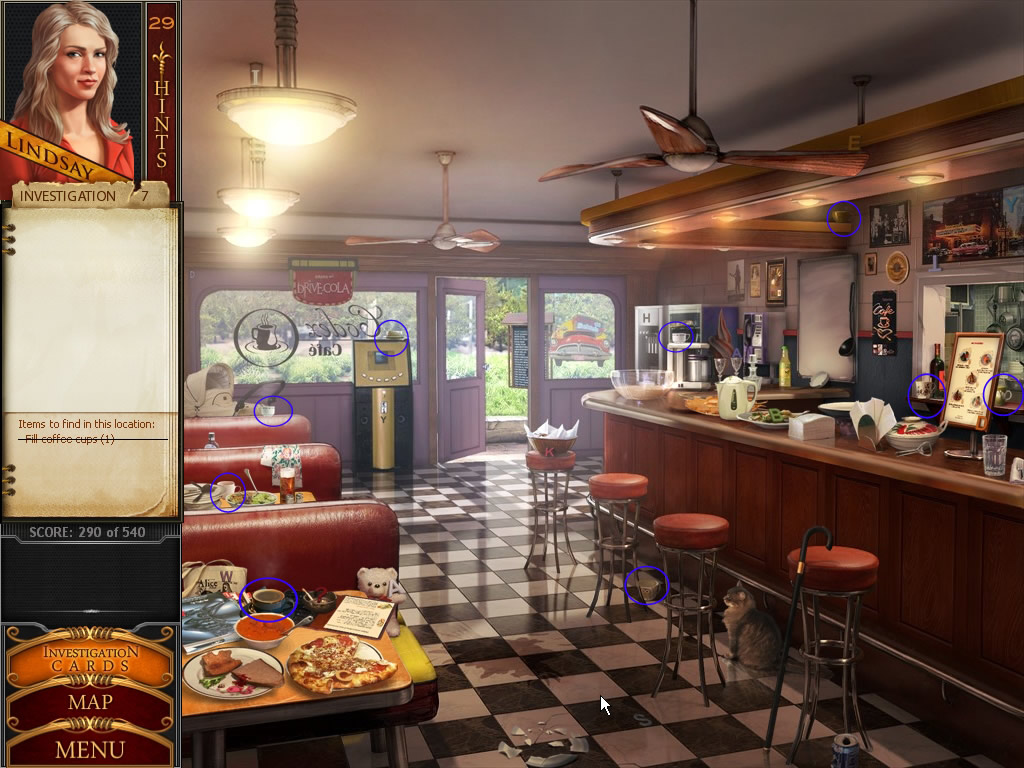
Get the silver coffee pot from behind the bar and fill 9 cups
Click a cup and hold the mouse pressed for a moment
When a cup is filled, you will see a little bit of steam
To see all positions of the cups, please have a look at the screen shot
screen shot - Cups
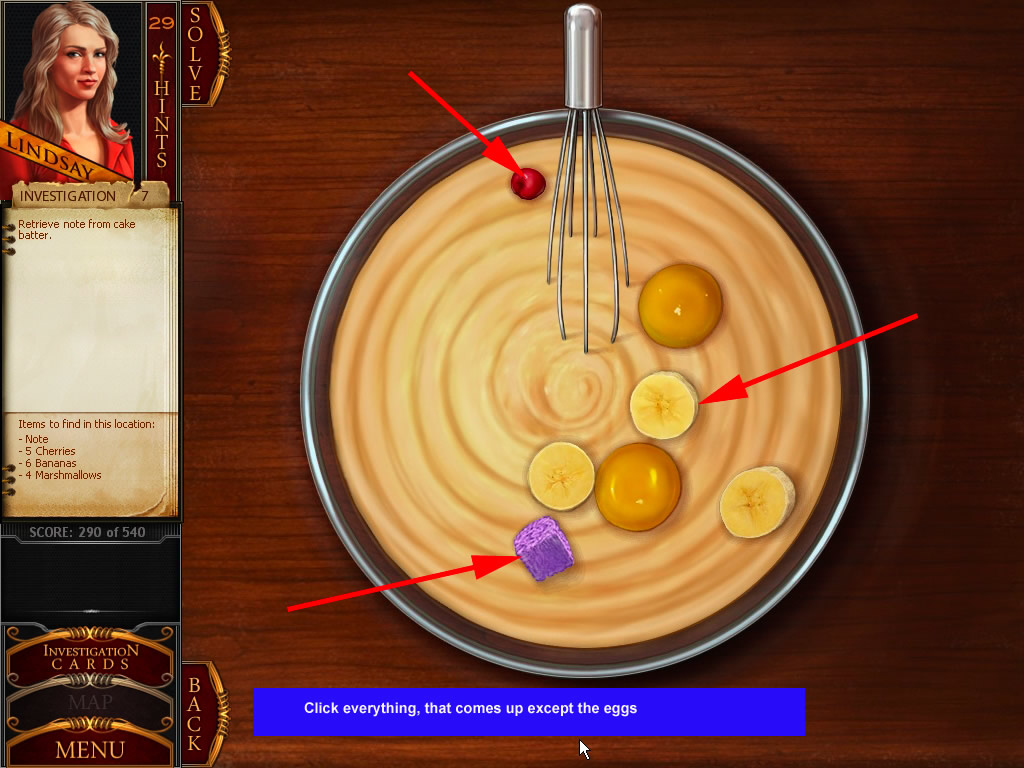
Now click the glass bowl
Click on the handle of the whisk and the batter will spin around, moving the cake batter around
Once you've turned it sufficiently, some ingredients will pop up to the surface
Click on all the items in the cake batter (except for the egg yolks)
Do it again, until you found everything and a note appears
li>Click the note
screen shot - Cake
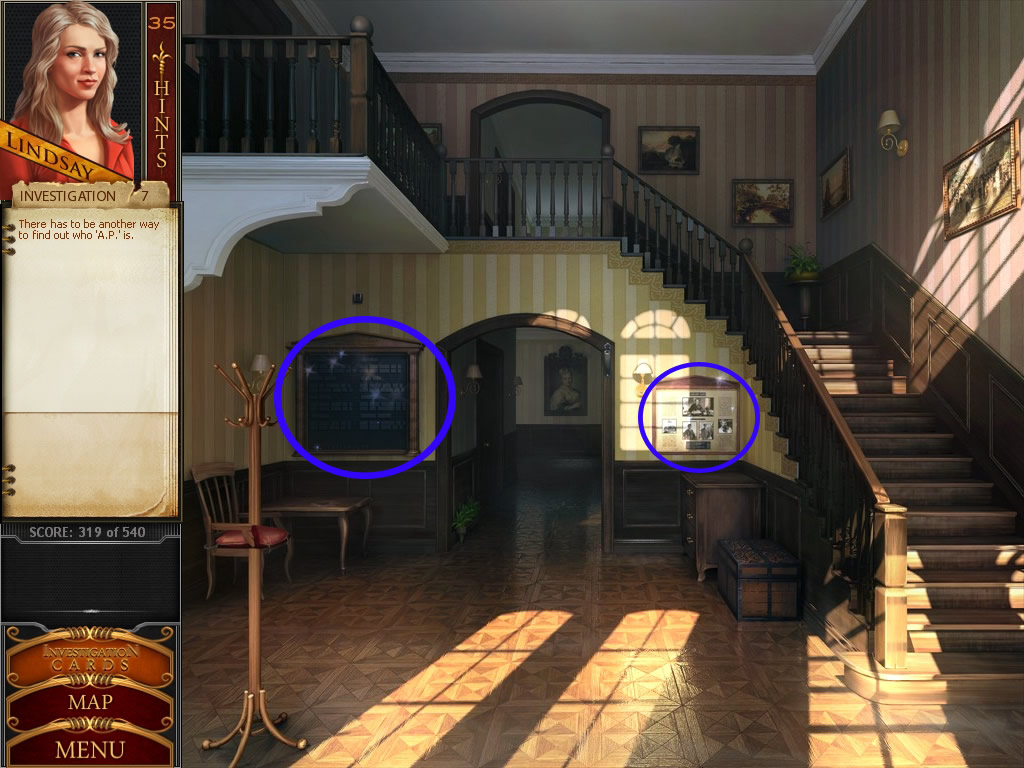
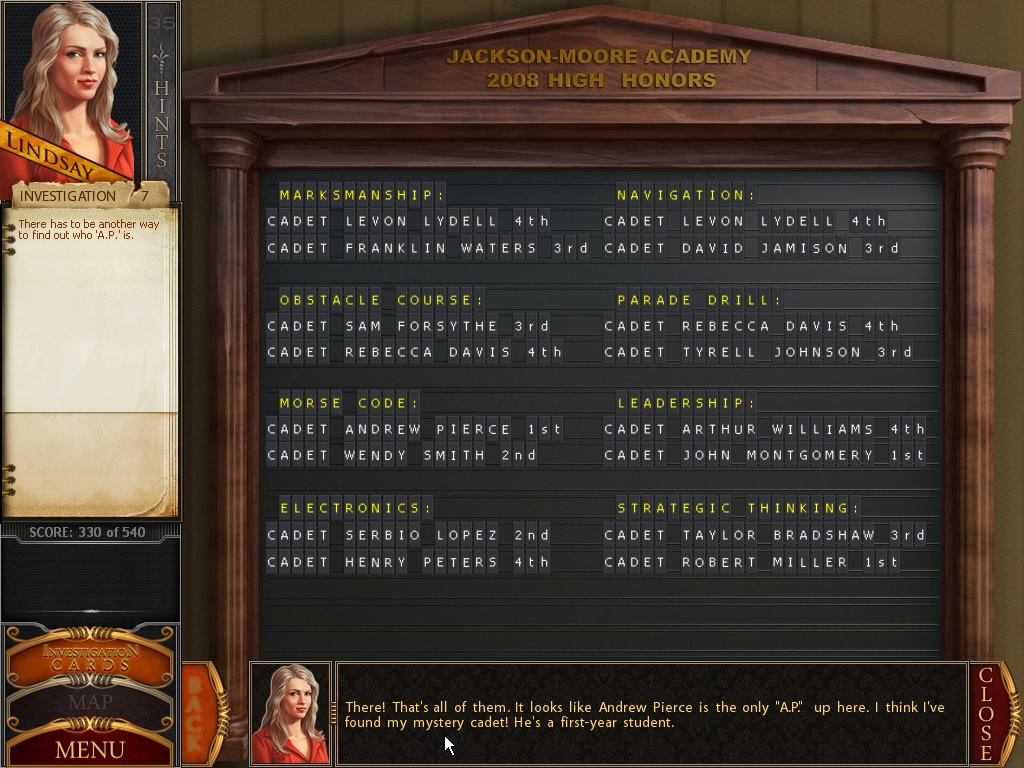
Foyer
After the cadet leaves, click the board - right side in the back
Read, was is standing there and click the left board after
screen shot - Foyer
You can see that some letters in the names are missing
screen shot - Board 1
It's your goal to put back the missing letters in the right empty spots
Click one of the letters on the bottom and click it at the part of the board, you think is right
When you are right, the letter locks and you can't move it anymore
When you are mistaken, the letter will fall down again
The easiest way is to first fix the names where you are sure
You have to try out the rest of the names
Please see the correct names in the screen shot
screen shot - Board 2
Sheriff Office
Find all 12 paper scraps of the fax
They are located exactly at the same place as the first time
screen shot - 12 Paper Scraps
After getting the scraps from the left side of the desk and assemble them
By clicking two pieces, they will change their positions
screen shot - Fax
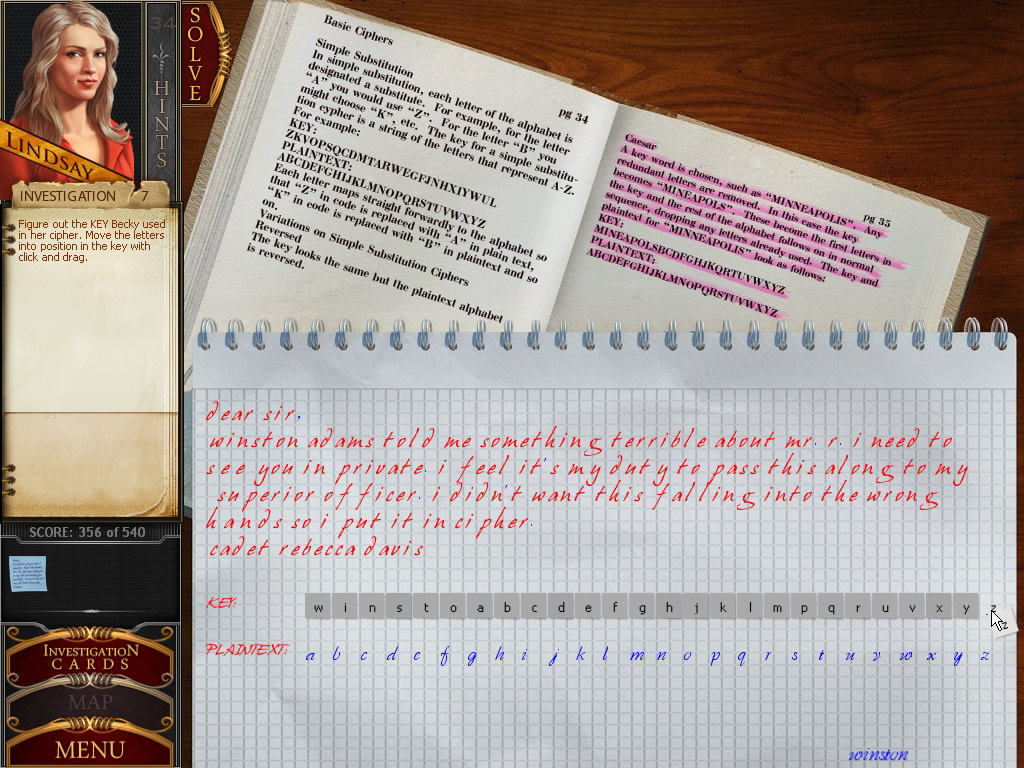
Academy / Code
Click all shimmering items in the rooms
You will find a paper inside the books on Rebecca's desk
Your goal is to decipher what the paper says by placing all the right letters in the right places
The book explains how the code works
A normal word is a keyword - in Rebecca's case, it's WINSTON
If a letter is double, like the N in Winston, the last one will be taken away
This shortened word has to be placed in front of the normal alphabet now
The Caesar alphabet, in our case, now looks like this
WINSTOABCDEFGHJKLMPQRUVXYZ
When you now write a coded word, the numeric order will still be used
A is still the first letter, but in the Caesar code, the first letter is a W
For example, the word AND would be spelled: WHS
Now drag the letters from the bottom line in the correct order on the row above
Right letters are turning gray and combining with the letter, wrong letters just stay a piece of paper
In the note above, the letters change with every correct letter you set below
The complete text is:
dear sir, Winston Adams told me something terrible about Mr. r.j. i need to see you in private. i feel it's my duty to pass this along to my superior officer. i didn't want this falling into the wrong hands so i put it in cipher. cadet rebecca davis
screen shot - Code
Investigation 8
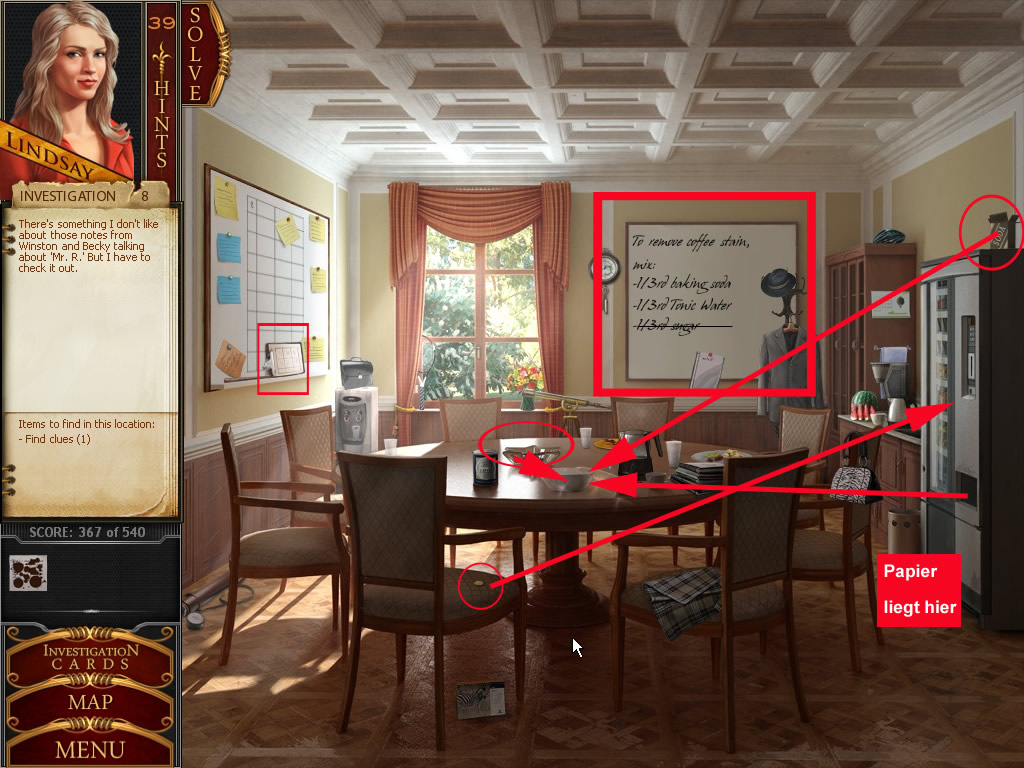
Staff Room
First click the white board in the background left
Read what it says - it's a recipe to remove coffee from paper
Get the paper that is laying on the floor, right side, in front of the trash bin
It's full of coffee, so to remove it you need soda, baking soda and sugar
Get the coin from the chair in the front
Click it on the soda machine and grab the soda can
Click it on the big bowl on the table
Get the little bowl with sugar, behind the big bowl
Click the sugar onto the big bowl also
On the top of the soda machine, you will find a box with baking soda
Click it also in the bowl
Click the bowl once again to access the mini game
screen shot - Staff Room
Click the cloth and dip it into the bowl
Now click it on the coffee spots on the paper
When the cloth gets dry, dip it into the bowl again
Do this until the paper is clean
screen shot - Mini Game Coffee
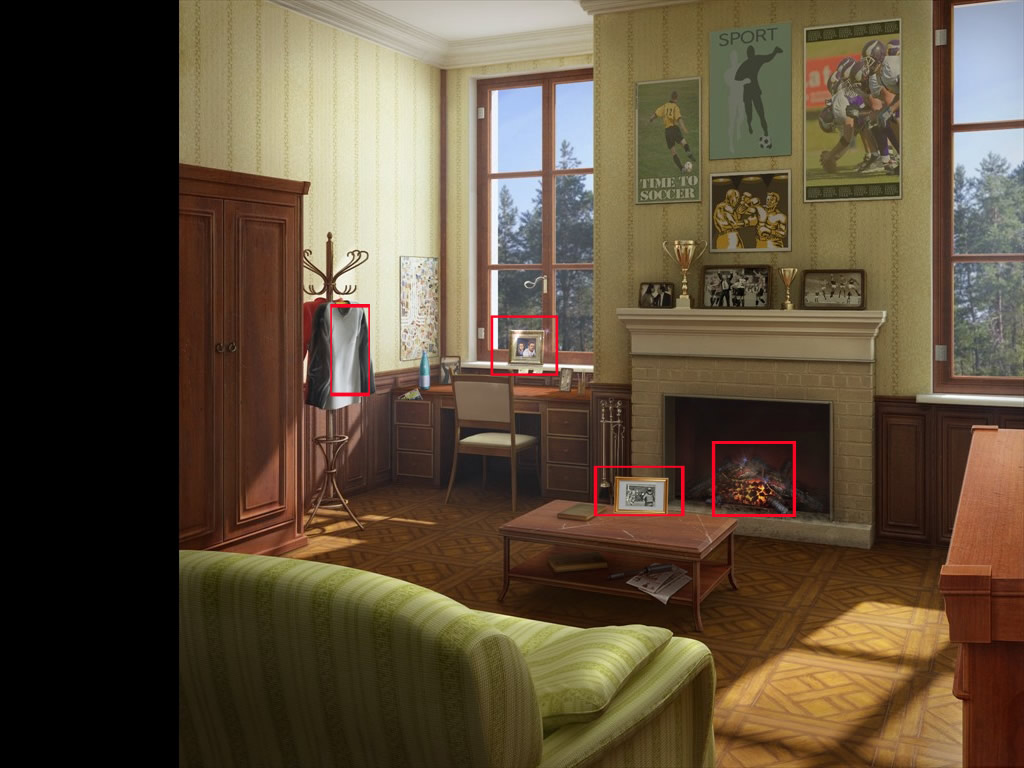
Mr. Reynolds' Room
Click everything that shimmers
Painting at the window
Picture on the table
Shirt on the coat rack left
The fire in the fireplace
screen shot - Room Mr. Reynolds
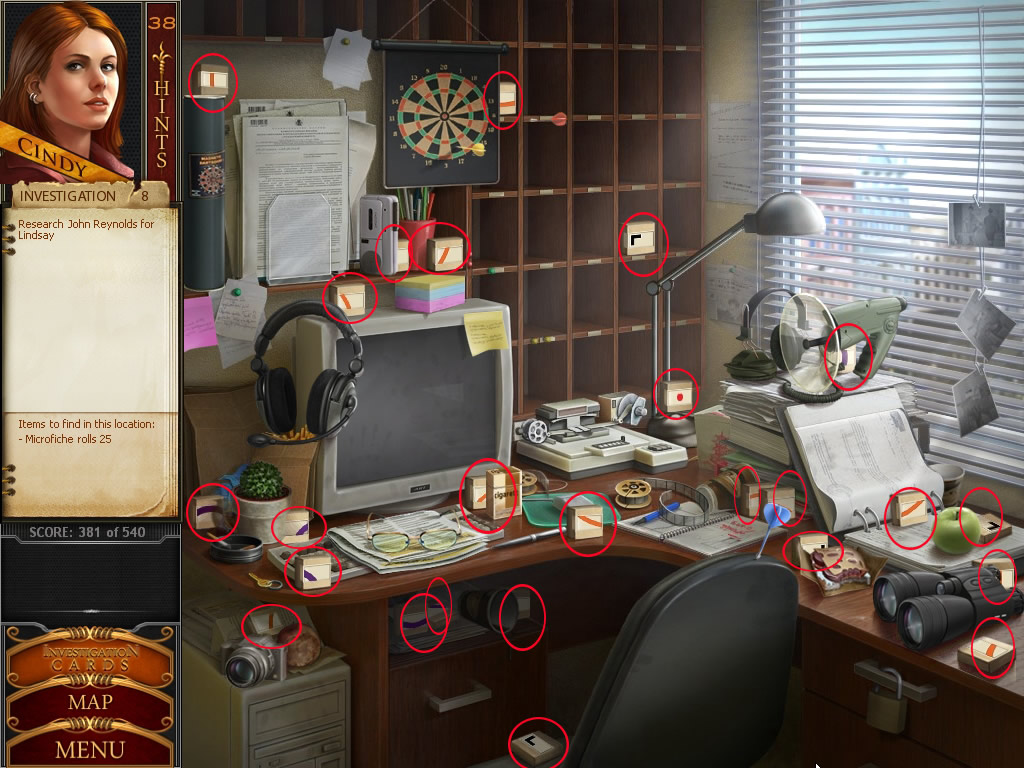
Charleston Reporter
Find all micro fiches
They are laying at the same place below, but have other signs now
screen shot - Charleston Reporter
When you find all fiches, click the screen
On top of the shelf, you see a note with a hint for the order
The Bull's Eye of a Dart board
The micro fiche with the red dot in the middle has to be in the middle of the shelf
Place the boxes with the purple signs around the red dot, so that they show a circle
Next are the orange parts - arrange them also in a circle
The black signs show the edges
screen shot - Charleston Reporter 2
Write the name John Reynolds in the first field and Coach in the second
Get the micro fiche from 2005 and read the article
Go back to the bar and play the video game again
Investigation 9
Lt. Burke
Get all the evidence from your inventory and place it on the table
After Burke gives you the list of students, click four at all
Make sure, that one of the students is Andrew Pierce
Bookstore
Get the bottle with insect spray
Click all spiders with it until they are gone
Take care that you don't have one of Lindsay's sentences at the bottom of the screen, as you won't see all the spiders in this case
After all are gone, grab the book, which is shimmering on the right side in the middle shelf
screen shot - Book Store
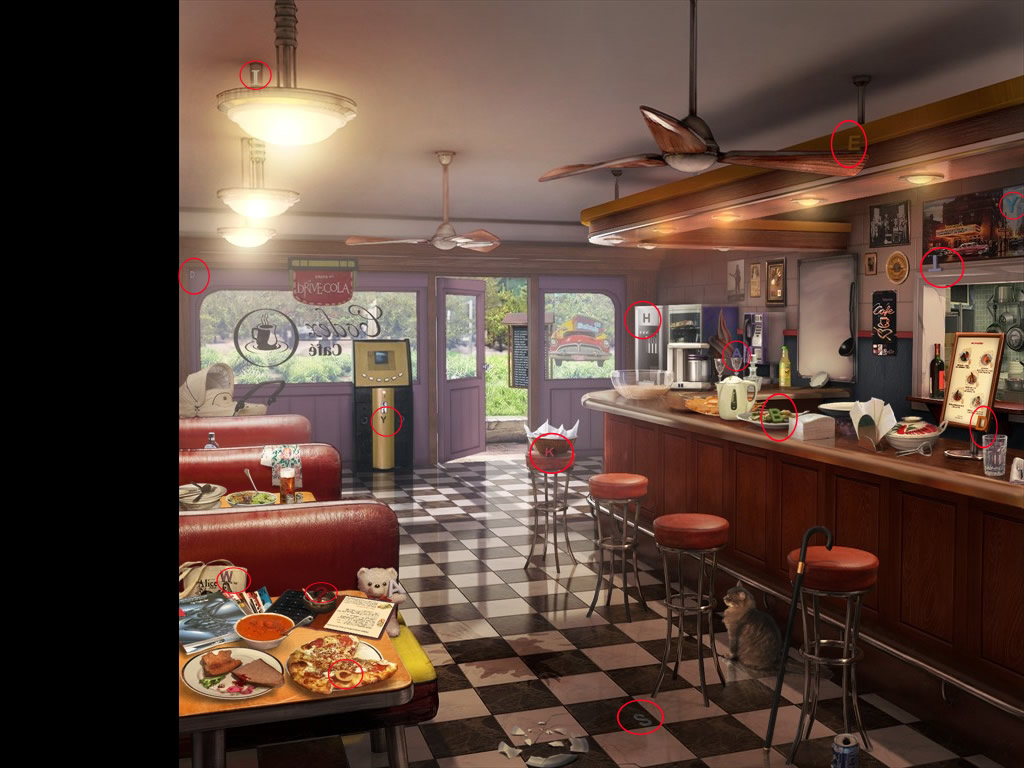
Café
Find the 16 letters
screen shot - 16 Letters
Click the white board, right side
With the letters, you have to spell out the question, Lindsay want to ask Andrew Pliers
By clicking two letters, they will swap places
You want to spell out
WHAT DID BECKY SAY ?
Don't forget to place the question mark at the end of the sentence
screen shot - White Board
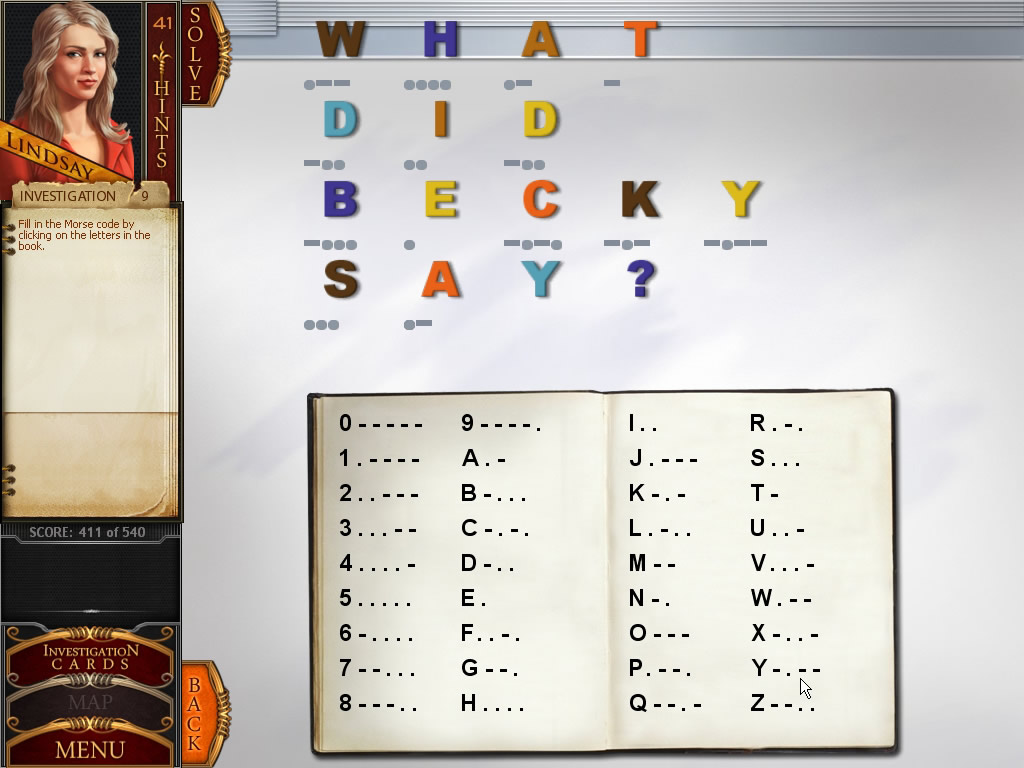
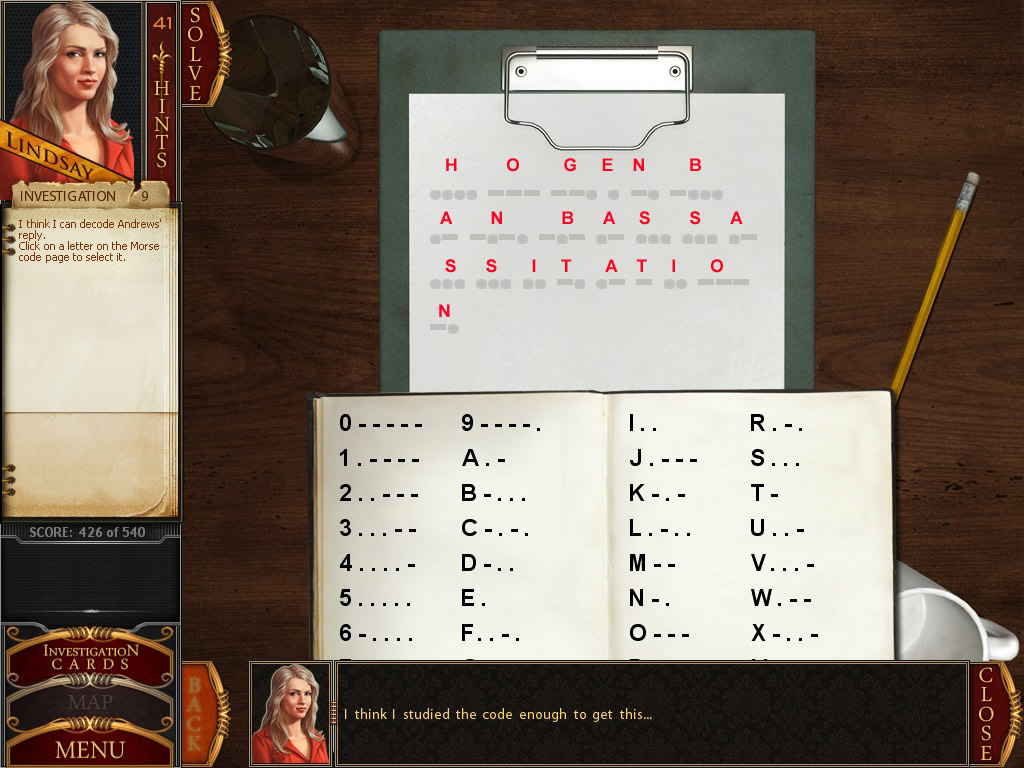
After that, click the letters in the correct order in the Morse book
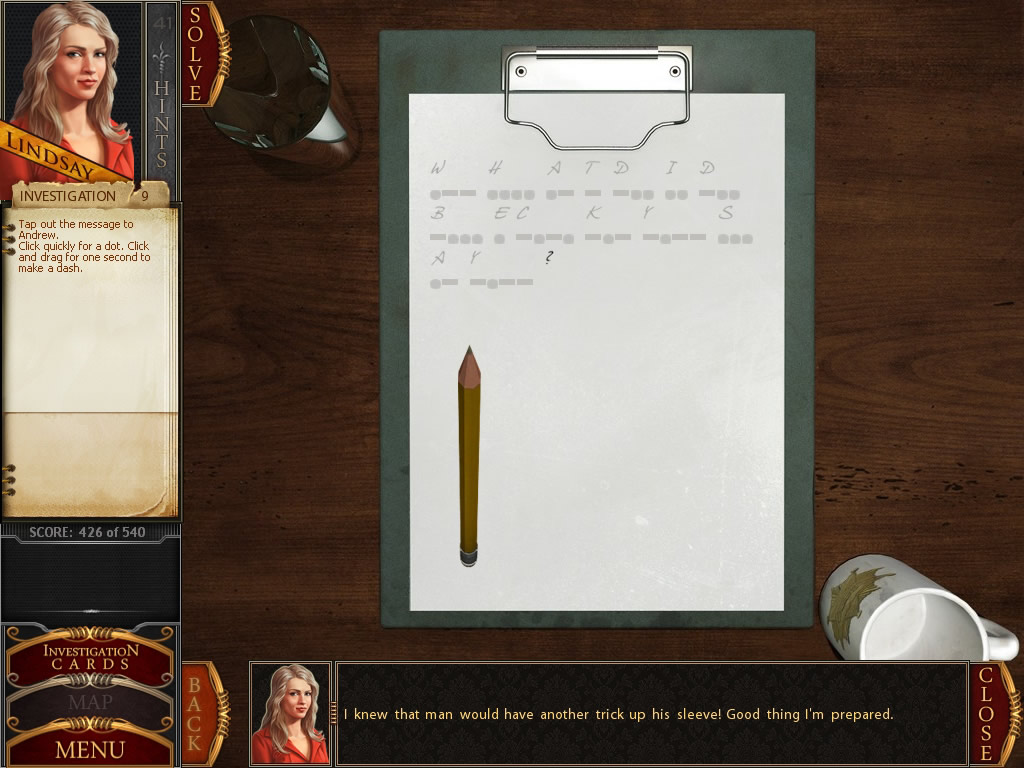
Interrogation Room
As you can't talk, you have to Morse your question to Andrew
Get the pencil
For a dot, click one time
For a dash, hold your left mouse button pressed and drag your mouse a centimeter to the side
screen shot - Morse Code 1
Andrew answers, so you have to find out what he said
Click the right letters according to the Morse signs you received from Andrew, in the Morse book
Andrew said:
HOGENBACK ASSASSINATION
screen shot - Morse Code 2
Investigation 10
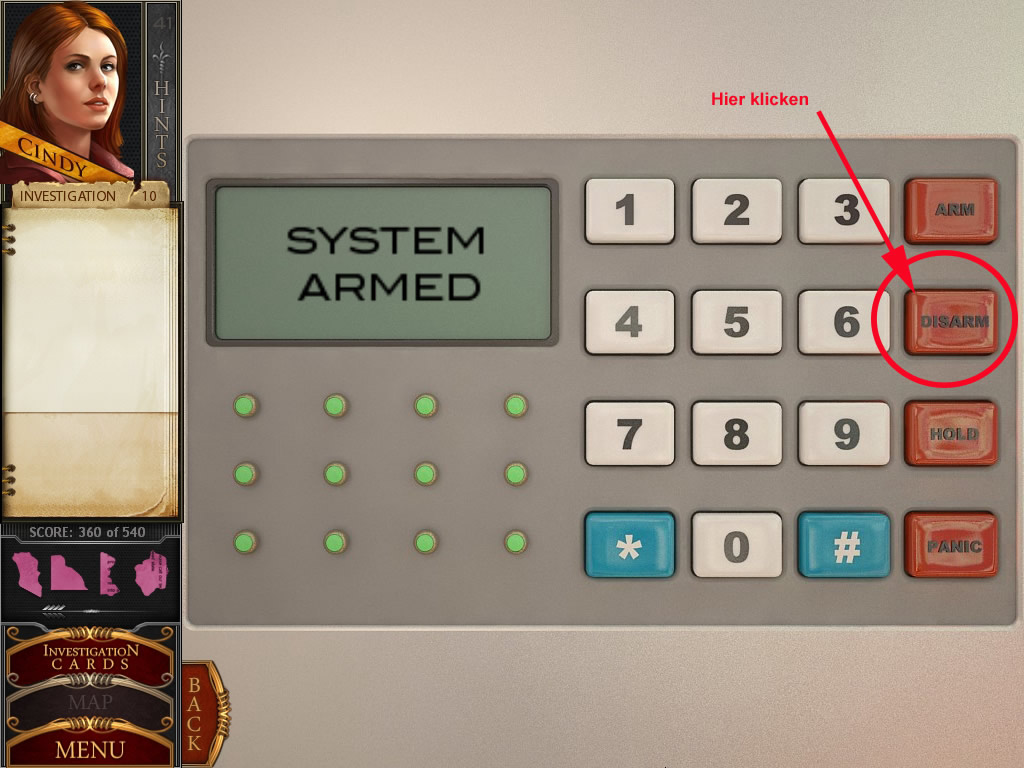
Utility
First click the alarm system left of the door and click the button DISARM
It does not work
screen shot - Alarm System
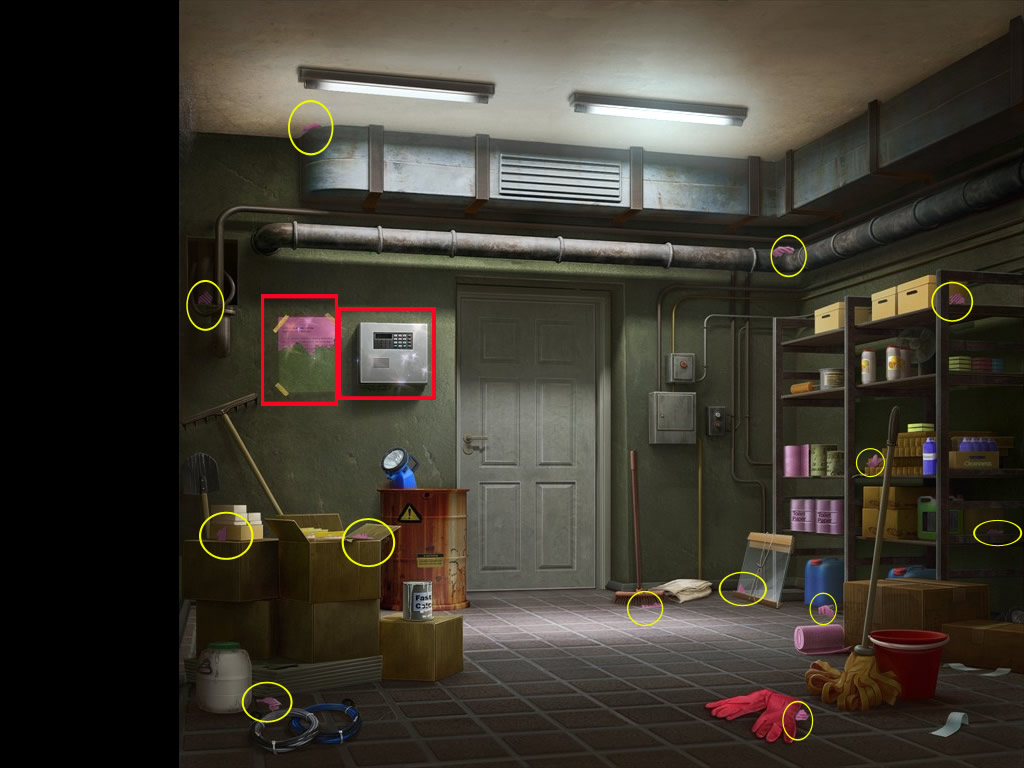
Click the pink ripped paper, left of the alarm system, you will receive the order to find the missing pieces
Find the 13 paper pieces
screen shot - 13 Papers
After finding the last one, a puzzle opens
Click the paper scraps and place them in the right places of the puzzle
A part that is laying at the right place will be locked
With right click you can turn the pieces around
screen shot - Pink Paper
Read what it is saying
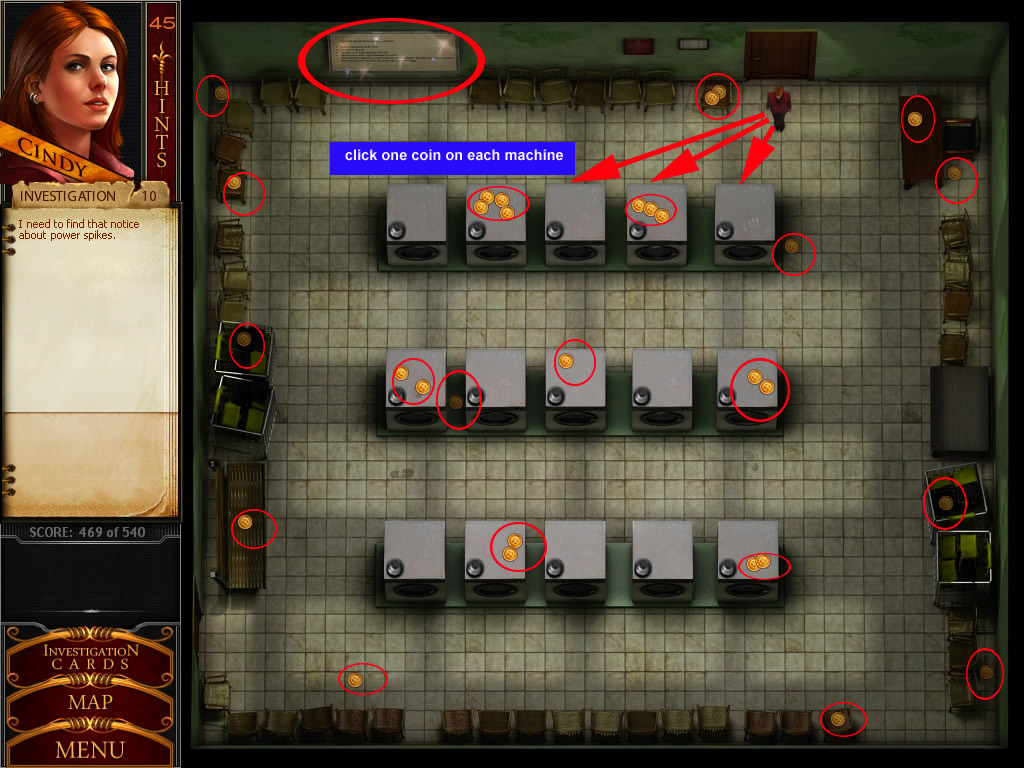
Laundry Machine Room
Click on the notice that is on the back wall
Collect all the coins in the room
Your goal in this game is to have all the machines running at the same time so you can obtain a power surge, which in turn will disable the alarms
Once you've collected all the coins, grab them and place them on each machine. As you do that, all the machines will turn on
Do the same thing for all the machines as quickly as you can so you can have all of them turned on
If you're close to having all the machines turned on and one of them goes off, just grab another coin and deposit it quickly before others shut down as well
Try to place the machines in order so you can get all the machines done at one time
If the machine starts flashing between red and green, it means that it is about to turn off. Just try to have everything done before the light turns solid red
screen shot - Laundry Room
Go back to the Utility room and click the alarm system again
As soon as you come into the close up view, the system will be disarmed
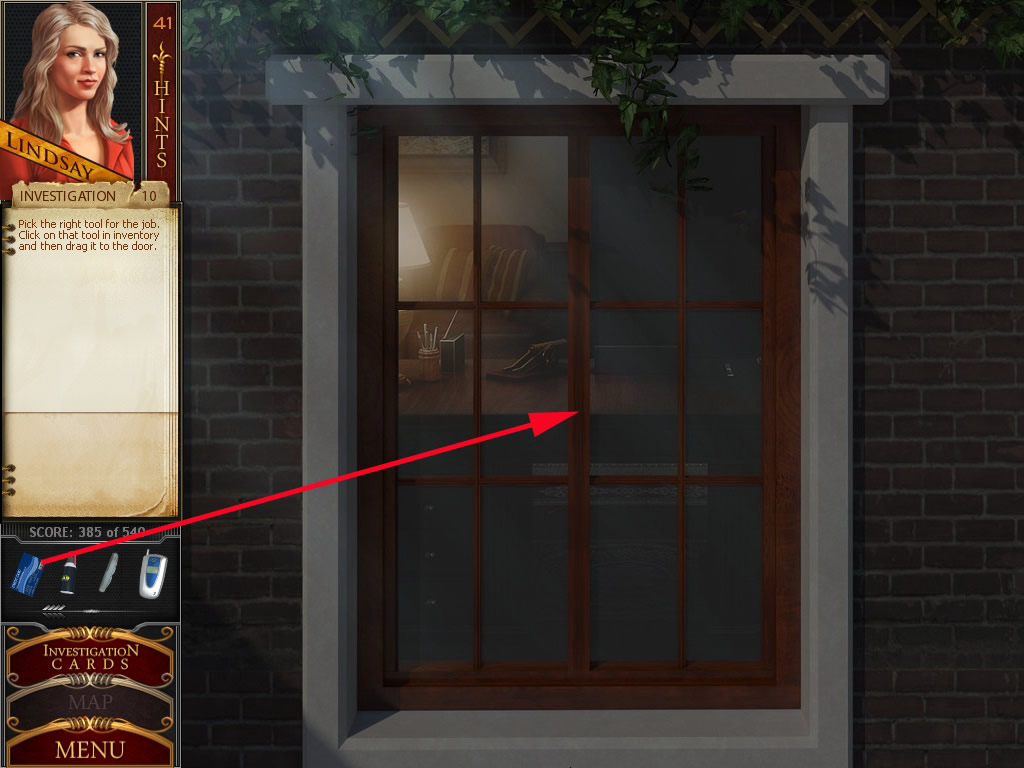
Office Lt. Col. Burns
After clicking away Linday's sentence, you will see her handbag
Click it and the object will go into your inventory
Grab the credit card and place it in the middle of the long wooden beam in the window
screen shot - Window
After clicking away Linday's sentence, you are inside the office
Click the desk and all drawers, but there is nothing important
Click the very left square above the drawers and it will fall down
Now push all the other squares one step to the left
The fifth one is under the last one and can be pushed up
It shows a hole
Grab the Allen wrench on the desk, right back corner, half hidden behind the cactus and click it at the hole
It opens the drawer
Click the white note
screen shot - Desk
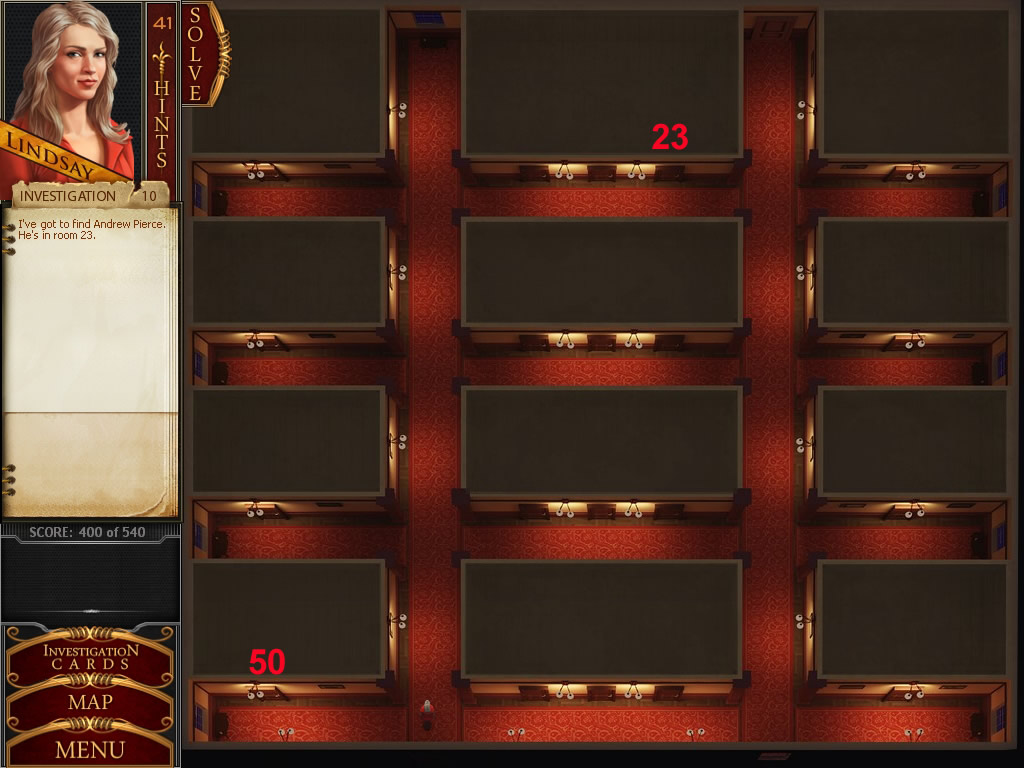
Dormer
Your goal is to reach room 23 - the room of Andrew Pierce
The movements work the same as they did before in this place
If you get caught, you will have to start again
li>But after doing a few steps, Cadet Lydell comes out of his room
Make sure that he does not see you
Enter room 50, which is the first room on the left, bottom
Click the shelf and the pc
The screen shows you a hotel reservation
Leave the room and find room 23
It's the room in the middle block of the top row, the room at the right
screen shot - Dormer Hallway
A special thank you to Kayleigh for writing this walkthrough!
Posted by: Pam |
March 18, 2009 2:12 AM
|
March 18, 2009 2:12 AM