JayisGames.com is now available ad-free!
Jay is Games recommends Cheat Happens with 8,000+ games and 35,000+ trainers!

Ambivalence


  • Currently 4.5/5
  • 1
  • 2
  • 3
  • 4
  • 5
Rating: 4.5/5 (32 votes)
Comments (52) | Views (6,487)

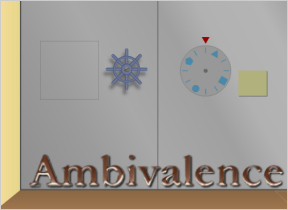
ambivalence.jpgJohnBThe point-and-click room escape game Ambivalence is a member of a crowded genre. Fortunately it's just different enough to be worth your time. Instead of walking around a room turning over objects and poking your nose in every corner, your only goal is to unlock a very secure-looking door that sits right in front of you. The fun twist is that you play from both sides of the door, switching views with the click of a button. Items you find on one side do not transfer to the other, creating a unique collaboration-style atmosphere where you are your own partner.

Use the mouse to click items/areas you want to examine or use. The "About Item" button lets you examine and interact with objects in your inventory, while the "Change Side" option flips you to the other end of the door. The puzzles in Ambivalence are fairly straightforward, although there will be a few times you'll be scratching your head. You'll also have to keep an eye out for hard-to-see items and hatches, and a few times you'll just have to get lucky and click the right pixel.

Despite its minor shortcomings, Ambivalence is a satisfying and engaging entry to the point-and-click family of games.

Play Ambivalence

Walkthrough Guide


(Please allow page to fully load for spoiler tags to be functional.)

Walkthrough:

1st: get the crowbar from the box with the handle (beginning screen)

2nd: get key from transportation box (beginning screen)

3rd: get coin, right from the drink machine

4th: Put the crowbar in the transportation box (beginning screen)

5th: Change side: grab crowbar and use it on the hatch right bottom screen

6th: grab the gold coin & transport the gold coin

7th: change side and grab the gold coin.

8th: use gold coin in the drink machine and get the blue can. Look at blue can and open it, click a few time on the opener until it falls off.

9th: Click on the "coin-change-whole" of the machine and get another silver coin.

10th: use the silver coins on the drink machine and get the orange can, get the piece of paper as well. Again, open the can and click a few times on the opener until it falls off.

11th: poor both drinks in the whole, bottom right of the drink machine.

12th: look at the orange can, press the bottom of the can and grab the piece of paper.

13th: transport one piece of opener

14th: switch side and grab the piece of opener. Use it on the "wheel-handle" and take this handle and transport it.

15th: Switch side again, take the blue handle and put it in the box left from the transportation hatch. Close this box and click the handle twice. Switch side.

16th: Note the digital number, and the symbol under the red triangle on the door. This number matches the symbol. Look at the whole at the bottom right. Here you see 4 symbols, where only the circle is not filled with the drinks.
Switch sides again

17th: Switch the handle again 3 times and switch side again.

18th: note that the digital number has changed and the symbol under the red triangle as well. This is caused by the switch on the other side. Note all the numbers of all the symbols. This are six numbers eventually, however, the number with the circle is not useful.

19th: switch side and take back the blue wheel handle and put it to its original place. Switch sides again and close the transportation hatch. Switch again from side and not the third piece of paper in the transportation hatch. Take it.
Combine all three papers and note the pattern.

20th. Reset the the blue wheel (left, right, left, as can be seen on notes)

21th: Follow the whole pattern as written on the pieces of paper with the blue wheel. (2R, 3L, 2R, 1L, 4R, 3L) If done correctly, one hears another door/hatch closing.

22th: Switch sides, and open the transportation hatch. one sees a laser machine in the transportation whole. Put the key in it and click the red button. Grab the key after it has been lasered and use it on the keypad, note the green light is turning on. Put in the 4-digit code (Square, penta & triangle = 8217)

23: Switch side and use the blue wheel, turn it to the left. Congratulations, you opened the door and you are free!

52 Comments

This one is crazy. Haven't gotten very far. Anyone beat it yet?

Reply

bah. EVIL escape the room game.
ive found like 3 things that i find no practical use for and like 4 separate hatches with no obvious or even plausible uses. this ones hard.
ill be very disappointed with the JIG community if someone doesn't post a walkthrough before I have to go to bed. please.

Reply

Ive gotten pretty far but im stuck on he part where you combine the pieces. Im stuck. Help please?

Reply

have

coin,crowbar,flat key

on one side and

paper with reset

on the other

Reply

I highly suggest resizing the pop-up window so that the ads below the game cannot be clicked by a stray click of the mouse. x_x

So far I have:

coin, crowbar, key

Reply
The Great Dane November 12, 2007 9:06 PM

I'm on it. By now I've found

three notes that give a code for the wheel, two coins, two cans, that I've poured into the drain.

And some other stuff. I'm stuck now, but if you need help getting any of that, just say so.

Reply

agreed, this is a hard one.

got coin and used it, got nothing from that
figured that square = 8, pentagon = 2
found a wrench type item, not used
and a piece of paper

Reply

I'm out, and with no walkthrough either! First time for everything, I guess.

A hint to get you started:

you have to move things from one side of the room to the other using the transport

Reply

Walkthrough:

1st: get the crowbar from the box with the handle (beginning screen)

2nd: get key from transportation box (beginning screen)

3rd: get coin, right from the drink machine

4th: Put the crowbar in the transportation box (beginning screen)

5th: Change side: grab crowbar and use it on the hatch right bottom screen

6th: grab the gold coin & transport the gold coin

7th: change side and grab the gold coin.

8th: use gold coin in the drink machine and get the blue can. Look at blue can and open it, click a few time on the opener until it falls off.

9th: Click on the "coin-change-whole" of the machine and get another silver coin.

10th: use the silver coins on the drink machine and get the orange can, get the piece of paper as well. Again, open the can and click a few times on the opener until it falls off.

11th: poor both drinks in the whole, bottom right of the drink machine.

12th: look at the orange can, press the bottom of the can and grab the piece of paper.

13th: transport one piece of opener

14th: switch side and grab the piece of opener. Use it on the "wheel-handle" and take this handle and transport it.

15th: Switch side again, take the blue handle and put it in the box left from the transportation hatch. Close this box and click the handle twice. Switch side.

16th: Note the digital number, and the symbol under the red triangle on the door. This number matches the symbol. Look at the whole at the bottom right. Here you see 4 symbols, where only the circle is not filled with the drinks.
Switch sides again

17th: Switch the handle again 3 times and switch side again.

18th: note that the digital number has changed and the symbol under the red triangle as well. This is caused by the switch on the other side. Note all the numbers of all the symbols. This are six numbers eventually, however, the number with the circle is not useful.

19th: switch side and take back the blue wheel handle and put it to its original place. Switch sides again and close the transportation hatch. Switch again from side and not the third piece of paper in the transportation hatch. Take it.
Combine all three papers and note the pattern.

20th. Reset the the blue wheel (left, right, left, as can be seen on notes)

21th: Follow the whole pattern as written on the pieces of paper with the blue wheel. (2R, 3L, 2R, 1L, 4R, 3L) If done correctly, one hears another door/hatch closing.

22th: Switch sides, and open the transportation hatch. one sees a laser machine in the transportation whole. Put the key in it and click the red button. Grab the key after it has been lasered and use it on the keypad, note the green light is turning on. Put in the 4-digit code (Square, penta & triangle = 8217)

23: Switch side and use the blue wheel, turn it to the left. Congratulations, you opened the door and you are free!

Reply

So far...

I got the three coins, the two sodas, which I emptied into the drain, both of me have the poptabs used for unscrewing things, I have the paper with the numbers and arrows on it, I have the wheel/gear and the key and the metal rod. I know that square is 8, circle is 15, polygon is 2 and triangle is 17, and that for some reason, the circle will not fill with mixed soda. Unforunately, I can't seem to figure out what the code is to activate the keypad with the key. Did I miss something? :(

Reply

Well, so far I've gotten:

Crowbar

Both coins

Soda

Tab from soda

Wheel

Paper with instructions

I have the numbers and the order they go in, but they won't fit in the keypad. That's my only problem at this point I think is some weird mathematical thing.

Reply

Nevermind, walkthrough got posted while my post was pending. Thanks 5tring3r.

Reply
SeperToast November 12, 2007 9:19 PM

I'm confused. Well, heres how far i got.

1. Open that...square i guess...by pressing the button.(sorry)
2.Then on the...square with handle...and get crowbar(sorry)
3.There's a space between the metal door(i think) and soda machine. Click the bottom-right corner of soda machine.
4.You will find a hole and a coin. Get coin.
5. Place the crowbar in the opened "square." Now change sides.
6.Click the ummm..spinning thing..and click one of the handles. Choose the right arrow to open ...square...(sorry).
7. Get crowbar.
8. Notice the rectangle on the bottom-right corner. Click it. Use crowbar to open it. You'll find coin and shapes behind glass or something. Well, get coin.
9. Put con in opened square. Change sides.
10. Get coin. Now click the geen squares on the soda machine. You'll see two sodas, but you have to buy! Insert the two coins and slot.
11. Get either soda. Go back to main screen. There's a rectangle on soda machine. Click it to find change.
12. Repeat step (10) (there's a peice of paper behind blue soda.
13. Go back to the little space between soda machine and metal door. Click soda in item inventory. Then click "about item". Click the ummm opener? to open soda. Do that to both sodas.
14. Pour sodas in hole
That's all I got

Reply

This may be of some interest:

The portal that opens with the yellow button can also be opened on the other side of the door, using the blue wheel.

You can use it to get items from one side to the other.

Reply

Cheers to 5tring3r. Your walkthrough was excellent.

Reply

*trying hard not to look at the walkthrough*

So far I've got:

a key, crowbar, gold coin, silver coin (already used both and got:), blue can, red can, 3 piece of paper (already put together and get code)

I've done:

- put coins in vending machine and get blue and red cans
- open the hatch with crowbar
- use the code on the wheel and reveal some cube-machine
- pour the blue and red liquid in the hole, and 3 of 4 holes on the other side are filled with red liquid

then what??

Reply

The game is all about teamwork (albeit with oneself), yet it's called "Ambivalence"? As in, "Disinterest" and "not really caring"? Maybe the ambivalence comes in when you realize the both of you are trying to open a door that you're on both sides of. You're still in that puzzle room, but at least you can give yourself a pat on the back.

Reply

used walkthrough for last step

laser key, use code, light turns green

then

switched sides, turned wheel to left

but nothing happened. Anyone else have this problem?

Reply

I haven't finished this game, but can tell it's an excellent PnC game.

Reply

Wow that was fun. Even with the walkthrough. I had done everything except #12 (which was actually wrong for me: it was the other one that had the thing) but then still got stumped at the last few parts.

Reply

that was pretty fun. It was a little confusing at times. I was really stuck on the part with the wheel until i saw the RESET part of the note.

Reply

Just completed the games... some Hints

There is a third scrap of paper beneath one of the drink cans.

Also, make sure to keep things tidy, don't leave doors open

Reply

Hmmmm....the walkthrough isn't helping me figure out

how to match the numbers and symbols with the "switch" or handle beyond the first two. I've been trying to use the numbers on the three sheets that have been put together, but that doesn't work. And there are 4 symbols--not sure how I'm supposed to come up with 6 numbers. What am I doing wrong? I don't want the answer--I want a tip!

Reply

@ Gar:

Actually, the common usage of "ambivalence," according to the definitions on Dictionary.com, is closer to "uncertainty" than "disinterest." Apparently, the term was coined in 1916 by psychologists as the English variant of the German Ambivalenz, to describe the condition of having conflicting feelings toward a single object: its roots are the Latin ambi- or "both" (like in "ambidextrous") and valentia or "strength" (like "valiant"... and of course you've heard of "valence" electrons!)

So the title is really a clever word game... the two sides are attempting to go in opposite directions through the same door... so you could say the team is ambivalent towards that door (if you are trying to be cute, or if, perhaps, English is not your first language ;)

And that's Elemeno's Etymology Moment! Hope you enjoyed.

Reply
Lord Torgamus November 13, 2007 2:18 AM

Thanks for that. Two bonus points for Elemeno.

Reply
Lord Torgamus November 13, 2007 2:19 AM

Thanks for that. Two bonus points for Elemeno!

Reply
Lord Torgamus November 13, 2007 2:21 AM

Sorry for the double-post, the first try came frought up an Internal Server Error page and I didn't think it went through. Could an admin delete one of those, and this message?

Reply

I think "ambivalence" is the feeling you get when you are halfway through the game and you accidentally click on one of the ads.
Oh no, wait. That was "irritation."

Reply

I found the "non-transferability" of the items from one side to the other an unneccessary nuisence since

you can carry the items from here to there thru that opening.

It just makes the player have to click a lot more.

Reply

I enjoyed this game. Hard without being really frustrating, and not too horrendously pixel-clicky (although I did spend large amounts of time trying to unscrew something that turned out to be part of the background. Oops).

Reply

dsrtrosy:

Hint for the wheel

You've probably been turning the wheel quite a bit. What does it say on the bottom of the paper? - you might want to try that before the sequence.

As for the symbols -

there are 6 numbers but only 4 are needed. Obviously one of the symbol's corresponding numbers isn't used. Have a look around and you should see a clue to which one, and also what order they go in.

Reply

A bug (I think)

this may be a spoiler as well, so . . .

I got two blue wheels. I did this by turning the blue wheel in the sequence on the papers. I heard the hidden passage open. I found another wheel inside the transport opening after that

Reply
Turbine2k5 November 13, 2007 2:13 PM

Yeah, the ending isn't working for me either...?

Reply

Yay, I got both people together! I am free... hang on... no there not! They are just opened up the wall between them. They are still stuck!

Reply

for those of you with the ending not working:

did you make sure to use the key on the keypad AFTER the code has been put in?
Code is:

8217

hope this helps!

Reply

eh?!! for those not getting the ending, i stumbled on a possible necessary sequence of events.

Hatch must be closed, punch in 8217 (even tho its already green), switch sides, turn the wheel to the left (counter clockwise).

Reply

I discovered that

the code for the door isn't actually needed. You need to laser the key, and the numbers don't matter. I never even tried 8217. As I was playing, I put the numbers 2343 on the keypad (from first two bits of paper) and when I lasered the key and put it in the code was accepted. I never used the geometric wheel or the yellow panel. I feel like I was cheated out of the game. I beat the game, but I didn't even do everything you were apparently supposed to do. So while the game is fine and dandy, it would have been nice if you actually HAD to do things to beat the game. As it was, I just felt silly.

Reply

There's a glitch in the game!! If you don't get the blue can first, you end up not getting some important items. I only found this out by getting stuck and then accidentally started over.

Reply

I found there are bugs. I was able to put the blue wheel in the gears but not retrieve it.I had this with the cans and the key.

Reply

how do i put all 3 of the peises of paper together can sum1 plz help me ??

Reply

Darren,

Just look at them. Get a pen. You don't need to put them together, you need to write them out in order. That is a combination sequence.

Reply

"I highly suggest resizing the pop-up window so that the ads below the game cannot be clicked by a stray click of the mouse. x_x"
Thanks Jay. :) I got rid of the ad-traps by loading the swf directly instead of playing it from the html. Fullscreen game - highly recommended! ;-)

Reply

wurlyearly,

:DDDDDDDDDD

Reply

Does anyone know what the "Coin-Change-whole" is on the machine i'm confused :(

Reply

Hate it, there's no logic involved and I got bored pixel clicking and using the walkthroughs. Bah!

Reply

I purchase blue drink, break off tab.
Check the change return hole.
Find silver coin.
Put silver coin in machine
Try to buy red/orange drink, nothing happens.

I restarted the game, stepped through the walk-through, still have same problem. No red drink for silver coin.

Is this a bug or am I doing something wrong?
Mozilla 2.0

Reply
An Onyx Mouse February 21, 2008 8:03 AM

Stuck:

Quick hint:
Soda = 50 cents
Gold coin = 75 cents

Reply

i found this game to be quite frustrating, with the pixels and the concept and all...

Reply

An excellent mind bender! The "Change Side" was a wonderful twist from the usual escape type games that I have played.

Reply
buxombrunette March 11, 2009 3:09 AM

Odd, my piece of paper was on the bottom of the blue can.

Pretty fun game.

Reply

Too many bugs made it necessary to look at the walkthrough. My third piece of paper disappeared at one point, even before putting all three together! I could finish the game without the paper anyway

In a previous try, the "symbols" wheel kept advancing 2 steps with every pull of the lever, even after putting the blue wheel into the machinery. So it was impossible to get the code. I could have been stuck there forever if it wasn't by these comments/walkthrough

Reply
jadis eaux January 4, 2016 9:12 PM

Working link to Ambivalence:
http://www.flash512.com/cn/game/17192

Reply

^ Scroll Up | Homepage >

Leave a comment [top of page]

Please consider creating a Casual Gameplay account if you're a regular visitor here, as it will allow us to create an even better experience for you. Sign-up here!
  • PLEASE UNDERSTAND SITE POLICIES BEFORE POSTING COMMENTS
  • You may use limited HTML tags for style:
    (a href, b, br/, strong, em, ul, ol, li, code, spoiler)
    HTML tags begin with a less-than sign: < and end with a greater-than sign: >. Always. No exceptions.
  • To post spoilers, please use spoiler tags: <spoiler> example </spoiler>
    If you need help understanding spoiler tags, read the spoiler help.
  • Please Preview your comment before posting, especially when using spoilers!
  • No link dropping, no domains as names; do not spam, and do not advertise! (rel="nofollow" in use)
chrpa Jayisgames needs your help to continue providing quality content. Click for details Welcome to the Roundup 66 - Retro with four games! After you find the ten monkeys in the chapter, look in the inventory. You will find a...  ...
chrpa Jayisgames needs your help to continue providing quality content. Click for details Welcome to the Roundup 65 with three games! As mentioned in the previous roundups, only odd-numbered episodes are featured since even-numbered are for Robin Vencel's patrons (the...  ...
chrpa Jayisgames needs your help to continue providing quality content. Click for details Hi! Weekday Escape and Weekday Puzzle are here! First we have two new cans from tomoLaSiDo and then two small rooms from isotronic. That's all for this...  ...
6,365 Views
0 Comments
chrpa Jayisgames needs your help to continue providing quality content. Click for details Welcome to Mobile Monday! We have another beautiful game from Nicolet and it's a winter game as it should be. Tasuku Yahiro have released another of their...  ...

HELP Jayisgames.com

Recent Comments


Display 5 more comments
Limit to the last 5 comments

Game of the week


Dark Romance: Vampire Origins Collector's Edition

Your Favorite Games edit

add
Save links to your favorite games here. Use the Favorites editor.

Monthly Archives